
CarolsHusband
-
Posts
16,668 -
Joined
-
Last visited
-
Days Won
46
Content Type
Forums
Downloads
Events
Gallery
Everything posted by CarolsHusband
-
I thought stalk too. So much stuff going on in there, so much dust & fluff gets in there too. I had a Marina with that simple BL indicator/ flash/ horn setup and it was so filthy that when you flashed the main beams while the lights were on, the engine started missing. / yes, I know. Marina. But the point is a valid one.
-

Tech Spam thread - because 1/4" BSP gets 5 hand spans to the jiggawatt
CarolsHusband replied to Roman's topic in Tech Talk
First time poster I was just watching a youtube video of a bloke putting coilovers on his Sierra Cosworth. I'd never really thought about it, but if the springs are separate from the shocks & the coilovers bolt in where the shock went, isn't that a disaster waiting to happen ? In my tiny brain, a separate shock mount is in no way built to take any load, let alone the weight of the car. Dan, 56, confused. -
Thanks Nick, sadly my starter is is a numberless repro of dubious national parentage. I'm pretty sure the bloke at the rebuild place would smile ironically and chuck it in the bin. / Should've kept my Cortina, etc.
-
Thanks. Because we were mostly an L series desert here, not many suppliers list the full compatibilities. Found one that says all Z cars & 510's, 1970- 1983, Good enough for me.
-
Yep, it's toast. Totally fubar. The bits that aren't rusty are all wore out. Anybody fancy messaging KY for me & asking ?
-
Hello brainy bods. I think the starter on the Hako may be toast. I'm putting it in for a rebuild but it maybe beyond saving. Are all 6 cylinder L series starters the same ? Or even fours ? I can get 240/260/280Z starters but dunno if they're compatible. Help me Obiwans, you're one of my hopes. Chur
-
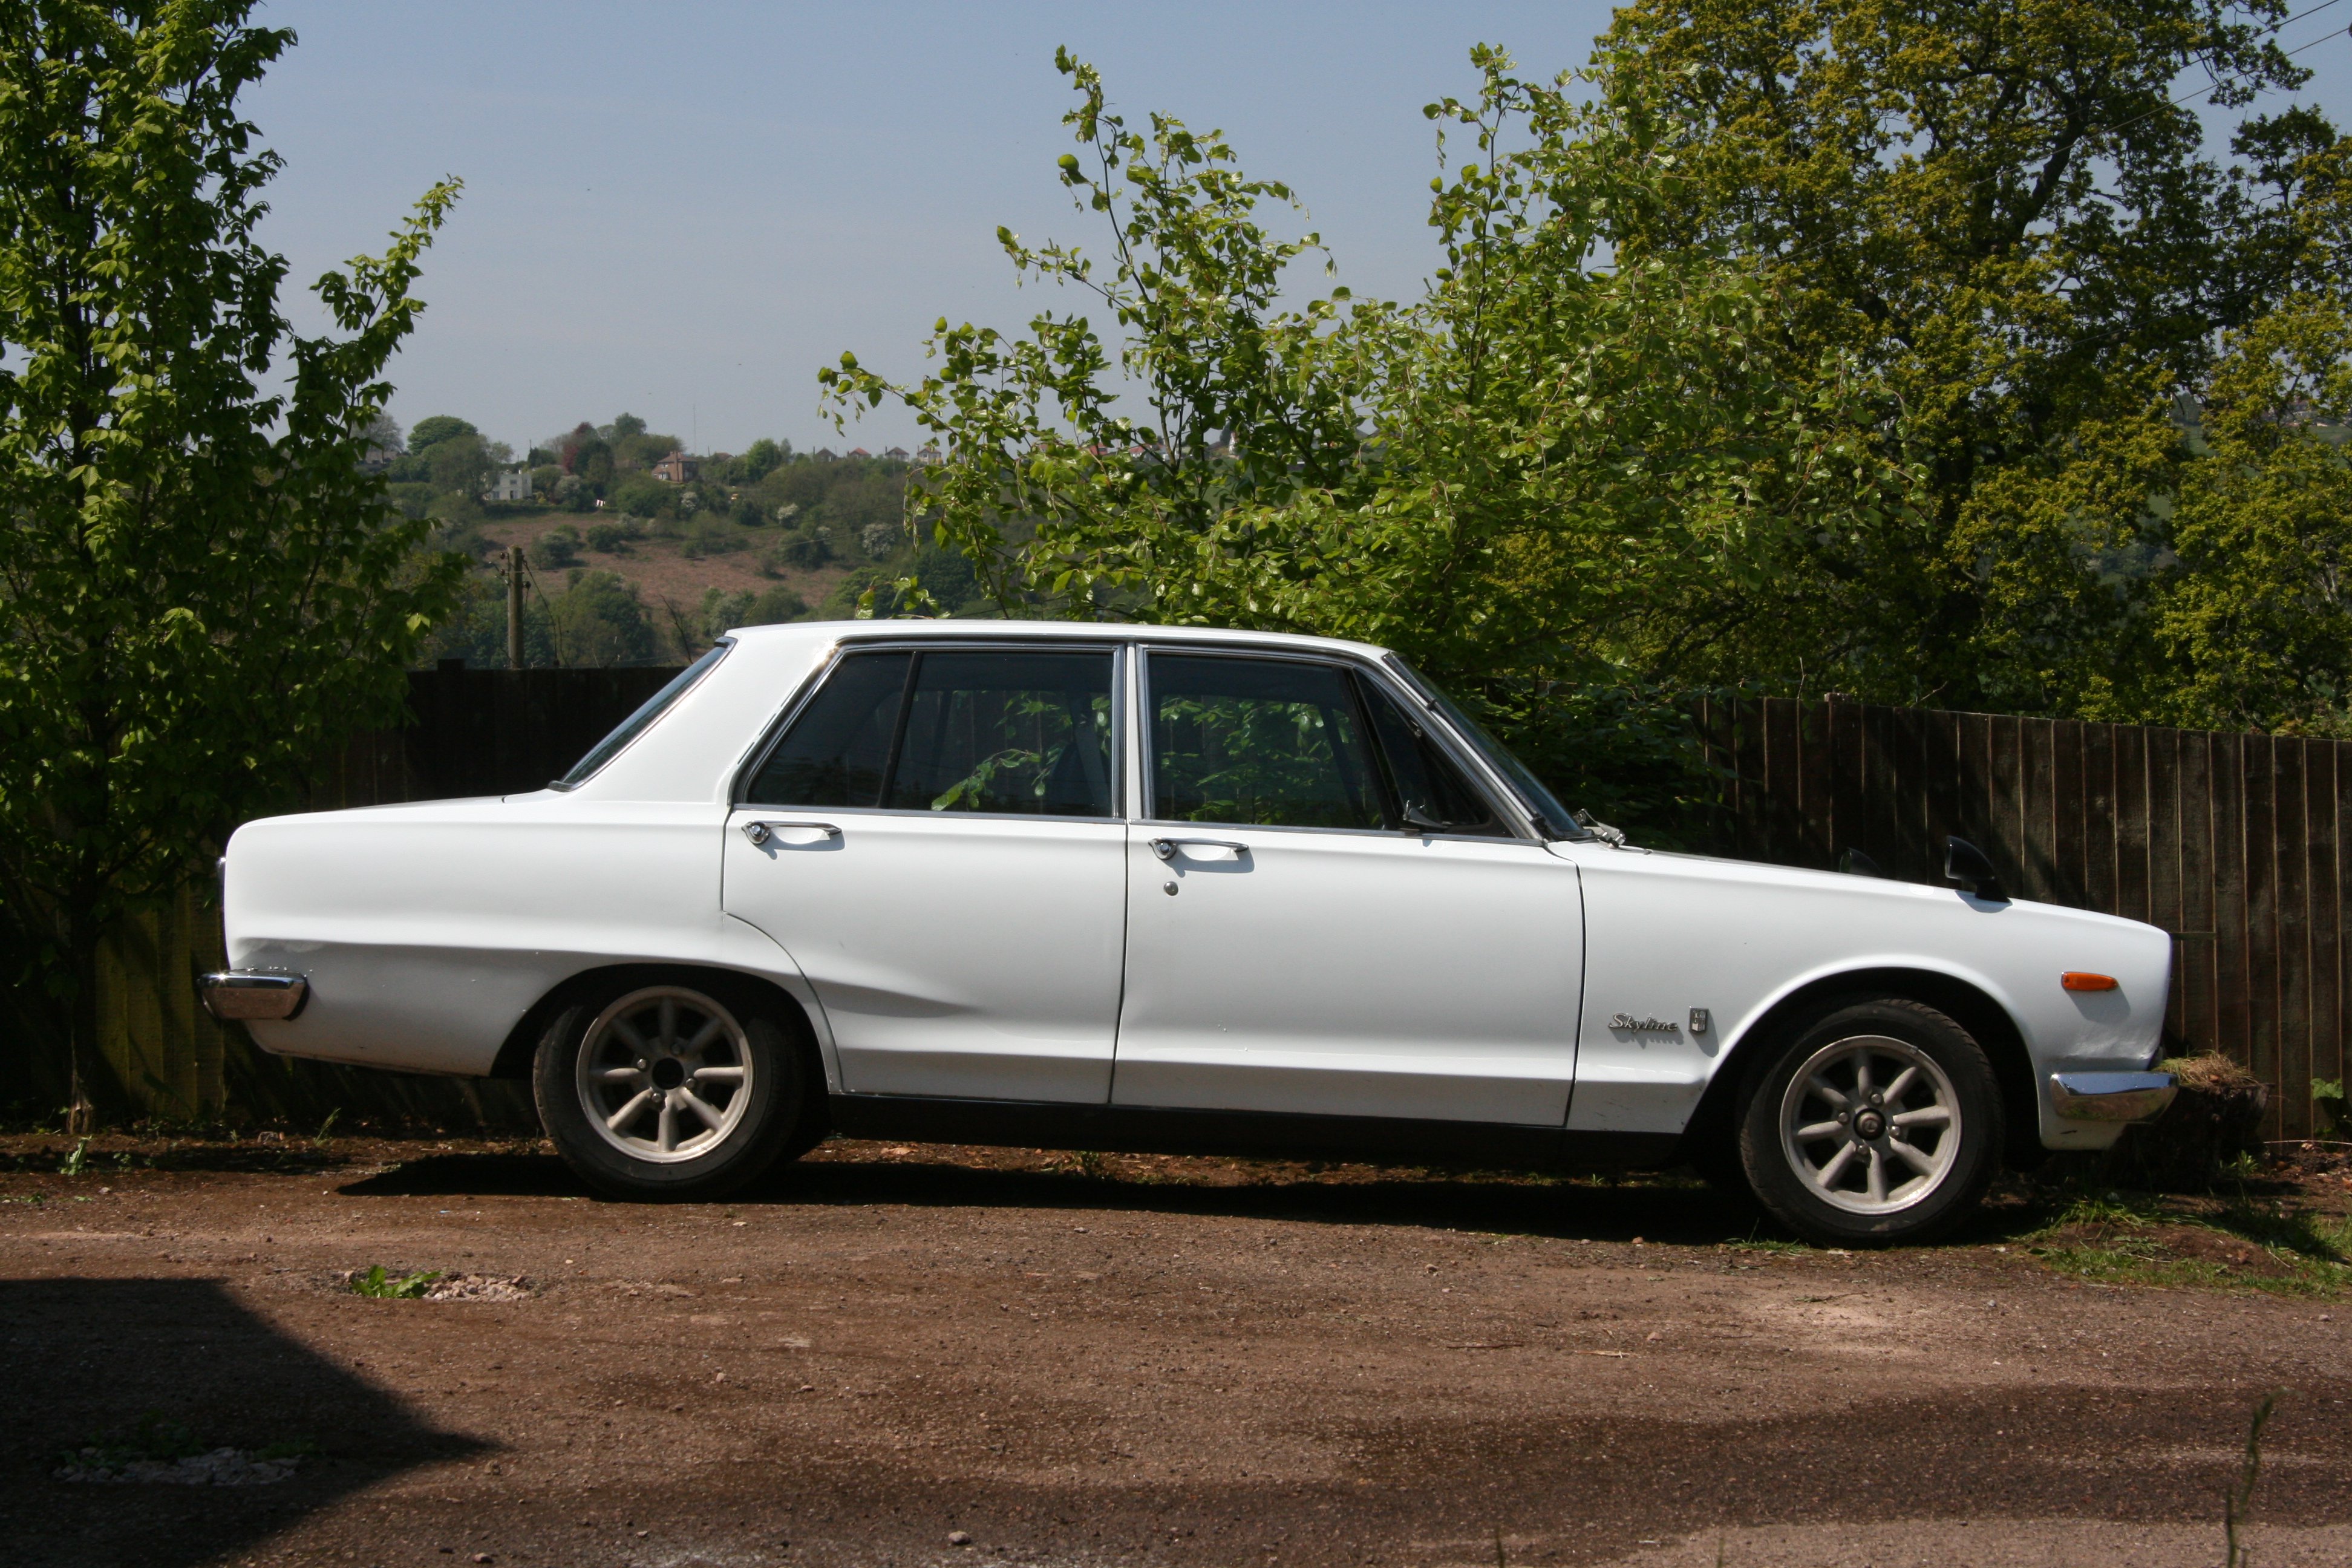
Karol Shusbands 72 Skyline. Discussion.
CarolsHusband replied to CarolsHusband's topic in Project Discussion
Thanks Terry, changes to come. Are we still calling you Terry ? -
I should really give a patina'd 1/24 car kit a bash. I'm quite a fan of cars, and indeed patina. I was going to do that 59 Caddy but it threw up more issues than solutions. I'll do one soon. just so I don't get banned for going off topic.
-
Karol Shusbands 72 Skyline.
CarolsHusband replied to CarolsHusband's topic in Projects and Build Ups
Yeah, I've got an update for this old crate too. Got some overnight parts from Japan. All new water hoses ( except the rad hoses coz I'm a dork) & new strut top mounts. I made up the rad hoses out of bends & also had the rad re-cored because leaky. And, it turned out, blocked solid. So all fitted & it now stays cool, doesn't leak & doesn't crash around at the front. I have plans for it though & I intend to implement them before a couple of local car shows in the spring. I've told Mrs Shuzz she's driving it coz I'm driving the Chevy. She looked worried. / pics of rad & Hako for Fred.- 37 replies
-
- 47
-

-
Four pages back & 11 months later. I don't think you fullahs are taking this thread entirely seriously. Lucky for you, there's always an old Pom around when you don't need one. Latest (and only) offering from Studio De Shuzz in the past year.
- 452 replies
-
- 20
-
-
My Dad bought this 1979 Wheelhorse in 1986. He used it to cut a couple of acres around the house while he was able & then I took over mowing duties until about 2018 when it finally became a burden & he bought a new one. I brought it home last year, having been sat in the chicken shed at his for 3 years and being " proper fucked". /pic. The paint job was just to make it a little less attractive to thieves ( it got nicked once but after painting it stayed put). I got a new bottom end & block for it in about '97 when the rod had an episode & I also bought a new deck in 2001. It still ran, kinda... http://i.imgur.com/Lg42X6w.mp4 Anyway, I decided to get it up & running as the grass ain't gonna cut itself. Wheels blasted & coated Shiny Got a load of panels blasted & primed Got the deck done too. Came back as Swiss Cheese. I paid £ 300 for that as a painted bare shell in 2001, priced a new one now and it's £ 1500. Wat. The jury is out. Forgot to take the engine cover to the blasters. Derr. Had to prep it myself. / good enough for a country job. Anyway, tyres on the way, paint ordered & I've been down the back of the sofa for some deck money. 1,500 quid. You could buy a car for that....
- 1 reply
-
- 31
-
-
Shuzz's " I've had this since before you were born" Hilux
CarolsHusband replied to CarolsHusband's topic in Other Projects
Took it for an MOT, failed on the usual rear brake balance/ handbrake efficiency, a track rod end and someone finally decided to get funny about the right hand indicator tell-tale not working after 26 years. While I was messing about fixing that I discovered I had one of these. Cooool.... -
Shuzz's " I've had this since before you were born" Hilux
CarolsHusband replied to CarolsHusband's topic in Other Projects
21 month update. Finally got the old banger down to Cornwall as its Welsh duties are concluded. We both said it's like the whole family is finally here. Haven't had a tow hitch on it since I did the flatbed but Mrs Shuzz's pikey palace isn't going to drag itself into the meadow so I spent this afternoon doing cutting & drilling as it used to be on a chassis extension with the longer tub. All done Stuck with the up-high pin hitch to deter people from asking me to spend all day pulling fucked stuff out of ridiculous places for a beer. Gotta make an A-Frame to pull the caravan next. / Blardy Travellers.- 227 replies
-
- 11
-
-
Yeah, there's one guy who built a "what if" rare German halftrack that had somehow got back to the US after the war and then was used as logging vehicle in Canada after being butchered & tiger striped. It looked mint but you could hear the gritted teeth in some of the comments. Hang on, I'll find a pic..... Think he must have striped it after.

- 452 replies
-
- 12
-
-
I almost offered one bloke "some form of physical altercation" ( copyright @dane ) when he started going on about something but everyone else told him to stop it so it was fine. They're almost as bad as the " Oh, I wish I was as good as you" type comments which are just impossible to answer without sounding patronising. Just practice and copy the things you like. Idiots. If I jack the model forum in it'll just be you monkeys that I internet with. *sigh*
-
I'd never realised how political model building is. There's so many "right" and "wrong" ways of doing things. I started a bit of a row on the model forum with the amount of weathering & rust on my Bergepanther. They'll shit themselves when they see the next one. There's also some big thing about "modulation" of paint colour on panels. So a bit darker at the edges where angles meet. It's too bloody complicated for me and they all seem to get their knickers in a twist about how much/little/right/wrong it is. I can see a rage quit happening on there although they are very nice. Stupid models.
-
I don't know anything about weathering planes. I've seen plane modellers paint all the panel gaps black before the top coat to deepen them but given how much history it's got that might not be possible. Youtube is your friend. I wasn't going to do any models for a bit but I've started another one. I'm hopeless.
-
Desert pink gets my vote. Good luck with it, there's something daft about re-building old kits with personal history but when I rescued the Bergepanther after a 35 year break it was satisfying.
-
The messing about/ tidying up thing is what puts me off too. I used to use a Badger with inks but that was easy enough to clean out. Enamels or acrylics is another matter, it's too easy to ruin an airbrush by being slapdash. And slapdash is my middle name. * It's actually Martin.
-
You flatter me. I don't think I've ever used one on models TBH. I just do a basecoat with Tamiya aerosols and brush paint/ dry brush the rest. I've been toying with the idea of getting one but not sure....
-
Right. It's bloody finished. Stupid shiny staff car didn't make the cut due to being over complicated and beyond my skill level. Found a Panzer IV in a box so on it went. Anyway, that'll probably be it for me and plastic until the winter. Far too nice out. / pics
- 452 replies
-
- 30
-
-

-
Shuzz's 62 Baja Bug. Maybe...
CarolsHusband replied to CarolsHusband's topic in Projects and Build Ups
YELLOW CAR ! / not doing it yellow, it's just the gel coat tub they had open. Seems like a pretty good fit, bonnet has a bit of spare on the leading edge but that'll help with fettling. Happy about arch width/ clearance. Should be good.- 17 replies
-
- 20
-
-
The Dutch, Scottish, & Indian people megathread (Driving economically)
CarolsHusband replied to Roman's topic in Tech Talk
We slip-streamed a coach in a 2CV for 20 miles at 60 mph. Had it in neutral most of the time. Also, in economical pickup truck news, tailgate net returns the best mileage vs open, closed & removed. -
Shuzz's 62 Baja Bug. Maybe...
CarolsHusband replied to CarolsHusband's topic in Projects and Build Ups
Kit all paid for & with the courier. Found that the bug's had a terrible front end repair as well as the cut n shut rear. Grinder's the best thing for it TBH. All panels off. I've got a Mountney steering wheel that was in my first bug 40 years ago,I knew it would come in handy. Going through the box of beach buggy bits I found a spare Mountney hub & horn-push. That made me happy. All a bit filthy.... An hour later, all a bit shiny ! Now where's my goddam panels ?- 17 replies
-
- 14
-
-
Nearly there. Think I'm going to need to spend some time on real cars for a while, this fiddly stuff will drive you potty.
- 452 replies
-
- 15
-

.JPG.5b2b953e5635cee5eba4df5dedd0dde4.JPG)