
Hyperblade
-
Posts
439 -
Joined
-
Last visited
Content Type
Forums
Downloads
Events
Gallery
Everything posted by Hyperblade
-

Hyperblade's KP61 Racecar "KP61R" Discussion
Hyperblade replied to Hyperblade's topic in Project Discussion
I'm not a big fan of ali for a splitter, if you go off road it has tendancy to dig in and fold over on itself. The strength over a larger area means you have to put in a serious amount of support work, especially around the edges. (My splitter goes all the way back to the firewall) I think 4mm ACM might be better for this potentially, even 4mm plywood would be pretty good as you have a good structure for it and would be a bit more robust. That diffuser looks fairly aggressive! I've only gone for a 7degree angle (vertically only) as going for more really requires a good flow of air clean air to it (i.e flat floor) which i don't have. You might find if you made it less aggressive it will be more effective, also if you have a rear wing or gurney flap it can help it. Thanks for sharing, always good to see how others have done it! -
Hyperblade's KP61 Racecar "KP61R" Discussion
Hyperblade replied to Hyperblade's topic in Project Discussion
Talking with someone in the know on aero, he recommended doing a double diffuser to deal with the air on top, i can't at this stage due to the fuel tank, but might be an option in the future. Currently it will still eventually find a way out, but just be a lot more inefficient. A better option might be to work on the lead up to the axle so you have less overall air going over the top. However you do need to be careful with Diff cooling then. Front: 400lb Rear: 350lbs -
Hyperblade's KP61 Racecar "KP61R" Discussion
Hyperblade replied to Hyperblade's topic in Project Discussion
Yep, i lowered the pressure to the rear during the racing and got it driveable but it wasn't stopping as well after that. Just the act of stomping on the brakes forced the front to dive a lot and so the rear to go up, so required me to be a bit less aggressive on them to keep the car flatter (probably also need some harder springs at the front). Will be trying it on Friday, so fingers crossed it's dry. Hard to know if it will help as the interaction of the live axle makes things a bit more tricky for us to get the air leading into the diffuser right. -
Hyperblade's KP61 Racecar "KP61R" Discussion
Hyperblade replied to Hyperblade's topic in Project Discussion
Thanks! The ducting mods made a big difference. I normally struggled to keep up with a competitor down the straight and instead could overtake him. I did take a bit of weight out of the car (alternator, doors etc) so i'm probably about even at the moment for adding it.. The splitter has had a big negative affect in the braking zones as the balance isn't right so i'm having to brake sooner then I normally would to keep the rear on the ground, but through the corners it is adding noticeable downforce and allowing me to turn in better. I'm hoping the diffuser balances it all out. Yep end plates and strakes added, just forgot to take a photo. -
Hyperblade's KP61R - Toyota Starlet with Honda K20a
Hyperblade replied to Hyperblade's topic in Projects and Build Ups
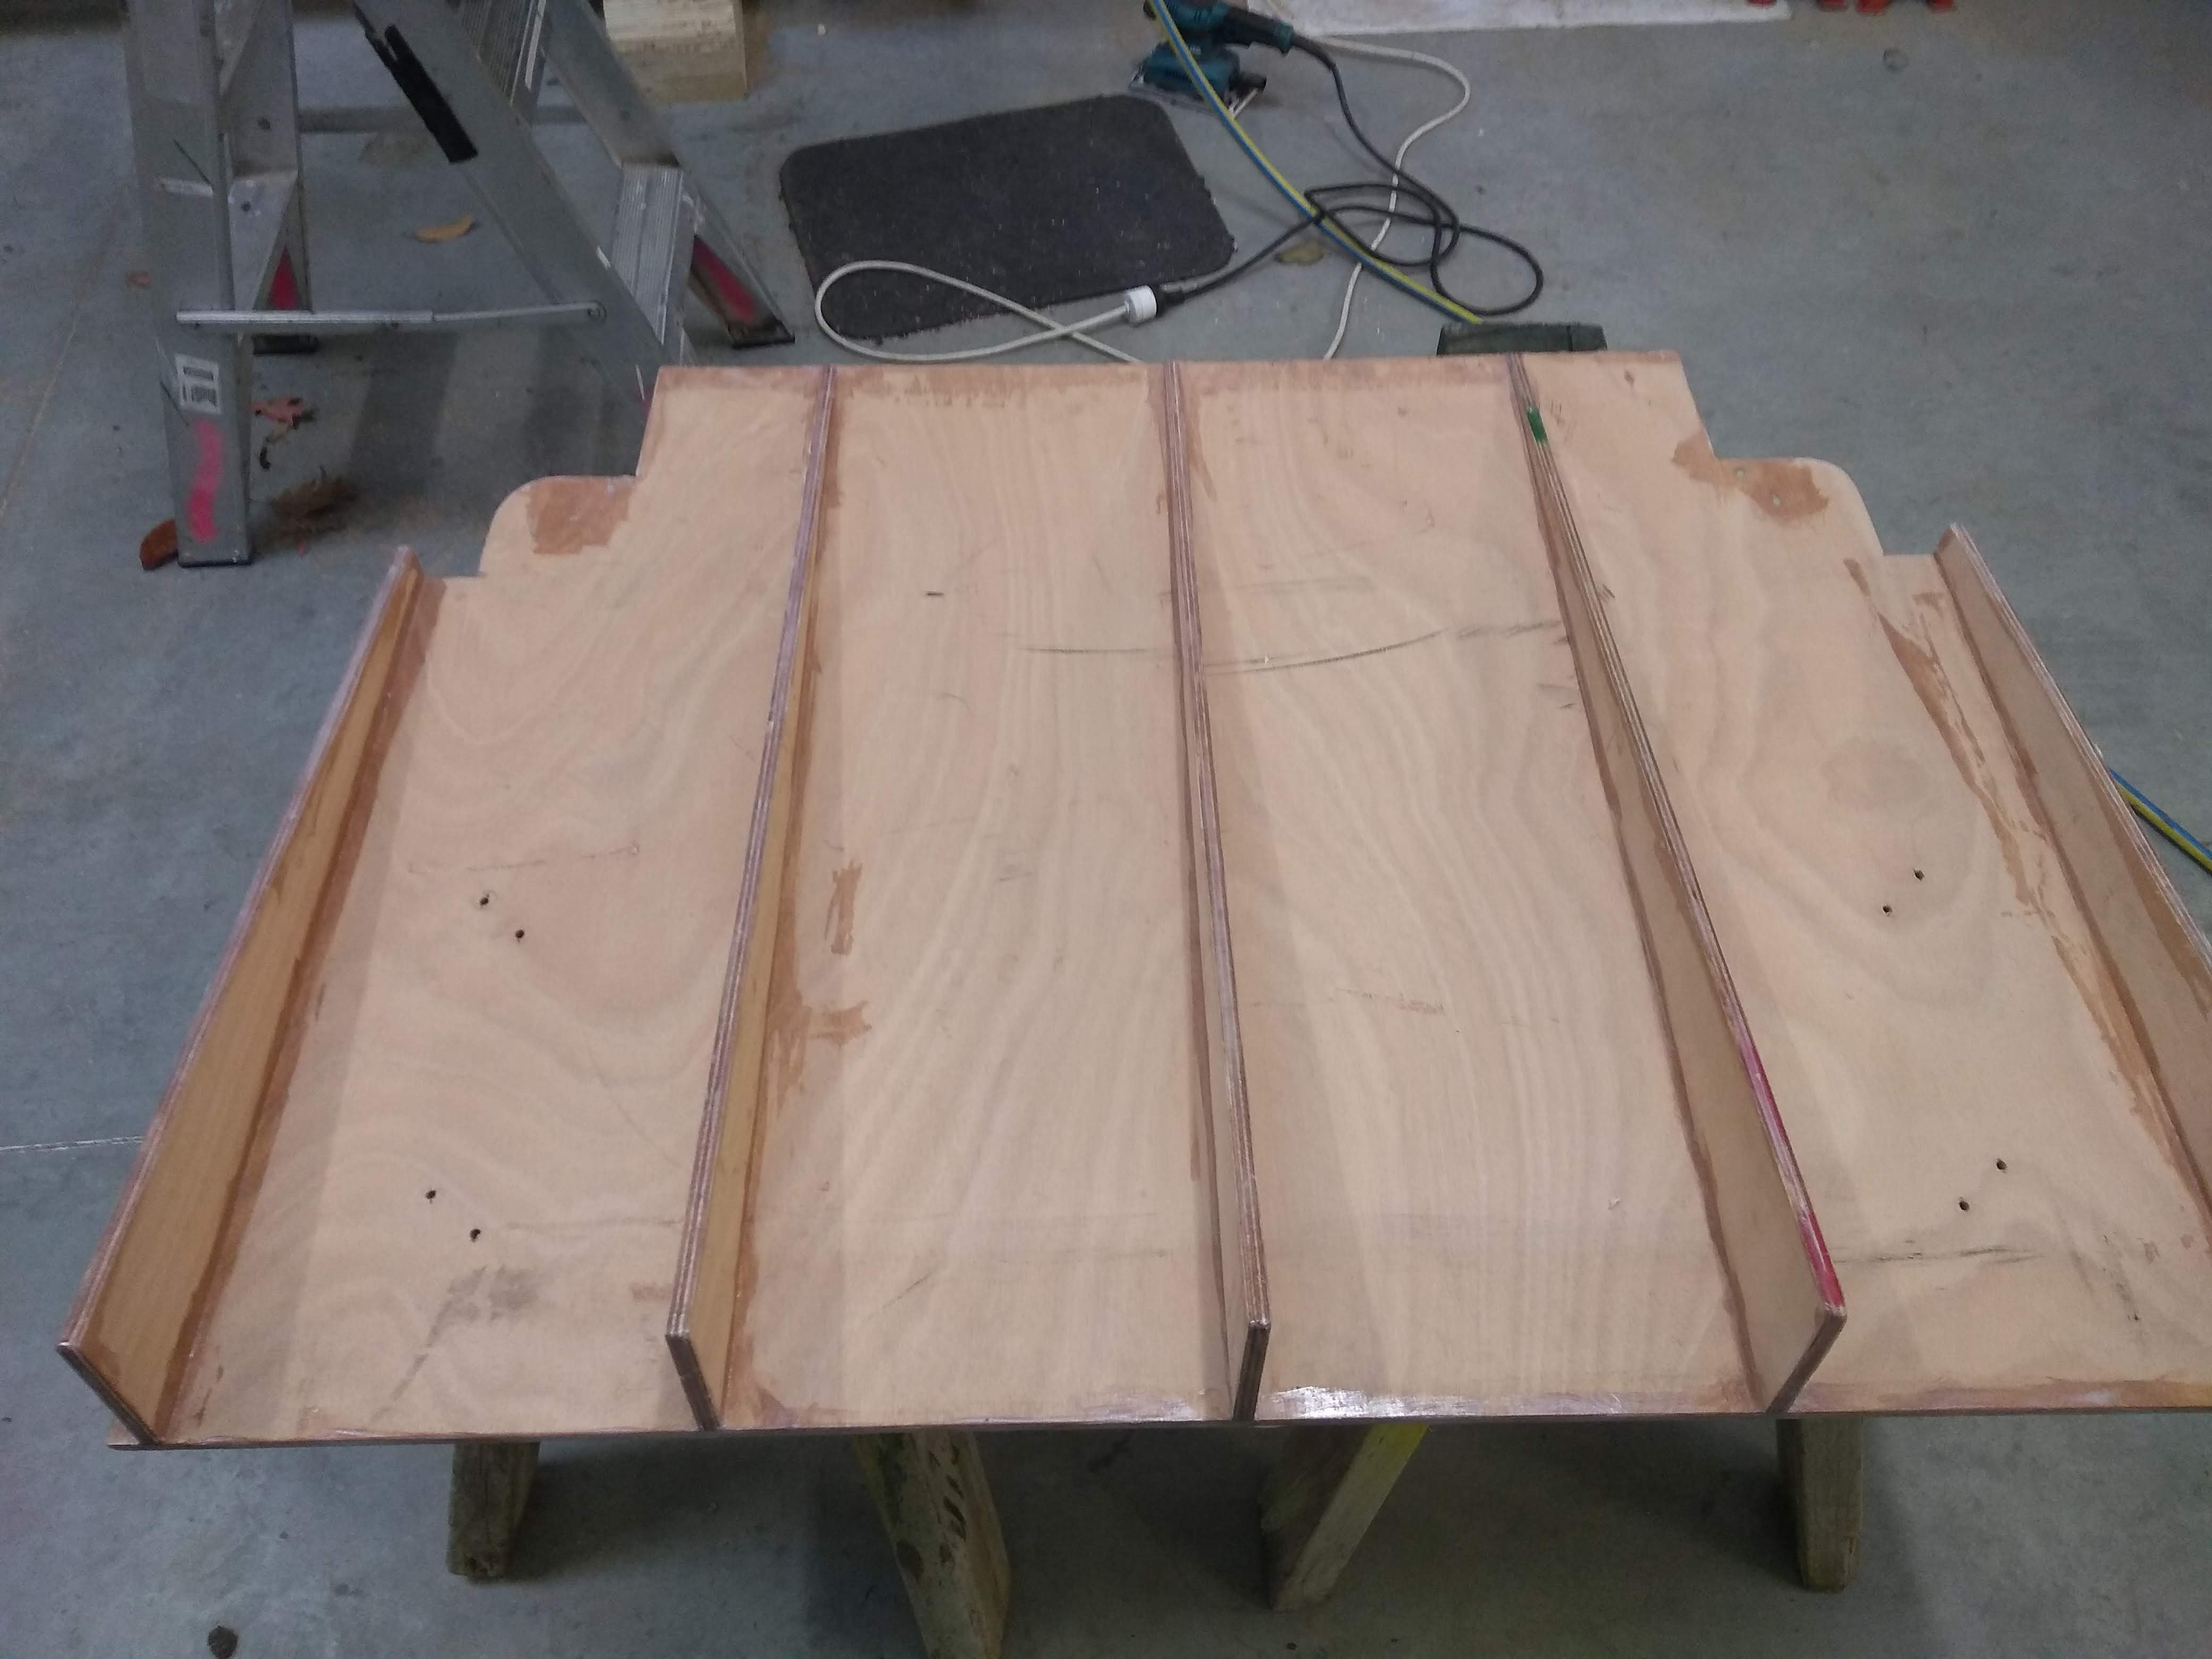
And finally to balance out the splitter I created a diffuser, again out of 12mm ply as that was easiest (prototype for now), mounting was really tricky but got their in the end. Have made some strakes for it and it's getting painted black to match splitter. It's height and angle adjustable, and is again quick release as i'm guessing it won't fit on the trailer. All ready to go for the last club day of the season Sun 5th May (Next weekend).
-
Hyperblade's KP61R - Toyota Starlet with Honda K20a
Hyperblade replied to Hyperblade's topic in Projects and Build Ups
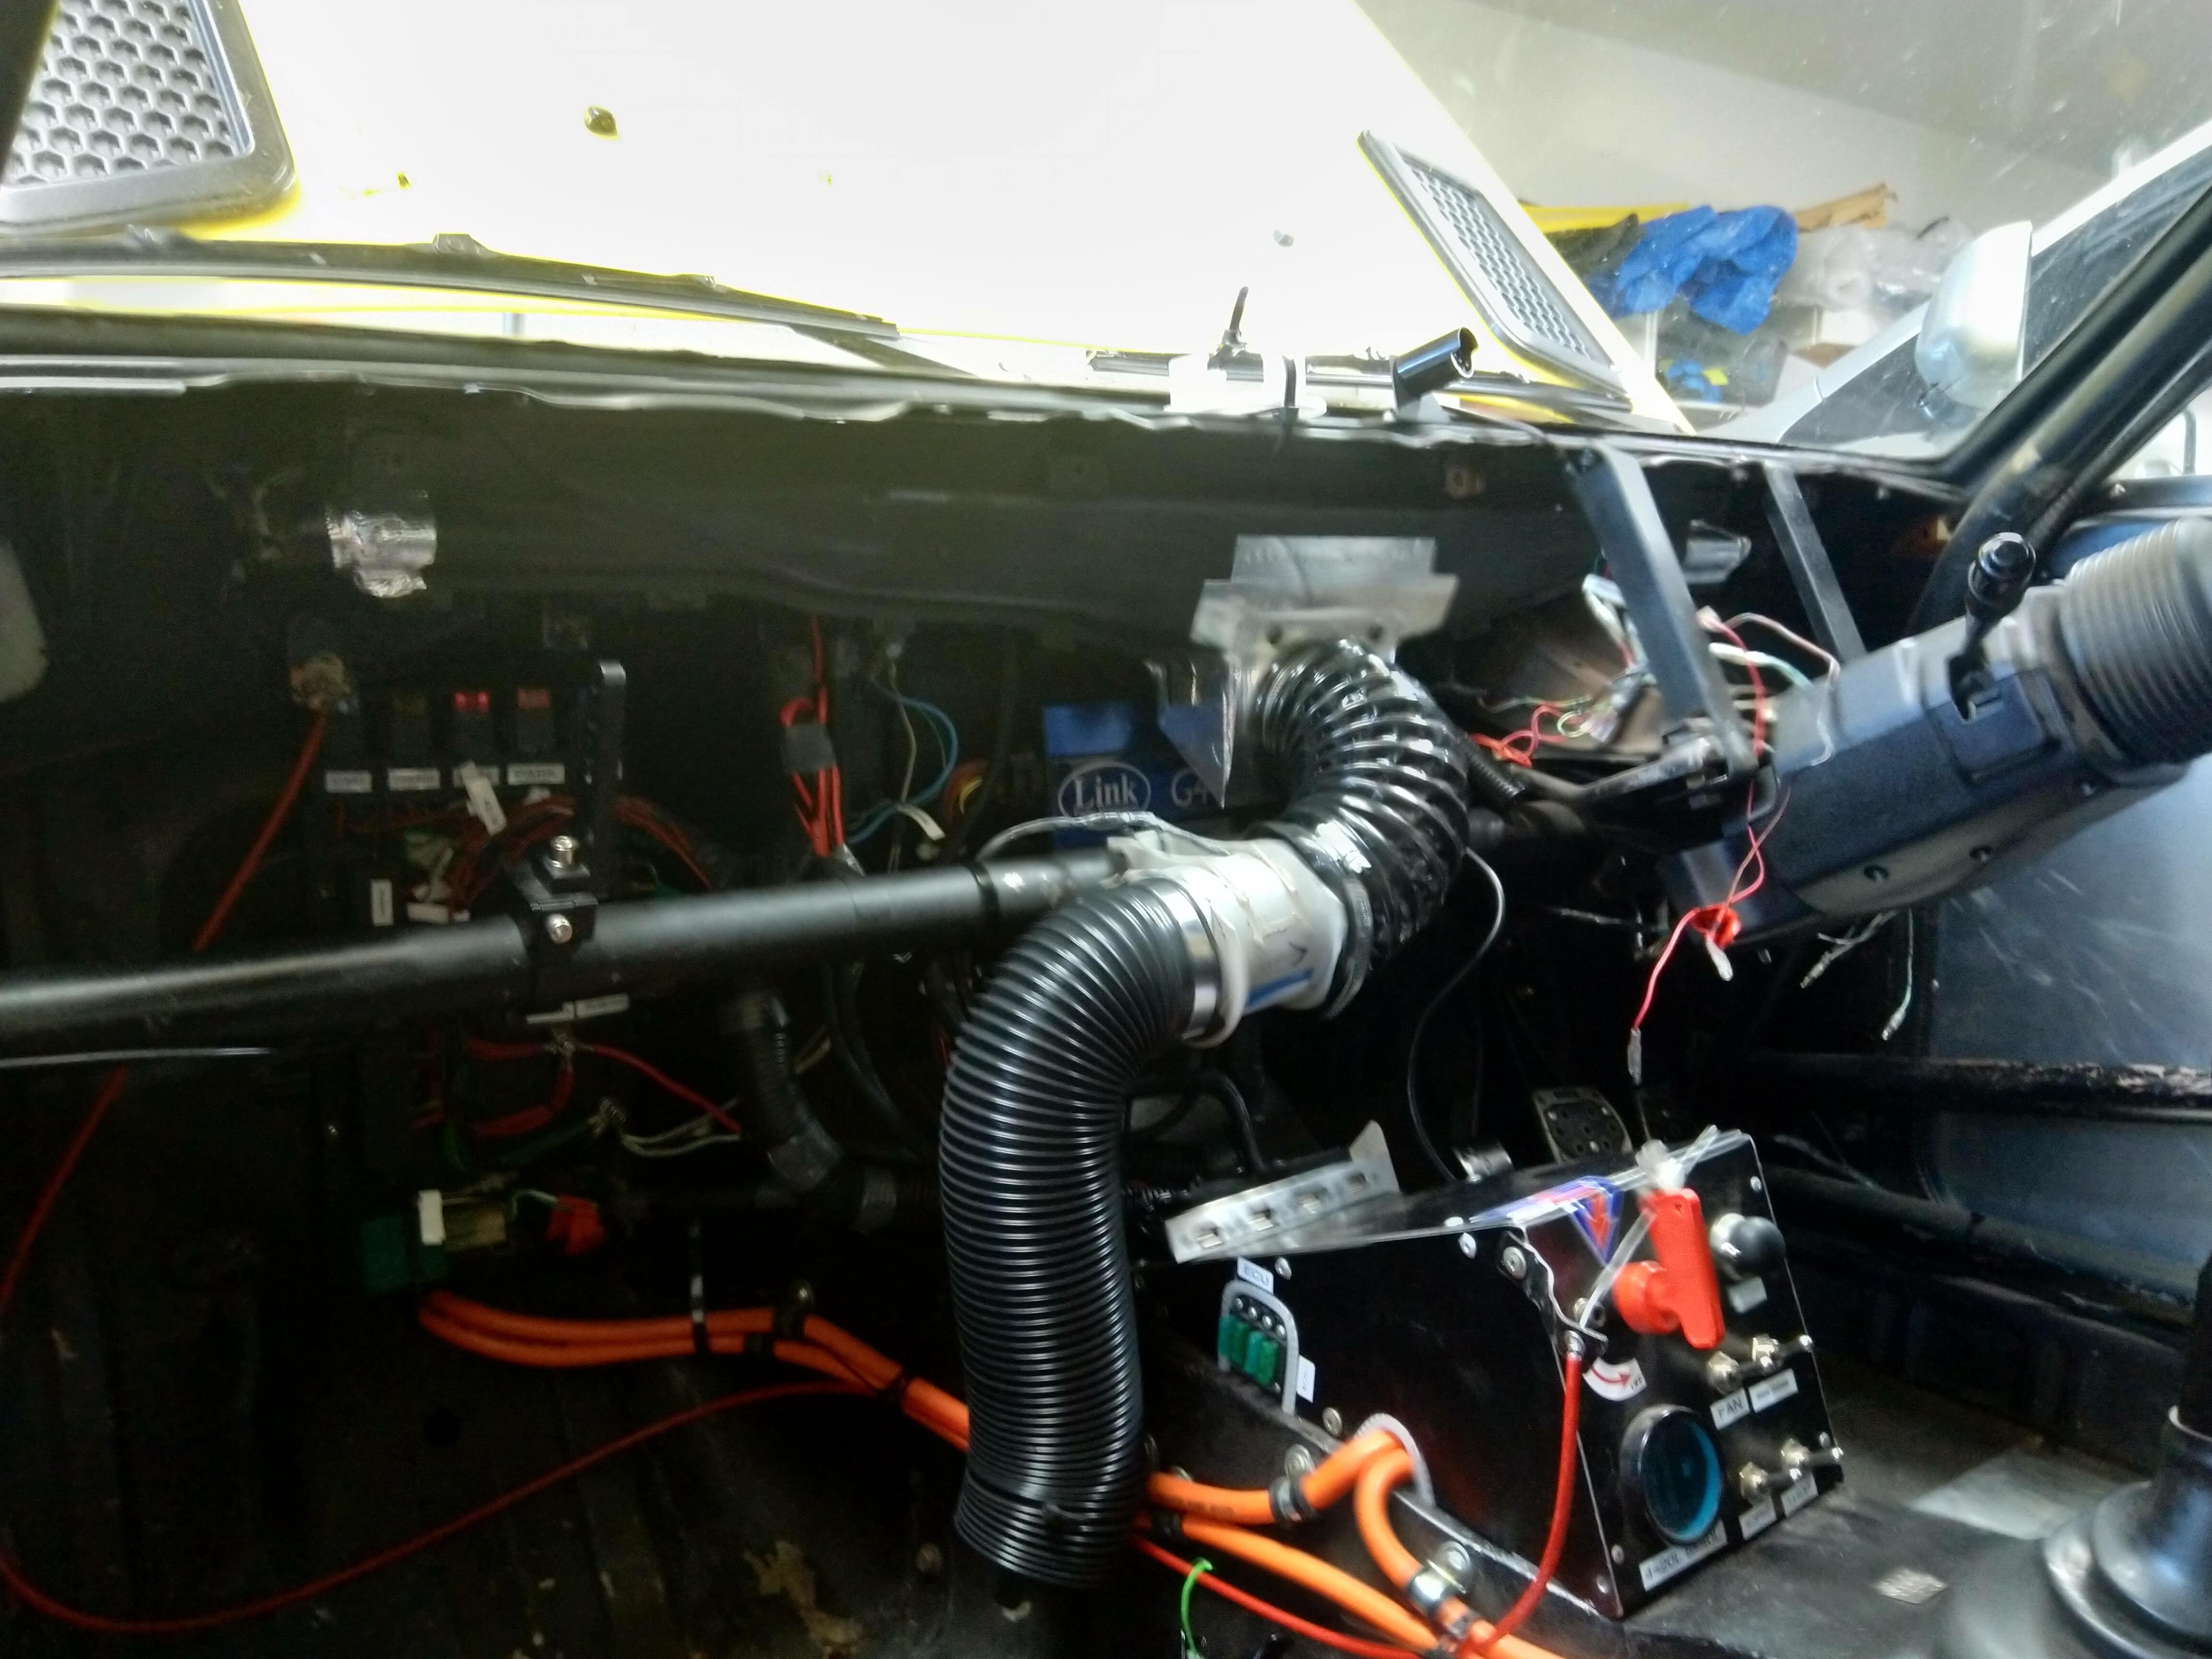
Got that all repaired and going into the last race of the season had a few things to sort out. Brakes were leaking at the rear still, so i pulled the calipers apart and found the seals were not the same size as the standard Toyota ones, really annoyed as they were done here in CHCH at great expense by a well known company. While I was at it I replaced the front ones as well just to be safe as they looked like they were starting to leak as well. I've had some 1mm Titanium brake pad backing plates made up for all the calipers which I'm hoping will protect the seals until I can replace the calipers all round with proper race ones. Been a bit concerned going into Winter that if I have to race in the rain that I won't be able to see out of the windscreen due to fogging (I do run anti fog) so I hacked the original windscreen venting to take a feed from a bilge fan which will take hot air off the floor (above the exhaust). Had the diff in to be checked after the hit it took, and have changed ratio from 4.3 to 4.5 so hoping that's going to give a nice boost at the end of the straight.
-
Hyperblade's KP61R - Toyota Starlet with Honda K20a
Hyperblade replied to Hyperblade's topic in Projects and Build Ups
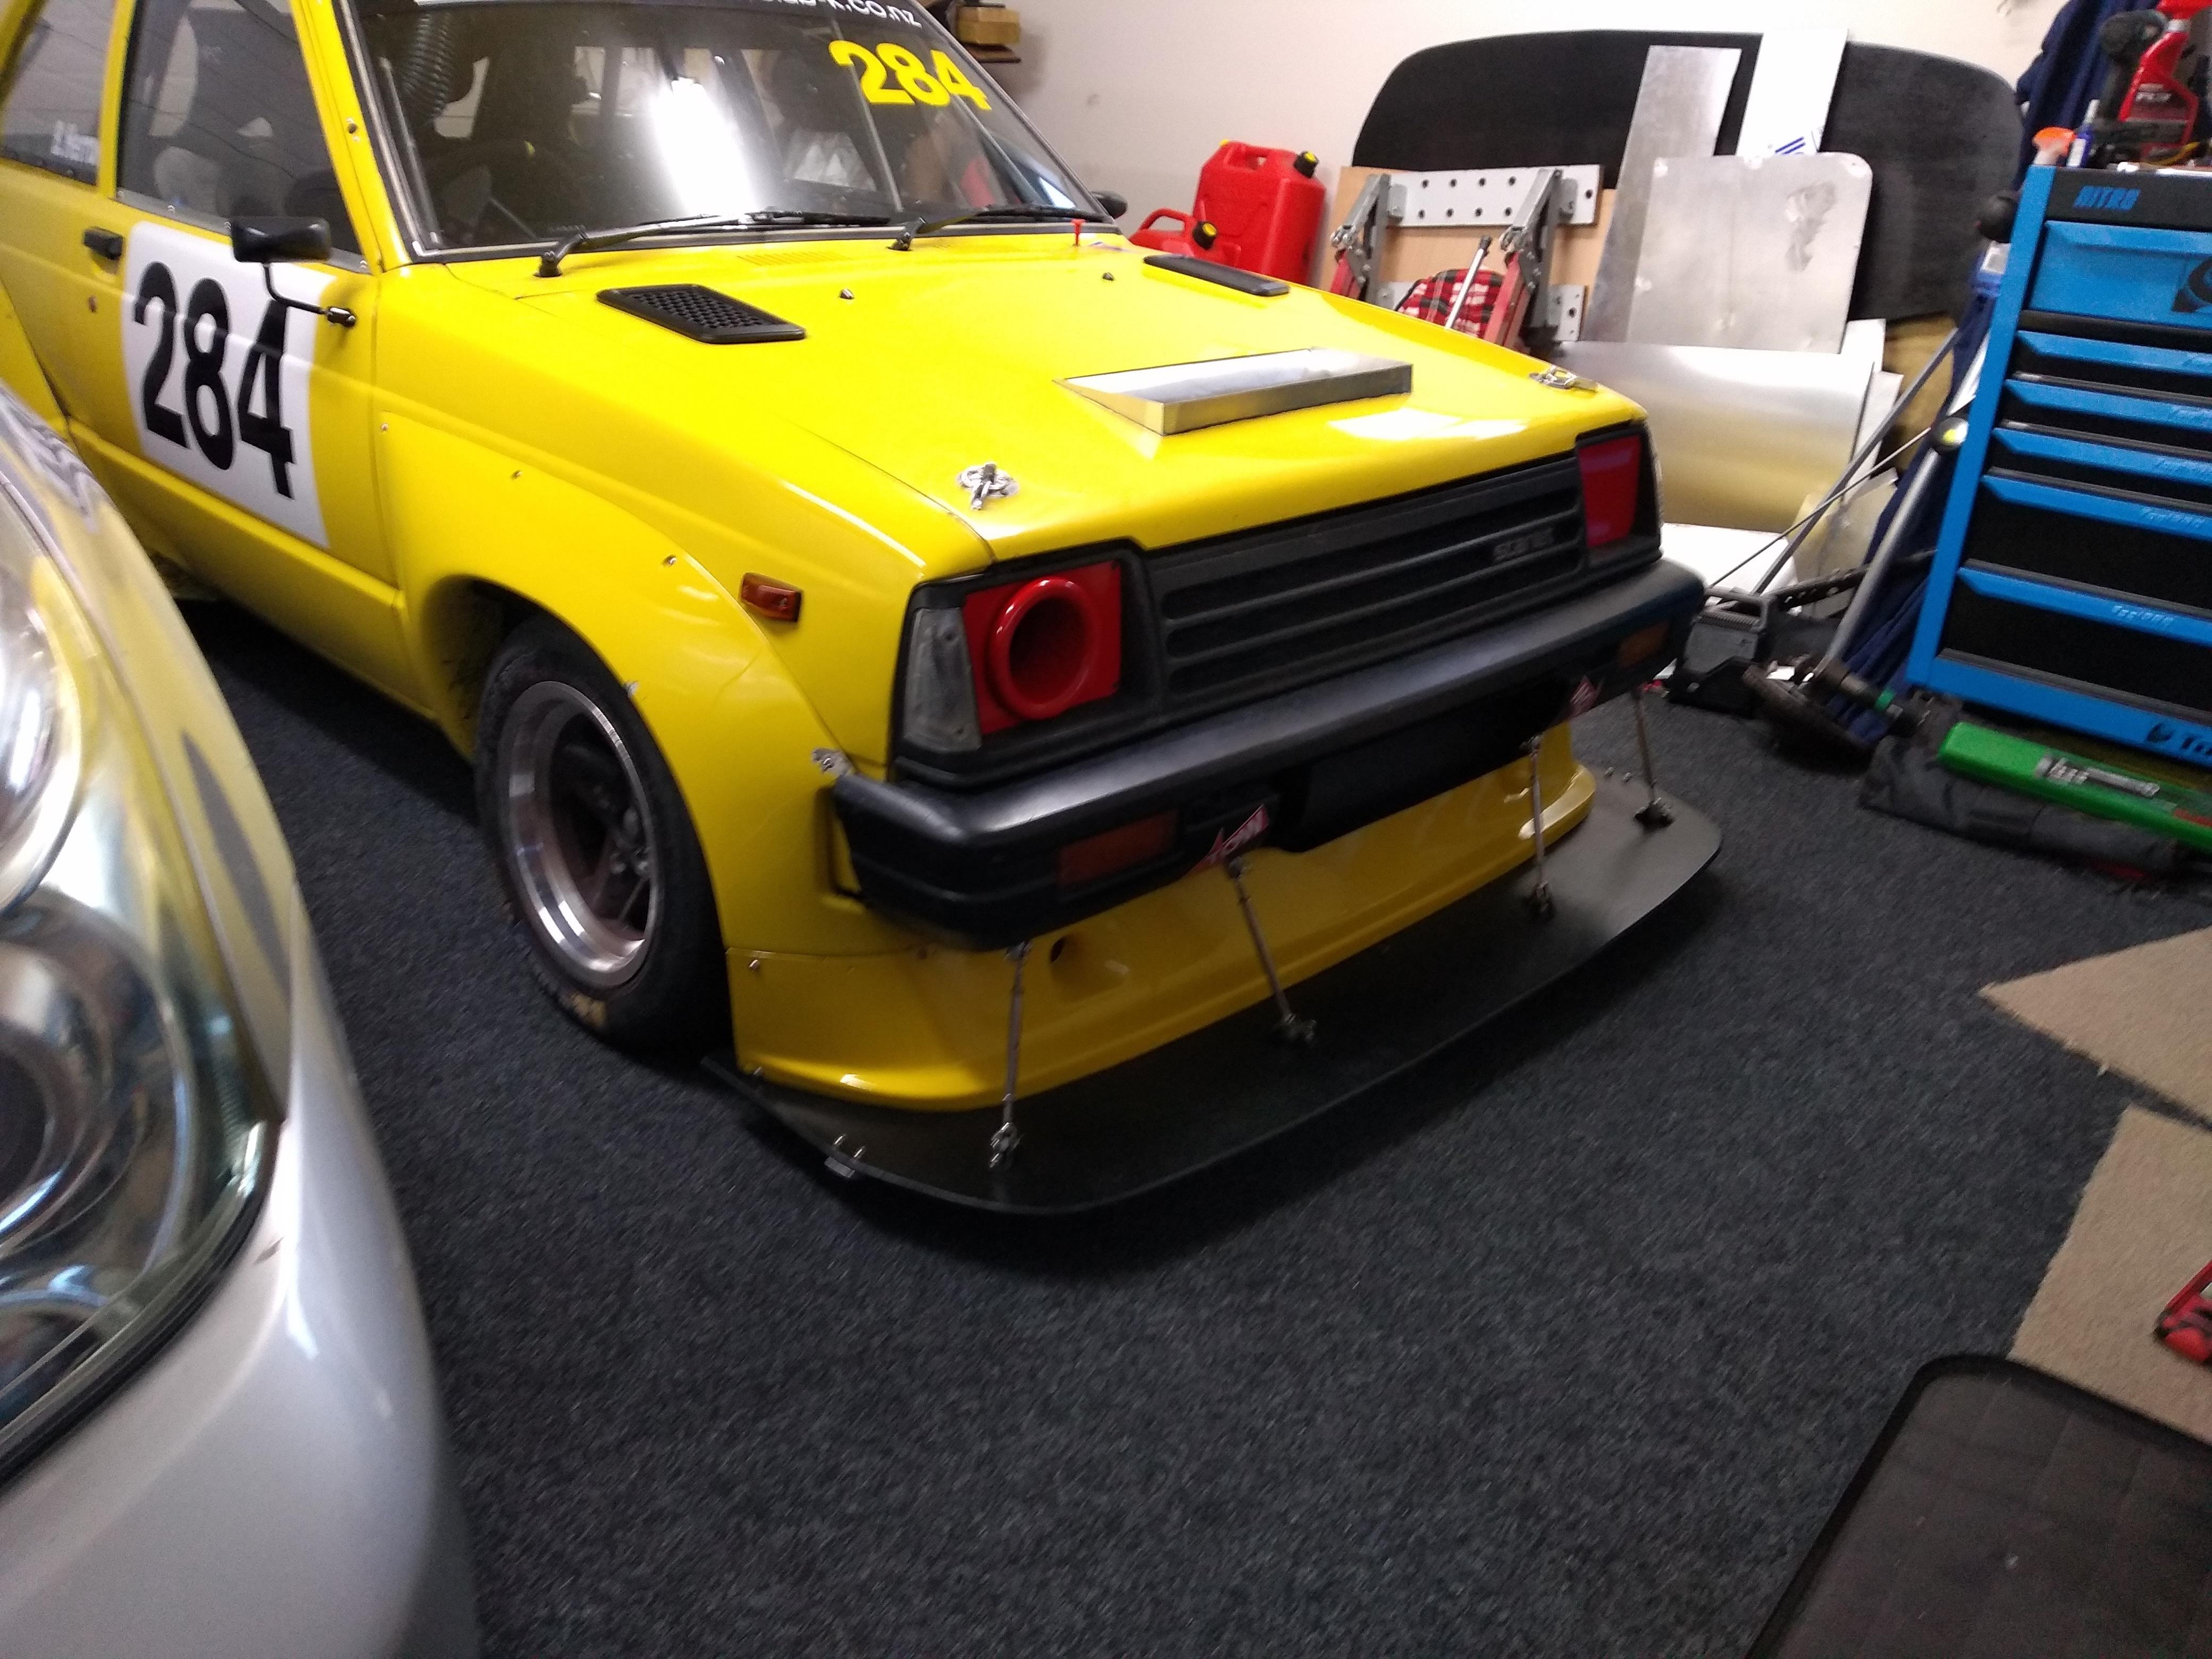
Of course the first club day I had the splitter on and got punted off the track (first time for me). From Behind: I was very lucky, minimal damage all round, his wheel hit mine and the rear axle took the brunt, he then ran down the side of the car and hit the front splitter which protected the front of the car, I ended up with a couple of bent brackets and turnbuckles, but actual splitter was in pretty good nick. Aero wise the splitter also had a major impact in high speed braking where i was getting huge weight transfer to the front and so the rears were locking, diffuser was now on the cards. However I have dropped my PB from 1:37.187 to a 1.36:200 -
Hyperblade's KP61R - Toyota Starlet with Honda K20a
Hyperblade replied to Hyperblade's topic in Projects and Build Ups
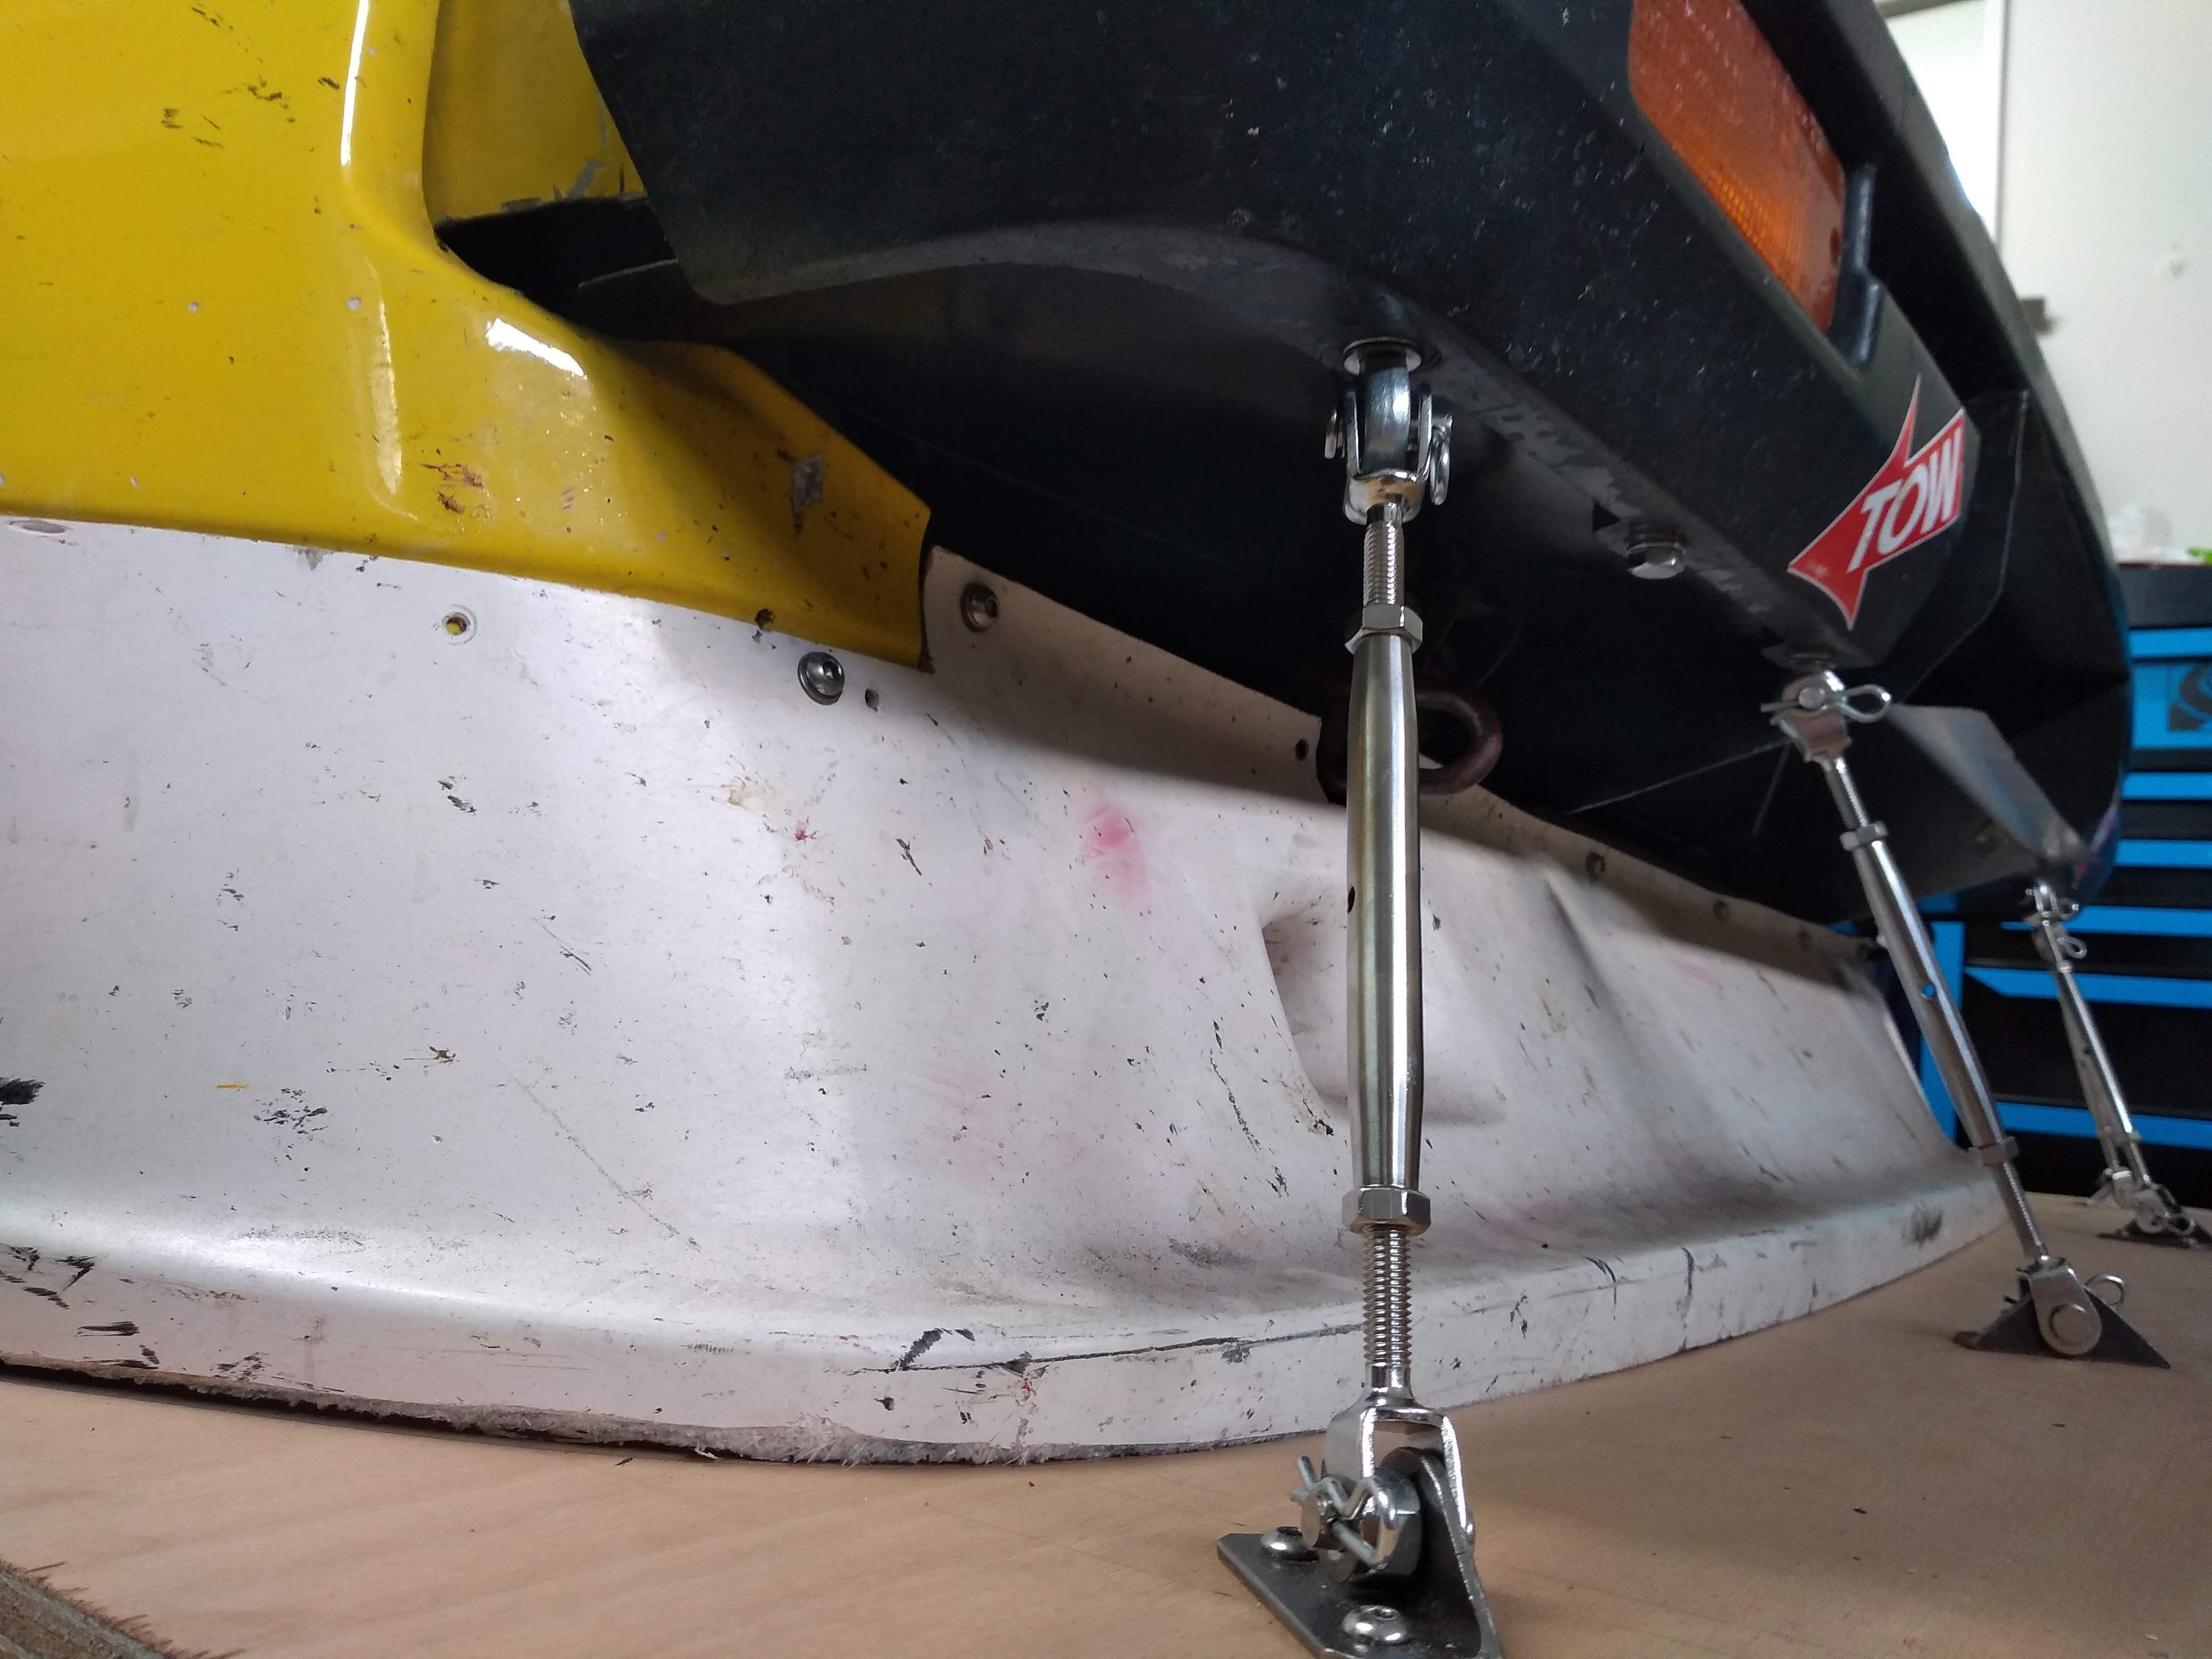
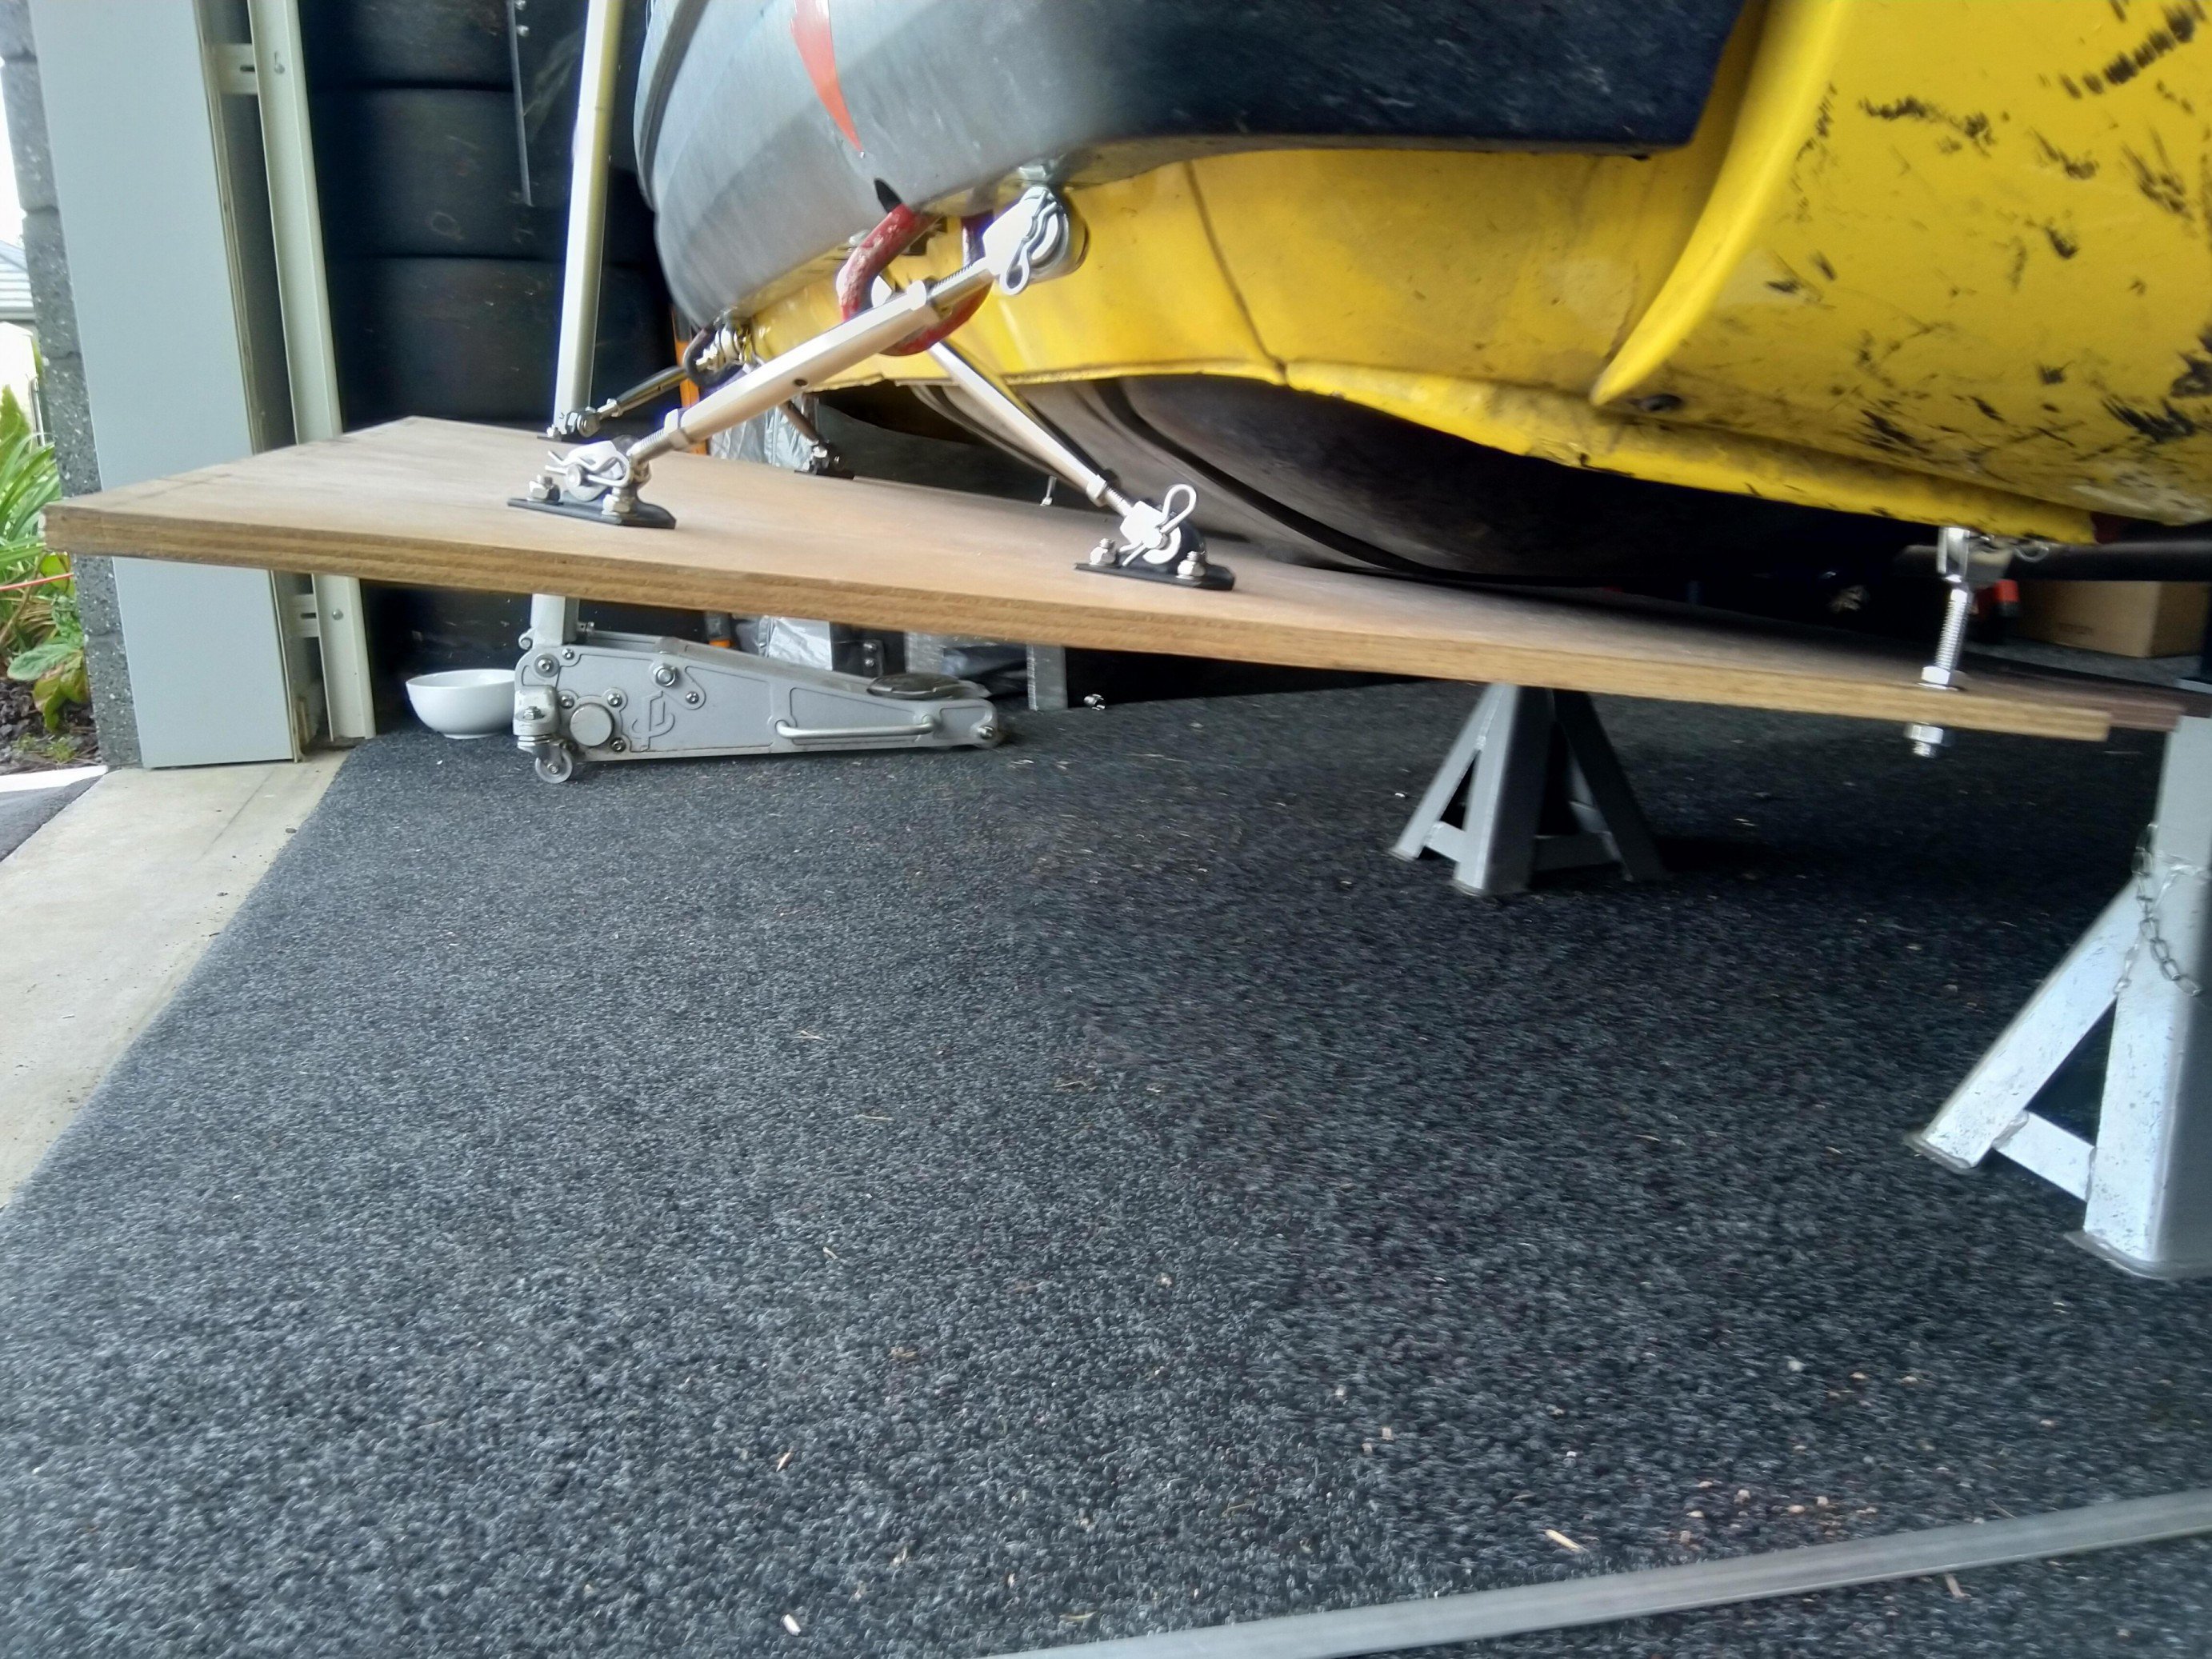
Splitter Finally! got round to finishing off the splitter, I ended up going with 12mm marine ply (the lightest i could find) which ended up being 12kg total. I chose ply after looking at all the options, I wanted it quick release which meant it needs to be held up by the front and back with nothing in the middle. ACM was flexible and pretty heavy for the size you would need. I also wanted it to be easy to replace if it got hit for mounting I went with Stainless Steel Turnbuckles (8mm Jaw Jaw) with 8mm tie rod ends (all sourced from AliExpress). Some minor grinding on the tie rod ends and making up the ali rear adjustable brackets, and I now have a really solid mount. It's also adjustable in height and angle and takes my weight standing on the front. The splitter is all quick release and I can install in about a min, which is great as the car won't fit on the trailer with it.
-
Hyperblade's KP61R - Toyota Starlet with Honda K20a
Hyperblade replied to Hyperblade's topic in Projects and Build Ups
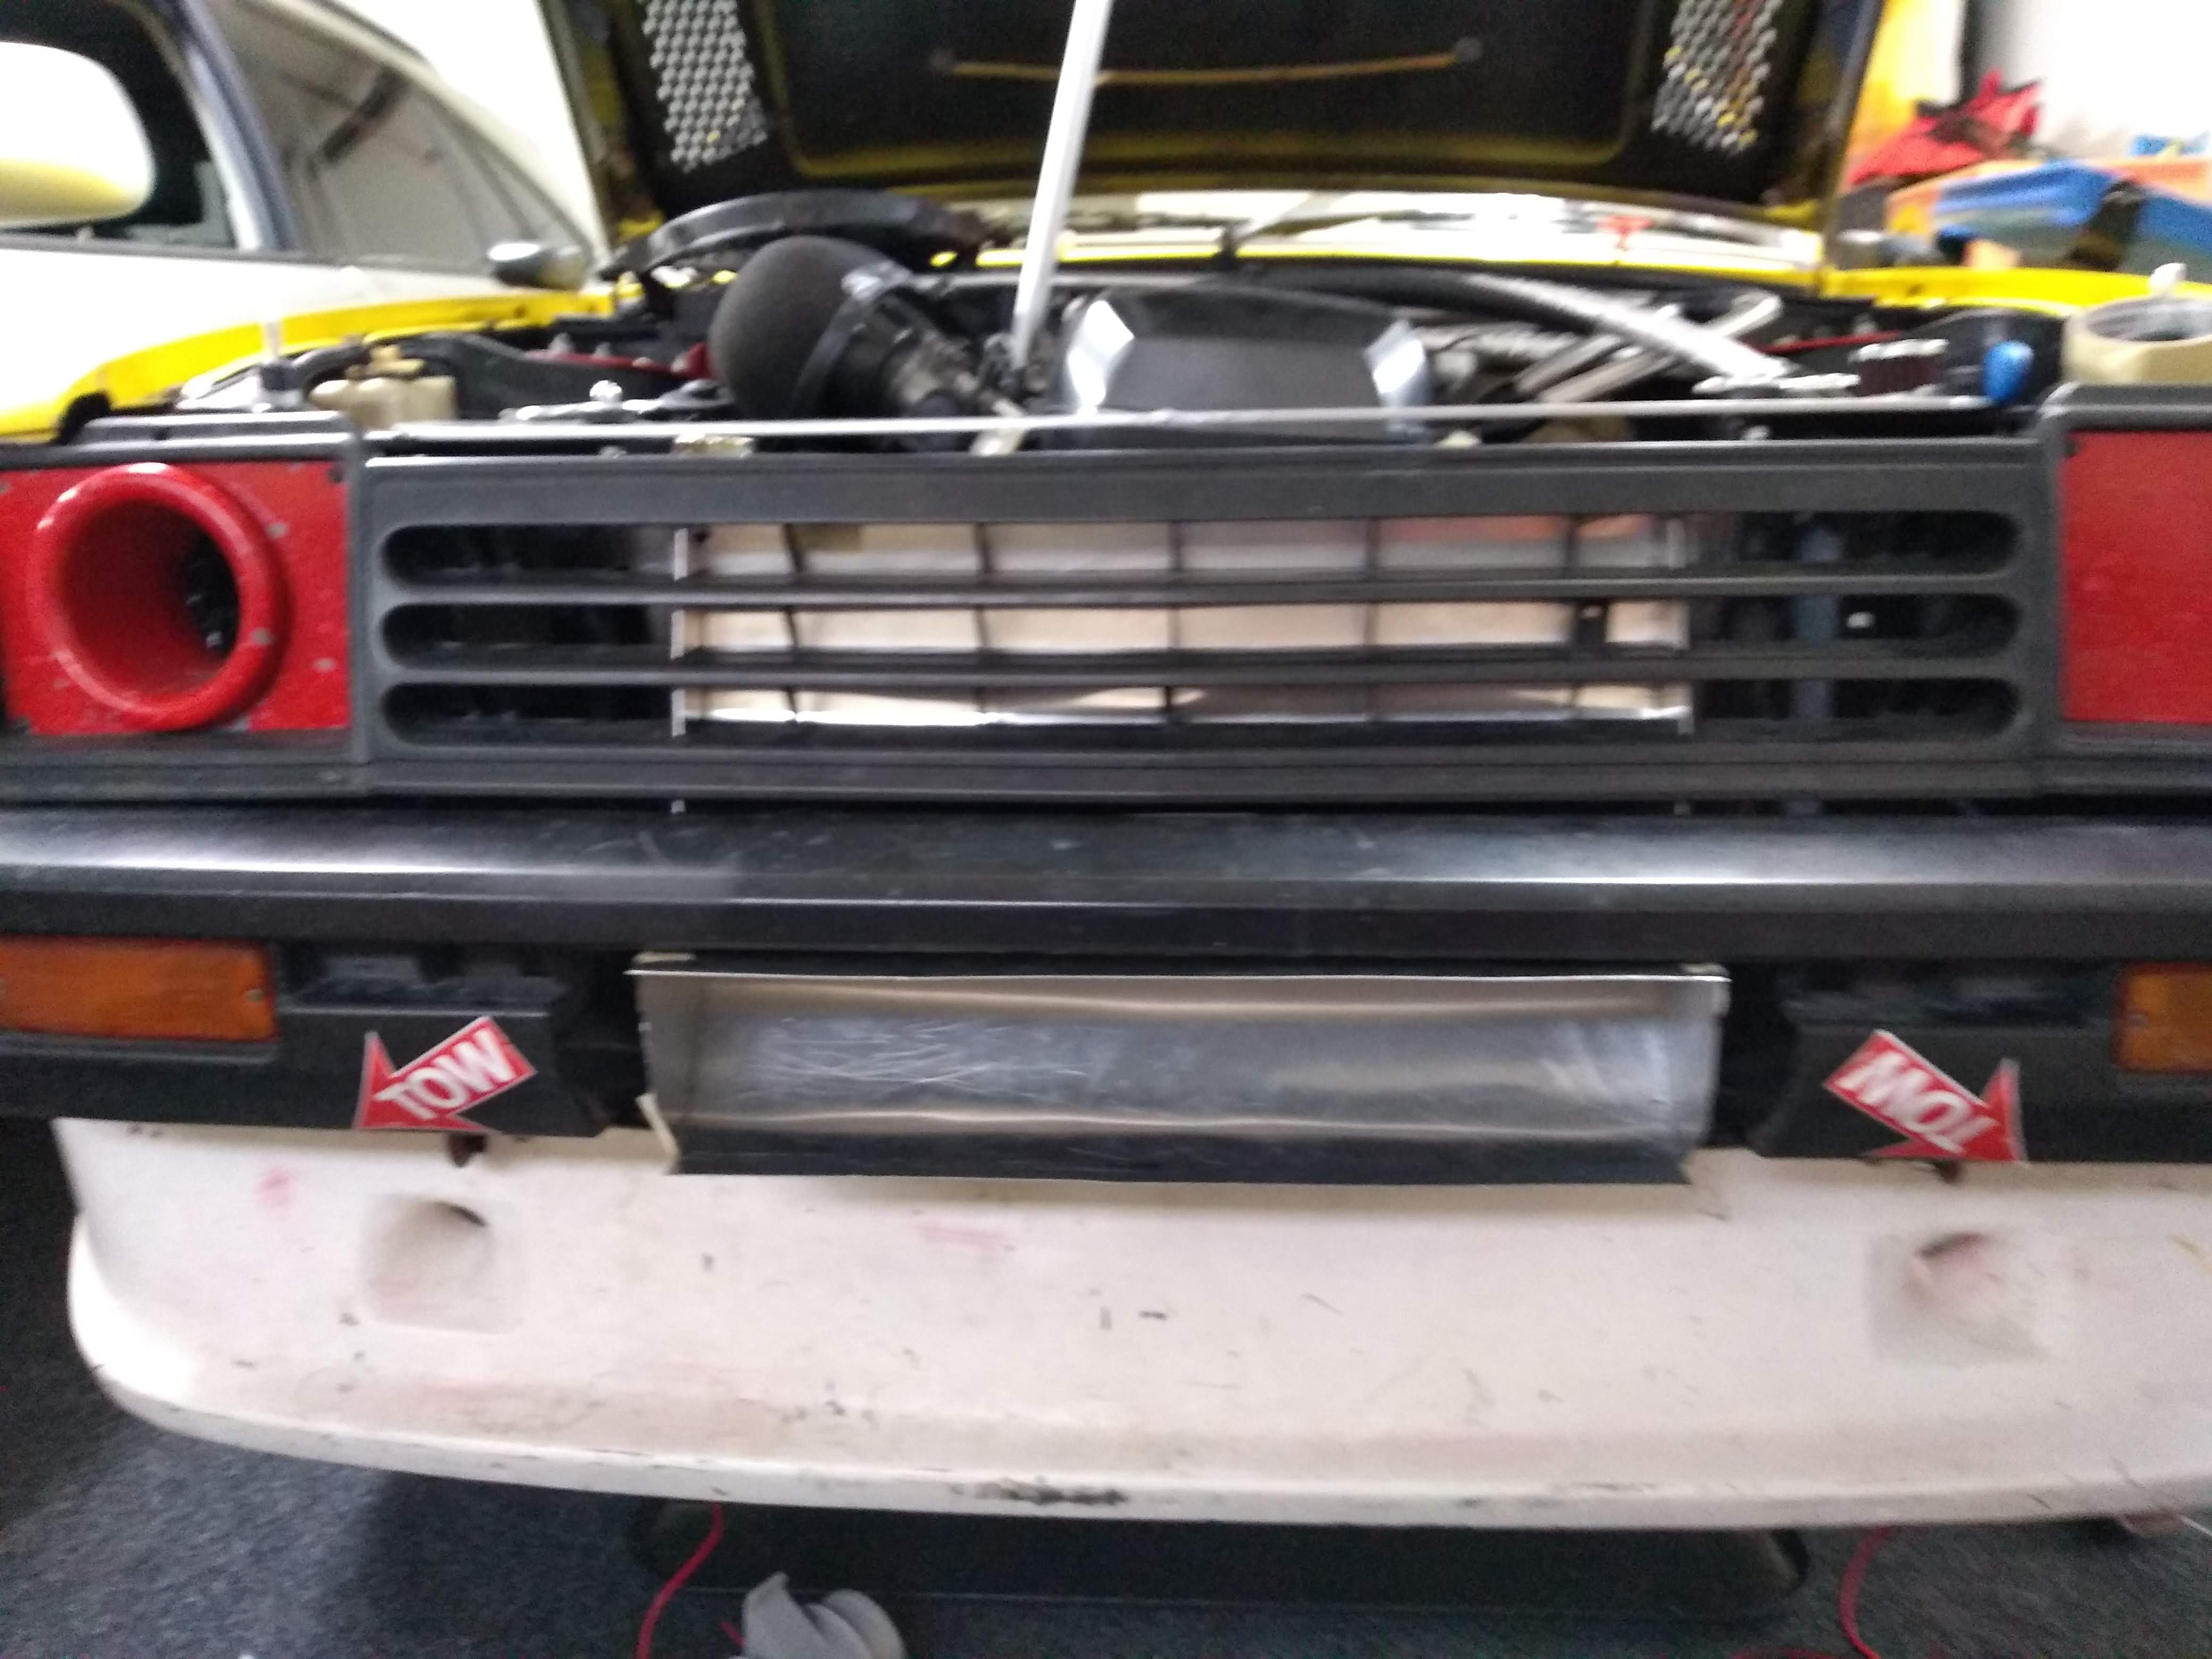
I also decided to vent it through the bonnet. This had a positive impact on air intake temperature dropping it by at least 10 degrees, which gave a noticeable boost in power. Got cut down a bit... The whole unit drops on to some pins and then has some clips at the top, so possible to remove in under a min.
-
Hyperblade's KP61R - Toyota Starlet with Honda K20a
Hyperblade replied to Hyperblade's topic in Projects and Build Ups
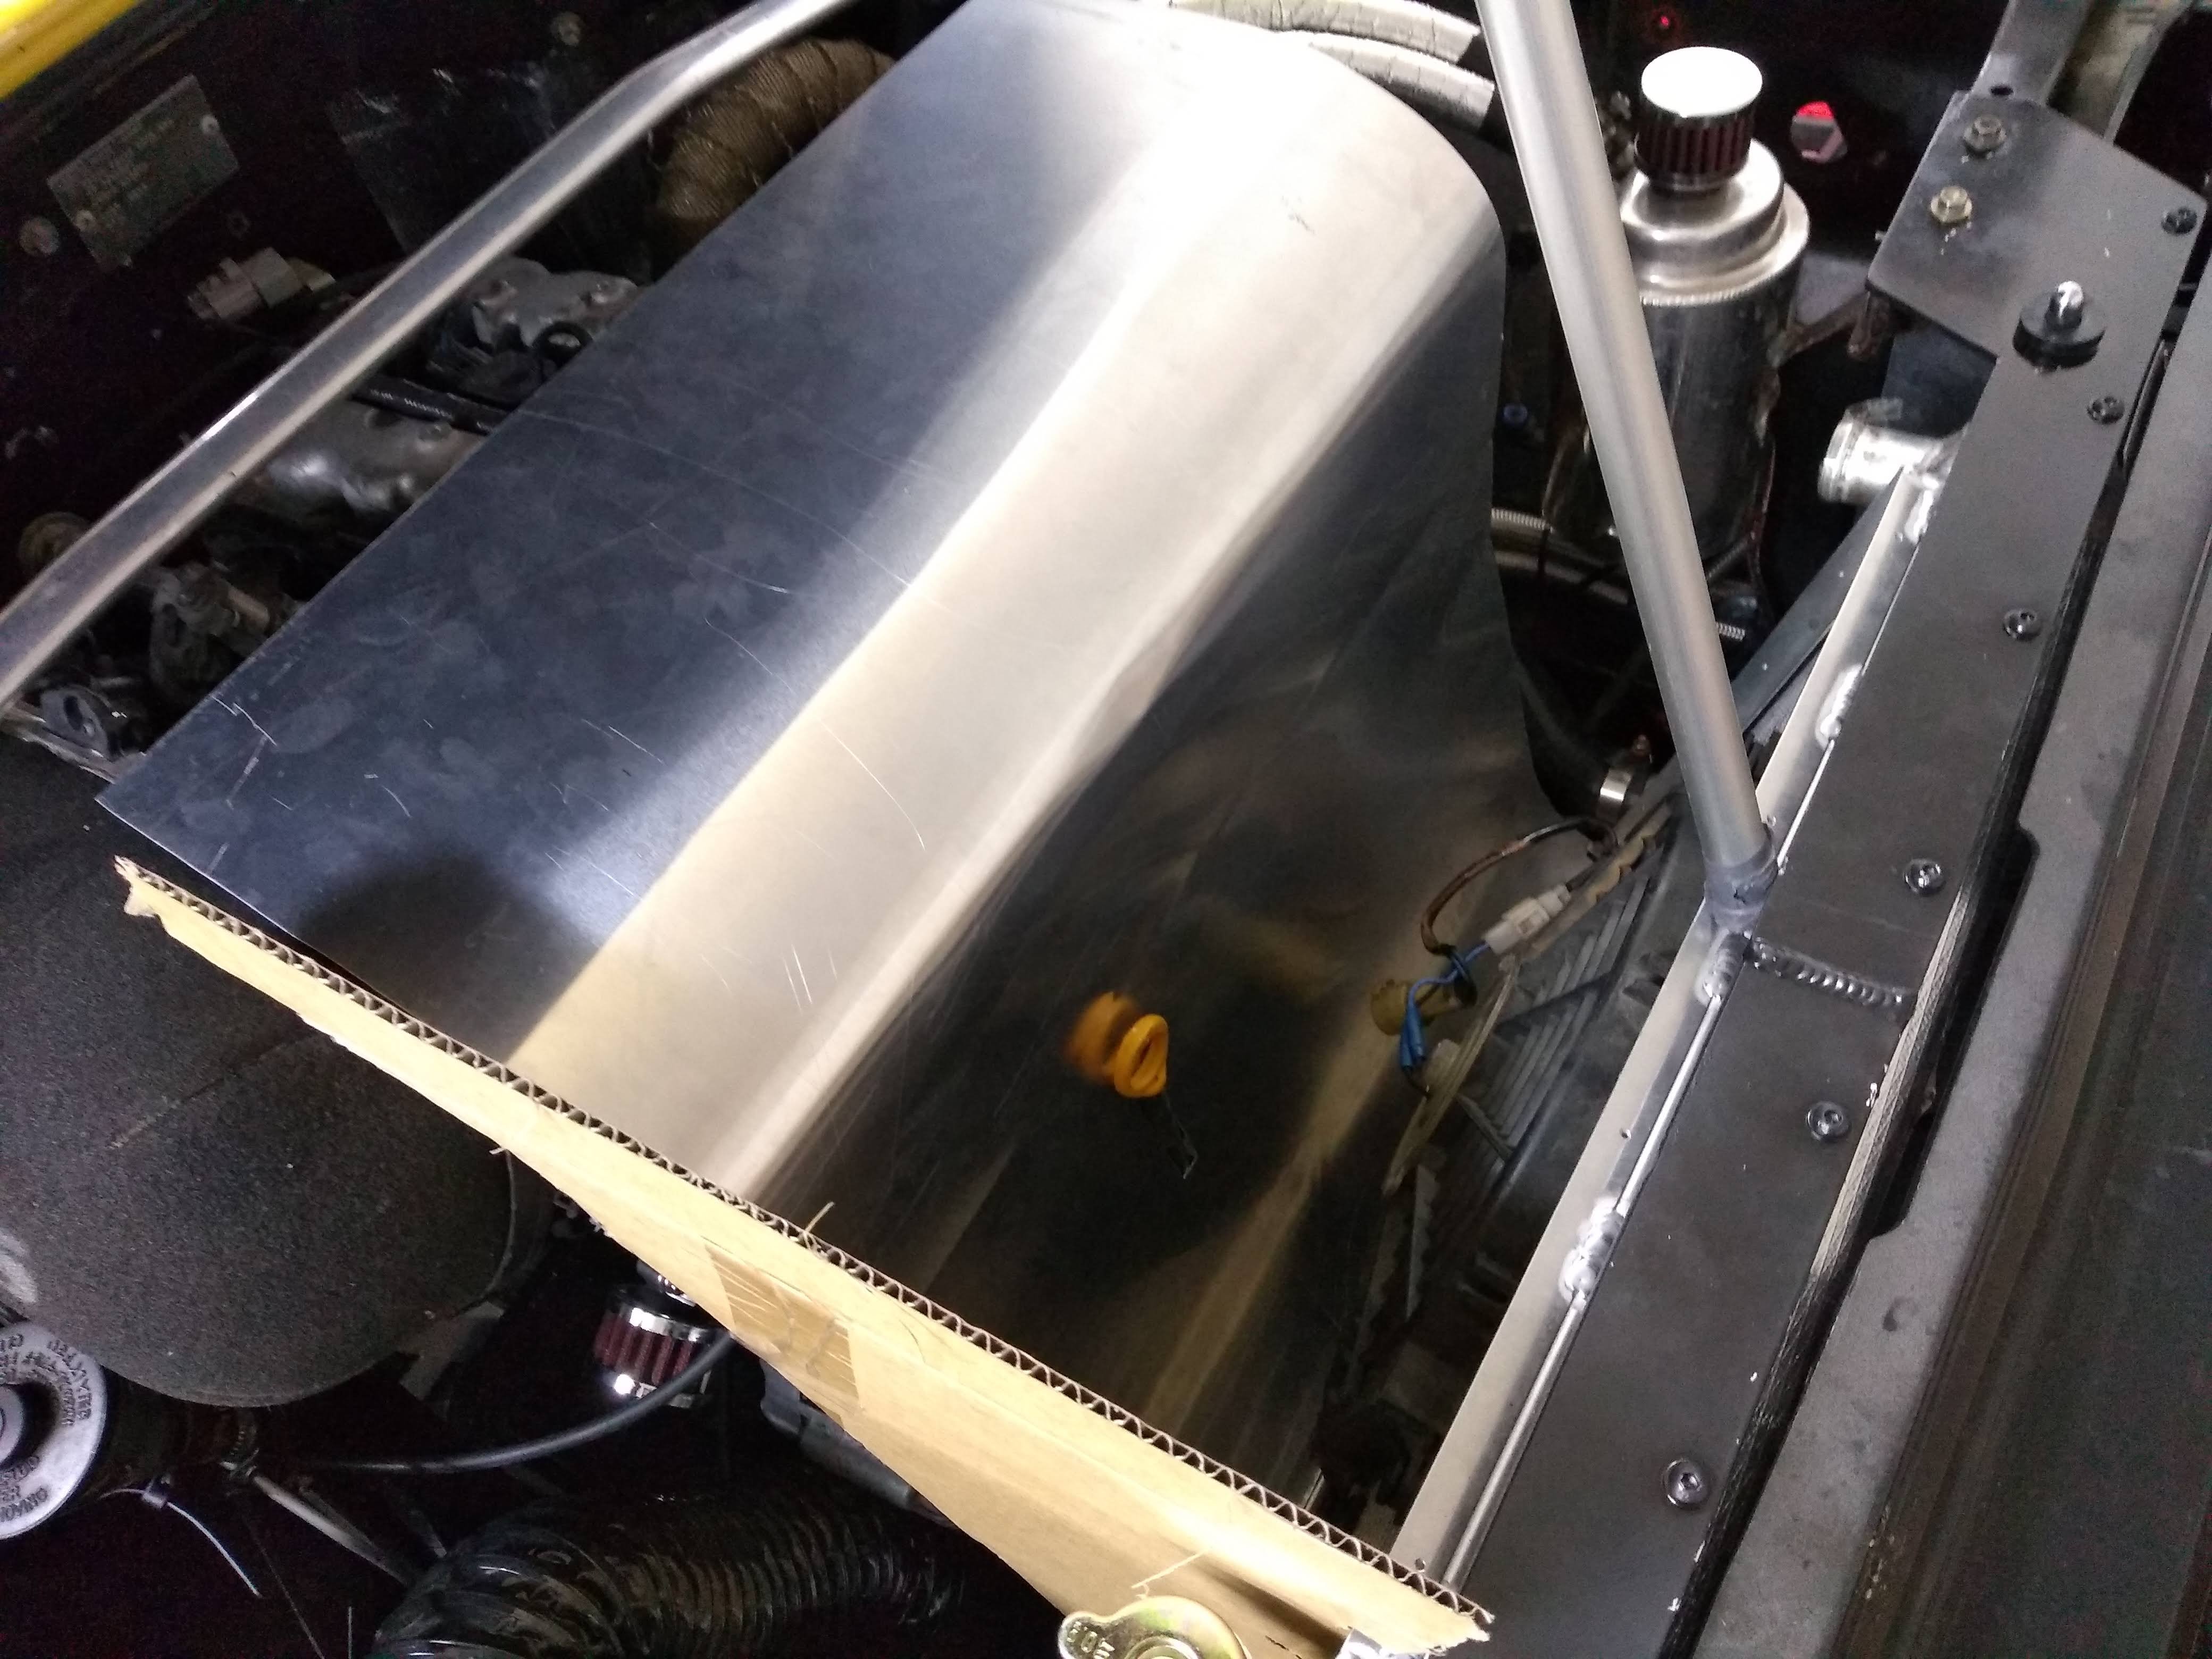
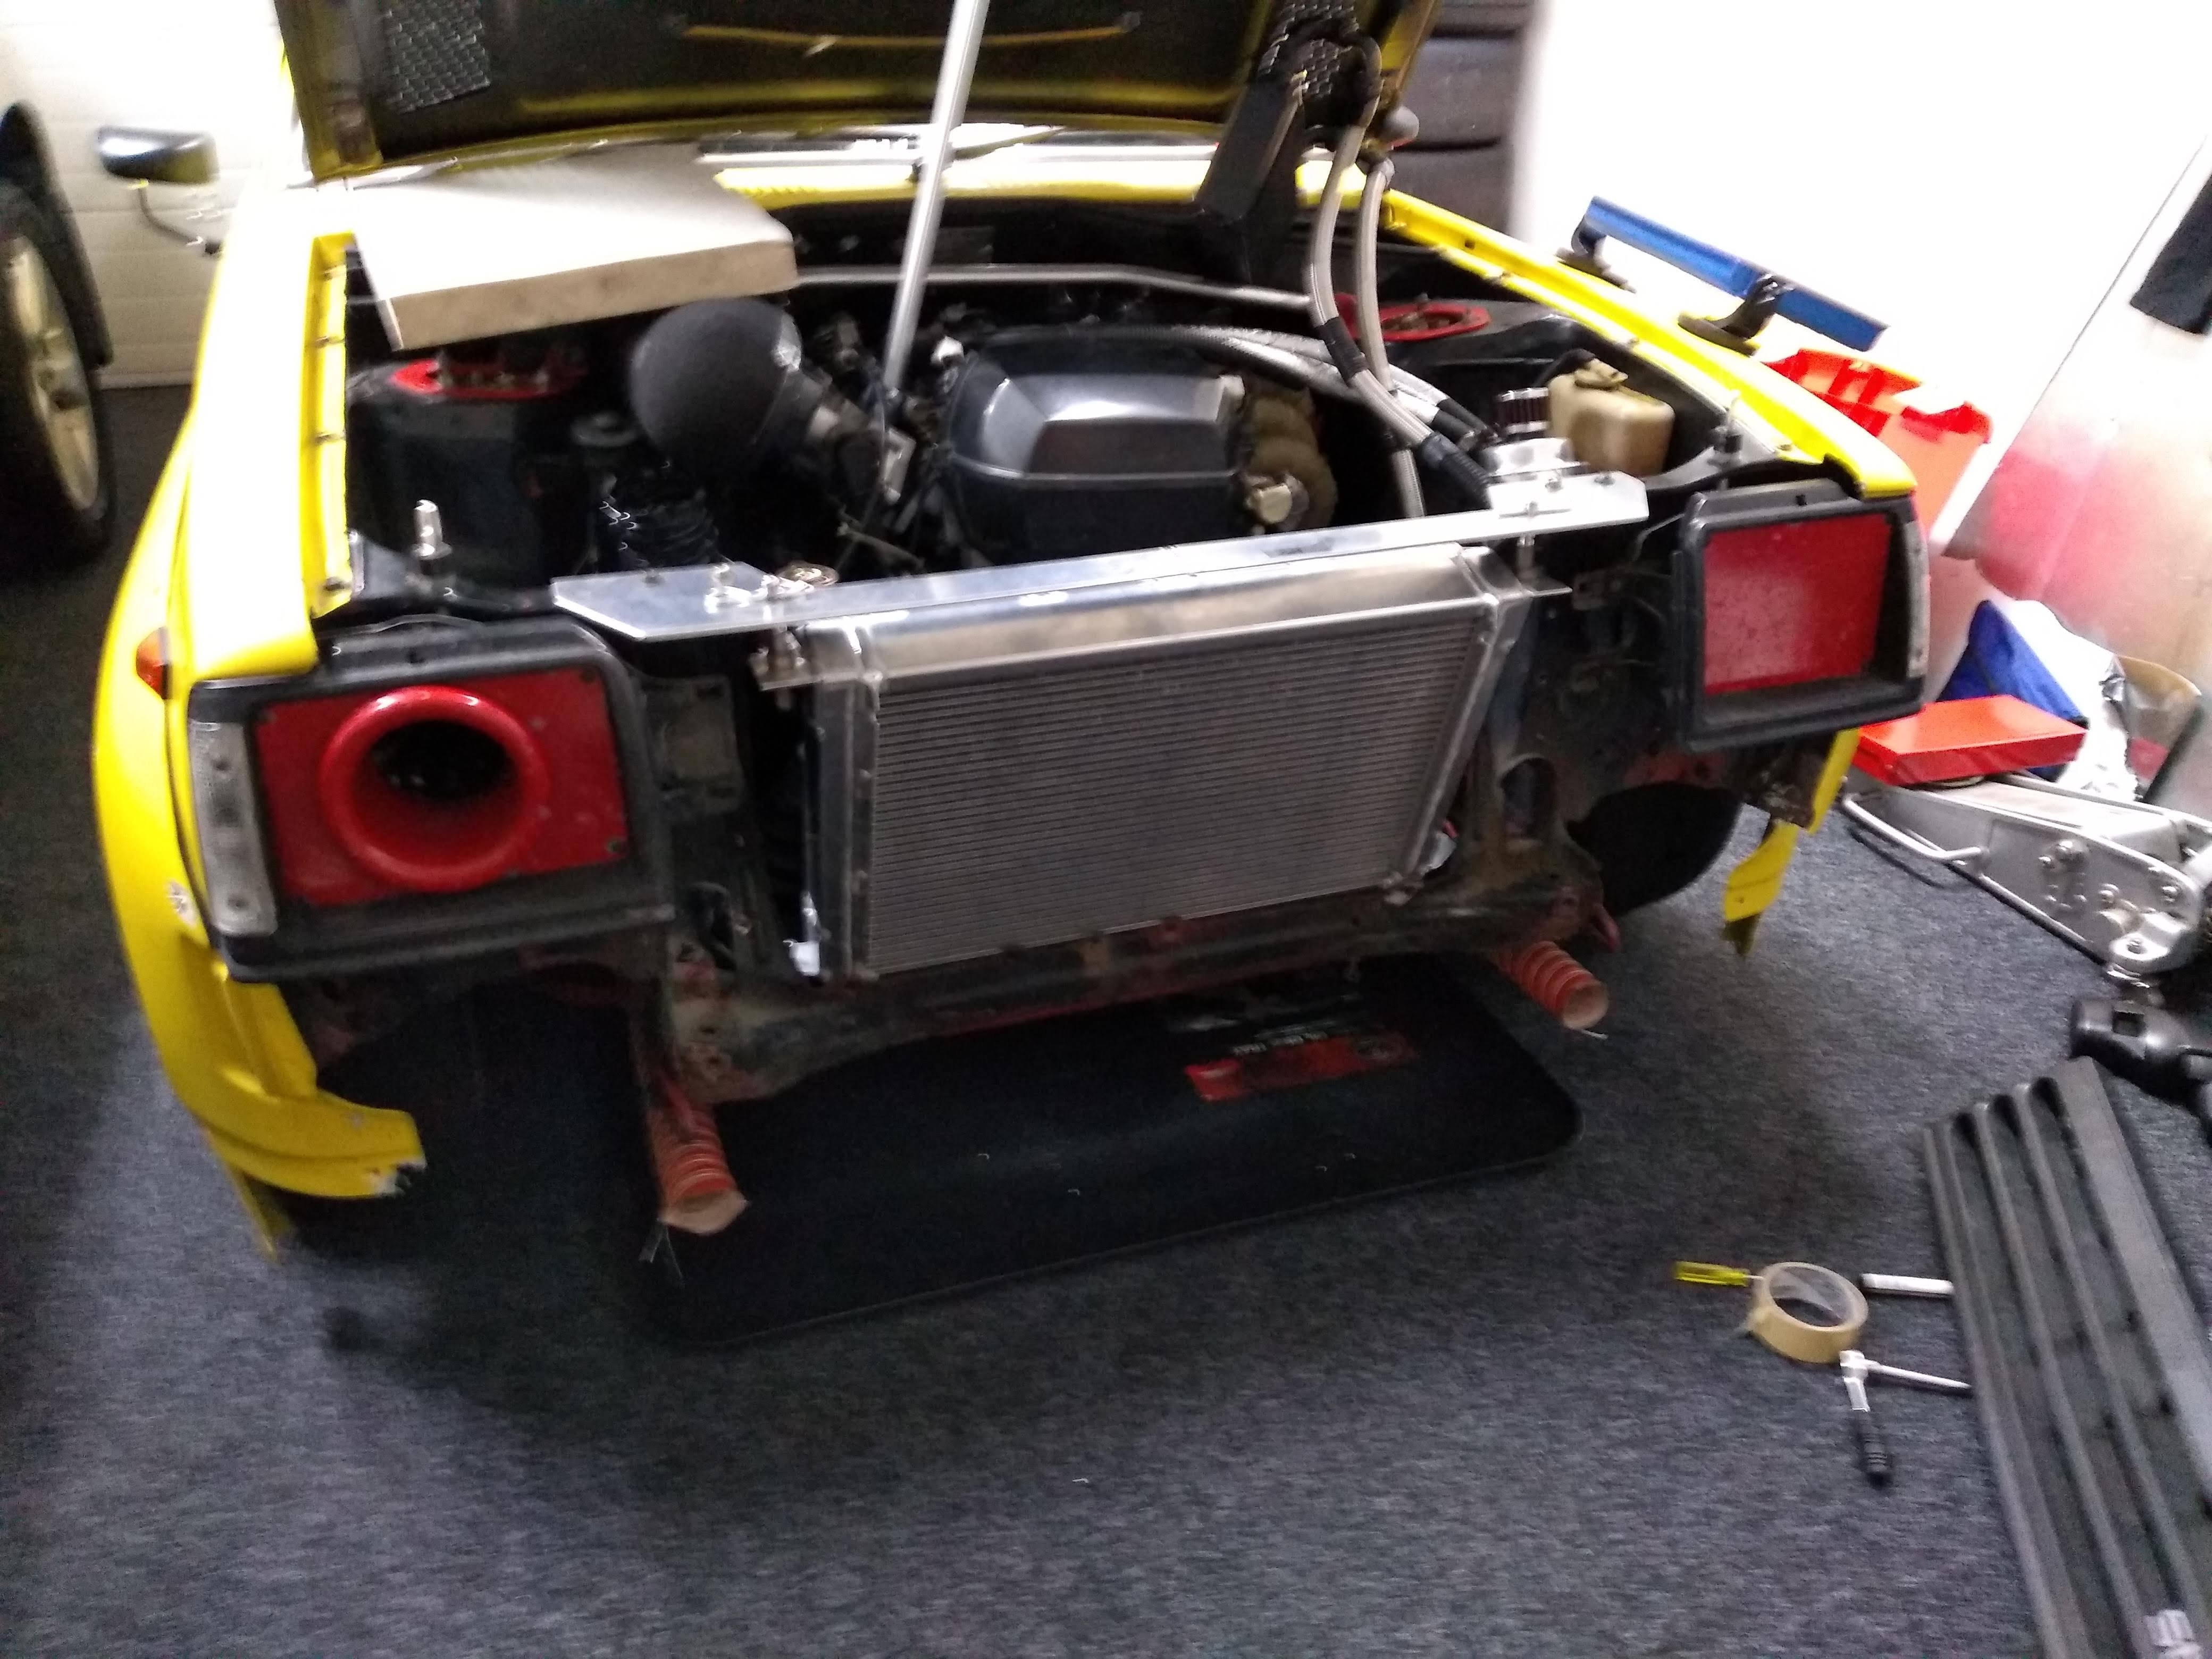
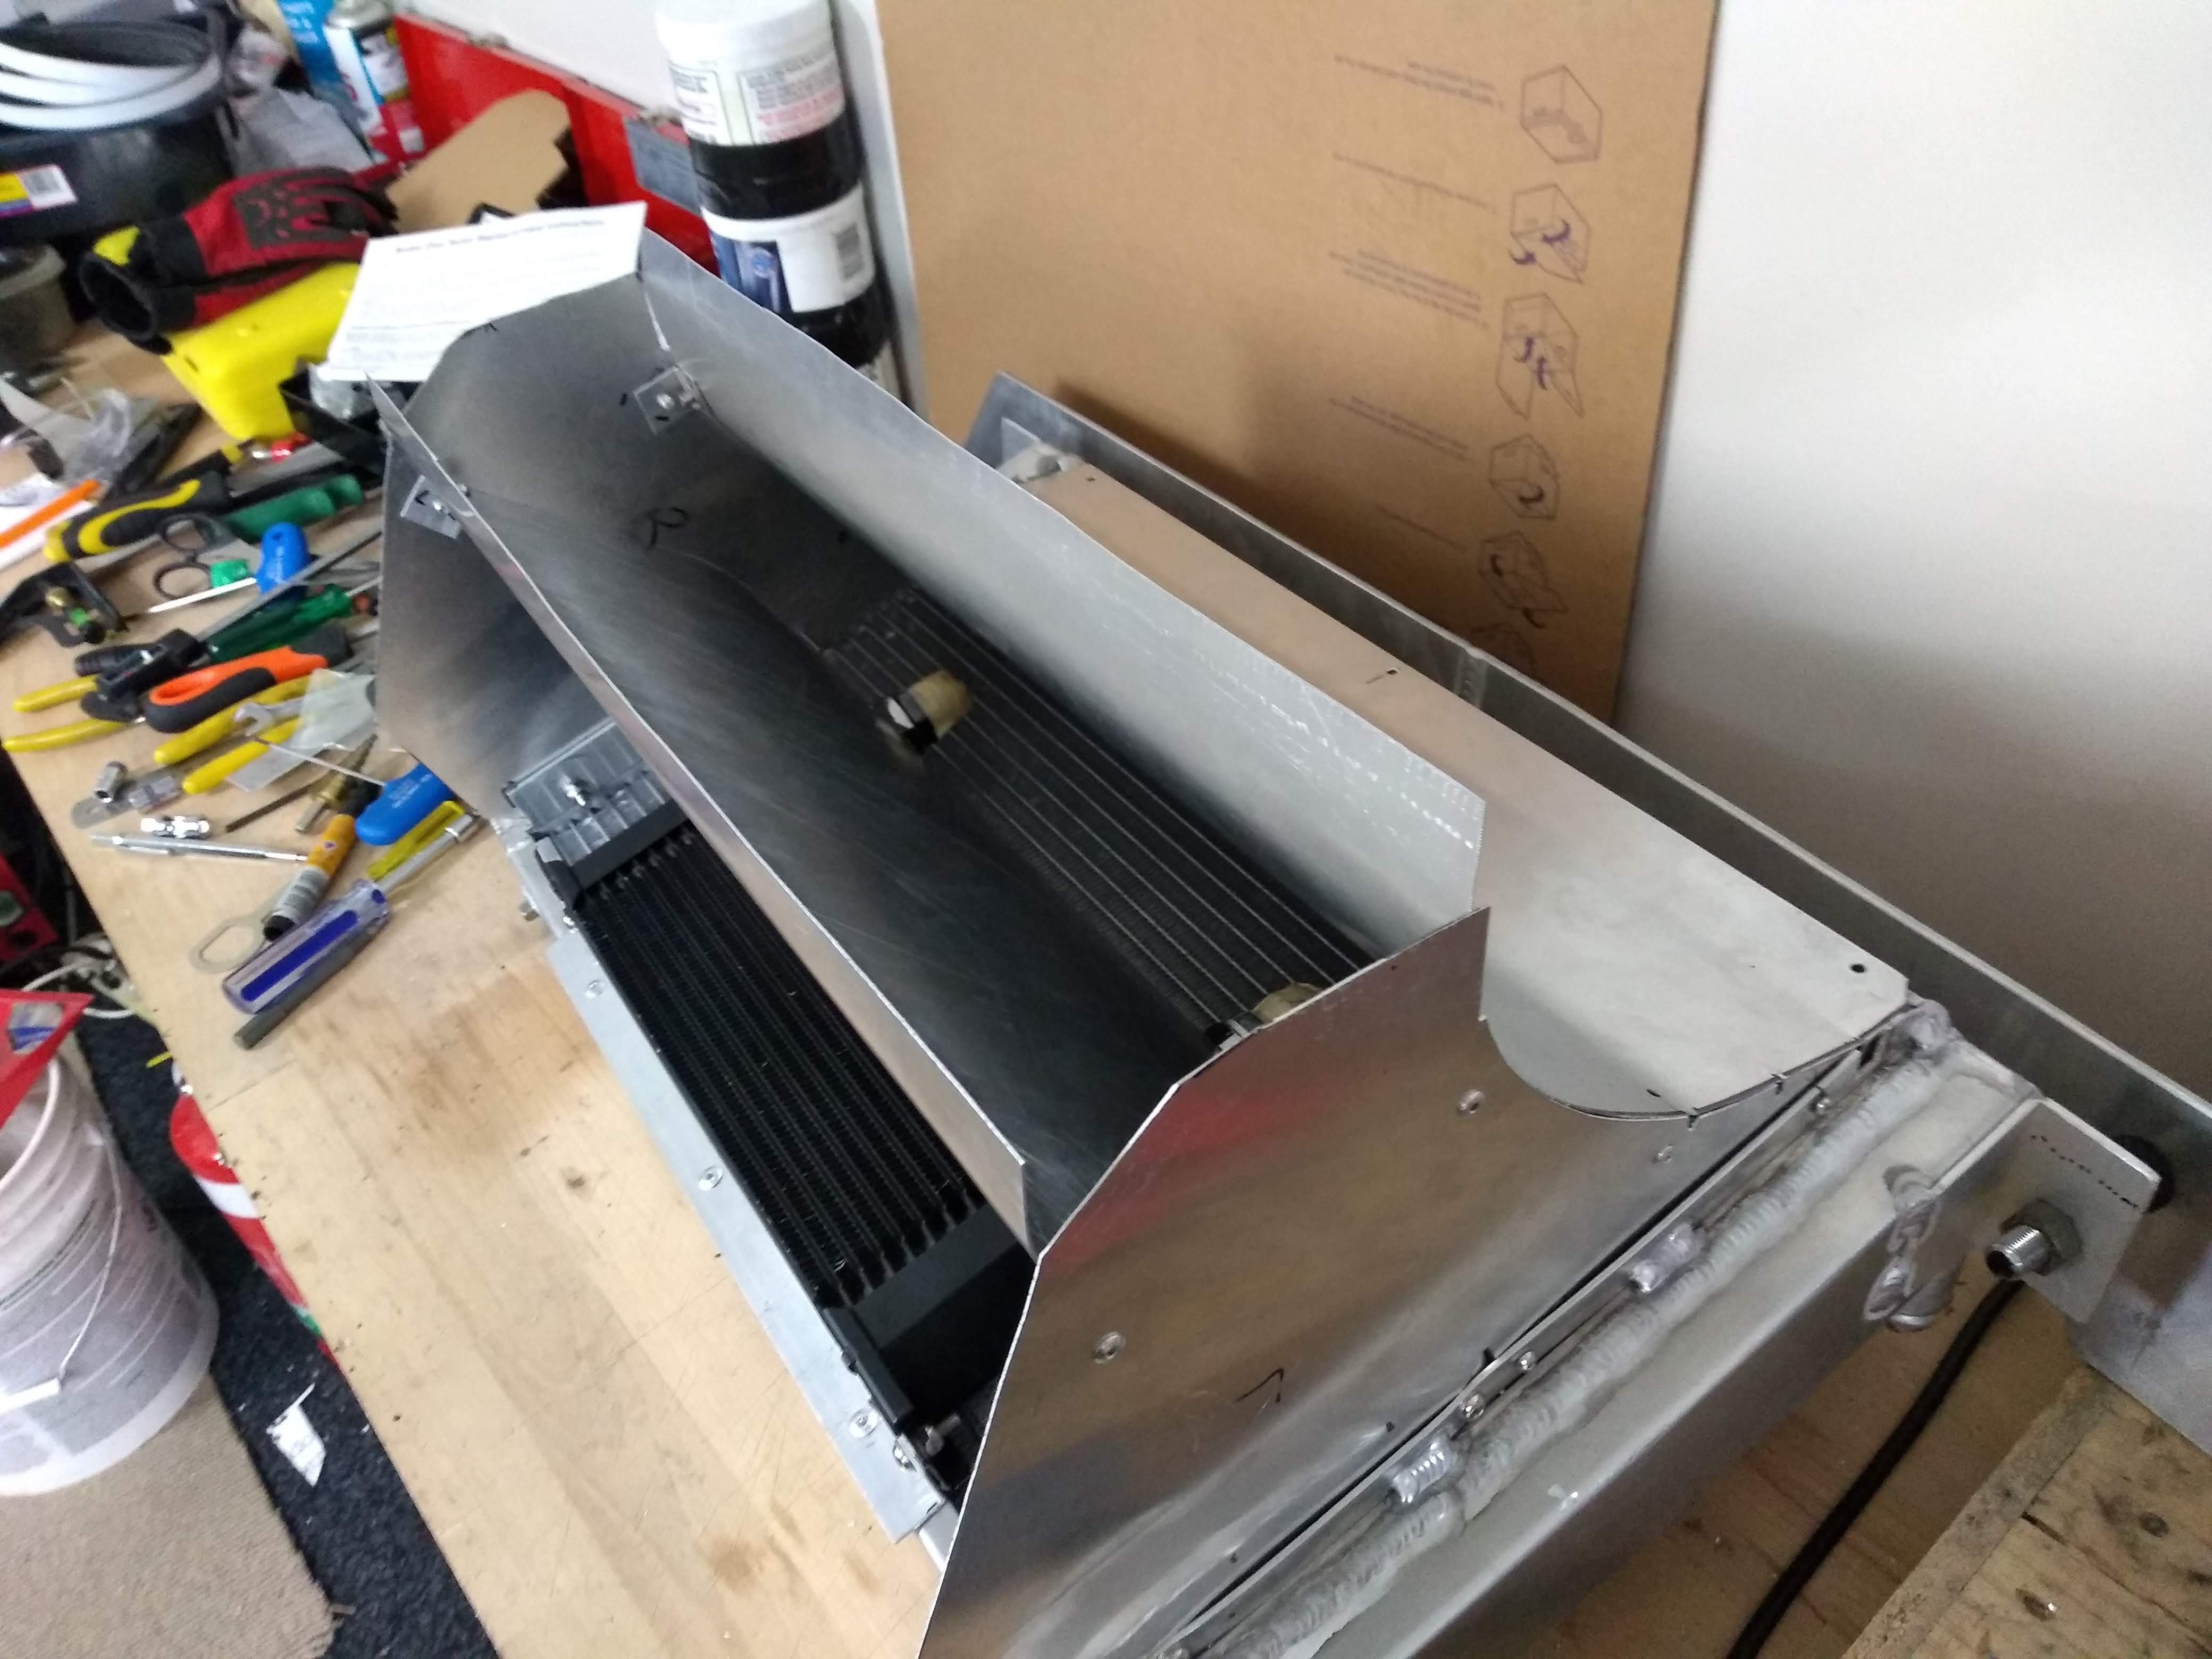
Instead the radiator decided it was time to start leaking. So time to replace it, I had also been concerned that adding a splitter would trap heat in the engine bay (In hindsight this is correct and I would have cooked things). I worked quite heavily on reducing the impact the radiator had on the aero by ducting the front and blanking off holes (with the overall goal of trying to keep the car still looking relatively normal...
-
Hyperblade's KP61R - Toyota Starlet with Honda K20a
Hyperblade replied to Hyperblade's topic in Projects and Build Ups
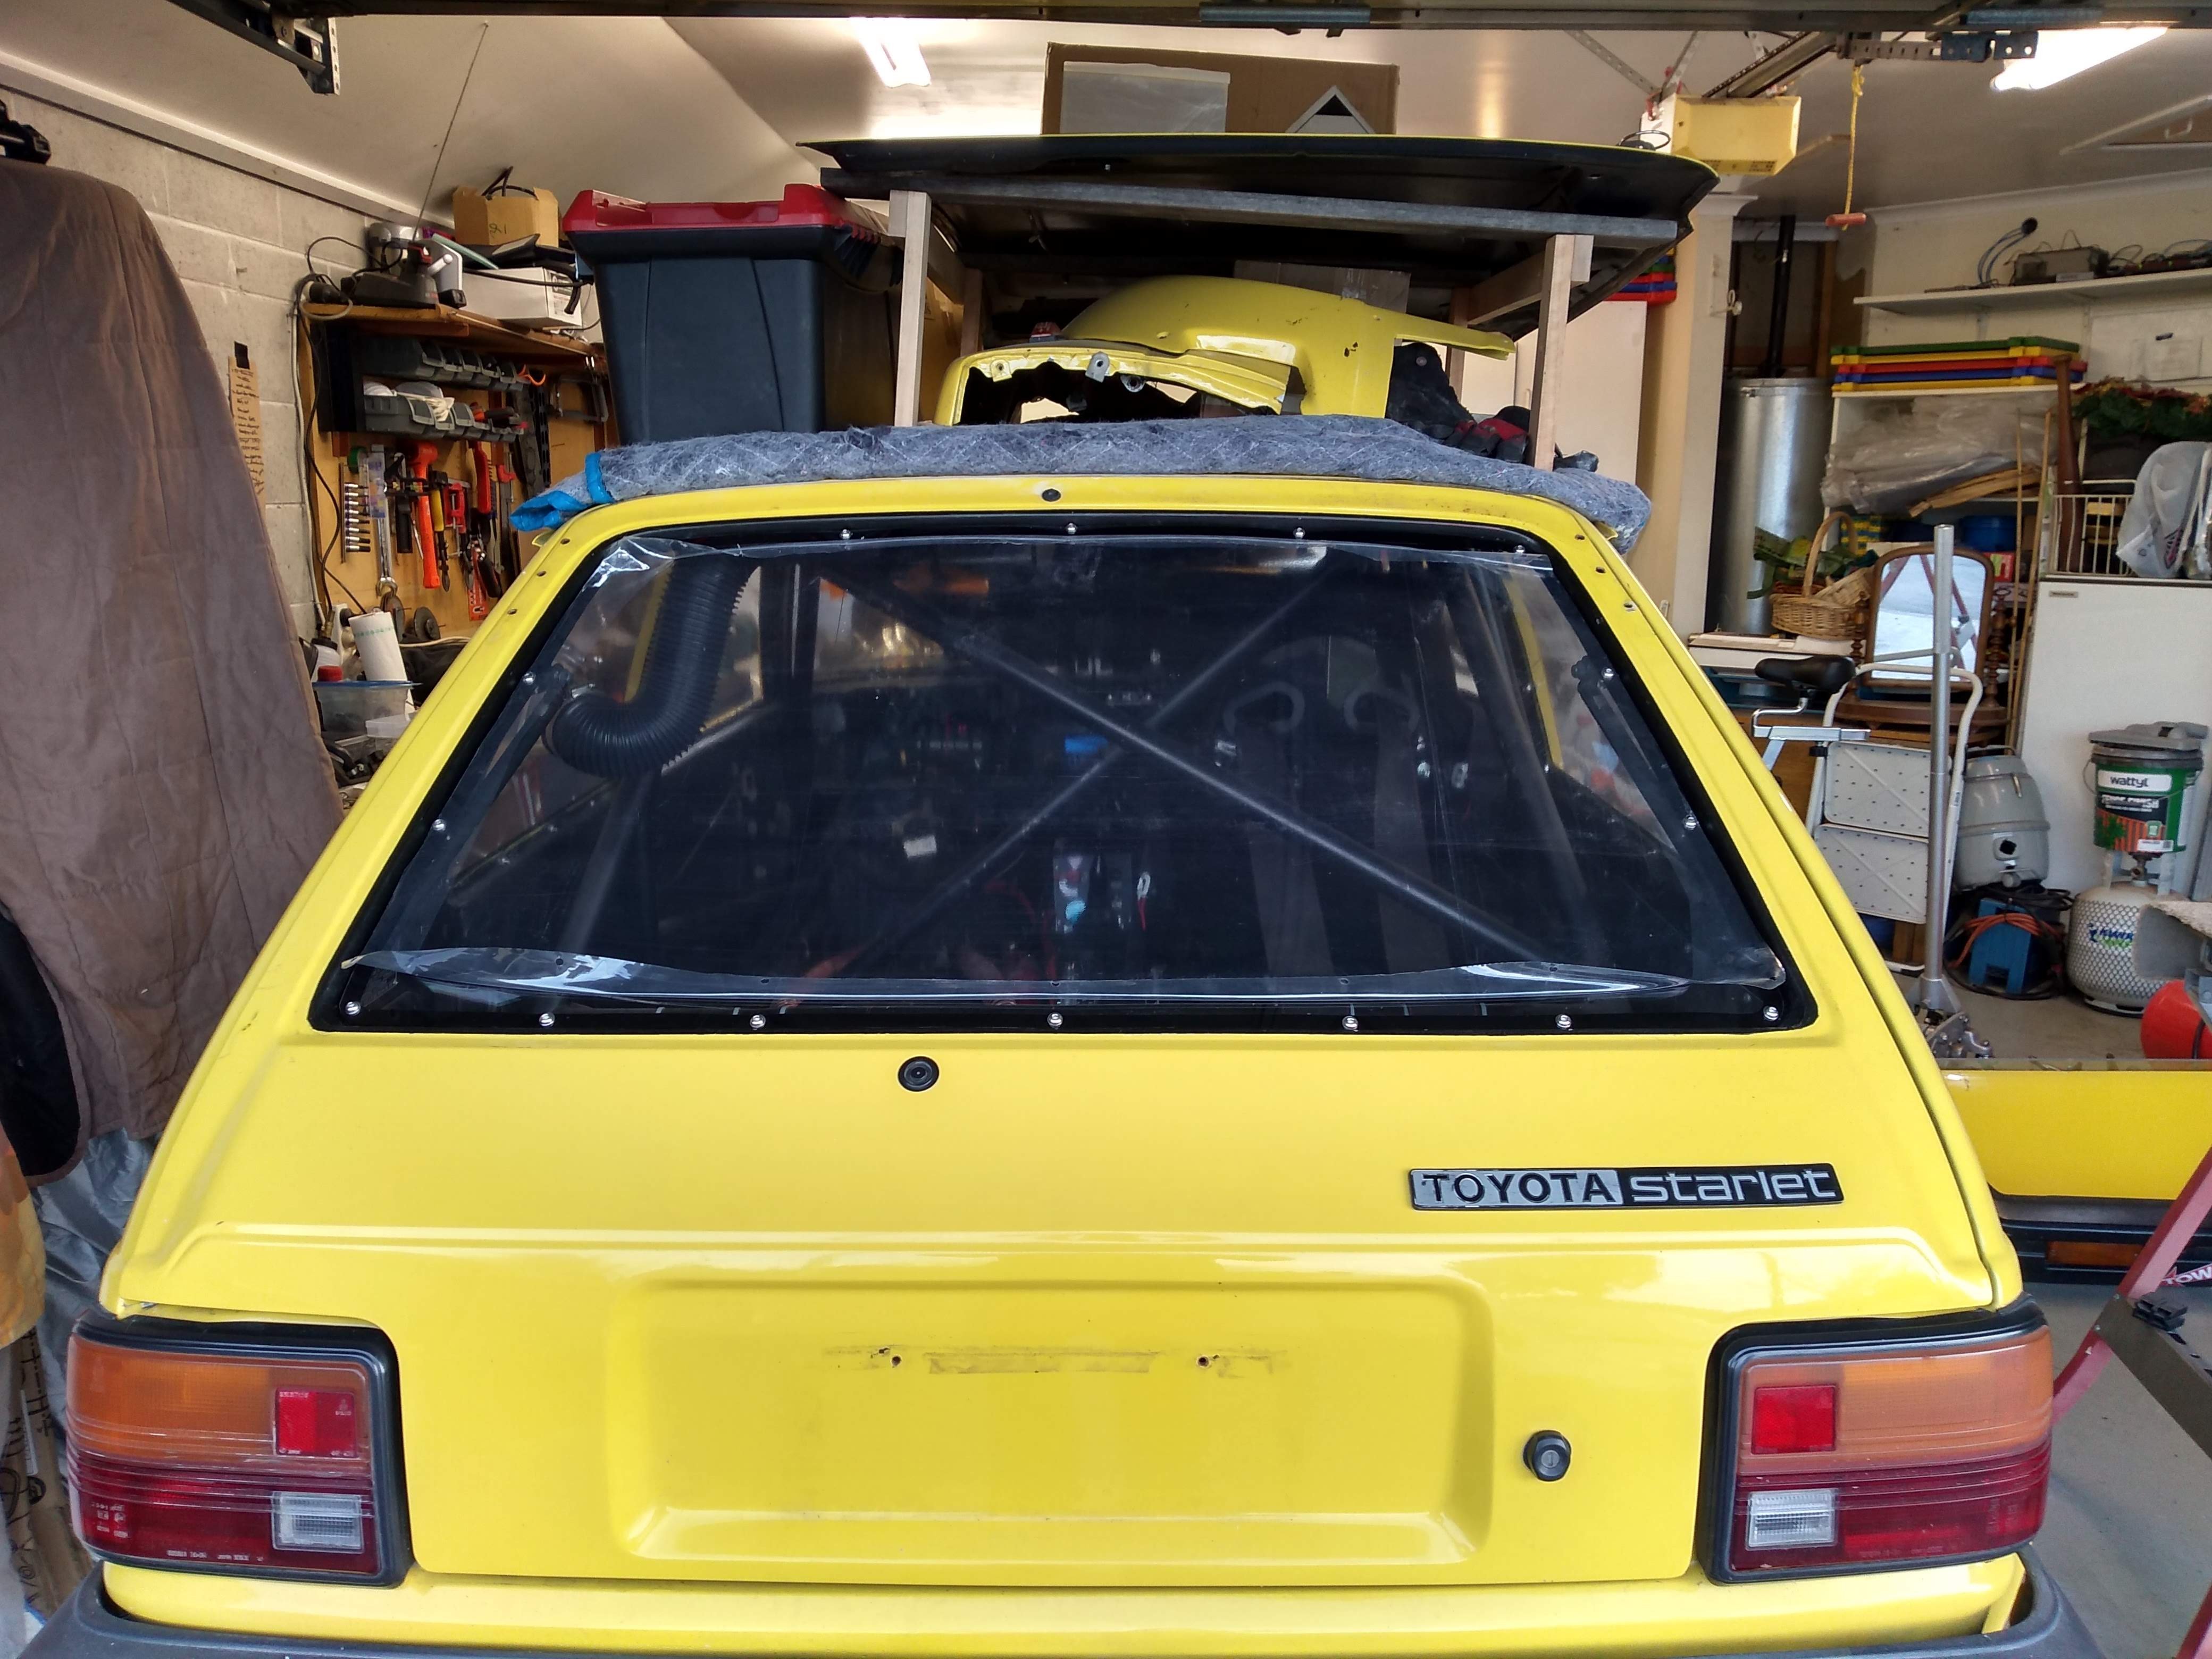
So as per normal, my best laid plans when to hell and i had other issues to sort out before the splitter. Brake Cooling: Brakes have been a continual pain, they are just getting to hot, it's not an issue in races as I'm running good pads, but it means the life span of the rotors and the pads is a lot less then they could be, and I keep going through piston seals. So I made up some better cool air feeds, basically the air has no where else to go but through the disk, at the same time I went to a smaller hose diameter hose (2") which meant the whole thing didn't really work as I had planned. Polycarbonate rear hatch: Tried to get some weight out of the car to help the brakes, so went polycarbonate for the rear hatch. This was enough to get me though the last club day and I won the overall Canterbury Car Club Championship and came 2nd in my class (1600-2000cc) With the season over the intention was to get back to the splitter...
-
@Snoozin Which particular Wilwood Pedal box did you go with 340-11299 with 6.25 to 1 Pedal Ratio https://www.wilwood.com/Pedals/PedalProd?itemno=340-11299 or 340-13835 with 5.1 to 1 Pedal Ratio https://www.wilwood.com/Pedals/PedalProd?itemno=340-13835
-
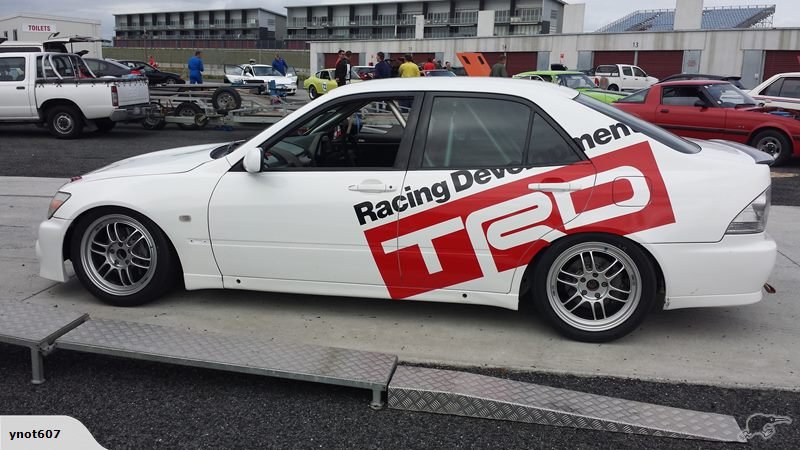
Awesome info! I was thinking about heading in this direction just for the ease of packaging, to know it wasn't just down to rules is even better. Do you know what type/size of ITB's they used? They also look like bigger runners then standard into the plenum Here's a couple of pictures of it in place in the car that was sold on TM: It was quoted as having "New 280 + BHP (dyno Sheet) Lyn Rogers 3S-GE engine."
-
Yep that's similar to my line of thinking too, although I was going to mount to trumpets (as a backing plate, that was actually where i got held up as I couldn't find a nice mounting point) then have rubber gaskets to firewall/bonnet. Your way might work better. However MC, Clutch reservoir and brake lines make it really awkward.
-
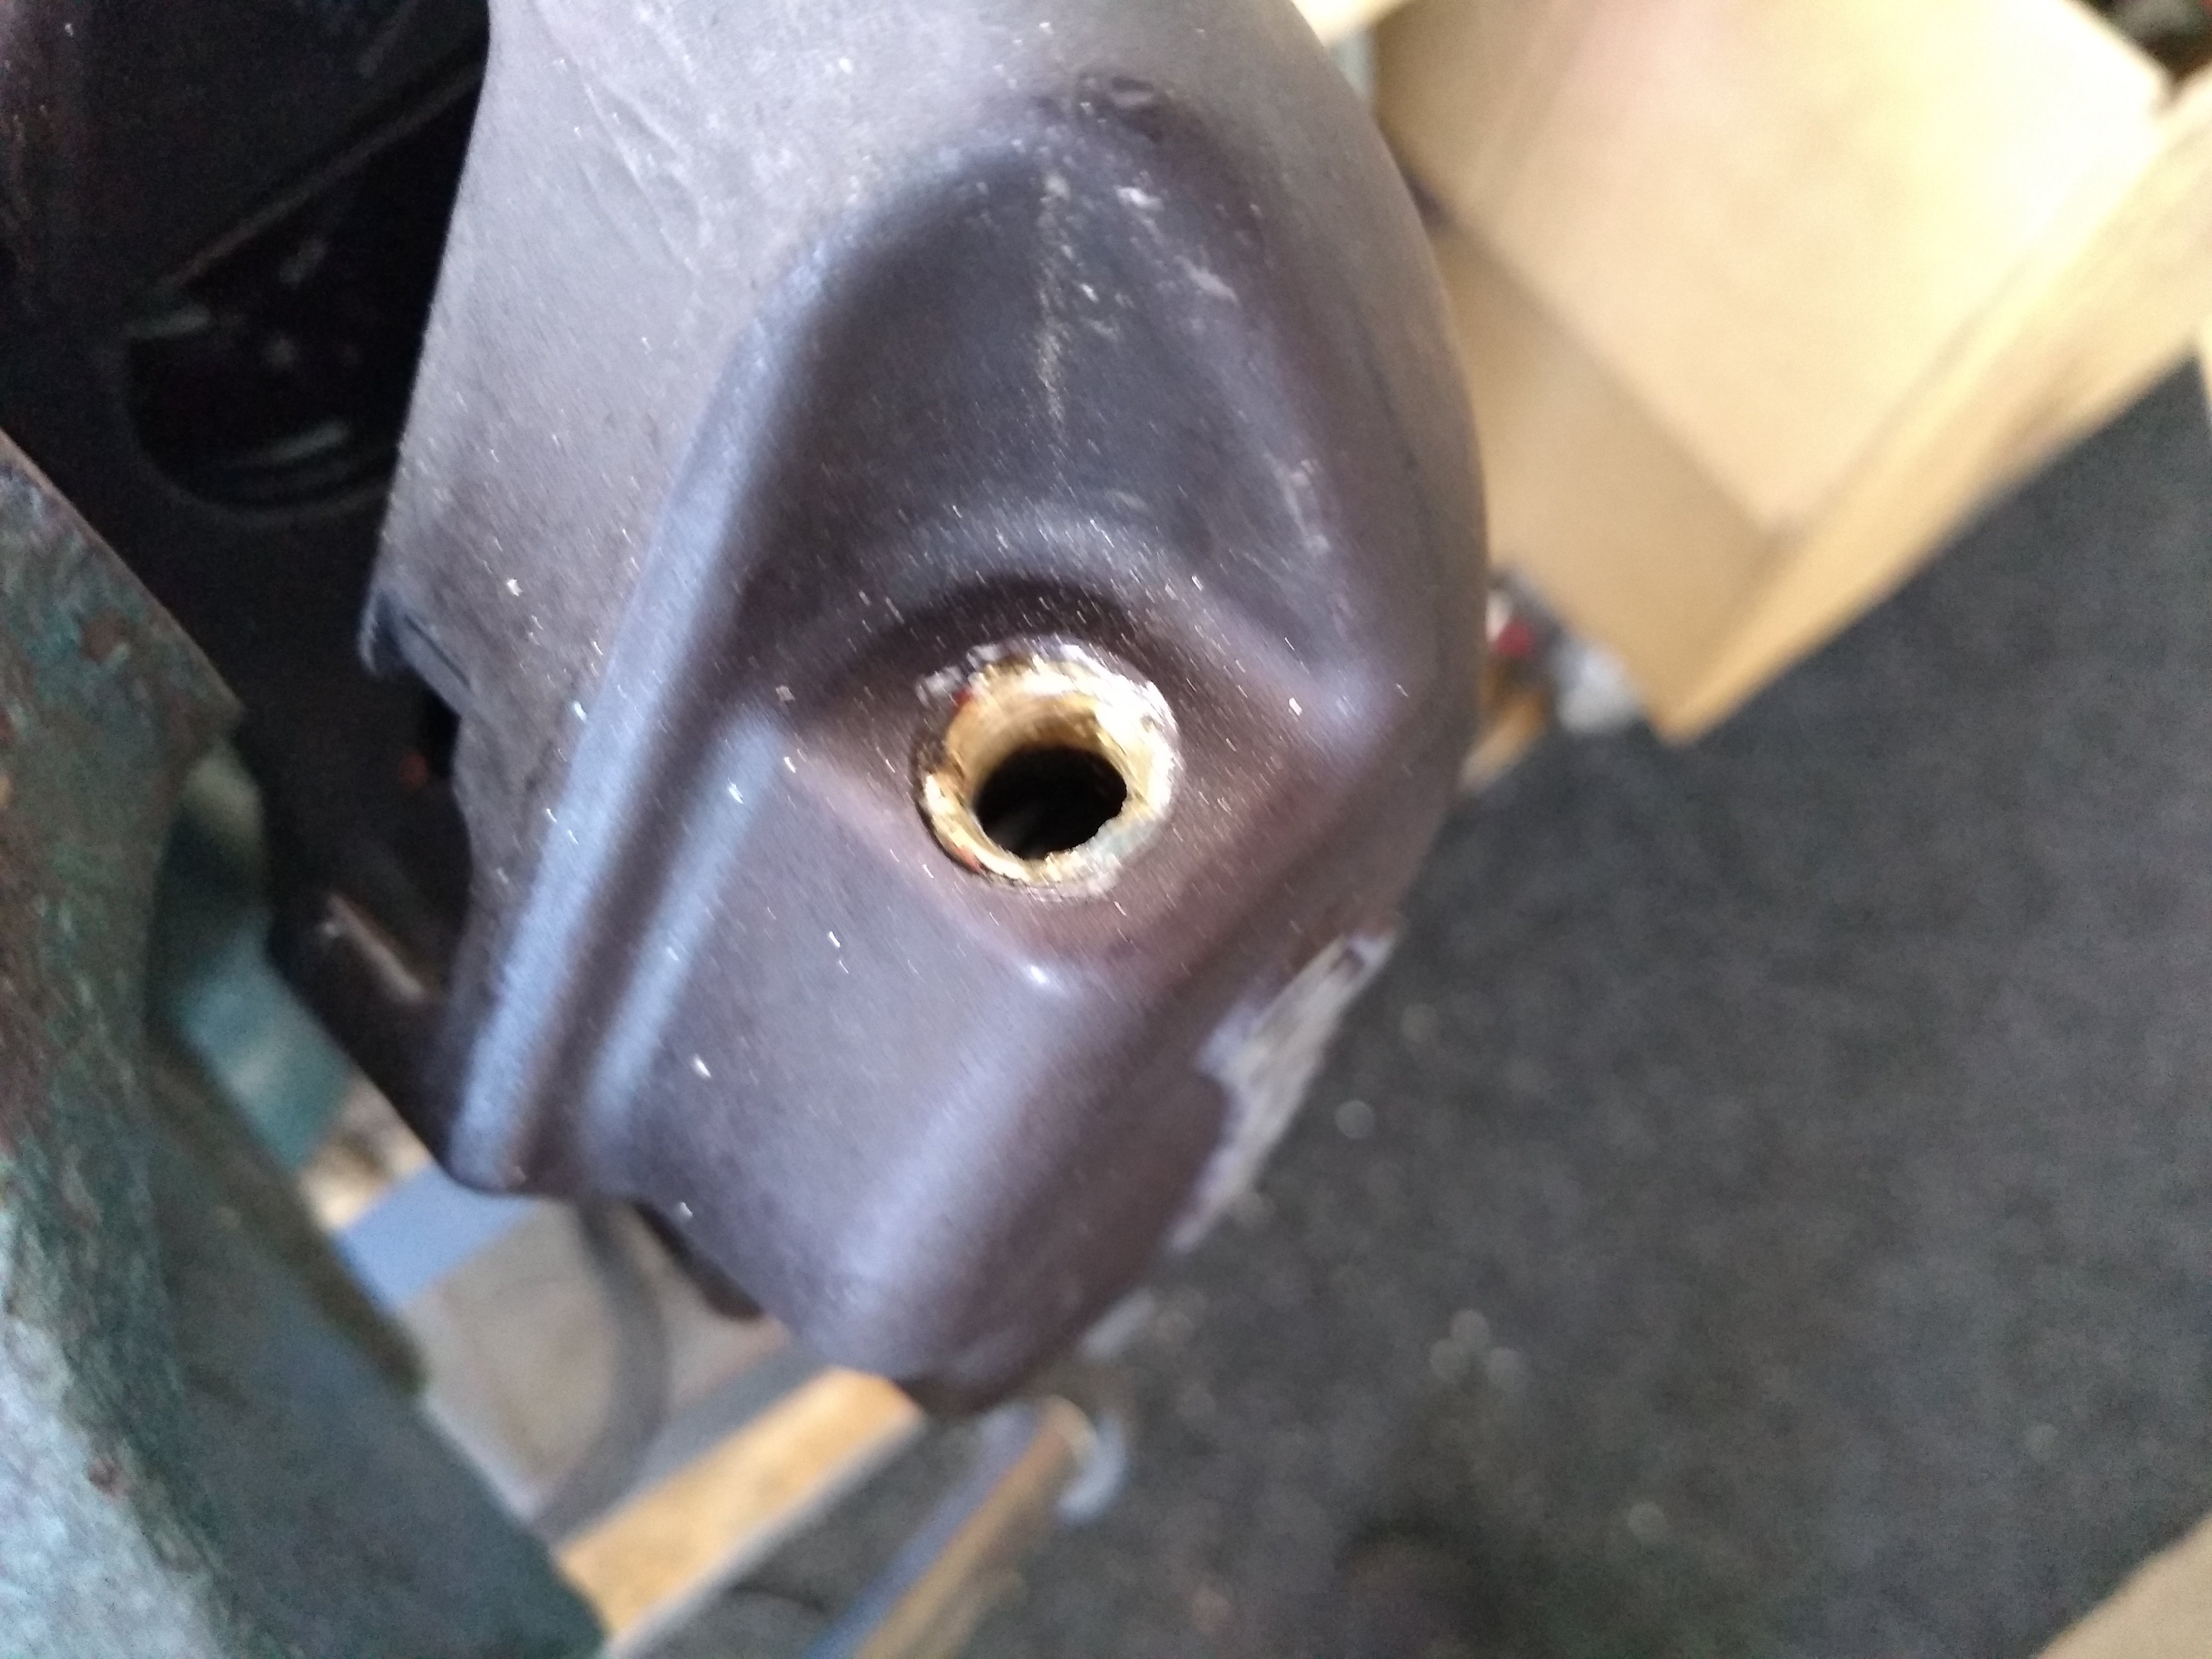
Thank you, had tried that, but the aluminum was wicking away the heat to fast and I was trying to be cautious, so this time I got it smoking at 90c and that was just enough to get it out. Many thanks!
- 3 replies
-
- 11
-

-
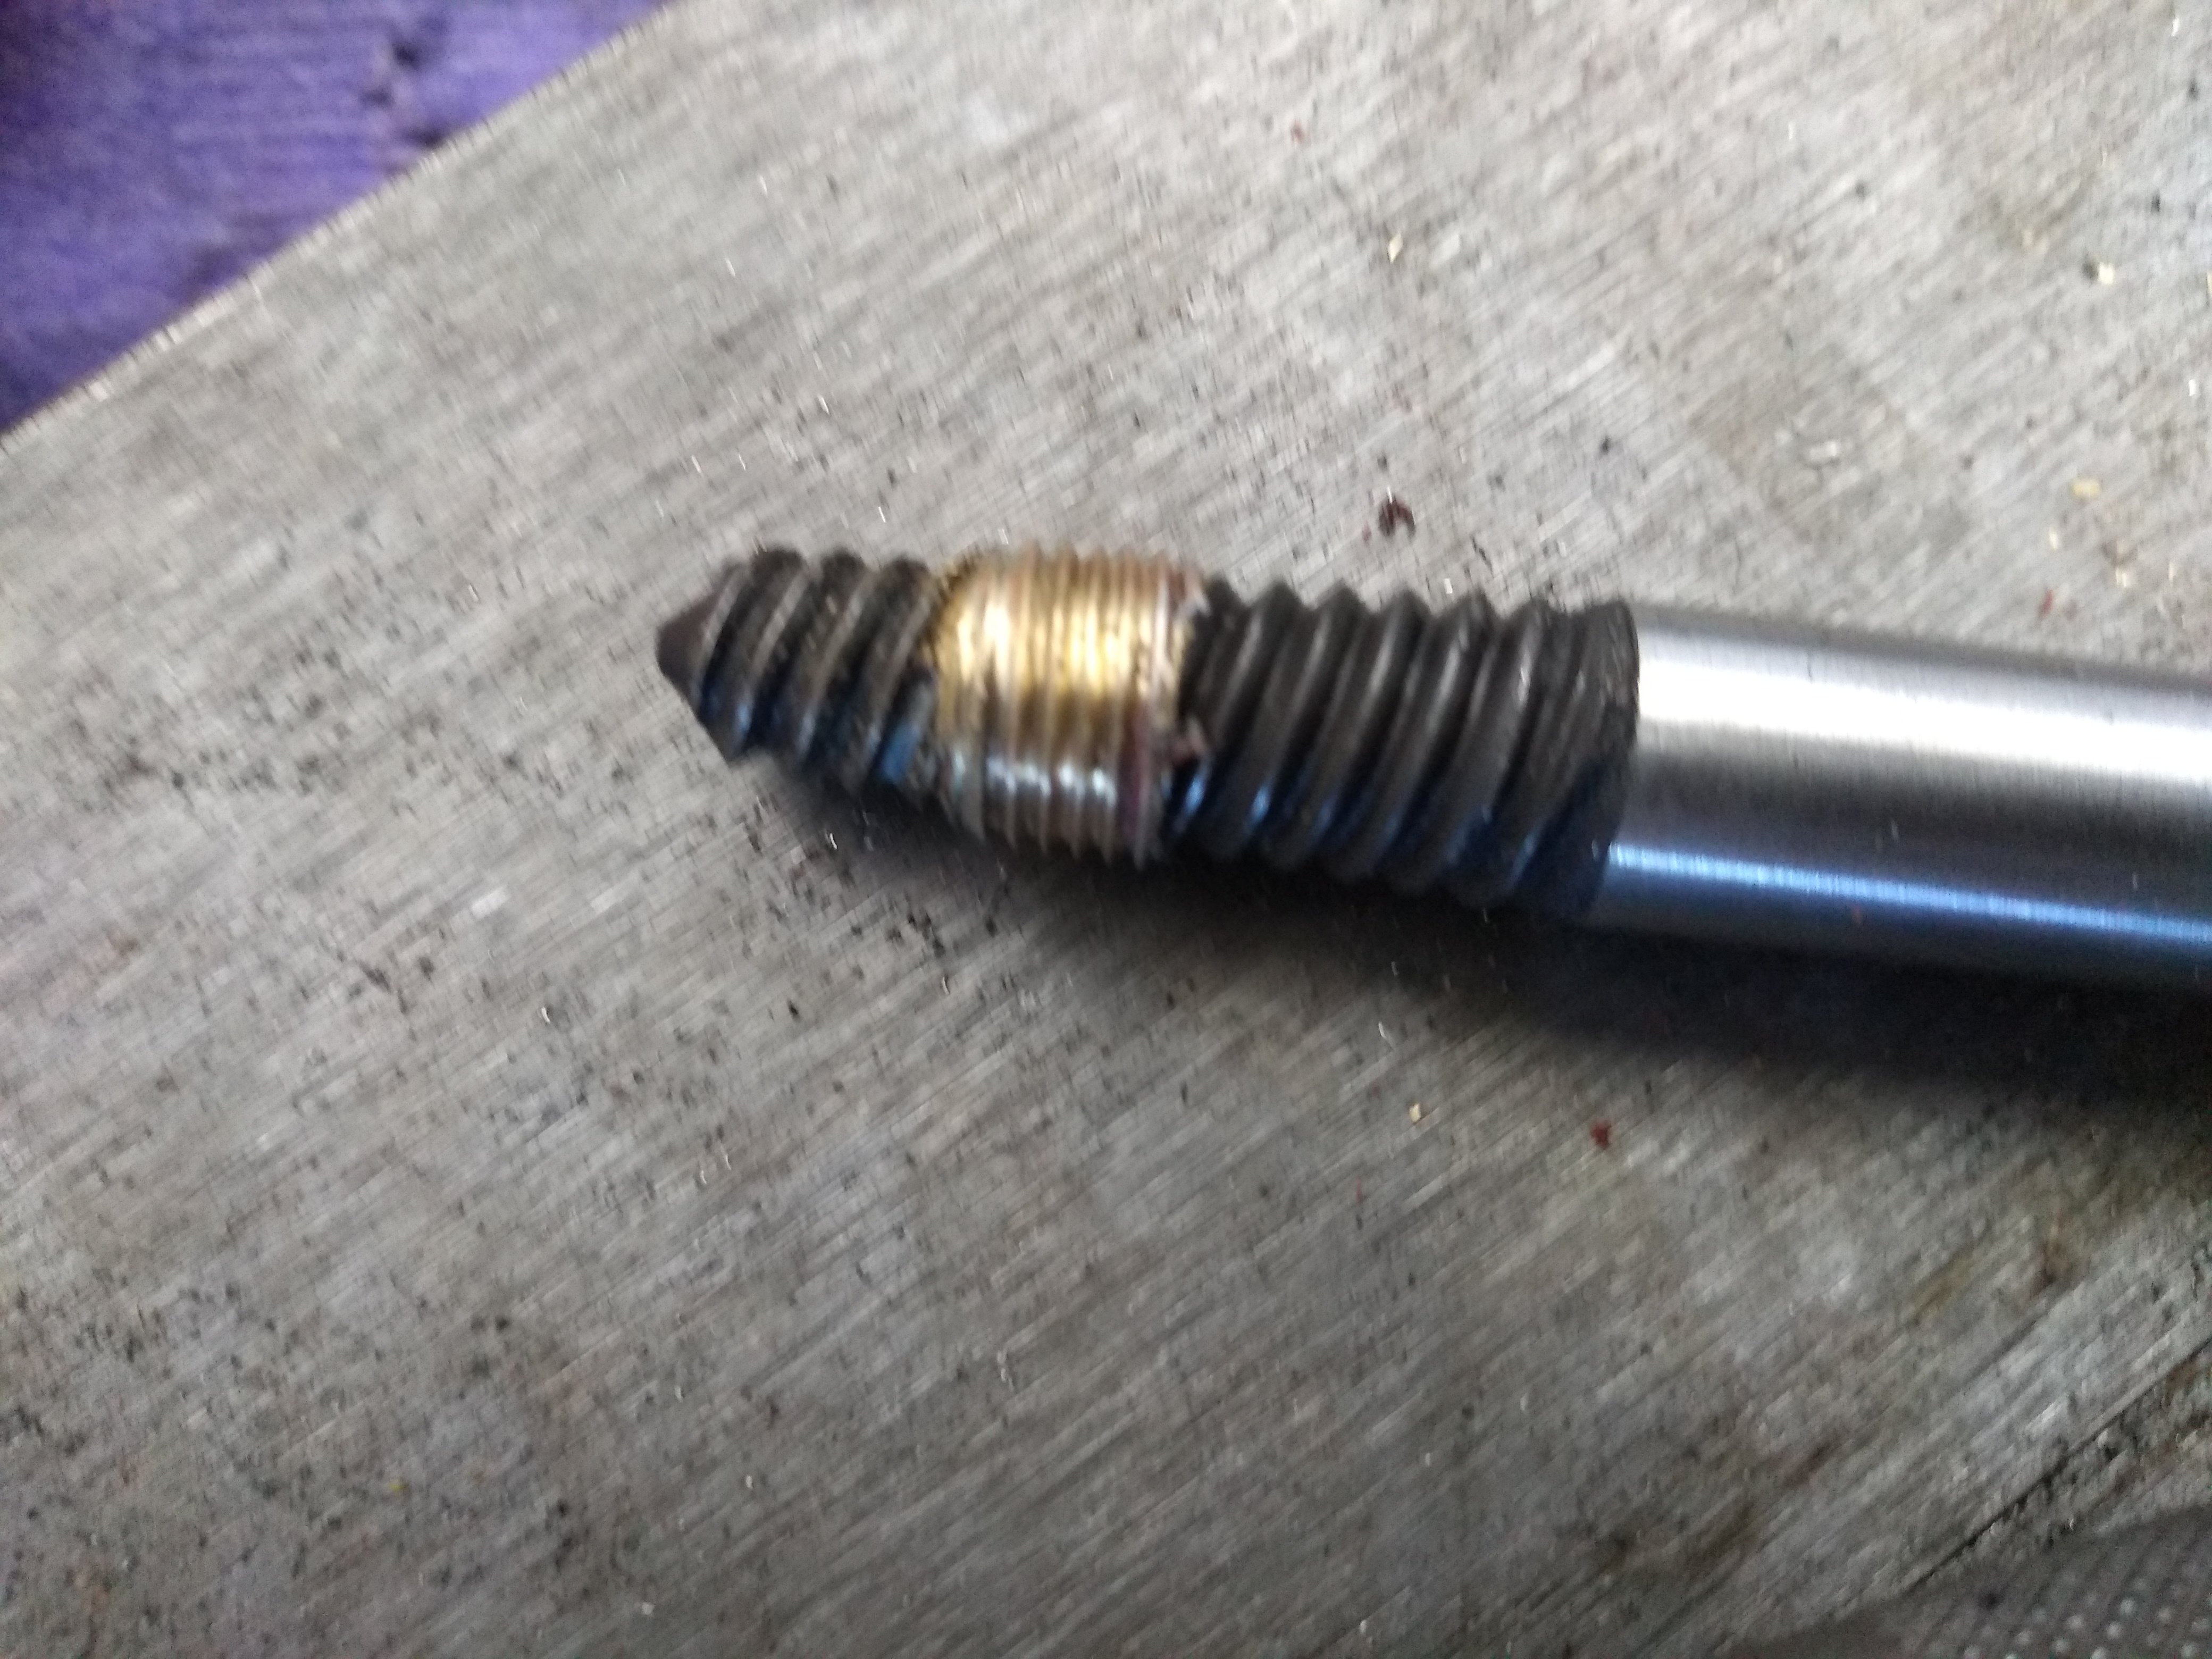
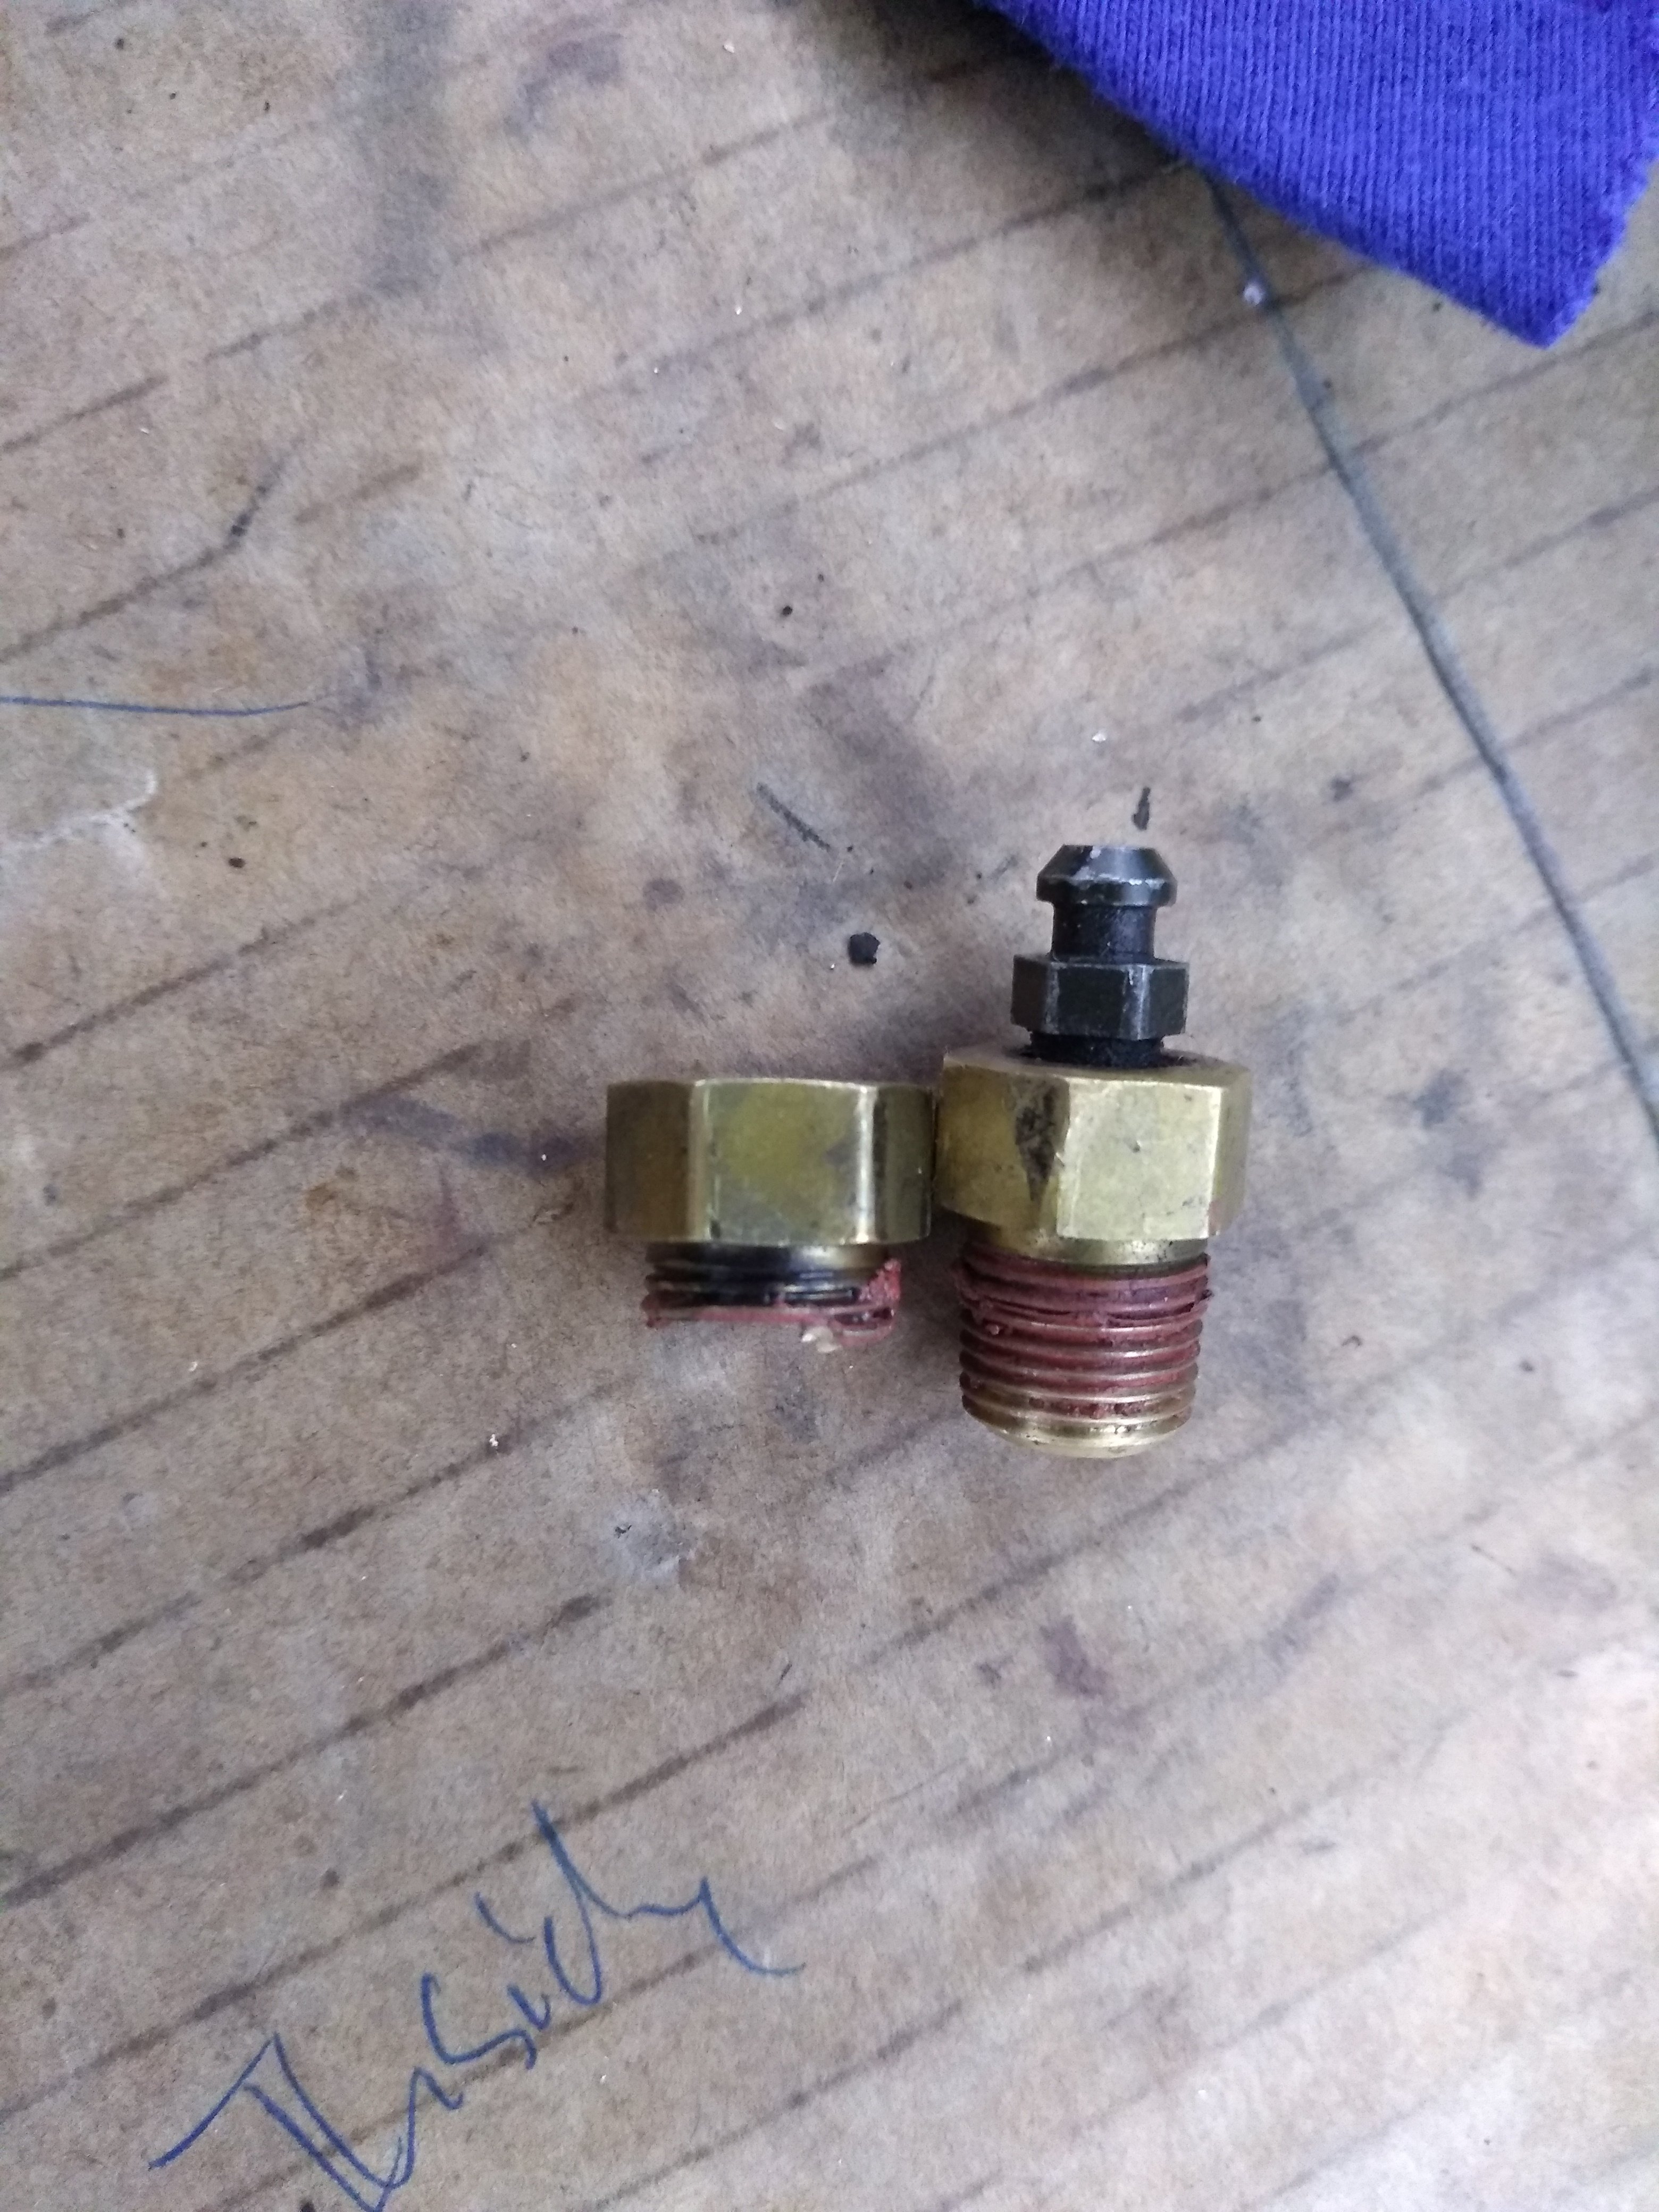
The fitting
-
So had a great day yesterday and broke off the bleeder adapter in the caliper. Then tried to use a screw extractor to get it out, but just not working as too soft. Anyone got any other ideas on how to get it out, caliper is aluminium so need to be really careful.
-
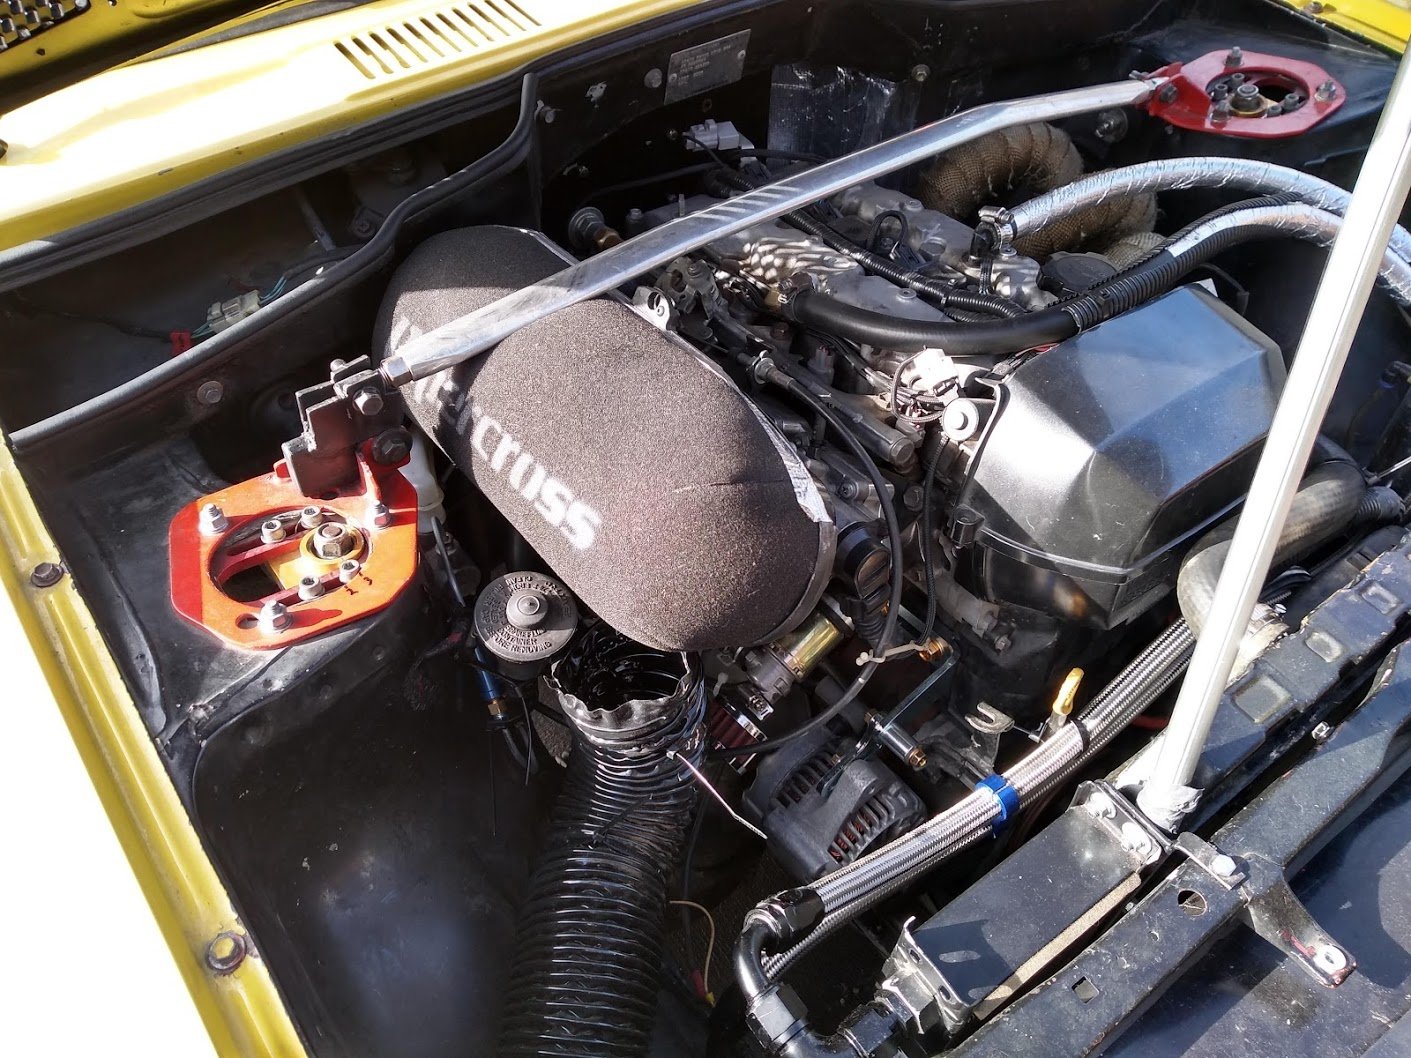
On the heat soak topic... I have definitely noticed this, at the moment my car is fairly flat during racing, I've noticed the intake temps have been hitting at least 40c (I suspect the hot air is mainly off the radiators). There was one exceptionally cool day and it felt like a different car, a lot more punch out of the corners etc. I've just ducted the radiators through the bonnet which should drop under bonnet temps, will be interesting to see if it makes a difference on temps, and then on performance. I looked at making an air box, but everything is so bloody tight, I gave up. My current thinking is to put the standard intake back on and chop the runners to fit the ITB's. I haven't measured but the stock manifold runners look just that little bit larger too and also have a curve in them so should end up being longer overall as well.
-
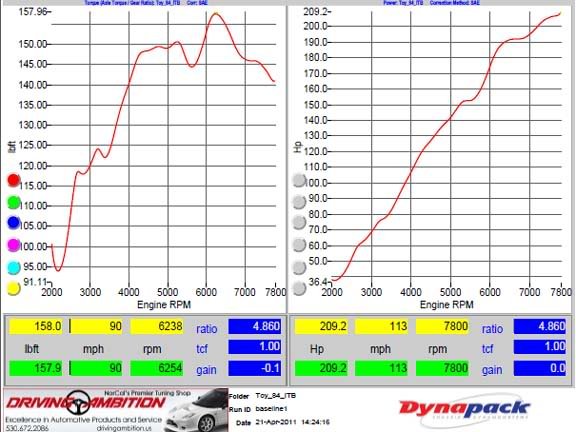
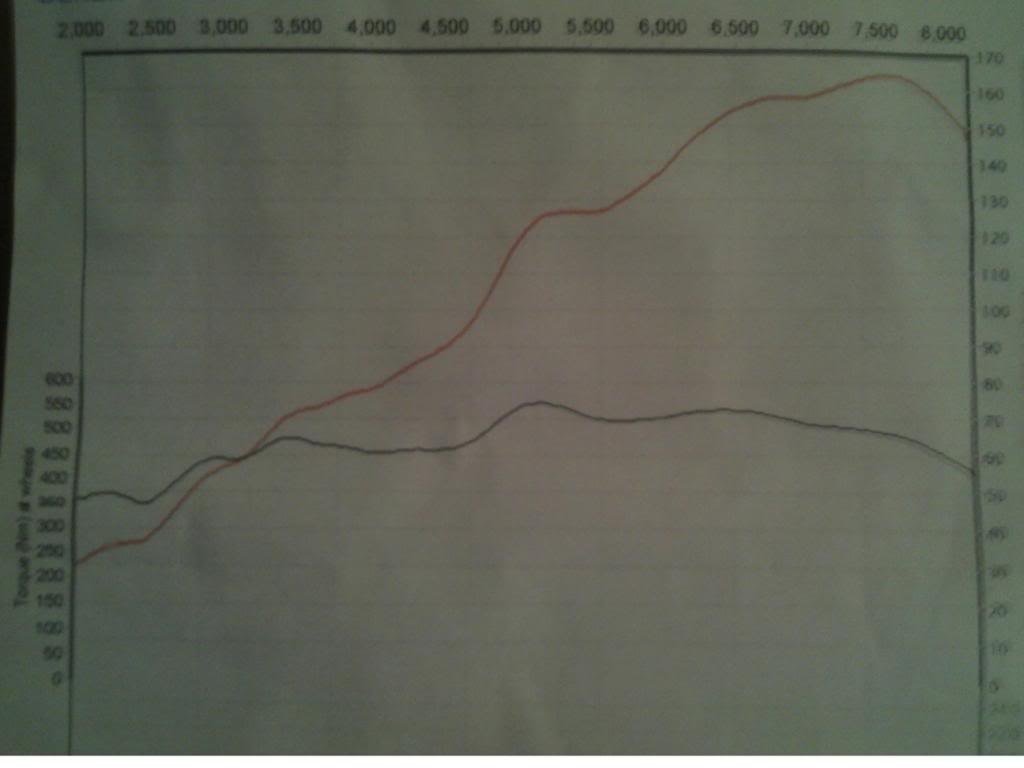
Following this with interest... Some more dyno charts for you My First Dyno: Blacktop throttles, 75mm trumpets, stock exhaust manifold, sq engineering adapter, good filter socks (didn't collapse) Second Dyno: Blacktop throttles, 75mm trumpets, Custom TRD Copy exhaust manifold, sq engineering adapter, pipercross combined filter. Other car dynos i had collected:
-
You might want to try changing the sensitivity if your struggling to read them, i.e if they are changing to quickly then they are impossible to read. For digital gauges best use case I think is for something like temps, pressures etc where you want to know what specific value they are running at a glance. For analogue they work best for quick moving values e.g. rpm, or where you are wanting to look for changes over time. However using a standard display for fake round analogue gauges i find to be a waste of time, as the resolution and lack of physical needle makes them harder to read. I ended up with this: Digital rpm value is waste of time while moving (but is useful in odd case where you want to see exact figure), yellow bar however works well as changes to orange then red at set points. The temp and pressure values will change to a red back ground if they go out of acceptable range. This is a really good UI pattern to follow, highlight and make standout only in an exceptional state. For me this works well, the values are there if i want to look, but i'm normally to busy to, so highlighting when something bad is happening is far more useful (bonus for buzzer noise) Driven Wheel speed is really hard to read, but not important in my use case, but for a road car you would want it to stand out as it's something that is critical to operation of vehicle (so in the center with other values around it). Note: Values are at bottom as I couldn't see them over the wheel when they were at the top but I would have preferred them at top as your eye would go past them when going to view speedo/rpm. I modeled it loosely off this dash (Honda City Turbo designed by Mugen) as it's one of the best i've seen on any car to date (improvements would be to get rid of the yellow boxes): The other thing you want to do is remove as many lines/arrows/separators as possible as they all distract the eye from the actual values and if you need them don't put them as a bold colour they should be lighter shade of red/blue so your eyes don't go to them first. For yours I would get rid of blue borders, and make red a much lighter shade (remove a couple of lines and also make them a lot thinner. You will still subconsciously take them in, but they wont distract from the actual data.
-
Hyperblade's KP61 Racecar "KP61R" Discussion
Hyperblade replied to Hyperblade's topic in Project Discussion
I've been holding off doing the aero until I got the engine sorted as I knew it should be making more power and I wanted a consistent car to experiment on. Plus I now have another honda I have to catch which is running 3-5s in front with a 2L engine, i noticed through the corners he dominated me, but down the straight it was similar pace, I don't think I'll ever be as quick as him, but I can hopefully get a little bit closer to at least make it harder for him! The other advantage of glass over ply is it protects the plywood, i'm still waiting on feedback from the guy who's going to do it, to see if it's going to be strong enough. Yep I think running aluminium angle makes a lot of sense for both those points you make. I've read that about standing on it, but it really depends on the use, for us we aren't really doing 250kph+ so the forces are a less, so you have to be really careful not to overbuild it. Thanks for those pictures, it's really hard to find good pictures of decent mounting systems! I like the pin idea (have also seen a slotted version), the only thing I also want is to be able to adjust the height maybe I can use the vertical member to do that. One source I've been using is https://www.youtube.com/user/Kyleengineers He has some good videos that explain what's happening, that plus reading has given me a rough idea on the key bits (low pressure/high pressure) work. He has a good video on beginner aero. He's quite good at simplifying it, he's also just been hired by an F1 Team to do aero so must be fairly accurate... It's actually really hard to find good info, as you have to be really careful what you copy, as a lot of aero is built to the regulations of the class the car is running in and they might design it quite differently if they were allowed to. -
Hyperblade's KP61R - Toyota Starlet with Honda K20a
Hyperblade replied to Hyperblade's topic in Projects and Build Ups
So after a lot of research on how racecar aero works, I started on the front splitter. My goals are Faster laptime (from more downforce) Robust Quick removal. Cheap Light There are some Motorsport NZ Aero Regulation's that i have to meet, which are: So measuring the rims I have to keep at least 80mm clearance from the ground, and can't be wider then 1600mm total. A lot of the other guys running starlets have already built splitters so it's great to see some examples. and get ideas. This is a very quick 4age powered starlet. More Info: http://www.themotorhood.com/themotorhood/2016/12/19/si-champs-spotlight-jamie-hodgins-kp61-starlet And a Nissan 1.8 T powered starlet which is crazy fast when the boost is wound up. But you do have to be careful about copying as that first starlet is trying to do a front diffuser (where the rear is higher then front), but it's venting into the wheel well, a high pressure zone, so it wouldn't actually be helping, and potentially is hurting rather then having just a flat floor. Most of the other starlet racers are using sheetmetal and are attaching it to the front aero dam. That doesn't work for me as i want it quick release I also want it more rigid. So to make life simple for myself I have started with 4mm ply to use as a template (so i can make multiple for when I inevitably break one), this made life super simple to cut around the wheels. So currently I've got this: And it extends nicely to just past the steering rack. And sticks out 140mm, which is larger then most, but I'm not going to do canards, so hoping this is about right considering i don't go over 200km/hr at the moment so i want it more effective at lower speeds. I'm looking to add end plates to contain the higher pressure zone on the splitter, and also make sure theres no air getting to the tyre. Haven't worked out mounting but am looking at Stainless Turnbuckles with the pins, but it's really going to depend on how flexible the final splitter ends up being. I haven't decided on the final material, but currently contemplating 4mm ply with a fibreglass layer to give it strength, I don't want to to heavy, but you can't have it bending either so it's a balancing act. -
Hyperblade's KP61 Racecar "KP61R" Discussion
Hyperblade replied to Hyperblade's topic in Project Discussion
Thanks! I was quite worried about the noise and going over the 95dba as they are really loud, but it turned out that on track they are the same 87dba as the old system, now there's no way it's quieter so it's just the fact they go out the side rather then the back. Going out the side has cleaned up the back a lot, means it should be easier to do a diffuser now which was my long term plan. Plus side pipes are just look cool... I sold the TRD pipes on Trademe, went to a guy in Blenheim. Interestingly the sizing of the TRD pipes is larger then what most guys are doing for their 4-1 race systems, but the results speak for themselves. Fitment wise it depends how far forward and high the engine is sitting, but I think you would have a better chance of fitting them in, they were just not going to work in the starlet without major cutting and reshaping. -
Hyperblade's KP61R - Toyota Starlet with Honda K20a
Hyperblade replied to Hyperblade's topic in Projects and Build Ups
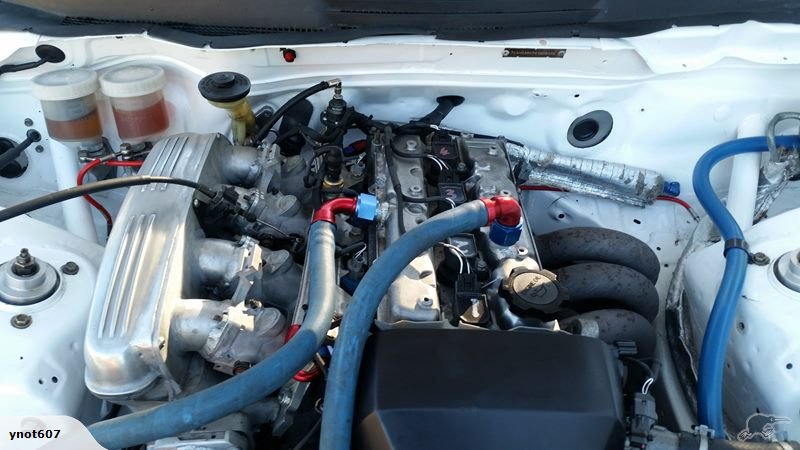
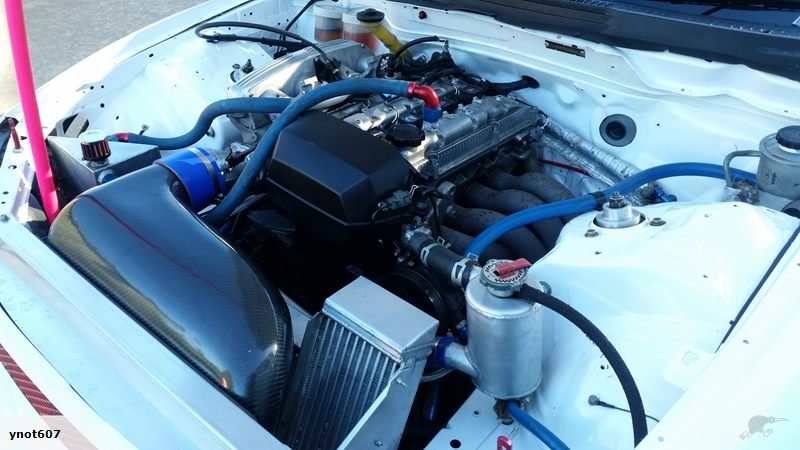
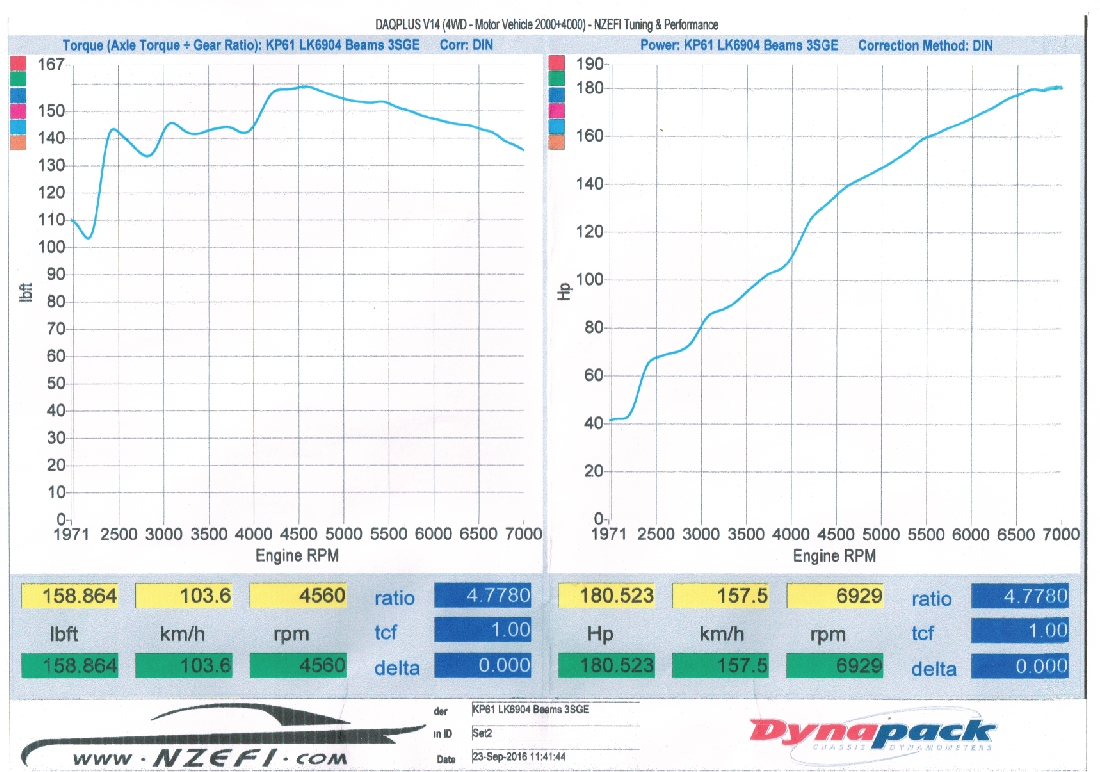
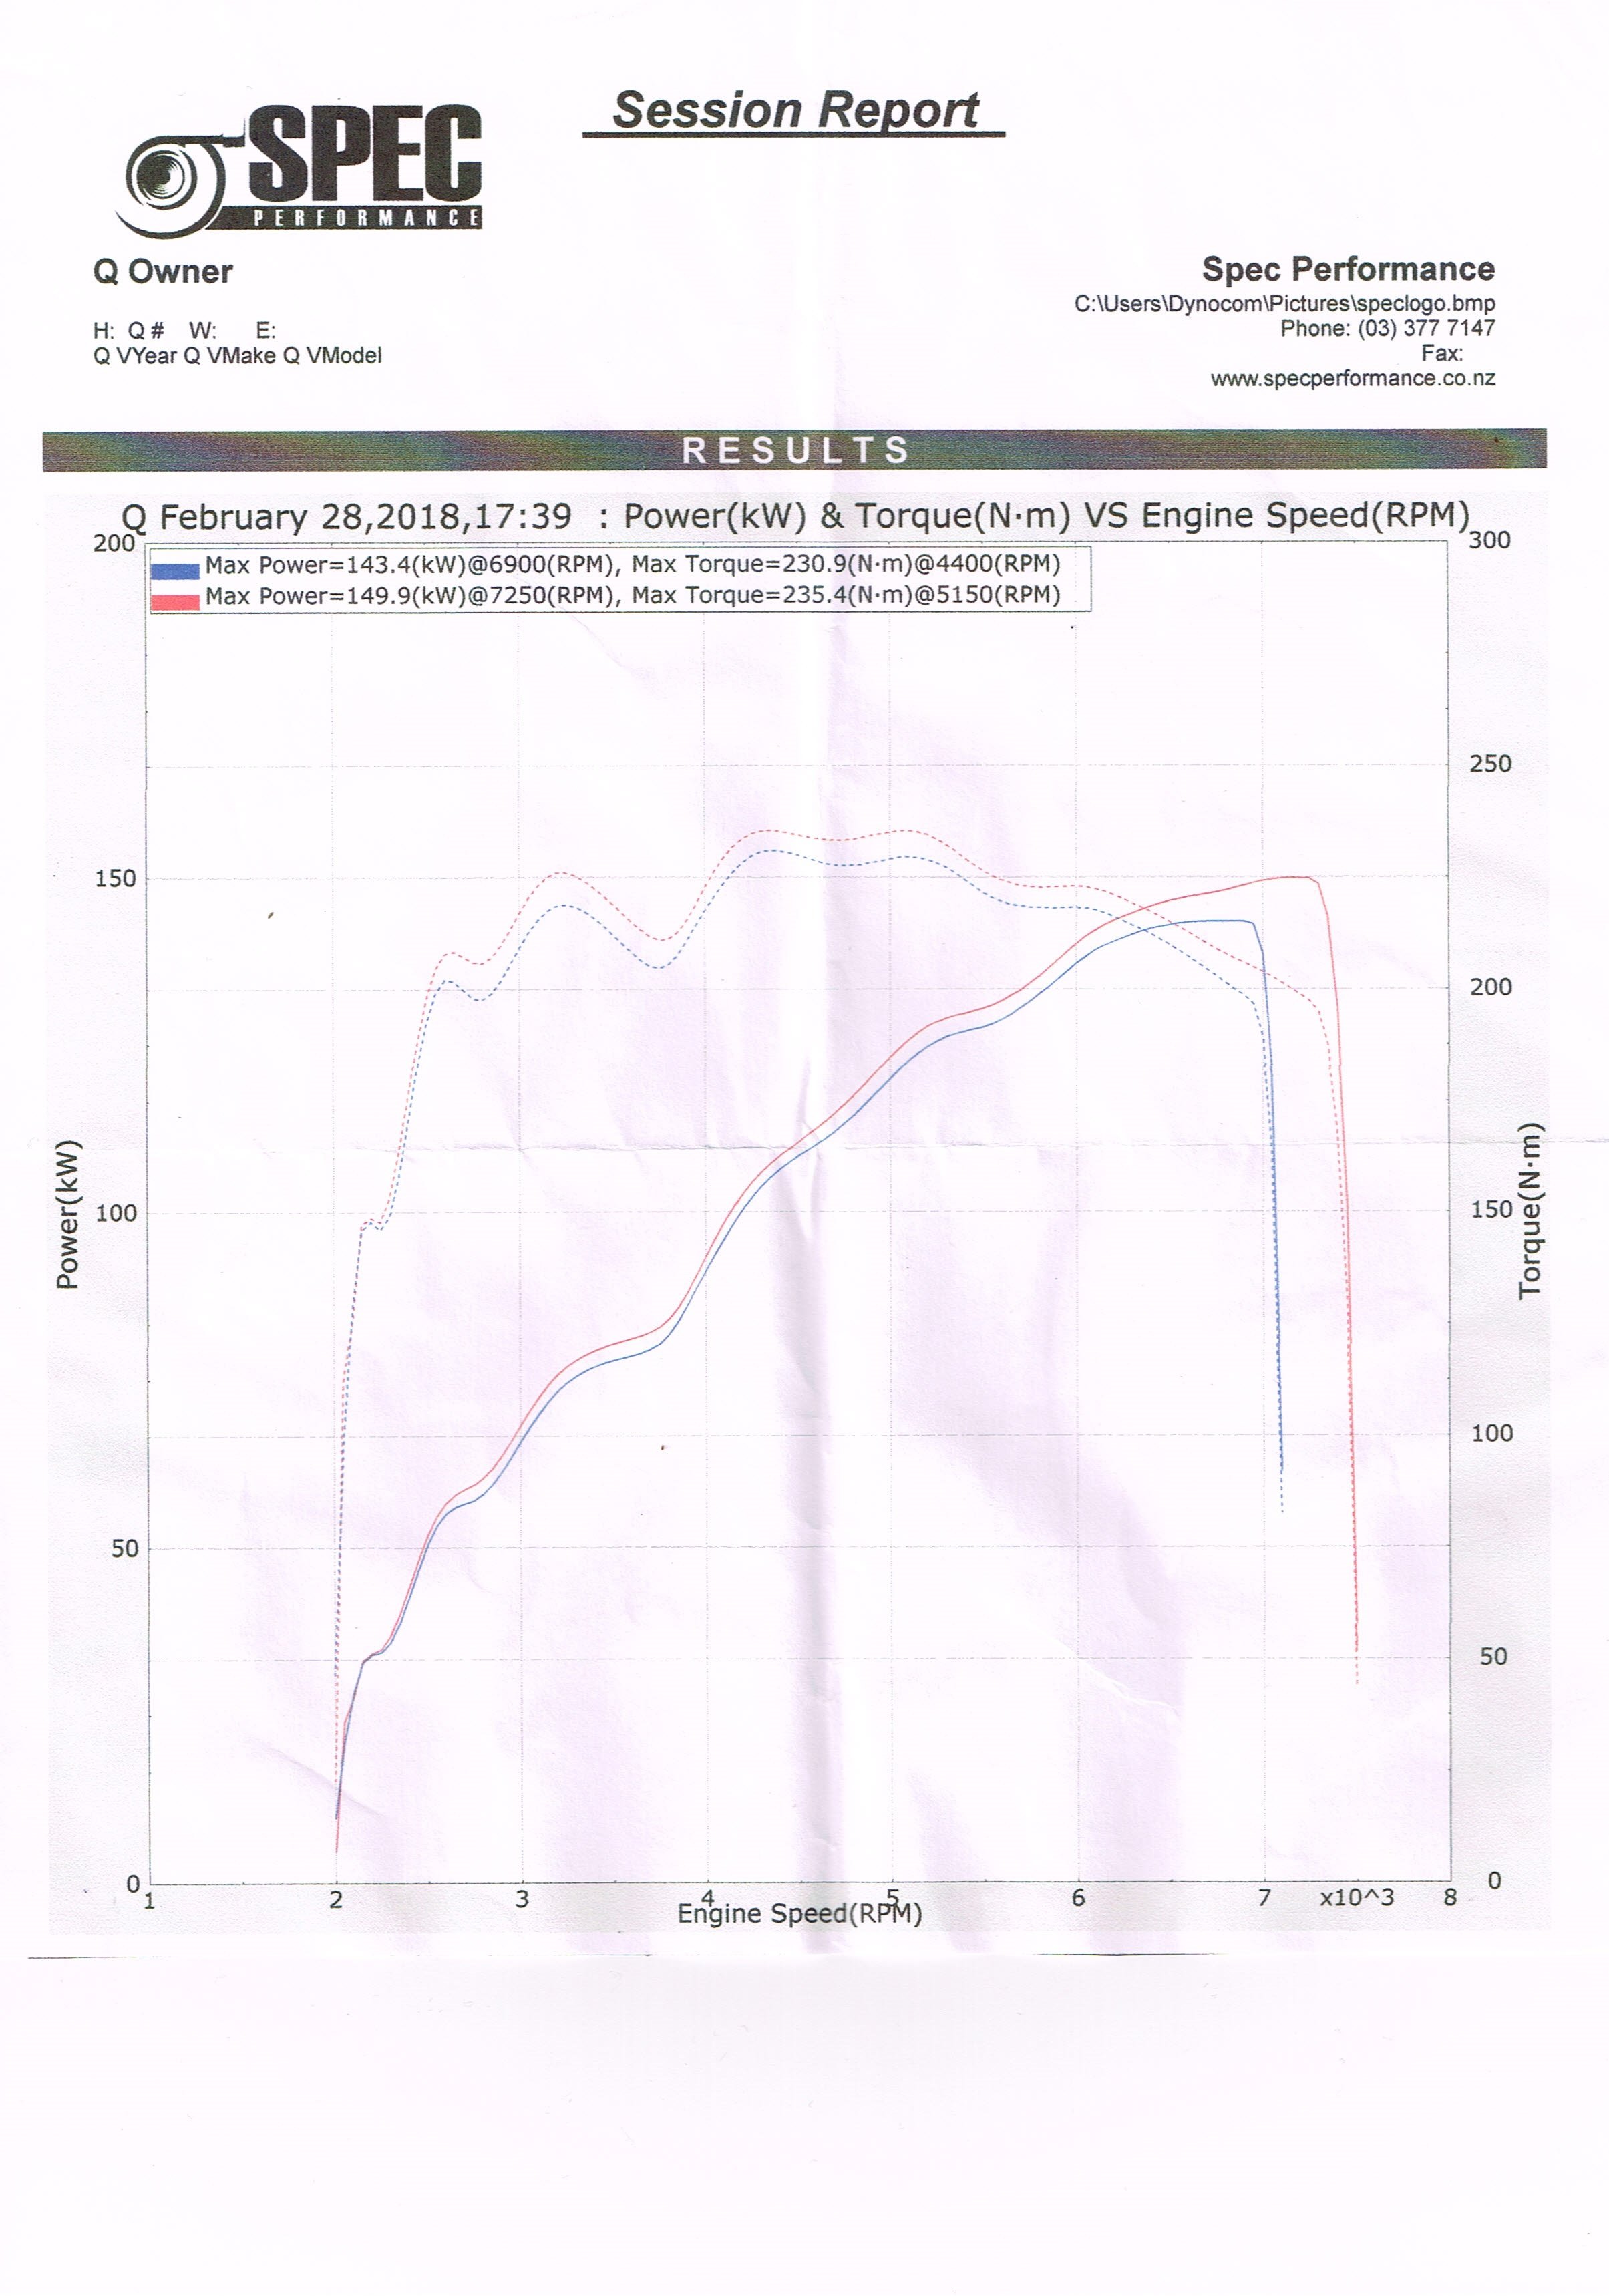
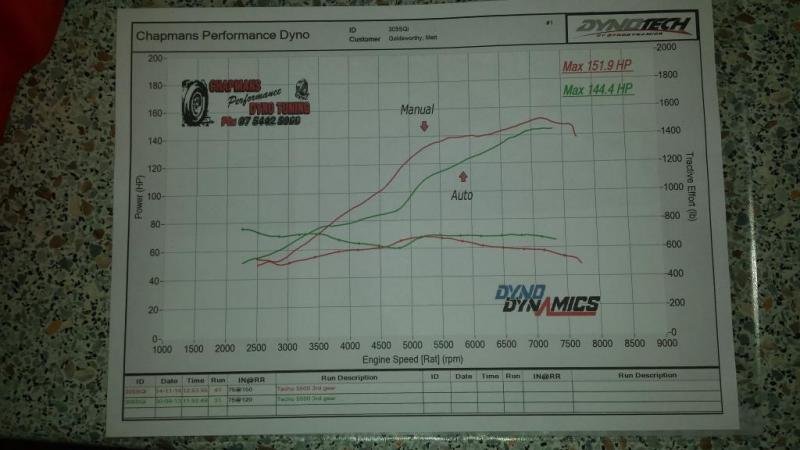
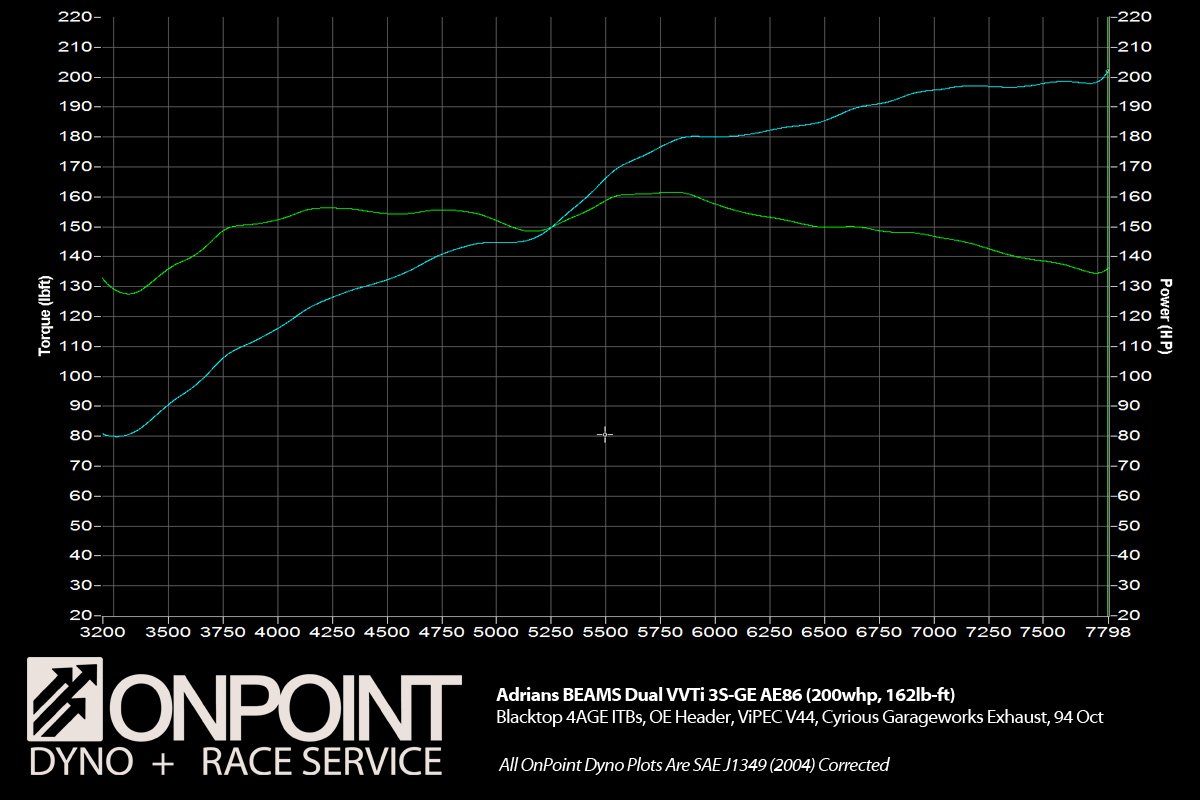
As is always the case, of the list of things I wanted to do before the next club day, I only ended up doing a couple... First job was new headers and exhaust, I had been running stock Altezza 4-2-1 headers (shortened at the 2 section) 2.5 inch steel system with two old mufflers under the rear diff and out the back. This was a pain as it was one piece all the way from the headers back and was bolted such that it could not be removed without major work (infact I never had it off as it was to hard). So the goal of the new headers/exhaust was: * Make it eaiser to maintain. * Side exit so no more diff issues * Gain HP * Save weight I was "lucky" when I spotted some TRD headers come up on Yahoo Japan in really good condition. Unfortunatly when we went to fit them, they ended up being 100mm to low, and there was no easy way to modify them to fit However they gave me accurate measurements, so on to plan b which was to get some custom headers made to the same specs. As the TRD ones were meant to give 13kw across the rev range. Being Made: All Wrapped: Next was to get rid of the indvidual trumpet filters. While I would like a cold air intake plenium, I just didn't have the time or desire to make one at the moment, so decided to go with a Pipercross filter and a backing plate to suit. Now space is quite limited in this area, so both the backing plate, filter and firewall had to be massaged to fit in and still allow the bonnet to close normally. Luckily there was enough meat on the filter to take the plastic frame down while still keeping its integrity, it means it's no longer quick release, but it will do the job. So then off to the dyno for a retune. Old Dyno Results: 134.6 kw (180hp) @ 6929rpm, 215 N-m @ 4560rpm (Hub Dyno) New Dyno Results: 149.9 kw (201hp) @ 7250rpm, 235.4 N-m @ 5150rpm (Rolling Road) Very happy with that result! So off to Club Day 4 with some new tyre pressures to aim for too (after advice from someone in the know) now running 21psi hot instead of 24psi. Race 1: Race 2: Race 3: So previously my best laptimes across the 3 races were: Club Day 2 1:39.040 1:41.980 1:40.270 Club Day 3 1:38.824 1:39.307 1:39.911 Club Day 4 Was: 1:37.187 1:37.400 1:37.424 New PB of 1:37.187 down from 1:38.824. What was most pleasing however was in race 2 every single lap was in the 1:37's where as previously they had varied quite a bit, I think that's mostly down to tyres as they used to feel like they were getting slippery in final laps. Car is now lifting it's front left wheel a lot out of the corners due to the grip, acceleration, and in some cases the back tyre was also lifting. It's performing a lot better now, and I can actually keep up with the competition down the straight so have a chance of getting them under brakes, where as before I was just to far behind. Next major items before the last Club Day 5 are around aero and improving the drag/downforce: * Duct cold air to the filter. * Front splitter/tray * Rear diffuser (If I get time) -
My understanding was for WOF's you need adjustable seat rails (locking on both sides if used on track under motorsport regs) authority card however allows you to run fixed... Might want to double check the regs. Could also drop your rim size down to save a bit of weight from the rim/tyre combo. Factory front calipers on cars are also normally pretty heavy, so going with an aftermarket brand could save you a couple of kg's each side (if you haven't already). Obviously all $$$, plus changes to cert plate which is a pain.
.jpg.4788453673b7e299006a46b2daedf177.jpg)