Flash
-
Posts
1615 -
Joined
-
Last visited
-
Days Won
2
Everything posted by Flash
-
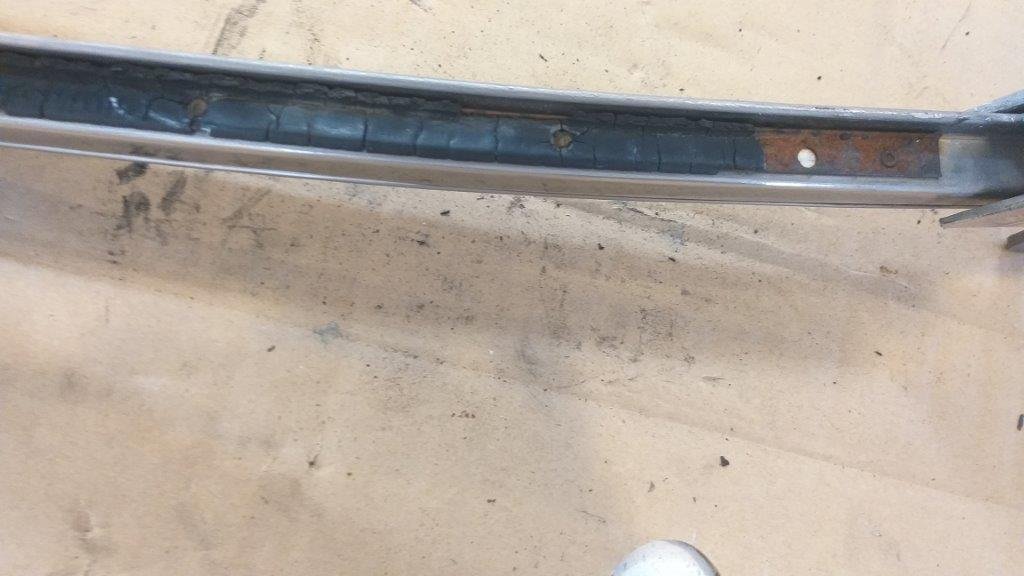
Sure enough looking at the channel felt it is well shagged.

-
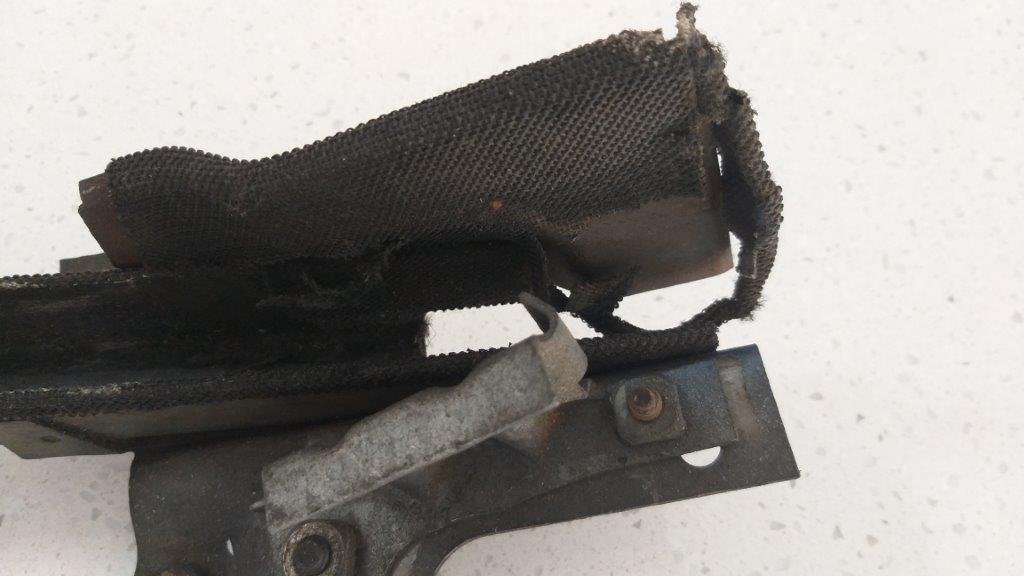
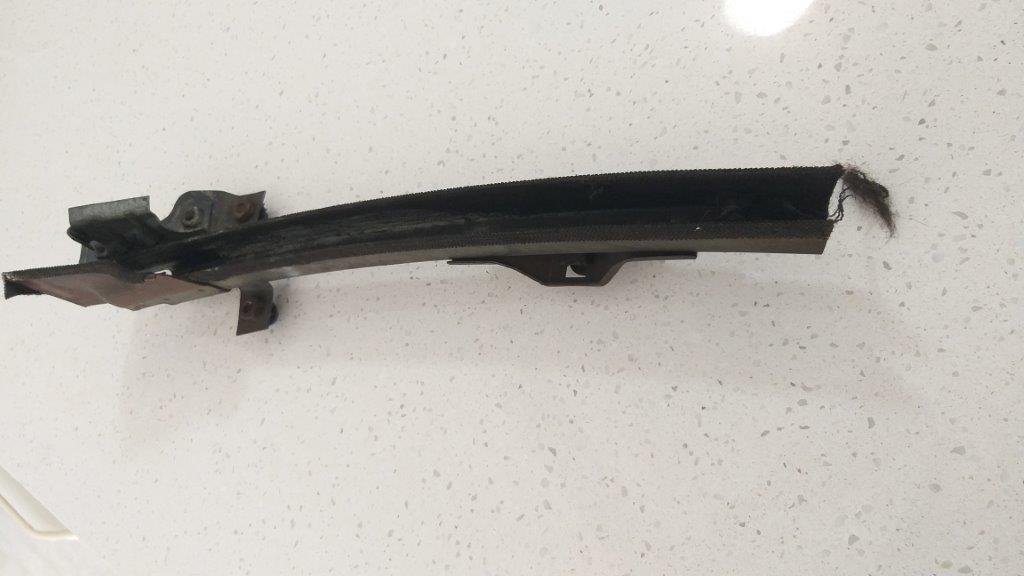
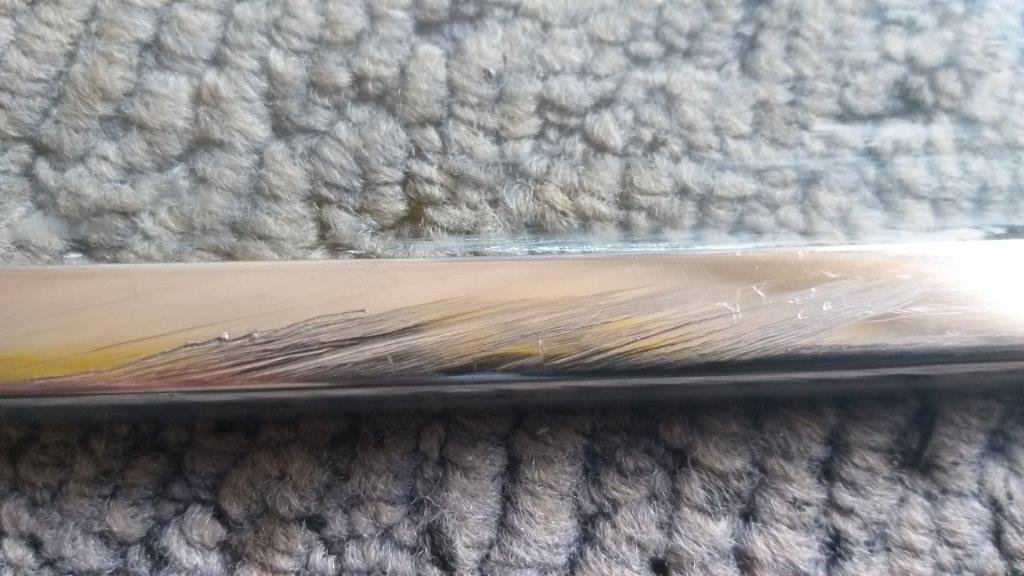
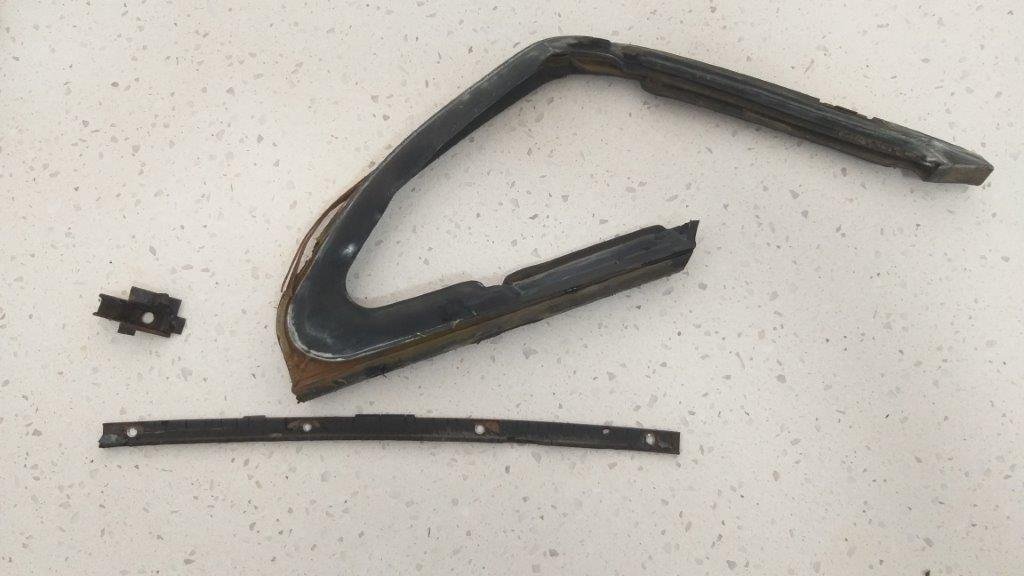
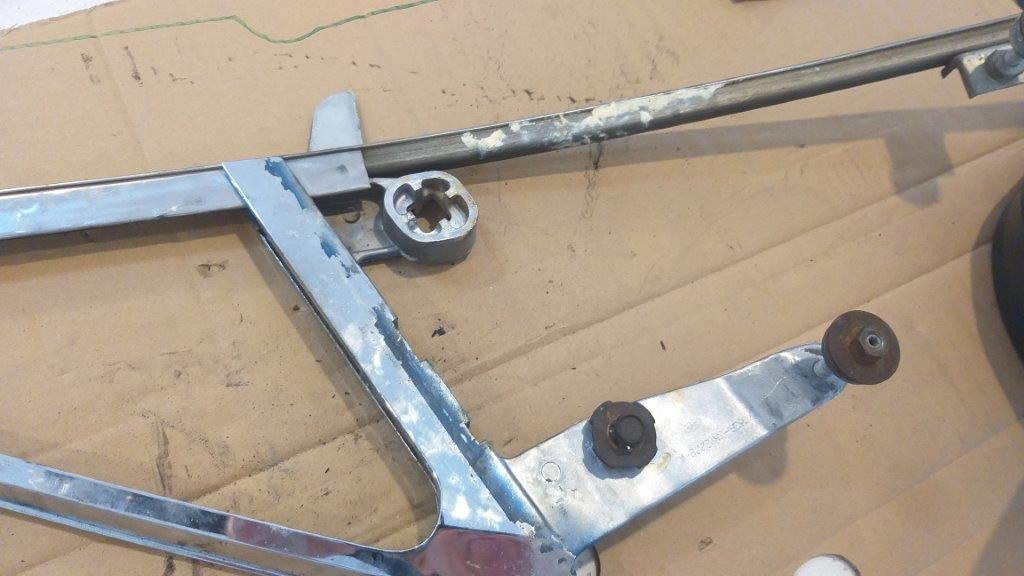
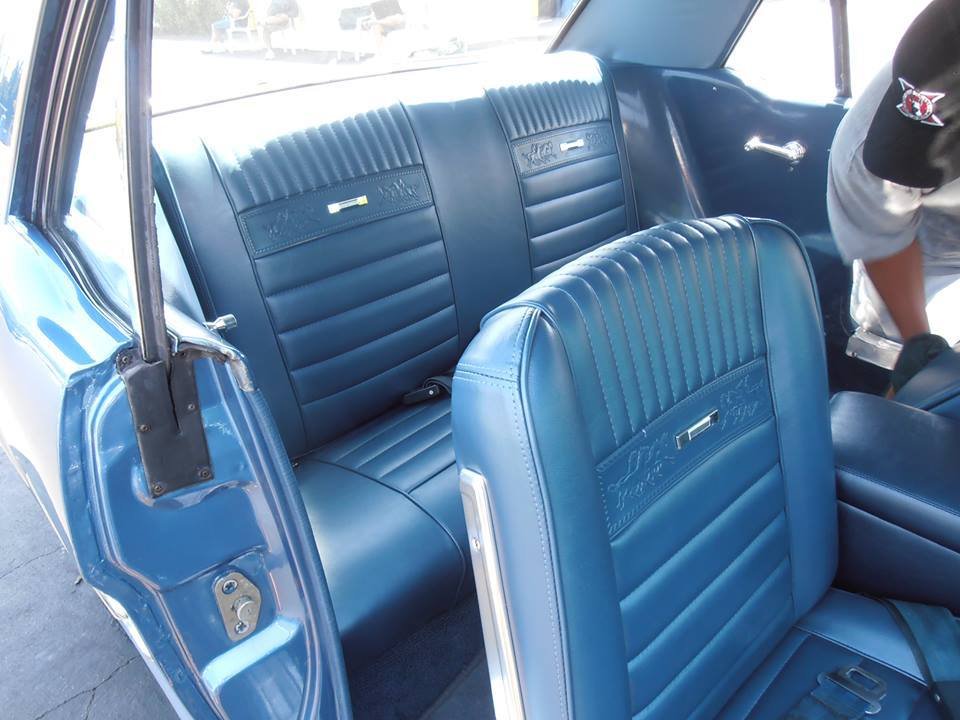
This morning I cracked into the window track refurbishment. The Mustang door windows are a frame less design with a stainless steel glass surround fitted to the side glass. The stainless steel trim runs in a window track that is factory fitted with a felt like material to protect the trim. When the felt fails the exposed metal channel then does nasty things to the window trim as seen in this photo :
-
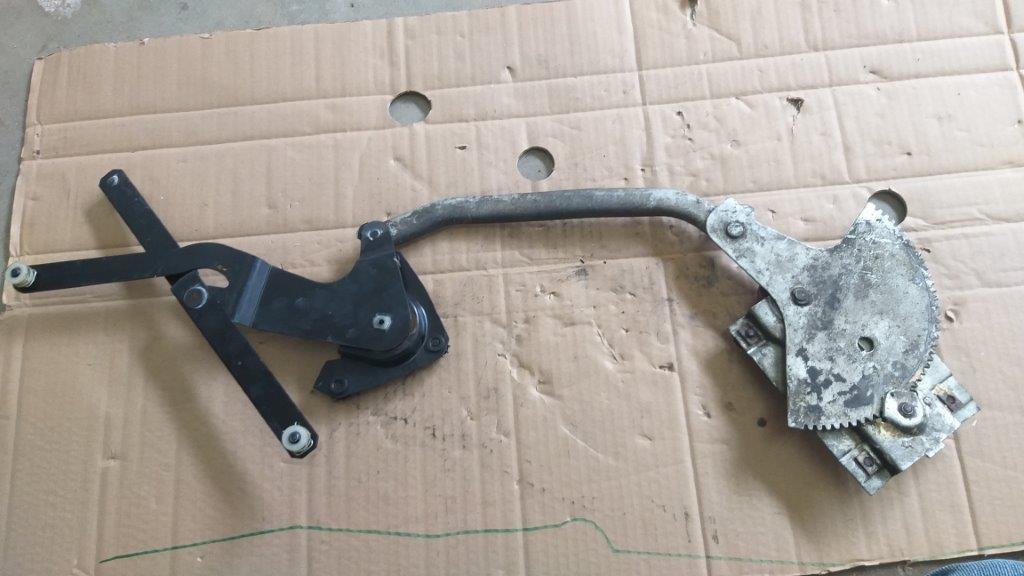
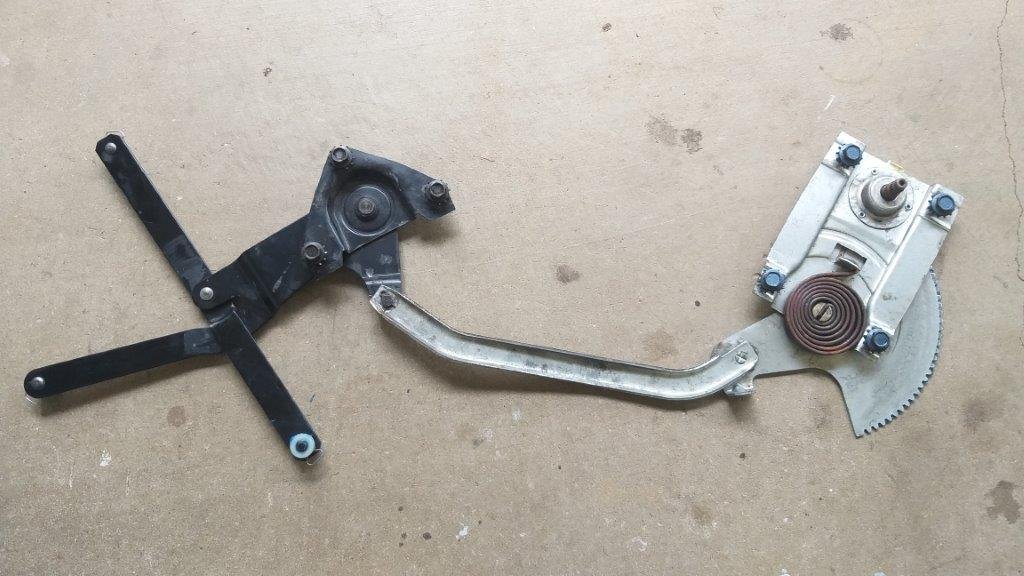
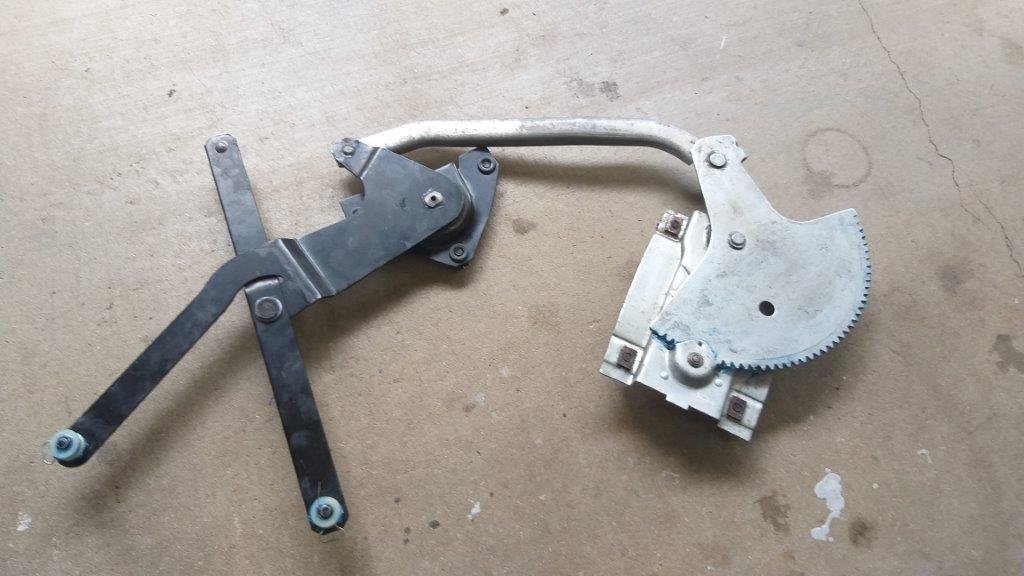
By the look of things the driver's window regulator has had a bit of recent loving. The rear scissor is a repro part and the rollers are fairly fresh. Gave everything a good clean and some fresh grease and that's one more thing ready to go back on once the doors are painted.
-
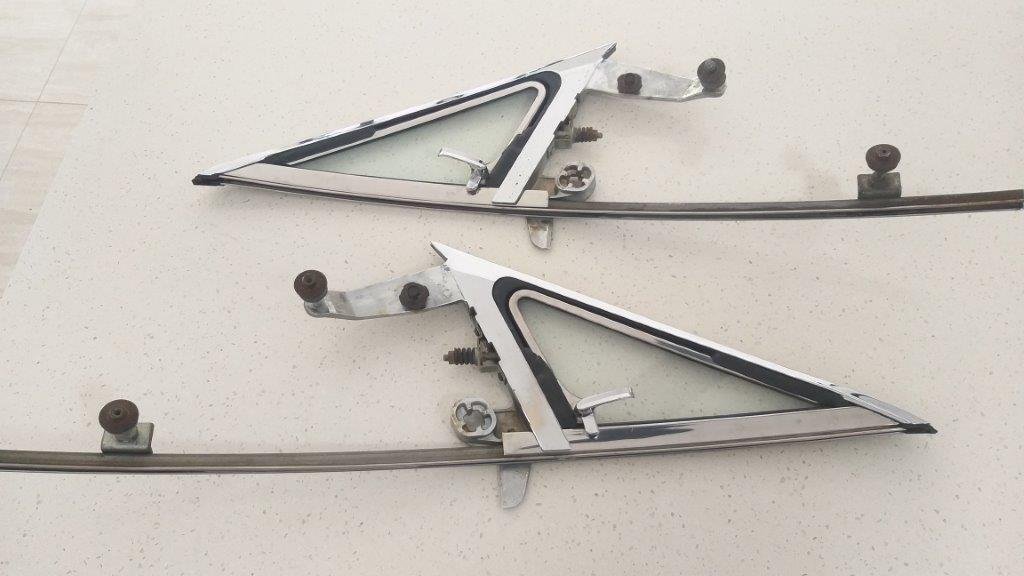
Driver's side vent window seals were the more knackered of the two, but now that I know what I am doing this one went a lot quicker. The stainless bits cleaned up nicely, but the plated frames are sporting quite a bit of patina. Cleaned them up as best as I could. So that's another small job ticked off the list.
-
Another small job ticked off the list today. This time it was the passenger side vent window that had a birthday. The housing was covered in gunk and patches of over spray and the 56 year old factory originally seals were well knackered. Now because Mustangs are as common as dingleberries (very second arsehole has one), there are a number of 'how to" videos on the interweb that you can follow along to at home ... just as long as you are able to tolerate some of the world's most irritating "YouTubers". Mrs Flash allowed me to commandeer her kitchen island bench for the morning so I cracked straight into it. Stripped it down easily enough and after a good clean up the assembly commenced. Apart from the main window seal there are two other small mouldings that need replacing, both held on with original factory rivets. Luckily the window kit came with replacement rivets and a nifty little purpose made rivet punch so even a Simpleton like me couldn't cock it up. So that's the one vent window done. I'll tackle the opposite side tomorrow. Thanks for looking.
- 194 replies
-
- 11
-

-
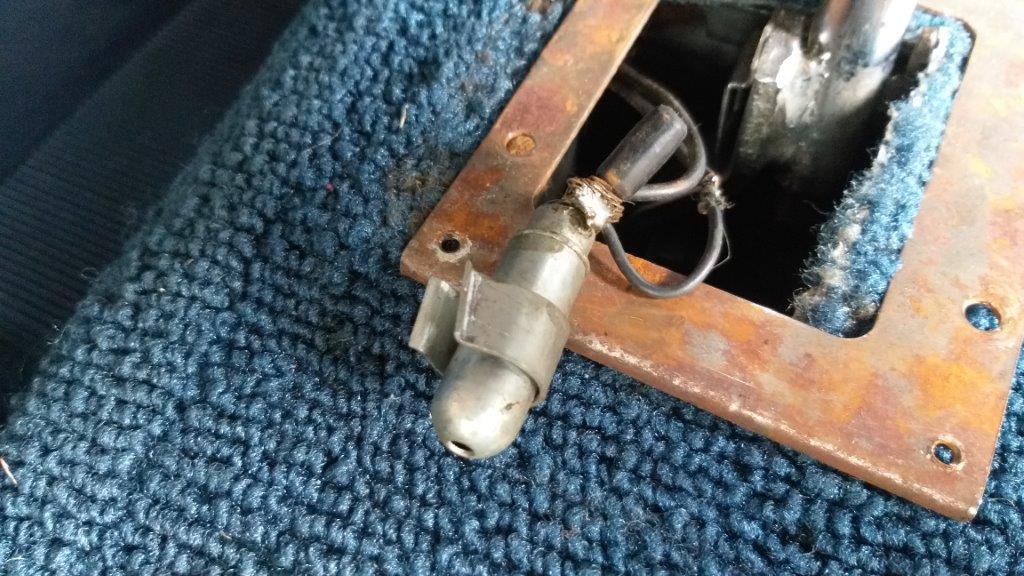
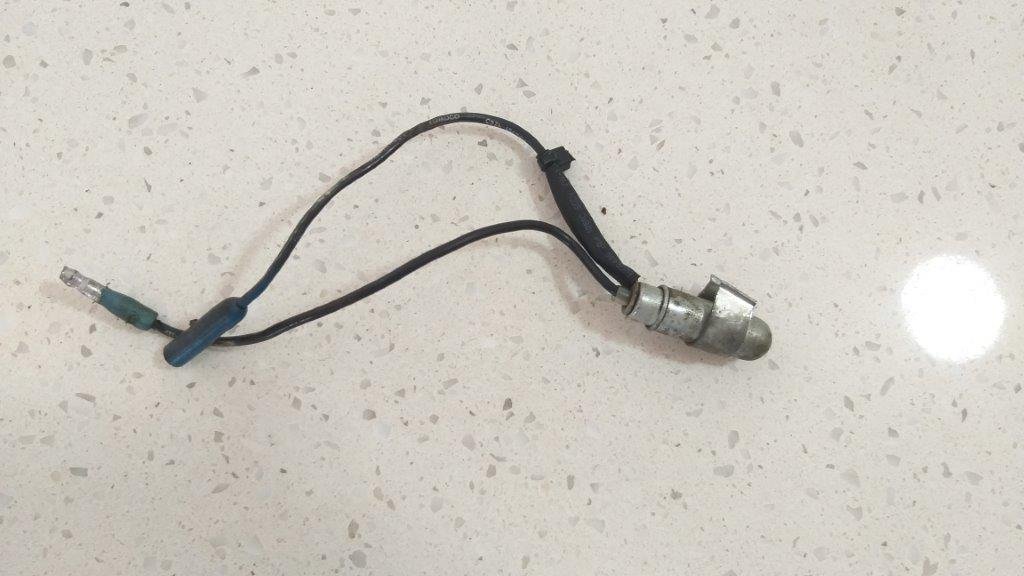
One thing I had previously noticed was the lack of a shift indicator light. I had assumed that the whole fitting was AWOL. A replacement fitting goes for $130 ... gulp. Luckily with the shifter surround removed I was able to pull on the electrical wires that were disappearing into the bowels of the shifter and managed to fish out the light ... winner. The earth wire had broken somewhere along the line and some muppet had had a go at fixing it ... fail .... and hadn't even bothered to tape up the joints ... bigger fail. Anyhoo I soldered the wire properly and chucked a bit of heat shrink on to neaten it up. Test showed still no light, but it was just a blown globe, so that is now sorted.
- 194 replies
-
- 13
-
-
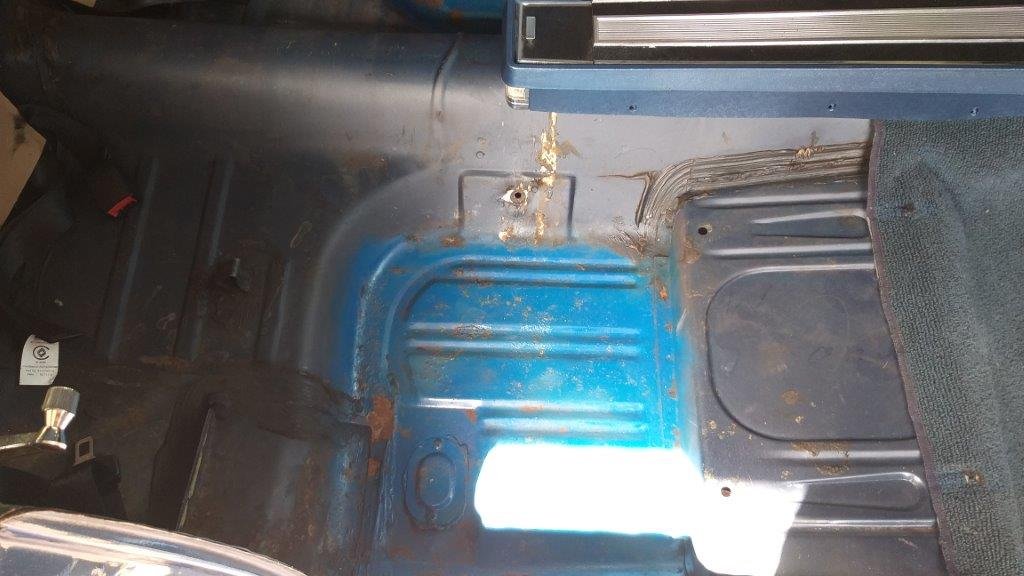
Another lazy old day on the Mustang. The T handle on the auto shifter was preventing me from removing the shifter surround in order to get the front carpet out. Turns out someone had butchered the little grub screw so I ended up having to drill the bugger out. I was able to cut a bigger metric thread and have temporarily fitted a little button head bolt. I'll source a replacement grub screw on my next trip into town. With the T handle off I was able to unbolt the shifter surround and lift the carpet. Drivers foot well has had the same half arsed treatment and looks crusty as.
-
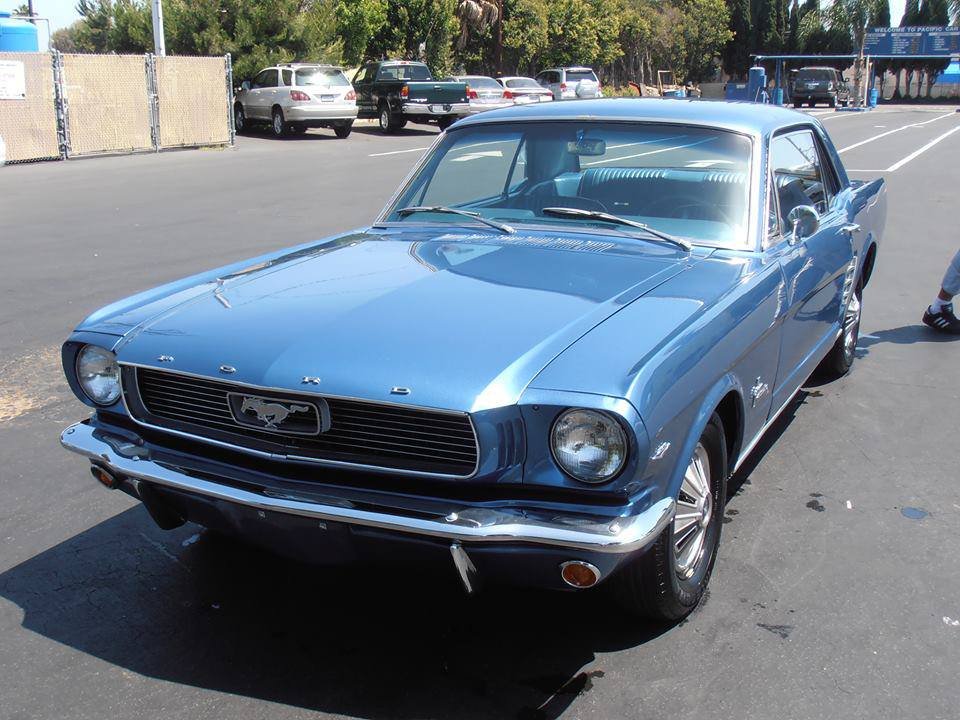
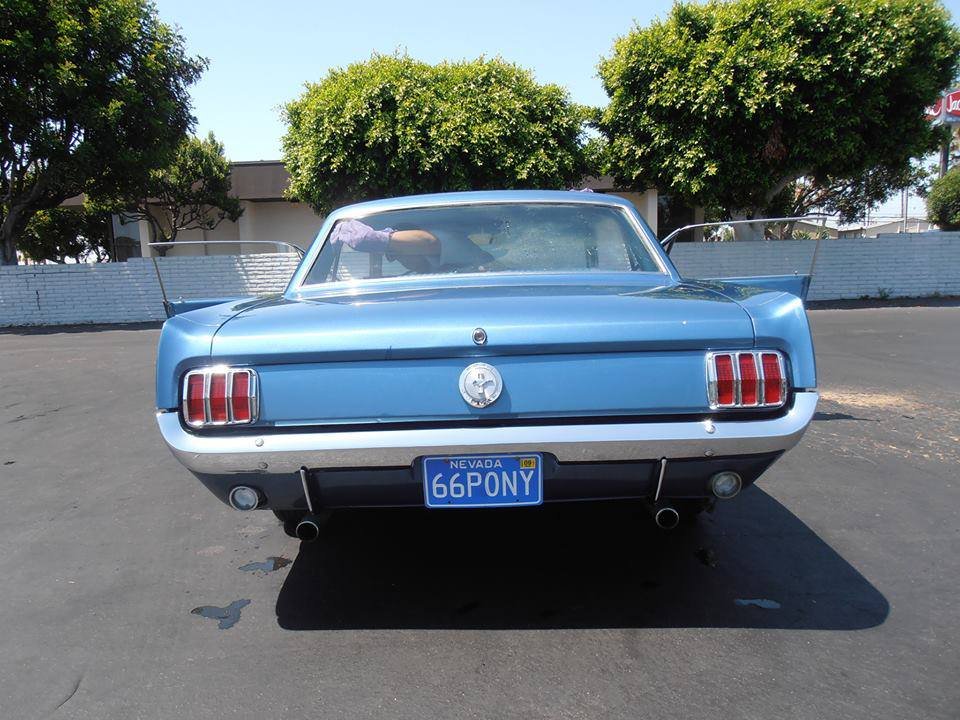
In other news Tom the previous owner of our Mustang was up our way on a caravan trip with his family and stopped in for a visit. When we bought the Mustang the deal was all done remotely so we had only ever talked over the phone. It was great finally meeting him and his family. Great people and we shared a good few Mustang related yarns. He shared some photos of the Mustang provided by the owner before him. These were taken either just before it left the USA or shortly after it arrived here in Straya. I would love to know whether the Nevada license plate is the real deal or one of those novelty plates that you can buy in the US. Nice to see it sporting its original wheels and hubcaps. Wish I had them. The paint colour looks so different out in the sunlight compared to all of my photos which have been taken under the shade of our carport.
- 194 replies
-
- 14
-
-
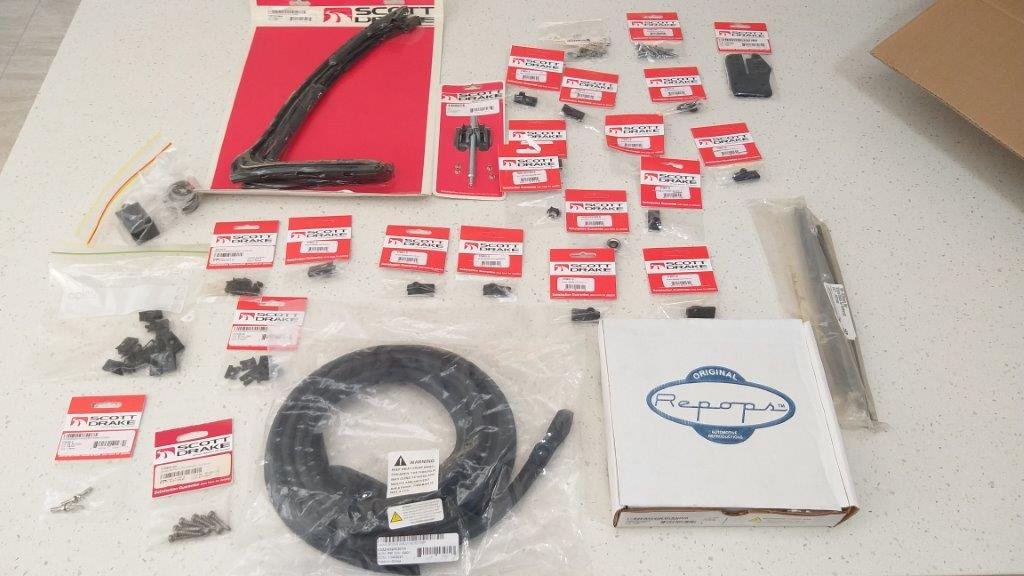
After smoko the courier arrived with a box full of Mustang goodness. Enough bits and bobs to refurbish the insides of both doors. Yummy.
-
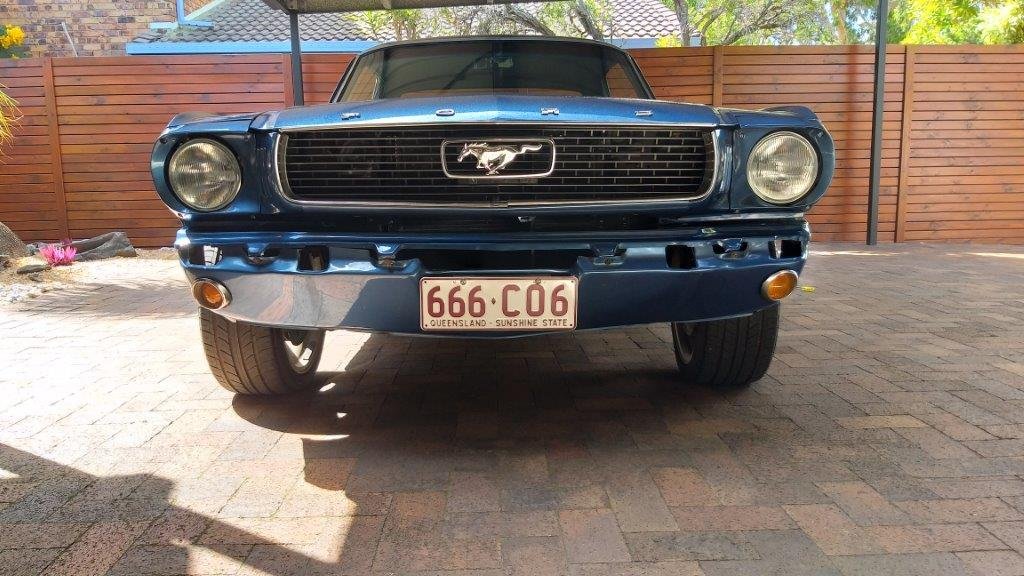
So being in a bit of a holding pattern at the moment, I decided to tackle a small job that has been on the list for a while. The Strayan front rego plate was too long to fit into the factory recess in the front valance. So the PO had bent the corners of the plate to fit. Didn't sit well with my OCD so I built a little spacer out of some aluminium angle that I had lying about. Before and after pics to show what a sad life I lead. Front bumper is off until paint has been blended. Not the best photos, but hopefully you get the idea. Thanks for looking.
-
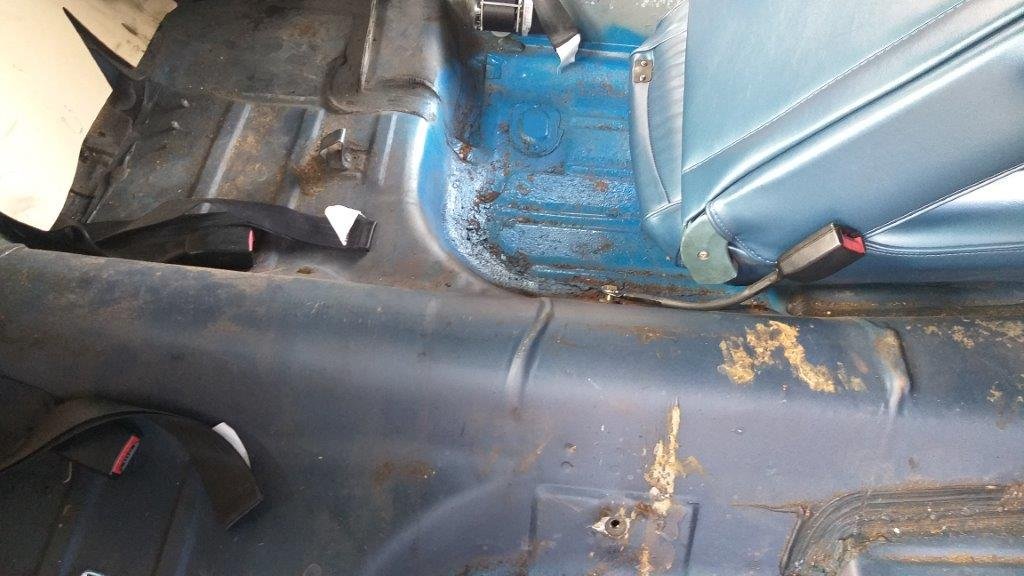
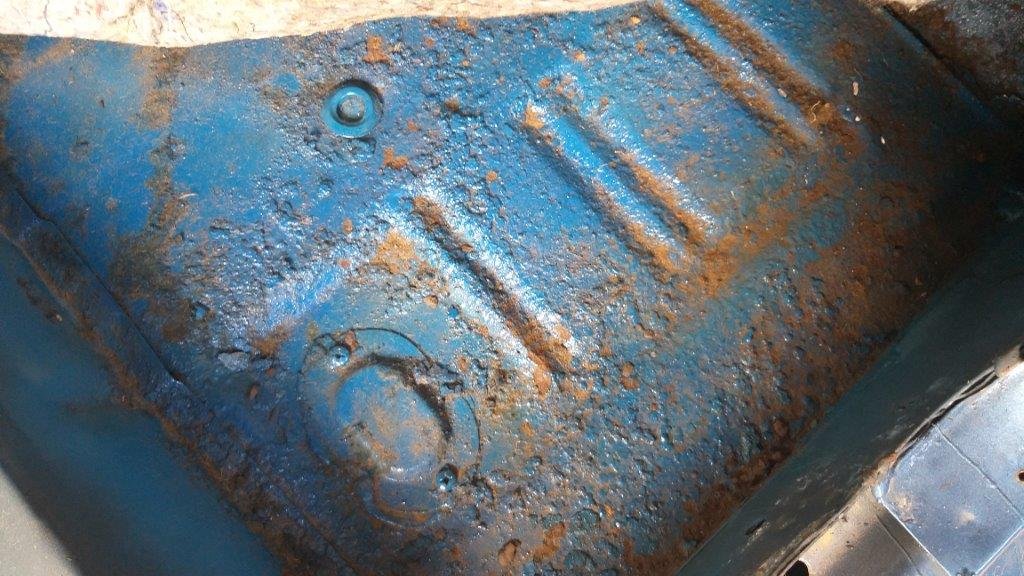
I needed to remove the front fender badges and rear quarter panel "fins" so that Grant can do the paint blending. Getting the rear fins off meant pulling out the back seat and rear side panels, so I figured I'd do a bit of archaeology at the same time. Lifted the carpets to find some pretty solid floor pans apart from someone having done a half arsed "restoration" sometime in the past. I'll clean things up and give the pans some decent rust protection before final reassembly.
-
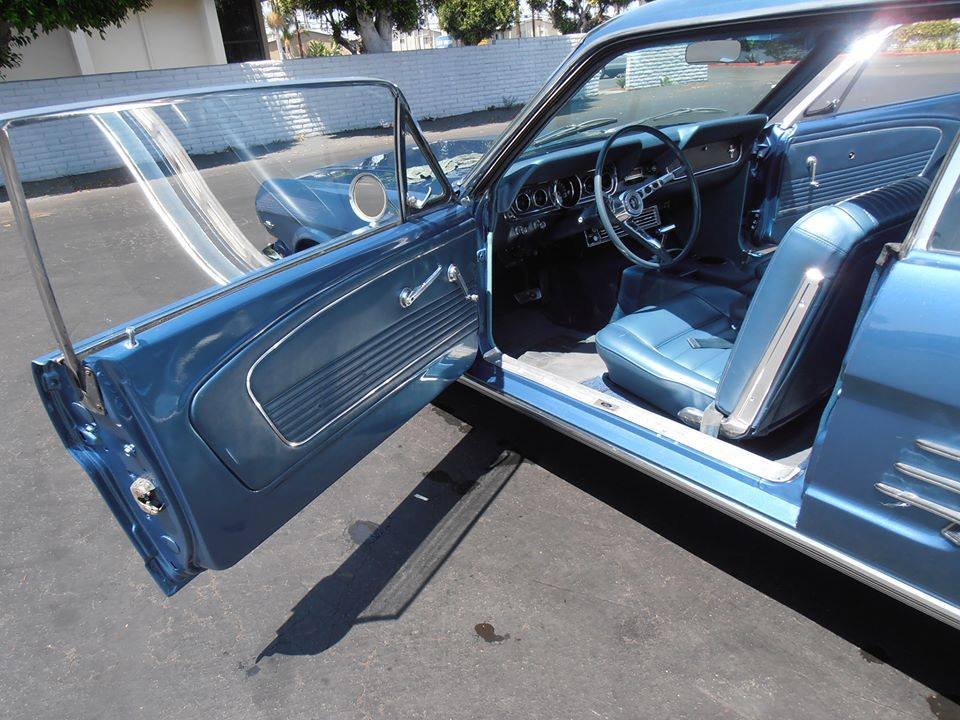
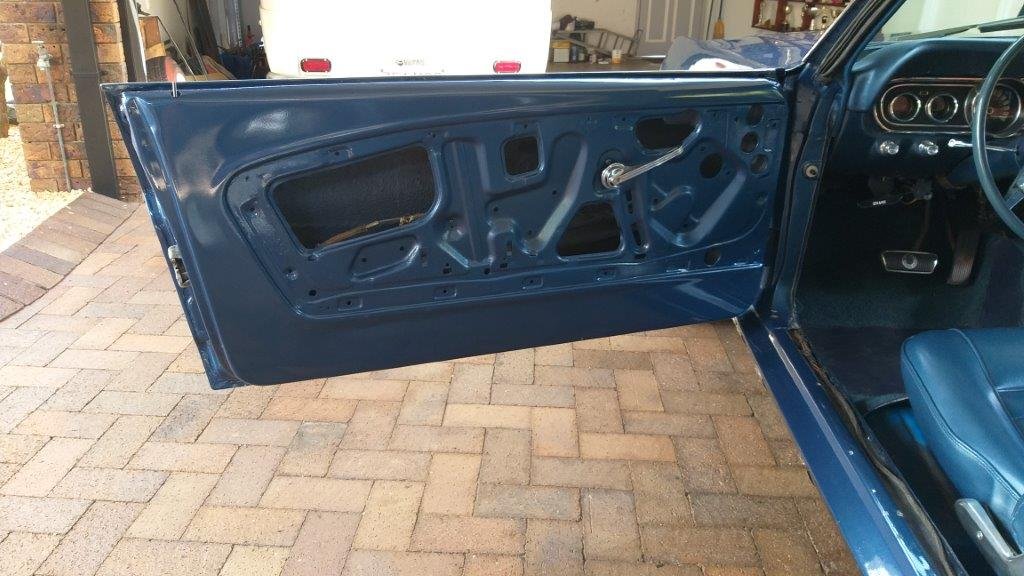
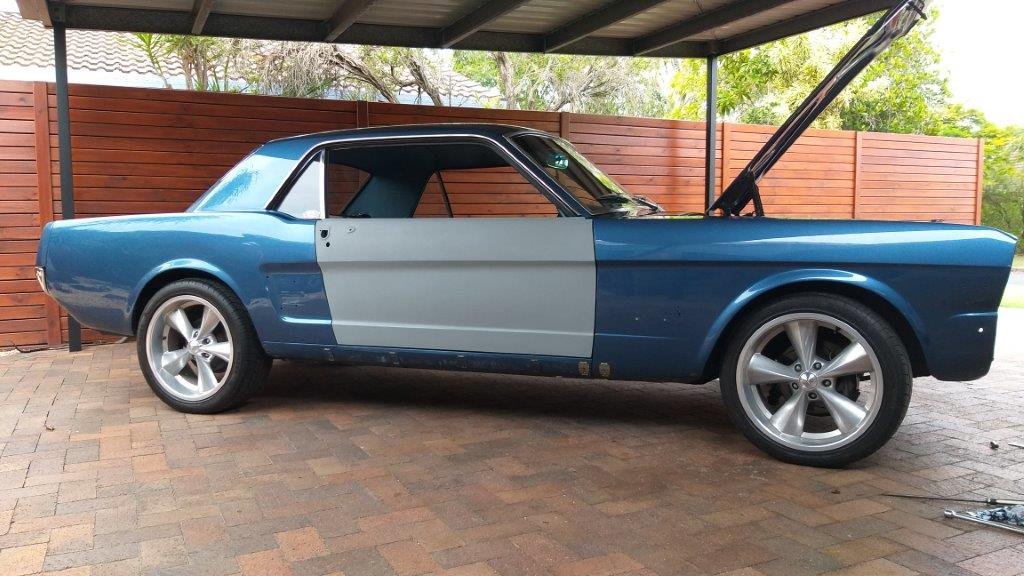
I managed to chuck some colour on the door inners over the weekend and Mrs Flash and I spent yesterday fitting and aligning both doors. Took a few goes to get things as best as we can. The factory gaps were never that good to start with and the fact that the car is fitted with a repro right front fender doesn't help either, but it's good enough for a daily driver. I've assembled just enough to get the car driveable and it's now it's just a case of waiting for Grant to get a gap to do his magic paint blending tricks. Few photos of the interim result.
-
If I'd read a bit further back I would have seen that @Nominal and @rusty360had beaten me to the punch on the rivnut suggestion. Yep the tap being stuck in the now loose nut makes that a bit of a challenge but will at least help you hold the nut in place while you give it a few welds. All the best mate.
-
Or just run a thin washer under the bonnet catch on the side with the original captive nut so that your catch is level. Hope this makes sense.
-
What about using a rivnut to solve your bonnet catch issue ? Will save you having to mess with your panels and paintwork. Might need to chuck one in the other side to level it out.
-

SR2’s 1947 Vauxhall “Rigamortice” Discussion thread.
Flash replied to sr2's topic in Project Discussion
Great progress mate. The MGA gearshift boot gets my vote. Will look more at home than the modern one I reckon. -
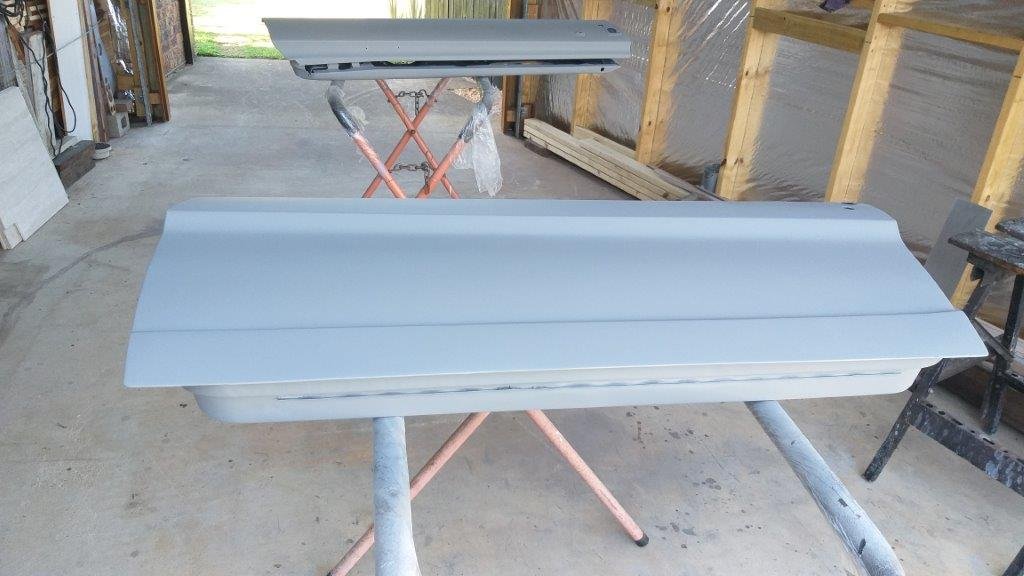
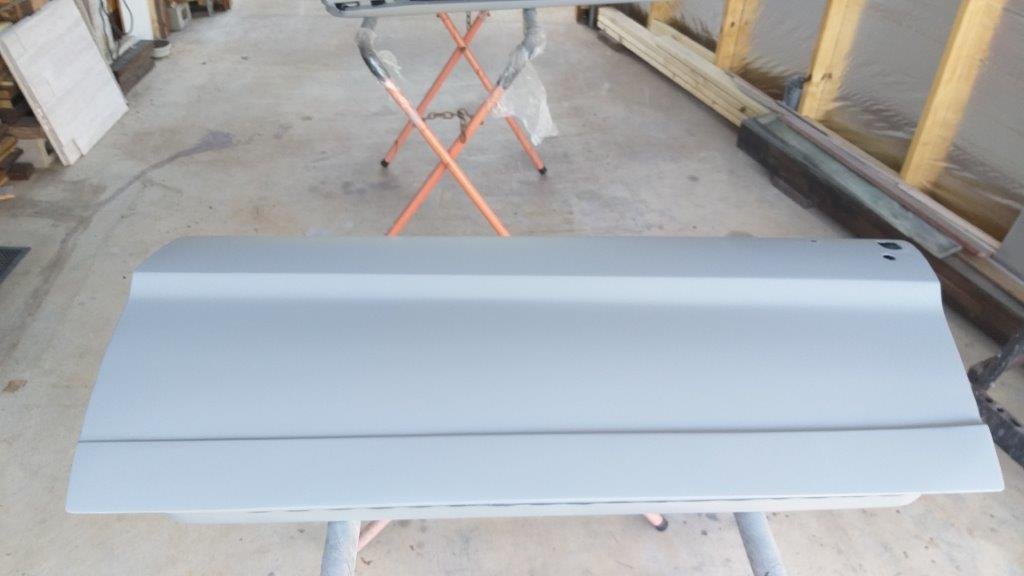
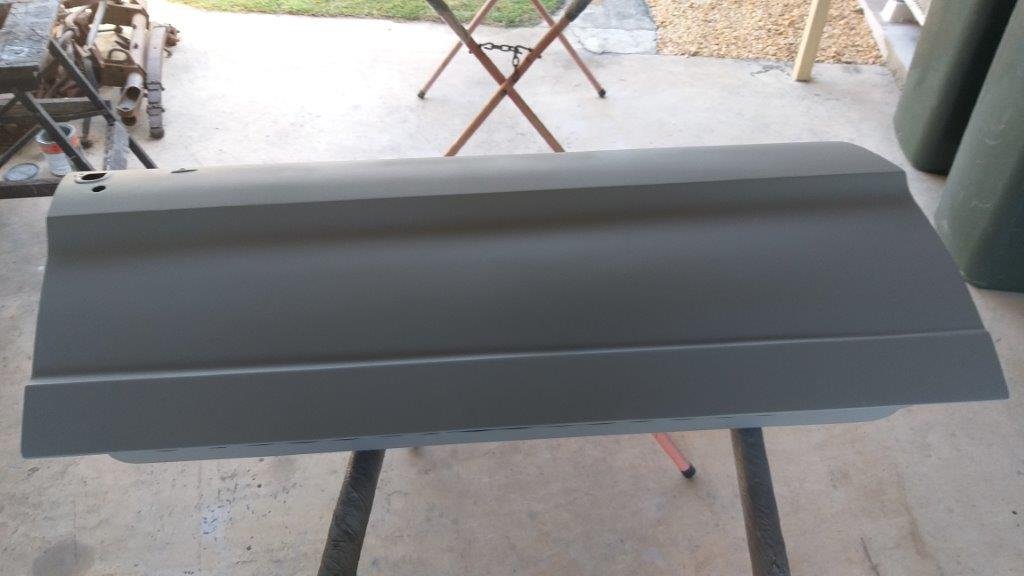
So it turns out that I was way off the mark in terms of the provenance of my driver's door. After sanding through the yellow / white stuff that I thought was the factory top coat on the door it became evident that this is an undercoat applied when the car was repainted back in 2010 or thereabouts. Under this primer I found the original Nightmist Blue. I swapped a few yarns with another Mustang Barry in the USA who confirmed that it is entirely possible that a door with a build date of late February could have ended up on a car assembled in early April. He also confirmed that the factory had a habit of using up their old stock before switching to the new stuff and its therefore not uncommon to find early 66 models sporting parts left over from the 65 run. So that solves the mystery of the older style hinge bolts. And now that I've bored you all to tears with Mustang trivia I though I'd update you on the status of my door repairs. After many coats of primer followed by multiple sessions of block sanding I've now declared the doors as straight as I'm ever going to get them. I've chucked a final coat of primer on the inner and outers and the doors are now ready for colour. A while back I took the car through to my local paint supplier and they matched up some base coat using their scanner. The colour is pretty close, but not perfect, so today I ended up dropping by a local old school painter that has a fully blown spray booth and paint mixing setup in his back garden. First time I'd met him and it turns out he is originally from Nelson so we had a good yarn about the old country. He played around with his tints and got the match near perfect to my eye, but he reckons even with the modified match the outer paintwork is likely to need blending. So the plan of action is that I will paint the inners with the modified mix and will then reassemble the car before taking it around to Grant's place so he can paint the outer door panels and do any blending that may be required. Few photos of the doors in their nice new coat of primer. Thanks for reading.
- 194 replies
-
- 15
-
-
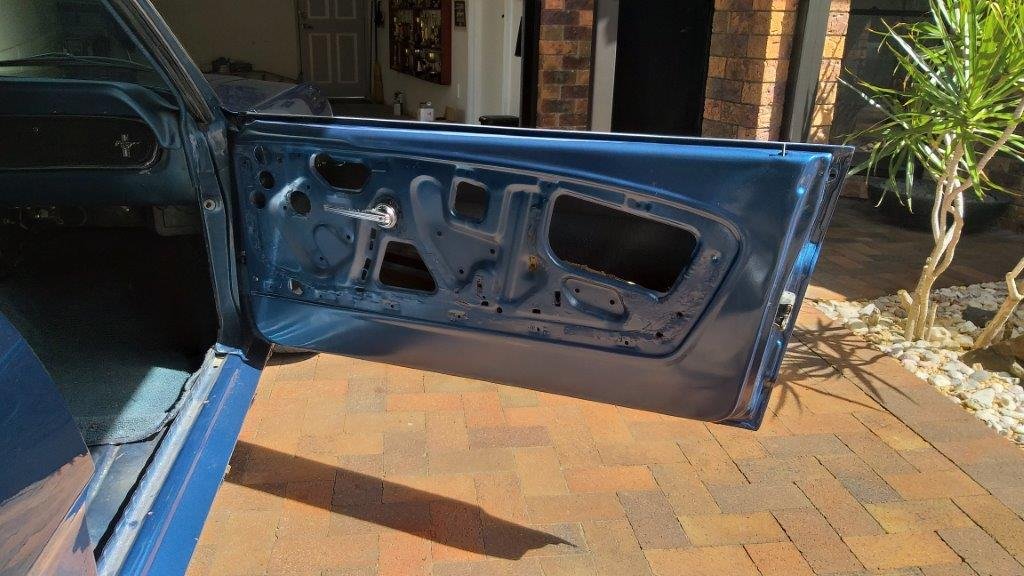
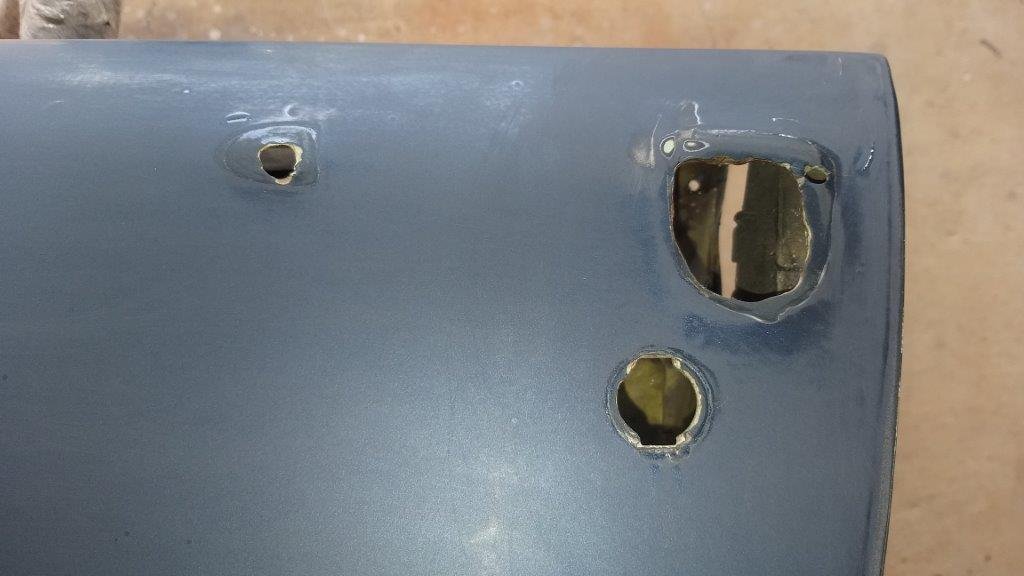
Turning my attention to the driver's door I have a strong suspicion that it is not the original factory door for this car. There are a few reasons why I have reached this conclusion. First up the captive plates inside the door that bolt up to the door hinges are threaded for the larger diameter imperial units compared to the opposite door. . According to Uncle Google the door hinge bolts for 66 Mustangs measure 5/16 whereas the 64 and 65 Mustangs used 3/8 bolts. Another clue is that I can't find any traces of the original factory paint on this door. There are traces of the new colour under the exterior door handle and traces of what appears to be Wimbledon White or Sunshine Yellow on some inner parts of the door. Final clue is the door build stamp which reads "2 10 2D" which decodes to 10th February day shift 2. So I'm picking that this replacement door was sourced from a 1965 Mustang. I'll just head off and get myself a proper life now. Thanks for looking. Mustang Barry over and out.
- 194 replies
-
- 19
-
-
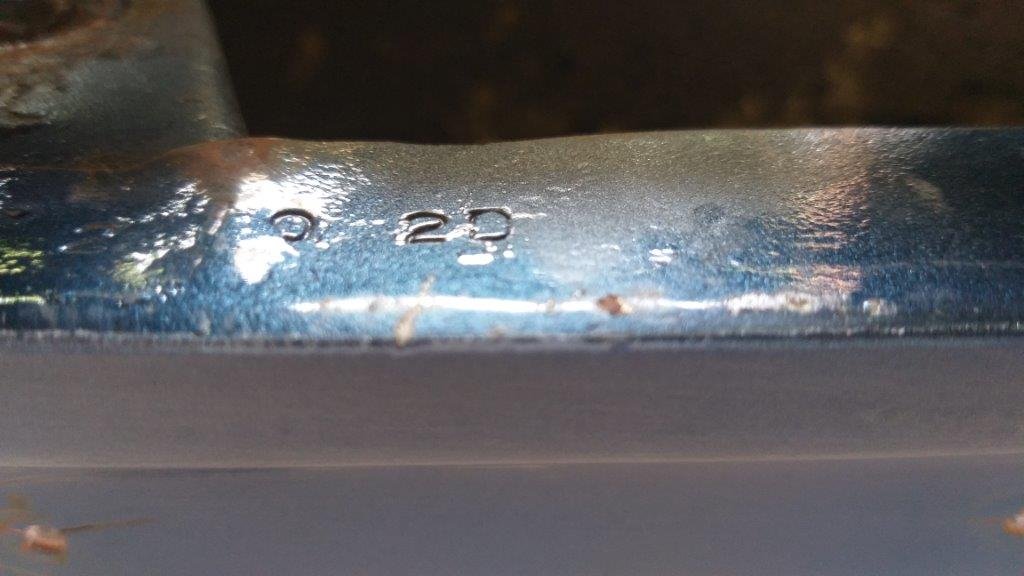
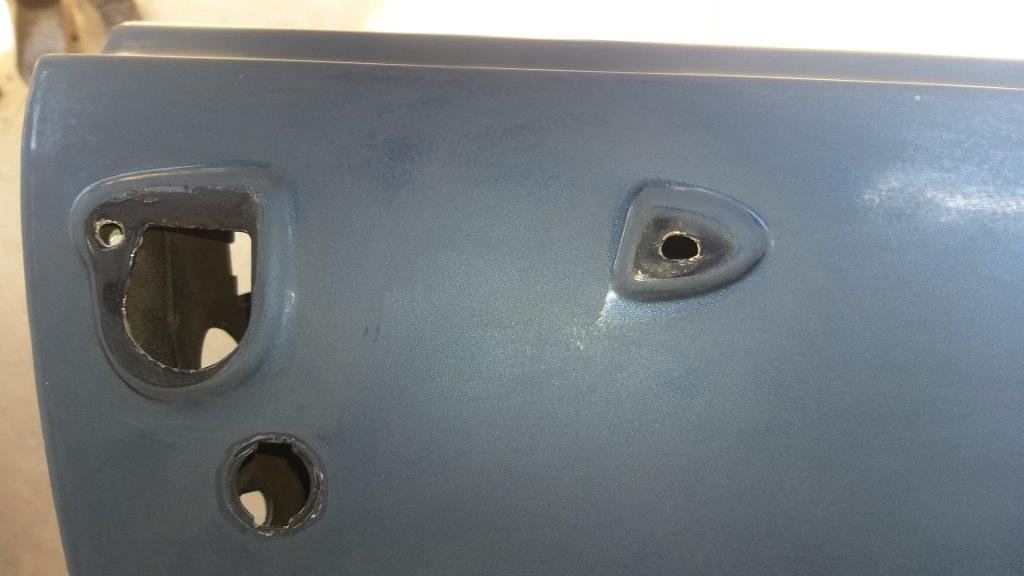
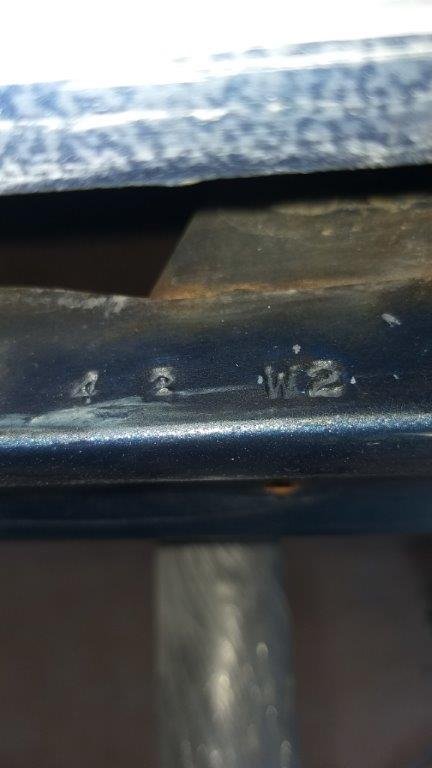
Spent a good few mornings finishing off the outer door panels and getting them ready for full primer. It's the small things that seem to take more time than anticipated. Today I made a start on the inner panels on both doors as I'll primer these first. Took the opportunity to do a bit of "door archaeology" while I was at it and discovered a few interesting facts. The passenger door shows signs of the original factory paint under the door handle, so it looks like the lazy bastards just did a tape up job when they did the colour change back in 2010 or thereabouts. I was also able to track down the factory door assembly stamp located inside the window channel. It reads "4 2 W2" which decodes to 2nd April weekend shift 2. Makes sense as the actual build date on the entire car was 6th April. So my conclusion is that the passenger door is probably the factory original for this vehicle.
-
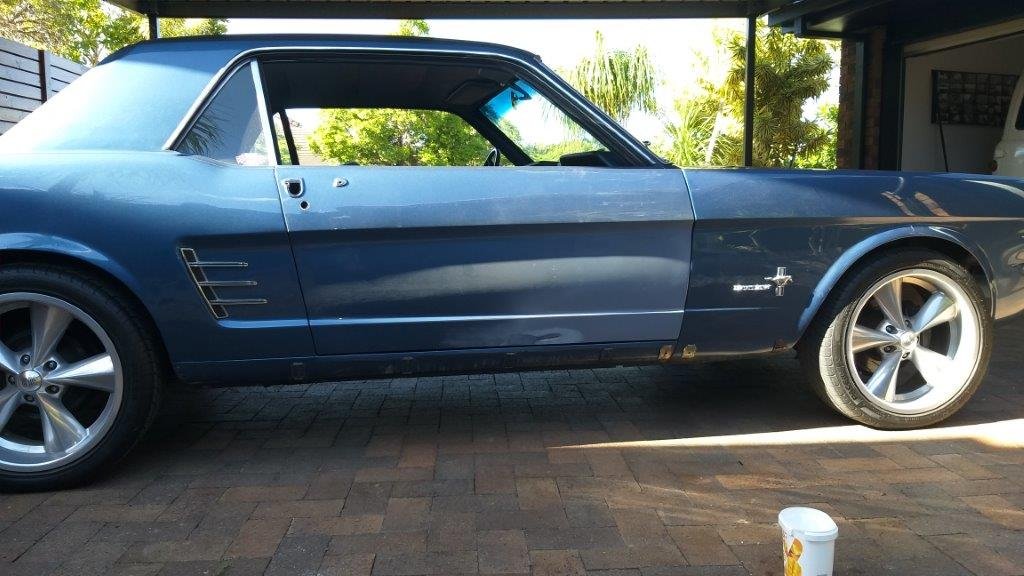
Passenger door gaps and alignment have turned out pretty good, so I'll take the win. With the adjustments now buttoned down and both sets of door hinges bolted into their forever positions, it's time to pull both doors off for a final tickle prior to paintwork. Thanks for looking.
- 194 replies
-
- 22
-
-
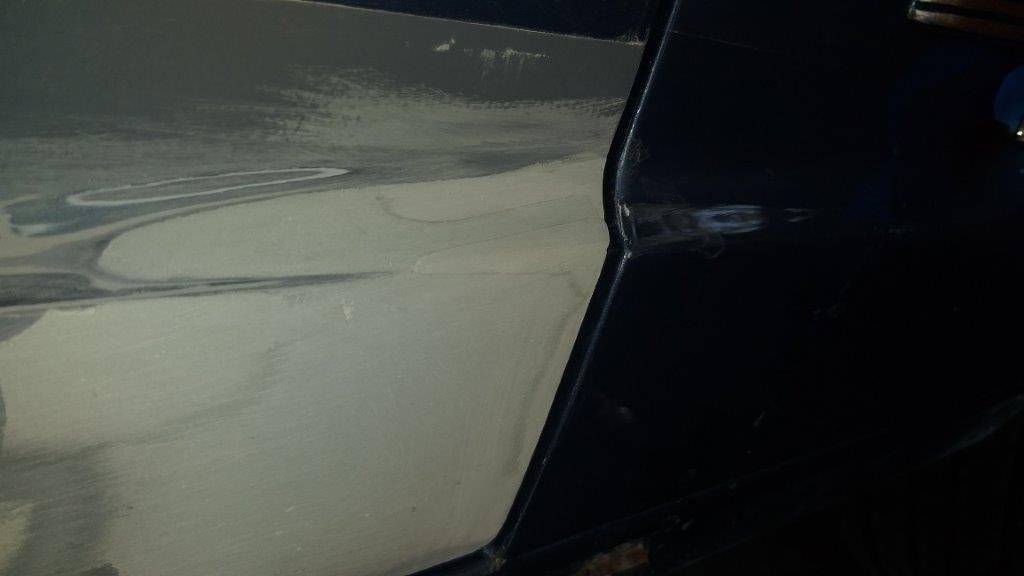
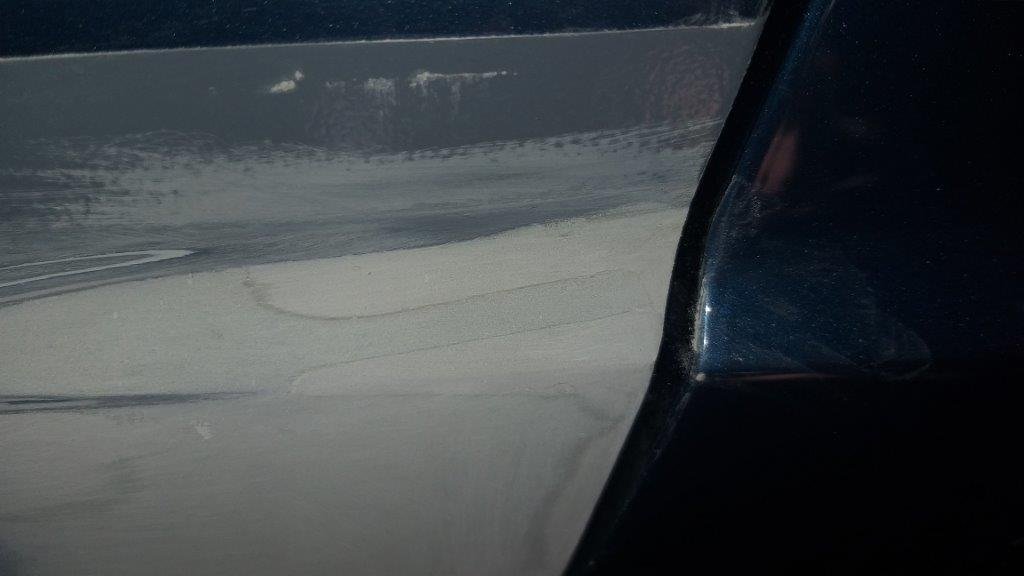
I've done a bit of creative sculpting on the back corner of the driver's door. Photo's don't really do it justice, but I'm much happier with the overall look. Just a wee bit more prep work and I'll call that door done and ready for a bit of paint.
-
With the front corner looking way better I moved onto the back corner. The door has two body lines plus the top of the door that lines up with the back quarter panel. My adjustments had managed to get the upper body line and the top of the door to match the quarter, but the bottom line is well out of alignment. I suspect that this is due to a poor quality repair, probably the handy work of the same blind panel beater who got the colour match wrong. First photo shows the parts that line up pretty well. The rest of the photos show the ugly bit prior to me slopping a bit of bog about the place. With a bit of luck I'll get to post some updated pics once I've done a bit of sculpting. Thanks for looking.
- 194 replies
-
- 12
-
-
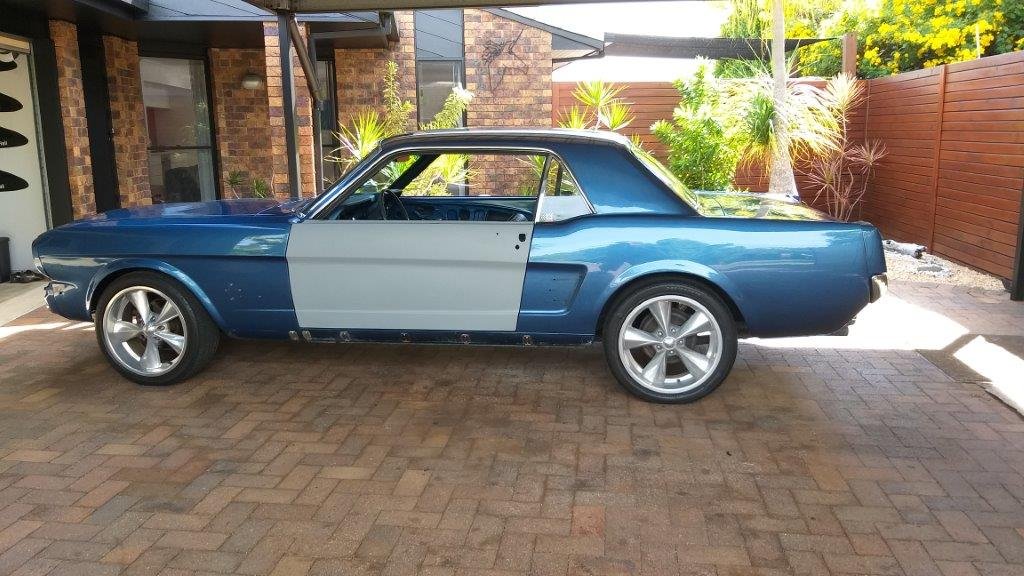
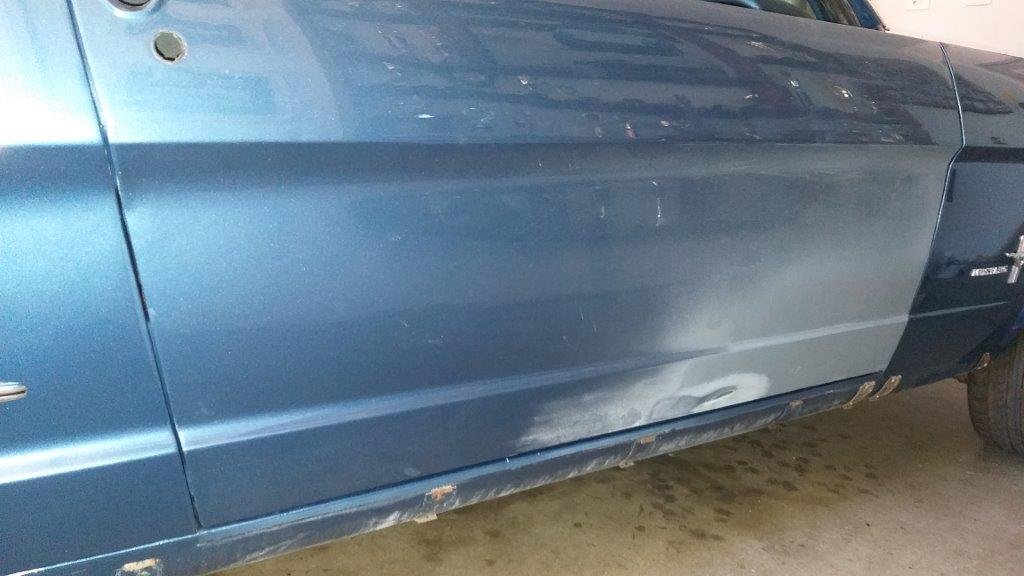
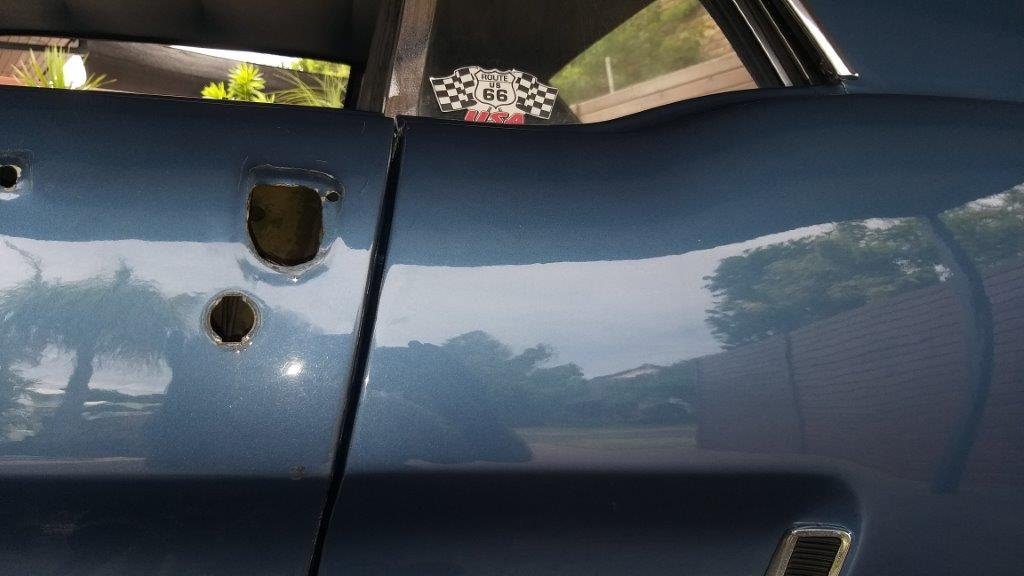
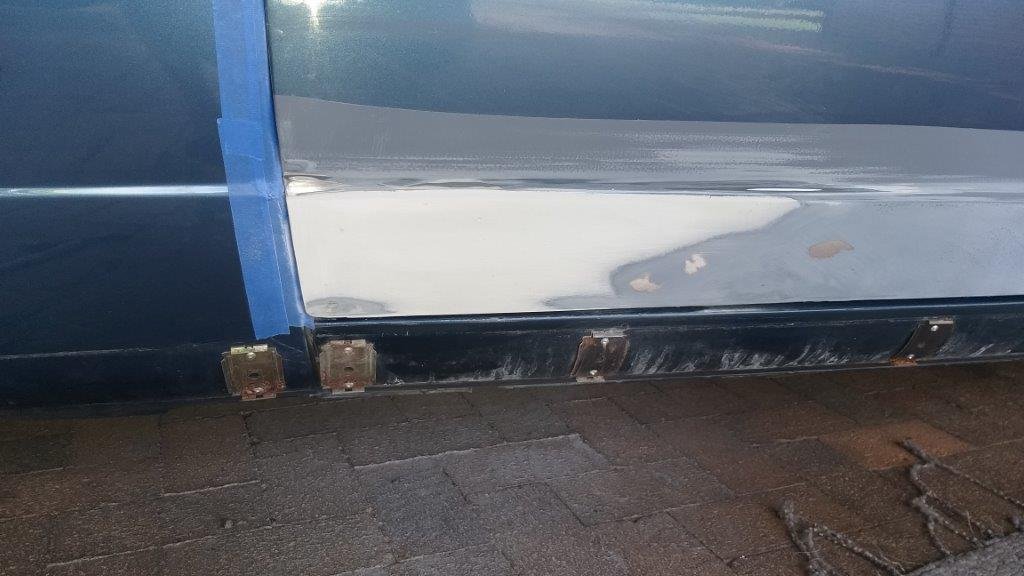
According to the Mustang Barrys the door gaps from factory were never that great, but I managed to get them a lot better than they were when I bought the car, so I'm relatively happy with the result. I refitted the front fender only to discover that the front lower corner was sitting proud. Gave it a little tickle with some 80 grit and it looks heaps better. In this photo you can clearly see the mismatch in paint colour between the door and the fender. It's only this door that is different so I suspect it was re-painted sometime after the initial repaint back in the USA
-
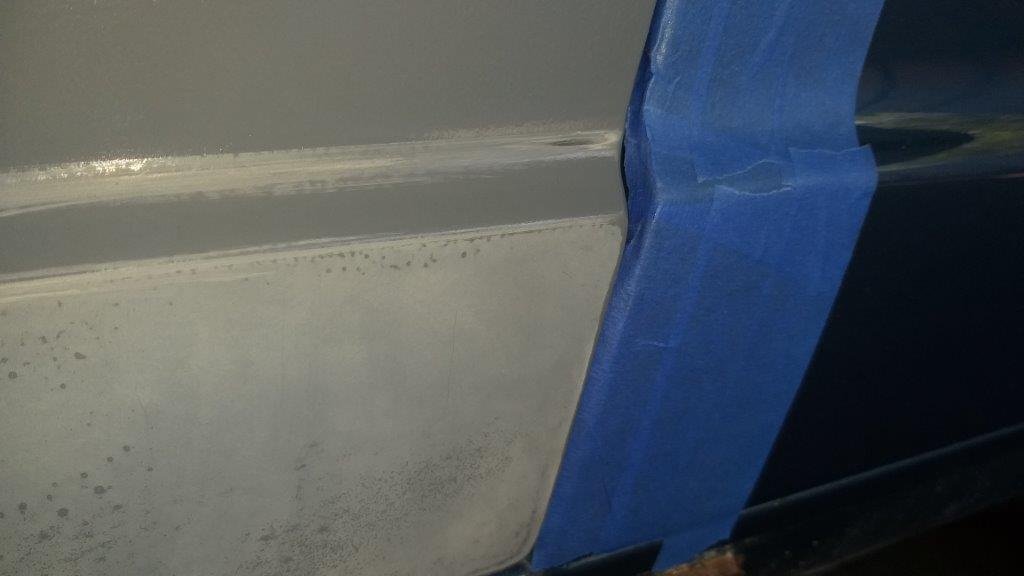
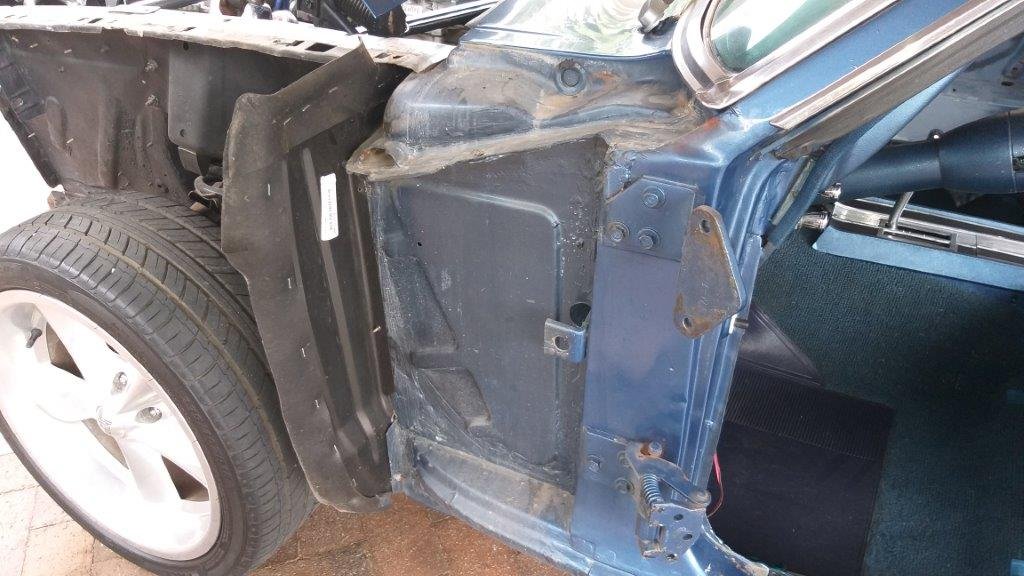
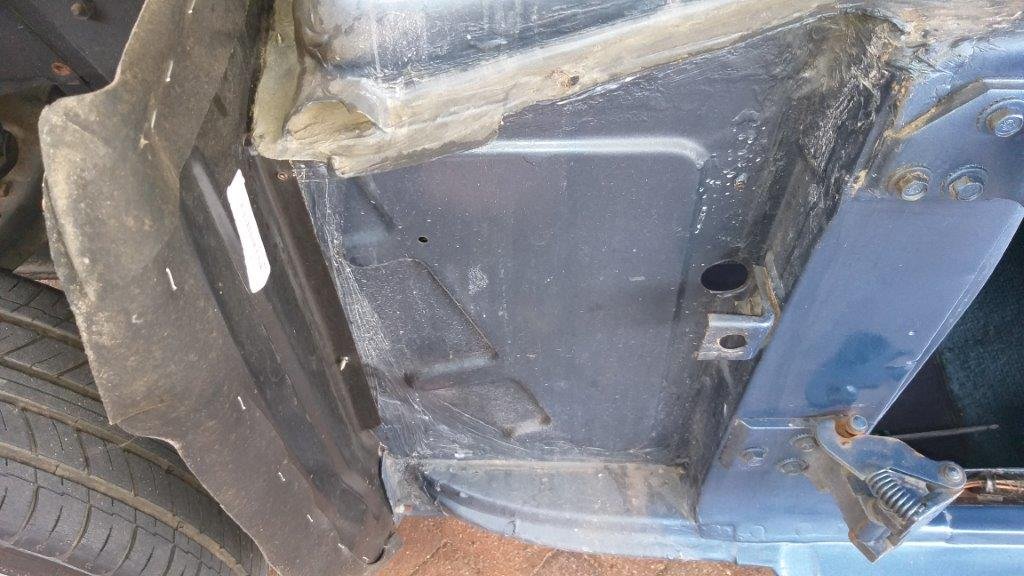
Chucked some primer on and then it was time for a quick test fit to check gaps and alignment. Uncle Google told me that the easiest way to line the doors up is to start off by getting the bottom and back gaps uniform with the fixed rear quarter and rocker panel and then to tweak the front fender to suit. So off came both front fenders which left the poor old Muzzy looking decidedly bare. Looks like someone has been here before as both splash panels have been replaced with Scott Drake replicas still sporting their labels. Date stamps say 2013 so must have been fitted two owners back. The chassis legs and inner panels look nice and solid with signs of the original Nightmist Blue factory paint.
-
In my last update I was battling to get the filler on the driver's door lower panel sanded evenly. Luckily @tortron stepped in with some much needed advice and a link to a really good "how to" video clip and I was soon back on track.