Flash
-
Posts
1,715 -
Joined
-
Last visited
-
Days Won
2
Everything posted by Flash
-
@Mike OReilly thanks heaps for taking the time to share your Thames adventures. Sounds like you have some bloody good memories of your van.
-
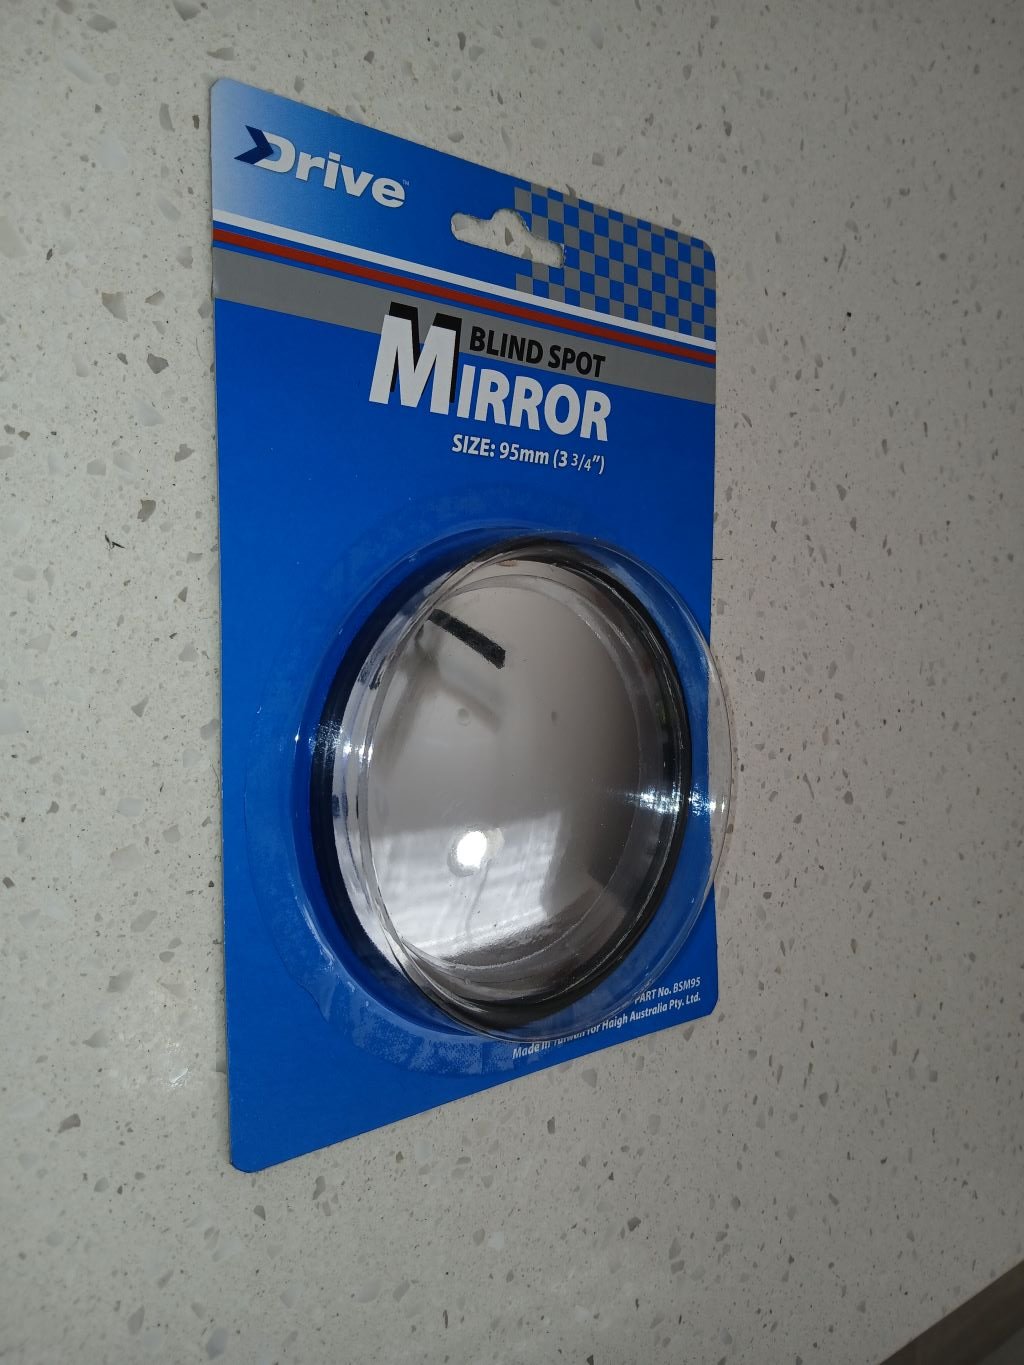
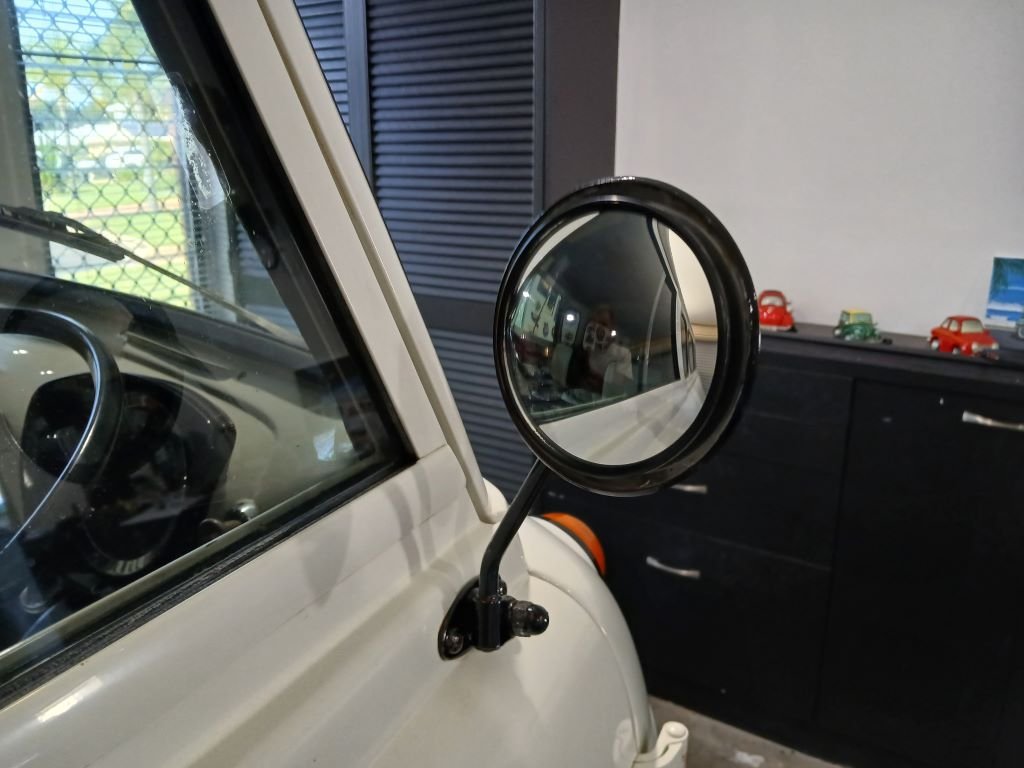
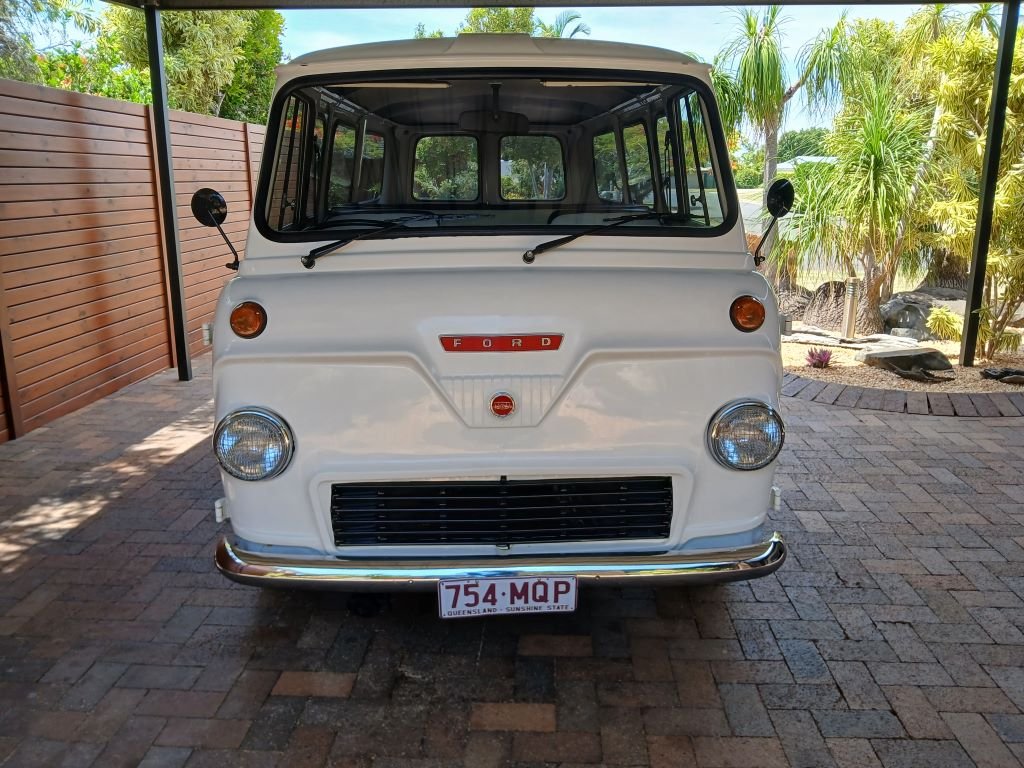
The old Thames is still going strong with no major issues at the moment, but the other day while driving into town I had a close shave with a little hatchback that was tucked into my blind spot. It left me a bit rattled so I figured a remedy was required. My first thought was to add one of those small blind spot stick on jobbies to each of the mirrors, but I soon realised that I didn't have enough real estate due to the factory mirrors being pretty dainty by modern standards, so a more cunning plan was needed. Upon browsing the shelves at my local parts place I came across a 95mm diameter blind spot mirror, which was just a few mm shy of the size of my existing mirrors. Figured I'd give it a try, so I grabbed one. Did a quick peel and stick job in their carpark. What an improvement. So, I immediately ran back in and grabbed another. By this stage it had started to rain so I held off fitting the second mirror until I was back home and the van had dried out. Photo of the final result: Hopefully near encounters with small hatch backs are a thing of the past for me.

-
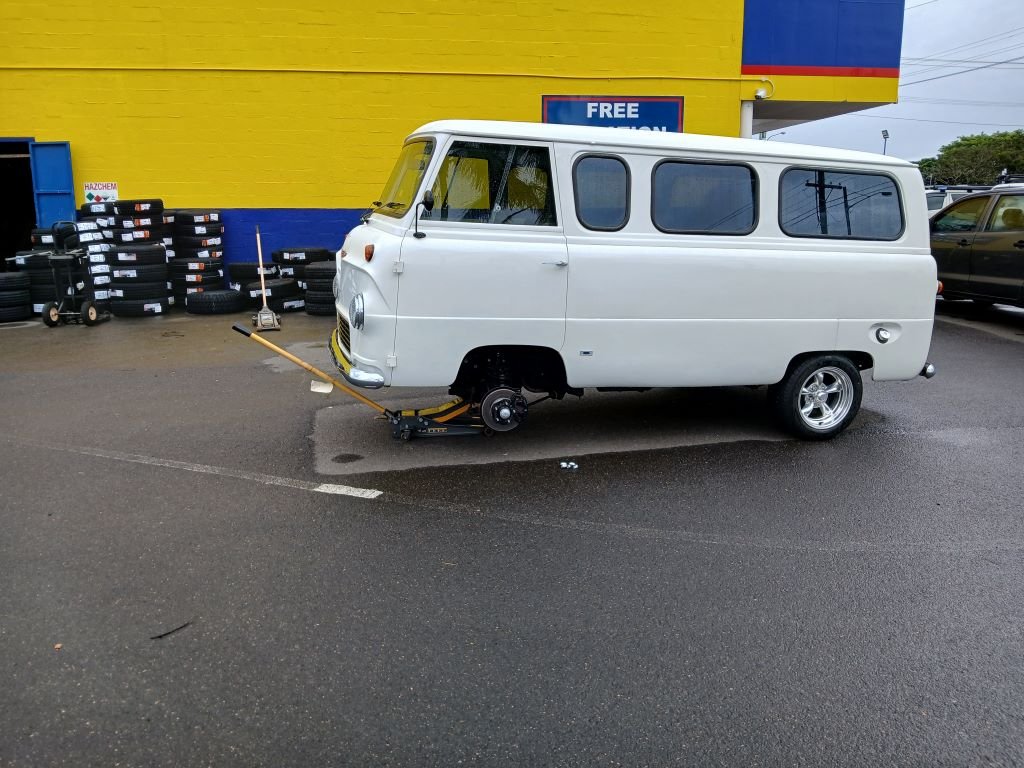
Finally managed to get a gap to replace the front tyres today.
- 739 replies
-
- 12
-

-
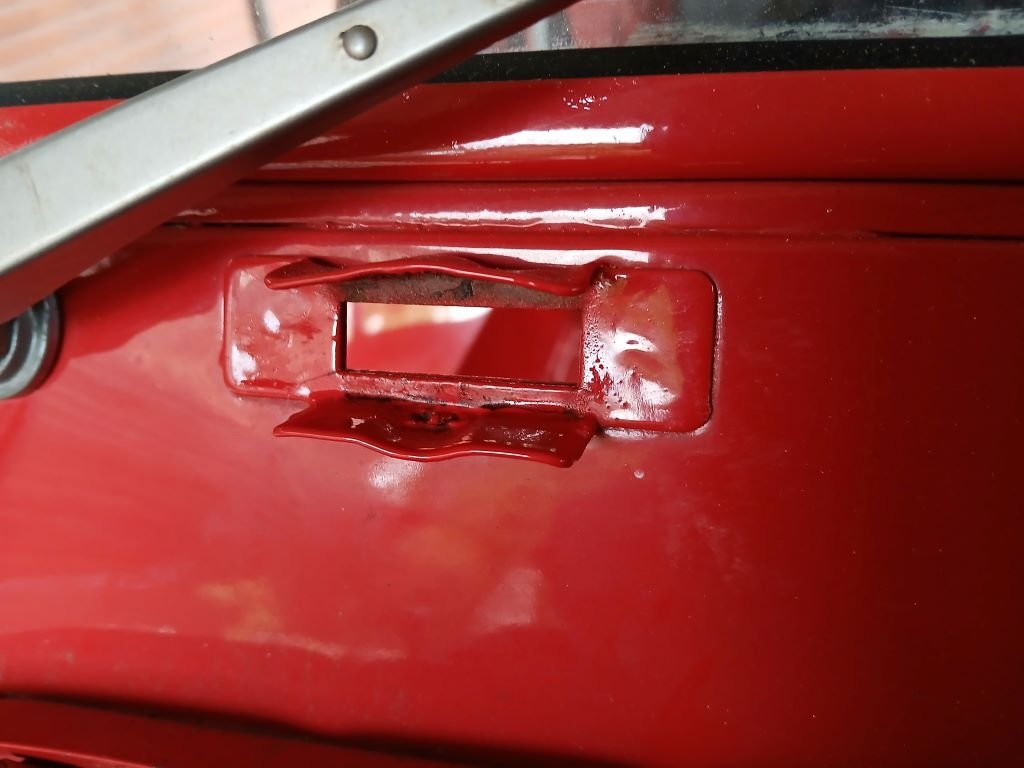
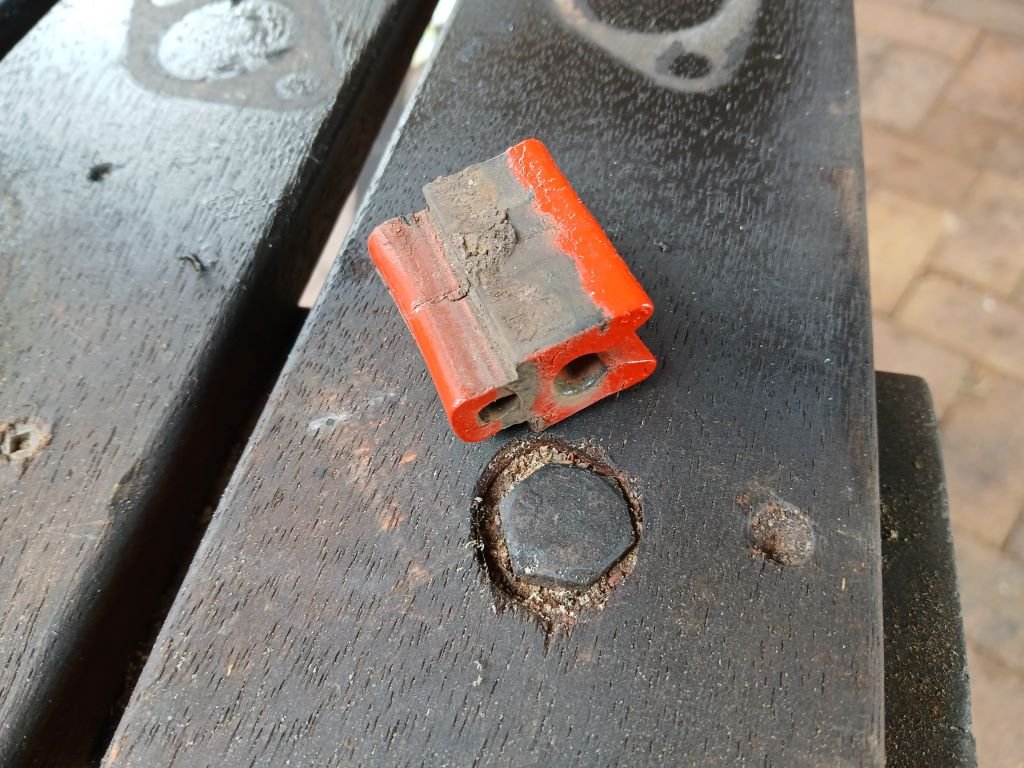
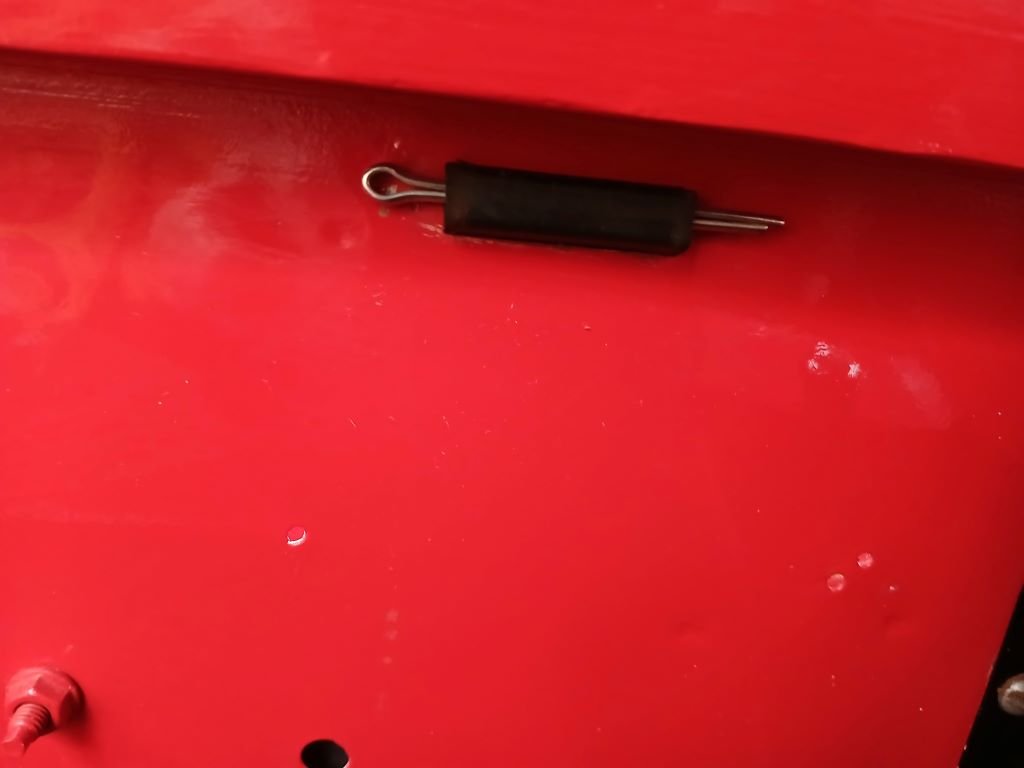
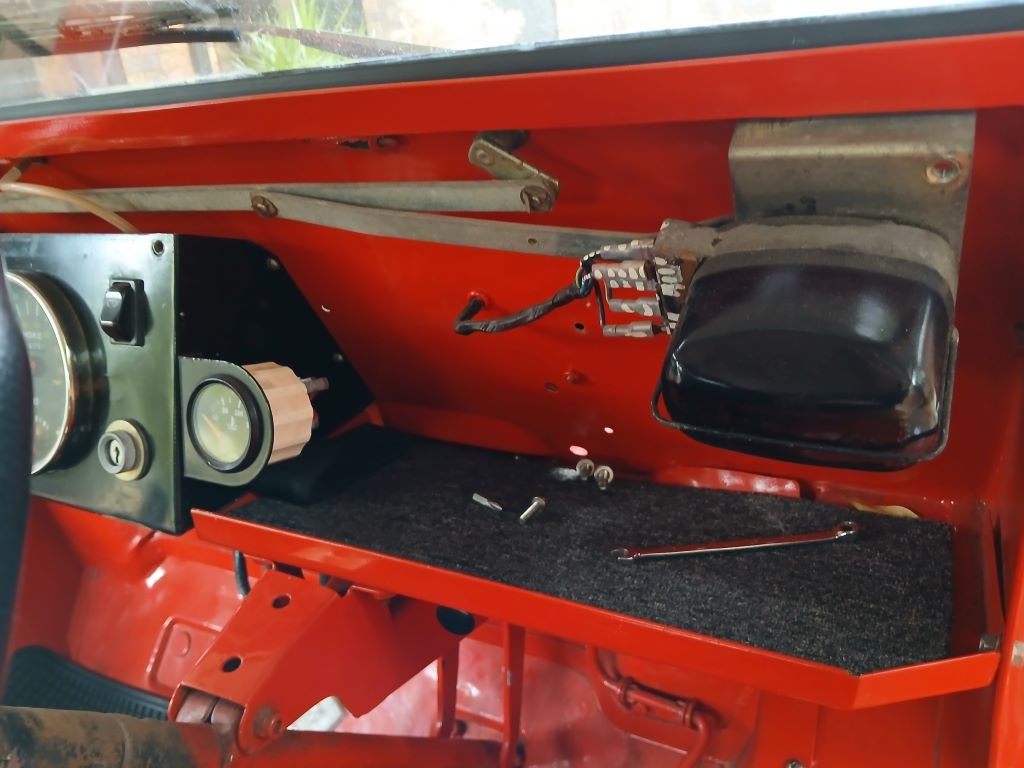
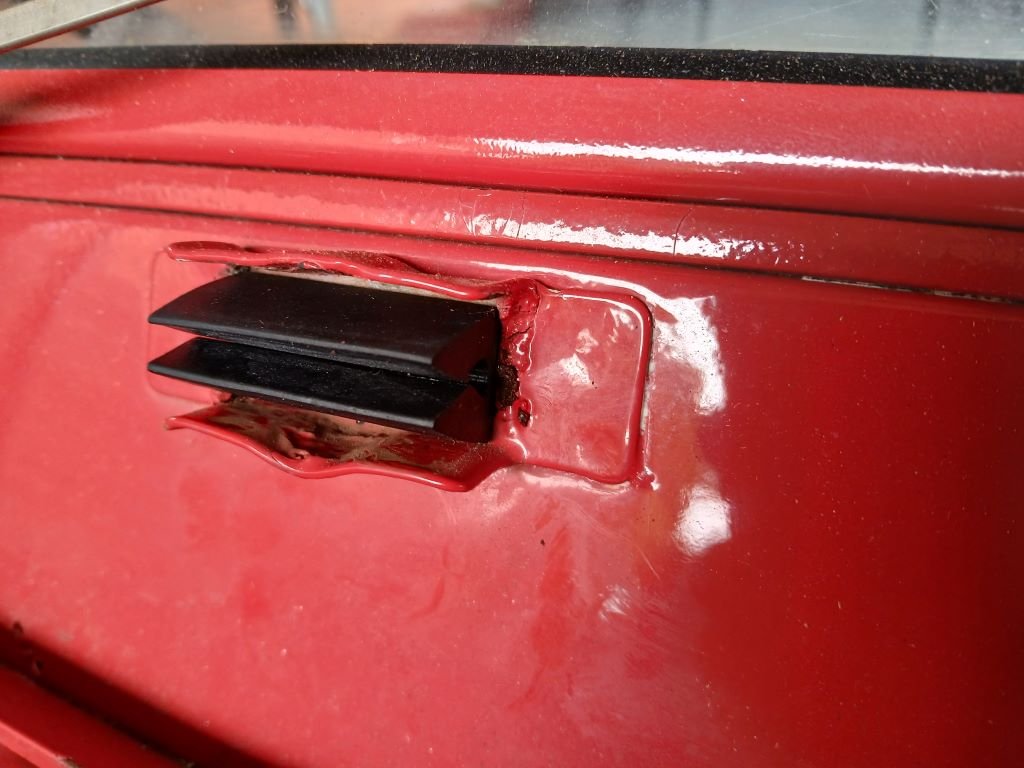
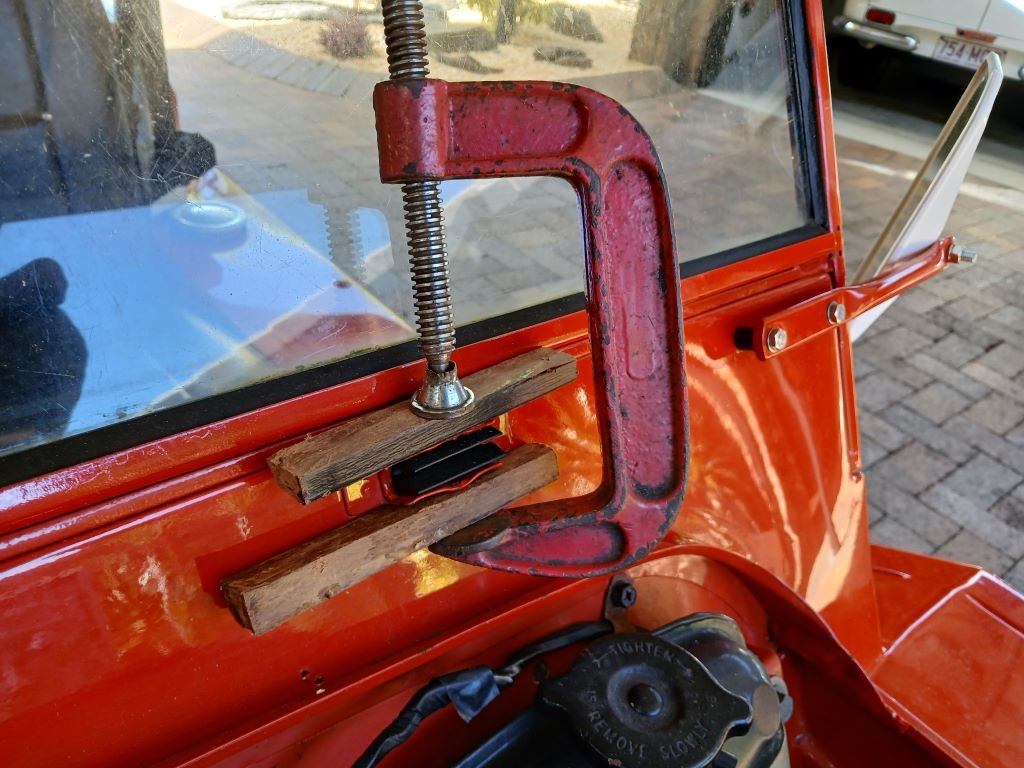
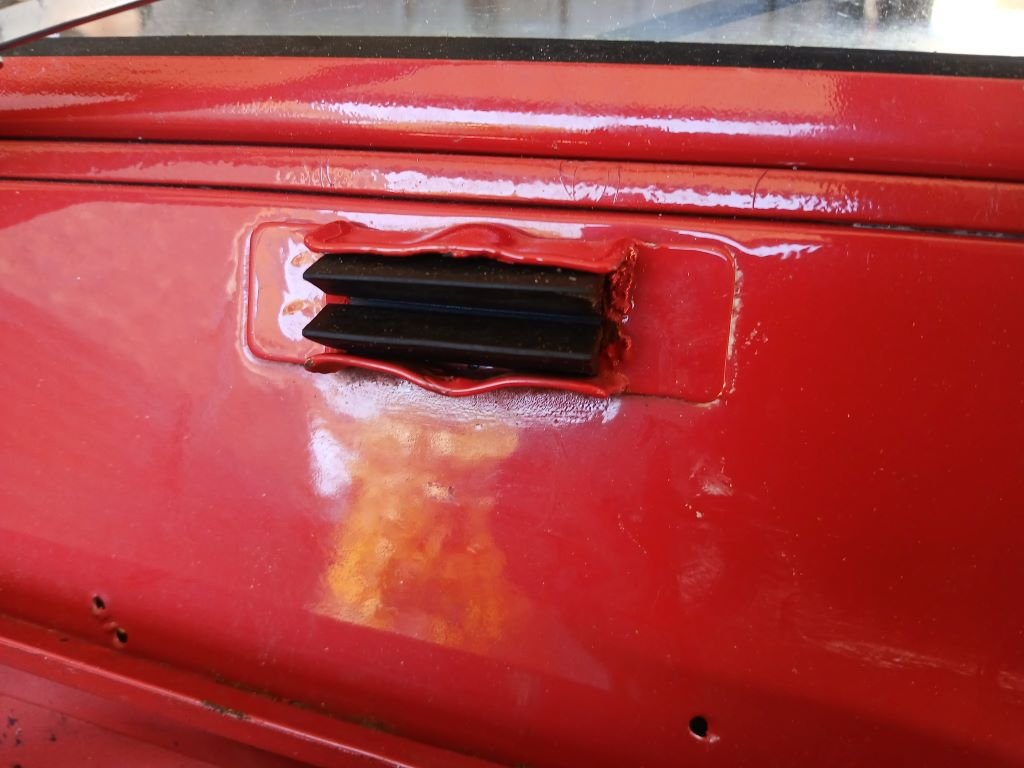
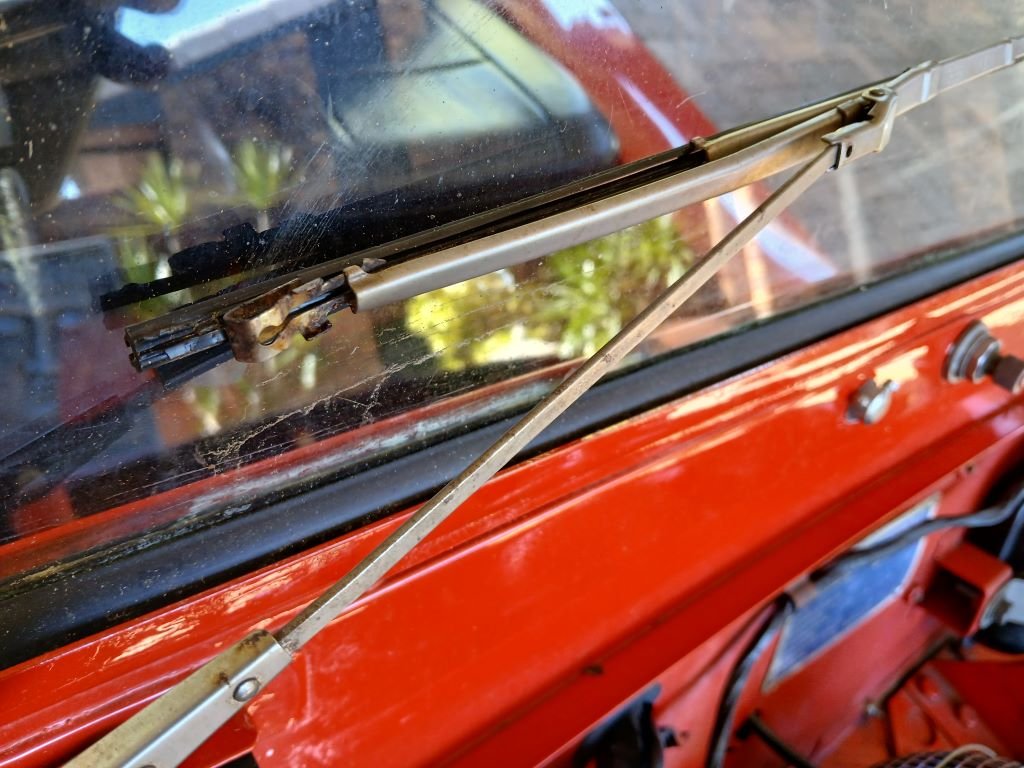
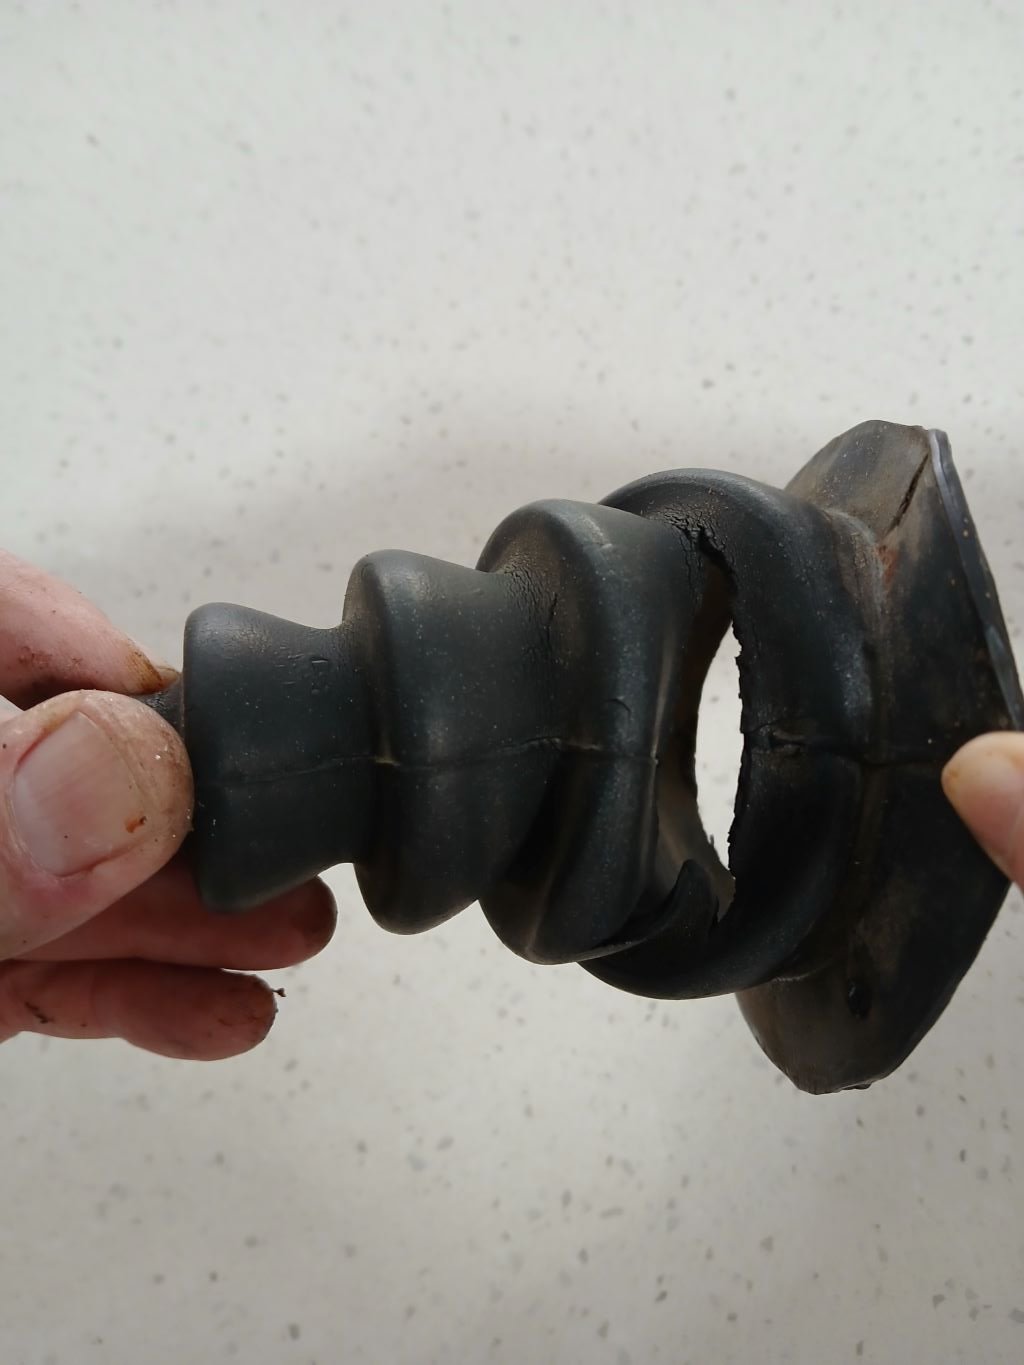
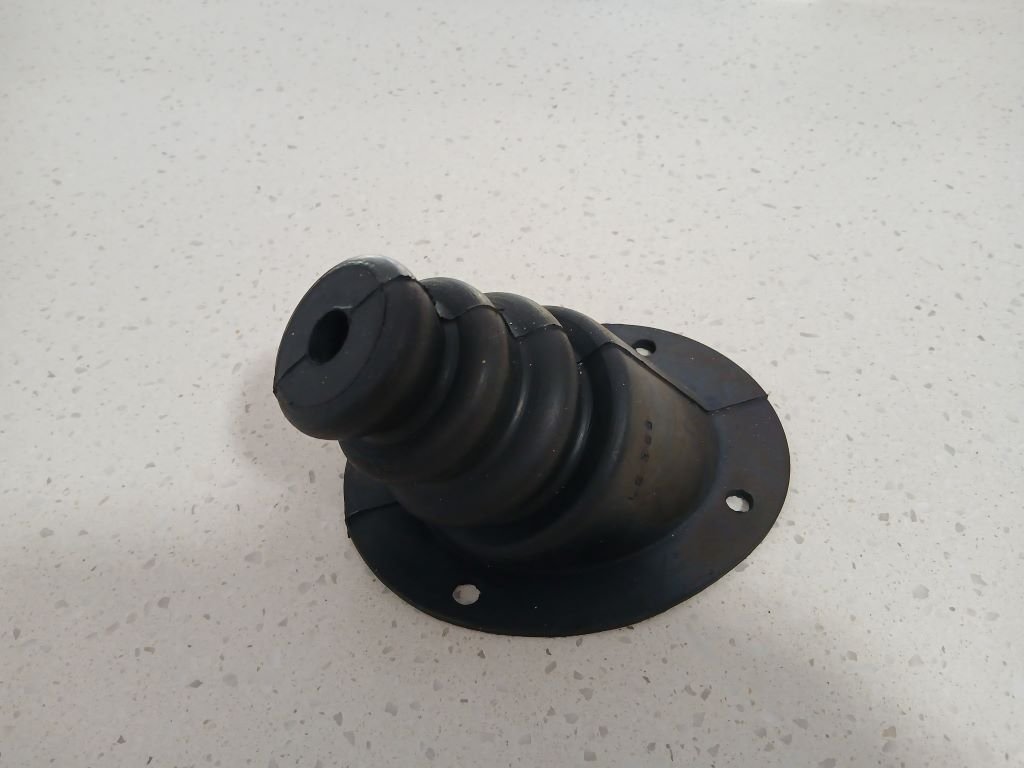
Thought I'd treat myself to two easy jobs for a change. First up the the replacement of the bonnet hinge support rubbers. The Moke has an interesting setup in terms of bonnet hinges. It consists of two rounded metal tabs on the back edge of the bonnet that "clip" into a little holding rubber and then swivel in that rubber when opening or closing the bonnet. The nice thing about the setup is that you can take the bonnet completely off for engine maintenance just by unclipping the tabs from the rubber. The old rubbers were looking a bit sad, not to mention being covered in overspray: Looks like old mate had painted the body with the rubbers in place, so I was a bit worried about what I would find paint wise once I'd removed the old rubbers. Luckily not too bad. The rubber is held in place by a split pin pushed through from the back. Close up of the old rubber once removed: Installing the passenger side replacement was a breeze. Here is a photo taken from inside the Moke cabin showing the locating split pin in place : I nipped the ends over after taking this photo just to keep the pin in place. Moving on to the driver's side it was immediatley clear that it wasn't going to be that easy as the back of this rubber sits behind the wiper mechanism cover plate: Luckily not too bad to remove which then revealed the wiper setup. I was expecting to find a cable driven wiper setup like that fitted to the older Minis so this was a bit of a surprise. Anyway, quickly swapped in the new rubber on that side and buttoned up the wiper cover once again. Went to refit the bonnet in its new support rubbers and the hinges felt far to loose for my liking allowing the bonnet to easily slip off the rubbers. With visons of bonnets crashing off and taking great gouges out of the mudguard paintwork in my head I quickly removed the bonnet and gave the rubbers a closer look. Turns out that the original rubbers had fatter sides that sat nice and tight in the metal U bracket, whereas the newer rubbers have thinner side walls. You can clearly see the gaps in this close up: Yikes, what to do to remedy this without damaging the paintwork. Scratched my head for a bit then came up with just the tool: A few slow turns of the clamp screw followed by a little rest period between turns and things were looking much better. Even managed to do it without stuffing up the paintwork. Took to the other side with my clamp setup and then slapped the bonnet back on. Needed a good push to get the metal tabs into the new rubbers, so I'm a happy bunny once again. Next on the list was a set of replacement wiper blades. The old ones were well flogged and the driver's side one had started to come apart: A set of fresh ones that I sourced from Minisport, but originally supplied by Minispares UK if the packaging is to be believed. Gave the original stainless steel wiper arms a good polish with some Autosol before installing the new blades. And that's another small job ticked off the list. Thanks for looking.
- 9 replies
-
- 14
-
-
Belt dust is usually a sign that soemthing is binding up. May be a silly question, but have you checked that your alternator is spinning freely ?
-
No TradeMe here in OZ so eBay is my go to site for online stuff. I found my Dayco on there.
-
Yep, that's my alternator belt drama on the same van. In that instance the belt in question is one of those serpentine 4PK belts. Also screams like a banshee on initial start up or when I'm running all 3 thermo fans and headlights. Looks like I'm going to have to fit a few idler pulleys to get more wrap on the alternator pulley to resolve that issue. Not sure about the imperial versus metric measurement thing.
-
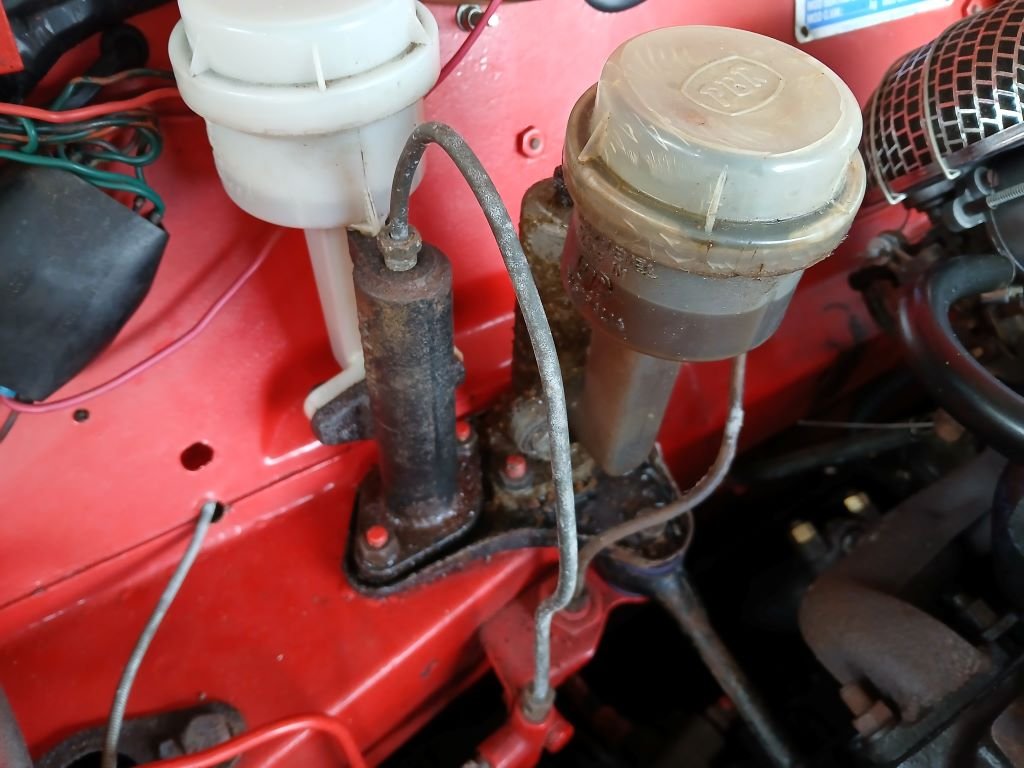
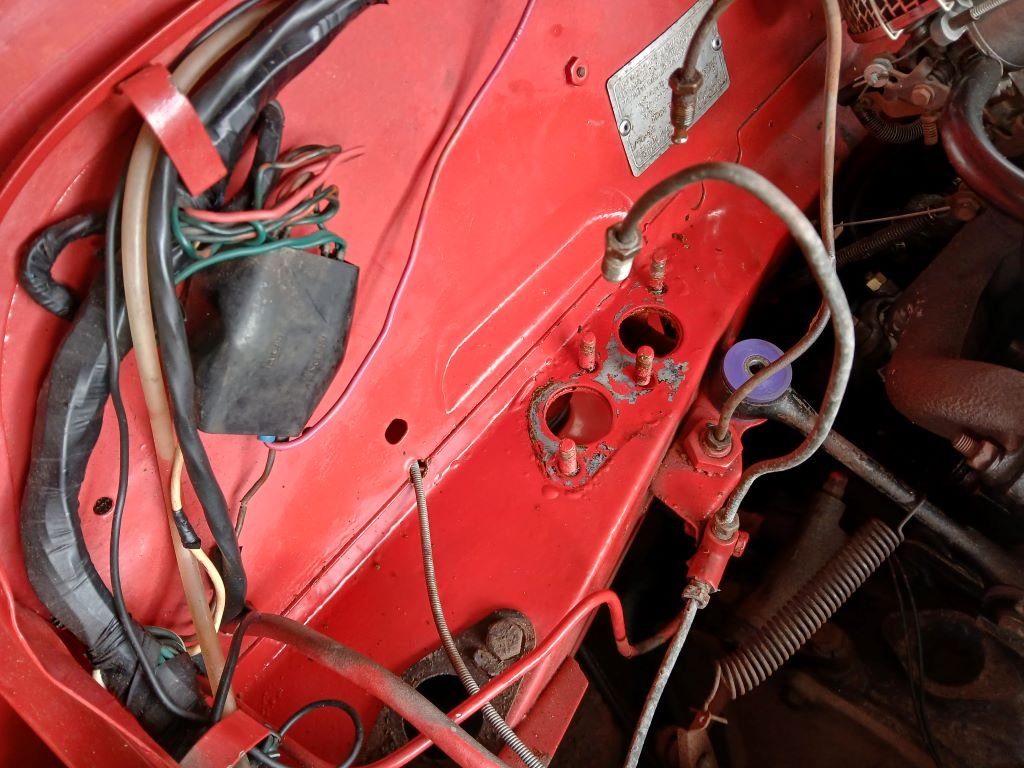
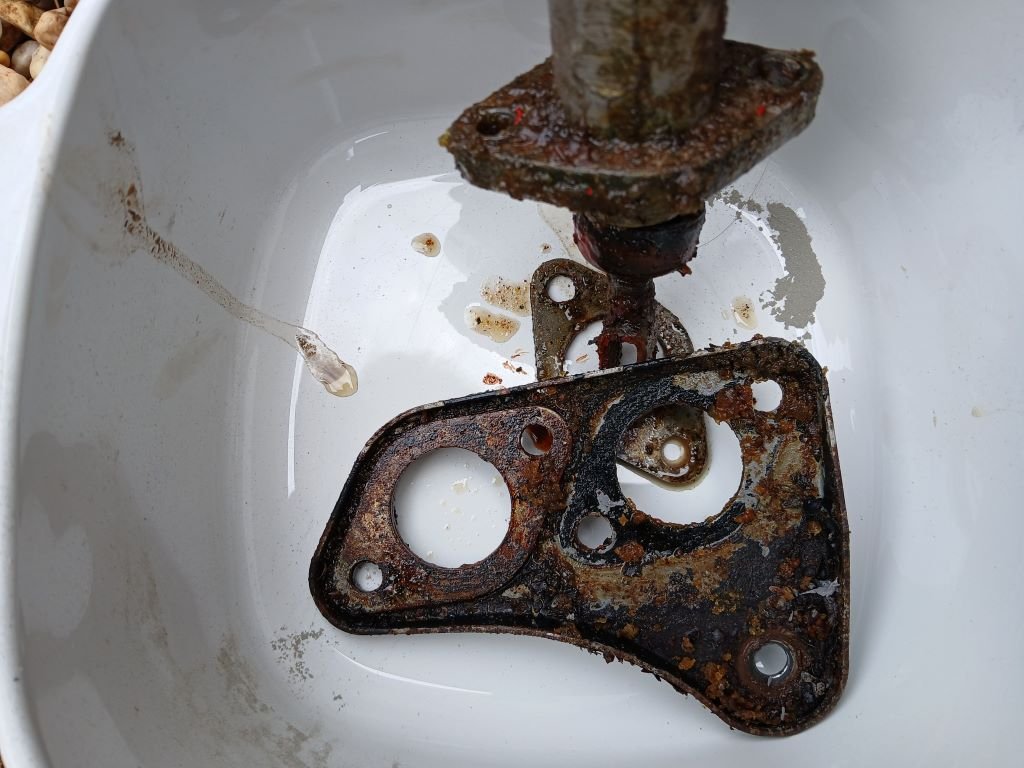
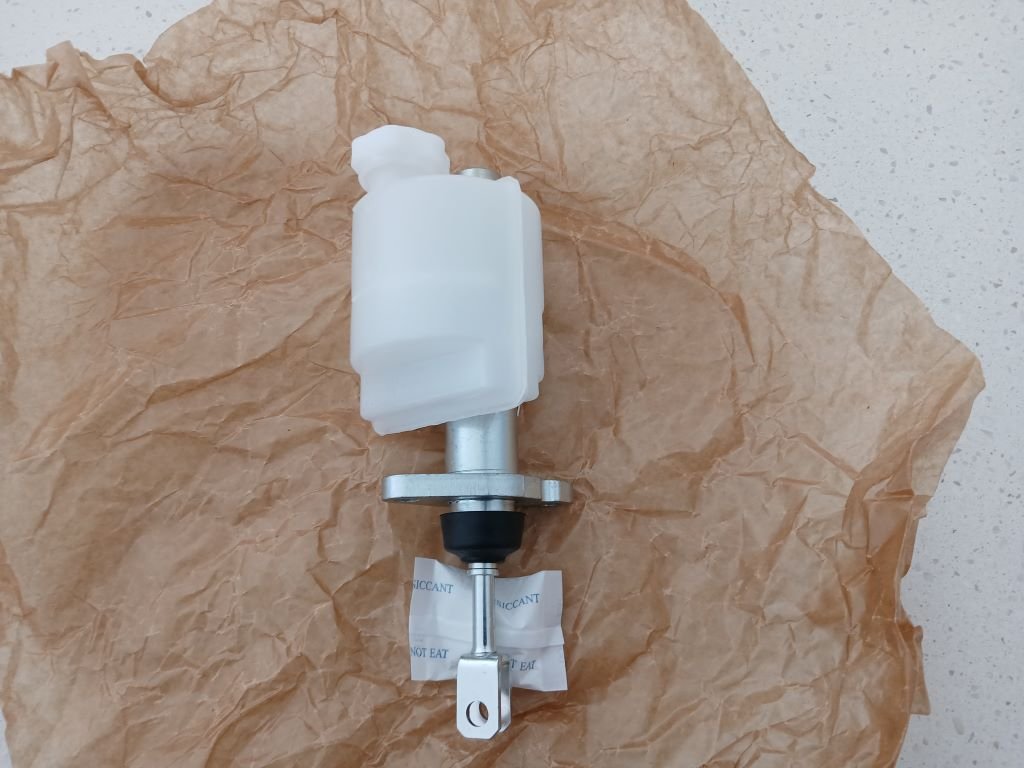
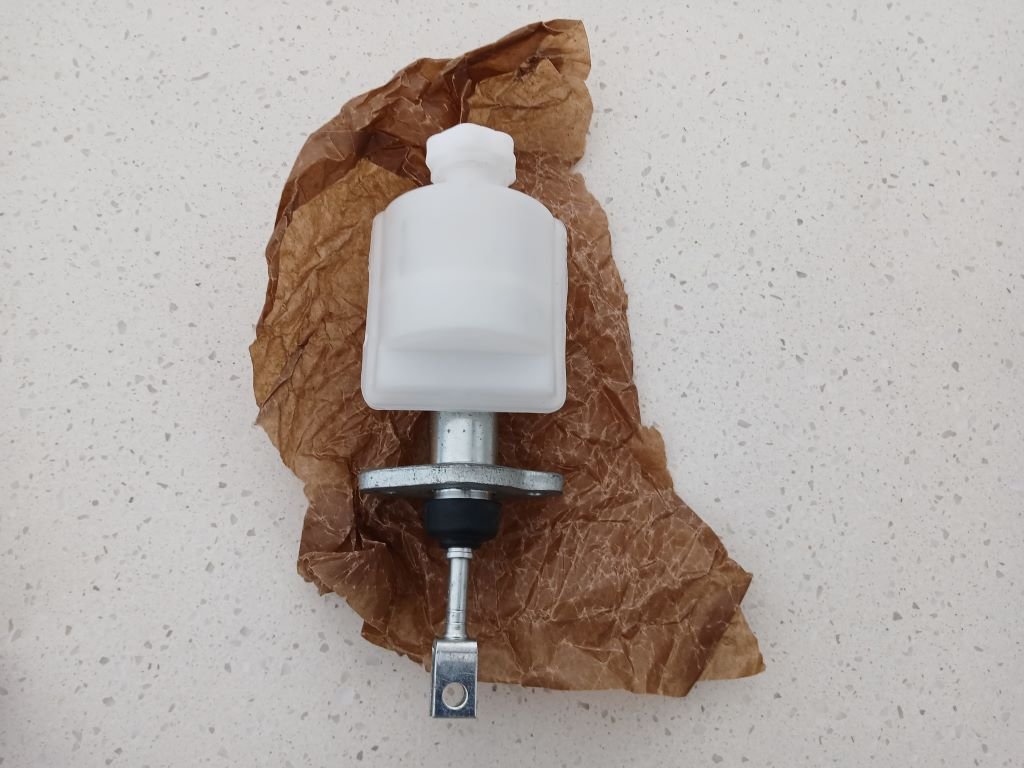
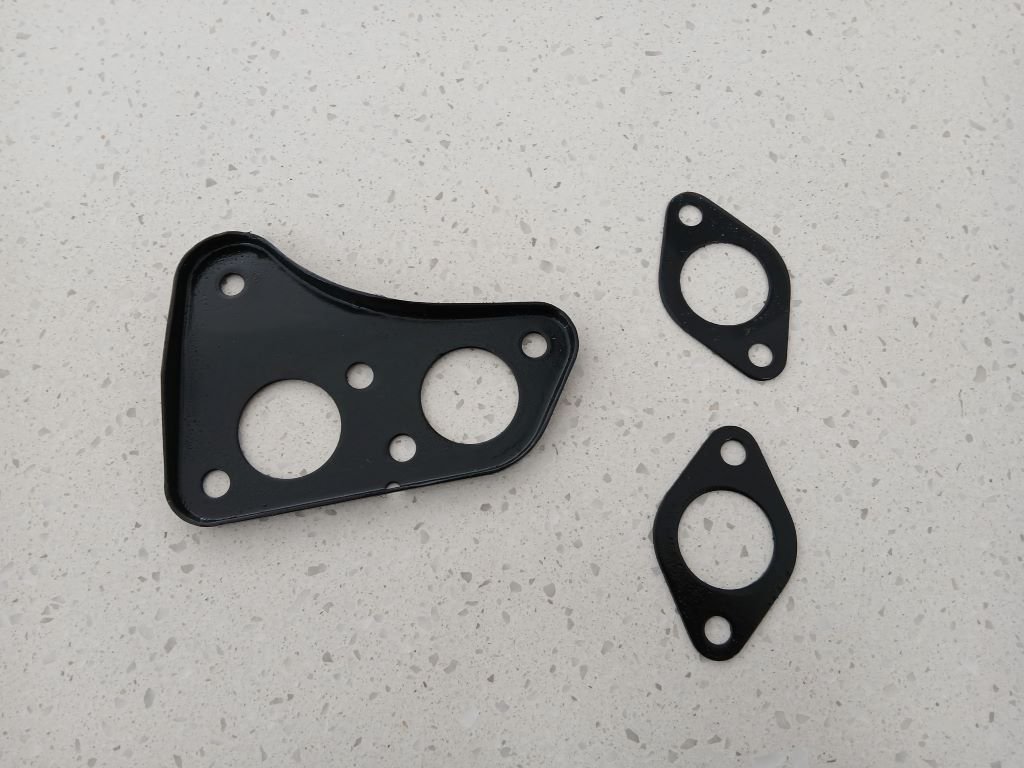
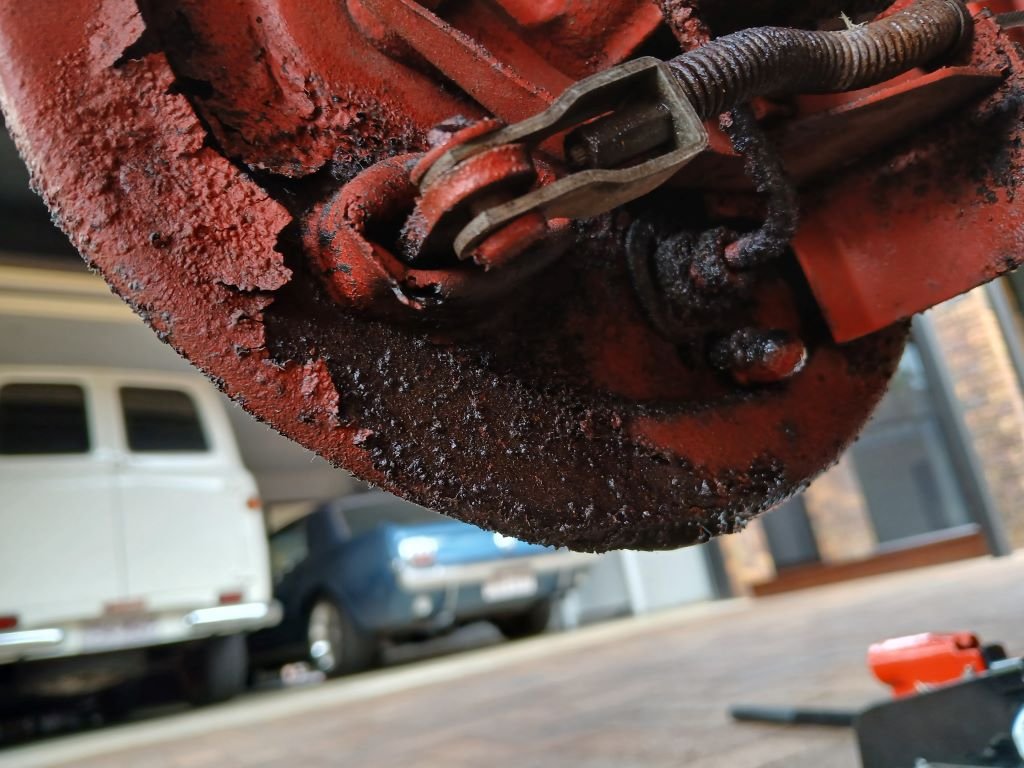
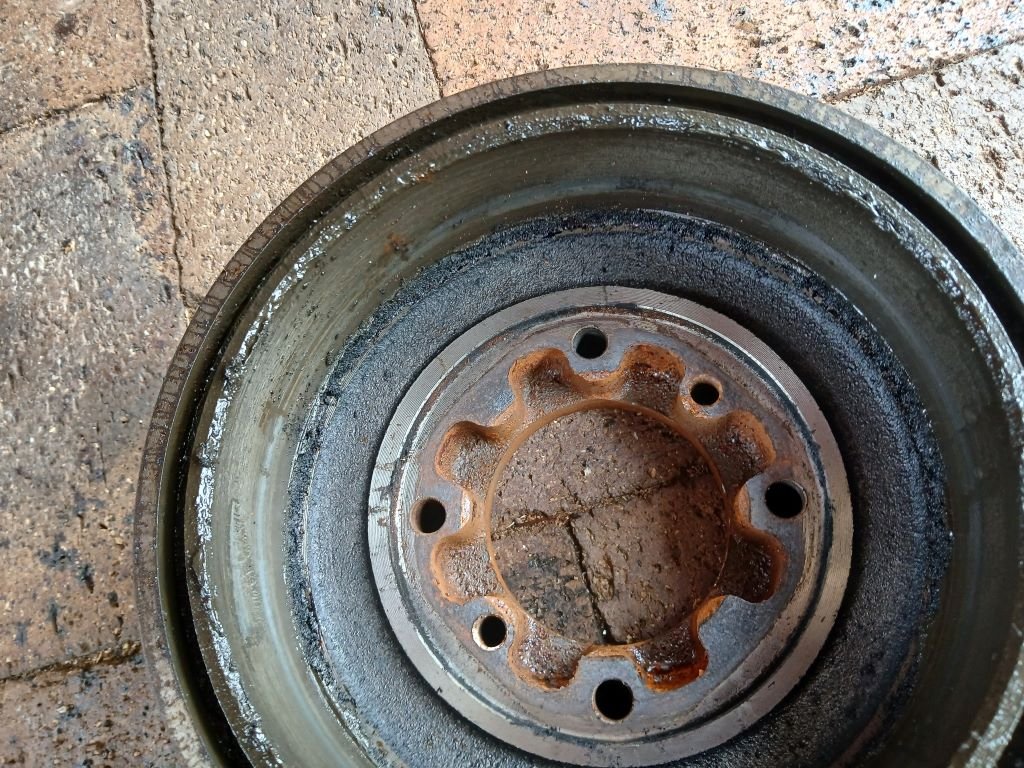
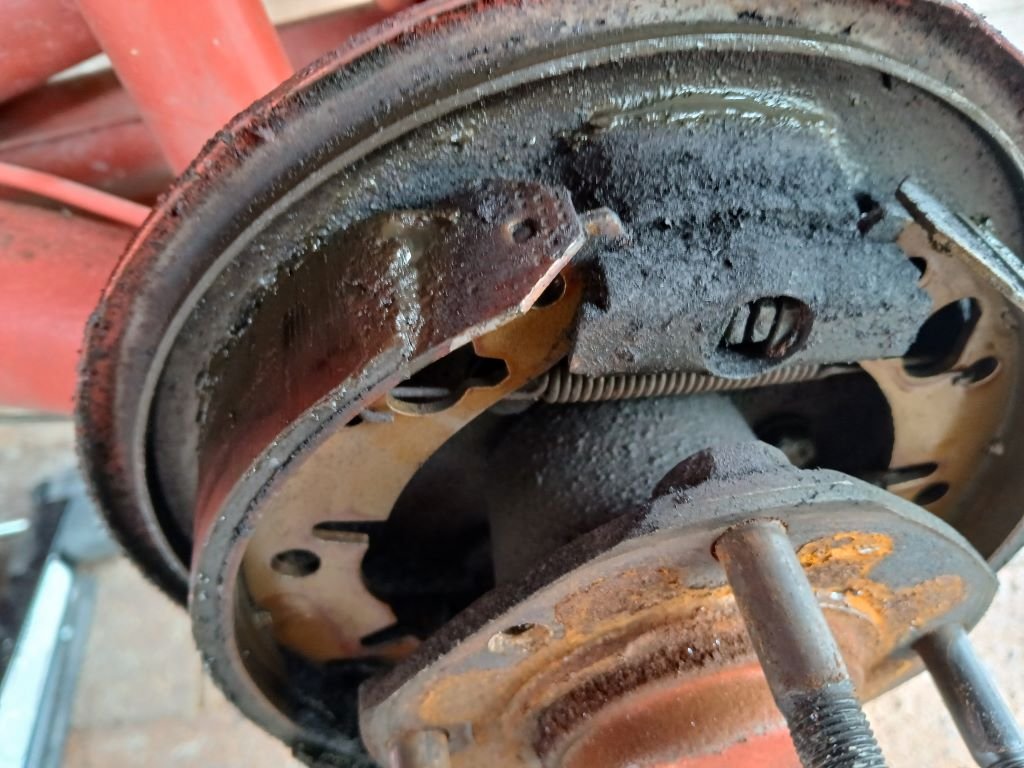
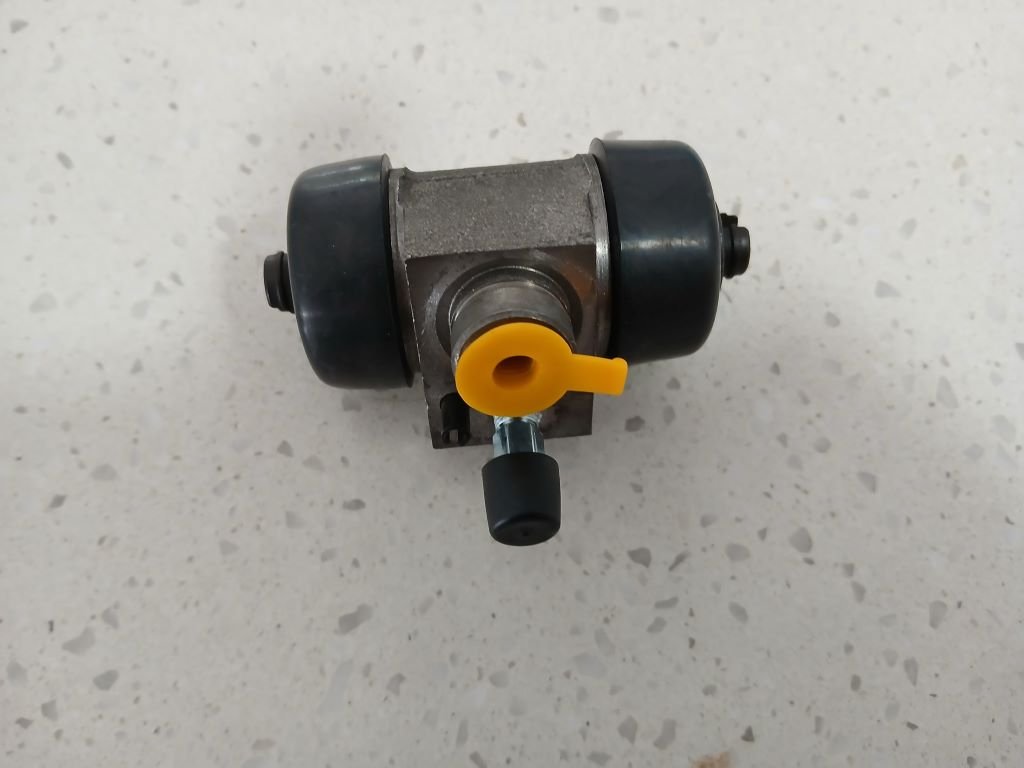
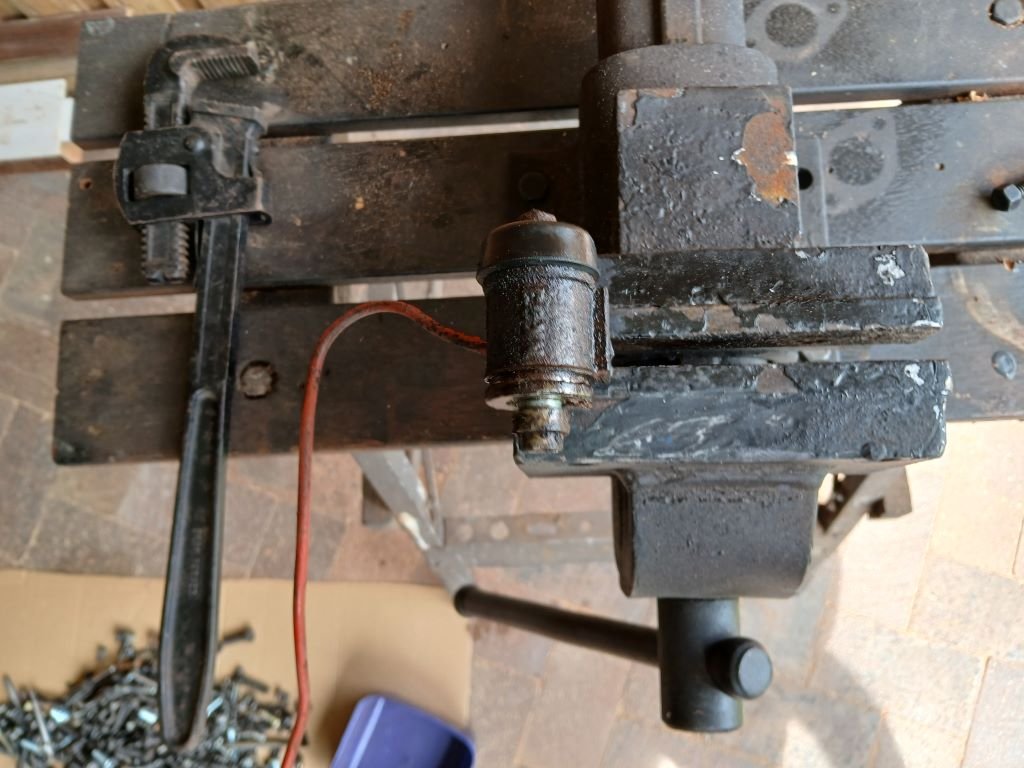
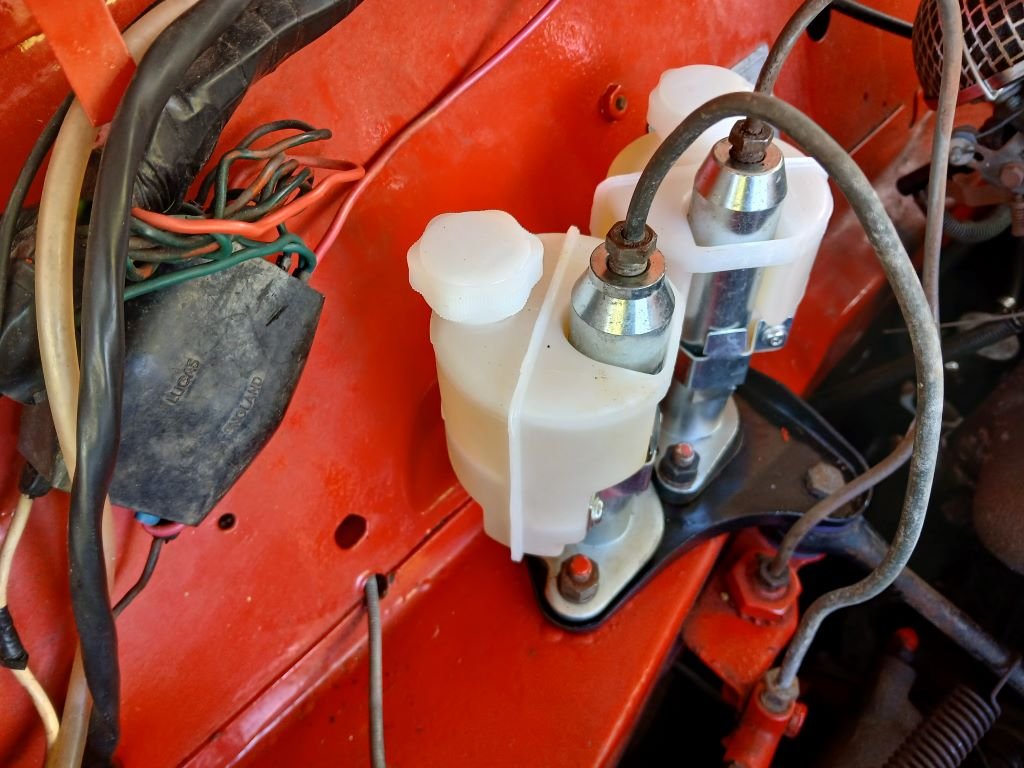
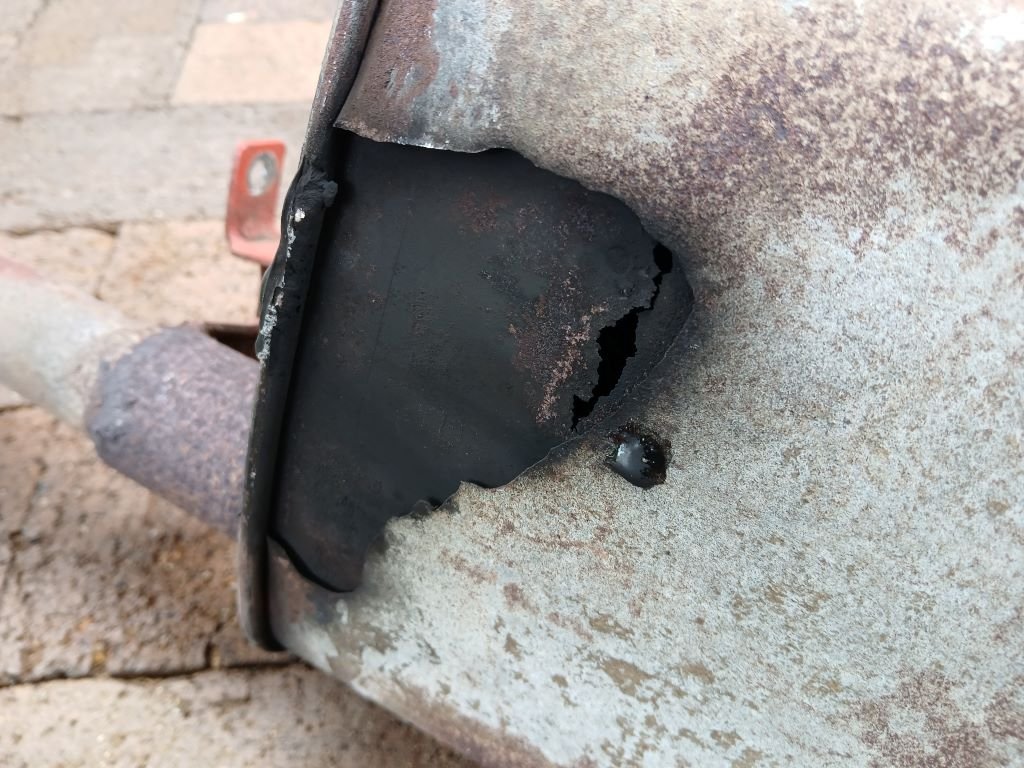
Checking fluids recently for my good lady Mrs Flash, I noticed that it was rather wet looking around both the clutch and brake master cylinders. I'd rekitted the brake master cylinder a while back and at the time I noticed that the reservoir had a slow weep, but figured it would keep for another day. Decided to pull everything out for a closer look. Yep, definite signs that fluid has been making contact with the paintwork underneath: The base plate was pretty crusty looking too: In the photo above you can see the business end of the clutch master cylinder with definite signs of a leak. Decided to treat Mrs Flash to a new pair ..... of master cylinders I mean Clutch : And brake: Started off by giving the base plate and spacers a good clean, a hit of sand paper and a spritz of my favorite VHT satin black engine enamel. Turned out like so: Whilst I was going through the brake system I also noticed signs of a leak from the left hand side back brake cylinder. Popped the drum off for a look see. Yummy: So got a pair of fresh back wheel cylinders added to the same order: Came to strip out the offending cylinder only to discover someone had been here before and had managed to round off the flare nut. Luckily I was able to remove the old cylinder complete with hard line. Clamped the flare nut in my vice and took to the cylinder with a pipe wrench. Nothing subtle about my methods: Got everything back together, gave both systems a good bleed. Much neater and we should be good for a while longer in the brake and clutch departments. Thanks for looking.
- 9 replies
-
- 15
-
-
Welcome to my world mate. I've been battling with belt issues on my Toyota 3Y powered Thames van ever since I completed the conversion. I'm running a V belt on the a/c compressor and I'd be lucky to get around 100km of travel before the belt started screaming like a banshee. Tightening the belt would last for another 100km or so and then back to the same problem. So far I've replaced 2 Gates branded belts and had the same issues with both. Have now moved over to a Dayco belt which so far has had no issues (around 400km of travel). I have been advised by other old schoolers that the cogged belts like the one in your photo are prone to issues and the better option is a wrapped belt which is a solid belt without the little teeth on the inside. Some spares outlets only stock the solid belts in inch sizes so you would have to work out what size you need. So in summary I'd be trying either a Dayco belt or a wrapped belt, but making sure you get the correct thickness for your pulleys is critical. Hope this helps.
-
While I was grovelling around under the Thames fitting those front shocks I noticed quite a bit of uneven tread wear on my front tyres, so while I was in town today I dropped in for a wheel alignment check. Thought I'd try somewhere else as I wasn't overly impressed with the last place. Turns out the toe in was sitting at +11.20 degrees overall .... WTF. How did the last guy get it so wrong and how did I not notice the issue earlier ? I've done just 4.500km on those tires and the left hand one is absolutely rooted, so next week Mamma is going to need some new shoes. Seeing the Thames next to modern day utes always gives me a laugh. The thing looks absolutely tiny.
- 739 replies
-
- 13
-
-

-

-
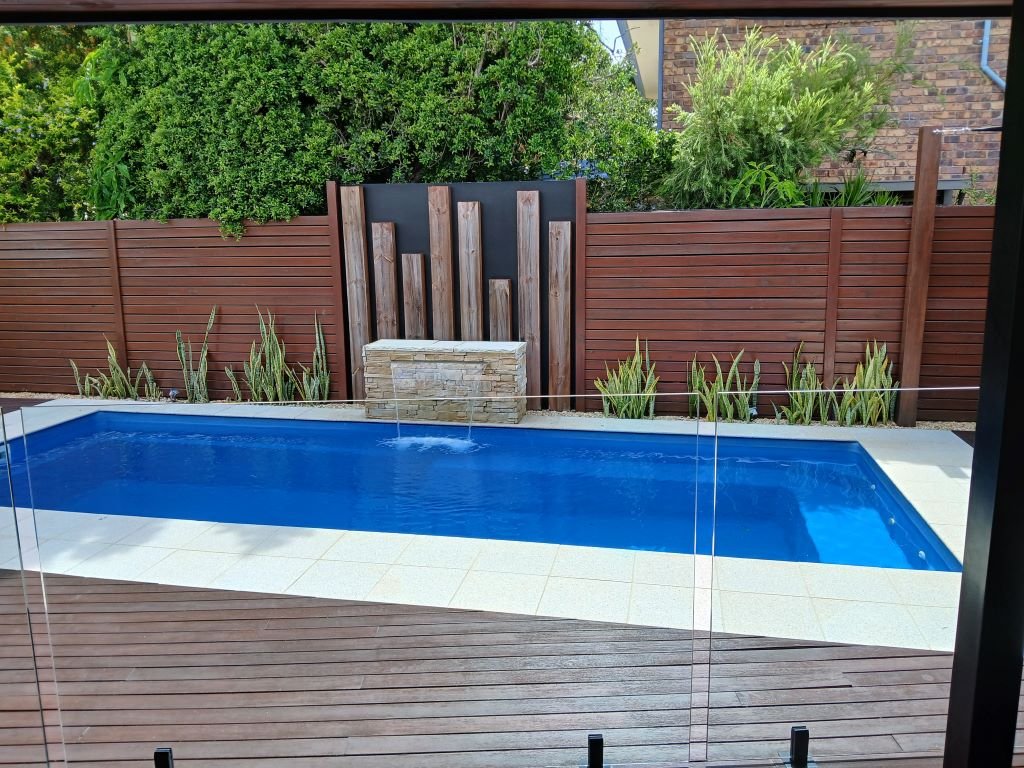
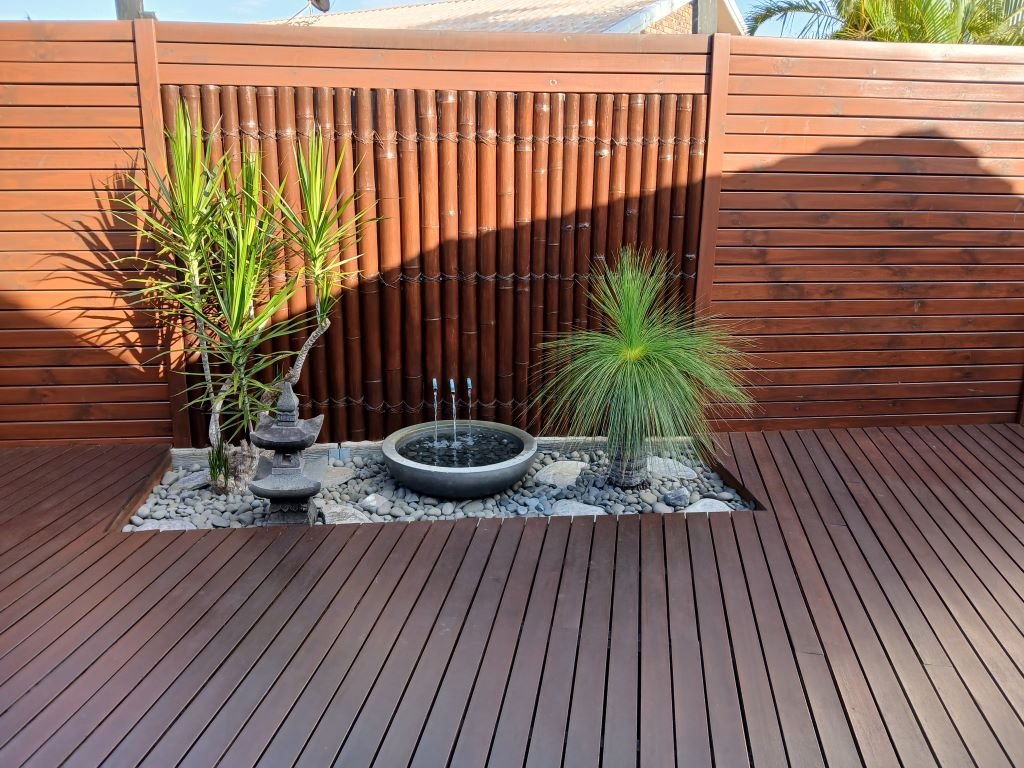
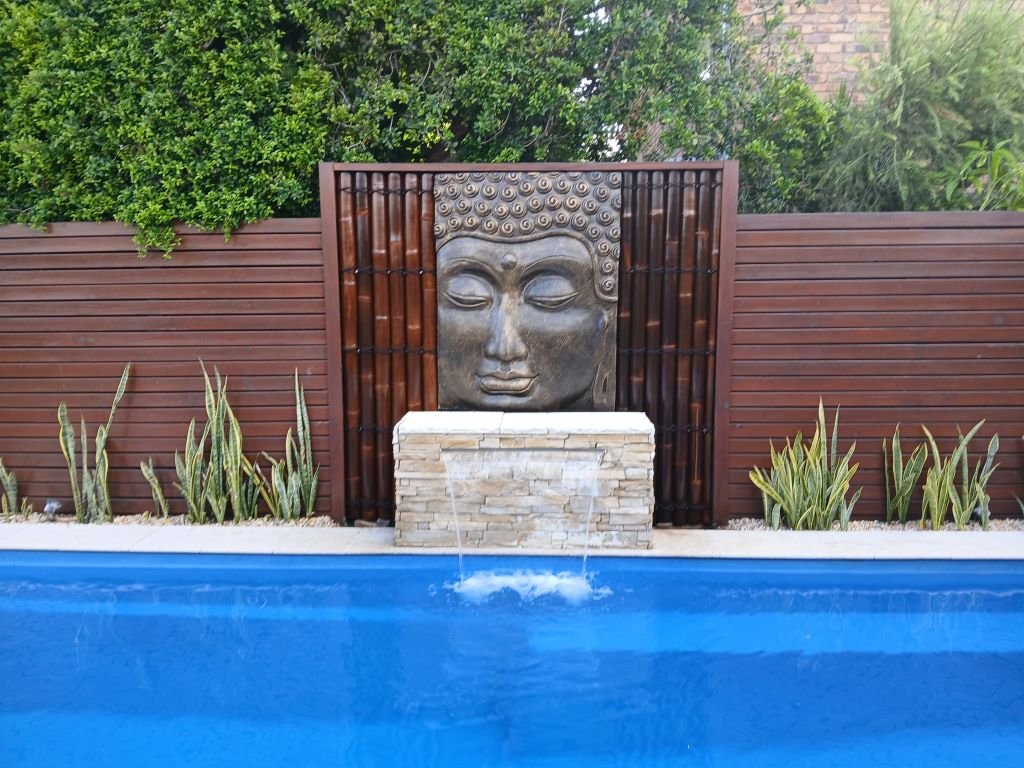
Here you go @Nominal Before: The feature timbers were starting to look a bit shabby. A good pressure clean would sort them out for a while, but being so close to the pool the cleanup aftewards was an absolute nightmare. So we decided to go for something a bit easier to maintain. And after : The trick was finding panels long enough for the job. Most panels come in either 1.8 or 2.0 long, but we needed 2.2 and my OCD wouldn't have allowed me to join panels or leave a gap at the bottom. Bamboo Land had 2.4 long panels in stock, so it was worth making the trip. Here is a photo of another little bamboo panel related project that we did in another part of our garden:
-
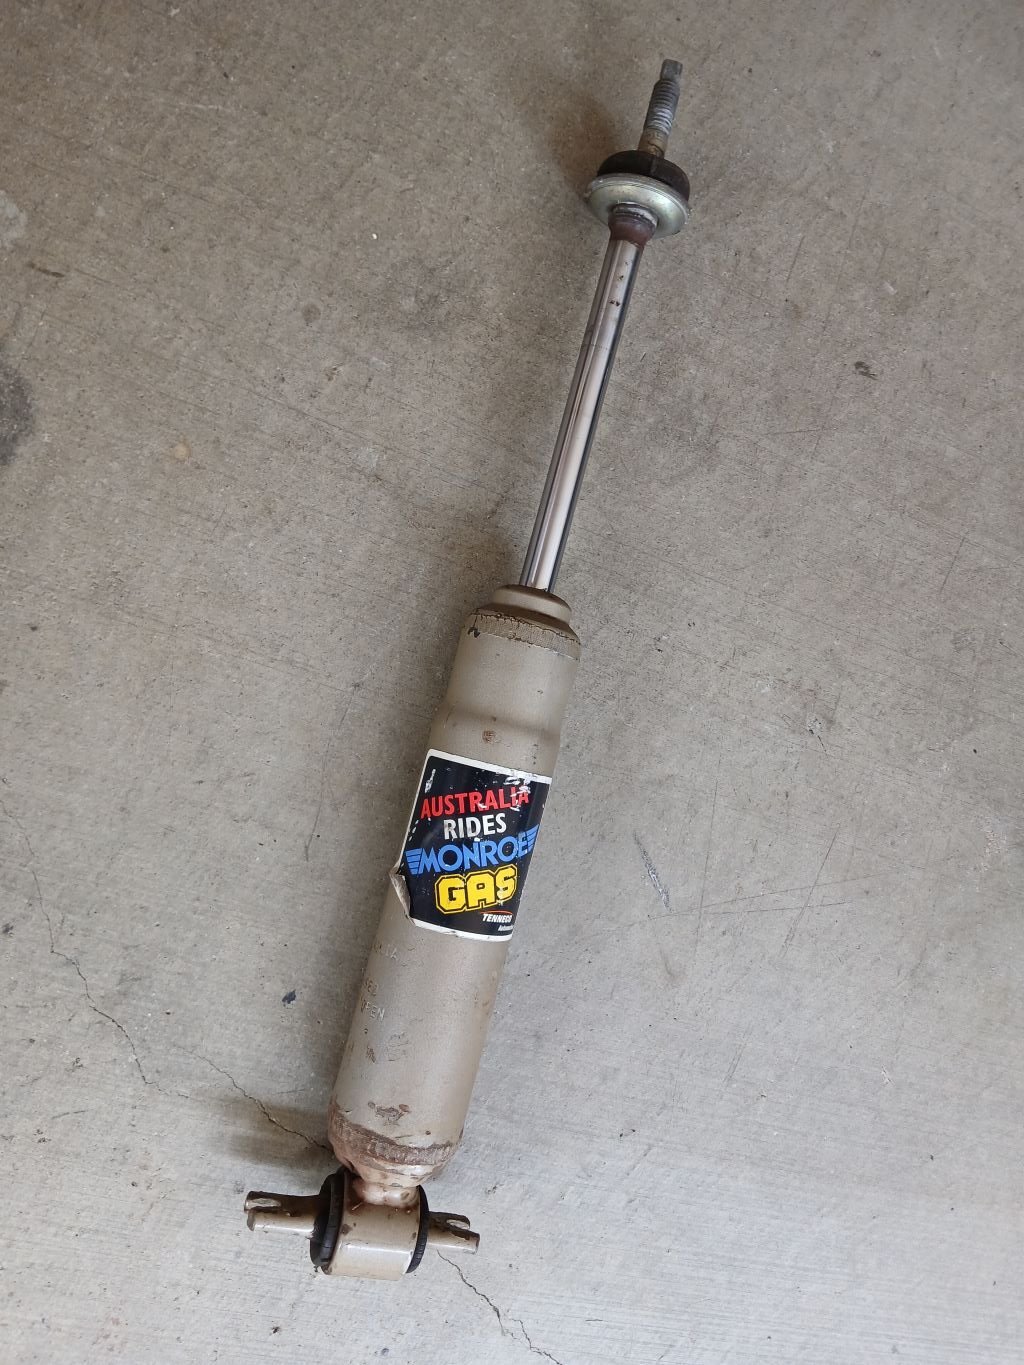
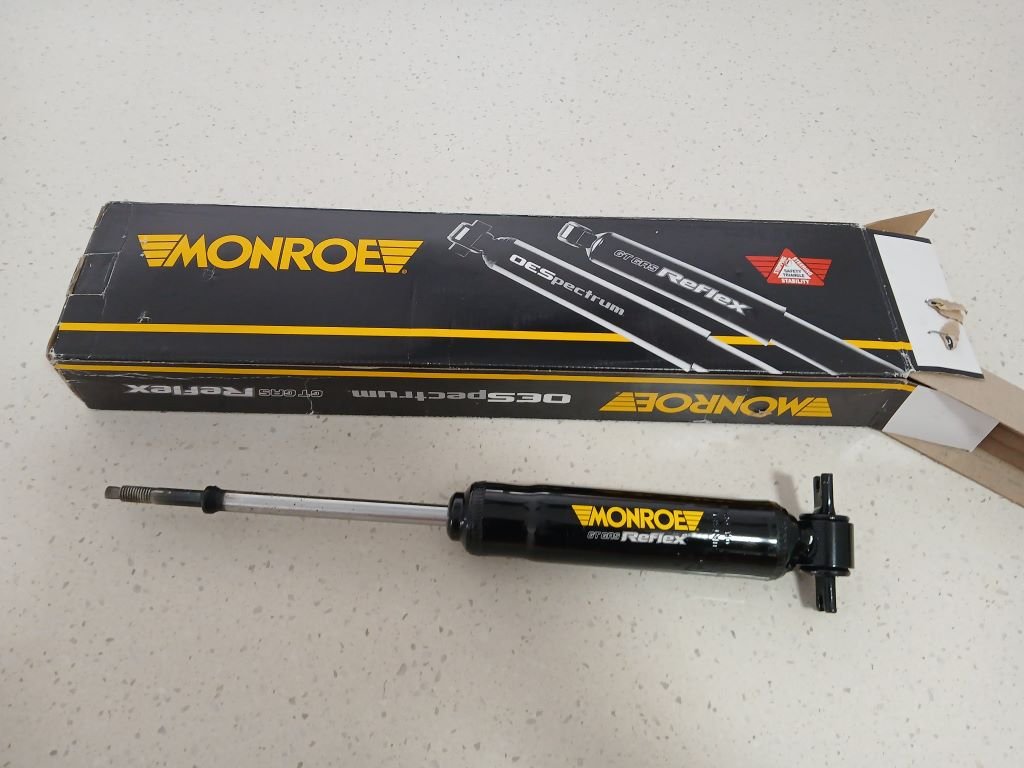
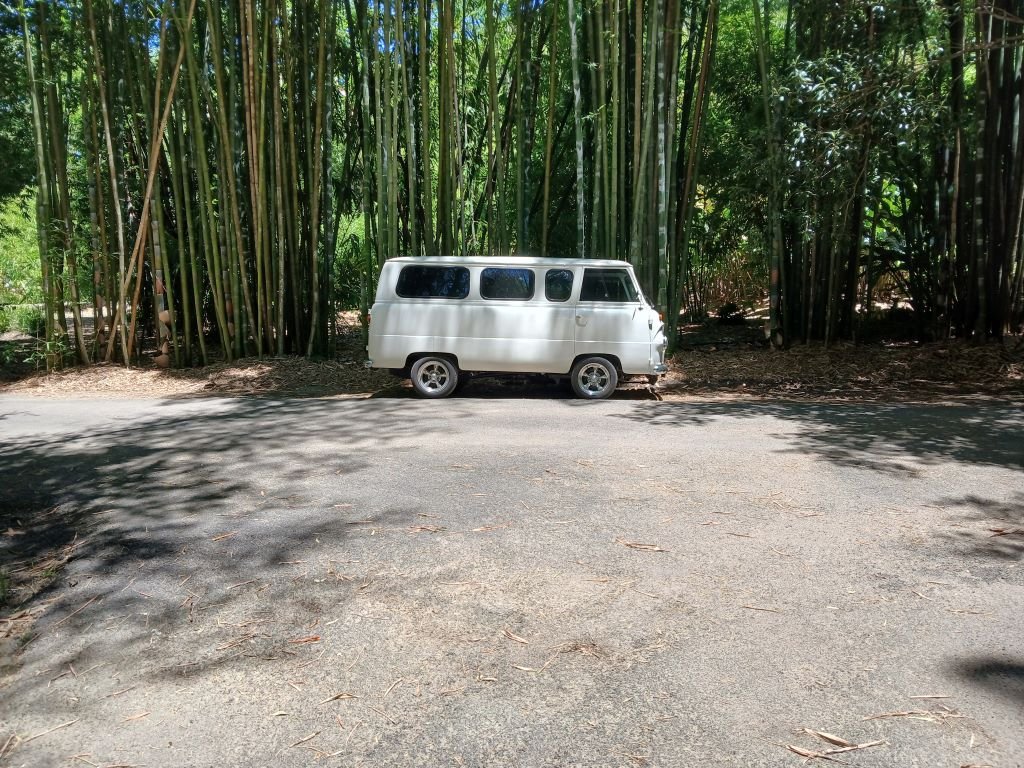
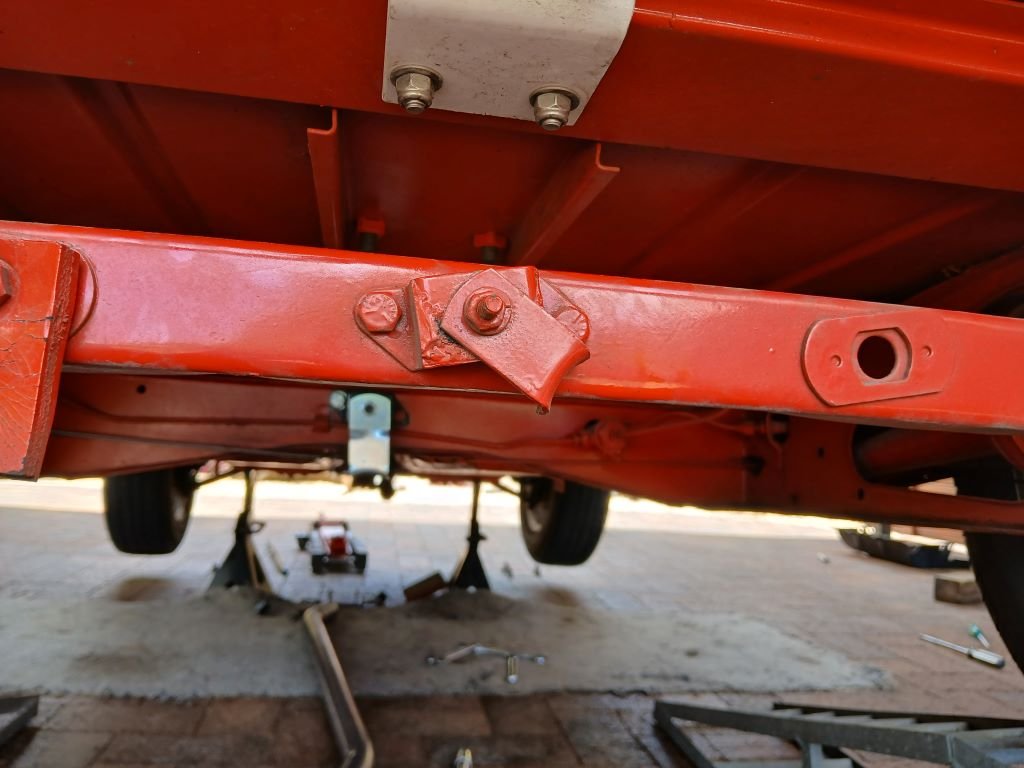
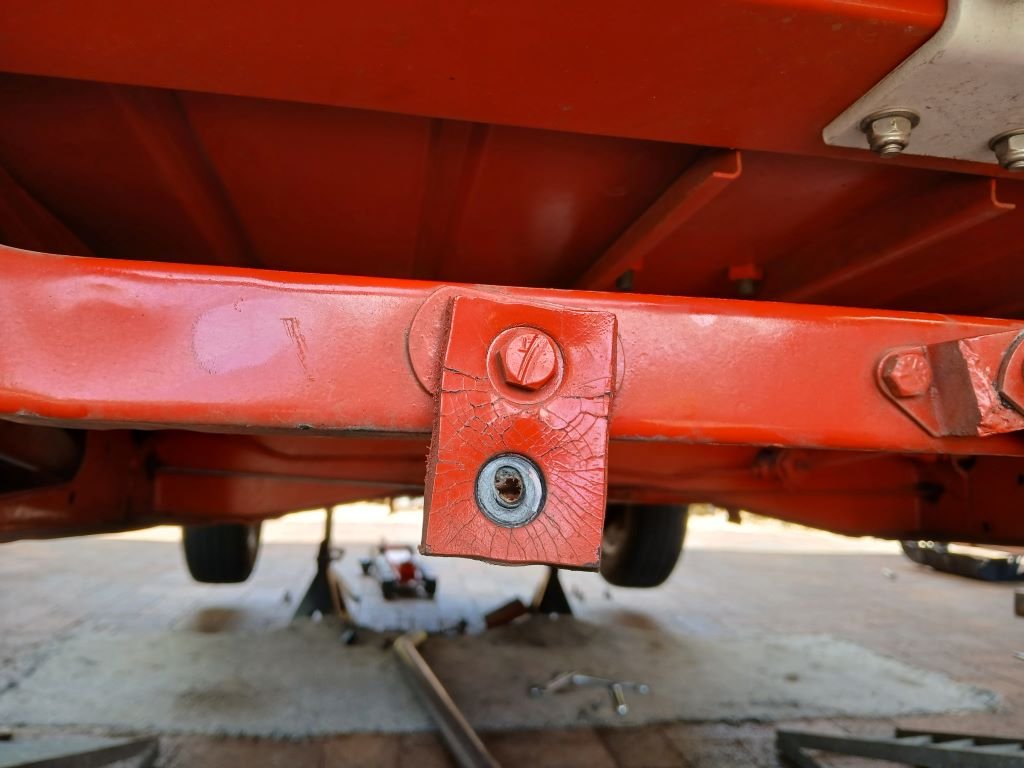
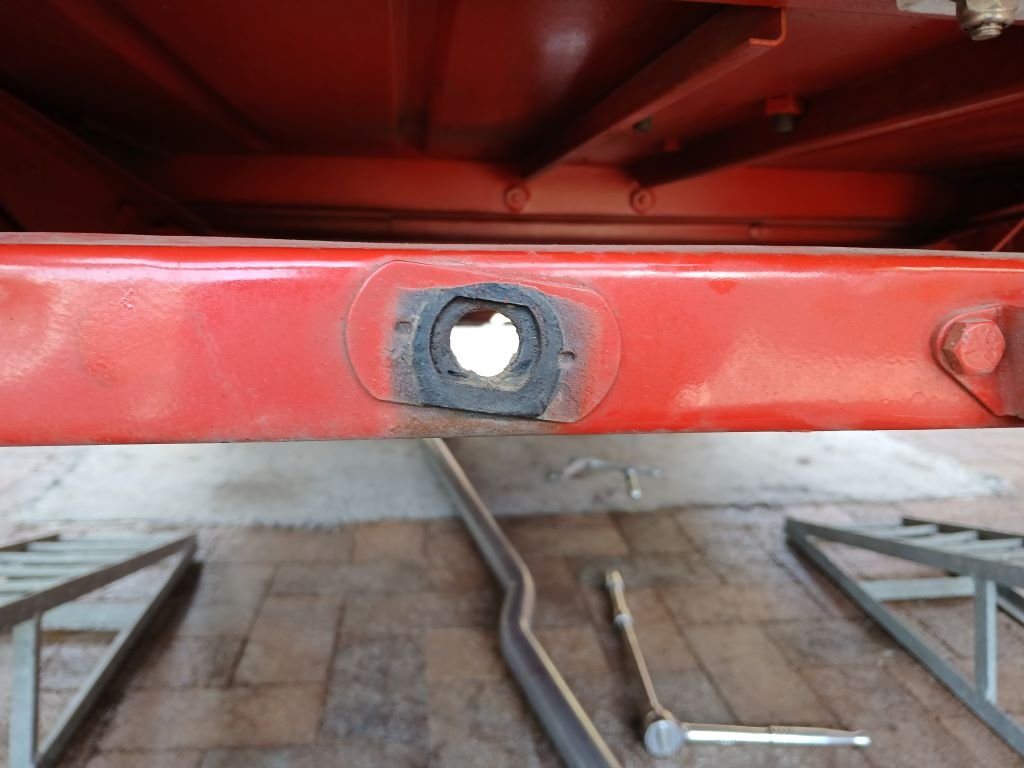
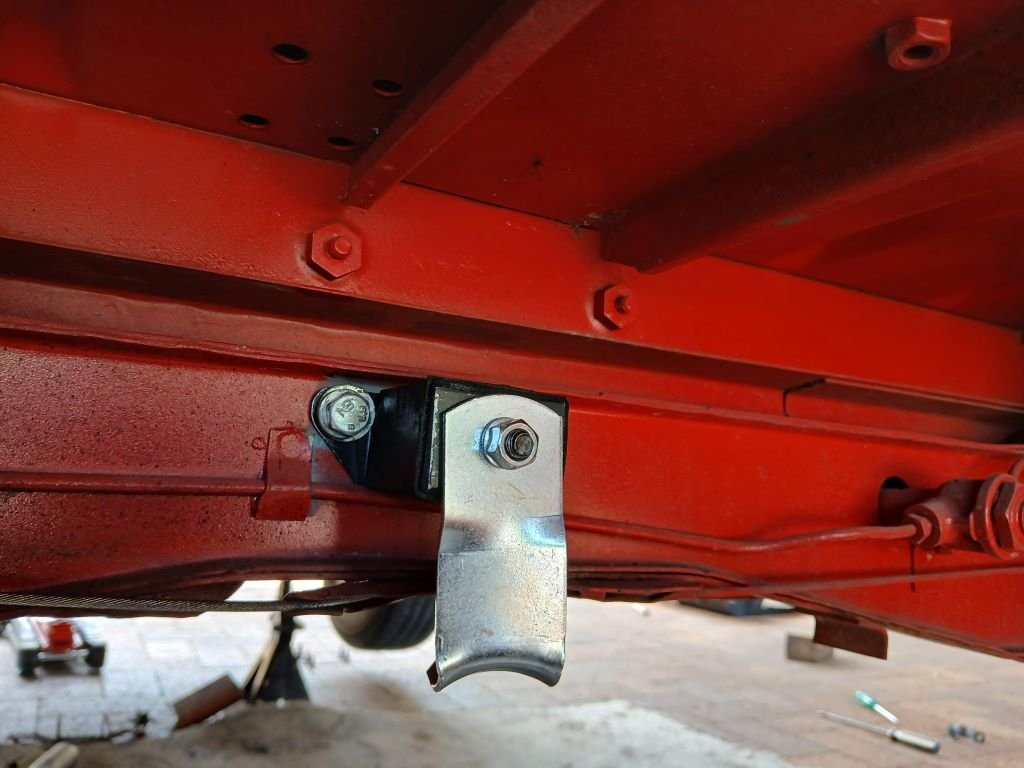
Got a bit of a gap today so decided to chuck in the new set of front shockies that I got for the Thames about a month ago. I went for a set of Monroe gas ones as that is what the L300 donor van was running when I pillaged its front end for the Thames. Out with the old: And in with the new: There is a noticeable difference in the ride quality with the new shockies in place, so I'll take that as a win. While I had the front wheels off I took the opportunity to fit longer bolts to the upper control arms as my wheel alignment guy gave me the heads up that we were running out of thread length when I last had the alignment done. Last week I did a 130 mile round trip to a place called Bamboo Land to pickup some bamboo panels for our latest landscaping project, so I thought I'd share a photo of the old Thames absolutely dwarfed by the bamboo growing alongside the carpark. And that's pretty much it for now.
- 739 replies
-
- 16
-
-
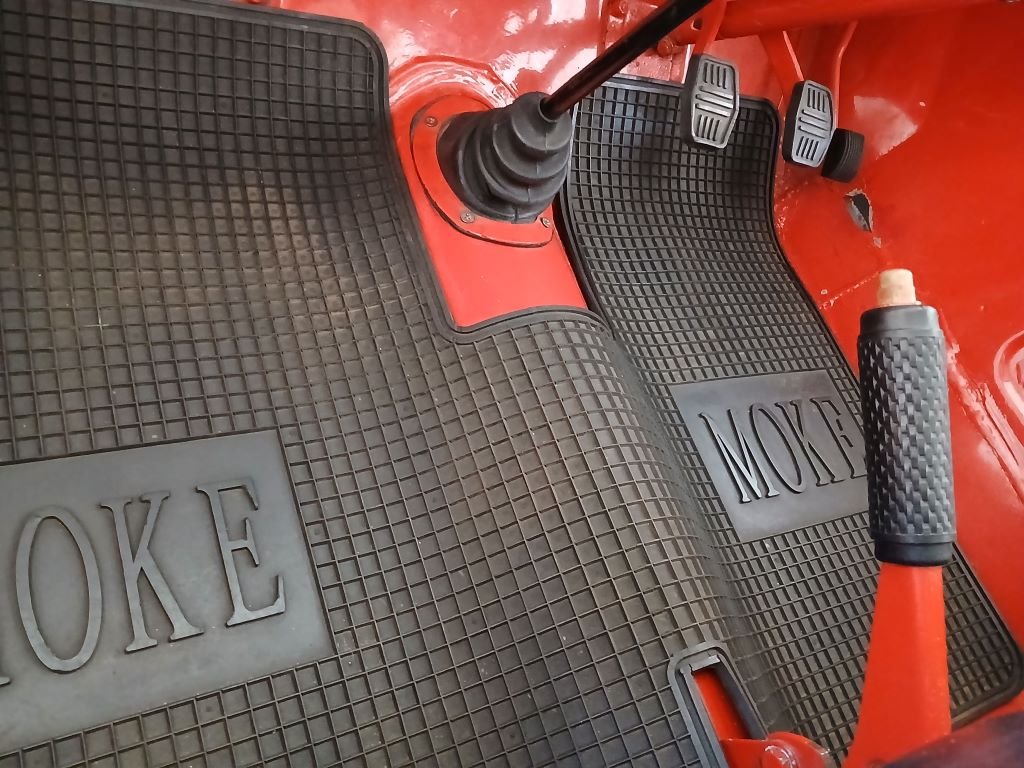
When I was replacing the exhaust I noticed that the rubber gearshift boot was looking a bit sad. Looked on the Minisport website and they wanted moonbeams for a new one. I tried another supplier who specialises in stuff for old British cars and he had one in stock at half the price, so I pulled the trigger and it pitched up today. Out with the old: And in with the new: Just a small step forward, but satisfying none the less.
- 9 replies
-
- 13
-
-
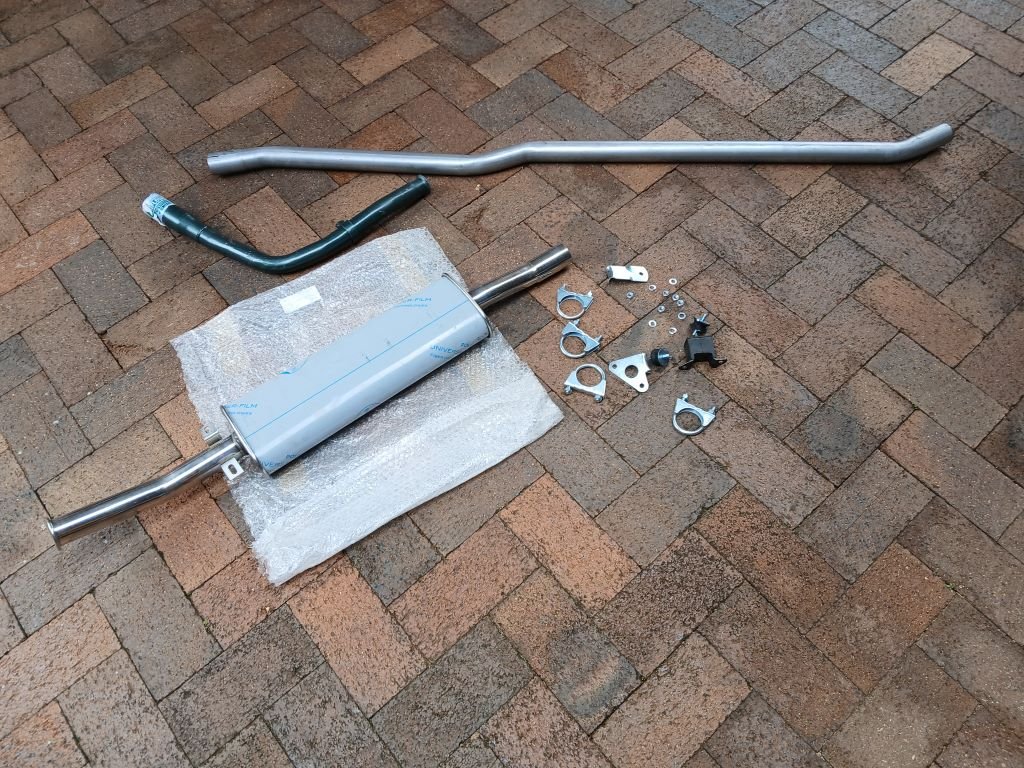
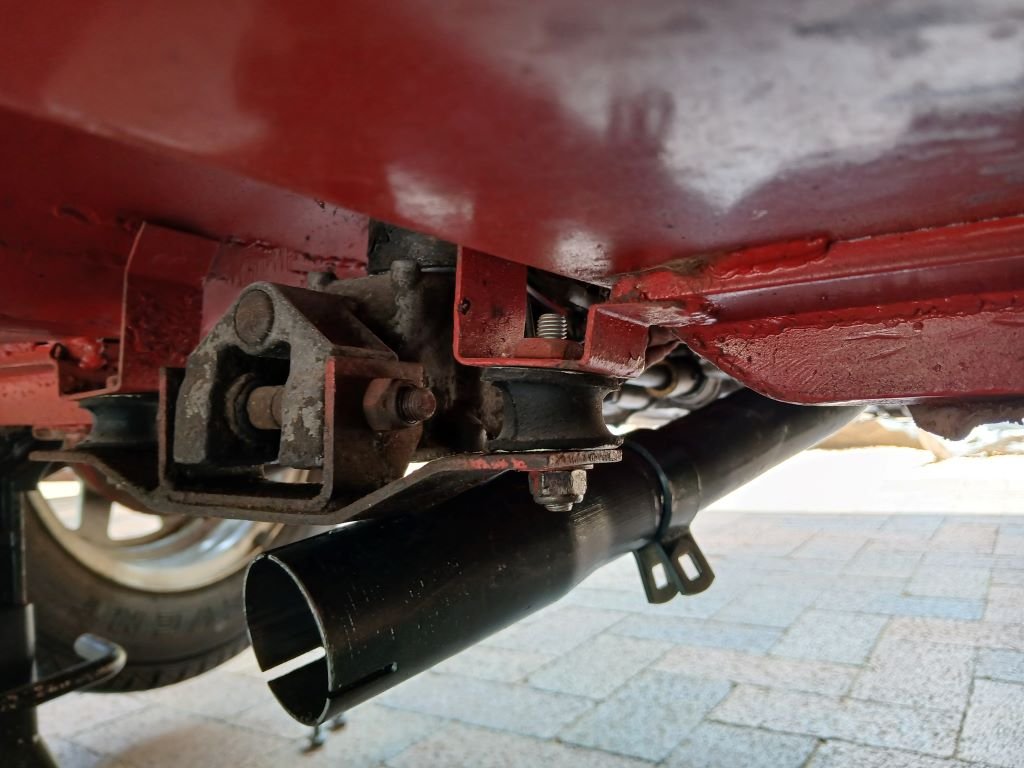
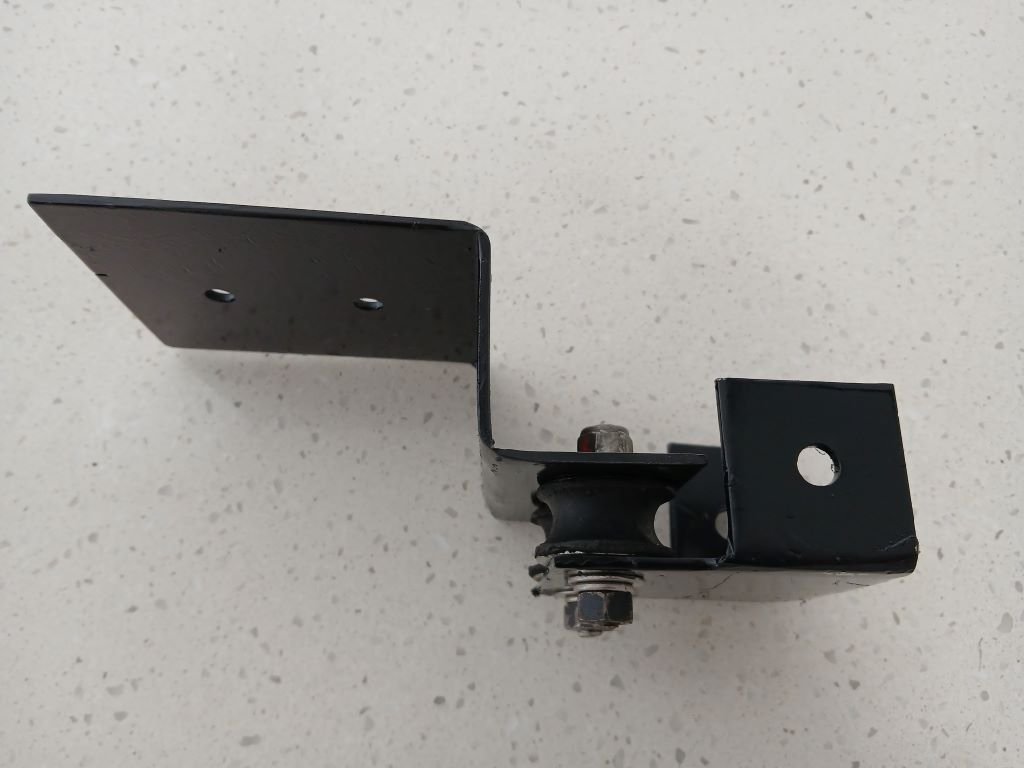
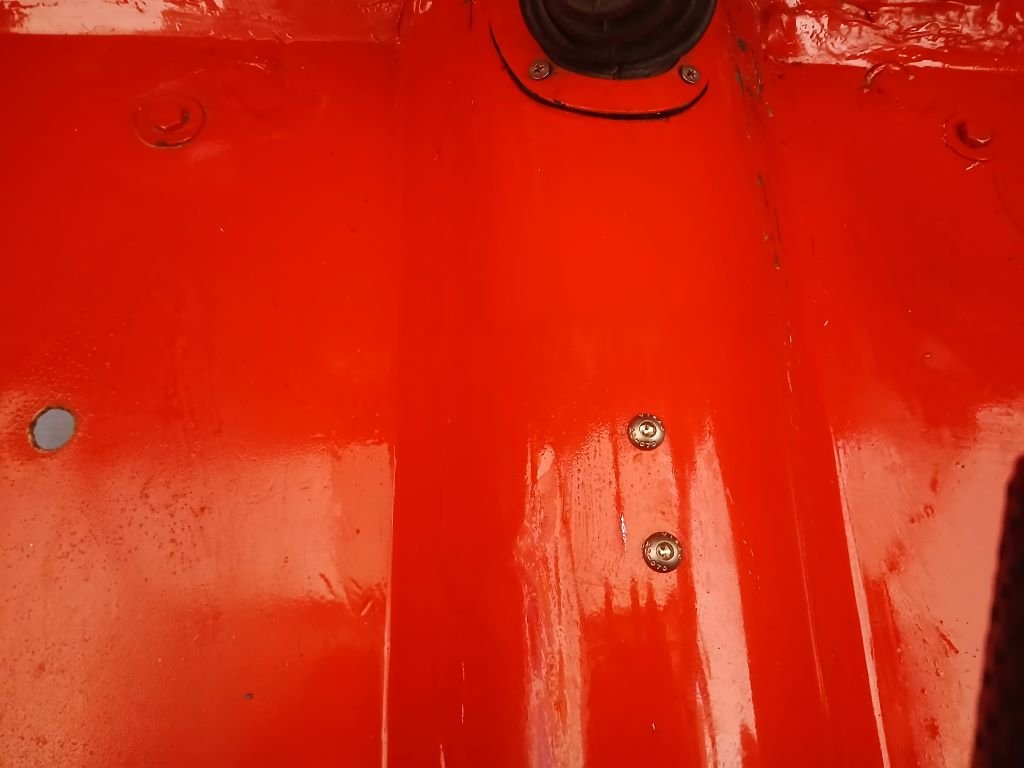
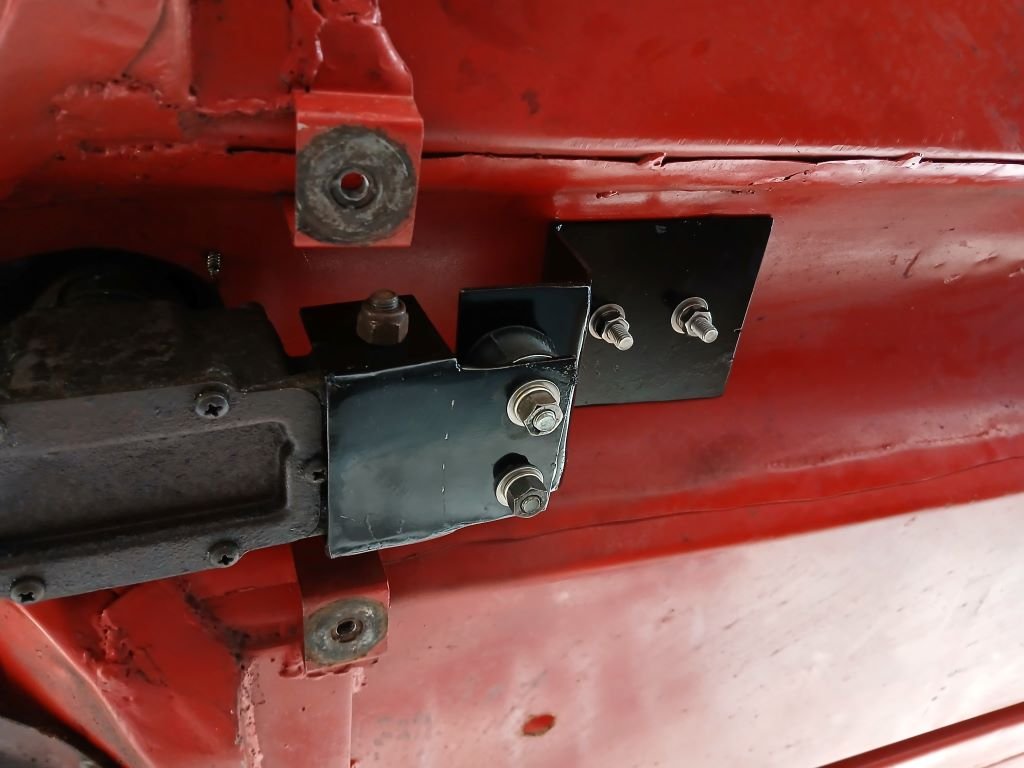
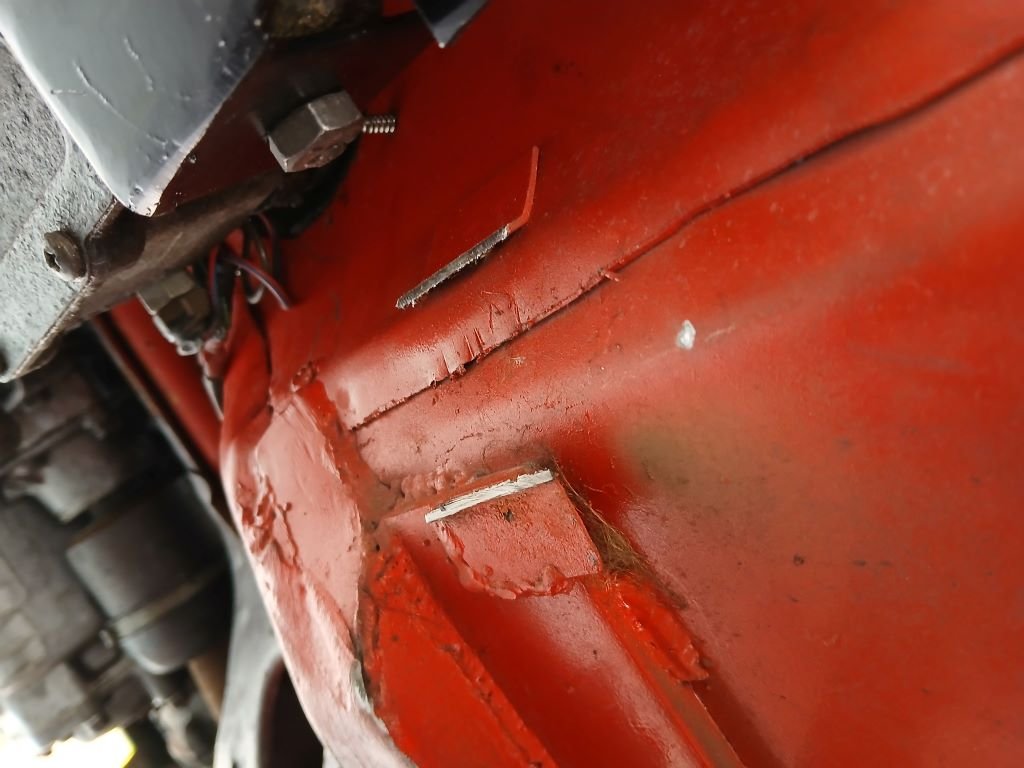
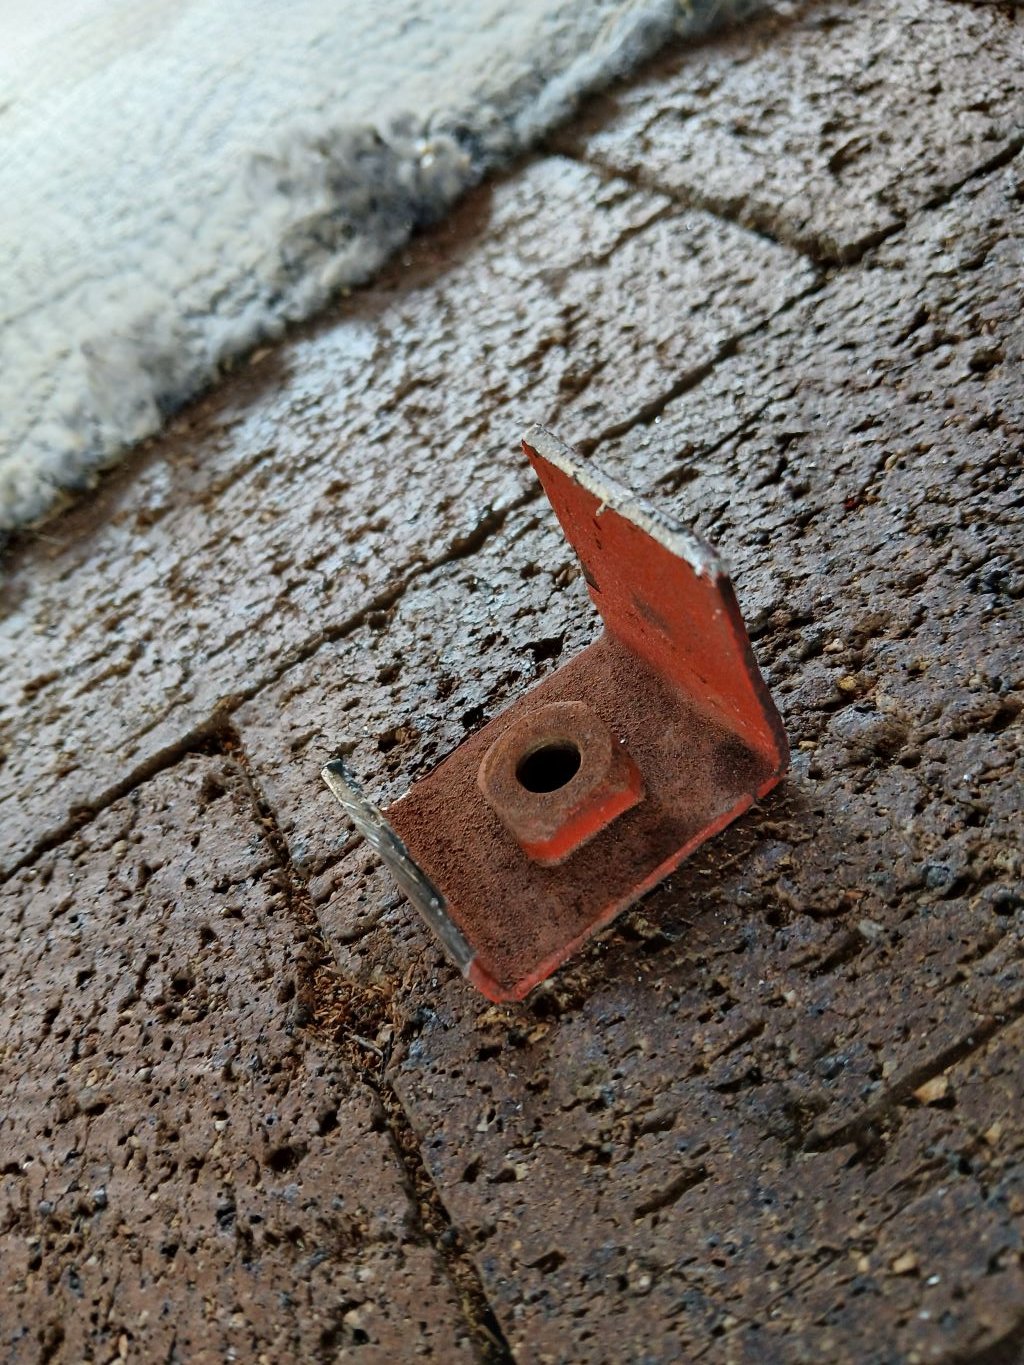
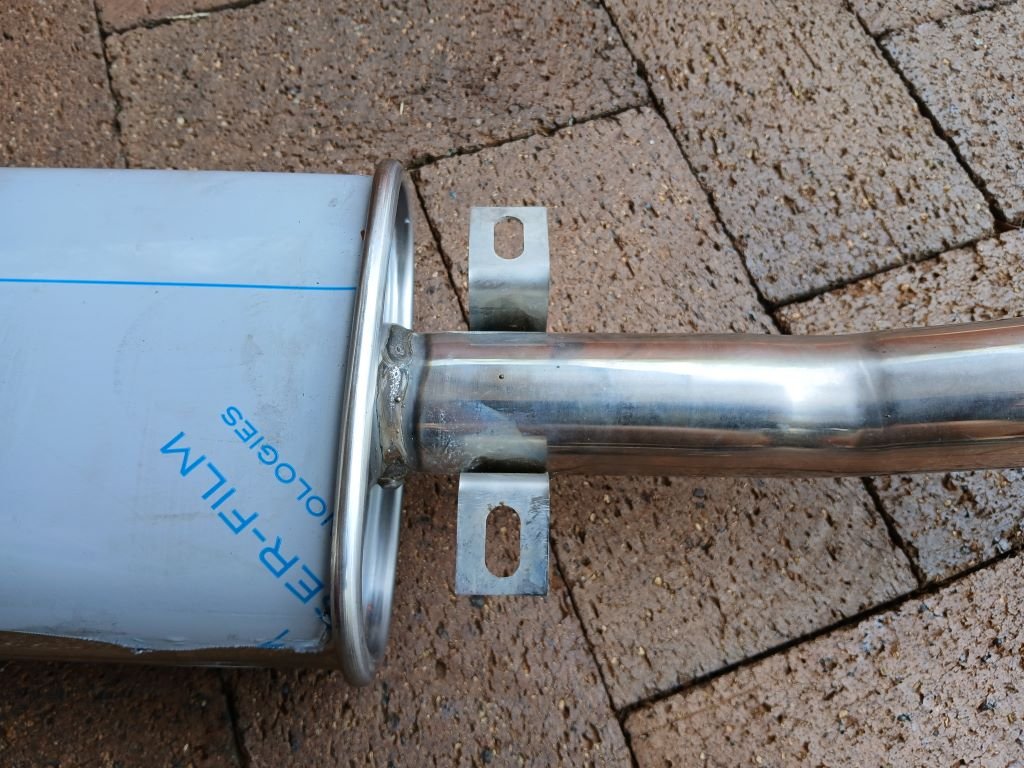
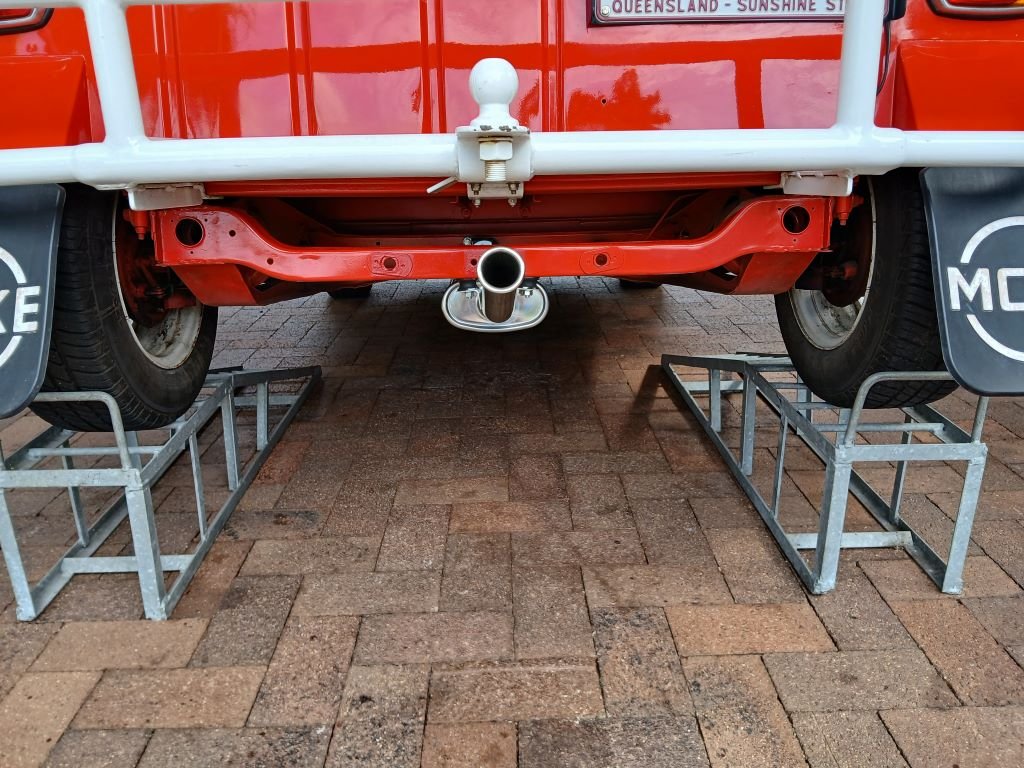
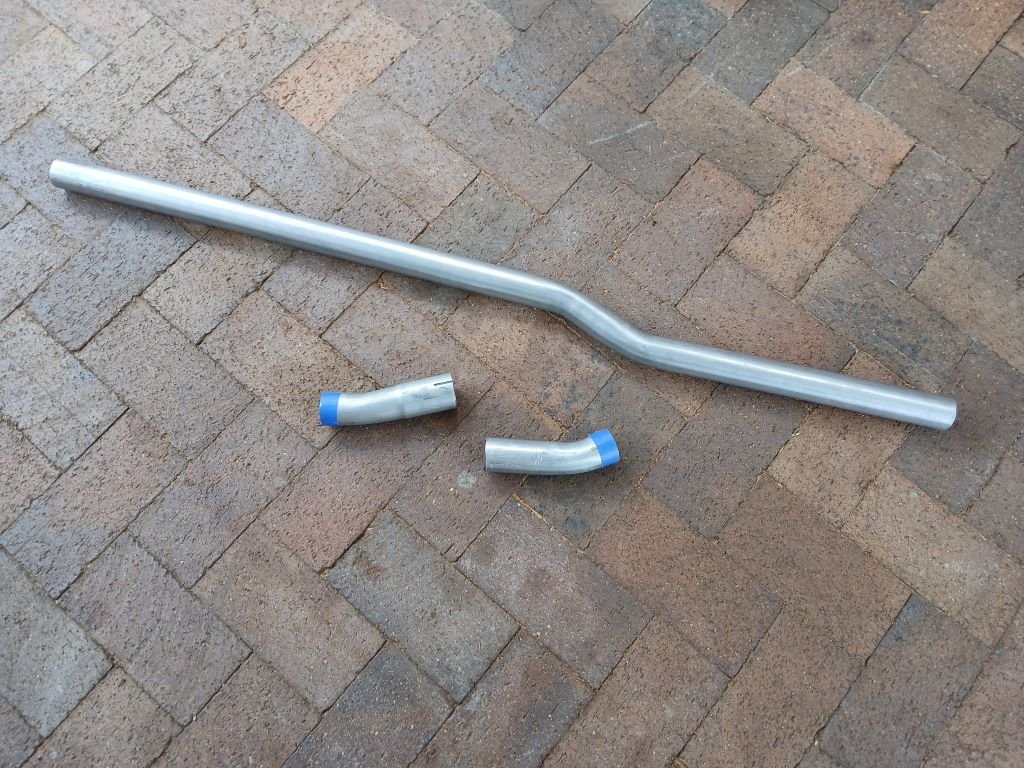
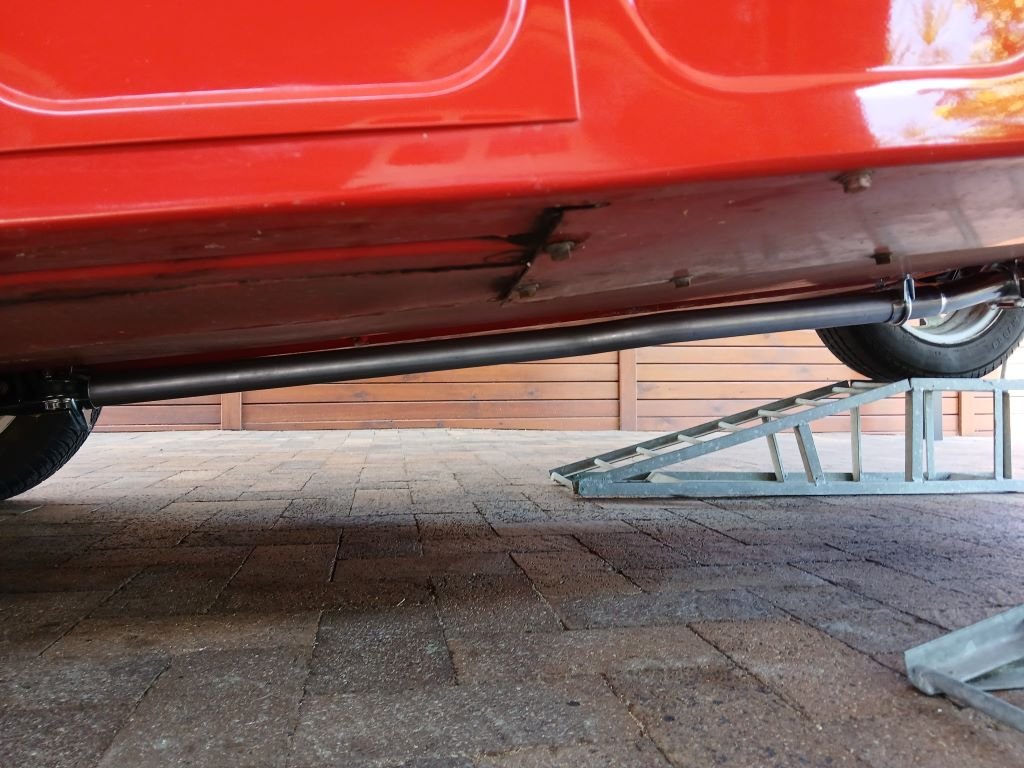
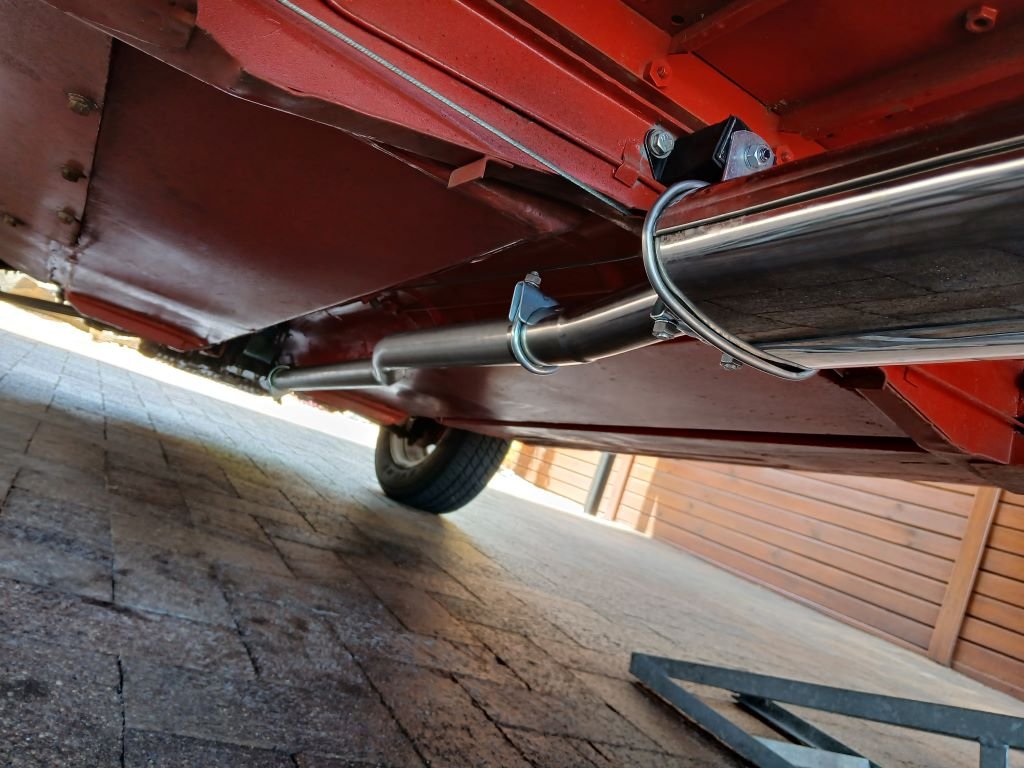
So, on to the installation of the new exhaust. Minisport offer a number of exhaust related components that can be mixed and matched to create your system of choice. In our case we aren't chasing increased performance so for simplicity's sake we decided to retain the original cast iron manifold while upgrading the rest of the system to a 1.75" OD pipe. In order to achieve this the first item on the shopping list was a downpipe with standard neck flange manufactured by Maniflow in the UK. Mrs Flash does like a bit of bling so she chose a centre exit muffler in polished stainless steel. They offer the centre pipe in either mild or stainless steel. We chose mild steel for no real reason other than to keep the cost down a bit. Lastly we included their recommended fitting kit. Parts looked like so: First order of business was to get the Moke up in the air: The old single piece system came out quick smart and quickly revealed how shagged it is: Thought I'd start by fitting the new Maniflow down pipe that looks like so: Now giving the chaps at Minisport fair dues, they did give me the heads up that I would need to modify the mounting bracket for the gear selector in order to create enough clearance for the fatter exhaust. Offering up the downpipe showed the extent of the issue: There is no way to line up the manifold joints with the original mount in the way, so a plan was definitely needed. The Mokewerx website describes the easist option of simply bending the driver's side of the bracket up at 90 degrees and chucking a bolt through the floor of the Moke. Yeah nah. Second option is to buy a pre fabricated bracket from Minisport : But with this option you have to drill two holes in the floor to mount the cottonreels and then get to enjoy the sight of the protruding threads, washers and nuts for ever after. Mrs Flash and I both have strong OCD tendencies so this would drive us absolutely crazy. We went for the third option which was to create something bespoke that could be hidden away. So out came the cereal box and after spending a bit of quality time under the Moke I came up with these two masterpieces: A bit of cutting, a spot or two of welding and a splash of my favorite VHT satin black and I ended up with this: The beauty with this bracket is that I can use button head bolts that are hidden under the factory floor mat. Sans floor mat looks like so: And with the floor mat back in place it looks like so: You can't even tell that some hackery lies beneath. From the underside she looks like so: Next step was to put on my big boy pants and hack off the original mounting tab on the driver's side ... gulp: There's no turning back now: With the new mounting bracket in place and the factory tab removed I offered up the downpipe and it fitted perfectly, so I'll take the win. Next I moved on the the muffler installation. So there are signs that the MOke once had a centre exit muffler installed as the original hanging bracket was still in place: As you can see old mate didn't really have an eye for detail. It would have taken him 2 seconds to pull that mount off before he painted the Moke. Same goes for the hackery that was used to install the old muffler: Nice ! Anyhoo, I removed both defunct mounts and marvelled at the finish I was left with: Sigh .... Anyway, onwards and upwards... Next step was to install the fresh centre mount: And then I poked two new holes in the rear chassis cross bar for the two cotton reel mounts that hold the muffler: Ended up looking like so: Notice my attempt to patch the paintwork where the original mount was. Not a perfect match, but at least its all in more or less the same colour. Last job was to hack a few unnecessary bits off the universal connecting pipe (The extra bends are needed if you are using a side exit muffler and an exhaust branch) : Slipped a bit of pipe, chucked on a few clamps and called the job done: Thanks for looking.
- 9 replies
-
- 19
-
-
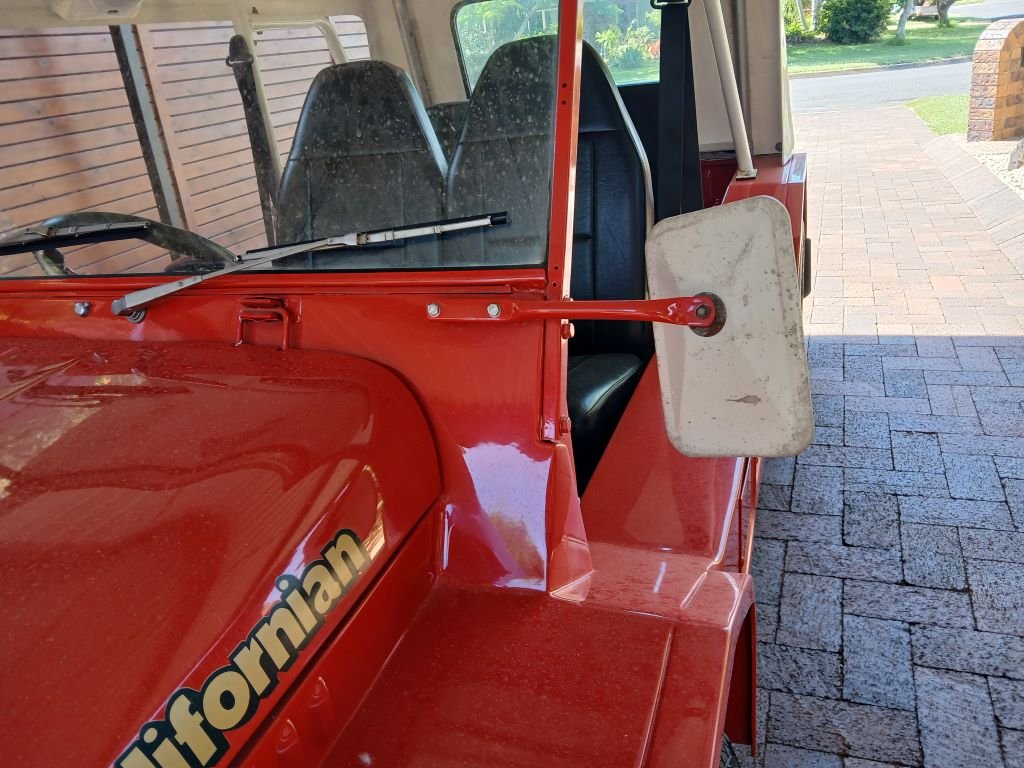
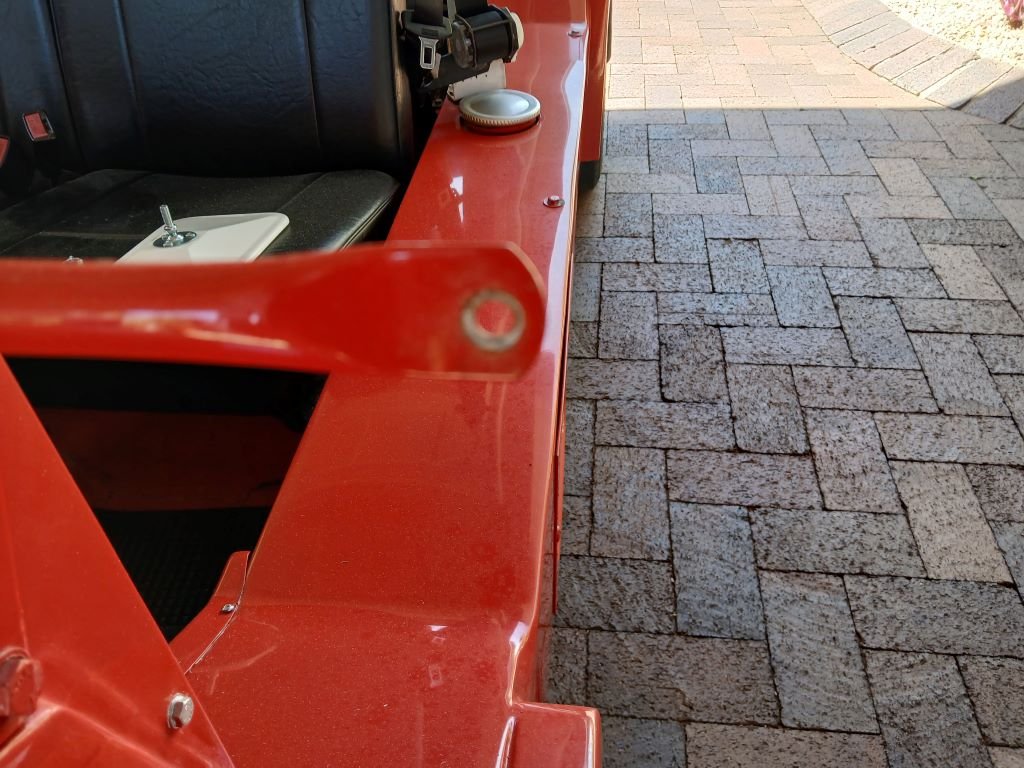
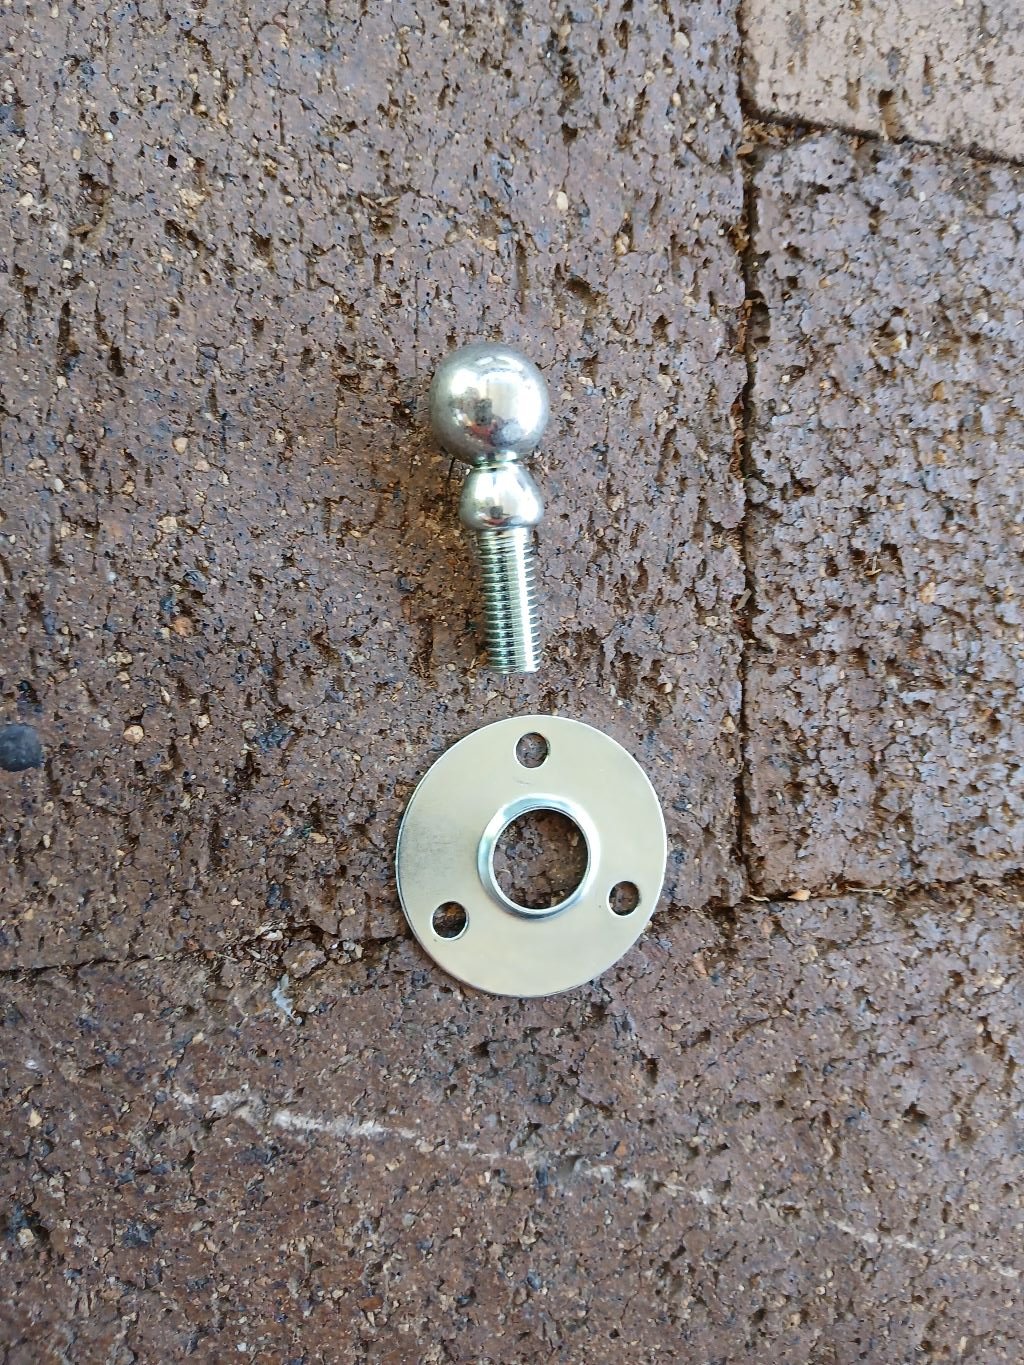
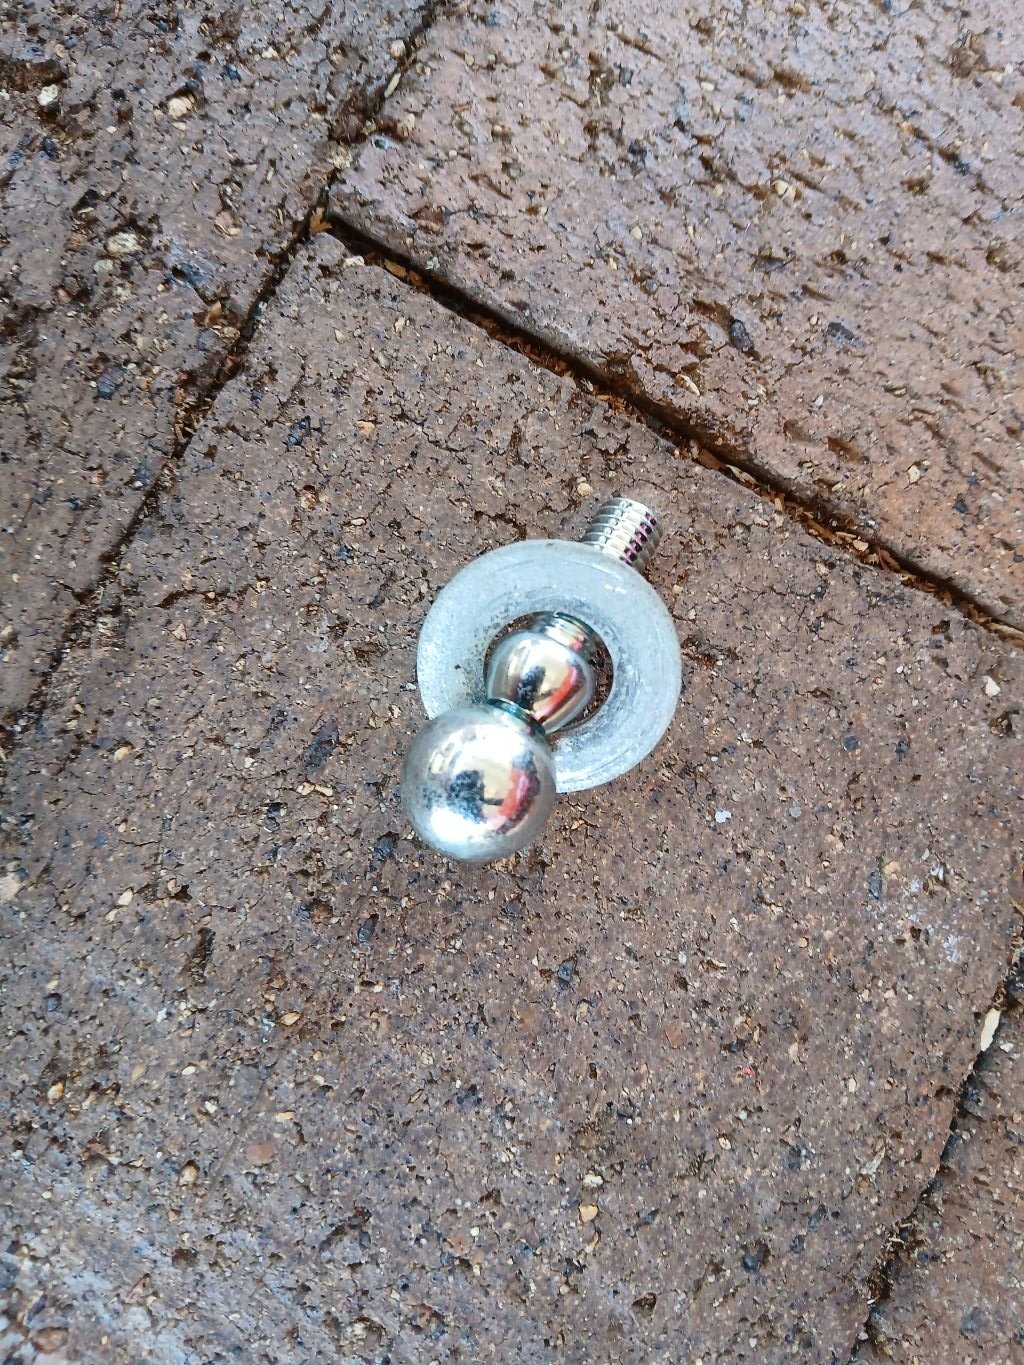
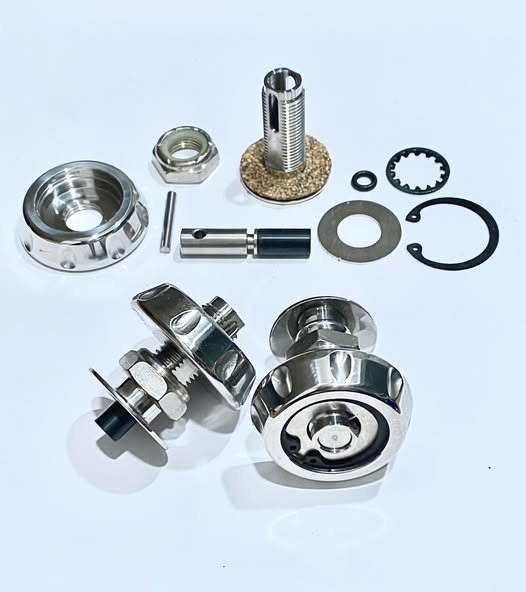
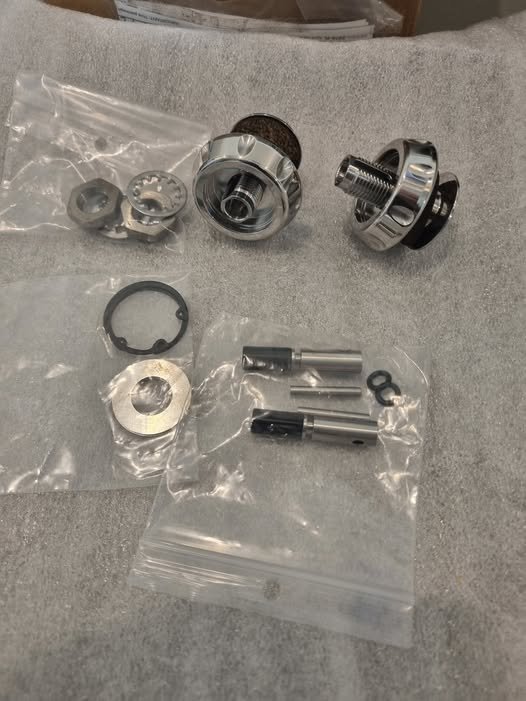
Mrs Flash is a wee gem. In early December she asked me if she could get some new bits for her Moke for Christmas and the top item on her shopping list was a new set of rear view mirrors. The old ones were looking a bit manky and would flap about in the breeze when travelling at anything over 60km an hour. In this photo the passenger side mirror is so loose that it is hanging upside down, LOL: Also on the shopping list was a new exhaust system. I've patched the existing muffler a good few times over the years, but sadly it's reached the end of the road. Anywhoo we duly ordered the parts needed from MiniSport and it took a few days to sort out the shipment due to the size of the exhaust system, but everthing arrived safely and the parts have been languishing in the shed while we finished building a new garden fence. Yesterday I finally got a gap, so thought I'd start with the new mirrors. Got them out of their packaging only to discover that the new mounting "bolts" are now metric so are a bigger diameter than the hole in the mounting bracket. Nothing that a light tickle with a reamer couldn't solve. After replacing the supplied zinc plated nut and spring washer with stainless steel equivalents, I fitted up the first mirror. Instant fail. The new items are pretty loosey goosey in terms of adjustment. Not as bad as the old ones, but still not stiff enough for my liking. Bugger !! Modifications were needed so I stripped the new mirror down to its components. There is what I would loosely describe as a little "ball joint" that rotates in a plastic half cup moulded into the back of the mirror. The mirror is attached to the ball joint using a round plate that is also slightly cupped and held in place by 3 self tapping screws. Looks like so: Scratched my head for a bit then decided to try fitting a washer between the ball joint and the mounting plate in the hope that it would stiffen up the ball joint. Found an appropriately sized washer that fitted the bill perfectly: With the extra washer sandwiched between the ball joint and the round mounting plate I reinstalled the 3 self tappers and then fixed the mirror back in place. Winner, winner, chicken dinner. Repeated the process on the other side and then celebrated by giving the Moke a wash and a polish. I'll tackle the exhaust when I next get a gap. Thanks for looking.
- 9 replies
-
- 18
-
-
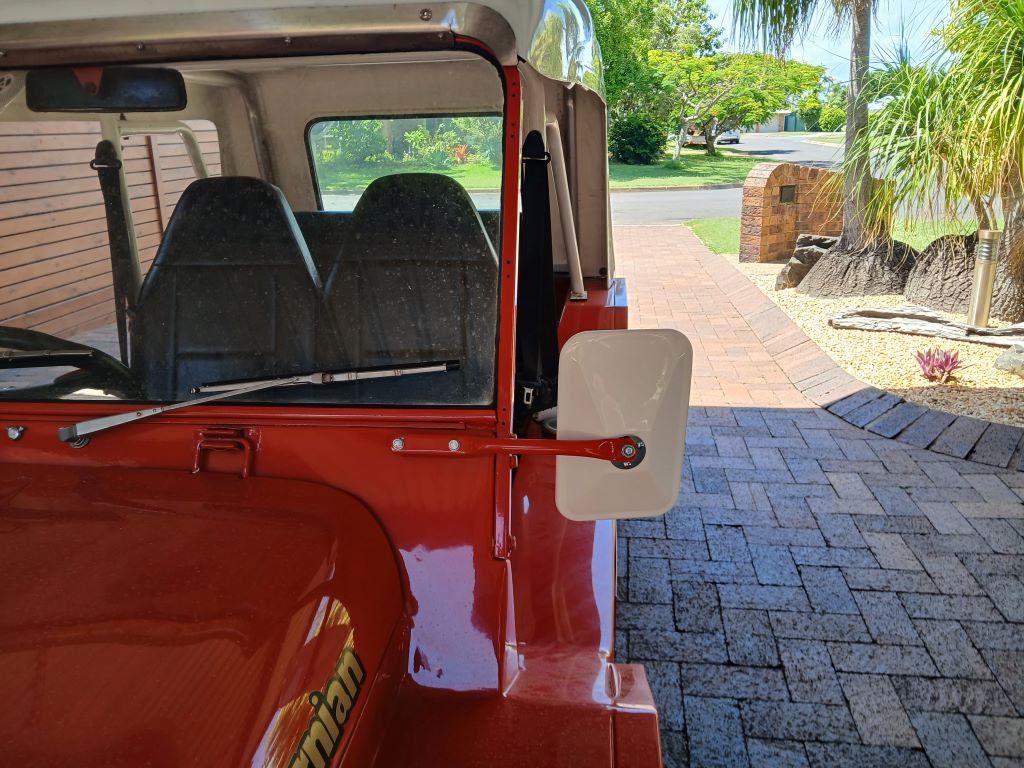
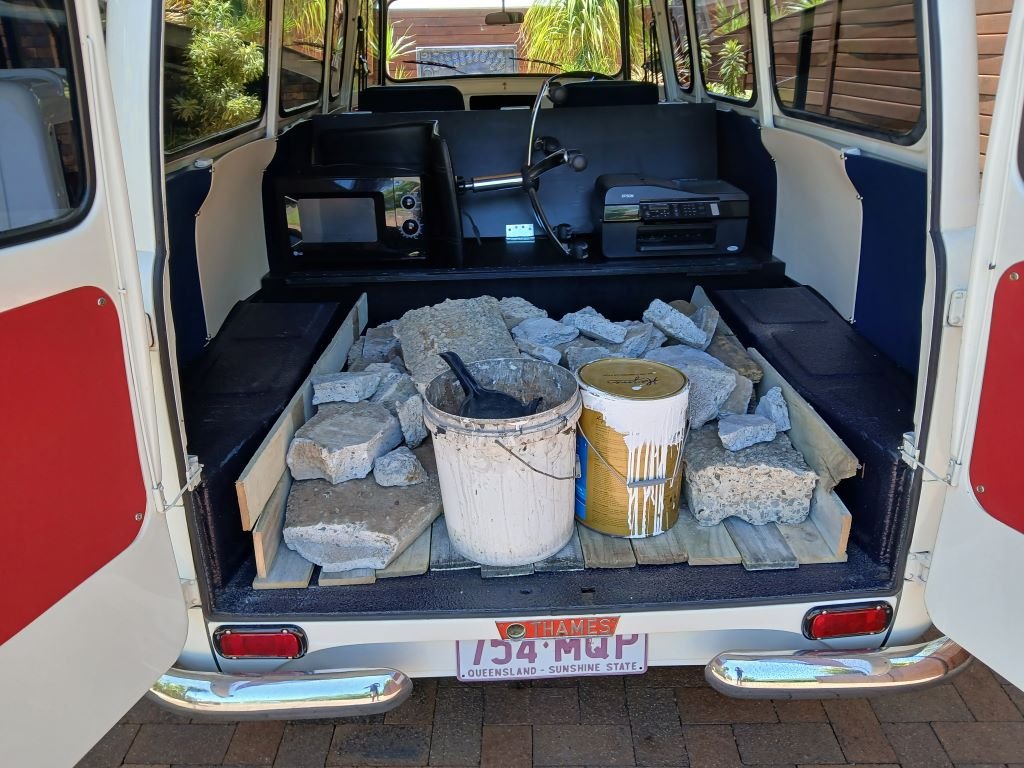
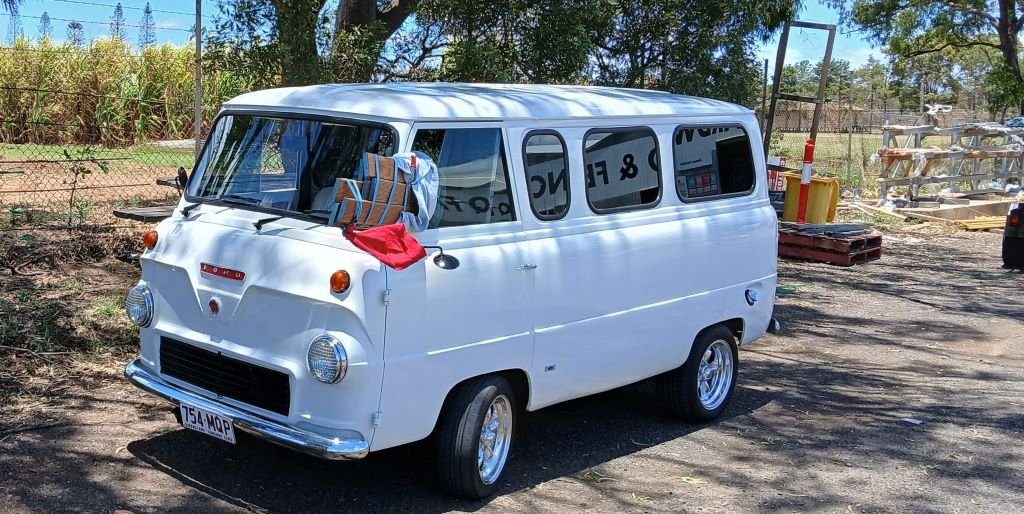
Thought it was about time I posted an update on the old Thames. Well, to say that she has been working hard to earn her keep would be an understatement. As part of our back garden renovation we lifted an old concrete slab and ended up carting it to the tip in the van. I was a bit worried about the factory plywood floor in the load area so I ended up putting down a layer of old fence planks that were due to be dumped and it worked like a charm. Photos or it didn't happen: I've also done a few Bunnings runs and can confirm that if I fold the rock n roll bed flat and remove the passenger seat I can fit in 3.6 meter long planks: In other news a few weeks back a fellow Thames owner travelled up from Brisbane to visit the area and dropped in to check out my van. He has owned an original Dormobile camper for almost 27 years and has recently bought a ute which is under restoration so he really knows his 400es. I was expecting a bit of flak from him about my modifications, but after taking my van for a drive he was very complimentary about the way it drives and handles, so I was stoked to get that feedback. Just before Christmas a Canadian 400e owner sent through this photo of some sliding window latches that he was having fabricated in polished stainless steel: Although my existing window latches are in good working order, the factory chrome is pitted and showing its age, so I splashed out and got the Thames a Chrissy prezzie. I've still got to get around to fitting them, but here is a photo of the new bling which arrived in late December: Hats off to Ian who not only went to all of the trouble of having these fabricated but also ended up having to travel from Vancouver across the border into the USA to post out 50 parcels of window latches to all corners of the globe. Apparently the Canadian Postal Service were on strike and he didn't want to let us down. What a champ. In other news my a/c has been behaving itsself lately, so looks like I am over the belt related issues that I was experiencing. I've dropped a belt size which has given me more adjustment and so far so good. And lastly in early December I noticed that my battery was staring to get a bit lazy on occasion. Opened up the battery compartment for a look see and realised that it was the second hand unit from our Mustang that I had fitted as a temporary solution 18 months ago and had promptly forgotten about. Talk about "out of sight, out of mind". Anyhoo I ended up taking advantage of the less 25% Boxing Day sale at our local spares and treated the old girl to a fresh 650CCA maintenance free jobbie. And that's about it for now. Hopefully my next update will be a little more exciting. Thanks for reading.
- 739 replies
-
- 17
-
-
Gave the Thames his weekly bath today and while he was clean I added some bling. Before: After:
- 739 replies
-
- 15
-
-
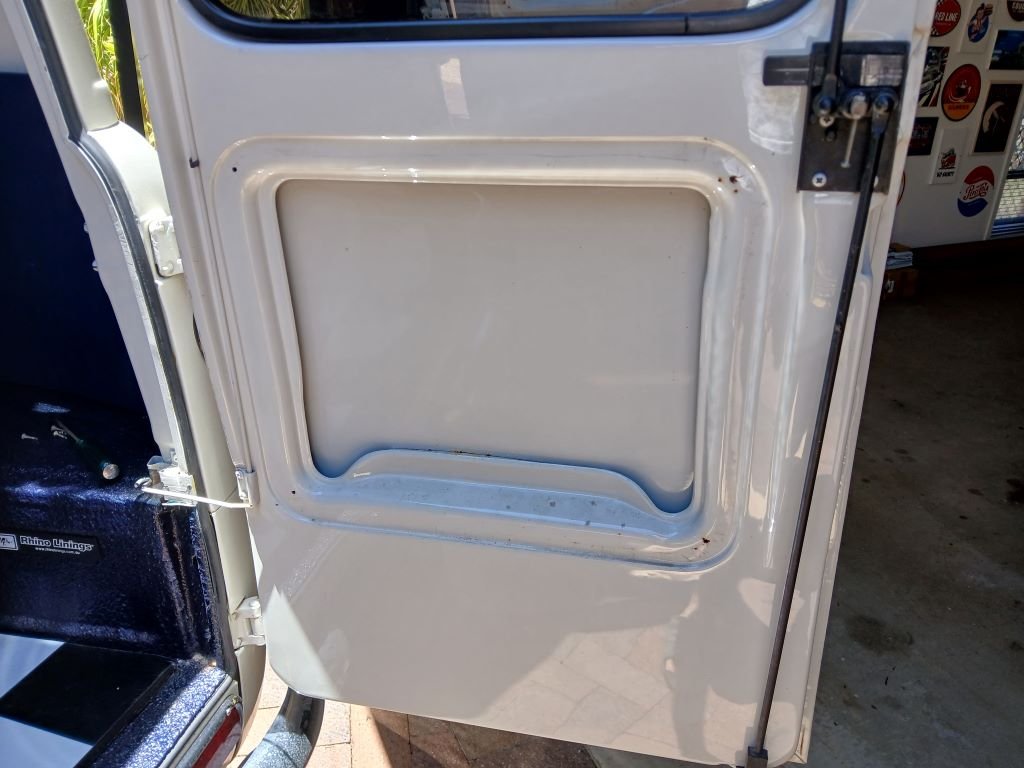
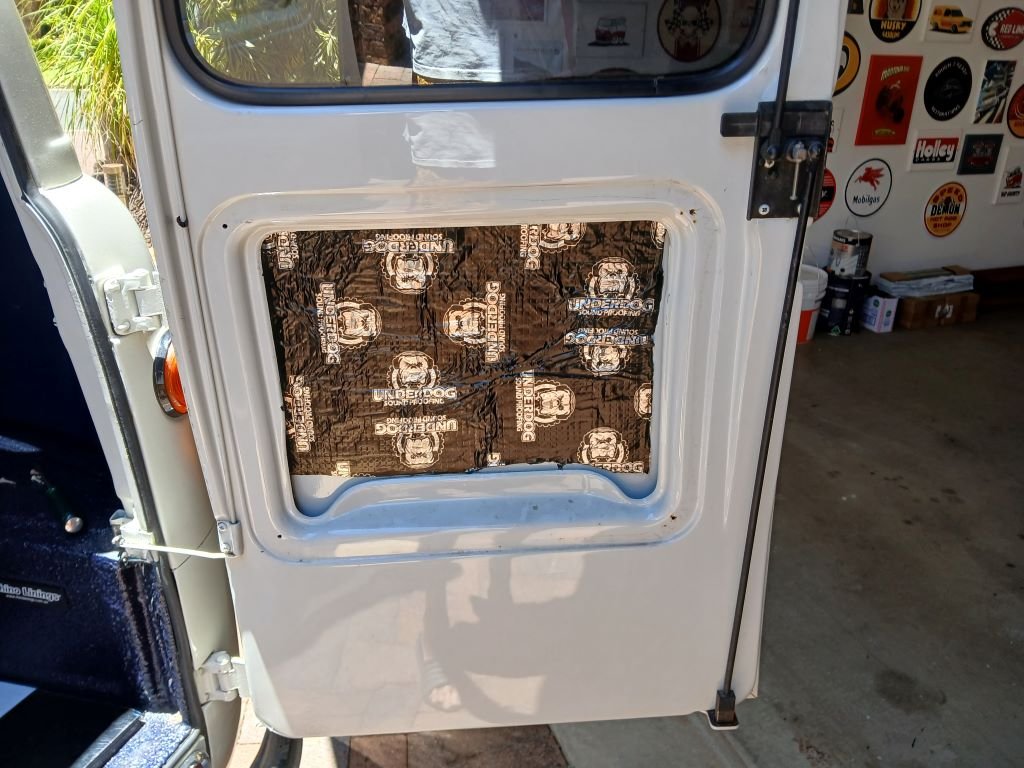
A few weeks ago I ordered a roll of sound deadening so that I can make a start on lining the old Thames. I'm hoping that it will make the van feel less "tinny". Anyway I had good success when I used this stuff to line the Mustang, so I figured I'd give it a go: Made a start today by doing both back doors. Pulled the door cards off to reveal loads of nothing: Slapped on a bit like so: While I had the panels off I gave the rest of the cavities a liberal dose of fish oil to keep old man rust at bay. Each side has 3 separate panels. I pulled the first one off for a look see and discovered that someone has been here before, but with some really cheap and nasty stuff: I'm thinking I'm going to have to remove that before replacing it with the quality stuff, but I'm just not sure how I'm going to deal with the old adhesive, so I'm going to give that some more thought before I proceed, but at least I've made a start. Thanks for looking.
-
That's a good point @cletus I've definitely cooled things down in the sweaty old engine box by running my thermo fan after switch offs, so it will be interesting to see how long my reco'ed dizzy lasts.
-
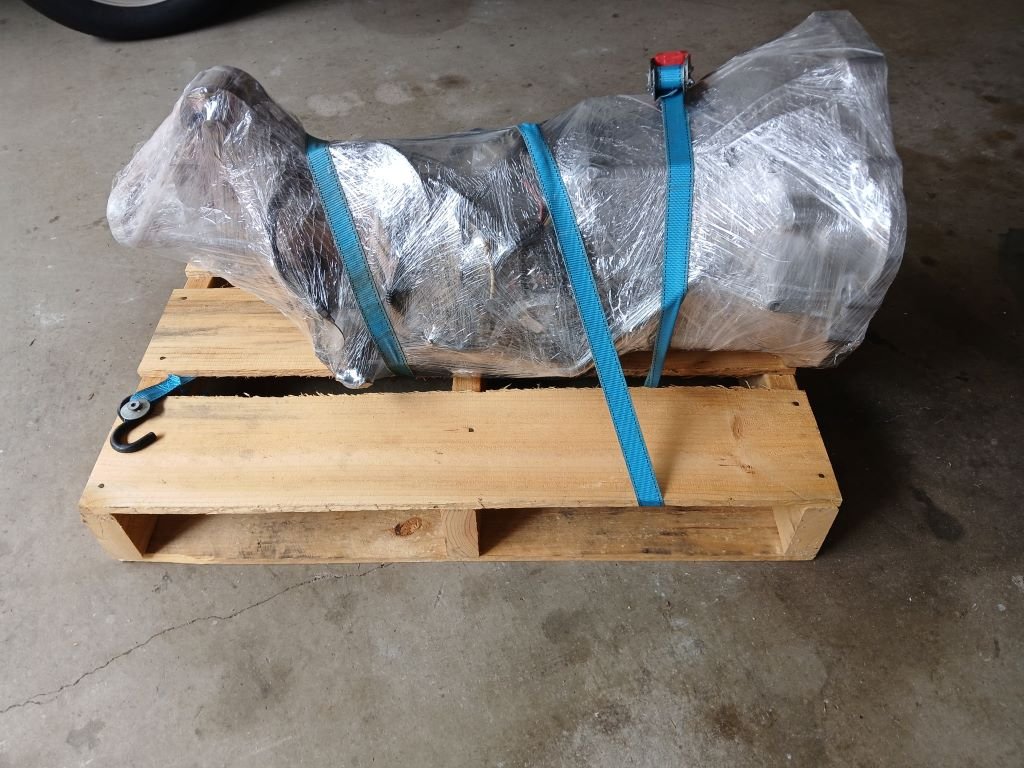
In my last update I mentioned that I was battling with my a/c belts which seem to stretch to the point where I run out of adjustment. I popped one of my usual "advice needed" posts under general car chat and @440bbm suggested that I replace the notched belts that I have been using with a solid belt. I've got one on order which will hopefully pitch up sometime over the next few days. Hopefully that will solve my issue. In other news I've just sold the last of my HiAce automatic gearboxes to a guy in Tassie. Gave it a clean before I wrapped and strapped it and I'll be dropping it off at my local courier depot tomorrow morning. I originally had two autos in stock in case I wanted to go down that path, but I'm happy with my 5 speed manual and these were just taking up valuable storage space. The last one went to Western Australia, so looks like these boxes are sought after items.
-
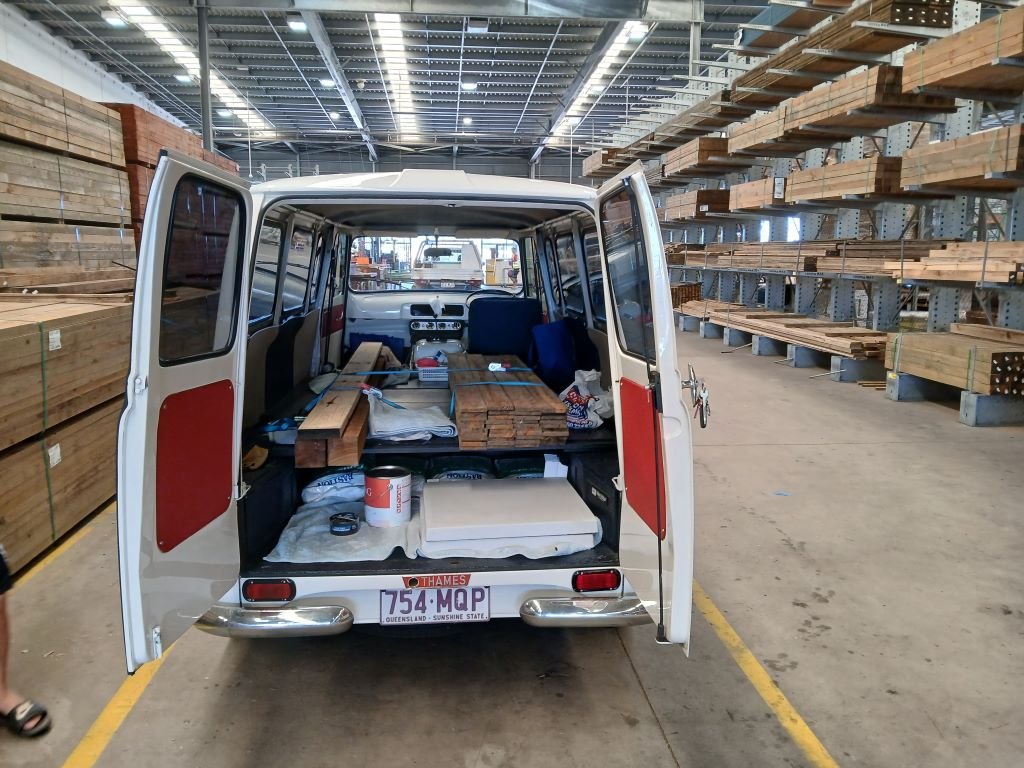
Okay, so the old Thames is still trucking along. I've been doing a heap of town runs to pickup building supplies for a few house related projects that we have on the go at the moment and because the weather is getting really toasty here I've been running the a/c almost constantly which has improved life no end. But, there is something a/c related that is really bugging me at the moment. From day one of the a/c install I've been battling with the compressor drive belt. I keep having to adjust the bloody thing every couple of hundred k's of driving. I'm going to put up a post under general car chat in the hope that I can get some much needed advice on the issue, so I won't bore you with all of the details in this post, but suffice to say the belt usually decides it's time to squeel at the worst possible times meaning I have to drive the rest of the way in sweltering heat. I know that I should just shut up and take a cement pill, but here in the tropics a/c is a must. Anyhoo, photo of the old girl loaded up with timber. Who says you can't fit 4.5 meter long decking planks in a Thames van hey.
- 739 replies
-
- 18
-
-
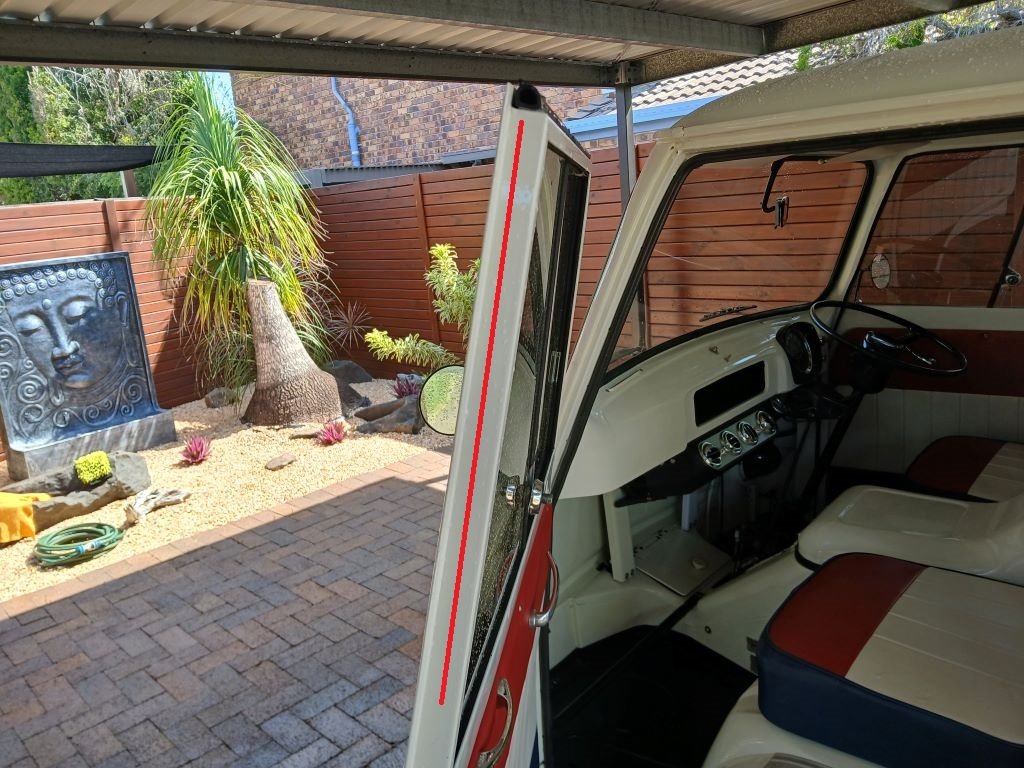
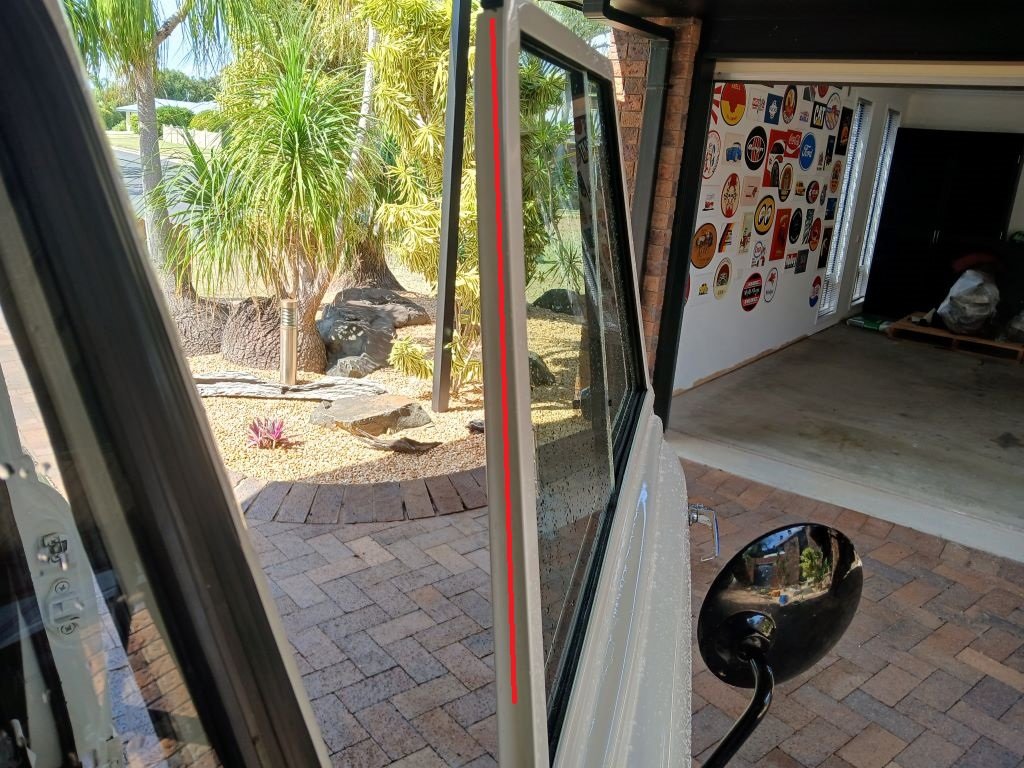
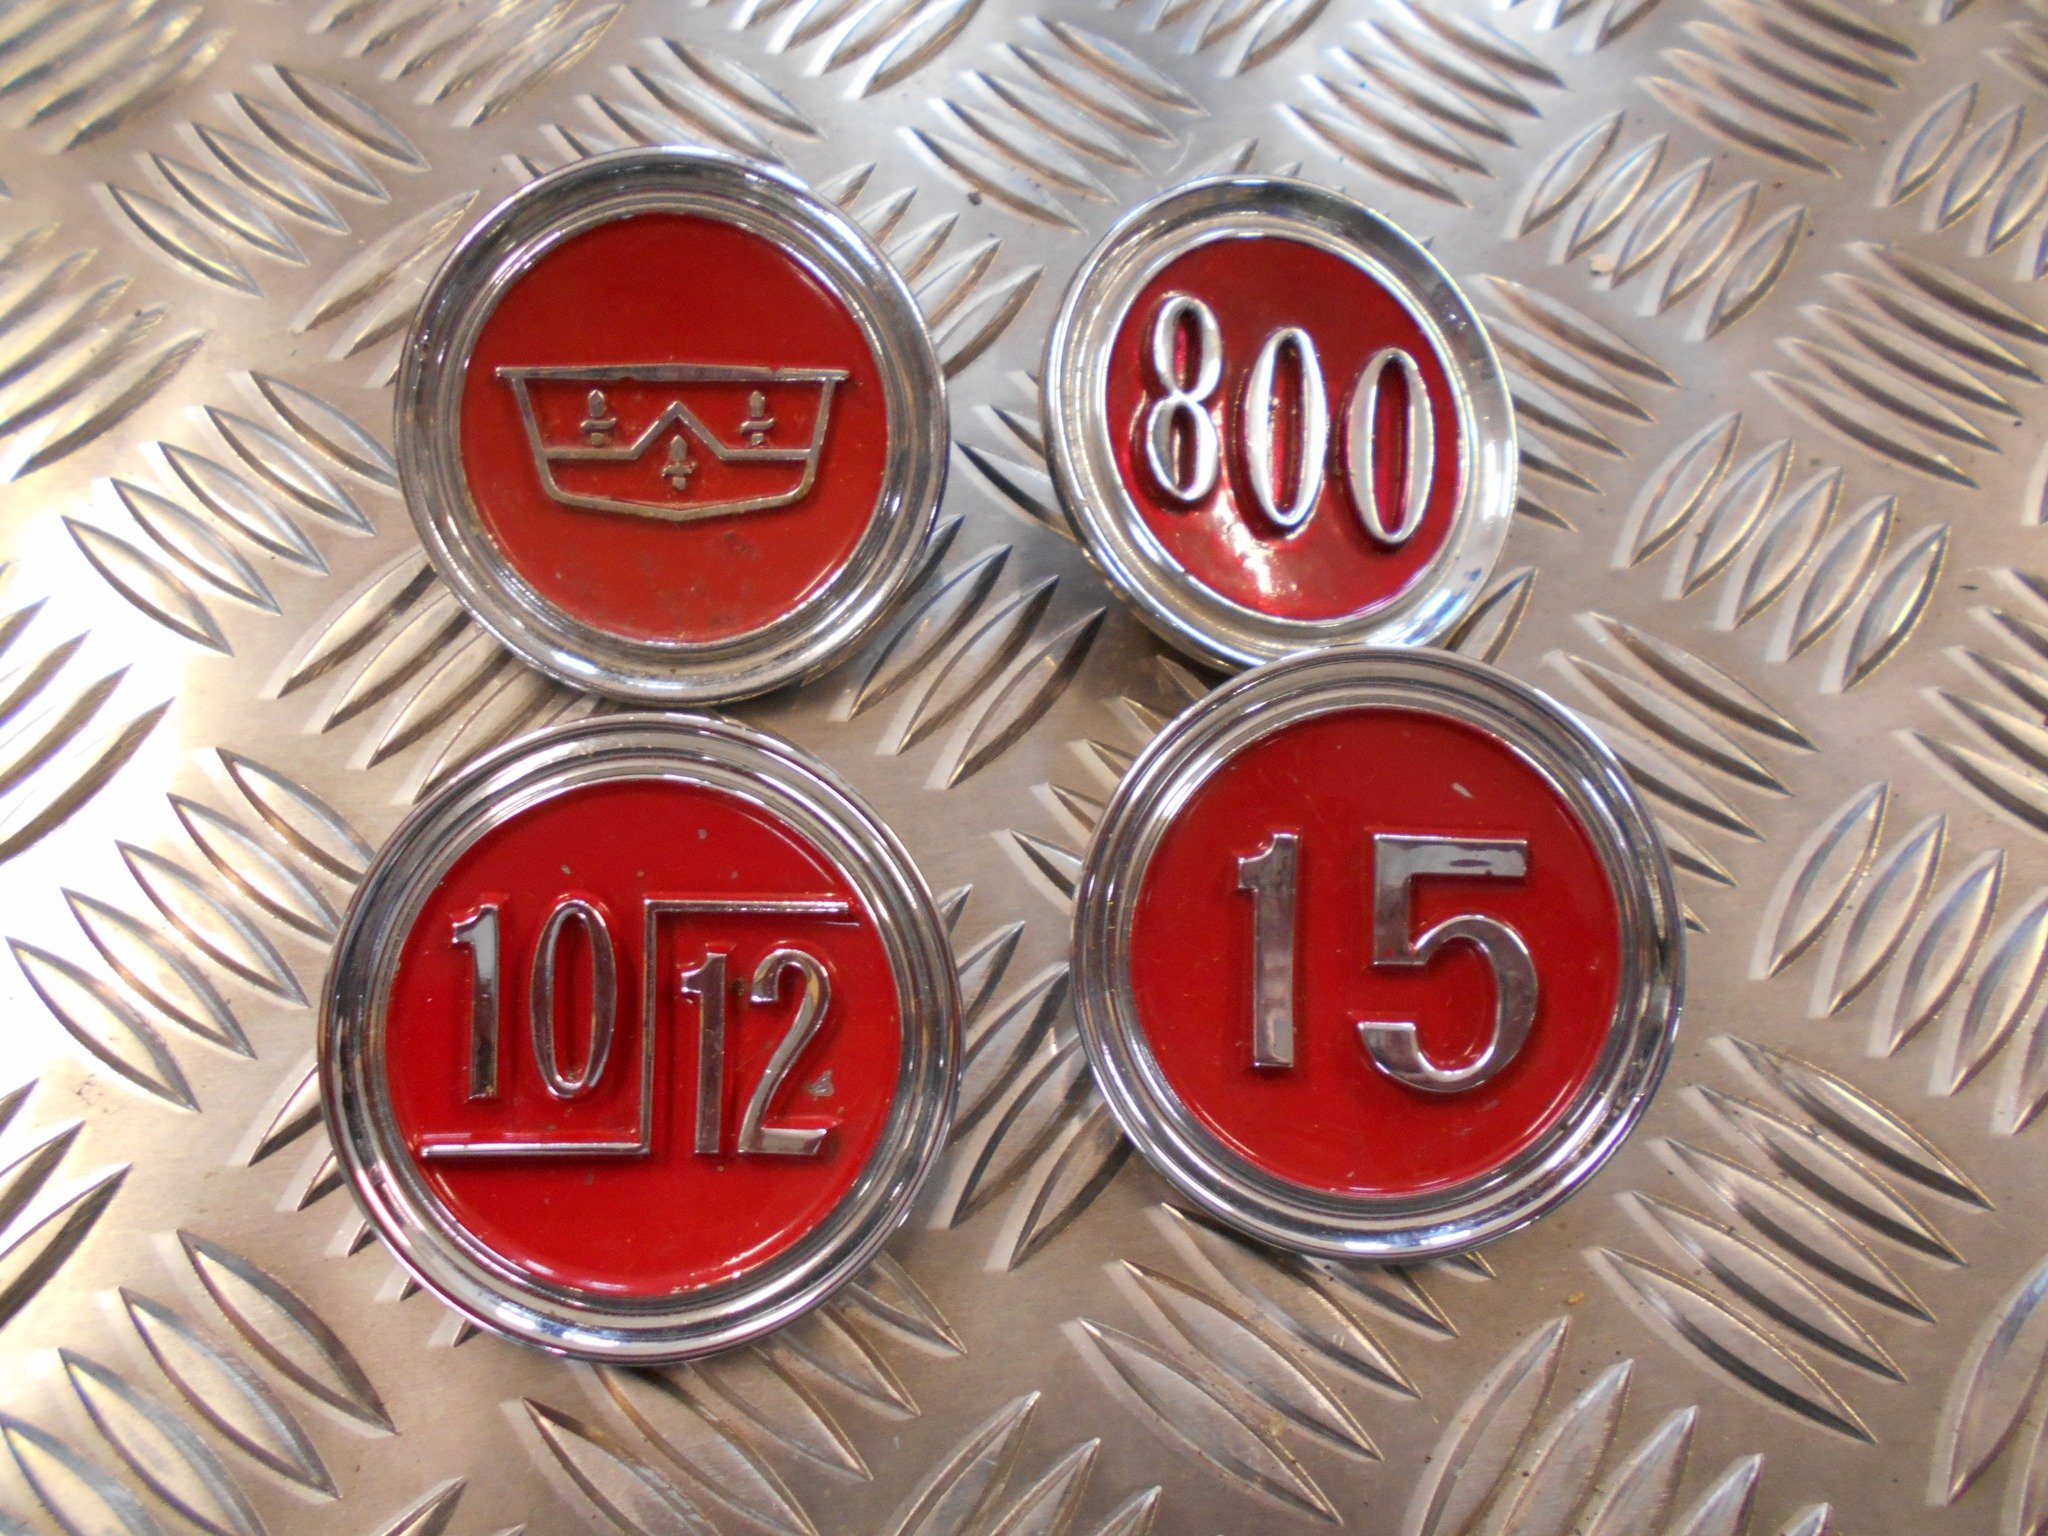
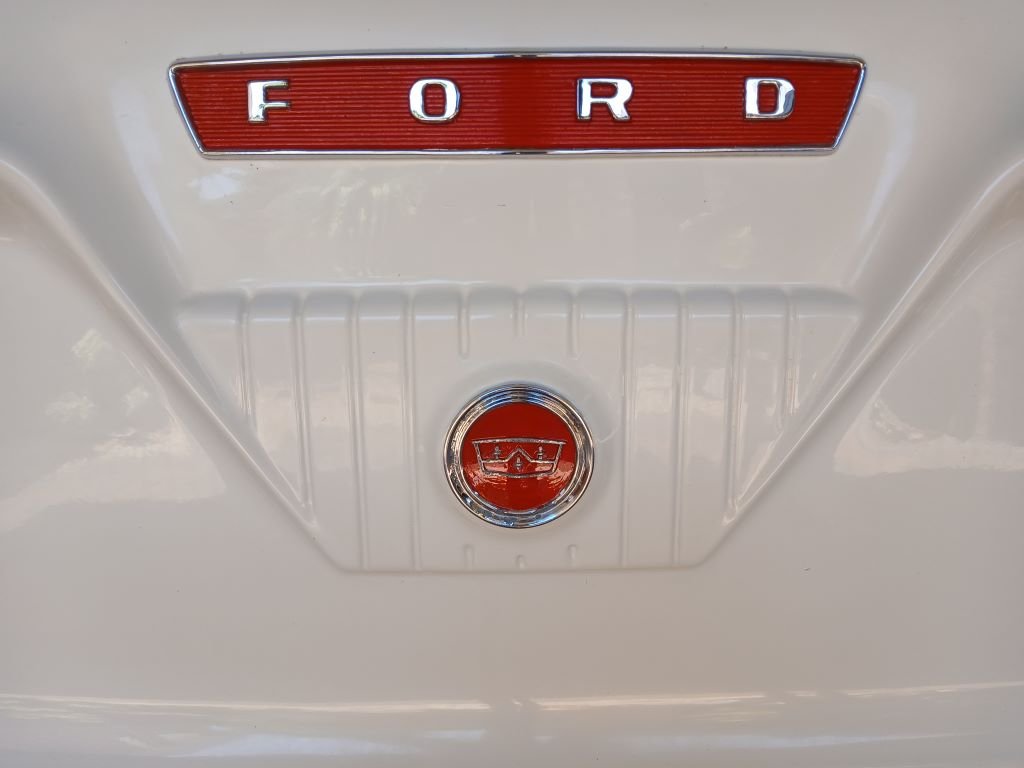
Okay, so today was bath day for the Thames and there were some mixed results in terms of the effectiveness of the new rubber strips that I fitted to the top of each door last Friday. The good news is that the door tops are now perfecly sealed. The bad news is that we are still experiencing water ingress down each side of the door. So I'm thinking that I need to run the same seal down each side of the door just to where the window ends as depicted by the red lines in these photos: Running 3 separate sections of seal on each door with tatty looking corner joints will send my OCD into overdrive, so I'm going to experiment with a few leftover offcuts to see if I can make a decent looking piecut for each of the 90 degree bends. If I can achieve that I'll bin the existing bits and stock up on some fresh lengths next time we do a town run. However, it's not all doom and gloom as yesterday we did a fairly long drive at speed and both Mrs Flash and I noticed that we have lost an annoying whistling wind sound that I had always assumed was coming from the sliding glass door windows. Turns out it was air coming in the top door gap that the new seal has solved. So one more for the win column. In other news I've been searching for a while for a new nose badge to replace my current one which as you will see in this image is looking a bit crusty: It's the only badge on the entire van that hasn't been replaced with a new one. This particular badge is pretty rare as they were only fitted to the vans assembled outside of Dagenham, in other words those vans supplied as "knocked down" kits to other countries. This image shows my badge and the 3 other nose badges that were fitted to the UK assembled vans: Sharing some useless information with you all - the badges depicting the 10/12 and the 15 refer to the CWT (hundredweight) loading capacities and the 800 was another derivative of the van. I have encountered a few NOS examples of the "15" badge on eBay UK, but as I said my badge is rare as. A few months ago I put the word out on the Thames 400e FB page that I was looking for a good nose badge, but have had no luck tracking one down thus far, so today I broke down and asked Mrs Flash to give my existing badge a bit of a birthday with some enamel model paint that I bought a while back. It's not perfect, but it looks way better than it did: And it looks even better from a few feet away: Thanks for reading.
- 739 replies
-
- 22
-
-
Well done on the WOF. What an amazing result. I've been following your Marina journey from the start and must compliment you on the way that you have phased this restoration. From a motivational point of view it's way easier to tackle the beautification phase on a vehcile that is already running and road legal. Too many folk dive straight into the paintwork and bling and then run out of steam when they realise that on top of this time consuming and financially draining bit they still have all the mechanical work to face. I'm looking forward to the next phase of your journey. Happy motoring.
-
I've clocked up another 125km on the old Thames in the past two weeks and she is purring along like a kitten. Gave her a good wash and a polish last week and noticed that when I hose her off I'm still getting a bit of water ingress along the tops of the front doors which sprinkles the seats and wets the floor mats. Bloody irritating. A closer look at the current pinch weld seals that am using around the door openings revealed a slight gap along the top of the doors. I could replace the seal with a fatter profile, but that will be too much down each side meaning the doors will be a bugger to shut properly. I probably could fit the fatter seal along the top edge only, but my OCD would battle to come to terms with mismatched seal profiles and nasty looking joints, so something more cunning was required. Scratched my head for a bit and then decided that a neater looking option might be to fit a second seal to the top section of each door. So while we were in town yesterday I wheeled past my local rubber place and picked up 1.2 meters of my favourite half moon rubber seal. Gave it a quick trim, peeled off the backing and stuck a piece along the top of each door like so: Profile shot: And with a bit of luck that should improve the situation. I'll know for sure next time I give her a bath.
- 739 replies
-
- 11
-
-
The old Thames has clocked up another 560 km this month. Fuel consumption and overall engine performance are back to normal since I fitted the remanufactured electronic distributor, so that is a bit of a relief. The a/c is also working like a charm, but I had noticed a bit of sideways play in the idler pulley when I replaced the compressor a month back, and rather than faffing about with a new bearing I decided to replace the whole pulley. Splashed out on a genuine Dayco unit which set me back a cool $39.50 including postage. Part number for my records: Quickly whipped out the old unit and sat it next to the new one for a quick comparison. The housing on the new unit on the left has a bit more shape to it, but the pulley diameter and the position of the bearing are identical. Chucked the new jobbie back on the van, adjusted the belt and fired it up for a look see. Belt runs perfectly true so I'll take the win.
- 739 replies
-
- 10
-