NewGuy Posted July 13, 2008 Author Share Posted July 13, 2008 o this is what i think i have to do before going for a wof1.Sort My Doors out so that the open and close nicely and line up etc 2. Attach Bonnet 3. Attach Number Plates Half done one i carn't find my front one at the moment!!!! Founded them 4. Fix Steering. 5. Get Front Left parking Light and indicator going 6. Position Driving Lights 7. Bleed the brakes to make sure they all workin mint 8. Patch Driver Door A pillar Rust hole Done 9. Patch Engine Bay Rust hole by Speedo cable. Done 10. Patch Rust hole on either side of engine were bonet stops go. Done 11. Patch the gearbox cover. Done 12. Decide on the Rear Number plate light arrangement. Decide 13. Primer Doors, Boot, Bonet. 14. Install Turbo. 15. Install some horns. Done got some Shitty Airhorns FTW 16. Tightened up Oil Pump Bolts to stop it leaking. Done Car now has no oil leaks Hunting for a gearbox mounting part, might steal my dads for the wof and get one made after etc. If i get everything done this weekend, Which i should!!!! Itl be WOF on monday and going to get new tyres etc before wof me thinks. ALL FUCKING DONE WOF TIME TOMORROW! Quote Link to comment Share on other sites More sharing options...
NewGuy Posted July 13, 2008 Author Share Posted July 13, 2008 New page so i thought id fuck it up for you guys with a whole heap of primer pics. Spent the Whole day going over the car checking everything. Changed the steering wheel position by putting in front wheels inline and taking the colum out and putting it in square etc. Tightened all the seatbelt shit up. Mounted starter panel. Positioned the lights. Check over the brakes. Got a mean firm pedal. Primered the boot. Cleaned light connections. Gave it a good clean inside, Got the windows like mirrors. Put some carpet over the tunnel, temporay gear boot etc. Should have filled it up but ill do that tomorrow morning. Checked oils etc also. Put a steering wheel cover on to protect the leather. actually not half bad holds the wheel tight.Nice as to drive with Also Put Front Grill on to look less Dodgy etc........ Should be all goods Tiote 1 Quote Link to comment Share on other sites More sharing options...
NewGuy Posted July 13, 2008 Author Share Posted July 13, 2008 Failed. Seat Belt washers on top anchors Front Left Tyre to worn. Fuck mean. Quote Link to comment Share on other sites More sharing options...
NewGuy Posted July 16, 2008 Author Share Posted July 16, 2008 What the tyres look like before lowering etc. Mean grip though feel safe etc etc Front way to high bit nicer at the back Quote Link to comment Share on other sites More sharing options...
NewGuy Posted July 17, 2008 Author Share Posted July 17, 2008 Going home early to swap springs shocks etc. See how she looks. Quote Link to comment Share on other sites More sharing options...
NewGuy Posted July 17, 2008 Author Share Posted July 17, 2008 What the shorter springs did for me. Still got this much adjustment on the shocks, but i think if i go any lower in the front the back will not be even and maybe come up even more etc. Quote Link to comment Share on other sites More sharing options...
NewGuy Posted July 17, 2008 Author Share Posted July 17, 2008 Just dropped the car up to my tyre shop. Cars sitting perfectly even. Might save some coin and get some 2inch lowering springs made up for her. Depending on how low the body will be allowed to go. Then get the adjusties certified. The Front Bearings have a little bit of play, so they are going to tighten them up. Gunna source some new ones though. Gunna go weigh my car this arvo See how light it is and how much more i have to get ride of for a mean Power to weight ratio. maximum weight with a full fuel cell water and oil etc is supposed to be 1375Kg Quote Link to comment Share on other sites More sharing options...
NewGuy Posted July 18, 2008 Author Share Posted July 18, 2008 Dunno how i got wof tbh Bearings had heaps of play, and some bushes have disappeared that hold the steering etc in the right place, Comes off the chassis and goes to the suspension. Parts car gunna get a surprise tonight. They fixed the toe in so it won't chew the tyres in the mean time but want me in there Tuesday next week with the repairs done. Gunna see how to pull them off my parts car tonight and check their condition etc. Drives way better now, easy to just turn while backing up etc and just moving etc Sheet etc Quote Link to comment Share on other sites More sharing options...
NewGuy Posted July 19, 2008 Author Share Posted July 19, 2008 Sorted out the front strut bushes, should be here monday or tuesday. Aswell as some nolthane bushes for the sway bar. Did 150 odd miles today, didn't skip a beat. Quote Link to comment Share on other sites More sharing options...
NewGuy Posted July 29, 2008 Author Share Posted July 29, 2008 So i haven't got my car in to town again as i have needed the work van at work. What i have been doing. Changed the Thermostat cover for one that does not leak out of the Expansion Bottle Hose Connector thing. It feel out when i pulled it apart, I am going to Tap it out and fit a new fitting. So now im not loosing any coolant for there anymore, it was squirting all over the bonet, carbs engine etc. Big test will be tomorrow after a good long run. Checked the plug gaps again as it is sometimes missing and spluttering etc. They seemed to be fine so i wound the carb needles right out so its running nice and rich and the problem has gone, Sounds smoother aswell. Goes alot better also. SO i also advanced the timing a bit and i think it come forward a bit more also. And i also Waxed the Primer paint job to protect the underneath a bit better in our wet season we seem to be having. Actually came up quite glossy. Smells like cherry's aswell!!!! Quote Link to comment Share on other sites More sharing options...
NewGuy Posted October 20, 2008 Author Share Posted October 20, 2008 Shit well it has been a while. I have just got my 2nd Rego for 3months, first time the car has been on the road for three months. Im pretty sure ive done over 2500Miles Ive ironed out most of the squeaks and shit and its all going pretty well. Im still keen on getting it sprayed but i just gota get my a into g and get on with it. Also i have the dellortos bolted up to the manifold , i just need to sort some hose fittings to come off the water and where the breather goes back into the carbs. Ill then whip my current setup off and make sure my gasket matches the head intake and ill match the ports up. throw the dellortos on and see how i can get it to run and perform, really just want it for bit more noise. Plus then ill have it all setup to go to and from the su's etc. Pedal went all spongy on the weekend thinking i could have a rear cylinder leak though im not loosing any fluid. Switched the dashes over aswell to one wit no cracks and good varnish etc. Dellorto 48s Quote Link to comment Share on other sites More sharing options...
NewGuy Posted October 30, 2008 Author Share Posted October 30, 2008 Alrighty the change is under way. i drained the cars water Got a new Thermostat Took the Throttle cable off Took the chock cable off Removed the heater hoses Removed the SU carbs Pulled the water pump cover off Tried to get the water pump out, got it to pop half way up but i could not get it right out of the hole. Mocked up the manifold and carbs to make sure everything will clear and is in the right place. The bypass tube,manifold, pump cover look very close together. Hopefully got a mate who is going to help me make a cable mount for the throttle. Quote Link to comment Share on other sites More sharing options...
NewGuy Posted November 10, 2008 Author Share Posted November 10, 2008 As some of you know ive been getting the new Waterpump etc in my car and changing the manifolds over. Had a slight problem when i ran it with the carbs running and i must have glazed the cylinders on number 1 and 2. Going to change the oil tonight, but just about everything is back together. Quote Link to comment Share on other sites More sharing options...
NewGuy Posted December 3, 2008 Author Share Posted December 3, 2008 Getting the car ready for summer cruising. Found out that i can fit a Mini Dizzy and Rotor arm and that the Mini Points also will fit my dizzy. So i brought new Dizzy cap and rotor arm and Points, i just have to modify my leads or buy some new ones that will plug in and then i will have off the shelf items electric ways. I can not buy the Dizzy cap for a Sprint, nor the rotor arm in NZ. Also the Mini Cap would not fit with the original manifold only with the Webber/Dellorto Manifold. Pics of new Dizzy Cap, and my Worn and broken rotor arm. Doesn't look good to me???? Quote Link to comment Share on other sites More sharing options...
NewGuy Posted December 10, 2008 Author Share Posted December 10, 2008 I was thinking today hmm i haven't updated on here for a while. In this Thread. THe car seems to be going very well and i am doing some good mileage in it. After putting the 48s on. I have since been after A new Dizzy cap and Rotor, and have found i can use a Mini one which i can buy off the shelf. I have brought the new parts and new leads etc i just have to fit it all up. I have then been looking at getting another cam reprofiled for bigger lift and longer duration, i am going to go to the Fast Road Cam. Which goes from Stock Timing 18/58-58/18 .360" Valve lift Duration of 256Degrees to 34/66-66/34 .392" 280 Should make the car run alot smoother and give the cars a little bit more suck. I am still trying to get my head around what needs to be done to make the change, i dunno what i have to do with clearances with the valves etc. Or if i can just pull the old cam out and lay the new one back down and rebolt her up so any information about this would be much appreciated. I haven't done alot in this area but am very prepared to learn and just a general idea would be a great help. I have also in the last couple of days looking at changing the cooling options for summer time which is now here. And i am going to make some ducting to force the air through the radiator while cruising as the electric fan is not on it restricts the flow of air through the Radiator. This morning i had a crack in my new exhaust patched as it some how cracked the welds. And i dropped off my Speedometer to have the flicker taken out of it. I also found that the black paint on the chrome around the gauges came of easy so i did this. Quote Link to comment Share on other sites More sharing options...
NewGuy Posted December 15, 2008 Author Share Posted December 15, 2008 Picked up some hosing, brass reducers, Hose Clips. The hose guys here that i deal with have been pretty good to me. Giving me trade less 45% which makes it pretty handy. Have decided on a place for the Header Tank, and i will route the hose back behind the motor and under the carb's to keep it all nice and low. Quote Link to comment Share on other sites More sharing options...
NewGuy Posted January 28, 2009 Author Share Posted January 28, 2009 Time for some paint, bums now filled with bog, as someone with the bumper on has either been hit or backed into something pretty hard and bent the body where the bumper bolts on. Its now pretty flat and will only have one ripple in it. The driver side front gaurd is going to be a prick, needs to be bent in welded then bogged. Hopefully will be ready for a etch up this weekend and a long board block down. Quote Link to comment Share on other sites More sharing options...
NewGuy Posted January 31, 2009 Author Share Posted January 31, 2009 Well i finished off the body prep yesterday at about 5pm with help from Johnathan and Harriet. Drove it around to the next Shed and masked it up around the windows and shiny bits I shot it with primer with a gun, i used 1 Litre of paint and lots of thinners. I did one door and thought it was coming out a bit ruff but it was just because the compressor was not on, i used the 200L tank cleaning the car down. I also de greased and waxed before primer. To etch it up for the final coat i have used 3m Pads that are sorta like a slighty stiffer dish cloth. They work very well and give you lots of control around small areas. So today i will be putting the lights back on, driving to my work masking her up ready for paint in the morning. It looks pretty straight and i am happy with how it looks, Prepare your computer for overload tomorrow. Cheers Stew Quote Link to comment Share on other sites More sharing options...
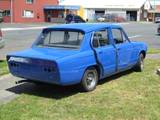
NewGuy Posted February 2, 2009 Author Share Posted February 2, 2009 I think blue works, what about you? Quote Link to comment Share on other sites More sharing options...
NewGuy Posted February 3, 2009 Author Share Posted February 3, 2009 Yea your so right, today was so dumb i saw so many blue cars, but then i saw a whole lot of dull cars again. Some more with some bits on, need to get the corners of the bumper welded or micky it up some how so it is all nice and tidy. Sex on a car or what??? I like no badges or anything, from now im going to tell people its just a clapped out 1500 with a 5K paint job on some oldschool rims. See how long i go for this look for, gunna sand the grills down and spray Quote Link to comment Share on other sites More sharing options...

Recommended Posts
Join the conversation
You can post now and register later. If you have an account, sign in now to post with your account.