

slacker.cam
-
Posts
558 -
Joined
-
Last visited
Content Type
Forums
Downloads
Events
Gallery
Everything posted by slacker.cam
-

Cam's Toyota AE86 Trueno Racecar
slacker.cam replied to slacker.cam's topic in Projects and Build Ups
Lots of stuff has been happening over the past few days. I want to post photos in a more grouped fashion so I'll wait till a few things are fully complete before posting photos. The main things I've been working on are painting the exhaust system, fixing the wiring in the engine bay, calculating the compression ratio, polishing bits, drilling holes in stuff and building some electronics so I can control my water pump with the ECU. I'll post photos of all of these bits when I've finished them. On Saturday I went back to Tony Lynchs place to finish putting the head back together (or so I planned). The first thing I did was install the replacement valve guide seal from my mishap last weekend and finish putting all the valve springs back in. This is when we realised that things were about to get messy as the cams have been reground to an unknown profile by the original engine builder. So I have no idea what the valve clearance should be or what the cam timing the engine needs. To sort this out I'm going to get the cams profiled by Franklin Cams in Pukekohe. For $35 I'll have a complete picture of what these cams have been ground too which is pretty sweet. I have a feeling that the cams are holding back some performance from this motor so this will also help me to figure that out too. The less unknowns the better... But while I had everything there I figured I would measure the valve clearances and the current shim thicknesses so I could save some time later on. I put the cams back in and came up with this. The only issue is the fucking towel I had the head sitting on got picked up by a lot of the valves as I turned the cams so all my clearances are full of shit. Grrrr. At least I know the shim thicknesses now. I'm going to redo it this week. So with the rest of my day I went about cleaning up all of the water fittings and re-plating some nuts and bolts. It's a lot of fun to see scungy old bolts become like new again As I was talking about above I'm tidying up the old connection points for the heater core so I can retain water flow from the back of the head but not have a spiderweb of old water lines going everywhere. So I gave the pipe that goes on the back of the head the chop, re-swaged it and then bead blasted it. Then the pipe that runs rearward from the water pump got taken care of. Gas welded the hole where the heated throttle body line used to attach, swaged the end, tidied up the mounting face on the sanding disc, then zinc plated it with a gold passivate. I think it looks the tits! The bypass pipe that allows water to flow from the head back to the water pump when the thermostat is shut is now surplus to requirements as the car no longer has a thermostat. The easiest way to block up the fluid path was to plug weld the bypass pipe and put it back as normal. I tidied it up and re-plated that too. My gasket set only came with one o-ring so I need to find another before I can put it back together though. Next I took all the aluminium water fittings and sorted them out too. I resurfaced and sealing surfaces with the sanding wheel and then bead blasted them all. This sort of work is really fun as the difference is huge and it doesn't take long when you have the right tools. A big thanks to Tony for letting me use his workshop! Finally I took all the mounting hardware for the head and re-plated it all. So this week I will start putting all the water fittings back on the head and block. The cams are getting sent away tomorrow and it's a 1 day turnaround so by the end of the week I may even have the cams in and have it all shimmed up Next post I'll write up about the zinc plating process.... -
Auckland Monthly Meet - 20 July - 730pm
slacker.cam replied to EURON8's topic in Upper North Island Region
Equally strange was rot808s lack of attendance! -
Yep, perfect for fuel lines. That's what I'm using them for.
-
Cam's Toyota AE86 Trueno Racecar
slacker.cam replied to slacker.cam's topic in Projects and Build Ups
Just a quick update from the past couple of days. I stripped the paint off the radiator support bar and dropped it in to be powdercoated. This photo is pretty shit but you can see the bonnet latch bar on the right that was on the car when I bought it. It's completely unnecessary as the car has bonnet pins, so I pulled it out. It bolted on to the radiator support panel so I also removed that part by grinding away the spot welds (the piece on the left). Underneath you can see the partially stripped, modified radiator support bar. I should get it back from powdercoating early next week. While I was at the powdercoaters I picked up my crossmember. It came up really well considering I had let it get a bit rusty. I need to pull finger and get the manual steering rack sorted ASAP. I gave the water lines for the heater the chop. As I talked about previously there is no heater core in the car but I'm going to retain the water flow from the back of the head so any air bubbles that bubble up from the block will not get stuck there and cause hot spots. I'm not changing the water flow, it's just to tidy the lines up and to get rid of the heated throttle body connections. I'm going to put a swage back into the end of the pipe and gold passivate it this weekend I started doing the little bit of rewiring that I talked about before. Instead of using DTM connectors I chose to use Weather Pack connectors. The DTMs are only good for 7.5A and this fan can draw up to 9A so I had to find something alternative. These connectors are good for 20A, are fully waterproof, and are available from Pan Pacific for pretty cheap. The fan originally had shitty spade terminals on which are complete crap for this application as they have no locking mechanism and obviously aren't waterproof. I cut them off, sheathed the wires in glue lined heatshrink and then installed the new connector. Before After Probably could have had less photos for just a connector but motorsport electronics is my thing -
Thanks for the offer. I got the few I needed on the way in to work this morning so I'm sorted for now. I wish I worked somewhere that had sweet staff discounts!
-
They're for mounting tubes and wires in place. Like in this photo I stole from Petes build thread: EDL don't stock them. TWL has them for $3 each for 10mm ones (I guess that's retail price and there's big discounts if you have an account) RAJ is $14+GST for a 5 pack of the 10mm size
-
Choice. I'll ring around and see who's cheapest near here. Thanks! And fuck. I was in Pan Pacific 20 minutes ago and didn't even think to ask the guy. Moron.
-
Where can you buy these in NZ? I've got them before for cheap through Summit Racing but I need a few different sizes ASAP.
-
Cam's Toyota AE86 Trueno Racecar
slacker.cam replied to slacker.cam's topic in Projects and Build Ups
Got the valve gear back into the head yesterday. Pulled the old valve guide seals out. Success! All valves re-ground and ready to be lapped. Valve seats re-cut. Before. Add paste. Roundy round. Sorted! Cleaned the head. Fuck this took ages! Before. After. Inlet port. Nothing fancy - just cleaned up. The ports are too big on these motors anyway. I put the new valve guides in, cleaned the valves and associated bits and put them back in. It was getting late in the day so no photos. Here's the head looking all shiny and new Now I just have to replace one valve guide seal that I messed up. Grrrrrr. And re-shim it. Should be doing skids this time next week if everything goes according to plan -
Cam's Toyota AE86 Trueno Racecar - Yes, Another One!
slacker.cam replied to Ned's topic in Project Discussion
Don't get me wrong. I'm all for a set of quads and EFI. But, aside from being a fan of the simplicity of the carbs, I just don't have time to set it up at the moment. I have 4 more weeks before trackday so time's of the essence. The other reason for not dicking with it is that it's a bigport motor and still has a 3 rib block and probably the little gudgeon pins. It's never going to make as much power as the later model motor with the same amount of coin spent on it. I have a 20V and a smallport motor sitting in the garage at home so I'll most likely build one of those up to eventually replace this motor. If I was to go to EFI there's no way I'd sell the Link and replace it with a MS. For timing I'm not so fussed as all it's doing at the moment is acting like a mechanical advance dizzy (no TPS or MAP input - just RPM). -
Cam's Toyota AE86 Trueno Racecar
slacker.cam replied to slacker.cam's topic in Projects and Build Ups
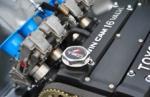
I pulled the exhaust out so I could remove the original AE85 fuel lines that were still in the car. While it's out I'm going to wire wheel everything and paint it with some high temp paint. I also want to sand/machine the face that bolts to the motor because it had a heap of exhaust poo on it so I have a feeling that it may be warped. I really like the design - pretty much exactly what I'm doing on my other car. So then I ripped out the old fuel lines. Partly to save a few grams but they also just make an unnecessary mess of the engine bay. All the rubber mounts weigh a surprising amount. I've replaced them with P-clips to hold the brake line. The carbs got a birthday so they're now clean and ready to be reinstalled The sump makes me happy. Having to buy 7.5L of oil to fill it does not. -
Cam's Toyota AE86 Trueno Racecar - Yes, Another One!
slacker.cam replied to Ned's topic in Project Discussion
I think the reason behind the Link is so that the car could be swapped back over to EFI in the future. Also, the previous ignition module that was on the car shat itself at a race meeting and there's nothing worse than having something trivial like that ruin a whole weekends racing. Reliability had a lot to do with it. I'm still tossing up what I'm going to do with the ECU. I'd quite like to sell it but then I have to spend time installing a Megasquirt or something. I'm quite a fan of the simplicity of the carbs to be honest so I'm not going to swap to EFI unless there's a good reason to. Interesting that you bought those wheels Jif. I wonder why he sold them. What size are they? Possibly too small for the big brakes or too narrow for decent tyres... -
Cam's Toyota AE86 Trueno Racecar - Yes, Another One!
slacker.cam replied to Ned's topic in Project Discussion
When it comes to carbs I'm a complete amateur. If I can't get this Holley thing up to scratch I'll definitely buy a Malpassi. Tony knows his shit though and he said he sorts them out all the time. What's so bad about them? -
Cam's Toyota AE86 Trueno Racecar
slacker.cam replied to slacker.cam's topic in Projects and Build Ups
Here's a pic dump from yesterday. I'll come back and tidy this up later. Aside from the bad motor there are a number of other things that I'm changing on the car while I have it apart. Well, that's my excuse, mainly it's because I'm a picky bastard... I also thought this car could do with a bit of Colin Chapmans 'add lightness' mantra added to it. The main change is to ditch the power steering setup that it had. I don't see any reason to have PS on a circuit car. It adds weight, adds rotational mass, reduces driver feedback and it's just more shit to break. So yesterday I pulled out a manual cross member that I had sandblasted a few months back and dropped it at the powdercoaters. Before: I should have after photos on Tuesday I'll also recondition this spare manual rack that I have and treat it to some Urathane bushes from AJPS. The offending item: Here's a couple of better quality photos of how the car sits at the moment There's a whole bunch of other stuff I'm going to change too... I hate this overflow bottle for some reason. Going to see if I can make a standard AE86 one look at home in the engine bay. This external oil filter needs to be flipped up the other way so it doesn't drain every time the car is turned off. The sooner the oil pressure comes up the better I reckon. It also makes oil changes far less messy. Can anyone think of a reason why this is a bad idea? The battery tray can also come out. I need to think of a tidy way to remove it without using the angle grinder and getting metal everywhere - I'm thinking a milling bit in the drill. The thermostat bypass (near the bottom of this pic) needs to be blocked off as there's no longer a thermostat in the car. At the moment it allows hot water to circulate directly back into the motor - not such a good thing I also need to tidy up the heater pipes as they've just been looped (same as the heated throttle body pipes). I want to retain the water flow from the back of the head so I can stop air from collecting back there but I'll do what I can to tidy them up. I also want to swap the good set of bumpers I have onto the car as I hate the painted rear bar that it has currently and the front currently has a big hole cut in it for some unknown reason. I pulled the crank pulley off so I can replace the cambelt because Ned spilt oil all over it I'll replace the tensioner while I'm at it. I have an ally pulley that I bought for my 20V motor a while back and I'm hoping that I can use it on this motor to drop some rotational mass. It has a 0.75mm offset that you can see in the photos. What's the maximum offset that I can get away with? I'm thinking that I'll machine up a spacer to slip on the crank before I put the pulley on or somthing. More to come soon! Let me know what you think here -
Cam's Toyota AE86 Trueno Racecar
slacker.cam replied to slacker.cam's topic in Projects and Build Ups
On Tuesday night I headed to the workshop to make a decision on wether I'll be pulling the bottom end apart or not. All of the bores are showing some signs of wear but only a couple of the marks are big enough to be felt with my fingers. My concern was that if I did pull the bottom end apart that I'd run out of money to get it back together before trackday. Rings and bearings aren't cheap for a race motor and who knows what else I might want/need to replace. So I did a simple test to test the condition of the rings. I cleaned each piston and bore with a clean rag and turned the motor over until all the pistons were at the same height. I then poured 50mL of Kerosene into each bore. What we want to happen is for the level of each bore to drop at the same rate. If there are any broken or rooted rings then the kero will leak faster. My motor took about a hour and a half for cylinder 1-3 to drain out. Cylinder 4 was still going strong 4 hours later. This just means that the rings are a bit gunked up on this cylinder. I know a good way to fix that once I get it all back together though I'm pretty stoked that nothing seems to be beyond recovery. It looks like I should have this motor ready to go again for around $600! So far I'm looking at: Head machining $150 Gasket set $120 Cambelt $40 Tensioner $35 Head gaset $120 (assuming I can run a 0.8mm TRD one) New oil $100-150 (need to change the oil once I've bedded it in) I also pulled some of the wiring apart as it was looking a bit rough. I'm going to replace the connectors on the water pump and fan with DTM connectors like this: They're a really nice aerospace/motorsport connector that's fully waterproof and good for 7.5A. -
Cam's Toyota AE86 Trueno Racecar
slacker.cam replied to slacker.cam's topic in Projects and Build Ups
I have a shit load to write up but I'll try and keep the words to a minimum. I didn't have my camera for a few days so there's a shortage of pics to post up. On Sunday night I pulled the worst looking valves out of the head. Both the inlet valves on cylinder 2 and the rearmost valve on cylinder 4. I could clearly see that these valves had not been sealing as there was carbon in the inlet ports. I was expecting to find pitted valve seats or burnt valves but they all looked fine. The main observation was that the sealing surfaces on the valves were visibly concave which looked like where my problems lay. Before I had pulled the head off I checked for valve clearance and all valves were fine so at this point I thought the damage was just due to a hard life. So on Monday arfternoon afternoon I took the head to Tony at Lynch Built Engineering so he could have a look at it. He agreed that the valves I had pulled out were the worst of the bunch so we spun them up on the lathe to make sure they weren't bent. There was no evidence of any contact between the valves and pistons but this confirmed that the valves were all good. Next we put the worst valve in the valve grinder and it was immediately obvious what the issue was. Not only was the sealing surface very concave but it had worn out of round so only 1 side was sealing at all. With a decent grind it came back to life though so that was great news. Valve grinding machine: We resurfaced the valve seat with a tool like in the photo below, and that also came back to life. There was no evidence of metal discolouration so this was another piece of good news All of the wear is due to the motor being in the car since 2004 and with a hard life of high RPM it's taken its toll on the valves. I left the head with Tony so he could pull the rest of the valves out and tidy everything up. I'm going up on Sunday to lap the valves in and complete the remainder of the machning. While I was there we noticed that there was a lot of green residue on the cabs from the race gas. It looks like the fuel has been overflowing out of the various ports on the carbs. Tony asked what kind of fuel pressure regulator I'm running and when I told him it's a Holley he said that this was likely to be the problem. Apparently there is a inherient fault with these and they don't regulate properly. The ball bearing does not seat correctly and they need to be modified. We're going to sort that out on Sunday too. I'll find out some more information about what the issue actually is for anyone who's interested. -
Auckland Monthly Meet - 20 July - 730pm
slacker.cam replied to EURON8's topic in Upper North Island Region
My mouth is watering already -
Cam's Toyota AE86 Trueno Racecar - Yes, Another One!
slacker.cam replied to Ned's topic in Project Discussion
KY - I guess it depends how you define 'too much'. I think I got a super awesome bargain. I could part the car out easily for 1.5x what I paid for it. The previous owner REALLY wanted it gone Richie - Yeah it'll definitely be running by trackday. Looking forward to some track battles with Markku. And you're welcome to borrow the trailer if you want. It's single axle, braked, non-sprung. Tows fine when it's empty so long as you run SFA pressure in the tyres. Perfect size for a little car like yours. -
Cam's Toyota AE86 Trueno Racecar - Yes, Another One!
slacker.cam replied to Ned's topic in Project Discussion
Yeah, that'd make sense as the previous owner works in Rosedale. Thanks! -
Cam's Toyota AE86 Trueno Racecar
slacker.cam replied to slacker.cam's topic in Projects and Build Ups
So with the purchase of another car it became apparent that the double garage here at home wasn't going to be enough so I managed to find a empty double garage about 200m from where I work. It's 36sqm, has power and water, and is locked up behind a really solid set of gates. This gives me somewhere to not only store the cars but also somewhere to store the trailer as our driveway is already overflowing. I actually got the car started and drove it the few hundred metres from work to my shed. It was running rough as guts - not at all like an ignition fault. When I got it into the shed I did another compression test, this time on a warm engine and with the throttles open. The issue immediately became a lot clearer. I could hear the air getting forced back out of the inlet port on the compression stroke on cylinders 2 and 4. The motor definitely was suffering from a lack of valve sealage so the head was going to have to come off. I started to strip the motor and Ned and another mate, James, gave me a hand to finish it off on Sunday. It's such a pleasure to work on after having been stuck under Neds Alfa 155 for the past couple of weekends! Excuse the camera phone pics. Courtesy of Ned Rocker covers off, getting ready to pull the cams out Cracking the cam caps Head off - bores look ok for a race motor. Honing marks are still there, with some scouring. Will check for broken rings and only pull it apart if I need to. Table of bits Combustion chambers - looks like its had a hard life but everything still where it should be. No signs of bent valves or interference. No signs of detonation or of a blown head gasket. Running rich but not excessively. Pretty positive really. Tucked in for the evening More about the diagnosis tomorrow... -
Cam's Toyota AE86 Trueno Racecar
slacker.cam replied to slacker.cam's topic in Projects and Build Ups
I've been building my other car to race in the relatively new All Classic Japanese Series which is run at Puke and Hampton Downs. The series is aimed at Japanese cars 20 years or older and is a lesser expensive way to go racing than say SS2000. The guy who started the series is Steve Melhuish and the series is basically designed around his (ex) car - the car that you see here. When his car came up for sale it made sense for me to buy it as it's a perfect way for me to get into the series I want to eventually race in with my other car - just a lot sooner. I think he sold it because he got frustrated by never actually using the car as he's always too busy running events. He's certainly sunk a lot of cash in to it in his last 4 years of ownership and I think it also was starting to look like and bottomless money pit. The car was not running when I first went to look at it but I was told that it was an ignition fault and the motor had a bad earth or something like that. Apparently it would pop and fart but wouldn't fire up. The next weekend I called Steve to see if I could go and have another look and take it for a drive. When Steve told me that he hadn't had it fixed yet I saw an opportunity to grab a bargain so I made him an offer for it as-is. He accepted the offer and we agreed that given it passed a compression test (to help confirm that it was an ignition fault) that it would be mine! The next day I went and compression tested it and cylinders 2 and 4 were both well down (65psi compared to 165psi) so the deal was off. Steve at this point was pretty pissed off (with the car) so I decided to call it quits and bail out. Later that day he called me back with deal that I couldn't refuse that included his single axle car trailer so it was all back on again. Some history about the car: It was built up North in Whangarei in 2004 as a Targa car. I'm pretty sure it never raced in any Targas but it was raced in a few hillclimbs and other club events. Steve bought the car 4 years ago and stripped all the road racing gear out of it (passengers seat, foot rest, etc). It looked like this when he bought it: I think the paint looked a lot better back then.... It was then raced in a few Auckland Car Club events and eventually Steve started the All Classic Japanese series after he was unable to enter the Arrow Wheels series due to the car not being of British of European origin. I think the car's only done about a dozen events all up since it was built! This was what the car looked like in September of last year: -
Link to discussion fred I think I have a problem. Sitting in my shed is now another AE86 which brings the total to 3. The story goes something like this... I've been building my other racecar for something stupid like 6 years now and it's still a reasonable way from being ready to make its first outing. This is for a whole bunch of different reasons, primarily lack of focus and laziness I guess. In some ways this doesn't really bother me as I find that at least half the pleasure of the car is being out on the gargae working on it. BUT at the end of the day I started building it to go racing and in the past 6 years all I've managed is a few trackdays in my Silvia. So, when this AE86 came up on trademe I decided that enough was enough and that it's time to go racing. At the very least this should provide a shitload of motivation for getting my other car finished as I'd much rather be in something that I've built myself rather than simply bought. This is the car as it sits now. Photos are straight from Trademe as I'm slack at taking photos myself. Excuse the colour - I'm not sure if I can't stand it, or if it's growing on me yet. It's now sitting on different wheels that make it look a heap better than in these photos. The basic specs are: Excellent condition AE85 shell which was race prepped in 2004 Recent respray Facelift bumpers and factory boot spoiler Brand new Jamex race seat New harness Fully homologated cage (basic but tidy 6 point design) Comprehensive set of gauges Awesome monster tach with shift light Bigport 4AGE Wiseco 11.8:1 forged pistons Ferra oversized valves (Formula Atlantic spec) Ported head (more of a tidy up and port matching really) Adjustable cam gears Reground factory cams (unknown specs but appear to have decent lift) Fully balanced ARP rod bolts 7.5L race sump Twin Dellorto 45 DHLAs with velocity stacks High volume oil pump Alloy radiator Oil cooler and remote mounted oil filter Coby extractors (I think) with side exiting exhaust Electric fan Davies Craig electric water pump (no thermostat) Facet fuel pump and Holley fuel pressure regulator Link Storm G4 computer running ignition only Full rewire (no indicators, headlights, etc) Tuned by Bob Homewood - was apparently putting out 144 HP @ wheels T50 gearbox with short shifter and obligatory TRD gearknob Hi Lux LSD differential with 5.3 gears (also came with a 4.89:1 CW&P) AJPS FC RX7 front brake conversion with Honda 265 mm front ventilated and slotted discs Nissan Cefiro rear Brand new Ferodo race pads all round Billstein shocks all round Adjustable height coilovers in the front (unknown springs but I suspect they're King springs) King springs in the rear Adjustable castor arms Front and rear sway bars (both factory AFAIK) Toyo R888s in 195 x 50 x 15 (6 meetings old) 15 x 7 alloys (Avantis apparently) I'll go in to more detail in the next post.
-
His dizzy does have the VR sensor in it already. Depending on how difficult it is to cut and install a new trigger wheel i would go down that route. Hopefully you can just get a new disc laser cut. A 36-1 (same as EDIS) as Spencer suggests would probably be best as that's what megasquirt seems to base most of their shit from and it gives you far more updates per revolution that the 4 prong so it's more accurate. Mounting a trigger ring on the front pulley and making bracketry for the sensor would be more of a mission. Then it's just a matter of procuring some ignitors and coils from pick a part and you're good to go. I still have that MS1 if you're keen. I bought a box for it the other day so it's now 100% complete and ready for a new home. If you don't want it I'll put it on the tard.
-
Here's the link to those ingition controllers for anyone who's interested: http://www.erd.co.nz/products/toyota.html
-
I've heard bad things about those ignition controllers. The guy I bought the car off had one on it before the Link and it blew up (I think while trying to jump start the car). I spoke on the phone to another guy who runs an AE86 in the series and he also used to have one before it blew up and now he runs a MSD6AL. I have two megaquirts lying around that I can use to replace the Link if I want to make a quick buck. Either that or sell the carbs and swap to EFI. Either option should net me over a grand which is sweet. Thanks for mentioning it though. If they didn't blow up I'd most probably go down that route! So to update on this. I now have the car (I'll start a project thread shortly). I just pulled it off the trailer and tried to start it. And..... IT STARTS!!! I don't know what the guy was going on about but it definitely frikin starts and runs, albeit rather roughly. It kinda sounds like it's running on 3 but not quite. This is a huge bonus in my eyes. I can now diagnose the issue with a running motor rather than pulling it down and hoping I correctly diagnose the issue. I can check for cold exhaust primaries, drop spark to one cylinder at a time and shit like that. Oil pressure is still excellent so I'm not too concerned about running it in the state it's in. It's not making any terrible noises either. Shit yeah!
