Roman
-
Posts
7,233 -
Joined
-
Last visited
-
Days Won
39
Content Type
Forums
Downloads
Events
Gallery
Everything posted by Roman
-
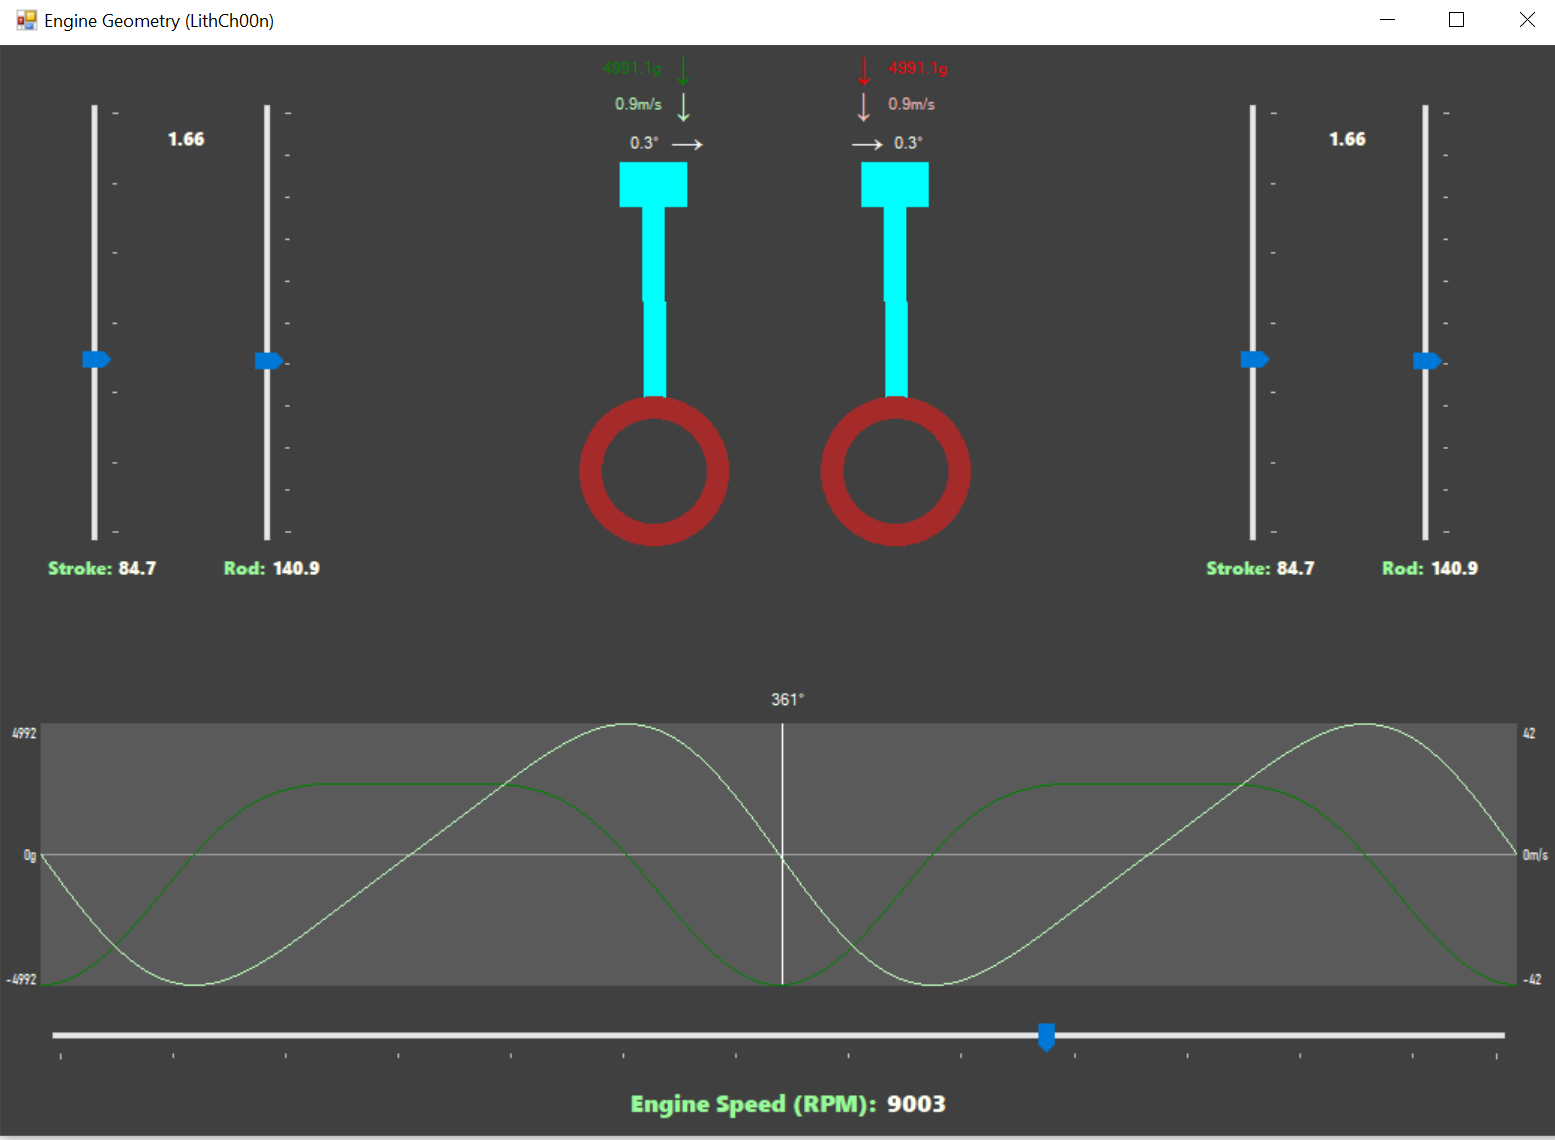
I think you could be right about that. If the piston is trying to fly apart, where the top of the piston is trying to carry on upwards, and the pin is pulling it back down. So the material strength around the pin is the weakness. Then on the exhaust stroke this force is lessened, and when the cylinder is full, on the compression stroke this force is lessened too. The engine didnt fail when it was approaching max rpm, it failed just after a gear shift where throttle got cut to zero. So the worst case scenario would be zero throttle, high vacuum, high rpm on the compression stroke. I'm not sure if these forces are on the same magnitude as each other though. However, I can indeed increase my piston return spring value. I can use e-throttle to set a minimum high rpm throttle value to something like 10% or 20%, and then use a fuel cut and/or pull zillions of ignition timing out to cut power instead. This might bring a host of its own issues, but might be a bodgey solution I guess haha. Flat shifting, interestingly enough, would also help haha. The incredibly clever @Lith made a calculator ages ago that works out forces on pistons/rods. Entering 1NZ stuff. Peak accelleration on the piston at 9000rpm is 4991G! I'm not sure what sort of numbers I was expecting, but thats bloody lots. Then the PEAK piston speed is 41.7 meters per second. Which is 8200 feet per minute. Which is zillions high when 3500fpm is the reccomended mean value.

-
When I was a kid, my Mum taught me that it was rude to take basically anything offered to us kids when we went somewhere. So we go to someone's house, and they're expecting us, so they've made some chocolate biscuits especially for us to eat. Which are the best thing ever because I'm like 8 years old. Fucking delicious! However. I'd been conditioned to say "No thank you" because doing otherwise was rude. For the person who baked something especially for us arriving, it's was disappointing that no one wanted their food. "How could kids not want delicious my biscuits?" "Are they especially bad?" "What did I do wrong?" How could my Mum not understand how mutually disappointing this situation was? It didnt make any sense to me then, and I've still no idea who profited from this situation. The people were happy to give me a biscuit, and I was happy to eat it. Surely this is the worlds simplest situation to keep everyone happy. I fucking love biscuits, and it tears me up thinking how many I missed out on, at the stage of my life when they were the most delicious. God damn. For some reason, tonight I have had a revelation that refusing willing help from people here draws parallels to this situation. I have been conditioned to feel shameful about accepting assistance that's willingly offered. Why? So for anyone who's willing to chip in a few bucks, I can promise you this: I'll spend any contributions towards a Prius motor, and maybe exhaust parts. I will not spend any contributed money on psychological counselling for my unresolved childhood trauma about missing out on biscuits. I also promise I will come to your house and eat your biscuits if you invite me over. https://givealittle.co.nz/cause/finding-a-cure-for-the-atkinson-cycle Thanks to anyone that wants to help, and by all means dont anyone feel obligated.
-
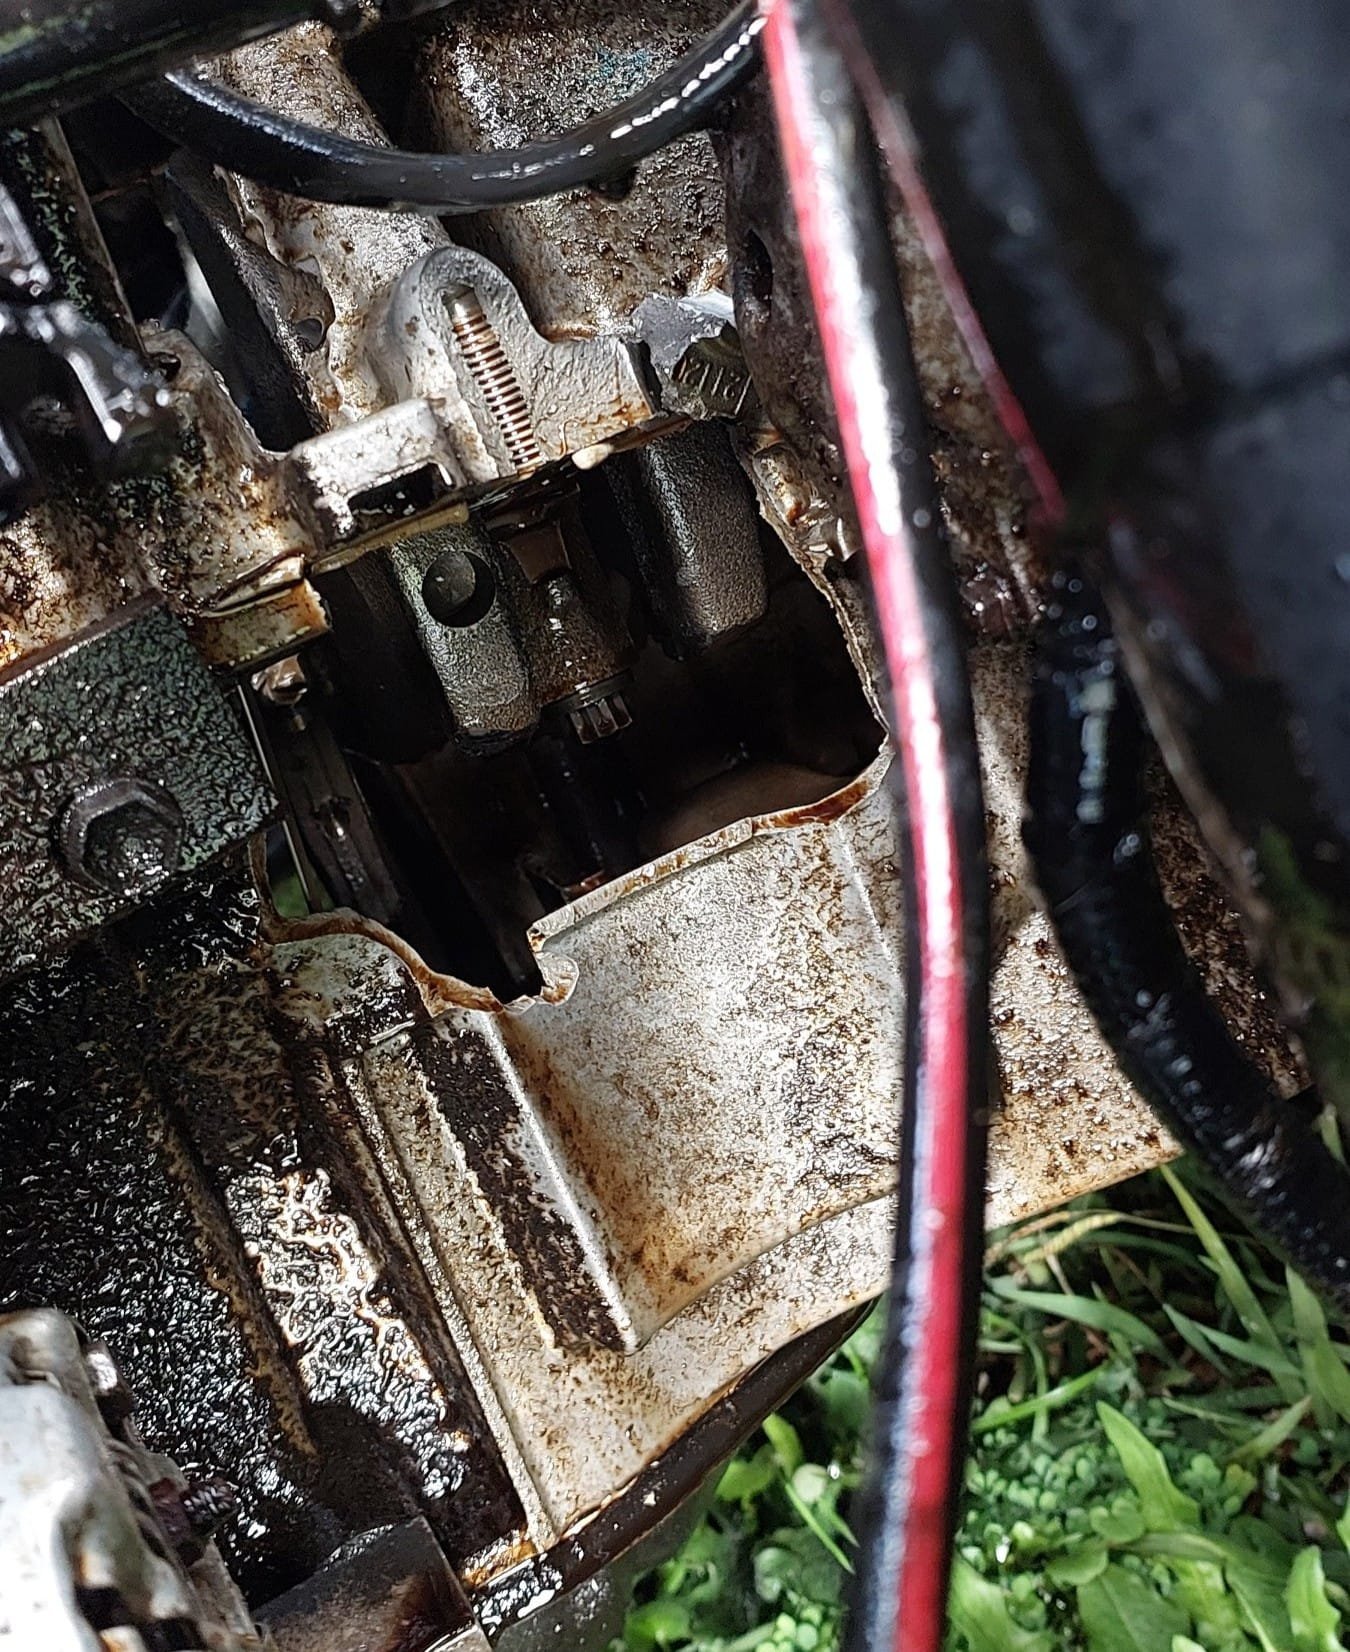
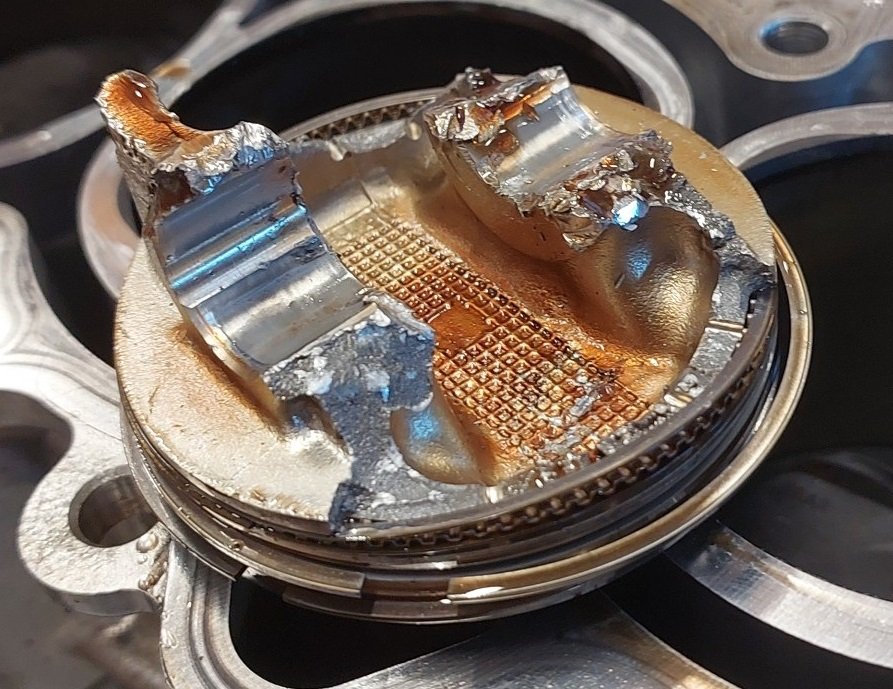
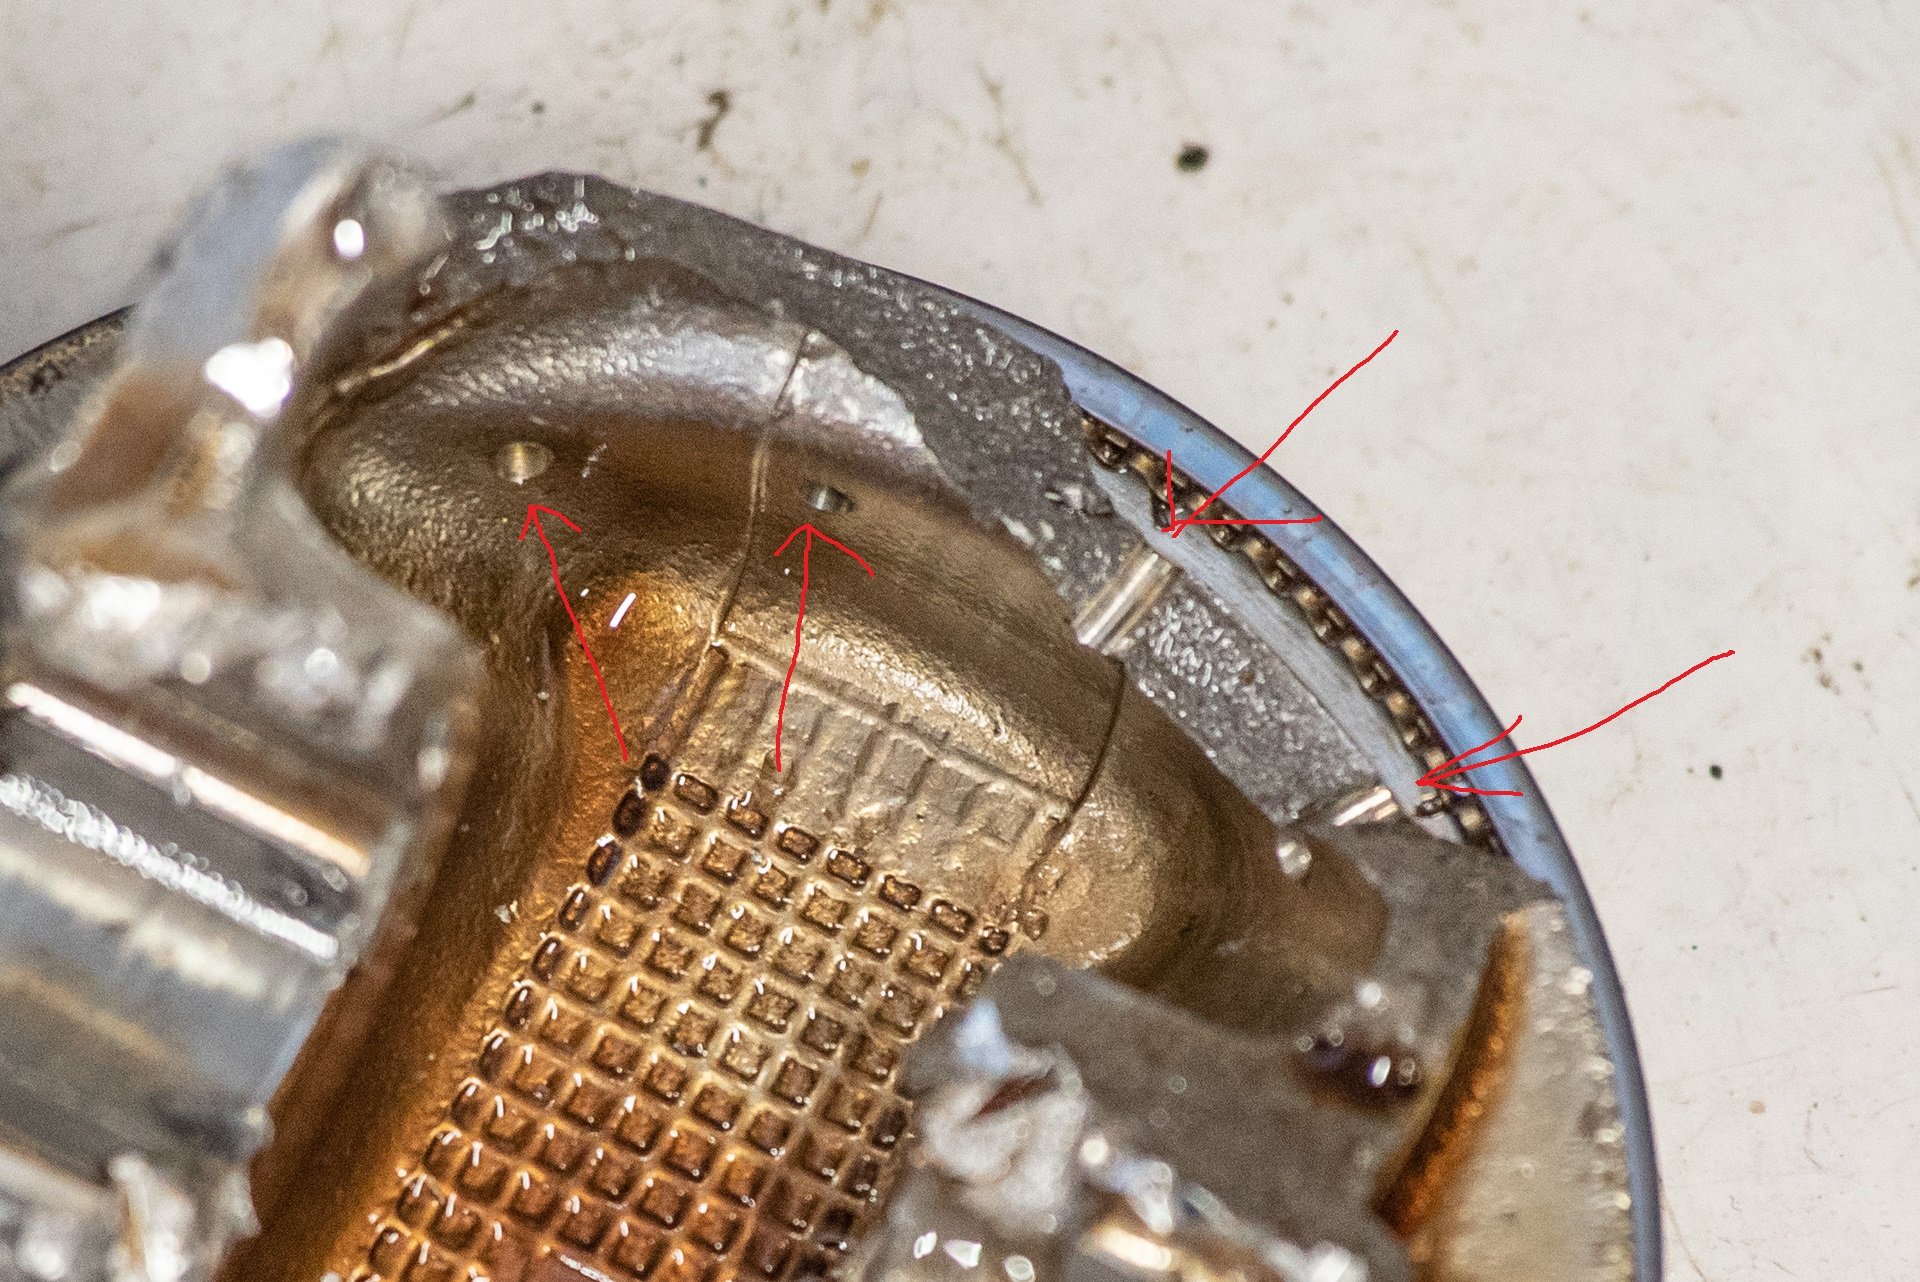
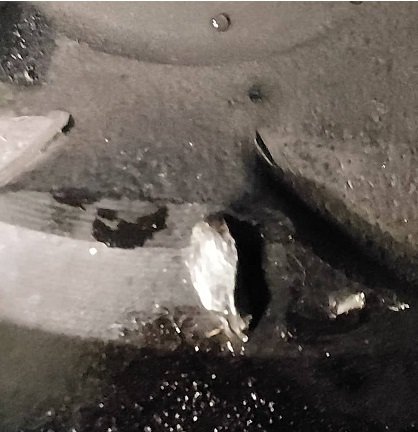
Sorry will take a better picture. But on the other side, it's a break through all of the holes. Yeah it's pretty hard to know cause or effect though. If I can't find the wrist pin in the sump I might go for a walk near where it blew up and see if I can find it haha. But I just wonder, if it was the rod that broke first, how do you end up with damage like that? Like the pin has been pulled out downwards rather than smashed up by a broken rod.
-
"In a high performance application 3500 FPM can be used since the burst at that speed will be short in duration" 9000RPM 1NZ is 5000fpm hahaha I know it's probably a different kettle of fish for tiny pistons compared to V8 stuff, but... yeah. It's getting up there.
-
Finally had some time to get the old motor out. I was busy just dealing with the nuts and bolts of the situation, undoing things etc... It wasnt until the motor was completely out, that I had a look at the back side of the block and had a hearty chuckle So I got the motor and gearbox out, split the gearbox off. Then I wanted to get the piston and the top half of the rod out, to see if there's any evidence of how/why the rod broke. So I used an extension bar and tapped the piston up until it popped out. Well, part of it anyway... And then I laughed some more, oh man, I wasnt expecting that carnage! I cant find the wrist pin or the top of the rod anywhere. I suspect I might have to go for a long walk up the road to go find it. So one concerning thing about this, is now I'm not sure what broke first. If the rod broke and caused the damage, that's fine. Easy, just put stronger rods in. But it looks like the piston broke along the line of the oil return holes from the oil control rings: Which maybe makes me think that the piston sorta... fell in half. Then caused rod carnage. However I'm thinking this is less likely, based on the lack of damage to the cylinder head. Either way, it might be a good idea to drill some tiny chamfers on the oil holes next time for stress relief. But I'm not sure if you can get a drill anywhere near it while the piston is intact. So, hopefully the rods are the problem and not this haha. Maybe the remaining 3 pistons and rods might show some extra clues.
-
After that collector it's basically a straight run. Could probably easy-ishly convert it to a long 4-1 or 4-2-1 The cat converter normally starts fairly close to where this is cut off. Which is interesting because my understanding is the idea of the short 4-1 design is to get heat into the cat converter quicker. but it's not right up against the extractors. Maybe a single pipe just loses a lot less heat than 4 small ones. EDIT: That reminds me I've seen this mentioned somewhere before. This was in a paper about the 2ZZ motor. Interesting to see how much heat is lost by having individual pipes in a 2-1 section. Also the power losses from having a gap in the flexy join to the 2-1 section. 4kw loss for a 4mm gap!
-
Yeah I've got the ebay headers here but they were gross. Larger diameter runners but didnt make any difference, and had other issues such as leaking from everywhere possible. Touching the gearbox cables. Rigid mounting the flexi join via stupid design. I dont have any welding skills or equipment so V1.0 of the exhaust will definitely just be from those standard extractors back. Ideally would be much longer length, but the diameter of the standard ones are fine for the port size.
-
Haha, done deal.
-
Thanks to everyone that has offered. I'm obviously not above accepting charity, as I've been on the receiving end of an incredible amount of it to get this far with things. it's very humbling that anyone would want to help pay for another engine. However I'll be happy to play around with the 1300cc setup for a while. I found all of the 2NZ motor parts needed, I thought I might have thrown some of them out. It looks like all I need is the right length PK belt to suit the addition of the mechanical water pump. Then it'll be good to go once I've swapped the flywheel and clutch over. I havent pulled the old block and the gearbox out yet, but it's not too much work left. The intake manifold has no issues with having the alternator in the high mounted position. The dipstick very nearly fits in the correct spot too. But not quite. I've taken out my VVTI travel stopper, and set the cam to the proper position instead of 1 tooth back. I have confirmed that with the cam in the correct place there are no piston / valve issues. One benefit of the 1300 motor is that there's a little bit more room for the intake, as the block is shorter. So it all sits lower in the engine bay. Looking forward to it!
-
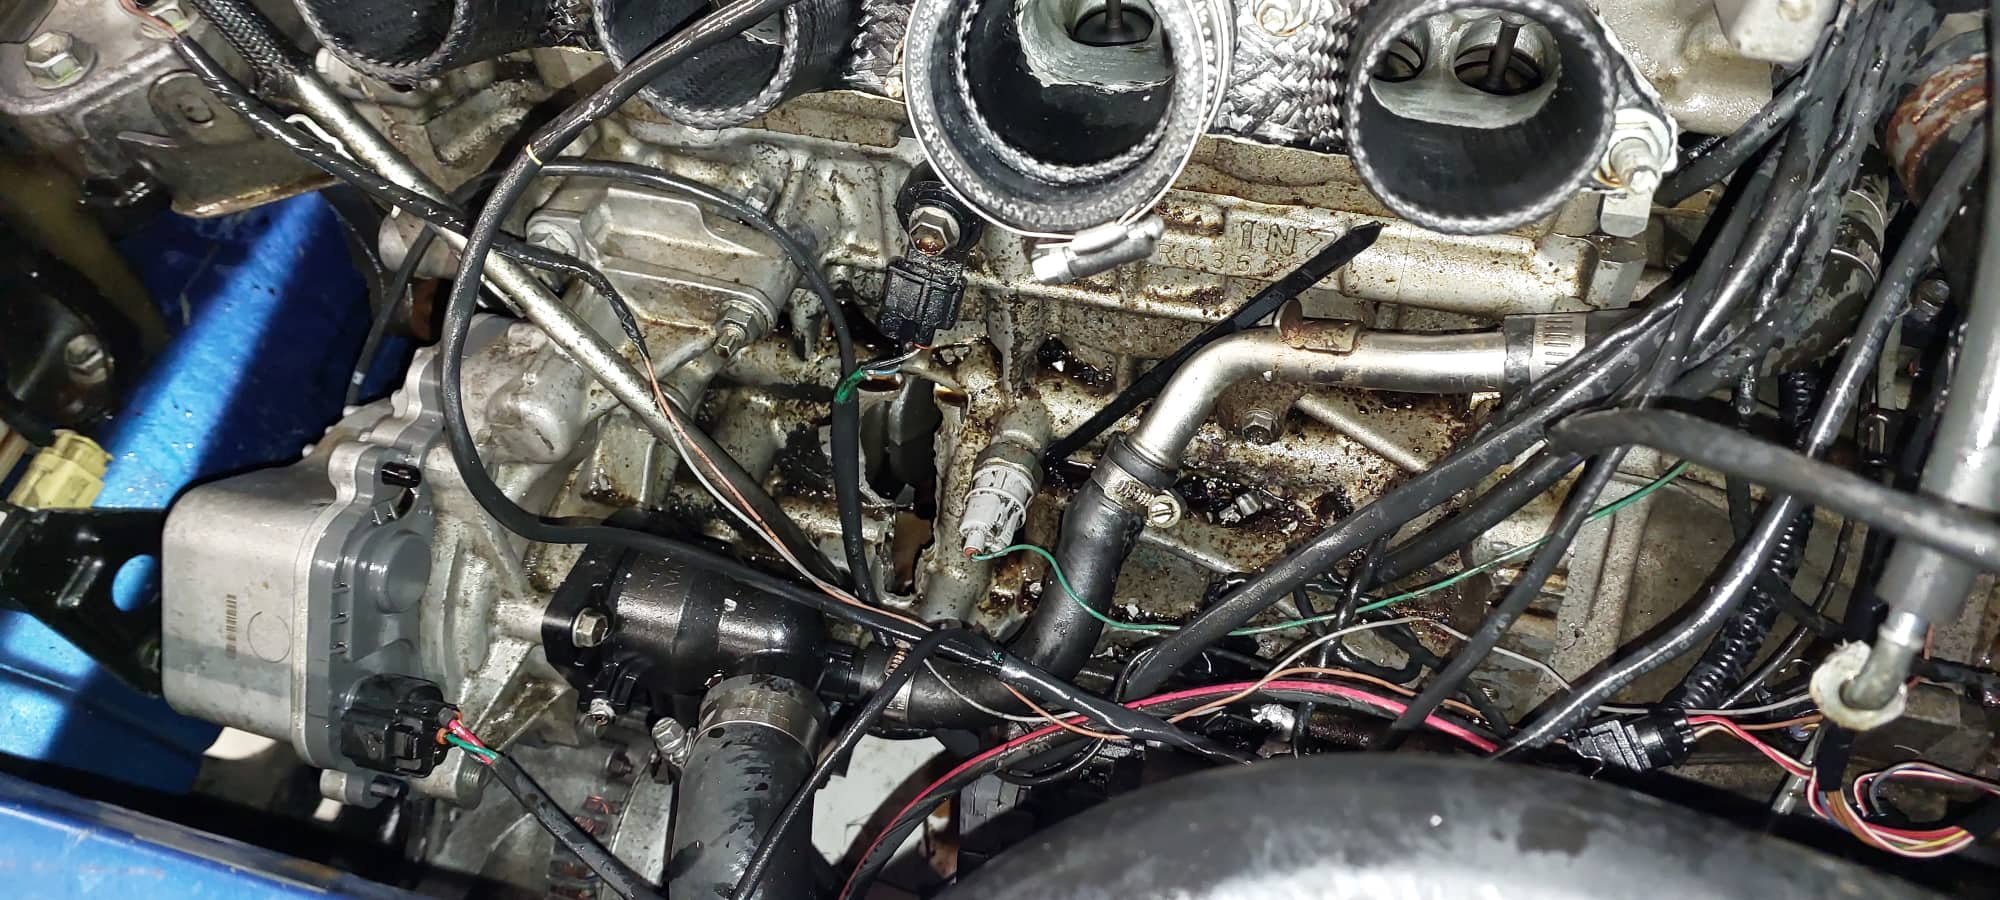
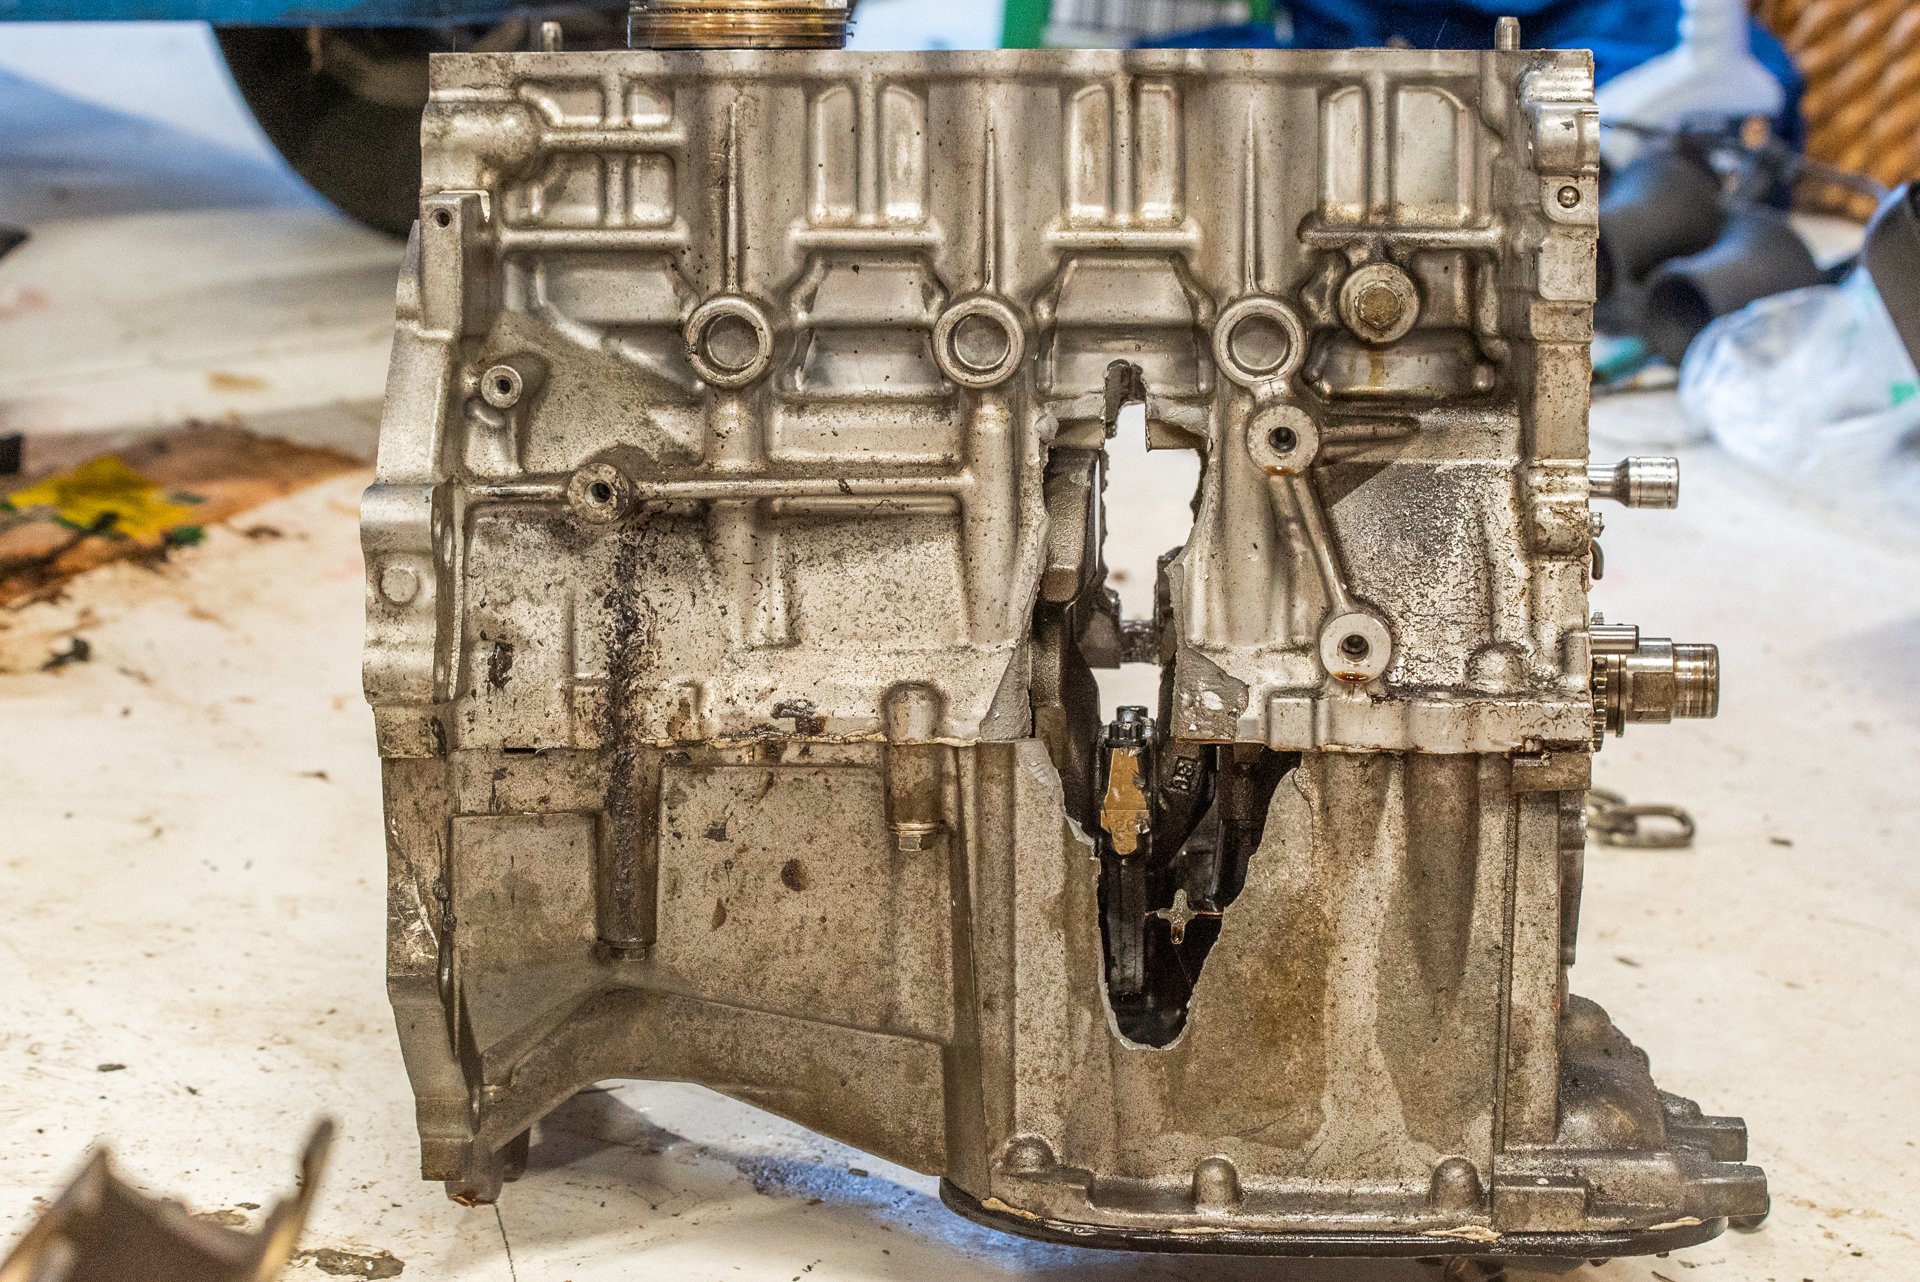
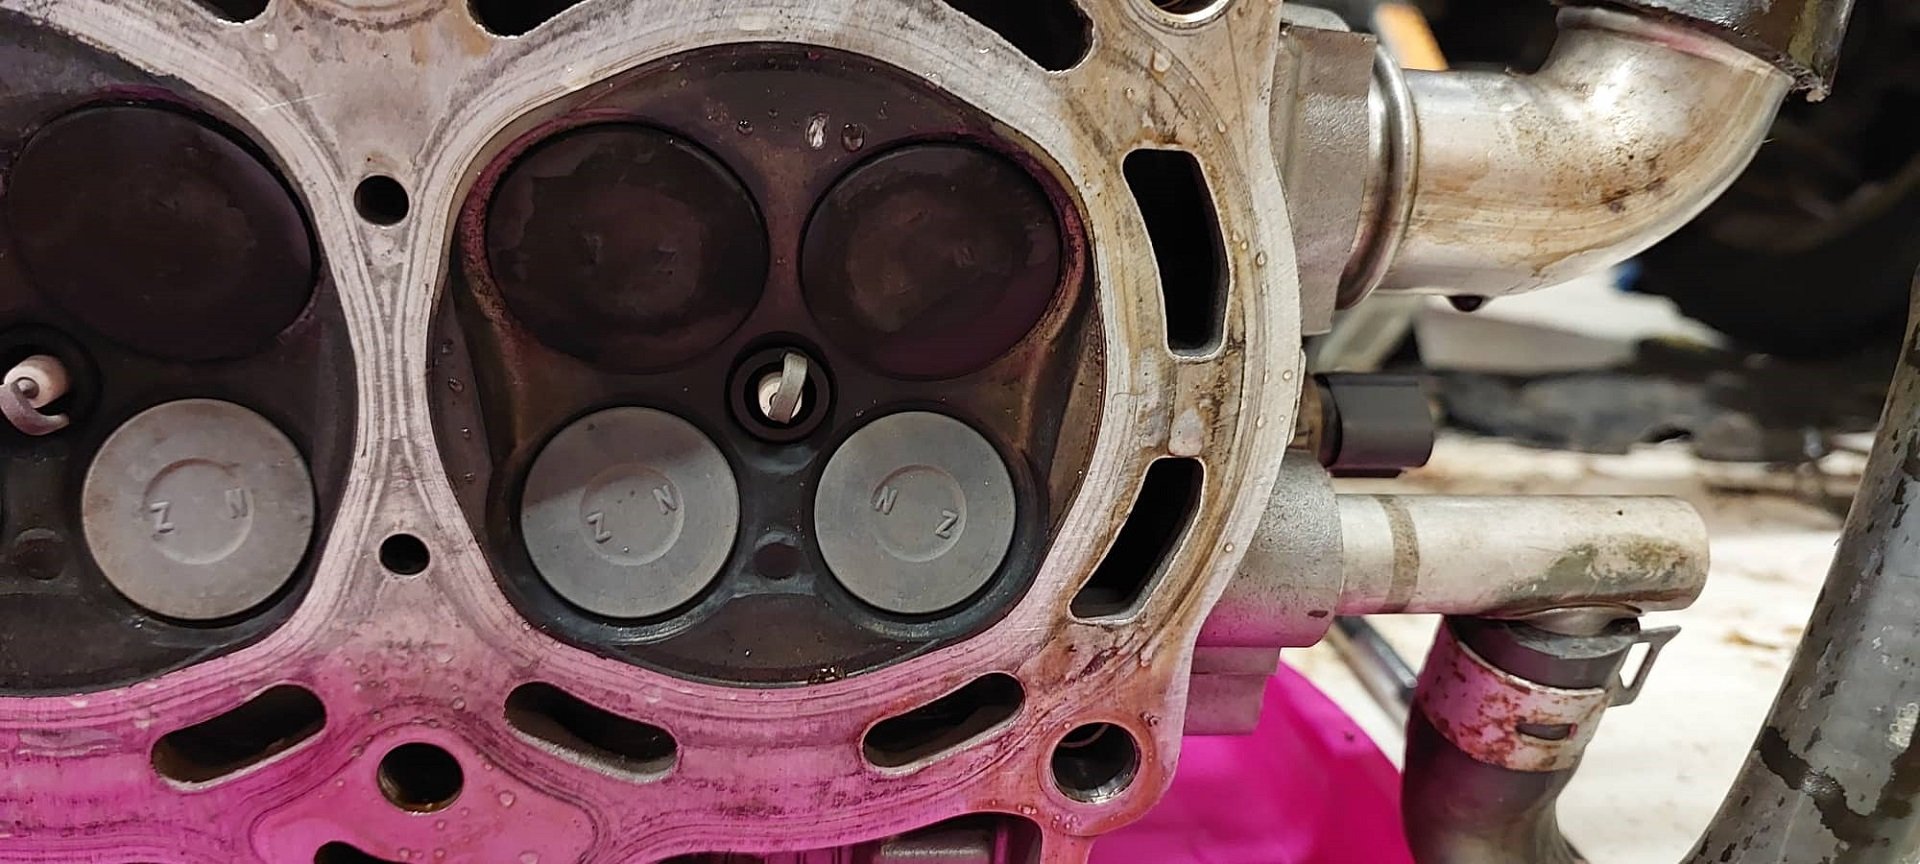
I got the head off today. A rough timeline of events, based on evidence: -Cylinder 2 rod went asplode -Lower part of the broken rod smashed the engine block, front and rear. -The still full throttle engine, probably thanks to my new intake design that has runners pointing to this area (haha damnit) sucked a piece of debris into cylinder 4. -Cylinder 2 piston rotated in the bore slightly while near TDC, and was bonked by one of the intake valves to push it back down a bit. (with very little resistance, as no rod) -No rod left to push it back up, so stayed there and no further damage to #2 valves or head. -The debris that entered cylinder 4 got conked between the piston and the head. Luckily, the piston material took the brunt of it, and it buried mostly into the piston rather than into the head. -Small dent left in the head on cyl 4, straight looking valves everywhere. But will do a leak test on all of them. As possible damage on cyl 2 valves. Project smallblock still looks good to go, so long as I can find all of the 2NZ related bits! The cams are 100% fine, and the head looks 99% fine. I'll give it a good clean out to make sure no debris entered the oil passages. But no evidence of that which I can see. Probably because one of the main oil supply galleries was busted by the conrod, around about the same time as the oil filter said Bon Voyage. Piston #4 close up: Small dent on the head. Will smooth the edges so it wont cause knock. Feeling pretty lucky!
-
Sorry - fixed it Yeah one of the local guys who rallies 2NZ motors says they eventually break if you keep them going to 8000rpm. So a 10k motor would be on a very limited lifespan without strong rods haha. then there are issues like the oil pump wanting to explode, and so on!
-
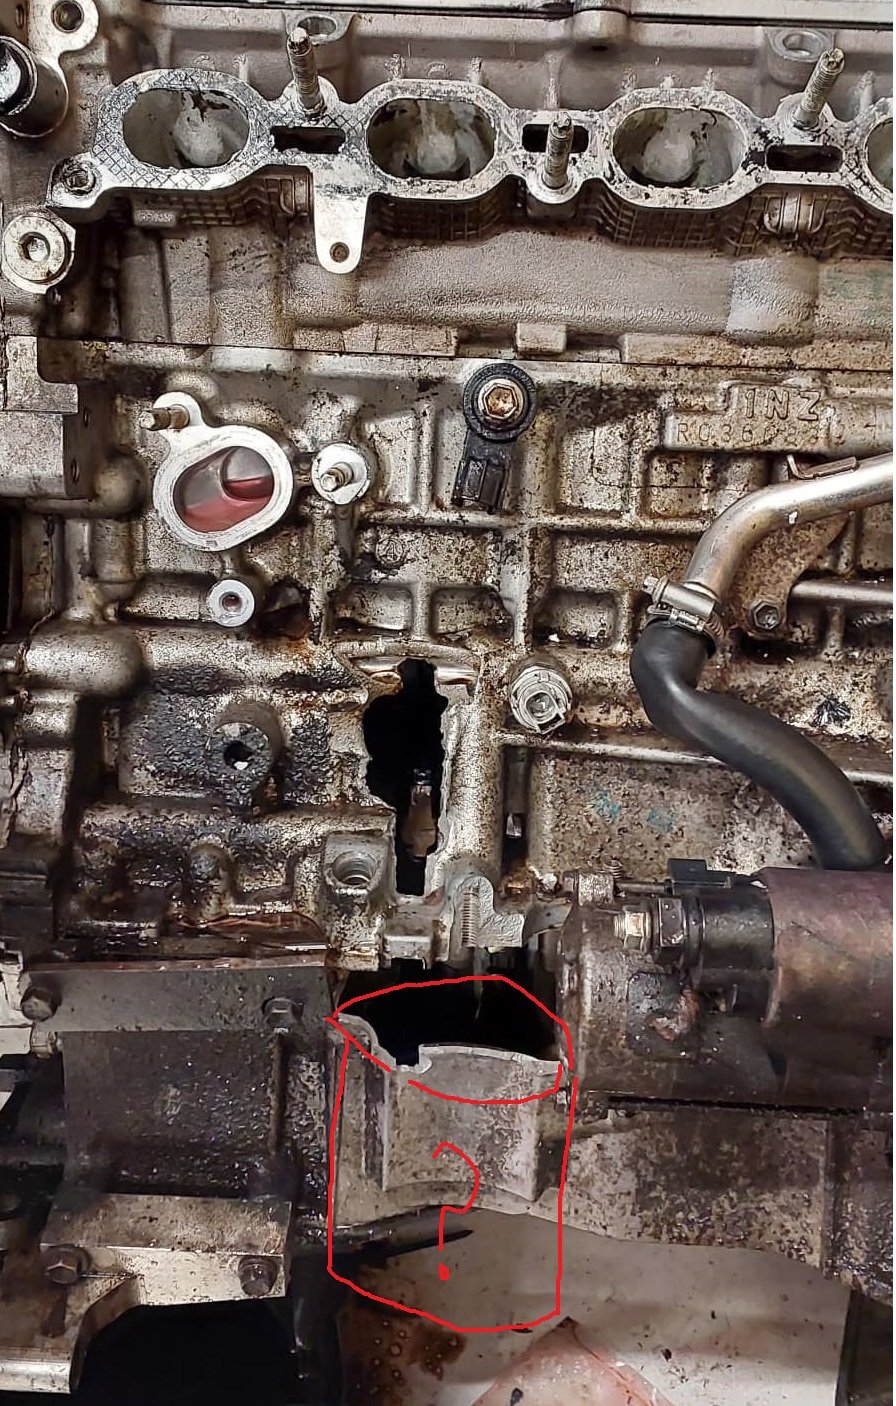
Nah no 2NZ rods available, and I'm fairly doubtful that all of my current pistons would be usable. Some of the bore is missing down the bottom on cylinder 2, so piston might have copped some damage. As well as the entirety of the oil filter and it's housing is AWOL haha Some good news while I've been stripping the motor down though, I found some of the rattles. The rear engine mount bolt has been vibrating itself loose, and my upper half of the alternator bracket had broken. So I think one or the other of those was making the recent noise, not the clutch or gearbox. So that's good news.
-
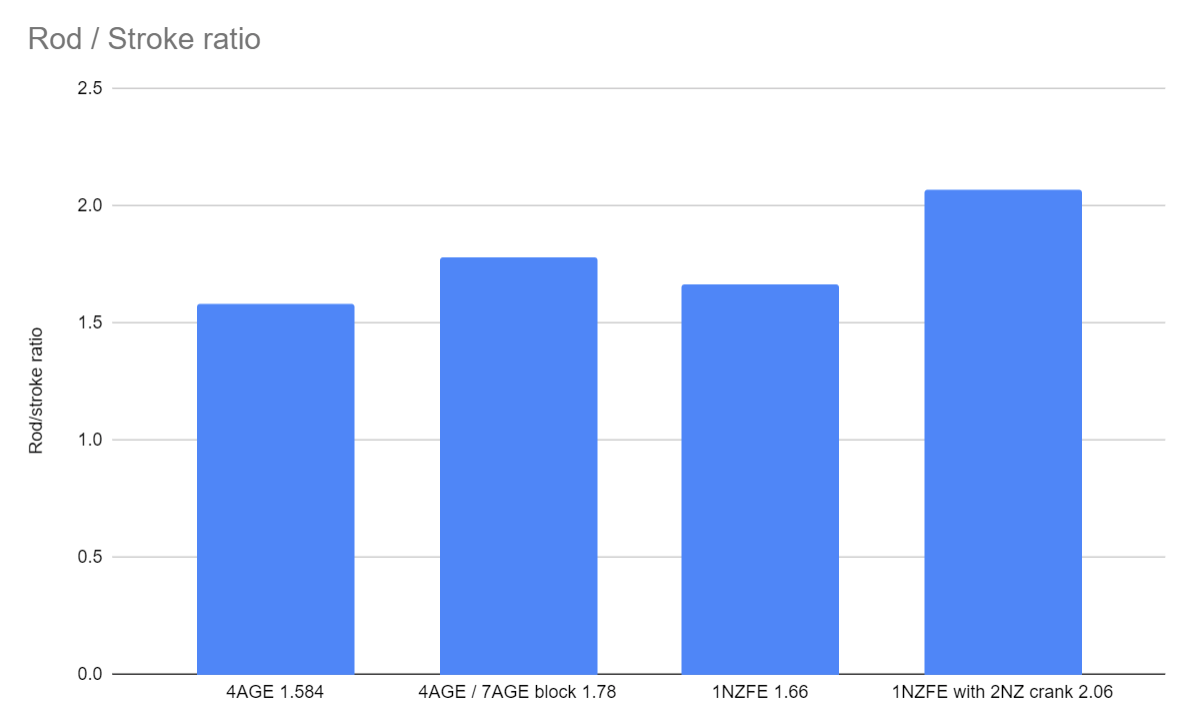
Did someone say graph? No? Too bad Yeah would be a 1300cc rev monster. A 1NZFE has a mean piston speed of 25.4 meters per second at 9000rpm. A 2NZ at 25.4 meters per second would be revving to 10,350rpm, and the mega long rod motor would be able to deal with it a little better. Doesnt mean its possible to rev a 2NZ that high without other issues though. But it would certainly be glorious! haha Also as another reference point, an S2000 motor that is built from factory to go 9000rpm. Has a stroke length of 84mm (vs 84.7 for 1NZ) then a much larger bore to acheive 2 litres. S2000 F20C motor has a rod/stroke ratio of 1.82
-
So long as the current head and valves are okay (find out soon!) Then small blocking it will be a good short term solution. Which might show some interesting results. So long as I can find the 2nz specific parts I need,like the shorter timing chain. where ever I put them. Will need to give the head a pretty decent check for debris in the oil circuit though. If the head is stuffed then I need to buy a new motor either way. Been busy but will get it off this coming week.
-
Oh god this sounds like a hiliarious idea haha. Probably feasible too with a good 60ft
-
Thread sidetrack #1: The title for my our house/section might be available in roughly a month and a half. We've just had our finances preapproved again for another 3 months, as it expired. Been worried about getting our finances bounced due to changing interest rates etc. Hence needing to not spend any money etc etc. So that's a relief. Phew. So this is good and bad news for the Echo, it means hopefully the bulk of my housing worries are over sooner than later. But it also leaves me not much time to sort house stuff and do something with the car in the meantime. Once I've moved to the new place I'll not have a shed or anything for a while. So I really need to do something with it in the meantime to either get it mobile or make peace with it being dormant for a fair while yet. I'm thinking if I try fit stronger rods it'll end up having complications / cost / time blow out. If I buy an earlier motor with mechanical waterpump then I dont have 100% surety that it'll all swap easily and there are no complications with the alternator fitment and waterpump belt. So maybe for now I just get another Aqua one for a quick swap. Then when I've got some more cash monies I'll buy an earlier motor and put the good rods in it. Then hopefully get to a few events this coming summer as is, maybe with a little bit lower rev limit. Thread sidetrack #2: Also, a friend put his K24 swapped car up for sale. With aftermarket intake/exhaust, but standard cams. On the dyno this made 225hp at the wheels from 2.4 litres. So thats 93.75hp per litre at the wheels. The echo in its pre-blown up state on 20v throttle and standard exhaust made 141hp at the wheels from 1500cc... Which is 94hp per litre at the wheels. It's official, Prius motor is the new K swap Thread sidetrack #3: One of the reasons I've not worked on the Carina for ages, apart from being distracted with this. Is I really want to put a lighter engine in it. Turbo 1NZ seems like a really good option that will be really light weight, and tick all the boxes. I'd like to run an Altezza 6 speed box behind it, if so. So, I swapped one of my 3S bellhousings for a 1G version. So I've got both to see how they compare in case one's better. I've been meaning to take a bellhousing up to my Dads and sit it on the milling machine with the digital readout, so I can just work out the x and y coordinates of all of the holes. Then I thought... Oh wait I can do that with the printer. So I've got a rough-ish idea of where all of the holes are, and did the same for a 1NZ gearbox casing. The 1NZ bolt pattern is a little bit smaller on outside diameter than the 6 speed stuff. Not sure if that's going to work out good or bad for making an adapter. I'd also need to work out things like how deep the flywheel needs to sit inside it. Might need to shave off quite a bit of the bellhousing and weld something else on. Or something. Dunno yet, its a complex job and I'm feeling out of my depth. But will do some more research on it. The altezza's flywheel face sits quite far from the block, because they run a dual mass flywheel which is very thick. So it might be that the final overall length including new adapter needs to be considerably shorter. Which is also fine, as it pulls the gearbox slightly forward, and the stick is usually a little to rearwards on swaps. Anyone done something like this before? Any tips?
-
Oh yeah, I've seen a few vids of Supras with that DCT. Looks amazing!
-
Shit yeah, this will be cool! After having not seen clapped out R32s driving on the streets for the last 5 or so years, I've got a renewed appreciation for how nice the shape is. What's the gearbox situation like, is the factory box going to be happy with RB30?
-
Appreciate it, thanks. But I'll figure something out. Dodsons has a pile of Aqua engines with around 100,000km for $460 each with warranty. I revved it to 9k then shifted into 3rd, and it went blammo at around 7000rpm. If I reeealllly wanted to save some money, I could buy a bare block at zebra or pick a part for about 100 bucks. There's a few of the right shape/year Prius's there, but it's hard to tell if they have 5 billion kms on them or not. Just costs a day of mucking around to get it out instead and there's more risk that it might be a dud motor. When I get around to pulling this motor out, the post mortem should be some interesting content at least anyway haha.
-
Ew imagine all the brits you'd get with an oilyfans page Nah they have rockers in the head, and there's no way you'll rev them out to anywhere fun. Everythings a lot more expensive. Cheap and cheerful has been the name of the game here.
-
Yeah 100%, its been a worthy effort for an essentially stock motor with minimal mods. One one hand I should have sorted the rods already, but, hindsight aye? (and too much effort if it seemed okay without them) Not quite sure what's gonna happen from here as I'm fairly financially steamed until probably end of year at least. I've got the 1300 motor there still, maybe chuck the good head / cams combo on it, and see how VVTI goes with the full range of travel
-
I guess the right time to have fitted those stronger rods was yesterday
-
Something like that... Maybe the new curved runners were just too damn hectic.
-
Can confirm that the new block ventilation mod did not add any power.
-
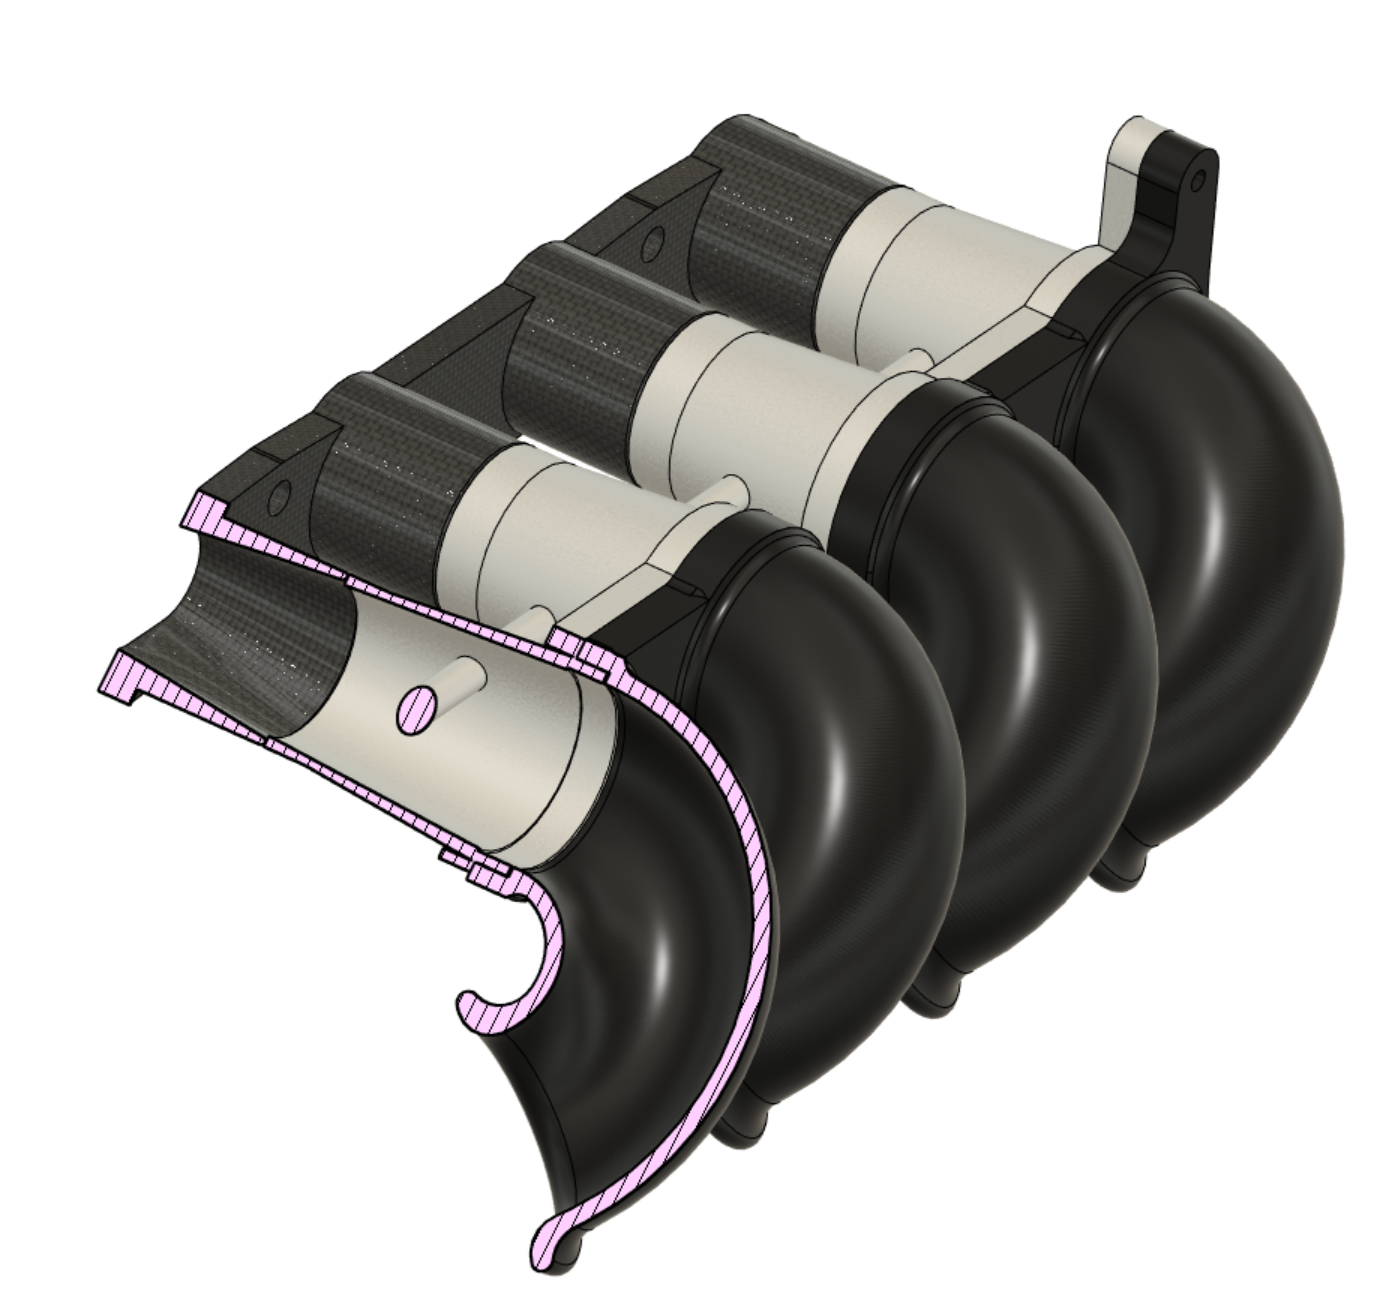
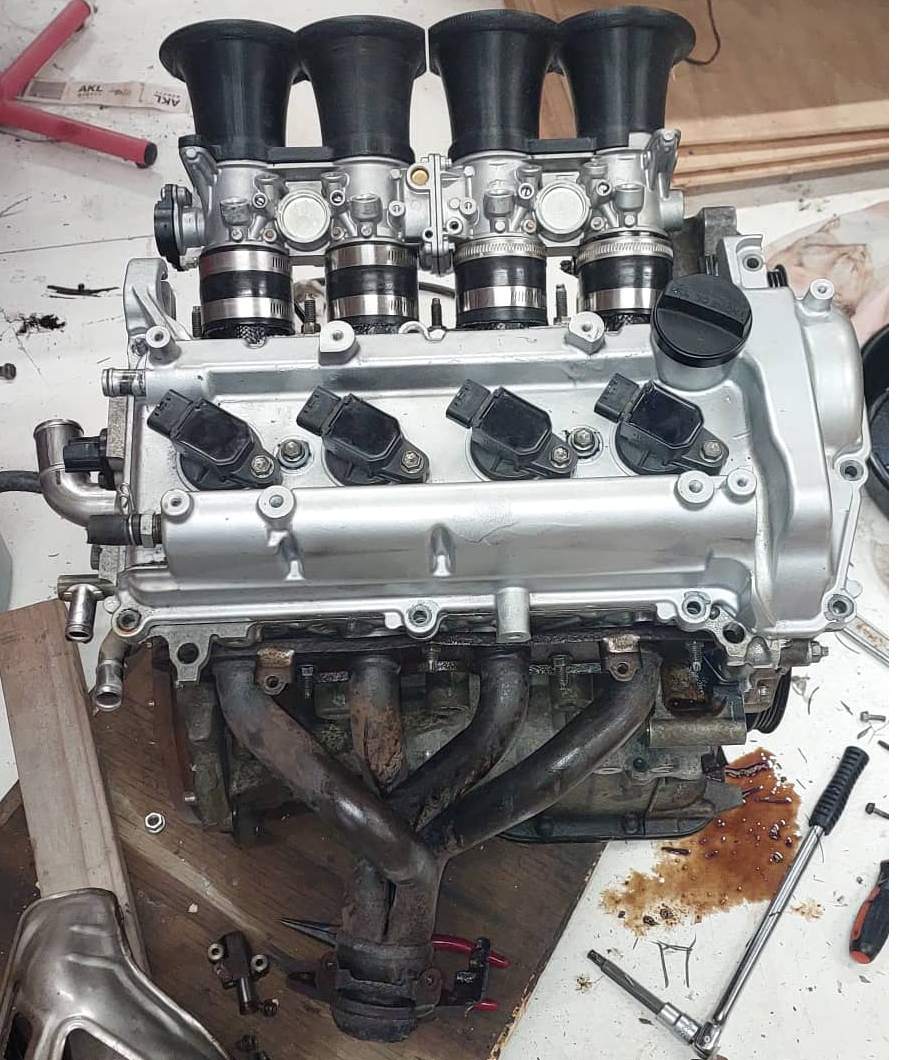
Big trumpets sticking out the bonnet will be a 1 way ticket to green sticker haha. I should have a new version with bonnet compatible extra length, ready to go by tomorrow night though. These ones are rotated on 45 degree angle in order to try get as much length in as I can. Then about 130 deg of bend or something like that. Hopefully these indicate that they are "too long" as my life is easier if I can fit straight ones. But if they make good power then cant complain! No outer injectors but will try get the runner length right first. Will also try borrow the @Stu Science(tm) tig welder soonish and have a go at splooging together a mild steel exhaust.


.jpg.cb3ebfc1eaccbf645391b12badd21f62.jpg)