yoeddynz
-
Posts
19,489 -
Joined
-
Last visited
-
Days Won
158
Everything posted by yoeddynz
-

Nissan Micra k11 - Mandy goes to a new happy home.
yoeddynz replied to yoeddynz's topic in Other Projects
No rush at this end for anything- as folks will see soon from other project updates its been and will continue to be a bit busy around here!.... -
Nissan Micra k11 - Mandy goes to a new happy home.
yoeddynz replied to yoeddynz's topic in Other Projects
So obviously its rego on hold, is 99% all there and just needs a wiper blade for a wof but you're too busy to fit it so your loss is the buyers gain.... -
Nissan Micra k11 - Mandy goes to a new happy home.
yoeddynz replied to yoeddynz's topic in Other Projects
We've not even heard from the man @Early jap nuter whether he wants rid of it. All these little micras and other temptations and I still have a goldwing engine to finish! -
Nissan Micra k11 - Mandy goes to a new happy home.
yoeddynz replied to yoeddynz's topic in Other Projects
@oldrx7 Fuck - I'd love to rescue a rusty superturbo but I had said to myself and hannah no more rusty cars. But super turbo!!! -
Nissan Micra k11 - Mandy goes to a new happy home.
yoeddynz replied to yoeddynz's topic in Other Projects
Yes please. I shall rescue your super turbo for the entertainment of all on oldschool! -
Nissan Micra k11 - Mandy goes to a new happy home.
yoeddynz replied to yoeddynz's topic in Other Projects
Its funny but since you started your Integra thread I have been spotting them about. I quite enjoyed reading how you would look for better original bits, factory fresh (along with Eds Toyota mr2 thread that was similar in ways) Now I'm spotting Marches everywhere... Now I totally understand the fun that is trying to get nicer bits and tidying it up. Its refreshing not to have to stress about dealing with rust, modifying things to fit, certs etc. Just tidy up what's there and the little details. I'm very much looking forward to building the yellow one into the car we want, picking the best bits and cleaning it all. -
Oooohhhh i like this thread. Cheers for sharing. You might well find this thread here from my friends seth a good interesting read. I love the tiny tools etc. Fucked if I could do any of this work with my shitty eyesight but I love reading about other people doing this work.. https://forum.retro-rides.org/thread/66976/assorted-diddy-engineering
-
Nissan Micra k11 - Mandy goes to a new happy home.
yoeddynz replied to yoeddynz's topic in Other Projects
Not enough Micras? Trust me - we are trying.... -
Nissan Micra k11 - Mandy goes to a new happy home.
yoeddynz replied to yoeddynz's topic in Other Projects
I love them. I've got a whole stash. I was think of starting a thread but need to chat to the mods so we can make something neat of it. -
Nissan Micra k11 - Mandy goes to a new happy home.
yoeddynz replied to yoeddynz's topic in Other Projects
Yeah. Sort of become a bit nerdy with our enthusiasm for these now. I have already been looking up where I can find a Fujimi HK11* 2 door 1.24 kitset for sale and I have also pondered looking for sales brochures online. Oh dear.
- 213 replies
-
- 11
-

-

-

-
Nissan Micra k11 - Mandy goes to a new happy home.
yoeddynz replied to yoeddynz's topic in Other Projects
Yeah something like that. But really the second one (now not the new one and still has no official name Megan?) just sort of had to be bought on the basis that it was such a bargain for all them juicy bits. Could have got away without buying it. But how could we not? And the yellow one. 2 door! wow. Its perfect. We are probably going to split the 2nd one down and keep a few spares from both that and the yellow one after building the 'perfect one'. Sell the remaining bits off. Sell on Millie soon- once we know which is the best 1.3 engine we have. Or some sort of.. 'scribbled on our addled brains notepads future plans that wont save us any money but seem perfect right now' ..idea -
Nissan Micra k11 - Mandy goes to a new happy home.
yoeddynz replied to yoeddynz's topic in Other Projects
Oh dear. We sort of have three Marches now. Picking this one up at the end of the month... So happy. Its like a dream. A yellow 2 door. Its low mileage and very tidy. 1.0 with a rubberband auto. Gonna have some fun later in summer swapping all the bits mechanical across, inc the pre-facelift wings, lights, grill and spoilers. Make our ultimate looking Micra. The lady we are buying it from is super happy we are basically k11 foamers/nerds and that its going to a good home. I like these little March sill guards. Also noted that it has the original March mat set with the bubble car logo, still in good nick. Not sure on the name yet - but currently they are referred to as Millie, Molly and Mandy. Some might say we have a problem but its all smiles here * I've just noticed how terribly both cars are parked.. Micra drivers be all like "and I'll just put it here and that will be that".. and get away with it because their car so tiny.- 213 replies
-
- 22
-
-

-
-
Nissan Micra k11 - Mandy goes to a new happy home.
yoeddynz replied to yoeddynz's topic in Other Projects
Yesterday and today we did a few more tinkering jobs on both Millie and the new one (Myrtel?). We had taken the Imp over to Kaiteriteri so we could do a trail run in the park there. The Imp was booked in for a wof later on in the afternoon and the run distance was further than we expected. So we decided to run to home, shower up and then drive the new car (Marjorie?) back to kaiteri, pick up the Imp and drive in convoy into town. Got to show off the Micra to our wof man (the Imp passed with flying colours btw...) and warm up the oil properly so once home it would drain out sweet. Hannah had Kevin helping her with Millie... I was tucked out of the hot sun and worked on the new one (Marilyn?) Terribly backlit photo alert... Drained and replaced the oil. It was pretty filthy but nothing horrid with no signs of sludge. While I was under the car (on axle stands because hoist is still blocked by timer piles) I had a look about. I was really happy to see how super tidy it was under there. No dents, no rust, underseal very neat, exhaust looked factory fresh. Nice to see its not been off road or rallied. Engine bay is pretty tidy too... I fitted new spark plugs too- the old ones were pretty worn. I kept joking with Hannah that the old oil, plugs and the fact it was running cold = my extra 2 litres of petrol used.. So yeah- that thermostat eh?... well it wasn't there. I suspected as much. Luckily we had found a thermostat on Fridays romantic trip to the wreckers. I made a gasket to suit - because while normally it would be sealed in with rtv I didn't want to seal it in with goo just in case it turns out I needed to remove it again, like perhaps the head gasket is iffy etc etc. We tested the thermostat before fitting anyway and it opened on time and the full amount. Fitted it, refilled the system with nice new 33% coolant mix and I took it for a hoon. The temp sat right in the middle as I headed up the 300m climb on our side of our local hillclimb/racetrack. Drove it hardish until I caught someone. Then laughed at the comical power button that it turning the air con on and then turning it off for extra boost Temp stayed put as I followed a line of cars stuck behind a Kenworth logging truck down the other side. Sweet. That's better! However I best test it again so I turned back at the bottom and headed up the hill, second gear ALL the way (because for fast progress up our hill with only a 1300cc, trying to use 3rd just pops it out of its 'happy' zone) What a great little engine these are! Really quite smooth. Another neat thing I liked was the LSD. I've not driven a fwd equipped as such and It was most noticeable out of the tighter corners, especially if a bit lumpy. It just gripped and pulled out really clean. No noticable torque steer but then again its only 75 little ponies... I do wonder if viscous lsds heat up and start to lose some grip on the discs so allowing a bit more slip- but really propbably not an issue on a road car getting trashed now and again ? More of an issue on trackdays etc? Got home, let it sit idling. No dramas. Hannah also cleaned those nifty March logo'd mats she had found. They came up sweet and look neat installed. I gave the car a quick vacuum and found $1.50 under the seat so now the car had only cost us $698.50. I also found some sort of interesting plant material. It looks like some sort of Tomato. I might have to light it with a match and see what the smoke is like to confirm my thoughts?.. Hannah tidied out the boot area and she found this. Looks like the new car (Martina?) has been to a ski field at some point... https://okutone.jp/facility/- 213 replies
-
- 27
-
-
-
Nissan Micra k11 - Mandy goes to a new happy home.
yoeddynz replied to yoeddynz's topic in Other Projects
Me- "oh hey Hannah- we have to go to town right? " H - "yeah we need to do a shop" Me - "cool....... well while we are there why not let me take you somewhere special and show you a good time?" H -"oooh neato. Ok ! Much excite!!! What could it possibly be?"..... One hour later.... . . . . . Yuss!!!! Ka-ching! Score.... A friend who manages the local wreckers let us raid the one and only little k11 there. (apparently it was driven in without a single fault. Ran perfectly. But rego had been let lapse. Fuckers! Its a manual 2 door!!! who does such crimes to let regos lapse) anyway- we got all these bits that we needed to either fill in the blank spaces on the new car (Meredith?) or complete Millie so we can sell her on. Ok - I know.. I should not really anthropomorphise cars but I cant resist... they are just so cute. So yeah- a good haul. Bits included : a thermostat! Hopefully good- looks better than a Tridon branded one. An air box and filter - this car we robbed is a face lift and they changed the airbox with a better sealing arrangement. A cold air feed. Its longer and feeds from behind the light. Millie doesn't have this feature but the new one (Margaret?) does. They obviously thought it was such a neat idea that even the poverty spec 1.0 facelifts ended up with it too. A horn - because the twin horns on Millie don't work properly so lets go back to standard. A radiator overflow bottle- missing on Millie. Complete strut assemblies - because why not. They were sitting on the drivers seat and needed a home. The cv boots are good so they can replace the torn ones on Millie. A windscreen washer cap- MOM (that's missing on Millie...) Rear parcel shelf - MOM A clutch cable - Millie's is pretty yuck. Could just do with a lube. But now we have a spare. A ciggy lighter - for Impy! A load of fuses and a few bulbs- because I'm a magpie for them at wreckers. I've never had to buy fuses yet. However- I am saving the best bits for last. While I was tinkering away in the engine bay Hannah was scrummaging about in the car (no mean feat because it was a prick to get into- OSH would have a field day! ) and she found these... Genuine Nissan March items complete with the little bubble car logo that they used for the marketing and subsequent merchandise. Soooo cool (for nerdy k11 foamers like us) and Hannah was well chuffed with her score! They'll need a proper good clean but should come up ok. I told her she'd have a good time- 213 replies
-
- 25
-
-
-
-
Nissan Micra k11 - Mandy goes to a new happy home.
yoeddynz replied to yoeddynz's topic in Other Projects
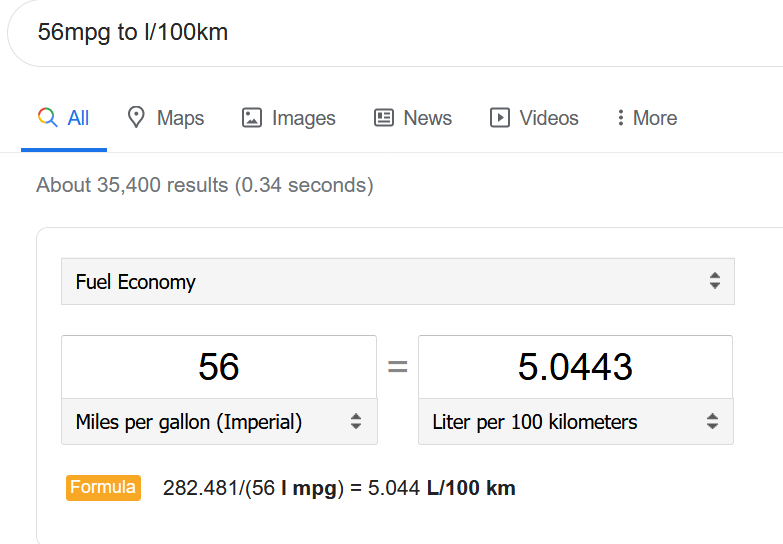
I just used an online calculator and specified imperial gallons. Blame that calculator if wrong...
-
Nissan Micra k11 - Mandy goes to a new happy home.
yoeddynz replied to yoeddynz's topic in Other Projects
@ajg193 Oh shit- you are correct. #iswhyIfailedatthestockexchange @locost_bryan Hannah's sister Leila had two pet ferrets. Molly and Daisy. She took them for walks on leads and they held their ground very well against all the neighbours cats and dogs. Fearless little buggers- very cool pets * *but not really suited for showing off on the streets in NZ....people frown upon pet Mustelids here... -
Nissan Micra k11 - Mandy goes to a new happy home.
yoeddynz replied to yoeddynz's topic in Other Projects
Haha- but apparently (according to Hannah) they have to have girls names. Something will pop into my head. I did that thing this morning- the thing where you go out and look at your new car purchase and then check the dipstick with that slight fear of the unknown- will it be down- is the new car a little burner. Luckily the answer was good. Level is bang on. Sweet. Will buy new oil and filter today. Battery on Millie drains over night- I suspect its the stereo. Definitely lights a bulb between a removed terminal and batt. For now we can remove the terminal at night. New car (Melissa?) also might have a drain. Or a shite battery. Will check also. -
Nissan Micra k11 - Mandy goes to a new happy home.
yoeddynz replied to yoeddynz's topic in Other Projects
Well then- Micras seem to be breeding around here. There's now two in the yard. Just after purchasing the silver/green car (which Hannah has named Millie) @Sanfiddy messaged me with a link to another 4 door manual for sale in Blenheim. I initially almost didn't even look at the advert because we had a car already and we dont need another 4 door. However something caught my eye in the photo. Is that a front spoiler I see? Hang on a minute. I looked at the other pics and it had a rear spoiler. Hmmmm. Then I spotted the sporty seats. Wow- could this be a Super S ? I asked the seller if it was still for sale. Yes it was. Sweet! Could he send me a pic of the car id tag with the model details. He replied with this photo... I looked up the numbers in the workshop manual and it was certainly different to Millie. I asked on a Facebook micra group and someone pointed out that it had the code for an LSD ! (the RS5F31V) " Religious bovine non-gender specific batperson!" I shouted out. "Jump into the bat automobile and we shall race over to blenheim at a pace that does not exceed the legal speed limits and view this mighty thing" Today was a good day for bargains. We drove over this morning, picking up a new air filter on for Millie on the way. The fella selling the potential Super S was a top dude- friendly as. It was his daughters car and she had lost her license. So the car is no good sitting there not being used - money in pocket = better. I climbed under the back and checked out the rear axle. It has disc brakes! Yuss!!! Then the interior- wow - it has a full black dash! I didn't even know this was a thing on these cars. The interior is tidy as, has a factory leather rimmed steering wheel and gearknob and comes with a good stereo. We had to jump start it as its been sat a while. Took it for a spin - no dramas except not heating up very quick. Hmmmm. I'll watch that. Gave the man his $700 - I'd bargained a deal to take it away with no wof. Its only just ran out but saved him bother and us money. All happy. We filled both cars up to the brim at the nearest petrol station... Then drove to Renwick for some of the 'world famous in Renwick' pies that I love so much (I used to get these when doing my apprenticeship at Cuddons engineering a few many moons ago).. Visited my parents for lunch (pies of course). They approved of the old cars in a sort of 'here we go again' way. I pulled out my 'about to buy a car that might have issues' emergency kit from Millie's boot... Started looking over what we had just bought. That big fat lip... Those sporty(er) seats... ( they are definitely more hugging) That black dash which I really do like! Just seems soooo much more racy?.. ABS is here... Factory mats (well.. on the drivers side at least) The extra 300cc that we've come to enjoy... Factory rust? The other one has a repair in the same spot. It not bad so I'll sort it out properly before wof time... I tried jacking the car up to check the diff but did not trust the factory scissor jack to take all the weight. So I had a look and it certainly does have the larger gearbox that houses the lsd. So I think its a thing. Cool! Standard box on milly... Wider diff area on new car (yet to be named btw...) The reason why the temp doesn't sit midway and drops low on downhills is because I suspect it either has the wrong thermostat or no thermostat. I'll check it out soon. Going from my experience with the Mazda V6 in the Viva the Tridon aftermarket brand thermstats never worked well and my V6 always ran cold/fluctuated. When I replaced it with a genuine Mazda item it ran hotter and stable. Tempted to get a decent Nissan one for this car too. Certainly something has been played with there- can you spot the signs?... So after throwing in roughly a half litre of oil (I hope that's not a thing... but the oil does look old so I suspect its not been looked at in a while) we took off back home. Me in the new Micra (Molly?) and Hannah following in Milly. The idea was to just cruise home with the flow of the traffic (roughly 90-100kph) and see who could get to our local dinosaur juice station using the least amount of dinos. The new car (Mandy?) certainly seemed tighter and a bit less floaty. It does have 175/60s compared to Millie's 155/70s so that will help. Took some pics on the way in the evening sun... Hannah likes it that Millie has a genuine Nissan healing Crystal... Cute bums. (that little rear spoiler- so neat! )... Got to our local and re-fuelled... I used 12.7 litres. Hannah used 10.7! What !!!!!? HTF did she do that? I blame my wider tyres, engine running cold so ecu thinks its cold and adds more fuel. I did 'play' a little bit more on some hilly bits but only barely. I want a re-match when the thermostat is replaced. Also- we can swap and she can use the new car (Melanie?) Anyway. WOW at that economy! 56mpg (or 5L/100km in new money). Even allowing for the fact that both cars speedos read an optimistic 5% fast its still bloody good. Really enjoying driving them too. Actually quite nice to sit on 100 at only 3000rpm and still have a conversation. I must add some sound deadening and carpet to my Imp because it'll cut so much noise. So now we need to spend a while getting to know them both. See what issues the new micra (Maureen?) might have and then sort those out. New oil, plugs, filter. Wof. One thing is for sure- I'm going to take on Hannah in another economy run battle and win this time! Then just use them and form a plan along the way. Meanwhile - little Impy is not that IMPressed with the new IMPosters taking over his favourite parking spot...- 213 replies
-
- 27
-
-
-
Nissan Micra k11 - Mandy goes to a new happy home.
yoeddynz replied to yoeddynz's topic in Other Projects
-
Nissan Micra k11 - Mandy goes to a new happy home.
yoeddynz replied to yoeddynz's topic in Other Projects
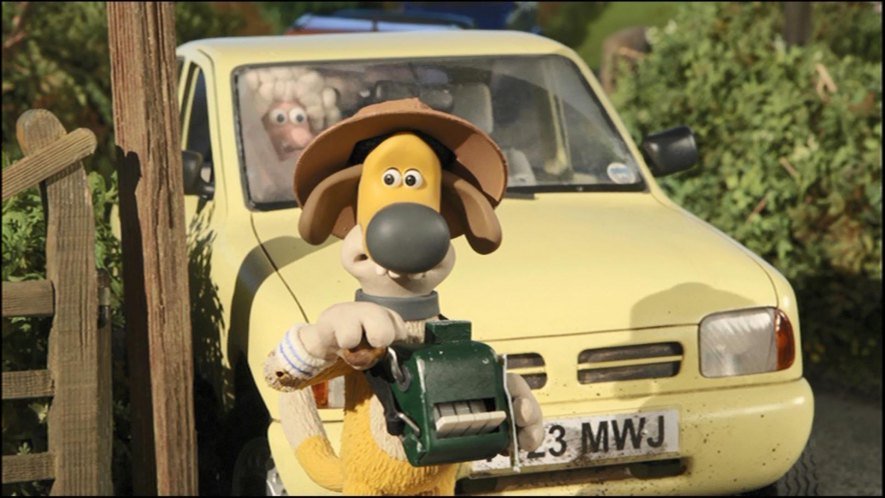
Even Shaun the sheep had micras!...
- 213 replies
-
- 17
-
-
-
Nissan Micra k11 - Mandy goes to a new happy home.
yoeddynz replied to yoeddynz's topic in Other Projects
Swoon! Sooooo many to choose from ! -
Nissan Micra k11 - Mandy goes to a new happy home.
yoeddynz replied to yoeddynz's topic in Other Projects
I think the standard heads and even the stock manifold can flow quite well. Plus they apparently handle a bit of boost on the stock bottom end ok (if sensible) So this morning I swapped the plugs out. The old ones are certainly old with eroded rounded electrodes but clean- no signs of an oil burner and a nice light brown colour... We took it out for hard trash around 'the loop'.. a good drive if its quiet and no freedom campers sitting on 30kph. Up and down, narrow windy road with a decent hillclimb to finish on before home. Perfect for little cars with big hearts. It pretty fun. Almost forget its just a little 1300 until you hit 6500 and then select third and it falls on its face. Luckily it seems fine with staying in 2nd all the time for the really tight bits. I think the few cars we saw heading the other way must have thought 'wtf! Well look at that Karen- I think those kids are on meth and have just stolen some grannies car for a joy ride' We got some dirty looks Got home and poured some engine flush into the engine and ran it for ten minutes at idle. Never used this stuff before but thought why not- oil on dip stick looked/smelt fairly dirty. Hannah then did an oil and filter change. We'd have used the hoist but someone has thoughtfully filled the floor up with loads of timber for some glorified shelf build. Poo. Sump plug and draining easy to do on the ground. Oil filter not so easy - not when the last monkey had overtightened it. But all good and sorted. Old oil yuck. New oil yum. Engine even sounds a bit quieter. Thought I would check the air filter. Hmmmm. There is no air filter installed! FFS. Luckily there is a fine stainless mesh covering the TB mouth. So a filter is on the list before we next drive it. No wonder the engine sounds so neat. Also- both cv boots are torn so that's another job- especially before we start Colin Mcraeing it on the gravel roads.- 213 replies
-
- 15
-
-
-
-
Nissan Micra k11 - Mandy goes to a new happy home.
yoeddynz replied to yoeddynz's topic in Other Projects
I presume they must have sold a fair few across OZ but like many a 'bland grannies shopping car' from the early/mid '90s most have probably been crushed now. There seems to be a decent core group of enthusiasts over there though- where probably many cars sell through word of mouth. -
Nissan Micra k11 - Mandy goes to a new happy home.
yoeddynz replied to yoeddynz's topic in Other Projects
Nissan superhatch engine secrets.. -
As some might have seen in my wanted advert I've been looking for a Nissan k11 Micra (march) for a while, mainly to have as a daily for when the Imp eventually goes under the knife to get its new flat six heart, but also just because both Hannah and I fancy k11s. There's a bit of history with them for us both and this connection along with just the cute unpretentious little car looks has us hooked. Not to mention that overseas there are some wickedly cool uprated versions doing the rounds. Quite a following for these cars in many countries except weirdly in NZ. When I was living in the UK I'd spot these everywhere. Very popular little cars, but ones that I looked past. That is until Hannah's younger sister needed to buy her first car. I helped them look for one and a Micra K10 came up for sale locally. We knew little about them except that Hannah and her two other sisters both learned to drive in K10s. Simple,easy cars to operate (685kg light too!!) So we Leila bought the little K10 and loved her first car, which became known as the Badger mobile - due to the trips Leila would take in it to Badgermans beach down in Cornwall... Sadly, because mother nature can throw out some right horrid things at us, Leila became ill with a rare disease called Crest syndrome, a type of auto immune thing. It started with her hands and she was unable to operate some items, including the windows. The little K10 became a bit run down and the road salt had done its job. Combined with the trickyness of using cars controls Leila decided to seek out a more suitable car. This is where the little K11 came to reside with Hannahs family. Hannah helped her look for a suitable car and then her brother found one. A four door 1000 facelift in dark blue. It had electric windows and central locking- two small things that made life for Leila show much easier... That little K11 did many missions about the place and the family became quite fond of it. Its also what made me start spotting K11s and becoming a fan. In a horrible turn of events Leilas life was cut short. The condition had continued to worsen to the point where it was effecting her heart. She died from a heart attack in 2017 at only 26. A huge loss to the world. Her little Micra was then taken on by Hannahs brother and he now continues to take it on adventures and the other siblings borrow it. I used last year for the 2019 Retro rides gathering - this being the first time I had ever driven a Micra any real distance and I really enjoyed it. While at the gathering I also spotted and fell in love with this little hillclimb beasty... I was amazed at how peppy it was for a 1000cc car. Its handling was 'floaty' but fun. I could instantly see how they would make a sweet little pocket rocket for twisty roads- in very much the same way as the Imp is. Hannah was also smitten and of course there is the family connection to add. So we would own a K11 one day- that was that! Fast forward to last month. I old my Viva wagon during lockdown and had some cash. I know that the Imp is to come off the road for the transplant. Lets start looking for a K11. There were requirements to be met though. It has to be a manual, two door, pre-facelift (PFL) and ideally would have the CG13 engine- not the smaller 1.0. But we soon found that these combined features are a very rare thing indeed in NZ. Kiwis never got Micras here new. They are all imports from Japan. Most are auto (CVT) with the 1.0 and most are 4 doors. All the earlier pre-facelift models, made up to the change over point of around 97, seem to have disappeared. Weirdly - Australia had them new - imported from the UK! They apparently are all PFLs too! Lucky. We found a very tidy 2 door manual face lift locally- but it stunk of ciggy smoke, was a 1.0 and a couple of other alarm bells rang about the owners and their honesty. They were also asking moon beams for it and wouldn't accept my lower offer. Plus- it was a not so pretty facelift version... Then this 4 door PFL turned up locally, going cheap. After a quick look up on carjam we found out that it was a 1.3! Also spotted in the photos were a rev counter. That rev counter dash is certainly a rare thing here- quite a bonus. With some more research Hannah deduced that it might be a March S. These have a few extras like the rev counter and a split rear seat. I messaged the seller and he confirmed it had the split rear seat. Oooooh we thought! Now a March S is not the same as a Micra Super S- as sold in the UK and Oz. I believe that the Super S has a few other blingy things like rear disc brakes, sportier seats, quicker steering rack and a deep front spoiler with added fog lights. ^Dreams. We went for a look. First thing I checked was the engine number- just making sure it was indeed a 1.3 with all those extra 20 ponies. Took it for a hoon (wow- the 1.3 is way faster ! ) checked some things and made a cheeky low offer. 2 days later there was a counter offer and we bagged it for a nice cheap enough price of $825 Picked it up yesterday afternoon. Bought some engine flush, oil, filter and new plugs. Will giive it a bit of Tlc. Its a bit dented and rough but will still clean up ok. Plans : 1 - look for a tidy 2 door PFL car to swap all the good bits into. Probably will be an auto 1.0. Wont be a quick job this so it can wait till later in summer because there are way more urgent jobs about the place. Plus this car is meant to be a runner to use while the Imp is off the road- not another project..... but hey. How can we not have a play! 2 - Lower it. Most likely using some garden variety 'Makita modified' springs... Apparently one can remove 2 coils and they will remain safely contained. We shall see. 3 - Find some nice alloy wheels. 13" x 6 would be nice. The pcd is 100mm so not too odd. 4 - Hannah wants a yellow Micra. So eventually it will be re-painted the official Nissan custard yellow.. 5 - add a turbo. Maybe. Could be fun. That's a way off in jobs to do here though! So here are some pics I took... The seller had the most amazing jumper on! I'd have been stoked if that came with the car... Before handing over the monies I thought it best to quickly check that the spark plugs were not seized in the head. Not coomon but worth checking to save a lot of aggro... All good! So we paid the man and hooned off into the sunset- me in the Imp and Hannah getting used to 'her' new toy Filled the tank.. Played cat and mouse over our hill to home... I took some quick pics in the evening light... JDM factory crystal for added healing power and bling. Some Marches came with these factory fitted... One key element to a good Micra... Another great thing to have when you're ragging all those little ponies to the point of exhaustion... \ Some service items... More to come soon. Lets see how much money we find under the seats etc
- 213 replies
-
- 24
-
-