yoeddynz
-
Posts
19,547 -
Joined
-
Last visited
-
Days Won
159
Content Type
Forums
Downloads
Events
Gallery
Everything posted by yoeddynz
-

Nissan Micra k11 - Mandy goes to a new happy home.
yoeddynz replied to yoeddynz's topic in Other Projects
Yeah I think quite a few have been converted however its not all plain sailing plus they are quite a heavy engine, even though all alloy. Spoil those Micra dynamics... I see a little turbo install in the future. Decided we will put the 1.0 and auto into Milly, the first micra and sell on for what ever we can get. Then split the second Micra (Madge?) down, use the nice bits needed to put into the 3rd Micra (Molly?) , keep all the other spares and scrap the shell (or build a really naff Micra trailer....) Lowering will take place but its gonna be subtle to start with... only last night we visited some friends up the Marahau Valley and it involves a ford crossing. No way the Imp would even go near it and a lowered Micra might scrape. Skid plates you say?...... -
Yoeddynz's 1985 Hino N0915 housetruck build.
yoeddynz replied to yoeddynz's topic in Project Discussion
https://www.trademe.co.nz/a/motors/trucks/other/listing/2822609524?bof=T6H92jRw 43,000 kms! Buy it and shorten the cab (because not hindered with sprogs...)
-
Yoeddynz's 1985 Hino N0915 housetruck build.
yoeddynz replied to yoeddynz's topic in Project Discussion
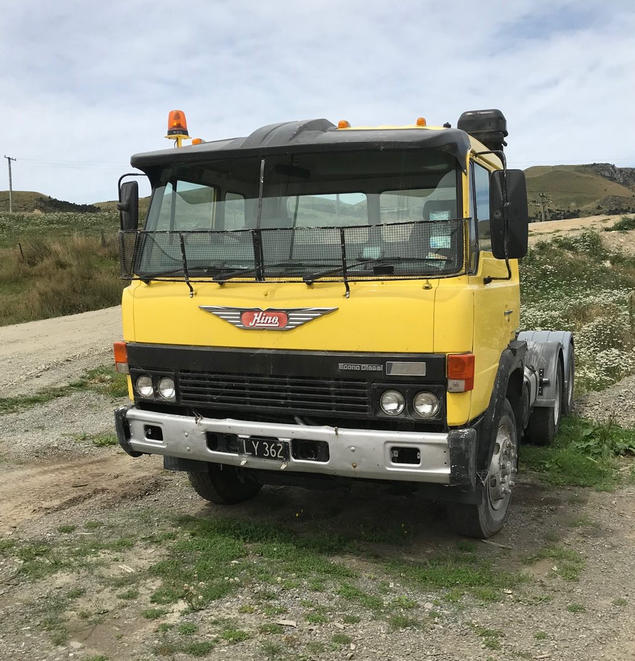
Hmmmmmmmm.. I like them in yellow. It would match the latest Micra https://www.trademe.co.nz/a/motors/trucks/tractor-units/listing/2810817781?bof=XFKug6kr
-
Yoeddynz's 1985 Hino N0915 housetruck build.
yoeddynz replied to yoeddynz's topic in Project Discussion
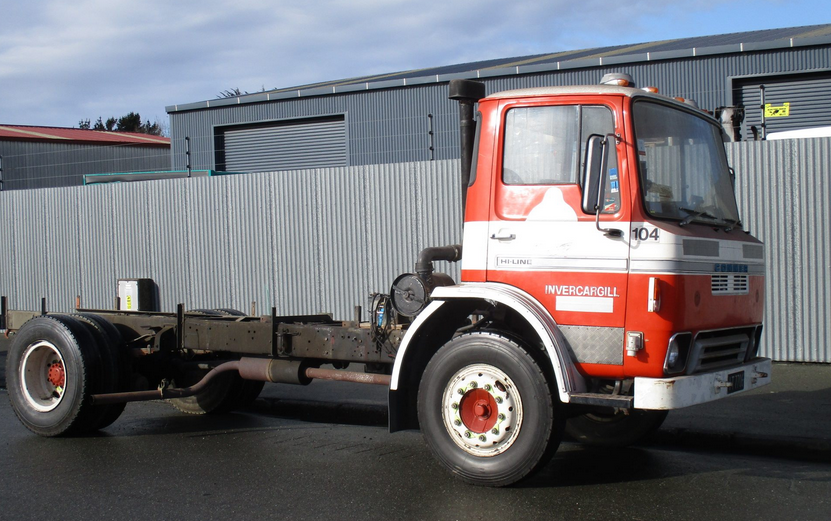
For the truck- probably looking around 10-12k max. But paying less means more money for the conversion. We only paid $6500 for our current Hino but that was a bargain - even at the time. Most likely because the old boy had only listed it in the buy sell swap and not on TM. Great price considering we saw the receipts for a full engine rebuild by nelson truck services to the tune of circa 10K! Luckily there is no rush to find the right truck. I do love the look of this one down south. Its older and english but low mileage ex fire service.... https://www.trademe.co.nz/a/motors/trucks/flat-deck/listing/2803760177?bof=kgahRUQ2
-
Yoeddynz's 1985 Hino N0915 housetruck build.
yoeddynz replied to yoeddynz's topic in Project Discussion
I do really love the look of that truck. But I don't see it being a realistic easy to get along with truck to drive about, work on, get parts, cheap to run etc like a classic 80's Japanese truck is. Oh plus its a 6x4 and I only have my class 2 -
Yoeddynz's 1985 Hino N0915 housetruck build.
yoeddynz replied to yoeddynz's topic in Project Discussion
Its the angle of the accelerator pedal that was really awkward on long trips. Might be just me. -
Yoeddynz's 1985 Hino N0915 housetruck build.
yoeddynz replied to yoeddynz's topic in Project Discussion
There's one sitting here in Motueka. Been there ages. I imagine @Slacker_Sam. Knows what the deal is with it. But yeah.. A bit too small and least fine I drove my series 2 i owned any distance it killed my legs. Wasn't comfy. -
Yoeddynz's 1985 Hino N0915 housetruck build.
yoeddynz replied to yoeddynz's topic in Project Discussion
I do like Bedfords but not the rl shape. I'll pass thanks. One thing I need to check is the height of the deck. The fire truck sits so bloody high. Might not allow the full height we want in the living space...especially because I need to factor in the popout sliders and strength below and above such a massive hole in the side. Such fun. I see many coffee/other drug fuelled scribbles in my drawing pad taking place over the next few months. -
Nissan Micra k11 - Mandy goes to a new happy home.
yoeddynz replied to yoeddynz's topic in Other Projects
So not salty at all.... -
Wow. It been six years since I last posted in this thread. I see it still has some missing photos I need to sort out at some point. Bloody photobucket. Anyway. Update time. This just happened... That's a new fresh legal stamp of approval stating that its safe to take our house out for some hoons. We just put it through a COF test because we have sold the housetruck recently to a nice local family. Wow. So much to take in. Suddenly things got very busy around our place! But I better back track to a while back with some various bits of work we did to improve the truck... In December 2018 we had a little leak from one of the skylights. Water was creeping through a spot, created initially by condensation on the skylight and had rotted the plywood roof around that area. It could possibly have been a local fix but we decided to take off the entire roof on that side, replace the ply, get rid of one skylight and make a new improved design with double glazing. A proper fix. It was hot and sunny,materials cheap and a satisfying thing to fix. Photos... Old design skylights looking a bit tatty... Rotten ply... rip it down starting with the butynol roofing... Open air bedroom... Lunchtime... new ply, new Butynol... New roof. New improved skylight yet to be built and fitted. Not got a photo of that but will get some. Was actually a pretty easy job- made better by sunshine, music and drugs. This dates the photo. Imp race car, Viva wagon. But check out that centre garden and compare it to the pics from when we first parked the truck up here 4 years previous to this pic... We also re-roofed both popouts because the drains that used to block with leaves when parked up in the Nelson campground had created some issues in the corners. New improved roofs and covered in alloy (for now- but it looks unfinished so we have some baby iron to fit before passing the truck over to its new owners) I didn't take too many photos- It was a job we just got stuck into. Here's what I did take. Luckily all the steel work was fine as. Some new wood, new ply and all good. Learned a lesson not to fuck about trying to make hidden drains! Keep it simple and easy to keep clean! Fast fowarding on to this year. We had chosen a while back to sell this housetruck and put the money towards building another. A few reasons why... 1: this truck layout didn't suit the aspect of our land. It never will. Stuff is in the wrong place. The bedroom at the front facing north for all day sun when we aint in there is silly. Turning it around doesn't help because that the sheltered doorway is in full blast of the main bad weather directions we get in our valley. 2: we are not using all of the truck to its full- the spare room is just filled with junk. The bike box is wasted not being used. The truck is too big in the wrong ways for us two. 3: I want to build another housetruck. This is probably the main reason really. But the next truck will be designed around our land and be removable (on legs) so we can use the truck when ever we want (cof and other costs considered). But yeah. I've got itchy housetruck building fingers. So much learned, so many little ideas. No pressure this time either because we have the cabin and the (being built right now) mezzanine floor to live in. Find the right truck and have fun. So a few people heard it was for sale, some came round and kicked its tyres and absorbed huge amounts of time but in the end it has gone to a young local family- who's parents had them growing up in a housetruck. Lovely people, staying local = happy sale. Its a great truck, they got a great deal and we are less stressed by keeping it local with friends. We decided we would put it through a cof even though there is a good chance it'll be parked up again for a few years. But it means everyone knows what the deal is and the condition. A few jobs in the last week after booking it in for its test. Clean some stuff, source and fit some seatbelts because its now registered as a motorhome and then test drive it... Just having a little look to see if its engine would fit the imp.... Such a lovely simple clean engine... Luckily I have been really strict on a regular routine of hopping in the cab every so often and pumping the brakes etc. Occasional starts on hot days when the air is dry and rock the truck on the clutch too. It all worked so nice. One rear brake was binding slightly - has been a bit tightly adjusted ever since I had fixed that leaky hub seal year ago. I backed that off and we took it down to the beach... Kevin joined us... We broke some rules... Hannah had a drive in the Abel Tasman carpark. She has not driven a truck since she owned her Bedford TK in Blighty. Happy Hannah wants to get her NZ truck license... I did some laps... We got home, gave it a really good clean, checked all the other bits and bobs. Today I drove it to Motueka VTNZ truck testing station where it was booked in... The fella was super nice, liked the truck. We went for lunch and came back to a freshly cof'd truck. It needed an orange bulb as one indicator cover is faded almost white in the harsh Nelson sun and he's advised I tighten the bearings on one side of the rear axle (the opposite side to that what I had worked on when doing the brakes way way back in 2012) We drove home happy but sad. Its been a great truck to us. Happy its going to a good home but still sad. Excited though...soon we can start hunting for another truck to buy!!! We had a beer to celebrate. Much work to do now- a few tidy up jobs on the truck and we have to finish the mezzanine to live in once the truck leaves our place at the ned of November! I'll have a few ideas to put forward for the next build. Some little designs that I would like to get others to view and discuss . Many minds etc etc. We will have the time to really make something sweet. I'm keen on another Hino - I would love a 4wd like our firetruck and have already been asking about via the various channels within Fenz (fire and emergency NZ - if you've not heard of that) plus there's a sweet classic truck down south I fancy. Hmmmmmmm.... Next housetruck build will be shorter in length, have a one sided full length pop out that extends at least 1.5 m, a bedroom over the cab but that raises up high for full standing height and slide back roof for star gazing. Open plan living area at the back with roll around walls for inside outside flow onto a verandah (when this truck is gone we will be landscaping the entire area its currently parked up on) Bloody excited really
- 80 replies
-
- 34
-

-

-
Nissan Micra k11 - Mandy goes to a new happy home.
yoeddynz replied to yoeddynz's topic in Other Projects
No rush at this end for anything- as folks will see soon from other project updates its been and will continue to be a bit busy around here!.... -
Nissan Micra k11 - Mandy goes to a new happy home.
yoeddynz replied to yoeddynz's topic in Other Projects
So obviously its rego on hold, is 99% all there and just needs a wiper blade for a wof but you're too busy to fit it so your loss is the buyers gain.... -
Nissan Micra k11 - Mandy goes to a new happy home.
yoeddynz replied to yoeddynz's topic in Other Projects
We've not even heard from the man @Early jap nuter whether he wants rid of it. All these little micras and other temptations and I still have a goldwing engine to finish! -
Nissan Micra k11 - Mandy goes to a new happy home.
yoeddynz replied to yoeddynz's topic in Other Projects
@oldrx7 Fuck - I'd love to rescue a rusty superturbo but I had said to myself and hannah no more rusty cars. But super turbo!!! -
Nissan Micra k11 - Mandy goes to a new happy home.
yoeddynz replied to yoeddynz's topic in Other Projects
Yes please. I shall rescue your super turbo for the entertainment of all on oldschool! -
Nissan Micra k11 - Mandy goes to a new happy home.
yoeddynz replied to yoeddynz's topic in Other Projects
Its funny but since you started your Integra thread I have been spotting them about. I quite enjoyed reading how you would look for better original bits, factory fresh (along with Eds Toyota mr2 thread that was similar in ways) Now I'm spotting Marches everywhere... Now I totally understand the fun that is trying to get nicer bits and tidying it up. Its refreshing not to have to stress about dealing with rust, modifying things to fit, certs etc. Just tidy up what's there and the little details. I'm very much looking forward to building the yellow one into the car we want, picking the best bits and cleaning it all. -
Oooohhhh i like this thread. Cheers for sharing. You might well find this thread here from my friends seth a good interesting read. I love the tiny tools etc. Fucked if I could do any of this work with my shitty eyesight but I love reading about other people doing this work.. https://forum.retro-rides.org/thread/66976/assorted-diddy-engineering
-
Nissan Micra k11 - Mandy goes to a new happy home.
yoeddynz replied to yoeddynz's topic in Other Projects
Not enough Micras? Trust me - we are trying.... -
Nissan Micra k11 - Mandy goes to a new happy home.
yoeddynz replied to yoeddynz's topic in Other Projects
I love them. I've got a whole stash. I was think of starting a thread but need to chat to the mods so we can make something neat of it. -
Nissan Micra k11 - Mandy goes to a new happy home.
yoeddynz replied to yoeddynz's topic in Other Projects
Yeah. Sort of become a bit nerdy with our enthusiasm for these now. I have already been looking up where I can find a Fujimi HK11* 2 door 1.24 kitset for sale and I have also pondered looking for sales brochures online. Oh dear.
- 213 replies
-
- 11
-

-
-
-
Nissan Micra k11 - Mandy goes to a new happy home.
yoeddynz replied to yoeddynz's topic in Other Projects
Yeah something like that. But really the second one (now not the new one and still has no official name Megan?) just sort of had to be bought on the basis that it was such a bargain for all them juicy bits. Could have got away without buying it. But how could we not? And the yellow one. 2 door! wow. Its perfect. We are probably going to split the 2nd one down and keep a few spares from both that and the yellow one after building the 'perfect one'. Sell the remaining bits off. Sell on Millie soon- once we know which is the best 1.3 engine we have. Or some sort of.. 'scribbled on our addled brains notepads future plans that wont save us any money but seem perfect right now' ..idea -
Nissan Micra k11 - Mandy goes to a new happy home.
yoeddynz replied to yoeddynz's topic in Other Projects
Oh dear. We sort of have three Marches now. Picking this one up at the end of the month... So happy. Its like a dream. A yellow 2 door. Its low mileage and very tidy. 1.0 with a rubberband auto. Gonna have some fun later in summer swapping all the bits mechanical across, inc the pre-facelift wings, lights, grill and spoilers. Make our ultimate looking Micra. The lady we are buying it from is super happy we are basically k11 foamers/nerds and that its going to a good home. I like these little March sill guards. Also noted that it has the original March mat set with the bubble car logo, still in good nick. Not sure on the name yet - but currently they are referred to as Millie, Molly and Mandy. Some might say we have a problem but its all smiles here * I've just noticed how terribly both cars are parked.. Micra drivers be all like "and I'll just put it here and that will be that".. and get away with it because their car so tiny.- 213 replies
-
- 22
-
-

-
-
Nissan Micra k11 - Mandy goes to a new happy home.
yoeddynz replied to yoeddynz's topic in Other Projects
Yesterday and today we did a few more tinkering jobs on both Millie and the new one (Myrtel?). We had taken the Imp over to Kaiteriteri so we could do a trail run in the park there. The Imp was booked in for a wof later on in the afternoon and the run distance was further than we expected. So we decided to run to home, shower up and then drive the new car (Marjorie?) back to kaiteri, pick up the Imp and drive in convoy into town. Got to show off the Micra to our wof man (the Imp passed with flying colours btw...) and warm up the oil properly so once home it would drain out sweet. Hannah had Kevin helping her with Millie... I was tucked out of the hot sun and worked on the new one (Marilyn?) Terribly backlit photo alert... Drained and replaced the oil. It was pretty filthy but nothing horrid with no signs of sludge. While I was under the car (on axle stands because hoist is still blocked by timer piles) I had a look about. I was really happy to see how super tidy it was under there. No dents, no rust, underseal very neat, exhaust looked factory fresh. Nice to see its not been off road or rallied. Engine bay is pretty tidy too... I fitted new spark plugs too- the old ones were pretty worn. I kept joking with Hannah that the old oil, plugs and the fact it was running cold = my extra 2 litres of petrol used.. So yeah- that thermostat eh?... well it wasn't there. I suspected as much. Luckily we had found a thermostat on Fridays romantic trip to the wreckers. I made a gasket to suit - because while normally it would be sealed in with rtv I didn't want to seal it in with goo just in case it turns out I needed to remove it again, like perhaps the head gasket is iffy etc etc. We tested the thermostat before fitting anyway and it opened on time and the full amount. Fitted it, refilled the system with nice new 33% coolant mix and I took it for a hoon. The temp sat right in the middle as I headed up the 300m climb on our side of our local hillclimb/racetrack. Drove it hardish until I caught someone. Then laughed at the comical power button that it turning the air con on and then turning it off for extra boost Temp stayed put as I followed a line of cars stuck behind a Kenworth logging truck down the other side. Sweet. That's better! However I best test it again so I turned back at the bottom and headed up the hill, second gear ALL the way (because for fast progress up our hill with only a 1300cc, trying to use 3rd just pops it out of its 'happy' zone) What a great little engine these are! Really quite smooth. Another neat thing I liked was the LSD. I've not driven a fwd equipped as such and It was most noticeable out of the tighter corners, especially if a bit lumpy. It just gripped and pulled out really clean. No noticable torque steer but then again its only 75 little ponies... I do wonder if viscous lsds heat up and start to lose some grip on the discs so allowing a bit more slip- but really propbably not an issue on a road car getting trashed now and again ? More of an issue on trackdays etc? Got home, let it sit idling. No dramas. Hannah also cleaned those nifty March logo'd mats she had found. They came up sweet and look neat installed. I gave the car a quick vacuum and found $1.50 under the seat so now the car had only cost us $698.50. I also found some sort of interesting plant material. It looks like some sort of Tomato. I might have to light it with a match and see what the smoke is like to confirm my thoughts?.. Hannah tidied out the boot area and she found this. Looks like the new car (Martina?) has been to a ski field at some point... https://okutone.jp/facility/- 213 replies
-
- 27
-
-
-
Nissan Micra k11 - Mandy goes to a new happy home.
yoeddynz replied to yoeddynz's topic in Other Projects
Me- "oh hey Hannah- we have to go to town right? " H - "yeah we need to do a shop" Me - "cool....... well while we are there why not let me take you somewhere special and show you a good time?" H -"oooh neato. Ok ! Much excite!!! What could it possibly be?"..... One hour later.... . . . . . Yuss!!!! Ka-ching! Score.... A friend who manages the local wreckers let us raid the one and only little k11 there. (apparently it was driven in without a single fault. Ran perfectly. But rego had been let lapse. Fuckers! Its a manual 2 door!!! who does such crimes to let regos lapse) anyway- we got all these bits that we needed to either fill in the blank spaces on the new car (Meredith?) or complete Millie so we can sell her on. Ok - I know.. I should not really anthropomorphise cars but I cant resist... they are just so cute. So yeah- a good haul. Bits included : a thermostat! Hopefully good- looks better than a Tridon branded one. An air box and filter - this car we robbed is a face lift and they changed the airbox with a better sealing arrangement. A cold air feed. Its longer and feeds from behind the light. Millie doesn't have this feature but the new one (Margaret?) does. They obviously thought it was such a neat idea that even the poverty spec 1.0 facelifts ended up with it too. A horn - because the twin horns on Millie don't work properly so lets go back to standard. A radiator overflow bottle- missing on Millie. Complete strut assemblies - because why not. They were sitting on the drivers seat and needed a home. The cv boots are good so they can replace the torn ones on Millie. A windscreen washer cap- MOM (that's missing on Millie...) Rear parcel shelf - MOM A clutch cable - Millie's is pretty yuck. Could just do with a lube. But now we have a spare. A ciggy lighter - for Impy! A load of fuses and a few bulbs- because I'm a magpie for them at wreckers. I've never had to buy fuses yet. However- I am saving the best bits for last. While I was tinkering away in the engine bay Hannah was scrummaging about in the car (no mean feat because it was a prick to get into- OSH would have a field day! ) and she found these... Genuine Nissan March items complete with the little bubble car logo that they used for the marketing and subsequent merchandise. Soooo cool (for nerdy k11 foamers like us) and Hannah was well chuffed with her score! They'll need a proper good clean but should come up ok. I told her she'd have a good time- 213 replies
-
- 25
-
-
-
-
Nissan Micra k11 - Mandy goes to a new happy home.
yoeddynz replied to yoeddynz's topic in Other Projects
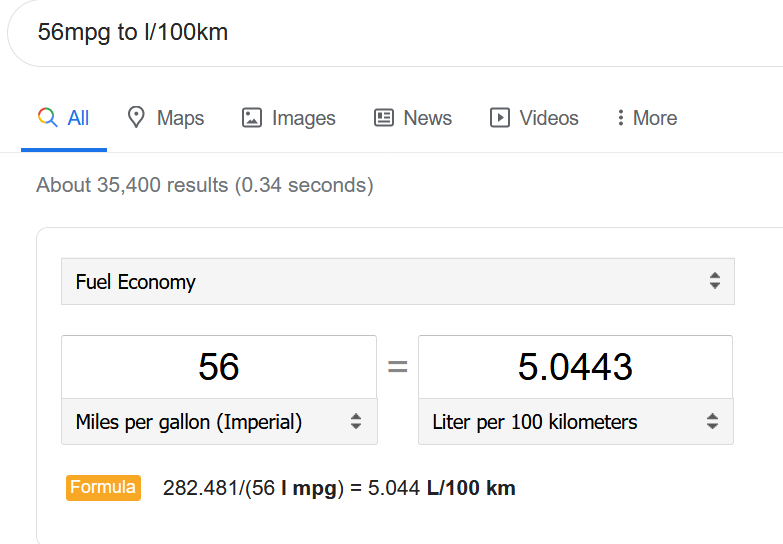
I just used an online calculator and specified imperial gallons. Blame that calculator if wrong...