
- Popular Post

Mr.Mk1
-
Posts
3464 -
Joined
-
Last visited
-
Days Won
4
Posts posted by Mr.Mk1
-
-
- Popular Post
- Popular Post
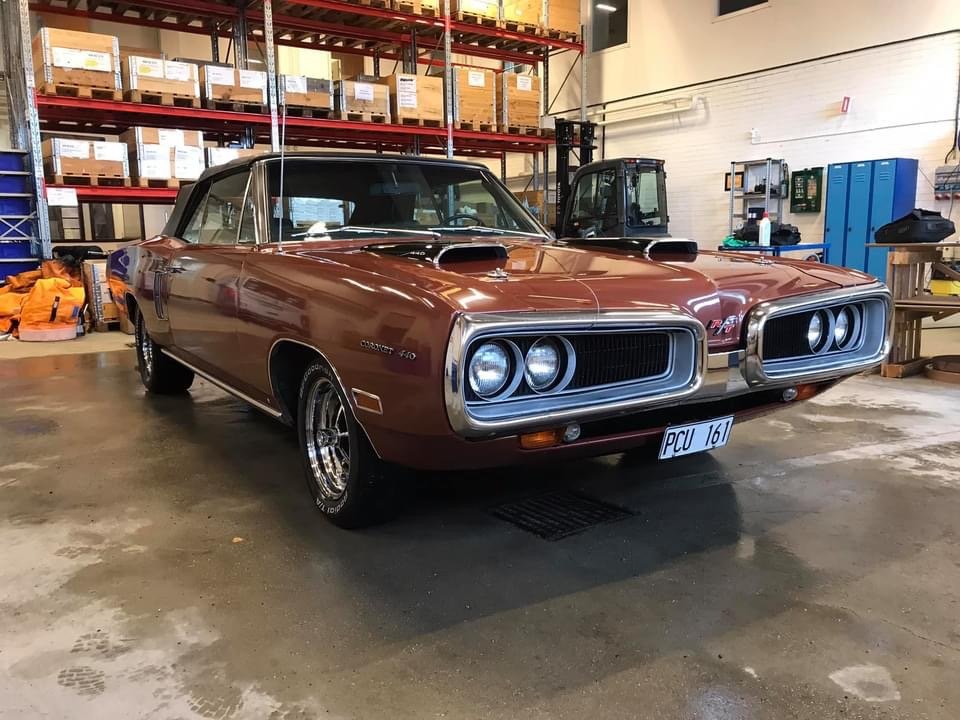
since last time: Attached the bee to the rear garnish

Sprayed the inner ridge of the grilles and touched up the wee slats between the ridge and the edge with black again
attached NOS bee to hood
Not much else really, still waiting in the queue for repair cert.
-
 21
21
-
BNT will only send it away to another shop and clip the ticket + charge freight. Sterling brake and clutch, lamberts, Apex or Christchurch has CBC, Clutch rebuilds, clutch systems, undercar & commercial
-
1
-
-
- Popular Post
- Popular Post
There were a few pallet cover sheets going spare at work so I claimed them, brought a jigsaw and got into making some new cards. Unfortunately the fronts are still on the car..down south so I could only do rears (which were way more haggard than front anyway). Wouldn’t mind pre-fitting them before I glue them so have come to a halt.
also made a new partition for between the boot and rear seat.
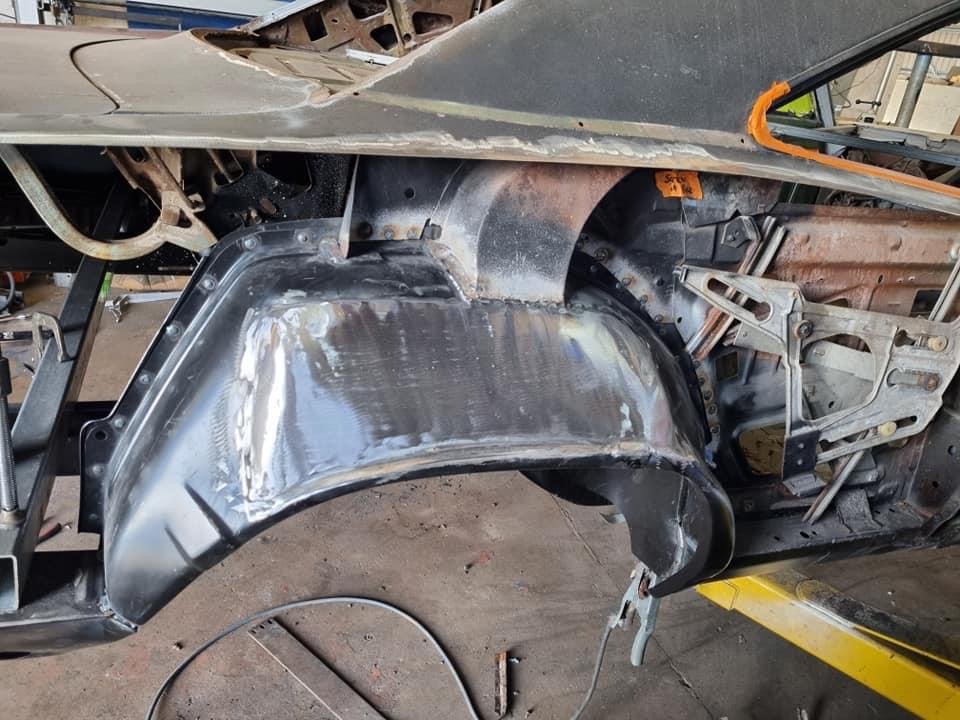
I made some more wee splash gaskets for inner guards.
This grille is a proper cunt of a design.
I couldn’t successfully mask it right, ended up making a card insert to cover the black and leave the silver exposed for painting..it somehow failed and I got overspray. Don’t particularly like the silver and the plastic is kinda pitted in places which I should have primed and sanded but wasn’t so obvious before. I still want to silver the seam around the inner edge but might have to use a paint pen which won’t be the same shade.. brush will look arse.
I tried touching it up and the paint fried up so that’s me giving up for a few years.
tried to start into making some new brake lines and the flaring kit fucked out so I went inside.
-
20
-
- Popular Post
- Popular Post
Poking with the torch revealed some crust in the pillar seam hidden by the roof framing so out came the welder again and brother put paid to it in a tidy fashion
-
26
-
- Popular Post
- Popular Post
Took ages to sand the hood back, about 14 120 discs to get it uniform, lol.
Only had to apply filler around the nose where I repaired, 2 wee dints and 2 repair patches and the crease that appeared when the wind caught it the other weekend in the gales and threw it onto the stand right after I welded the frame back in!
shot it in leftover Isolack 2k, it’s bizarre shit..like bed liner to mix but comes out normally.
The Second coat ejected some snot and fucked it up but at least it’s sealed in the meantime.. now I’ll just re-spray when I do the stripes down the track.
The back of the scoop will be gloss black but I had a little spare so painted them as well as battery tray.
Also scrubbed up the grills, have decided on the style I’ll paint them too.

-
30
-
Friends!
-
1
-
-
- Popular Post
- Popular Post
Yep, they will fill the back up nicely.. just need to get the tyres flipped
-
26
-
- Popular Post
- Popular Post
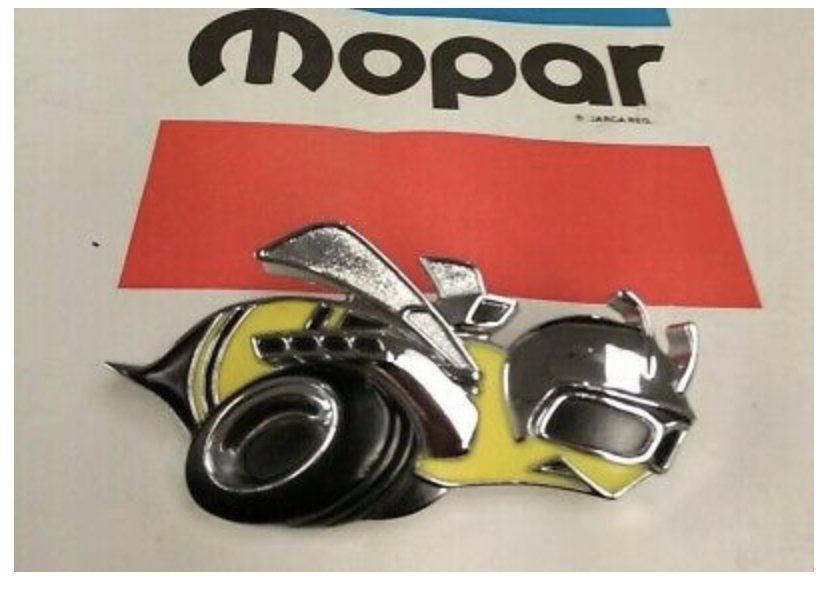
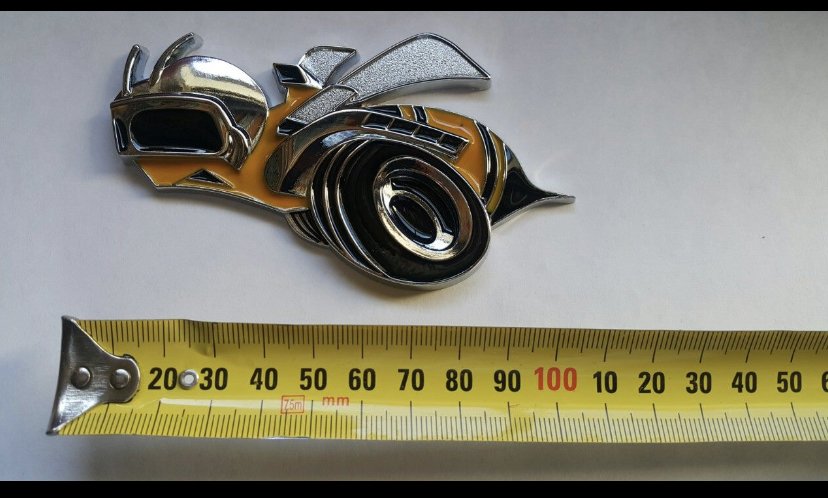
I’ve bee-n doing some bee buying too. Finally Sacked up and had a go at eBay.
Got a NOS hood bee (shaped to fit contours of nose of bonnet, mounts with pins)
Got some 8in decals for in the tail stripe and that came with 2 smaller ones that go in the rear side windows.
There’s also an auction for a stick-on one in Nz that I’ll put on the tail panel
That should complete the super bee disguise! I love the R/T badge already on the bonnet but I probably ought to fully commit to a theme
-
27
-
 1
1
-
- Popular Post
- Popular Post
Lame updates:
fizzed some metal back into the battery tray and painted it with nice thick paint!
Also stripped the pinstripes off the bonnet in preparation for sanding and some satin black 2K both sides.
Hit the wiring loom with a thinners rag and wiped everything, cleaned up the terminals etc. sucked! Will tape it again as I put it back in.
Blasted more clips and speed-nuts + painted, spend some time on the bench grinder wire wheeling nuts and bolts, painted inside the dash where it was a bit crusty from rodent piss.
Cleaned up and painted the bonnet striker catch and voltage reg bracket.
Made some gaskets for the inner guard splash guards, more to go.
And in fantastic news, I jumped on some wheels for the back! Just the size rim I wanted and the BFGs are pretty perfect..hard to get used to these old man profiles but they will suit it wicked
-
19
-
Got those mounts in yet cob?
-
- Popular Post
- Popular Post
Man, making fuel lines sucks heavily!
Was ok in the vice for a start, but vice is a metre away from everything in the shed and there’s like 5 metres of line..
cable ties and clamps as I went helped a bit..At least the brake lines are copper-nickel and much easier to manipulate (he says, having not made them yet..)
Also got the hood skin goo’d to the frame and spot welded back together. Used Bostic and it was fucking awesome!
I quickly buffed and painted the throttle linkages, hood latch and a fuel tank vapour breather this arvo too, have some clips soaking in vinegar.-
17
-
- Popular Post
- Popular Post
These two from my brothers phone didn’t make it onto the daily updates..just an after pic with quarter panel on
-
13
-
- Popular Post
- Popular Post
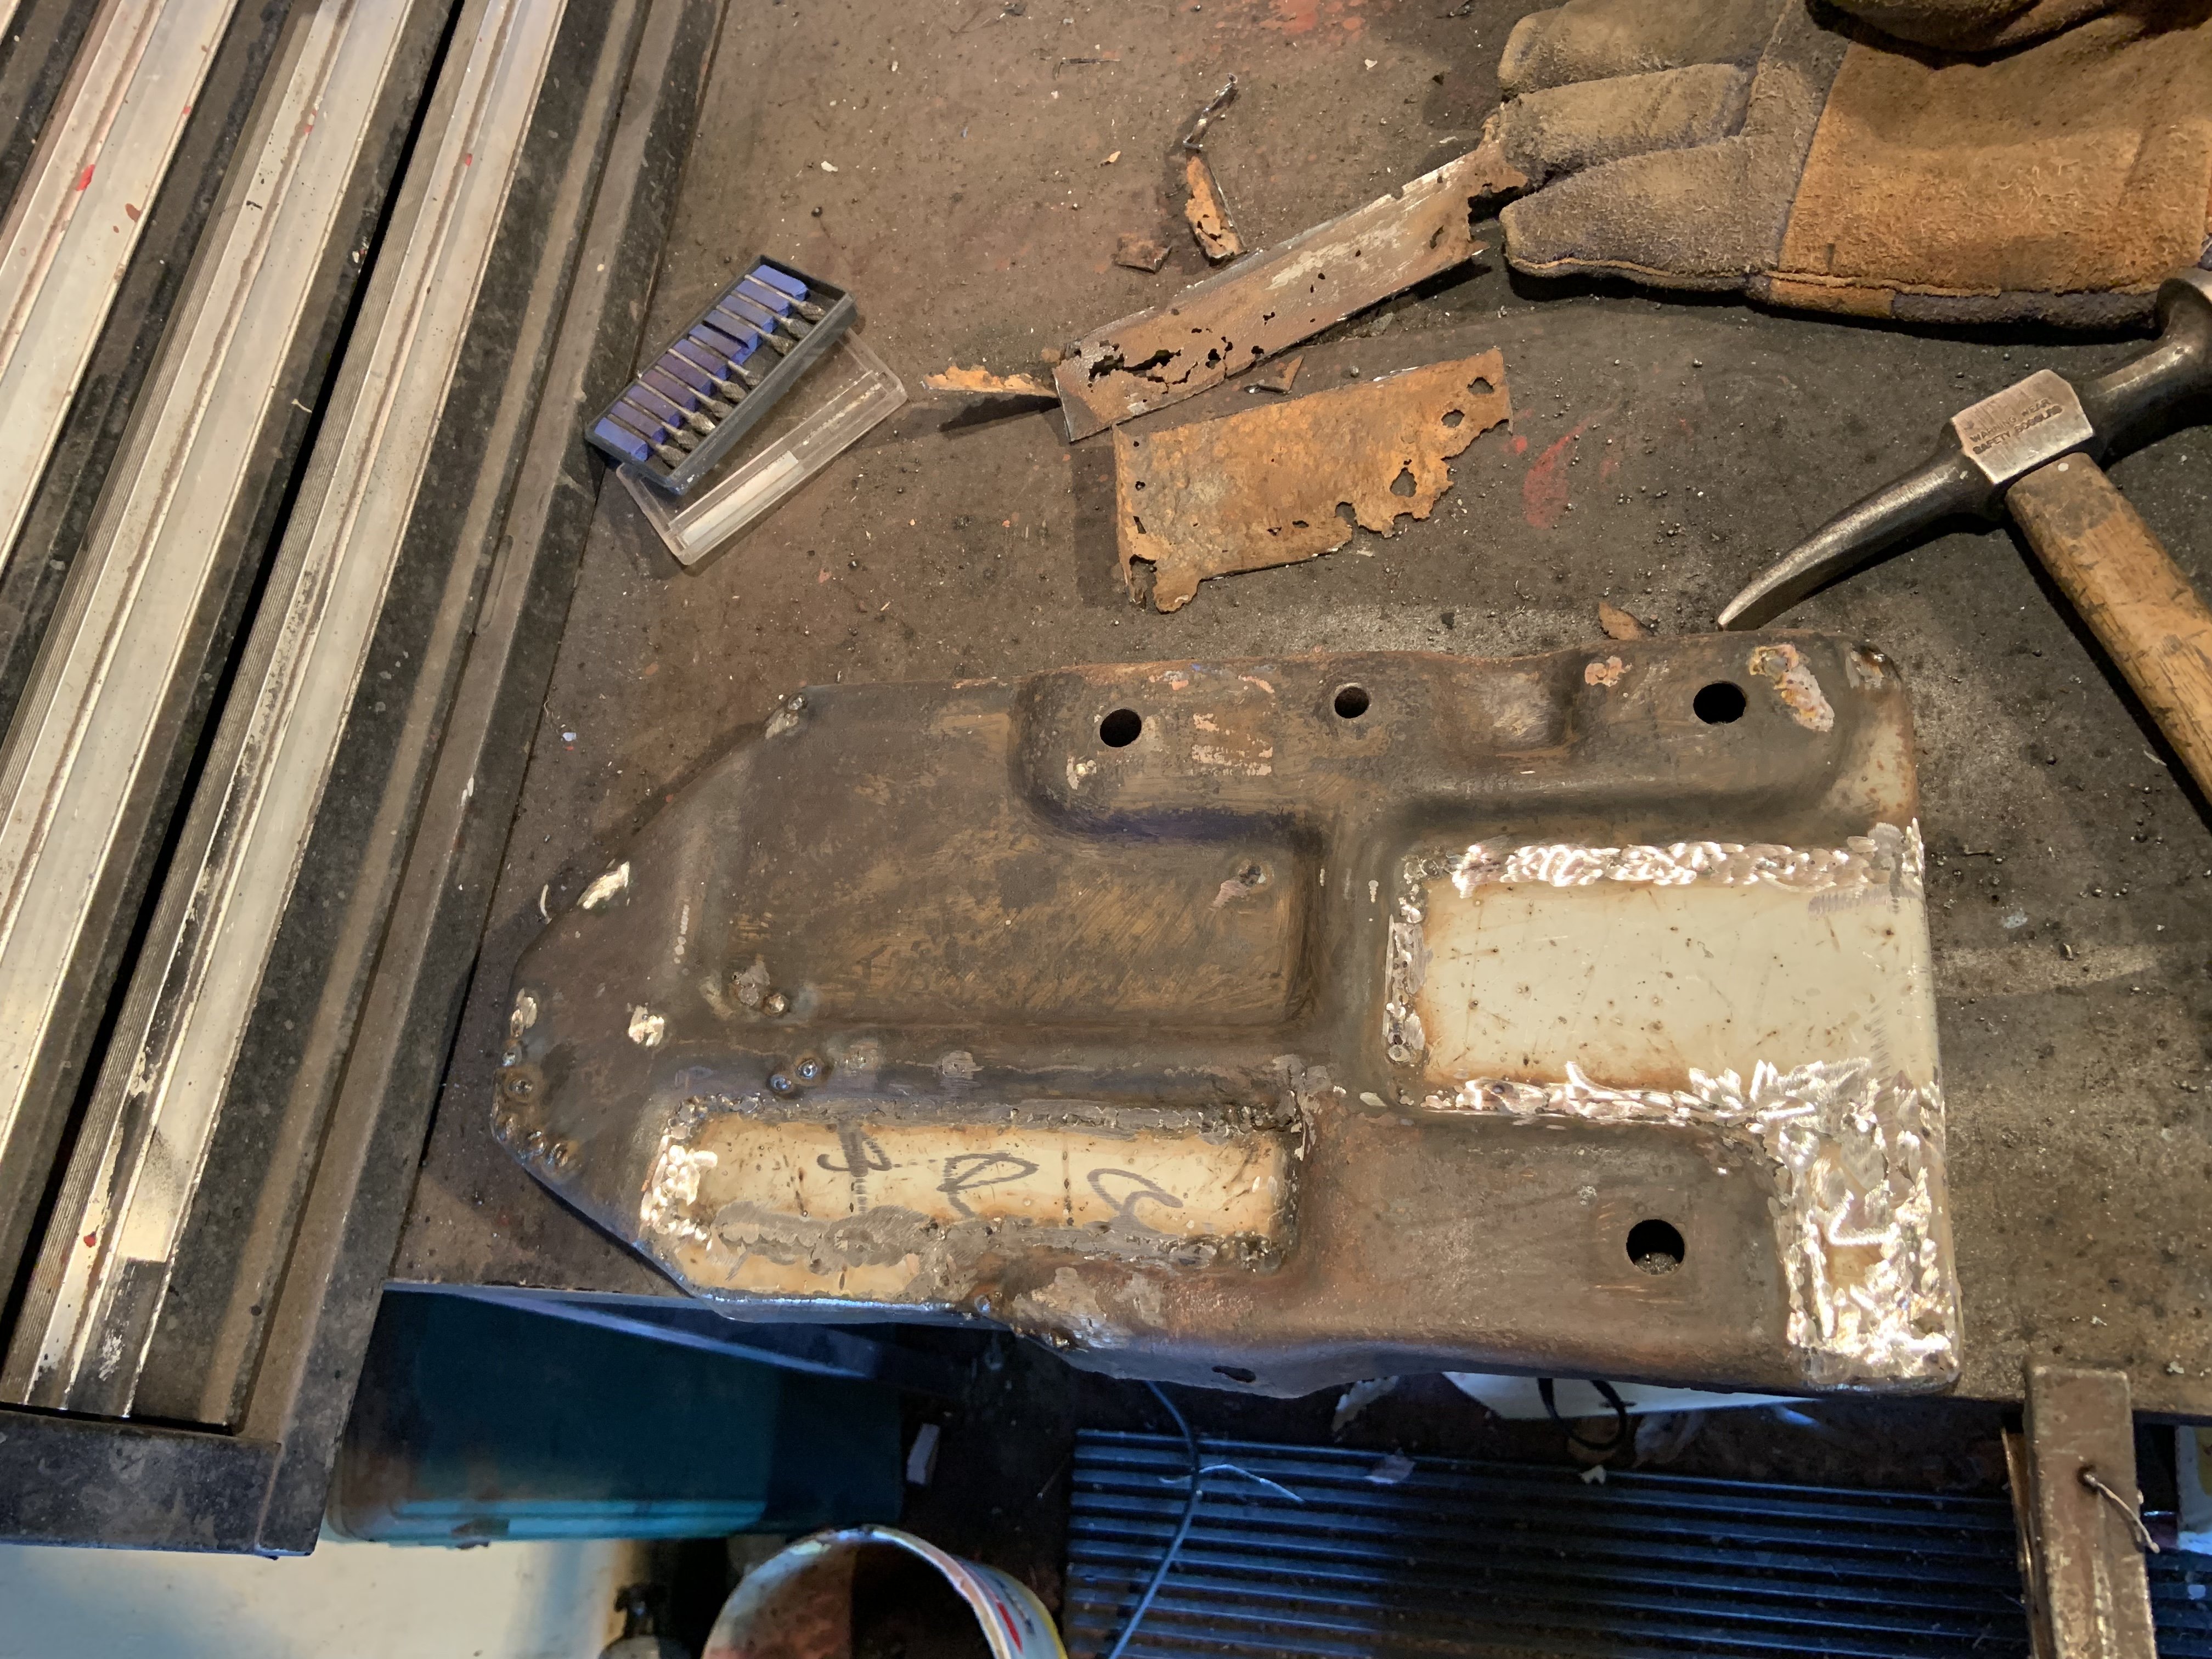
More goodies..
Shoes, pads, LH thread wheel nuts, rocker covers
The Mr. Gasket breathers have been display pieces on the shelf for ages so it’s good to finally have a use for them-
24
-
- Popular Post
- Popular Post
Another message from south today, a photo of the to-do list with only one thing remaining and a photo of the new boot edge.
Not a lot else to report, just started a new job at Mount Shop, so energy is directed into that and hours have changed so I don’t have as much shed time after work.
I flicked some satin black on the dash top and will pull some black vinyl over the dash pad..the weird green interior will slowly make its way out the door so I started with something that’s not going to be accessible soon as dash related things are a screen-out job.
Sourced some demister vents too, mine are sun buggered and cbf making fins to complete them. The new ones aren’t from a b-body but are pretty close so I’ll just linish them until they sit into the recess nicely
-
19
-
I’m speechless! What a fucking sweet car
An excellent write up too, good job!
Sounds like we are on a similar buzz with what we like and retaining original feel, really look forward to seeing it come together
-
1
-
-
- Popular Post
- Popular Post
This made my day!
I had the radiator at the shop to see if they could stop it weeping along the bottom. They filled that and then found the whole core was pinholed.
Because this was the ‘big’ radiator, they struggled to find a suitable core and would have to make one. $780+Im sure this isn’t the correct radiator for my car anyway due to how it was mounted.
I asked on the Facebook groups and a guy 30mins away had one he replaced with an alloy rad when doing engine conversion.
$50!!
Super stoked! Always Wanted to stay original.
Will drop it into radiator shop and get the mounts re-attached and then I’ll tidy it up.
-
26
-
- Popular Post
- Popular Post
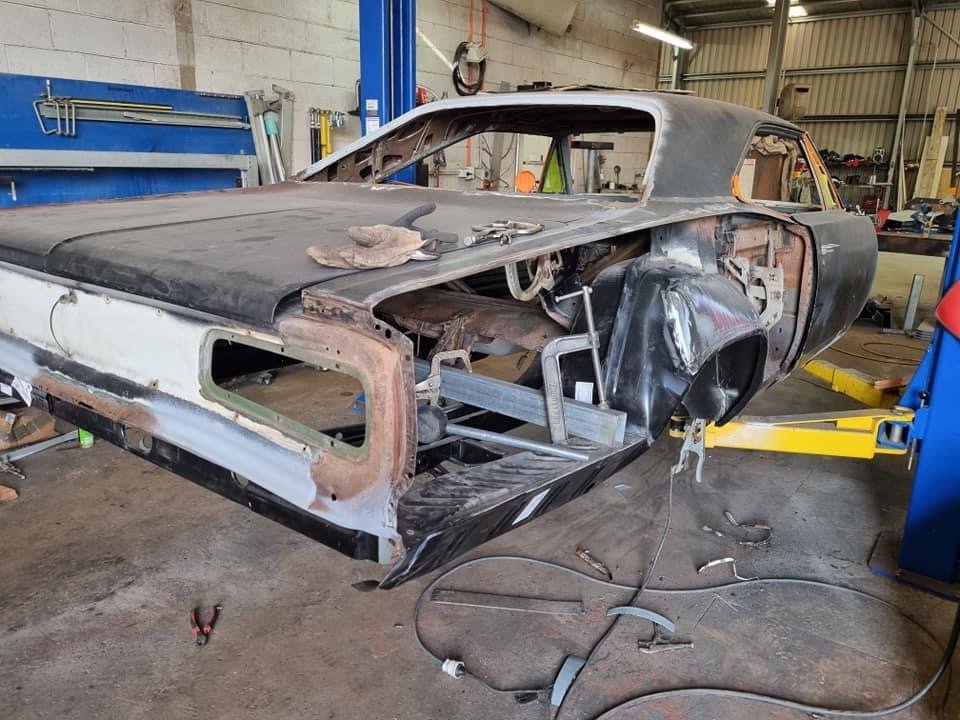
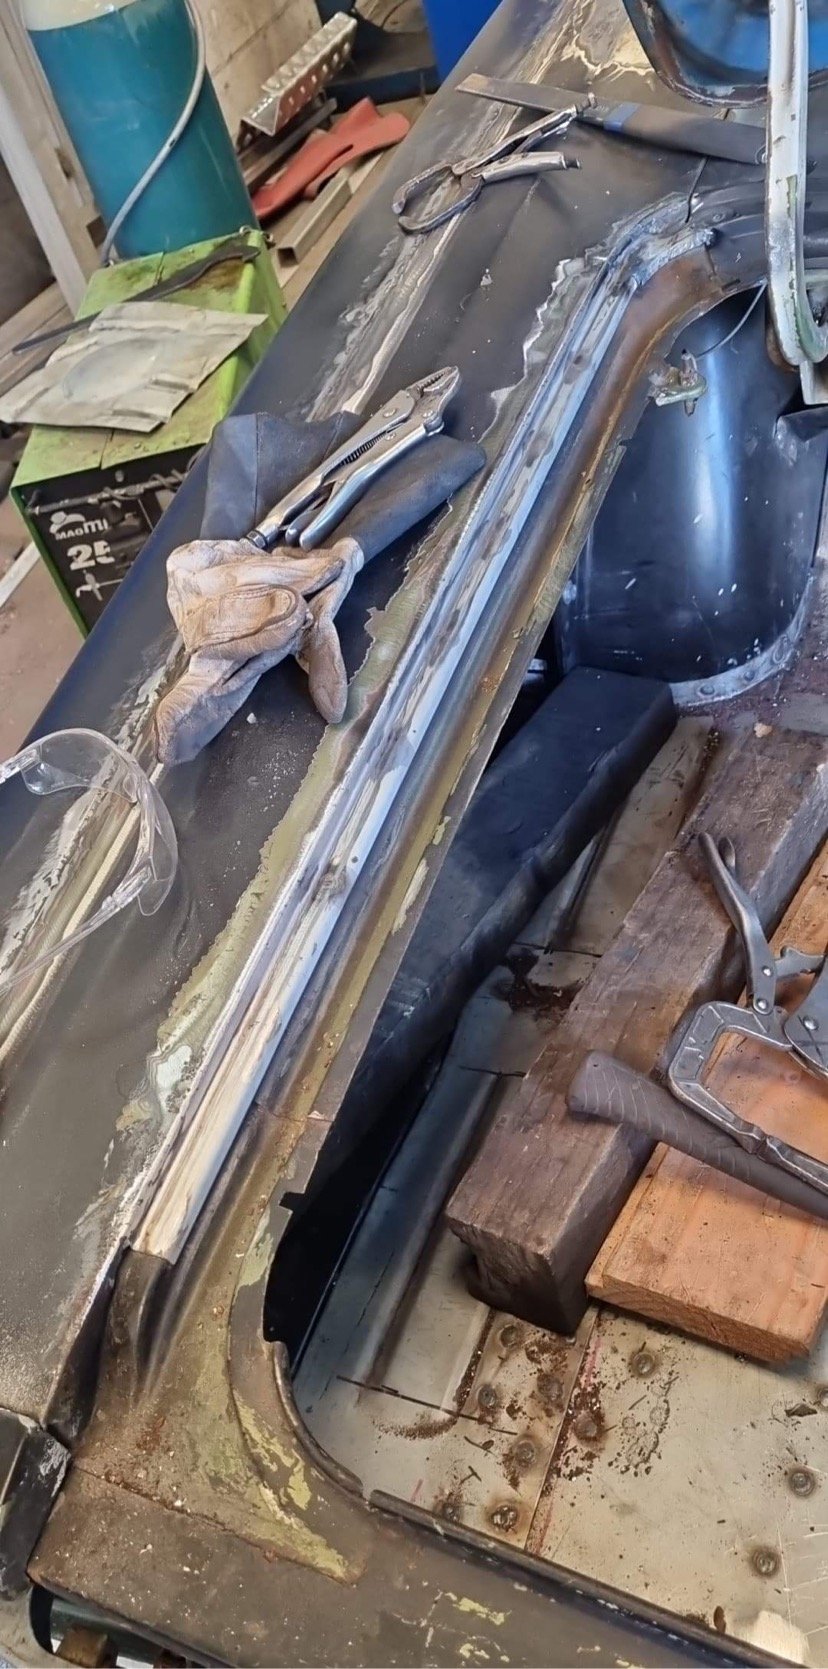
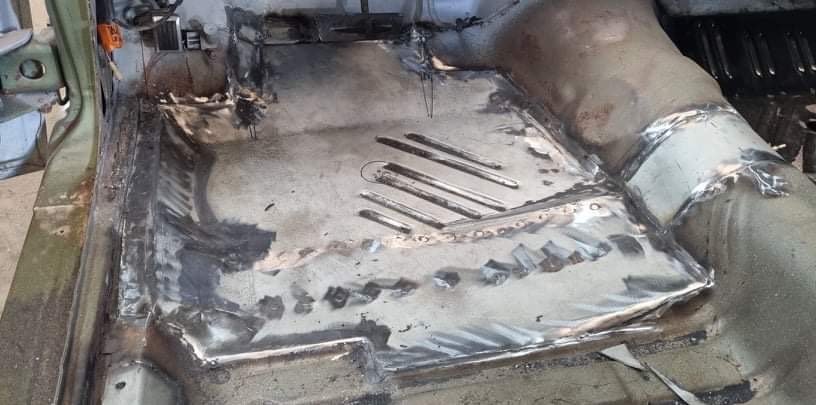
Just in from alexandra.. drivers floor pan, tunnel section and more firewall patches..
By my calculations, that’s all the main fucking holes filled, we have a god damn shell again!!
Still some hours of checking it over, finishing spot welds and the usual completion stuff then we wait for the repair certifier to give us an inspection appointment
-
48
-
 1
1
-
18 minutes ago, Chris.QCR said:
Great progress bro ! So good to see back down on the ground too.
Are you doing a bit of panel and paint too ?
I know, Shame the wheels suck! Gonna slap some paint and stripes on to keep the weather out and do it properly in another colour down the track
-
2
-
-
- Popular Post
- Popular Post
And that’s my last day on it, back to reality next week. brother still has a wee list of holes to fill but she’s bloody close!
Diff back in, wheels on and rollin!
rear valence almost dialledHard to scale but that’s a big pile of cast-off Chrysler
-
45
-
7
-
@RXFORDIt’s a p7 and came from farra engineering
-
2
-
-
Central custom engineering. The forming gear is my brothers hobby, only just got pullmax a week ago. Waterjet was a govt scheme a couple years back to help local business and bring in more jobs. Incredible machines! It’s a Maxiem 2040 and can cut on axis’ and all sorts of shit
-
2
-
-
- Popular Post
- Popular Post
Back on track!
When you have a waterjet on site, rooted shackles are no problem!
order number workshop")
the middle of the rear panel is holey so they waterjetted a profile for the pullmax and hooked into it!
made a full length piece but wasn’t worth the potential hassle as it’s a w shape so just chopped bits out.
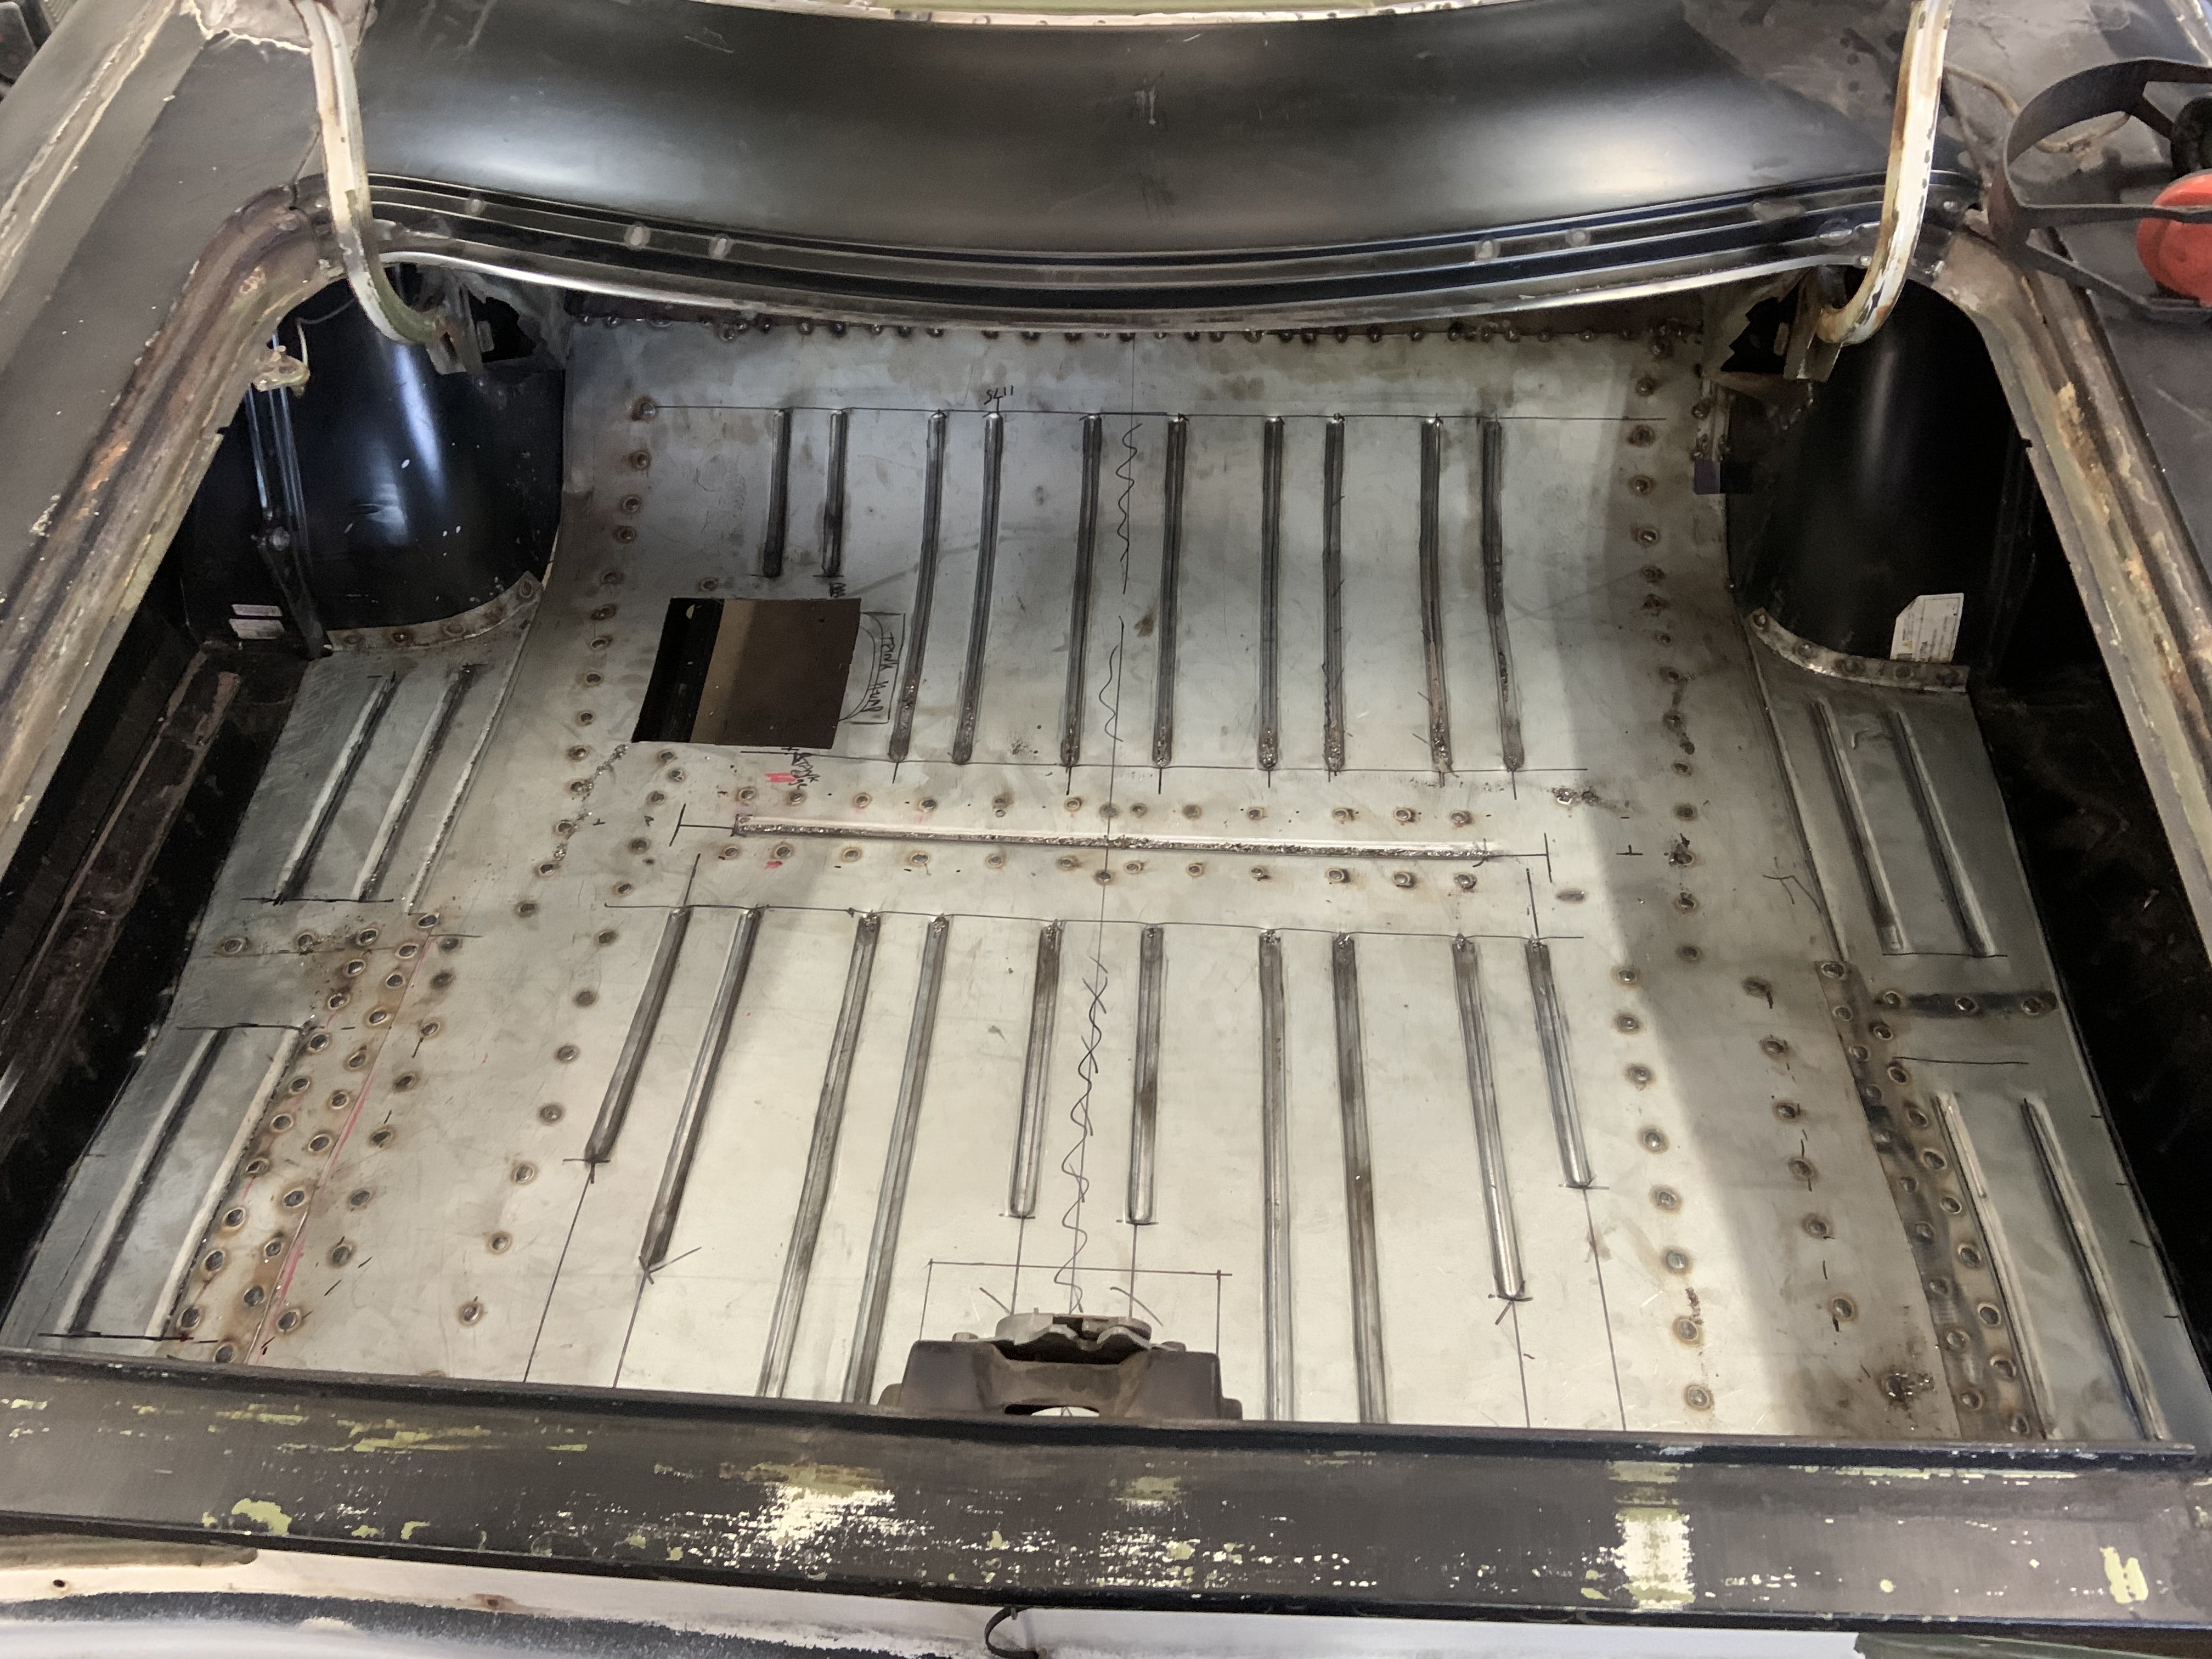
the underside piece was shit so replaced with disruptions and great difficulty
here’s a wee bit where ya feet go I made yesterday
raised this portion wrongly stamped in the Chang 1/4
The dumb floor was too small in all directions so trying to transcribe it.
-
33
-
2
-
- Popular Post
- Popular Post
Shit day. I was on my own and It didn’t flow well. Sandblaster played up, welder was fine when testing but weird when necessary, hurt my self a few times, just didn’t go great.
I did grind up all my shit welds, made some firewall/floor pieces, fixed a clip in the door that kept popping a rod off, stripped the springs and replaced eye bushes while I had access to a press (full beanbag job with someone else’s tools, ham rattle gun and rusty bolts)let’s try again tomorrow!
-
20
-
2
-
- Popular Post
- Popular Post
-
41


Mr.Mk1’s ‘70 Dodge Coronet 440
in Projects and Build Ups
Posted
Rubbish update: I plucked the exhaust out of the garden and gave it a quick flick of paint. The can was naffed so i pierced it and brushed it on.. It’s purely to keep them uniform. I’d love to do headers one day so wasn’t mad keen to detail these manifolds. The pipe work is practically new, like I’d be surprised if it had 100km. Can read the part numbers stamped into it. Mufflers I think are on their second life but I have some spares.