Hyperblade
-
Posts
336 -
Joined
-
Last visited
Everything posted by Hyperblade
-
Hyperblade's KP61 Racecar "KP61R" Discussion
Hyperblade replied to Hyperblade's topic in Project Discussion
Yes still old hoop size. Have to send paperwork off, but shouldn't have any issues. Working currently on getting sign off from original cage builder. Msnz have a form for the changes. -
Hyperblade's KP61R - Toyota Starlet with Honda K20a
Hyperblade replied to Hyperblade's topic in Projects and Build Ups
***Warning lots of images follow*** Final fab work was to add a harness bar in, new Motorsport regs mean I have to run a HANS and the old mounting was technically 5 degrees to low. I took the opportunity to also rear mount the seat which adds a lot of stregth in an accident. also took the opportunity to add some gusseting in to the A pillars. Here's a nice clear shot of the modifications to the gearbox to move the shifter forward: Next up was the headers/exhaust, carefully designed to meet the power requirements by John at JPWPerformance (Honda header guru). 4-2-1 packaged nice and low in the car. I then had everything cermaic coated to help reduce the heat, decided to do the muffler and flexi as well to have a consistent look and protection, really happy with how it came up. While the engine was still in I mocked up the wiring loom after putting myself through an HPA Wiring course to get up to speed on some gaps. Then the entire car had everything removed for the big strip and repaint of the interior, underside and engine bay, as I wanted to get away from the black which looks grubby very quickly. Going to be a rattle can job as it is a race car after all. Engine bay first: Stripped: Etch Primed: First light coat of grey: So while doing all that I found a rust spot, and started digging... That then highlighted a bodge someone had done, and the rust had spread abit... Least i found it now when it's easier to fix. Stripped the interior: Etch Priming (hard with a cage in the way): First light coats of grey: Still need to seam seal so avoiding those places for now. So current tasks are seam sealing, then get the car on a spit so i can clean up the underside and I can get the rust fixed. New driveshaft is coming together, flanges have been manchined. driveshaft is 900mm odd long and actually has less then 1mm change in length when moving from top of suspension to bottom, but we have allowed for 15mm movement.- 72 replies
-
- 19
-

-
Hyperblade's KP61 Racecar "KP61R" Discussion
Hyperblade replied to Hyperblade's topic in Project Discussion
Yep I'm planning to use the standard front sway bar location. I haven't noticed any flex before, they have some pretty beefy gussets, front end is pretty solid.
-
Hyperblade's KP61 Racecar "KP61R" Discussion
Hyperblade replied to Hyperblade's topic in Project Discussion
Definitely! Na on the starlet the chassis rails stop around the front seats, we have put a minor one in above the muffler, but nothing major. It has a cage which helps with strength. Have no intention of changing the fan at the moment as i've had no issues with it mounted the way it is (they are on foam), also will be ducting through bonnet so don't want to put a shroud on it as it will restrict air flow, it's hardly every used so doesn't need to be that efficient, and with EWP should have even less use. Been running fine so in the if it hasn't broken don't touch it camp! Yep new front sway bar still needs to go on, just being measured up now, along with driveshaft. -
Hyperblade's KP61R - Toyota Starlet with Honda K20a
Hyperblade replied to Hyperblade's topic in Projects and Build Ups
New Exhaust out through the sill to get it clear of the ground as I kept knocking it. Fuel/surge tank boxed in for a cover. Most of the bits back on. Wheel base has gone from 1300mm to 1400mm (standard AE86) so will be interesting to feel the difference. Fab work should be finished this week.- 72 replies
-
- 23
-
-
Hyperblade's KP61 Racecar "KP61R" Discussion
Hyperblade replied to Hyperblade's topic in Project Discussion
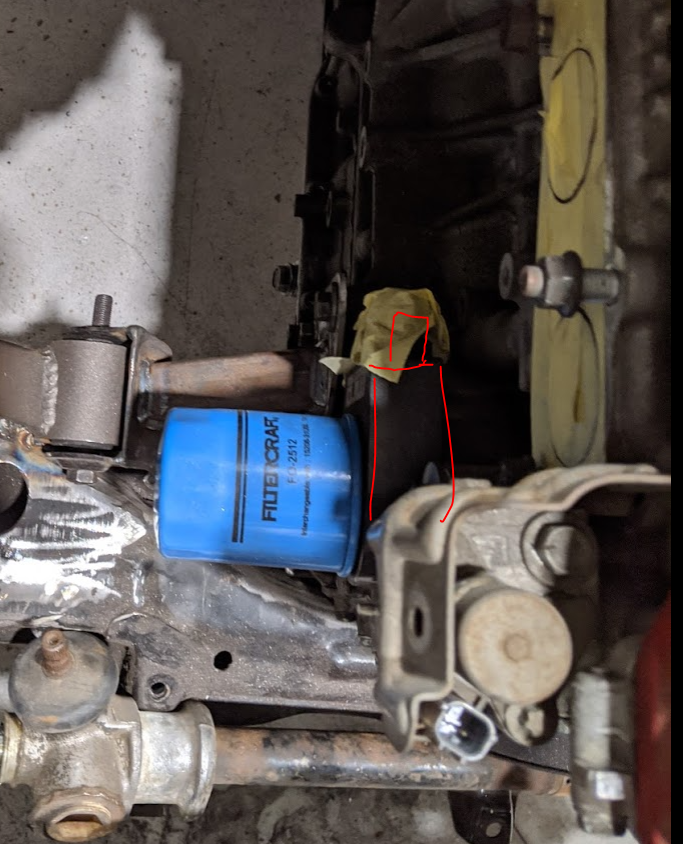
I was planning to do it in between seasons! COVID has slowed things up a bit, getting parts out of the US and UK is a lot harder and shipping has gone up significantly. I was lucky to get the main components very early on as I knew they would be key to the whole process. Paying someone to do the fabrication who has done plenty of different types of swaps and motorsport fab before makes a huge difference, he has so much experience so nothing is really unique and he often has a rough idea how he's going to do it, well before it's started, then it's just a simple matter of confirming locations and what i want etc and he's away. He's also put a BDA into a starlet (1.6 L that was faster then my BEAMS by 2s a lap...) so i'm getting V2 of all his ideas It has been the least stressful part of the whole process, which i'm very grateful for as normally i would be pretty anxious about it all, but i'm just excited. Some of the K motors (including mine) run an oil to water cooler sandwiched in between the oil filter and block. I'm removing it as with the water plate i don't have any coolant hoses to it. Unfortunately where it sits will fit a sandwich plate, but only rotated in an awkward way pointing towards the firewall, so you either space it out, or go for a remote filter option (currently looking at)
-
Hyperblade's KP61 Racecar "KP61R" Discussion
Hyperblade replied to Hyperblade's topic in Project Discussion
Guy got a friend in the US to send it over to him as he was putting a K24 in a starlet, so doing the same thing with the rack. No one wanted to do the fab work for him so he gave up on the project. -
Hyperblade's KP61R - Toyota Starlet with Honda K20a
Hyperblade replied to Hyperblade's topic in Projects and Build Ups
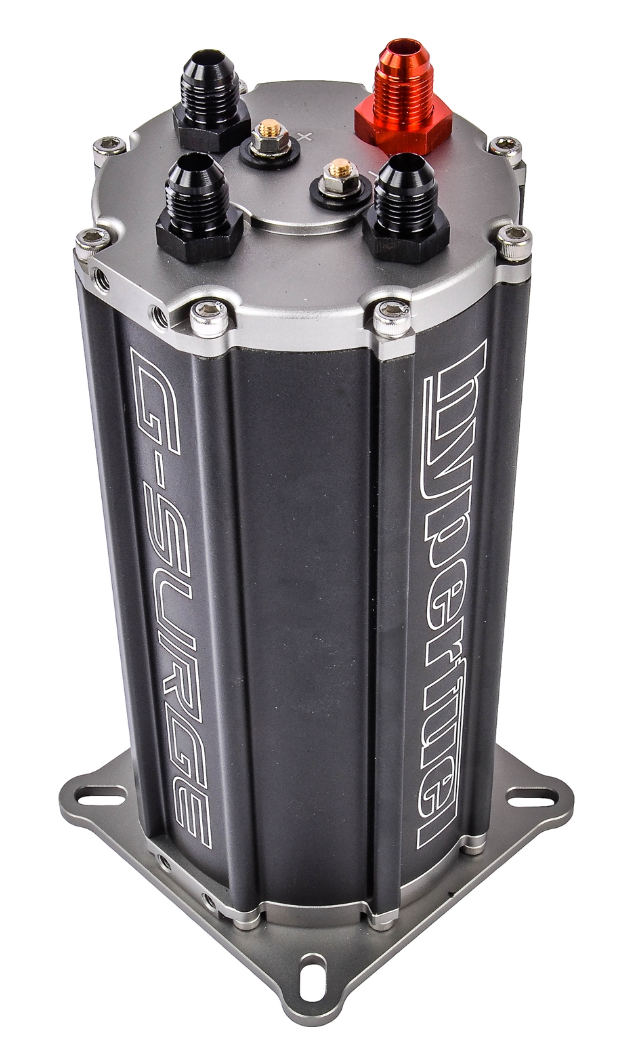
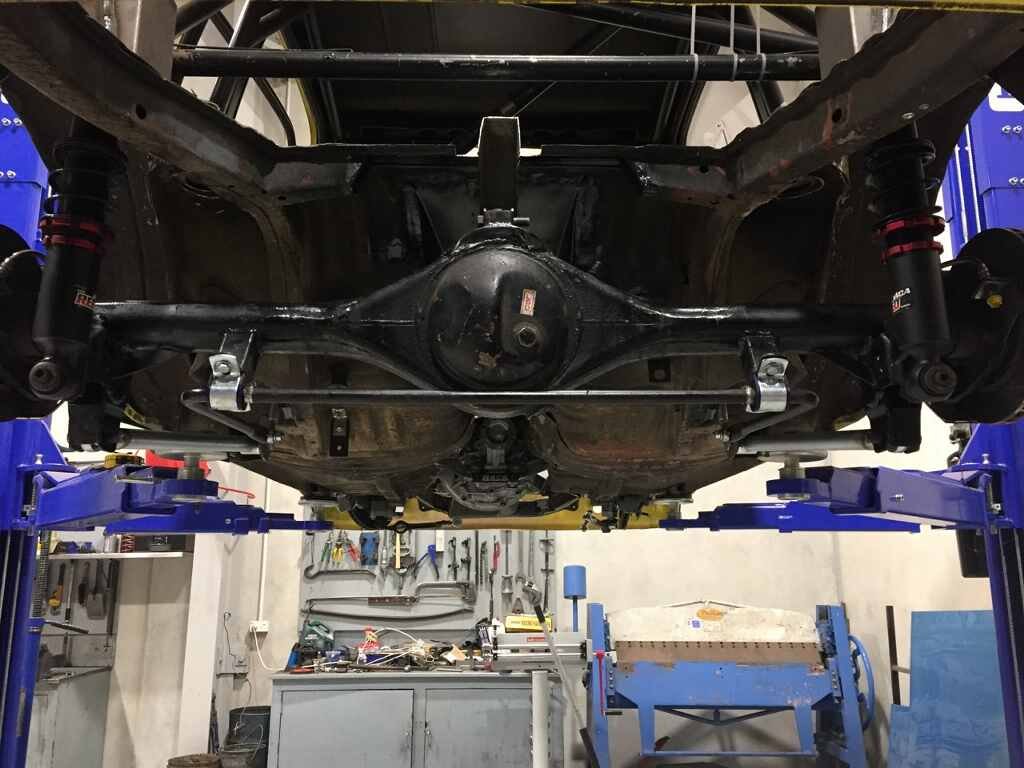
Passenger floor was a bit gnarly so that's been redone, Now have space to mount he muffler higher, will take the exhaust out through the sill as I was occasionally collecting it on kerbs. New Radiator and oil cooler mounts. Oil coolers are a pain to fit, the fittings always stick out so much and there never seems to be a good place for them. We have lowered it here so I can get a 3.5" intake pipe hover the top of it so I will run the pod filter somewhere in the front. Have to go in front of the radiator as there is not enough space for the fittings inside the chassis rails. A whole lot of sheet metal to fab up to duct it through the bonnet again. When turning the cross member around the steering rack needs to be changed to suit. Plan A was an Escort LHD rack as they are same length as Starlet (bump steer etc) but would have meant new arms. Somehow I found the only LHD Starlet rack in NZ and it happened to be in the south island. New mounts for it then everything bolted straight back up, that's a massive time/$$ saver. Need access to the rear coil pack as you can't remove it with the scuttle panel there. Cutting a panel is a tricky thing as it's easy to make it stand out like a sore thumb. So I came up with the idea to hinge the rear of this section, and use the existing slots, and the fixing will be under the bonnet. So once cleaned up should be pretty subtle. One of the worries when doing the Watts link was that their would be no space for my current fuel cell. Luckily however it fits in really nicely. I was previously running the main fuel pump in the fuel cell, but I had to keep the tank at least 1/3rd full to stop surge, and I can't be arsed with that anymore. So I needed a surge tank, however I hate having all the external pumps and pipe work that most people do, just seems nuts to me, more points of failure, noise etc. So I went with a FITech HyperFuel G-Surge Tank from Jegs. https://www.jegs.com/i/FITech-Fuel-Injection/546/40007/10002/-1 I will be running a return system so will be simple arrangement of just connecting the hoses via AN6 fittings. I have a lift pump which will go in the fuel cell so again keeping everything internal.
- 72 replies
-
- 10
-
-
Hyperblade's KP61R - Toyota Starlet with Honda K20a
Hyperblade replied to Hyperblade's topic in Projects and Build Ups
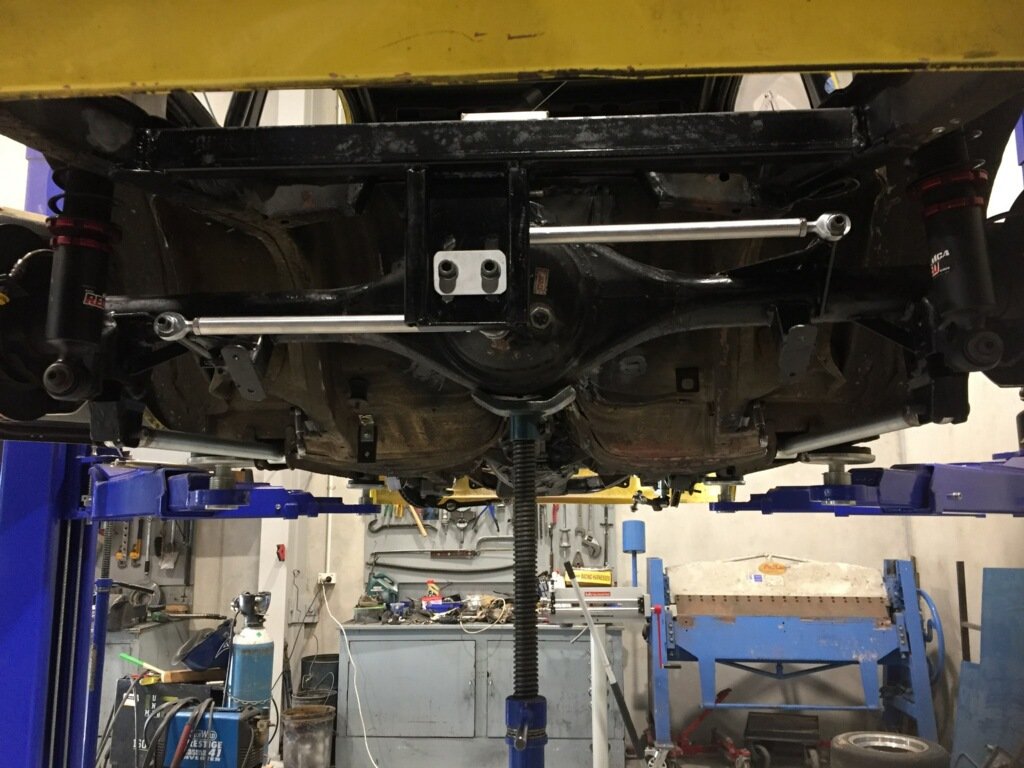
3 Link done. Required driveshaft length has turned out to be 898mm so any plans for a 2 piece are out the window as there's not enough space for it, it would be just all fittings. On the flip side does mean less weight slightly and no need to mount a center bearing.
- 72 replies
-
- 20
-
-
Remote coil packs are a thing!
-
Hyperblade's KP61 Racecar "KP61R" Discussion
Hyperblade replied to Hyperblade's topic in Project Discussion
Good point on the counter balance shafts, your obviously paying to much attention, however the Civic and Integra don't run them and it's the same crank, block, head, camshafts as those engines etc so we can safely assume that was for the old man accords just to remove 4 cylinder vibration I would probably be ok to run an Ali pulley as on the track you are generally always accelerating/decelerating so less risk of staying at one frequency, but you just never know. -
Hyperblade's KP61R - Toyota Starlet with Honda K20a
Hyperblade replied to Hyperblade's topic in Projects and Build Ups
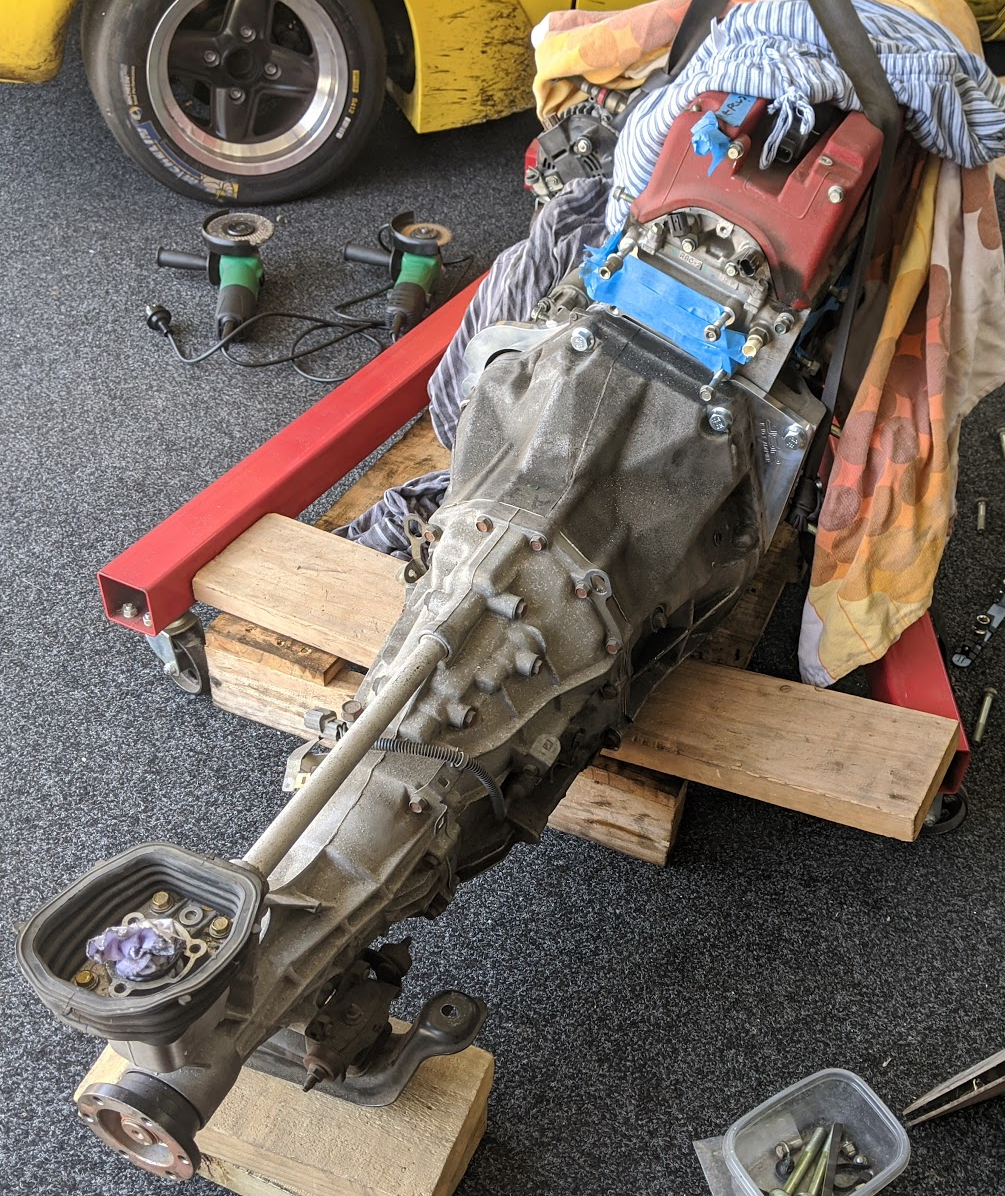
Gear lever in position. Gear lever Moved 190mm forward on gearbox, mount was cut off and the selector shaft shortened then mount welded back on. Means no need for loose linkage system to move the lever forward which should keep the nice gear change feel the box is known for. Can see it's quite a long way forward compared to original position. Nice lightweight panel to cover access hole. Engine sitting back in with front tubs done. Heaps of room around intake to have fun later on. Rear tubs in, the coil over mounts have been raised as well as I was running out of adjustment on the shocks. They have come up awesome, so tidy, Brent is doing an amazing job.
- 72 replies
-
- 22
-
-
Hyperblade's KP61 Racecar "KP61R" Discussion
Hyperblade replied to Hyperblade's topic in Project Discussion
I won't be running a knock sensor, so someone else will have to do that testing. Interesting, not sure about the argument that Honda didn't use it on X so we don't need to use it on Y. Why did Honda use it on Y then... They spent mega dollars developing the K20/24 trying to get weight out of them, even going so far as to make hollow cam shafts, yet they still added the heavy dampener. The argument that it's for the accessories has some merit, but you can clearly see it's just an opinion and they have done absolutely no testing on it, no complaints is a poor excuse for lack of actual real world testing, and it didn't break after x years is not testing. Machining a aluminium pulley is easy stuff, easy sell too with "get more hp, faster revving" it's quite attractive to a customer. That's the thing with dampeners you can get away with not using them if you avoiding the frequency so will be fine for years, but if your engine happens to run at that frequency then you get the damage. Not a risk I think is worth taking personally. Thanks for sharing though, always good to have debates on this stuff. -
Hyperblade's KP61R - Toyota Starlet with Honda K20a
Hyperblade replied to Hyperblade's topic in Projects and Build Ups
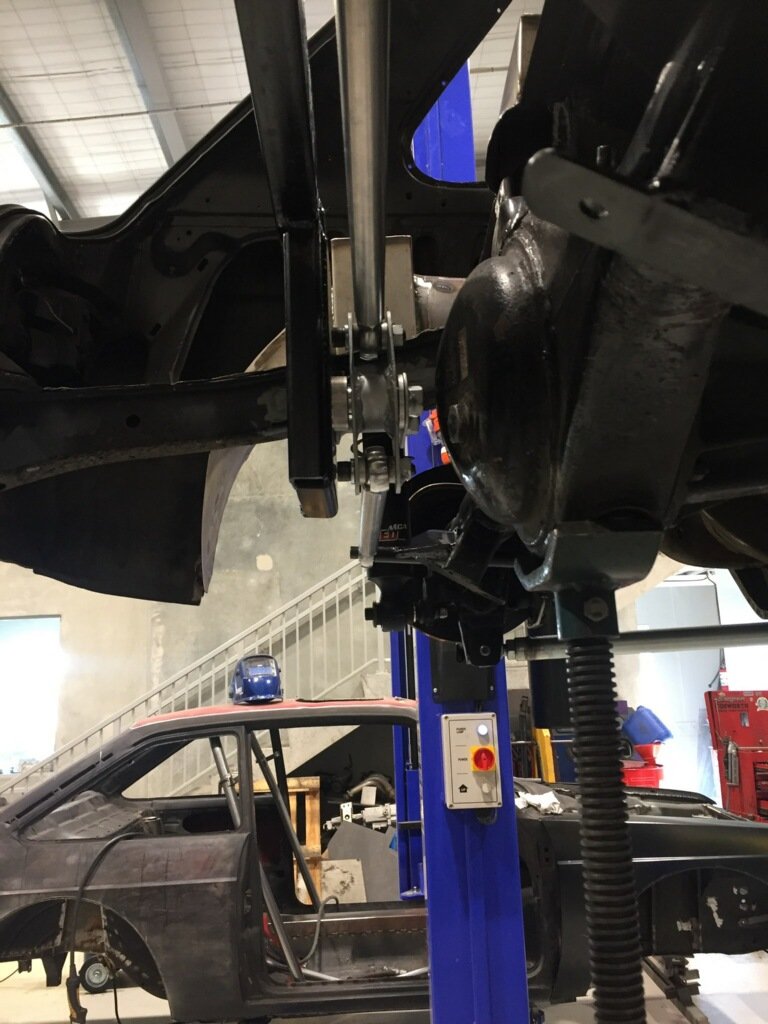
Brent is working away at a great pace. Here's a good shot of how far over the engine is to the left. Struts swapped left to right, bottom arms modified and tied back to the chassis, instead of the stock starlet swaybar which goes forward. Driveshaft tunnel tided up. We are going to have to move the gear lever 190mm forward to get it into the right position (more info on that later). Beginnings of rear changes, 3 link going in. The whole axle is being moved back 50mm and tubs going in the rear, so quite a bit more cutting to go...- 72 replies
-
- 16
-
-
Hyperblade's KP61 Racecar "KP61R" Discussion
Hyperblade replied to Hyperblade's topic in Project Discussion
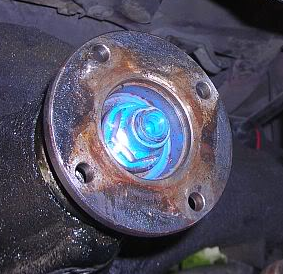
You don't want to go anywhere near alloy crank pulleys, you need the harmonic dampening in the crank pulley, putting one of those ali ones on means it's only a matter of time until you destroy your crank. Good video on it: You can get legit aftermarket harmonic dampeners like the ati super damper, but they aren't cheap. http://www.atiracing.com/links/pr/honda-k20-damper/index.htm -
Hyperblade's KP61R - Toyota Starlet with Honda K20a
Hyperblade replied to Hyperblade's topic in Projects and Build Ups
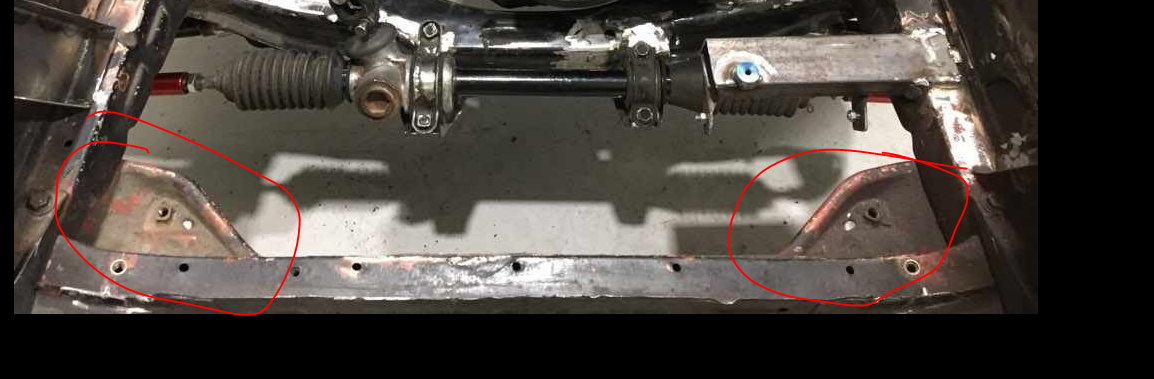
Right, now we are up to speed on where I am at. Now for the fun stuff. First strip the engine bay. Second turn the cross member around and bolt back on, so we get more room behind it, this also moves the front suspension forward so less angle on the bottom arms (as i was running quite a bit of castor), so benefits all round. We will swap the suspension over from left to right to suit, and then the questions is how to do the steering rack. At this stage I have a lead on what must be the only LHD starlet rack in NZ, so that is plan A, plan B is to use a LHD escort rack which is the same length so bump steer etc is kept consistent with current rack. Both require making new mounds for them. The engine is sitting behind the cross member, so no need to make any modifications to the sump which makes life easier! Obviously a heck of a lot of metal cut out to fit... Engine is deliberately offset to the left hand side of the car to help with clearance on exhaust port 4 and for weight distribution. #1 spark plug is inline with center of strut towers. #4 spark plug is under cowling, so we are going to make a panel removable to get at it. Clearance to the pedals/pedal box was the biggest worry, but we have ended up being no closer then the BEAMS motor. Exhaust ports 1-3 are all in free air, only the 4th is tight, we moved the engine forward from this position 20mm and up righted it a little bit to get more space. Heaps of clearance on intake side. And strut bar even fits across, Fab work going in, corner by pedal box has been rounded off to give event more space, bit area next to intake to give lots of options. Bell housing on gearbox is fairly large and also want to be able to remove it from engine in place. Goes back a long way. Bit rough under the car, passenger side will be cut out and redone to give more room for muffler. Engine mounted to cross member, can see how far back it's sitting. Boxing it all up, the big hole is for access to back of engine from inside the cabin, will have ali sheet covering it, nothing worse then trying to fix a water leak in an awkward location. Pedal box also gets an access panel to the top of it as it's impossible to access now. Steel used where the bolts go to the pedal box uses thicker gauge and rolled top edge for extra strength in handling the pedal forces when braking. Been told I could fit a TV in there, I was thinking some glass so i could admire the engine. Tubbing the front to support 10" wide rims so later on I can use the new TRS slick tyres. That's just the front... The rear is going to get a few changes too- 72 replies
-
- 24
-
-
Hyperblade's KP61R - Toyota Starlet with Honda K20a
Hyperblade replied to Hyperblade's topic in Projects and Build Ups
Next challenge was the intake manifold. With the engine rotated around into RWD config the throttle body points directly at the firewall. This is where you have so many options off the shelf as it's all been done before. You can buy an adapter plate to fit an F20c (S2000) intake manifold to the K motors, but they look terrible so I didn't want to go down that track. You could go Quad Throttle Bodies (with multiple options from different manufacturers, swoon...) Straight: Curved: Kinsler mega dollar ones... But this conversion is already going to cost a fair bit, so that can be an option for a later day... So I ended up with the Skunk 2 Ultra Street Intake Manifold https://skunk2.com/induction/intake-manifolds/ultra-street-intake-manifolds/307-05-0600.html It has a rotatable plenum cover, which can be removed if you want to go crazy and port the runners and you can also buy spacers for it to increase the chamber size. Supposedly it also gives 20hp over stock manifolds. It also matches up perfectly to a 74mm throttle body (standard for the engine is 65mm) so I didn't need to port anything and it saved a lot of time. The downside is the quality of the casting is not super great with some imperfections and I had to port match the thermal gasket to the head, which was disappointing as it should just be cut correctly from factory. The other thing to note is the Idle Air Control Valve (IACV)on a Euro R is NOT the same as other K20'a Type R engines, i.e it won't bolt up, so I got an Integra R which fits.. -
Hyperblade's KP61 Racecar "KP61R" Discussion
Hyperblade replied to Hyperblade's topic in Project Discussion
The B16 and B18 have stronger internals and can take those revs, the K20's have weak rods (well designed right to the required limit), so if you miss a gear your stuffed, one guy here did it and the rod let go and block + head were destroyed on a stock K20 he is now going forged internals just to stop it being an engine destroying event. Yep I run a shift light, frequency of flashes changes as it gets closer to rev limit. I also set it differently for each gear i.e 1,2 comes in 500rpm before limit, while 5,6 are 200 rpm, the link makes it easy. Trying to stay away from sequential, it's just the start of your problems if you go that way. The pulley came with the water block kit, I think it was slightly bigger but not by much, thanks for the heads up, will see how it goes, if i keep blowing them then will have to look at options, maybe putting the K20 one back on. -
Hyperblade's KP61R - Toyota Starlet with Honda K20a
Hyperblade replied to Hyperblade's topic in Projects and Build Ups
Up above I mentioned the stock water pump housing was 4.8kgs It's also a huge chunk of metal, and has a idler pulley down low in an awkward place. You can find AC/PS eliminator kits like this one. http://k-tuned.3dcartstores.com/Universal-AC-PS-Eliminator-Kit_p_248.html The issue is it puts the alternator even lower and I'm going to have a cross member there. So looking at the options I decided to go with a water plate kit This allows me to get rid of a lot of weight, run a lighter alternator, and keep it all away from the cross member. I chose the older k-tuned kit which doesn't support the K series alternator, only because it was slightly cheaper. I chose to only get the plate and the alternator bracket and pully. (not the water pump) as when I contacted K-Tuned they commented they had only used it in drag applications, and hadn't tested it in a road race application. http://k-tuned.3dcartstores.com/Water-Plate-w-Alternator-Brackets_p_600.html So why use an older alternator? Alternator Weights: K20a - 5.68kg B18 - 4.64kg D15 - 4.9kg Cause they are slightly lighter! Now ideally I would have gone with a B18 alternator but the shaft on it was too small for the pulley. So D15 it was, however it wasn't a straight fit, I had to clearance the top of the alternator slightly to fit. But the other advantage was the plug is the same as the K20 alternator. Sticks out a fair way, would have been nice to have it closer, but can't have everything. Chose a Davies Craig EWP 115 (alloy 8140) https://daviescraig.com.au/product/ewp115-alloy-12v-115lpm30gpm-remote-electric-water-pump-8140/ewp115-alloy-electric-water-pump-12v-8140 Australian made and with the Aussie dollar pretty good to NZ and shipping prices makes sense to go localish. Only annoying thing is they don't have mounting points, they can just be held up by the hosing, however will have to see how that looks when I go to mount it. Otherwise you can buy this bracket: https://daviescraig.com.au/product/ewp-mounting-bracket-kit-ewp115-130-150-8700/ewp-mounting-bracket-kit-ewp115-130-150-8700 The pump can be PWM controlled, so i will do this via the LinkECU through a PWM relay, so it will be pulsed on an off to control the flow depending on the temperature. So with this change I've cleared up some space, dropped 5kg and freed up some HP from the engine. -
Hyperblade's KP61R - Toyota Starlet with Honda K20a
Hyperblade replied to Hyperblade's topic in Projects and Build Ups
It begins...- 72 replies
-
- 14
-
-
Holden/Ford 2 Piece CV Driveshafts which models?
Hyperblade replied to Hyperblade's topic in Tech Talk
Thanks! Thanks! Interesting they have CV and u joints, I thought U joints had to be at the same angles as they aren't constant velocity. I don't quite get how that works, unless they have the rear diff on an angle upwards? -
I have to get a custom driveshaft made for the new engine/gearbox combo that's going in my starlet. I need to go from a S2000 Gearbox to a AE86 Diff. But the max RPM on the shaft will be fairly high at 9500 rpm. So I've been advised by a few people to go to 2 piece, however unfortunately the S2000 gearbox has a flange at the rear which makes things a bit harder than normal. Ideally I want the joints able to be rebuilt if required, and as light as possible. Ideally i want to run CV's (due to the speed) and 2 piece, and I've been told both Holden and Ford ran a form of these driveshafts in some of their cars. But what models? I've seen mention of Crewcab. Does anyone know other common models worth looking into? The challenge: S2000 Gearbox Flange AE86 Rear Pinion Flange
-
Hyperblade's KP61 Racecar "KP61R" Discussion
Hyperblade replied to Hyperblade's topic in Project Discussion
That comparison to the BEAMS included the EWP in it. So K20 weight is as I'm going to put it in. I'm also in two minds, it's not as much as I thought, but than again we are talking about 2 very similar motors and one is 20kg lighter than the other, yes its aluminium but that doesn't account for all the weight loss, if you tried to take 20kg out of the beams you would struggle. They are also only a 4 cylinder not a 8 so a lot less to remove. Also need to be careful as the BEAMS weight included a light weight alternator setup, and I can't remember If I included the starter or not, so if not than it's another 5kg on top. So overall I'm happy with that gain, will try and make a lighter exhaust which will help the difference. Integra is 8400 red line, and 8600 rev limit. accord euro R is 8400 rev limit Since the Euro R is same cams/valves etc I will be safe to run up to 8600 at least. Stock oil pump can cause issues, but that won't be a problem for me, issues is normally rods from what I've seen, A lot of people mis shift (especially with 6 speed box) and overrev and than destroy the engine, where as the B16/B18 are a bit more forgiving. Won't be touching the internals so will be keeping the rev limit stock. I'm hoping it matches my expectations! -
Hyperblade's KP61R - Toyota Starlet with Honda K20a
Hyperblade replied to Hyperblade's topic in Projects and Build Ups
So now for the Honda K20a Weights. 105 kg - K20a Euro R, no oil, no balance shafts, ktuned alternator bracket and water block off, D15 alternator, stock oil cooler removed, MRP oil cooler sandwich plate, no intake, no exhaust, no flywheel, no clutch and lots of bolts left in the block, no engine mounts. 34.8 kg - S2000 AP1 Gearbox, no oil, no slave cylinder, no gear stick. 11.69 kg - Stock 4 - 1 Headers with Heat shield. 5.72 kg - Skunk 2 Ultra Street Intake mainifold with 74mm Skunk2 Throttle body, stock injectors and stock fuel rail. Misc Info: 4.85 kg - Stock water pump housing with thermostat 5 kg - Stock Balance shafts and oil pump. 1.1 kg -Electric Davies Craig Water Pump 0.47 kg - Hybrid Racing Pod Filter 1.39 kg - K2F Adapter Plate 5.87 kg - K2F Flywheel 1.27 kg - Exedy S2000 Clutch Plate 4.64 kg - Exedy S2000 Pressure Plate. Alternator Weights: K20a - 5.68kg B18 - 4.64kg D15 - 4.9kg So if we compare like for like with the BEAMS 119.27 kg = Engine with clutch, no engine mounts. 34.8 kg = Gearbox 6.19 kg = Intake 11.69 = Stock Headers Honda K20a with S2000 Gearbox Weights: 137.15 kg Engine + Intake + headers 154.07 kg Engine + gearbox 160.26 kg Engine + Intake + gearbox 171.95 kg Engine + Intake + headers + gearbox Toyota 3SGE BEAMS with J160 Gearbox Weights: 161.39 kg Engine + Intake + headers 182.91 kg Engine + gearbox 189.91 kg Engine + Intake + gearbox 199.39 kg Engine + Intake + headers + gearbox Difference: -24.24 kg Engine + Intake + headers -28.84 kg Engine + gearbox -29.65 kg Engine + Intake + gearbox -27.44 kg Engine + Intake + headers + gearbox- 72 replies
-
- 13
-
-

-
Hyperblade's KP61R - Toyota Starlet with Honda K20a
Hyperblade replied to Hyperblade's topic in Projects and Build Ups
So old engine is now out of the car, so time to work out what it weighed. 144.91 kg - 3SGE Beams Gen 5 with lightweight flywheel (6kg), Exedy HD clutch, sq engineer Alternator bracket, echo/yaris alternator, sq engineering slim line water housing, water lines at back of head chopped, top cover chopped, altezza engine mounts, no oil, no intake, no exhaust. 38 kg - J160 with cross member, gear lever + knob, slave cylinder, no oil 9.48 kg - Stainless 4-2-1 Headers went back just past firewall 7 kg - Blacktop throttles, SQ Engineering Adapter plate, Toda 75mm trumpets, Standard Altezza rubber spacer, and standard Altezza engine to rubber spacer plate, steel bracket for quad vacuum manifold, vacuum manifold and idle up valve and piper cross filter and fibreglass backing plate. So in Total: 161.39 kg Engine + Intake + headers 182.91 kg Engine + gearbox 189.91 kg Engine + Intake + gearbox 199.39 kg Engine + Intake + headers + gearbox I honestly wasn't expecting it to be that high.

.jpg.385849fe7614f6febde6b51805bedebe.jpg)