


TheAudioDude
-
Posts
154 -
Joined
-
Last visited
Everything posted by TheAudioDude
-
Help please. I have a rather rough Pioneer KPX-999 cassette deck i just want to know if the unit works and I am doing something wrong or its has problems. First Question, Do these units have security codes? I have tried Connecting one of the 8 pin din plugs to the gm-4200 amp and the orange (power?) wire to the B+ and the only thing that happens when you turn the amp on is the buttons light up and the door opening works, the display is not lighting up and nothing happens with the cassette mechanism. Ideas? Three cables and a single orange wire. The Guts of it
-
My latest toys to play with are these two Pioneer Carrozzeria amps, a GM-3000 and GM-4200X. Both totally dead when received. Dismantled both units and found all the problems lead to cracked solder joints, common problem on all car equipment normally due to not enough solder used on the boards and being subject to excessive vibration. The bottom pic shows four cracked joints not making contact, now all going and have no idea what to do with them because the bigger one draws four amps at idle and sixty at full power on 15 volts, that drain a good falcon battery in 2 hours. Excessive!!! They sound real nice tho.
-
Found this in my box of papers.
-
This might be of use to some of you, simple circuit to remove unwanted noise from old head-units. put it between the main power in and the power in on the head-unit. the coil is about 6 turns and should be on a ferrite rod with about a mm or two between windings. this should remove the RF interference. the big capacitor could be smaller/larger and the 2mf use a film capacitor.
-
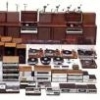
Also been playing with some car audio Centrate KPX-999 Pioneer GM-4 Blaupunkt BEA-100 Nakamichi TD-20 Alpine 7190det Alpine 3615 surround controller
-
Couple of things done I have done, first was to replace the fabric on a pair of my speakers because the last owners cat had been at them. It made them look a thousand times better. Before After I made a start on transferring some records on to tape. what a long process that is.Constantly adjusting bias so Dolby noise reduction fucking works, and cleaning the glass heads I can see why the format doesn't exist any more but hell when it works it sounds better than mp3!!! nothing like the naturalness of tape. The final thing is i'm starting work again on build a pair of speaker cabinets that can fit twin 15"s or a single 21", Quad 8"s, huge horn and super tweeters, My aim is a flat response from 20Hz to 20kHz, 600Watts ish of real power, and a fork lift to move them. 34mm thick walls, 40x40 frame and lots of bracing. overall dimensions 600x600x1200mm SOLID!!!! once they're built I'll have to build an amp to match, Tube????
-
The earth must not be connected because any charge build up or short to the case will go straight to ground and blow the circuit breaker/fuse. Are you using an RCD?
-
Leadfoot Cruise Part II - Saturday, 1st November, Hahei
TheAudioDude replied to BDA780's topic in Upper North Island Region
Fantastic day. Campervan tries to overtake some of us Thanks so much BDA780 -
So, for finishing the Technics, the re veneering and re painting the grill makes it look good.Vinyl veneer is so easy and looks good enough. For the lights in the amp, they use two automotive 5w festoon bulbs which lights the display OK but is nothing compared with old Sansui's. So i found a couple of LEDs to put above the meters and tuning indicator. Now as it uses 12V ac you get pulsations from the led as they only illuminate every 2nd hundredth of a second(this causes some of the problems people have reading under fluorescent lights). So to fix this is very simple. all you need is a diode bridge and a large capacitor. this turns ac into dc thus removing the problem. On the grill of the Technics I decided to give it some "bling" by cutting out a stencil and spray panting Technics onto it. This worked a lot better than I thought it would, oh and for safety reasons I put a new power cable on it as the plastic goes hard and brittle on the old ones. Also gave the amp a good test and then measure 40.1V on the rails and 32V easy at speakers so (32X0.707)²/8=64Wrms in oldschool measurement AC in, Smoothed DC out
-
love the idea, here's a nice stainless steel job
-
Thanks man, this is another pointless project i'm doing. Just for you Pioneer fans I’m doing this. “Orion Fels” I believe your ts-x11 are mint compared with these heaps of shit. But this is what can be done if you have a lot of time. They are out of a crashed vehicle, so the magnets have moved and bent the frame of the woofer. There is also glass and dirt behind all grills. I plugged them in to my Technics and no sound at all from one and only a murmur from the tweeter in the other. I pull them apart and think why should I bother I've all ready got three sets of perfectly good car speakers, Tenvox BiYo 9007, Pioneer GS-5300 and Roadstar RS/934X. It took lots of 556 to get those screws out. The only ones to snap were on the underside Right now time to see why the drivers are all open circuit. Some acetone and the woofers apart answer its cooked I pull the other apart and its OK but has rusted between the lead out on the coil and the brades going in, so a quick solder and 3.9ohms,dc which is about right. I must say they are very well designed for a commercial production speaker. Glue them back together, replace the foam surround and a quick paint they’re working like new. I go and replace the capacitors on the crossover as well. The mids are fun as they are really badly rusted in the same place The cabinets get the bucket of soapy water Now to strip off the stuffed paint, you could sand it but that takes hours. I used a paint stripping wheel on a drill them sanded it with 80 grit to get the brushed finish. Compare one against the other I have a quick go at the front and then decide to see what they sound like Impressed I am. Still a lot of work to be done.......
-
The story of a very sad Technics SA-T470 Receiver. Saved from the scrap. I was told by fans of OldSchool to put it up there as something different, as I believe they are Retro/OldSchool just not of the automotive kind. Thats my mint one but This is how it looked when I got it. You cannot really tell that is been dropped hard on its face apart from the missing selector tuning shafts on the very right of it, and the face has been pushed in 14mm at selector shaft. The purpose of getting it was to keep the other three going. But as they are one of the most indestructible amps I’ve ever used, so I see no need in having a parts amp. Solidly built in 1981ish by Fisher & Paykel, Consolidated and some bits from Japan. There a total oddball, the tuner in them is from a Technics ST-8080 with the board rearranged and a few modifications and are notorious for being out of adjustment at this age. So overall they’re sort of based on a Technics SA-5550 which would be the Japanese equivalent. So the first thing to do is see if there is any life in it, plug it in oh wait there is no fuses in and that is just the start. Fuses and stuff in, it trips the RCD dodgy power switch going to ground and some life, I managed to get both channels after a lot of soldering up cracked joints and tracks...... then smoke, a suppressor blows Can you tell which one it is? The shear amount of dirt, grinding dust, overspray, glass and more dust causes problems so magic it away(this took many hours)and its clean. Thanks to Michael I got a new piece of glass cut for it and it showed me how out of shape everything was. So a total dismantle and a straightening of the frame was in order. this proved to be quite hard, literally. They are made of a lot of metal and are solid!!!!!!! It makes me wonder what they did to it to get it this bent. I have pioneer TS-X11 out of a crash vehicle and they’re less damaged but they are a good substitute for a brick. many pieces of wood later and a sore arm from belting the shit out of it, its kind of square.For the selector and tuning shafts I ended up turning up a new ones on a lathe out of brass and circliping them in there. I'm slowly going through and replacing all the eletrolytics (capacitors). so now it works like new and looks good apart from the odd scratch. the top got sanded and new veneer glued and pressed on it. The grill got attacked by a wire brush and a coat of gloss black, looks great
- 55 replies
-
- 16
-

