Flash
-
Posts
1,719 -
Joined
-
Last visited
-
Days Won
2
Content Type
Forums
Downloads
Events
Gallery
Everything posted by Flash
-
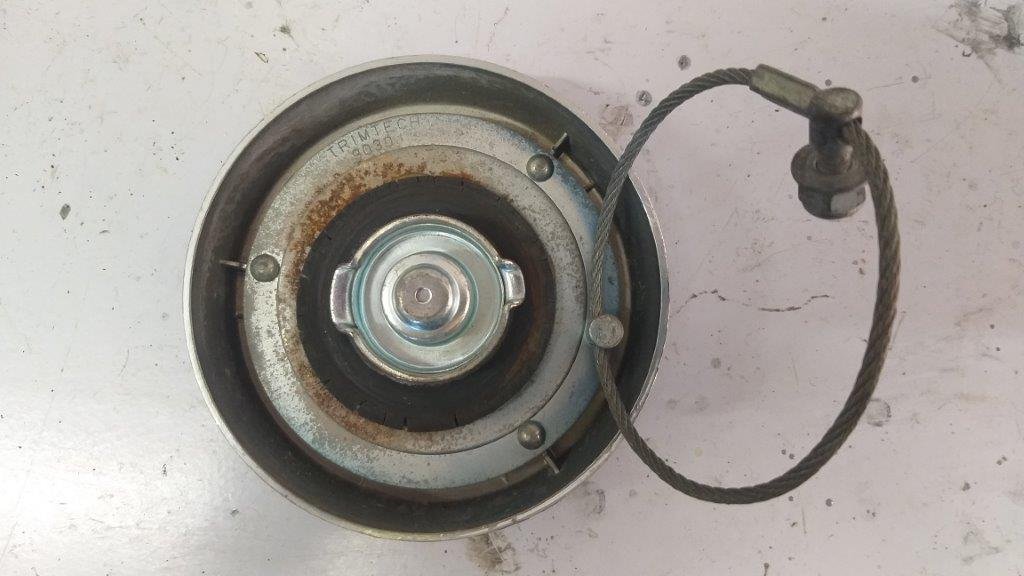
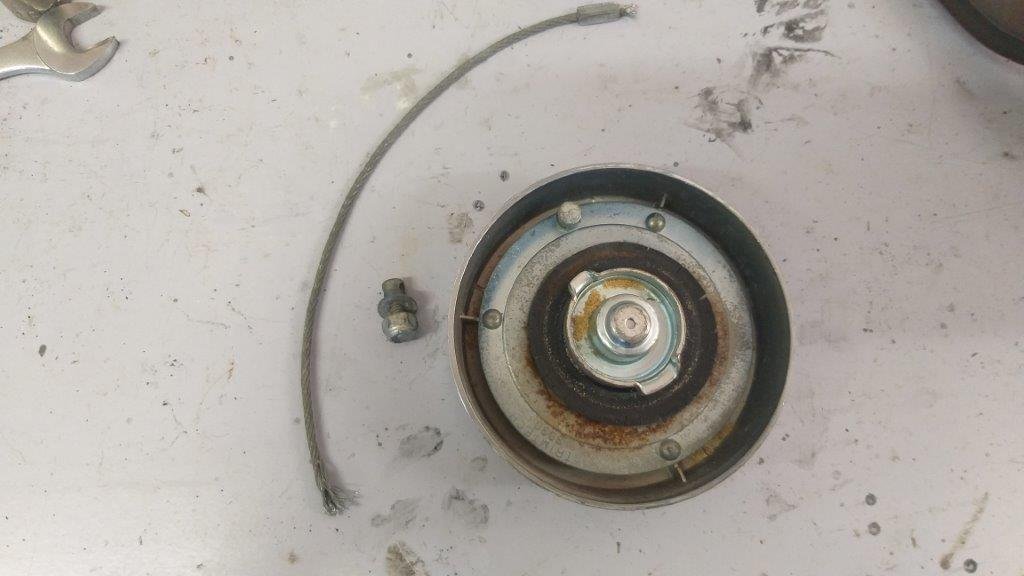
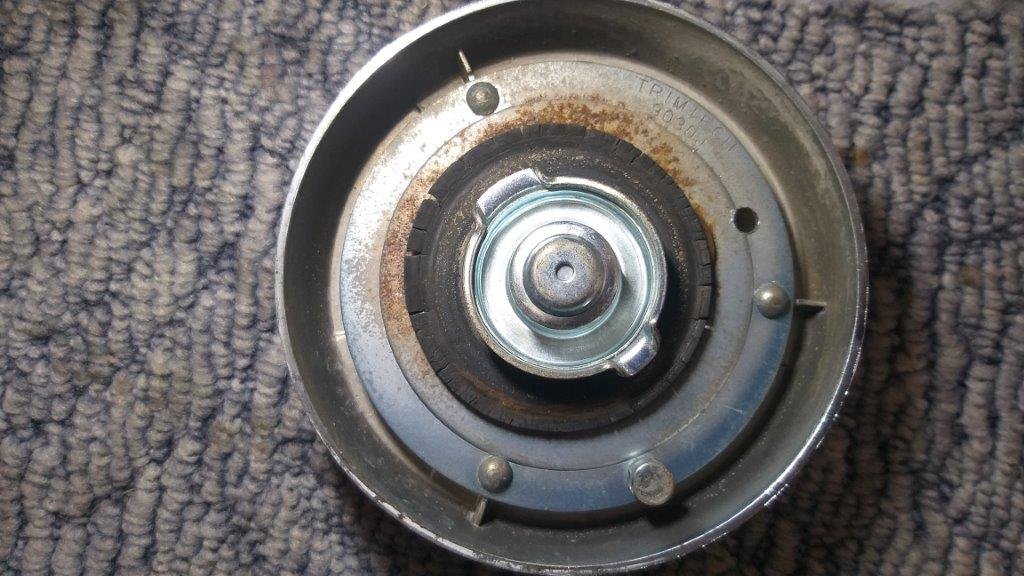
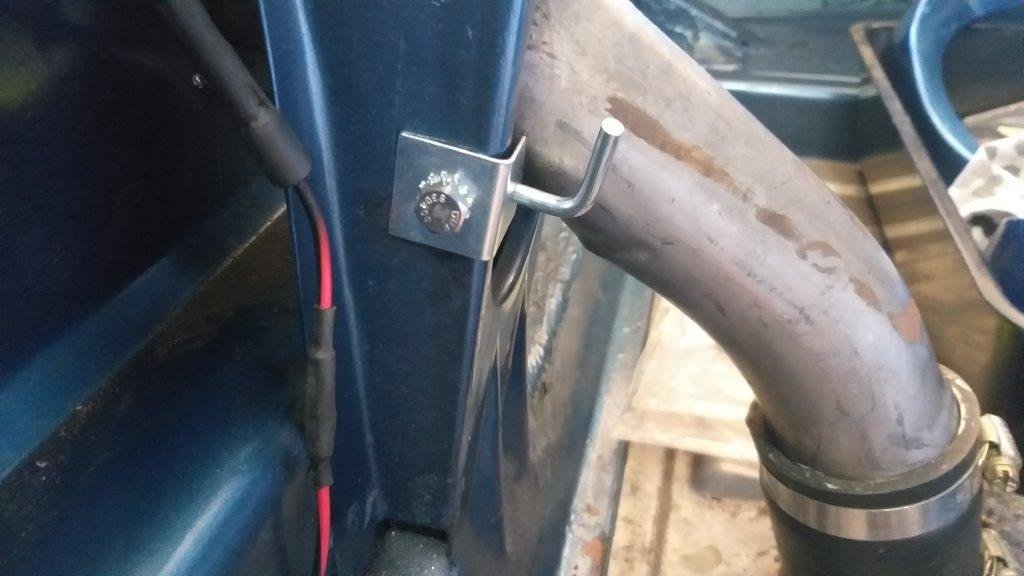
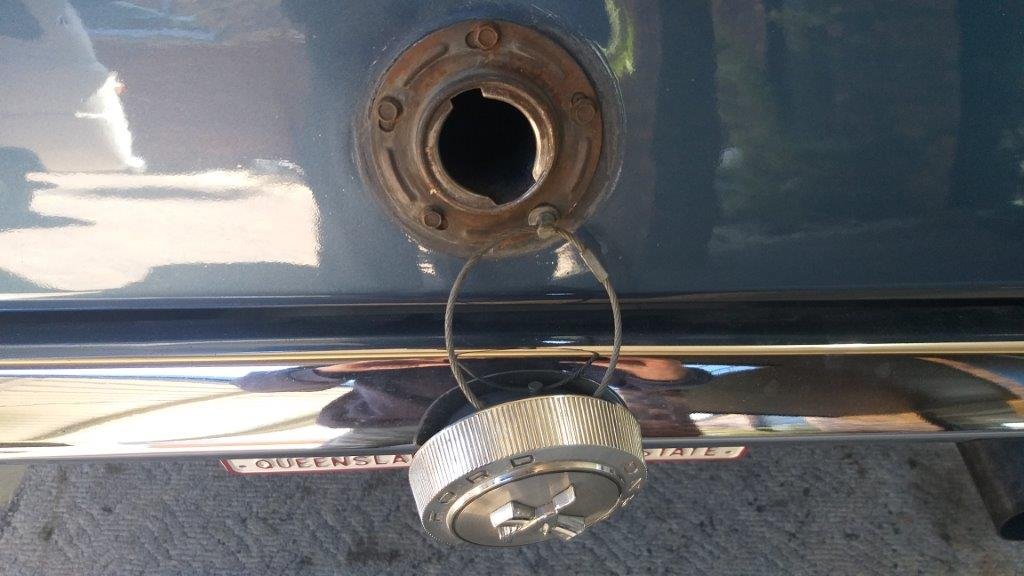
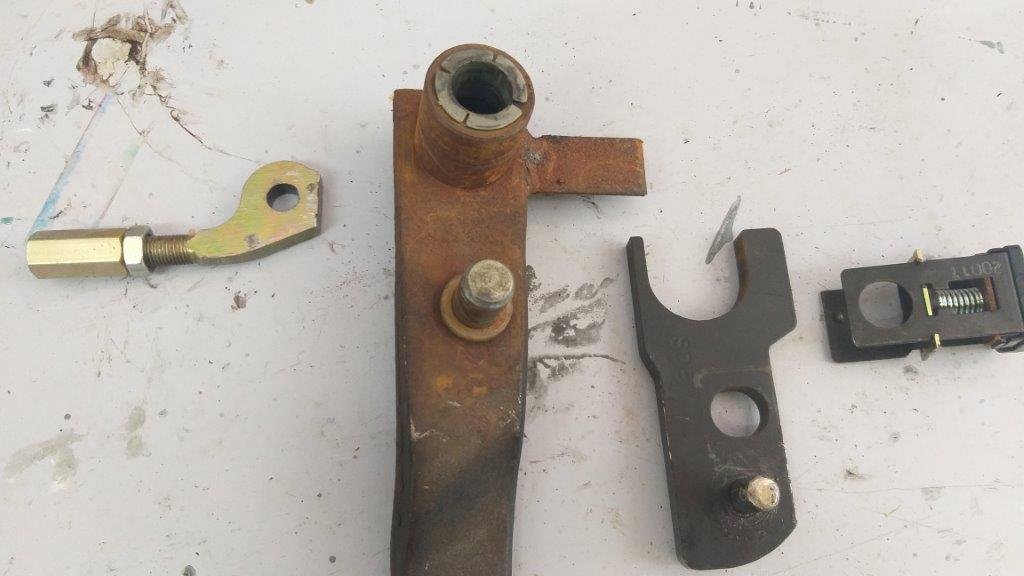
Comes with a set of instructions that even a fool like me can follow. First step is to unbolt the original retaining wire that tethers the cap to the fuel tank neck. Unfortunately you have to then sacrific the wire loop, but it's worth the effort. Then with the fuel cap in place you mark a pilot hole position at the back of the cap through the original hole that the wire loop retaining bolt passed through. Next you carefully drill a hole through the inner face of the cap taking care not to go through the outer brightwork. Then it's just a case of mounting the little spring loaded latch pin inside the boot. The spring loaded pin engages the hole in the cap when the cap is closed and the only way that you can open the fuel cap is by unlocking the car boot and disengaging the spring loaded pin while you screw off the cap. Bonus is that now that the cap is no longer tethered to the car, you can place it safely elsewhere while you fill up. Bloody clever.

- 198 replies
-
- 11
-

-
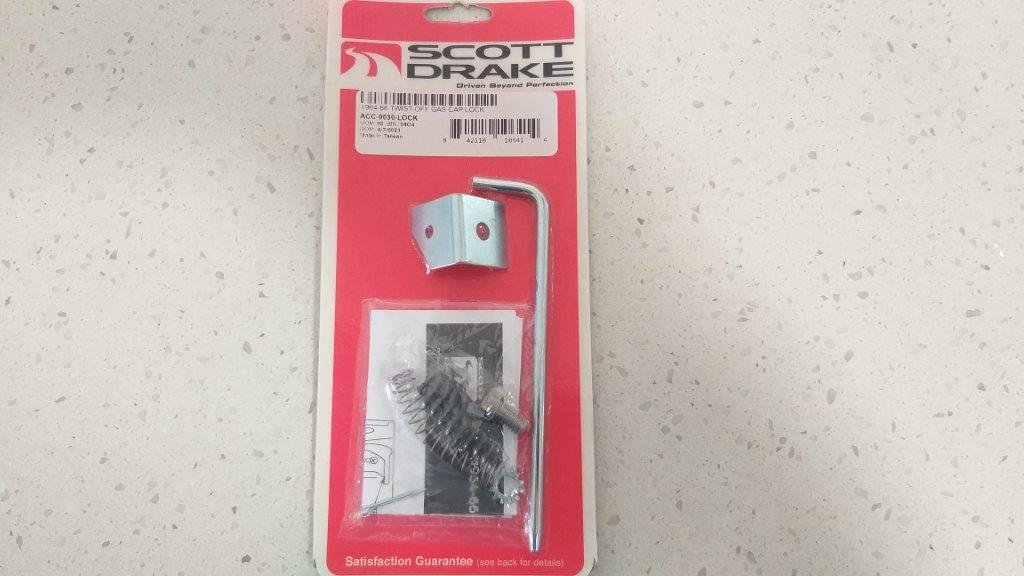
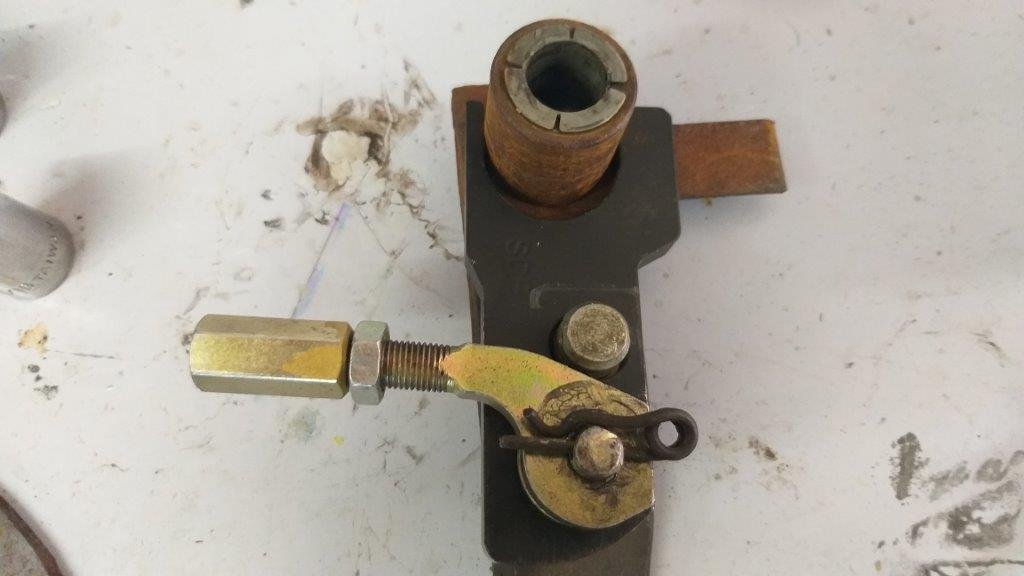
Now it just so happens that Scott Drake market an ingenious little locking kit that they sell for around $15. Probably costs about 15 cents to make, but the idea behind it is priceless, so I had to have one. Kit looks like so:
-
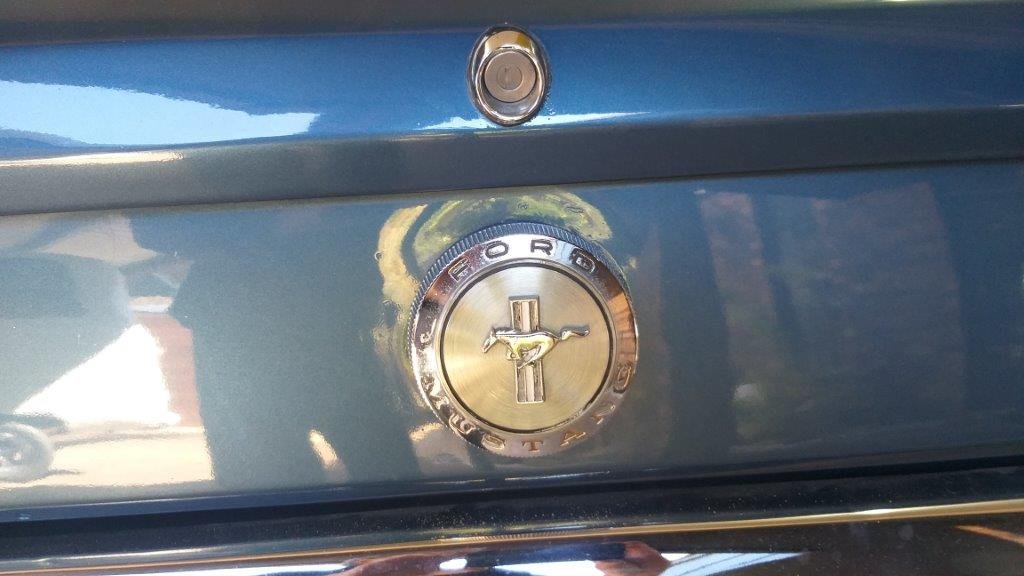
Thought I'd tackle a quick and easy job for a change. The fuel cap on the 66 Mustang is an absolute work of art. Although it looks bloody good its functionality leaves much to be desired. Firstly it doesn't lock which I'm guessing wasn't an issue back in 1966 but because I'm planning to use the Muzzy as a daily driver, I'm picking I'd be a sitting duck for fuel theft or even worse someone chucking a handfull of sand into the tank just for shits and giggles. Secondly when you do unscrew the cap it has a factory fitted retaining wire so it dangles down onto the back bumper. Just the thing to scratch the chrome or paintwork.
-
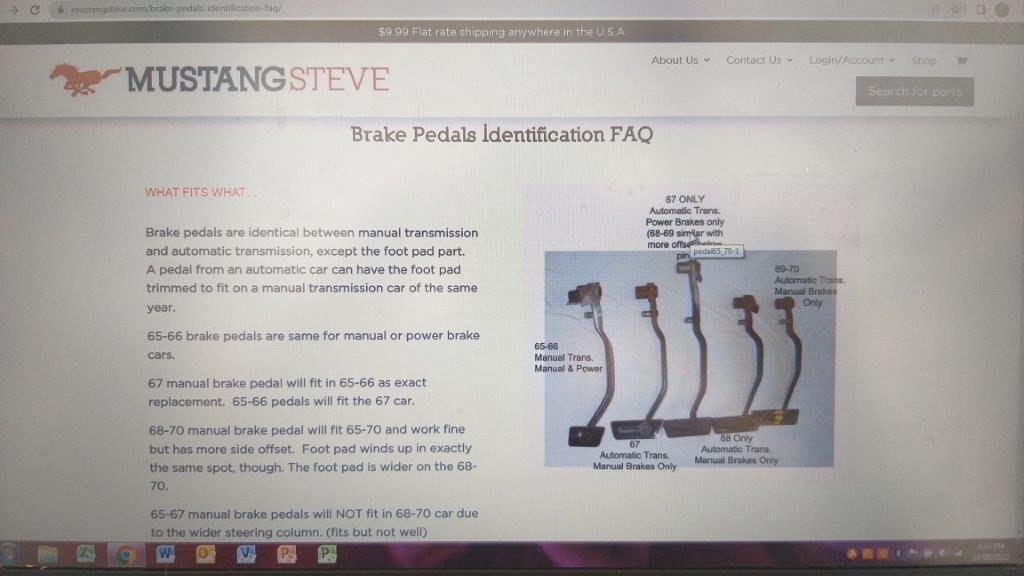
Thanks for the additional info @cletus I was anticipating exactly what you describe in terms of a factory pedal modification and from what I have read it seems like Ford built this into the Mustang brake pedals from 1967 onwards. All of the info that I have managed to track down thus far suggests that for the 65 and 66 Mustangs the brake pedal was exactly the same for both manual brake and power assisted models. I find this really hard to believe. I'm going to make contact with Rob from Sydney Mustang tomorrow morning to see what he says as he has restored and modified hundreds of earlier Mustangs over the years. Excuse the crappy quality screen grab below.
-
Okay, so if I use the straight pivot connector instead of the pivot lowering kit everything works smoothly. That is a plus, but I'm still left with the problem of the pedal ratio which would be back to the non power assisted ratio. Uncle Google tells me that for manual brakes the pedal ratio should be somewhere between 5:1 and 7:1 and that for powered the ratio should be somewhere between 4:1 and 5:1. So I thought I'd start off by measuring my existing ratios. Sure enough with the standard pivot connector I get a ratio of 6:1 and with the pivot conversion I get a ratio of 4:1. Okay, so if I'm going to use the standard pivot I solve my alignment issue but I end up back at a manual pedal ratio. Uncle Google tells me that this will result in twitchy brakes. Yikes that doesn't sound good Did some more searching on some of the Mustang forums and there are quite a few posts that say that for any Mustang prior to 67 the pedal ratio for manual versus power brakes was the same from factory. Now much as I would like to believe this I also know that everyhting you read on the net is not always true, so I'd really like to hear the opinions of those who have more brake knowledge than I do. Calling @sr2 and others ....... please help a brother out mate. Oh a picture of the brake bias adjuster that was hidden under the booster for anyone who is interested.
-
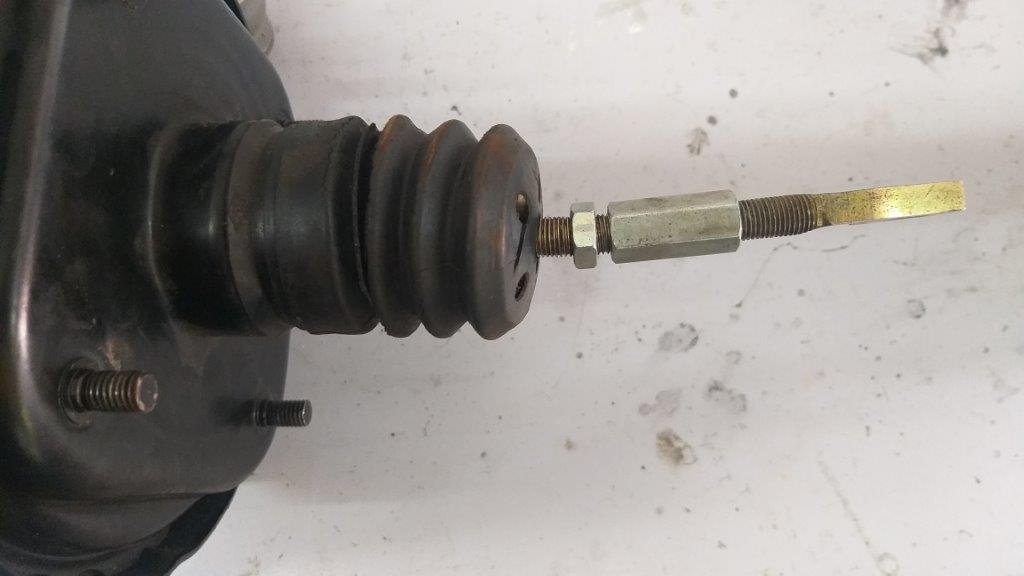
Now being an absolute ignoramus when it comes to brakes I ended up asking my good friend Uncle Google what was going on and it turns out that this little conversion kit is used to lower the pivot point on a non power assisted brake pedal to modify the pedal ratio for a power assisted setup. Okay ..... but how the hell does that work if the actuator rod fixed inside the booster remains at the same fixed height. Surely this will cause a mis alignment between the pivot point and the actuator rod. Got some mixed answers to this from Google. Some say that you need to raise the pivot point for the pedal at the same time. Looked at the pedal bracketry and yikes, modifying the pedal pivot point would require major surgery as well as having to remove the whole setup from the car to do the mod. So I'm definitely not going down that road. Is the booster perhaps mounted too high on the firewall ? Checked this out but the holes in the mounting brackets for the non factory booster are all predrilled to suit the original mounting points in the firewall so that would need modification as well as the hole for the booster neck in the firewall would need to be elongated. Again I'm definitely not going down that road. But all of this extra info got me thinking some more and I decided to try something different. The new brake kit was supplied with a different looking pivot connector, so I pulled off the conversion hardware and fitted the straight connector and then bolted the pedal back in the car. Next I bolted the new booster to the firewall. Grovelled under the dash again and guess what ... the booster actuator rod and the new pivot connector line up perfectly. Screwed the two together and gave the pedal a try. Nice and smooth. The two setups pictured below for camparison:
-
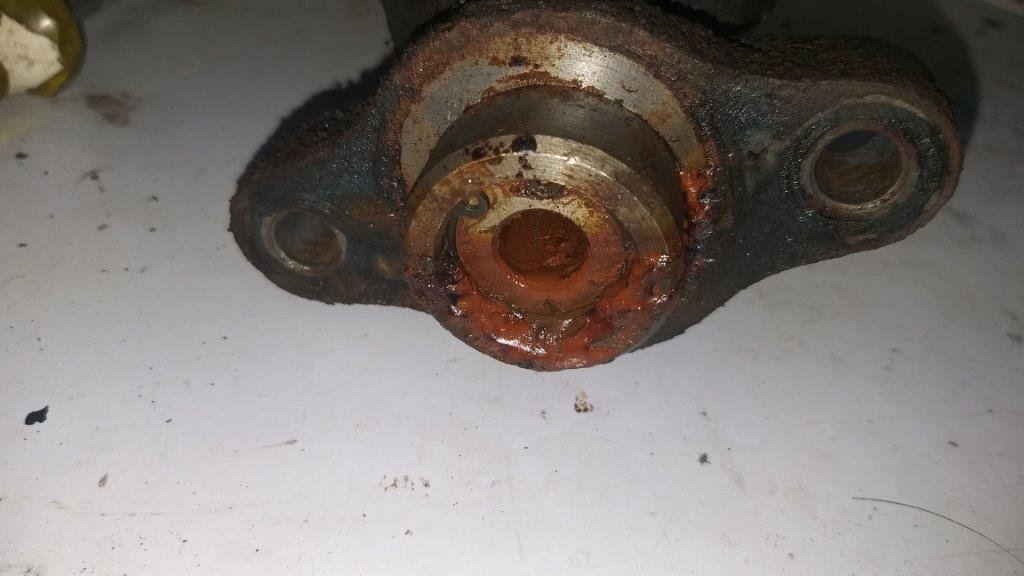
The newly discovered bent actuator rod on the old brake booster has been playing on my mind over the last day or two. Although I knew from day one of owning the car that the power assist wasn't working, apart from the pedal requiring more pressure I hadn't noticed anything untoward with the actual pedal movement or travel. In my mind there must be a reason for the mis alignment between the pedal pivot point and the actuator rod that caused this bend and surely whoever was doing the conversion should have picked this up during the installation. And if they didn't notice it whilst bolting everything together you would think that they would have smelt a rat when they tested the pedal movement and felt something binding up. The force needed to bend that rod surely couldn't have felt normal. So whilst I had the old booster out I decided to investigate further. Spent a few minutes fumbling about in the dark under the dashboard and managed to extricate the brake pedal. With the pedal on the bench in the light of day things took an interesting turn. Hello .... this doesn't look standard:
-
Eventually got the old brake booster out. On close inspection I discovered a bent actuator rod. That's not good either.
-
So back in December when I bought the Mustang the brakes worked okayish but needed plenty of leg power and I suspected that the power assist wasn't working. I swapped a few emails with @sr2 (AKA The Brake Wizzard) around Christmas time and with his help we diagnosed a faulty brake booster. I ordered a decently priced replacement that came complete with a new master cylinder. Both have been languishing in their packaging for a good while now, but today was the day. Started off by checking out the existing setup a little more closely. First thing I noticed is a brake bias adjuster mounted under the booster. Hullo .... that doesn't look factory. There is also a set of non factory looking firewall brackets that the booster bolts up to. So I'm picking that this car was originally delivered without power assist or if it was someone else has been here before. Okay, so after removing a few nuts and having to sacrifice one of the solid brake lines due to a previously rounded flare nut, I was able to seperate the m/c from the booster. Yikes, that looks a bit nasty:
-
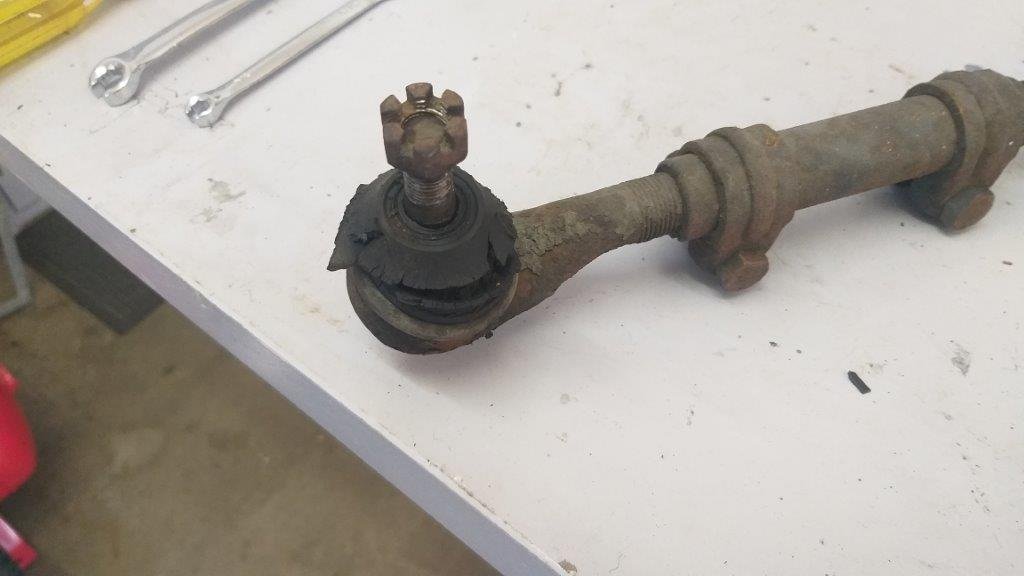
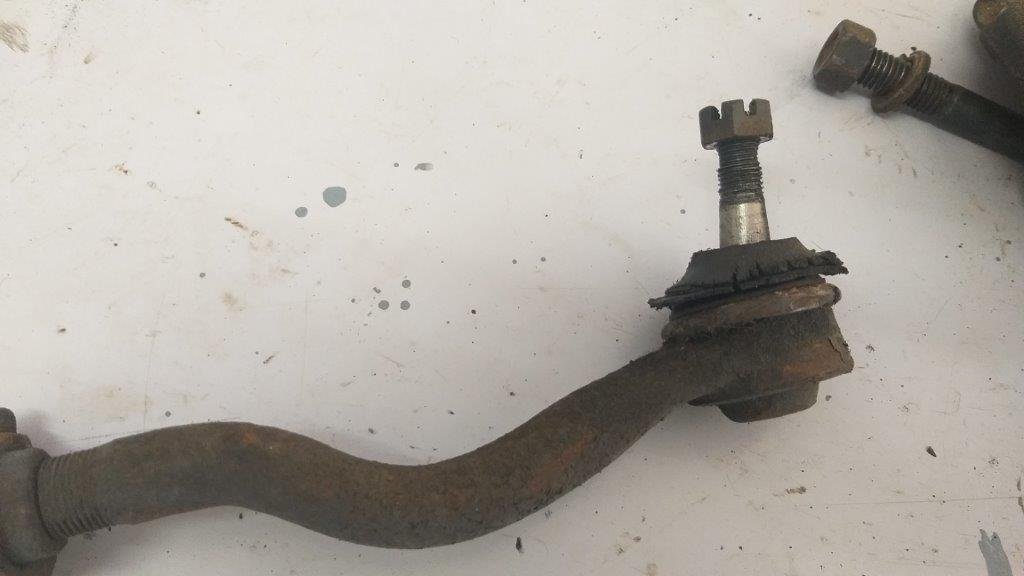
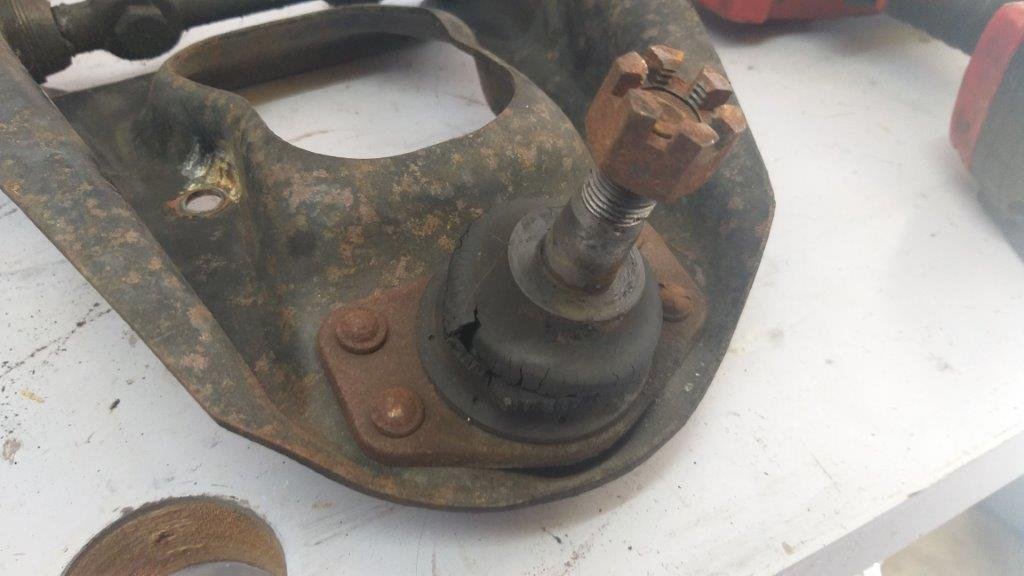
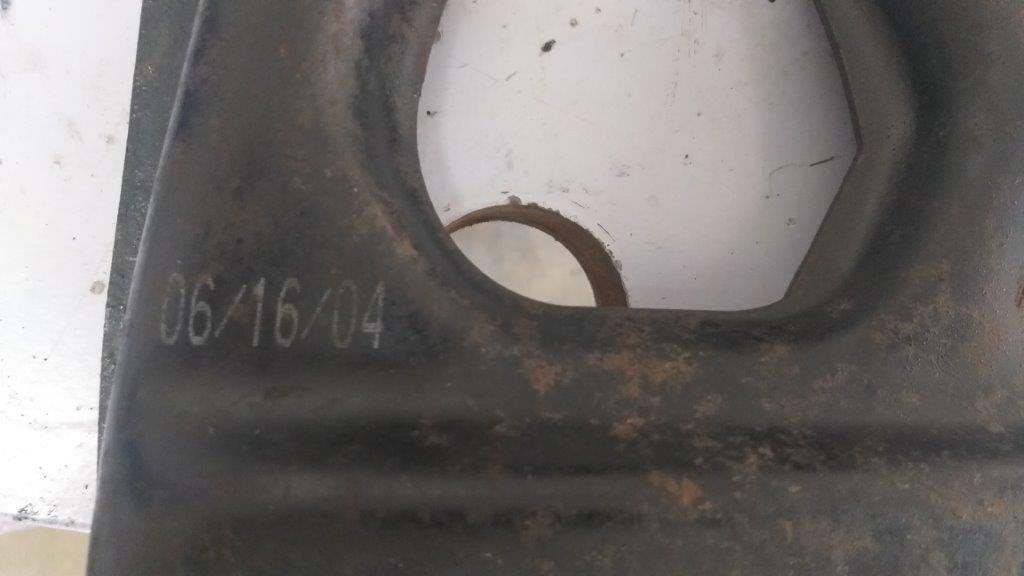
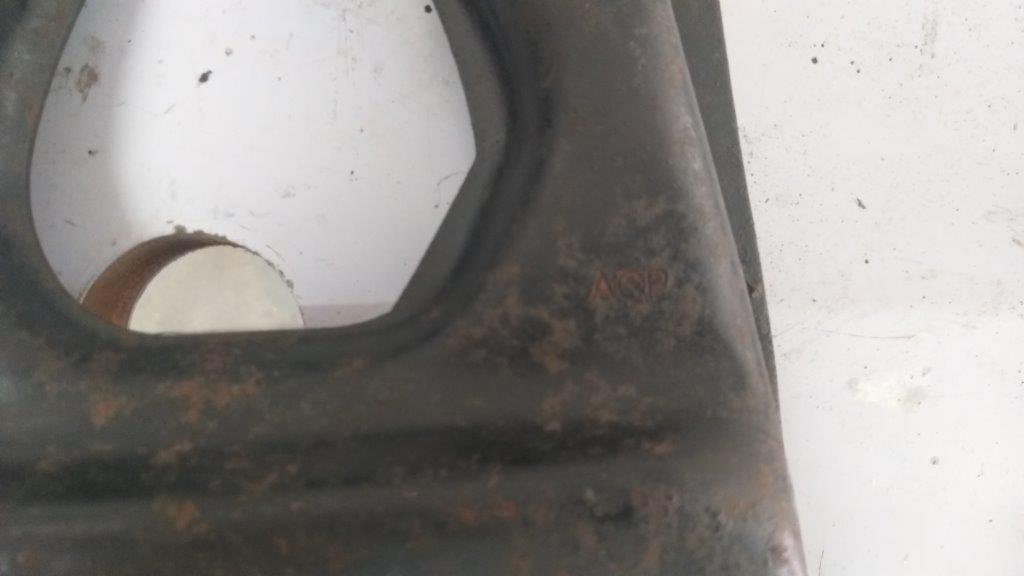
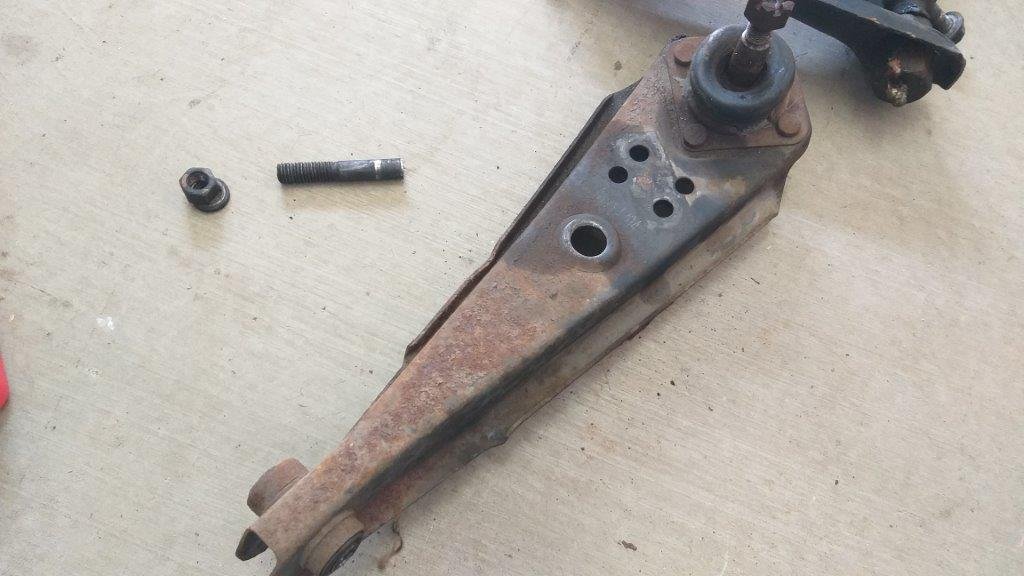
Got the driver's side suspension all back together yesterday and started taking the passenger side apart this morning. Lots of shagged dust boots and some notchy feeling ball joints and tierod ends. A bit more of the Mustang's history was revealed during the process. The upper control arm on this side is a repro unit manufactured by ACP. Date stamp says 2006.
-
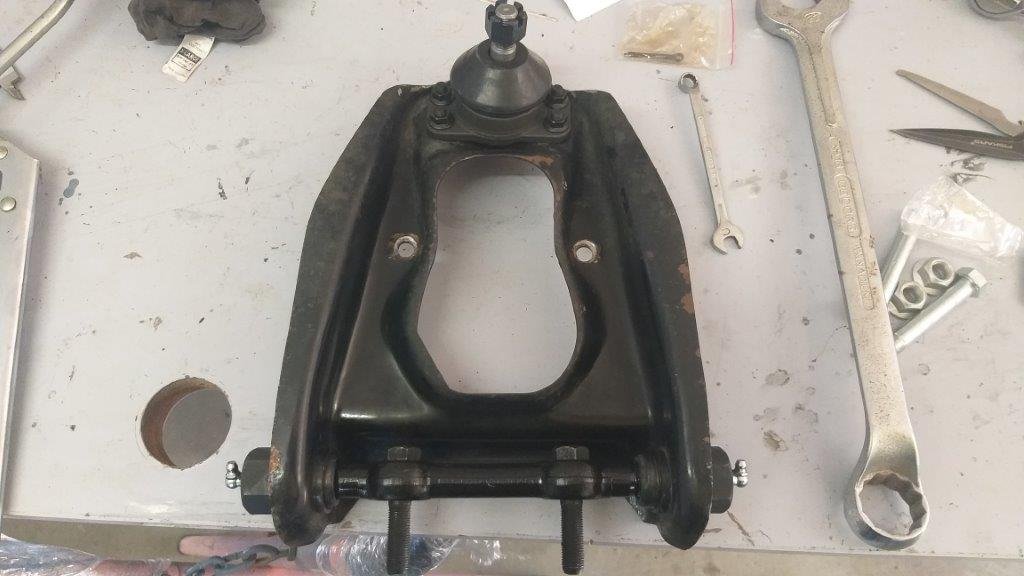
Last bits are the new upper arm shaft kits and ball joints. Let the assembly commence.
-
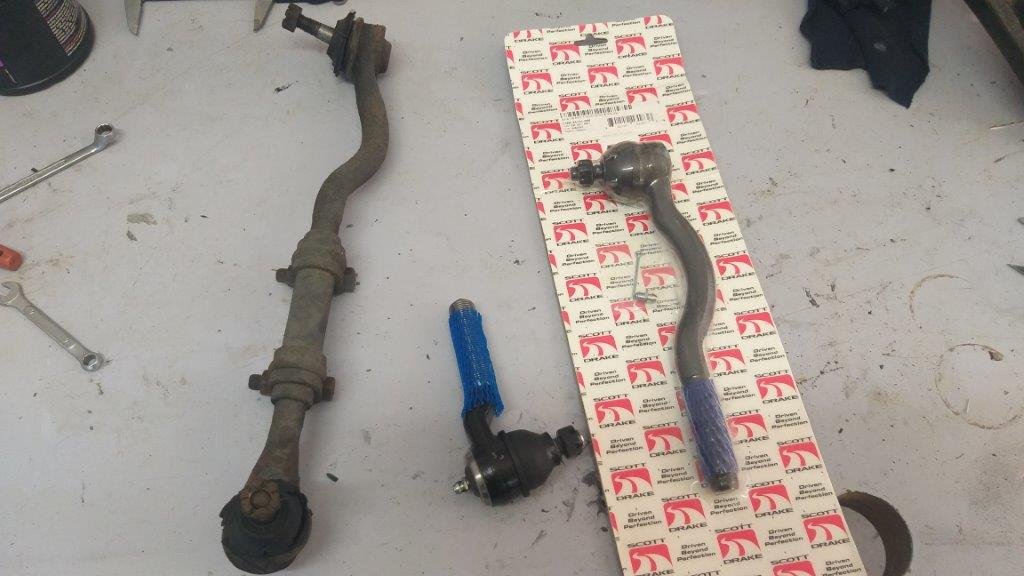
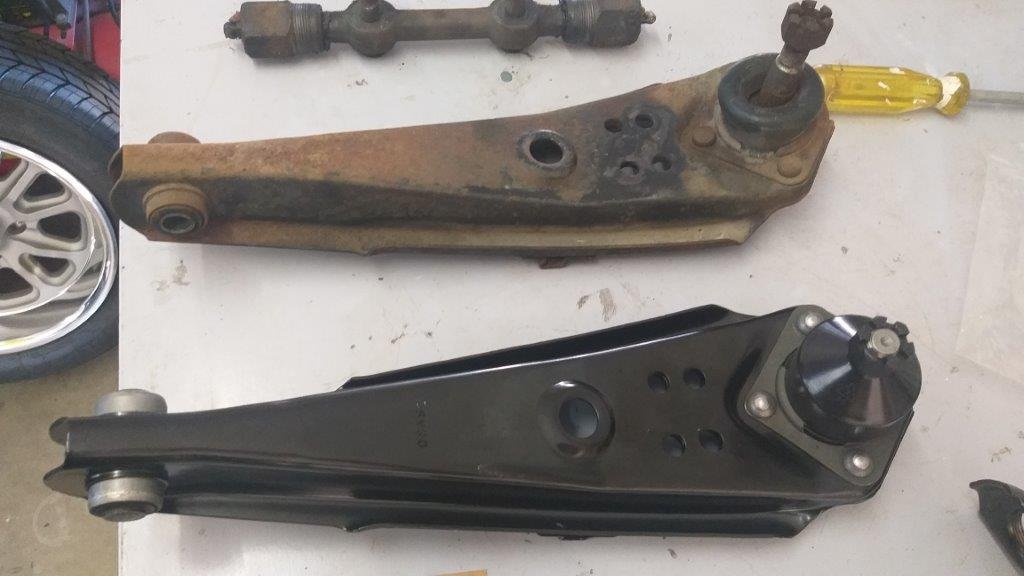
Next up are the new lower control arms. One of these newbies photo'ed along side his old mate:
-
Late yesterday arvo my final batch of front suspension parts arrived, so this morning I excitedly unpacked the box to inspect the goodies. First up were the high performance coil spring perches. As you can see in this photo the modified units are fitted with a grease nipple and the usual factory rubber bushes are replaced with a greasable polymer. My original units are completely siezed up, but the new unit rotates smoothly with a little finger pressure. Winner. These units should cure the lateral pressure that my front shocks were experiencing during suspension travel.
-
Late last week whilst patiently waiting for the rest of my suspension parts to arrive, I thought I'd finish off the last bit of exterior re-assembly being the front bumper and support brackets. But, before tackling that I wanted to have a go at sorting out the bonnet and front fender gaps which were pretty bad when I purchased the car. Whilst it all sounds pretty straight forward, it has been complicated by the fact that the car has previously been fitted with a reproduction right fender, under grill skirt and lower valance as part of the previous USA restoration and everyone knows that these non factory panels leave much to be desired in terms of final fit. Now a wise man would have sorted this out before final paint, but sadly I am not that man. Anywhoo I started off by loosening everything off then aligned the back of the bonnet with the windsheild scuttle panel. Got that as best as I could and then worked along the bonnet to fender lines on each side. After a bit of fiddling about I got those gaps pretty good then refitted the bonnet catch. Nope .... nowhere near going to work. Ended up getting physical with the bonnet pin and now for the first time the bonnet latches and unlatches smoothly. Flushed by my success I thought I was home and hosed until I tried bolting up the under grill skirt. Nope not even close. Tried the lower valance and again an instant fail. Okay .... Changed tack by loosening the fender mounting bolts, then loosely fitted all of the front panels with finger tight bolts. Then with a bit of pushing and pulling in all directions I finally managed to get everything to line up as best as I could. The front bumper and brackets are also reproduction units so they served up a few extra challenges, but after spending three full mornings on it I've declared a victory. The final fit is not 100% prefect, but it is way better than it was .... enough to quell my OCD, so I'll take the win. Sadly without its suspension in it's not a roller so I haven't been able to take any photos of the results which I will do as soon as it is back on its wheels. Now no one likes a pictureless update so here are a few photos of the inside of the reproduction front bumper and over riders which were badly rusted inside and are now sporting a protective coat of epoxy primer after a good de-scale. Thanks for reading.
-
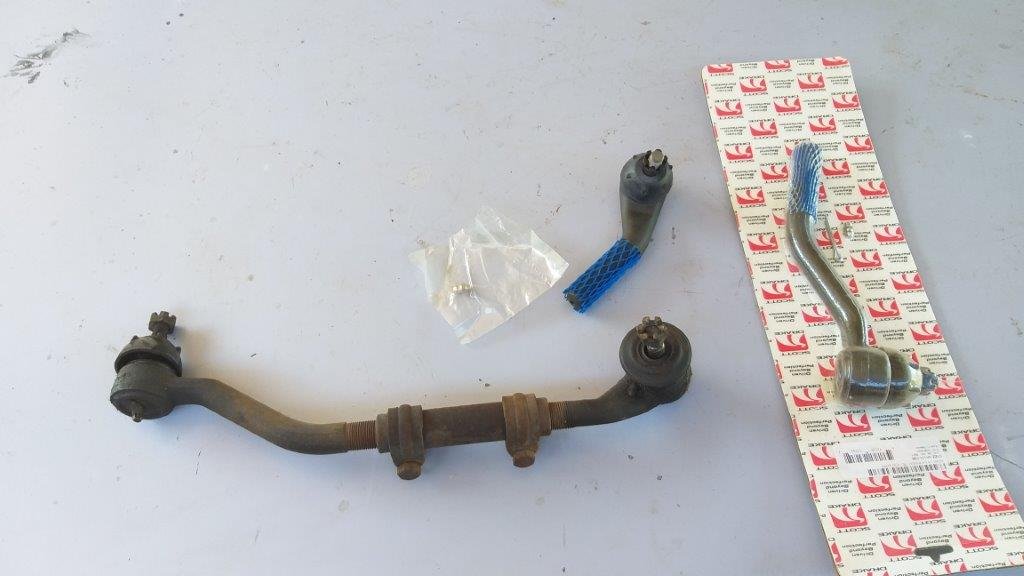
While I'm waiting for more parts to arrive I started off today with a few hours of butchery in true Rough & Ready Restos fashion. Cut the head off the lower control arm mounting bolt with my sabre saw and got the arm out. Then did a bit more butchery on the upper control arm to remove the old ball joint that was riveted in place. That was enough destruction for one day, so I moved on to installing the replacement inner and outer tierod ends on the driver's side.
-
I can believe that. Yep, I agree no Shelby drop for me. It looks like an absolute hack.
-
Today I was under pressure to get the last of my suspension parts ordered from Rob at Sydney Mustang in time to catch the courier pickup, so I quickly stripped down the driver's side to check on the last few bits and pieces that I suspected I would need. Sure enough the bushes on the lower control arm are well shagged and the arm has heaps of sideways movement. It's almost the same spend to buy a complete replacement lower control arm than to refurbish my existing ones with new bushes and a ball joints, so I've gone down that path. I'll refurb the upper control arms as they are a lot more expensive to completely replace. I've already sourced the upper ball joints and just needed new shaft kits from Rob. I've also ordered a set of high performance spring perches as yesterday when I was trial fitting the replacement coils springs I noticed that the existing spring perches are siezed solid, thus placing lateral force on the shock abosrbers during suspension travel. The originals are a dry setup but the newer style come fitted with a grease nipple for periodic lubricating. Oh, and the Muppet that fitted the lower control arms (possibly at the assembly plant) fitted them while the engine was still out as the bolt heads face backwards and clash with the engine mounts, so you can't get the arms out without sacrificing the bolts. So I've ordered some replacement bolts from Rob. I needed to pack up early so only got one side partially stripped. I'll continue the removal tomorrow.
-
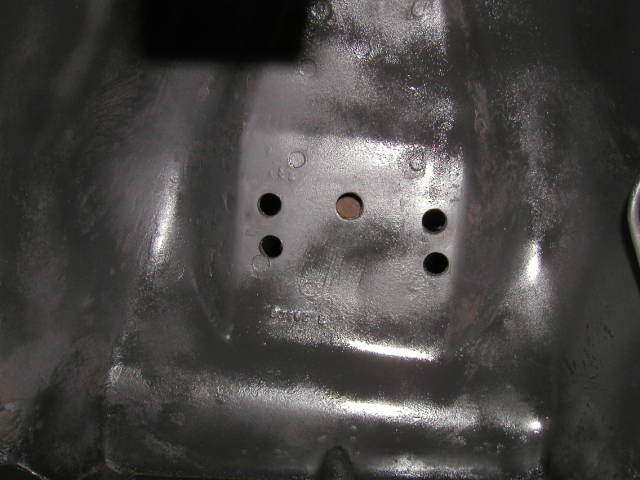
Thanks for the heads up Clint. I'll need to watch out for this issue. I'd be interested to know if that 68 Mustang that you are referring to had been modified with what they call the Shelby drop (also called Arning drop). It's a modification that relocates the upper arm and is supposed to improve handling, but at the expense of causing ball joint lock ups. The cure is to fit a ball joint wedge to prevent the issue. Looks to me like that might have been the cause for that damage. Did you notice whether the upper arms had been relocated ? Here is a picture of a car that has had the modification done. The tell tale sign is a double row of locating holes for the upper arms. Would be hard to see unless you were specifically looking for them, I guess.
-
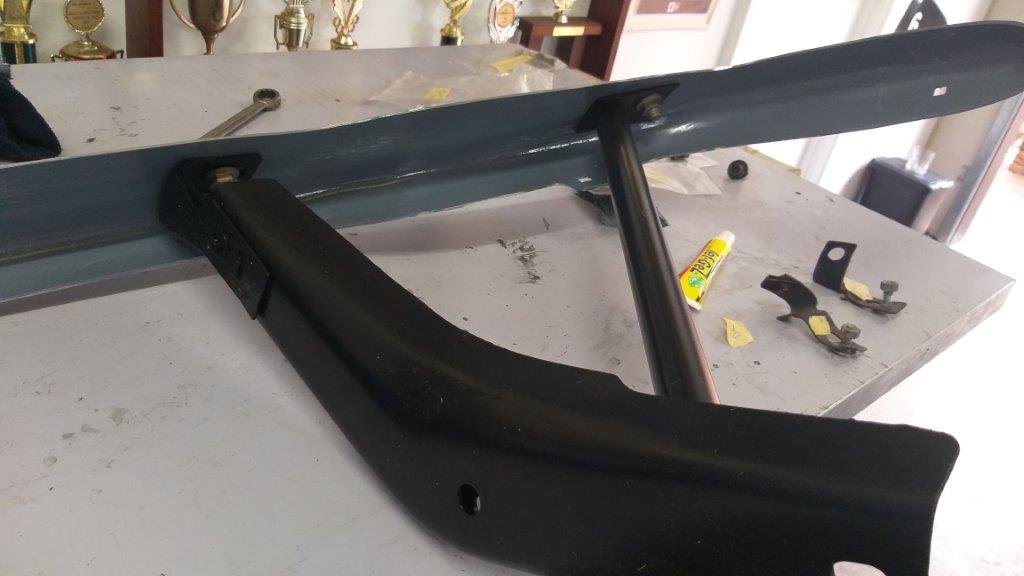
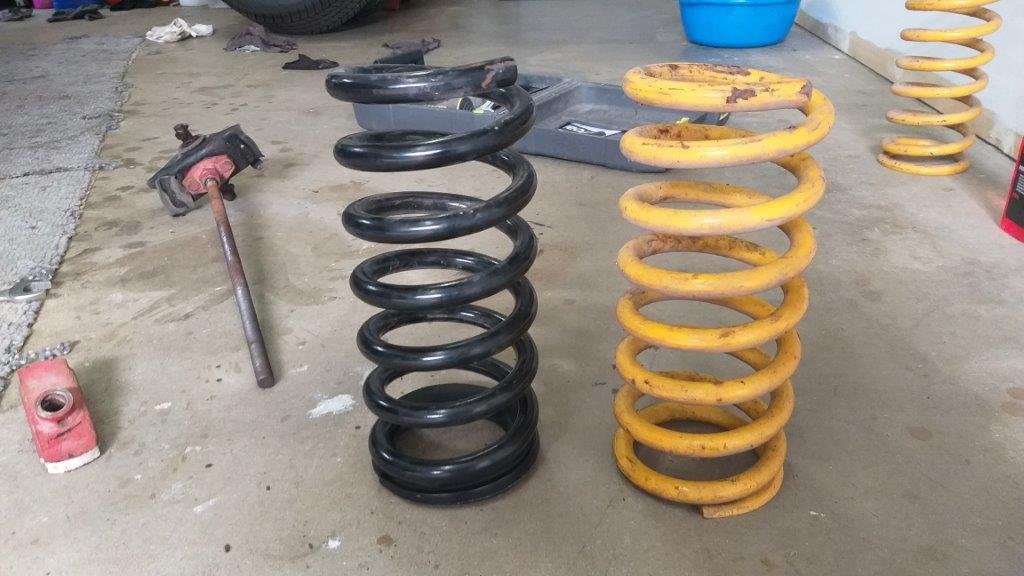
My plan was to tackle the brakes next, but I soon discovered that I needed to source a set of imperial sized flare nut spanners if I had any hope of seperating the brake pipes without things ending in tears. So with those on order, I moved on to the next item on the list being the refurbishing of the front suspension and steering components. First step was to do something about the front ride height. Back in 2014 the previous owner fitted a set of 1 inch lower front coils, but these just weren't cutting the mustard, especially after I dropped the back by a further 2 inches. My mate Grant had a set of KingSprings that he had pulled from a Falcon a few years back and he suggested that I give these a trail fit with the thought being that I could always give them a bit of a Makita haircut if they were still to high. Grant also lent me his Ford specific spring compressor tool which made the job an absolute breeze. So yesterday morning I did the old switcheroo and I'm pleasantly surprised with the results. The photo's tell the rest of the story.
- 198 replies
-
- 16
-
-

-
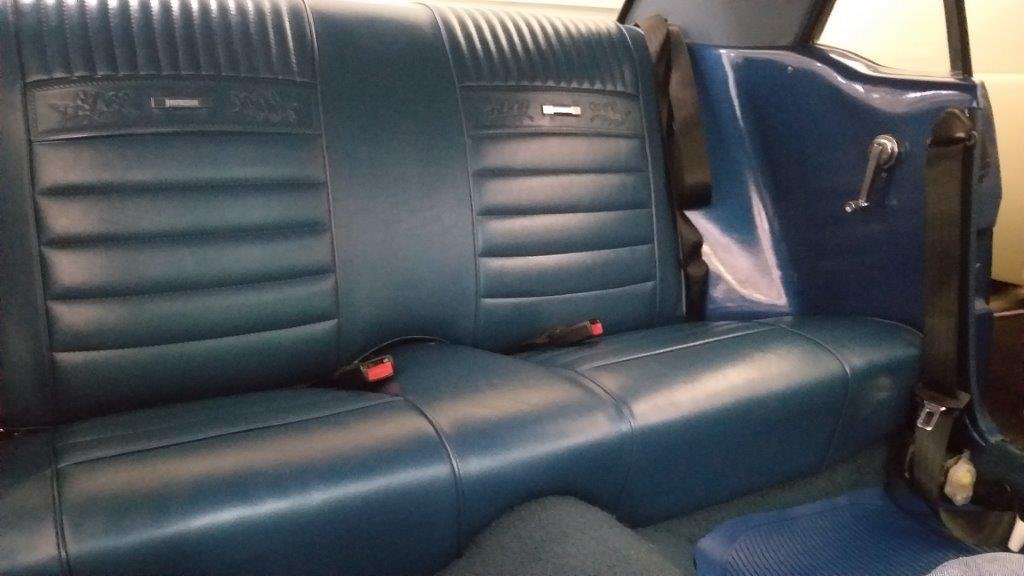
Got the parcel shelf, back seat. rear underlay and carpeting in. Looks like the seats were recovered as part of the major renovation that took place between 2010 and 2012. As a result they just needed a good clean underneath as they had a lot of tar like smears from the old sound deadening Once the seat was in I fitted the front and rear seat belts. I'm going to leave the front carpet, centre console and seats out for the moment as I need to replace my shagged brake booster and I figured it would make grovelling under the dash a lot easier. So it's on to the brakes next. Thanks for looking.
- 198 replies
-
- 13
-
-
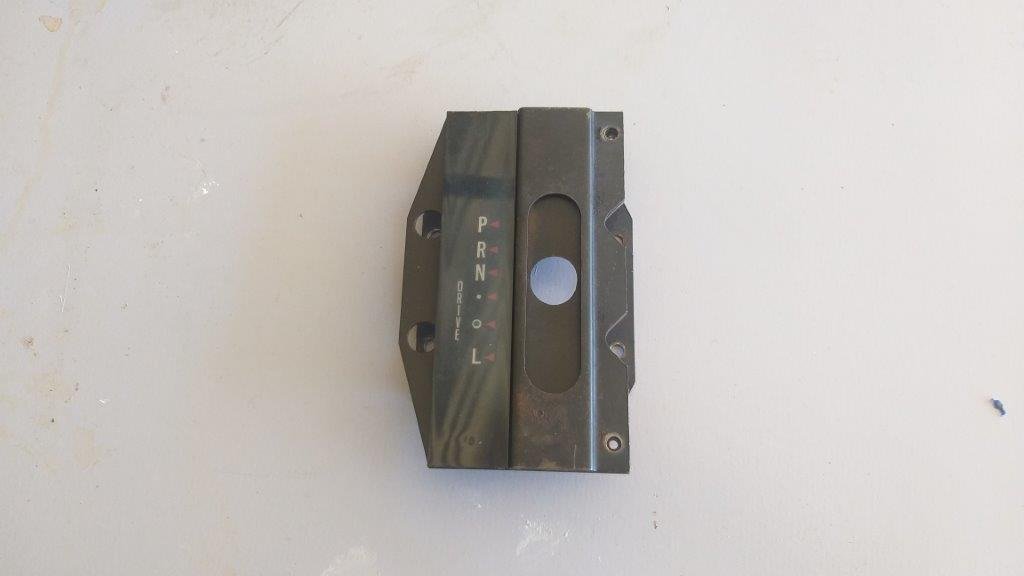
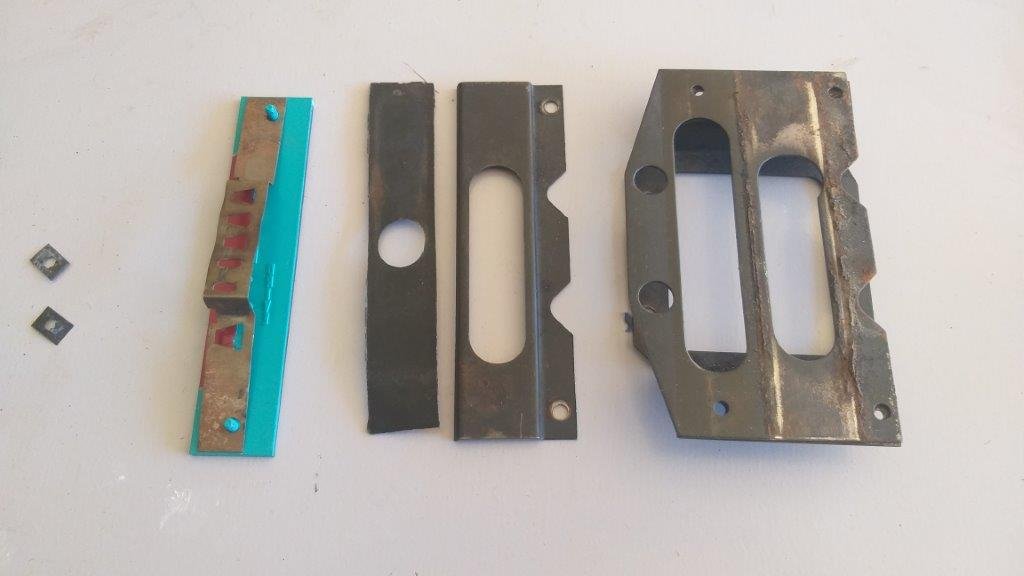
And here is the last interior bit that is in need of some loving. Pulled the shifter surround out and up close it looked pretty tatty. Covered in 50 year's worth of dirt, grime and surface rust. Stripped it down to it's components, gave the metal bits a good sand, primer and paint and then reassembled with a fresh face plate. Much better.
- 198 replies
-
- 15
-
-
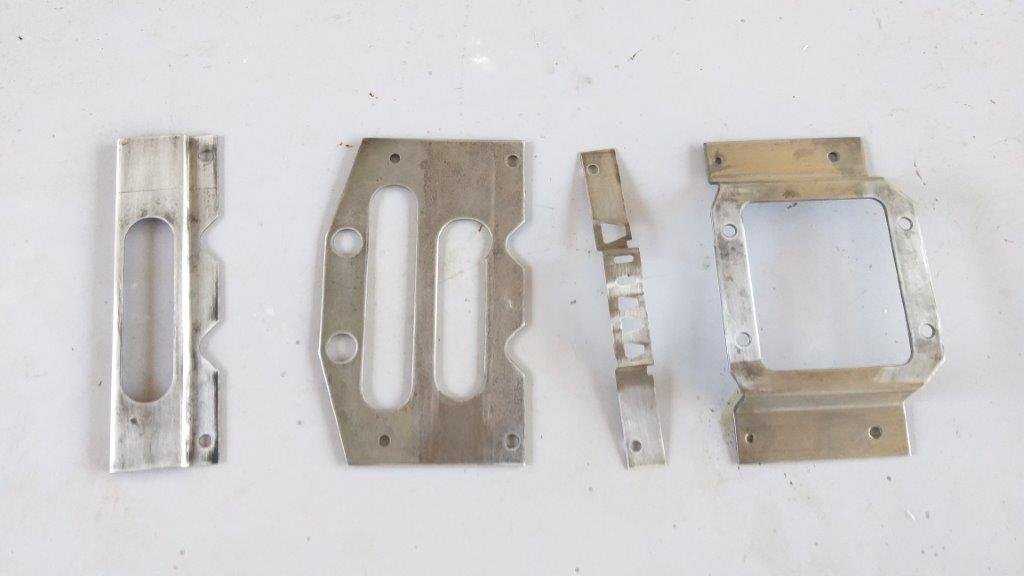
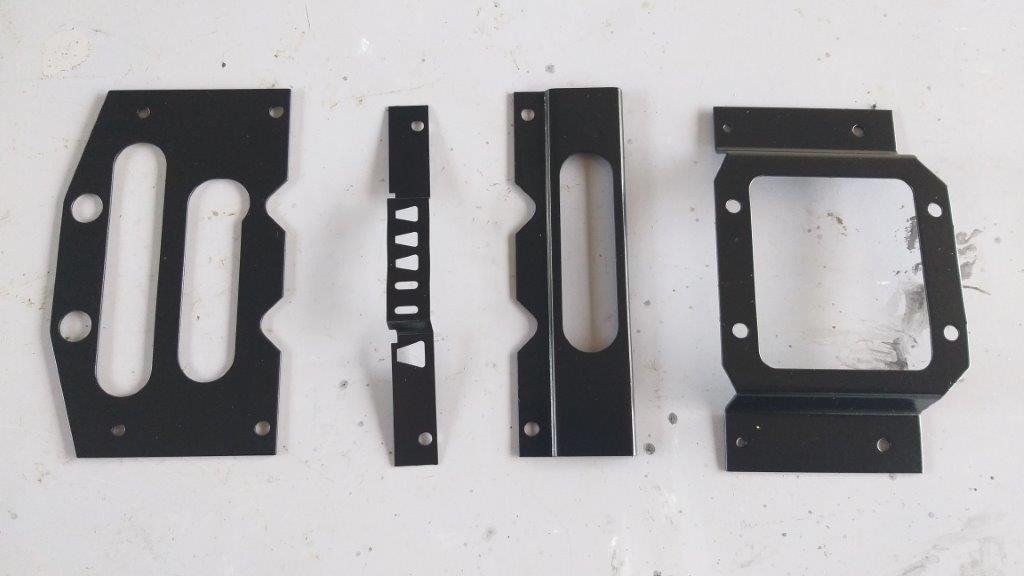
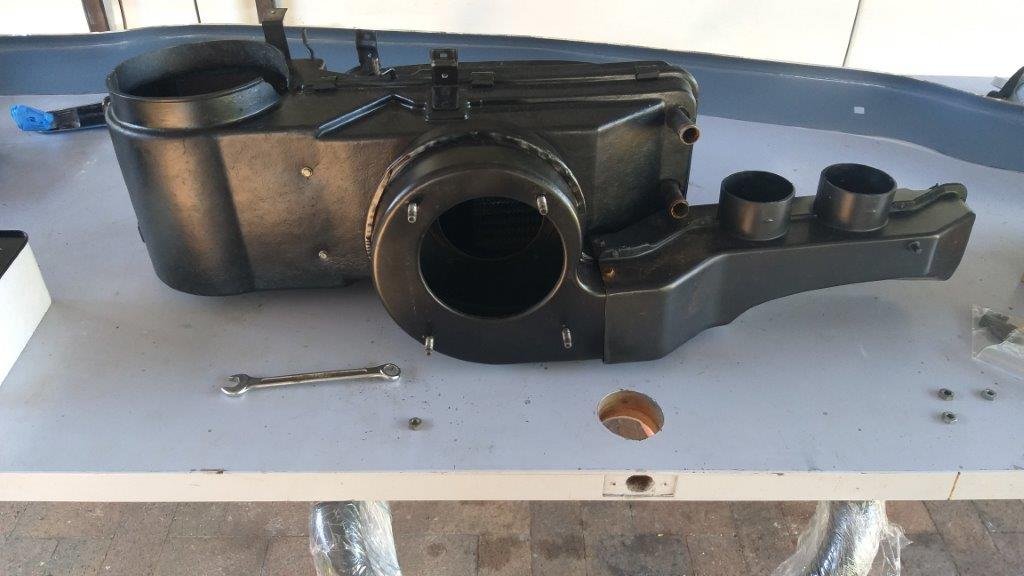
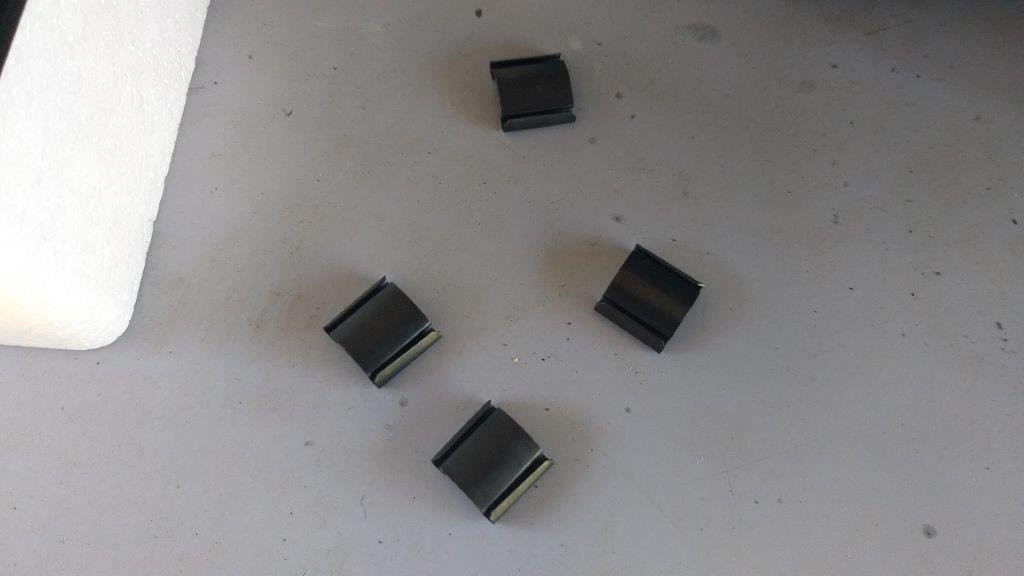
Today was another one of those "one step backward" situations. After refurbishing and reinstalling the heater box a few week's back I wasn't completely happy with the result. The blower motor sounded a bit like a coffee grinder and I figured if I left it as is it would irritate me no end. Figured if I was going to do anything about it now was the time while I still had some of the interior in pieces. Ended up ordering a replacement motor in my latest parts shipment. So, out came the heater box first thing this morning and I did the motor swap. When I originally refurbished the unit four of the eleven little clips that hold the casing halves together were missing, but I didn't have replacements at the time, so just had to make do with the available clips. Got some new clips at the same time so those went in too. Much happier now. The new motor is nice and smooth and I can now move into top gear on the reassembly of the rest of the interior.
- 198 replies
-
- 10
-
-
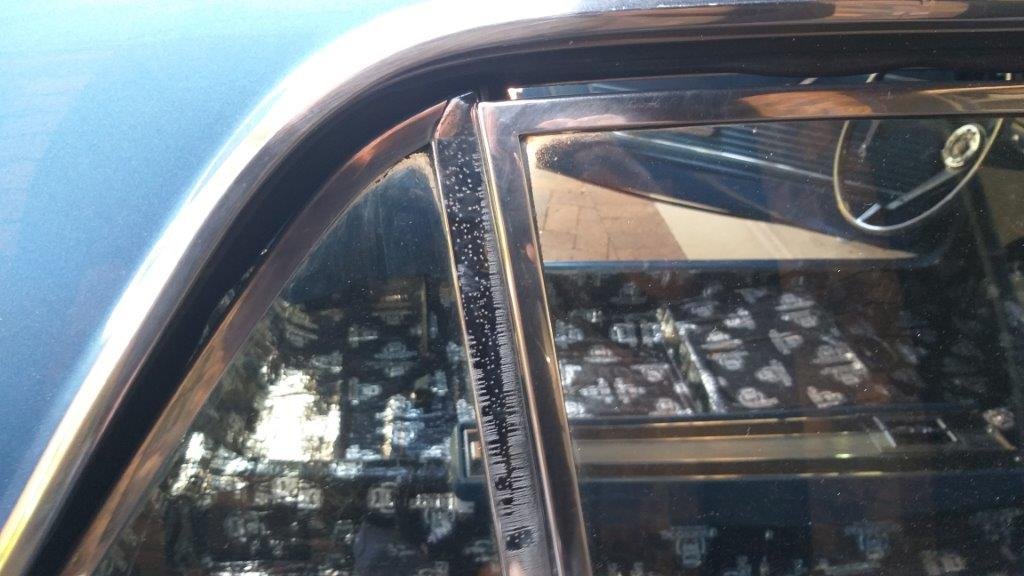
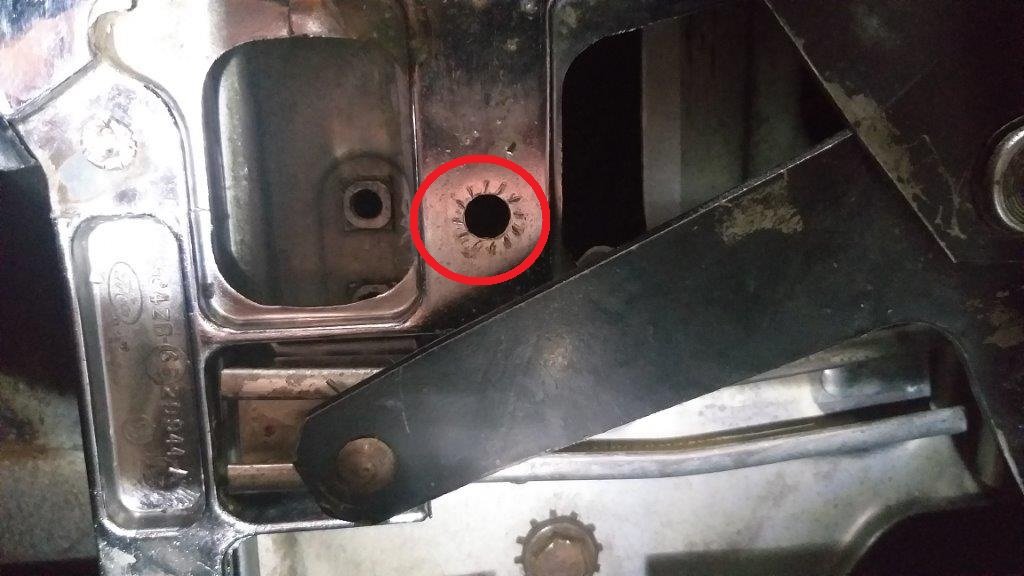
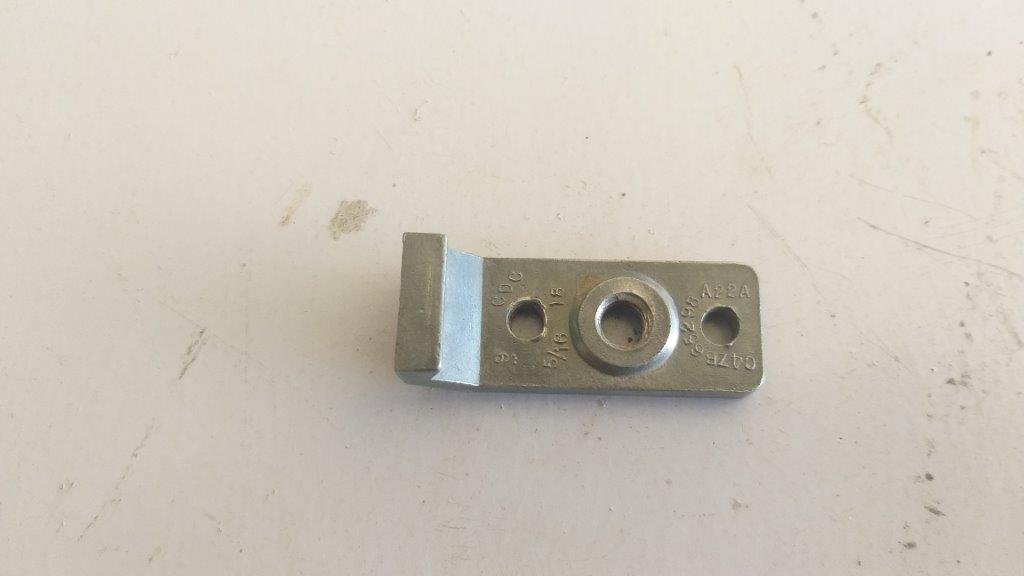
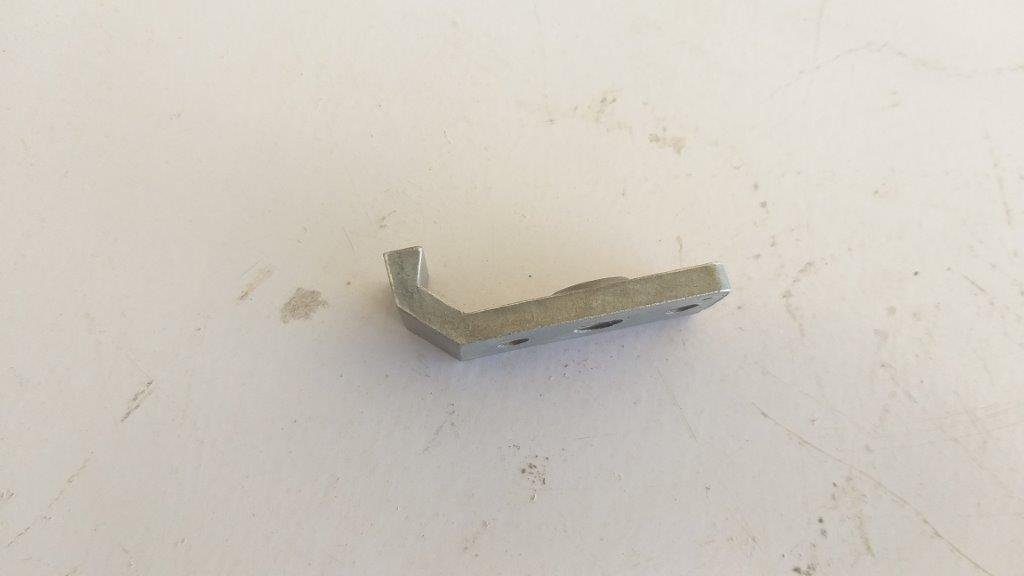
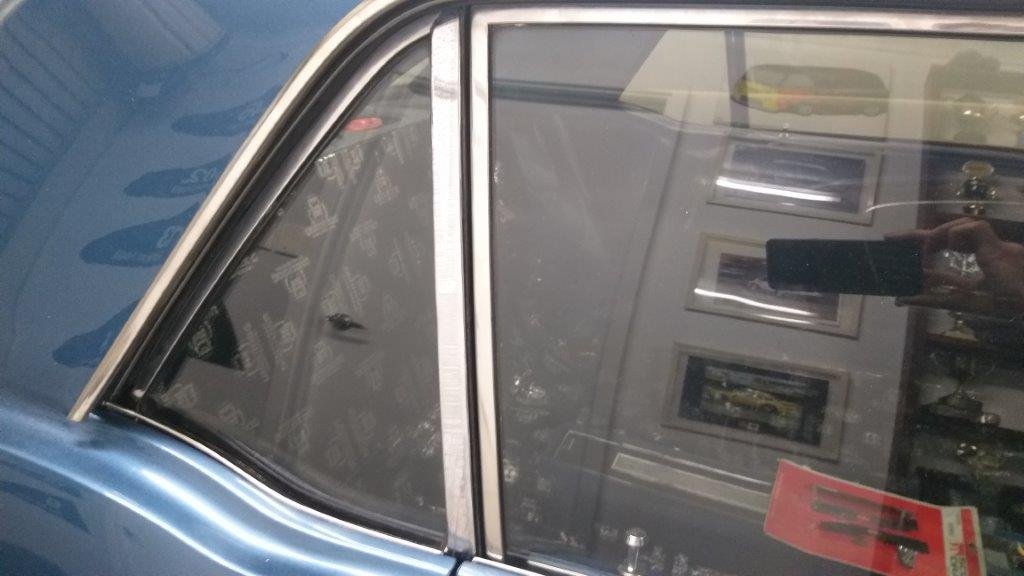
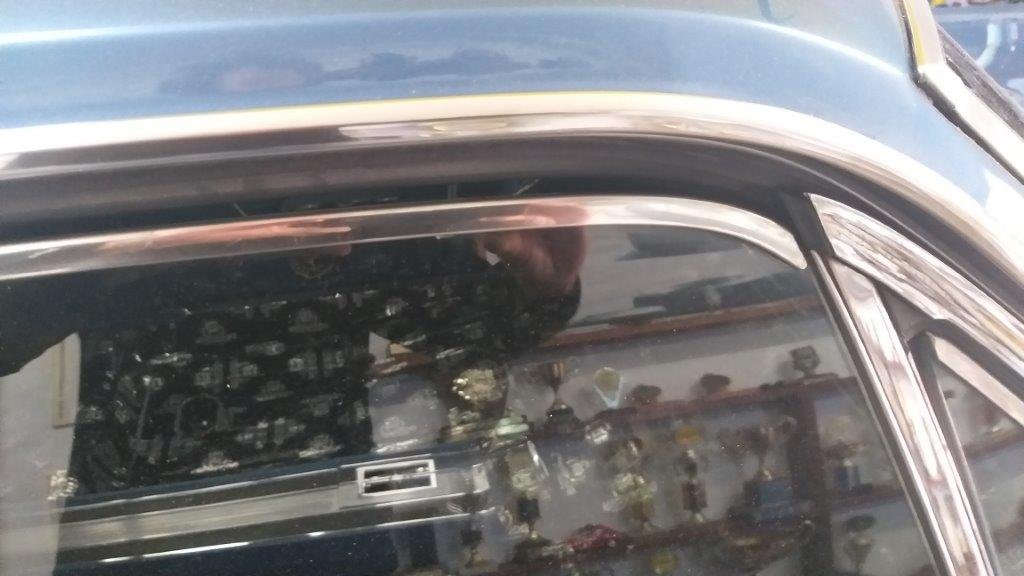
The second window issue being the intermittent misalignment of the passenger side rear quarter window was slightly more tricky to solve and only because I am not the sharpest tool in the shed. So my first step in trying to resolve the issue was to fiddle around with the window alignment, but try as I might I just couldn't get a consistent result. After faffing about for about an hour I decided to strip the whole glass and mechanism out. The first step of the tear down is to remove the window bumps stops. It was at this point that I realised that one of the two upper bump stops was missing.......... and that is when the penny dropped for me. The missing bump stop was allowing the window to tilt slightly forward towards the end of its upward motion ...... bloody bastard ! The missing soldier is circled in red in one of my photos below Now I'm very fastidious when it comes to stripping things down. Everything gets bagged and labelled and all of the parts associated with a particular item are stored away together in their own plastic bin. Since neither the bumpstop nor its mounting bolt were left over in the container I'm almost positive that this bump stop was missing before I stripped the window down. I searched around in my storage location under the Thames van in the hope that it might have fallen out of the storage bin, but no such luck. So now to find a replacement. Easier said than done. You can get repro replacements ..... US $75 for a pair ...... gulp. Bugger that .... I only need one. Then by a stroke of luck I spotted an eBay listing for a single pre-owned one here in Aussie. It was listed at OZ $31 including postage which is still rather spendy for what it is, but I figured what the heck, take the coward's way out rather than spending hours fabricating a replacement. Anywhoo, it arrived earlier today so I slapped it in and hey presto .... the window now aligns perfectly every time. I am now a happy bunny. Thanks for looking.
- 198 replies
-
- 10
-
-
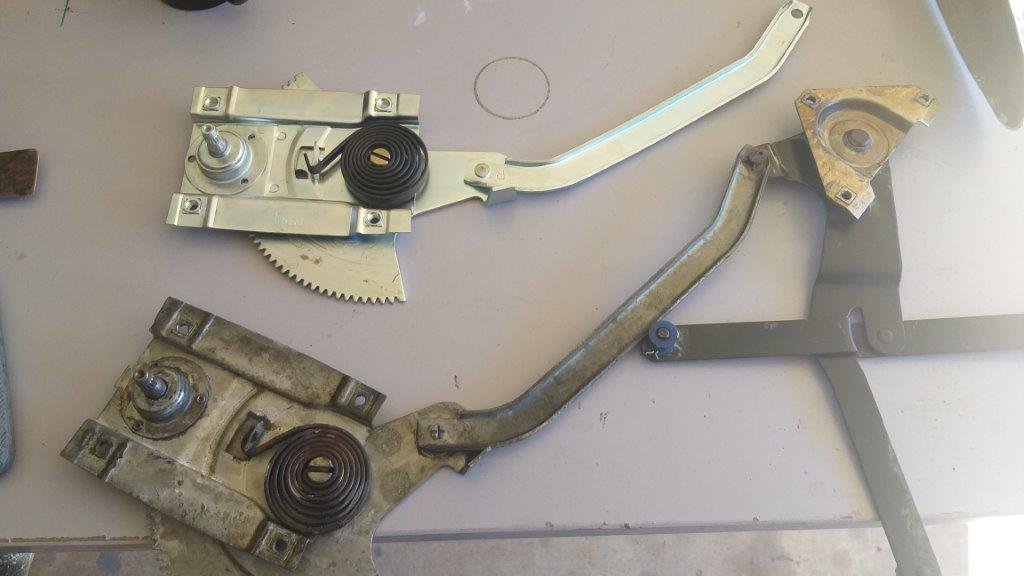
Earlier in the week I mentioned an issue with a window bump stop. Thought I'd share the whole story with you. As you know the Mustang has a pillarless setup with both the front and rear side windows able to roll down. A good few weeks back I refurbished the windows mechanisms and associated components. The driver's side worked perfectly but over time I had noticed two issues with the passenger side. First issue was that the door window would wind up perfectly, but after opening and closing the door a few times I noticed that the window would drop about half an inch. The second issue was that when winding the rear window up it would sometimes not line up properly with the frame around the door window resutling in both metal strips clashing. Anyway, it started to bug me so over last weekend I decided to investigate further. First step was to give the door window a closer look and I quickly discovered that by pushing down on the glass I could get the window to wind down. Not good. My first thought was that I might have installed the big "clock" spring incorrectly, but sadly not as I discovered after pulling the mechanism out. Asked Uncle Google and he reckoned the problem was likely to be a faulty regulator. They aren't that pricey so I ordered a new one in from my mate Rob at Sydney Mustang Parts. It arrived today so I swapped in the new regulator and that has solved the first issue.
-
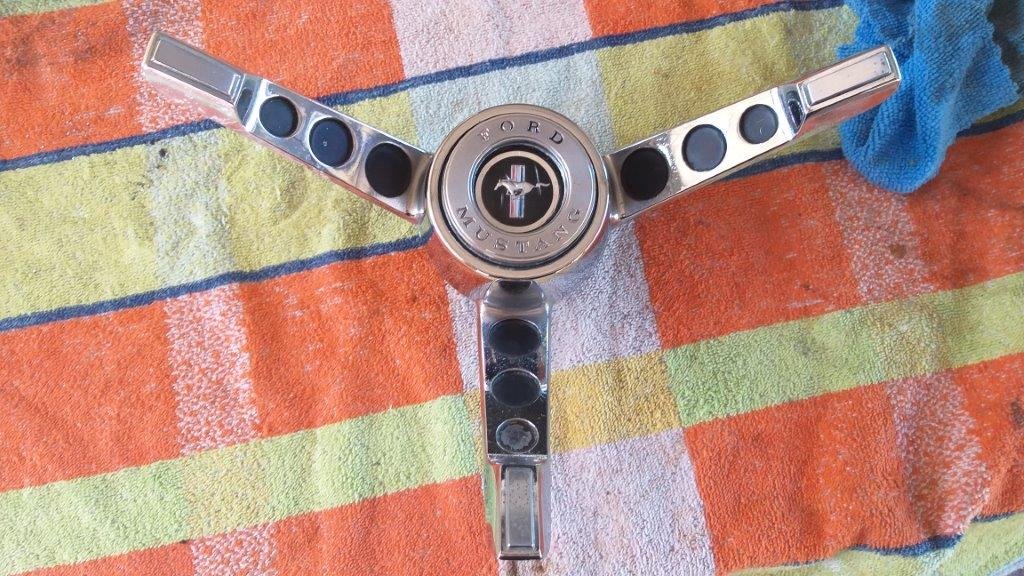
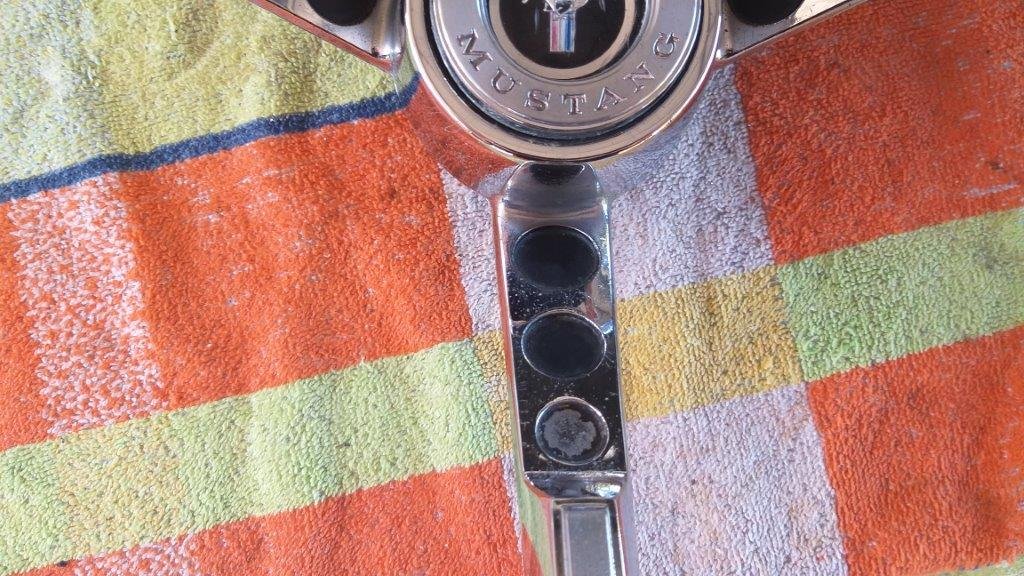
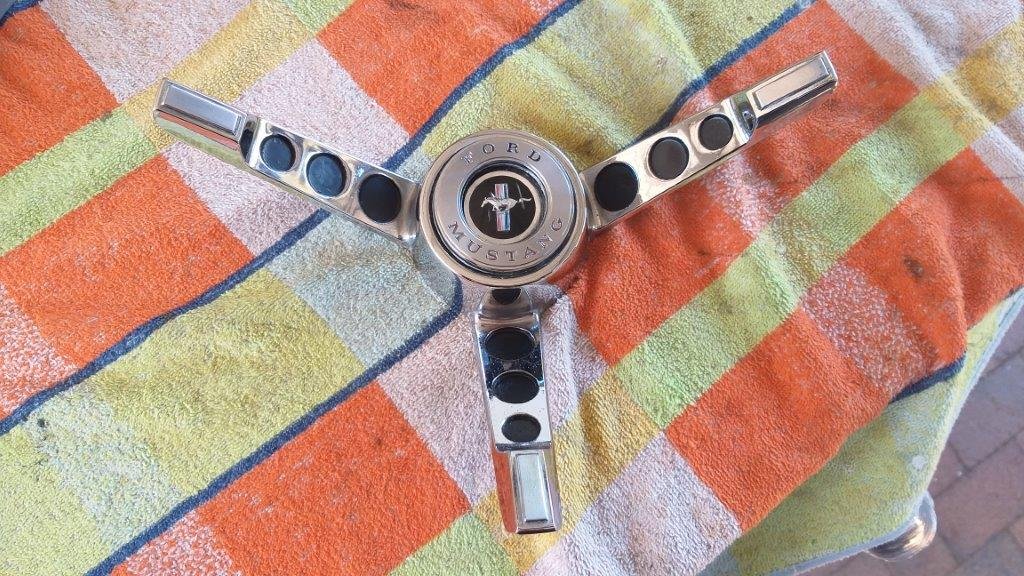
With a few free minutes to spare I thought I'd fit the steering wheel. The original centre needed a bit of loving so I tickled it up with a bit of autosol and used some craft paint to touch up the black accents that were looking a bit shabby. And that's another item ticked off the list.
- 198 replies
-
- 12
-