Flash
-
Posts
1615 -
Joined
-
Last visited
-
Days Won
2
Everything posted by Flash
-
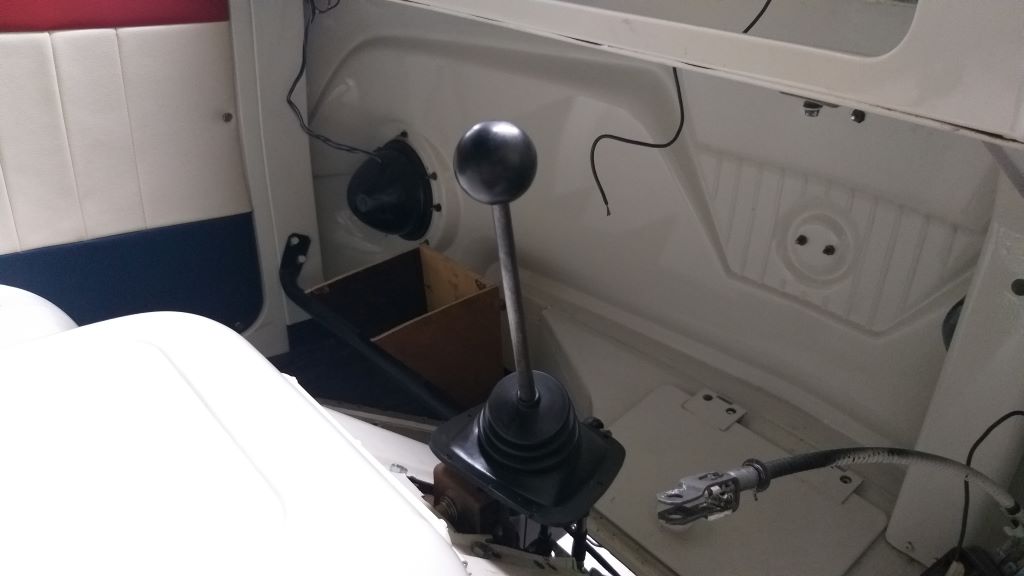
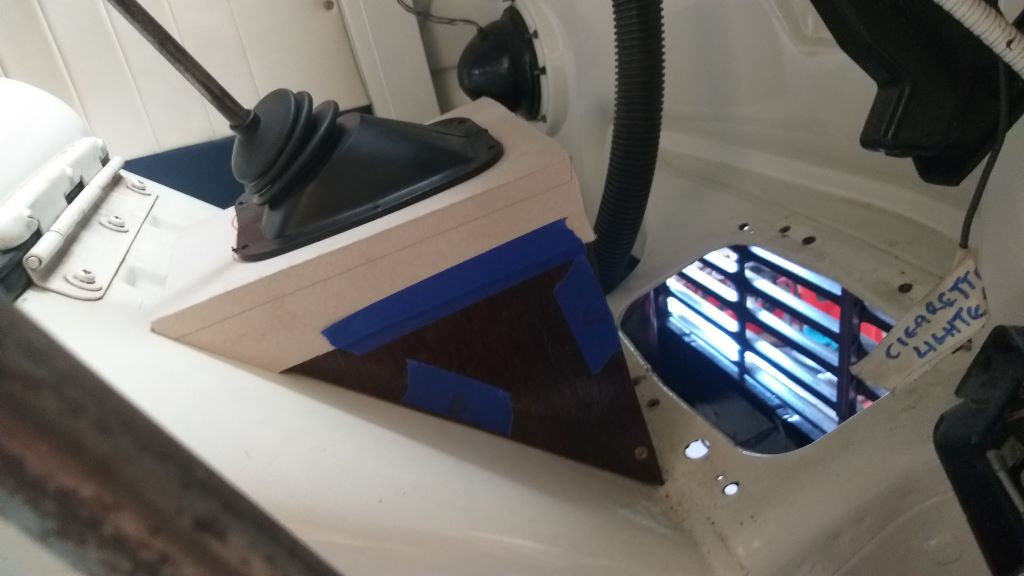
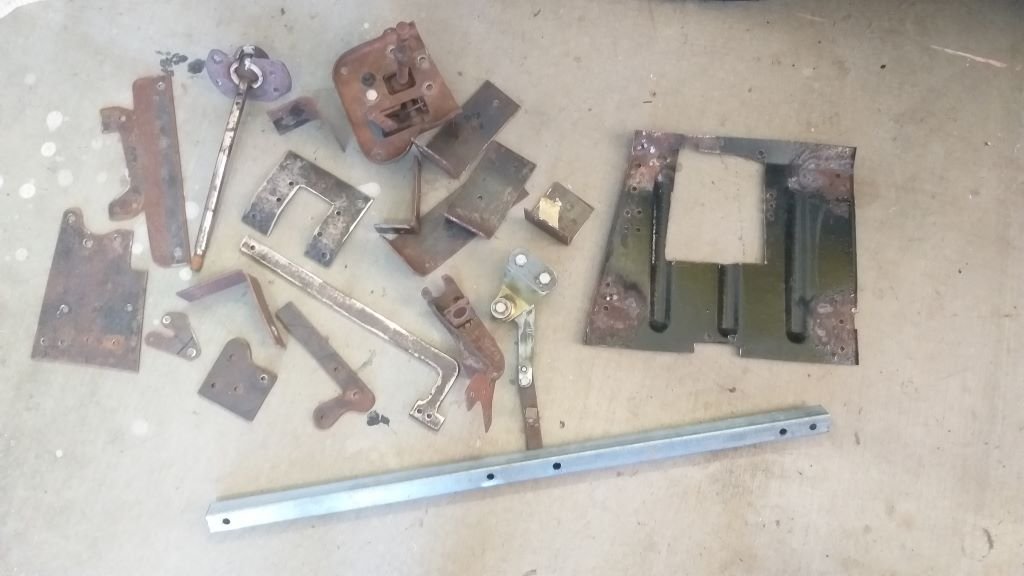
My good mate Grant donated an old Cortina MK1 gearstick complete with factory knob and rubber boot to the Thames project. To say that I was chuffed would be an understatement. The longer and thinner gearstick really looks the part compared to the existing short and chunky L300 one. Quickly took to the selector with my grinder of angles to get the L300 stick off and then welded the Cortina unit in place. Much better. This inspired me to start working on a gear selector cover and I managed to whip up a mock-up using some old plywood and cardboard. Doesn't look too out of place. I'll ask my mate Cameron to guillotine some of his aluminium off-cuts to match the panel shapes. I'm not setup for aluminium welding, but it doesn't need to be that strong so I'm thinking about using some aluminium angle glued to the inside of the panels to hold the box together. Some of that body panel glue should do the trick. It's worth a try, I reckon.

- 715 replies
-
- 12
-

-
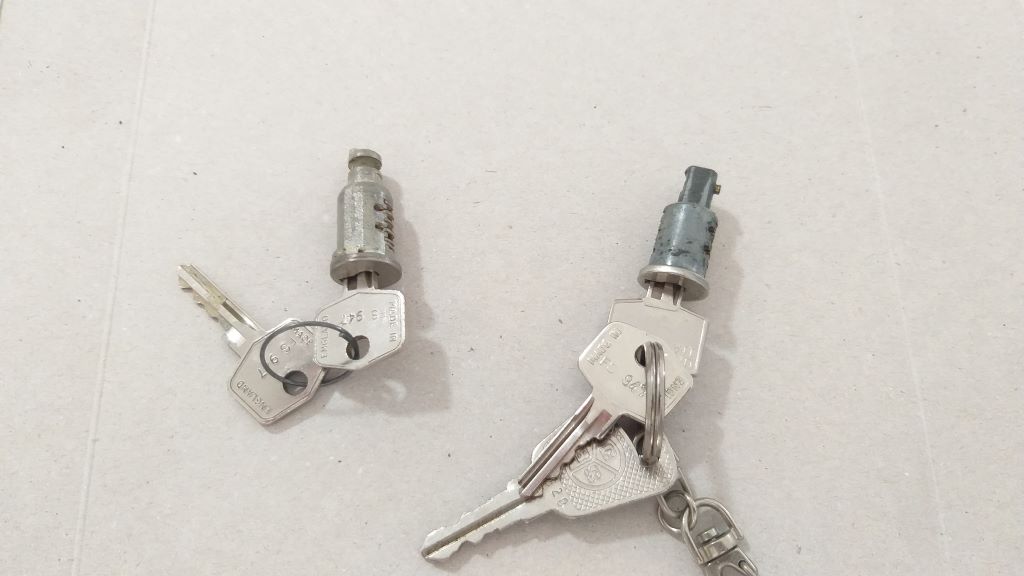
Now that I've got a single key working all of my new door locks, I thought I'd try to match the ignition to the same key. My replacement set of door handles came with an extra handle for those vans fitted with a side door, so my first thought was to see if I could swap the key barrel in the ignition for the one from the spare door handle. Pulled both barrels out for comparison, but yeah, nah ... barrels don't match. Next thought was to swap the little brass thingies between lock barrels. Watched a few youtube "how to" videos that demonstrated pulling the brass bits out with a set of long nose pliers while dodging a bunch of small springs flying all over the place. Looked simple enough so I tried my luck with both barrels, but the buggers wouldn't budge so in true "Rough & Ready Restos" fashion I moved on Plan C which entailed using some brute force and ignorance. Shoving the new key into the original ignition barrel I noticed that only two of the brass plates were sitting slightly proud on the one side of the barrel and a single plate on the opposite side. Some light work with a metal file sorted that out and I now have a single key that fits all three door locks as well as the ignition switch. Ignition barrel on the right and spare door lock barrel on the left in this photo shows the difference.
-
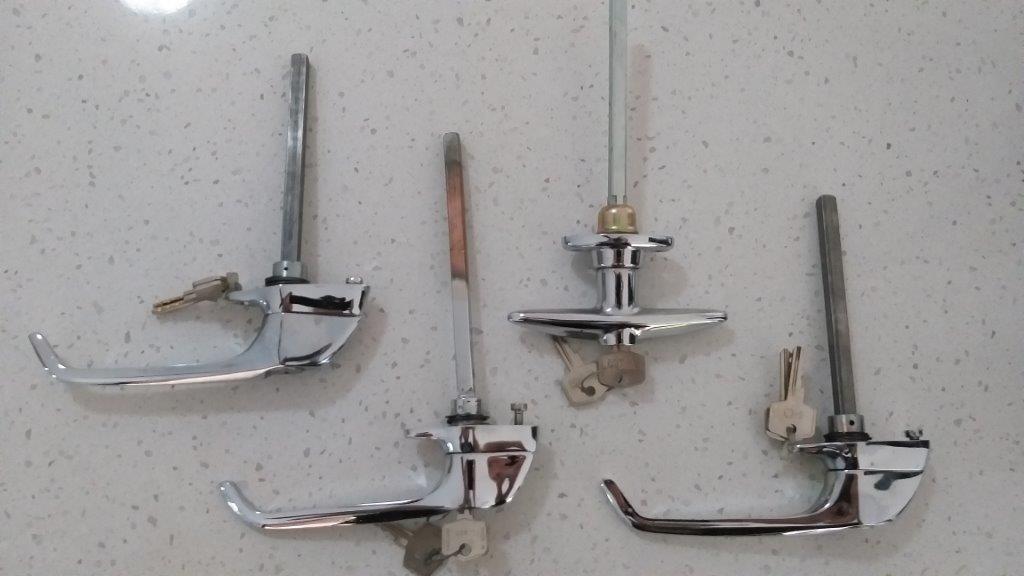
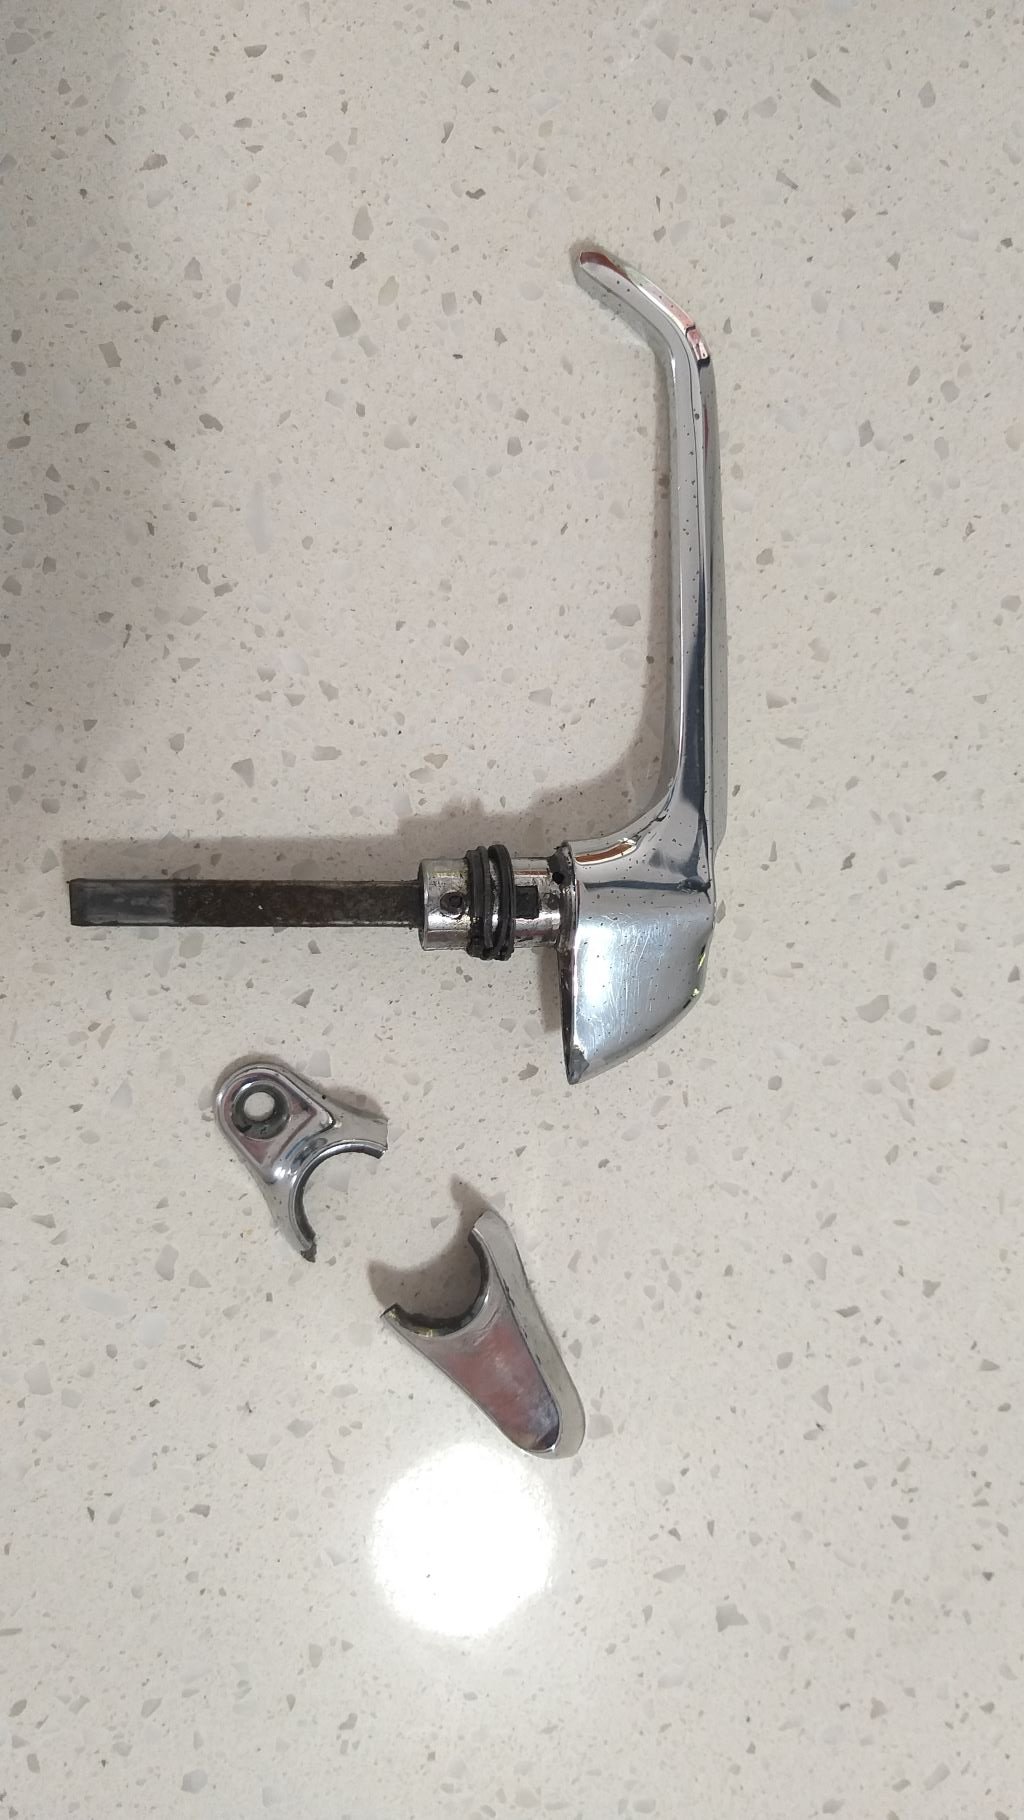
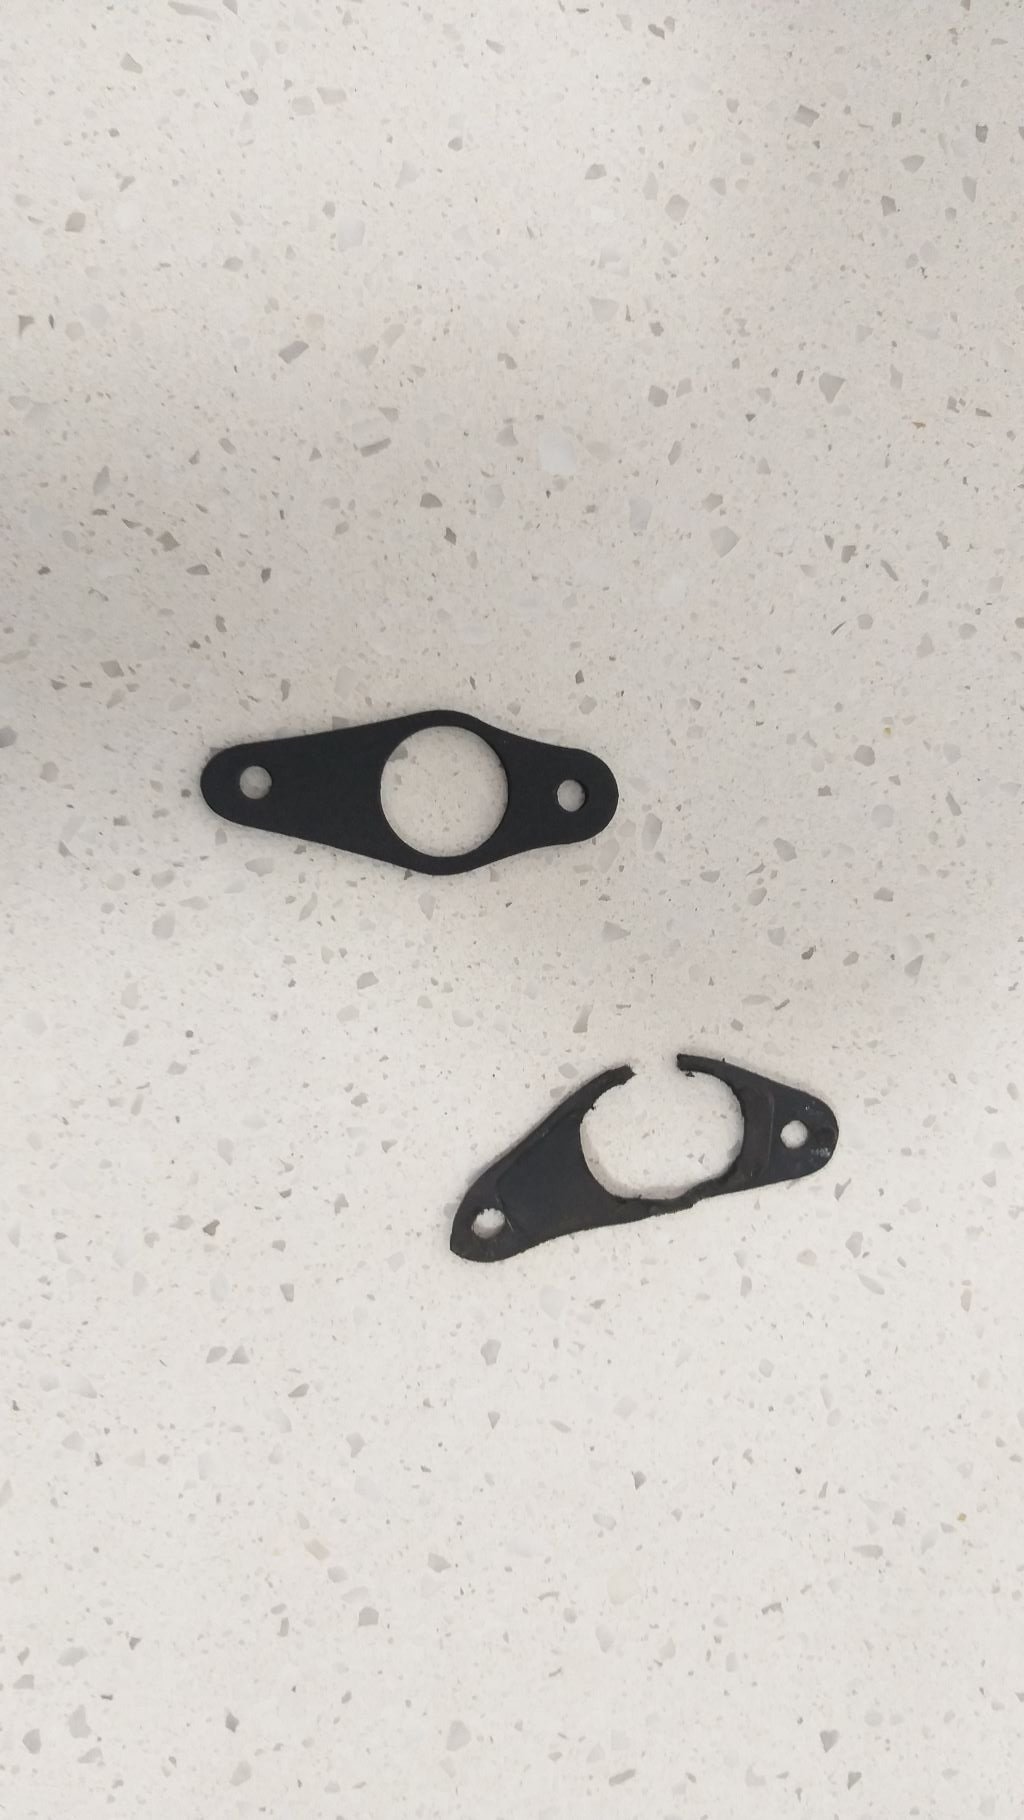
Next up I decided to fit the new door handles that have been languishing on the shelf since mid 2020. The base plate on the original driver's side door handle was broken resulting in a wobbly handle and an ugly crack that you can't help but notice every time you open the door. Another of the handles had been replaced at some stage resulting in a set of 3 mismatched keys, so not ideal. Replacing the two front handles and the rear "T" handle was a doddle, just needed to trim down the square shafts to suit. Chucked in a new set of gaskets while I was at it. Locks match on all 3 doors now. Thanks for looking.
-
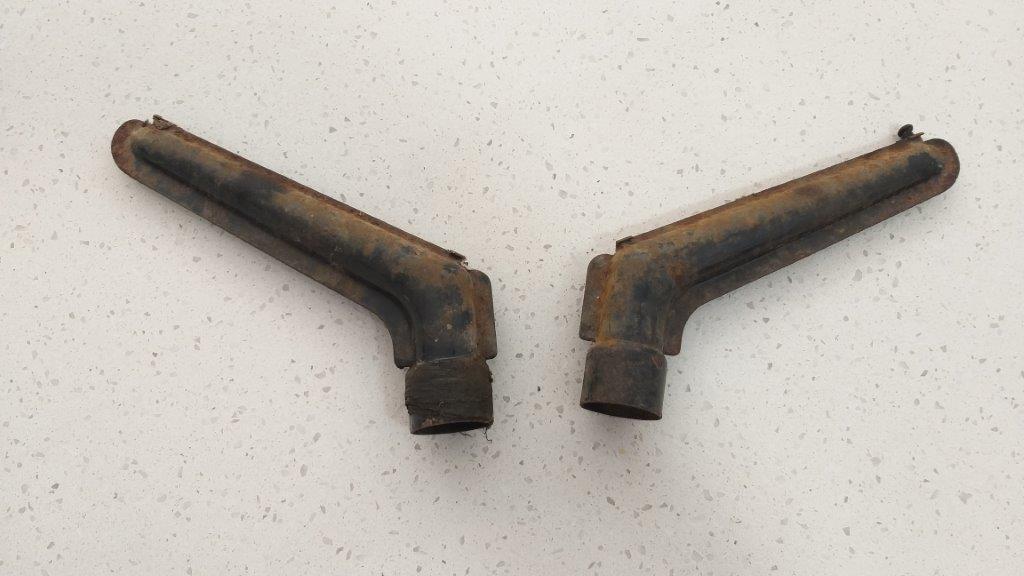
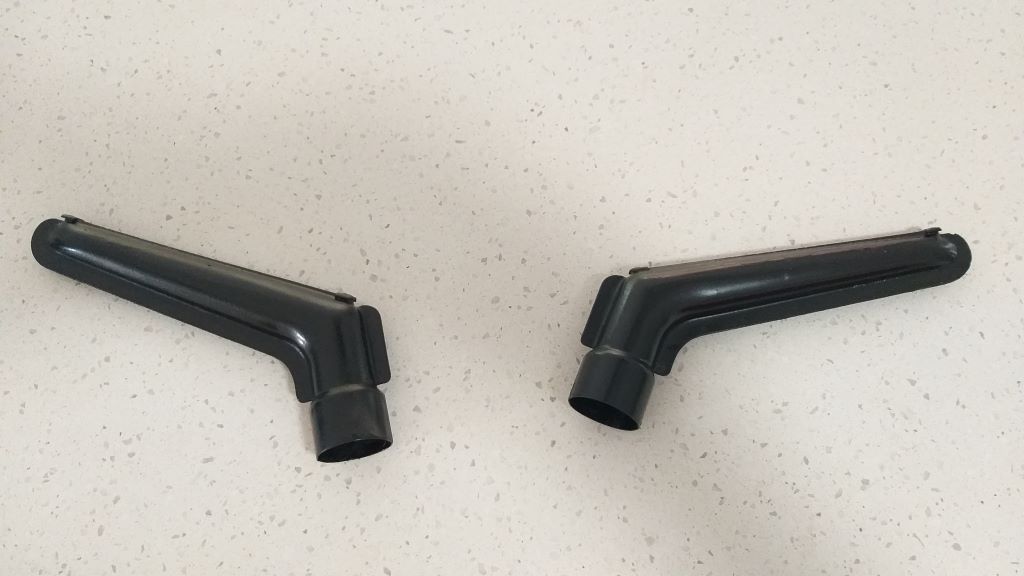
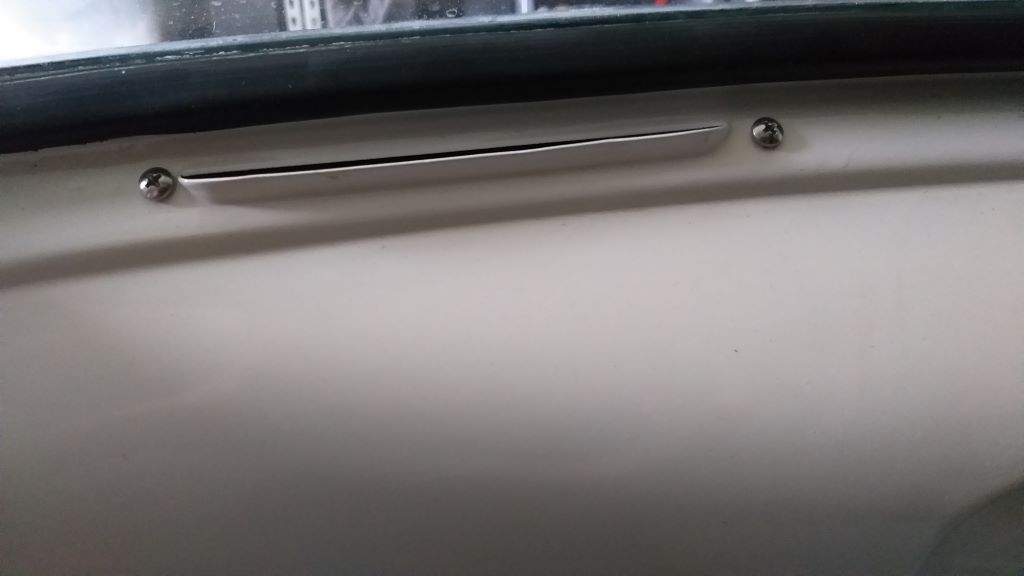
I was going great guns on fabricating my new hard brake lines until the little flare nut die self-destructed on me. Being in a bit of a holding pattern while I waited for a replacement to be delivered, I thought I'd crack into a few non-essential tasks that have been lurking around on the "to do" list for a while now. First up I thought I'd give the rather crusty windscreen demister nozzles a bit of a birthday. I sourced these from a chap in the UK who was wrecking a van a while back. Although all of the vans had the demister openings factory pressed into the all-metal dashboard only those vans that were equipped with the optional heater got the actual nozzles mounted to the back of the dash, so they are a pretty rare item. Anyway after a quick tickle with a flapper disc followed by a few days in a vinegar bath they didn't look half bad. Chucked some satin paint on both the inside and outside and then fixed them in place with some fresh stainless steel self-tappers. I still need to figure out what I'm going to do from a demister point of view, but at least the nozzles are in place for now.
-
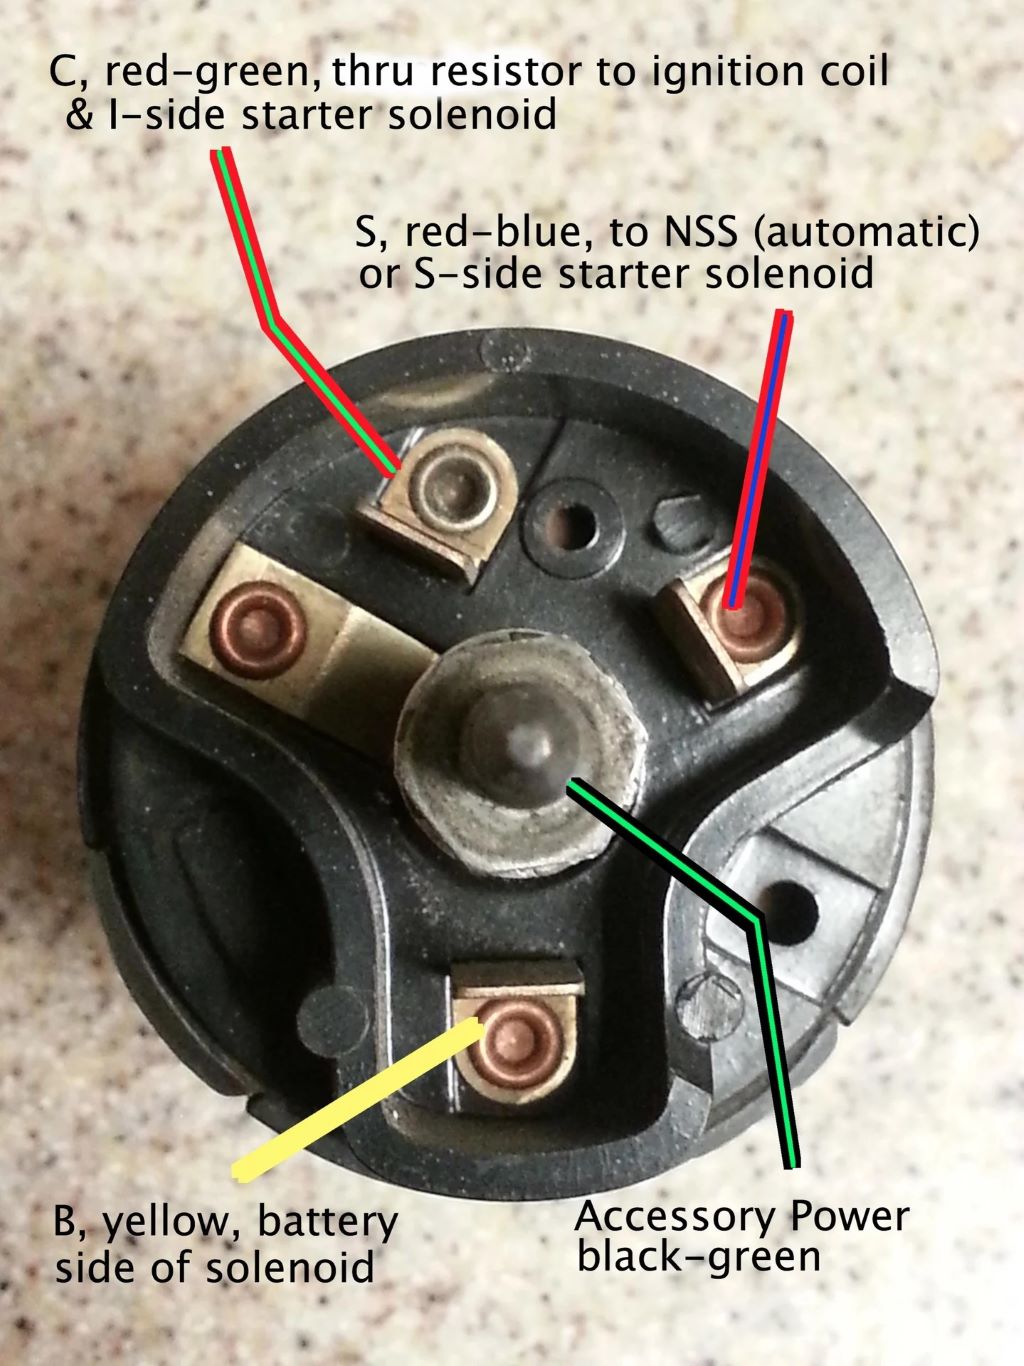
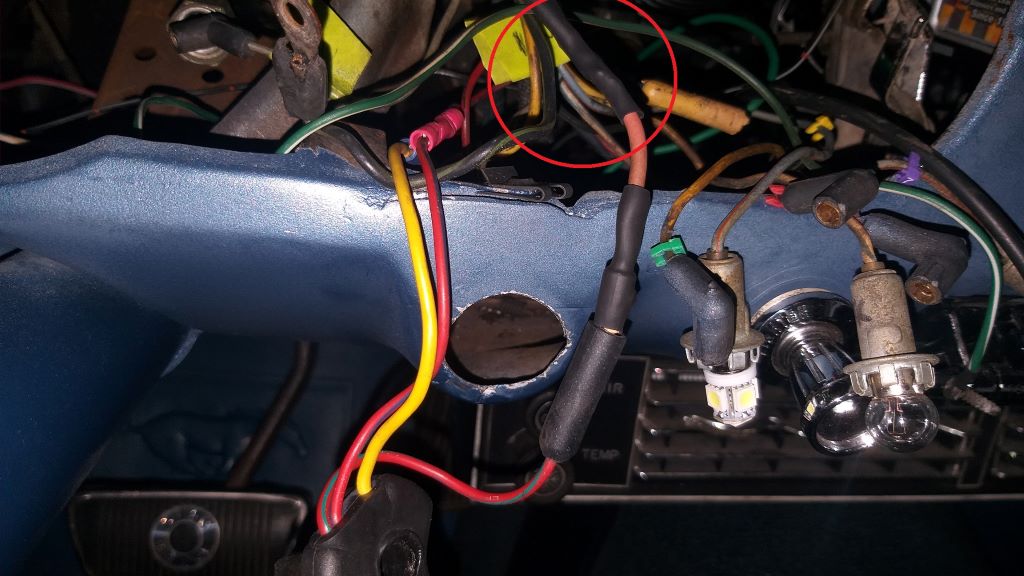
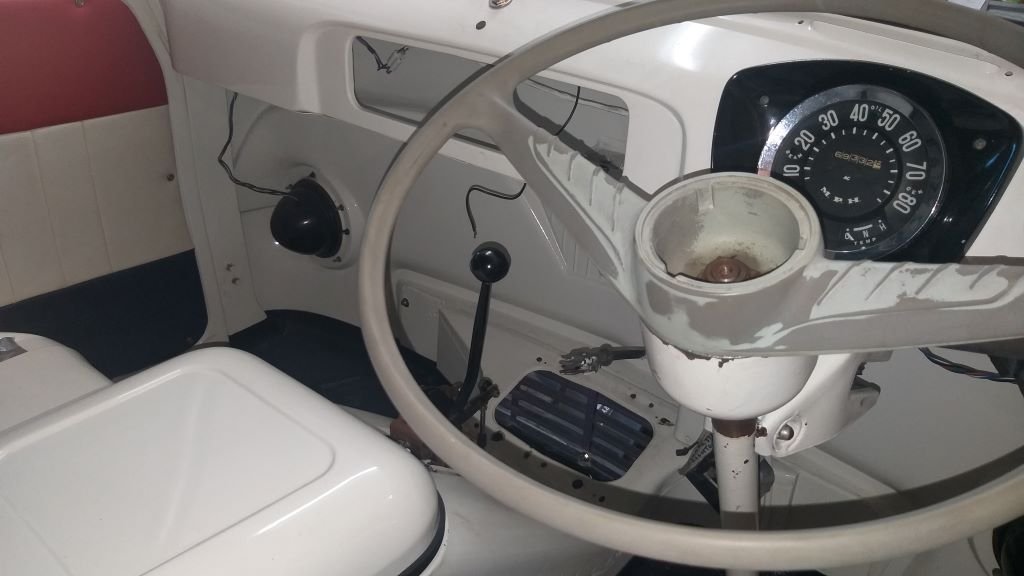
Okay, so some of you might have seen my plea for help on the general chat page as I was battling with a voltage related issue. Let me explain. The new EFI system came with its own fuse/ relay box which makes the external wiring really simple. All that is really required is two 12 volt feeds, one a direct battery feed and the other a switched ignition feed. The battery feed was pretty straight forward, but the switched feed had me scratching my head for a good few hours. I'd like to thank those who responded to my "help needed" post with advice and suggestions. Shout out to @nominal who gave me a clue that sent me off into the world of google where I finally got my answer. I don't want to bore you with a whole lot of useless detail, suffice to say that on the early Mustangs there is only one wire that has the potential to provide a full 12 volts on cranking and that is the coil wire on the ignition switch. But, there is a twist to this as right under the dash just before the wiring loom firewall connecter Ford have sneakily hidden an inline resistor that drops the voltage to the coil. So, the only way to get the full 12 volts is to tap into the coil wire before this resistor. Had to pull out my instrument cluster and then the ignition switch to identify the correct wire. Cutting into my factory harness hurt like hell, but I basically had no choice. And now my new EFI is one happy chappy. Image of the factory ignition switch identifying the coil wire that I pinched from the web as a reference for anyone who may come across the same issue and a photo of the wire with my bodge for your viewing pleasure:
- 194 replies
-
- 10
-
-
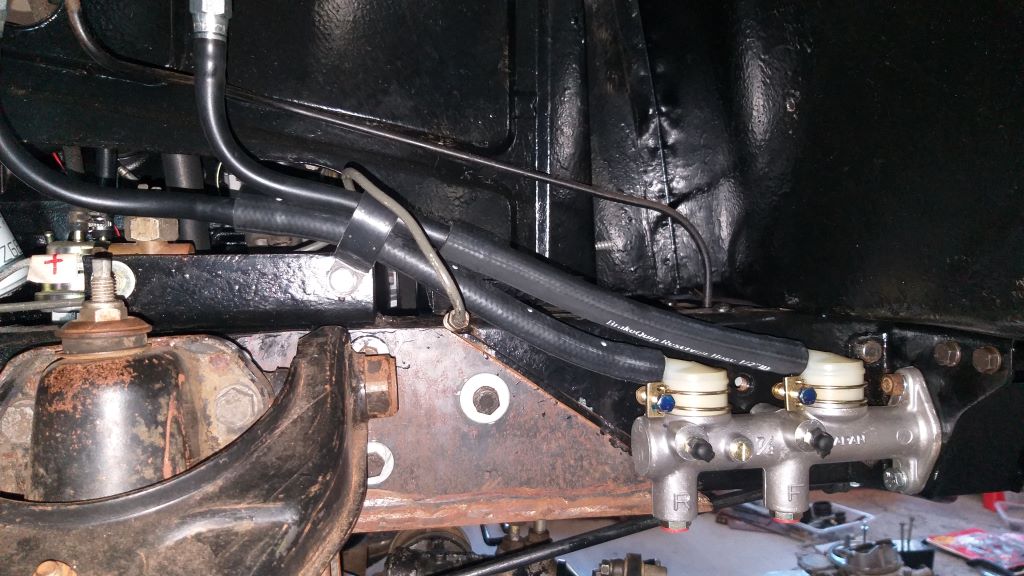
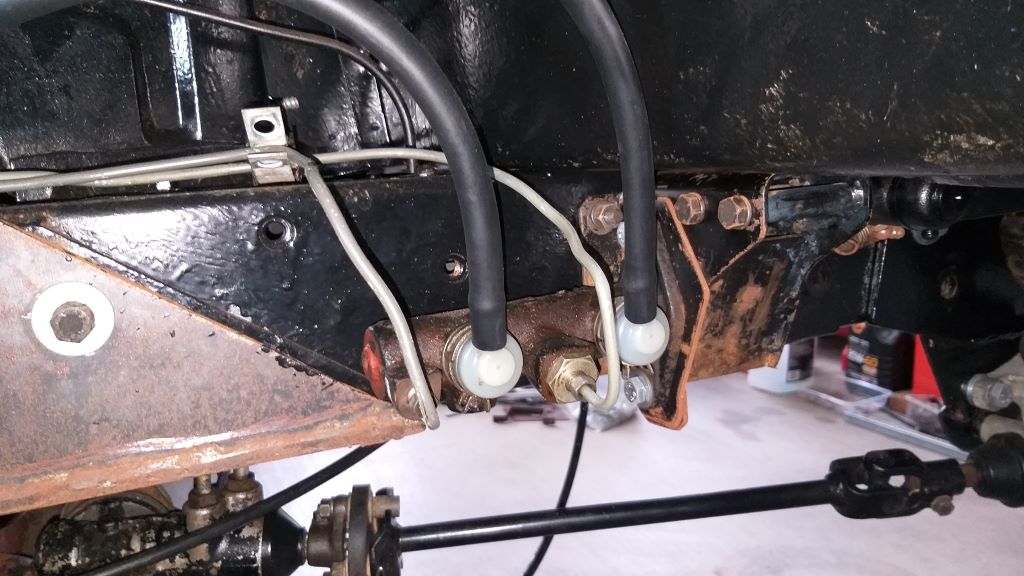
Finally got my reservoir hoses for the new brake master cylinder sorted out. I had to use barbed fittings in order to sort out the different diameter fittings on both sides, but it looks neat enough, I reckon. Just need to pick up some appropriately sized hose clamps on my next town run. Also fitted the custom fabricated stainless steel push rod that I had made up a while back. Needed this to connect the Thames brake pedal to the Nissan master cylinder. Next step brakes wise is to fabricate a new set of hard brake lines throughout.
-
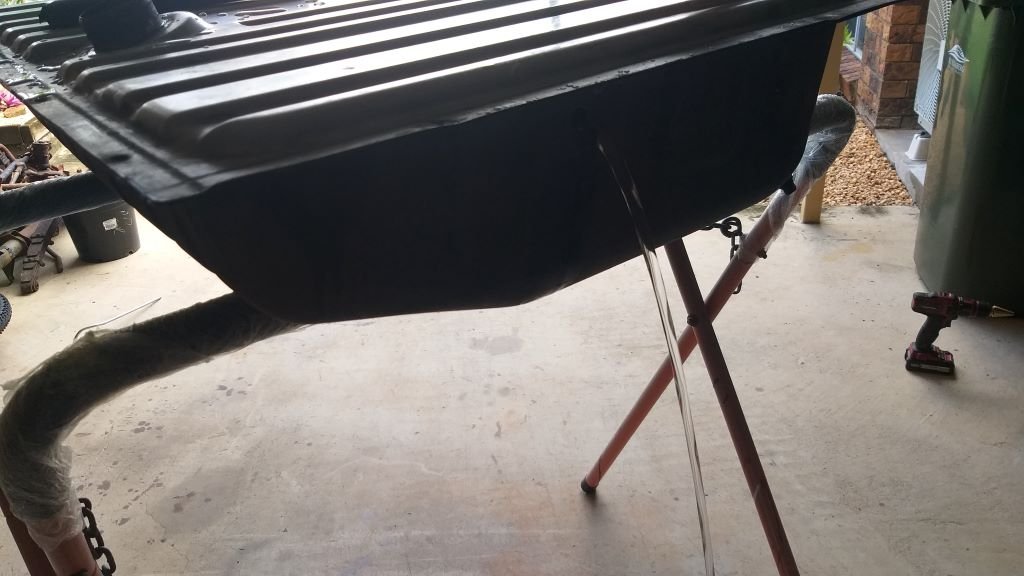
Steadily plugging away at the EFI upgrade whenever I get a chance. It's time-consuming fiddly stuff, but hey I want it to be right first time. Tank is back in and all fuel lines completed including high pressure line to throttle body. Space was so limited that I had to remove the RHS exhaust header to fit the o2 bung, but that's all welded in and the header is back on with a fresh gasket. Moved the existing temp gauge sender unit to the thermostat housing as I wanted to have the EFI temp sensor located in the inlet manifold which meant draining the coolant and then bleeding the system once again after the swap. Even the air cleaner thread was different on the throttle body, so had to do a town run to source some ss threaded rod and nuts to get that sorted. Then I wasn't getting WOT so had to fiddle about with the accelerator linkage in order solve that issue. EFI fuse box is mounted so all that is left to do is to poke a hole in the firewall for the battery and ignition feeds and the control wire for the handheld and I should then be ready for the big fire up.
- 194 replies
-
- 14
-
-
While I was in the hydraulics zone, I thought that I would revisit the clutch master cylinder. For those who can remember that far back I'm using a Toyota HiAce YH53 clutch slave cylinder which I am currently driving with a standard 11/16" Thames clutch master cylinder. This is a poor substitute for the original 5/8" HiAce clutch master cylinder. This didn't sit well with my OCD, so I decided to do a bit of research and it turns out that a Hillman Imp runs a 5/8" master cylinder and the Imp unit is identical to the original Thames unit from an exterior dimension and mounting point of view. So, a while back I sourced a Hillman unit and this morning, I thought I'd do the swap. First photo is of the Thames unit in place and the second photo is of the two units sitting side by side for comparison purposes. The Imp unit is the bottom one in the photo. All that I needed to do was to swap over the pipe fittings and push rods and the Imp unit was good to go. And that's another small job ticked off the list.
- 715 replies
-
- 13
-
-
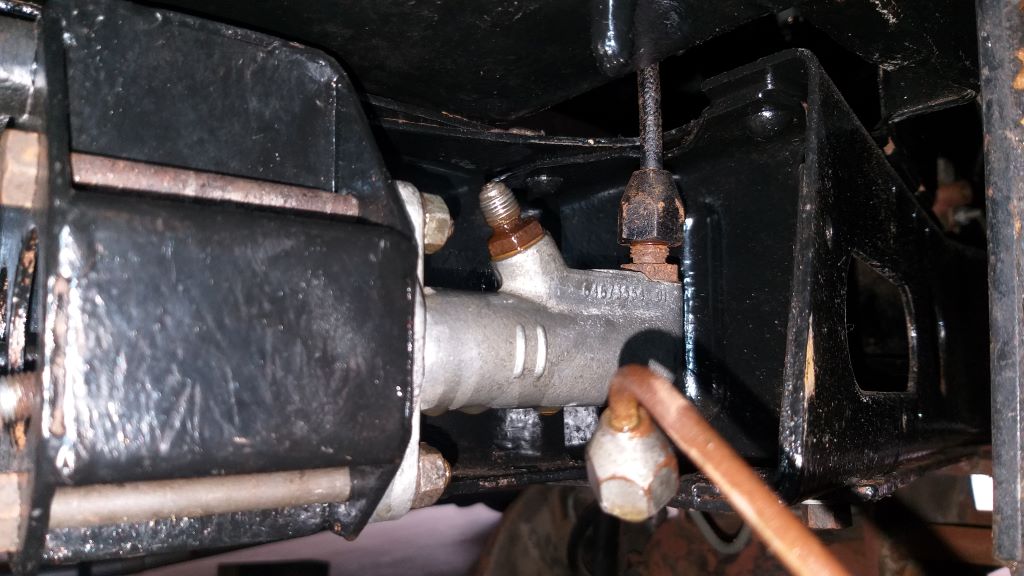
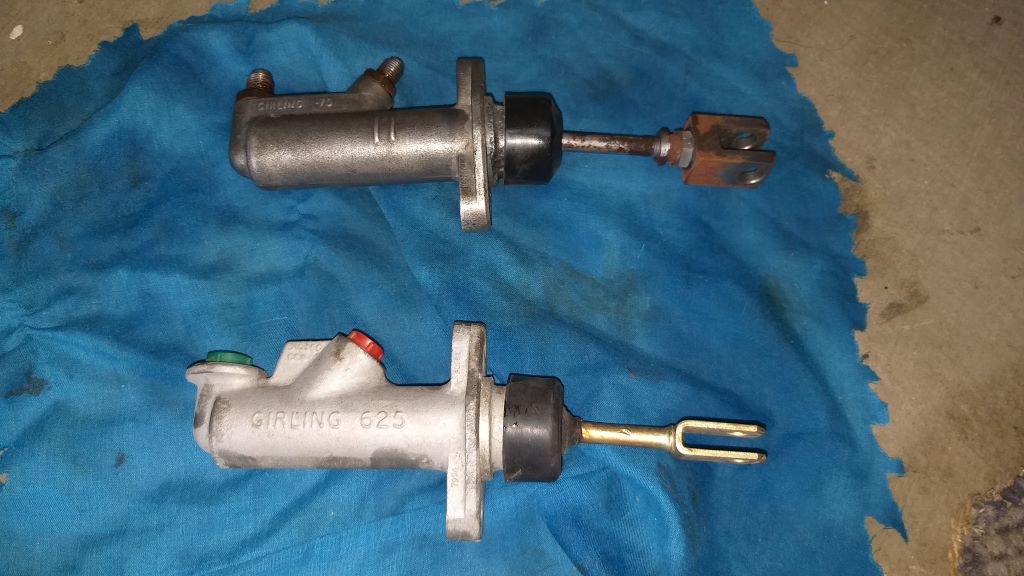
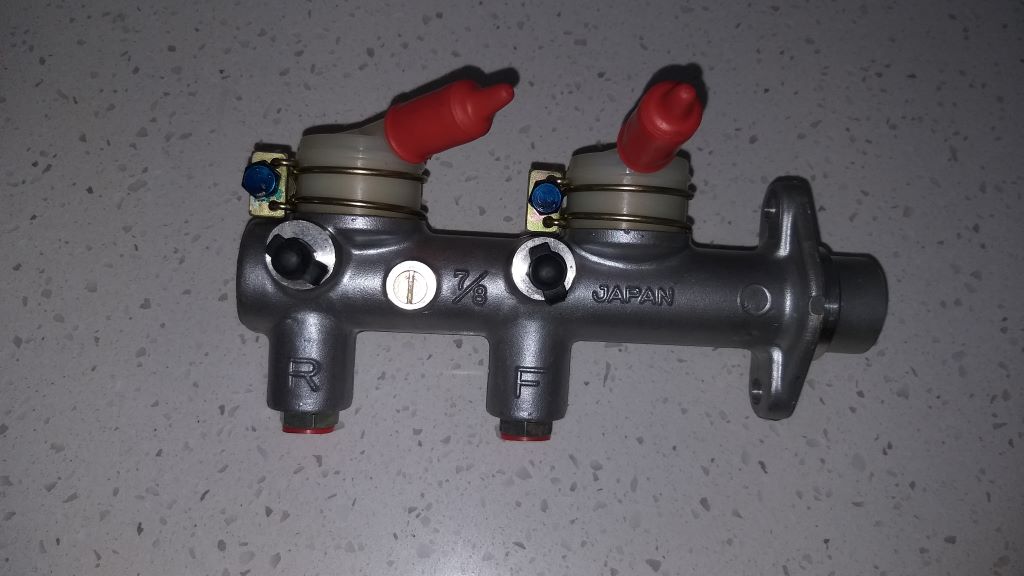
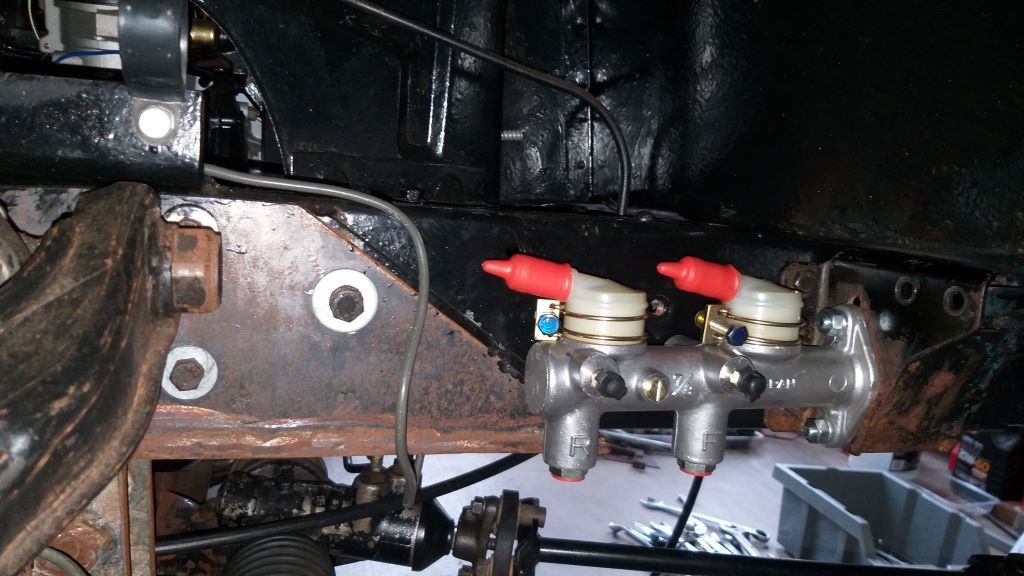
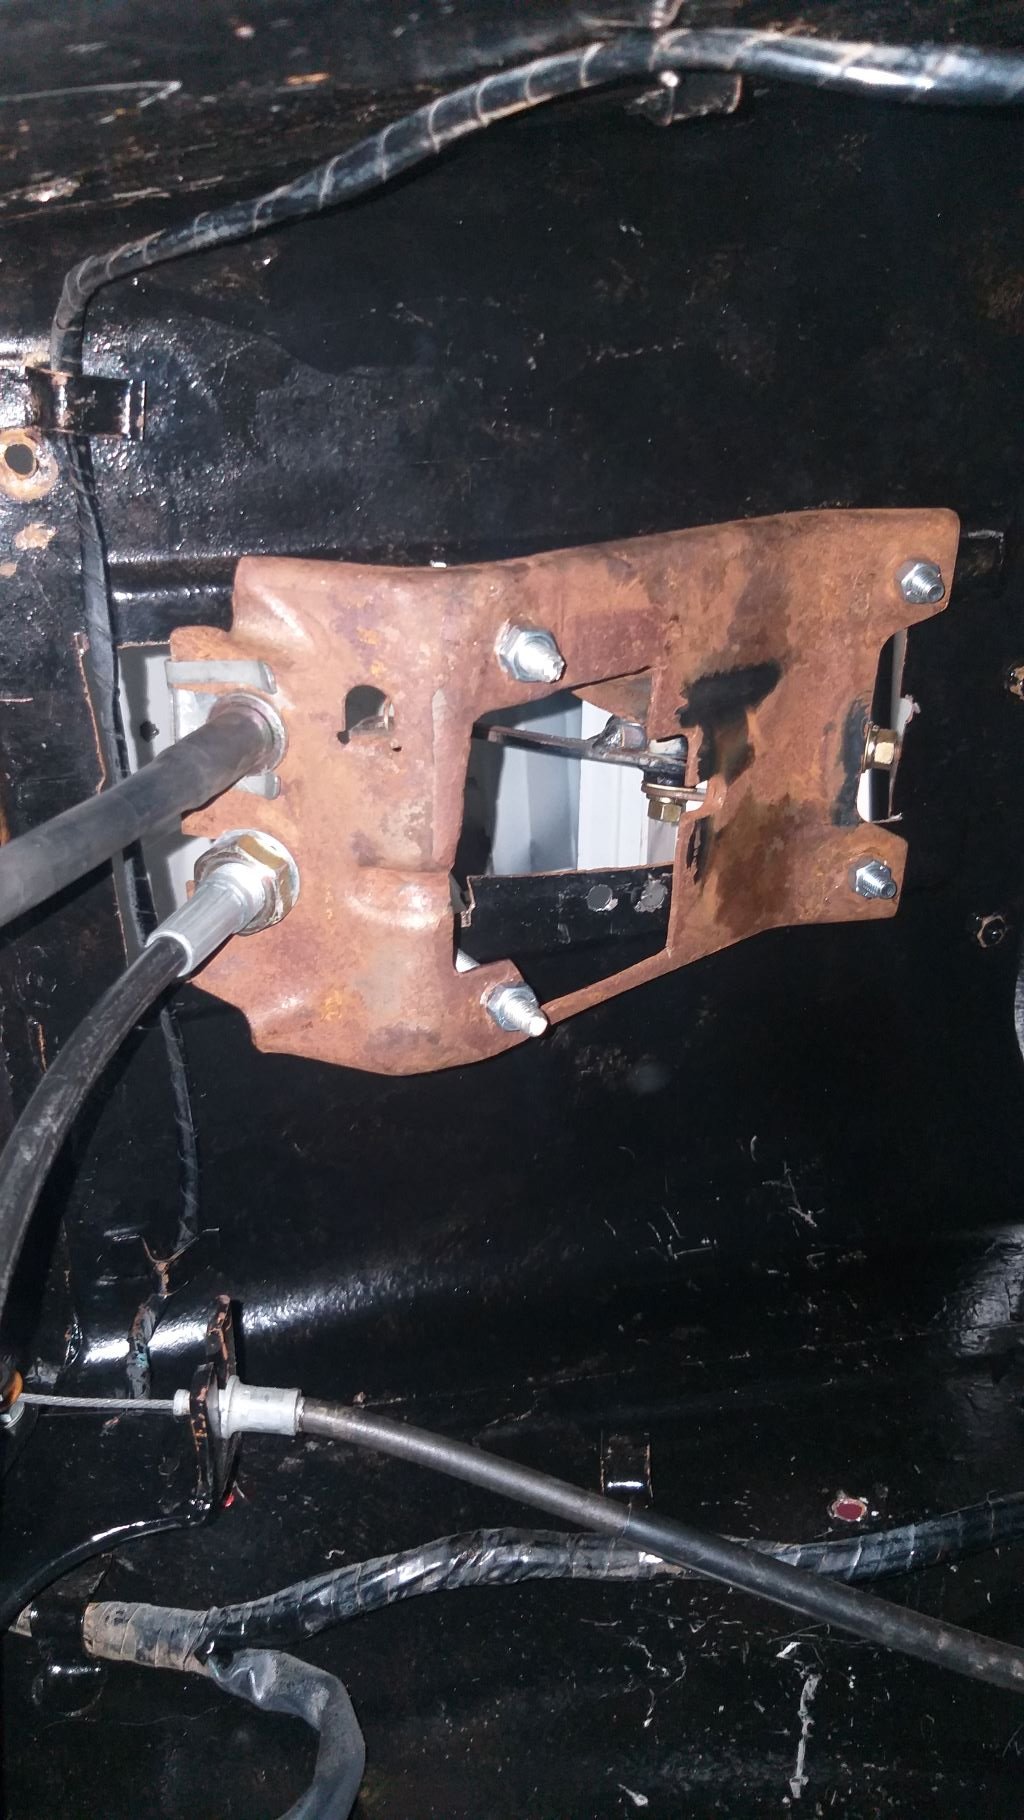
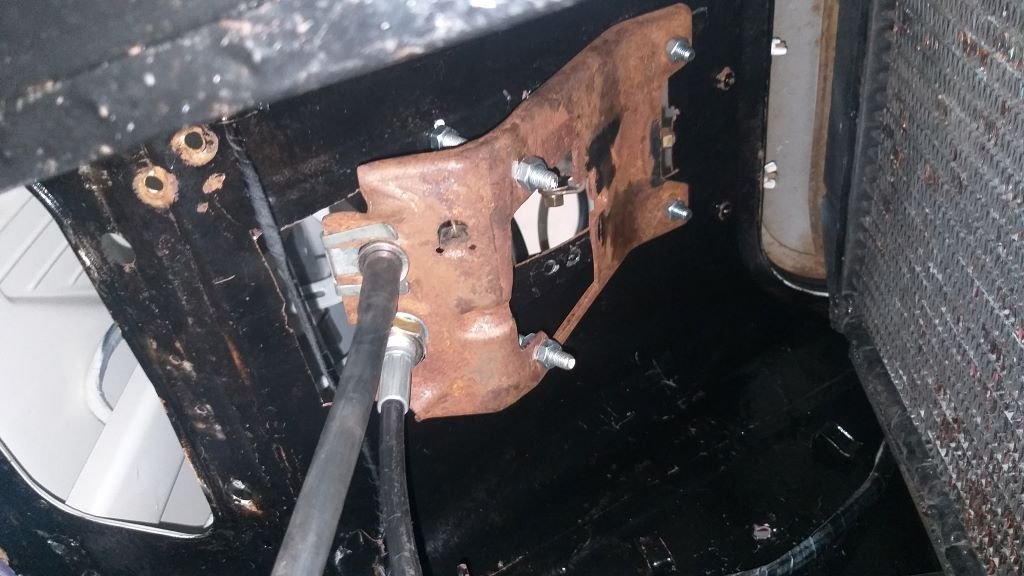
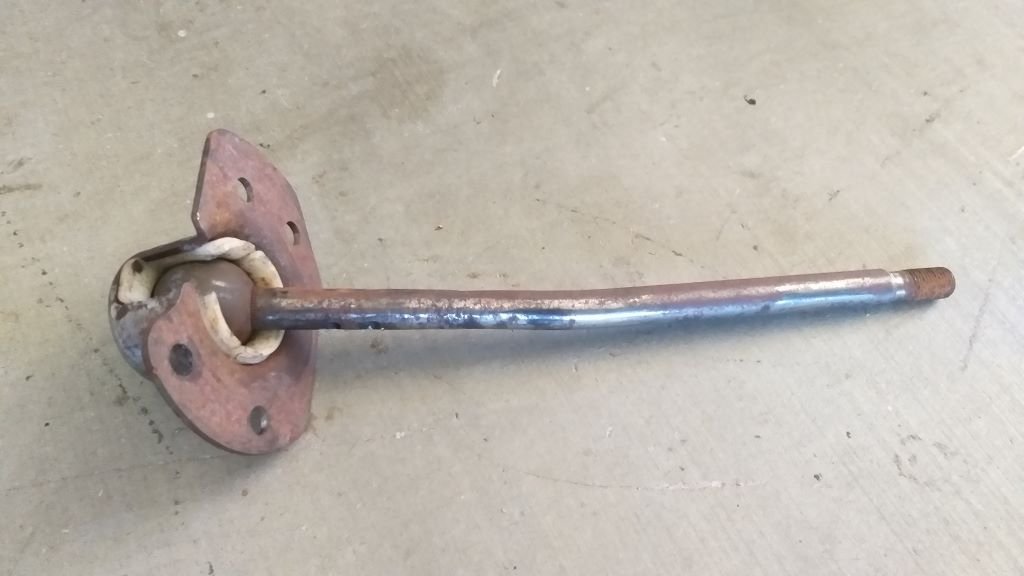
A while back I installed a dual circuit master cylinder that I had harvested from my donor L300 van. My concern at the time was that I had to rotate the m/c 90 degrees in order to get it to bolt up to the chassis leg. I asked for some advice on the tech forum and got a lot of valuable feedback with most of the opinion that I might face some bleeding challenges. At the time I decided to take a chance with the setup, but those feelings of doubt have always lurked in the back of my mind. Then about 6 months ago I spotted a Thames van listed for sale on the Book of Faces and noticed in one of the posted photos that the van had been fitted with a dual m/c that was the correct orientation. I messaged the seller and he confirmed that the m/c was out of a mid 80s Nissan Homer. Managed to track one down on the interweb and it has been langushing in my parts pile ever since. This morning I decided to do the swap out. First photo is of the old L300 unit. Second and third photos are of the new Nissan unit. I'll need to source some larger diameter reservoir hoses and make up some new hard brake lines, but it's worth the effort for the extra peace of mind. Thanks for looking.
- 715 replies
-
- 13
-
-
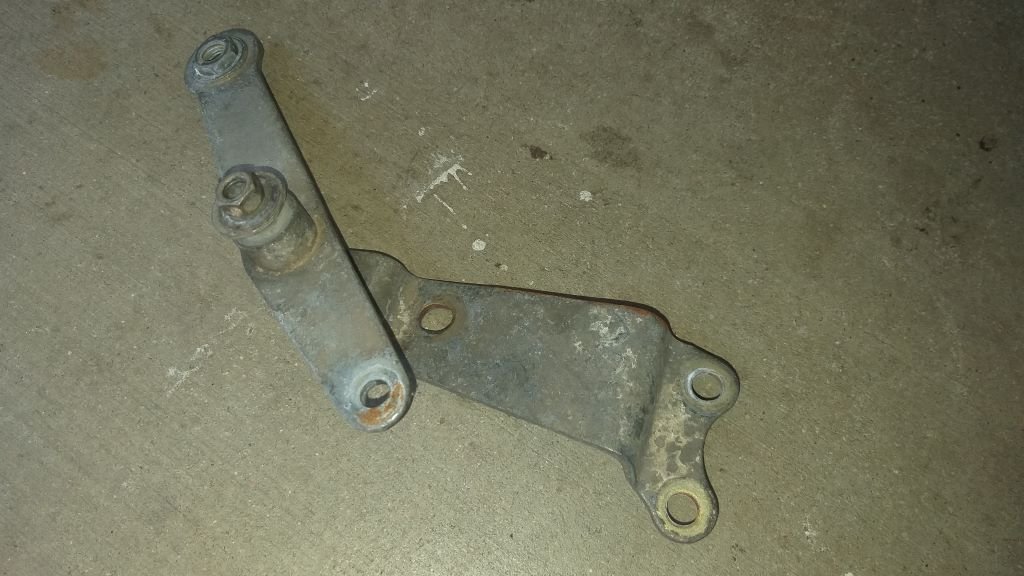
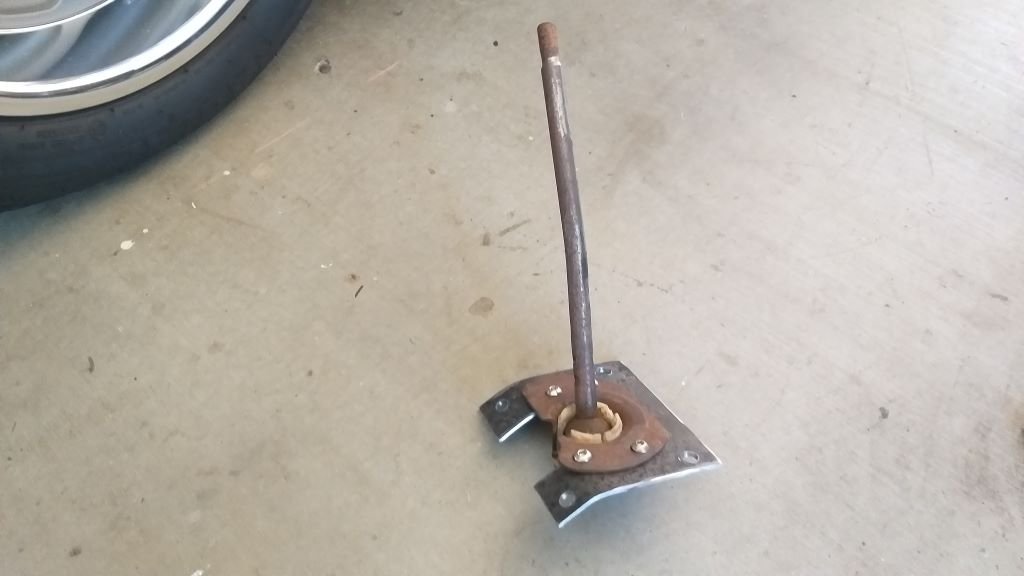
A little bit of cutting, bending and the poking of a few extra holes in the swivel and I had the makings of a solution. Chucked in a bit of threaded rod at the swivel to create an intermediate pushrod and hey presto... I now have a perfectly functional gear selector with a conventional selector pattern. After spending days and days on this and subjecting all of you to lengthy explanations of each failed attempt, I actually can't believe that the issue is finally resolved. I'll probably end up grabbing an "unhacked" Express shifter from my local wreckers just to feed my OCD and with a few licks of paint and a nice cover plate and rubber boot I should be good to go. I bet all of you are pretty relieved too that you won't be subjected to any more gear shift updates from me. Next up I'm going to revisit my brakes as I'm not altogether happy with the current solution. Thanks again for reading.
- 715 replies
-
- 16
-
-
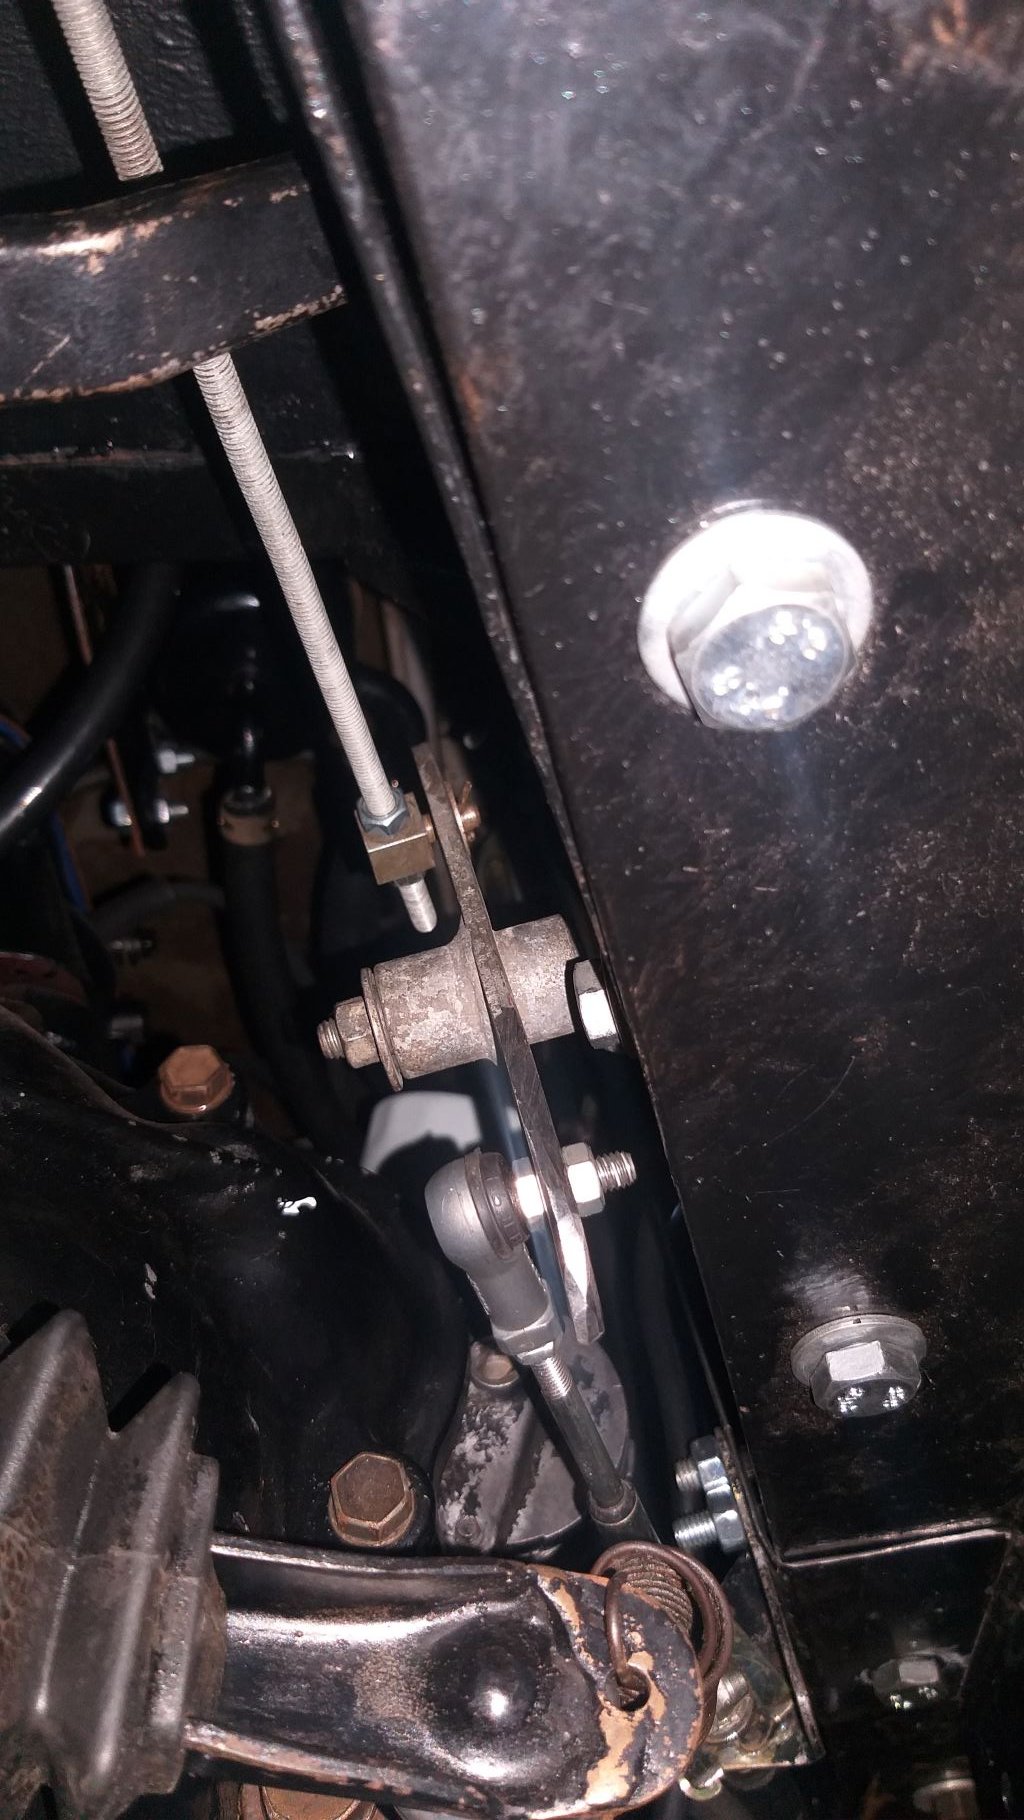
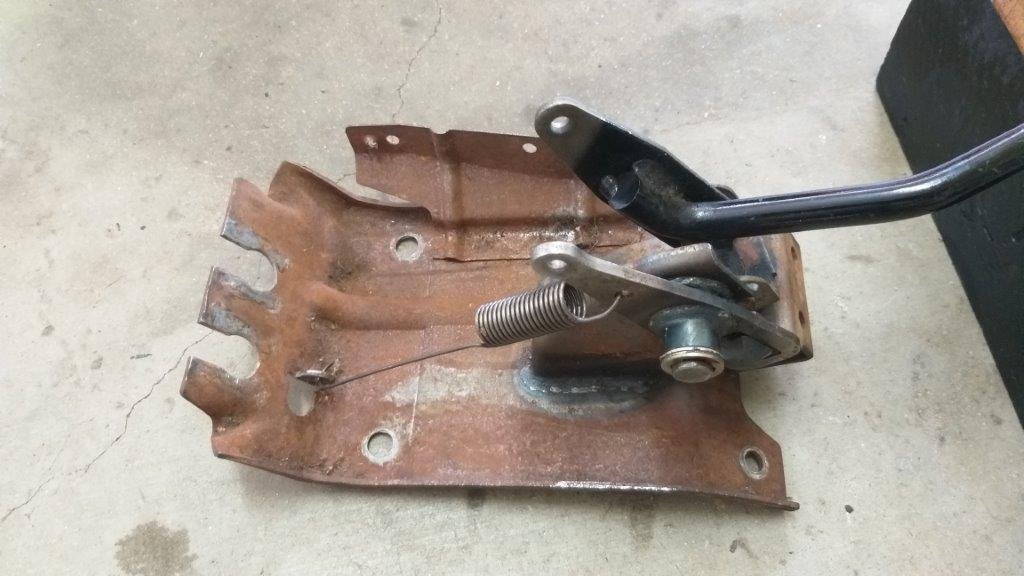
The Express mechanism works beautifully with a nice smooth motion, and it consistently springs back into the neutral position when slapped out of gear which is something that all of my other attempts had failed to do. As mentioned earlier the only issue is the reversed shift pattern which unfortunately, I'm not prepared to live with. So, my attention turned to the gearbox side of things to see what I could do to rectify the shift pattern. The gear selection was easy to resolve by installing a longer morse cable that I already had in stock and looping it around to the rear of the gearbox so that it would pull on the lever rather than pushing. Worked perfectly with only slightly more force needed on the gearstick, but definitely something that I can live with. The gate selection was slightly trickier. I tried the same solution using a longer morse cable, but the latency in the longer sheath causes the drop out to neutral to be a bit hit and miss. So definitely a shorter cable is needed. I then turned to my junk pile and discovered this little gem that came out of my HiAce donor van:
-
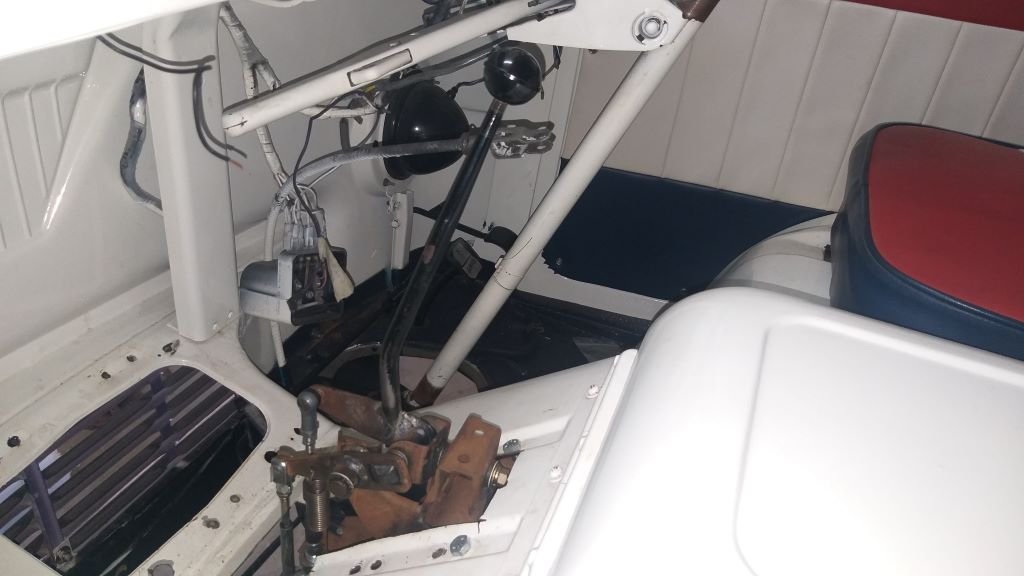
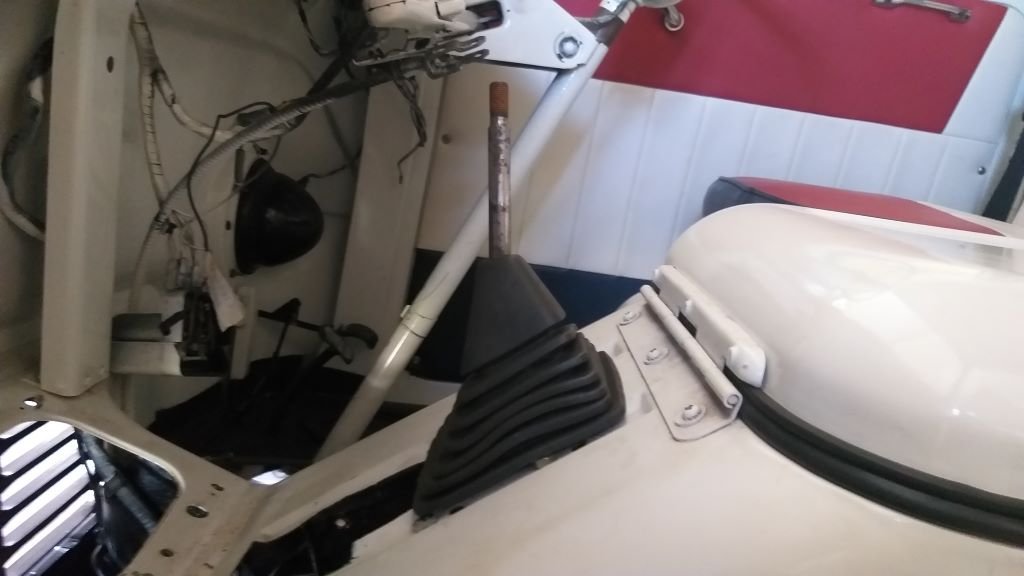
With the shifter bolted in place I hopped into the cab to see how bad it looked above the floor. The gear stick angle needed tweaking, so I cut that off and welded it back at a different angle. It's not really the smooth look I was hoping for with just a dust boot covering the stick, but hey if it works, I can live with having to make a little cover to hide the nastiness. I made myself feel a bit better about the whole thing by quickly fitting an old tractor gear knob that I had sourced a while ago.
-
The base of the Express shifter has been hacked to buggery, but at least it's still functional so my latest plan was to see if I could mount it in the tunnel and then somehow reverse the shift pattern on the gearbox side. Managed to get it temporarily mounted up inside the tunnel. Looks like a dog's breakfast, but nothing I can't tidy up if it turns out to be a functional solution.
-
With another spectacular failure under my belt, I spent a bit of time in front of the computer trolling back through my build thread to refresh my memory on each shifter option I've trialled so far. Looks like the Mitsi Express floor shifter was one of the more successful attempts albeit with a revered shift pattern. So, I gave it a dust off and crawled under the van with it to see what I could do.
-
Righto, so the last version of the gear shifter that featured the remote gearstick failed the test as the sideways throw for gate selection turned out to be excessive resulting in a shifting motion akin to stirring porridge. So, I pulled the mechanism out and banished it to the naughty corner with the rest of the debris from previous failed attempts.
-
Hiya Bas, yep the Bedford was easy as many had done similar conversions, so it was just a case of copying everyone else's ideas. Not so easy when you have to think for yourself Ha Ha. I suppose I could just take the easy route and chuck in an auto box, but I'm a real glutton for punishment. How is your Bedford project going?
-
Bit of fine tuning and a few nuts and bolts later and she was ready for mounting. Bolted my handiwork into position and chucked on an old rubber boot from the L300 donor van just to get the feel. Once I've plated over the ruddy great hole in the tunnel and sourced a "period correct" gear stick boot and knob it should end up looking fairly okay. Next step is to work out the best way to connect the remote stick to the main selector mechanism, but that's tomorrow's headache. Thanks for looking.
- 715 replies
-
- 12
-
-
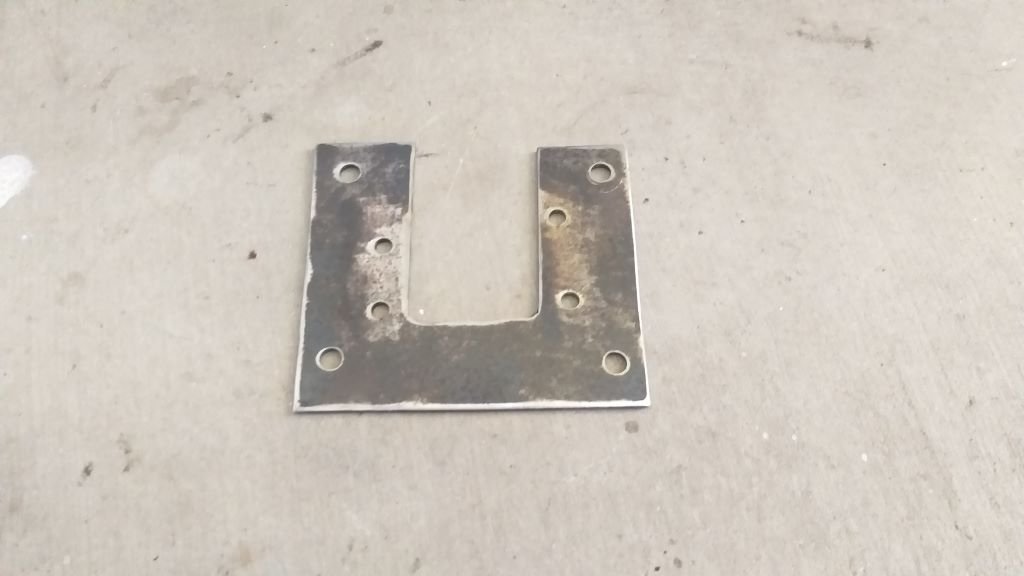
Grabbed a bit of scrap plate and took to it with my grinder of angles and my hole poker and I ended up with this fine bit of kit:
-
Okay, so with the gear shift mechanism in what is hopefully it's forever home, my attention has now turned to the remote gear stick. First up was to figure a way to mount this pared down gear stick to the radiator tunnel:
-
Last time I worked on the Thames I'd left the main gear shift mechanism temporarily fixed in place with just a front mount and the rear flapping in the breeze. So, first order of business was to knock up a rear mount. Grabbed a scrap piece of square tube and slapped it between the two chassis rails. Poked a few holes, chucked in a few bolts and its now firmly in place. Not the prettiest looking thing, but its functional for now. I'll put some lipstick on it at a later stage if it ends up becoming a permanent fixture.
-
Holy heck! I've been mucking around on the Mustang for well over a year now and all this time the poor old Thames van has been patiently waiting in the corner of the shed. So, while I'm waiting for some more Mustang parts to arrive, I thought I'd give the Thames a bit of loving. Pushed it out into the sunlight for a quick bath and whilst I had it outside, I managed to sweep up a year's worth of dust bunnies that had covered the shed floor. Tomorrow I'll get back on the next iteration of the gearshift mechanism. Hope I can remember what I was planning to do.
- 715 replies
-
- 23
-
-
Thanks for the info. I'll see if I can find it on my next visit to Bunnings.
-
Those hubcaps came up mint. I'd be keen to hear what the detailer suggests for polishing up the chrome on your bumpers. The ones on my Thames van are in similar condition and I've yet to find a way to improve them.
-
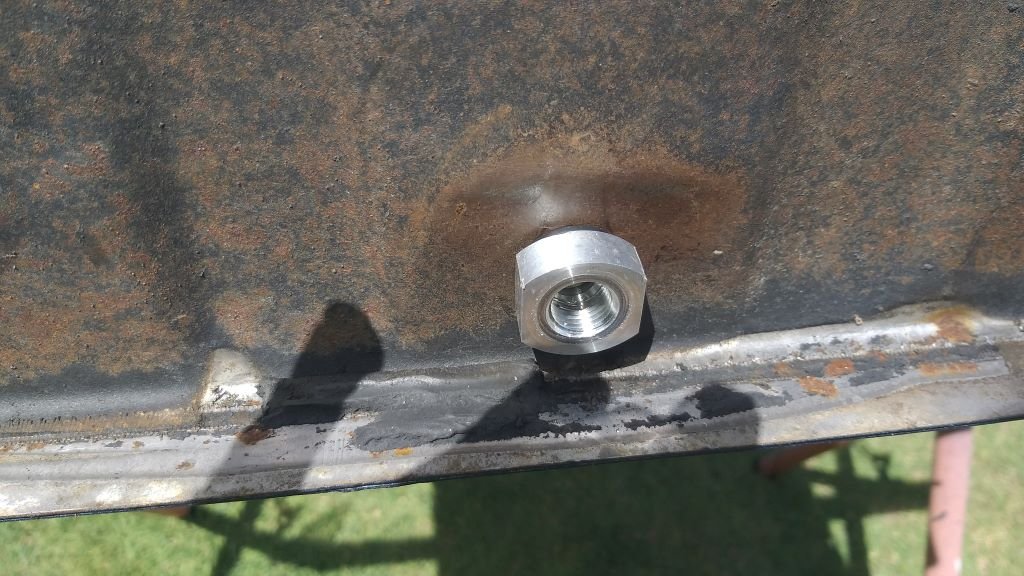
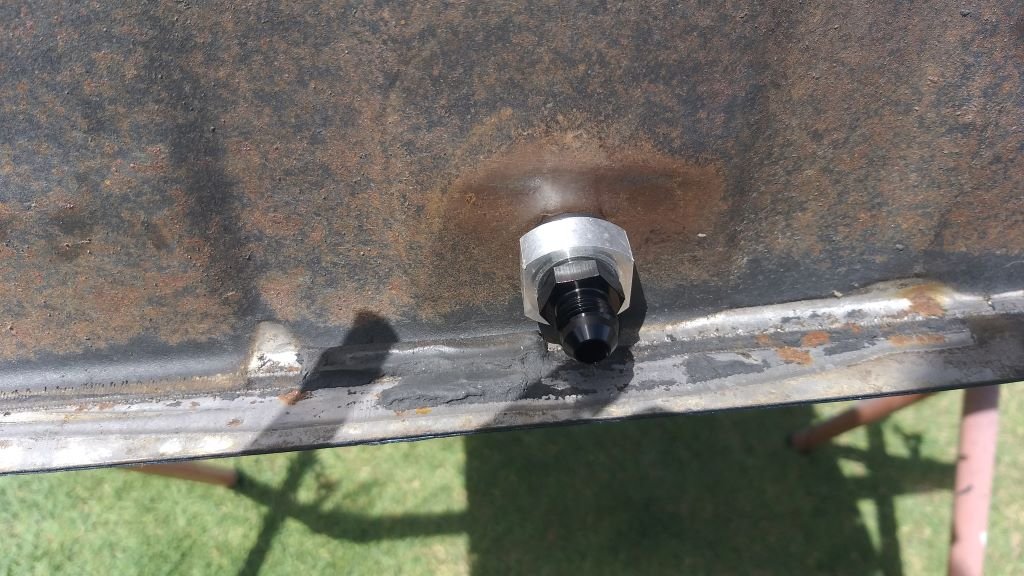
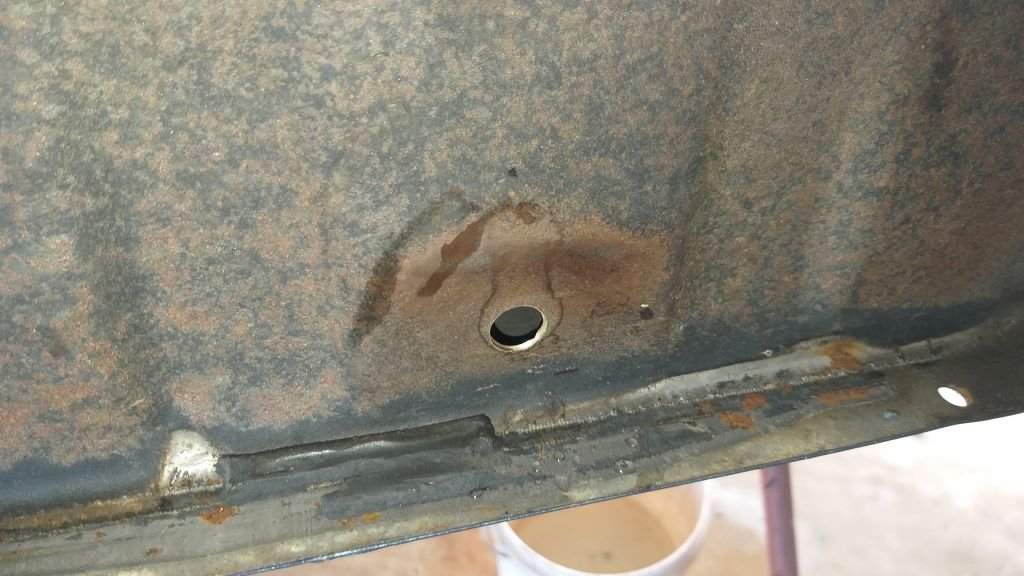
Final step was to clean the hole up a bit before pushing in the thingy. Grabbed the outer with a spanner and steadily wound the bolt in to compress the rear of the rivnut. The rubber O ring on the outside is supposed to seal things up nice and tight. Then out with the bolt and in with the ORB return fitting and hopefully that's it. I'll leave the tank in the sun for the rest of the day to dry out any water left inside.
- 194 replies
-
- 16
-
-
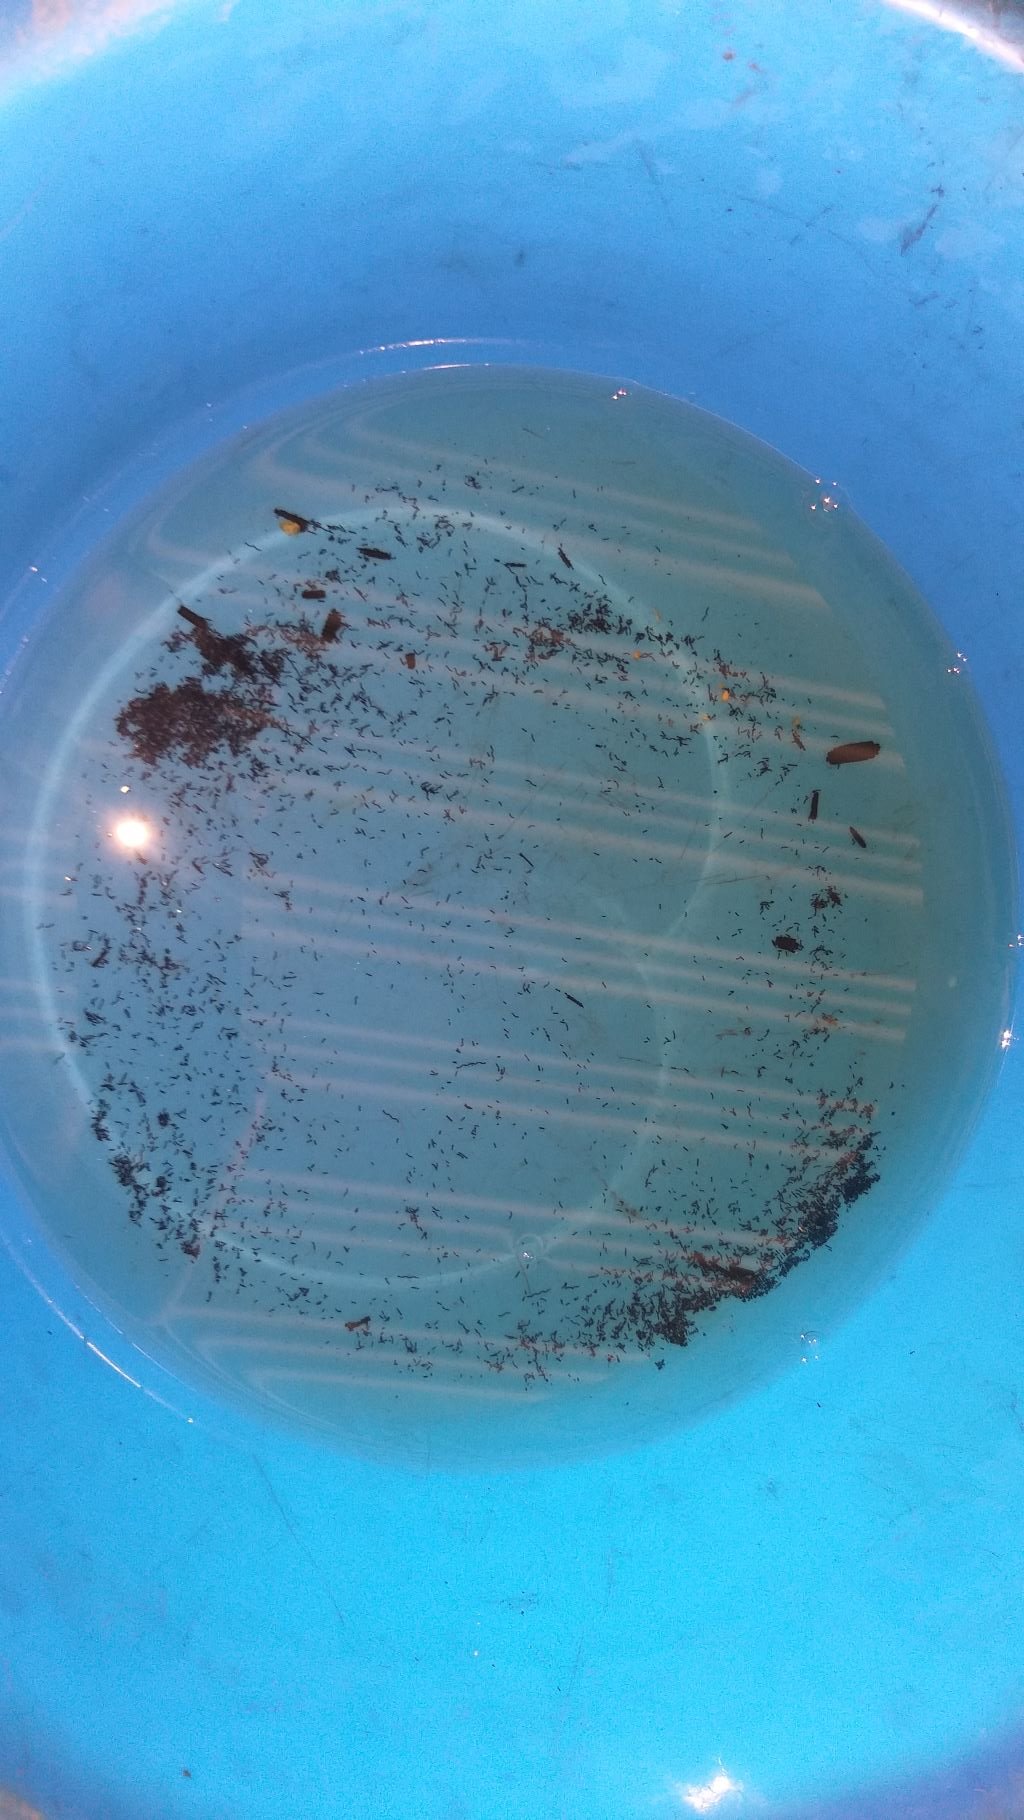
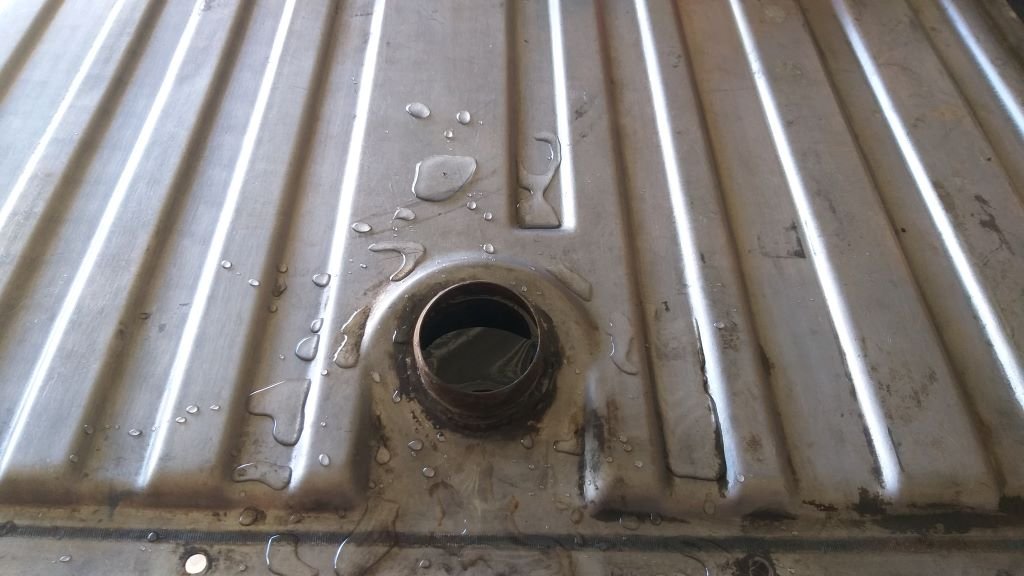
First step was to drain the loose tank of the last few cups of fuel. This included a bit of debris that I guess has been languishing at the bottom of the tank for a good few years. Next step was to fill the tank to the brim with sky juice as no one is going to make a burnt offering out of me. I then slowly drilled a 3mm pilot hole and worked my way in increments of 1mm until my step drill bit would fit the hole and took it the last few steps to 12.5mm.