


Ghostchips
-
Posts
4,869 -
Joined
-
Days Won
5
Posts posted by Ghostchips
-
-
7 minutes ago, kiwi808 said:
It belongs to Amy aka @rotorhoe
Tell her i said hi.
-
 1
1
-
-
Hang on a minute, that pink wheeled one might be piloted by someone i know.
-
Could someone tell me why this
  if (analogRead(inPin) <= sensorThreshold)
  {
      if (coilState == LOW && coilPin == LOW) {
      coilState = HIGH;
      coilPin = HIGH;
      digitalWrite(outPin, !(digitalRead(outPin)));
      previousMicros = currentMicros;
     }
    if (coilState == HIGH && coilPin == HIGH && currentMicros - previousMicros >= coilCharge)
     {
      digitalWrite(outPin, LOW);
      coilPin = LOW;
      previousMicros = currentMicros;
     }
    if (coilState == HIGH && coilPin == LOW && currentMicros - previousMicros >= dwell)
    {
      previousMicros = currentMicros;
      coilState = LOW;
      coilPin = LOW;
    }
  }
  else
  {
    digitalWrite(outPin, LOW);
  }
Runs way slower (as in, ignition retarded with the sensors and engine speed the same) and noticeably less smooth than....
This?if (analogRead(inPin) <= sensorThreshold) { digitalWrite(outPin, !(digitalRead(outPin))); delay(2); digitalWrite(outPin, LOW); delay(10); } else { digitalWrite(outPin, LOW); } }
-
If i have a command to run 'void taskname' in the loop, and the 'void taskname' points to another 'void taskname2' or something, will this run? I seem to be doing something wrong.
-
-
20 hours ago, HighLUX said:
Yeah just need Temp gauge, small digital readout would be fine.
Thermocouple off Ali might work if you could find one that runs to the right range?
Those $5 ones work for me. K-type with reader, 0-800 degrees.
-
1
-
-
Picture-less update.
While i will still need to dial in the auto-advance curve (the orig' relied on a combination of moving a lever to a basic range, and the magnets on the flywheel ramping up the speed of the points opening) it has a notable improvement in fuel economy, partly due to being able to wind the fuel mixture screw in 1/16th of a turn & have the same performance.
It's like having the magneto set perfectly. But requires a battery.-
6
-
 1
1
-
-
8 hours ago, Ned said:
You planning on designing a custom PCB for that now that you have a working solution? Looks bloody great
")
I wasn't, but it is possible.
-
1
-
-
6 hours ago, IvyMike said:
Congrats. How did you sort the ignition drivers in the end?
Cheated with opticouple chips to isolate the aruduino from the unbelievably noisy stock system.
-
1 hour ago, SOHC said:
Have you put that video on Ford Barn yet?
Sure... i doubt they'll look though. I should have posted it to the other forum just to get their knickers in a twist. So easy.
-
1
-
-
Finally.
Feels weird driving a car that used to have buzzing points. Now it only has this digital thing running the show.
Torn between continuing the coil on plug thing or coding some decent ignition timing for it.-
4
-
1
-
-
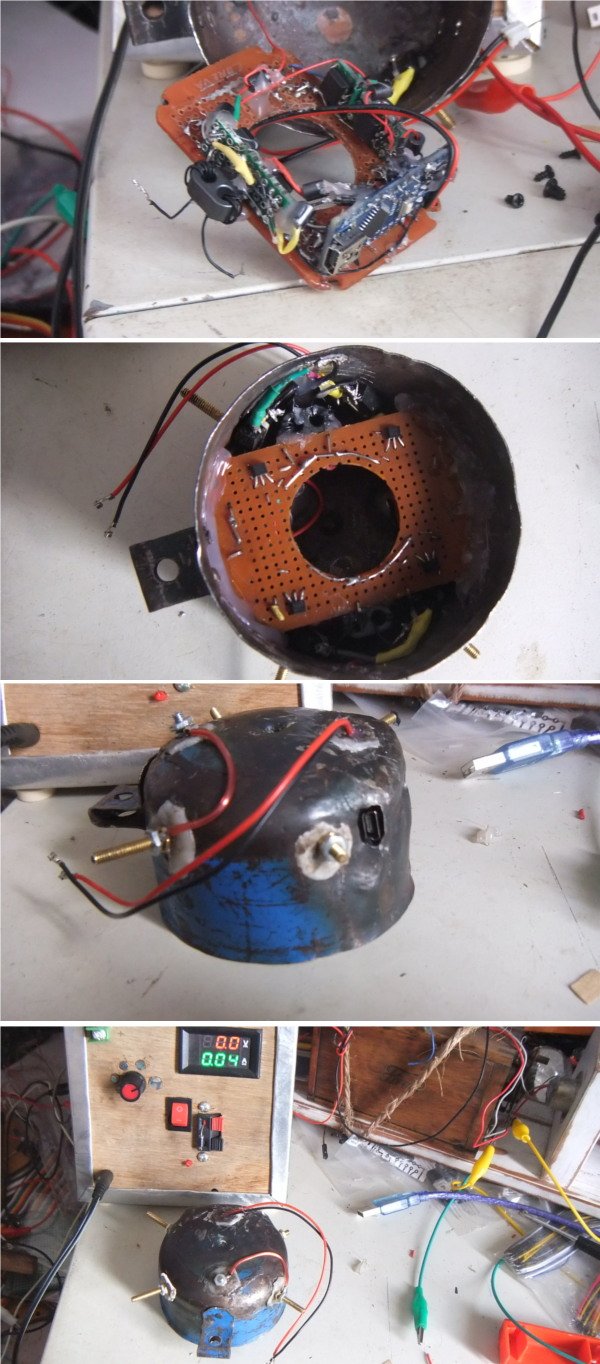
- Popular Post
- Popular Post
Ardunio nano on a small board with some hall effect sensors. installed in the end of an old can, some melted plastic in the holes, light passes through the plastic so i know where to drill it to put the bolts through.
-
15
-
4
-
On 21/09/2019 at 13:33, morkster said:
In my mid to late teens (25 yrs ago) i used to dream over this thing.. it still had a roof over it back then and was definitely savable.. however lack of cover has nailed it..
Flathead v8
I'd still attempt it.
-
6
-
-
If it's LED1 you're trying to connect to, that LDR idea i had might be easiest. Looks like connecting things to the LED makes that flasher circuit go nuts.
I only know that because i built that flasher a a kid, the rest of the circuit is a bit above my pay grade.-
1
-
-
8 hours ago, flyingbrick said:
Dewalt battery charger. 150 to 200 bucks to buy outside of a kit but has 1% of the functionality of my cheap multifunction Ali express charger.
The main thing i miss is a buzzer to say it's finished- i charge quite a few packs at night so it would be nice.
Currently an LED flashes when charging and lights solid when complete. I planned to use simple switch debounce code and arduino to sound a buzzer when the led stops flashing.
I stripped charger and wanted to check voltage of led during the charge cycle..but even touching one multimeter probe to one of the LED solder pads upsets its flash cycle- and at that stage i decided to re-assemble before i broke something.
Does anyone have any idea what could cause this? Must be extremely sensitive circuitry!!
Opticouple. Contains an LED. It might not might one being conected.
Or put a photo-resister over the LED. I've done things like that but the calibration is hard to maintain. Phototransistor might work better.-
1
-
-
- Popular Post
- Popular Post
Turns out i need to use the cylindrical style transformers, they need a longer ramp up time of at least 8 milliseconds, ideally 10-12.
The little cube ones are nice but they seem to foul. Although the cube style produce a hot enough spark to burn paper & start to melt the spark plug electrodes, when fouled with fuel they can't even light a pan of fuel.
The cylinder style build up a charge and discharge it all at once, this appears to help with the 'self cleaning' effect. A big plug gap will make them lag like crazy, but the spark is loud enough to hear from outside the engine block.-
8
-
2
-
7 minutes ago, SOHC said:
Do you think you have made a successful ignition system? I have noticed everyone on fordbarn is ignoring me now,
I have successfully made something that gives me 4 times as many shocks as a single ignition coil. Those sad old squares ignore me too.
-
2
-
 1
1
-
-
Video of it almost running. Cannot seem to get the mixture quite right.
-
8
-
1
-
-
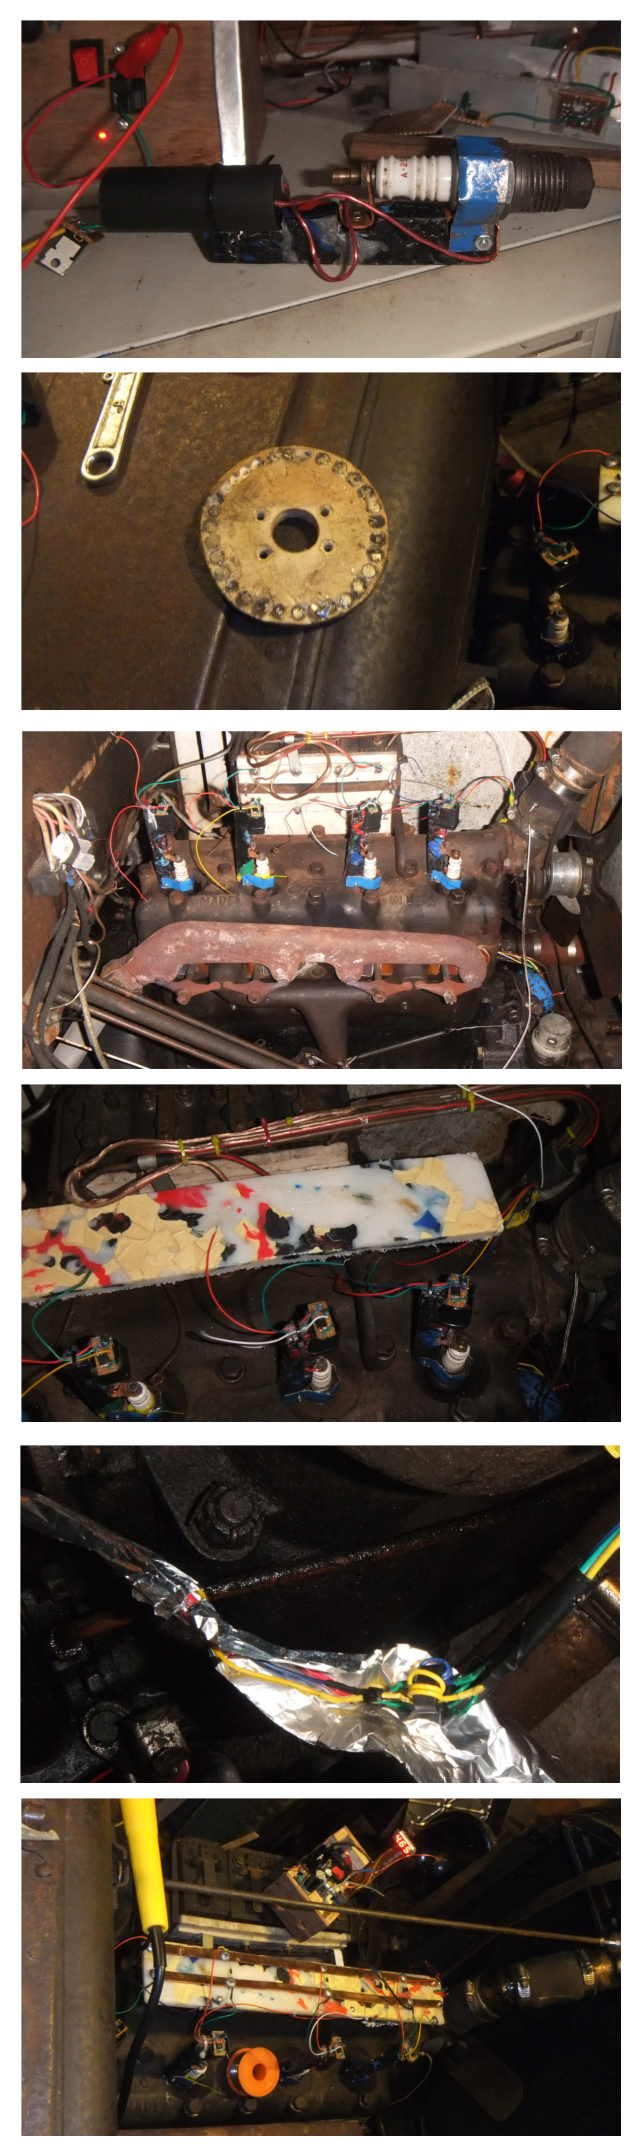
- Popular Post
- Popular Post
So i tried making my own coil on plug system with a piece of plywood with magnets glued in it in the front of the cam, an arduino pro mini with sensors mounted on the front of that, a sheet of plastic (Made from melted milk bottles & bottle caps) with copper screwed to it to distribute power i know those aren't proper ferrite toroids but thaat's just too bad. Wrapped in a tin foil tape to try & keep interference out (probably keeps it in?)
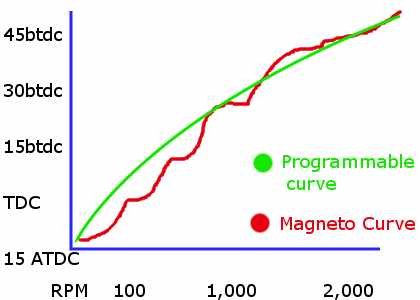
The cool kids have MS paint graphs & stuff so i'll try be be cool too.
The red curve is a rough approximation of how the standard magneto behaves.
The green one could be programmed any way i like.
If i put a high(er) compression overhead head valve head on it, then i can program a curve to take advantage of it.
It'll also make old grumpy people sad. Most people just use a distributor conversion.-
11
-
1
-
A guy i know fills them with soapy water for an hour or 2 & drains it. Soap binds the gas like it's an oil.
-
1
-
1
-
-
The chrome on the bumpers counts for something.
-
1
-
-
Do you mean "Which one would you rather afford to daily?", on my current income it'd be the civic.
-
I think i saw a bandsaw in there.
-
If you were local you could have my 2stroke Tecumseh.


Tech Spam thread - because 1/4" BSP gets 5 hand spans to the jiggawatt
in Tech Talk
Posted
Does anyone here know how a 'coil on plug' can sense when a spark has occurred & use that sensor wire thing?