

98cc
-
Posts
295 -
Joined
-
Last visited
Everything posted by 98cc
-

98cc's Resurrection Of The "Smith Spider" 2 stroke race car--Now with SOUND
98cc replied to 98cc's topic in Other Projects
Will get it sorted! Cheers Pete, Yep the spanny's are something else alright... Thanks man. The black thing is a rear view mirror mount, just need to find a nice mirror for it. Yep that sounds good, Dennis is a very interesting person and would be great to have an article published on him and the car. Yep it sure does! Cheers Kimjon! -
98cc's Resurrection Of The "Smith Spider" 2 stroke race car--Now with SOUND
98cc replied to 98cc's topic in Other Projects
The Spider has been resurrected! I'm extremely pleased with how its turned out and very exited for the future of racing it. The last few weeks I have been through the mechanical's. Pulled the brake system apart for new seals (apart from Dennis's homemade brake piston seals, they are ok luckily!) Only one master cylinder needed re sleving. After a new fuel filter and battery the motor fired up, was quite smokey to start with as you can imagine but with a bit of running it cleaned right up. It makes is an extremely loud, crisp, angry, un-muffled, expansion chambered 2 stoke sort of noise. Had a bit of a drive, could only get it into 2nd gear in the space available but acceleration is spectacular. Brakes work well, the clutch and gearbox is very nice but might be slipping a bit so will have a look at that. I also got the front wheels painted, one of the jobs Dennis never got around to doing. Allport Motorsport brought me in a fresh pair of Hoosier slicks. The compound is R25b which is the softest Hoosier do, the only compound available in this size. Their extremely sticky, even cold! This is going to go round corners like its on rails. If anyone knew of deals to get these slicks cheaper in the future i'd love to hear from you! One thing I need to sort out before racing is a new harness, Again if anyone knows where i can get a new blue Simpson like the one it has that would be awesome.- 85 replies
-
- 47
-

-

-
Random slightly cool stuff you built but not worth its own thread, thread
98cc replied to h4nd's topic in Other Projects
Awesome! Pics of patterns and core boxes pls SOHC -
98cc's Resurrection Of The "Smith Spider" 2 stroke race car--Now with SOUND
98cc replied to 98cc's topic in Other Projects
Yep really stoked. I did think about the mold idea but i don't think it would be worth it. Making a mold would be a massive job, the way Dennis did it is quite a simple way of getting a complicated shape quickly and easily where a molded body is another couple of large processes to go through. -
98cc's Resurrection Of The "Smith Spider" 2 stroke race car--Now with SOUND
98cc replied to 98cc's topic in Other Projects
After much sanding and painting the body repair is finally finished! The original number came up great with a cut and polish I hope to never have to piece this jigsaw puzzle back together again..... I will get a some pics of it with the body on shortly. Next job is to get the mechanicals sorted out. Every thing is in very good condition so it shouldn't take much.- 85 replies
-
- 39
-
-
98cc's Resurrection Of The "Smith Spider" 2 stroke race car--Now with SOUND
98cc replied to 98cc's topic in Other Projects
That's awesome Truenotch, thanks for putting me onto that. Hopefully some more period pics will turn up. -
98cc's Resurrection Of The "Smith Spider" 2 stroke race car--Now with SOUND
98cc replied to 98cc's topic in Other Projects
Was outside sanding this and the neighbour wandered over for a chat. He said he had some high build primer that's used for fairing up fibreglass boats spare and would I like It. YEP! Jeez it was thick, just what I needed.....- 85 replies
-
- 27
-
-
98cc's Resurrection Of The "Smith Spider" 2 stroke race car--Now with SOUND
98cc replied to 98cc's topic in Other Projects
With the 100hp it probably would of had at the time the performance would of been quite exciting! Yeah man it sure is, i think one of his legs is a bit shorter than the other because of it... Its a great story, very lucky that Dennis is still around to tell all the history. I think one of the main reasons for casting his own wheels was to get exactly what he wanted as nothing available would do the job. Cheers man! All talent has to be given to the builder though, i just have to glue it back together... Coming up with something like this from scratch is a real engineering feat. I have talked to a few people that were there the day of the crash. They remember it very vividly, not nice. Yep very important part of kiwi motorsport history, Its going to be great to get it back on the track for everyone to see again. I got the car outside for a couple of pics, Wrapped to see it all back in one piece again! Now for a big session of sanding.....- 85 replies
-
- 33
-
-
-
98cc's Resurrection Of The "Smith Spider" 2 stroke race car--Now with SOUND
98cc replied to 98cc's topic in Other Projects
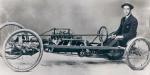
Part 1 of the Smith Spider story.... In 1964 Dennis Smith started building a single seat race car. It created lots of interest in the race car community at the time as it was powered by a 1.5l 2 stroke outboard motor. He finished it in 1966 and it had its first outing in October. He hadn't completed the gearshift mechanism yet so put it in third and bump started it, the session went well and he was quite surprised by the wheel spin in top gear! On the third outing, Guy Fawkes day 1966, the car was all finished and running well. He was timed at 130mph down the main straight at Pukekohe. The car was very light and only weighed 220kgs. Unfortunately a strong cross wind picked up and Dennis lost it down the straight a few laps later. 2 years of building and 1 month finished and 3 outings before the accident. He spent the next 6 months in hospital recovering from the crash and when he got out started building the Spider mk2 sports car. He used the engine and gearbox from the single seater and started fresh with the rest of it. A couple of pics I have found of the single seater The car looking very smart at Pukekohe 1966 It was named the Spider because of the narrow body with suspension parts sticking out looking like Spiders legs... A great pic of Dennis building the car in 1965 Last weeked I went around to vist Dennis. He said he had the remains of the single seater and a few other bits I would be interested in under his house, this is what we pulled out.... Had to lay it out I gave the tub a good scrub, it's quite bent! Dennis's legs were not in a good way after this The original wheels are in very good condition and survived the crash unscathed. The wheels and the tub are all that's left from Mk1, as well as the engine and gearbox in the sports car. We also found the box full of all the wooden patterns he made for the cars including the full set of wheel patterns. Laid all out to have a good look at them, They are all beautifully made just like the rest of the car Rear upright pattern for the sports car Front upright for the single seater Brake caliper pattern And the collection of wheel patterns Very happy to get this stuff, its great to keep it all together for the history of the car Update on the sports car this weekend- 85 replies
-
- 54
-
-
-
98cc's Resurrection Of The "Smith Spider" 2 stroke race car--Now with SOUND
98cc replied to 98cc's topic in Other Projects
Structural work on the body is now done. Two layers of glass done on both of the inner guards. This was the first layer going into the RH side And another layer of glass over the front I gave all of the exposed plywood a couple of coats of Everdure, this is a marine product which is basically very thin epoxy that soaks into the wood and seals it off. One of the things that happened in the accident was the front wheel got a bit damaged, Dennis's homemade rims are very thin so it would of not taken much to do it Had it welded up by a place in Drury Made up and mandrel and remachined it. It took quite a bit of hand filing and sanding to blend it in after machining and make the repair disappear. Had lots of problems turning the OD and ended up having to glue a big wooden plug inside the rim as it was flexing so much each time the tool contacted. All done- 85 replies
-
- 46
-
-
-
98cc's Resurrection Of The "Smith Spider" 2 stroke race car--Now with SOUND
98cc replied to 98cc's topic in Other Projects
All shaped up. I made some formers from the other side to get the shape exactly right. Used 80 grit builders paper to shape the foam, very easy to do but jeez it's messy! And the first layer of glass on Next up is another layer of glass over the whole front and then flip it over and do the inner guards- 85 replies
-
- 24
-
-
98cc's Resurrection Of The "Smith Spider" 2 stroke race car--Now with SOUND
98cc replied to 98cc's topic in Other Projects
Right hand side going back together This guard was very broken but after a bit of cutting i was left with just the arch. This had 2 fairly clean breaks and glued back together and fitted back onto the body well. The front was very munched so needed a new foam block. It was good to be able to reuse the arch as this defines the rest of the guard shape. I didn't get any pics but i rebuilt the inner structure so it looked just like this, a handy picture to have! And glued on the foam sheets. There is one more sheet to glue in and then its ready for shaping- 85 replies
-
- 24
-
-
98cc's Resurrection Of The "Smith Spider" 2 stroke race car--Now with SOUND
98cc replied to 98cc's topic in Other Projects
L/H guard repair: first up was shaping a foam block to fill in this gap And sanded all the paint of the guard. The LH side had a fairly clean break from the rest of the body so it fitted back into place well. The front was a bit broken so I cut it off clean and fitted a new foam block First layer of fibreglass going on, I am going to be putting on 2 layers inside and out. And all sealed up with 2 layers of glass. It needed a very light skim of lightweight filler in one patch which was a bit hollow. I did this before laying on the glass. Im very pleased this guard was able to be reused One more gap to fill!- 85 replies
-
- 27
-
-
98cc's Resurrection Of The "Smith Spider" 2 stroke race car--Now with SOUND
98cc replied to 98cc's topic in Other Projects
It doesn't seem to be a problem at all. Dennis said that he never had issues with overheating, the car has quite a small radiator aswell. -
98cc's Resurrection Of The "Smith Spider" 2 stroke race car--Now with SOUND
98cc replied to 98cc's topic in Other Projects
Cheers for the comments Roman and FlyingBrick! Yes the plane was a team effort with myself, dad and the grand dad. Its been finished a year now so the first annual inspection is this weekends job. Good idea Tori, will keep that in mind! -
98cc's Resurrection Of The "Smith Spider" 2 stroke race car--Now with SOUND
98cc replied to 98cc's topic in Other Projects
Thanks! Yep this one started out as 85hp, redline is 6k at the moment, i don't know what it would of gone to in a boat though. First fit up of the new front section And the paint sanded of in preperation for gluing the front section on Guled on, the joint will be reinforced with fiberglass later on Next up guards- 85 replies
-
- 26
-
-
98cc's Resurrection Of The "Smith Spider" 2 stroke race car--Now with SOUND
98cc replied to 98cc's topic in Other Projects
Thanks for that, might have to get in touch with him In the future. Dennis's mechanial fuel injection and ignition set up both use specially shaped cams for fuel metering and ignition timing. This stuff is all well sorted so hopefully I should not have to do much in the tuning department. -
98cc's Resurrection Of The "Smith Spider" 2 stroke race car--Now with SOUND
98cc replied to 98cc's topic in Other Projects
Yes VG it has an open diff, as Raizer says with one axle effectively broken the wheels wont drive. As the gearbox is bolted directly to the engine the main shaft is always spinning. This means that there is no need to double clutch but the clutch is used for all gear changes. Dennis made a new gearset for the gearbox which is dog drive and added an extra gear to turn it into a 4 speed instead of 3. The last wof it had was 1994..... Dennis cant remember the weight but he thinks its about 400kgs, i will have to get it on the scales sometime. He also thinks that the engine is putting out about 150hp and there are still some things to be done to it, raising the compression being the main one. Yep spot on, he still has this in his garage! Posts without pictures etc etc... The rest of the structure glued into the front box And gluing the base piece on, various weights from around the shed helped with this task! Next job will be fitting this to the body- 85 replies
-
- 19
-
-
98cc's Resurrection Of The "Smith Spider" 2 stroke race car--Now with SOUND
98cc replied to 98cc's topic in Other Projects
Here are a couple, Its quite hard to get pics of it as its very tightly packed in. No only one small radiator at the front. The gearbox is a Renault 3 spd trans axle that Dennis made a new gearset and crown wheel/pinion for. One of the very interesting details is the clutch, it is on the RH side driveshaft. The transaxle is bolted direct to the engine which i think is pretty unique.- 85 replies
-
- 12
-
-
98cc's Resurrection Of The "Smith Spider" 2 stroke race car--Now with SOUND
98cc replied to 98cc's topic in Other Projects
Sound sample will be coming shortly.... Yes Dennis managed to get the styling exactly right. Probably a bit of influence from the Mclaren Can Am cars of the period I imagine. After piecing this jigsaw puzzle together I was able to make an accurate pattern to cut out the new top piece for the front structure plywood box Marked out Cut out And the first bits of internal structure in. The air scoop box on top was able to be glued back together, this has the original number on it so i have masked it out to protect it until the painting stage- 85 replies
-
- 15
-
-
I have been extremely lucky and fortunate to have been at the right place at the right time to now own a very special piece of kiwi engineering. It was built by a very clever engineer called Dennis Smith in 1969 and is powered by a 1.5L Johnson V4 2 stroke outboard motor. Dennis built every part of this car apart from the basic engine block and gearbox casing. He made his own wheels, suspension uprights and components, brake calipers and discs, designed and built a mechanical fuel injection system, the list goes on.... About 25 years ago it had a slight accident on track which resulted in the front of the body being damaged and it has sat untouched since then. I brought it of Dennis last year and have set to work fixing the body. It is very important to me that it stays as original as possible and is preserved as an historic racing car. The car in Dennis's garage And back at home Got pipes? And the slightly damaged front. luckily we found a large box full of all the broken pieces under Dennis's house, these will make great patterns and will mean i can get the body exactly right. The body construction is plywood with foam glued on for shape and then a layer of fiberglass for the outer shell. The body is extremely lightly constructed and it would not of taken much impact to do this damage. Here are some pics of it back in the day Dennis on the left. If anyone has any pics or info from when it was active i would love to hear. There is so much info and technical detail to write about i will get to it all in the next posts.
- 85 replies
-
- 51
-
-
-
Thanks for all the comments guys! The hill climb went well today, got a bit of heat into the pipe! hopefully the VCC will be able to keep running the event as I hear it's getting harder and harder to organise
-
And a big pic dump... As mentioned earlier I have been working on another project. Here's a teaser pic, project thread to come....
- 58 replies
-
- 22
-
-
The Bantam is finally finished. Took longer than it should of to get the final details sorted as I've been distracted by another project... I am going to be riding it at the Chelsea hill climb run by the VCC tomorrow. Levers back from the chrome platers Turned up some foot pegs Made up a couple of rod ends for the rear brake linkage The seat upholstered thanks to Stus trim and sound, I was very lucky to find a nice piece of cream leather in the scrap bin just the right size for the seat Little bracket to support the twin front brake cables.
-
Cheers Maxted and and Kimjon! Have been distracted by another project but finally finished off the last details yesterday. Will put the finished pics up shortly.
