

PHLEX
-
Posts
244 -
Joined
-
Last visited
Posts posted by PHLEX
-
-
Thanks guys! Last night I was keen to cruise so I took the headers off and the gasket itself had separated. I smeared some red RTV around each of the ports and reinstalled it and it seems to have sealed. It is running the original studs and some brass nuts and I did notice that on the centre ports the nuts didnt really make a great contact so I put some small diameter washers behind them which I think has helped but still isn't great so the cap screws will be a great idea.
Today I picked up a replacement gasket and some maniseal as I couldn't find the stuff I thought I had and i will go and grab some cap screws to replace the centre studs so im ready to go next time it blows out. Heading down to the lockup tomorrow to make a blanking plate for my mechanical fuel pump so I will see what I can do about an exhaust mount while im at it.
Eventual plan is to get everything behind the headers replaced and also raised up as its all hanging a bit low at the moment anyway and the tail pipe doesnt even sit in its gap so I will add a flexi when this is all done!
-
 1
1
-
-
Awesome thanks for the advice. I’ve always tried to avoid maniseal unless absolutely necessary but I have some at home and have gone and ordered a new gasket so I’ll get stuck into that tomorrow.
I might also see if it’s possible to add another exhaust mount to the gearbox or somewhere to take a bit of weight off the affected area as I had thought that could be a factor
-
Replaced my exhaust mani gasket about 3 months / 30 miles ago and its just blown out again this morning. Engine is a 711M and is in a Mk2 Cortina with coby style headers and the headers had to be extended downwards around 2" to clear the chassis rails when we put this engine in. Exhaust is standard from the old engine (its on the list don't worry!) and is rubber mounted the whole way through.
A friend of mine with a mk1 running a pre crossflow 1500 said he has given up on gaskets all together and uses RTV sealant instead and hasn't had a problem since but as my headers are very visible I was trying to avoid this. The gasket I have used is the standard pressed steel type and I didn't use any sort of sealant on it - is this where I've gone wrong?
Is this a fact of life for old semi modified cars or is there something else I can do to make the gaskets last longer? The original one lasted 2 years before blowing out right in the centre of the gasket. I was on my way to work when this one blew so didn't pop the bonnet to check where this ones blown.
Thanks in advance!
-
That is a nice Mk1!! keen to see more pics and build thread as mentioned above1
Unfortunately I cant offer any advice on the issue
-
1
-
-
Small update for a Thursday afternoon. Aside from the exhaust coming off the centre hanger due to the scrape going out of my driveway each morning and banging on the diff at random I couldn't be happier with how the Cortina is going, Been driving it to and from work and absolutely love the looks and smiles it gets driving round.
Picked up a GT40 coil and an electric fuel pump today in preparation for the next lot of upgrades. Hoping to see my manual choke conversion within the next few days which will make it a bit easier to start in the morning and the electronic ignition conversion shouldn't be far behind it.
Hopefully ill get under it tonight and rejig the centre exhaust hanger so it stops coming off and start writing a shopping list of bits to do the electric fuel pump conversion. Plan at this stage is to put it on a relay on the key and then have a hidden kill switch somewhere as well as a bit of extra security
-
1
-
-
Bit of an update for the new year.
Decided it was time to get the thing legal for what's left of summer. I had been at a bit of a hurdle of the front springs not being captive and had done some research into what shorter inserts fit in and found whatever I used would need a spacer made to sit under the shock and a collar made to make up the difference in the shaft thickness into the top hat which I wasn't keen to do. Shortening factory shocks was another option but the first 2 engineers I talked to wouldn't entertain the idea because the shaft would be too short and could end up passing the seal in the body. I posted on here about my dilemma and @Beaver raised a great point that once the springs are in the shocks it'll be impossible for them to ever compress far enough to cause a problem. He also recommended @Steelies who came to my aid instantly and got them completed before Christmas for me. I now have a car that's about 3" lower than factory and completely captive and brand new shocks and bushes throughout the car which has made it handle significantly better than before
On Friday I went down and got a WOF because im a lot more motivated to improve the car when I can actually drive it. All it needed was an indicator bulb which turned out to be a loose wire, got that sorted and drove it home legally
Since it was Christmas I decided to order a few goodies for the car. First up was a manual choke conversion to switch the 32/36DGEV from the shitty water choke that's never worked to a manual choke which is currently sitting redundant. This will make it much easier to start and idle and i'm sure my neighbours will be thrilled that I wont need to warm it up for 5 mins before attempting to get up the driveway.
Secondly I decided to get hold of an electronic ignition conversion. These range in price on trade me from $150-250 depending on what seller has them listed. I went to eBay instead and found one ex UK for $68 NZD shipped which I will team up with a GT40 coil once it arrives. I also have plans to change to an electric fuel pump to relieve the factory glass bowl type from service. I can get one of these from Repco relatively cheaply
When driving the car on Saturday I noticed the factory temp gauge is coming to about 1/4 temp and sticking there so I installed a cheap temp gauge in place of the old mechanical gauge that's never been hooked up and has the complete wrong fitting for the engine. Seems the little 1600 x/flow gets to about 90deg while driving and creeps near 100 when sitting. I plan to get a electric fan on a thermo switch to ensure it doesn't get any higher. A bit of research tells me the temps are fairly normal for the old iron engines but since I drive from the Hutt Valley to Waikanae quite frequently I don't want to overheat if I get stuck in traffic. I've also got an alloy radiator that was made for a escort race car sitting around that I might be able to modify slightly to fit in place of the stock one which I'm sure will help!
Once again I've been slack and not taken any photos so will ensure I get some of the upgrades before the next post
-
4
-
-
Bummer! Such a shame, they were so good to deal with
-
Been past there a few times recently and the gates been locked. Anyone know what’s happened? Last I heard they were having a big sell off of all the RWD parts so they could get some new stock in
-
Another winter gone without much of an update. Now here I am sitting a week out from Christmas and i've decided its time to get the old girl legal for summer
Only real updates since june is I started making Pillar trims for the A and B pillars and all I can say is im glad I bought 1.5m2 of vinyl as ill need to have another crack at the drivers A pillar once i've perfected my technique on the others.
yesterday I finally purchased some shock inserts and am I talks with somebody who can hopefully shorten them a bit for me. Fortunately they are alredy 10mm shorter than the ones I pulled out so we don't need to take as much off.
Today I went and got everything to give it a service since its hasn't had an oil change in about 18 months so I don't want to start driving around without doing that.
Also hoping santa will bring me a good bonus this quarter so I can buy a new carb from weber specialists as I feel the one i'm currently running isn't doing the engine justice

-
1
-
-
Thanks, PM sent to Steelies
-
I haven't pulled the shock apart yet as it will immobilise the car which is currently movable when I need to. I have a set of inserts sitting on the pickup shelf waiting for me at repco and they aren't overly expensive. I tried calling autolign in wellington a while back hoping the guys there would have some ideas but they recommended I bought brand new shocks and went to Howat engineering to get them shortened.
@Beaver I hadn't actually considered the spring would be taller even when compressed completely that it would be impossible for the shock to go inside itself. I think ill stick to this idea and shorten some brand new shock inserts down as its probably less work than making adaptors to make other inserts work. Thanks!
-
Calling out to cortina gurus!
I have a 68 mk2 4 Door currently lowered on mk1 super low king springs and 2” blocks and it’s sitting nicely.
I have replaced shocks in the rear and bushes throughout but the issue I’m having is the front shocks are about 40mm too long for the springs to be captive.
i have looked into shortening some brand new replacement shocks but the shaft will end up shorter than the body and the engineer I spoke to is not willing to go that low because they may leak if they get compressed too far.
ive heard of others using a corolla or Camry shock with slight modification, google has failed to tell me what this shock is!
Can anyone one help with a recommendation of something around 40mm shorter? Be great to get this car legal again for summer cruising
-
Old thread but thought id chuck my 2c in. I paid $850 for mine, standard bore, had a replacement piston and set of rings chucked in a few years back. I didn't think that was too badly priced. Spent around 6 months trying to find one as my earlier engine ran but was pretty tired, ended up finding a guy locally with about 3 of them under his bench and he agreed to sell me one eventually. Sounds like they are commonly bored and a "standard" motor is what everyone wants
-
Bookmarked that for a potential upgrade if the slow speed gets annoying. Actually surprised nobody seems to sell a pre wired plug in plug out single phase to three phase converter for these types of scenarios. However not overly difficult to wire once you know what each letter means
-
Had not even considered that. Both diagrams are on the lid for the terminal box. Will do some research and give it a go. It is however it was wired before. Didn't take too much notice other than to identify what colours had been wired to what terminal (U V W)
-
Thought I'd jump back in and give a conclusion. I ended up going with a solid state 1.5HP frequency converter which has worked to get it going in both directions and cost us just over $100 on eBay.
Definitely worth the money to get it going relatively simply, downside of running a 3 phase motor on 240V is that it is lacking a bit of torque. Tested it out on a bunch of 17" wheels we had kicking round and short of needing a slight helping hand occasionally it was faultless. Total cost of tyre machine and the converter is a little under $700 so still less than half the cost of a Chinese single phase
-
1
-
-
Might give stocks a call and find out what the price is for a new single phase motor as this model appears to have come in single phase also.
On the subject, Can anybody identify this power point? It is labelled 15A and is on the wall closest to where the tyre machine is. Unsure if its still live but if it is it would be ideal to save using a 20M extension cord.
-
I had seem some people talking about a VSD but removed that as an option as anything we did would need to be able to be plugged into a standard wall socket as the building the tyre machine will be in is our lockup in an old factory building which has been divided into 3 or 4 units and is all run off the same power board and we have no access to it. Due to it being a "power included in rent" deal we don't want to ask the landlord for 3 phase or to run extra wires from the meter as we will likely end up with a rent increase. Plus due to the housing development going up around us we don't want anything too permanent as you never know when the place will be sold
-
Awesome thanks! I saw those boxes on ebay and ali express but wasn't sure if the capacitors was a good idea or not and I suppose although slow spinning they need to maintain torque sometimes. Will look into the converter box!
-
Just picked up a Corghi A2001S tyre changer 3 phase model.
I know there is boxes you can buy that allow them to be run on single phase but was wondering if anybody had experience rewiring a tyre machine to run on single phase without the need for extra bits? I know they only spin one way but that doesn't worry me too much if its going to save a whole lot of cash.
I have seen people using capacitors to boost the charge for the missing wire but am not a sparky so am reluctant to start playing round with that sorta stuff!
-
wow another 3 month stint without update. Back in March I finished the rear suspension and installed the lowering blocks which had arrived that day. Unfortunately due to the "good" leaf springs being a bit firmer the vibration is back, but only between 80 and 95KPH which is manageable. Handling has improved significantly and I can live with the vibration for now as its not being driven much. I will get the driveshaft lengthened by 1" at some point soon to get rid of the shake for good.
Not much else has been done in the past few months as I've been working on my Skyline race car instead, that was treated to a new engine and a bunch of upgrades to get ready for next season so that hasn't left much money or time for the Cortina. Fortunately its quite happy sitting warm and dry in my garage at home.
Current plans / dreams for the Cortina when time and money allows:
- Lengthen driveshaft
- Replace front shock inserts with shortened units
- Widen rear wheels 2' and fronts 1" and paint to match green interior, ditch outer chrome trims and just run centre hub cap (one needs replacing)
- A and B pillar trims to buy / make (white vinyl)
- Rebuild and tune carburettor (Weber 32/36)
- Electronic Ignition upgrade
- Semi sealed headlights / LED everything
- Stereo install either in glove box or in the dash where the ash tray currently isNo new photos since the lowering was complete but ill put some up next time I go for a cruise.
-
1
-
-
On 4/04/2017 at 12:04, Adoom said:
I had Howatt Engineering in Wingate, shorten and balance my propshaft, by 20mm last week. I just rocked up on my lunch break "hey, can you shorten this?", it was ready two days later.
He also checks for play in the universal joints, in my case, they were still okay.
Was $203
awesome thanks for that ill go and see him next week when I get a chance. I need to get a couple of shocks shortened too so might see if he can do those at the same time to minimise the amount of time the cars off the ground
-
Just to give everybody an update. I splashed out and replaced the rear shocks and all the bushes with nolathanes, reinstalled the good set of springs with some 2" blocks. I thought the driveshaft didn't look as far in as the saggy springs let it go in but put it back on the ground and road tested. Vibration is back but not nearly as bad, probably 40% of the original intensity. It is also now only there between about 50mph and 60mph then goes away again completely.
From here my plan is to get the driveshaft extended by 20-30mm and balanced and that should solve my problems once and for all.
-
1
-

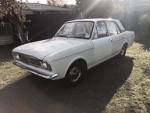
Phlex's 1968 Cortina MK2
in Projects and Build Ups
Posted
Saturday night and I'm sitting at home sober-ish
Choke conversion arrived yesterday so had a go at installing that when I got home. Got it all installed and working on the carb and can manually operate it open and closed. Also found a vacuum line had come off which was causing a shit idle so put that back on and it was night and day difference. Unfortunately the choke cable is too frail and missing too many strands to open the choke butterflies so I have ordered a solid core cable to replace it which will hopefully work. The cortina had also blown out the exhaust manifold gasket yesterday on the way to work and since I wanted to go cruising I slopped some RTV on it and that solved the issue - for now im guessing
Last night when driving home I had to stop half way up the hill I live on to let the carb bowl refill once again, this had happened once before last week and I had put it down to being low on fuel, this time there was plenty of fuel so it was pretty obvious the stock mechanical fuel pump wasn't keeping up.
I jumped in the car after breakfast this morning and went down to repco to grab some fuel hose and try to find a fitting to convert the standard fuel pump inlet side -plastic tube running through a brass fitting. They didn't have any female fittings that looked right but I had a brainwave while I was at the counter grabbing the rest of my bits and thought id grab a female compressor fitting just in case that'd do the trick.
Got home and thought id give everything a dummy run before making permanent connections so unscrewed the inlet to the pump and hey presto it was the same size and pitch as the $4 compressor fitting. The barb side fit into the fuel hose with a bit of persuasion and the fuel pump test did the trick.
I had been thinking over the best place to install the pump itself knowing most people install them in the engine bay but I am trying to keep a fairly original classic look so had thought about putting it inside one of the guards but upon opening the instructions that came with the pump it recommended being as close to the tank as possible so I made the decision to run it under the car by the tank. Install was fairly easy using a relay taking main power from a circuit breaker at the battery end and a switch hidden under the dash providing fused power from the "on" position of the key to trigger the relay.
Totally forgot to grab a fuel filter while I was out so back down to repco and grabbed a couple of inline universal filters, installed one before the pump and will install another in the engine bay but i ran out of enough hose to do it tidily so that one can wait a few days until I get some more and some sort of bracket for it
[Photo showing fuel pump installed up in the cavity just behind the tank ensuring its not in the path of the diff bolted through to the boot]
[Photo showing the fuel filter installed. Second time I was fortunate to get fuel in my armpit today. Glad that's done!]
Road tested absolutely fine and even tested turning the override switch off while driving up the hill, waiting till it splutters and flicking the switch back on it comes back to full acceleration within seconds which is a major improvement of what I was dealing with before
Installed my Bosch GT40 coil today as well, nice simple swap over from the ancient Lucas coil and am now ready to go for then the electronic ignition conversion arrives hopefully next week
Have been having some issues with one of my wipers coming off at random which after some research I have found out was due to how they were removed by the previous owner so am currently only running a wiper on the drivers side and have been looking for a replacement pair but not having too much luck at the moment
Also managed to stop the centre exhaust hanger from coming off every time i go over a bump and spent some time replacing the springs in my bonnet release because the bonnet has been popping up at random, Still plenty to do but loving driving it everywhere and learning heaps about the car!
Oh and here's a couple of snaps of the cortina out and about yesterday
