


shrike
-
Posts
989 -
Joined
-
Last visited
Posts posted by shrike
-
-
So Alloy place came back at $100 for the 3 peices, have added a 4th so just confirming new pricing and pickup/payment details
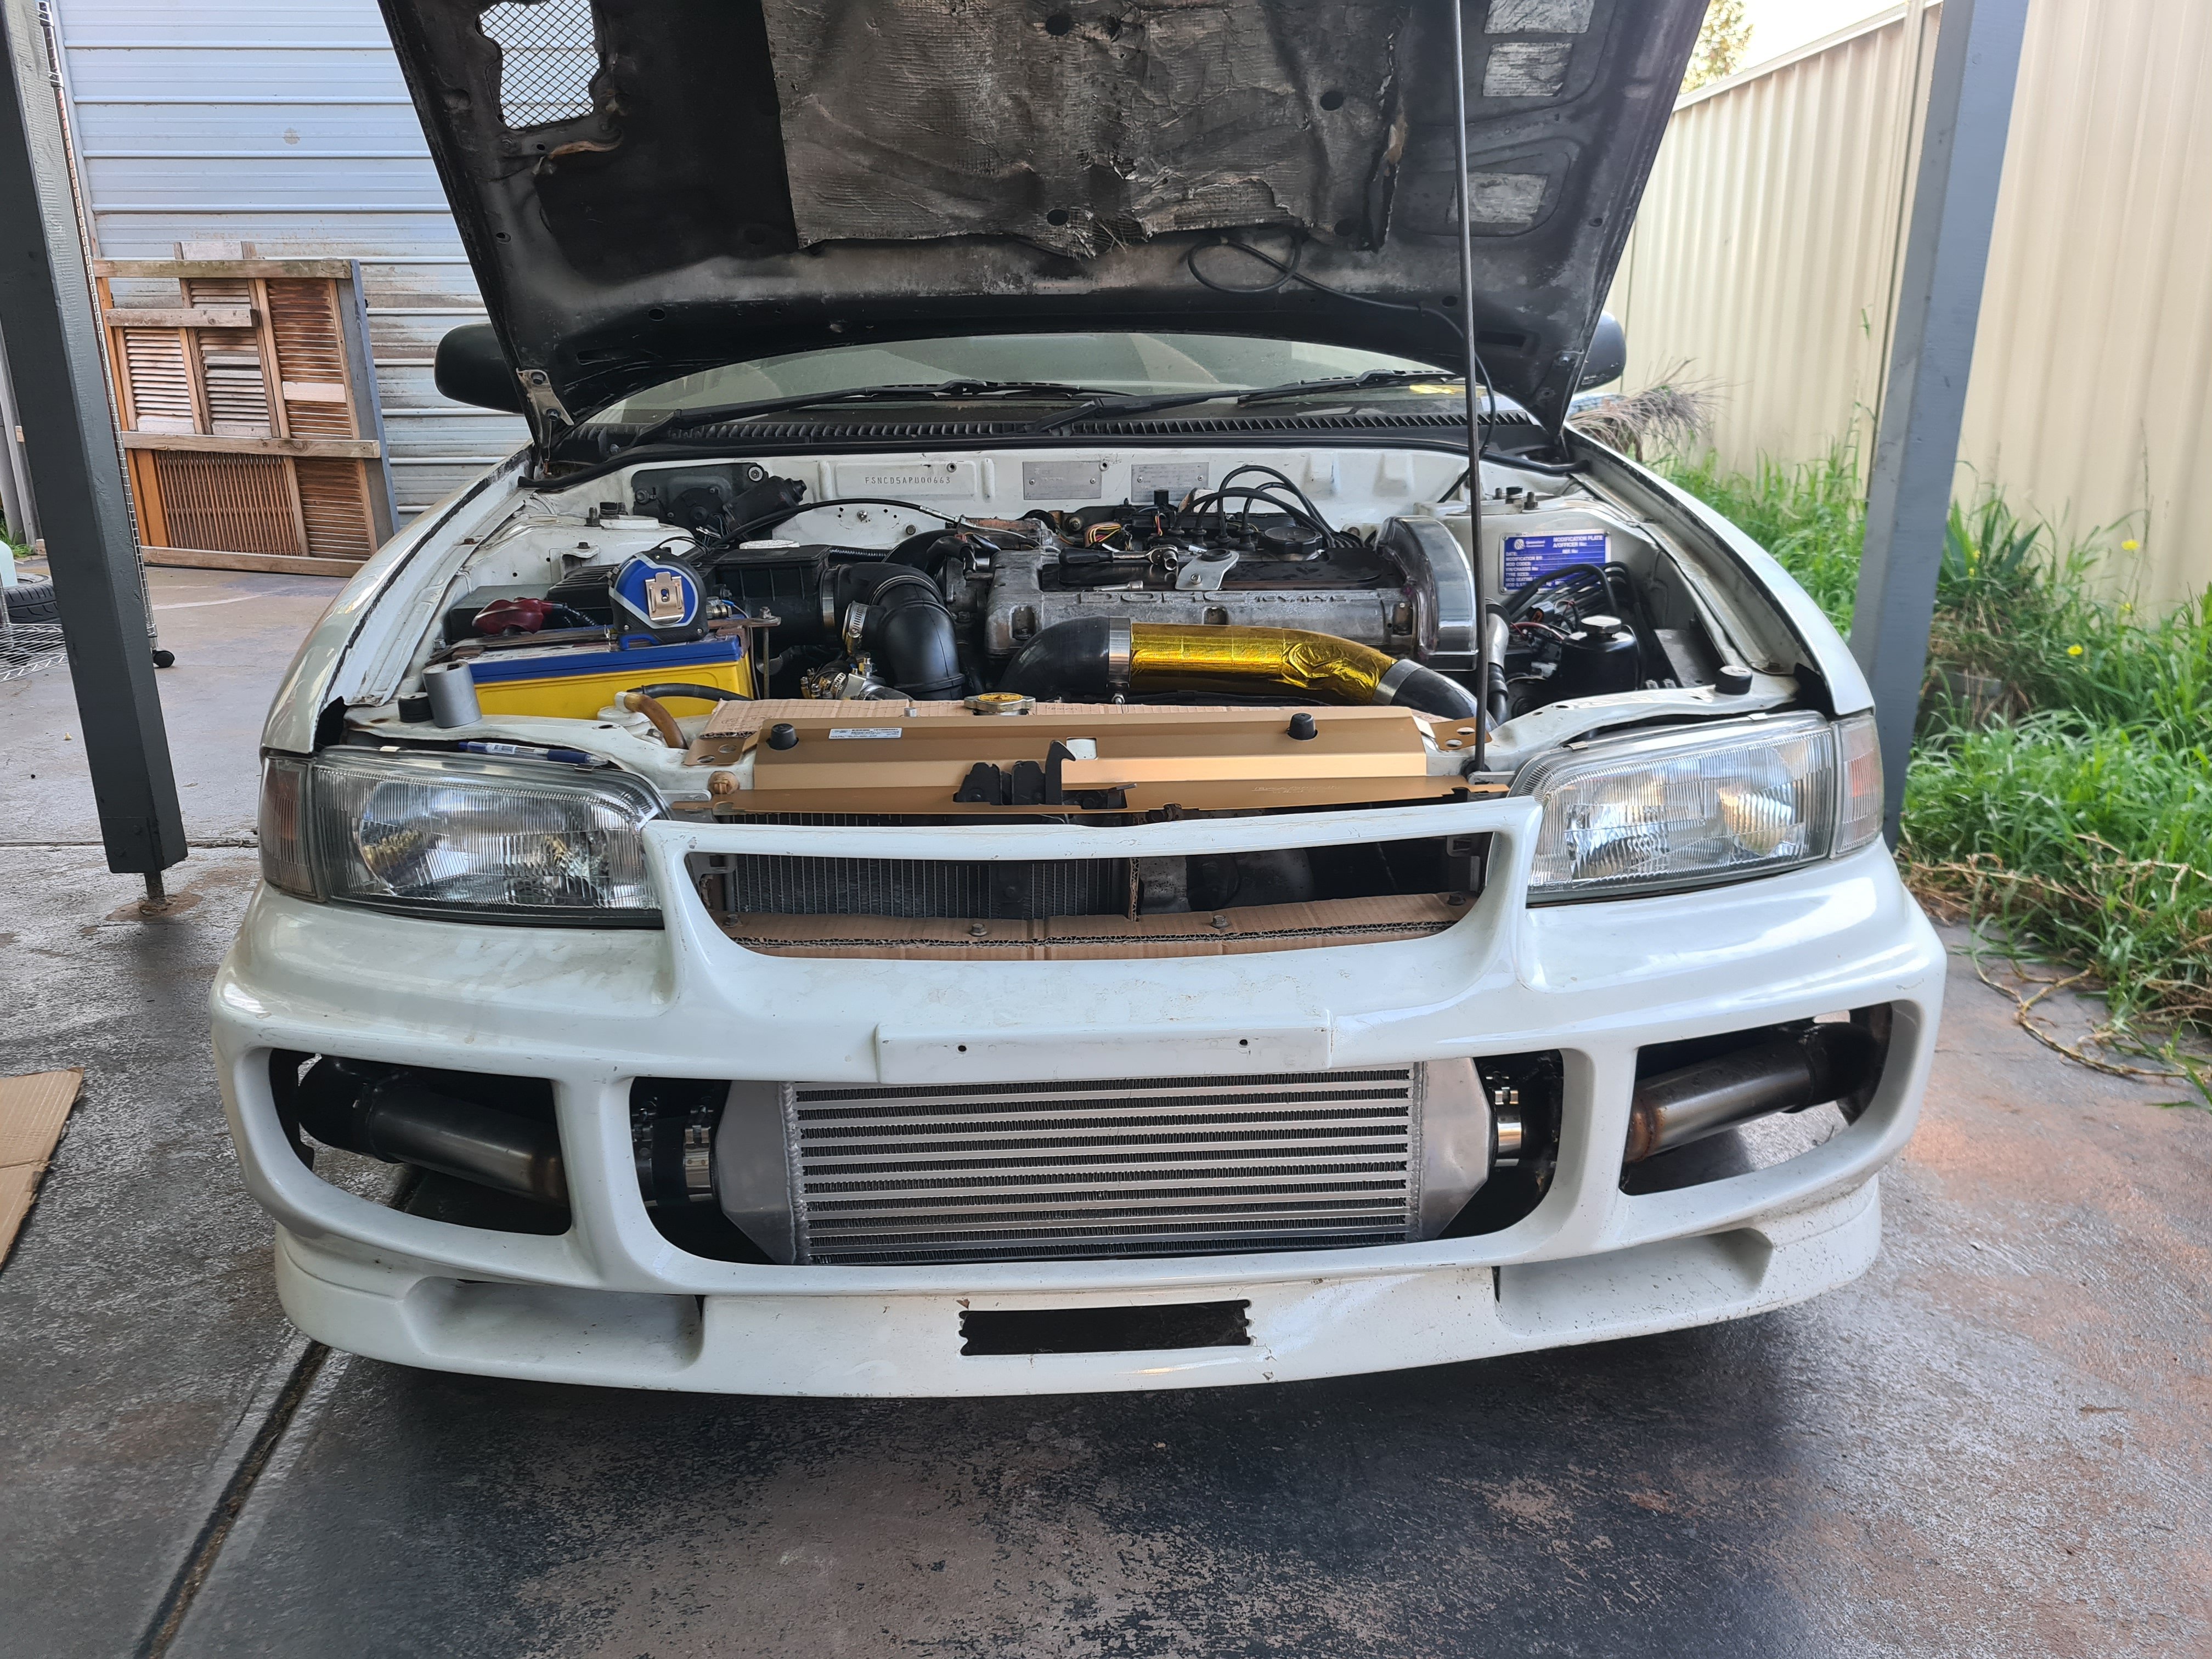
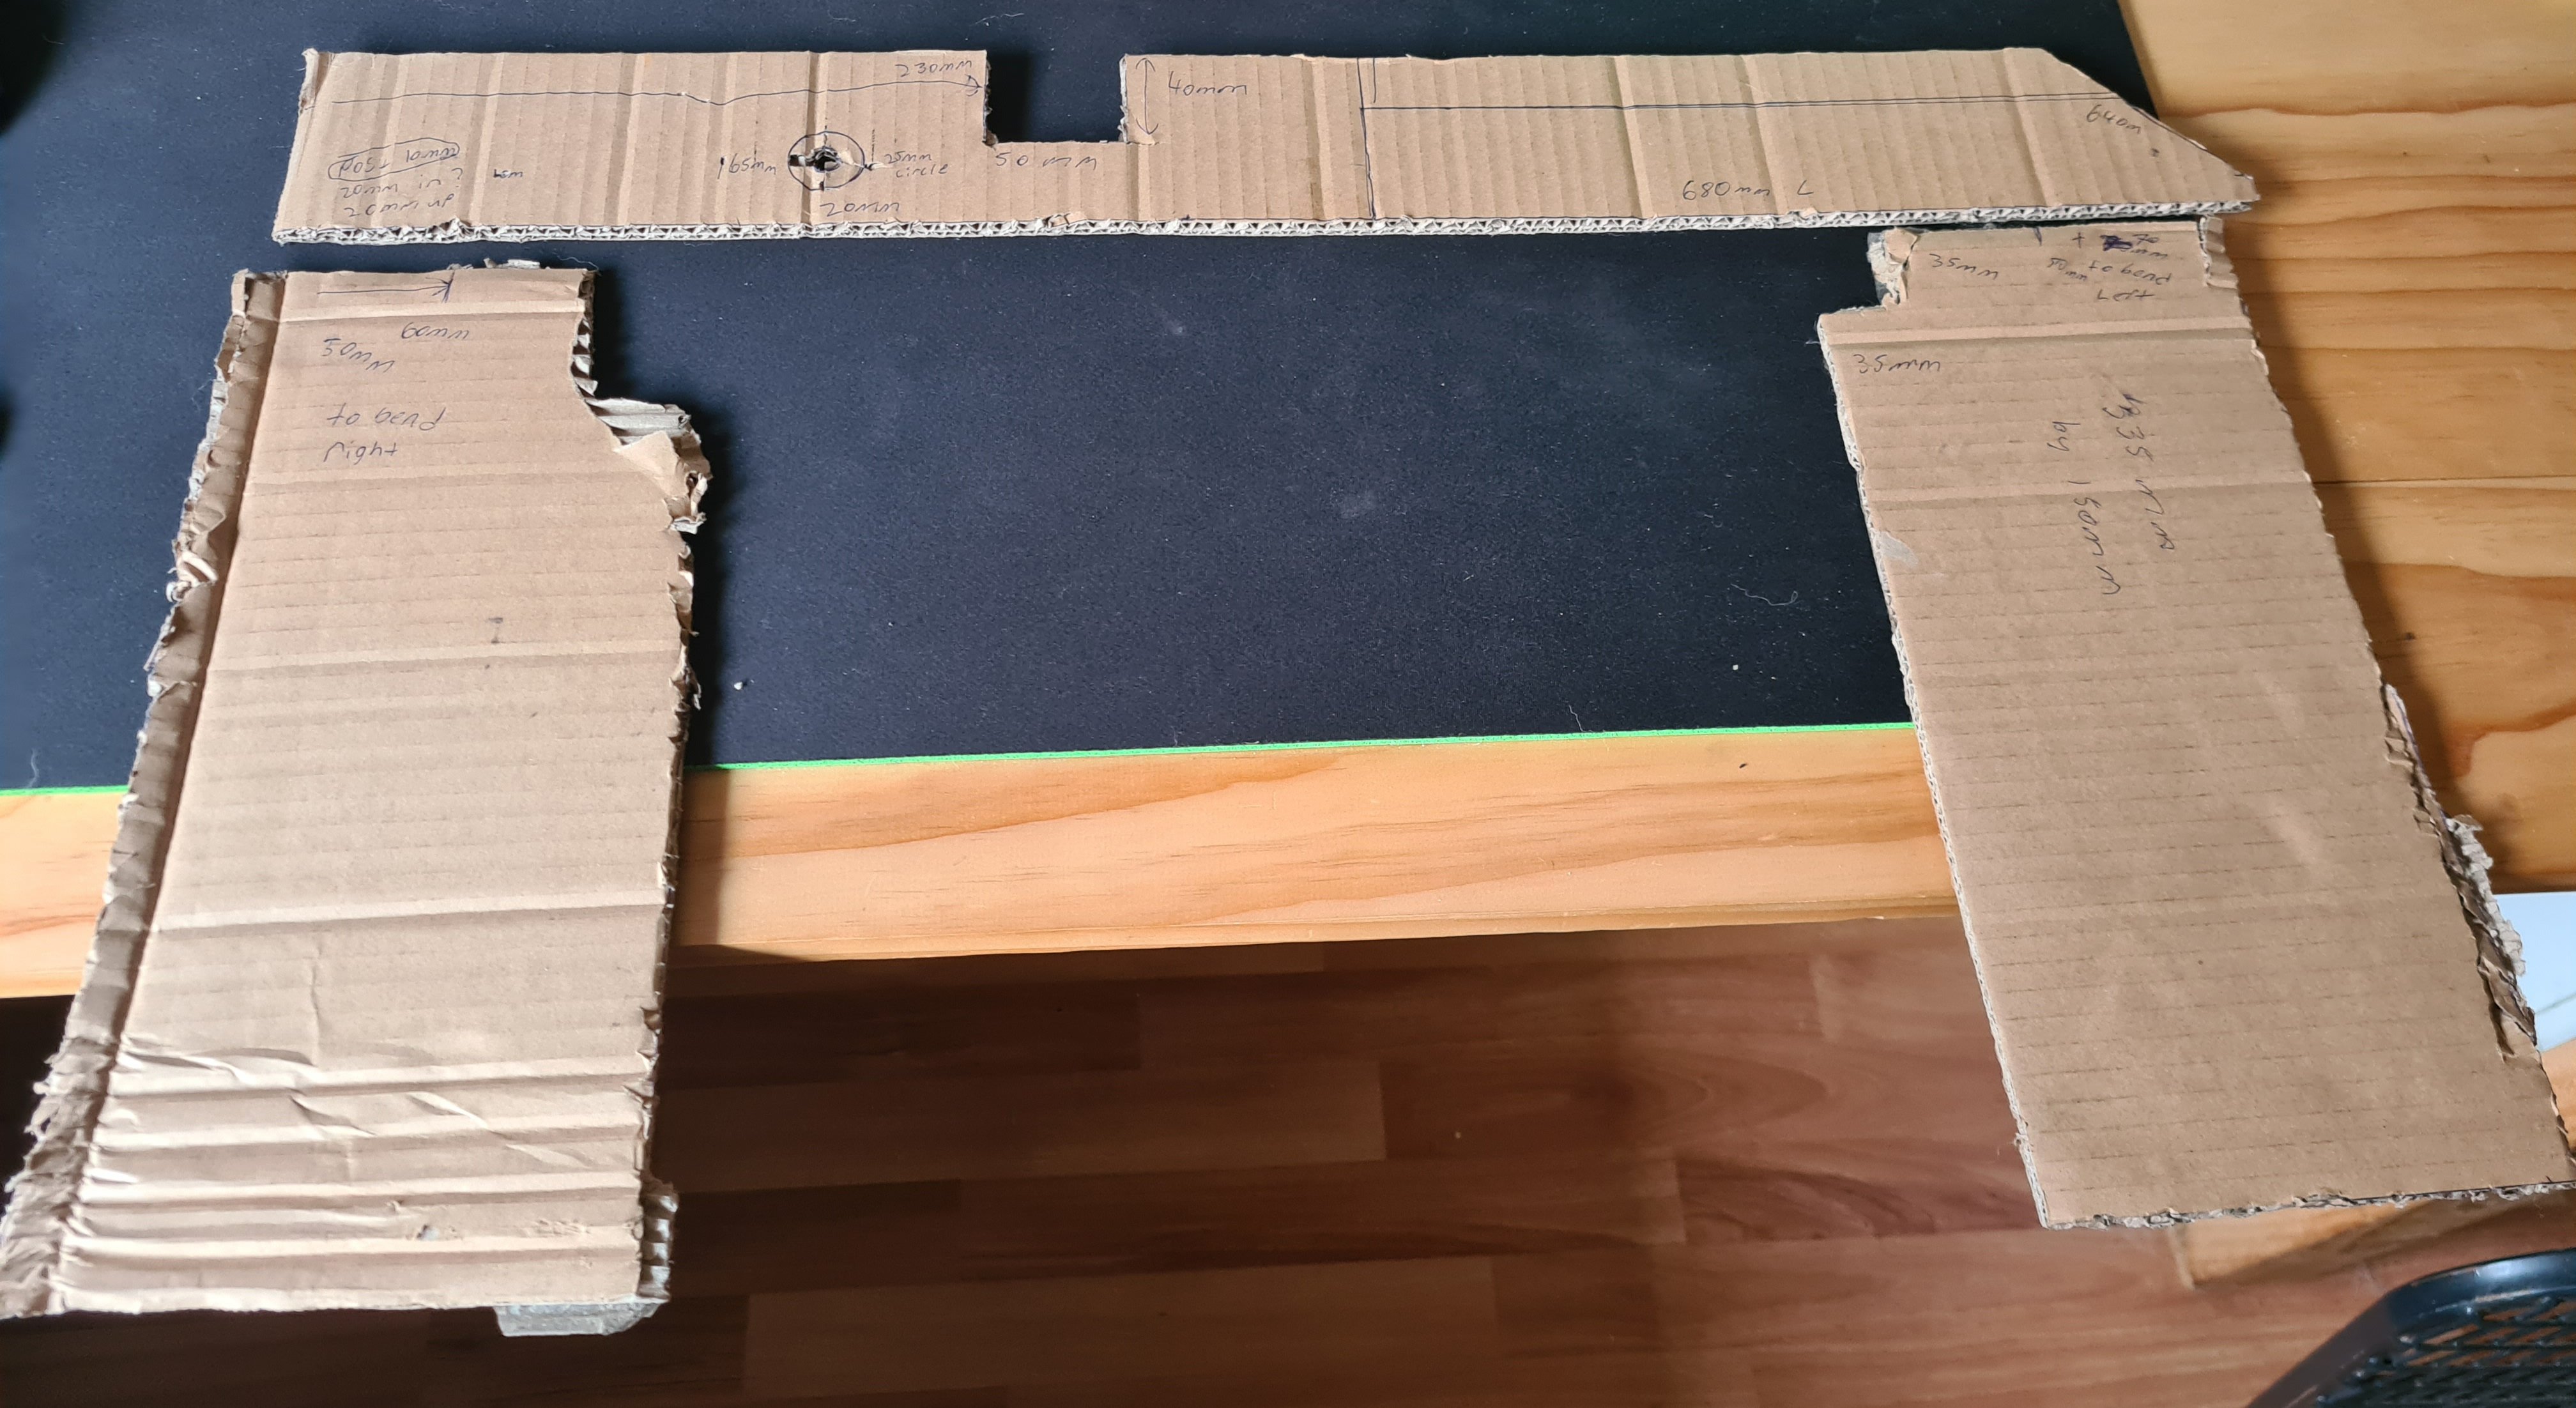
With the cardboard mock-ups mock-ups the cooling panel I brought
Cardboard is 5-6mm so will fit better
should be hidden when I get the mesh installed
Going to add the 4th peice and either bolt or sika flex it to the bumper as another mounting point behind the number plate area

-
 1
1
-
-
So no one has come back to me about laser or water-jet cutting me the pieces I wanted, guessing I am just too small a job.
So have reached out to a place that does Aluminum sheet if they can cut me the pieces to the total overall size I want and ill break out the grinder/dremel/jigsaw/drill etc to remove the excess material
- 75mmx680mmx3mm
- 150mmx435mmx3mm
- 150mmx455mmx3mm
Will do the old score with a knife on each side and then bend the ends up trick to get the tabs I want as well once I cut it down to shape
3mm thick should do the job I think and will save some weight on Stainless/Mild steel
Top part I can probably get away with using a 25mm hole-saw for the rad mount hole and a 50mm one to allow for the radiator cap instead of cutting out a square, end angle will be easy with my cut off saw.
Attaching the factory radiator top mounts/brackets may need some thinking or I may have to take it to someone to weld some posts onto
-
17 hours ago, shrike said:
So did some CAD work today (cardboard aided design) mocked up a new rad mount option and some shrouding for the half rad
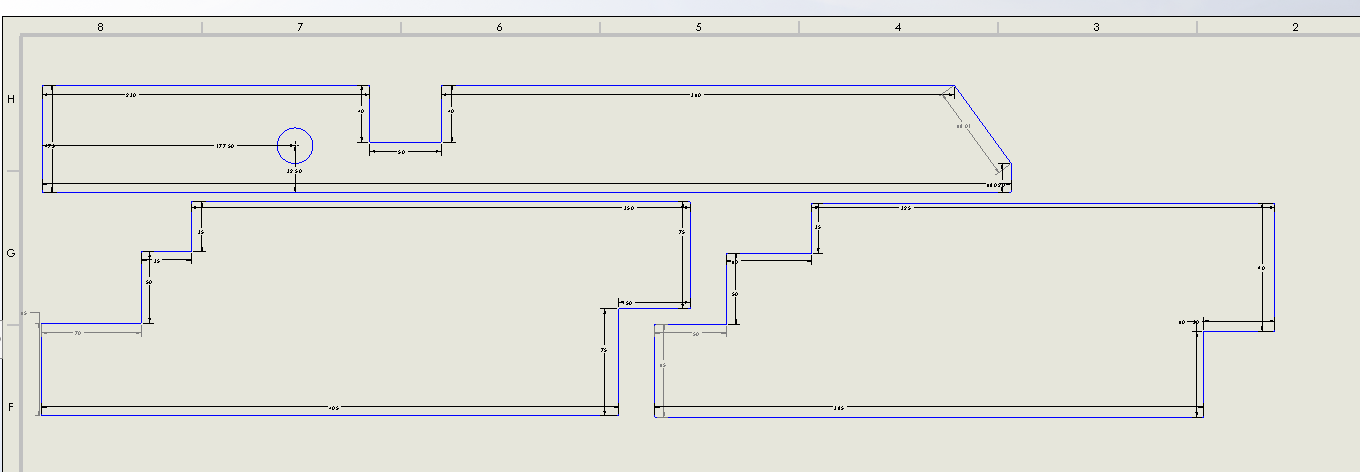
Need to work out what cad software to use so I can draw it up before I can get it cut out of 3mm steel?
May have a play at adding some other ways of mounting the bumper better as well but see how I go
Edit: added some pics of my cardboard mock-ups
Will make more sense on the car
And done up in solid works, added some extensions/tabs that I can bend up and down on the rad shrouding so that I can bolt it to the lower rad support using holes already there will have to weld on a couple of 10mm locating pins to use the factory radiator brackets but should work ok. Thinking 3mm should do the job for the sides but unsure on what to use for the top as yet, may go a little thicker. Wishing I had a 3d printer right now as I would do some test prints first, still need to find a place that will cut it out for me as well
-
So did some CAD work today (cardboard aided design) mocked up a new rad mount option and some shrouding for the half rad
Need to work out what cad software to use so I can draw it up before I can get it cut out of 3mm steel?
May have a play at adding some other ways of mounting the bumper better as well but see how I go
Edit: added some pics of my cardboard mock-ups
Will make more sense on the car

-
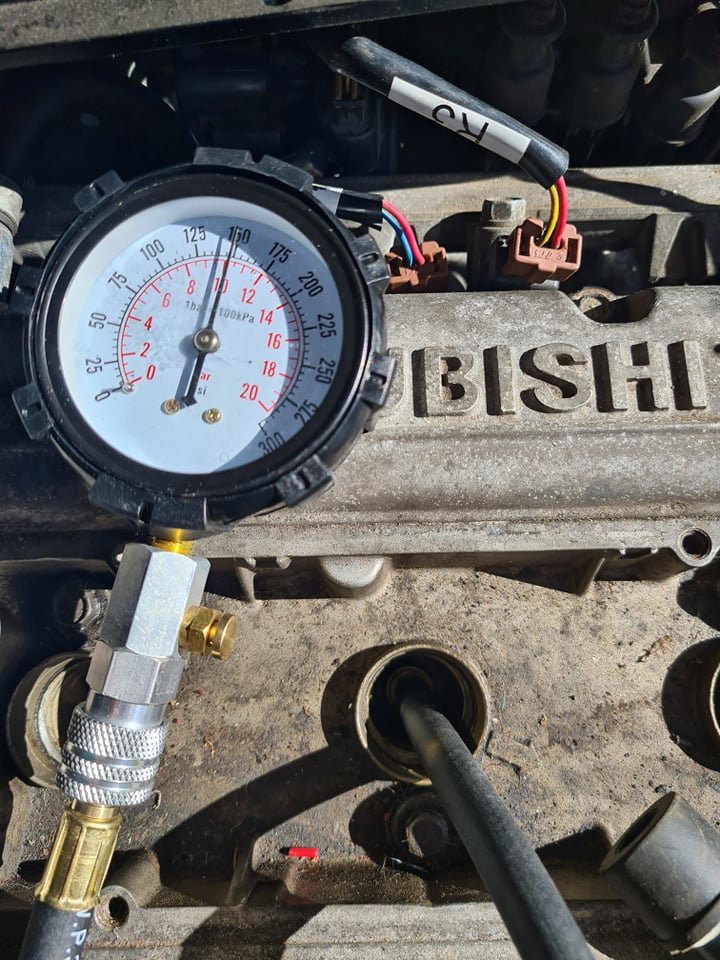
Compression tester turned up yesterday, and I cleaned the sparkplugs last week
Decided to do a dry compression test today and see how the old girl went, I have no idea how many kms are on this motor
Had the pipe to the throttle body from the turbo off for the compression test and spark plugs out, cranked it over for 10 compression strokes, probably didn't need too but wanted to see how it went.
Compression test
Cylinder 1
Cylinder 2
Cylinder 3
Cylinder 4
All pretty much at 150psi, pretty happy with the fact its pretty much the same reading across the board.
I believe 178psi is factory fresh and 133psi is rebuild territory so middle of the range is ok with me for an unknown motor.
Should keep me going until I build another motor
Got it started again, I suspect it doesn't like to start when its cold. Need to get the cold start/idle sorted properly and check the timing again as well, may do that tomorrow as ill move it up the front driveway so I have more ventilation. Still getting some smoke out the exhaust, but suspect its due to sitting so long/shit in the exhaust/ idle/timing could be running abit rich as well.
Makes the right sounds when I give it a small rev so at least its getting in the right direction
Managed to buy a brand new rear bumper as well so that's something else to switch over long term
-
1
-
-
So few small updates
Works fine and the pump now primes when it should etc again. Part of me is wondering why the pump suddenly stopped working properly, considering it was previously running and driving (not well but that was due to other issues)
Can't get the dam thing to start atm, I have fuel, I have spark, have pulled the plugs and have cleaned them up to see if that makes any difference. Ordered a new compression tester as I can't find mine/the one I had was very questionable, will check compression to rule that out.
Could be timing, I even went back to the old cas wiring to rule that out as being an issue, have ordered a new crimping tool as my current one isn't suited to the new Cas plug connector I have so will re terminate that. Could also be a dodgy cas, but if I have fuel and spark I doubt it. In saying that it wants to go and it is bloody cold atm so perhaps the cold start is the issue.
Still looking at options
Also trying to remember if I've had it running with the ecu thats in it atm, perhaps I should try hooking the 2G cam and crank sensor back up and see if that works
Part of me wants to
- Buy an OBD1 capable OBDII scan tool and the adapter to see what its doing
- Investigate the ecu (RVR) and see if that's shit itself
- Plug in my Speedunio and see what it can pick up (need to add the module so it can run the IACV)
- Make a new factory style loom for it so if I do go to a Haltech 1500 long term and know the wiring is good
- Buy a new factory loom (Amayama may have them) but its like 1500AUD so feel that I could put that money into an aftermarket option
- Just buy a Haltech and see if I can get it to work with my questionable current loom
- Buy a Haltech 1500 with its own 4g63 specific harness and get rid of the factory loom
If I go down the Haltech pathway I want to also
- Install 1000cc injectors for an E85 Tune
- Move to R35, Hitachi IGC0002 or K20/K24 coilpacks
- Change to the DBW throttle body and pedal I got from a 4G69 Outlander so I can piss off the Bliss etc
Frustrating as I had it running, also wondering if its had some stop leak or excess RTV/Silcone come loose as I have found some residue on the spark plugs
-
Hey anyone got any tips how to wire a 12v constant to a relay setup for the fuel pump?
Ive got a relay with a 30amp fuse built in, the trigger I am running off the ecu controlled + single on the MPI setup in the fake evo (gsr) ecu grounds relay, relay sends power to fuel pump. Its 7-10v at most so ive added a dedicated relay to the fuel pump.
I could run a feed direct to the battery but id like to use the MPI constant 12v to power it (mainly due to extra fuse protection and less wiring length), tried a couple of spade/fork crimps into the MPI but not comfortable with how loose they are. Don't want to cut or splice into factory wiring as I want to keep it original, thinking about a spot of hot glue to hold it in (means I can remove it late) don't want to epoxy/pot it either. Have also considered using the 12v switched power to the MPI as well.
I do have a dodgy 12v connection that ive capped off I could possibly also use but would rather not
Thoughts?
Seriously still thinking about just rewiring the whole car :s
-
On 14/07/2021 at 22:34, Bling said:
Factory car that 4AGZE came in would be around that weight, and they certainly seem to go ok in factory form. As for more boost, of course more boost is good lol. From memory change of pulley helped a little. Otherwise probably new charger up SC14 IIRC. Depends how quick you want it vs ease of getting it in car as is and being done. Low 15's / maybe high 14's down the 1/4? Been ~18 years since I was in that scene, but they'd usually edge out the Blacktops by a little.
SC14's are getting low on the ground these days or need the rotors recoating, probably better off going the turbo route (td04) etc if you want to upgrade but obviously more $$
Personally if you have a complete lotus I'd leave it complete and look at other cheap motor options
Whats common at the local wreckers? I can pick up most 4 cylinder motors complete from a wrecker here for 240Aud (if I pull it myself) Gearboxes are similar pricing
-
1
-
-
Keen to see what you do with it, personally Ive got a soft spot for coupes but nothing wrong with a sedan
Hopefully the rust isn't too bad and you can save it
-
Is one of them the DR SUMURTOS golden ale?
-
So MPI works as expected, only issue is the output for the fuel pump is only getting 9v when the ecu grounds it (during cranking) so the pumps not pumping
I could wire up a dedicated relay for the pump that can use the 8-9v when cranking to trigger the relay for the pump so it only runs when cranking and then while running
Other option is I run the trigger to switched ignition and have it running whenever the ignition is on (perhaps with an added switch) but not sure if I am keen on that
Will have a think and report back
Again seriously tempted to rewire the whole car lol
-
1 minute ago, Spencer said:
How many holes have you started drilling in it?
Did any of these come out with non electric windows?
Should shorten all the bolts and make any non load bearing bolts hollow :p
Still got sound deadening?
Lexan? :p
-
2
-
-
51 minutes ago, Roman said:
Also, my plan to use good tyres as a poor mans LSD hasnt worked too well.
There isnt much weight over the front left so it spins it up real easy which is annoying.
So will have to make a start on getting that other box sorted.Got a welder? just weld up the open diff :p
Can you move any weight in the bay around to help get more even weight distribution over the front tyres?
Open for a front splitter? for more down force (not great for take off obviously)
Did you work out how to get vvti working?
-
Hey mind if I ask where you got the titanium buts from?
-
Ok small update, CAS wiring one wire had come loose so no fuel due to that
Fuel pump still isn't getting 12v at cranking, also not getting 12v when key on to prime. Swapped out MPI with no change, have diagrams so need to do some more fault finding, may end up wiring up a new relay and using the low power thats currently being sent to the fuel pump to trigger it. Will see how I go tomorrow, a little bit frustrating as it was previously working, also need to remind myself how the MPI works as its two relays etc
Might get it going tomorrow all going well but not holding my breath.
On another note all my outside/garage/shed lights along with my house lights are all LED now
-
So once I remembered that all the air will go through the engine when I try pressurize intercooler piping I actually managed to make some progress, had to block the waste-gate port off the turbo outlet pipe as well, Found a leak right near the throttle body so nipped the clamp up more (its an odd spot so not surprised) and found one other small one that ive now sorted.
Went to start it and had issues, battery is now on charge as I couldn't hear the fuel pump running when I cranked it, checked power to the pump in multiple spots and it was down to 8v ran a wire from the battery direct to the pump and it primed as I was worried the pump may have died.
Hopefully ill get it running tomorrow and can work out the idle/ how fucked 2nd gear is etc, assuming I can do that Ill get it an alignment after lockdown ends.
Part of me is ready to rip all the wiring out and start again, anyone know where I can get new early 4G63 connectors (and the tools to terminate them?) seriously considering building a new loom. Though I may just piss it off and buy a haltech with an early 4g63 harness and then wire that in :s Ive also got another engine bay loom (headlights/fusebox/abs etc) to swap too at some point.
Thinking about what steering column would be best to use for an electric steering conversion as well, kind of keen to remove the hydraulic system and just pack the current rack with grease. Also need to work out an aircon setup but that can wait till its actually on the road.
Hoping once its running I can get it a RWC and then will get it on club rego
-
Maybe its the gods of speed telling you to that you need a turbo to help with the lower rev ranges :p
-
2
-
 1
1
-
-
Yeah a thicker oil could also increase pressure
Again maybe map out what spring pressure a normal setup can manage and then how much additional pressure you'll need
Is there an option to run an external oil feed to the solenoid that you can use to increase pressure (restriction or an external pump?)
-
4
-
-
Anyway to supercharge the VVTI solenoid and increase the pressure it sends? Ie block one of the return holes or make the hole going to the cam smaller to decrease the flow and increase the pressure? just thinking aloud so could be completely wrong. Can you increase the oil pump pressure so that the solenoid has more pressure?
How much spring pressure can the current setup work with? how much would you need to increase the oil pressure to work with the stiffer springs?
Hope this makes sense
-
1
-
 1
1
-
-
On 07/05/2021 at 15:46, Regan said:
Yeah fair enough! It’s a sweet little project man. If you’re keen to sell let me know haha
Some days I do consider just moving it on but would be wanting what I consider silly money for it as thats what the markets like. Car is also in Melbourne so might be a bit far away for you :p
Anyway, managed to chuck the boost leak tester onto the turbo and what do you know cant even get 3psi into it as its leaking out that fast :s so when I get a chance will go round all the clamps again and then start on the old soapy water trick starting at the turbo and moving out.
Also could hear bubbling so really hoping I am not pressurizing the cooling system or something.
Pretty sure the gearbox may have 2nd gear problems based on my last posts but considering it probably needed to warm up and was running like a bag of di*ks it may not be that bad. I do know of a gearbox going for 1100aud in QLD that I may jump on as a spare.
Hoping the leak is just a loose clamp and not a pin hole somewhere :s should probably buy a 2.5" to 3" adapter and a 2.5" bung so I can pressure test each pipe but I suspect itll be easier to just work forward from the throttle body if I have to do that.
Fun times

-
1
-
-
39 minutes ago, Regan said:
Where’s the updates man? Or you given up on this site?
No current updates, think I started it the other-day to move it back in the car port slightly haha. Cold start is a b***h so need to have another crack at the BLISS adjustment/setting again after I get the leak tester onto the piping
Haven't had much motivation for it lately, which is annoying as its really close, may have time this weekend to do some more to it.
Just need to find the time to get around to it, been busy with other hobbies etc lately.
-
Hey, might be worth having a chat with Barry at MRP around a twin/triple plate clutch thats more slip friendly, hear the triton/quartermaster setups he does are good
-
If you are on tank water, I would look at just pumping it back into the tank (assuming you use clean/foodgrade hoses and keep your chiller clean) fire tank would be less worry if its not going to be drunk, doubt the volume of beer you are cooling will impact the temp of a large tank much. I used to run my still with up-to 4800w of elements and used to cool that with a 3000L tank that was just feeding water through via gravity. (barely heated up even over a couple of hours)
-
1
-
-
Nice build
") , a lot prettier then my setup.
, a lot prettier then my setup.
With the temp probe I use a thermowell into my fermentor and use the exact temp of the wort to heat/cool, another option is to tape the probe to the side of the fermentor with some insulation. Not a must but have found it gives me more accurate temp readings and notes etc.
Wort looks nice and clear what did you use to chill?
Care to share the recipe?
-
1
-


Shrikes latest Australian project
in Other Projects
Posted
Close ups