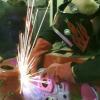
ta63-1uzze Posted October 10, 2013 Author Share Posted October 10, 2013 so yet again I have changed jobs, worked out that I was over fixing other people cars. and even thought I up skilled I just couldn't get the pay I wanted. so I have jumped in the deep end and now I am an apprentice cnc machinist/tool maker. back to the bottom of the pecking order once again. ANYWAY. . . . so couldn't move around in the garage, needed to re decorat Started by making a dedicated metal working station, something that I could bolt everything to so they stop moving around when loading up. couple hours later I had this bad boy Then the move around , shit is much better this way !! So cool to have my tools at home, fuck yeah! So got some gas and continued making exhaust. . . And had to bend up some ten mm rod for hangers, I couldn't get my hands on a gas set, so I managed to borrow and old school torch. this thing is so bad as that I went and bought my self-one for any time I need some heat!!! it got the rod to cheery red, so not quite white hot, but hot enough to bend and easily manipulate. this is a paraffin burner, or as we call them in new Zealand kerosene torch. I made some washers on the lathe at work, slid them on . Then I made a pinching tool so I could heat up and form the ends of the rod so that the rubbers won’t fall off . It was all really good fun , never formed anything before so this was a sweet thing to learn how to do . And since that is all done I decided to plug up some of the extra cooling system barbs that I won’t be using . So it took this amount of fucking around to drill out the old fittings and tap them for a 1/8 bspt plug. I did a couple more but you get the idea, this was hard because nothing is flat or straight to drill and tap. I also decided to mill up the original idle air control valve, got rid of the cooling barbs on this too, this is what it looked like originally and now this is my adapter plate , milled and new tinny air filter, IAC completed ! with that all done I decided to move back to suspension and wheels . I worked out that the spring rates from the Honda springs are up the shit, and they are not heavy enough. and if I cut them any smaller they need keeper springs. So I borrowed some siliva suspension, and I made some rough template spring hats, my idea was to move the spring down so that the top mount could be narrower to make it fit into the rear shock mount. well long story short it all didn't work , really fucked me off . I got so fed up with trying to design and make suspension work that I threw in the towel and bought some mx73 bc's. so now I am waiting for them to arrive. since I couldn't get them right away I thought I would tape on the flares so I could start looking at rims, borrowed my good mates wheels again for measuring . 8 inch on the front 9 inch on the rear and still got a lot to fill. looks like I will be buying some custom wheels ! my pockets are hurting already and I haven't even found out the price for them yet 9 Quote Link to comment Share on other sites More sharing options...
ta63-1uzze Posted November 24, 2013 Author Share Posted November 24, 2013 so back into the panel work , I like to chop and change up the order of things , I find it helps to keep me motivated . each time I put more bits on and it starts looking more like a car again it make me want to get fuck loads done. so with that in mind I decided to have a go at some panel work and see if I could tackle the bonnet and guard work . start with a celica supra xx bonnet, ( big thanks to zestripper for the old school hook up ) attack with grinder heaps , then try and fil the holes your just made and well only after looking at this from the computer did i realize that the carina knows its going to be a death machine, and its prepared with its own coffin bonnet hahahahha . . and evil upside down cross which is actually the primer underneath the old supports that i cut out. i capped the supports that i had to cut out, not for another reason than just to try and attempt to tidy it up. kind of worked, will have to seal it up and get some paint on it to know if it worked,. and trimming up the front guards to add a bumper mount, as i will be trying to use the ae corolla bumper. this is as far as i have gotten. need to get some box section to make up the main support frame . but its coming along nicely so far. got this far and then i stepped on the grinder plug on the floor. . . but hey no problem right, no ! just like a fucking key, once you bend it you cant bend it back with out it braking, so with that i finished all the beer and then called it a night,. but tomorrow i might just go and buy a new grinder then i can get a 1000wat one, and stop having to swap over cutting disks and linishing pads. can never have enough tools . 3 Quote Link to comment Share on other sites More sharing options...
ta63-1uzze Posted January 8, 2014 Author Share Posted January 8, 2014 so bit more gard work, made a nice little 2mm plate to support the bumper and a bit of a gusset to support the plate. and with that bit done it was time to make a bumper bar/oil cooler mount. the fit isnt as good as i would like but its only a bumper so will do for now or untill i find a better solution . here are some pictures of the front as it sits now in the garage. am a bit all over the place at the moment, things on the horizon include custom sump, oil "an block" to conect up the oil cooler and remote filter , and finaly get around to fittig the suspension i bought months ago. shit doesn't happen fast around here ! 6 Quote Link to comment Share on other sites More sharing options...
Popular Post ta63-1uzze Posted February 14, 2014 Author Popular Post Share Posted February 14, 2014 shit , so where do i start. ive been bouncing all over the place lately ,i want to get the dry fitting stage over with so i can start the nice bit of painting and re fitting everything. this project feels like its taking to long, so this last few weeks i have been hard at it , possibly pushing a bit to hard , i seem to be lacking direction, but anyway so , for my new job i have been learning a fuck load, and this is my first sold works drawing, first part ive designed and first well everything to do with making shit using computers and cnc machining. its a block adapter for an fittings for remote filter, i chose the remote filter because i wanted to use a oil cooler and i also wanted in increase the oil capacity of the sump . so by moving the filter i can achieve both things . here are some pictures. so i fucked around for along time trying different places to mount the reallocater, and this was the best place i could find with out having to cut away a shit tone of the inner guard or any stupid shit like that, the design of the reallocater leaves allot to be desired with regards to mounting options, but now its all done i have happy with its positioning and i feel it works well with everything else. i also started on the power steering shit too, this is going to be a total cunt face wanker because of how tight the headers are on the drivers side, so i am going to need to remake the flared fitting and tube that go into the rack its self . its going to be tight to say the least well this may look quite funny at this stage but this is the beginning of making a custom sump. i am basically widening it so it holds more oil, i will add some trap doors to help with sloshing around, with out spending a million bucks on dry sump systems i feel just having more oil in the system is going to help me not run out when doing stupid long slides. 1uz's don't hold allot of oil from factory compared to most v8s and i feel this is the main reason they tend to run bearing's cause the reserve is too small to begin with. first i traced it out then i made a square around it by following its straight lines, after that i used a compass to draw in the rest of the arks , now i can measure from the outer edge to the center of the circles, this gives me a position and now i can make a digital drawing on sold works, i will use the same approach to get the wings onto the computer, then once that is done i will make a top and bottom plate, the bottom will be welded to the side walls , and the top will become a adapter between the lower sump its self and the flange of the engine this will turn into something cool, but for now i just need some way to measure the bloody thing, looks dumb but from this i can measure it onto sold works and that's where it all begins and whilst i was at it, i finally saved up enough money to buy a new tig welder , this is primarily so i have the ability to weld alloy, basically modify my radiator at this stage, with the hopes in getting good at it and making more shit out of alloy later in the build. so with that i had to once again modify my welding trolley to hold the new welder. version 4.0.1 is fucking mean, i am surprised that this thing is still together its been fucked with so much, but yeah here it is in all its glory and here is the shit for the new radiator mods , ive got lots to do again . 11 Quote Link to comment Share on other sites More sharing options...
ta63-1uzze Posted March 30, 2014 Author Share Posted March 30, 2014 well, been hard at it again, have made a small amount of progress. i have taken allot of time away from the sump modifications , i have been battling with learning solid works and trying to get other small jobs done at the same time, so i decided to just get some of the little things done and come back to the sump when i have completed the little jobs, so firstly i decided to tackle the radiator modifications, i have been putting this of because i had never welded alloy before and the general consensus was that its a bitch , really had skill to learn and all that . but after i spent a day or too just getting the setting right i found that its actually very easy and bloody fast to weld aluminium. i even prefer to weld it now that i have spent a bit of time doing it , i find its very nice to weld almost like it flows differently . so here is the shots that explains everything. these are the setting i ended up with for welding alloy, i struggled to make it work at the beginning, and this is were i ended up at. hopefully this may help someone out there in internet land : ) next bit was to do the fans, unfortunately the fans i got were kind of oddly made, and if you didn't support the face of the fan the mount would fall out of the back. very shit idea, badly though out, pissed me off . because now i had to make some kind of lip for it to sit onto rather than just being able to weld some tabs onto the car and tap some holes. so had to completely re design how i had planned on mounting the fans. i eventually ended up with this well i wasn't happy with the original coil overs i had made i felt that although they worked and would have been ok, that i did actually want the benefits of camber plates and adjustable shock inserts so i bought some bc coil overs , i forgot to take the finished pictures of my suspension, but the tubes are away getting crack tested. so when they come back i will add a picture. now they don't fit my car correctly so i made these plates to weld in so i can also have adjustable caster too , i have yet to speak to my cert guy to see if they are acceptable so i wont weld then just yet. not much more left to make, mainly the sump and high pressure power steering hose. soon it will be time for the strip and paint. oh and i have a sneaky plan to make some custom wheels , so that will be very interesting, hopefully that will work out well for me as i don't want to spend 5 grand on wheels . . . that will be next after my custom sump is done : ) 1 Quote Link to comment Share on other sites More sharing options...
ta63-1uzze Posted February 22, 2016 Author Share Posted February 22, 2016 so , here we are again , a new year, and time to get back into the swing of thing, I have been getting side tracked allot . need to get focused . i went hard out on the mini project, and its so close to being finished, but then i got a bike. . . . 12000 rpm sounds so freeking sweet !!! so any who, this is what i have been up to on the carina front sump , its now real , just need to get the walls folded up so I can weld the sucker up. then make some kind of baffling I guess. . . this is the 3rd one of these I have concocted (water bridge) and yeah its not super great, shit as welding, the flat bit to miss the belt didn't go according to plan. it has been a pain in the ass trying to figure out a nice and clean way to plumb the front water bridge, the entire design from factory is very out of the norm. so this has and still is so far my biggest challenge. I may even do this again and try find some oval pipe and pie cut it . my ocd isn't happy with the out come thus far . . did some more plumbing, got all the vac lines done, booster done, here is a pasanger side picture of engine bay . and started doing some cad . . but not with a computer, haha, this intake pipe is a monster, its cause I chose to keep the m112 throttle body . and I couldn't find a 4.5 inch 45 degree bend and a reducer all in one. so I just thought fuck it, just stay at that size , I have the room for it, and hopefully it will make a sweet roar and awesome dort type sounds . . this is it in panel steel. I ran out of card board for the day. so tomorrow ill get stuck into it some more. got some other shit done , finally got some material for my wheels, and I made a sold works design of the wheels I want but cant find. the elusive Riverge . kind of like work equips but with a bit more style . so once I have a bit more things completed I can start milling them . I figure ill get the sump done first other wise I cant stay focused enough to do to big chunks of the project at once . I always end up getting of task and starting some other half pie idea but yeah I still have completed a few little jobs like making the heater control panel work properly, made a clutch hose up. sold some shit to buy a bike, got a license to drive it, then I got some beer, and I got a new bbq. . . . shit getting side tracked again . mmmmm bacon . 5 Quote Link to comment Share on other sites More sharing options...
ta63-1uzze Posted January 15, 2017 Author Share Posted January 15, 2017 So its been a year again. and well shit I ain't achieved much at all . not really sure where to start. 2016 was a absolutely miserable year for me , I've had allot of ups and downs, and well all I can say is ; I am fucking glad to see the ass end of 2016 !! continuing with my typical fashion I haven't finished anything that I was doing ; well nothing completely, but I have done heaps of random shit in no apparent order . . . And so its now 2017 and I have to find a new place to live, I'm now a single man, and I have got to get this beast moving under its own power!! sump stuff , was good fun to weld up. tig welding is the bees tits ! AND HERE IF YOU LOOK HARD ENOUGH YOU CAN SEE MY EPIC FUCK UP !!!!!!!! but its ok cause I made the flange area to small , I was going to mill the weld off where the head of the screw would sit, but seeing as I completely made an entire fuck up of the whole thing it doesn't matter any more . so here I am starting again, I learnt allot about welding stainless on the other sump, so this time I am bolting it down to a massive bit of steel. should help to stop it from warping so much , and I gave the weld more clearance to the screws . with the sump on its way again I looked into the high pressure power steering hoses. This was always going to be a battle, and it didn't prove me wrong at all, I started out with 3 meters of 10mm of 8mm id heavy wall pipe ,I broke 2 hand benders, stuffed up 1 fairing tool ; and with allot of mucking around to get them to this stage, I scrapped allot of pipe and spent allot of time to create these, and once again I haven't finished anything, all that is needed now is to weld on the an fittings, make a clamp block to clamp them to the cross member, and buy the braided ptfe high pressure hose and that is the last of the plumbing done! all of this just because there is no room to get braided hose with an fittings to clear the exhaust/rack/clutch hose/cross member/sump. its all very tight , but this was the best solution something that has taken me a long time to figure out, trial and error . but I'm stoked that its going to work and I can keep power steering. never really liked manual racks to be honest. all that other shit aside, this is the cream of my year, and whilst it doesn't look like much at this stage this has been a huge driving force for me. and I cant wait to get some more operations done on these !!!! and this is my model that I drew up from pictures of the internet hahah, I like work equips 01 , and I really like star sharks , then I came across these, I cant remember what they are called but I nabbed a few pictures and went to work modeling them up. and now finally I'm making chips , just got to dig the rest of the wheel out of all that stock : ) and that's me all caught up. merry fuckers new years ! 9 Quote Link to comment Share on other sites More sharing options...
ta63-1uzze Posted January 15, 2017 Author Share Posted January 15, 2017 16 minutes ago, flyingbrick said: I get a 404 error when using the discussion thread link :-[ re linked : ) //oldschool.co.nz/index.php?/topic/32064-ta63-carina-with-a-twist-discussion/#comment-849236 1 Quote Link to comment Share on other sites More sharing options...
ta63-1uzze Posted February 18, 2017 Author Share Posted February 18, 2017 on a roll this weekend, moved the mini to my new house, welded up the an fittings on my power steering hard lines , welded up the sump. made some trap doors . I made some out of hinges and welded them off , but I couldn't stop the heat from twisting them up. I tried 2 different sets, all moved so much the hinge would bind up. so I resorted to using nuts and bolts, I don't think they will cause any issue like this, I may drill and lock wire them, but for now this will do. . . . now just to wait for the sealant to dry so I can water test it. make sure it has no leaks !!!!! and now I'm caught up with what I was doing like a year ago its time to write a new list of things to get done. 4 Quote Link to comment Share on other sites More sharing options...
Popular Post ta63-1uzze Posted September 24, 2021 Author Popular Post Share Posted September 24, 2021 Lets drag this thread up from the dead ! its been about 4 or so years since this project had any love. Carina has been in 3 different storage locations. And in this time I've moved house 3 times. finished a qualification . and managed to buy a house !! After so many years, and moving so many times, and everything changing so much. Its hard to get started ; some times when you look at it all, such a huge daunting project full of half finished jobs and ideas, things start looking like a insurmountable task. So what do you do ?? you just look at it for awhile, look for one little job you know you can do, you break it down, ah, you make a list. and start from the top! Great idea ! So I made a list and then in my typical fashion, I just did what I do. . . I did none of the things on the list at all. hahahah I just picked something I didn't like and decided that I can do this better .I think , and with that thought I finally started , it wasn't long till I was right into it again . but ah, anyway Ill shut up now, and show you heaps of the pictures. this was how I left it, and I didn't like it, because the hoses are under allot off stress to make the bend, I can see this being a failure point. I tried to find some silicon hoses , that have sharper 90 bends at the ends, but they all have short tails and the long side here is 350. So i just decided to start again. because this all ties into the water bridge and the clearance issues there too. you can see the blue marker where the belt is going to touch. The idea , is I make the flats better ,first and then, tighten up the angle. and hopefully there will be more clearance. I was very nice here and just softly tapped it down with a panel hammer. making sure not to distort the other side, it worked better than I though it would Now I just have to tighten up the angle at the top of the water bridge . this was a bastard , its just kept bubbling up this black spotty stuff and making dirty as welds. eventually I ground enough away and welded it again then I got a nice puddle , and it flowed much better. (I'm only at home fabricator my welds are very average) here you can see that huge angle change First part done, now for the piping small adjustment has added allot of change, I hope its going to be enough clearance at the end . More supplies ! here my angles aren't as accurate as I wanted , it was meant to come out further and also parallel to the timing cover, I think I cut it a little short. and on a slight angle but it is what it is. will have to make use of it . this fit up, is not tacked, just sitting in place no tension, a lovely fit up. couldn't have done it better if I tried this is so damn hot, no one tells you when you start tig welding, just how obscenely hot aluminum gets to weld I had to hang it like this cause I couldn't touch any of it even with welding gloves on. Trusty block of wood, third hand, weight, prop, holder thingy and that is the cooling system update. seeing as that was going so well I decided to redo some more things. Some of this stuff when I do it I don't really have a end plan as such , some times its just trial and to see what its like . and then if it looks like it'll work then ill do some more research and ill make a plan later on. So the bonnet was one of these idea. where later on I would work out if it was going to be fiber glass, or I leave it to the panel and paint shop to make it look mint. or just who knows I have to cover this spinning thing with something ah shit I lets chop it up and see if I can hide it. Yeah that sounds like a good plan . . . . and then we have this monstrosity But as of now I think I can make it better. I never liked how I had left it and well now is a better time than any to give it another nudge. this is a hack job at the back of the bonnet, at the time I had no idea how to blend it all in, so I just did this, to get a feel for it. and as you can see it was a mash of a job. if I had been a little slower I could have made all this nicer right from the beginning. But its a lesson learnt. pencil line is how much i am going to trim off, this is al the way around destruction ! Tacking it all back in, but welded. back edge trying to keep it flat. this was going fairly well here. So much tacking, this took like 3 hours to weld up. do a weld., blow it down with compressed air. do this over and over. Another thing I learnt is I should have finished the extensions, completely. whilst it was off the bonnet. because effectively welding 3 strips the whole way down the entire bonnet added a shit load of warpage and heat. so much grinding !! almost there. out side done had to re trim the inside to give it strength again. i am unsure of the level of grinding i will do on the inside, i want it to look nice but i am also going to seal it all so there is no point of going hard out if the seam sealer just covers it all anyway. all metal , no filler yet......... but. yes its very very not flat. and it will need filler for sure, I hope it wont crack . time will tell. Now if I had to do this again I would go about it completely differently. There is so much i would do differently. I learnt so much doing this, and one thing I now know is warpage lol . I can make shit warp hard out ! I learnt this the hard way, so this was a valuable lesson. I will take this information forward in my next welding project. I cant do anything about it. I don't have another bonnet, so this is just going to have to be it. until I learn how to fix it, or what ever will come in time. so some of this is up loaded in the wrong order. the pictures get out of sink. but anyway , i hate the stupid rod bonnet stand thing. Its useless and it has to go ! here is it going. now I know it looks weird. but with the charger and throttle body, no gaps in the guards or on top of the strut towers. this is the only place they could go. and well for the convenience , I choose to have these and not have the bonnet hit me in the back of the head again. the first 3 times was enough Next is guards , front, and indicators, head lights, why wont it all line up? you can see here how much has been cut of them, that and no lower front valance, leaves no support for the out side of the guard or headlights. So i measured heaps of shit, found out the guards I started with were all beat up., and the mounts were all pushed back in. so I needed to make a slide hammer attachment to slide hammer the mounts back into place. This meant I needed to bend some 10mm by 50 flat I have kicking around. which means I get to play with fire ! and its a great excuse for me to use my new to me Oxy set ! shit yeah I love this stuff. ! finally the indicators fit well, the guards are where they need to be, and I got to play with a some new tools yay , no what else needs forming !?!? ah yes I need to add a support to the guard as its still pretty weak on that outer edge. heat up some 8mm flat bar, its super soft so will be mint for supports. strong, but they'll bend if then get pushed. smash flat. welded some nuts to the car. this will get finished welded on later., they just tacked there for now. this is the drivers side inner guard, you can see the guard support and the mount for the front bumper. So now the front is on , its all bolted, its firm, it has strong proper mounts, the bonnet is looking a bit better. we have a upgraded water bridge. and some bonnet stays. ! Fuck yeah I love finally having a shed again, I have been waiting for so many years to get stuck back into this project. ! This is my happy place making stuff in the shed at home! 17 Quote Link to comment Share on other sites More sharing options...

Recommended Posts
Join the conversation
You can post now and register later. If you have an account, sign in now to post with your account.