


azzurro
-
Posts
2,878 -
Joined
-
Last visited
-
Days Won
4
Content Type
Forums
Downloads
Events
Gallery
Posts posted by azzurro
-
-
looks so nice,
cool to see some proper front tyres on there

-
so not much happening on the 125 front, im pretty much being held up by #$%& parts.
Ive given in and ordered a bunch of stuff from the always friendly and well priced AutoRicambi.us - be interesting to see if this package arrives before i even get a reply from the several local vendors ive called/emailed (some more than once). I guess business must be really good to not be bothered to follow up on a $500+ sale
In the meantime ive been pulling my spares together in prep for a big splurge when i get all the bits i need.
Had a look at my diff and drivetrain due to the noise coming from there. Verdict is some maintenance is required: centre bearing hanger thing is hosed, diff leaks from the nose seal (flinging stinky SP90 onto my nice new exhaust to burn
), and the diff end cap has somehow been bent in (by a stone?) and was rubbing on the housing, and probably making half the noise - bent it out of the way again, but this wont have fixed the leak (or replaced the diff hanger).So got the guibo and hanger already, just waiting on universals and a bearing and then ill pull the driveline out and can bung in this:
This is from the old blue car i chopped up on the driveway, except it now looks like this:
Someone has been in there before, with one of the halfshafts being replaced and the diff head having evidence of being removed & disassembled (it was also nice and clean and smooth with no chips or anything obviously untoward despite finding a large chip from a gear tooth in the pumpkin (probably undiscovered debris left over from the reason for the last rebuild) i think that har had been driven pretty entusiastically and someone had blown a diff
However, the unreaplaced halfshaft bearing is a bit noisy (oil seal o-ring was chewed into the cavity so oil out and greb in) so ill put the best one from the diff thats in the car currently when i swap it over along with fresh o-rings.
Ive also found (by driving in the dark and rain trying to demist the windscreen) that the heater doesnt get very hot (but neither does the temp guage), possibly related to the connections between the heater controls and the tap, but possibly also because its just stuffed, so ive dissassembled my sparest one. Unfortunately the matrix on that one is stuffed too, so i do have another spare in the red car, if the one in the car is also busted, but all the other parts are all cleaned up and ready to go in if required. Ill need to pull the whole dash apart to do this to, and at that point ill put the new dash pad in as well.
I have also made a start on cleaning up the engine bay, in readyness for pulling the engine out to do the clutch/and maybe swap the spare one with the new pistons in and fixing some rust. The start is by moving the battery to the boot:
Current state - was about 100mm short with the brown wire replacement last time
Battery out and ready to drill out the tray to relocate it to the boot:
And done (ill cut the rest off and tidy it up when im doing the rust/engine bay prep):
Pretty happy with the state of the metal underneath the battery tray spot welds
All wired in, 80A fuse, nice thick cable to the drivers knee area, earth screwed to a new captive nut:
Then to this thing, which is a distribution block with built in 60A breakers - the brown wire replacement (main supply for loom), starter (unfused apart from the 80A job) and Alternator all run from this. The voltmeter reads about 0.2V less than when the battery was in the front.
And done, bolted in from underneath while i checked the diff:
When i get my new parts box i should have plenty to get on with
-
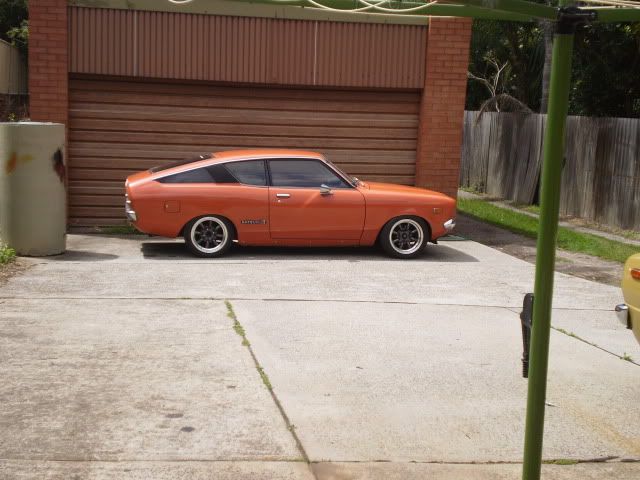
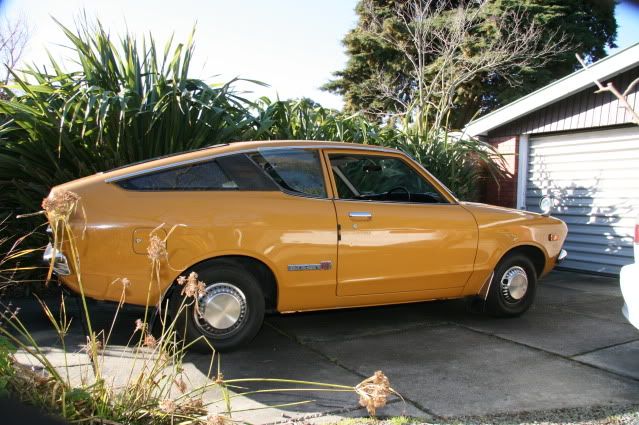
seems that the biggiest difference betwwen the lowered one (want!)
and your one one is blacked door surrounds (excl. lows and wheels of course):
seems to make the lines flow together much better or something
do it - STAT!
-
mean
was on my watchlist - seemed like a bargain for a rare car in ok condition with side skirts
there's nothing wrong with those engines:
ka6-K4xqk5s
-
nomnomnom burgers for dinner a day early nomnomnommmm .
car ready to go, have intalled roofies for a pickup
(must remember to pm euron8!) -
im no expert but...
the factory felt is to stop noise of the large roof panel flexing and tappitty-taptaptapping on the bars not hold the bars up, the welds/screws on the roof surround hold the bars in place.
there is proably a better/non-water absorbing way to stop the noise and reduce the roof flexing too, probalby some sort of strong yet flexible adhesive. i want to say tiger seal but thats proably too much retro rides.
however i do know that on my fiat the lining went over the window lip to the 'outside' - this is so the window rubber holds the lining in place nice and taut. seemed a bit funky to me too but ive since put the screens back in without any sealant other than the filler strip (as per factory) and no leaks yet.
however ford may be different?
also those big black foldback clips are good for the hours of crease chasing you have coming your way
-
i would but Baleno is immobile awaiting a new clutch cylinder and blocking the Fiat in the garage.
Also Homy-Van will need the same thing done soon.
Lucky the CVT in the high milage Primera is sweet...stupid unreliable manual transmissions!
-
speaking of bringing stuff to meet,
chris do you want to bring them rims along for a car park test fitting?
-
JB weld on thermostat?
-
well, if your gonna do all that stuff then you should do this too:
makes haymans one look about a trillion times better, and bmw lights are surely easier to find than integrale ones!
a compulsory mod for all square headlight deltas I reckon.
-
they work by sensing the change in magnetic field from the dizzy cam lobes moving past the sensor to rest/fire the coil instead of the points opening and closing to do the same thing.
they are as easy to install as replacing points, as this is basically what you are doing, and basically the only difference between models is the screw holes to suit. The dizzy rotor and cap still work the same as before to get the spark from the coil to the plugs so work best if these are good too.
Only problem with them is if you have small lobes on the cam as the sensor will have problems accurately sensing them relative to the shaft, so they arnt as good an upgrade as they could be for my fiat for example
Theyll still work, but not as good as they could (wobbly dwell times, which is the main 'performance' problem with points remain, the other problems of constant adjustment and maintenance are fixed). this pic shows difference between lobes for points and an electronic one - the electronic one ® has exaggerated lobes for the magnetic sensor, which i suppose you could make your lobes bigger with blobs of weld (lol) or machine one up, or steal necessary parts from a suitable electronic dizzy from PaP?
they are also about $70 landed from overseas...
-
was at M10 on weekend - $33.14 for a 1200x2400x4mm hardboard sheet - more than enough to do 4 doors @ < $8 each with heaps left over.
however the stuff is hard to cut, flakes off esp around trim clip holes etc and cracks easy, and is affected by water ingress even with plastic sheeting, so id probably go for the same thickness treated ply (which is also a couple bucks cheaper) or that plazzy stuff mentioned above + some thin foam from spotlight to puff the covering out a bit.
-
lol - i reckon id get shot! I already have a shed and a 1/2 full of rusty crap.
only thing i 'need' are those lamp protectors
will probably throw a bid in if it doesnt get silly tho
also looks like the rusty white car on the right is a 125 as well - parts car for the parts car?
-
cheers snapper
test will be if i can make it go i suppose, but i havnt spotted any reason why it shouldnt. Ill try it when ive swapped the single downdraft carb and stock manifold off the engine in the car now, which i know works/runs which should mean one less thing to adjust when i try to fire it up on the ground in the driveway
Which reminds me that I would have had the sideys installed by now, except i still hant got a lovin manifold gasket. Just never put in the package the first time and still not sent nearly 2 months later
stuff would have been here already 4x over with much better communication etc if id ordered them off the internet from overseas.
stupid local specialists and their extensive knowledge, experience, inventory, and bricks and mortar...
-
sweet meet
highlights:
the light up grill-nipple on indy's blue wolseley flavoured milkshake bringing all the girls to the yard
gold mk2 go-tina - i'm liking that shape more and more
and snoozins datsun luxo-barge
oh and dat alfa - nomnomnom
was it a members?
-
weathers looking like it will be ok, and i like burgers so
ill be there
dont you know baby yeah
-
been waiting for some new parts, especially some intake manifold gaskets so i can fit my twin sideys to the engine in the car, for aaages and they still havnt shown up
I was hoping to have had a few test drives done with them fitted by now. Maybe next weekend.
So instead ive been pottering about putting the spare engine back together.
I painted the block - i wanted battleship grey but they didnt have any, black i decided would be too dark to spot any oil leaks so third choice bright blue it is:
Colour I realised afterwards might be a bit OTT in my engine bay but meh, it makes all the nice clean parts pop:
Also picked up a couple of rusty old starter mtors and my spare gearbox/bellhousing from the lockup to bolt to the back of the spare engine to see if it will fire up one of these days - gearbag was from this car:
which had been stting in the mud at the base of this farmers bank for 15+ years when i got it, so i wasnt expecting much, other than a useful mount for the starter, but it cleaned up pretty nicely after the mud and grease were scrubbed off + a bit o' paint.
Gears etc look ok too and rotate smoothly with no rust or steel flakes or whatever in there, so i suppose thats a full spare drivetrain
also have my eye on these hayashi street copies (themselves a 'homage' to a DeTomaso wheel so i reckon they are Italian styled):
hhhmmm, given condition id have to repaint them - maybe in all over white, or plain blasted silver, i think the usual polished faces and gloss black could be a bit too JDM-yo for this car?
Hurry up already manifold gaskets!
-
Nothing wrong with that colour
The Cream interior goes so nice with it
Rims look choice too but spend your $ on getting it proper sorted first and get bling later.
Sux to have a project stalled due to lack of funds for parts that noone likes to see but the wof man
-
stink aw
rear is ok tho? i think the nose is maybe a little low anyways
so do that and roll wof - re front arms, is the low point where they bolt to the x-member? 30mm here is pretty much = to 30mm @ wheelarch so it will be sweet i reckon.
if you really wana stay low i reckon you should move the wounting points and take the opportunity to fix the handling/known weak spots/rust. your gonna cert it anyway?
these are designed to tralalaa over snow and on russian roads with 4 sheep in the back and nonna on the roofies, so all the angles are whack when lowered. have a look for how the lada drift cars are set up maybe, you can even buy full setup kits if you can speak eastern european and want to send your credit card deets to russia! lol
I reckon id rather spend the $900 on shiney new things that bolt straight on than paying someone to test repurposed OEM parts on top of a cert cost.
-
ha,
i will get a little breather filter i think, so only filtered fumes & oil vent to atmos/drips on the ground
took the mrs out for tea in the car to hallertau in the rain last night - so under a bit of pressure, but it went sweet, heater fan on high + lights + wipers on full + stereo, and no electrical worries/smell/fires at all. Stoked
Miss also seems much less now, but still there. Still something funny in the diff/gearbox/driveshaft tho and im going to get a wheel alignment and a couple of tyres swapped off the steelies. The old mismatched and misalighned tyres are a bit too hard and slippery in the wet to have on the front. Will now keep the oldies on on the back tho - woopsie!
-
I knocked off work early on friday so went to see murray at weber specialties as thinking i could get rod, tabs and ball ends to make my linkage, or to see if there was an aftermarket plate that could be ordered - nope - he didnt have any rod, and i forget to grab some screw on ball joints but he did give me some laser cut steel tabs to use for the arms, and some advice too. Nice one
I also picked up some allthread and some nuts on the way home. Cost me less than $10 in parts all up which is better than a $85 for a generic kit off the internet!
So got to put my plan into action today when i could finally bust out the grinder and welder. It worked ot quite well in the end, so hopefully some one will find this useful in making a much much simpler mounting for the twin Dellorto DHLA sidedrafts as fitted to many later model Alfa Romeos to almost any other engine with rod linkages. It should also work in a similar way with a cable throttle as well. Basically you want to change the throttle action to pull straight up rather then try to push down and under like the Alfa.
Standard Dellorto main throttle linkage plate (note carb is upside down so thottle plate is the same orientation in the next shot - thottle opening rotation on the ball is anti clockwise, or down towards the sump). All sorts of stuff gets in the way and the gap betwen the carbs is less than the gap between the manifold tubes:
Linkage arm from some crusty old carb ready to weld on - after a lot of checking I put the arm directly opposite the std location and at the same distance from rotational centre so the rotation required is the same, just pulled from above - note the kink in it so the adjustable linkage arm socket clip doesnt rub on the manifold and pop itself off.
And from above showing the slight bend in the adjustable linkage arm to clear the slave carbs balance screw (but no where near as drastic as the full 'L' required before). I also flipped the rod mount boss and i ended up taking the kink in the top tab out after this shot as the reversed mounting boss put it in the perfect spot to centre with the kinked lower arm.
Looking towards the front of the car/engine - The difference in lenth of the arms means the small movement (25-30mm vertically) of the factory accellerator rod linkage end (in this diagram represented by my hand...) is magnified by the long arm at the carb which requires 40-50mm of lift to rotate the butterflys the 85-90deg required. The carbs will hit the WOT stopper just before I run out of pedal travel
The arms are tacked to a nut, and after finally figuring out that the correct position of the lock nut varies depending on the force applied (it took a while
) its all done and these are ready to bolt right on to the factory engine/linkages in the car and look pretty factoryish as well Just need an intake manifold gasket and some 5/16" fuel hose, Oh and some air filters. And maybe some 6mm ID pipe of some sort to hide the allthread
So carbs should be spitting at me next weekend or so That done, I pulled a few bits off the spare block to tidy up and check out as well as hose out the water galleries etc - its all looking pretty choice and most are bits clean and newish, with a bit of a wire whell/sandblast they will look new again can go back on with new gaskets where required. Had a bit of a look at the pistons, i think they are just flat tops, and with the conditon of everything i think its best to leave the head on for now as its not going to be a race engine, just a nice clean spare.
vroom vroom!
Also, what should I do with the crankcase breather valve outlet now?
-
Had a play with the carb linkage:
You can see how its got to push back underneath.
It works in concept so I reckon I can make it work for real, with some generic linkage parts to allow adjustment in the lengths of a few bits, and with a bit less tape and hose clamps obviously.
But it seems to me that the big 'L' shape required in the intermediate linkage (even in the manufactured aftermarket ones) makes the forces a bit off, and is in there even in the linkages you buy, as a work around for the dumb position of the ball and esp the interference of the bulky balance screw on the carbs.
it would be much tidier i think to reverse the movement and pull "up", by welding or purchasing a ball on the carb throttle plate on the manifold side?
Like this:
-
125 spindles may or may not be 19mm lower than 124/lada ones. I swapped my last spare set to testament/tom and he reckoed it was a myth and didnt drop his 124 at all - they are stronger tho.
that bump mount will come off with a spotweld drill, just move it up/cut and shut a bit no one will know after the first mud you drive though. isnt it inside the spring or something crazy?
-
thats looking really tidy.


 so do that and roll wof -


 So carbs should be spitting at me next weekend or so


CatatonicChimp's 1977 Trabant 601
in Project Discussion
Posted
exciting times!
i bet ya one rusty wheel nut that when you get it it will still be covered in radioactive mud and invasive spiders, despite MAF invoicing you $400+ for a steam clean and full decontamination with a toothbrush.