


gibbon
-
Posts
2,726 -
Joined
-
Last visited
-
Days Won
7
Content Type
Forums
Downloads
Events
Gallery
Posts posted by gibbon
-
-
I'd do it in a heartbeat
-
 5
5
-
-
Poor old triumph failed it's wof for underbody rust, I had a quick look and didn't see anything too terminal except around some seams. Is there any gc in northland who does the whole underbody sandblast/treat/epoxy shebang?
-
right, if im not going to oakura tomorrow I'll drop in
-
did it go ahead in the end? or all snotted by the weather
-
Then perhaps a guy I know might bring his gt6
-
if we say that hypothetically the warrant status of vehicles at this show isn't a matter of keen scrutiny, just saying, I mean as a moot point of argument for the sole purpose of fostering robust debate
-
who what when why?
-
so what did they actually take? just the running gear??
-
On 11/01/2023 at 20:16, DB8-TypeR said:
Depends where you are by the sounds, down these ways its policy that every single break in and theft gets at least visited and prints taken where possible so that eventually when the person gets caught for something then they can be tied to all their previous crimes too
When my mate's Evo got stolen a trillion years ago the cop's response was "well you're insured so what's the problem?"
-
 1
1
-
-
9 hours ago, kws said:
My mother had one of these U13s when i was growing up. NEVER serviced it (literally never, no oil changes, no spark plugs, nothing), put heaps of KM on it, overheated it a couple of times, blew the engine (completely seized), replaced the engine and kept going for a few more years until it was replaced with a Honda Fit (Which at my insistence got semi-regular oil changes). A cockroach of a car.
"one lady owner"
-
1
-
 1
1
-
-
So what happens when it's running and you add 12v momentarily to the field?
-
I think the wrong field coil would have an affect, something something less lines of flux being cut etc
I assume there's some kind of external regulator? Normally there's a few adjustments to be made there
-
1
-
-
this one is only a couple of months old. And I'd never bring the boy he is the devil incarnate
-
I shan't be bringing mine if she's behaving like she is now, phwoar
-
damn, I was just thinking I hadn't seen any fellow northlanders post in a while
I will have to clear with the wife... no promises lol
-
ah, the rotor and eccentric shaft rotate at different speeds don't they. Otherwise you wouldn't need a rotor bearing at all. The rotor drives the e-shaft like a big end bearing drives a crank, and the stat gear stops it from kicking around the bearing.
as you were, lads. I believe it's modular monday in three hours
-
1
-
-
Trying to picture it now, I suppose it's mounted on the journal but not keyed to it, so without the stat gear it could rotate aimlessly.. why isn't it keyed to the e-shaft?
-
1
-
-
Can I ask a dumb rotang question... why does the motor need stationary gears? If the rotor is mounted on a journal on the eccentric shaft, I can't really picture why it also needs to hula around a toothed gear too
-
The high resistance through the armature would drop the output for sure. If it's 20x what the book says I'd start there
-
1
-
-
needs more full sik airbrushing m8
-
1
-
-
Watching one of the many custom car shows, guy makes some subwoofer boxes, covers them in polar fleece, puts resin on the polar fleece then sands it all back to shape... that's a new one to me?
-
On 10/05/2021 at 19:27, EpochNZ said:
I get the feeling quite a few people did, a mate definitely remembers BUA with fondness.
interesting development with BUA, current owner has contacted us tentatively with regards to restoring. workmate speculates it might have been the first civil twin in the country, imported in '57
-
1
-
-
When it comes to gillies, the Rule of Cool prevails IMHO
-
 4
4
-
-
On 11/04/2022 at 23:44, xTerraH said:
What ecu error codes are you seeing?
sorry mate never got back to you - i meant to take a video but life took over.

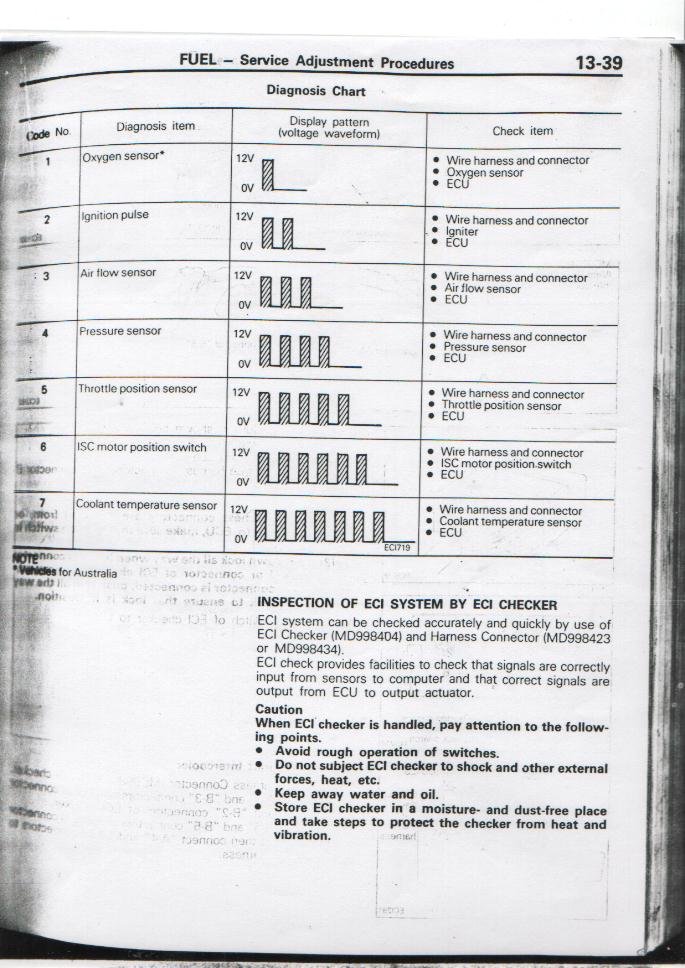
these are the fault codes for a regular SOHC 4g63 starion. the 4g54 conquest uses the same codes so i assume they were standard for mitsis at the time. however the code i pull is totally different
I'm using an analog meter as the regular digital multimeter can't react fast enough. I get a code that looks like this (repeating):
i don't know what to make of the big sweep at the start. is it a "begin sequence" indicator? the manuals don't mention anything about it. given that the car runs, i doubt there's a problem with the "ignition pulse" which would suggest that it's code #1, O2 sensor (which I have swapped out with an AEM unit, the gauge is configured to duplicate the factory sender output but perhaps there's something in there that the ECU doesn't like). the second part there's a slight gap between the two so again a bit hard to tell if it's a code 5 or a code 2 and 3. measured individually none of these components appear to have anything wrong with them. i've since changed AFM to the double barreled type ,there's every chance that it's all sorted now but ive had some problems with the fuel rail which i've made worse every time i've touched them so the car currently isn't running,. oh but the brakes have seized on again in the meantime.....

Rust removal in Whangarei
in Upper North Island Region
Posted
Bought a hoist, I'll do it myself (if I ever get around to installing it)