

SR ROLLA
-
Posts
178 -
Joined
-
Last visited
Posts posted by SR ROLLA
-
-
All sorts of progress going on, big improvements by the panelbeater, small improvements by me.
Pillar all sorted

Rear and sill all sorted
Other bits all sorted
The plastic buffers which go between the mirrors and the fender were all hard and cracked, have been glued back together at some point
I was very surprised to find that someone in Japan is making replicas. They're exactly the same, should fit up sweet as at reassembly time.
I have also taken out the tail lights and cleaned up all around where they go. Was a little bit of rust starting, nothing serious but glad to have gotten to it now rather than let it get worse. Also been cleaning up everything under the guards. The top side, which had a tiny bit of surface rust, will be painted up in blue when I get to the colour stage. It all gets covered up by the guard anyway. This is where everything starts to go off the rails. This is where it starts. This was supposed to be a quick job, with the minimal work needed to get it looking a bit better but then I thought 'while the guards are off I may as well redo the underbody seal bit too' then I thought 'Some of this is a tiny bit flakey, I may as well see how much effort it will be to chip/scrape/clean off the old stuff'. What a ballache, looks all lovely and clean now though.
But then I thought 'That looks all nice, I should do the whole wheel arch too' So now there's sticky old shitty underbody seal all over my garage and I'm fucking sick of scraping and chipping for the sake of something I had never originally intended to do. Don't think I can be arsed to do the whole arch back to bare. I will just scrape off anything which is loose and give it all a good scrub then do a nice fresh coat over the top. A couple of drives and it will look exactly like it did before anyway.
Anyway TL;DR Things are still happening, slowly.
-
 8
8
-
-
So, the work has all been done now and I have the car back. In the end they did fill and prime everything and it came in around $100 under the quoted price, which I wasn't expecting. It's all straight and tidy, all the work looks good. They even kept all the bits they cut out to show me. Apparently they took lots of photos of the process but I haven't got these through on email yet, so it will be good to see a bit more detail once they send those.
@piazzanoob the work was done at Golden Gun in New Lynn, they were very friendly and nice. All around I would recommend them, for sure.
-
4
-
-
Yeah, I'm currently spending a whole bunch of money that I don't really have on tools for painting but I'm thinking that maybe welding would be a good next thing to learn, once I start to get somewhere with the painting. I don't anticipate a huge amount of welding in my future but it would be a great skill to have for the times it is needed.
TOTP d'oh
-
Okay cool, seems like I’m doing okay then. Thanks for your comments everyone.
I’m confident that the quality of the work will be good and, as pointed out above, if they are willing to give it back to me with no filler then they’re obviously not trying to hide anything. I always find myself pretty unsure with this kind of stuff because it’s not work I have any ability to carry out myself, so I’m kind of forced to just trust what I’m told.
This is one of the things that makes the oldschool community so good, so much knowledge in the heads of so many GCs ready to share what they know.
Cheers lads.
-
3
-
-
I’ve not really had serious panel beating work done before and I’m curious on how far my $$$ should go. Obviously you get what you pay for and I’ve taken my car in to a place that does good work – they have done some work for a friend, many years ago, and he spoke very highly of them but their quote seems higher than I was expecting?
It seemed to me like there is not a huge amount of work needed:
– Cut out and replace an old patch repair in one sill, will need to be slightly curved, but no complex profile or fiddly end bits.
– Patch the bottom of one guard where there is a rust hole (probably replace the whole bottom section from the profile line down I would guess?).
– Fill a couple of small holes, one in the top of a guard, the other at the base of the A pillar, both approx 4mm diameter.
– Pull out a dent in the rear valance, quite wide but not deep.
– Fix a few small holes where the roof joins the rear pillar (this is something where I really have no idea how much work is involved, will they remove all of the old lead filler completely and re-weld the join?)I have stripped all of the affected areas to bare metal, removed all trims, bumpers etc which would be in the way and removed all but the most minimal number of bolts holding on anything which needs to come off, to save them as much time as I can. They are doing panel work only. No filler and no paint.
Including GST the cost would be a little over $2000 (assuming the price doesn’t go up more from the original quote). Does that sound about right? Like I say, I don't really have experience with getting this kind of stuff done and don't have a very detailed knowledge of how many hours this will take, so maybe this sounds good to those in the know?
-
Do this:
-
5
-
-
Welp. No going back now. I've started to strip the GTO back, removing badges, trims and bumpers and started to strip the paint off the suspect areas.
On both sides I will need to sort out the original joins where the roof meets the pillar. Passenger side was okay but the drivers side has a few little holes near where the lead filler meets the corner of the window
You can see the layers of original primer, original blue, yellow primer, new blue and my previous paint touch up primer and blue.
The sill below the driver's door was always a bit suspect as a couple of the mounting holes for the sill trim were missing. Given that the dent below the rear bumper was 'fixed' by filling with bog I suspected something similar was going on here. Let's see…
Yup, bog about 10–12mm thick. Nice.
It wasn't just dented though, a patch panel has been tacked in, but not shaped at all first, just stuck in flat, with the curve built up in bog.
From above you can see how much it was built out with filler.
Took the guards off and found that it was all pretty clean underneath. Some surface rust but nothing scary. The passenger side guard is a bit rotten at the bottom but should be easily saveable. All in all really good for 44 years old.
So the car goes off to a panel beater on Monday to fix the bits which are beyond my expertise. Yay for car, boo for wallet.
-
5
-
-
Yup, imported from Japan.
-
Well, been a while. Not a heap going on, finally got around to switching the headlights over to proper semi sealed units
I quite like the look, yellow looks good against the blue.
Also been acquiring the necessary items to sort out the paint work. I have decided that short of a lotto win in the near future I am better off painting it myself. I've done it once before (with plenty of help) with pretty good results. I figure it wont be any worse than it currently is and if it's not great then it can just be a holdover paint job until I can afford the real deal some years down the track. Worst case I can learn a lot.
I've also put in motion plans to rebuild all the suspension to a proper height. Custom coilovers up front with reset leaves+blocks in the back. Just finalising the shopping list at the moment, then it should all get sorted in the near future.
Feels like progress. ish.
-
8
-
-
Hey man, love your car, it looks awesome. Can I ask what the specs on the wheels and tyres are? size and fitment seems bang on. Cheers
-
1
-
-
I ended up getting some cans colour matched by Auto Industrial Supplies and painted the doors and guards below the white lines and the tops of rear quarters. This has advanced the paint job from 'patchy bogan shit-heap' to '
goodmeh from far but far from good'. It's at least mostly shiny and mostly blue now.Went to Caffeine and Classics a couple weeks back, not a bad turn out considering the weather was iffy and Beach Hop was on at the same time. Got some pics with the other GTO guys:
Turns out my car must have had a full respray at some stage with another, exterior only touch up at a later date. As you can see above dwlee's factory Himalayan Blue 75 is noticeably lighter. No wonder I had trouble finding a match for my mystery blue.
I had a couple of little things done in time for a fresh WOF recently. Rear wheel bearings, nice and quite now, they were getting pretty past it. Tightened up the steering a bit. General servicey fluidy stuff. Flew through the warrant but with the note that the strut tops are starting to get a little perished. Apparently these can be re-vulcanised if no replacement part can be found but the plan has always been to replace with coliovers anyway. Guess I need to get on that sooner rather than later, just need to save up some of my not-enough-money. I don't know a lot about working with leaf suspension for the rear but I think retensioning to lower and stiffen a bit, maybe combined with small blocks would be the go? The slight rake has always bothered me, feels like the bum could happily come down quite a lot.
-
7
-
-
Thanks, that's a handy reference.
Looks like I need to research more carefully and spend the money to do jobs properly/go to the right people. Shocking.
-
1
-
-
I decided to get a can of colour-matched paint mixed up so I could at least make the whole car blue while I wait to save up for a full respray. The VIN plate in this car is nowhere that I can find. A bit of internet research confirmed what I thought I already knew — the 74 GTO only came in 4 colours: Fuji White, Tahitian Blue, Alpine Silver and Athens Olive.
I can't find reference to any other shades of blue, so this must be it right?
Apparently no. I found the colour code for Mitsubishi Tahitian Blue, it was only available in 1974 – 1975. But the mixed up paint is too light and looks too yellow, the original colour is darker and more purpley. I suppose it's possible the whole car was resprayed at some stage… I know in the 90s it had a touch up where the exterior was painted, but not the engine bay, door jams, boot etc Even the racing stripe and badges were just masked.
Any ideas? Discussion
-
Thanks man, I'm pretty stoked on how they came out.
-
- Popular Post
- Popular Post
-
13
-
- Popular Post
- Popular Post
A few bits and pieces over the last couple months.
New master cylinder seems to have sorted some minor brake issues. New shiney:
New HT Leads:
Santa brought some NOS indicators:
Finished off repainting the factory wheels, got tyres on and got them on the car:
They came out a little darker than I wanted but it's nice to have a change. Tyres get whitewalled on Monday.
really need to get the paint + height sorted
Edit: Forgot, I also re-shoed, cleaned up and painted the rear drums. So all in all the brakes are really mint now.
-
12
-
Hi, sorry for the slow reply, only seen these questions just now.
The only thing I've had from Rare Spares so far is the door rubbers. I replaced the brush seals (which run along the top edges of the doors and under the rear windows, I think that's what you're after?)direct from Mitsubishi NZ. Not sure if they will still have them, they only had a few left when I got those, which was a couple years ago now.
-
Lights are all sorted now. The good folks at Ron Wood Auto did a stellar job, very nice and tidy. Relays set up in the engine bay now so the lights are much brighter right off the bat.
I haven't switched over to the semi-sealed units yet. The locator tabs aren't in the right places for my headlight cups, they would make the lights on a whack angle and also they sit a little too far out towards the outer edge. Do people normally just cut/grind these off?
I also got around to checking out a dodgy looking patch under the rear bumper that I've been meaning to get to for a while. There was a horizontal crack in the paint just below the bumper which I could see was letting water in under the paint. So I cracked it off to have a look. It appears there has been a dent at some stage fixed with the tried and true method of filling it with bog and painting over it. It was about 8-10mm thick in the middle.
I've taken off the bog, cleaned it all up and painted it black to seal it up for now. The dent will be added to the list of things to address when the panel and painting happens.-
1
-
-
Have managed to source a new fuse holder, from a Celeste, to replace the melted one but don't have it yet. The car is currently with the auto sparky, hopefully I will hear from him tomorrow and the issues will all be simple ones.
While the car has been going nowhere i decided to whip the side vents off and give them a bit of a tart up. They were in okay condition but look to have been repainted at some stage with some less than perfect masking and there were a couple of peely bits.
after a quick sand on the worst bits:
masked up:painted:back on the carI ended up getting impatient waiting for the right conditions and went ahead and painted them when it was a bit too cold, like a dick. So it took ages in front of a heater for the paint to go off and it has ended up a bit stipply (doesn't look quite as bad as the photo above IRL) and shinier than I wanted — it's a satin, should've maybe gone for full matte.Anyway, a bit of a cock up (especially after the ballache of masking them) but not the worst cock up ever. They look better than they did plus nice and clean and crisp. I can easily enough redo them when the weather is warmer with a flatter paint if they bother me.-
4
-
-
Yeah, will definitely be running relays once they are converted to semi-sealed. Nick is going to be having a look when he can fit it in next week. I'd like him to have a bit of a poke around all of the electrics, see if I can get things tidied up a bit, make sure it's all on the up and up. I was hoping to get along to the OS meet this month but it might be a bit of a challenge bombing along the motorway in the dark with no headlights. D'oh.
-
Sweet, cheers.
-
So, I've not had the best time of it lately. First some lovely chap decided to break into the garage and nick every single power tool and hand tool in there. Was very tidy about it. Cunt.
Also, weirdly, stole a spare (new/unused) water pump for the GTO and, I discovered tonight, my Haynes workshop manual and original owners manual too. Any oldschool Mitsubishi enthusiasts on here who are inclined towards the occasional burglary?
Then I started having headlight problems. One side's lowbeam stopped working, the inner lights and the outer's highbeams were all good. I thought that the bulb was playing silly buggers, which was odd because they are not very old. I decided to take the opportunity to upgrade to semi-sealed so that I could actually see where I'm going at night. However when I plugged in the new unit it still didn't work. Balls.
I thought "I'd better just check the fuses in case it's something super dumb like that" and discovered this:
The fuses for "Upper R" and "Upper L" have melted halfway out of the fuse box. So. That'll do it I guess.They are both just regular 10A fuses which have not blown, despite getting hot enough to melt through the plastic housing and fuck things up good and properly.Electrics are not my thing at all so I am stumped as to the cause (has been fine for the past 3 years) and stumped for what to do. I guess find a good auto electrician.Suggestions here, if you have 'em: //oldschool.co.nz/index.php?/topic/38426-sr-rollas-1974-mitsi-colt-gto/page-3Cheers.-
1
-
-
-
just come over now and do some D1s in it. he won't know.
LOLZ
Nah.. got to treat it nice, might be mine one day…


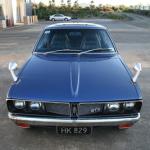
SR ROLLA's 1974 Mitsi Colt GTO
in Projects and Build Ups
Posted
Bugger. Once I started with the couple of loose edges I ended up spending half the night scraping it all off anyway. Just like I said I wouldn't. Couldn't help myself, oh well, looks good now though.