

ThePog
-
Posts
5,626 -
Joined
-
Last visited
-
Days Won
6
Content Type
Forums
Downloads
Events
Gallery
Posts posted by ThePog
-
-
Stripped the hubs, one is ok, one is fucked. I found some cash so decided to just buy a new hub anyway and use the good secondhand one in something else so this is todays effort;

Shifter cable is too short bit I will sort that later. Otherwise it is mint, can hit warp factor 9 no probs now.
-
yea I welded a couple of extra supports at the front for this exact situation, must make an excuse to plumb some shit
-
Got a very wet arse on the run home Monday evening, decided that mudguards were probably the ticket so got these real steel bad boys from Velo Ideale for $40, I kind of like the rust vs very shiny thing going on;
Also took off the new bars etc as it all looked way too technical and serious, but I needed a very long stem so I could use a spare set of Raleigh bars I had, behold the roughness;
Perfect riding position tho
In other news, I purchased these two Sram P5 internal gear hubs off TM, no idea of completeness or condition but shit they were cheap;
IGH goodness will follow shortly.
-
Treated longbike to a new set of handlebars + quill stem adaptor + adjustable stem, it is like riding an armchair now...
I tried swapping the seat for an old sprung one that I had lying around, unfortunately it isn't in top condition and it felt like someone was banging a nail into your perineum, so I swapped back the old one.
I have decided to put 700C rims on it for extra largeness - does anyone have a spare set lying around that I could purchase? I chucked on the ones from my other bike which mostly fitted, I will need to move the brake mounts and/or buy a different fork for it.
-
I found this, which sort of makes sense;
http://www.dclxvi.org/chunk/tech/trail/
I would have thought the rake would need to be increased, not decreased, but straight forks would increase the trail in this case.
I have found most mountainbikes are twitchy in this respect, it is usually pretty hard to ride them with no hands, but my old 10 speed based single speed is totally bulletproof for no hands... and that looks like it has more rake and a lot of wheel to stem offset..
Longbike is based on an old MB, obviously enough has changed in the geometry to effectively reduce the trail or at least make the amount of trail (or lack) more noticeable.
So I can either try straight forks or more rake?
-
So I have a bike geometry q for all you knowledgeable kernts out there....
Longbike, while superior in nearly every aspect of performance/load carrying ability/awesome etc, has a handling issue in that you simply cannot let go of the bars in an upright position without the fuckers darting to one side and making you poo your pants a little bit. It is actually not enough of a problem to make me not ride it, but it would be good too see if this can be improved.
Having pondered the issue during the many miles I have now covered on this beast I have decide that it is either about the angle of the steering pivot line or the distance between the steering pivot line and the front axle. So what I want to know is this; which is the most likely culprit so I can make this better?
Thanks in advance.
-
I'd say the top one would be best, looks like it has equal(ish) length primaries + it is a 4 into 1 which will probably be peakier at the expense of low down torque. Also cast manifolds are poos cos I say so.
-
Fucking sweet, smooth riding perfection. The only problem now is the single gear - I max it out everywhere now. I just need to find that internal geared hub from somewhere.
-
Yea seems too, I modded it a bit so it can pivot freely/keep the spring tension etc, the proof will be the performance on the way to work tomorrow...
-
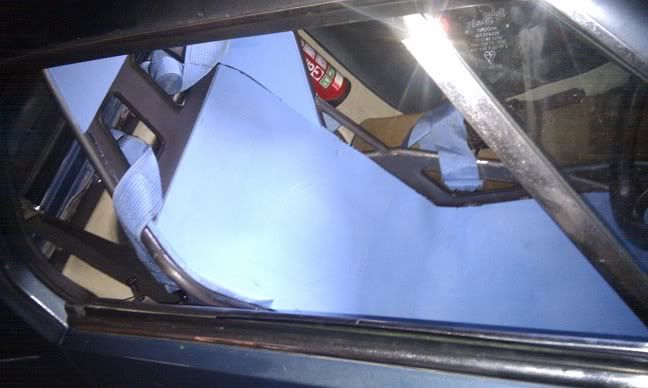
So trackday has been and gone with the car mostly intact..
I had a big off at the hairpin, was doing an awesome full lock drift then next thing I know all this dirt and shit is blowing into my face through the window. No damage, but one of the rear tyres now has a clump of grass jammed between it and the rim
In the afternoon I did 7 laps hard out before the pedal went to the floor and I thought it best to pull in for a while. Not bad for a 30 year old car..
Also my brake reservoir cracked and pissed fluid everywhere, have to find another out of something else as these are not available anymore, apparently BMW 540/740 ones can be modded to fit - anyone got one?
The seat was pretty good, I semi covered it in camping roll the night before;
Rough but semi effective.
-
Thanks to Dodgysam (
) longbike now has high tech chain tensionThe chain jumped and jammed on the way home from work on Friday, the tensioners arrived on Saturday...
-
Ah did you see me give it a wee bit?
-
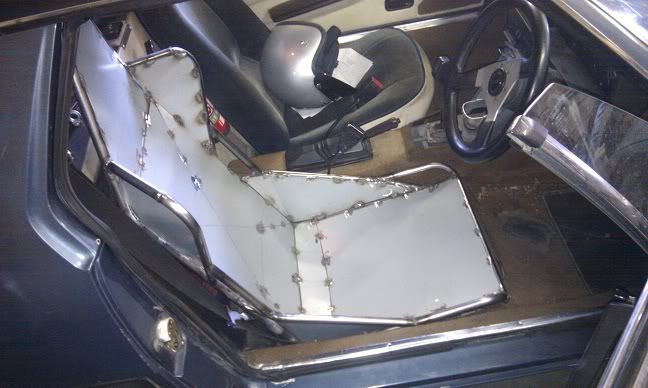
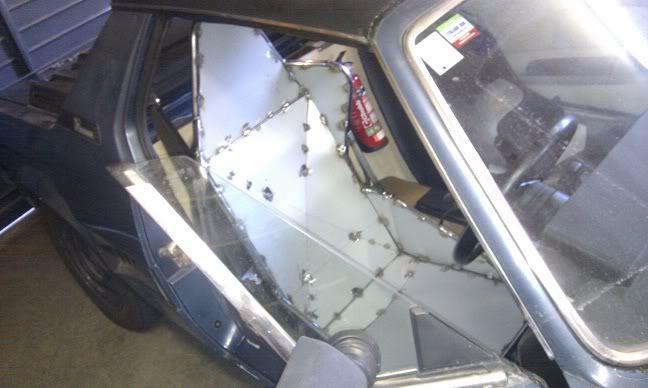
Track day on Saturday so I thought I would actually try to finish my seat, this is today's effort;
It is really quite comfy and my helmet fits too...
Will cut belt holes etc tonight hopefully then find something to line them with. Then I need to find some padding, probably foam held down with duct tape for max rang spec.
-
Yea, was just picking it up after getting a wheel alignment done post epic suspension improvements, is minty mint now.
Traffic is totally shit in that car, until you hit a clear spot then it is bazookas...
-
someone in LNI buy this and be like me
http://www.trademe.co.nz/Sports/Cycling/BMX/Other/auction-362578928.htm
When I was 13 I had a chrome one of these
-
Will be sending tensioners this week...I hope ur prepared.
Do I need to break out the vas?
-
So longbike has back brakes now which is a good thing.
I rode it to work today and gave many, many of the denizens of Christchurch a chance to think to themselves 'What the fuck?' and ponder on the meaning of such a remarkable sight.
-
And if anybody is interested I have a whole lot of non leading link ct90 bits, 2 frames, 1 98% complete engine etc. Will be flicking that shit on once this is all go. probly.
-
Todays efforts;
Exhaust is just sitting there, was a brand new item that I got for $1 off TM. Probly going to do a serious rerout of that tho.
Random bike light that I may use if I can fit the right bulb in, really need a 5" teardrop for the original light.
Now need to wire it up, fuck I am dumb about electrickery/end of project
-
-
Should be bolt in....? and I have a spare engine now.....
-
I have considered the possibility.
-
So just picked this engine up, CT110 with CDI $60 off TM, looks pretty sweet actually.
Side cover has been removed roughly and the neutral switch is broke, but *apparently* all that is actually wrong with it is the CDI unit has a tab broken off. I can see that this is so, so fingers crossed. Looks pretty genuine otherwise, has the carb and everything
-
I have just put a new chain on which has vastly improved the chain jumping issue, still need extra tensioning probably.
Waiting for rain so it will rust sooner.


ladaspeeds CT90 of certain illegality
in Other Projects
Posted
Got slightly sidetracked with longbike and other shit + when I filled the new engine up with oil it all fell out of the cracked side cover I didnt know about, so kind of got the shits with it. Get back onto it soon tho, be keen for a burn with other scoots.
I have a million bits, all stacked up on a pallet - what you want? two frames there if anyone is keen, Horse25/David was interested just now but it would be a job to get a working bike out of what is there. Be a start tho.
yea saw Andy, bike looked sweet as, hope he got it going again