

mk5corty
-
Posts
353 -
Joined
-
Last visited
Content Type
Forums
Downloads
Events
Gallery
Posts posted by mk5corty
-
-
Yeah painted it myself, took bloody ages cos one of my compressors shat itself.
Was planning on using a stripe down the side with GT in it, much like the FPV falcon stripes. have still got the orginal trim peices if i decided to go with that.
Current tires still have about 80-90% tread cos i have hardly even got to drive the bloody thing haha.
-
Well shes been awhile, mostly cos i was at welly and the tina was in aucks in my garage.
got some pics finally

Nice ass, primo boot spoiler, orig ford, aws, plus got some brand spankers new taillights to go in.
Pretty happy with the gloss, thats just after first compound, broke the pad so thats it for now.
Badass art stz one with $40 digicam, chur.
-
wire brush on a drill wont be very effective on well adhered paint. 320 is a scuffing grit, fuck using it for baremetal. Personally if i was gonna baremetal an engine bay i would chemically strip it.
Would recommend about 120-220 grit for sanding, finish with 220, then primer.
-
Meh i dont reckon it would be too bad, that ford focus xr6turbo was set back by about 2 cylinders and it was a dedicated track car and won most of the races in it's class.
-
matty blue.
Any place that sells car paint will have a book of colour chips, find a colour you like, get the codes for it, work from there with tinting at the panebeaters, or just buy it at the shop and give it to the painter, just make sure its a brand he/she paints with.
-
found out the 4.4 leyland is actually wider than the 3.5 rover for those that are interested. The injection head with cams exhaust extractors and some porting usually makes around 200hp.
Seen many different figures for rover v8's but what usually comes up is 160hp for p6, 170 for sd1's, 200 for leylands
from Wiki: The Rover engine was heavier but stronger than the Buick engine, with a dry weight of about 170 kg (375 lb). It was first offered in the 1965 Rover P5B saloon, initially making 160 hp (DIN) (118 kW) @ 5200 rpm and 210 ft·lbf (285 N·m) of torque @ 2600 rpm on 10.5:1 compression.
-
People checking back bump up the views aswell, i spend atleast an hour a day on here but prob only post once a day.
-
-
YB is teh shit.
-
-
4.4l of awesomeness
200hp and 380nm of torque.
http://www.trademe.co.nz/Trade-Me-Motor ... 053912.htm
one on trademe at the moment minus carb, not sure on teh conversion, apart from the gearbox would expect it to almost bolt straight in, being essentially the same engine.
-
The head off the sd1 flows better and has bigger ports, best is the vitesse or vanden plas fuel injected if you can find it.
Or search for the 3.9 or 4.2 engines.
The twin SU carbed sd1 engine makes about 170hp and the carbs are good for over 200 with rejetting. So get the good head, get it ported get a good exhaust and extractors, extractors may be the expensive bit.
-
-
a bench grinder and a polishing bonnet is the shit for doing peices like that just watch the fingers. Slap some autosol on and shine it up like chrome.
-
pretty much all paintjobs except backyard ones are done in 2k.
-
Like those car valet dudes for lambo's ferraris and bentleys and shit, dude took 100 hours to clean the car or thereabouts.
I learn heaps of shit off properautocare, heres one of the good articles
-
oldschool- better than vtec
oldschool- do a skid
oldschool- where carbs live
oldschool- it aint plastic
oldschool- 5k redline
meh.
-
Guy at my gym chucked a 50kg dumbell onto the lat pull machine and stacked it, the wire snapped on about the 6th rep, now we have signs saying "Dont add any weight to this machine"
-
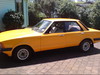
mk5 cortina 2l pinto, 4 speed manual, pretty much stock.
Approx 13 secs of looking at the clock, didnt launch very hard tho.
-
sure i saw a mk1tina wagon in welly about a week ago, looked tidy as.
-
Ok i understand that bit now, i do the same, pull the air on about 30cm before the panel so my arm is at the correct speed when i pull the trigger a few cm before the panel.
-
Not meaning to say your wrong or anything, just dicussing a few points i dont entirely agree with or feel i have a way that would better suit some, feel free to argue/bash/contradict me.
1. p.s. to remove said milky appearance, empty your paint into a spare clean container, then throw in some two-way thinners and lightly spray it over the affected area - the thinners will soften the paint and help release the moisture. But I'm sure you guys will never need to do that, aye!
2. start with 33% thinners in a small mixing pot and do some test runs and keep thinning/thickening till you work out the required ratio. However, be advised, if the weather/temperature changes, your ratios may need to as well.
3. One other trick I learned - once I start painting, the air is always going and then I just need to squeeze the trigger a little bit to get the paint flowing (I'm talking about the fact that the 1st few mm of trigger only flow the air - then it increasingly brings the fluid into the airstream) - this means that you have more accurate control over how much material is being deposited on the work - otherwise sometimes you squeeze the trigger a bit much and *surprise* !! too much=runs. This technique also helps you achieve consistent coats.
4. with more modern paints, lighter coats seem better and give a more consistent finish without "shadows" - also, it helps reduce the risk of runs in the finish. This is especially true of metallics, where if you try to paint a few heavy coats, it'll be horrid and all over the place like a mad woman's shit.....
Buffing:
5. I think this has been covered well here, but I'd just like to enforce the fact that - if you need to buff the finish - start with a 3M medium cut compund on a lambs-wool pad on a rotary buffer - there should be no need for sanding as you followed all the rules and got a beautiful finish off the gun, right??
6. This will make the paint go dull - don't PANIC! Then move to a fine compund (mothers scratch remover for instance) on an orbital buffer, then a pre-wax cleaner type product by hand, then several coats of pure carnuba wax.
7. Oh, and don't forget to leave the paint for at LEAST 7-10 days to gas off, otherwise you'll root it!
1. I would argue the best way to counteract the milky appearance if you manage to trap humidity in you paint film would be to sand with 600 once dry and leave in the sun for a day or two and recoat. The use of thinners can increase the milky appearance by killing gloss, as i found out when trying to use the raw thinners trick to flatten orangepeel in a section of my clear.
2. As for paints which require thinners i havent encountered any that flowed better at less than 1/1 (except primers) and usually in between 1:1 and 1:1.5 was optimal, the paint tin will give the best instructions.
3. Im not sure if im understanding you correctly but i either have a panel or a sheet of paper and i adjust my paint flow and fan on this before spraying any panels thus ensuring gun settings are correct.
4. When spraying 2k i spray the first coat as wet as the last and spray them all at full wetness, i do sometimes get a run yes but if im not laying the coats heavy then without reducing them with slow reducers they dont flow out correctly for me, this way i avoid compounding. I havent had a problem with metallics, aslong as i dust coat the last coat or two to even the metallic appearance up, also i adjust my technique by spraying further away from the panel and moving slower-i find this keeps the metallic particles higher to the top of the paint film.
5. I always sand if i am going to buff, if the paint is that smooth that i dont bother sanding then i dont buff, thats a personal choice however, i dont see an improvement in gloss.
6 and 7. The reason you can ruin the paintjob withing 7 days is the sealing of the paint with the wax, dont use the wax, you can compound in a few days, even the day after although i have heard of paints need to be re compounded due to shrinking back into scratches after it was buffed, the cause of this however was the use of 320 and not 600 grit between primer and colour stages.
Heres how personally buff
Sand with 2000 (start at 1200 if there is orange peel) then medium cut on a wool pad, followed by fine cut on a foam pad then swirl mark remover or other very fine abrasive on a finishing foam pad. Then hand glaze instead of wax- it doesnt seal the paint.
You can get away without the finishing pad and swirl mark remover on all expect dark finishes.
once again feel free to pick apart my suggestions.
-
Moisture or solvent bubbles.
Caused by many things, improper following of flash times, to wet a coat ( paint will run before this stage unless you are painting horizontally.) Extreme humidity, not wax and grease removing before sanding, not using a water trap in your lines etc.
You will find as i did this is a reacurring problem in affected areas, i had to remove to OEM primer or baremetal before i cured it.
-
bwahah ill just jam the paint gun full of water into the carb.


18rg for capri.
in Tech Talk
Posted
Stock they can be either 110 or 130, dependant on engine. I havent heard of this conversion but if your going to go through the trouble of putting in another manufacturers engine unless i would put one in that would give me better hp to $$$, unless your doing it purely for cool factor. Or mod the 2l pinto with the money it would cost you.
Likely you will need most of the conversion mods anyways, custom brackets mounts etc, exhaust, gearbox, driveshaft etc.