sleeektoy
-
Posts
782 -
Joined
-
Last visited
-
Days Won
2
Everything posted by sleeektoy
-

Sleeektoy's 1965 Daihatsu Compagno. Discussion
sleeektoy replied to sleeektoy's topic in Project Discussion
Cheers, there isn't any structural rust at all - its all surface and patina rust. I just got lucky those lights fitted Pm'd about the tank -
Tank all installed - new filter, new fuel lines and everything cleaned up. Next is to remake the hardboard backing to hide it all

- 32 replies
-
- 24
-

-
Tank was opened up and the official decision was... it's fu%ked So a new stainless one was fabricated as mentioned before ... close to the original. Test fitted..It fits and is (hopefully) leak free so that's what counts. Next is fuel lines and hoses to be run as the original a clear brittle tube and is not something I'm risking using.
- 32 replies
-
- 24
-
-
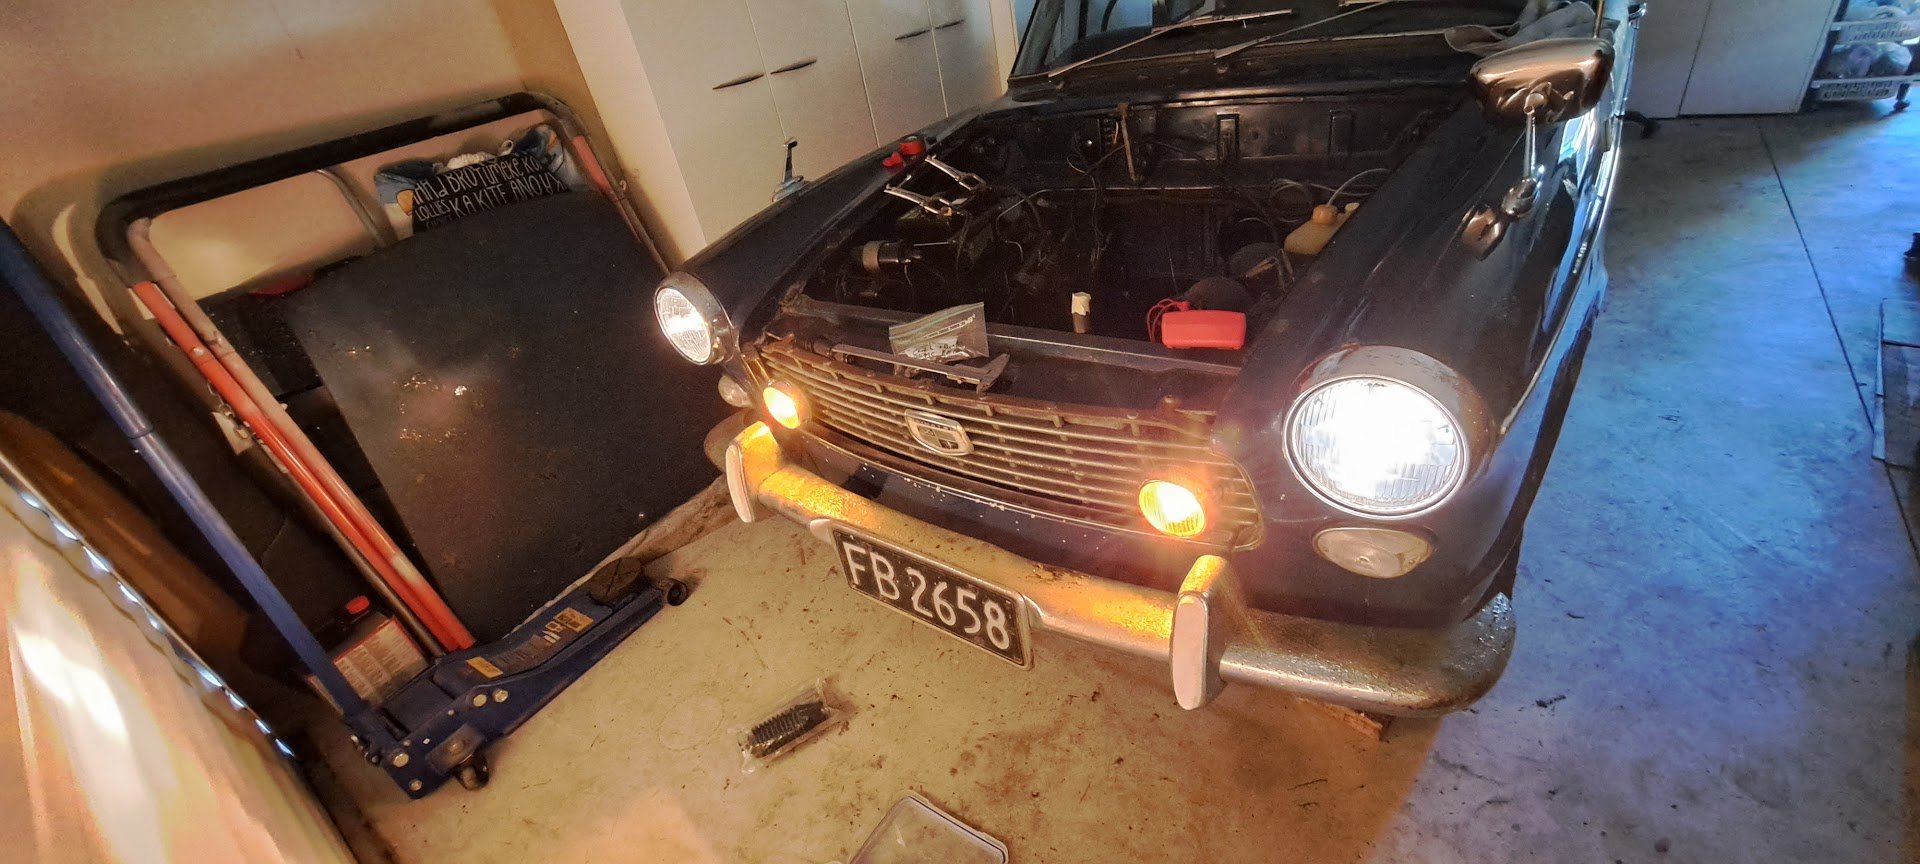
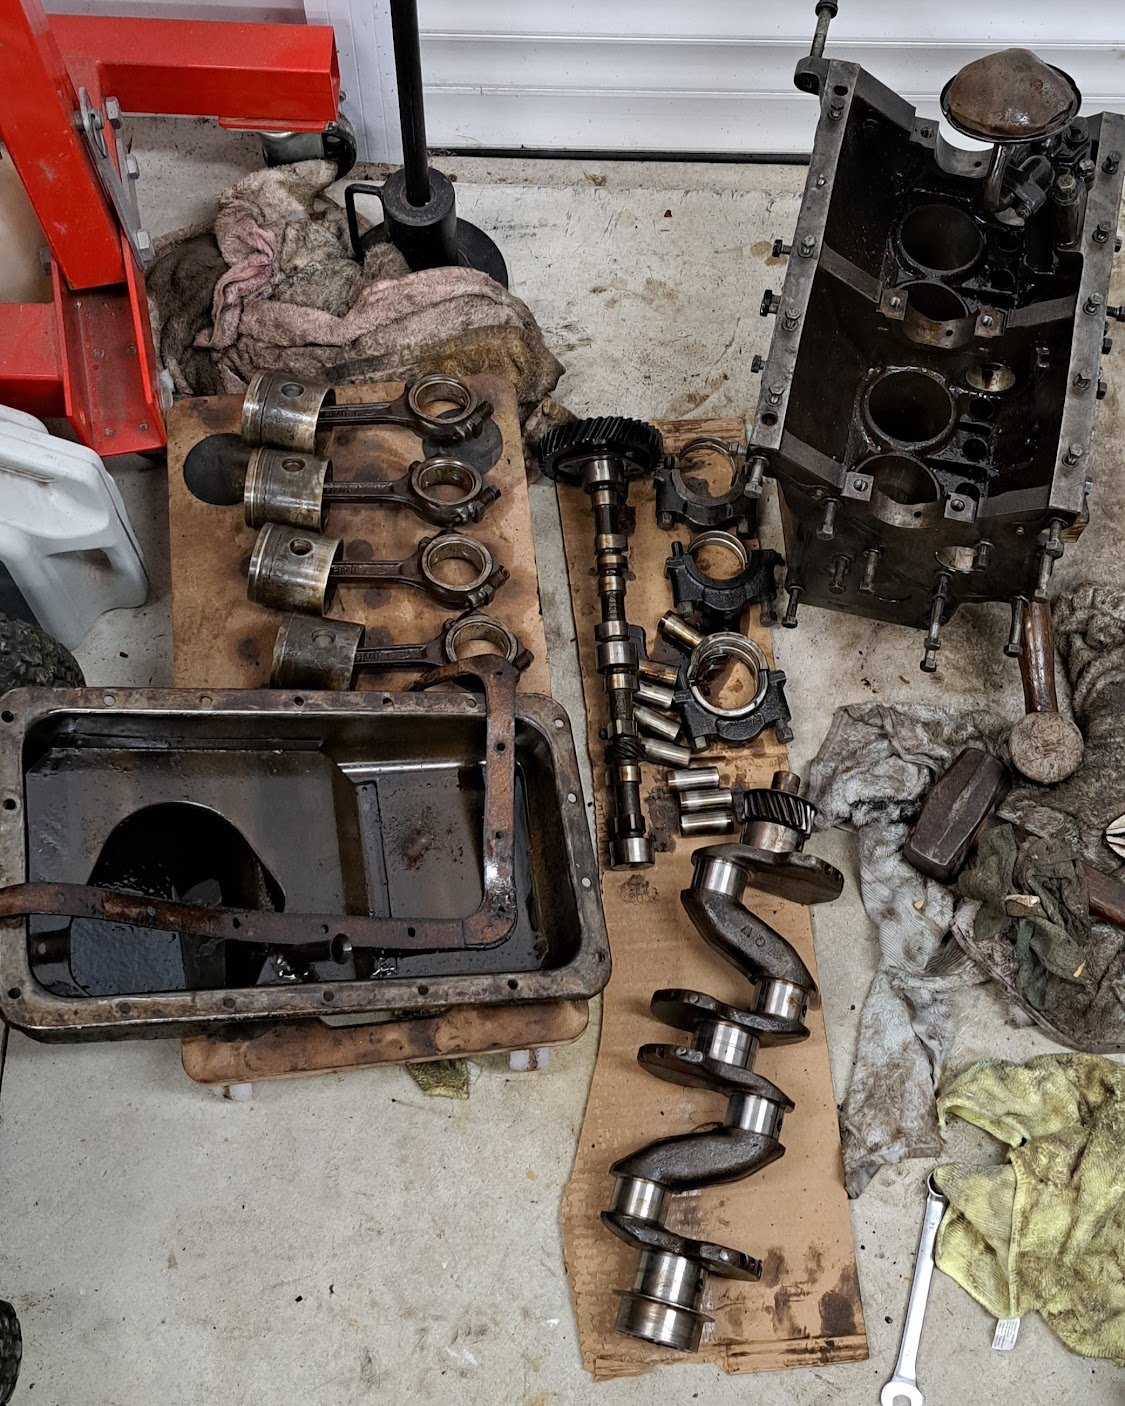
YES!! Pistons arrived finally!! And headlights - so they are installed.
- 32 replies
-
- 13
-
-

-
Got the horn and number plate light sorted. Number plate was just an earth wire. Horn was the steering column ring absolutely caked in corrosion. Quick buff up and the twins were tooting Promptly blew a headlight - so got them on order. Pulled the fuel tank and found it was absolutely rotten. Not surprising considering it sat 45 years with just a jam jar lid over the filler. New stainless steel one is being fabricated with the help of a local marine tank shop.
- 32 replies
-
- 16
-
-

-
It's not a surprise; Aside from oil changes, the starter, alternator, and water pump are the 3 things i have replaced on my 3GR Lexus. The starter seems a bit weak, it was sketchy with mis-engaging to the ring gear from around 90K Km but I just mashed the start button until it worked... until it didn't anymore at 145K Km. I suspect the alternator had gotten a bit fed up of the starter requesting all the amps and blew a diode whilst i was on a long trip, that stalled the alternator and burnt out the front clutch on it. lucky this was as i cruised into Auckland Water pump was just noisy/dripping and done when the alternator/belt was off. 21 bolts for this was a touch overkill. Aftermarket starter and alternator, Toyota genuine water pump all going strong.
-
I got the Power!! Most things work too.. just the horn and number plate light to sort.. both suspected wiring issues but easy fixes.
- 32 replies
-
- 22
-
-

-
A lot of smaller "to-do" things achieved with a rather productive weekend just gone 1. Removed the "crunchy bar" boot rubber and replaced it 2. Cleaned and straightened the wiper arms/blades and replaced with new refills 3. Windscreen washer (from a mini) fitted to the original bracket as the original had crumbled to bits. + new pipe 4. Removed the heater box, pulled out the core/tap and cleaned out all the old crud. freed up the tap too New heater hoses too 5 .Made some new rubber flappy doohickeys to stop mud splashing into the engine bay 6. Fitted the drivers side Compagno badge I got from Japan
- 32 replies
-
- 25
-
-
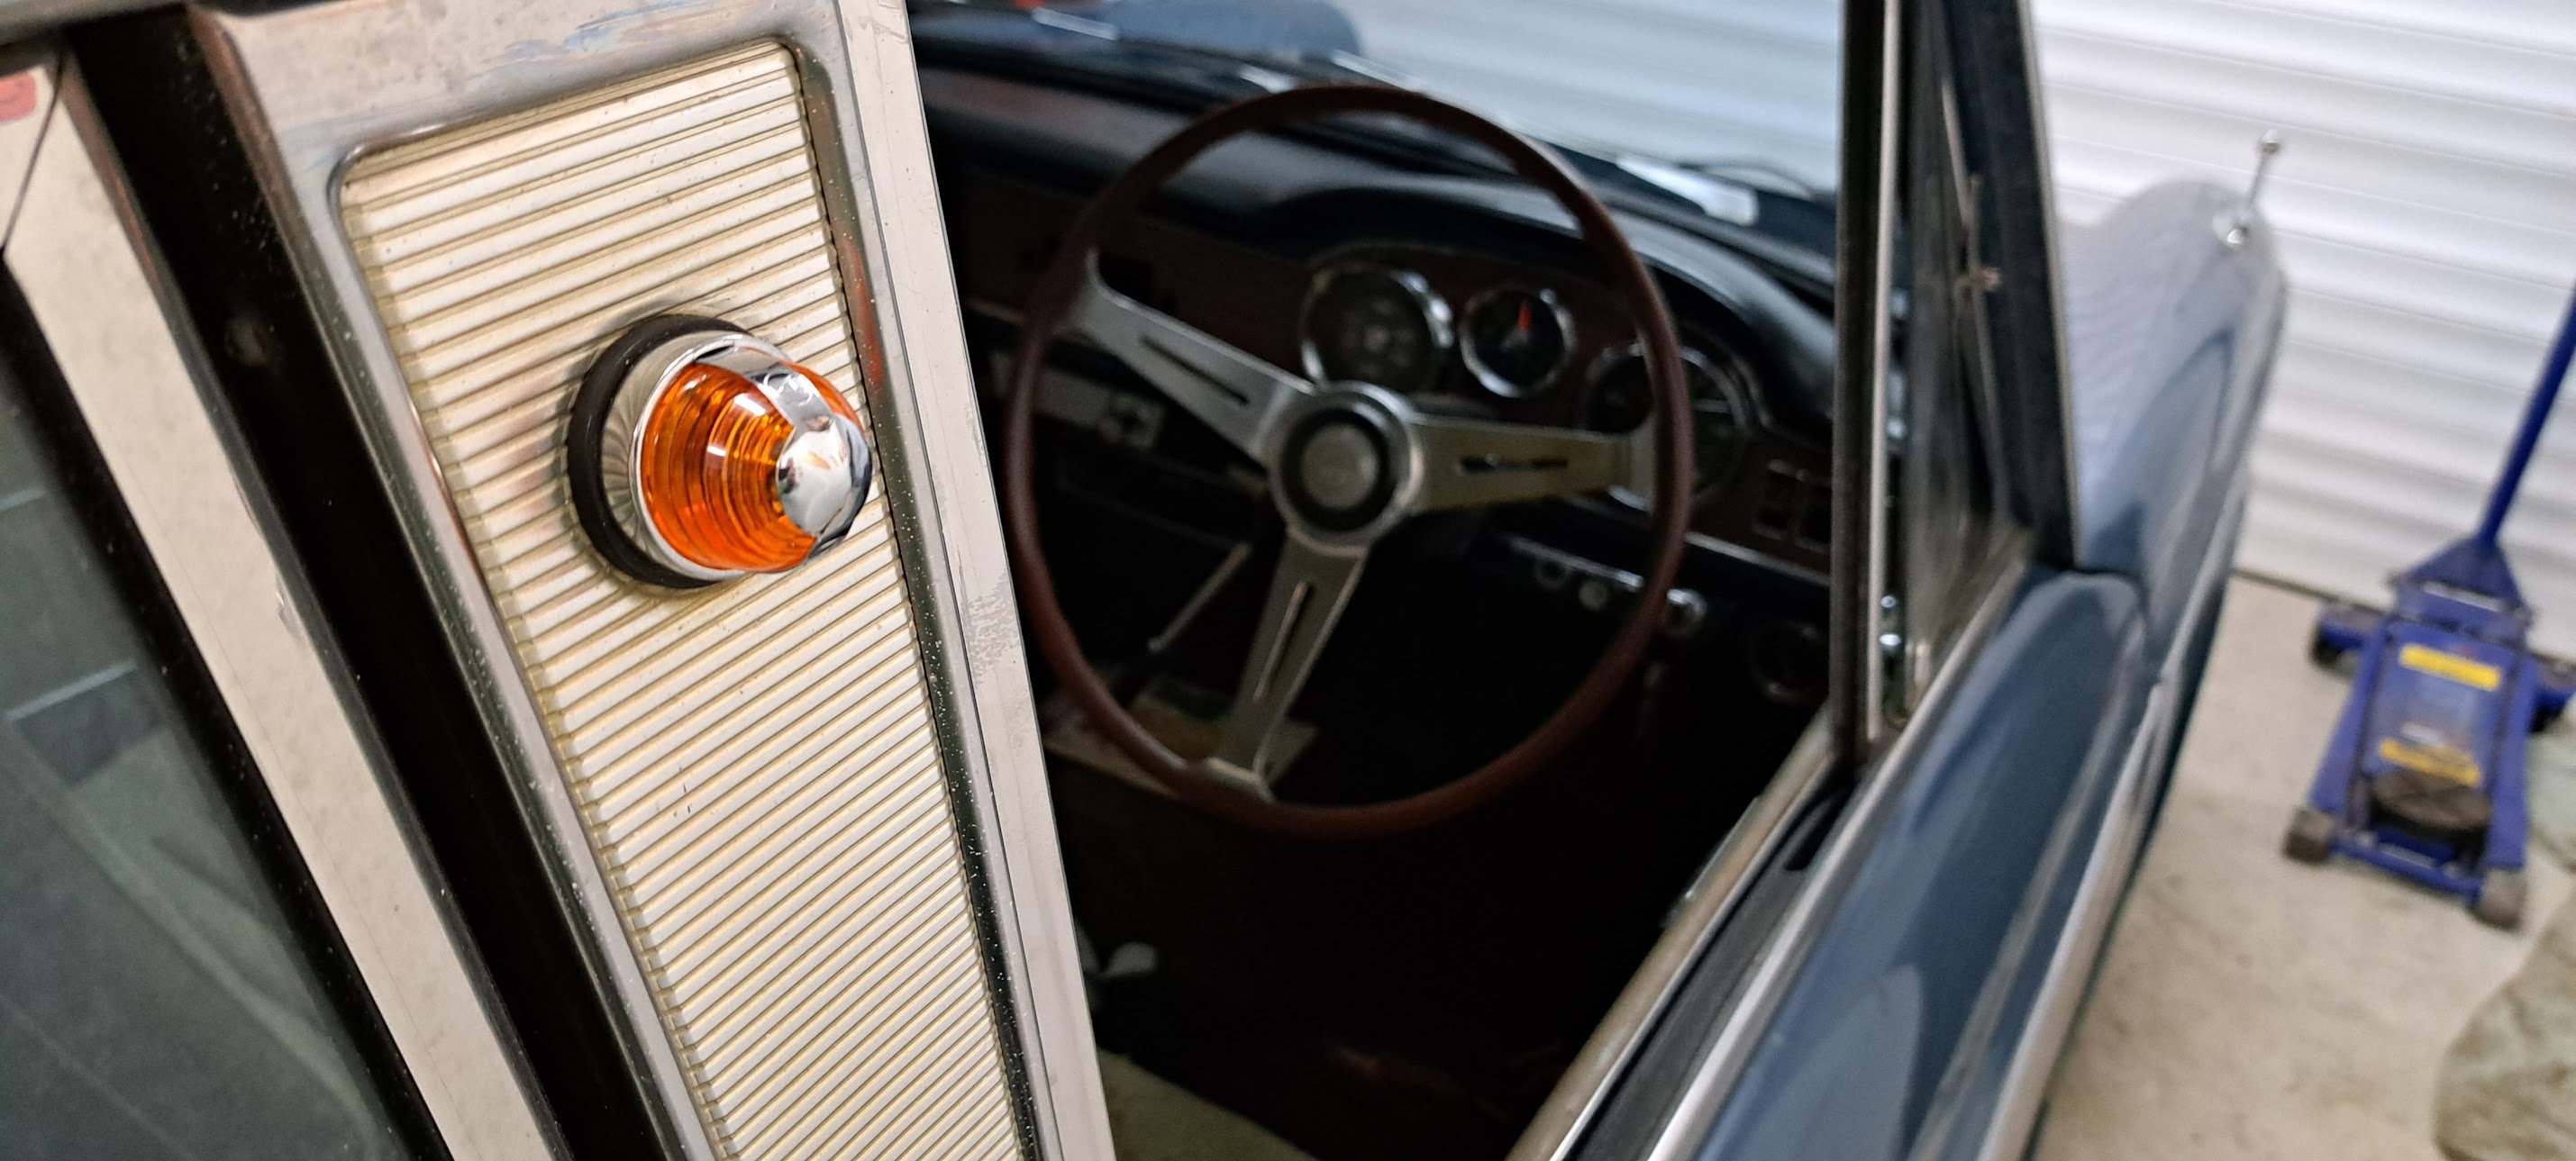
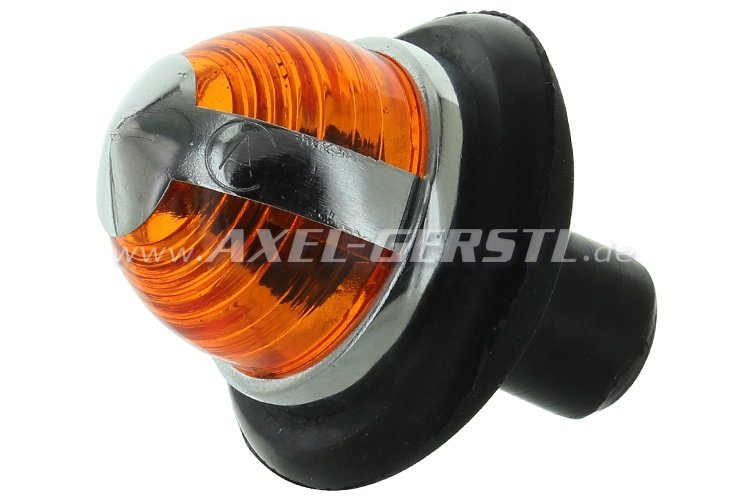
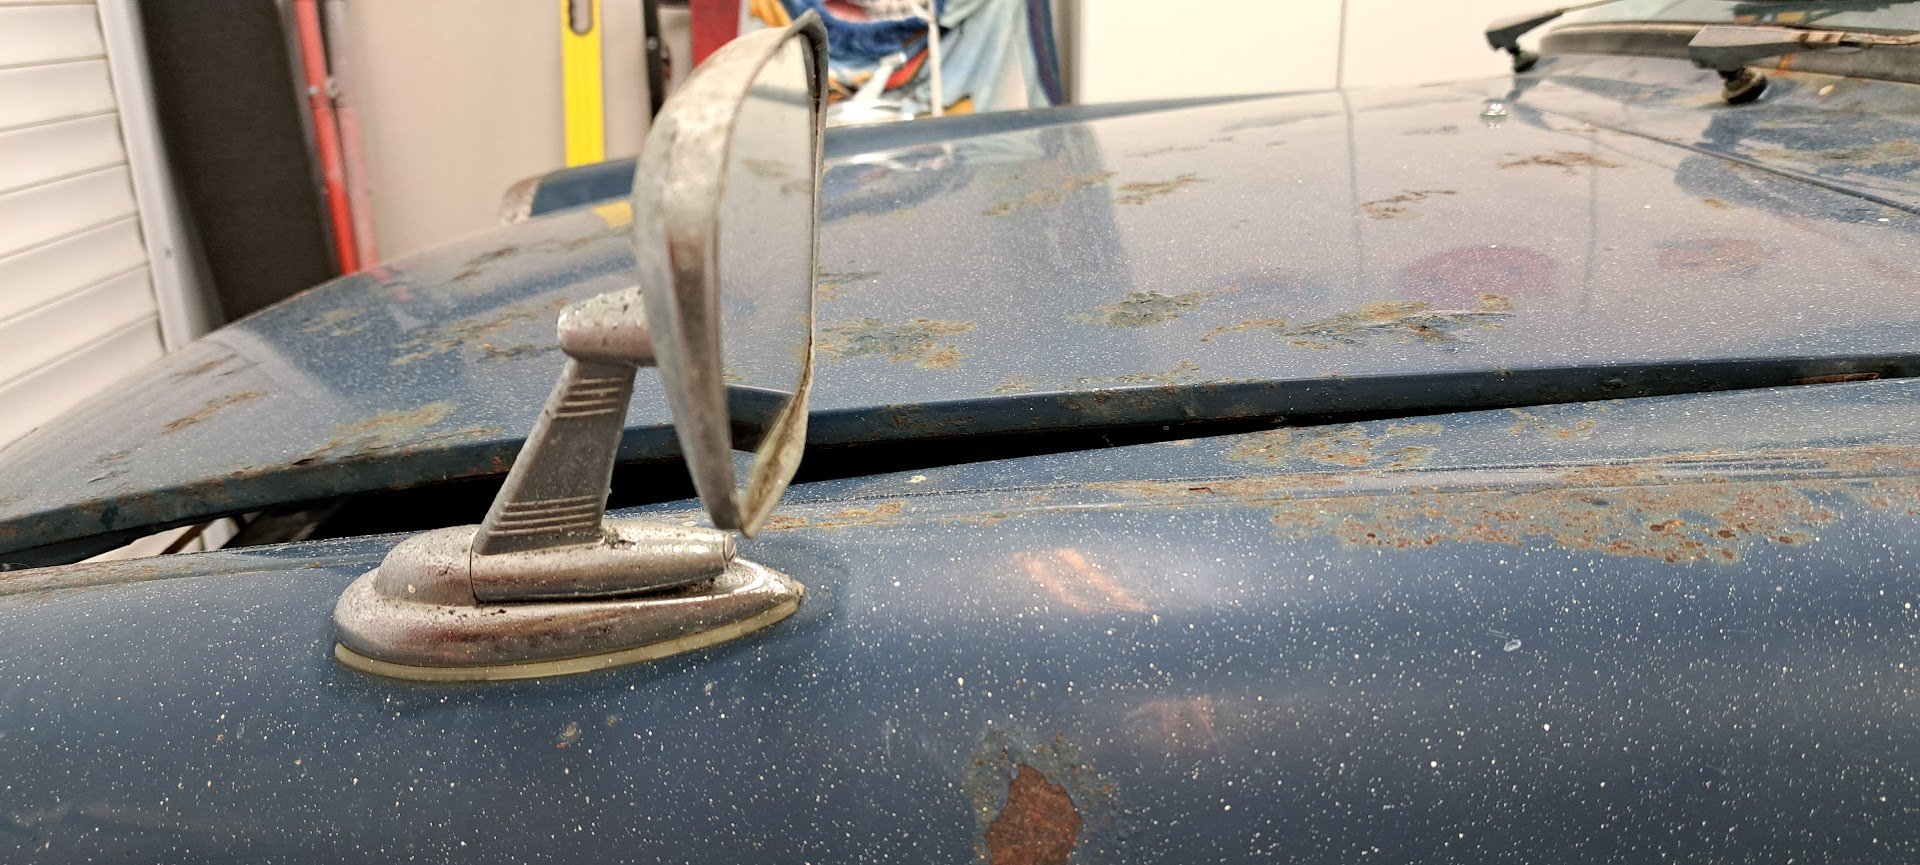
Front suspension and brakes all complete and its back on the ground. Almost ready to add brake fluid and give it real brakes for the 1st time in 45 years engine pistons .. waiting... waiting... waiting... The little side "trafficator" lenses were missing and I spent a great many spare minutes looking through the entire internets for replacements... I finally unearthed an Italian company selling replica Fiat 600 indicator lenses almost the same as the originals. A pair ordered and duly arrived today and were instantly fitted to the original bases ... so happy with this result
- 32 replies
-
- 37
-
-
-
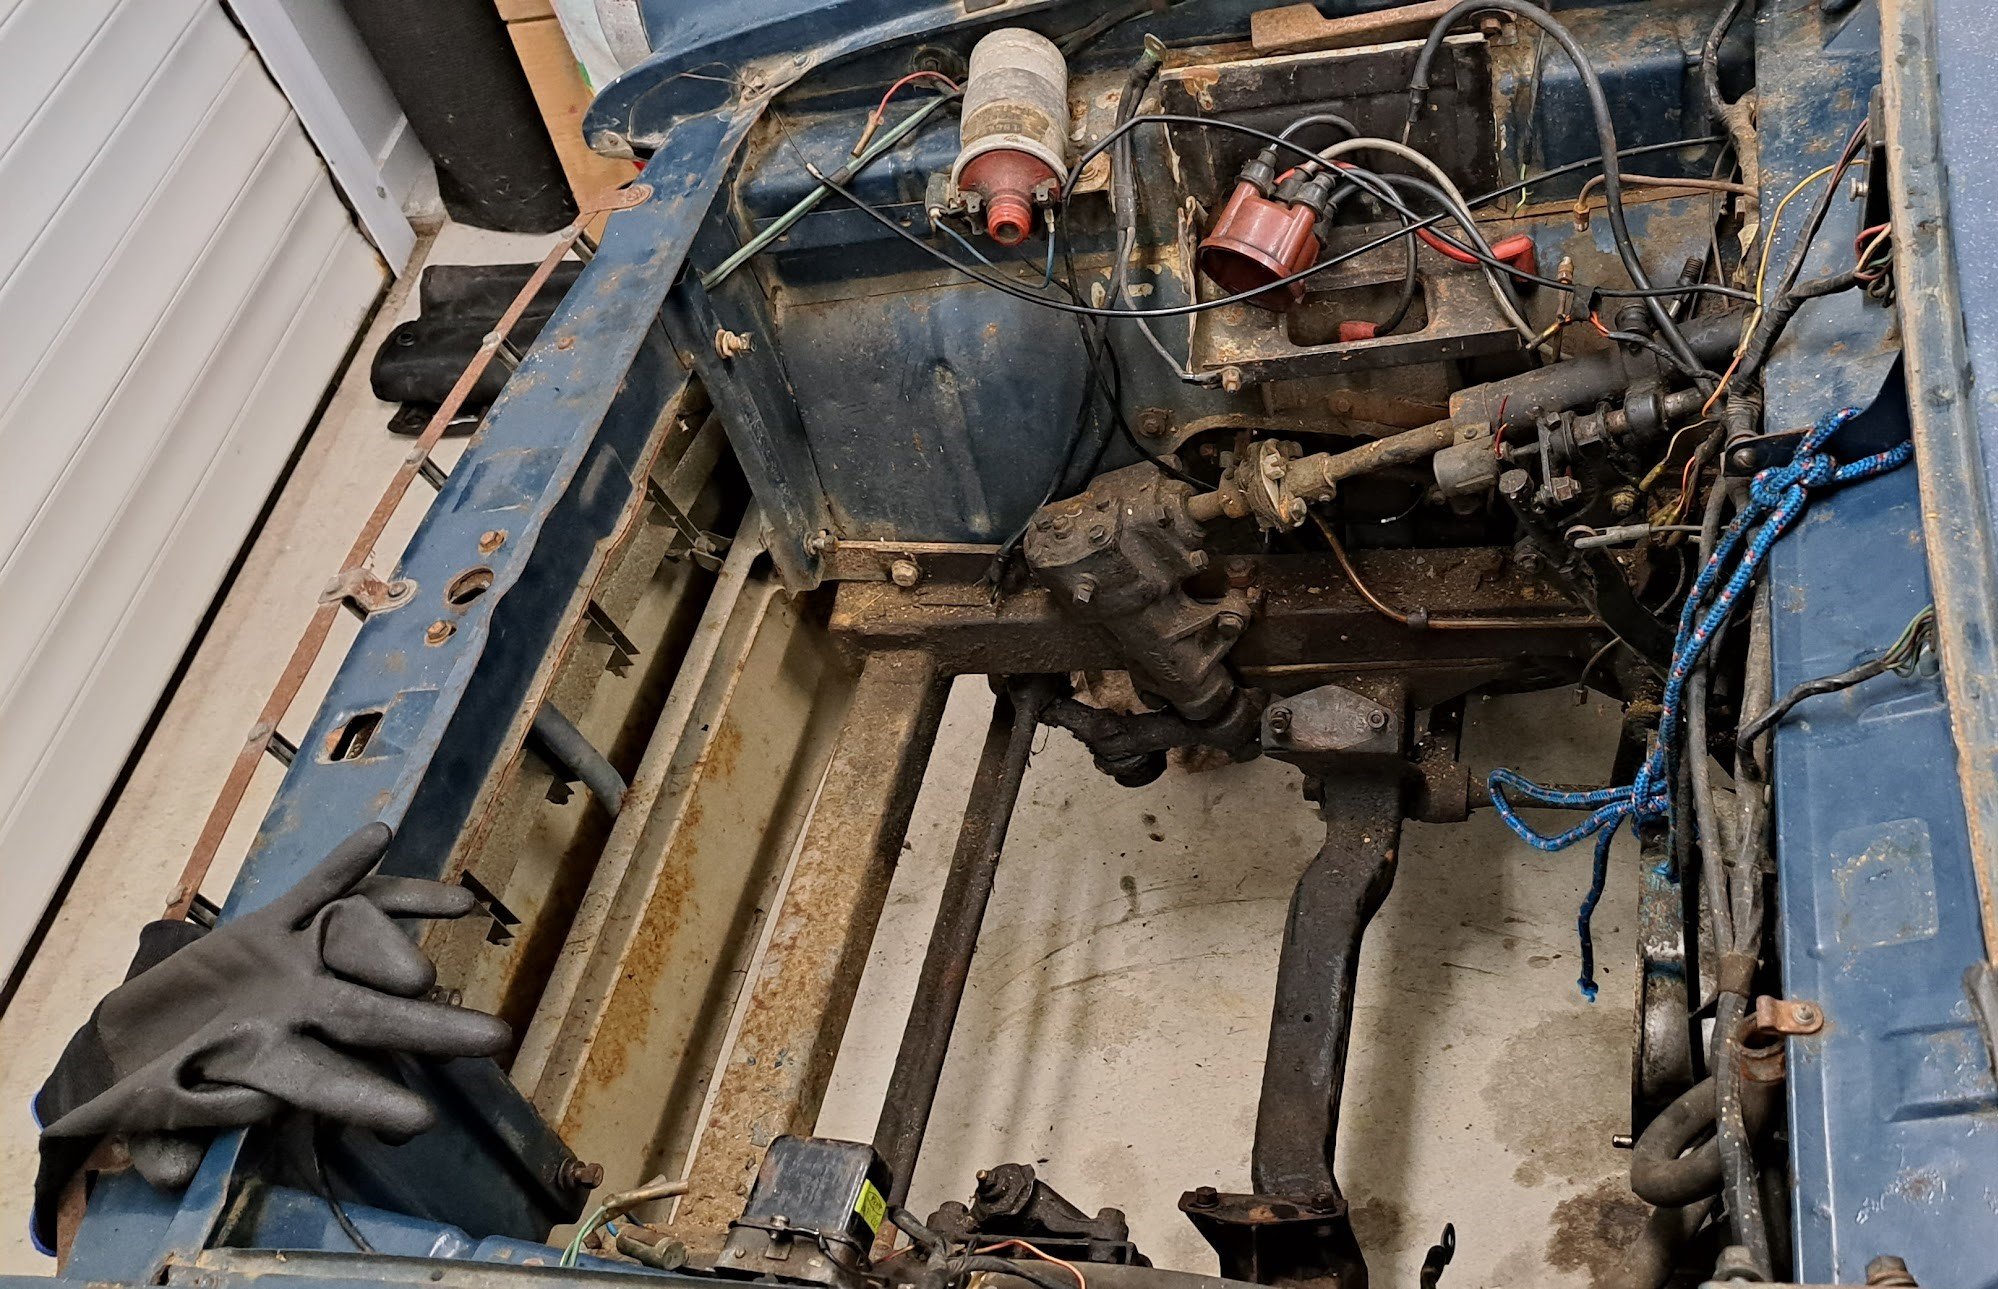
GRRRRR .. Pistons arrived from the UK... wrong size Stern words later and it turns out their supplier put +040 wrong pistons in a +020 labelled box!!! And to make matters worse they had correct +020 rings so that combo doesn't work so another set of triple checked correct ones are on their way via pronto post... albeit after some dude gets a crown on his noggin and they get a day off for it! In the meantime... Yucky, mucky, sucky front suspension Is now all black blingy goodness
- 32 replies
-
- 27
-
-
-
Been away to nats, toyotafest etc and just getting back into this. I have painted the drivers side engine bay/battery box Diff refitted And all engine parts are now purchased.. just awaiting arrival of the pistons. so some cleanup of other engine parts is in progress
- 32 replies
-
- 23
-
-
-
Checked the diff and rear suspension when fitting the rear cylinders and found the shocks stuffed and the springs chronically squeaking. so pulled it out cleaned all the crud/dust/rust/oil and added paint. Awaiting an oil seal for the diff and it will all go back in soon with new brakes. new drums have arrived too - they need machining but from all measurements will fit
- 32 replies
-
- 25
-
-
-
Unobtanium has been found!! Chatting to another owner of a convertible one of these in Aussie and i asked about the wheel cylinders. He mentioned all his were re-sleeved but had heard that some Subaru ones matched. This little titbit of info sparked some research and I found a Subaru Brat/Brumby/Leone rear cylinder that looked the same. I purchased a pair and compared them - the main housing is the same but the piston/rod setup is different. However swapping in my old pistons to the new housing and using the new dust boots works perfectly
- 32 replies
-
- 38
-
-
-
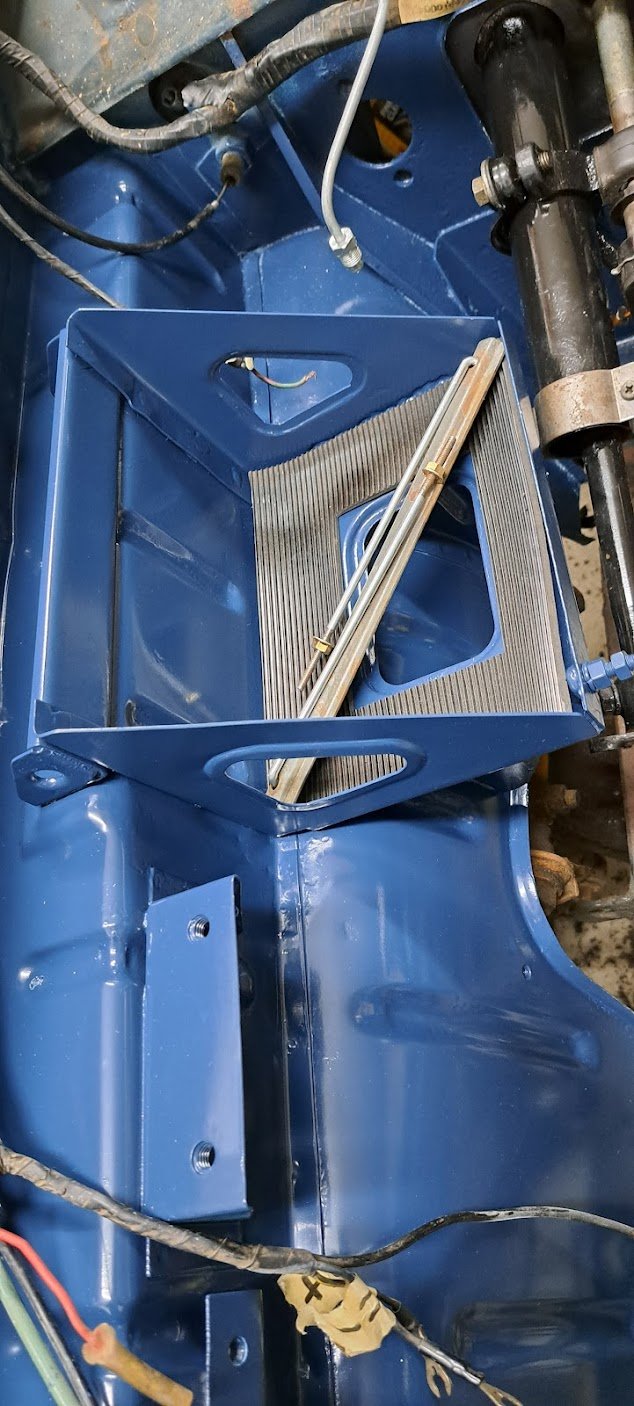
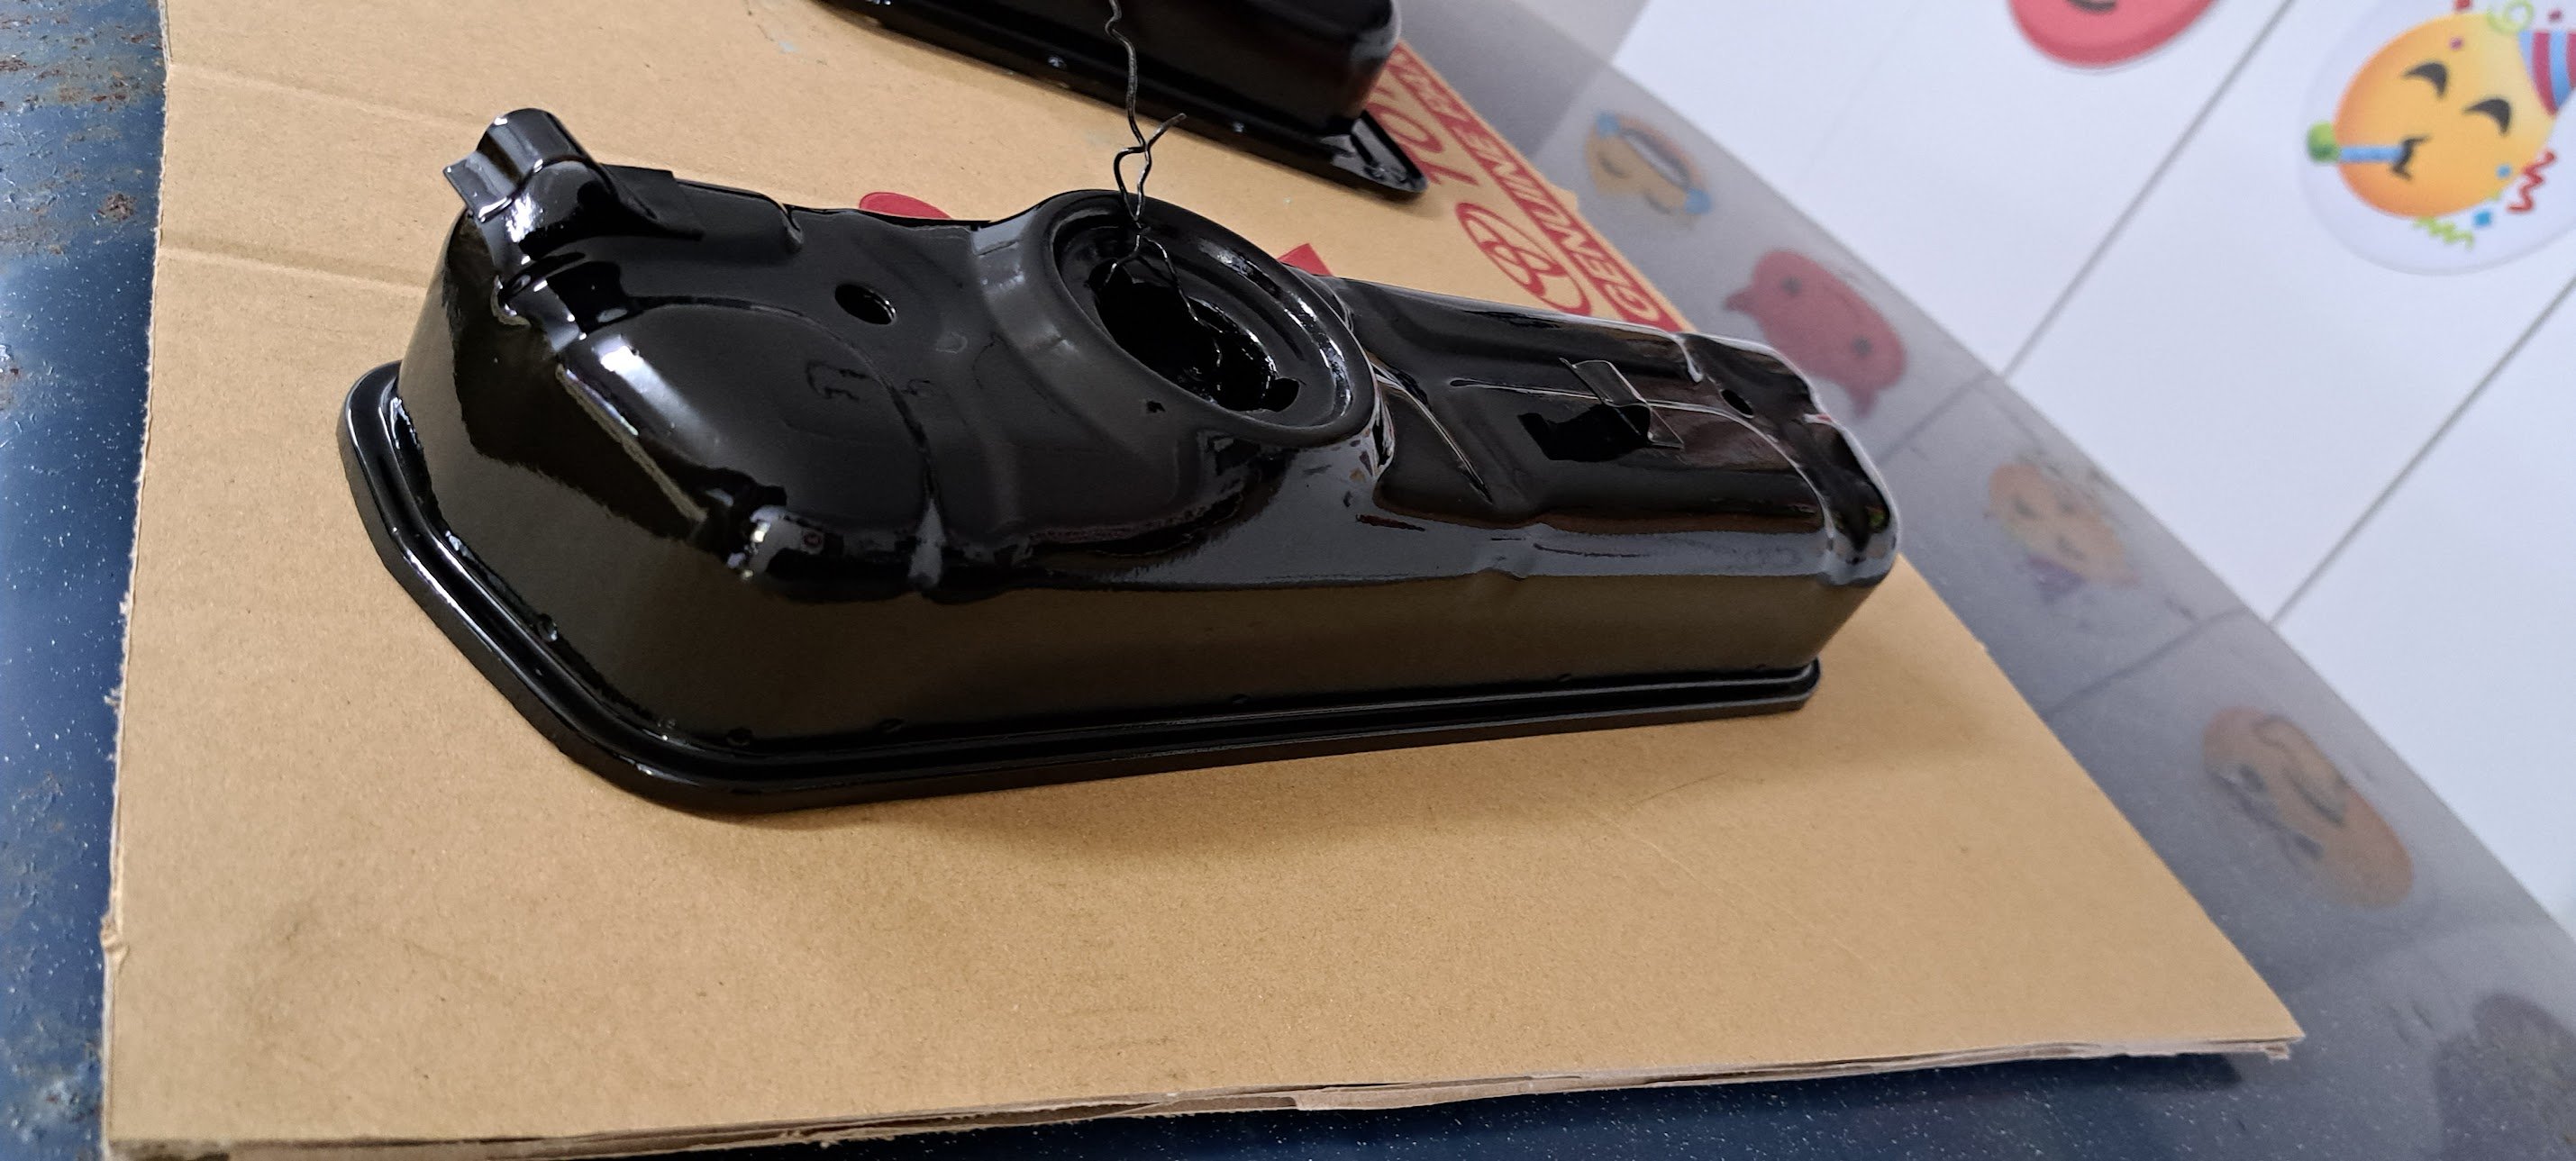
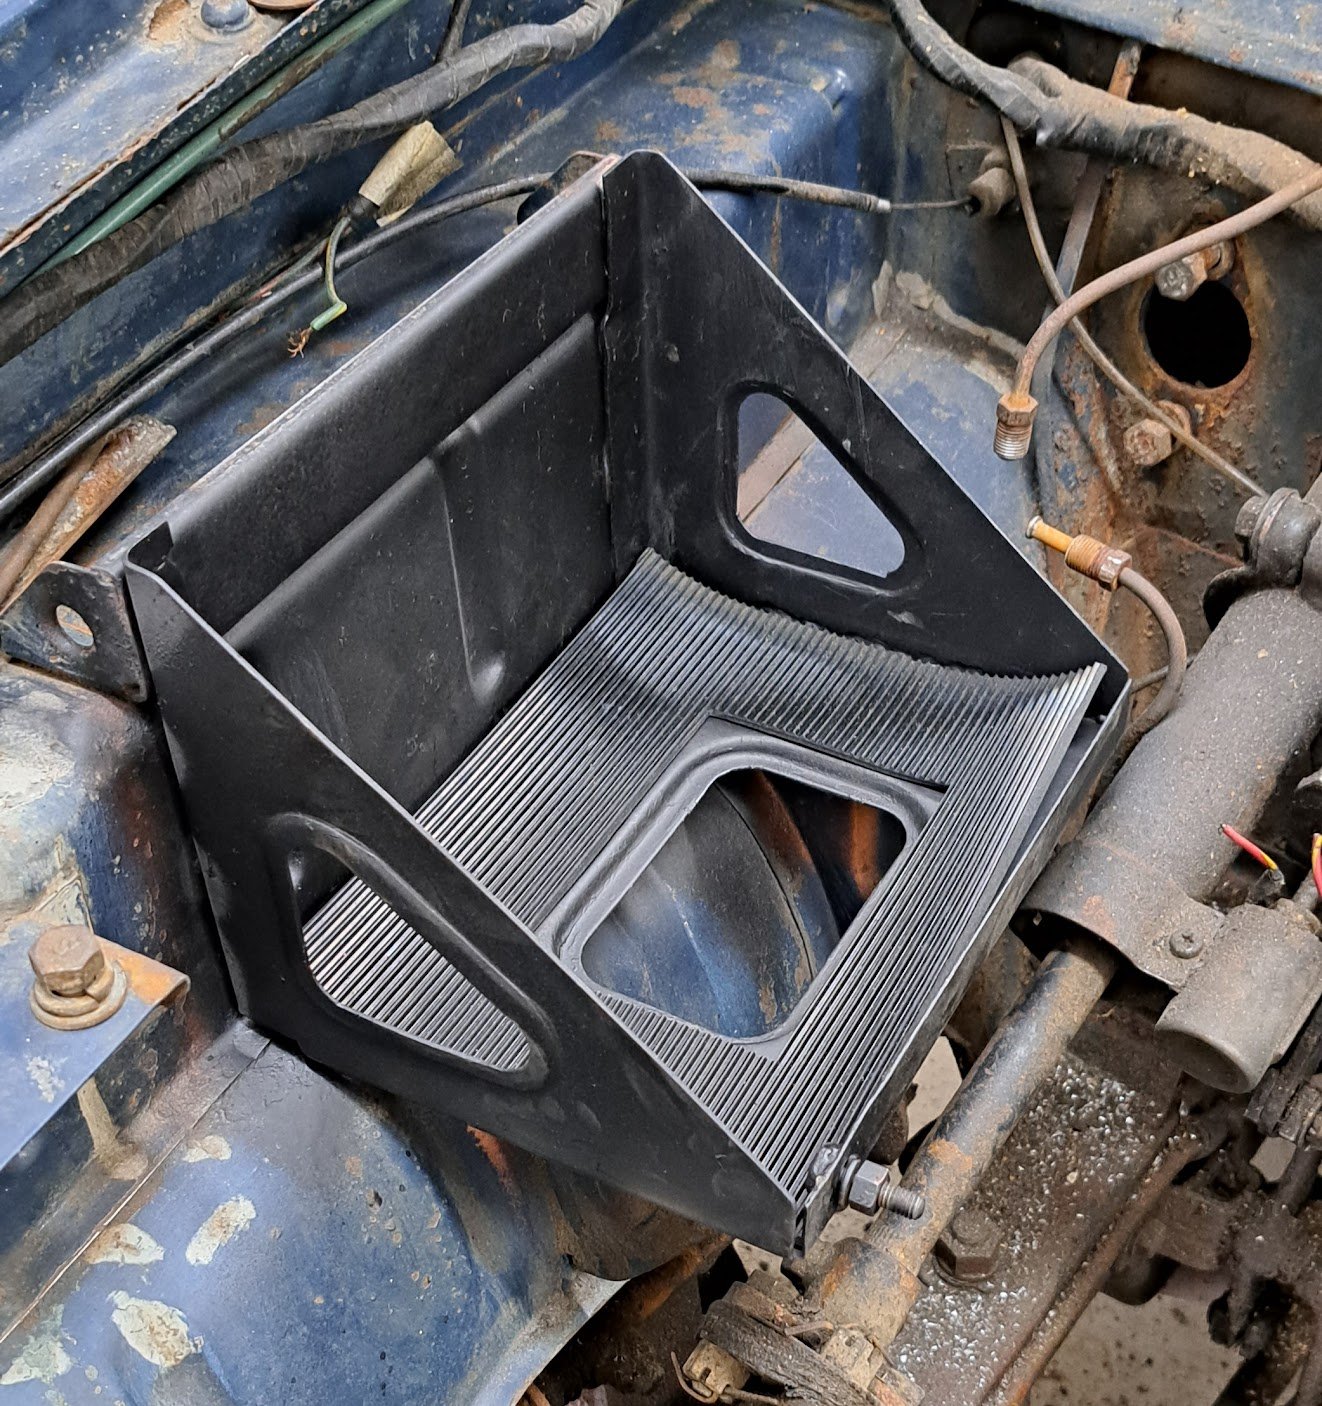
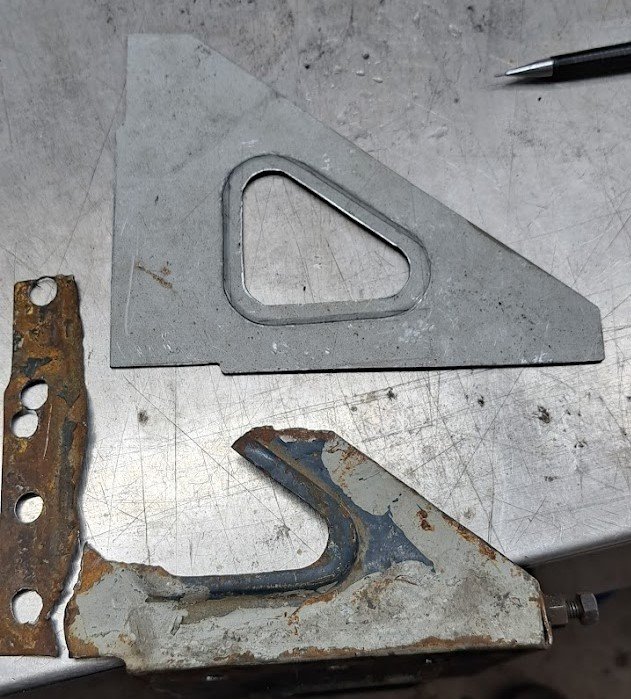
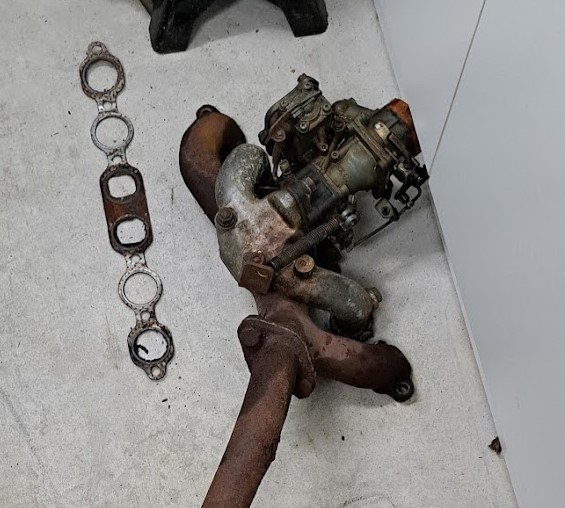
Whilst working on acquiring parts for the motor, i figured tidying up the engine bay is worth doing. Battery tray was mangled in the past to fit a std size battery So removed it Made a template from the remnants and made some new ends and glued it all back together Came out pretty good - i'll get some matched paint and colour it blue at some point Also cleaned up the exhaust/inlet manifolds and gave the carb its 1st bath in 50 years Waiting on a new pump diaphragm otherwise the carb was good condition.
- 32 replies
-
- 43
-
-
-
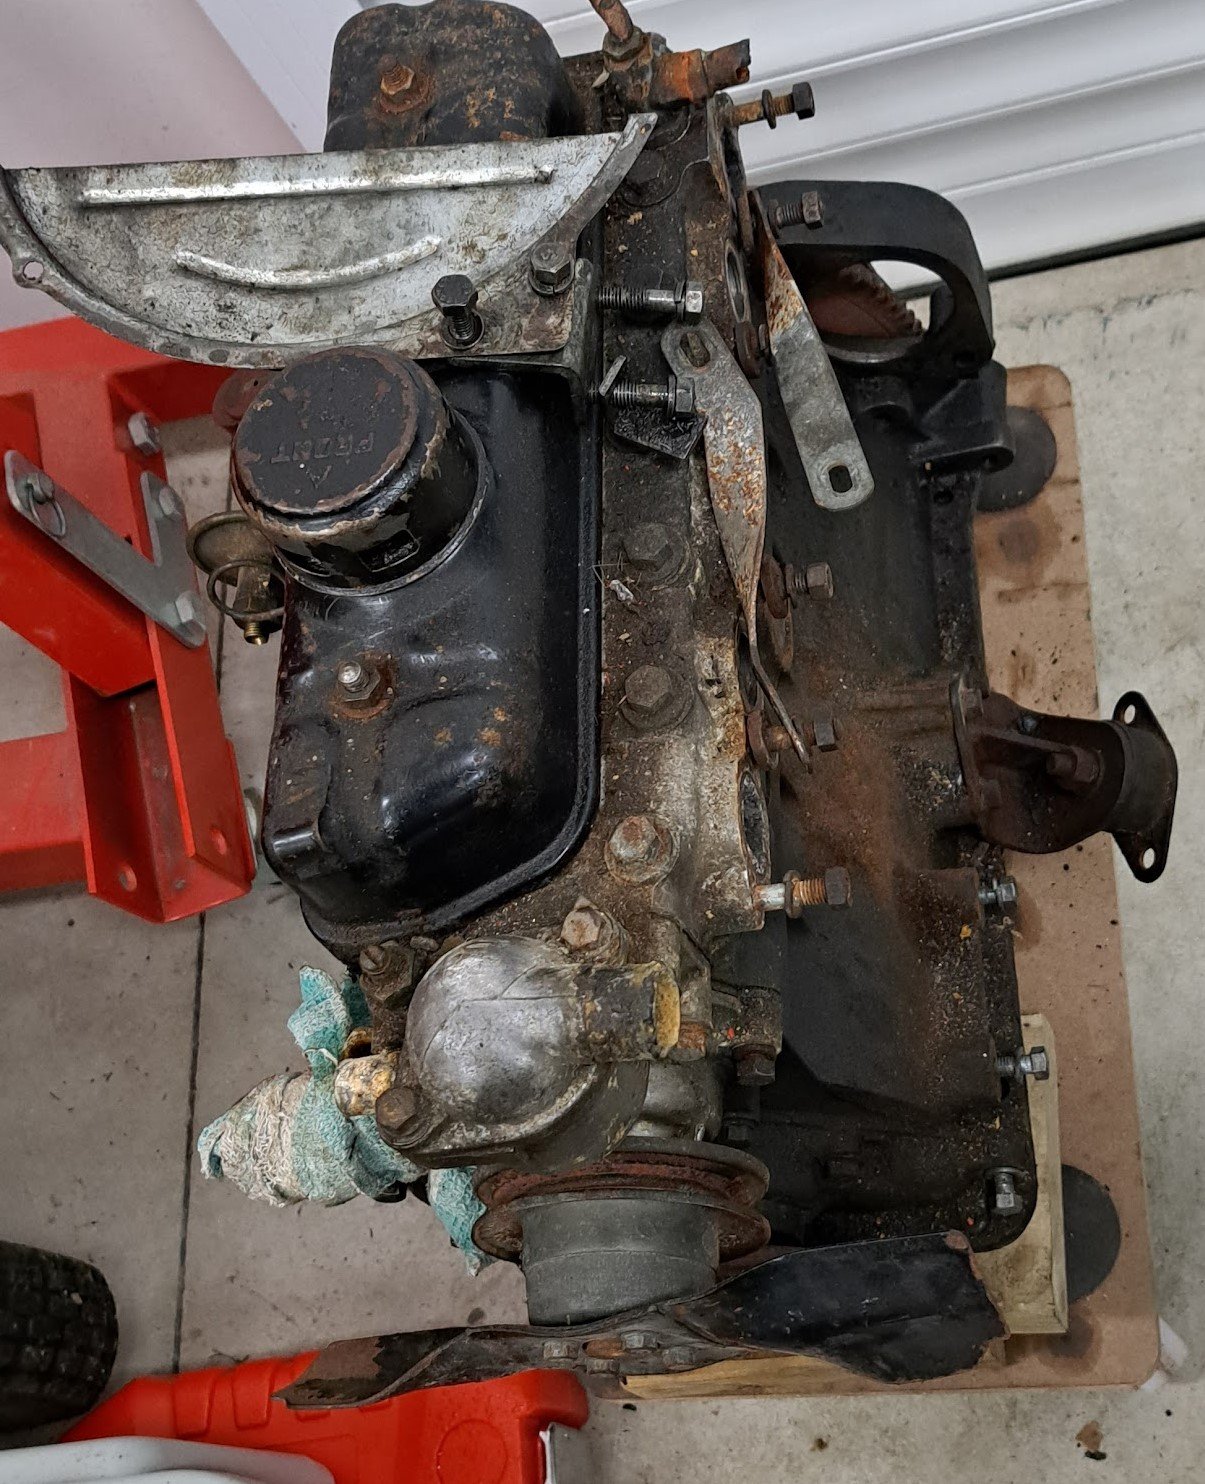
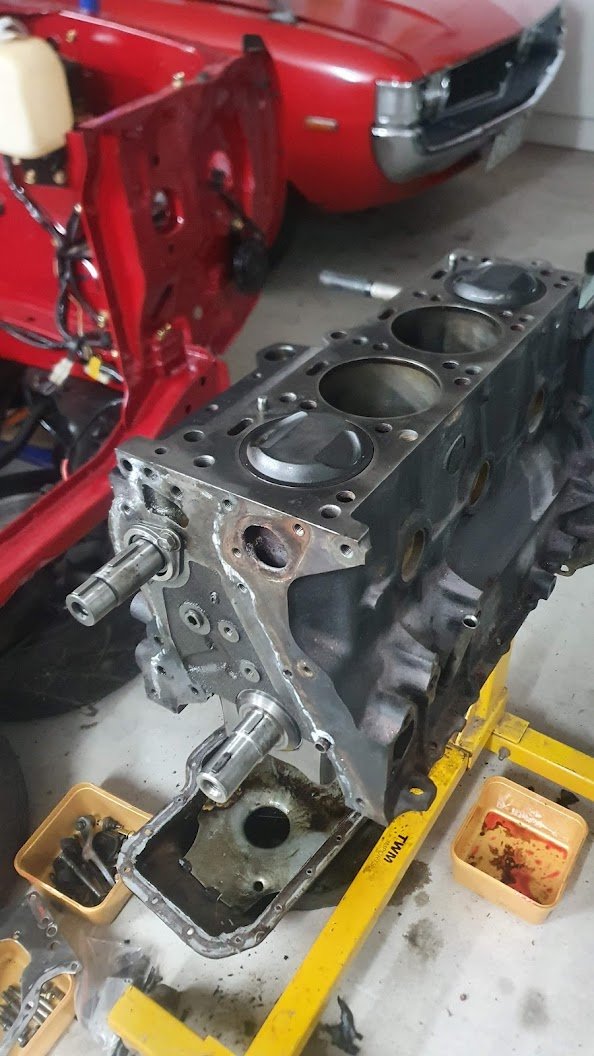
Xmas break.... too much time on my hands... No matter what i did the engine wouldn't budge so i figured it had to come out. and pulled it all apart as the pistons needed some gentle coaxing (BIG HAMMER) to get them out. Plan is to rebuild it with new pistons and bearings plus a tidy up.
- 32 replies
-
- 27
-
-
-
Rear brakes are shot.. parts are made of unobtanium .. Cylinders are salvageable but broken off bleed valve sux, drums are cracked/grooved badly so im looking to match/mod something to suit.
- 32 replies
-
- 13
-
-
-
-
Sleeektoy's 1965 Daihatsu Compagno. Discussion
sleeektoy replied to sleeektoy's topic in Project Discussion
I had my eye on that one but cant really justify the transport/ship/gst etc etc on top -
Sleeektoy's 1965 Daihatsu Compagno. Discussion
sleeektoy replied to sleeektoy's topic in Project Discussion
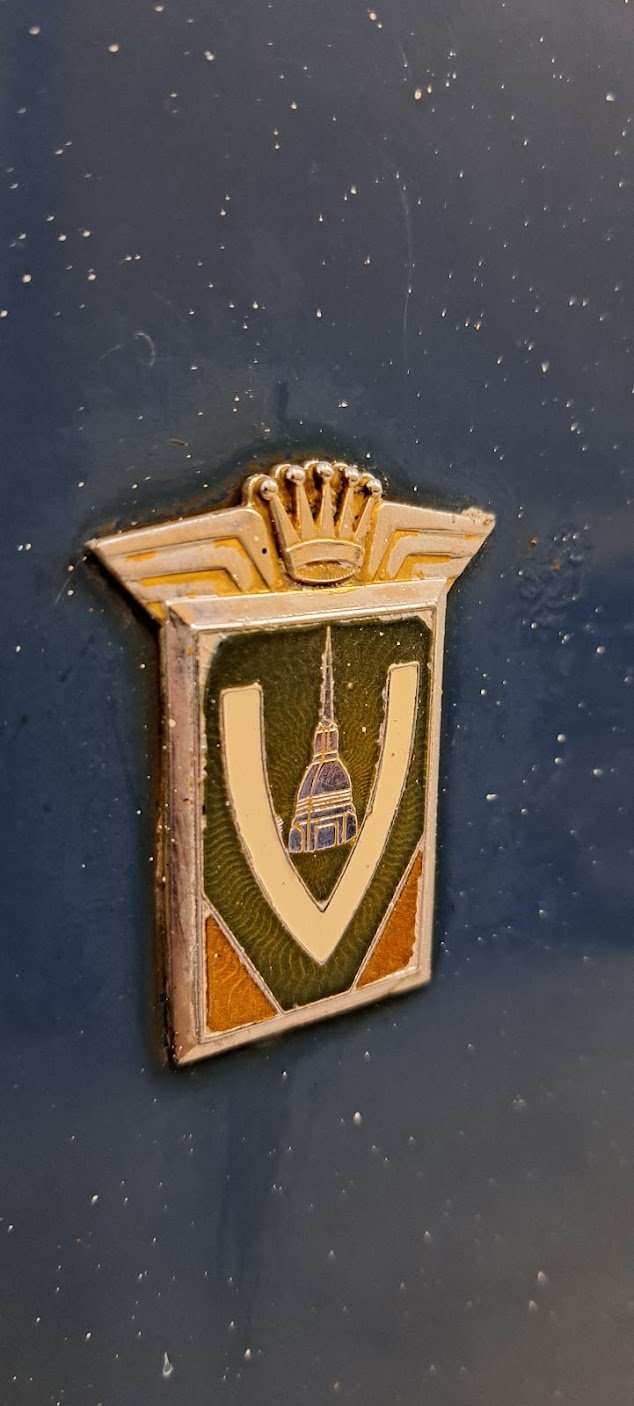
This lovely badge on the front guard - Vignale and a Lancia Appia Lusso Berlina Vignale is the closest I have found to it
-
Sleeektoy's 1965 Daihatsu Compagno. Discussion
sleeektoy replied to sleeektoy's topic in Project Discussion
WOW thanks @Nominal this is awesome -
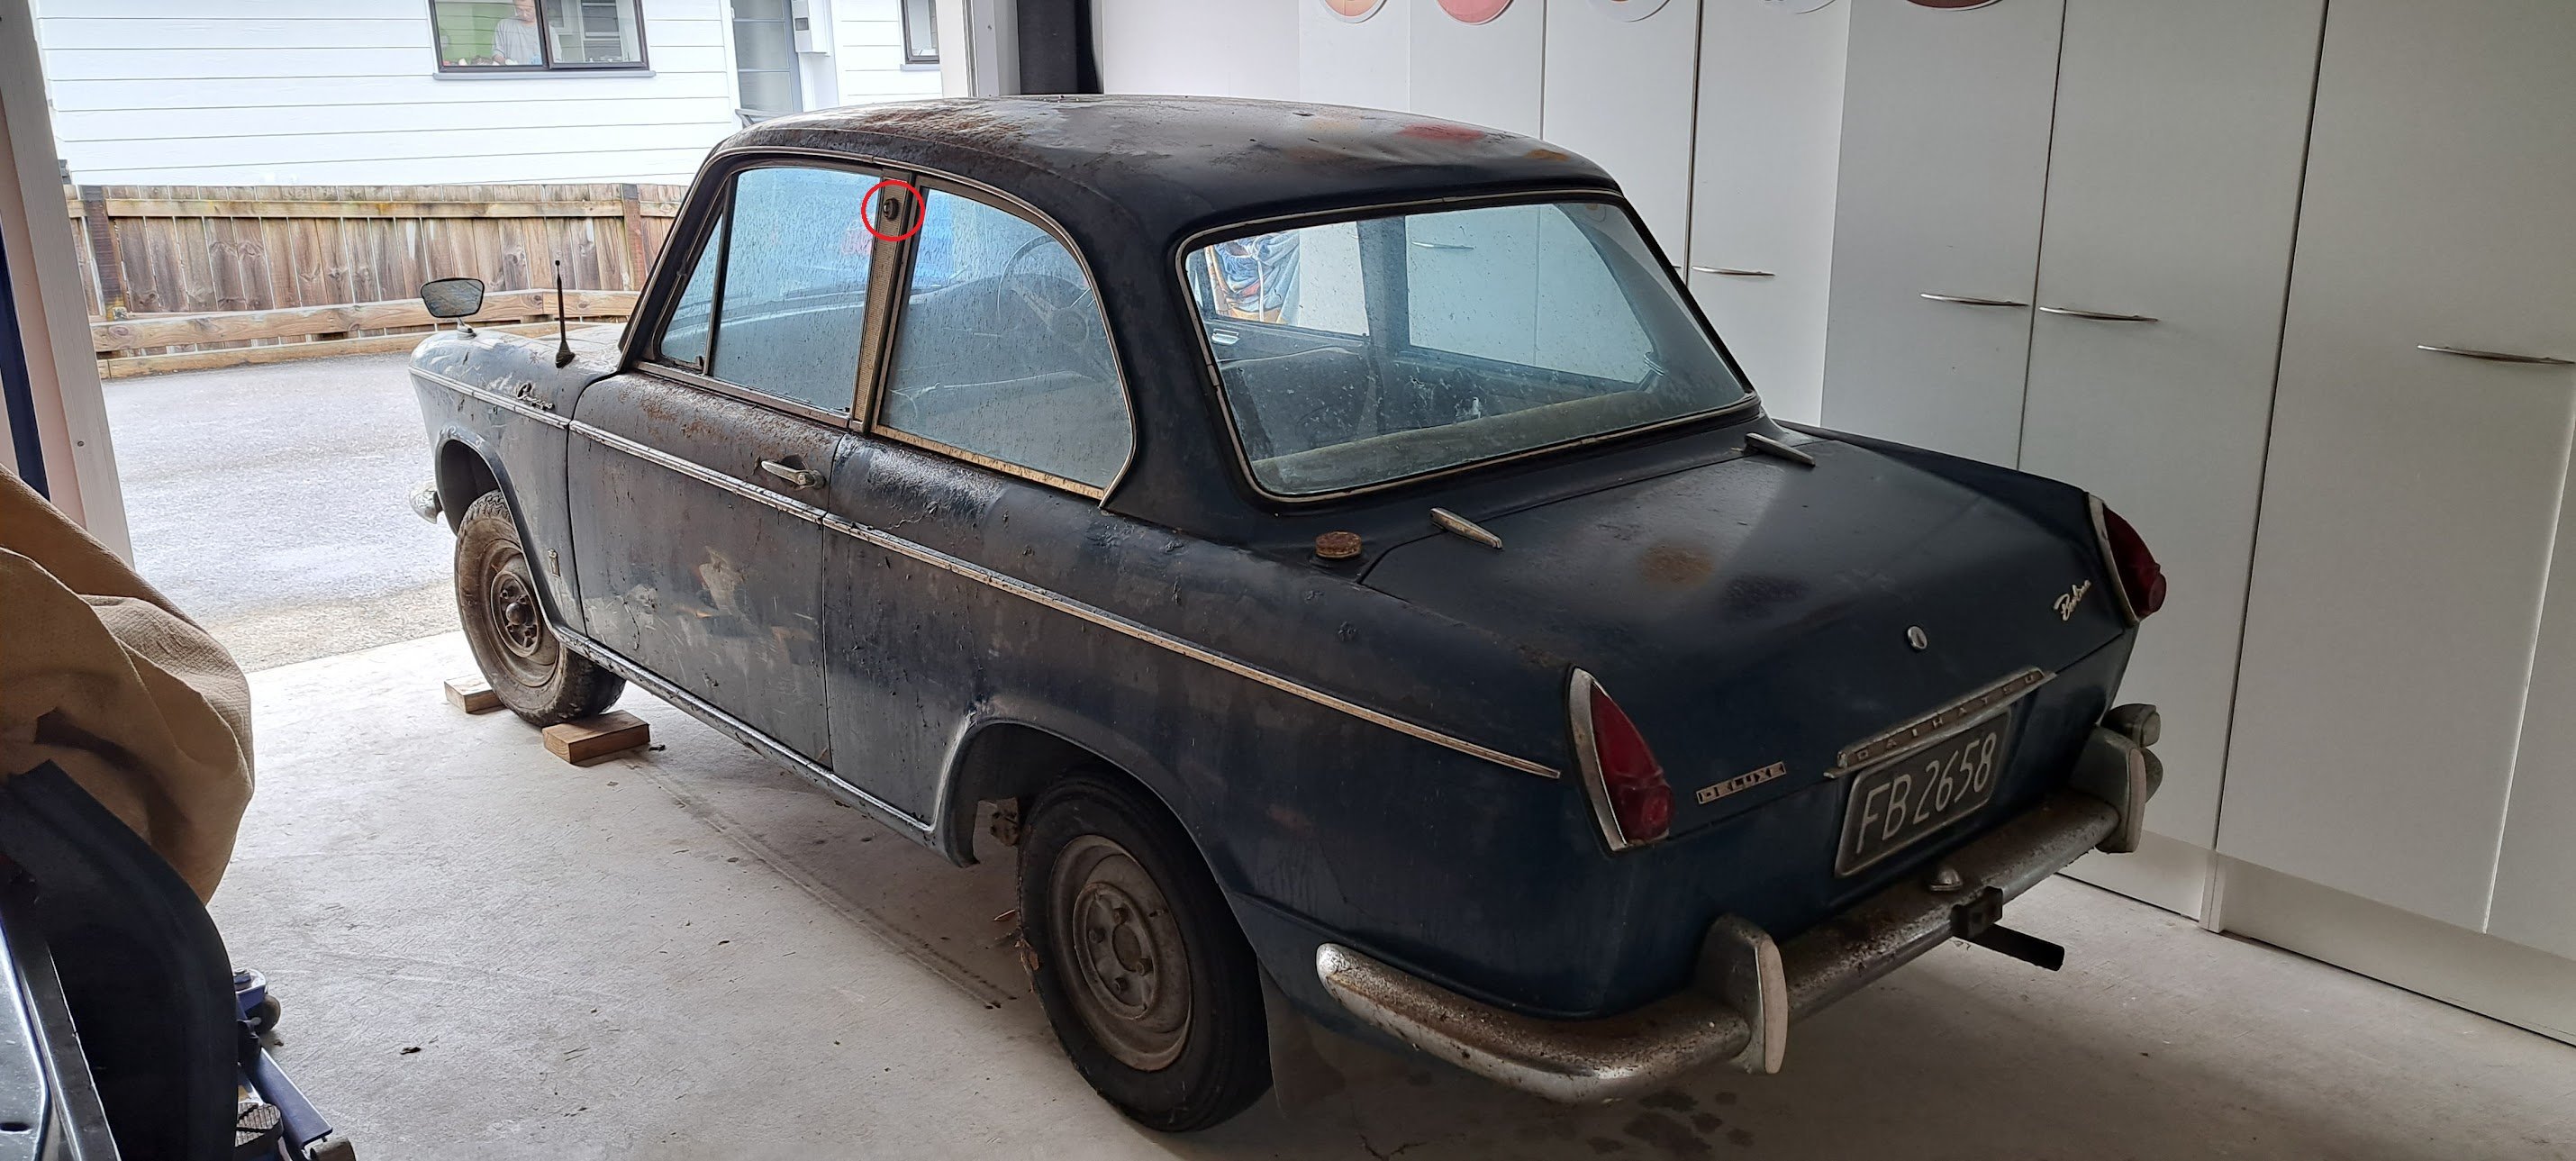
It has some fantastic patina this car too - tempted to run it as-is
- 32 replies
-
- 31
-
-
-
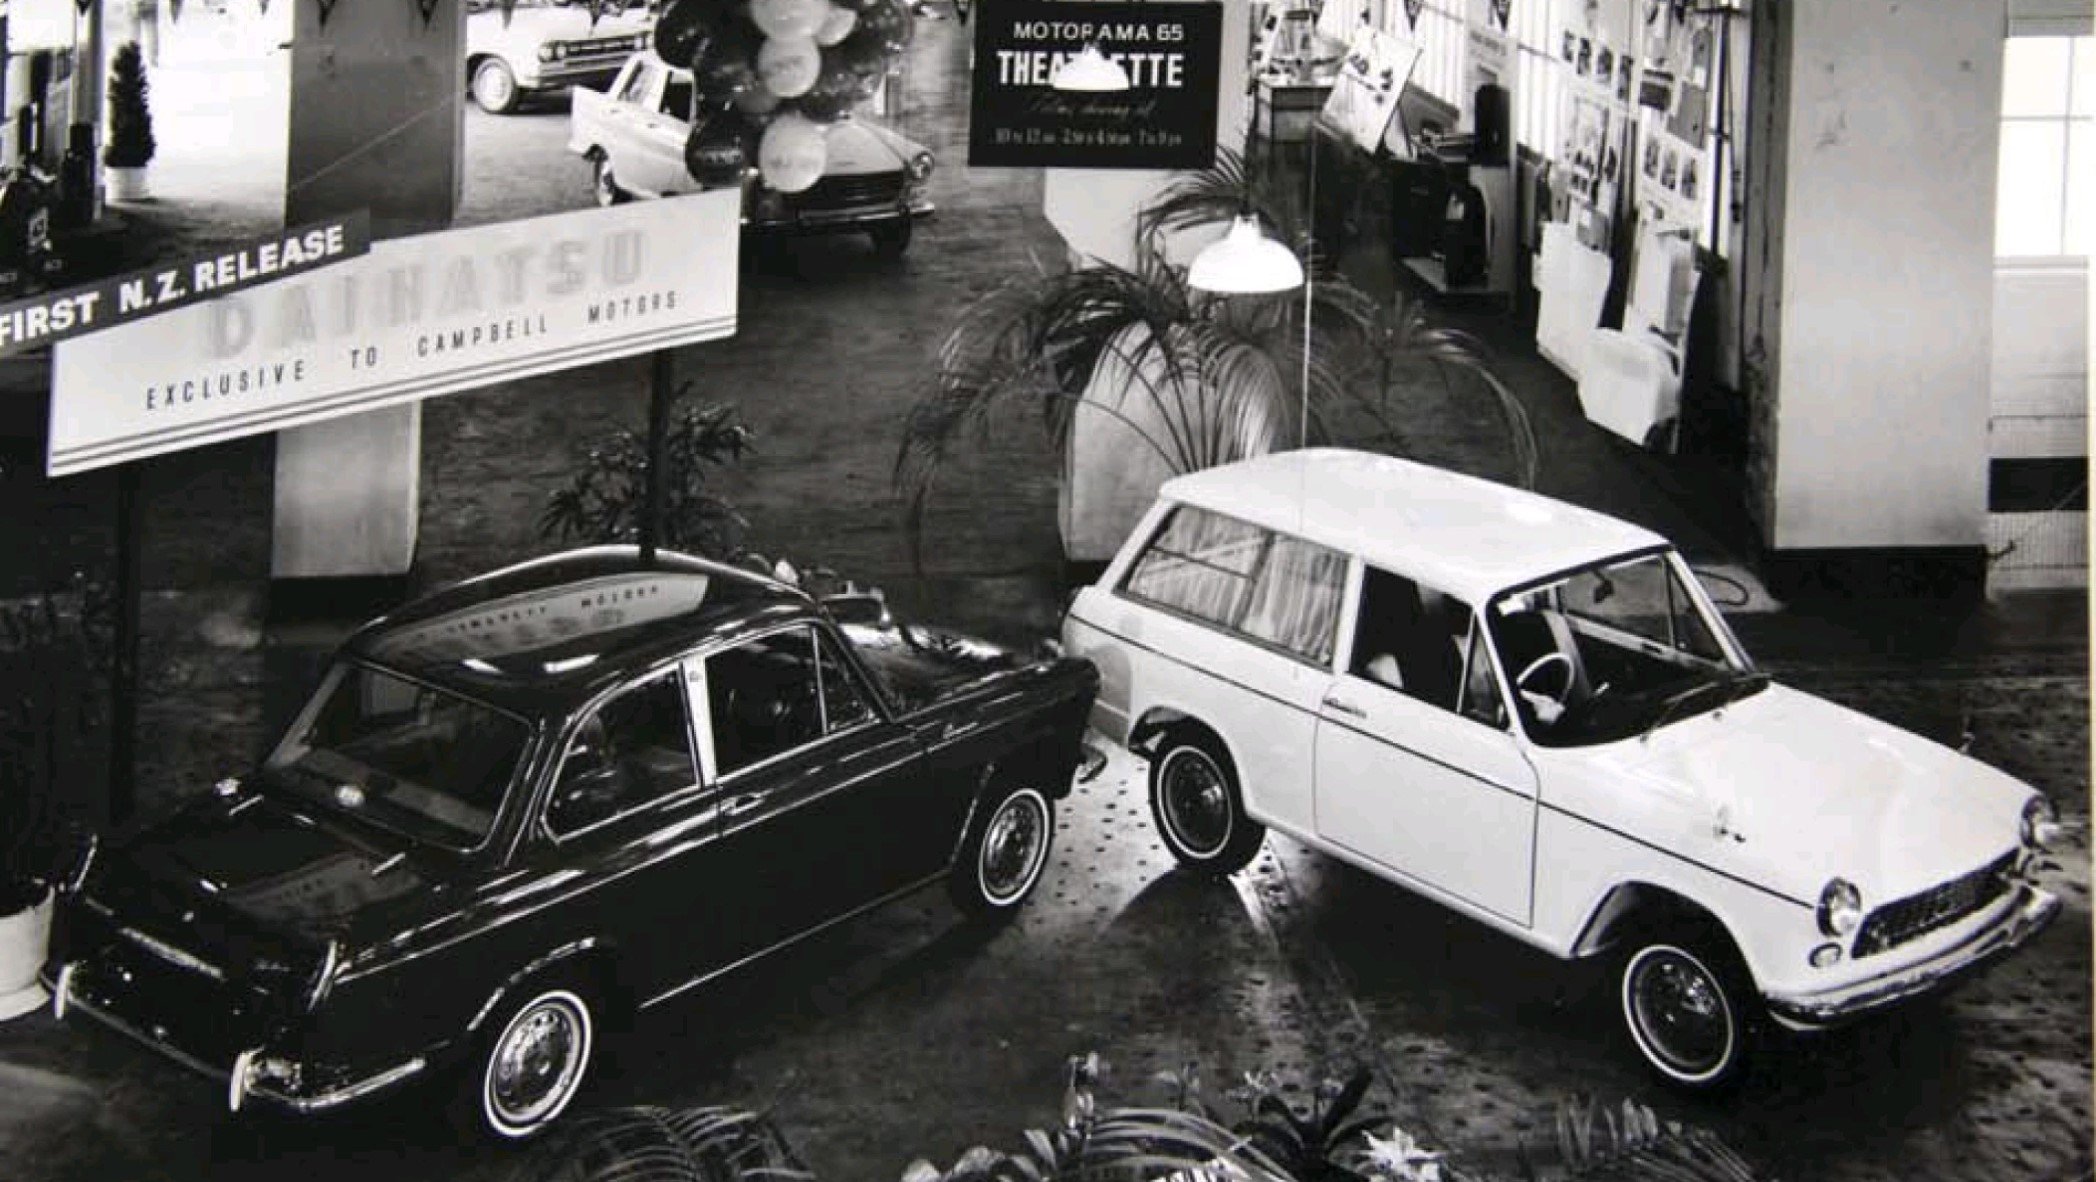
This is the actual car on the Campbells stand at the 1965 Motorama - the wagon was last seen in the 80's by the old owner of mine. Possibly these two were the only ones sold here.
- 32 replies
-
- 37
-
-
-
What have I done! https://oldschool.co.nz/index.php?/topic/86616-sleeektoys-1965-daihatsu-compagno/
-
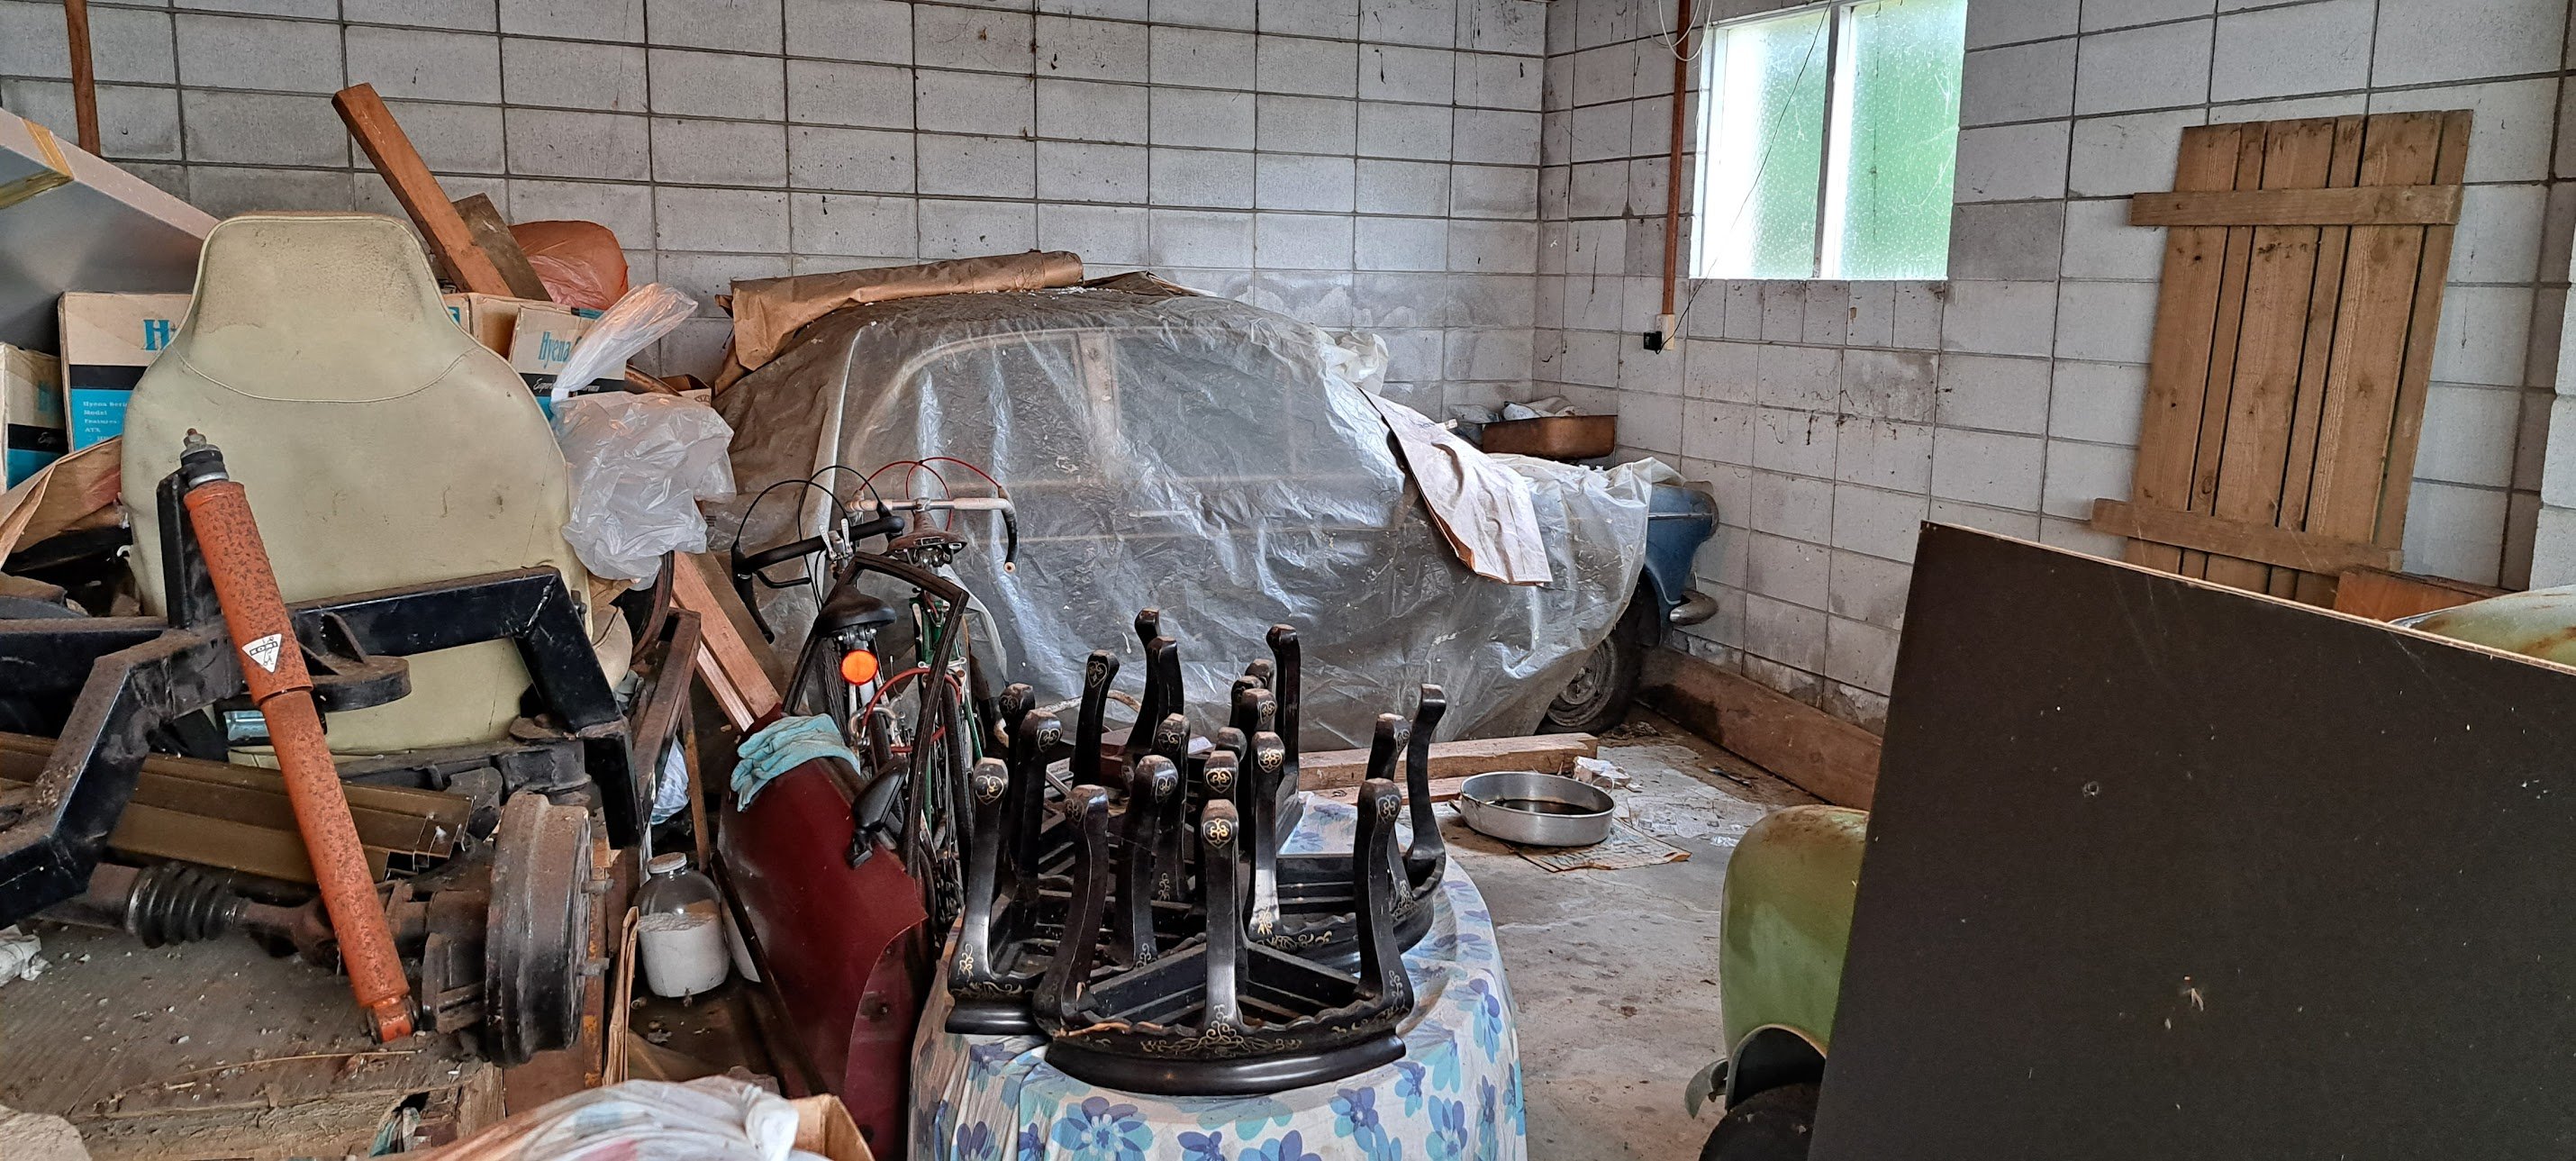
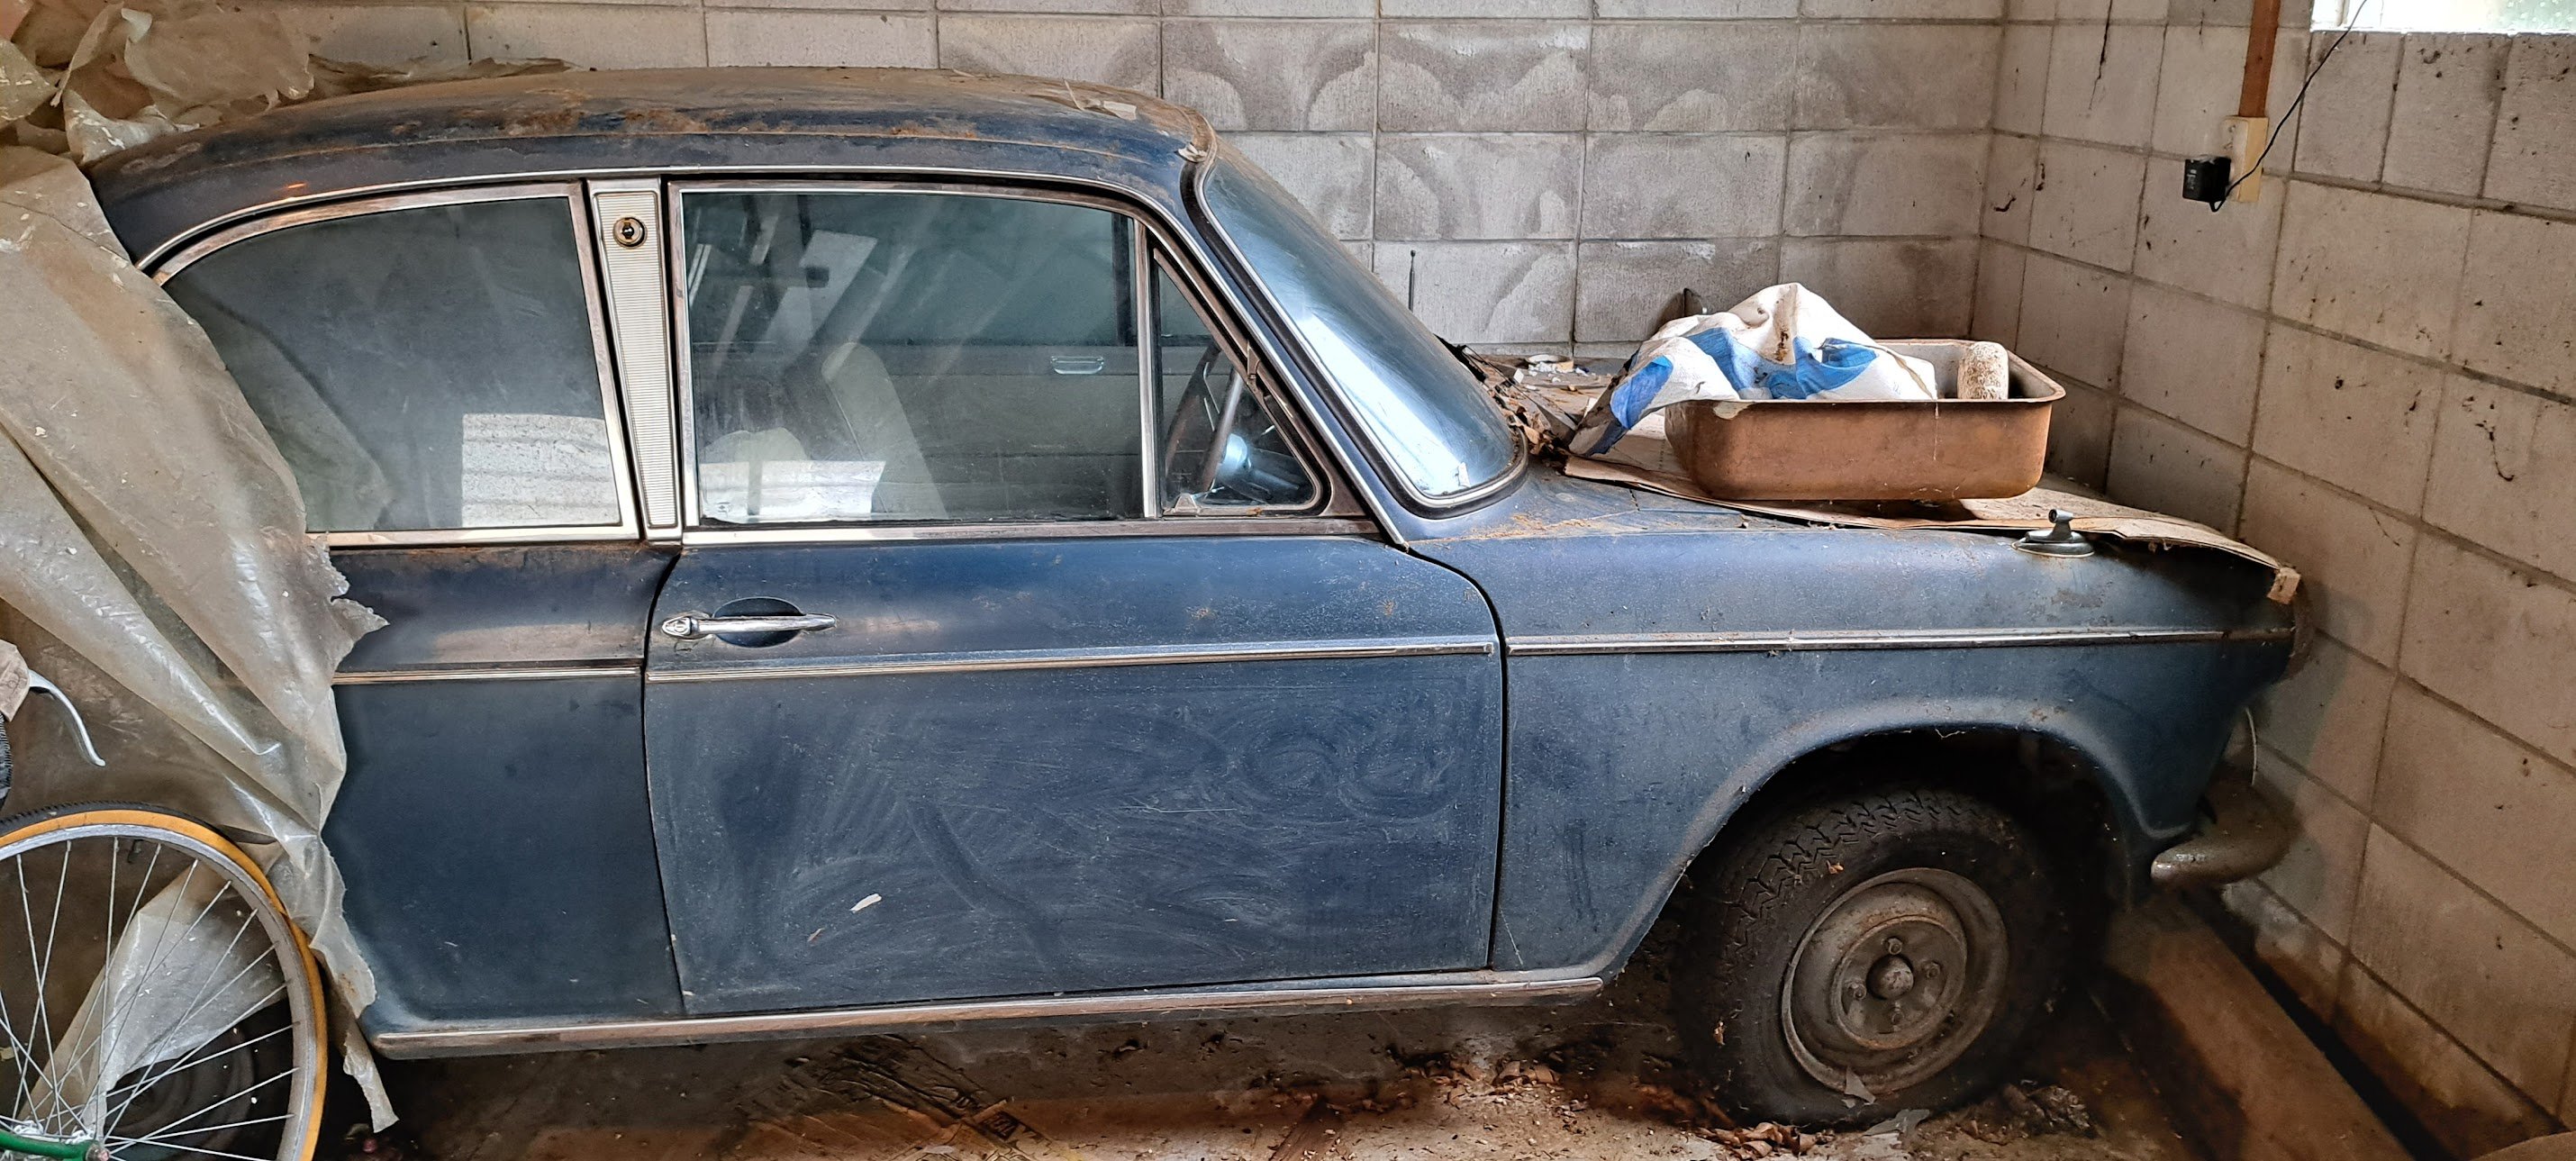
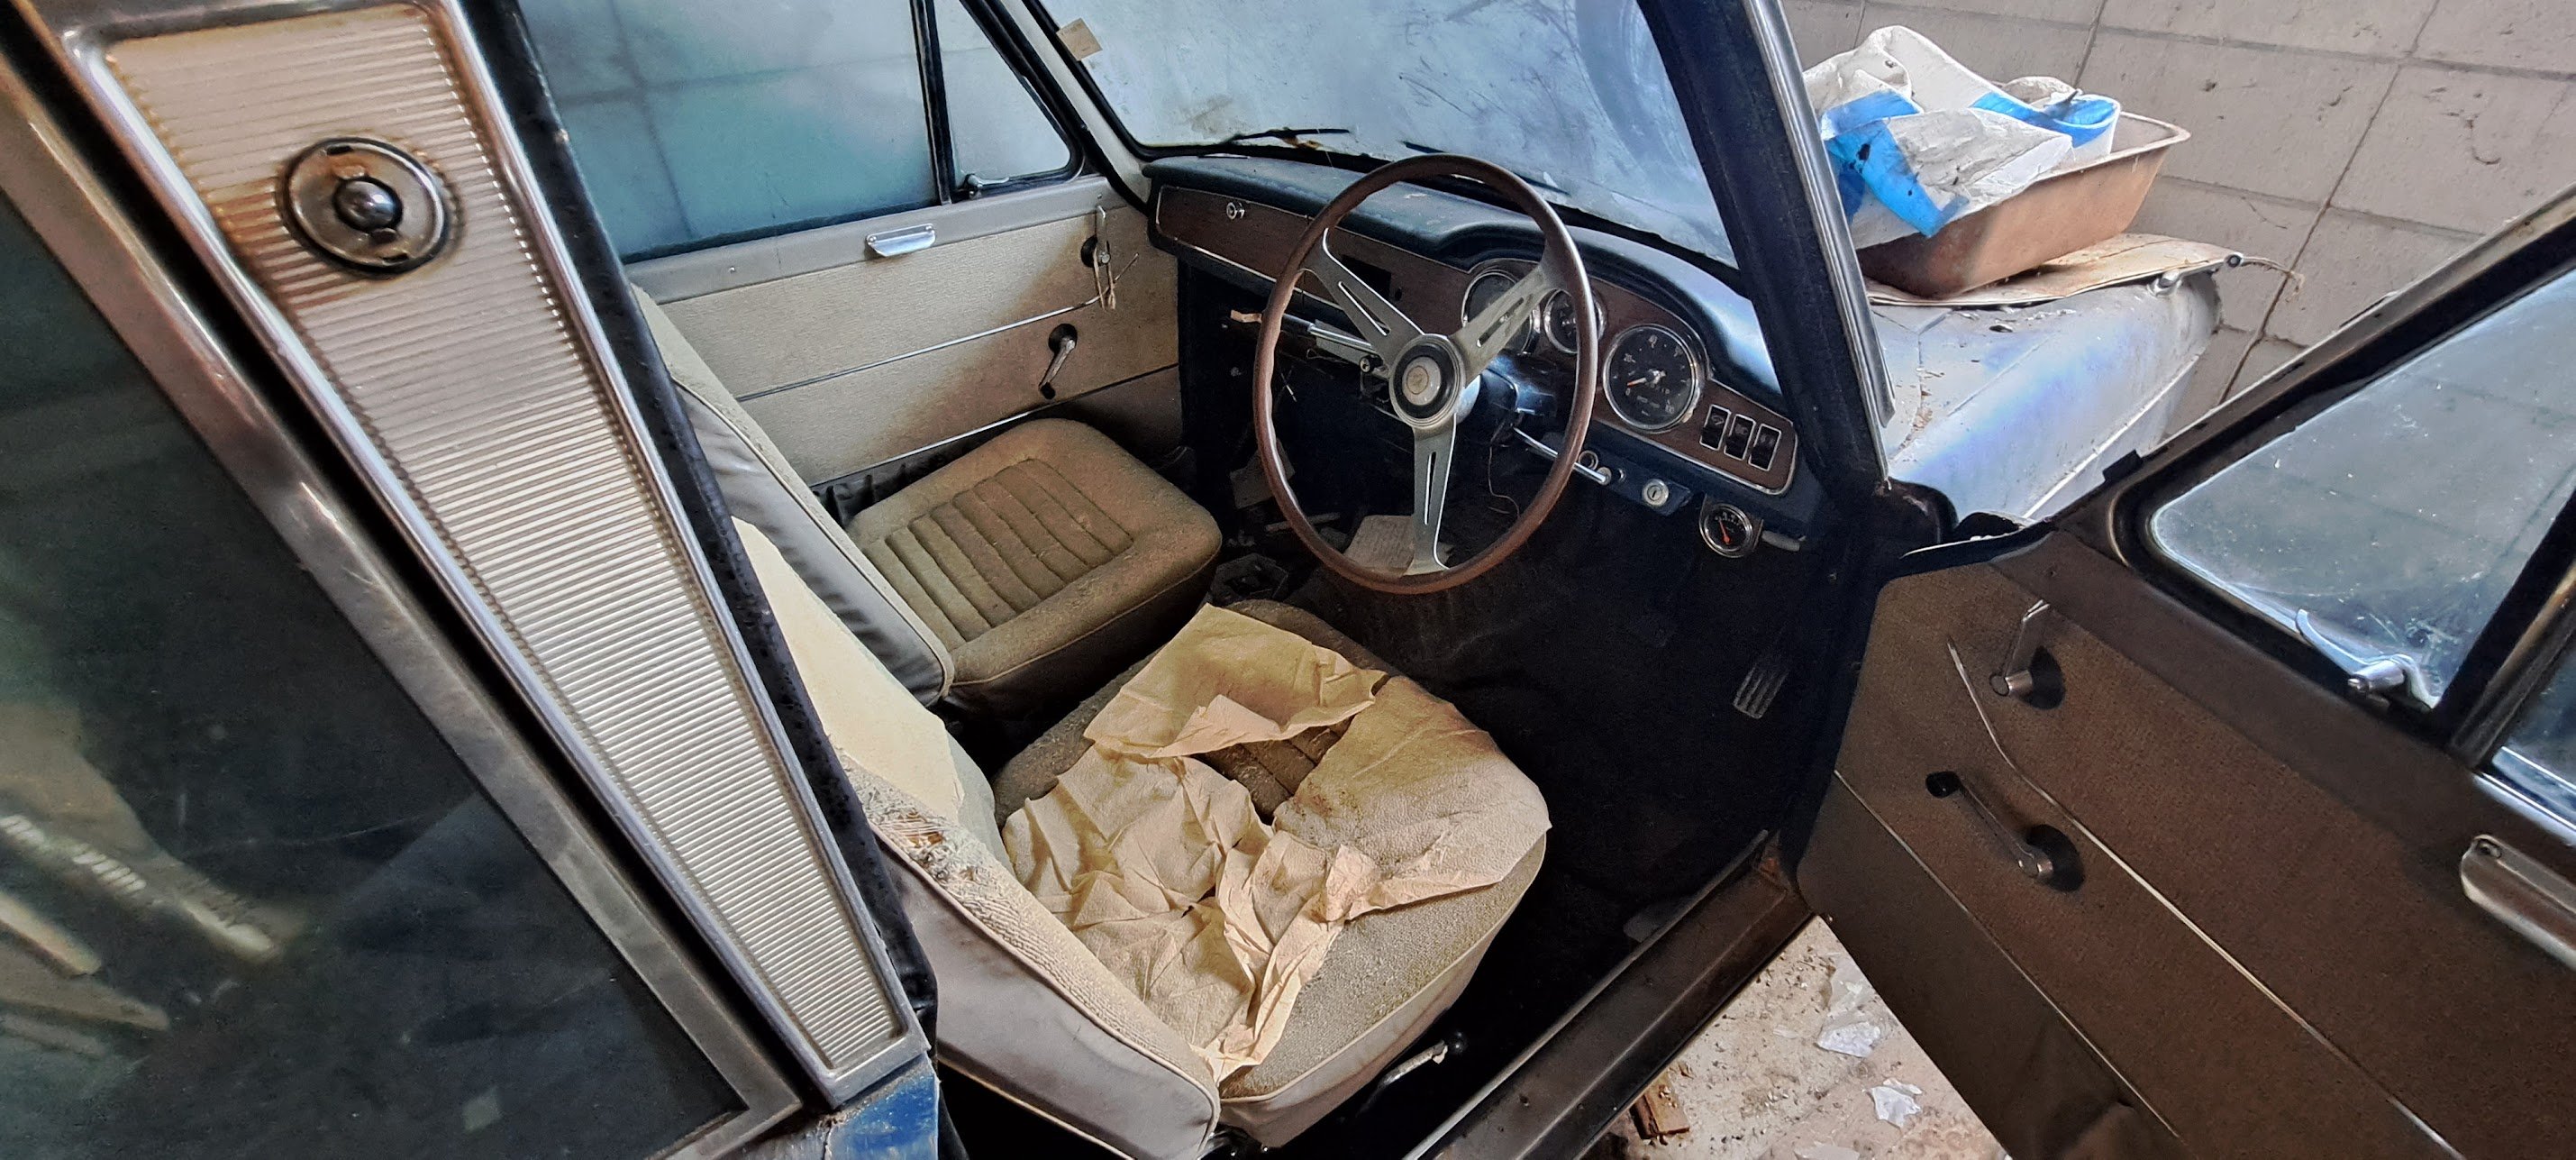
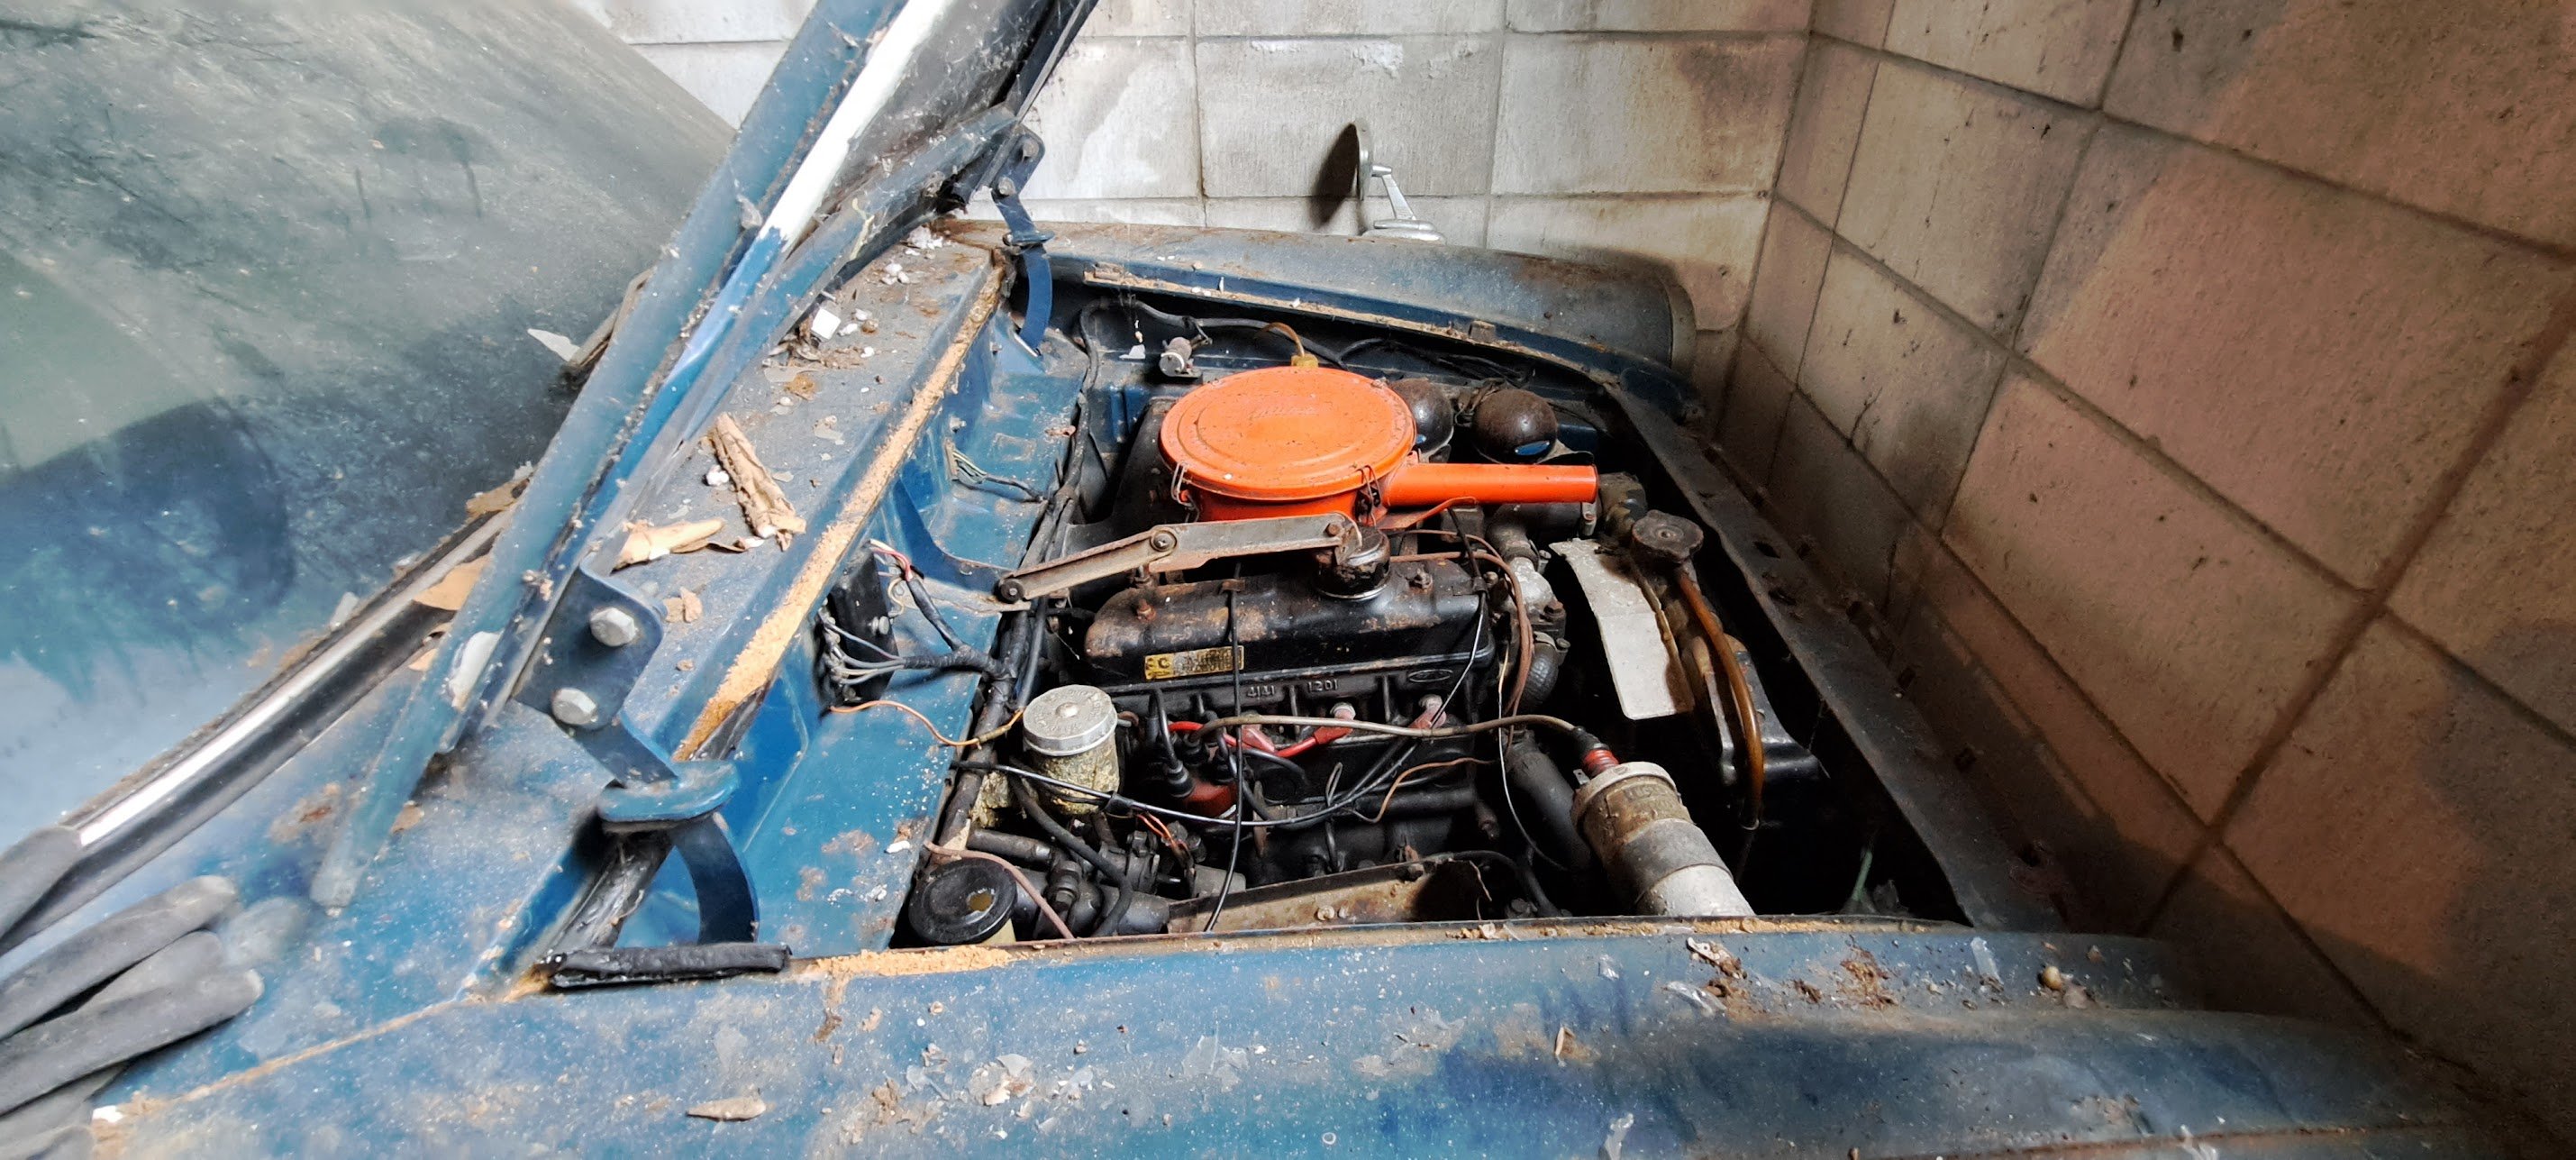
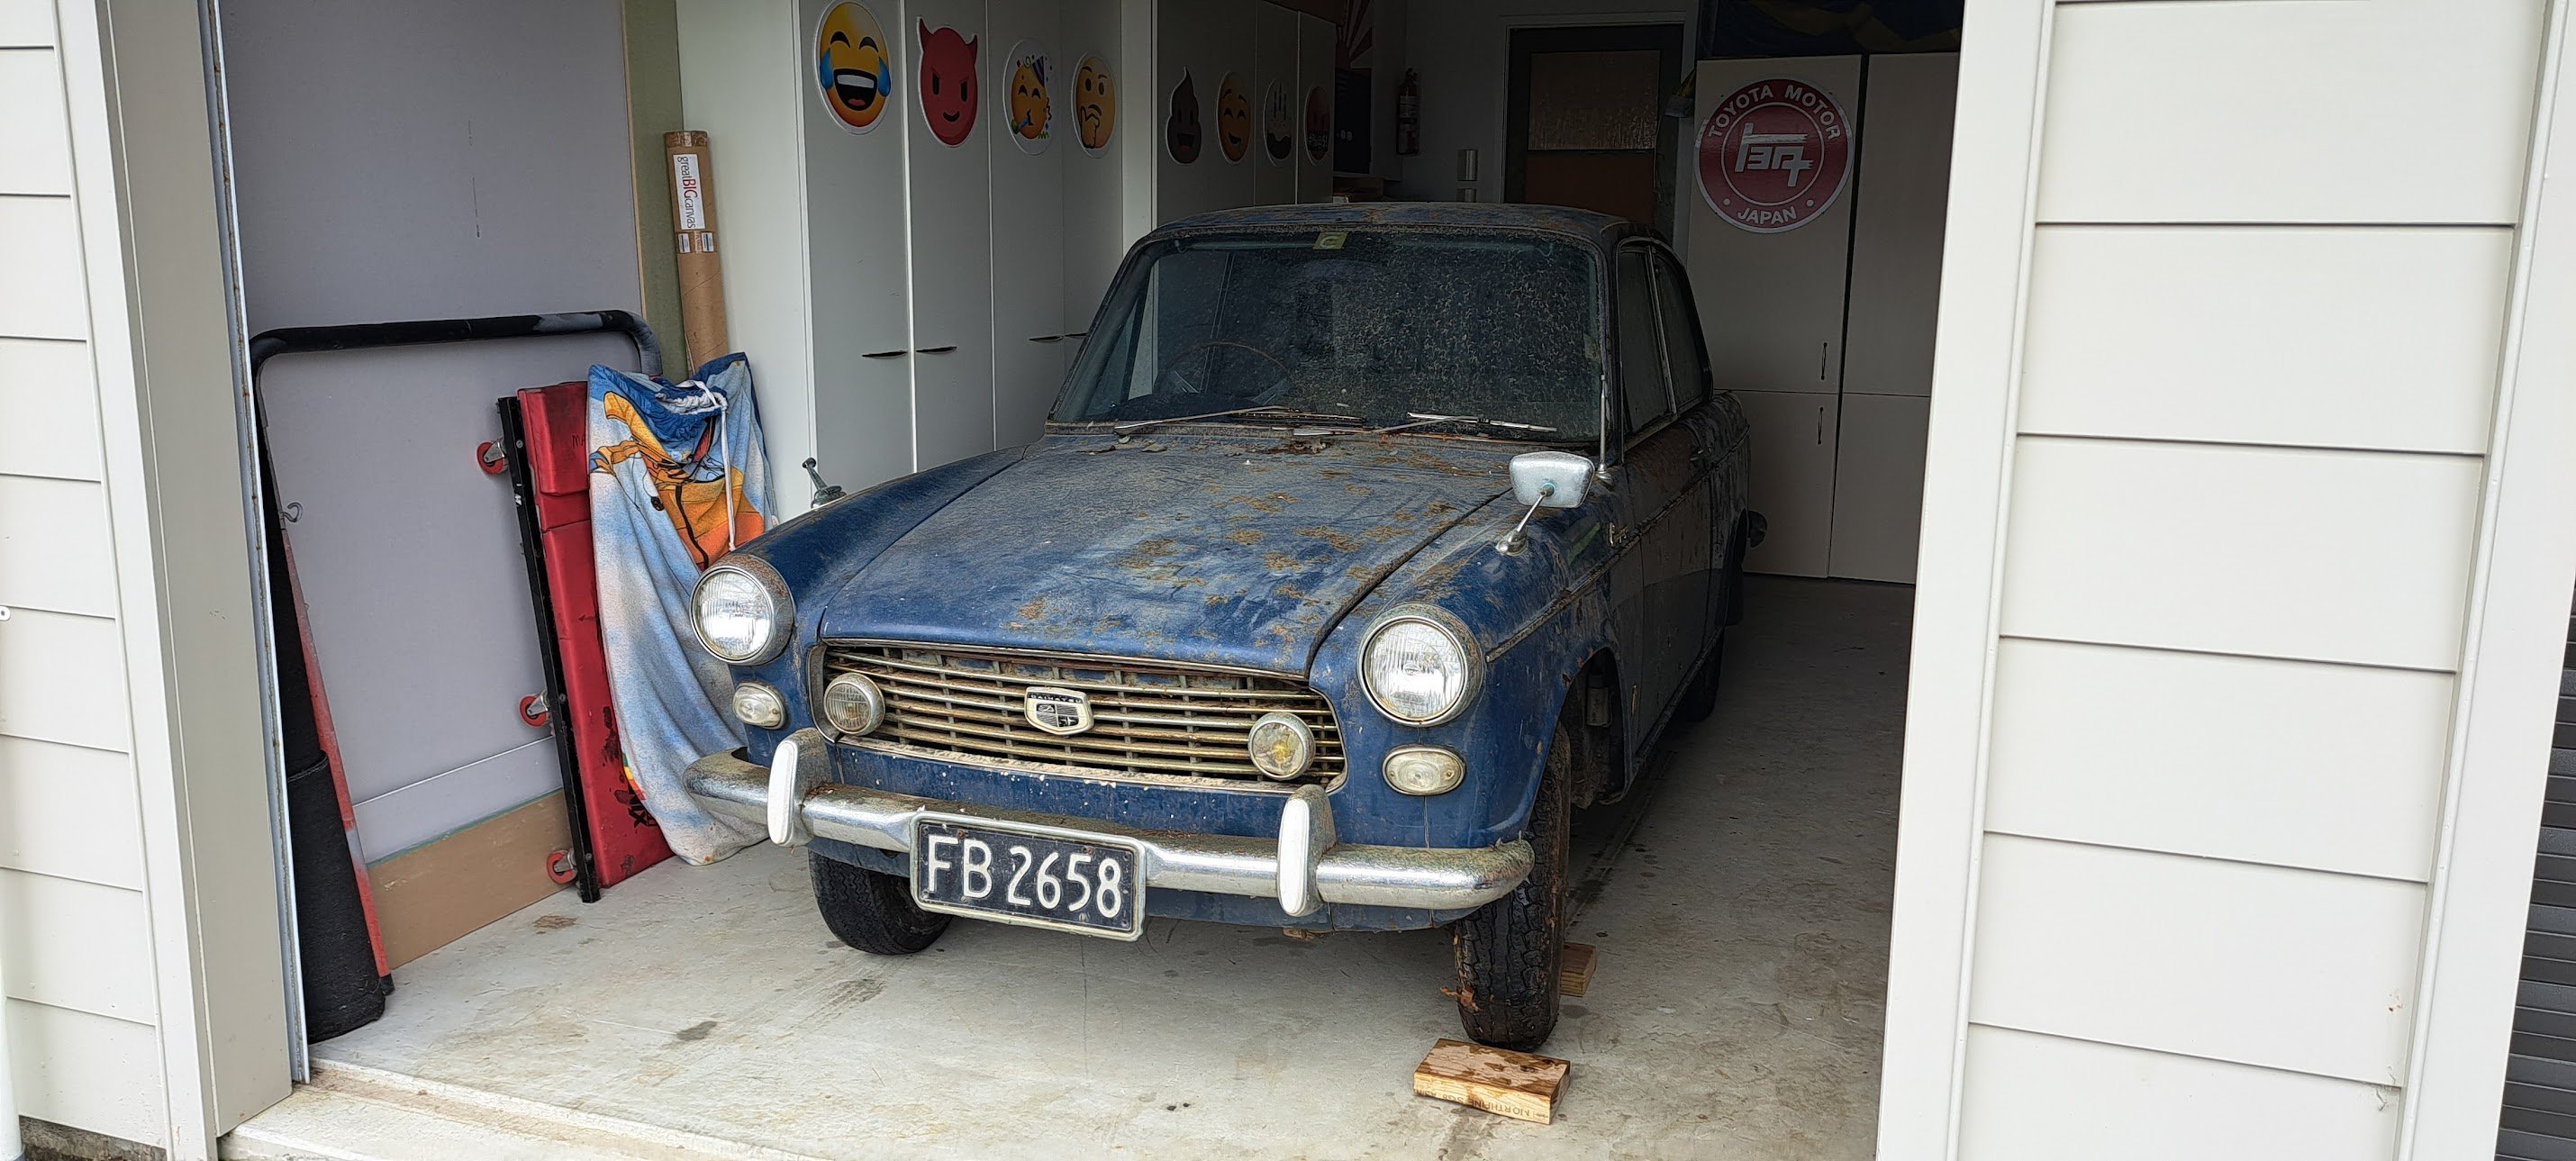
Around 25 years ago i worked with someone who mentioned they had an unusual Daihatsu in their shed. Owned since the early 70's. I'd kept in touch and occasionally asked about it but not much happened. A few months ago i ran into him at a car show and mentioned the car was now available. A "barn find" viewing and unearthing from 45 years sitting in one spot. And I was the proud new owner of this rare little beastie. The details: 1965 Daihatsu Compagno Berlina Deluxe 2 door 2 other owners from being sold new in NZ in 1965 by Campbell motors 53000Miles. Stored since 1977 due to front brake failure and dead alternator. 800cc "FC" motor IF ANYONE KNOWS ANYTHING ABOUT THIS CAR OR THESE COMPAGNO'S OR PARTS PLEASE PM ME For now it will be assessed, and things like brakes and clutch hydraulics will be rebuilt. Motor is locked so freeing this up will be tried. I have the original ownership papers and other details so it should be able to go back on the road relatively easy once mechanically sound.
- 32 replies
-
- 54
-
-
-
Sleeektoy's 1977 Racer Celica RA28 (WTF another one!!)
sleeektoy replied to sleeektoy's topic in Projects and Build Ups
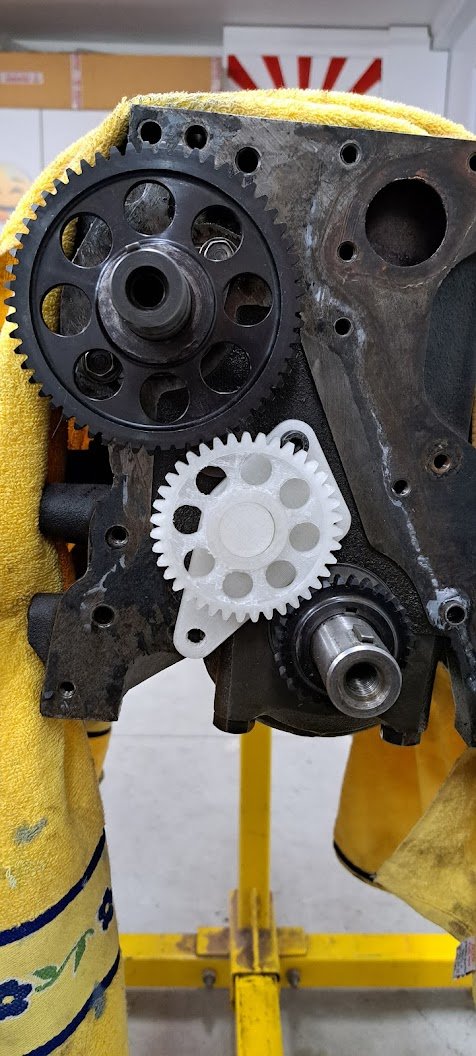
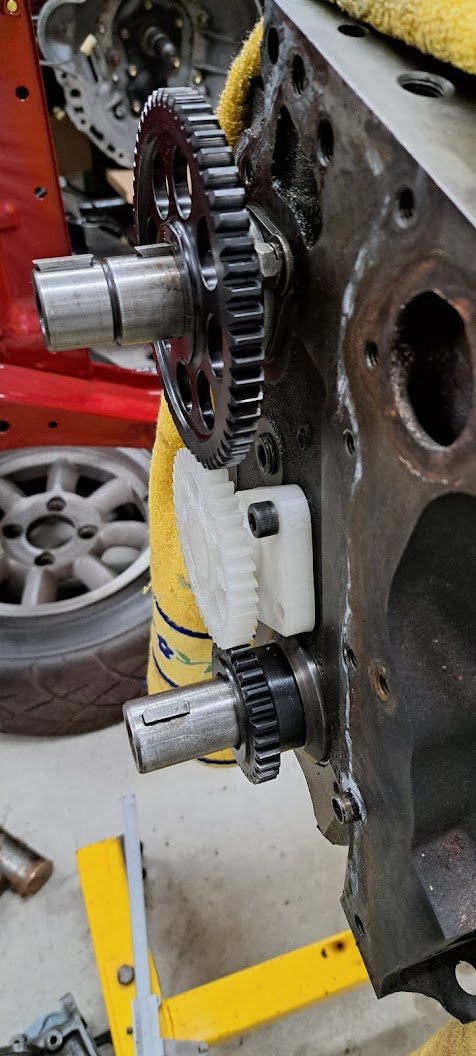
Long time update: Gearbox fitted, and engine dismantled for some tricks and refresh Testing a 3D print timing gear drive for bottom end
- 51 replies
-
- 16
-
-
Sleeektoy's 1977 Racer Celica RA28 (WTF another one!!)
sleeektoy replied to sleeektoy's topic in Projects and Build Ups
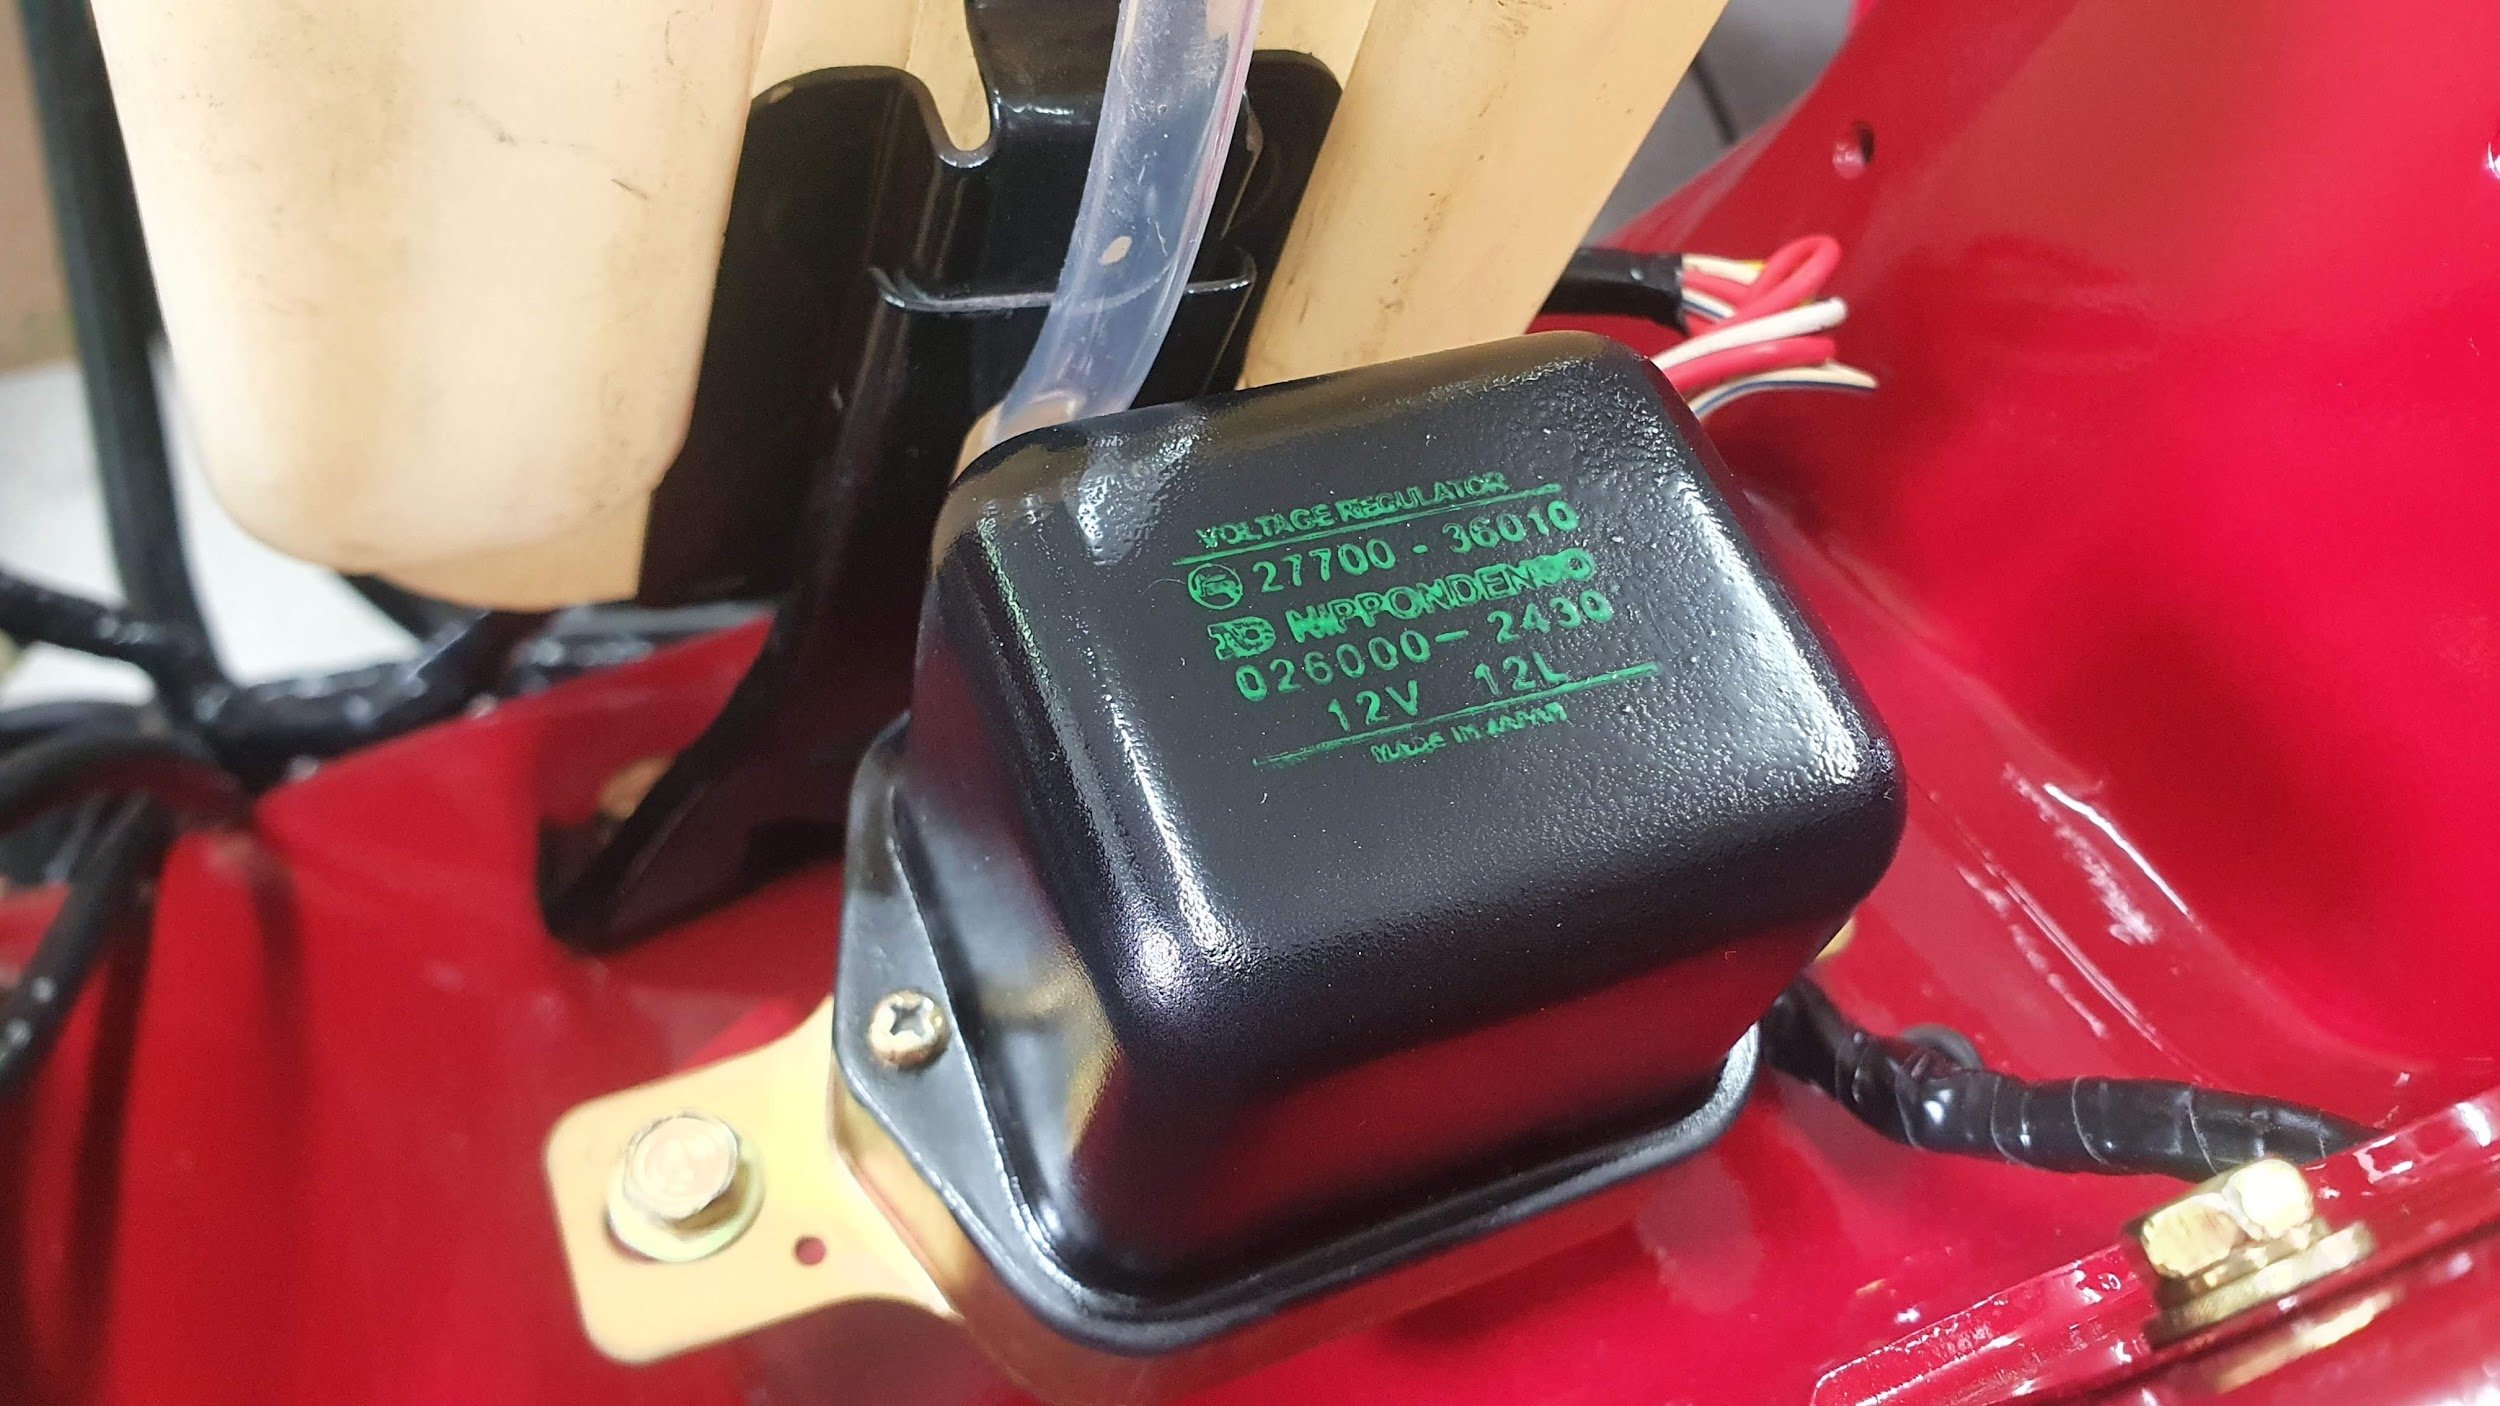
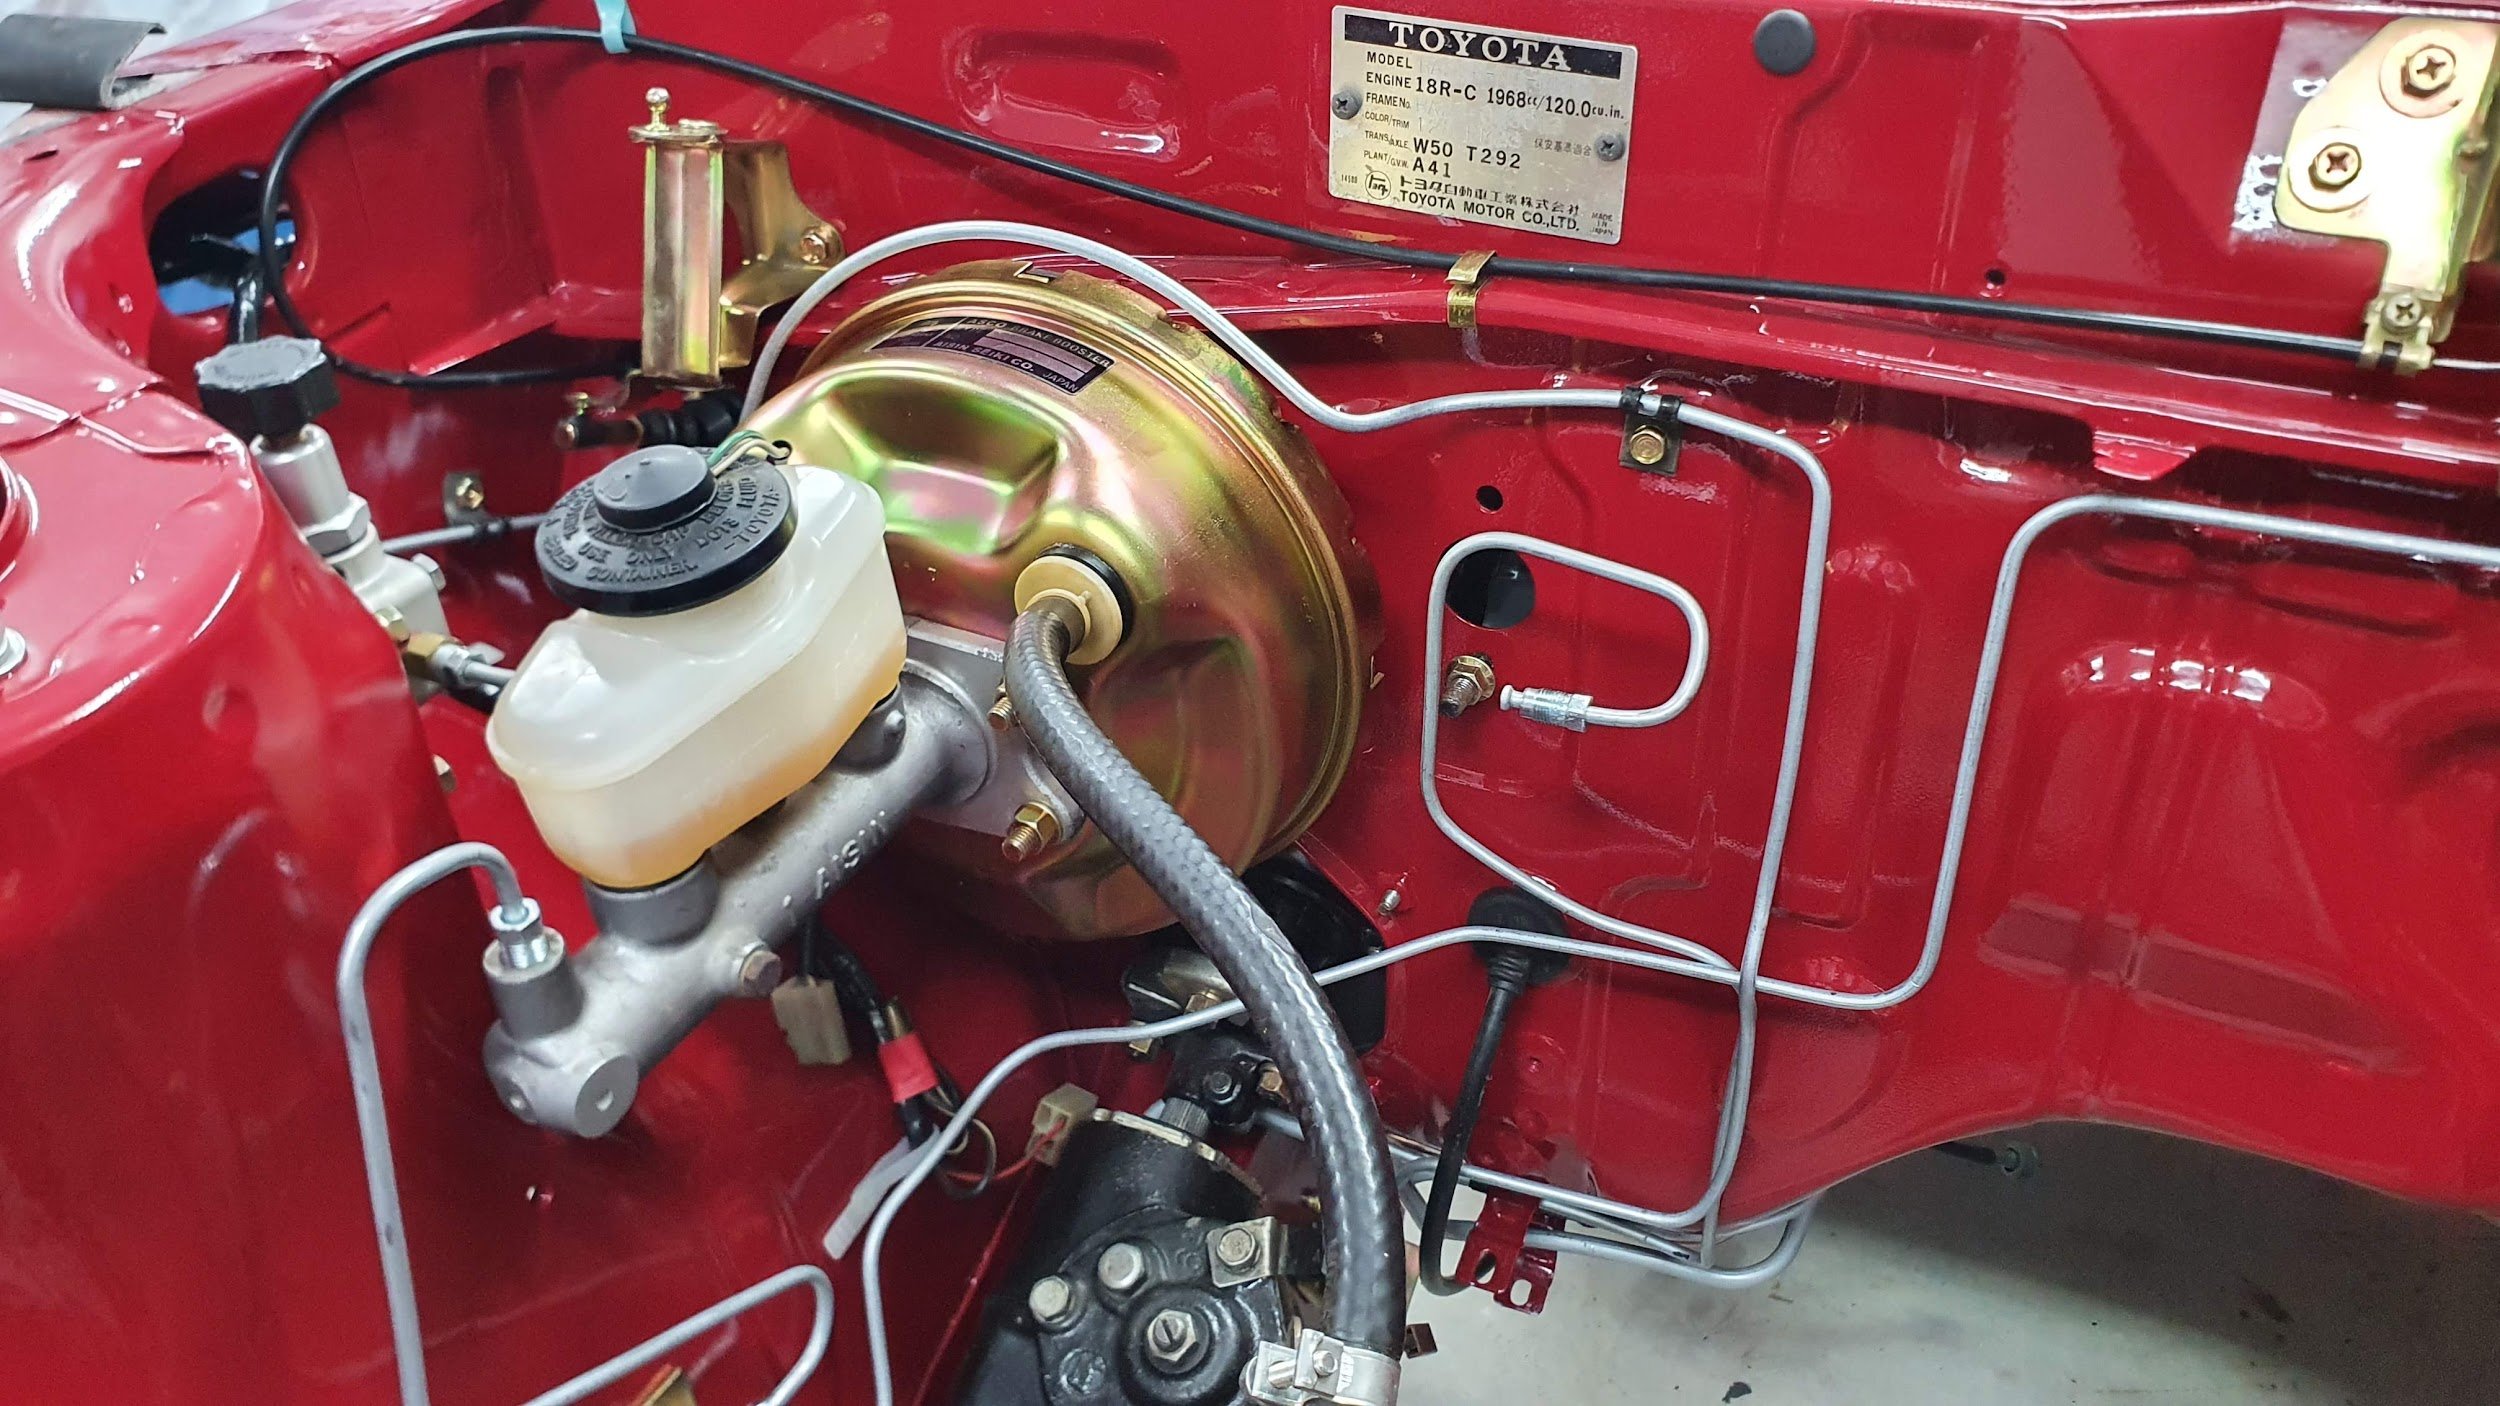
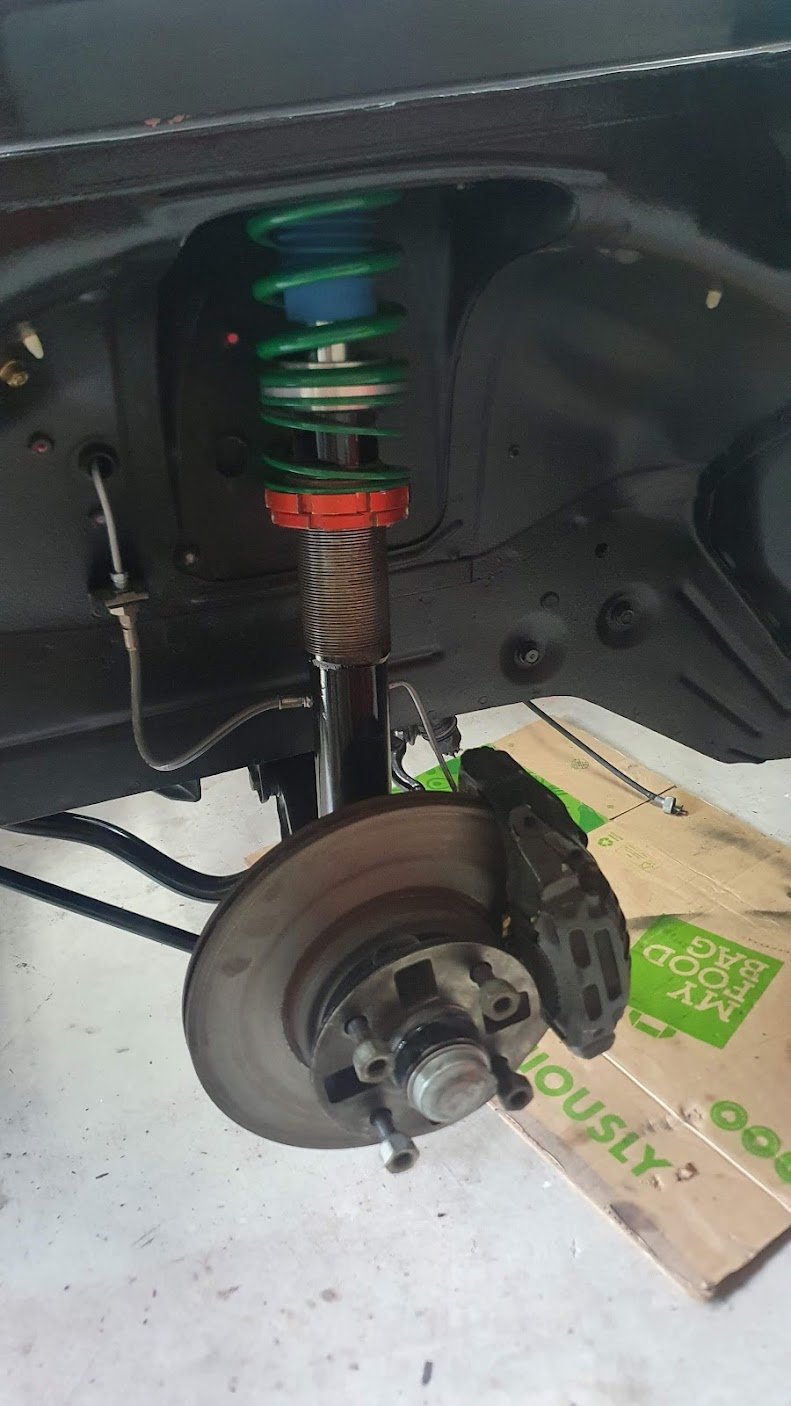
Booster and brake plumbing all done - I previously deleted the bias valve and replaced it with a wilwood adjustable, and upgraded the master to a bigger MA70 one Brakes all round means the front steering and suspension is all in too I previously disliked the wiring and relay/fuse for the electric fan As the alternator is internally regulated now - I figured up-cycle the old regulator housing to sneak the fan gubbins in... Next mission is to test fit the bigger W55 gearbox and apply clearance to any parts, and run a return fuel line that also clears it. Then onto checking the engine and see what needs freshening on it.
- 51 replies
-
- 18
-