MARTS-PL310
-
Posts
164 -
Joined
-
Last visited
Everything posted by MARTS-PL310
-

MARTS-PL310 61 Datsun Bluebird Sedan
MARTS-PL310 replied to MARTS-PL310's topic in Projects and Build Ups
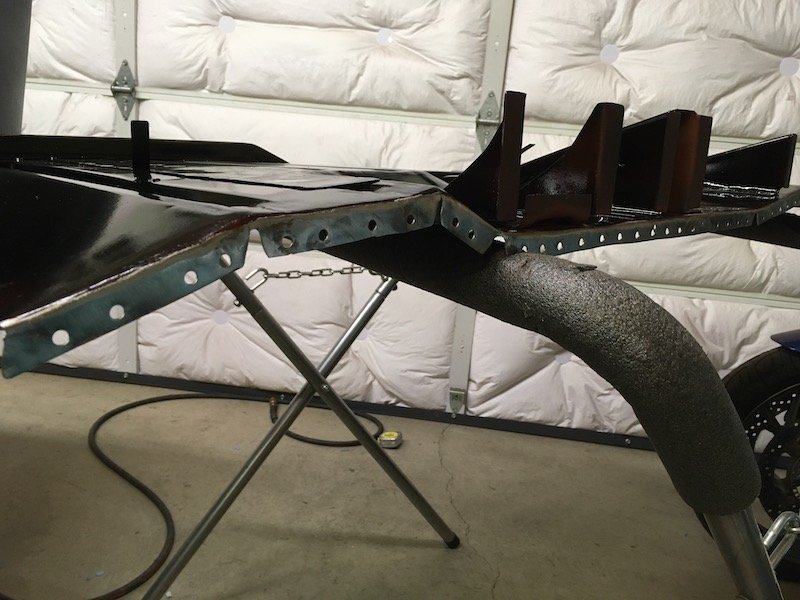
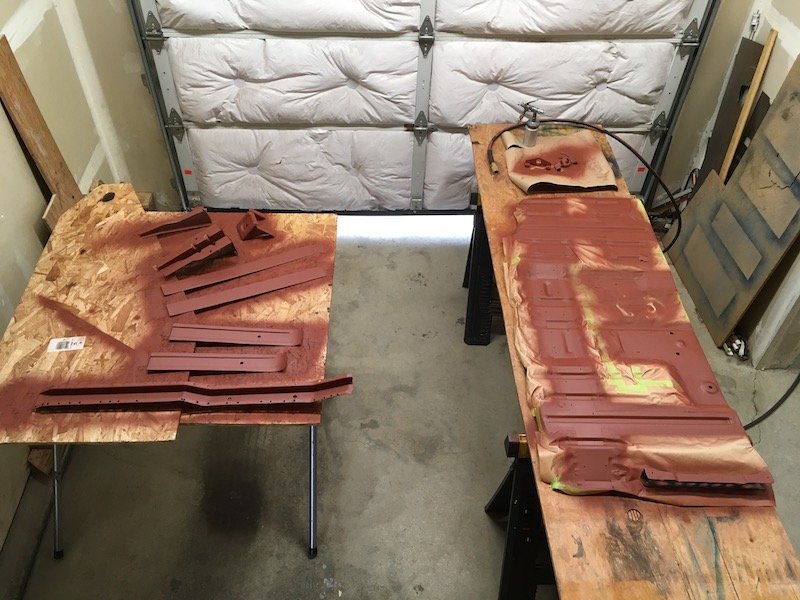
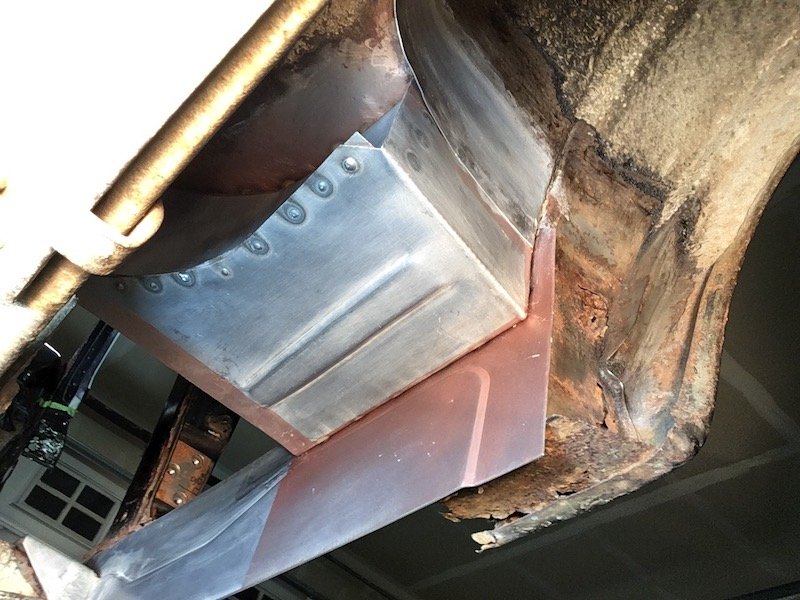
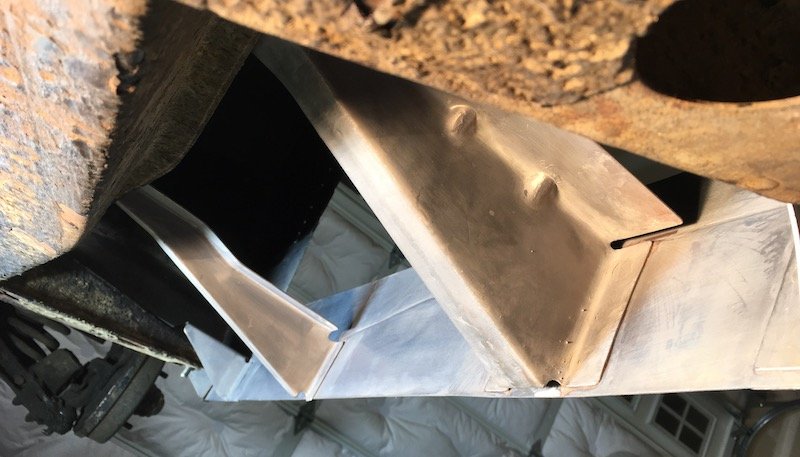
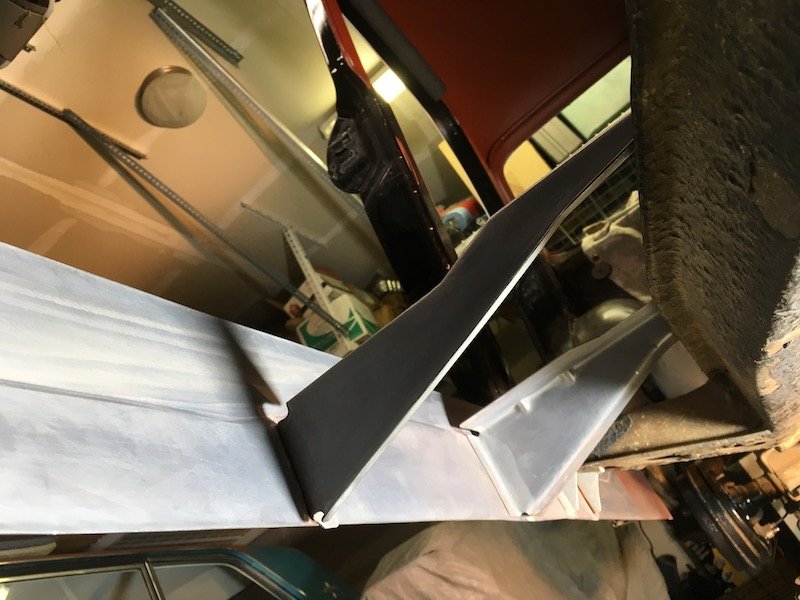
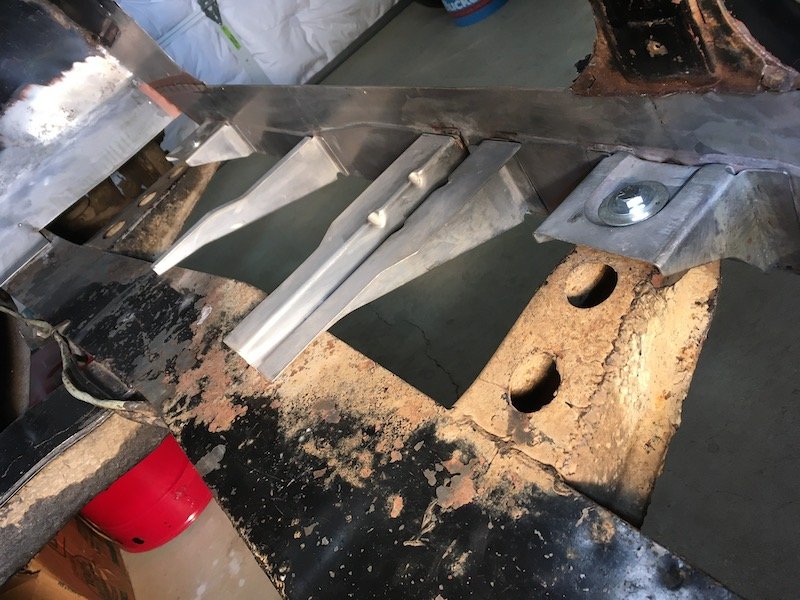
Building the 1961 Datsun 310 Bluebird - Right side completed periphery structures. A flood of pics to display the completed right hand side periphery structures. This will provide solid support for the future floor build. And on the work goes until the Bluebird rust be banished. Discussion: https://oldschool.co.nz/index.php?/topic/60267-marts-pl310-61-datsun-bluebird-sedan/ Build: https://oldschool.co.nz/index.php?/topic/60264-marts-pl310-61-datsun-bluebird-sedan/
- 74 replies
-
- 12
-

-
MARTS-PL310 61 Datsun Bluebird Sedan
MARTS-PL310 replied to MARTS-PL310's topic in Projects and Build Ups
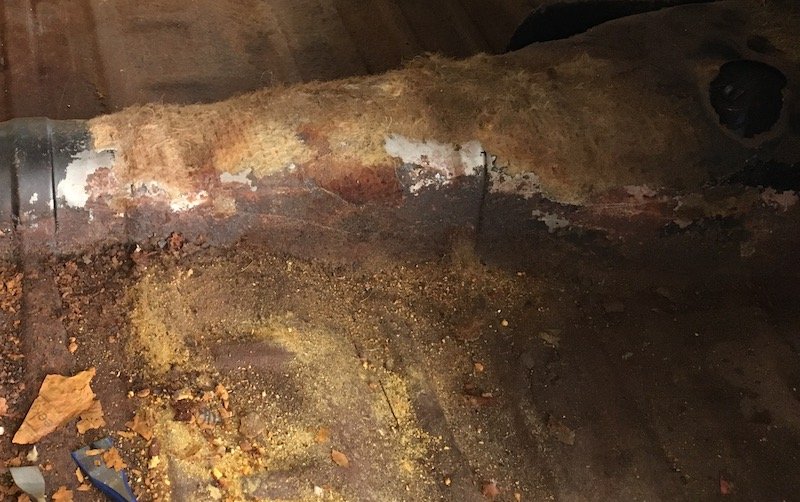
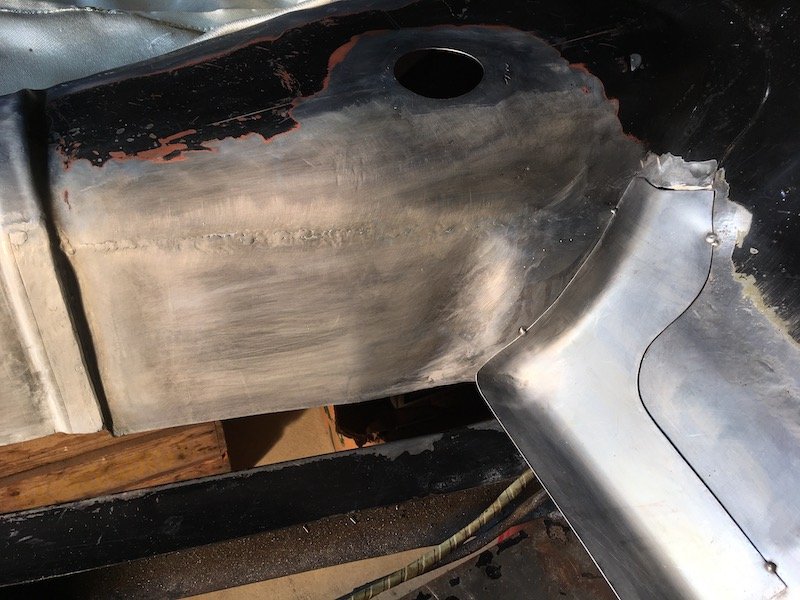
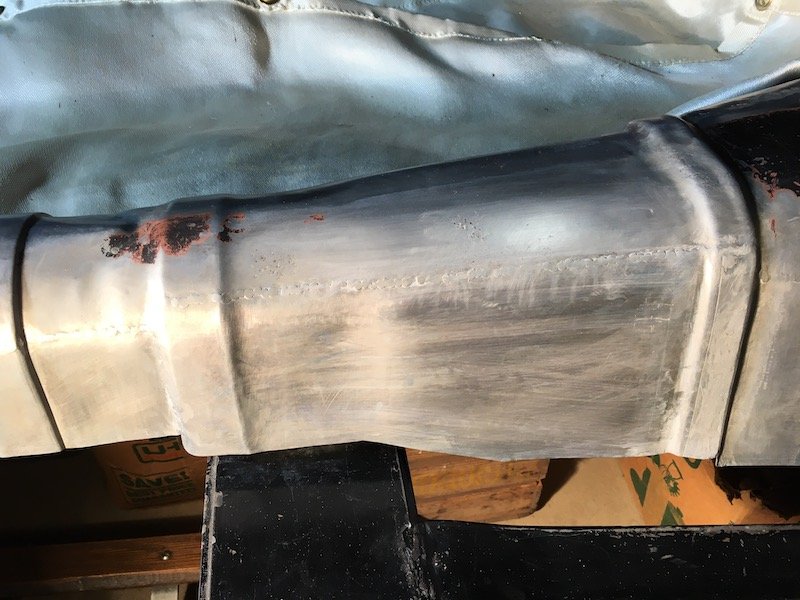
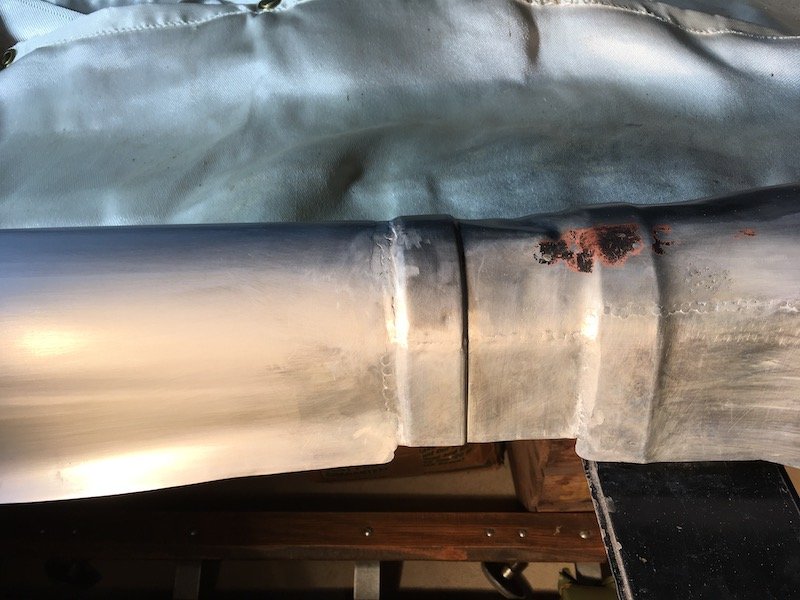
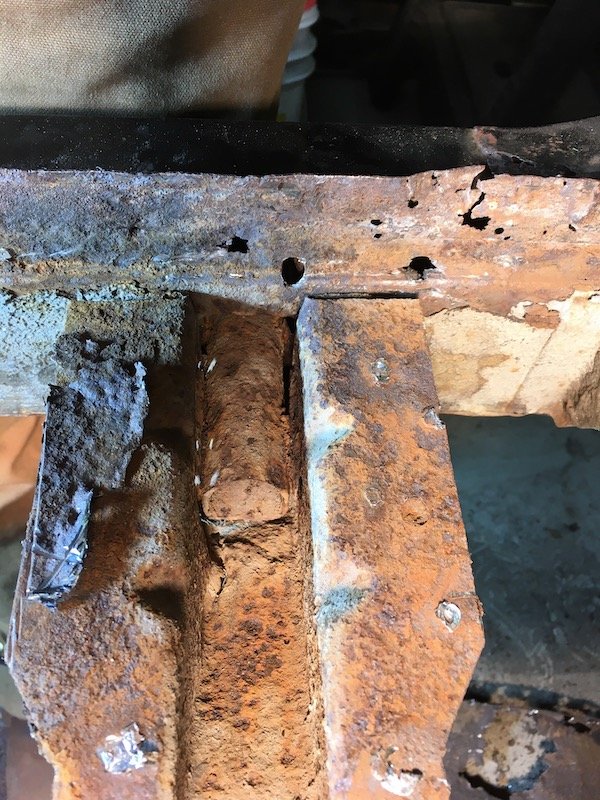
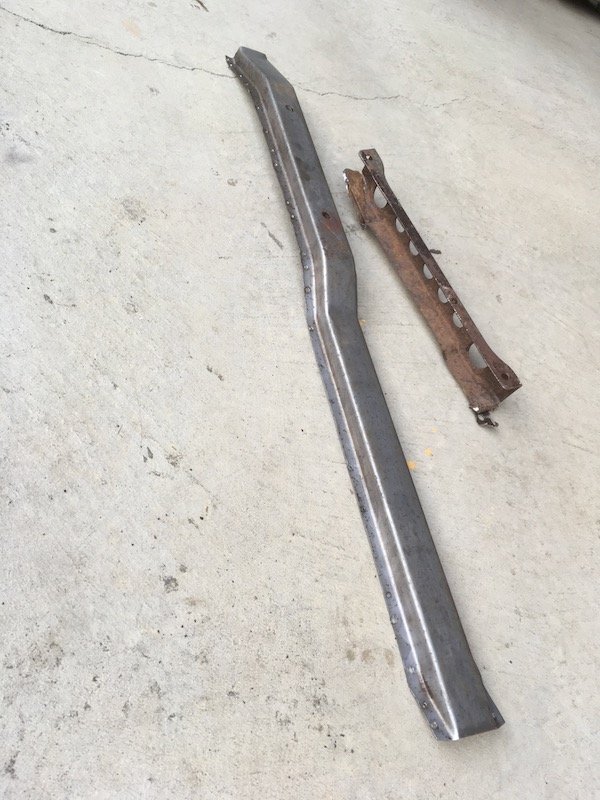
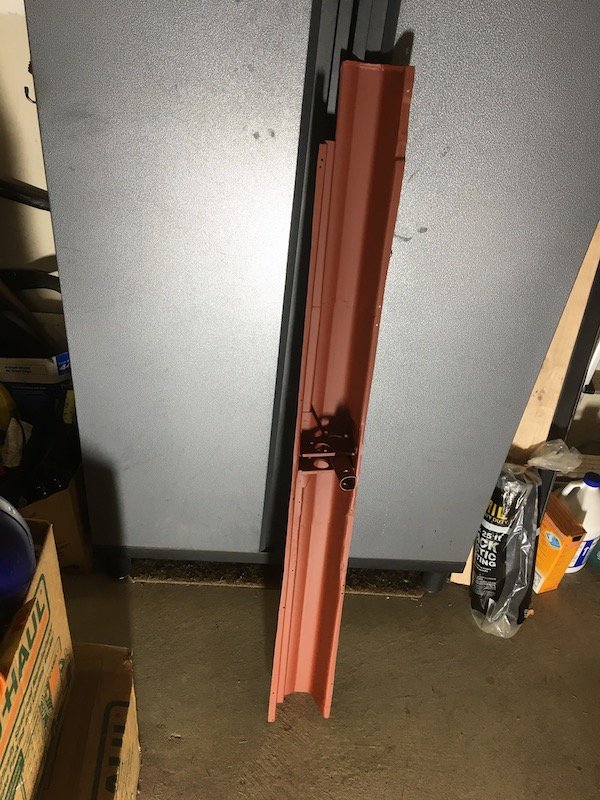
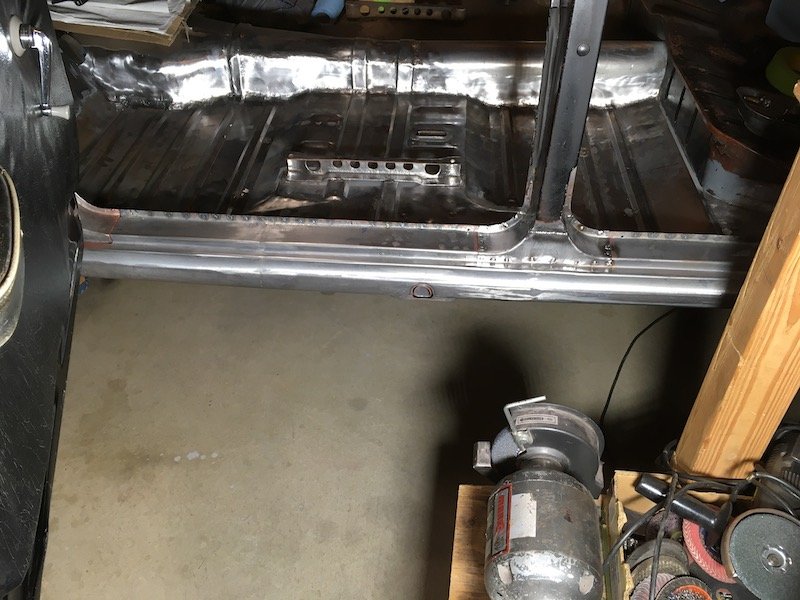
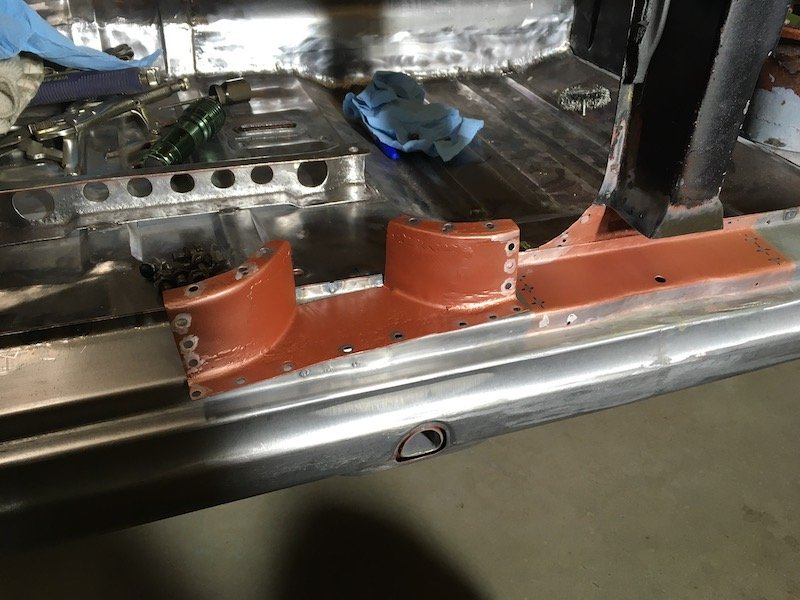
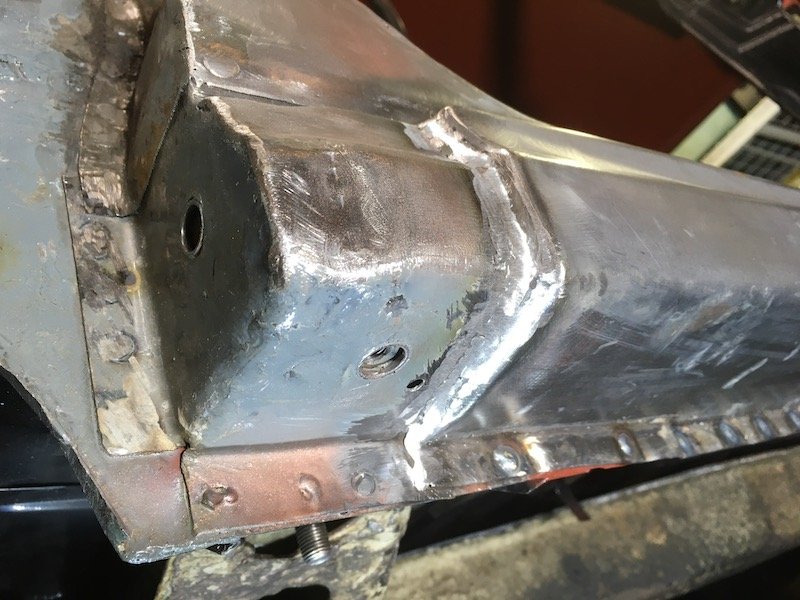
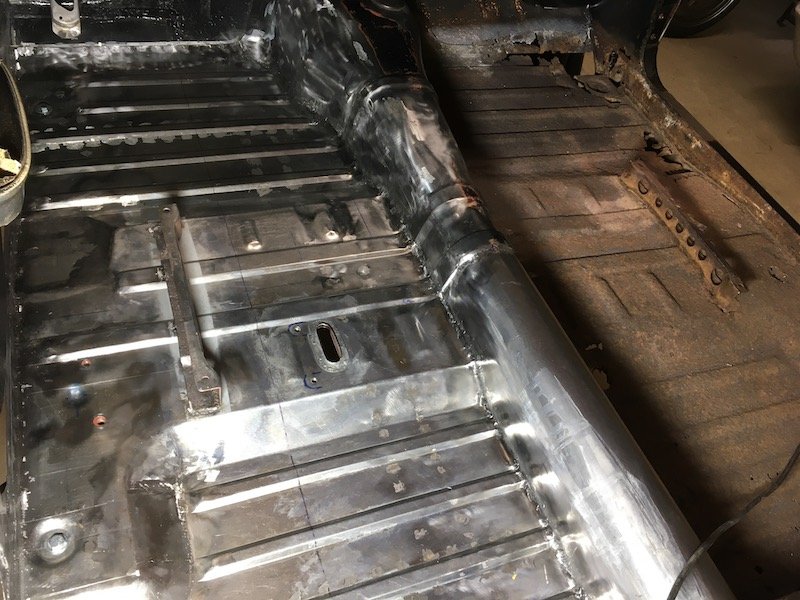
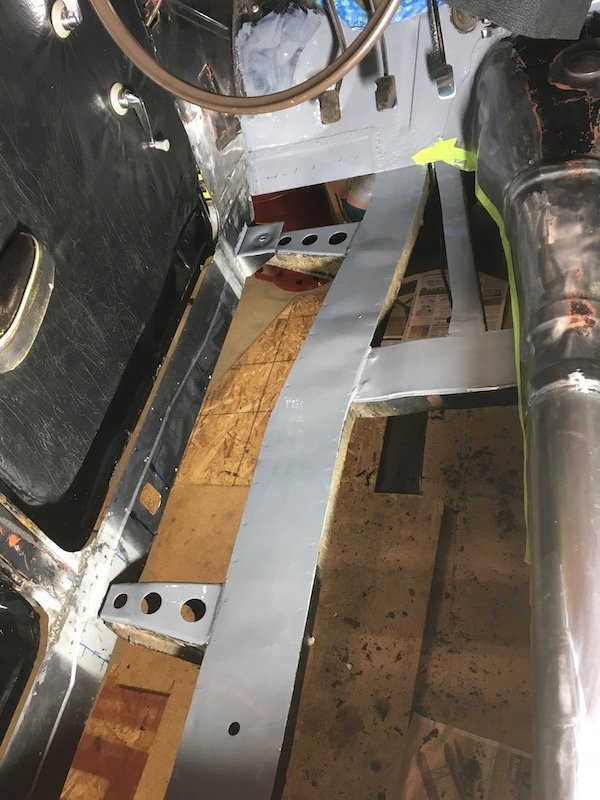
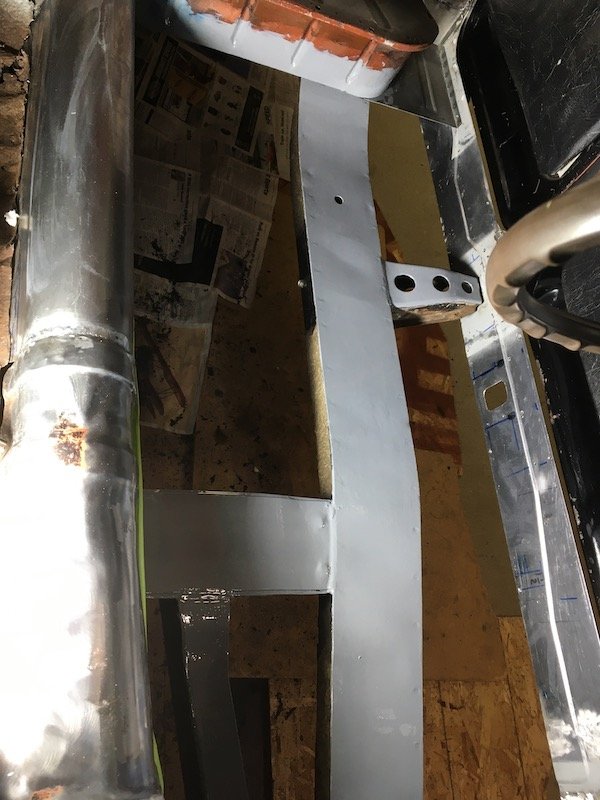
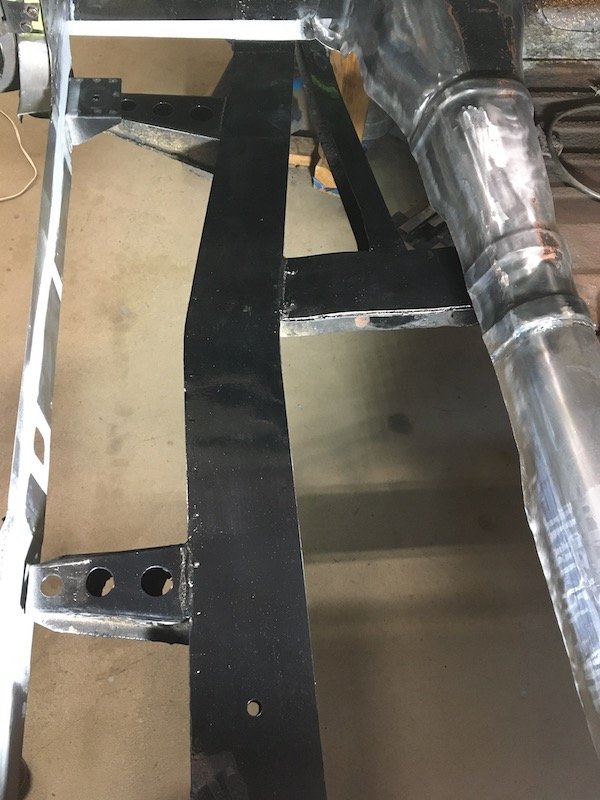
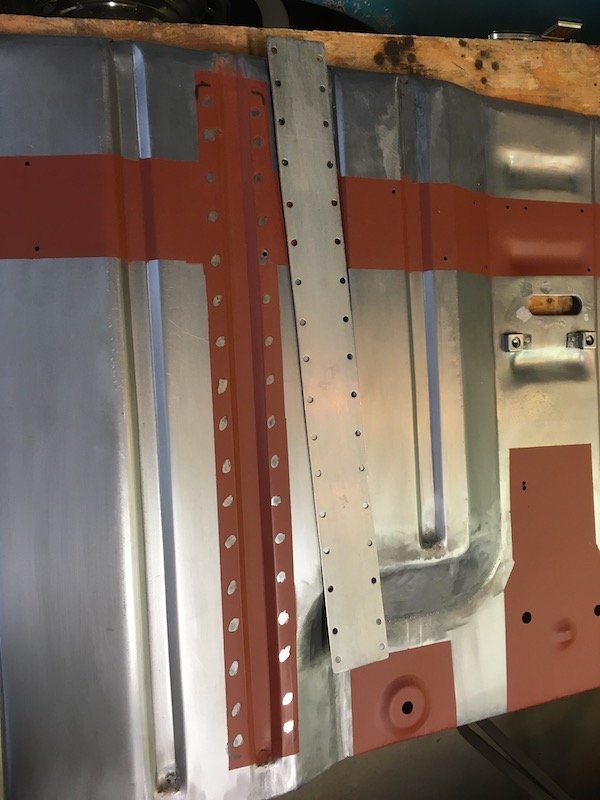
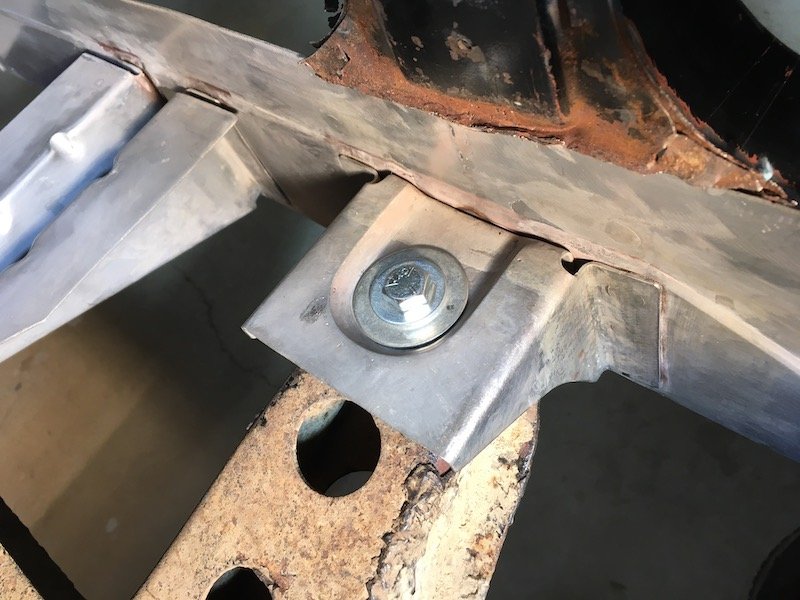
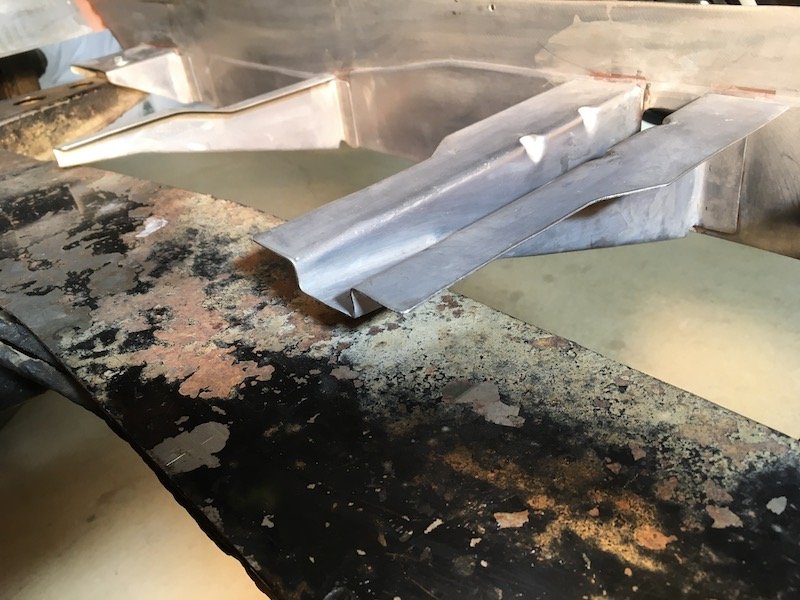
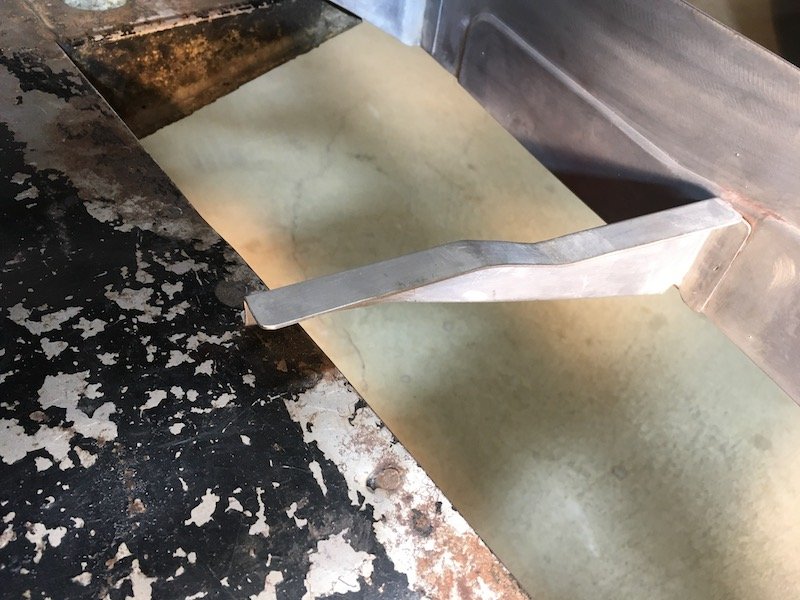
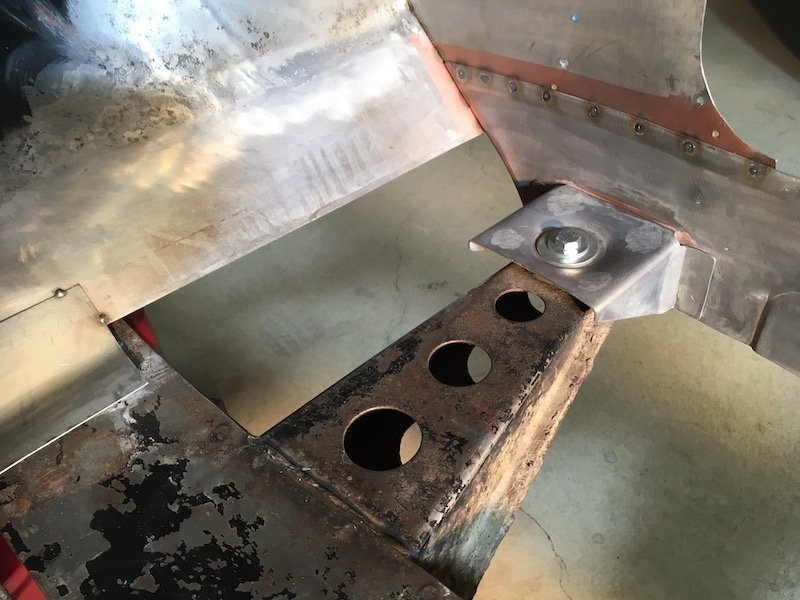
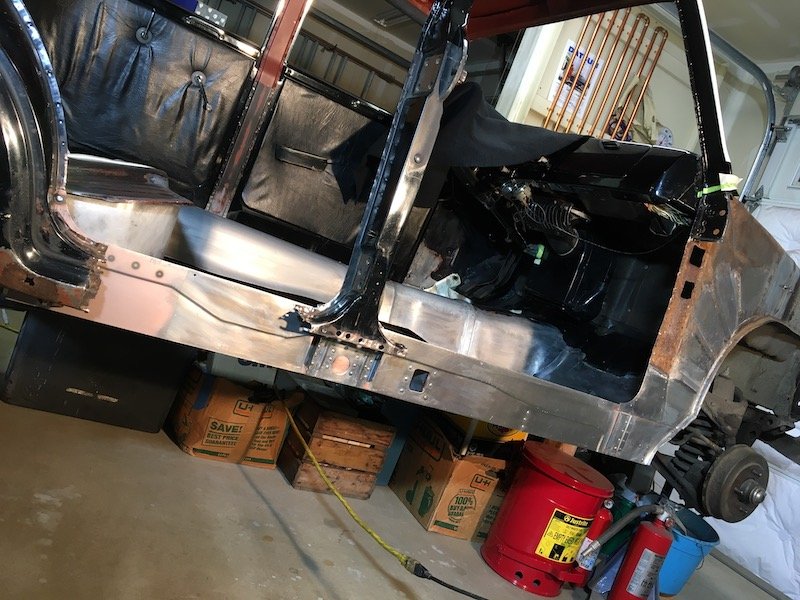
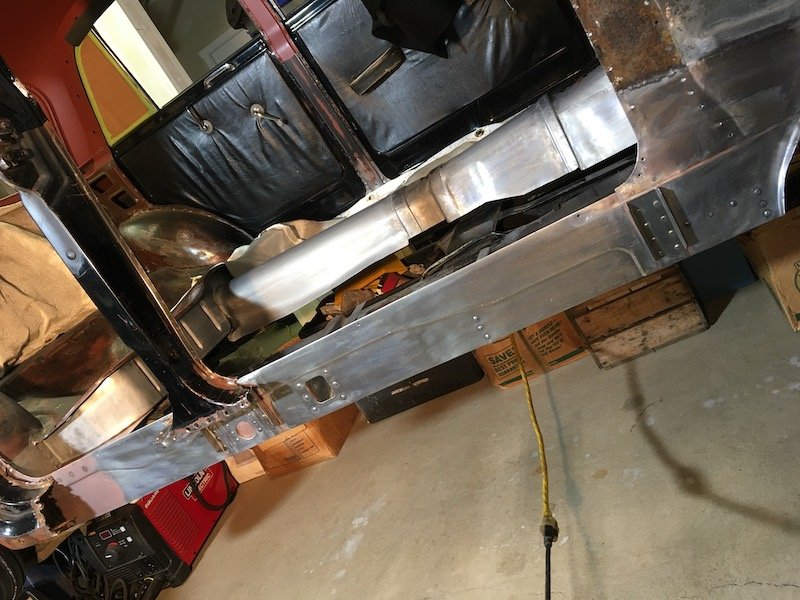
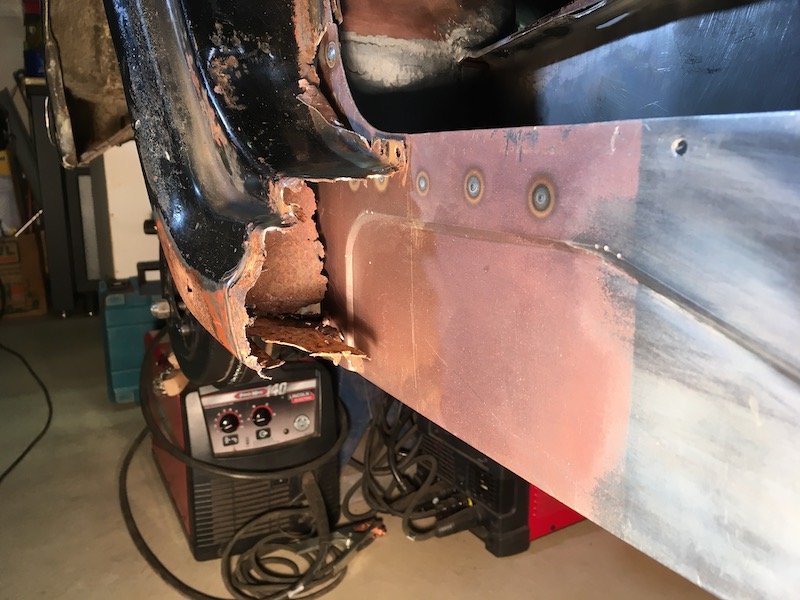
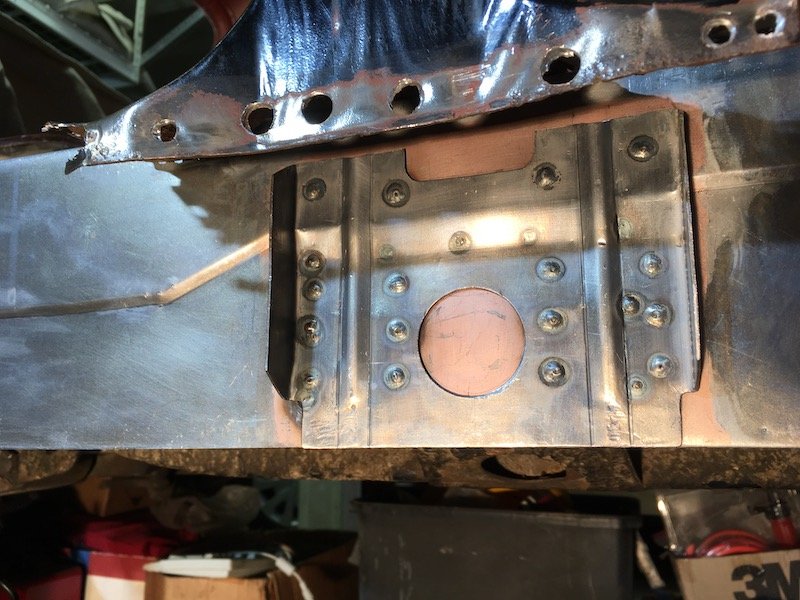
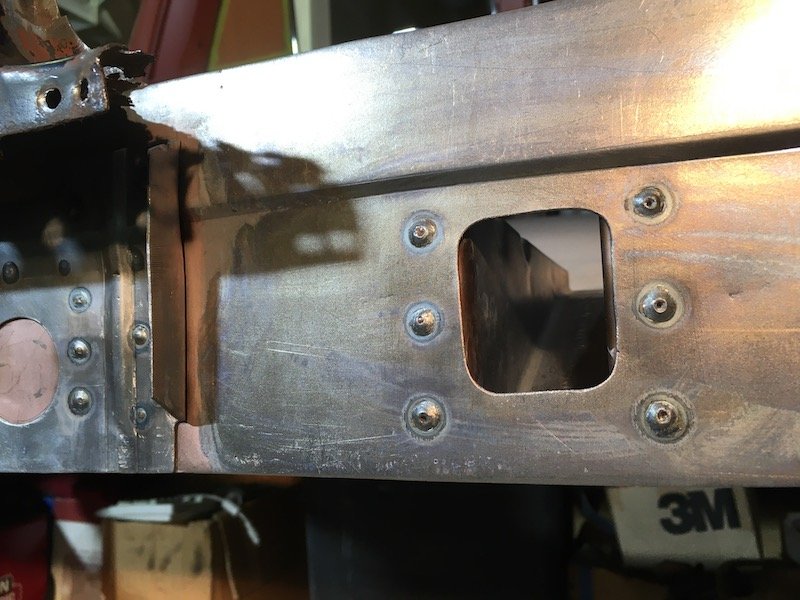
Building the 1961 Datsun 310 Bluebird - Right side inner sill and brackets. Rusty front section of inner sill before pic. Not worthy of a simple small patch. Inner body skin above it is also rusted out. A-post body mount bracket not looking too good either.All get replaced. Drilled out all the spot welds to the outer sill flanges and cut the gas welds at the posts. Hacked out the connections to the body jack pipe.The rusty inner sill is now ready to be pulled out. And it's out! A couple of pics to size it up against the new sill plate I built a couple of years ago. . And the brackets. four on the inside and two outside. I flattened the old forward end flange and use it as a template to trim the excess off my new inner sill. Bent the end to match the old and started welding the two new outer brackets on. Forming a recess in the A-post body mount bracket. 16g sheet proved quite resistant to 12 ton press. Eventually the press worked but did not produce a really clean edge, plus I have to fill in the clamping holes. I decided the B-post bracket will be made in two pieces. Making the B-post bracket. Sprayed some machinist blue die over my flat pattern copy and cut it out of 16g. Resulting flat pattern. Later on I bent up the flanges 90 degrees and then made the inside piece after making a little forming tool. Cut and welded it in. Made some indents to match the original with this setup. Angle iron brace and 3/8 inch rod that was pounded on to form the metal made soft with a gas torch. My four new brackets for the inboard side of sill. Position check for welding. Drilled and coated with some weld thru. Set up for plug welding. All goes smoothly. First and last fit check of the inner sill assembly. Exceeded my pic upload limit at this point. I pulled the sill out just to flange the upper edge for a lap fit same as original at and forward of the A-post. Welded the inner sill in at the front and back ends and then proceeded to cut most of the A-post off for future reproduction/reconstruction. Removed the outer sill as well. I'll post a set of summary photos of the periphery. Maybe tomorrow. So now the project is up to date with these last three posts and same number of months. The periphery is all welded in, ground, metal cleaned and etched. Working on the right side floor next. Not physically started on that floor as yet. I'm wanting to figure out ways to improve upon the left side floor just a bit. Discussion: https://oldschool.co.nz/index.php?/topic/60267-marts-pl310-61-datsun-bluebird-sedan/ Build: https://oldschool.co.nz/index.php?/topic/60264-marts-pl310-61-datsun-bluebird-sedan/
- 74 replies
-
- 14
-
-
MARTS-PL310 61 Datsun Bluebird Sedan
MARTS-PL310 replied to MARTS-PL310's topic in Projects and Build Ups
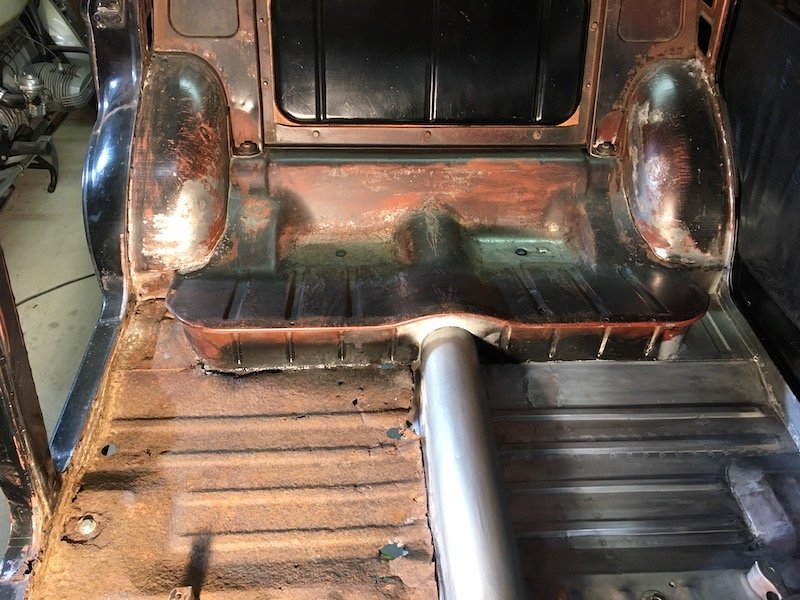
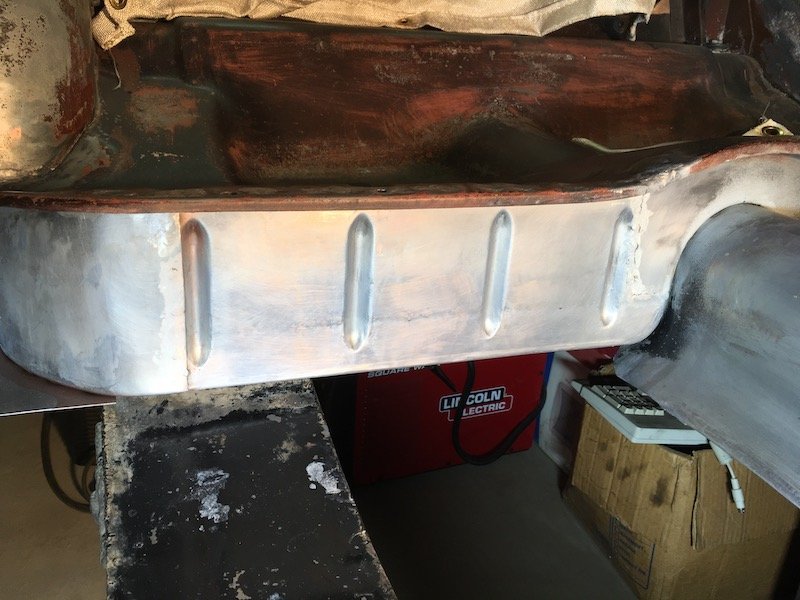
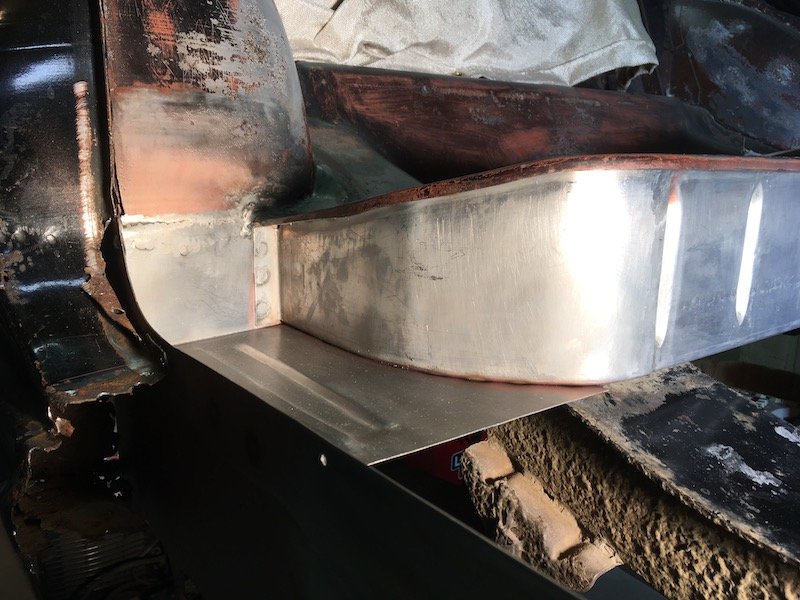
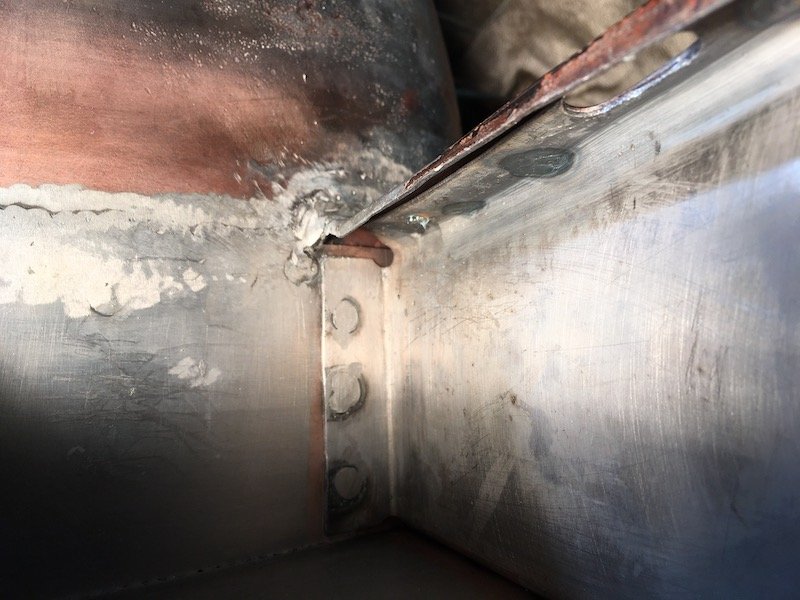
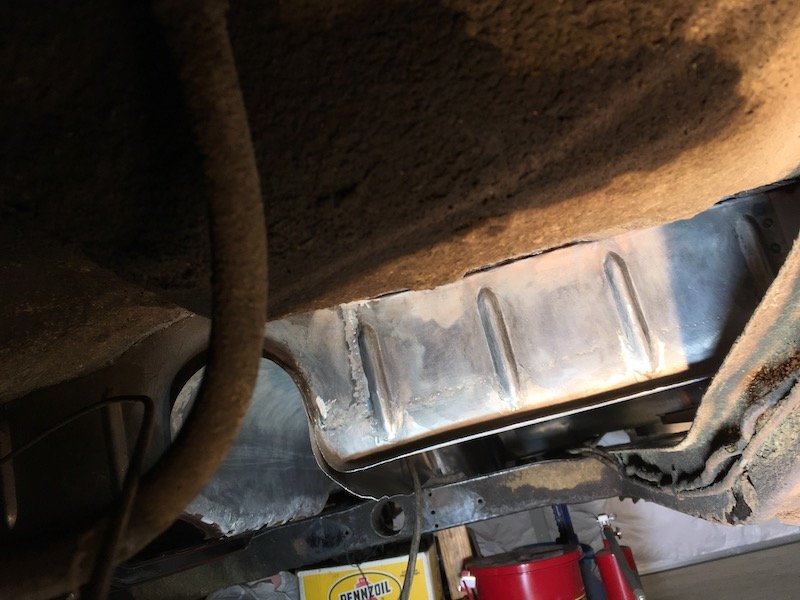
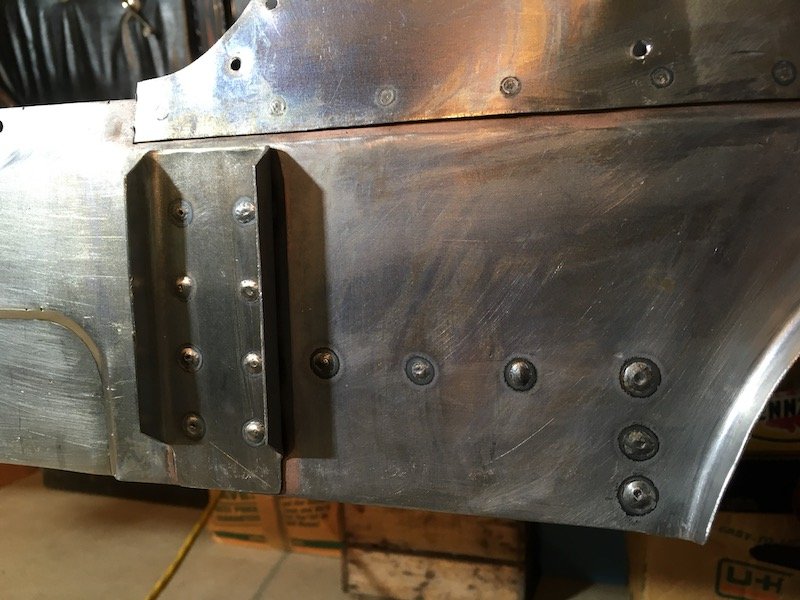
Building the 1961 Datsun 310 Bluebird - Replacing the right rear seat pan support structure, step and wheel well lip. First, the Bluebird rear seat pan structure as it was. And from the wheel well perspective. So I started by cutting some rusty metal out. Then I worked this piece to savage the good 3/4 portion with the four beads and replace the rot. Fitting the old and new together. Made some tack welds. Finished and cleaned up the welds and built the vertical side support. The little side floor was built a couple of years ago. Screwed the pieces together. Checked fit with the car. Fitted good! Welded on later. I moved on to fix the rot on the wheel well lower lip. A bunch of little rot pieces cut out and repairs can begin to the wheel well just behind the step plate vertical flange. Mostly self-explanatory. Three more or less flat pieces of rot cut out and new metal welded in. Took some time to do though. . And in the next post: The new inner sill and all six brackets that go with it. Discussion: https://oldschool.co.nz/index.php?/topic/60267-marts-pl310-61-datsun-bluebird-sedan/ Build: https://oldschool.co.nz/index.php?/topic/60264-marts-pl310-61-datsun-bluebird-sedan/
-
MARTS-PL310 61 Datsun Bluebird Sedan
MARTS-PL310 replied to MARTS-PL310's topic in Projects and Build Ups
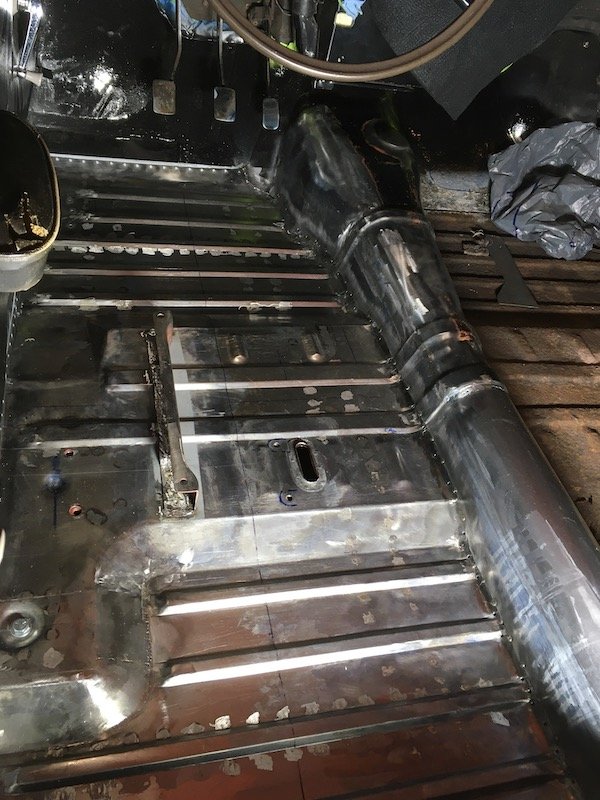
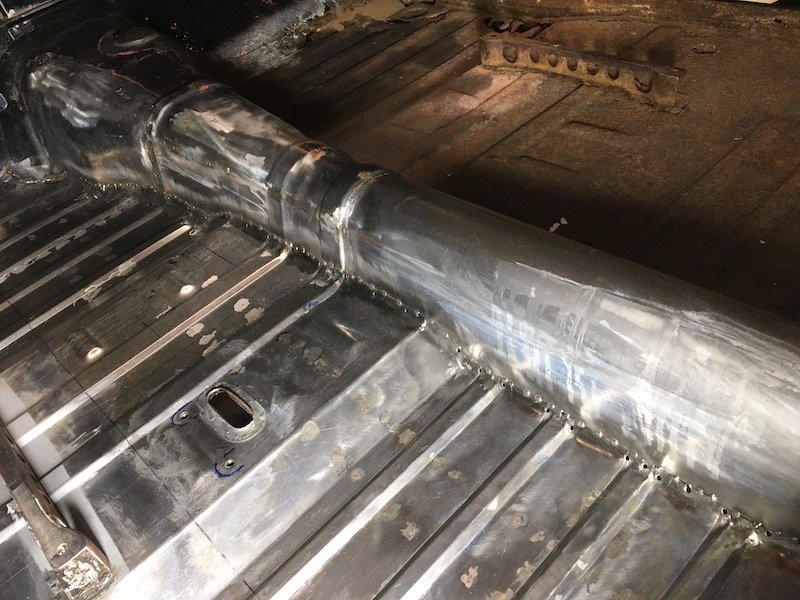
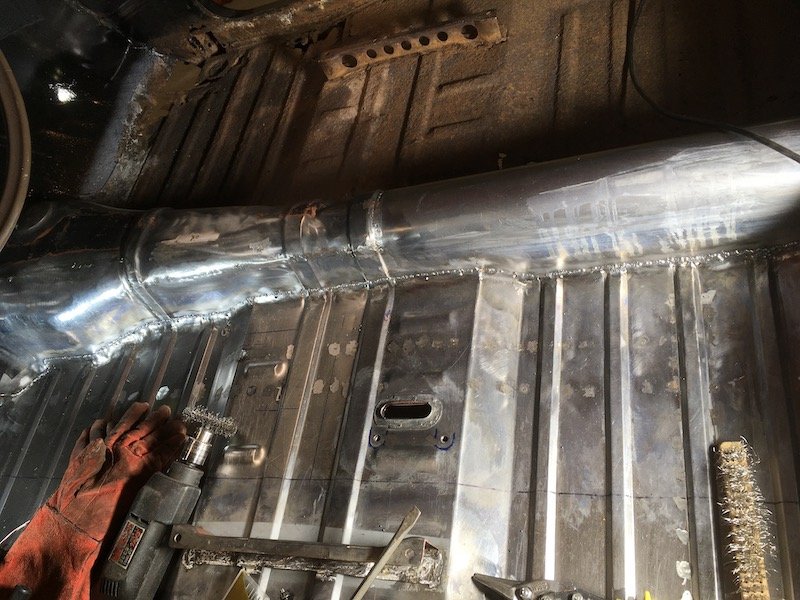
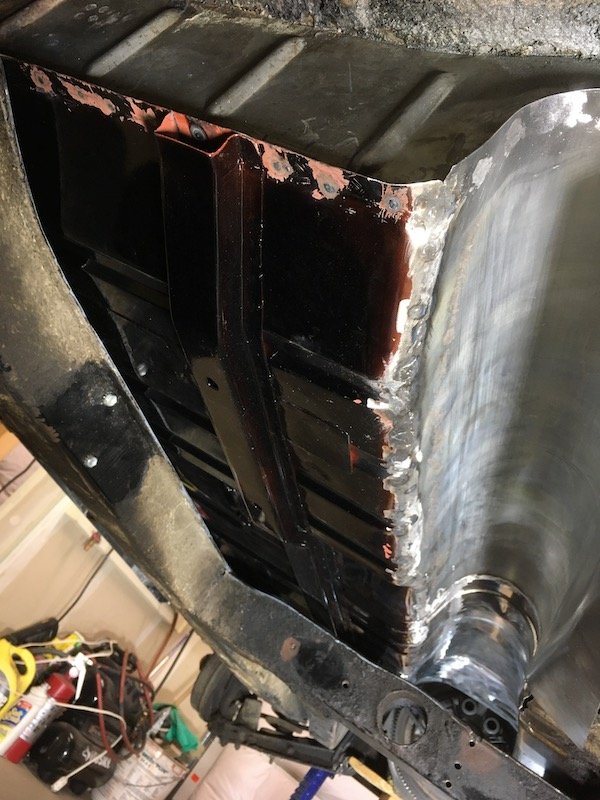
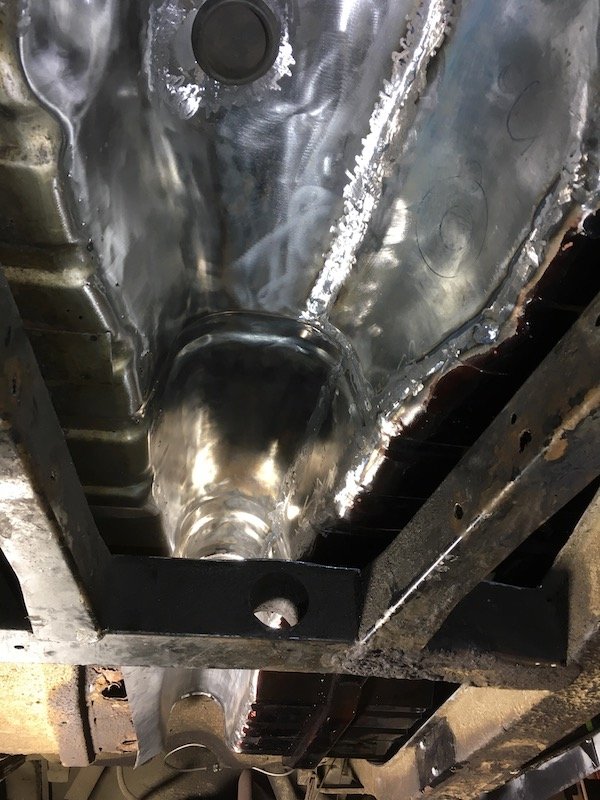
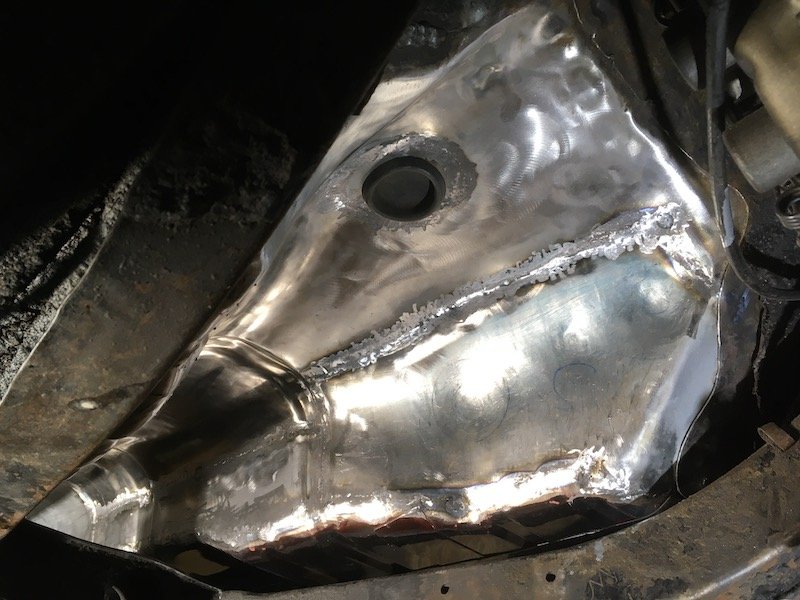
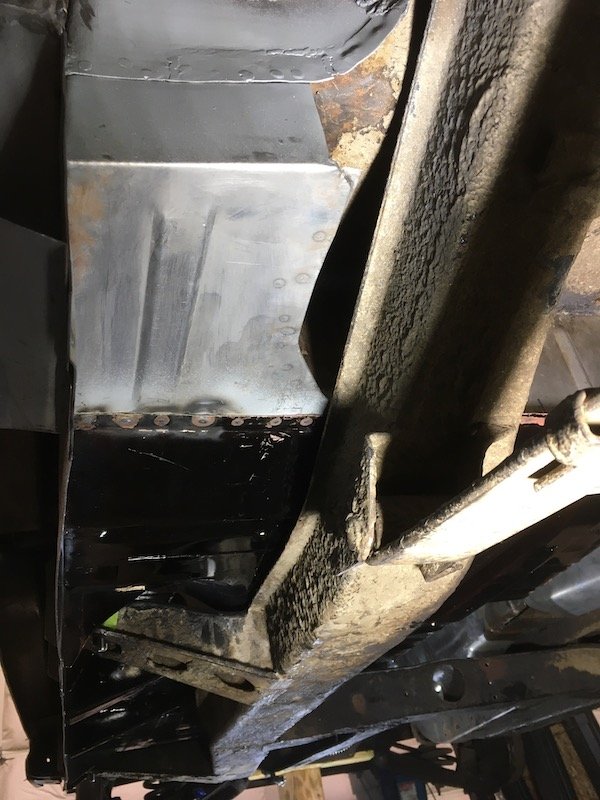
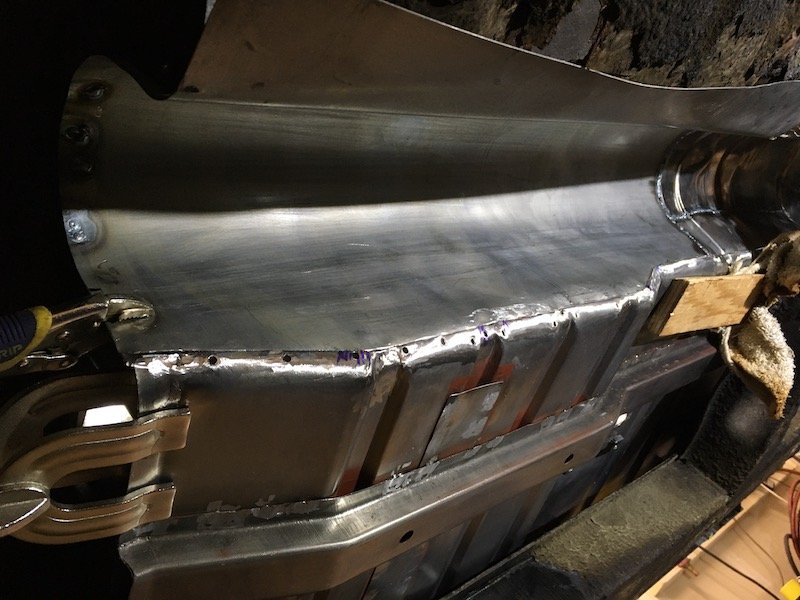
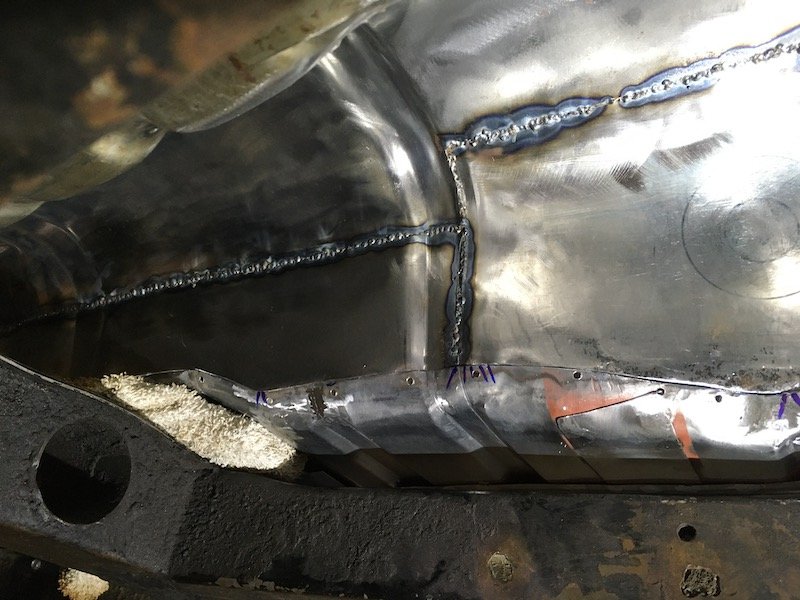
Building the 1961 Datsun 310 Bluebird - Replacing the right side of trans tunnel. So all the Bluebird rust repairs and reconstruction of the peripheral structure surrounding the future right side floor pan are complete. All new metal where the floor will then make a solid welded connection. I'll make several posts. I'm proceeding around counterclockwise from the previous post about the right side toe board repair. Posting in sequence then, here is the right hand side of trans tunnel, repair. The Bluebird trans tunnel as it was in the beginning. Then cleaned up a bit to expose the extent of damage and perforated areas. Formed the first patch and matched the original shape. Cut out the rust. Tacked in first trans tunnel patch . Then formed the second. Cut out more rust. Tacked in the second patch. Formed and fit checked the third patch. Scribing some cut lines and making index lines. Cut out yet more rust. Tacked in the third patch. All three patches in. Lastly, I made a transition fillet piece to connect the toe board to the tunnel. As formed. More welds, rough grinding, cleaning and metal etch. The transition fillet piece gets just a few tacks to hold it temporarily until the floor build gets underway, then I'll remove it and join it to the floor as a little extension. Moving on, I will post the right hand rear seat pan structure rust removal and related bits next. Discussion: https://oldschool.co.nz/index.php?/topic/60267-marts-pl310-61-datsun-bluebird-sedan/ Build: https://oldschool.co.nz/index.php?/topic/60264-marts-pl310-61-datsun-bluebird-sedan/
- 74 replies
-
- 10
-
-
MARTS-PL310 61 Datsun Bluebird Sedan
MARTS-PL310 replied to MARTS-PL310's topic in Project Discussion
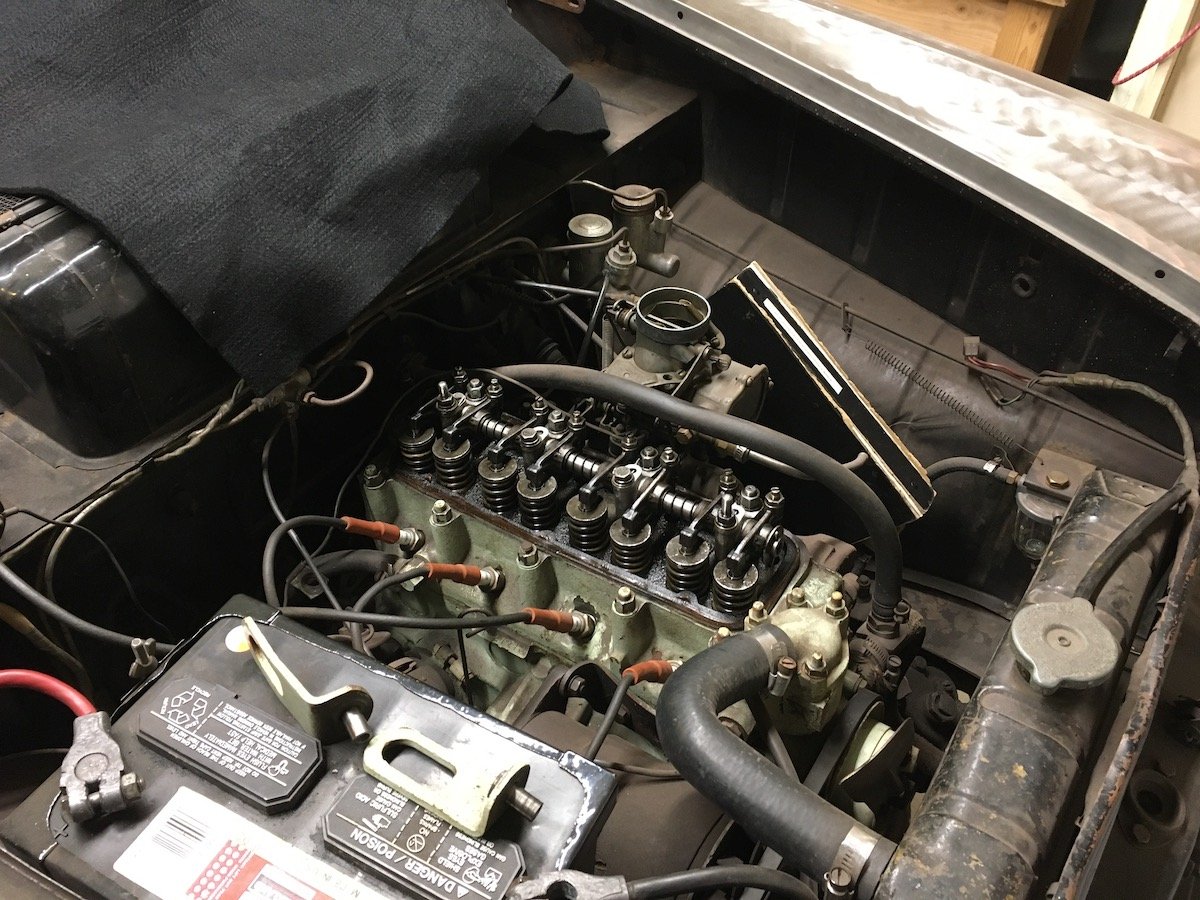
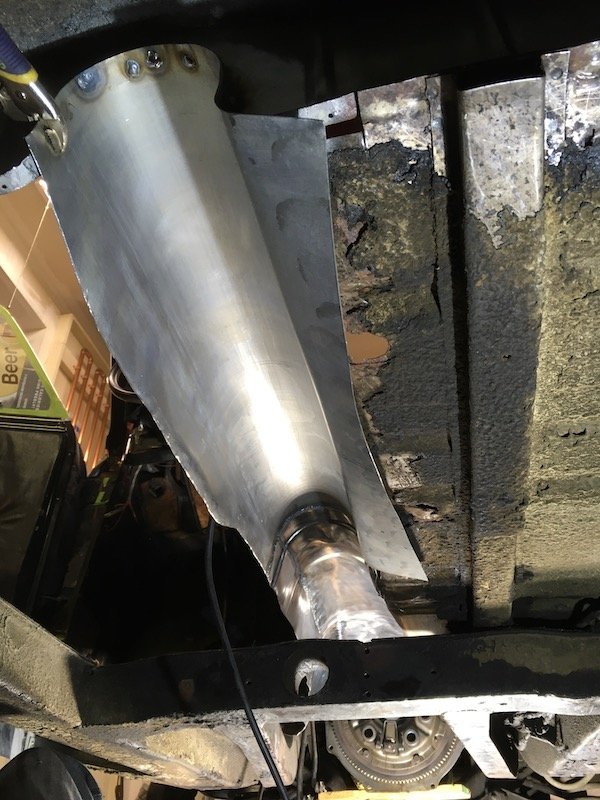
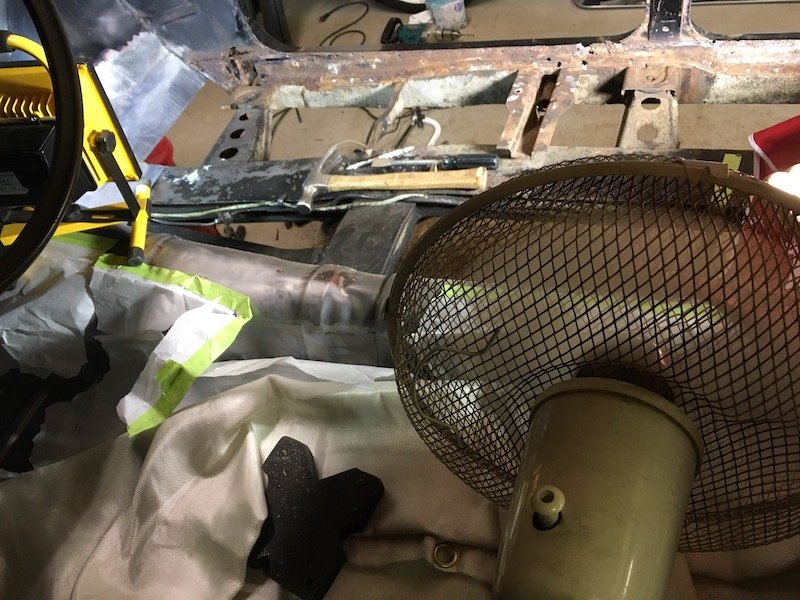
Took a break from the rusty sheet metal repairs and played with the engine. Checked out the valve train and made sure nothing was sticking, cleaned the metal grinding dust off the ignition components, rigged up a vertical fuel feed and cranked it up. Open exhaust manifold with no pipes or muffler. All just for a little fun break.
-
MARTS-PL310 61 Datsun Bluebird Sedan
MARTS-PL310 replied to MARTS-PL310's topic in Projects and Build Ups
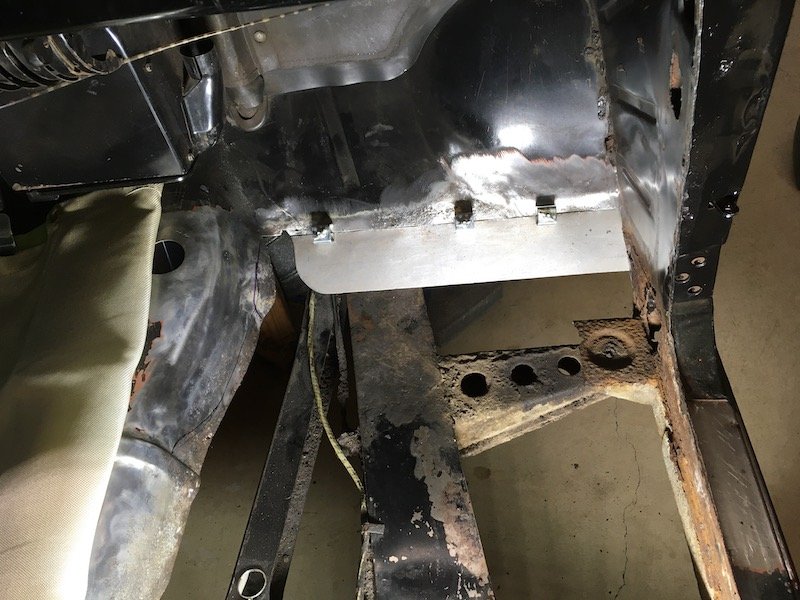
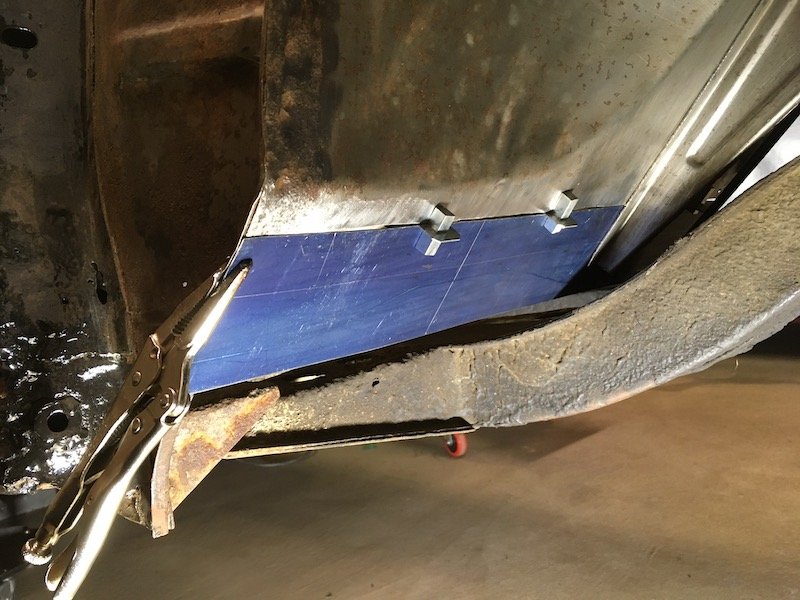
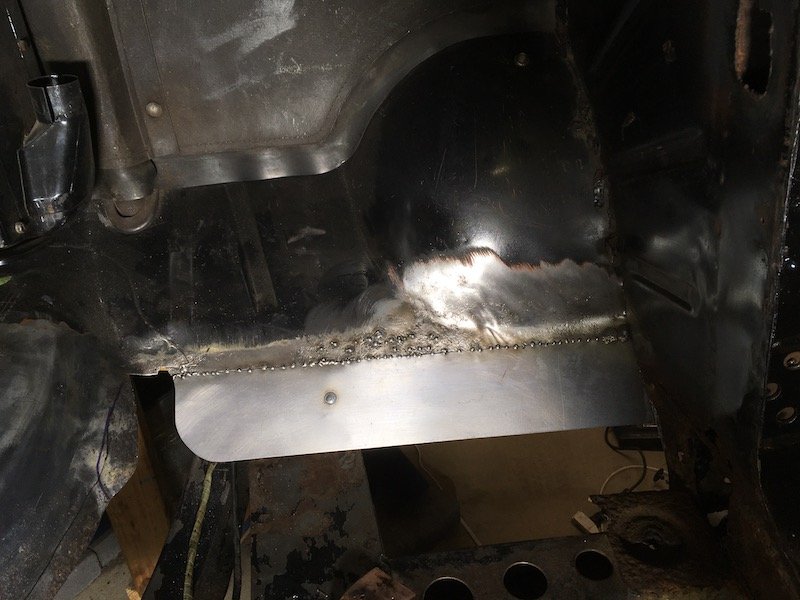
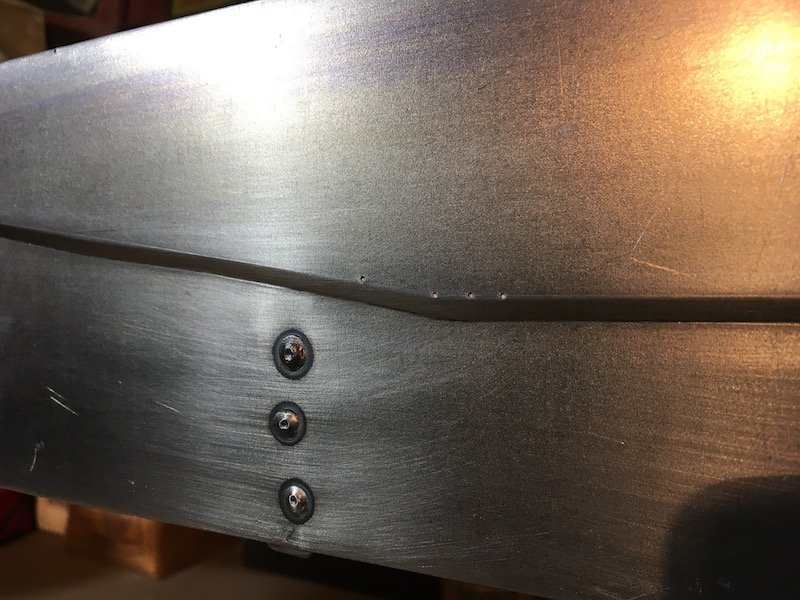
Building the 1961 Datsun 310 Bluebird - Replacing the toe board. Found some scrap metal just large enough, made the toe board and welded it in. Trimmed and checking for fit. Fought some indecision whether to butt or lap weld. Went with the butt weld for a flush join. This scrap had been destined to become the left inner sill plate until I realized it did not match the original thickness. Made a thicker sill and threw the thin one into the scrap pile. Tack welded. Some rust craters above the weld line are filled in. One plug weld connects to the support bracket underneath. Stitch welded between the tacks and ground flush. Moving on to the side of trans tunnel next. Discussion: https://oldschool.co.nz/index.php?/topic/60267-marts-pl310-61-datsun-bluebird-sedan/ Build: https://oldschool.co.nz/index.php?/topic/60264-marts-pl310-61-datsun-bluebird-sedan/
- 74 replies
-
- 11
-
-
MARTS-PL310 61 Datsun Bluebird Sedan
MARTS-PL310 replied to MARTS-PL310's topic in Project Discussion
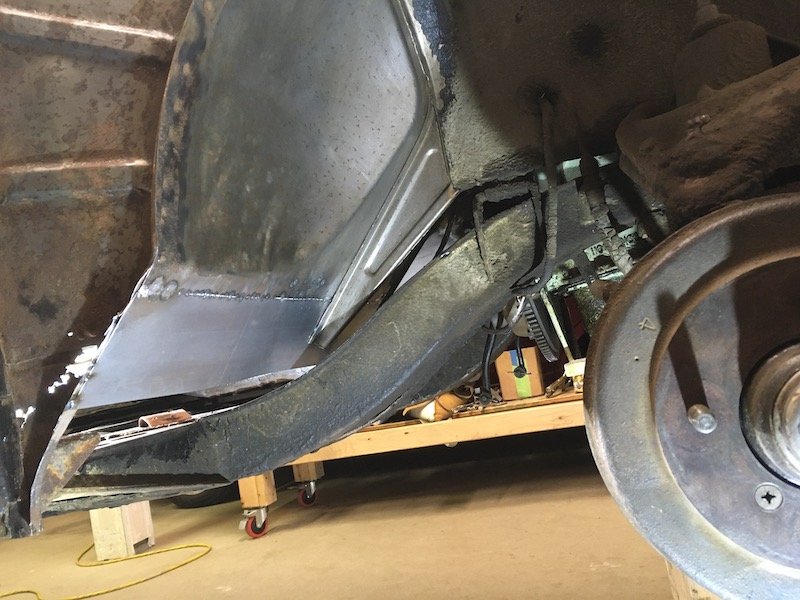
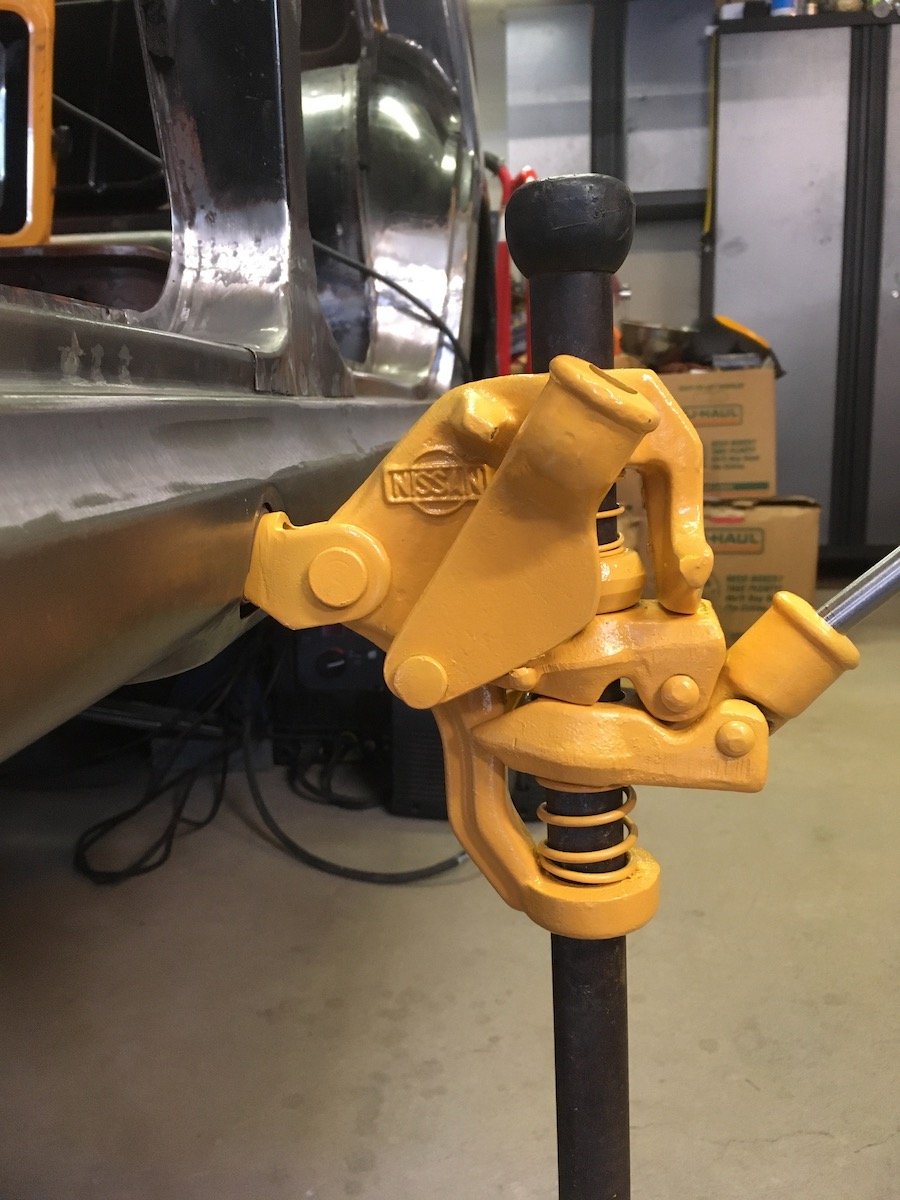
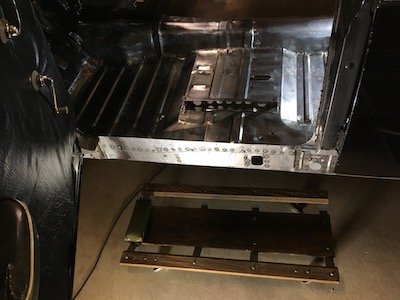
My interim diversion from the project metal work. Messed around with this Bluebird body jack thing a few weeks ago. Cleaned it up, disassembled, painted and tried it out. Lifted the left side of body an inch off the stands and set er back down again. Works great! Cut out the right side floorpan and posted that today in the project build thread. https://oldschool.co.nz/index.php?/topic/60264-marts-pl310-61-datsun-bluebird-sedan/
- 56 replies
-
- 11
-
-
MARTS-PL310 61 Datsun Bluebird Sedan
MARTS-PL310 replied to MARTS-PL310's topic in Projects and Build Ups
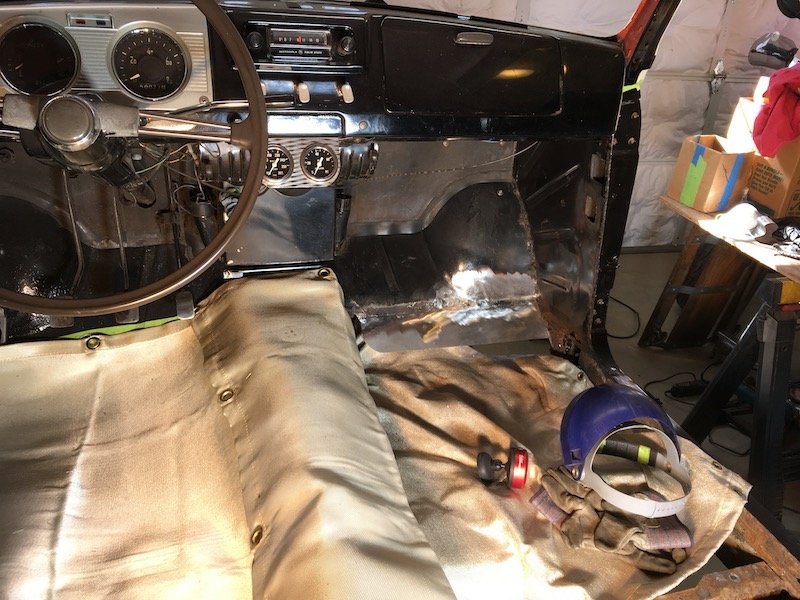
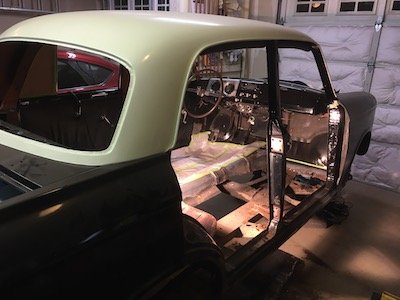
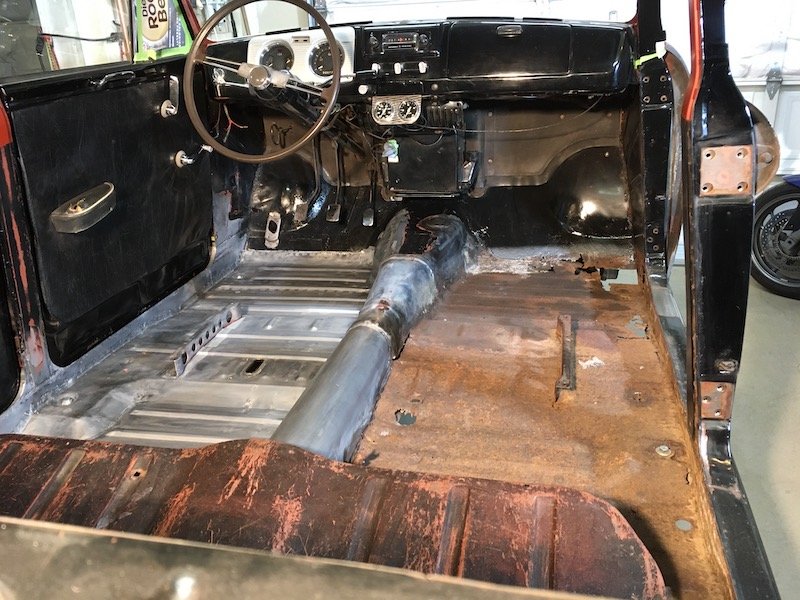
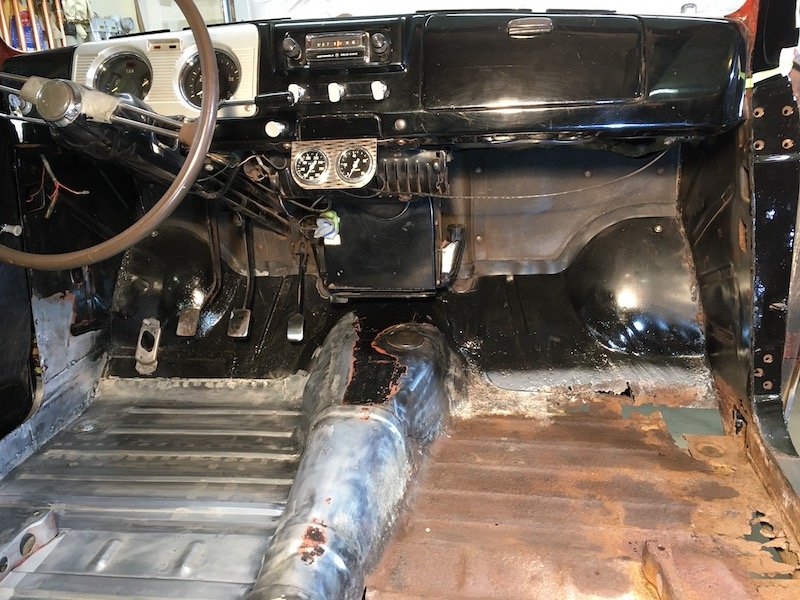
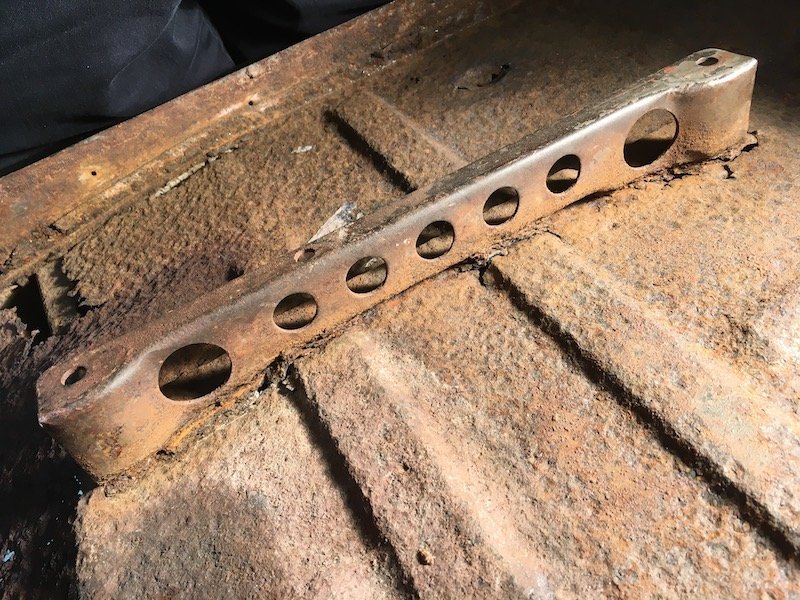
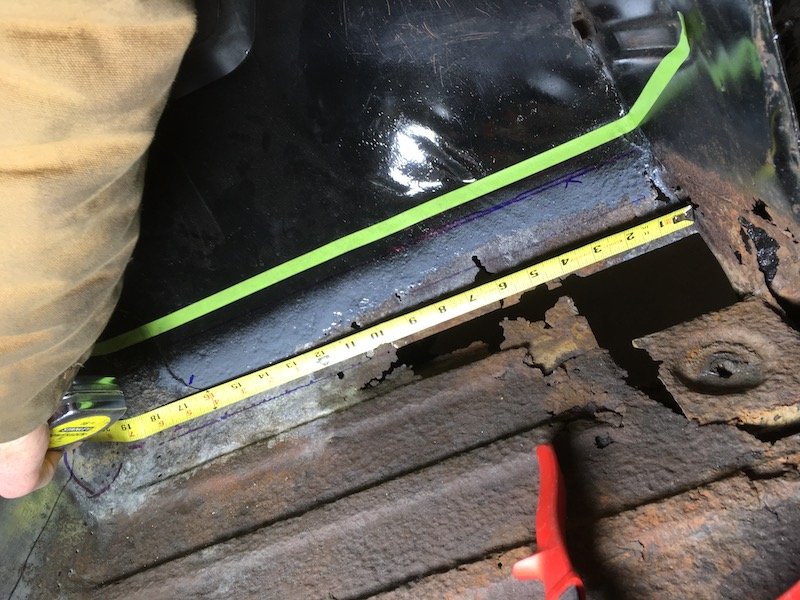
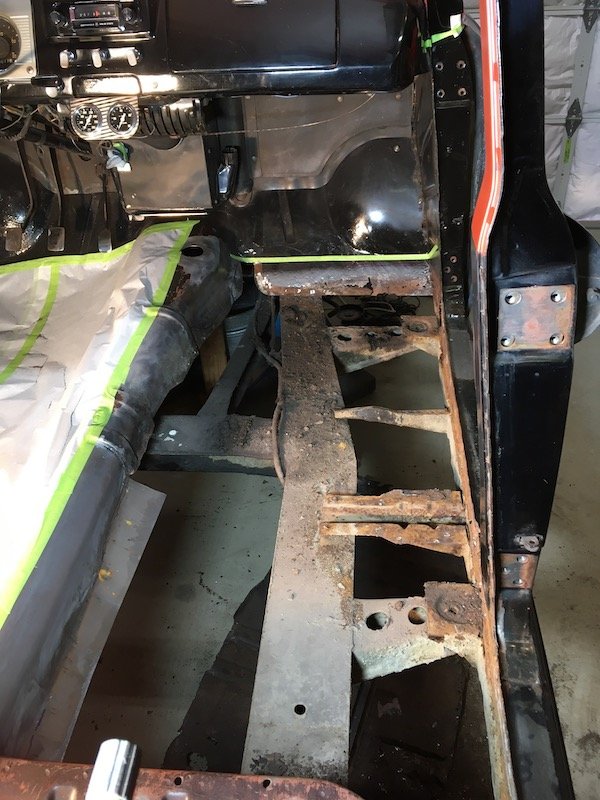
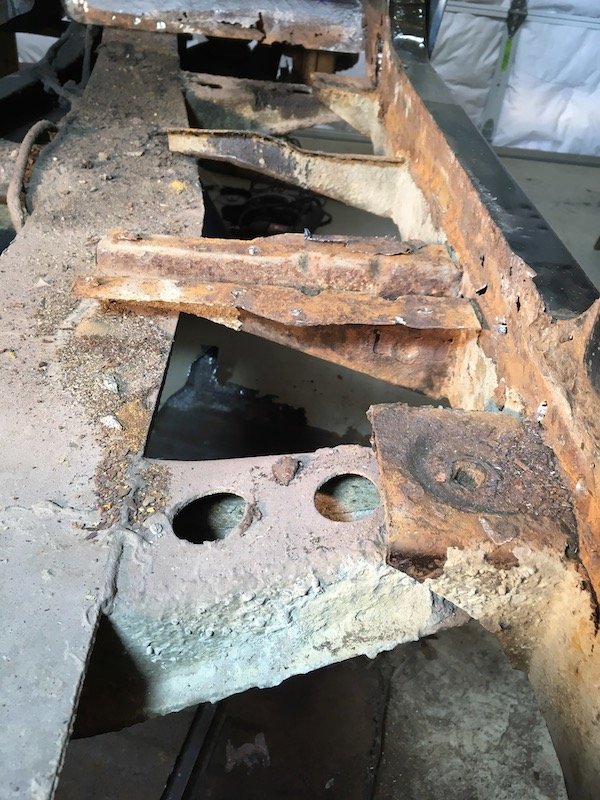
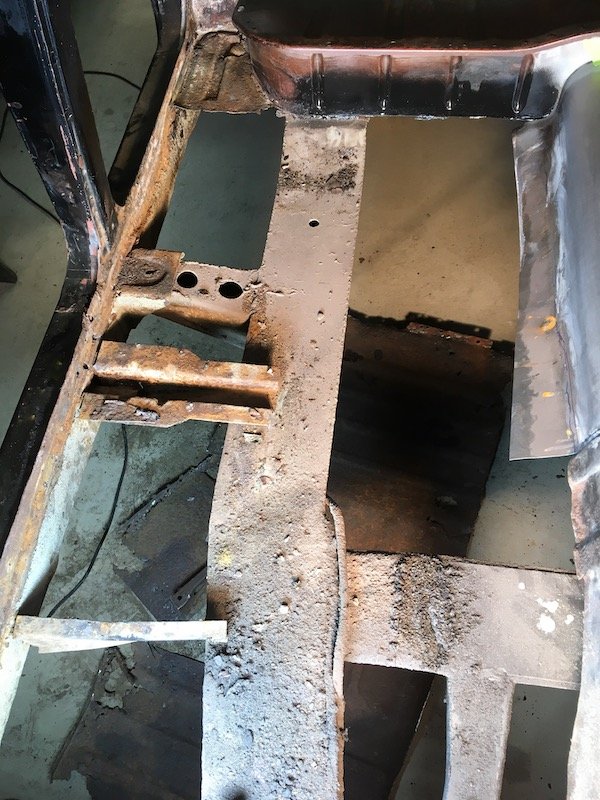
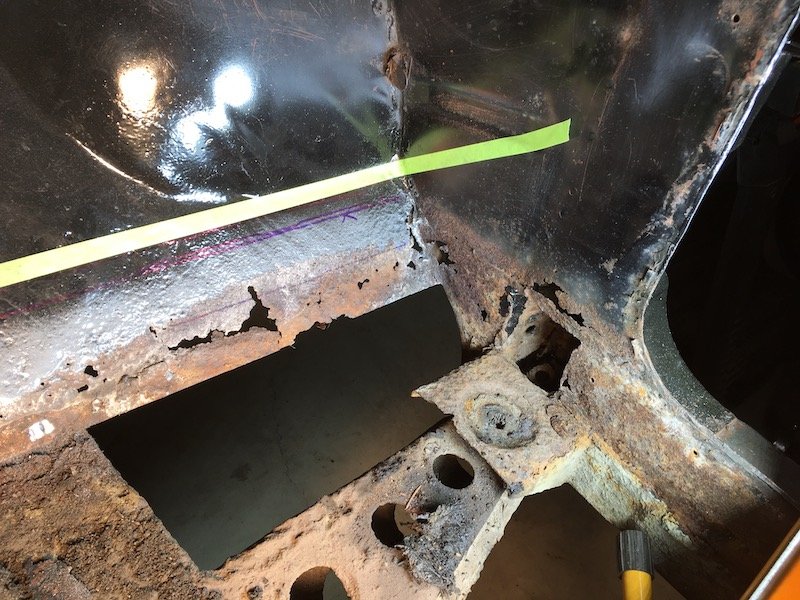
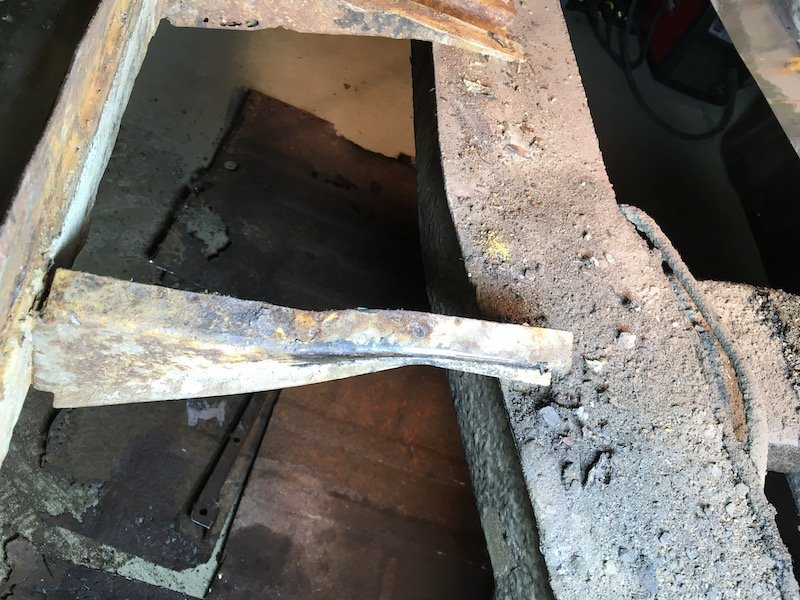
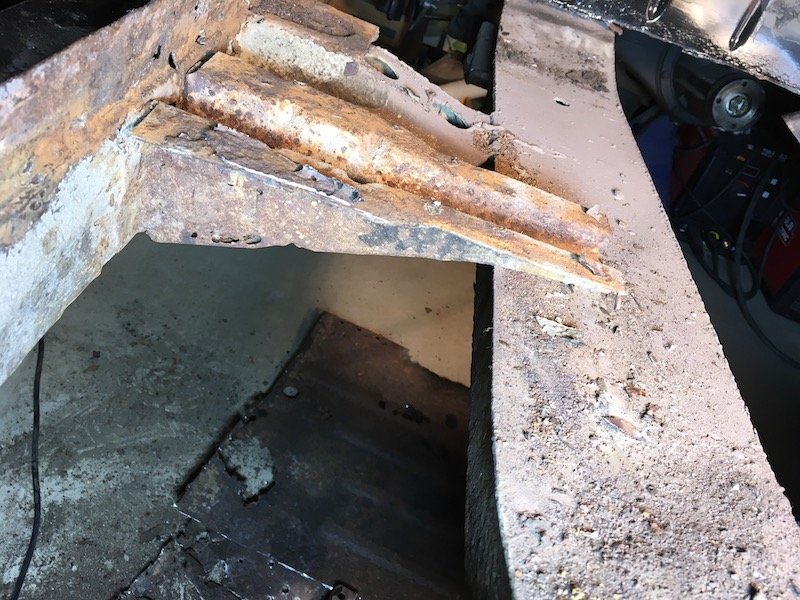
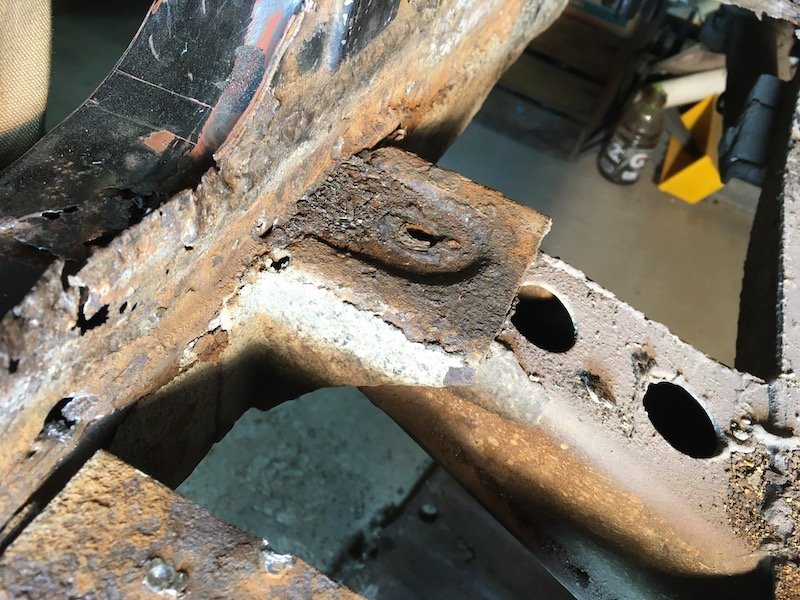
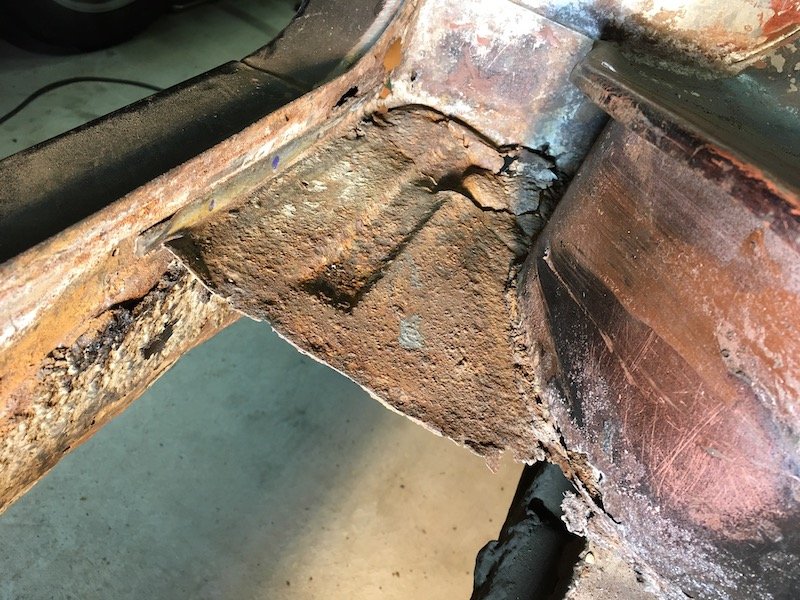
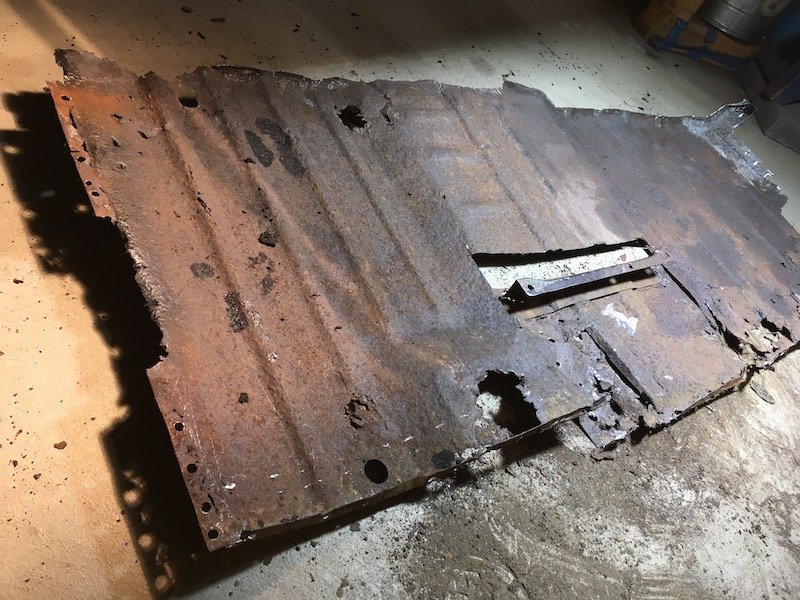
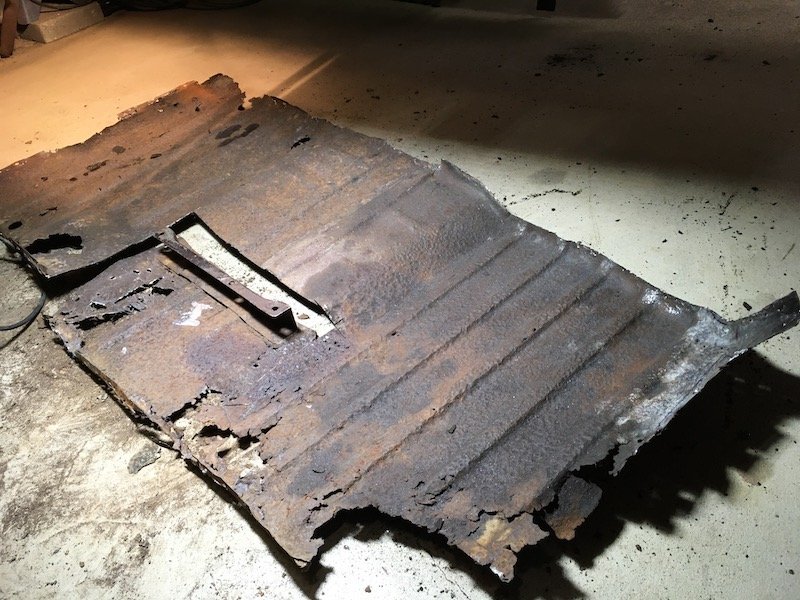
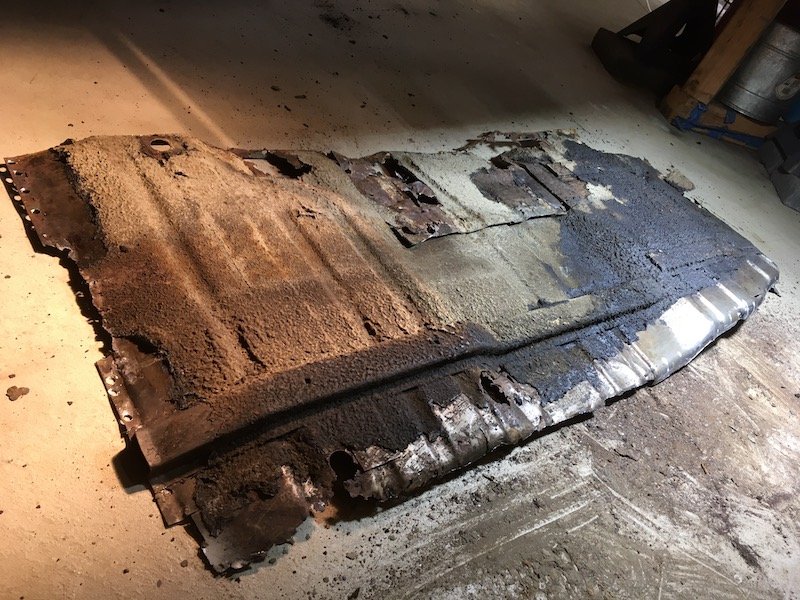
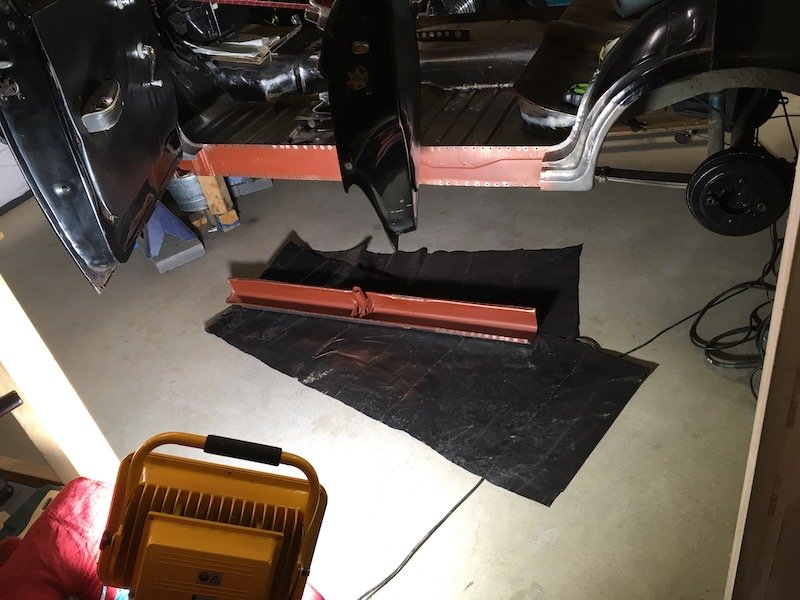
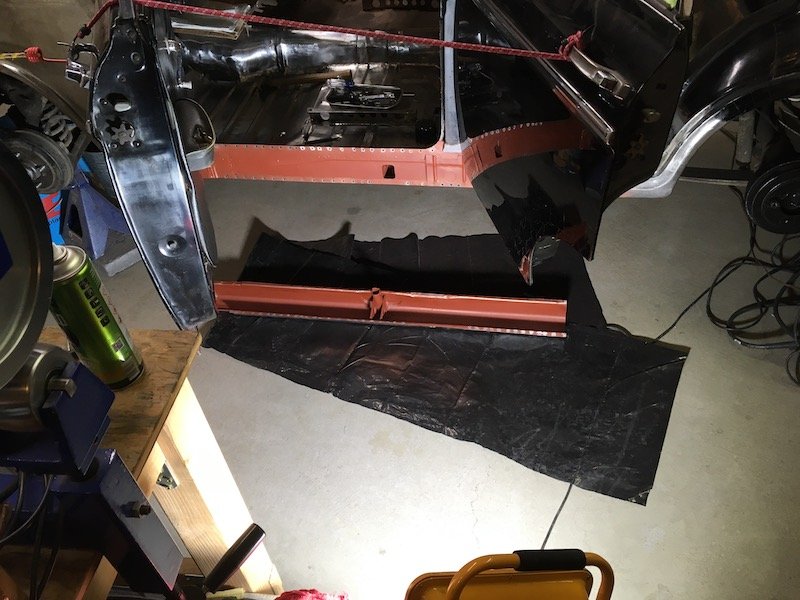
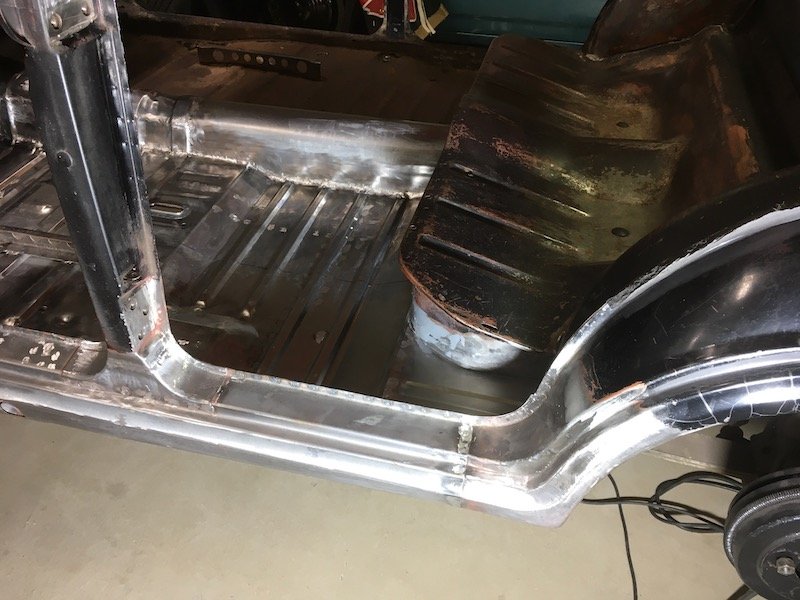
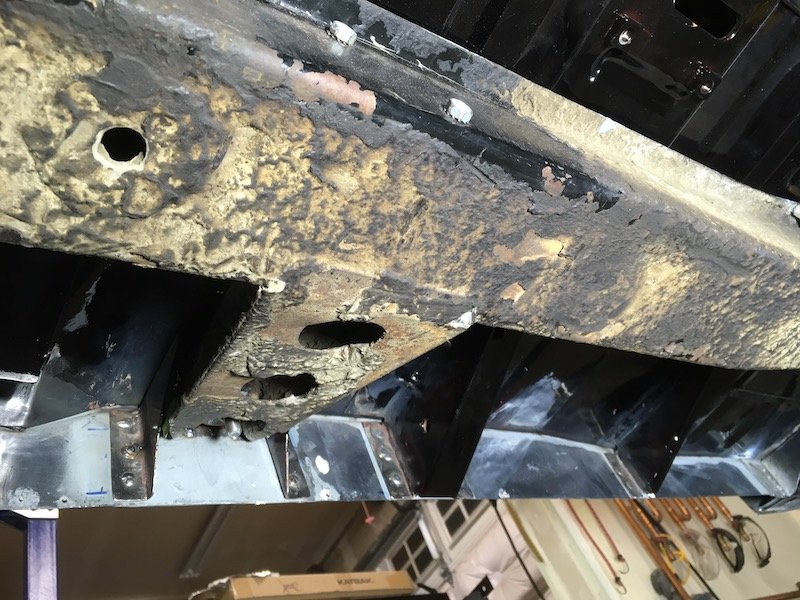
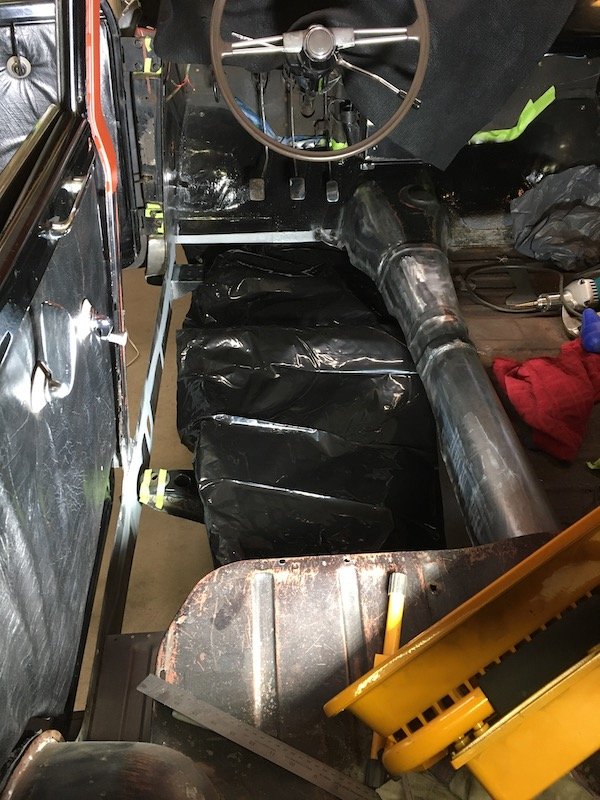
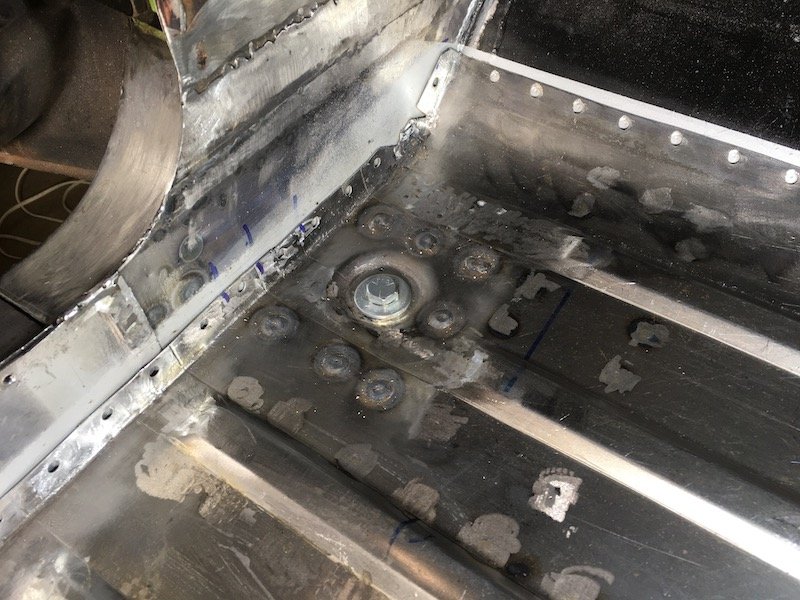
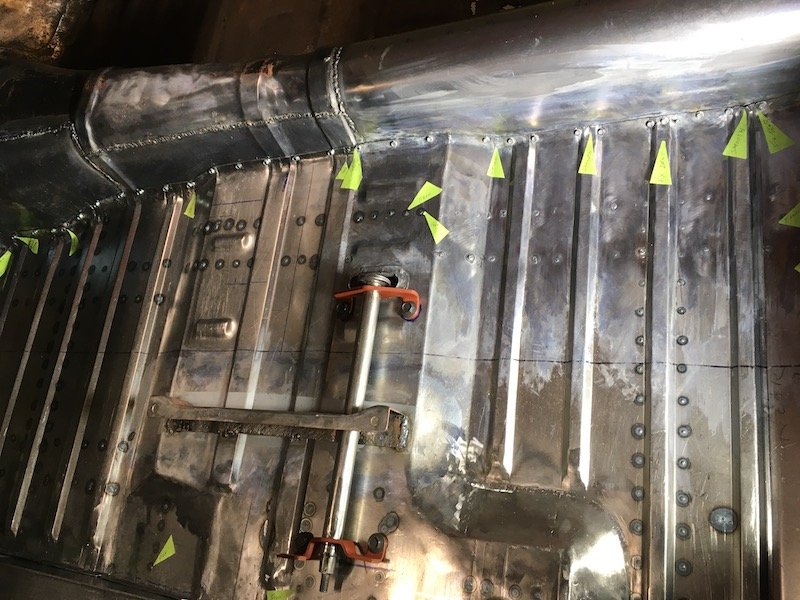
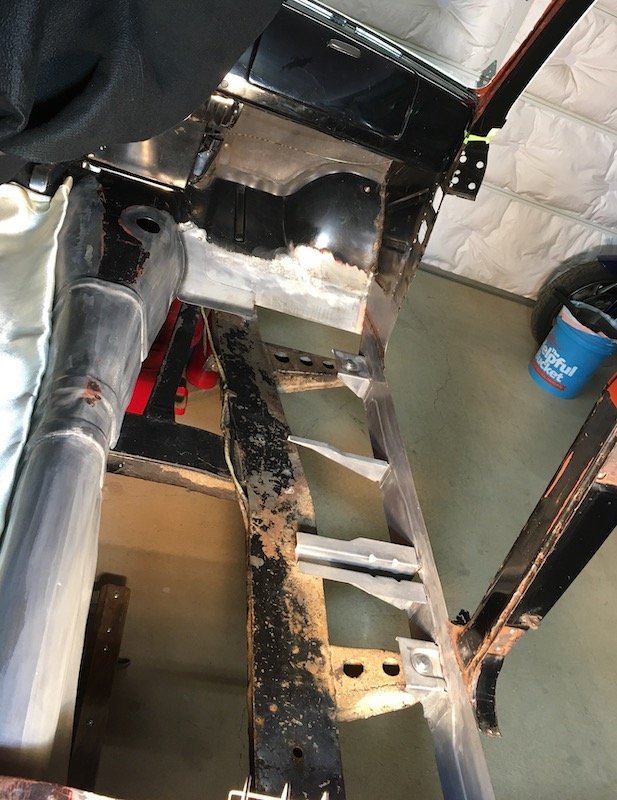
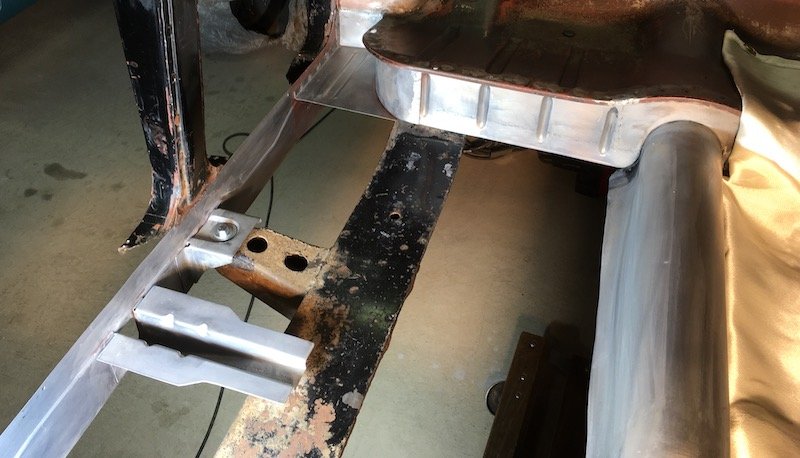
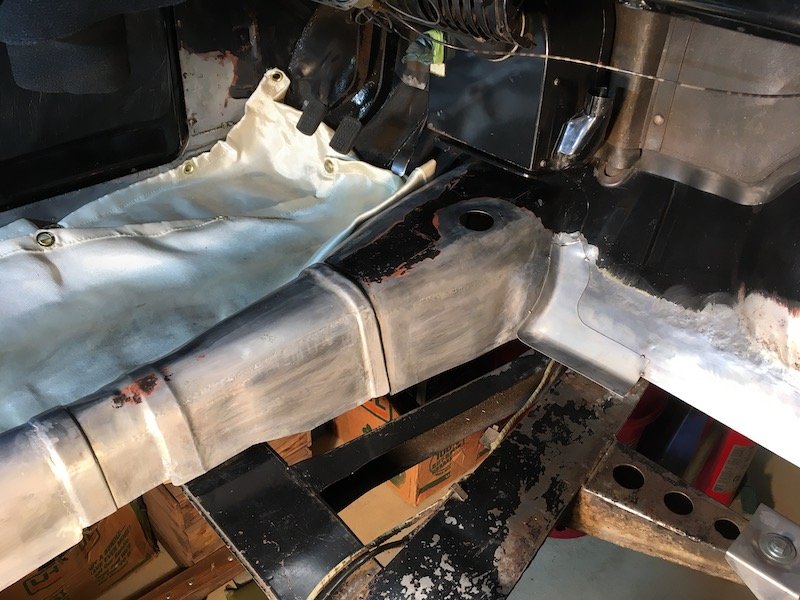
Building the 1961 Datsun 310 Bluebird - Removing the rusty right side floorpan and inspection. Finished the left side of car and I'm now just starting the right side. Recording and assessing the before state of the right floorpan and adjoining structure. That big hole on the middle lower right next to the tunnel is where an aftermarket seat belt was bolted directly to the then thin sheet floor by a previous owner back in the sixties. Sketchy. No secondary doubler plate, exhaust seal or anything. Local floor thickness remaining was nothing. Potential belt tensile restraint strength was zero. Plan is to salvage and repair the seat support bracket. The bottom flange is rusted out and the rest is not too bad. Measuring up the rotted toeboard before cutting the floorpan out. Plan is to cut the toeboard out later along the tape line. Cut the floorpan out. Survey of the underfloor brackets. Looking forward. Looking aft. Frame is not rusted, just dirty. Front A-post and body mount bracket. Rotted. It will be replaced. No. 2 (moving aft) bracket. It is twisted a bit due to some sort of abuse impact, and salvageable, but will be replaced since I've already made a new one. Side of body and jack lift point bracket. Rotted out on bottom. It will be replaced. B-post and body mount bracket. It might be salvageable. Floorpan, side of rear seat pan. Rotted. It will be replaced. Already have a new one made. Lower edge of rear seat pan vertical structure will be patch repaired. The remains of the removed right floorpan. Rust attacked it from the top down. Bottom view of same. An asphalt base underseal coating was applied against the otherwise bare sheet metal by the Nissan factory. This coating was relatively effective, it just didn't help the top side much. The only salvageable parts (so far). And the work continues... Plan is to go around counterclockwise and repair the perimeter structure starting with the toeboard before launching into making a new floorpan. Masking paper on the left side is to keep the cutting and grinding particles off. I'm also going to cover that completely with a protective welding blanket. Discussion: https://oldschool.co.nz/index.php?/topic/60267-marts-pl310-61-datsun-bluebird-sedan/ Build: https://oldschool.co.nz/index.php?/topic/60264-marts-pl310-61-datsun-bluebird-sedan/
- 74 replies
-
- 15
-
-
MARTS-PL310 61 Datsun Bluebird Sedan
MARTS-PL310 replied to MARTS-PL310's topic in Projects and Build Ups
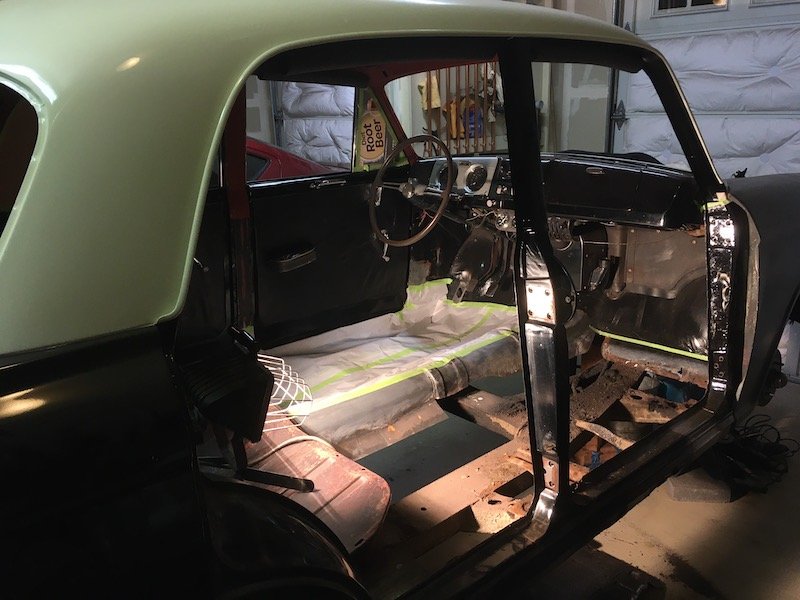
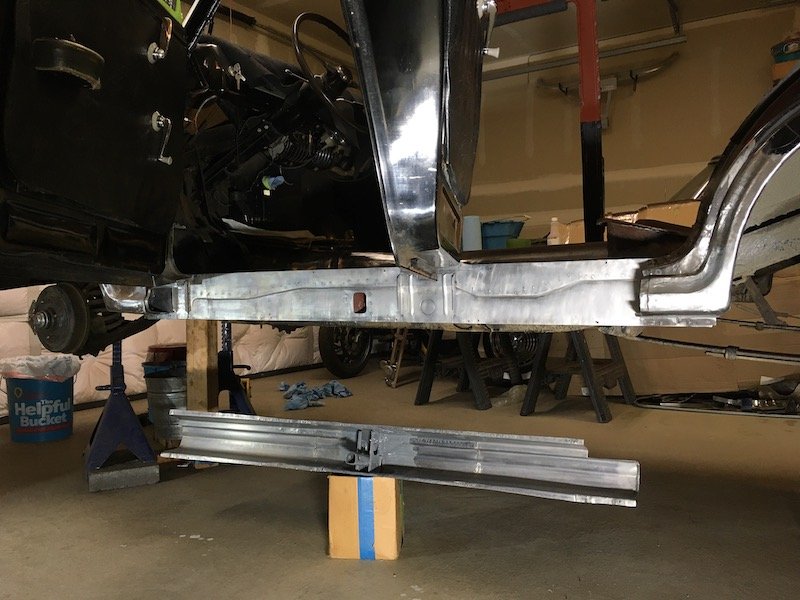
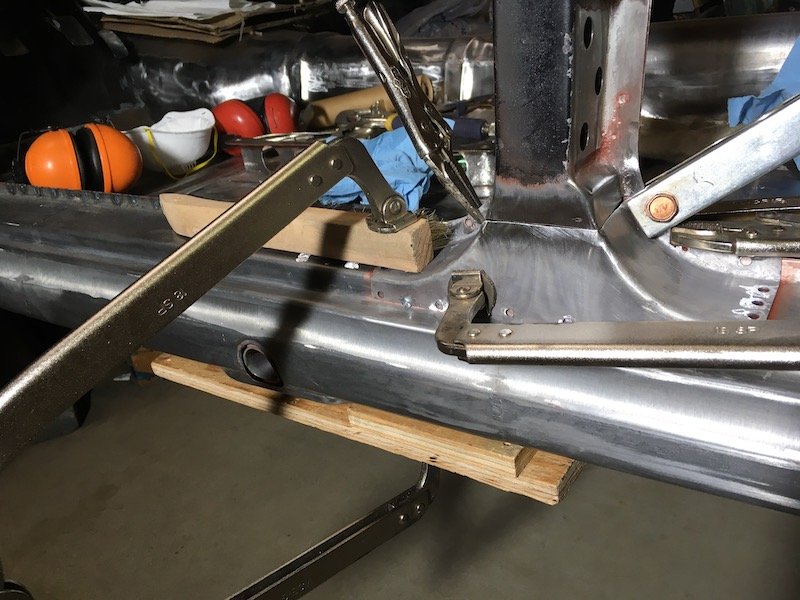
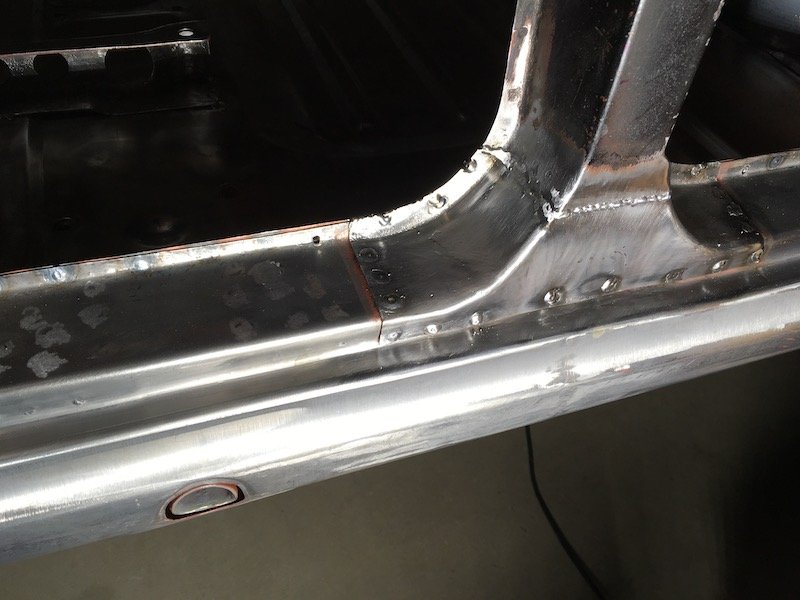
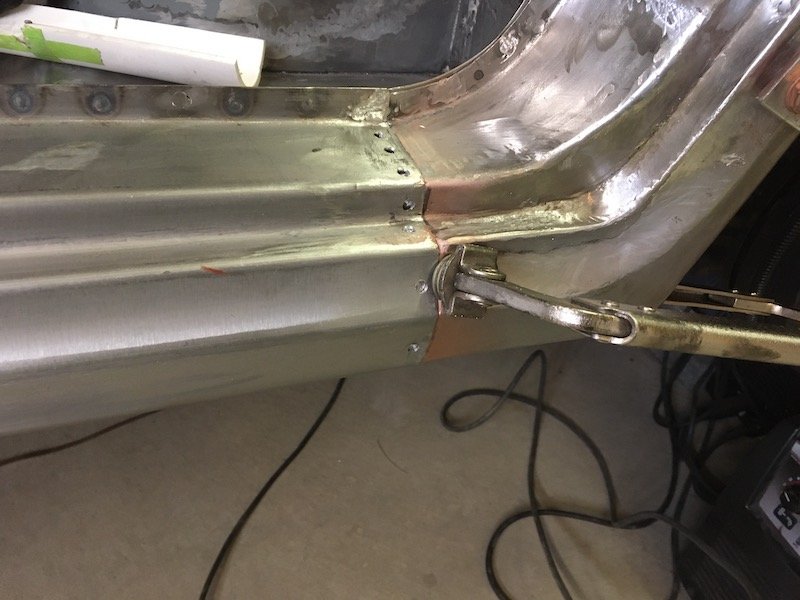
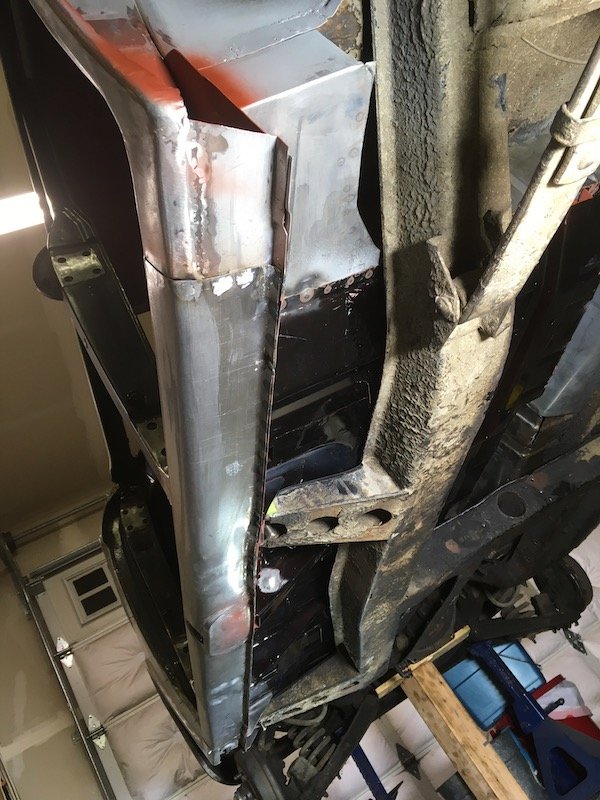
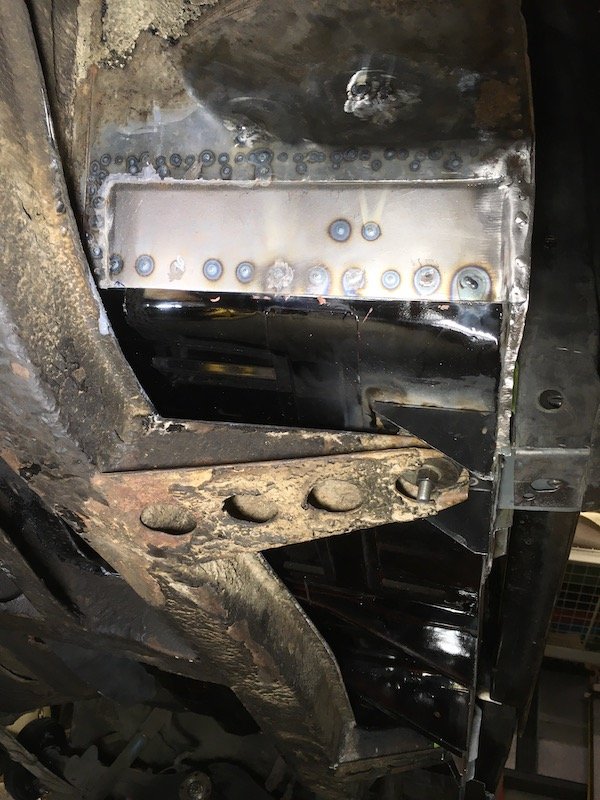
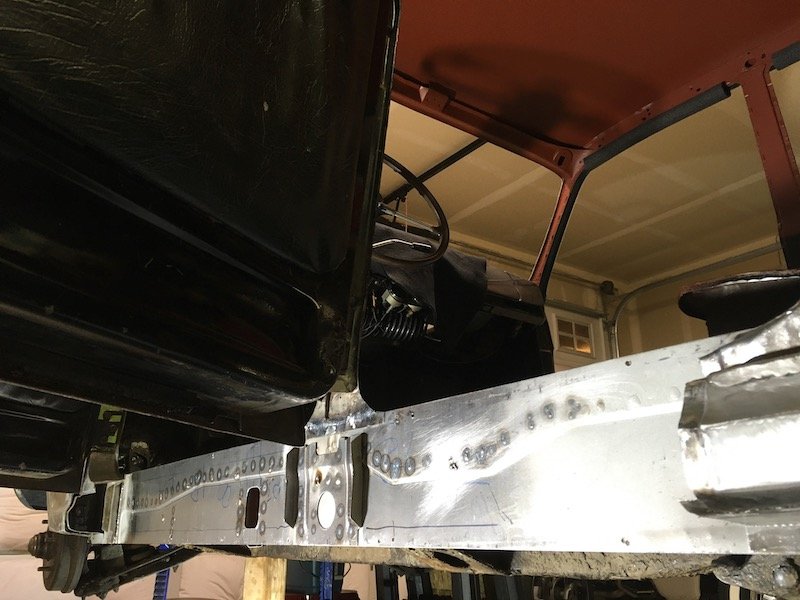
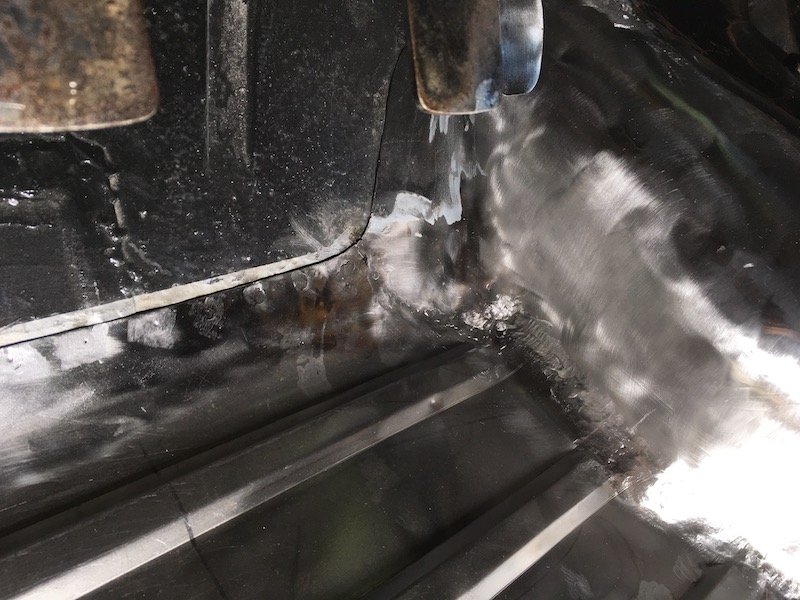
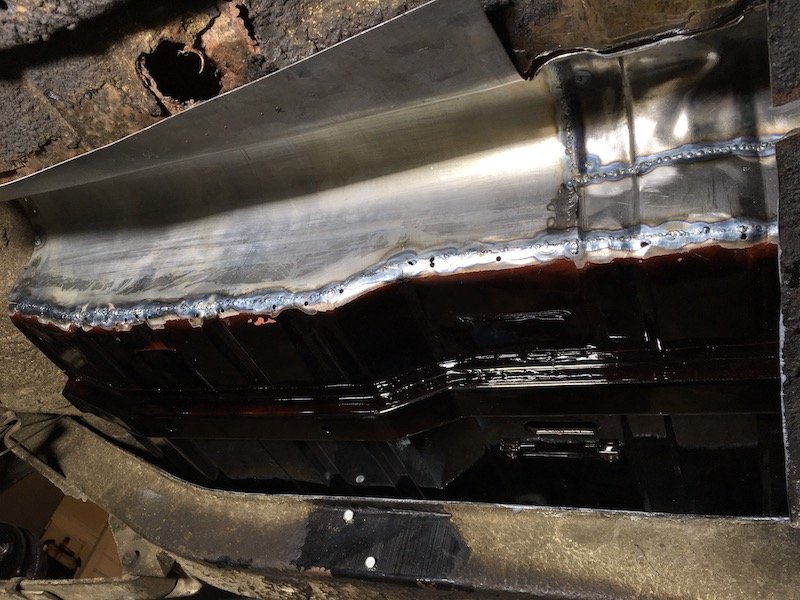
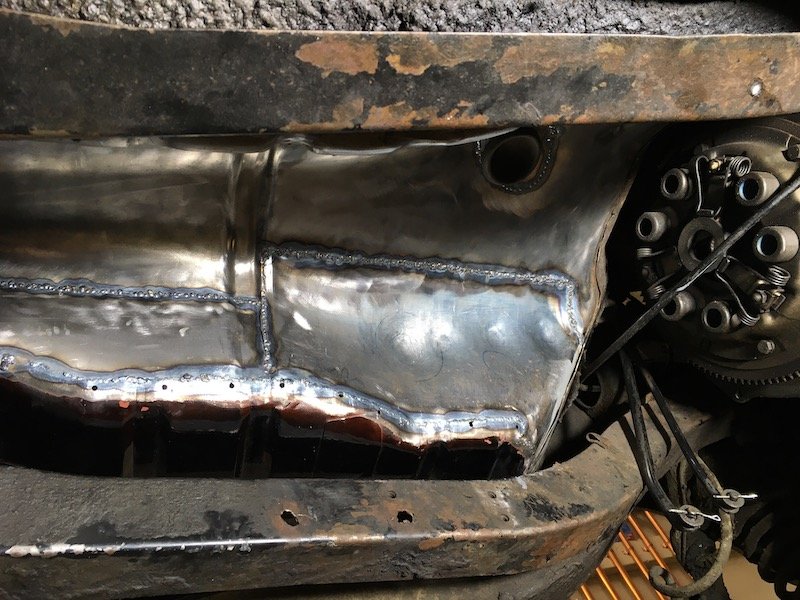
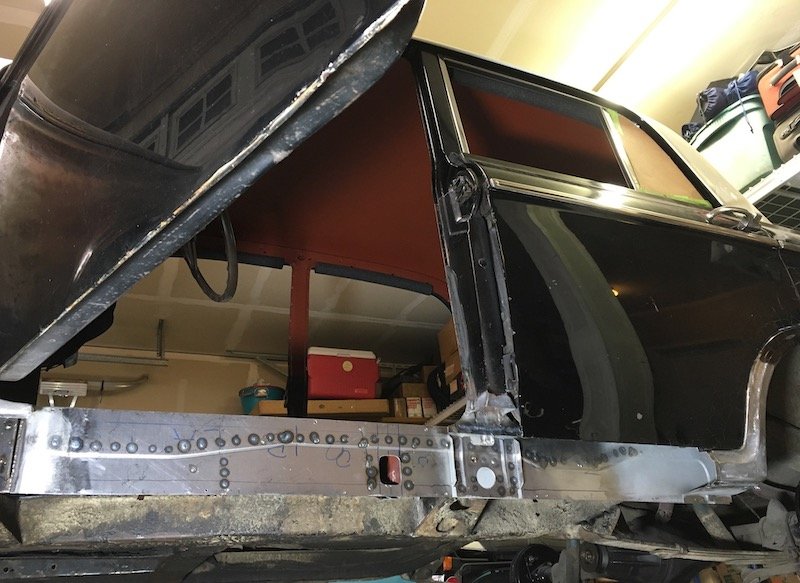
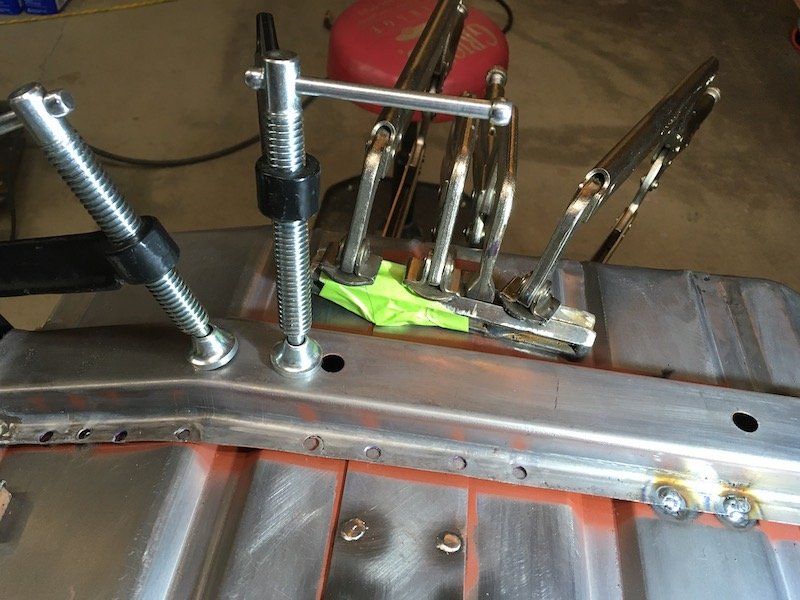
Building the 1961 Datsun 310 Bluebird - Painting the insides of the inner and outer sill and welding them into the car. Metal cleaned, etched and zinc oxide conditioned. Epoxy primed inner sill. Epoxy primed outer sill. Ready for plug welding. Doors getting in the way. I'd left them on for keeping a check on fit and gaps. . Made dozens of plug welds to attach inner and outer sill together and then went to work on the B pillar base and ends of sill. It's always a lot of fun to weld stuff shooting the wire feed straight up while laying on your back. Clamp and weld the aft end. Clamped it up and welded. A little rough but eventually cleaned up nice. Pinned it underneath at the body jack pipe to support bracket with a solid 3/8 inch rod. Maxed out the MIG power and wire feed and made eight ugly fat tacks then ground smooth. Shaping up with lots of now permanently attached and shiny metal, It has way more corrosion protection on the insides than original. A stark contrast to the right side now. Discussion: https://oldschool.co.nz/index.php?/topic/60267-marts-pl310-61-datsun-bluebird-sedan/ Build: https://oldschool.co.nz/index.php?/topic/60264-marts-pl310-61-datsun-bluebird-sedan/
- 74 replies
-
- 17
-
-
MARTS-PL310 61 Datsun Bluebird Sedan
MARTS-PL310 replied to MARTS-PL310's topic in Projects and Build Ups
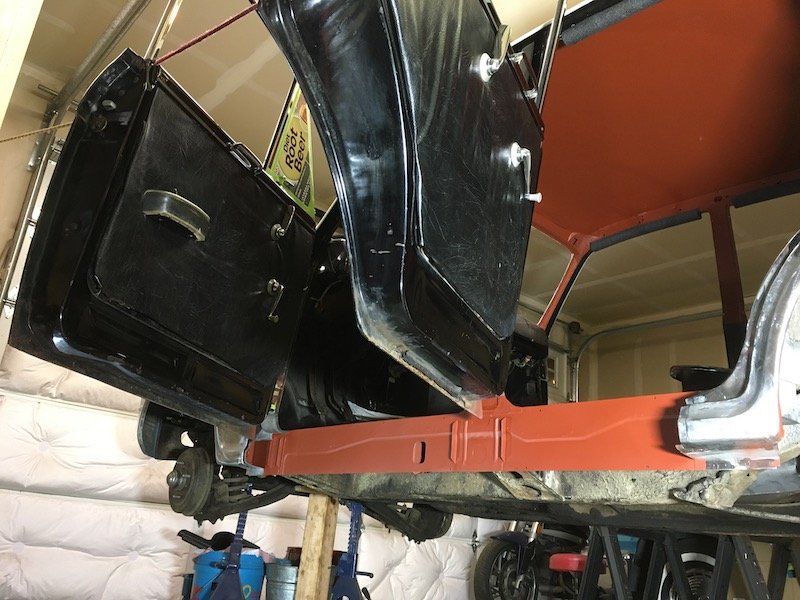
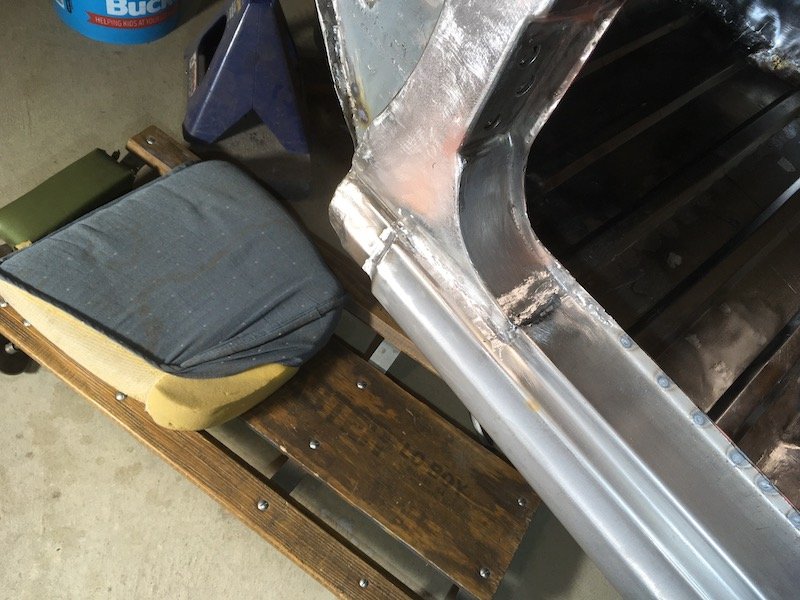
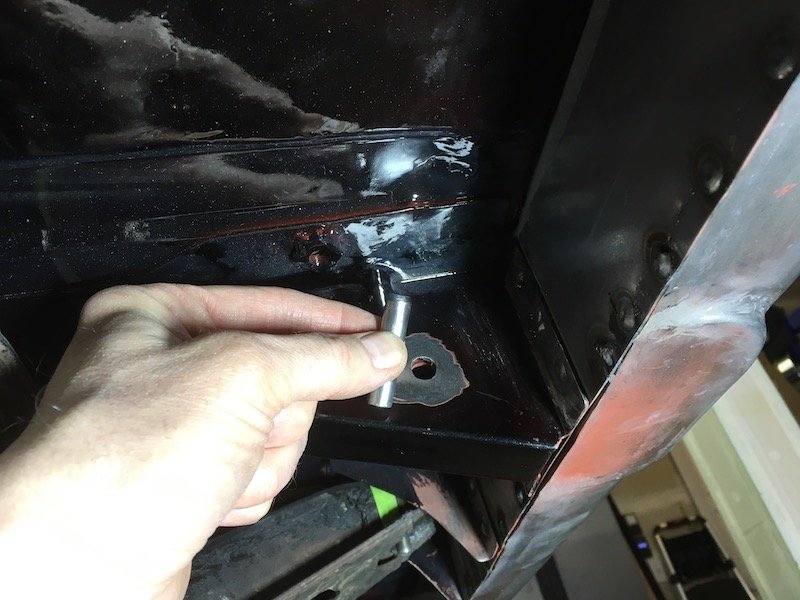
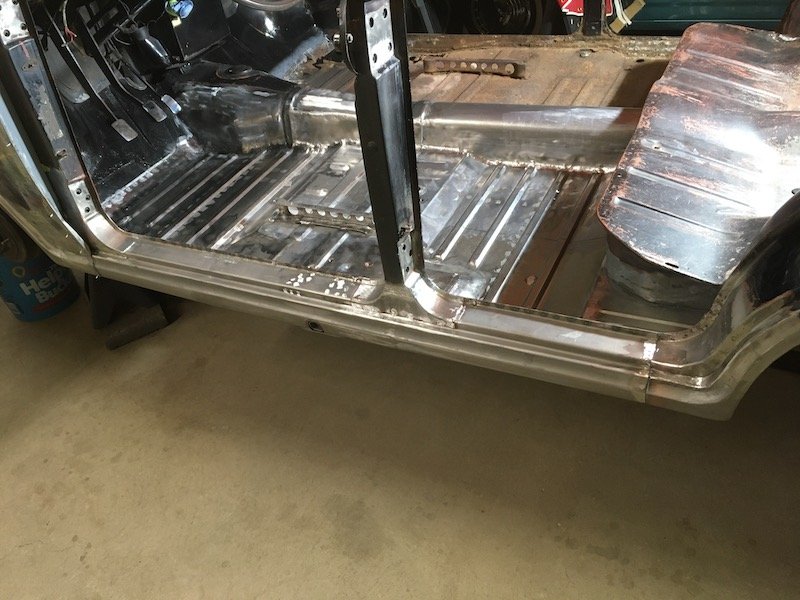
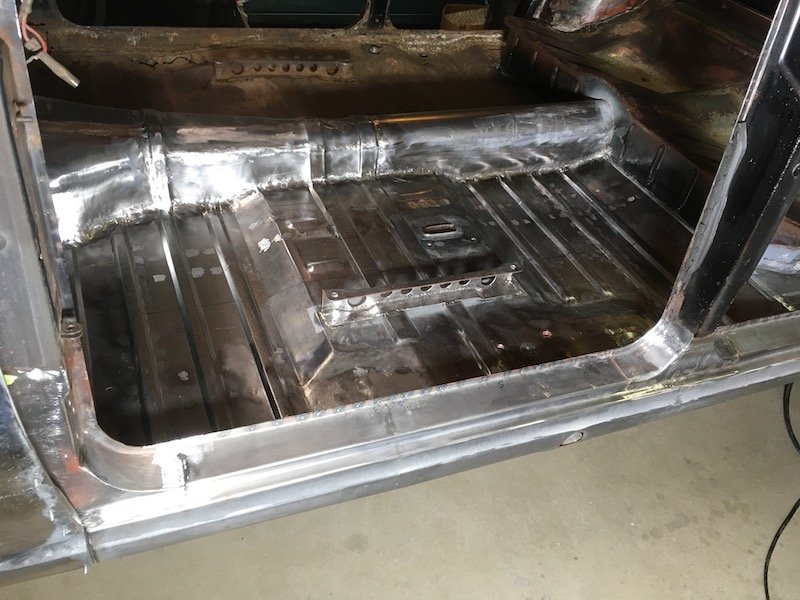
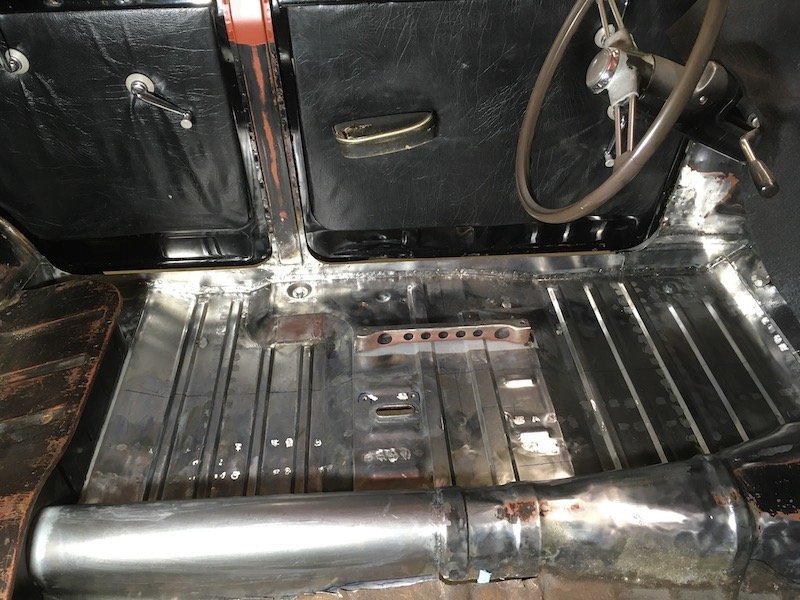
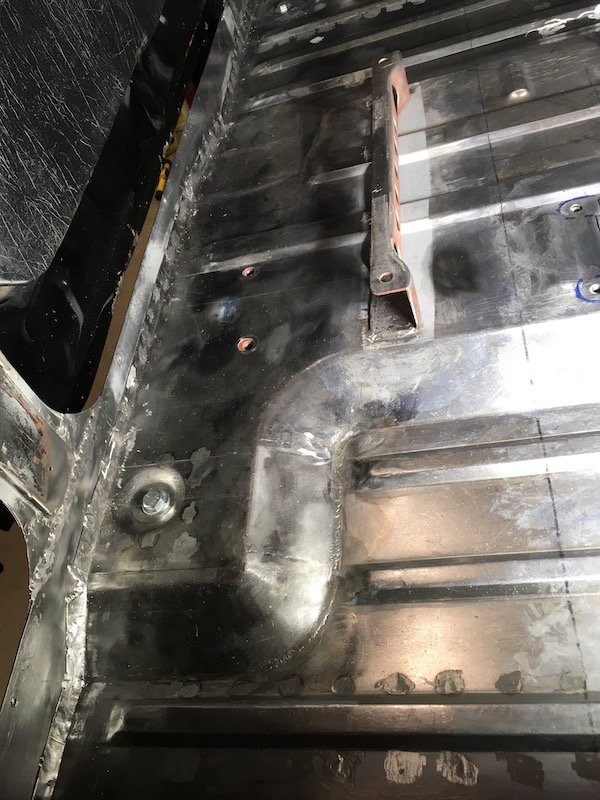
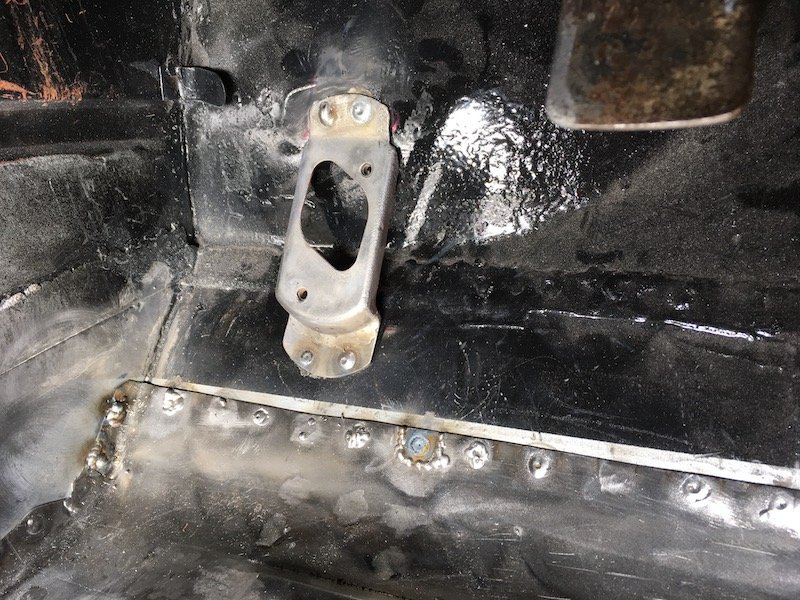
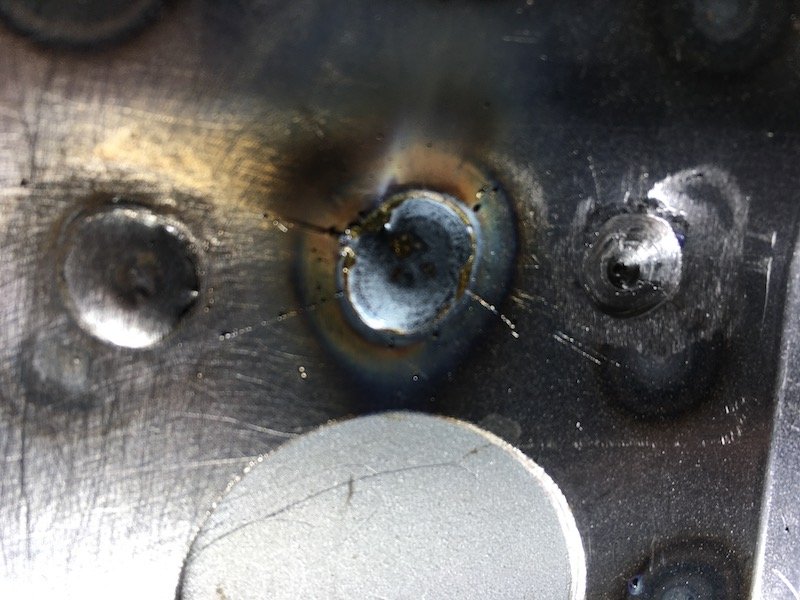
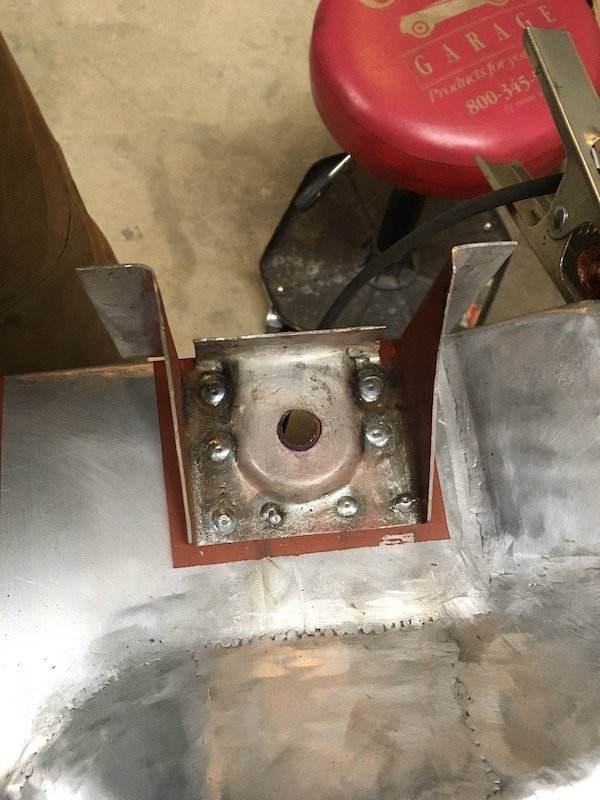
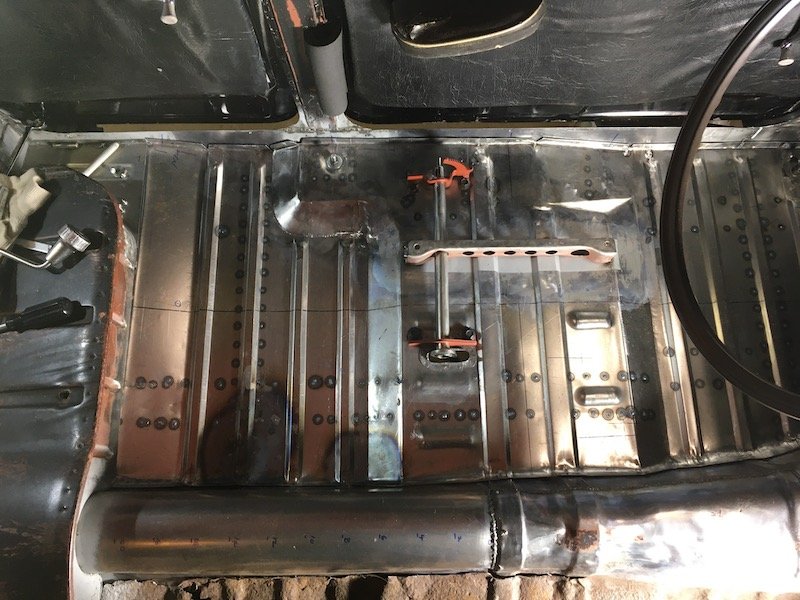
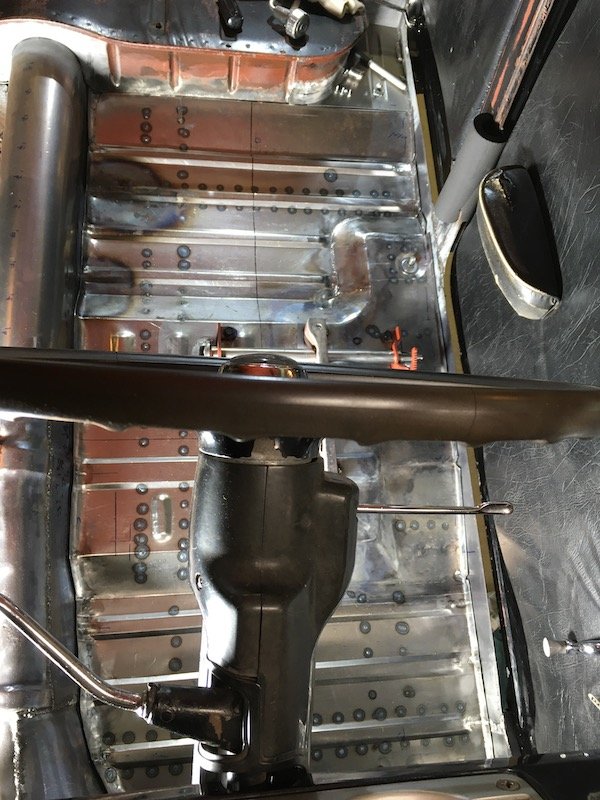
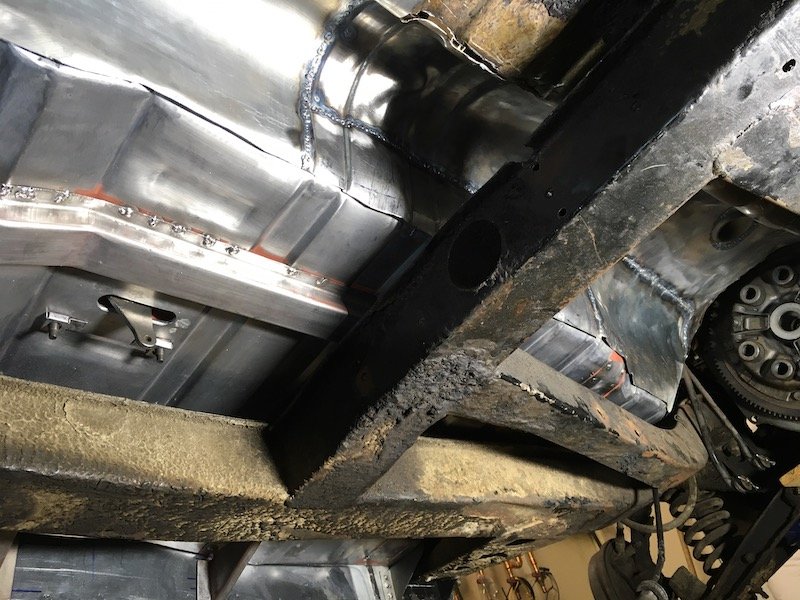
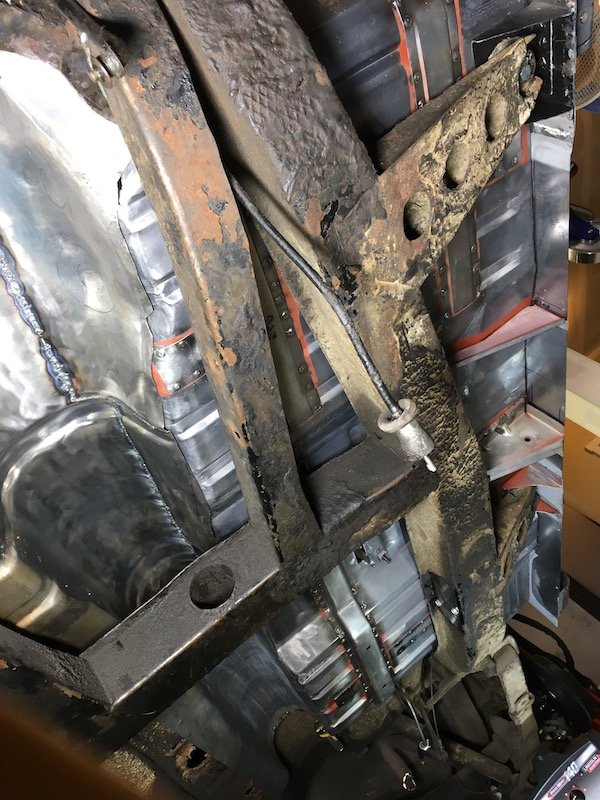
Building the 1961 Datsun 310 Bluebird Floorpan - Painting the underside and finally welding it into the car - Part two and last of the pics. Continued from previous post in the thread. Underside photos and a few more. Support bracket flange weld attachments to inner sill. Floorpan lap weld to prior toe-board patch. The far upper toe-board welds were from a couple of years ago and made a little too cold and random. I run the welder hotter now to get more melt thru and flatter welds. Sometimes though too much as in the extreme right weld melt thru. From previous post, the ideal weld melt thru I try to get. A nice shallow convex button of material. The outer sill will be welded onto the car next once I get all the hidden inside surfaces of both inner and outer coated with an epoxy prime. Should be a relatively easy task with no crawling back and forth under the car with my 60 plus year body. Too cold today though, freezing temps are prevailing. More topside pics of the completed work. Weld heads ground near flush for a clean look topside. Minutia. The black vinyl shown covering the door cards is not original. Probably from a late 60's redo. The original red and burgandy material remains underneath. The arm rest was salvaged from an ivory white parts car in mid 70's and sprayed black. Bezels for door handle and window cranks also salvaged from same PL311 parts car. Originals, PL310, were about same color as steering wheel, dark brownish gray. More of same. Again. Complicated and cramped location to access with welder. It was a little bit easier to get at this area. The structural welds to the A post body mount bracket will be left as is for best strength. The Hi/Lo headlight foot switch support bracket was salvaged and re-attached, but I had to replace the bottom flange due to rust thin-out. Yeah, so that's about it for now. Time to take a break, organize small tools and heal up from the under-car torture routine. Discussion: https://oldschool.co.nz/index.php?/topic/60267-marts-pl310-61-datsun-bluebird-sedan/ Build: https://oldschool.co.nz/index.php?/topic/60264-marts-pl310-61-datsun-bluebird-sedan/
- 74 replies
-
- 15
-
-
MARTS-PL310 61 Datsun Bluebird Sedan
MARTS-PL310 replied to MARTS-PL310's topic in Projects and Build Ups
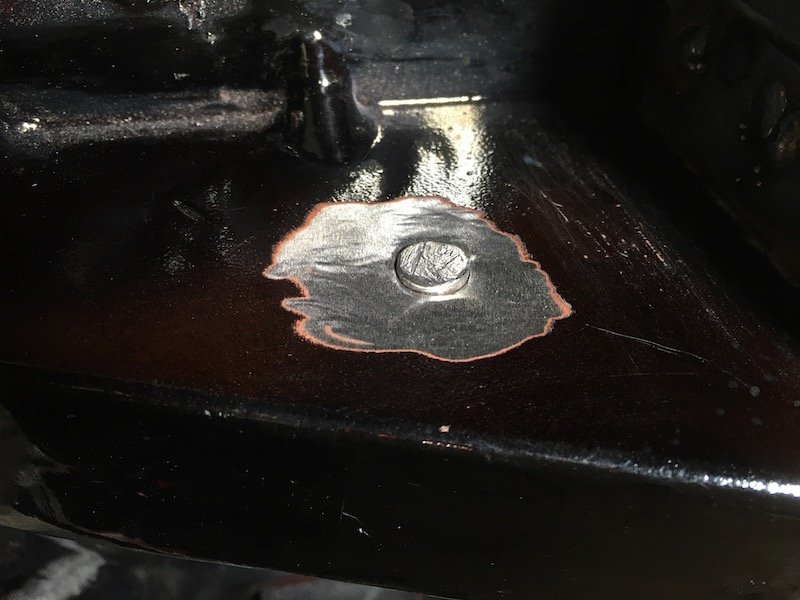
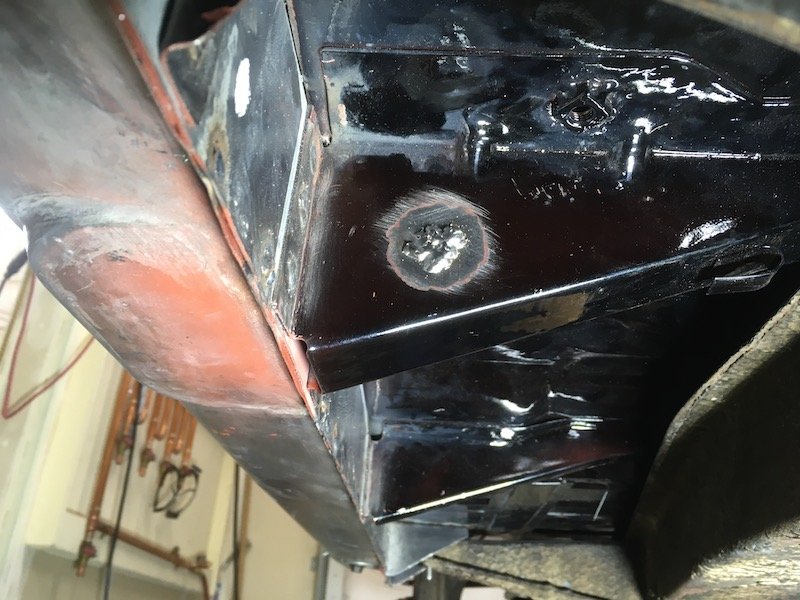
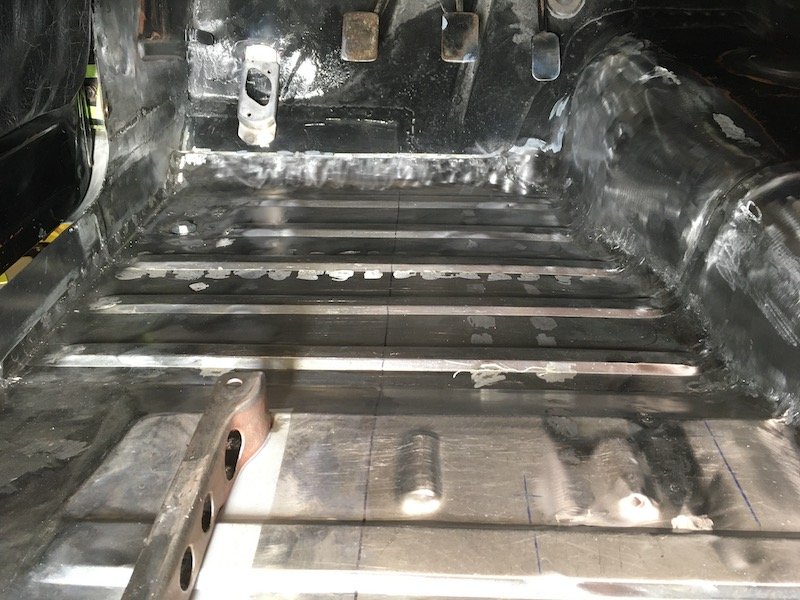
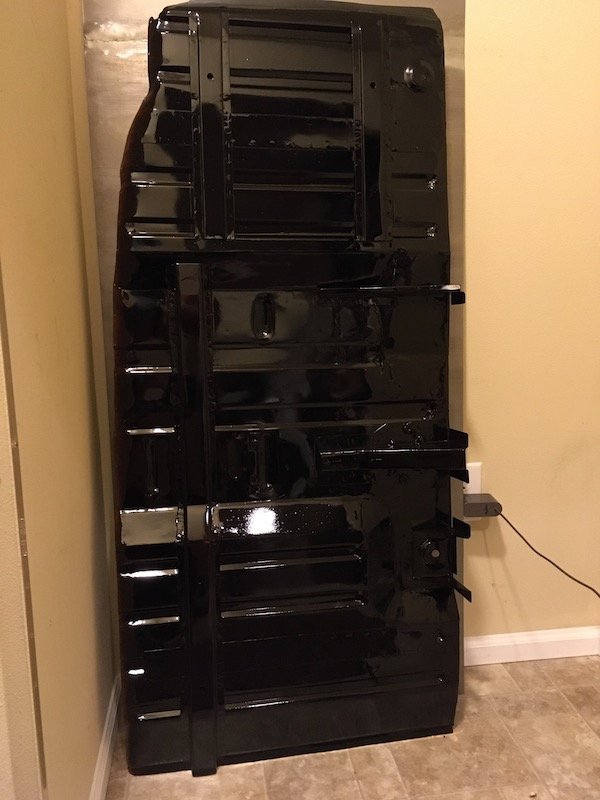
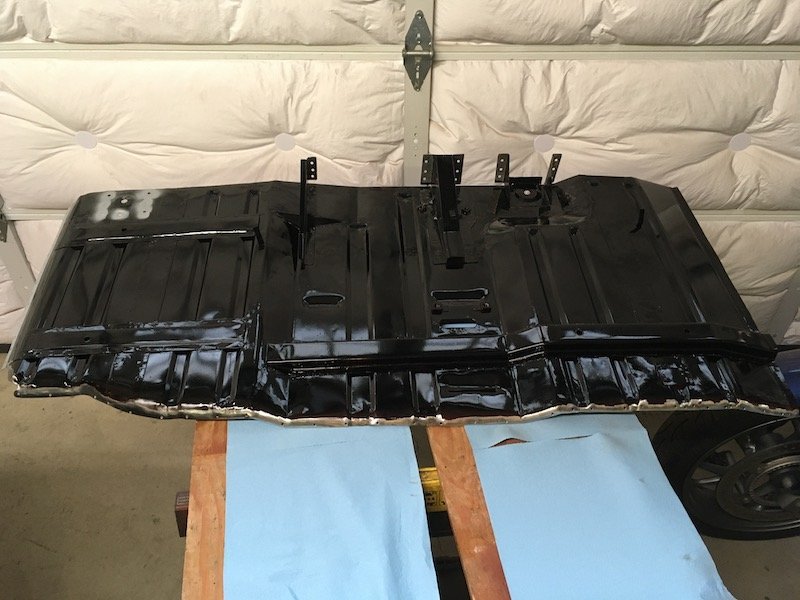
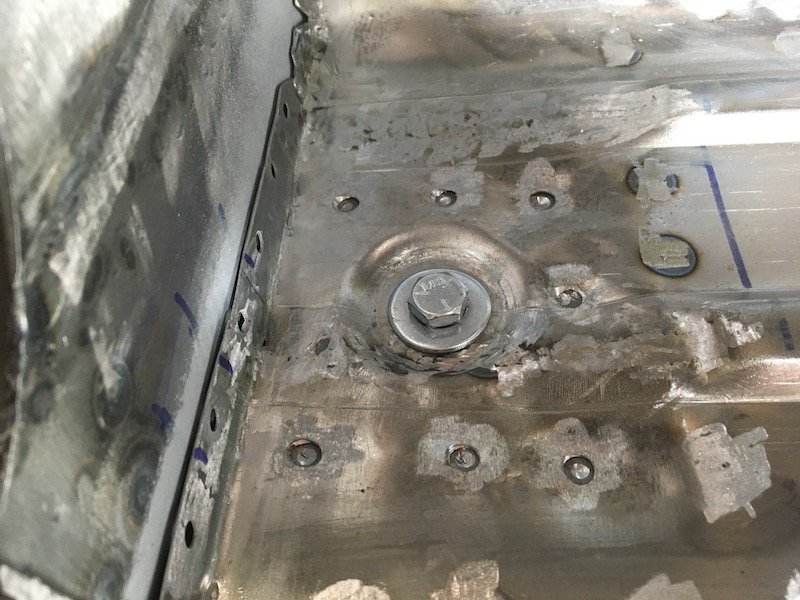
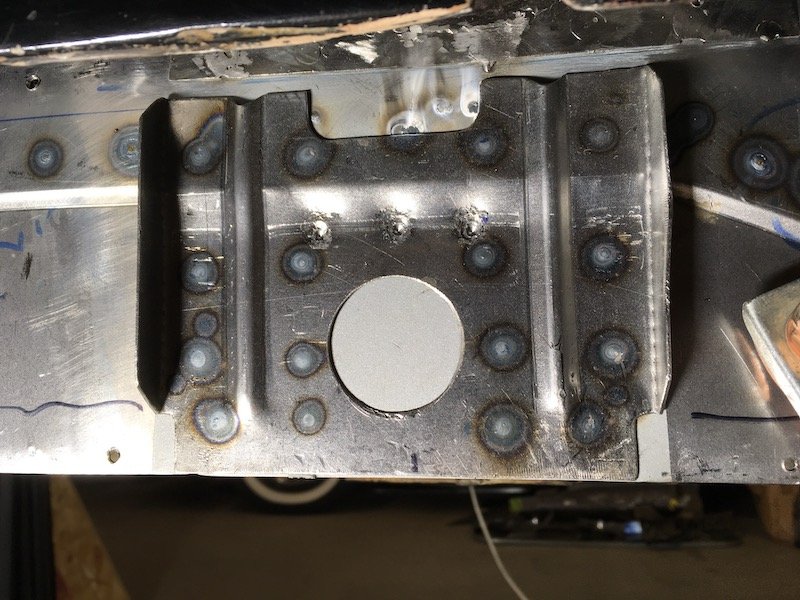
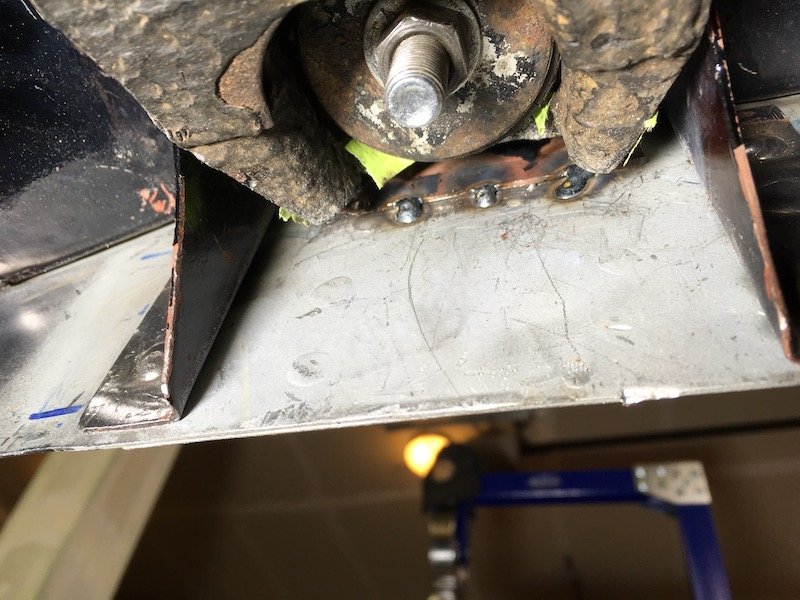
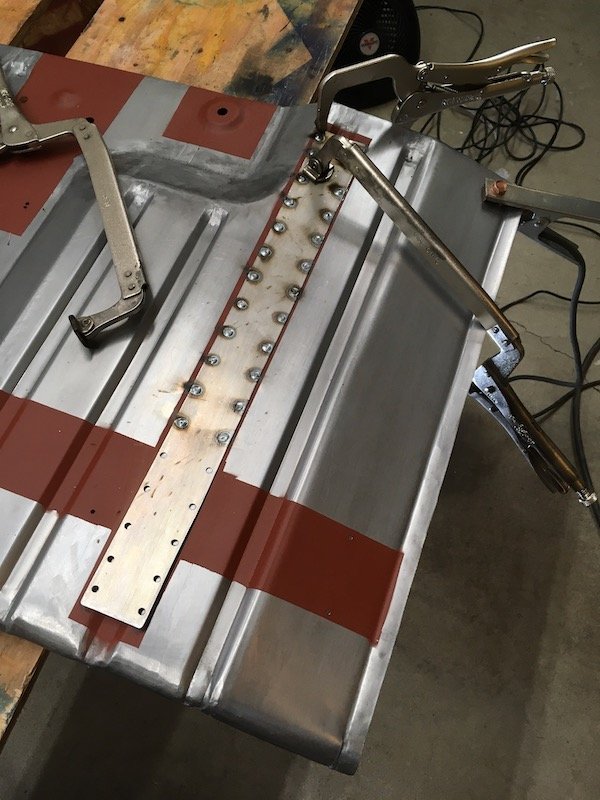
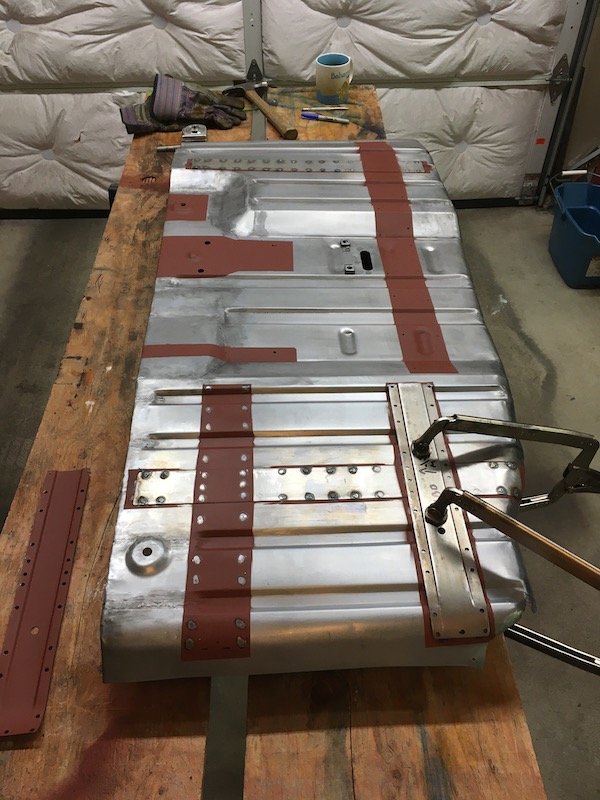
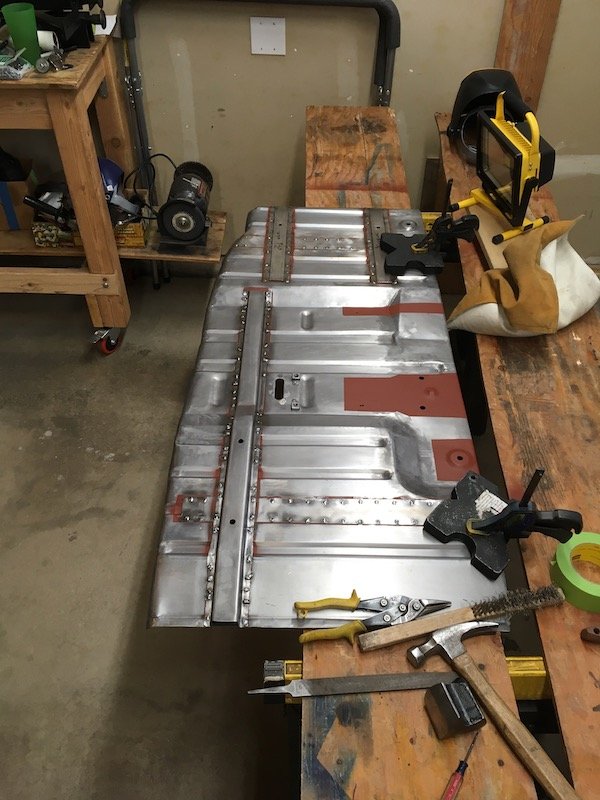
Building the 1961 Datsun 310 Bluebird Floorpan - Painting the underside and finally welding it into the car. Prepped and painted the underside of the floorpan with automotive exterior paint finishes (epoxy prime, base coat, clear coat). No fillers, lead or anything else to hide my handcrafting. Curing in a dry and heated space. Painting this side now saves me the otherwise awkward situation of trying to protect it once installed above the very wide frame rails. Painted the tops of the frame rails, and some other adjacent surfaces, with POR15 and rustoleum black. Meanwhile, the floorpan was prepared for plug welds with lots of holes punched and spaced an inch apart. I laid down some plastic to keep the frame rails from scraping the underside of the floorpan during positioning. A series of widely spaced tack welds were made a the butt joint to the tunnel. Conformed, drilled and readied the A post floor to body mount bracket for weld. Plug welded! Floor is not coming out now. Got good melt thru of the weld on the underside of bracket. Then just kept adding more tacks to the tunnel joint. Thought it was a good and tight enough joint at this stage to try a TIG weld. It was NOT. Total failure right away (no pics, too embarrassing ) ; I made more holes than actual weld. More practice required. Reverted back to MIG weld and eventually fully tacked the joint. Filled the positioning holes later. Underside - aft. Underside - forward. Added the HI-Lo Beam switch bracket. The last of the welding ops. Here I was trying to weld three sheets of metal together at the base of the B post. It can't be fully accessed from the other side while the body is mounted on the frame. Sill stiffening bracket, inner sill and body mount bracket horizontal flange. Failure. The first weld on the left drilled hole did not even hardly heat up the bracket on the other side. The arc just goes sideways to take the shortest path. Drilled the weld out and made much bigger holes and at least half way into the bracket flange, last in the stack up. This bigger hole, shown on right, helped. The weld still did not result in visible melt thru on the other side though it did attach to the flange. I followed up with edge tacks to at least keep it fixed on place until the body and frame can be separated later. You can see the impossibility of getting the torch directly on the face of the flange. The rest of the welds to the inner sill were no problem. Just some inconsistency, but all other welds showed positive weld through and good attachment. Plug weld spacing of the floor outboard flange was an inch apart, slightly tighter than factory electrode spot weld methods. Some random underside pics after welding was complete: Had to plug weld these blind using an inspection mirror to aim the MIG wire on top of the pinch weld joint. Not easy but very fun to watch the melt thru from below. View is looking forward and up at the side of rear seat floorpan (or step) and lap weld joint. Hit my pic upload limit. To be continued in next post with some other views underneath and closer topside details... Discussion: https://oldschool.co.nz/index.php?/topic/60267-marts-pl310-61-datsun-bluebird-sedan/ Build: https://oldschool.co.nz/index.php?/topic/60264-marts-pl310-61-datsun-bluebird-sedan/
- 74 replies
-
- 10
-
-
MARTS-PL310 61 Datsun Bluebird Sedan
MARTS-PL310 replied to MARTS-PL310's topic in Project Discussion
My 61 Datsun Bluebird 310 floorpan assembly is now completely welded in after a month of work activity nearly every evening and weekend. I'm very happy to reach this milestone and make visible progress on the old Datsun! A flood of pics to follow in the build thread in a couple of hours or so. Build: https://oldschool.co.nz/index.php?/topic/60264-marts-pl310-61-datsun-bluebird-sedan/
-
MARTS-PL310 61 Datsun Bluebird Sedan
MARTS-PL310 replied to MARTS-PL310's topic in Projects and Build Ups
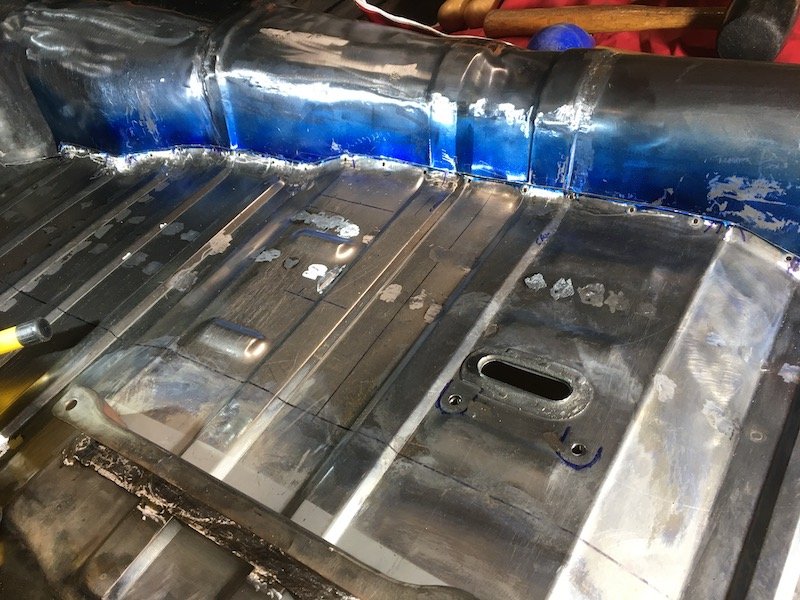
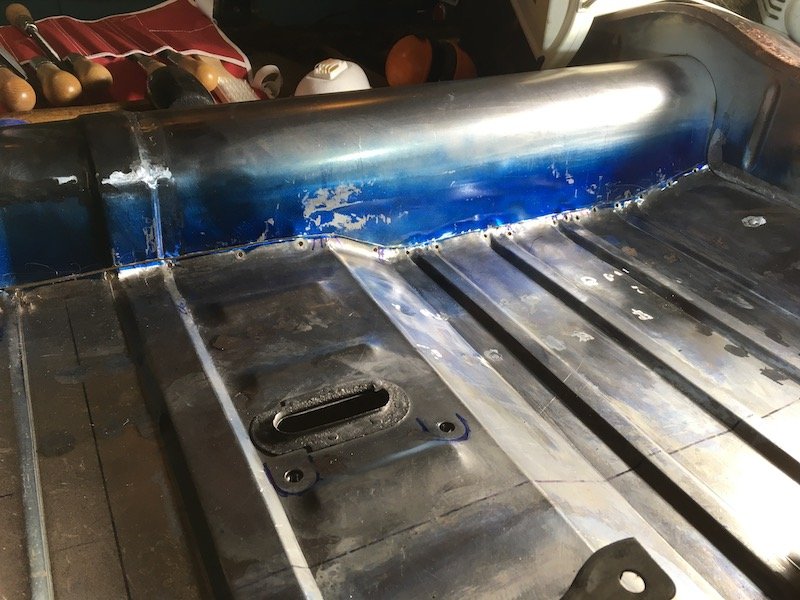
Building the 1961 Datsun 310 Bluebird Floorpan - Tunnel trim completed and floorpan edge conforms nicely! Trimmed and fitted. Trim was three steps. First a rough cut with an angle grinder cutting disk to within 1/4 inch of the scribe line, then manual cut with tin snips the rest of the way, finishing with hand filing to clean and de-burr the edges. It's very tempting to just start welding it now. Just need to paint the underside and weld it in - finally! Discussion: https://oldschool.co.nz/index.php?/topic/60267-marts-pl310-61-datsun-bluebird-sedan/
- 74 replies
-
- 17
-
-
MARTS-PL310 61 Datsun Bluebird Sedan
MARTS-PL310 replied to MARTS-PL310's topic in Project Discussion
@yetchh Thanks. The kind words of encouragement helps keeps me moving forward. -
MARTS-PL310 61 Datsun Bluebird Sedan
MARTS-PL310 replied to MARTS-PL310's topic in Projects and Build Ups
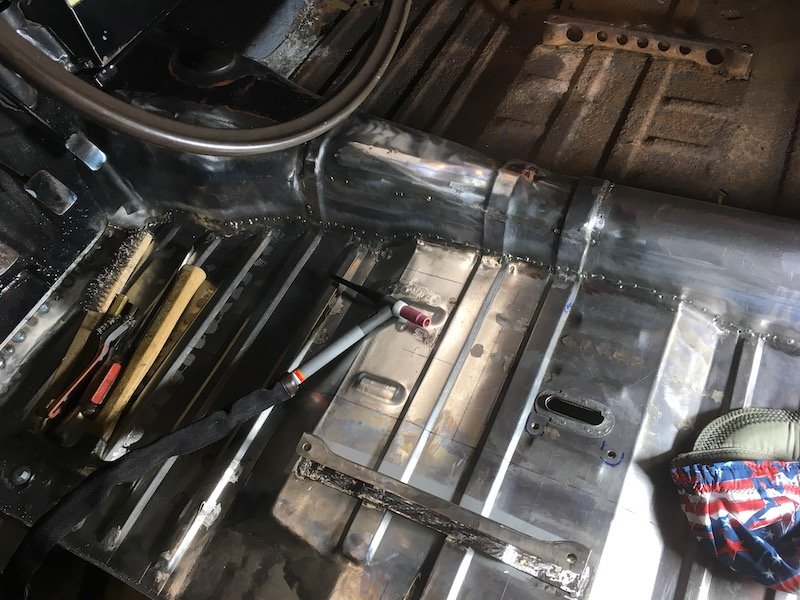
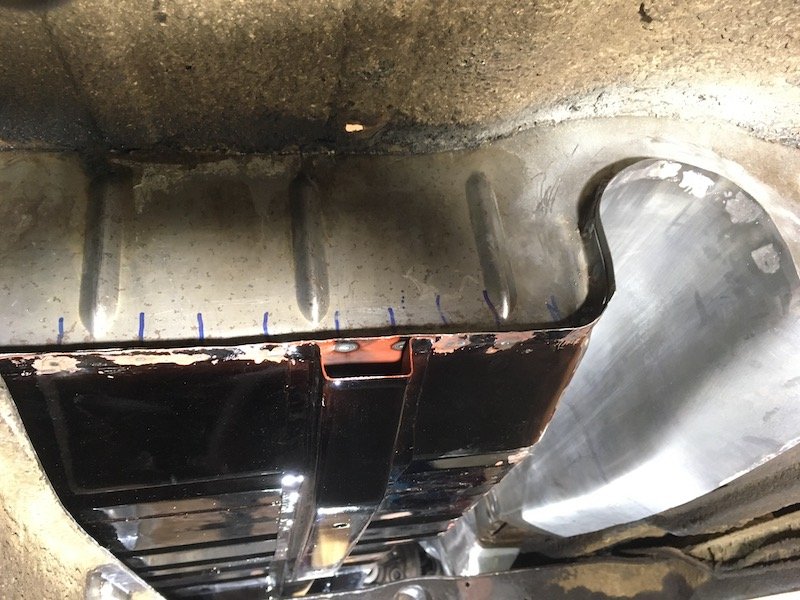
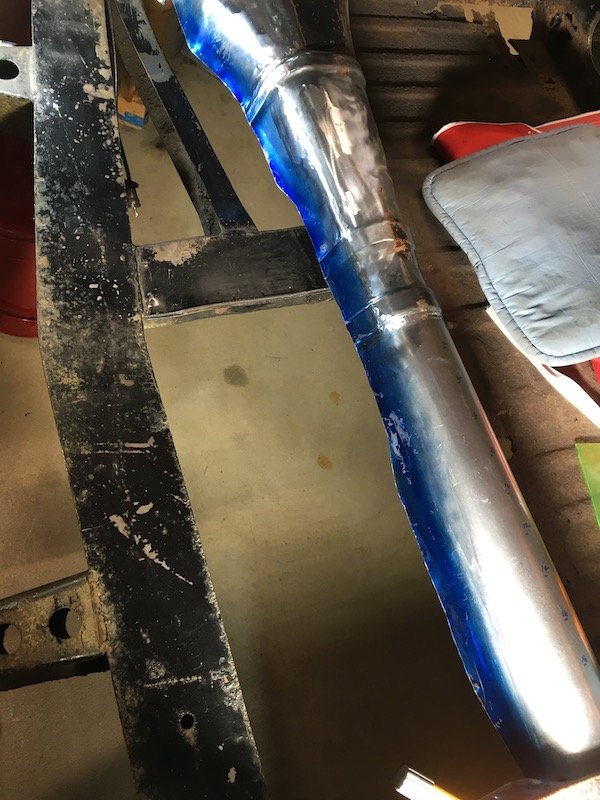
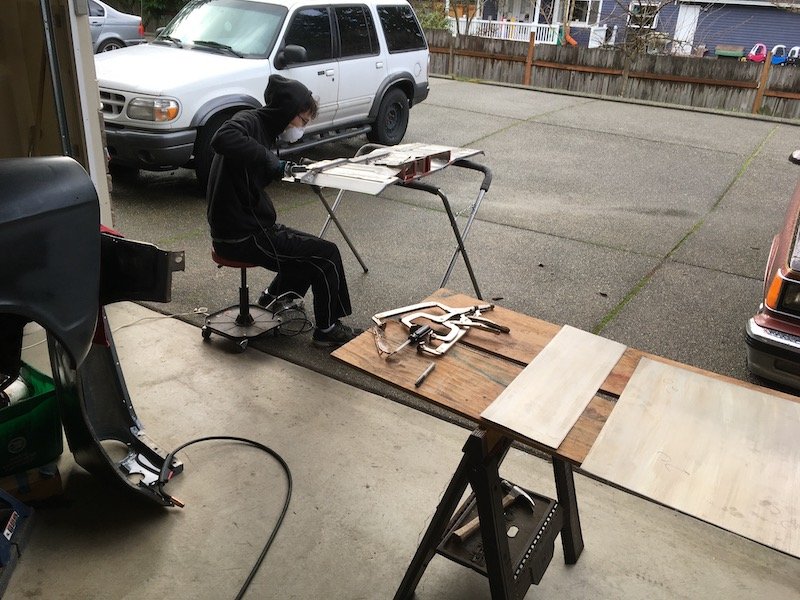
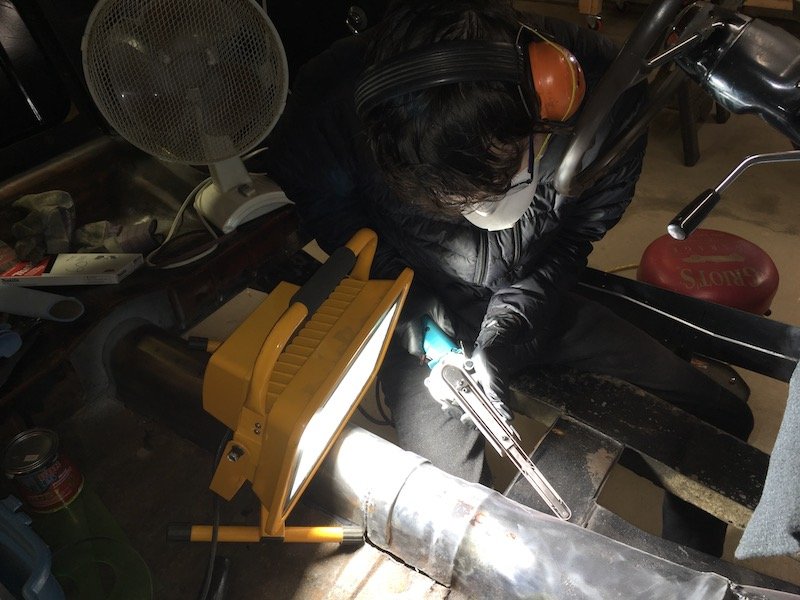
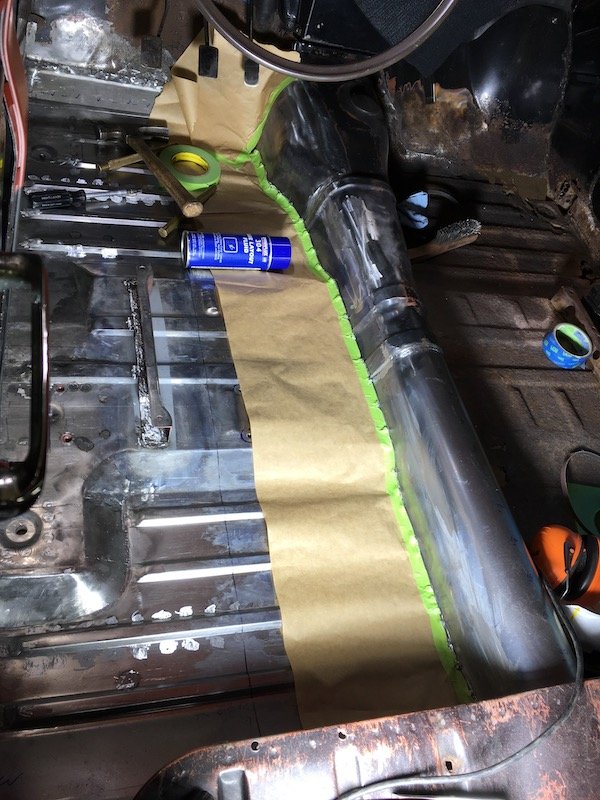
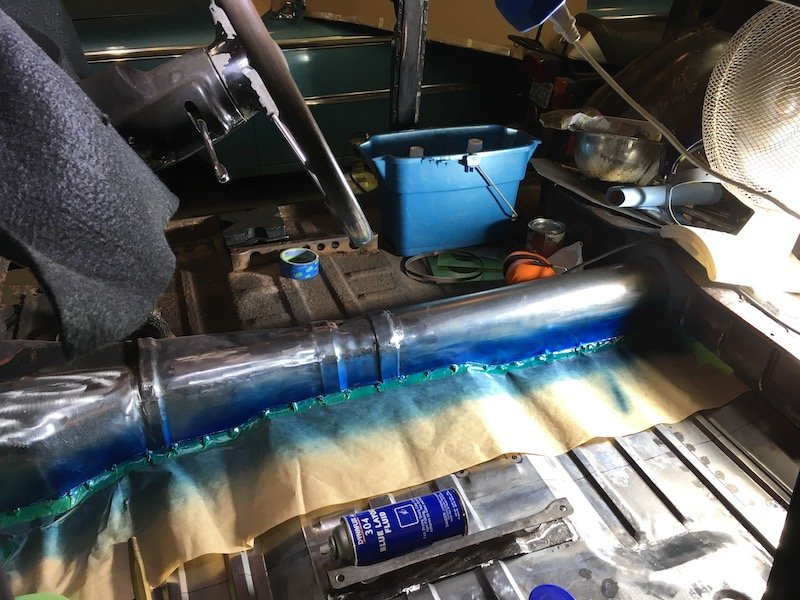
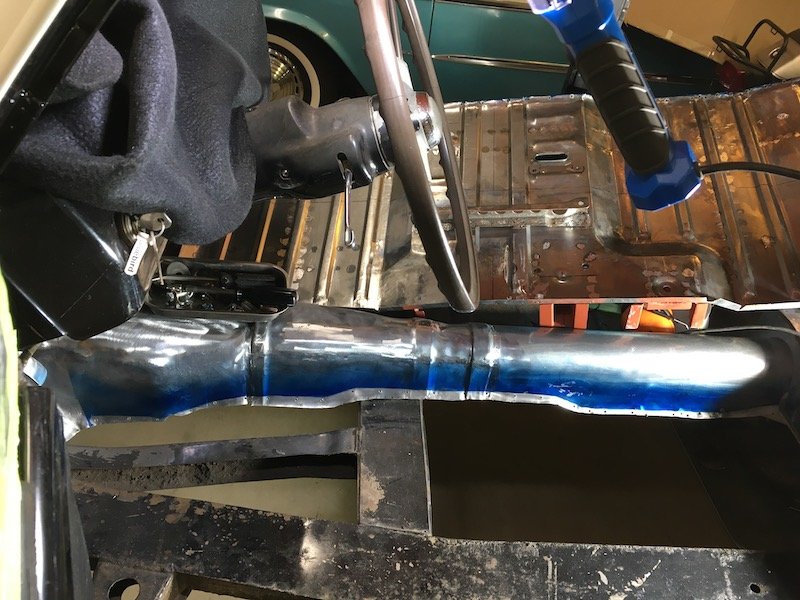
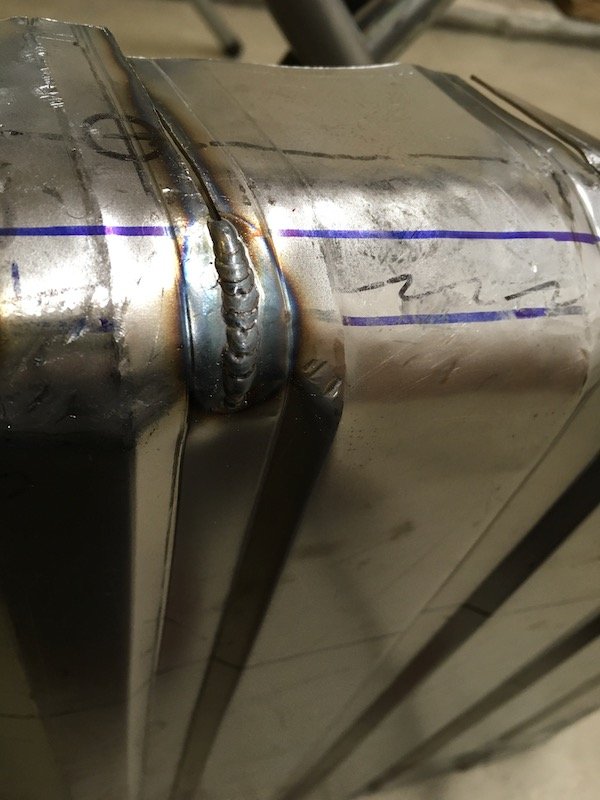
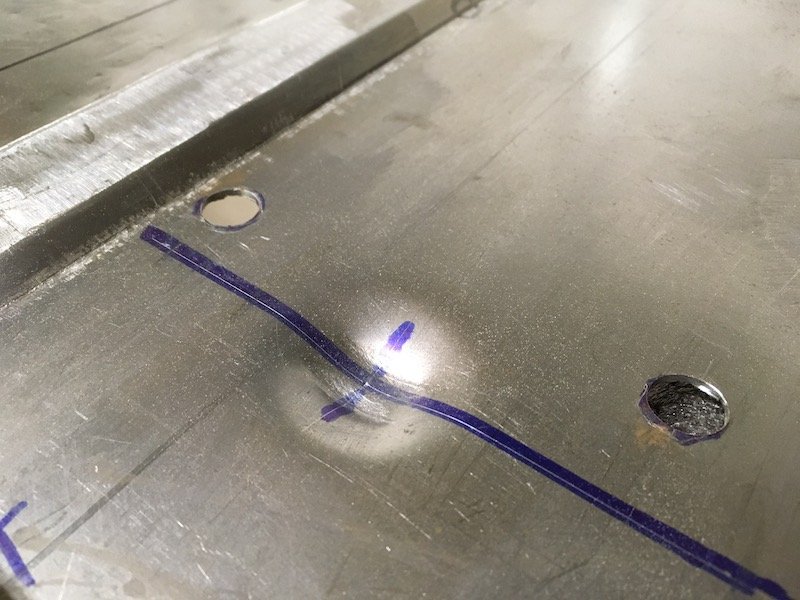
I'm trying to speed this project up a little bit. It's been over two years now since I began tearing into the Bluebird. The final fit check of the left floor, with it screwed down flush against the tunnel. Various inspections and fit adjustments are completed. I did some recruitment. The Apprentice. My son volunteered to help. Cleaning up my overly thick MIG welds on the tunnel. Preparing to paint a trim line on the tunnel. Painted and edge scribed with blue layout fluid. Tunnel is now ready to trim. Discussion: https://oldschool.co.nz/index.php?/topic/60267-marts-pl310-61-datsun-bluebird-sedan/
- 74 replies
-
- 12
-
-
MARTS-PL310 61 Datsun Bluebird Sedan
MARTS-PL310 replied to MARTS-PL310's topic in Project Discussion
@MRT1TRDHow about a discussion thread on your Bluebird wagon project? I noticed in your latest wagon post that it has the jack cover still attached on the sill. I'm very interested in reverse engineering that part for my project to complete the factory look. Could you upload some close up pics of it on your project thread to show how it is made on the inside to keep it attached? -
MARTS-PL310 61 Datsun Bluebird Sedan
MARTS-PL310 replied to MARTS-PL310's topic in Project Discussion
Your tunnel looks pretty good. Not much rust showing, at least on the right side. Hopefully the paint and under-seal coatings are not covering a similar starlight situation as on the lower portion of mine.
-
MARTS-PL310 61 Datsun Bluebird Sedan
MARTS-PL310 replied to MARTS-PL310's topic in Project Discussion
@MRT1TRD What’s the condition of the trans tunnel next to your front floors? Any pics? -
MARTS-PL310 61 Datsun Bluebird Sedan
MARTS-PL310 replied to MARTS-PL310's topic in Project Discussion
@MRT1TRD Thanks for the complement, it is much appreciated! There may be a possibility to help you, but not in the immediate future since I've yet to start the right hand floor and surrounding structure of my Bluebird. I don't know how long that is going to take. I will persevere and get it done. This is still a part time hobby for me, so my time investment is just considered fun play time in the garage. A cost prediction to help someone else is really unknown. I've purposely not tracked my hours spent on the various parts crafted so as not to shock myself silly with the crazy reality of what's going into this project. Limiting your need to a couple of front floors (lower corrugated section up through the forward lap edge) is far simpler than an entire side of course and might be readily doable. That helps a lot. I could consider doing a couple of front floor pieces side-by-side when I start making my full right hand floor since it would be more efficient that way. I need to know more on scope of the sills needed. One single 18 inch long outer patch segment or a full blown weld completed outer sill with all the side of sill lift jack penetration structure details? The latter would be horribly time consuming for me and thus cost prohibitive for you. Or in between those extremes, maybe three matching segments that you could weld together would suffice? PM me with further discussion. -
MARTS-PL310 61 Datsun Bluebird Sedan
MARTS-PL310 replied to MARTS-PL310's topic in Projects and Build Ups
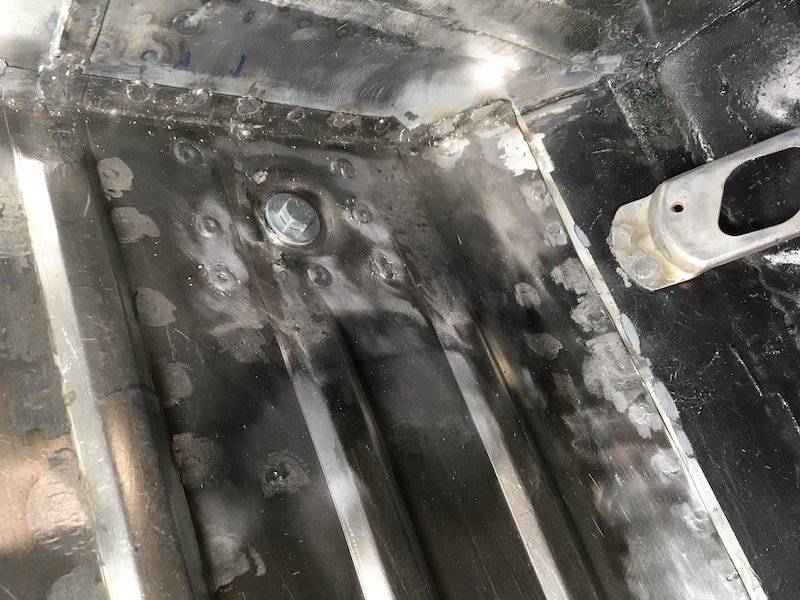
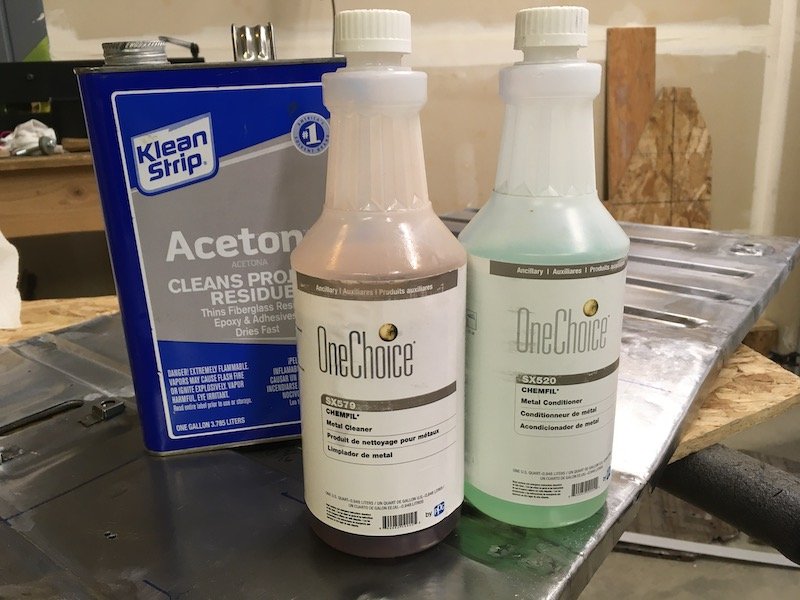
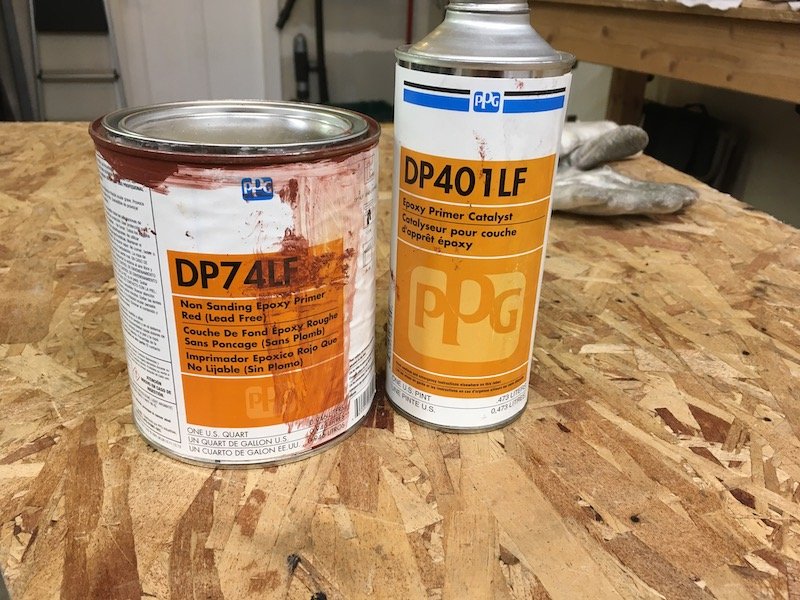
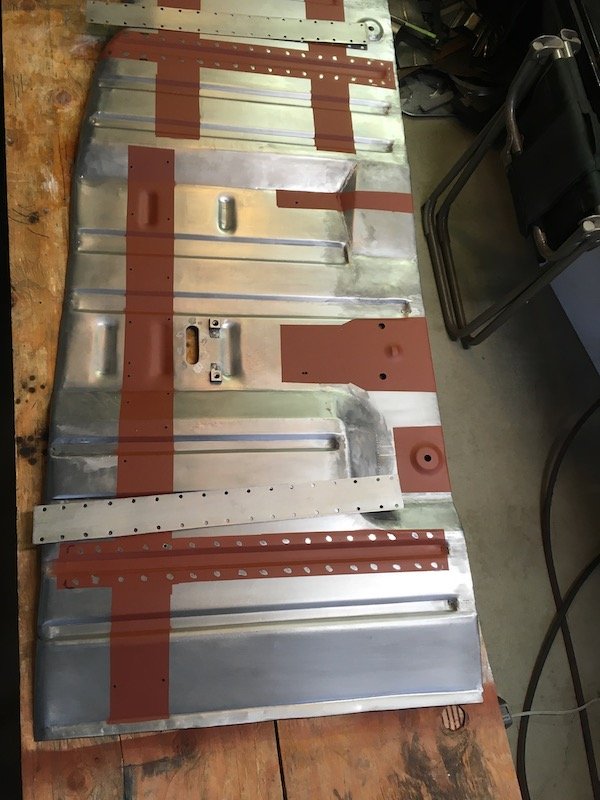
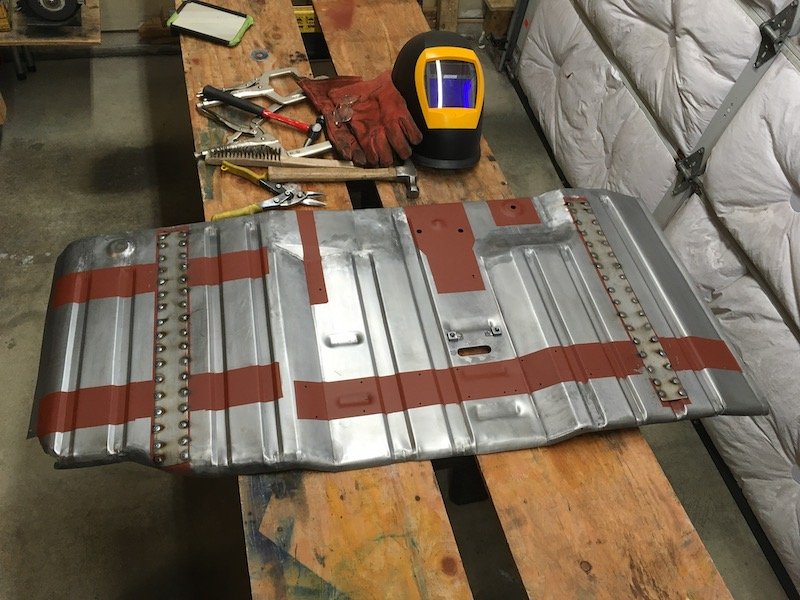
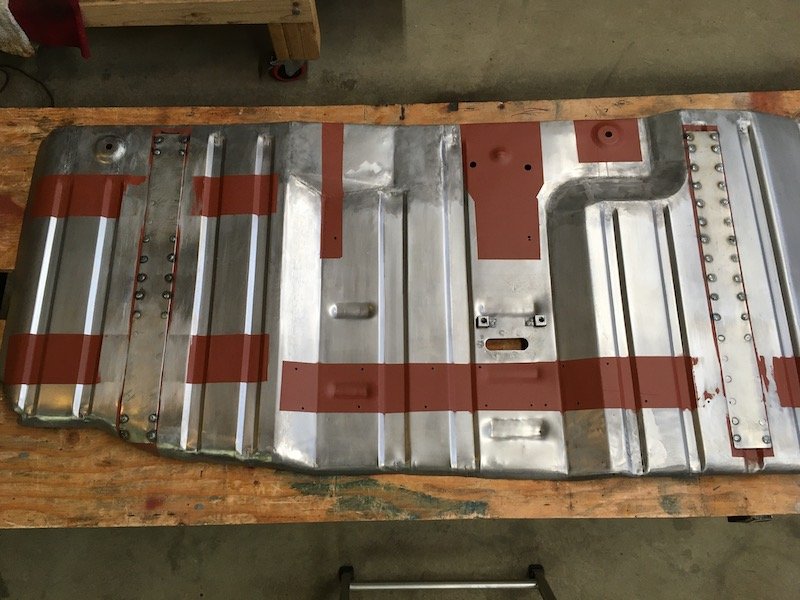
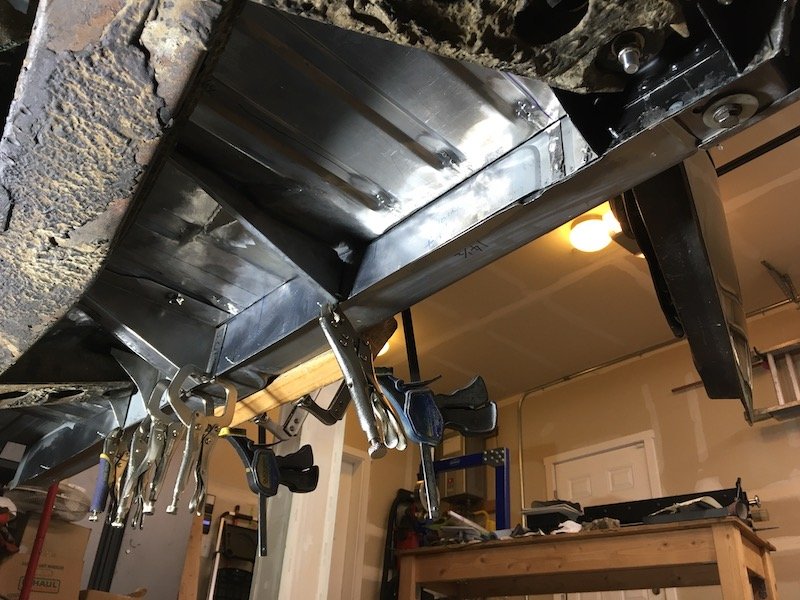
Building the 1961 Datsun 310 Bluebird Floorpan - Metal protection, and welding on a bunch of parts to the floorpan. Some of the stuff I use to clean, condition steel surfaces and paint epoxy primer. Eight ounce detail spray gun. Perfect to paint a small batch of parts and conserve materials. Very little gets wasted. I've had this one for over 30 years. A couple of freshly sprayed parking brake brackets sit in the background. Parts on the left will be welded onto the underside. The floorpan underside on the right is masked off to maintain bare steel on the exposed areas for later final overall finishing paint. Also in the lower is the seat bracket, which is turned upside down to coat just the lower surface. Unmasked. These are all the areas soon to become hidden yet vulnerable to condensation and rust if left bare. First these inbd-outbd straps go on. Checking for opposite side weld melt through. Grind some of the weld heads smooth and touch up primer for next layer of assembly. Installing the fore and aft front tie straps. I needed to flatten this section a bit with a bunch of clamps before the welds were made. The rear hat section beam is installed. B-pillar body mount bracket welded on. All brackets are installed. Very small fore and aft fuel line clips are also welded on. Top side fit check. On the top side the seat bracket was welded from plug welds underneath and fillet welded at the front and rear edges on top. Another fit check view from on top. The large oxidized areas in the rear passenger footwell are where heat was applied to correct some shape defects. This will be cleaned up. Fit check view underneath and looking forward. Fit check view underneath and looking aft. You can see it would be difficult to paint after installation in the car. The frames are massive and block access. I'm waiting for outside conditions to warm a bit in order to fully paint the underside and then weld it into the car. I'm debating whether or not to grind the dozens of weld heads down. Probably will do so. In the meantime, I'll be inspecting the right hand side of the car and making future repair plans to continue moving forward. That's all for now. Discussion:
- 74 replies
-
- 18
-
-
MARTS-PL310 61 Datsun Bluebird Sedan
MARTS-PL310 replied to MARTS-PL310's topic in Projects and Build Ups
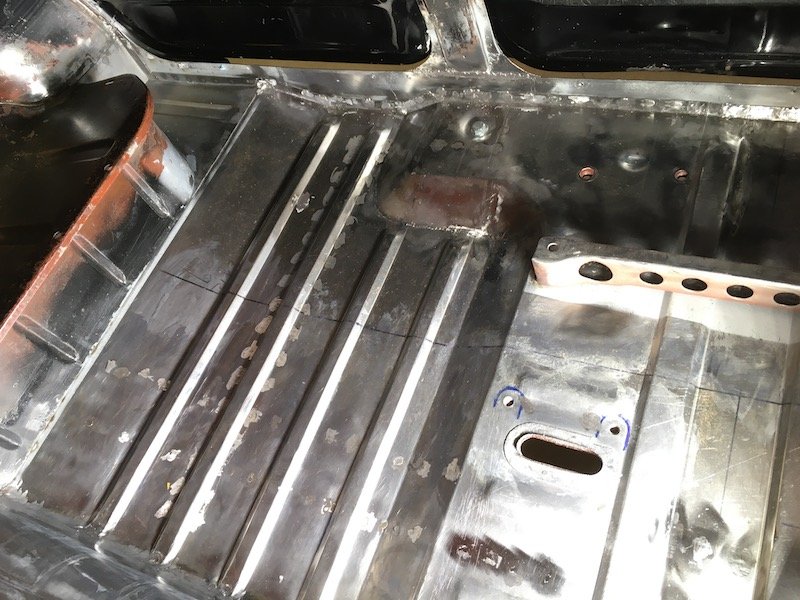
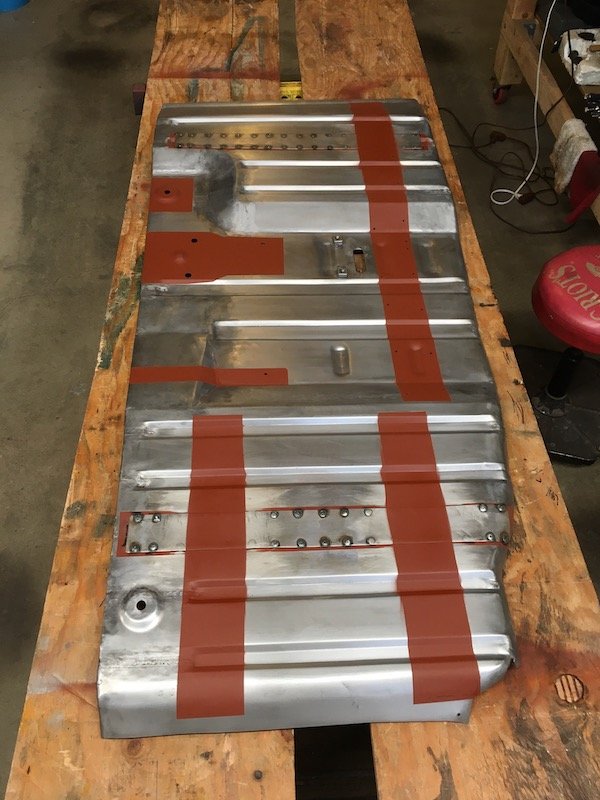
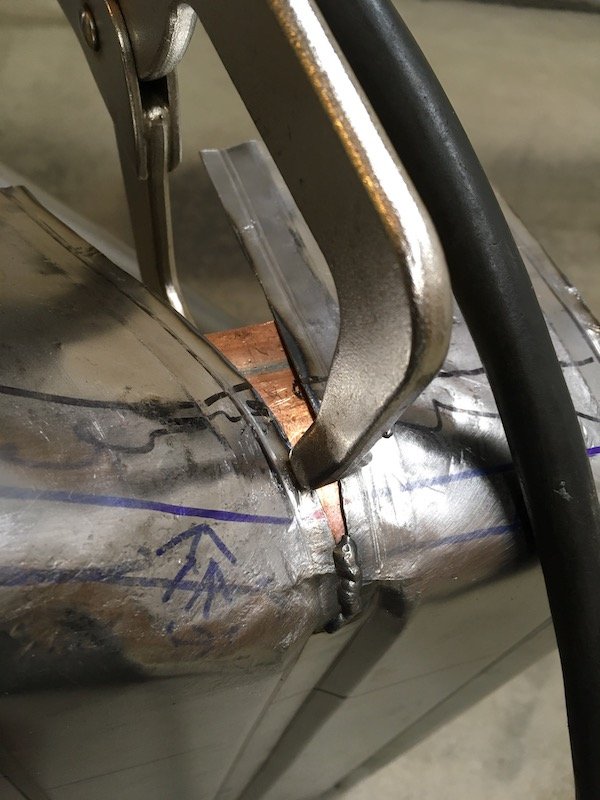
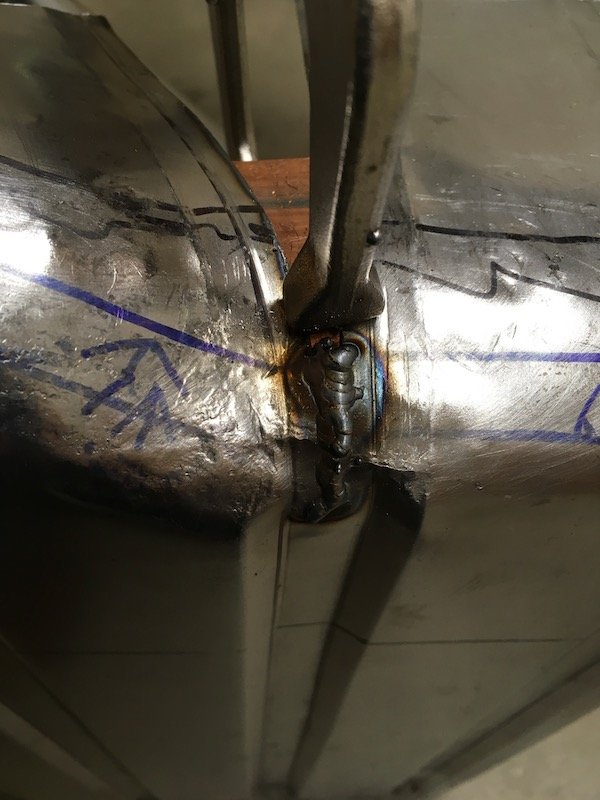
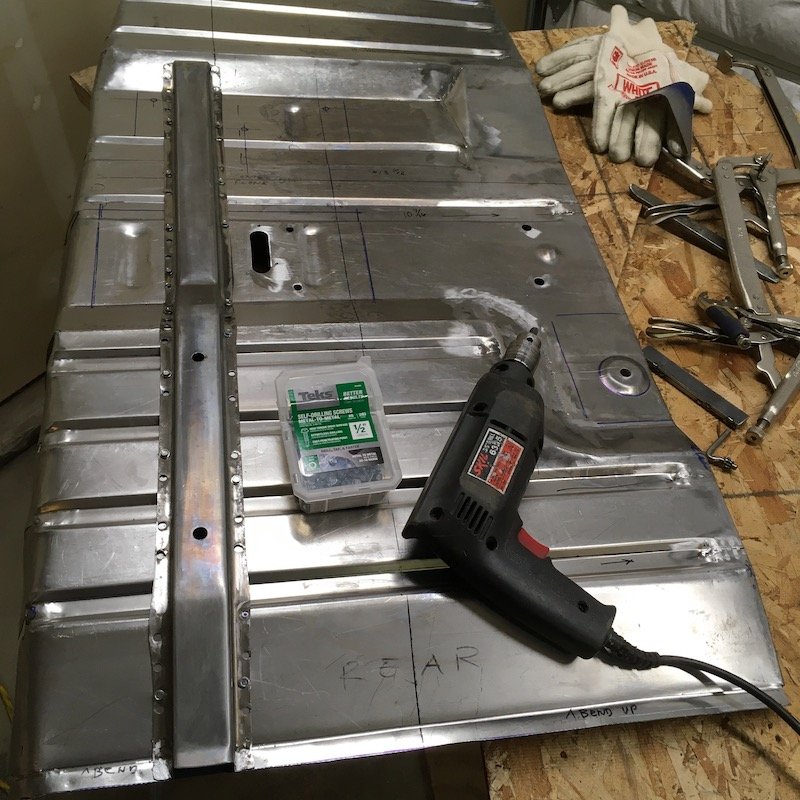
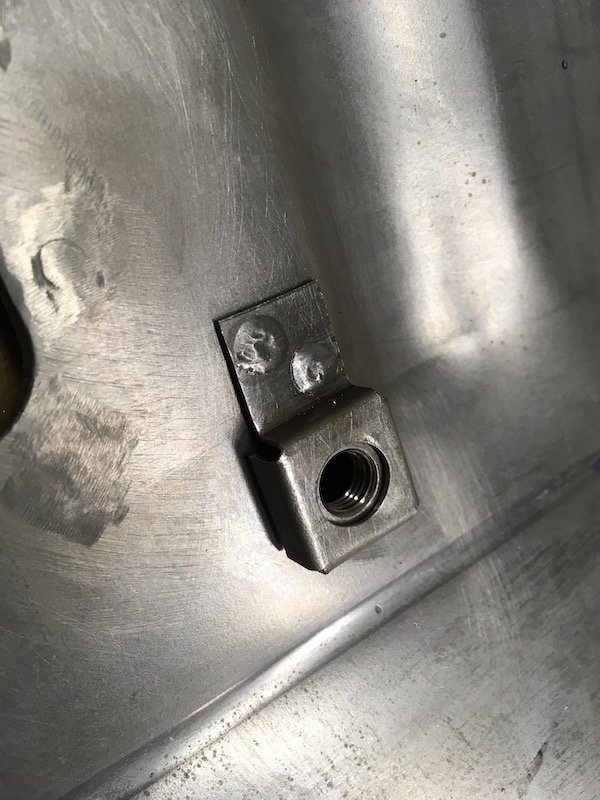
Building the 1961 Datsun 310 Bluebird Floorpan - Welding up the pie cuts along the floorpan edges. Making reproduction nutplates. More fit checks. Getting closer to completion. Some little things. I used Teks and temp fastened the underside support to conform the floor shape more accurately. And backing up a little bit from the thread post where I fully trimmed the flanges, I needed to first weld up some gaps. There's seven bends in contour along the fore and aft direction. That results in 14 pie cuts along the edges to be cleaned up and welded. Not so much on the outboard flange against the sill since these will be lap joints against a flat inner sill, but required along the curves of the trans tunnel edges. I'm keeping my options open to butt weld or lap weld against the tunnel. I back up the wide pie cut openings with copper from a split and flattened pipe. The blue line marks the extent that needs to be filled, the remainder I expect will be trimmed away. This one was kinda ugly. I just grind the excess away later. This one was a little easier to fill. I ground the welds and then, after final trimming (described earlier), did yet another mock fit with the floorpan below The fit is looking awesome! Almost pro maybe, but I have nothing from the internet to compare it to. Then I built some tiny reproductions out of 20 gauge sheet to look exactly the same as the original floating nut plates that get welded to the underfloor and support the inboard bracket of the parking brake. The 5/16 - 24 square nuts are extracted from some much larger purchased repo GM nut plates and inserted into my much smaller Nissan look alike single tab repros. Next post will be cleaning, preparation and epoxy priming the soon to be permanently welded closed cavities on the underside of the floorpan. And then followed by welding on ten or so parts. More posts soon… Discussion:
- 74 replies
-
- 14
-
-
MARTS-PL310 61 Datsun Bluebird Sedan
MARTS-PL310 replied to MARTS-PL310's topic in Projects and Build Ups
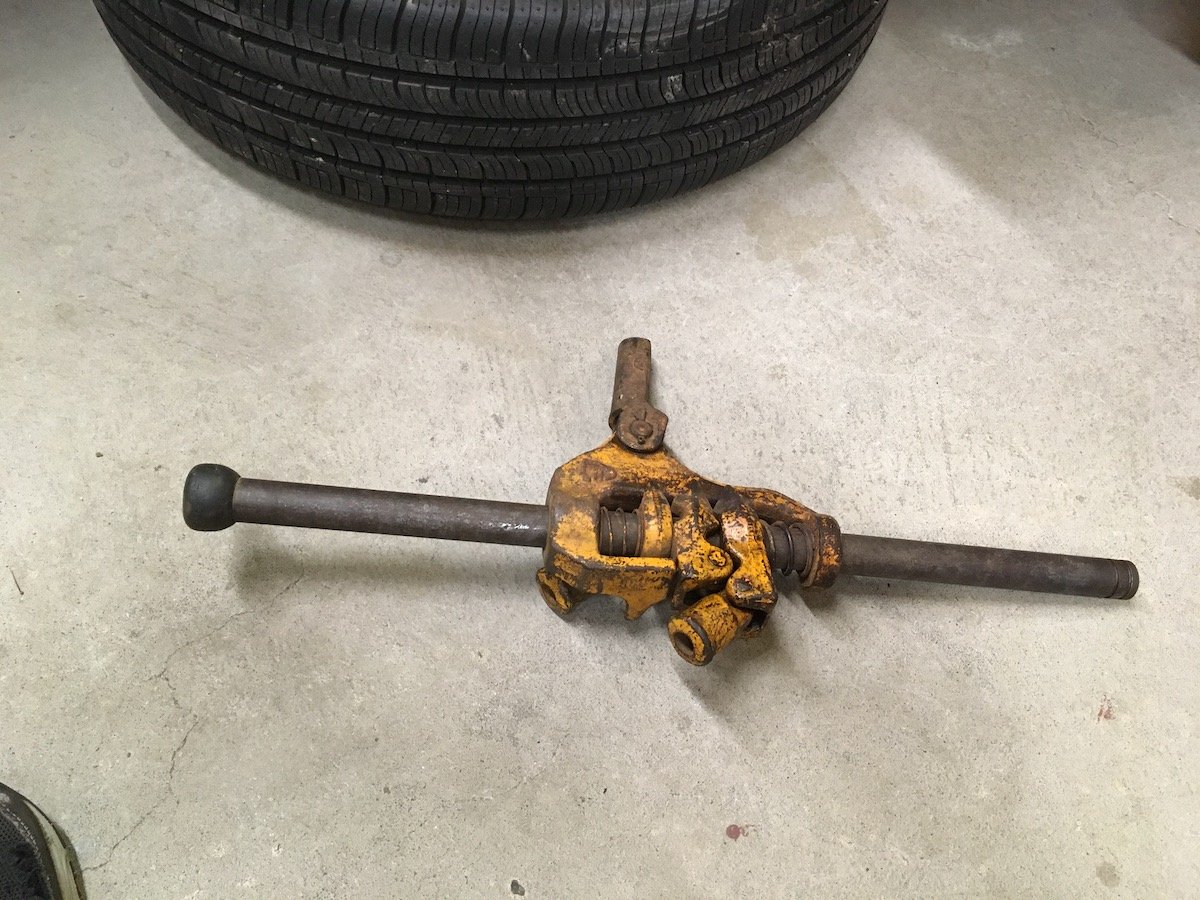
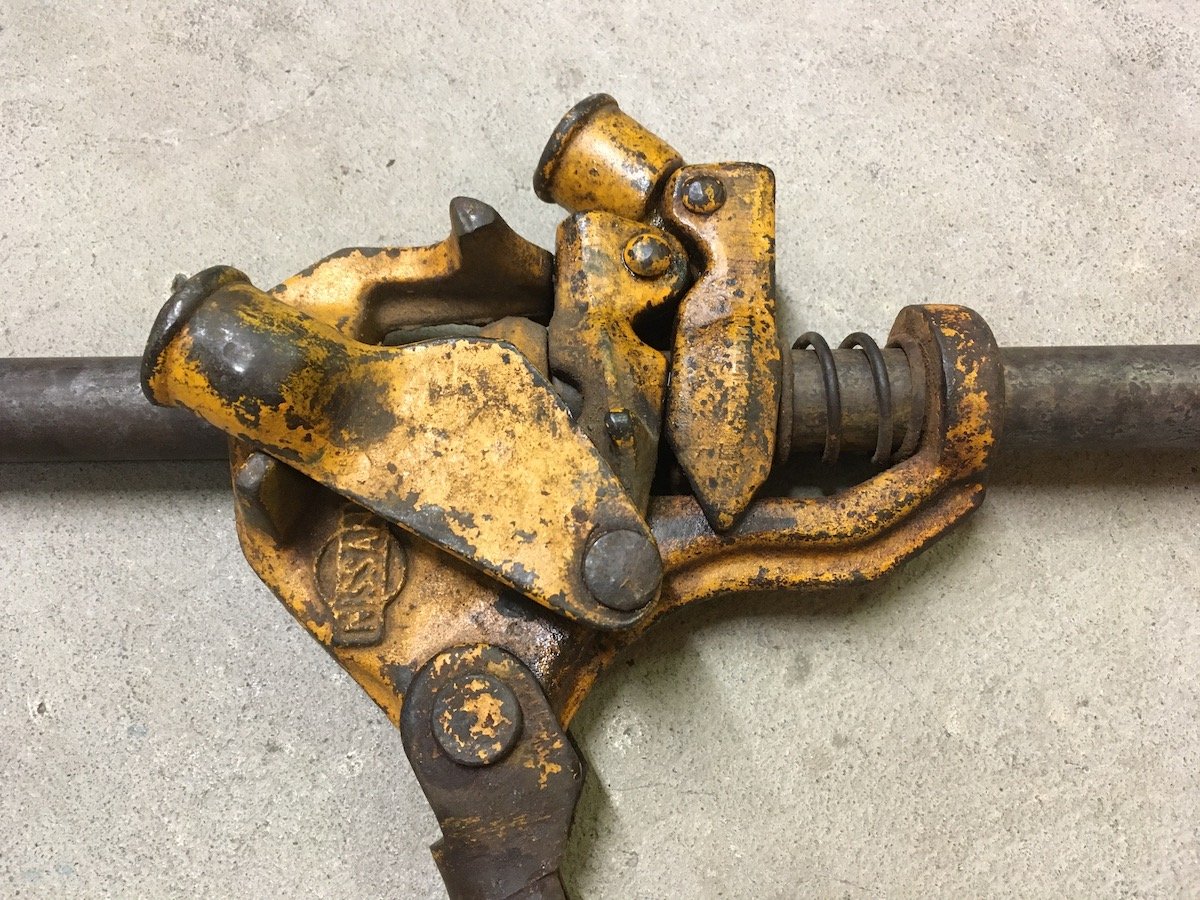
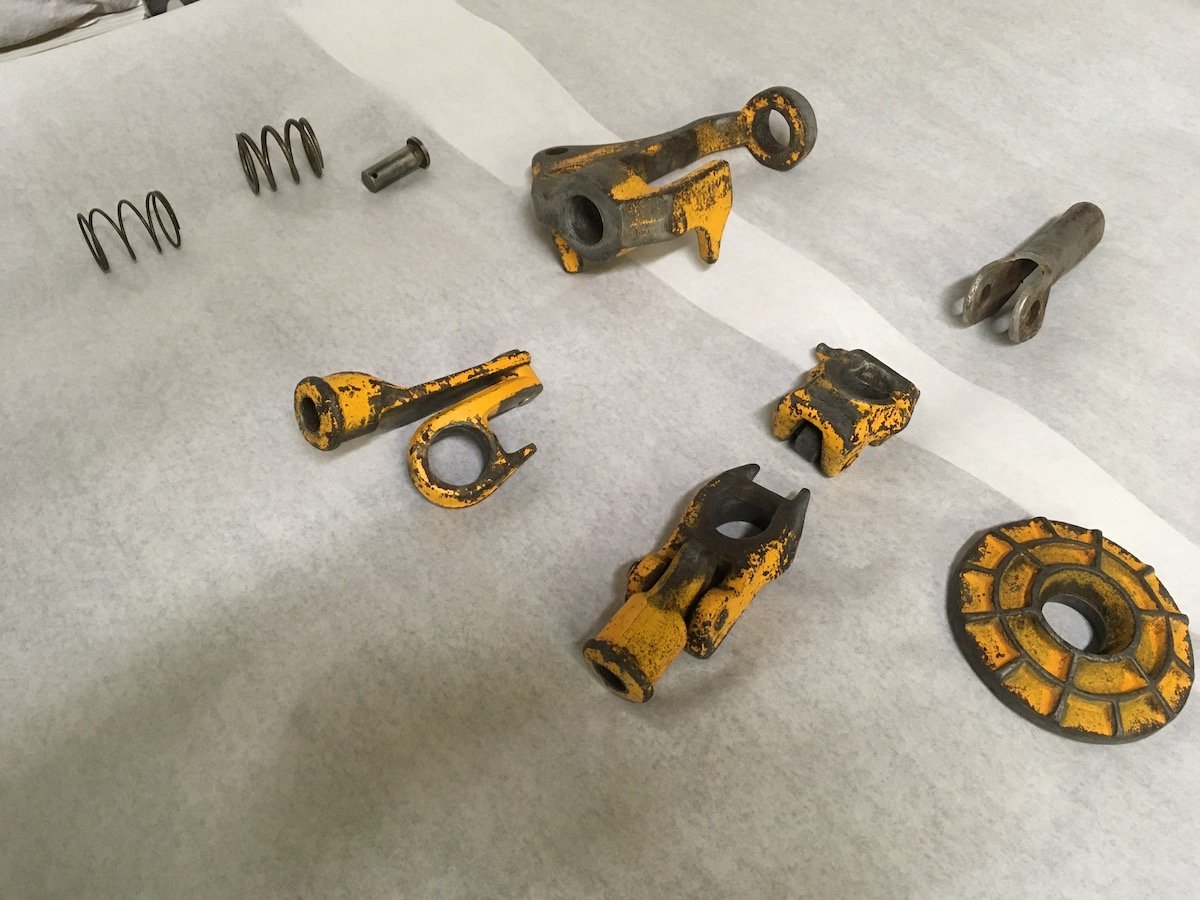
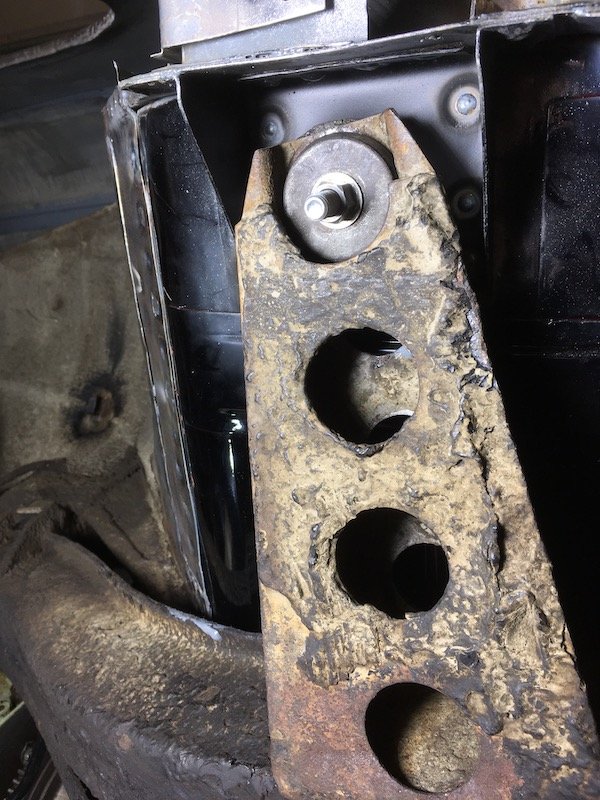
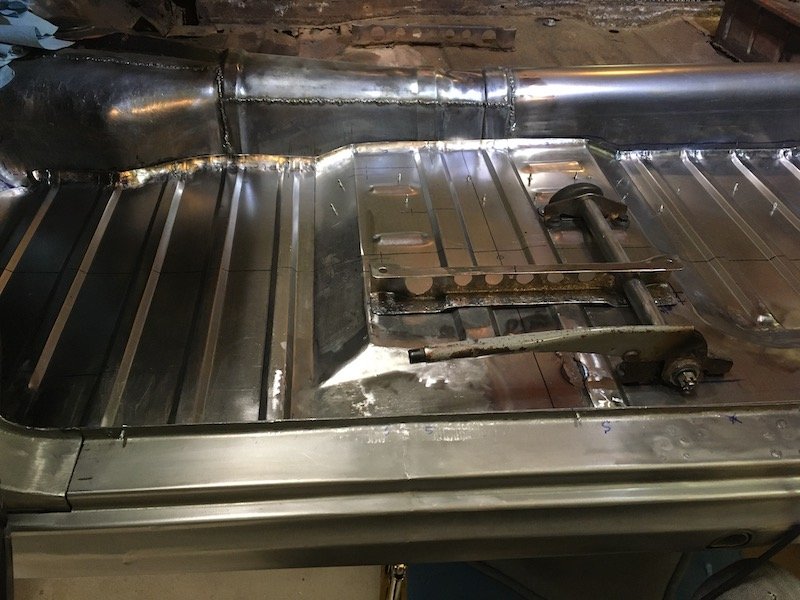
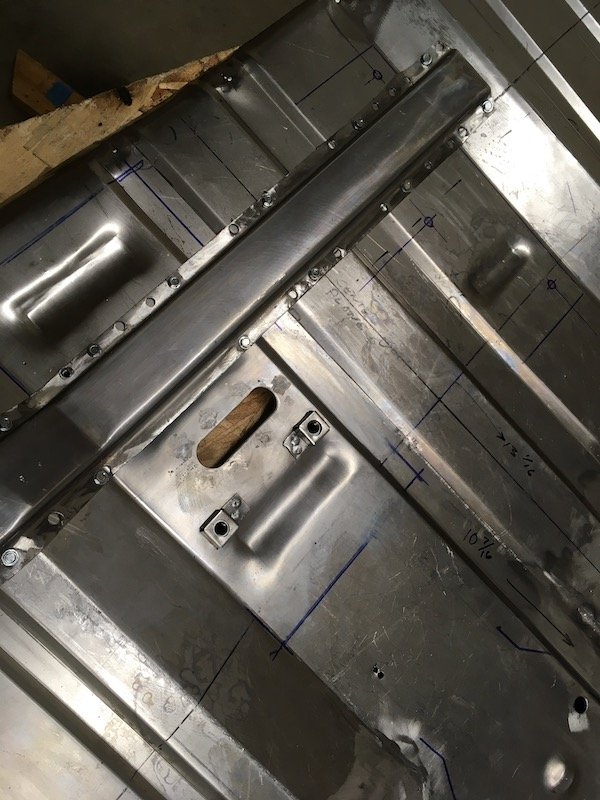
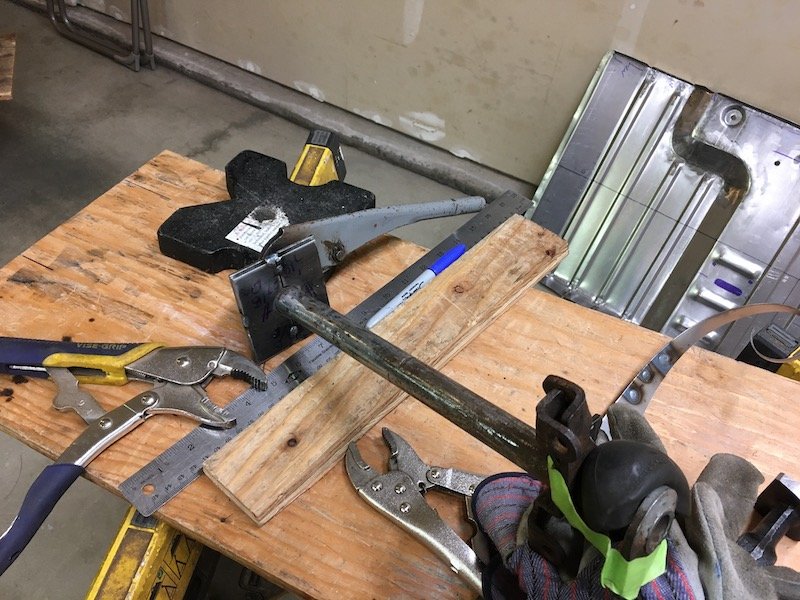
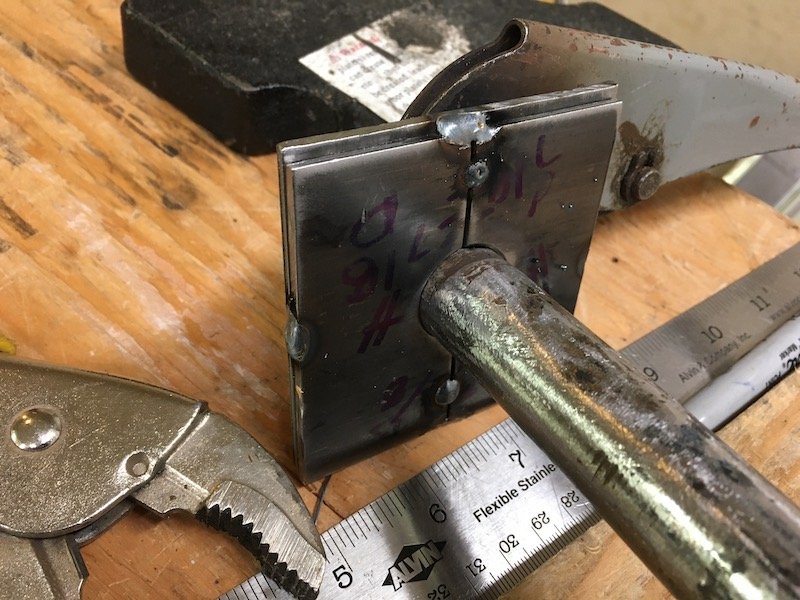
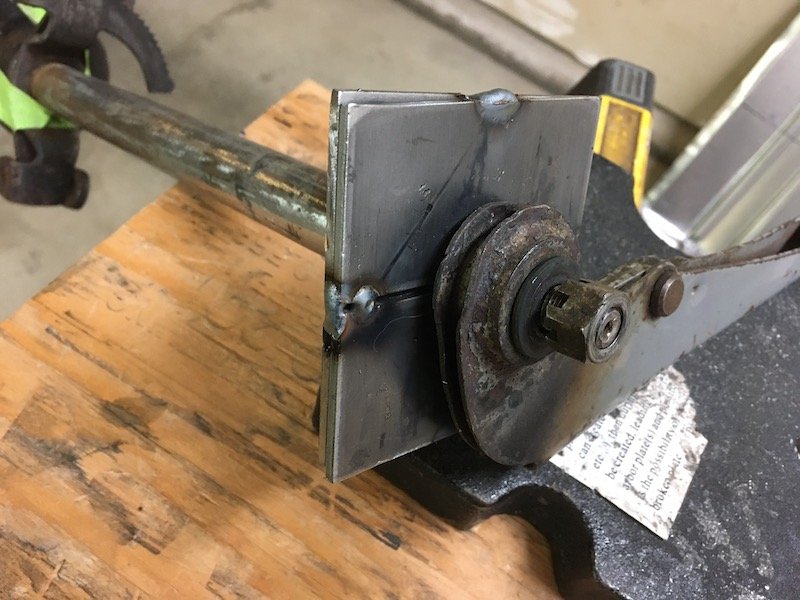
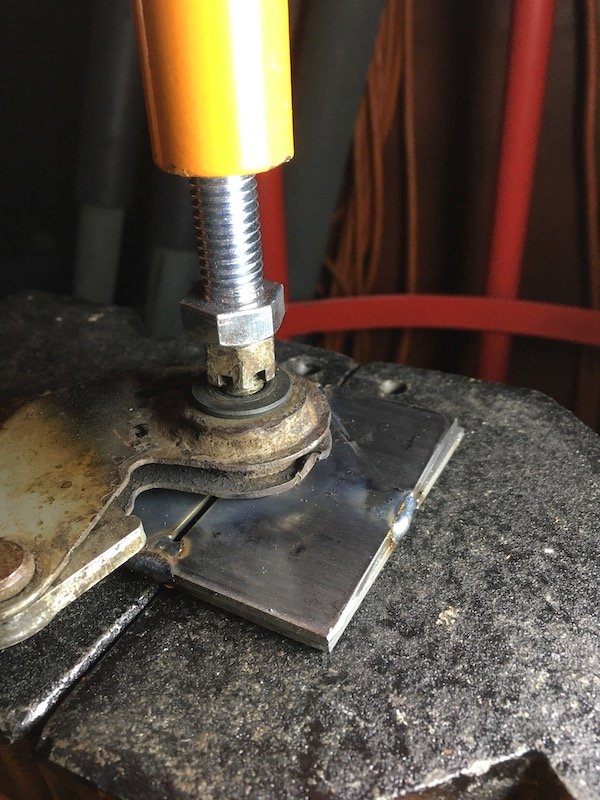
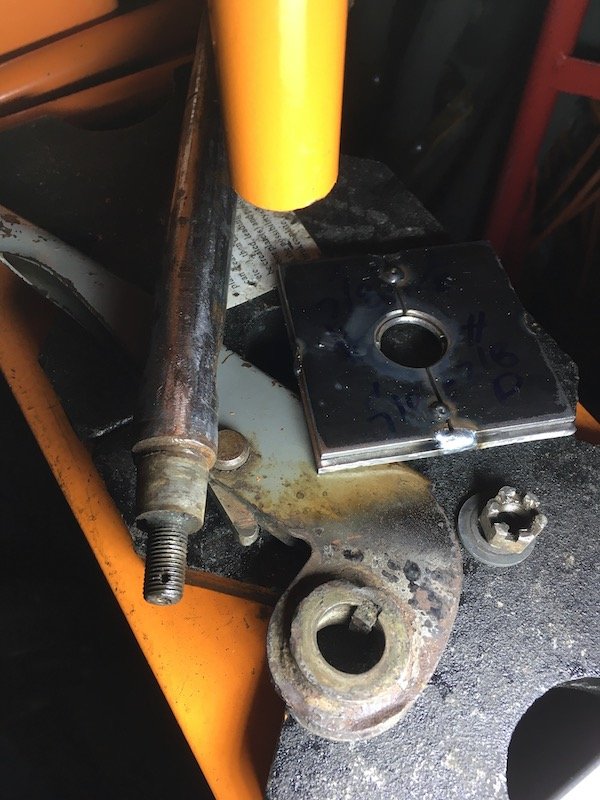
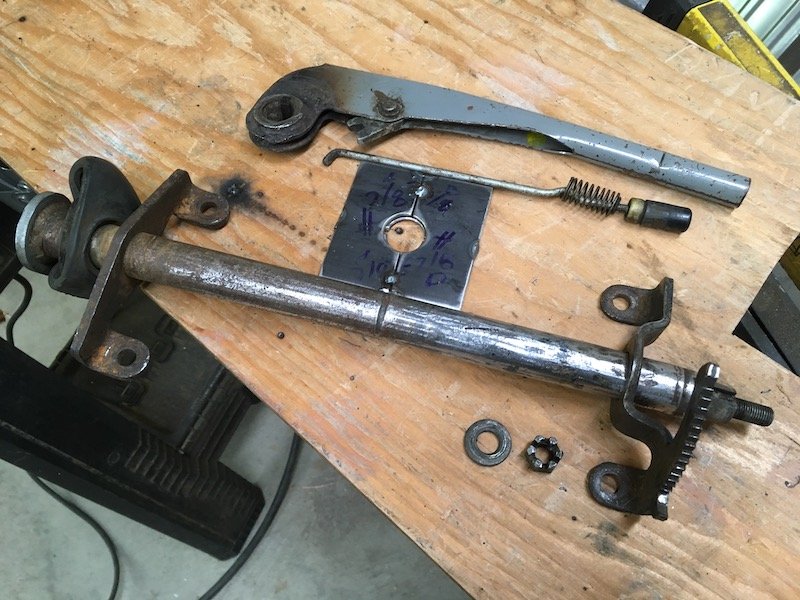
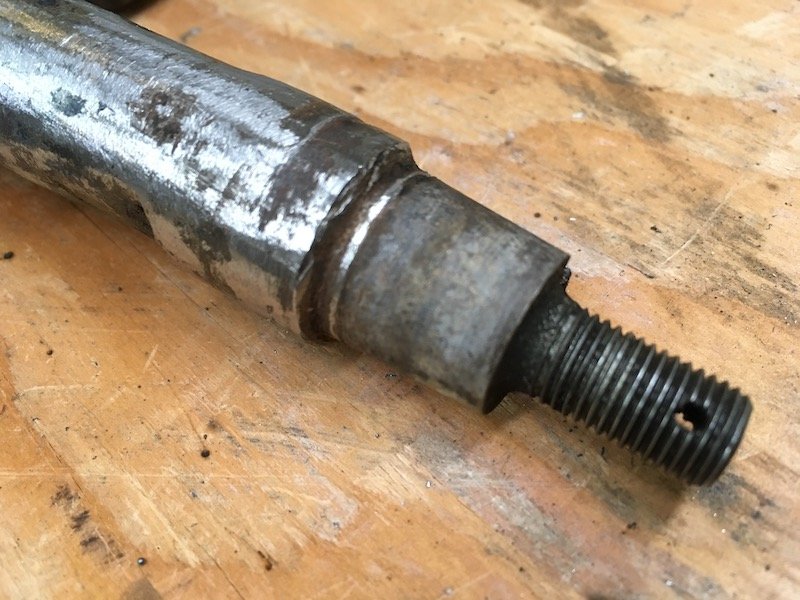
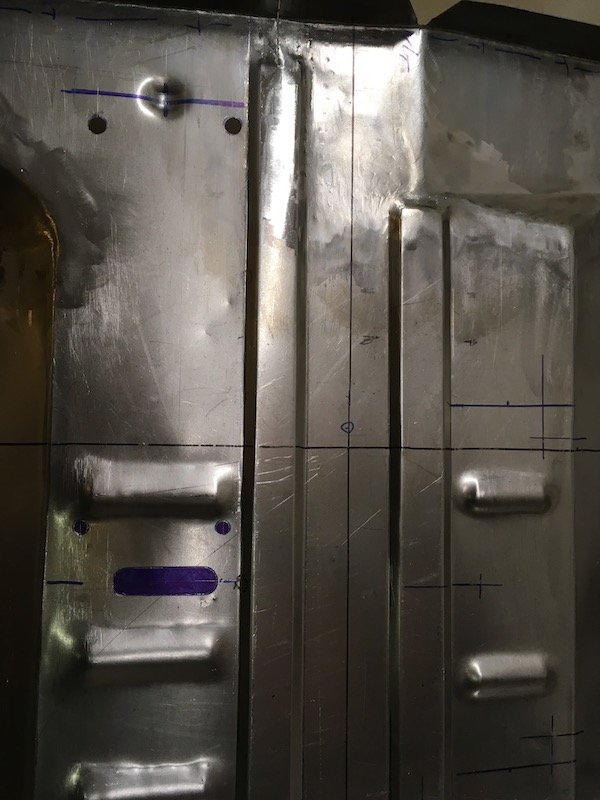
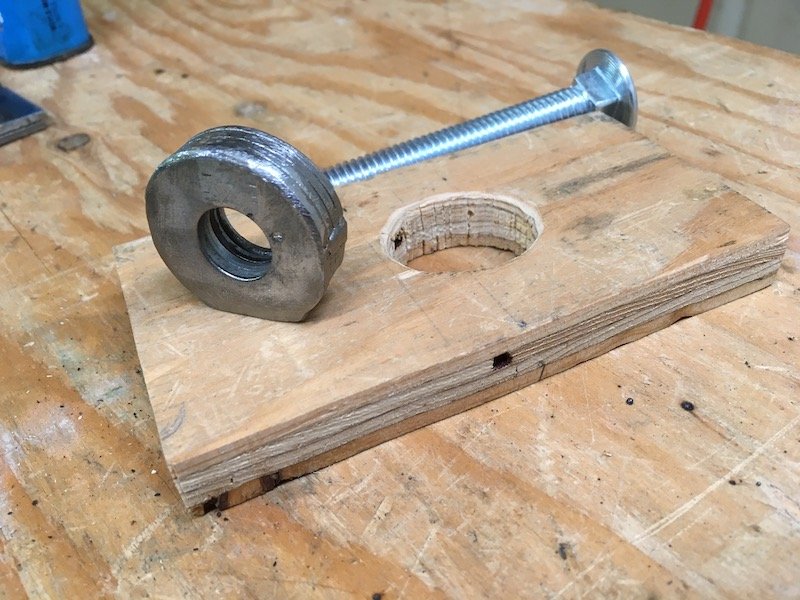
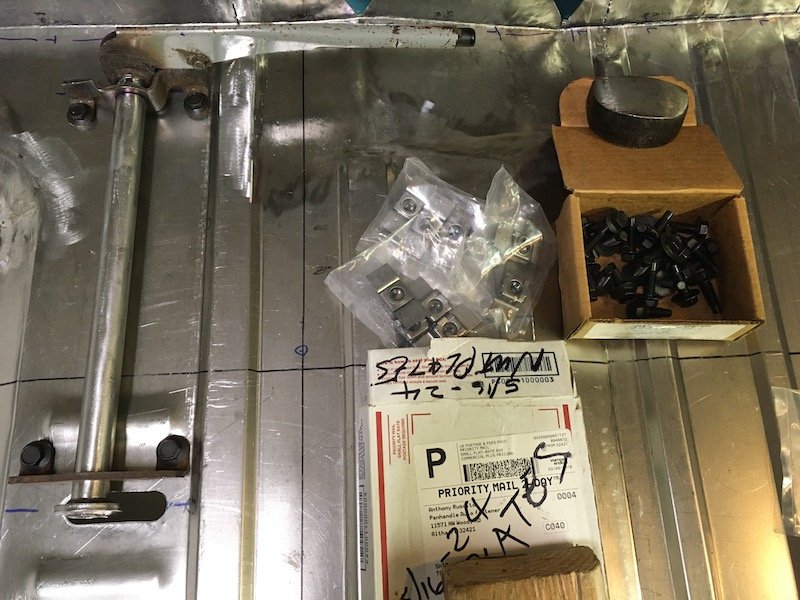
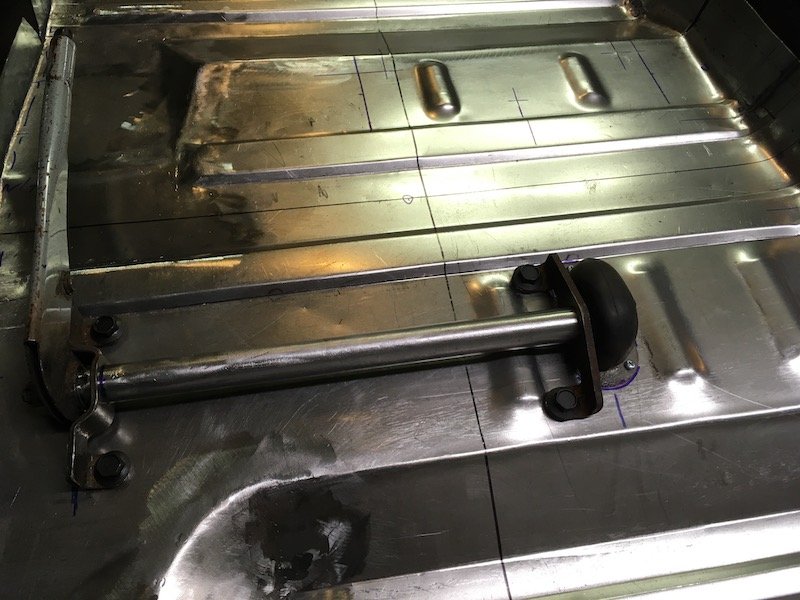
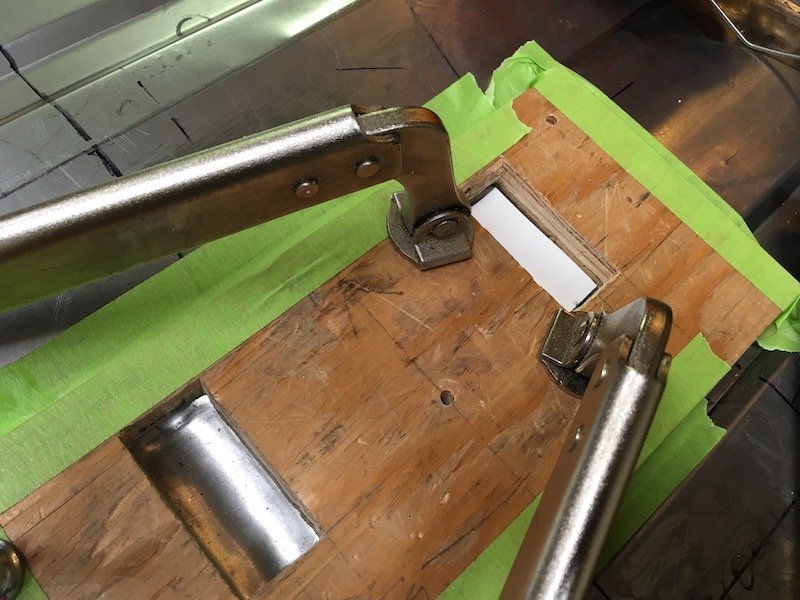
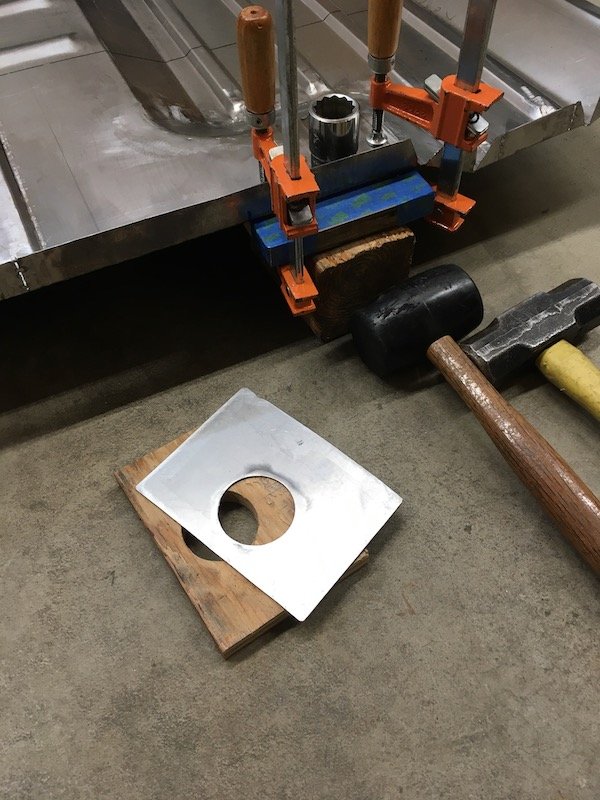
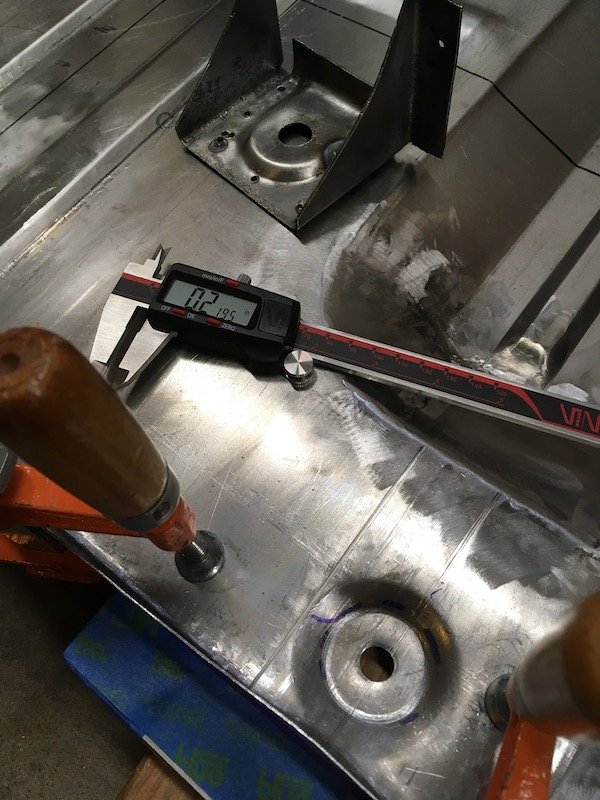
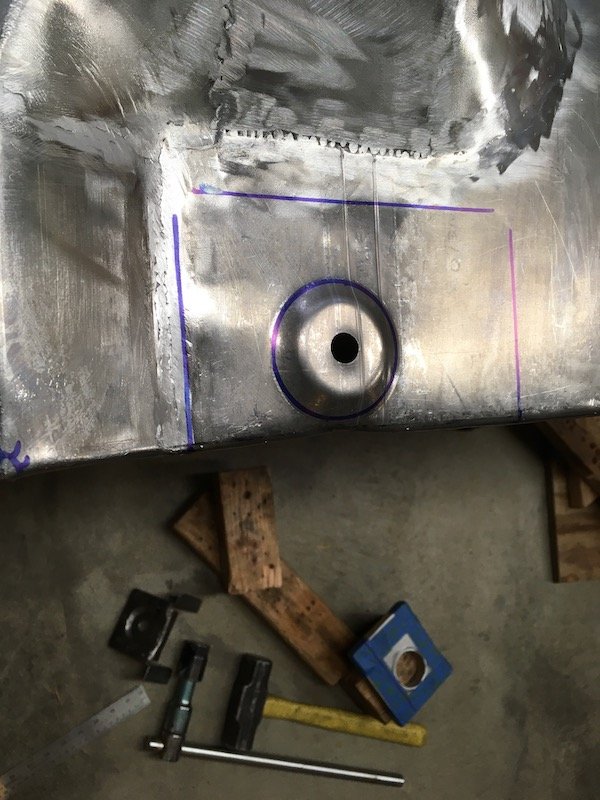
Building the 1961 Datsun 310 Bluebird Floorpan - Disassembly of the parking brake hand lever. Repair and fit checking the brake assembly installation against the floorpan. Adding the divot for the lever end. There was a problem getting this parking brake lever assembly off of the car in the first place. I need it now to temporarily attach it to the floorpan and locate the attach points and underfloor clearance cutout. The lever or arm was seized on the tapered shaft. I cut the seat bracket to remove the whole assembly and deal with the problem on the bench. Unsuccessfully, it was soaked in penetrating oil, beat, heated with a MAP torch and pried on with screwdrivers and a gear puller. Finally, I fabricated a very tight fitting, double plate steel backside restraint and popped it out with the hydraulic press. Success! At nearly 12 tons of restrained hydraulic force, the shaft popped out with a very loud bang. The abused and bent shaft and other related parts. The contact groove in the middle was cleaned up and filled with MIG weld. The bend of the shaft was corrected by beating on it. More weld metal was later applied to the shaft impact zone here and filed flush. ID of the lever. Laying out the attachment points and cutout penetration through the floorpan. Another simple tool fabricated from washers to make the same factory dimple below the lever pivot. Lever pivot dimple. Error made. Discovered I miss-located the bolt hole locations on the underside support bracket. Error was about 1/4 inch. These holes tie this structure into the mounting support above the floor for the parking brake. Above two pics shows how far off the support bracket holes were. The flanges should have been touching the inner sill. So I had to cut the square nuts off, fill the holes with weld and do these over again. More posts soon… Discussion:
- 74 replies
-
- 13
-
-
MARTS-PL310 61 Datsun Bluebird Sedan
MARTS-PL310 replied to MARTS-PL310's topic in Projects and Build Ups
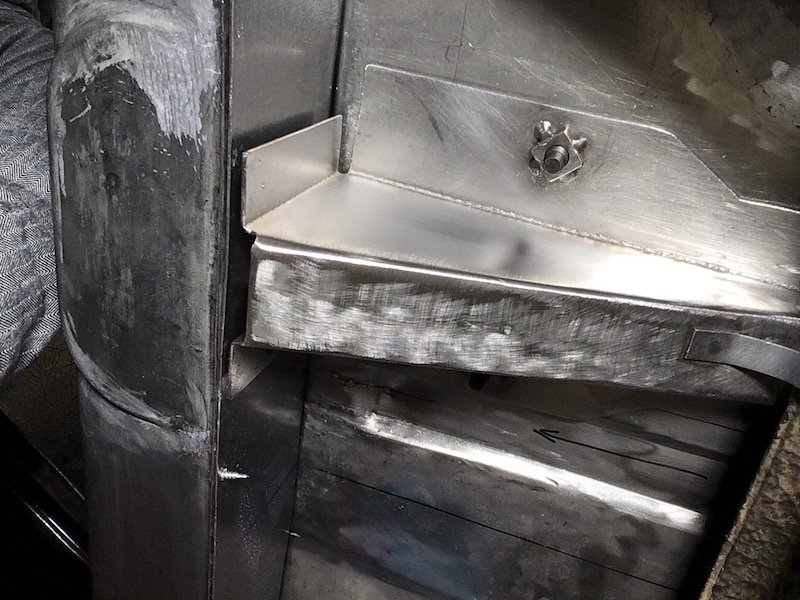
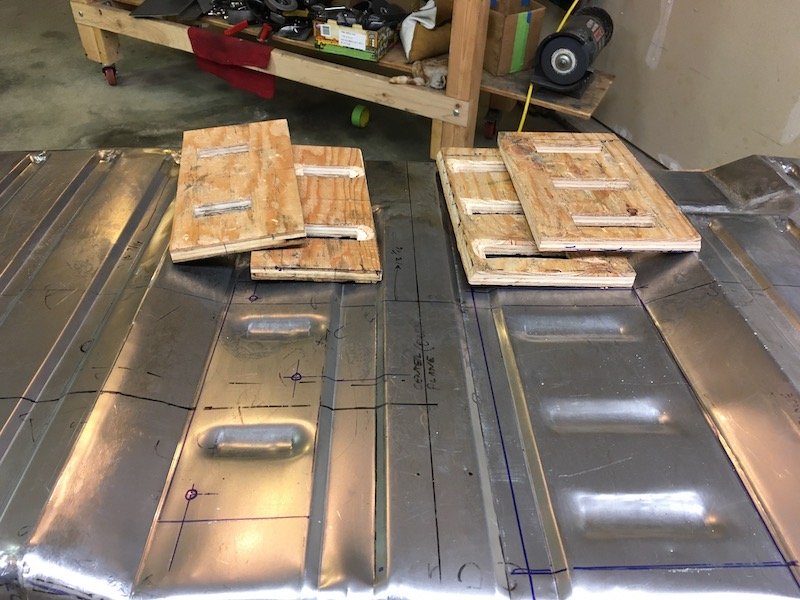
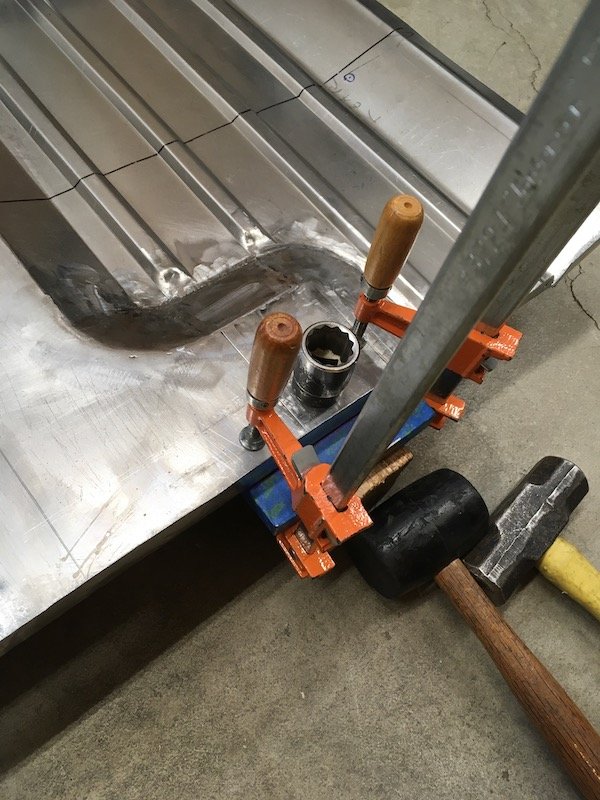
Building the 1961 Datsun 310 Bluebird Floorpan - Making the factory indents and body mount depressions. Pounding and beating in miscellaneous factory indentation features. Started by making these upper and lower forming dies from plywood. Goal and result is as shown. The dies are clamped in place and a piece of PVC pipe is laid inside for cushioning. Then an appropriate sized long socket wrench is inserted and beat on. The plastic pipe segment fatigues and breaks apart a few times and I just cut out some fresh ones and finish the job. Not a perfect result but acceptable. I know just about everything on the floorpan will be detectable as handmade, but only upon close inspection. Just trying my best here! Moving on to the body bolt mount depressions. Similar concept with two dies, very big hammers and a large 3/4 drive socket wrench. I found the upper die and plastic cushion unnecessary however. top side bottom side Fit checks and mock up continue above and underneath as progress is made. More posts soon… Discussion:
- 74 replies
-
- 13
-
-
MARTS-PL310 61 Datsun Bluebird Sedan
MARTS-PL310 replied to MARTS-PL310's topic in Projects and Build Ups
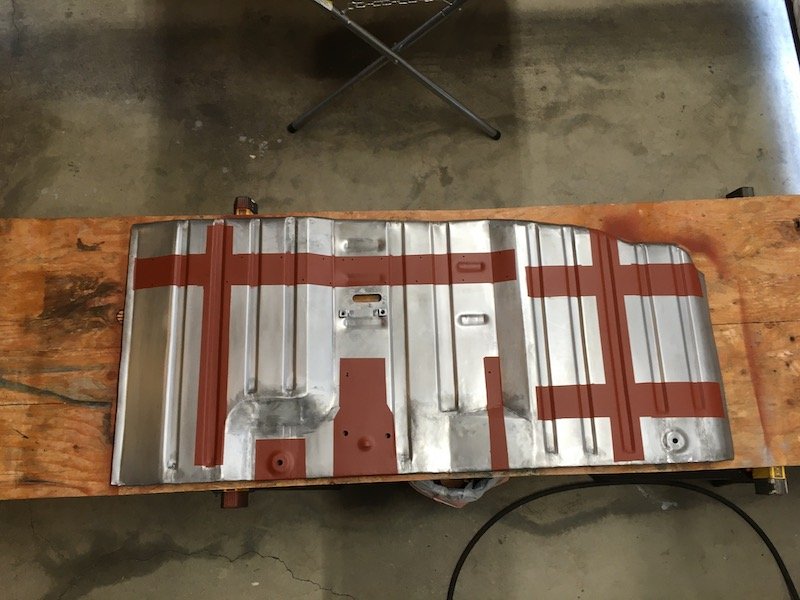
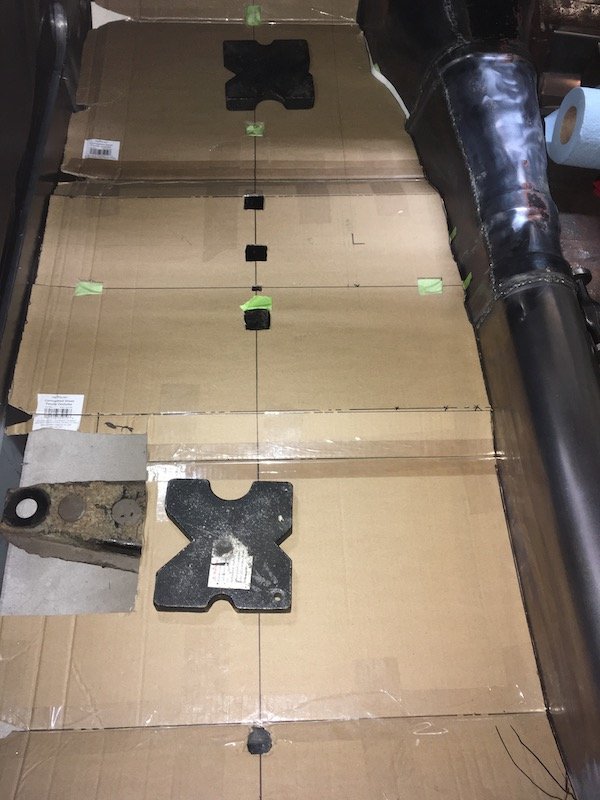
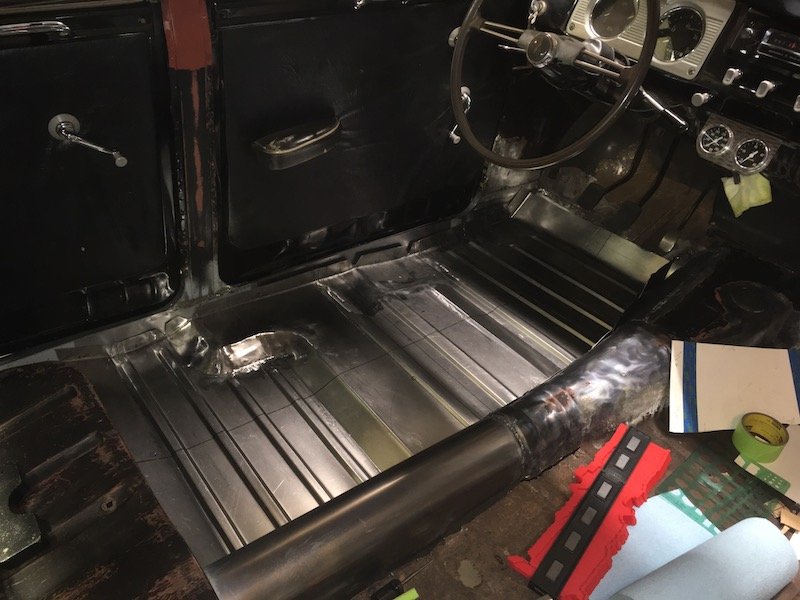
Building the 1961 Datsun 310 Bluebird Floorpan - Trimming the perimeter. Started off by taping together a big piece of cardboard. Then carefully trimmed it to fit between the inner sill, toe board, tunnel and rear seat box. Added extra margin with heavy paper to the edge. This was laid into the floorpan. Then I pie cut and panel beat the mating trans/drive tunnel edges to merge in accordance with the cardboard/paper template. The other edges were bent similar but with less beating since no blend radii were required. The result. First of dozens of fit checks in car. It looks not too bad for a start. It's a lot better than the rusted out floor that was there. Visible progress finally! I left it this way for a long while since the excess material made it a bit easier to grasp the floorpan by the edges and pull it out after each fit check. Much later, after doing several other feature additions, bend/panel beat tweaks, and satisfied the trim edge plans were stable and would work, I taped and trimmed all the finalized edges, then applied an angle grinder cut-off wheel and tin snips. Trimmed. Next up is duplicating factory body mount indentations and other stiffening features. Still lots more to catch up on. Might take me the rest of the day to upload it all. More posts soon… Discussion:
-
MARTS-PL310 61 Datsun Bluebird Sedan
MARTS-PL310 replied to MARTS-PL310's topic in Projects and Build Ups
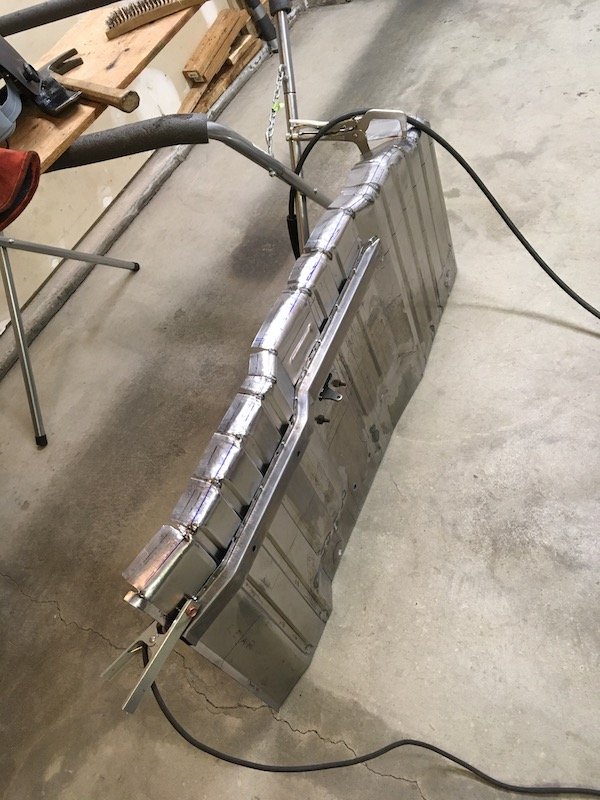
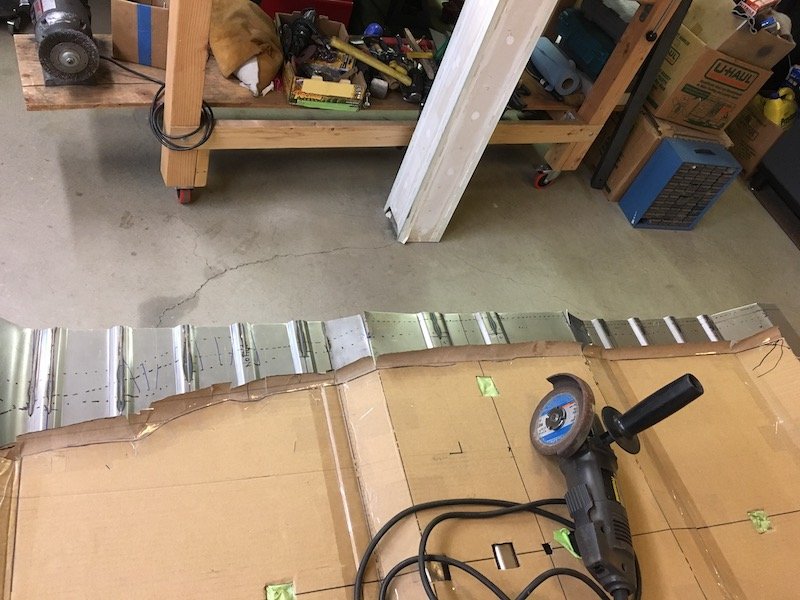
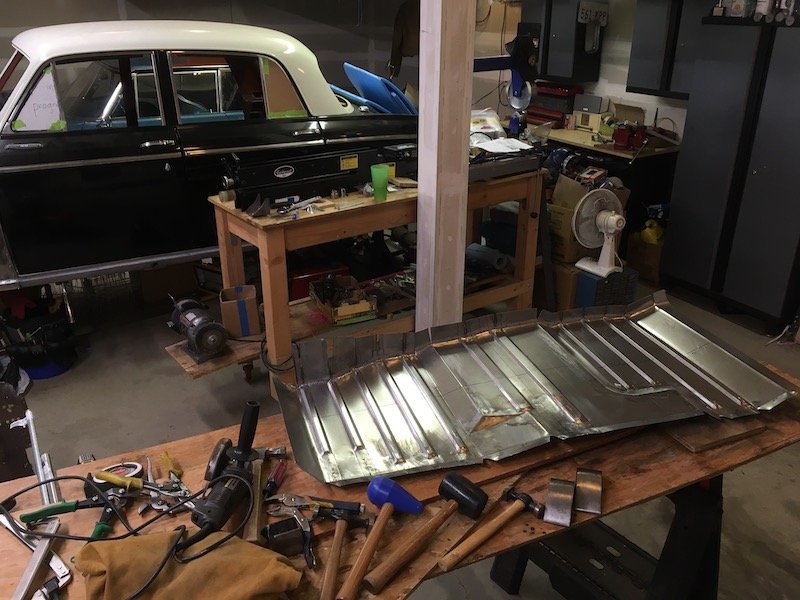
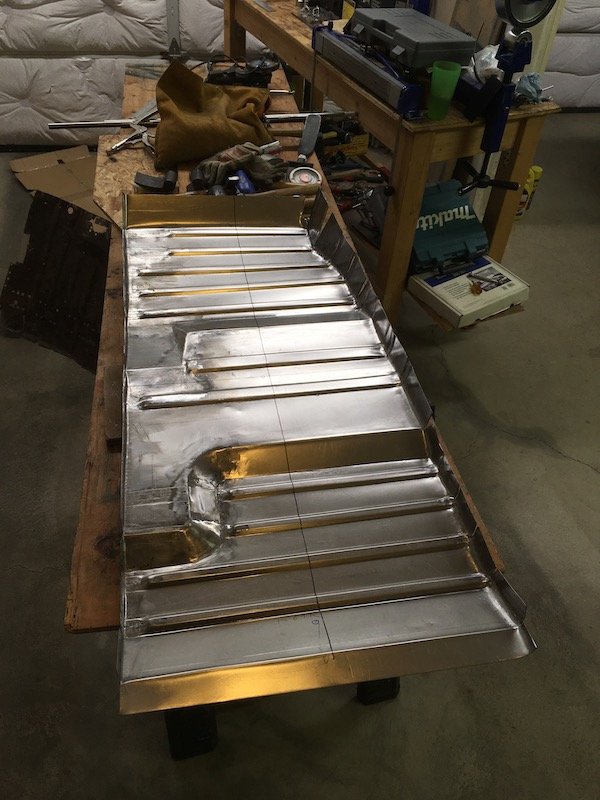
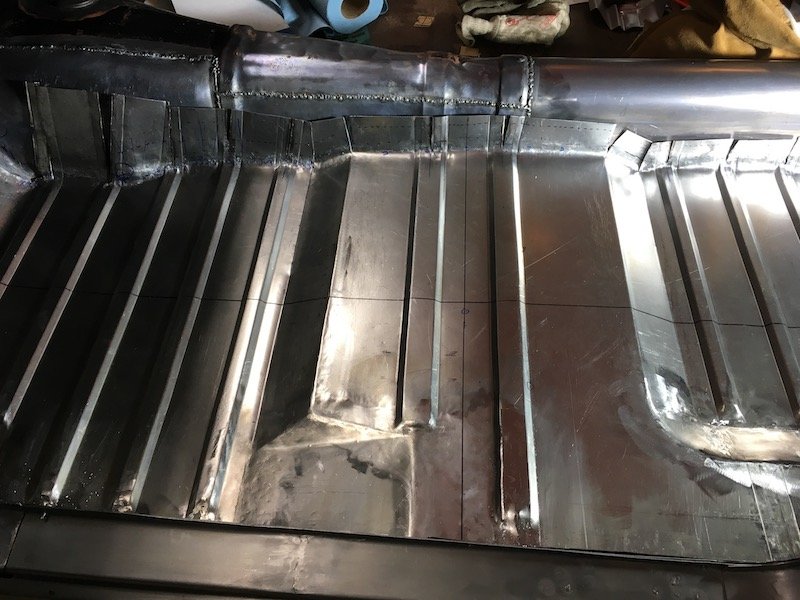
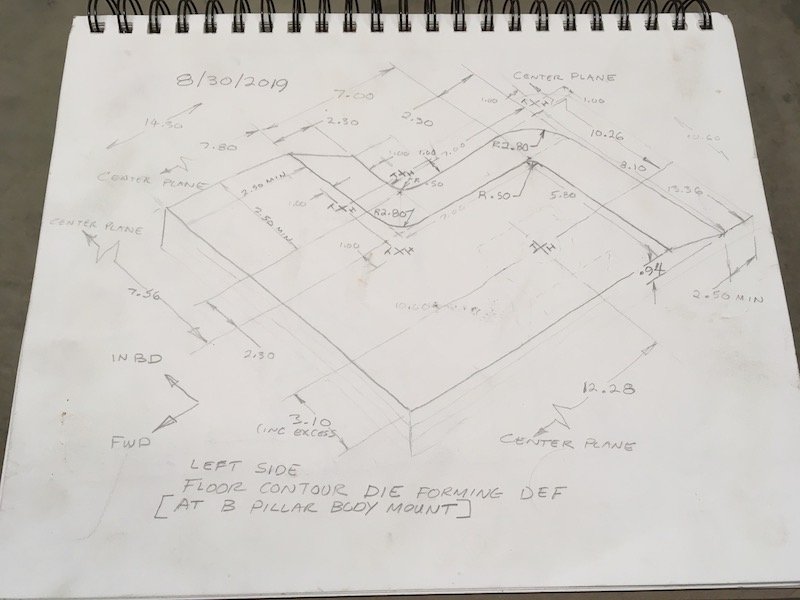
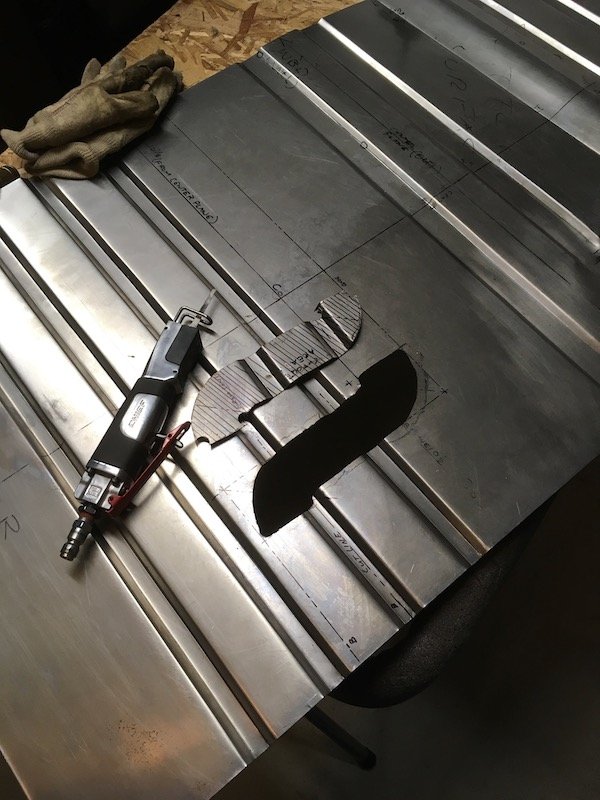
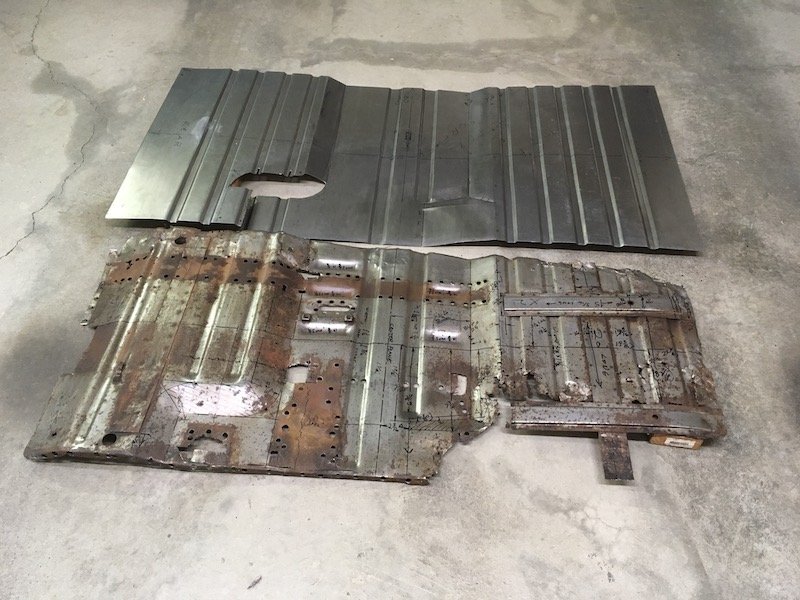
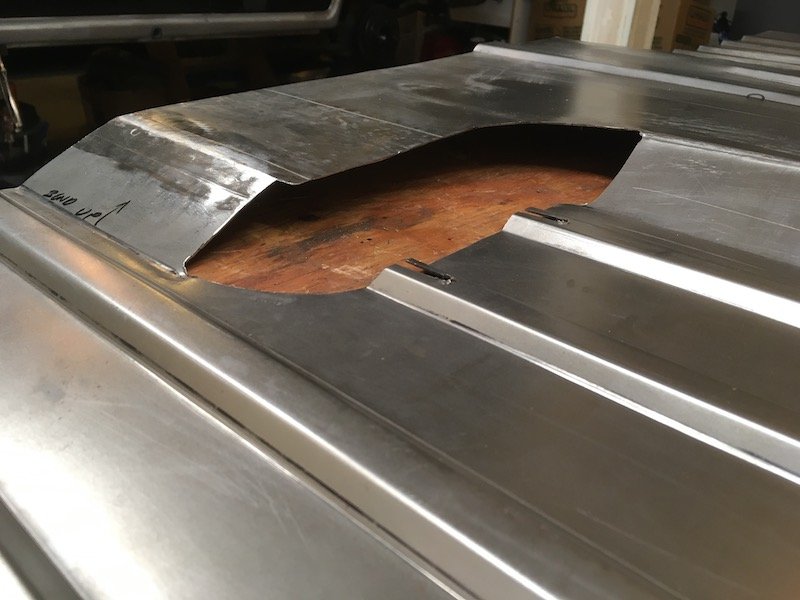
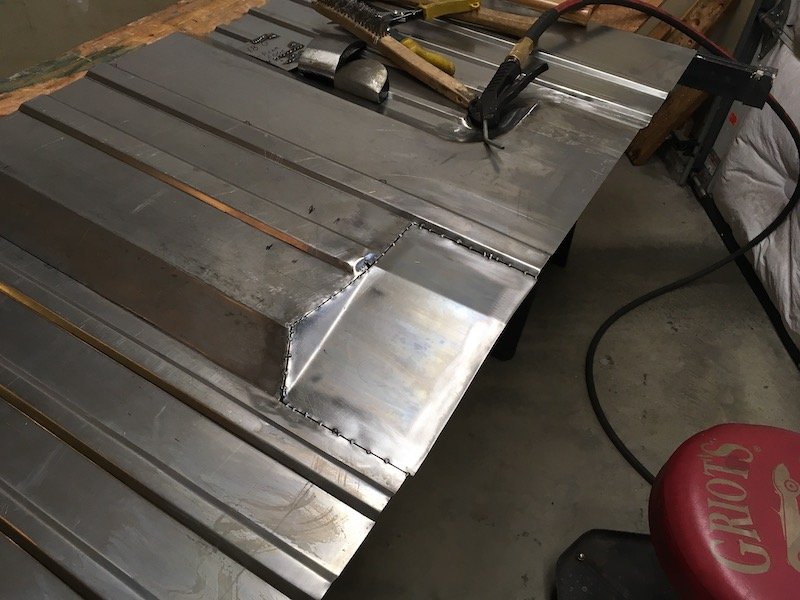
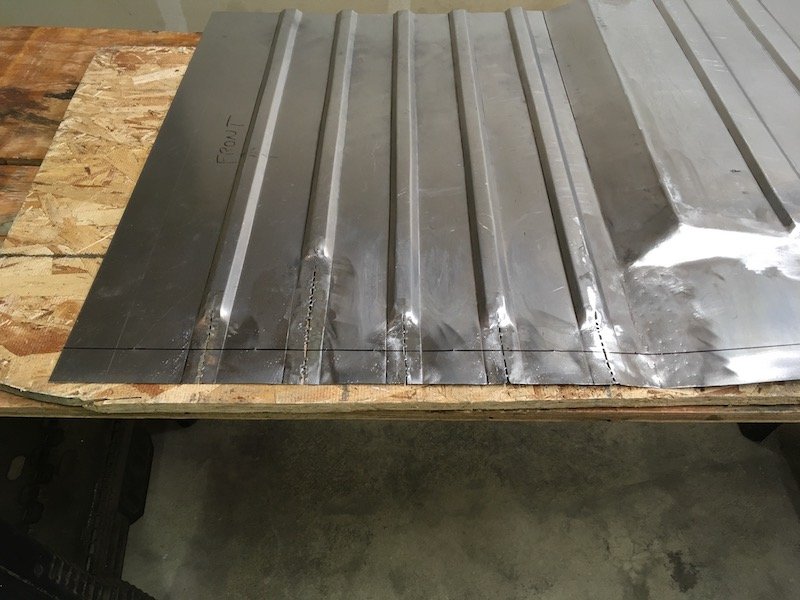
Building the 1961 Datsun 310 Bluebird Floorpan - 3D shape cutouts and weld in. So I first attempted to make a male and female die set to do the necessary metal forming but quickly discovered this would not work for me. The force required to squash the metal together goes up exponentially with the formed area size. Since I don't have access to giant presses I chose to cut and weld the shapes into the new floorpan. Started with a sketch from the remains of the existing floorpan. Made a strategic cut, flatted corrugations, made some bends and welded the loose end. 3D area is welded closed with two conical shapes and a rectangle patch. Same treatment was applied to the 3D parking brake lever ramp area. Then started cutting, tack welding and flattening the corrugations where needed. Next up is rough trimming the perimeter. More posts soon... Discussion:
- 74 replies
-
- 14
-
-

.jpg.312f68f9ca47874c114d1ad16228b9c6.jpg)
.jpg.c3567ddc9f9f1feed21913512c4a33e9.jpg)
.jpg.cd1ce1c81bf1b4db906172e017f6e48b.jpg)
.jpg.d6f16de9dc524af1c8c32cae4a9347ac.jpg)
.jpg.677d1bca1c0073a5627c93d9abaccaf1.jpg)
.jpg.02e68628ec2f81d8e80ed27d9e05cda2.jpg)
.jpg.a69187b522750a09931794d2cc088bb6.jpg)
.jpg.95ab4d1cbbb935c6638573d635964b9f.jpg)
.jpg.8a8bf4a6e72d9b2406ba60695aa1d958.jpg)
.jpg.e3e9945788bb633fb722d4976e8fb834.jpg)
.jpg.27015deba7043cd7b77e24cdffb2fe4b.jpg)
.jpg.da9c08485edd0ae258b2951e8345b618.jpg)
.jpg.e12c2a9fc06dbd73179710daf1acd479.jpg)
.jpg.d7b7239478911a988839c5b66f7d0da7.jpg)
.jpg.6dcfcfa6ea9c0f05c235e610fb758ff4.jpg)
.jpg.11b98fe10db676e40dabaf24d38c5323.jpg)
.jpg.79617009d92e231a45128d6139ad86a6.jpg)
.jpg.75f755e78f0cb29b9b65ed18f22a839a.jpg)
.jpg.5fcd2b41e152e660655fde43c2c51dae.jpg)
.jpg.3ccbc1511fa7418660c4b04c2e1b260f.jpg)
.jpg.61746cfcdbe2b4b108963ef0ca8898d7.jpg)
.jpg.292584779d752e0dc2b57d1a32859ffa.jpg)
.jpg.99fcaf25c7d7005fc4f55816ed230a40.jpg)
.jpg.b9155f7769ad9db3e09e641fa66b61eb.jpg)

.jpg.bfd8b030f2791dff3c579f739e0bb4f9.jpg)
.jpg.7958d35ac0ebdb88fbdc11c1e9ddc037.jpg)
.jpg.da1c48b0e61854074898d369bd1851cb.jpg)
.jpg.c2cdff4035ddb45e8f2a7dd6af29522a.jpg)
.jpg.090d0c829659c97dcb6af190a40d158f.jpg)
.jpg.69e39dda205d9db5b6c23d128dca05b4.jpg)
.jpg.b5ff1456271593268fcc879bd6ec11b8.jpg)
.jpg.e5ab5393e732f71c975442dd17a8f17f.jpg)
.jpg.579e275ef72aa6f0db88d8cf9a207061.jpg)
.jpg.85c8baa01246a267c65c9e5fba459032.jpg)
.jpg.3ef915e4d81f60ff74d0e3357a9daa32.jpg)
.jpg.241f6bda199e5460908ad802c59ceebb.jpg)
.jpg.4904bb6a7e8fded6960fcbe747a33904.jpg)
.jpg.f2df22f2fde17747a46d9c4f4291640e.jpg)
.jpg.b24ba5a335a1b9ce433457f1425cbce5.jpg)
.jpg.46fa000cb98b93d78739ba3de8a0aee4.jpg)
.jpg.92d9d8a8f5639ffc9a3d26f4bacad199.jpg)