


1963 AP5
-
Posts
352 -
Joined
-
Last visited
Posts posted by 1963 AP5
-
-
- Popular Post
- Popular Post
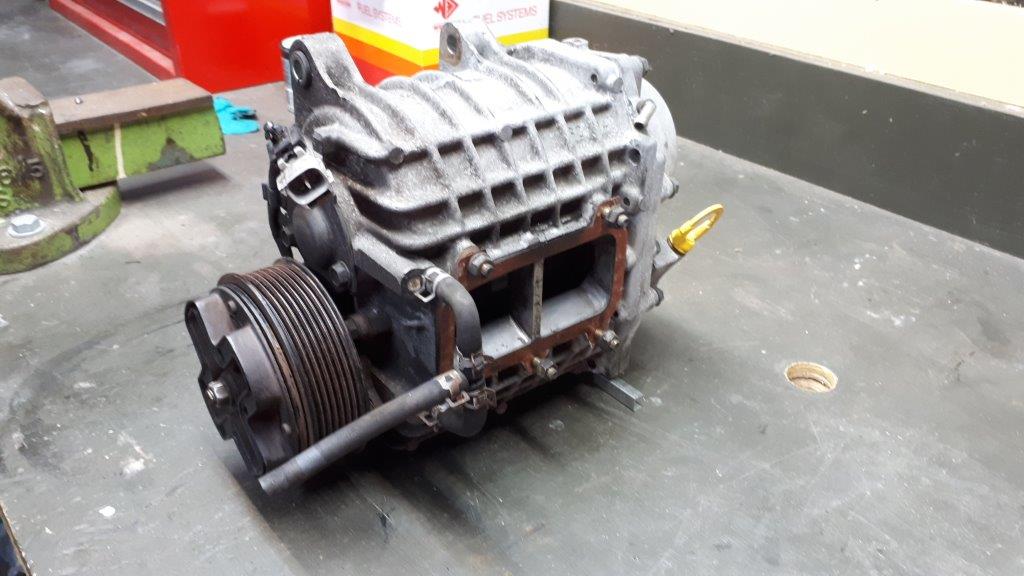
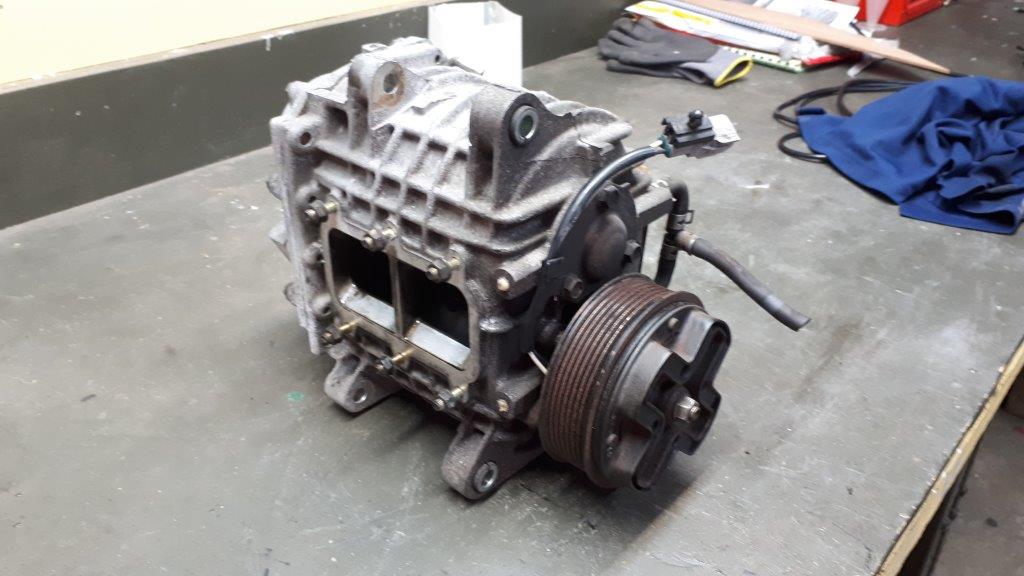
The Sigma has been sitting around a bit. I drive it every so often but it's kind of underpowered compared with my Aussie 6 cylinder stuff and I really wish it wasn't. I have been toying with the idea of repowering it but I thought I might try to liven up the stock engine first. A buddy of mine dropped this off over the weekend. I really have no idea what I am doing but that has never stopped me in the past. What could possibly go wrong?

-
 12
12
-
 1
1
-
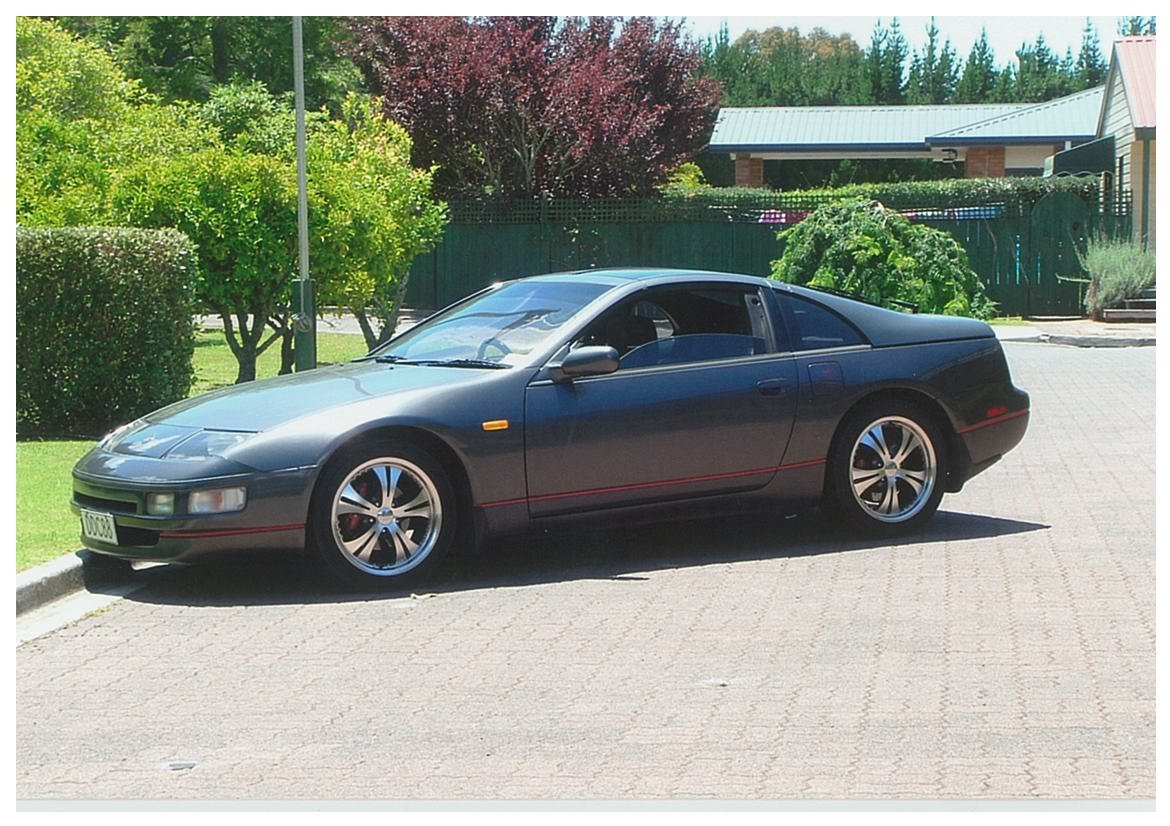
Well I really liked the one I had a few years back, it was a SWB version.
I think all Z cars are cool , I plan to have my midlife crisis in a 370 (this will be uncool).
-
3
-
-
- Popular Post
- Popular Post
Here you go @MaxPower
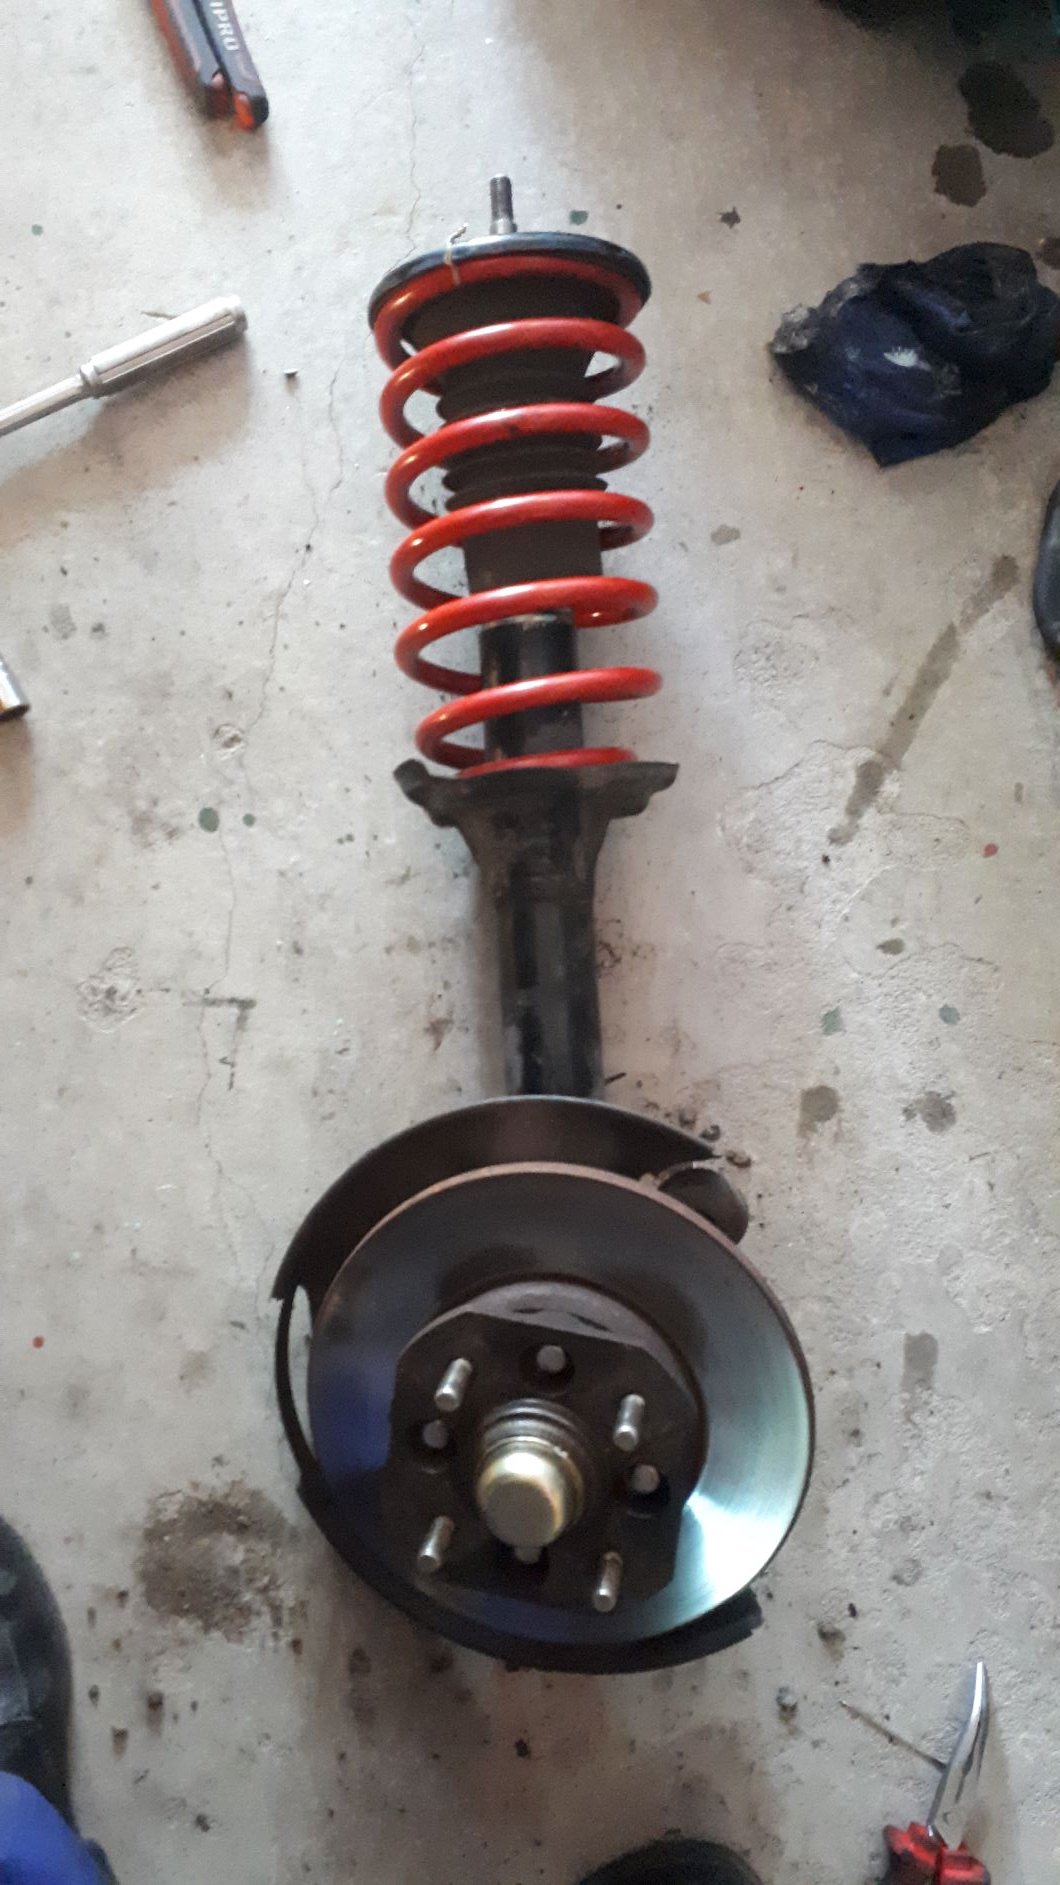
The front springs were just a little loose with the car jacked so I made them secure the oldschool way with some locking wire.
-
8
-
2
-
 1
1
-
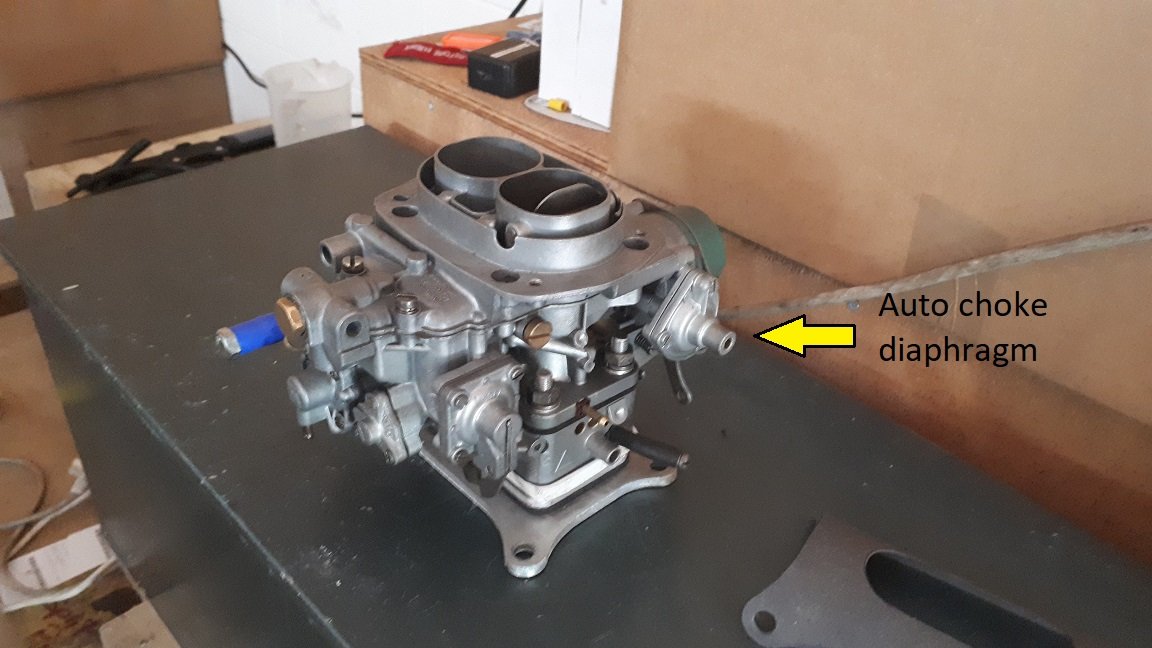
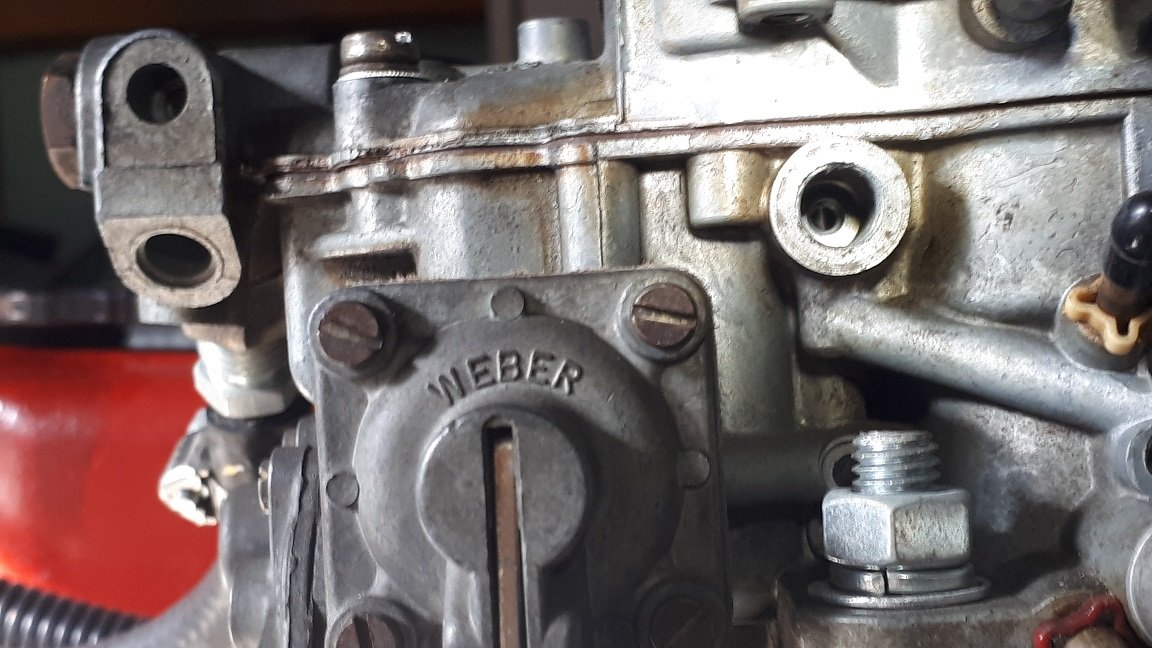
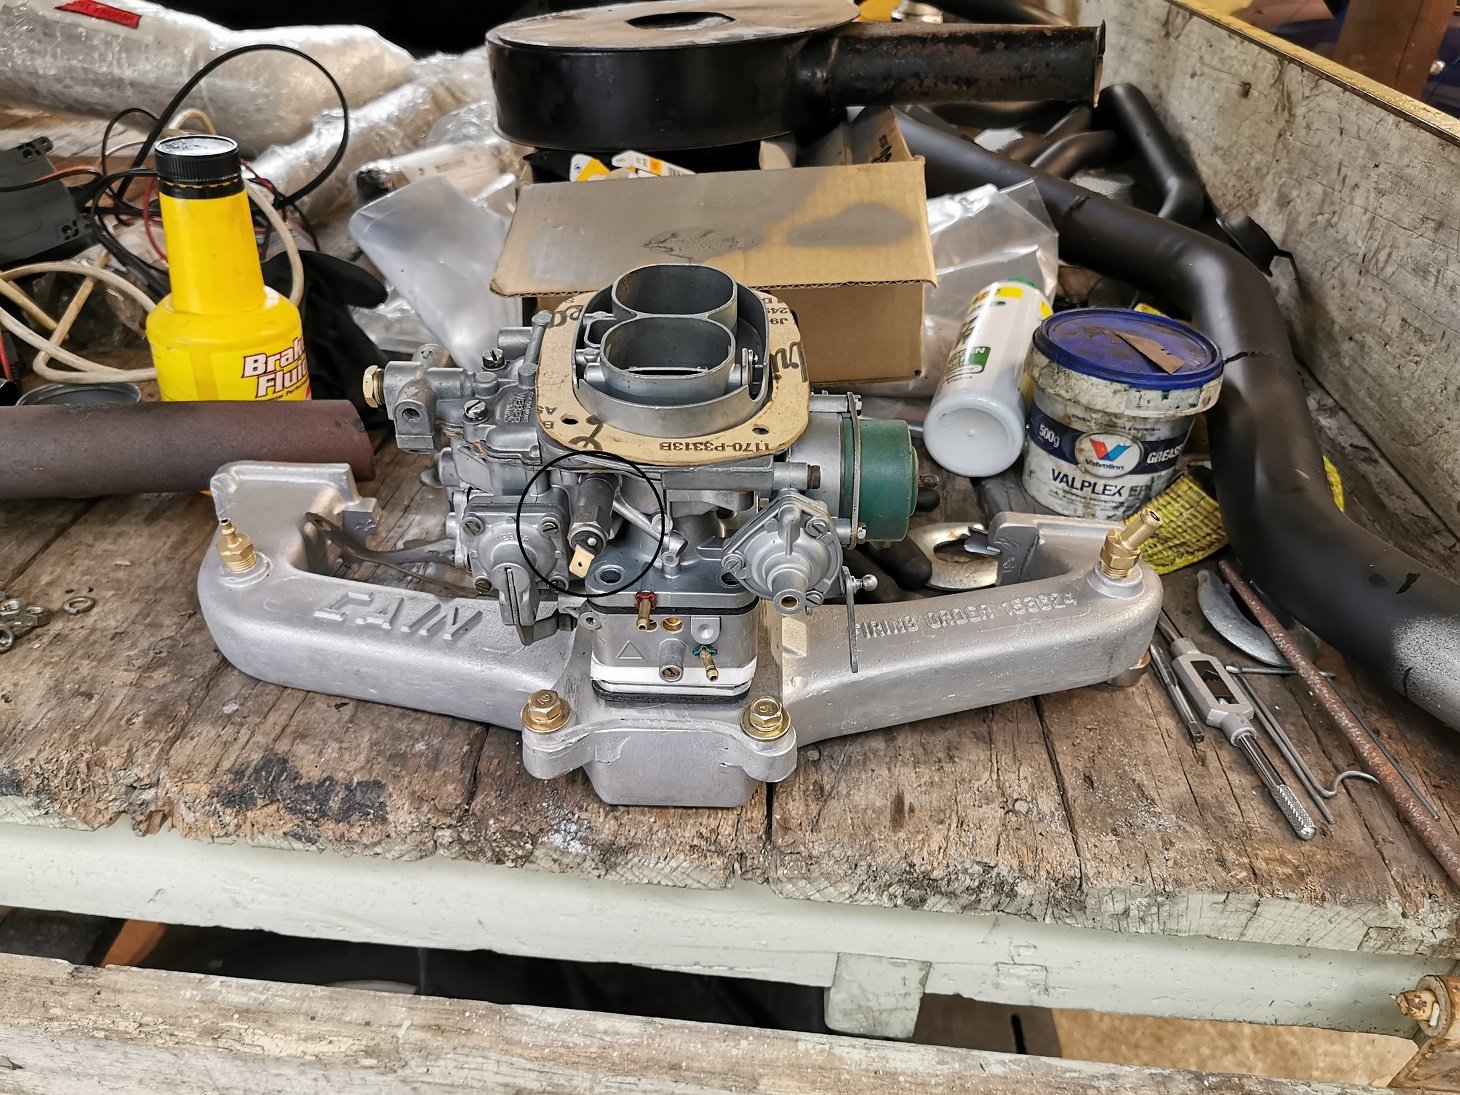
The carb is all back together and hopefully in working order now.
The main things I have changed are:
1) Replaced the primary jet holder and the jet. I have a 60 in my Weber and I did some digging through my parts box and found a spare 57 so I fitted it for you. This will be pretty close but it may still need some minor tuning if everything goes well.
2) Tidied up the carb spacer and fitted fresh gaskets.
3) Fixed up the idle mixture adjustment screw. I found that this was kind of gummed up and when it felt like the screw was all the way in, it was actually about 3mm away from the orifice in the carb barrel. I think this would have made it almost impossible to correctly adjust the idle fuel mixture. I cleaned it all up and pre-set the adjustment screw one and a half turns out. This should be a reasonable starting point but will no doubt require some fine tuning.
4) Sorted out the various vacuum connections and labelled the ones you need to connect to get things working properly.
I did notice that the vacuum diaphragm for the automatic choke isn't in good shape. Did you get one of these with your carb kit? If so I think you should fit it to the carb. All the other choke components seem to be in reasonable order and I think the auto choke would probably work if this diaphragm was replaced. The idle-up adjustment screw was missing so I have replaced that so all that's missing now is the vacuum diaphragm.
-
6
-
2
-
-
- Popular Post
- Popular Post
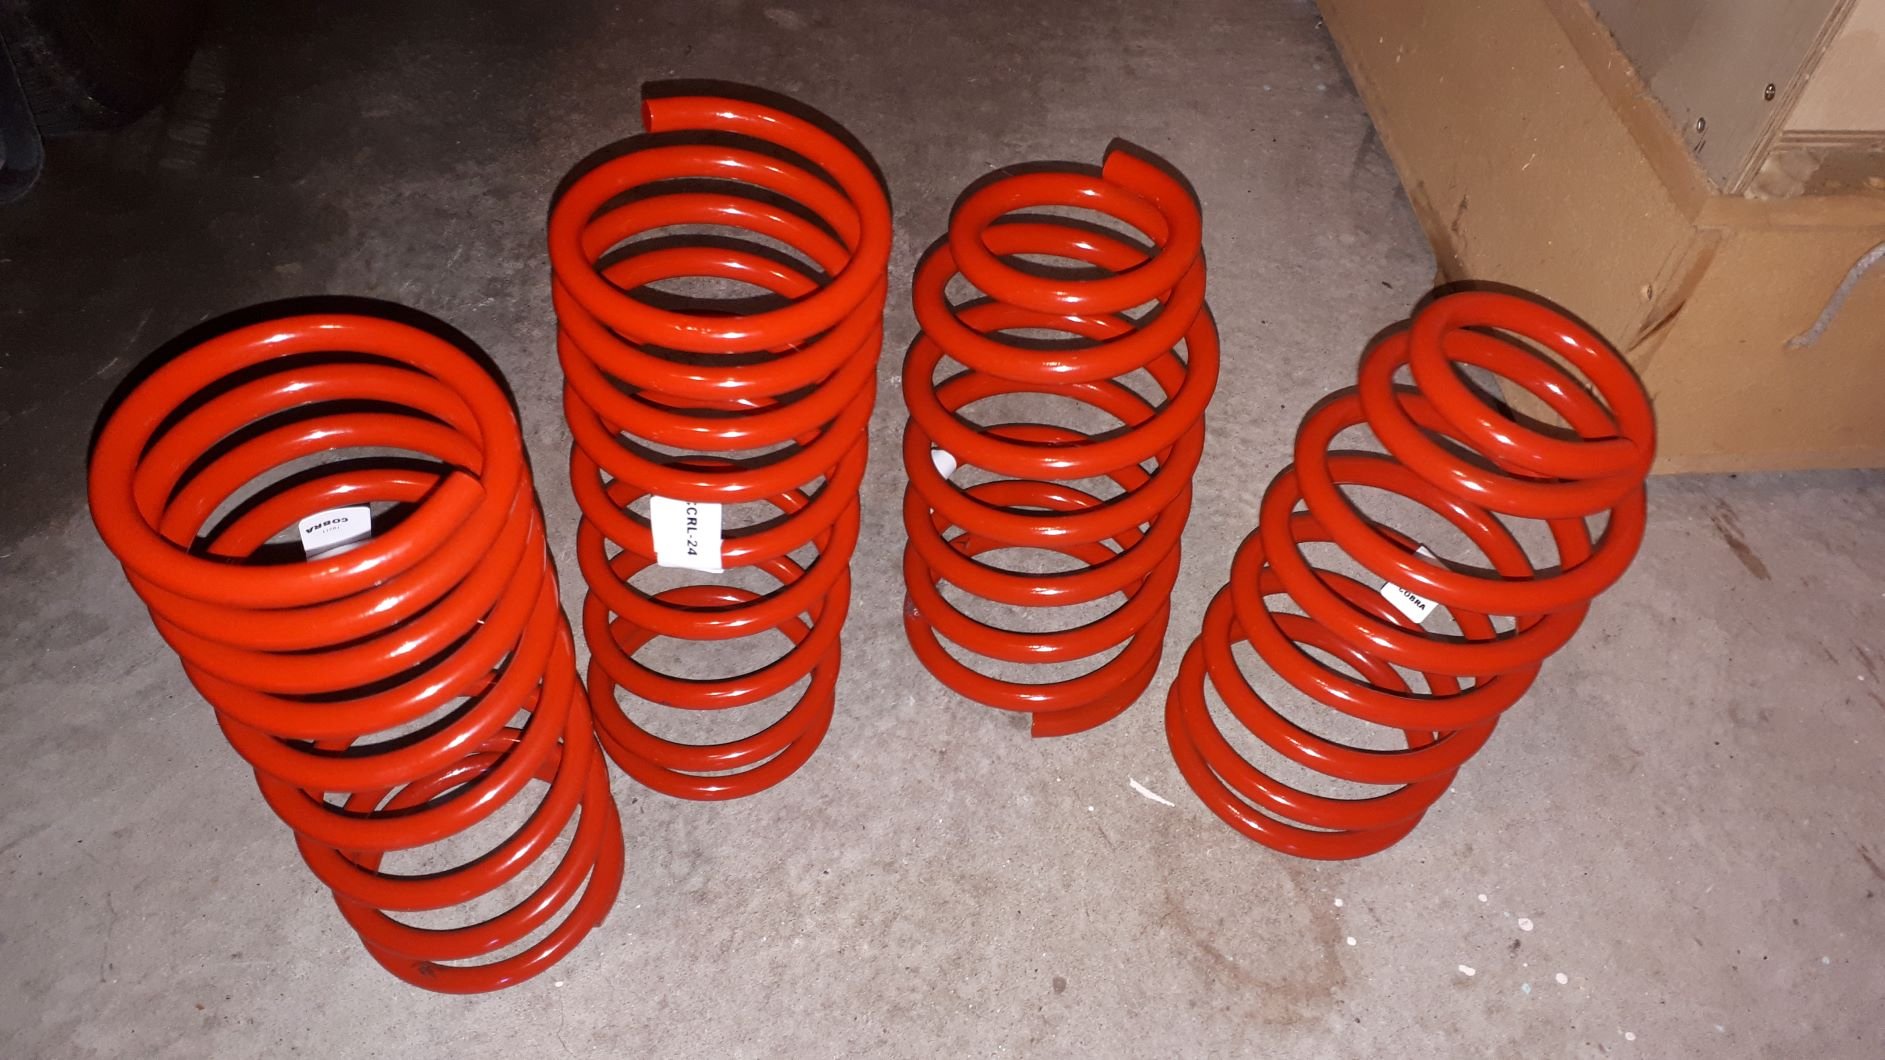
In the 1980's car manufacturers seemed to think it was a good idea to supply their customers with unnecessary and unsightly additional ride height. Last weeks project was to correct this with new springs and shocks all round. The car didn't drive particularly well so I did a back yard wheel alignment with string and a tape measure. I found that the front wheels were actually toed out so I also corrected that problem and it drives heaps better now. I will get it in for a proper wheel alignment sometime soon.
-
12
-
Finally I have an interesting theory about the make shift jet holder. While re-purposing the solenoid body as a jet holder seems like a good idea I think there may be a problem with this in practice. The solenoid body has quite a large internal volume compared with a jet holder and this void must be filled with fuel before the primary low speed circuit can begin to supply fuel to the engine. Further to this, any air or vapour trapped in this area will affect the fuel delivery to the engine. I believe there is also the potential for fuel to leak back down from this little reservoir again affecting the fuel mixture at low to mid engine speeds. The good news is I am sure I have a spare jet holder for an ADM somewhere in my parts stash and if I can find it I will send it your way so you can give it a try. I will put it all back together sometime this week and hopefully we can get it sorted.
-
4
-
2
-
-
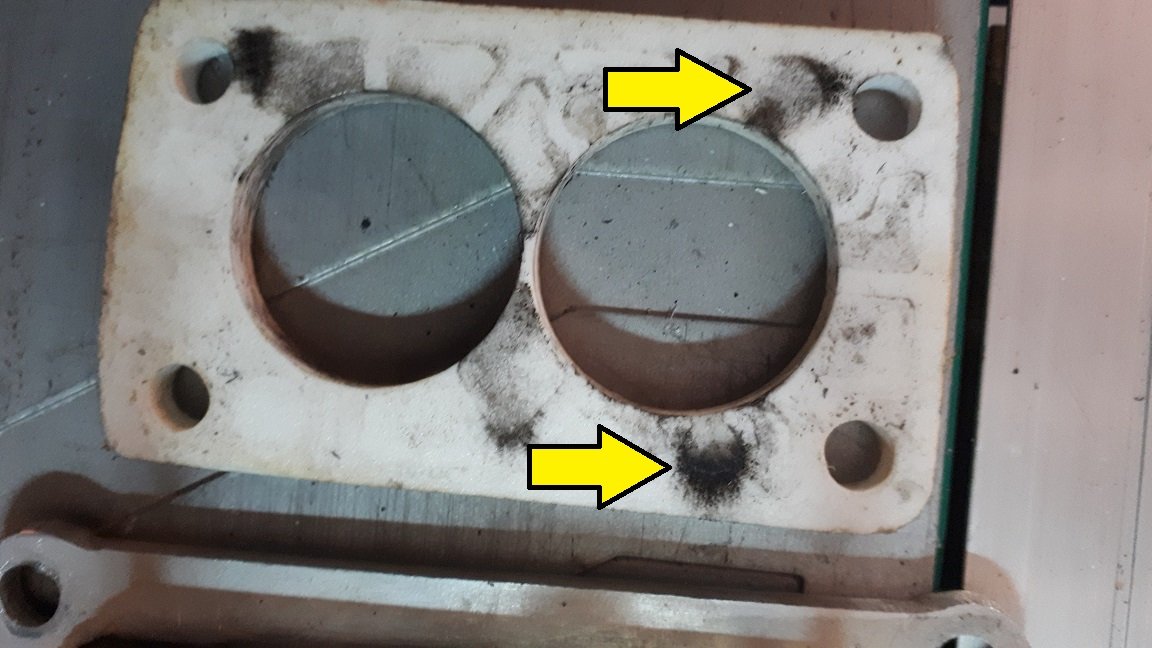
The next thing I noticed was the absence of gaskets on the spacer at the base plate. When I disassembled this I found evidence of vacuum leaks in this area. I will tidy this up and reassemble it with a couple of gaskets installed. If we manage to get the carb working properly you will need to replace this with a metal spacer.
-
1
-
-
Had a look at the weber on the weekend and i have discovered a few things and have a couple of ideas to share.
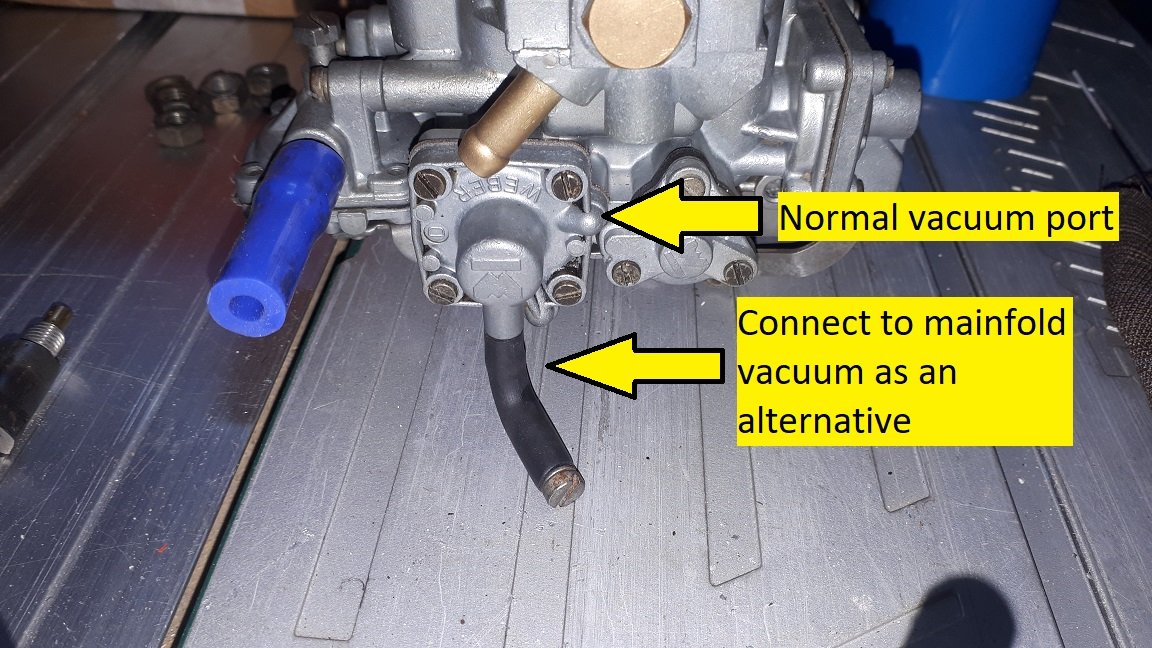
Firstly the accelerator pump boost diaphragm is set up in a rather unusual manner. On my ADM this diaphragm is supplied with a vacuum signal internally (shared with the power valve) but on your carb the internal port is blanked off and it seems to be supplied from an external vacuum source. Either someone has set it up this way on purpose, although I am not exactly sure why you would do that, or it simply has some incorrect parts fitted. Either way I am sure you can make it work by simply connecting this vacuum line to manifold vacuum.
-
1
-
-
I remember one of my mates mentioning that the Royal Enfield bikes built in India had a separate gearbox. I think they kept building them that way until quite recently so maybe it would be worth investigating. I don't know how strong they would be. Apparently they are a very common bike over there and you could probably get the bits using the power of the internet.
-
Yea utes will always be right up there as the weapon of choice for bogans everywhere, RWD, cheap (sometimes) and good for skids.
It's actually surprising how much early 90's stuff is starting to appear at classic car events etc. People are certainly starting to take these cars seriously as classics. You know you are getting old when you start to get feelings of nostalgia when you look at an early 90's car.
-
6
-
 2
2
-
-
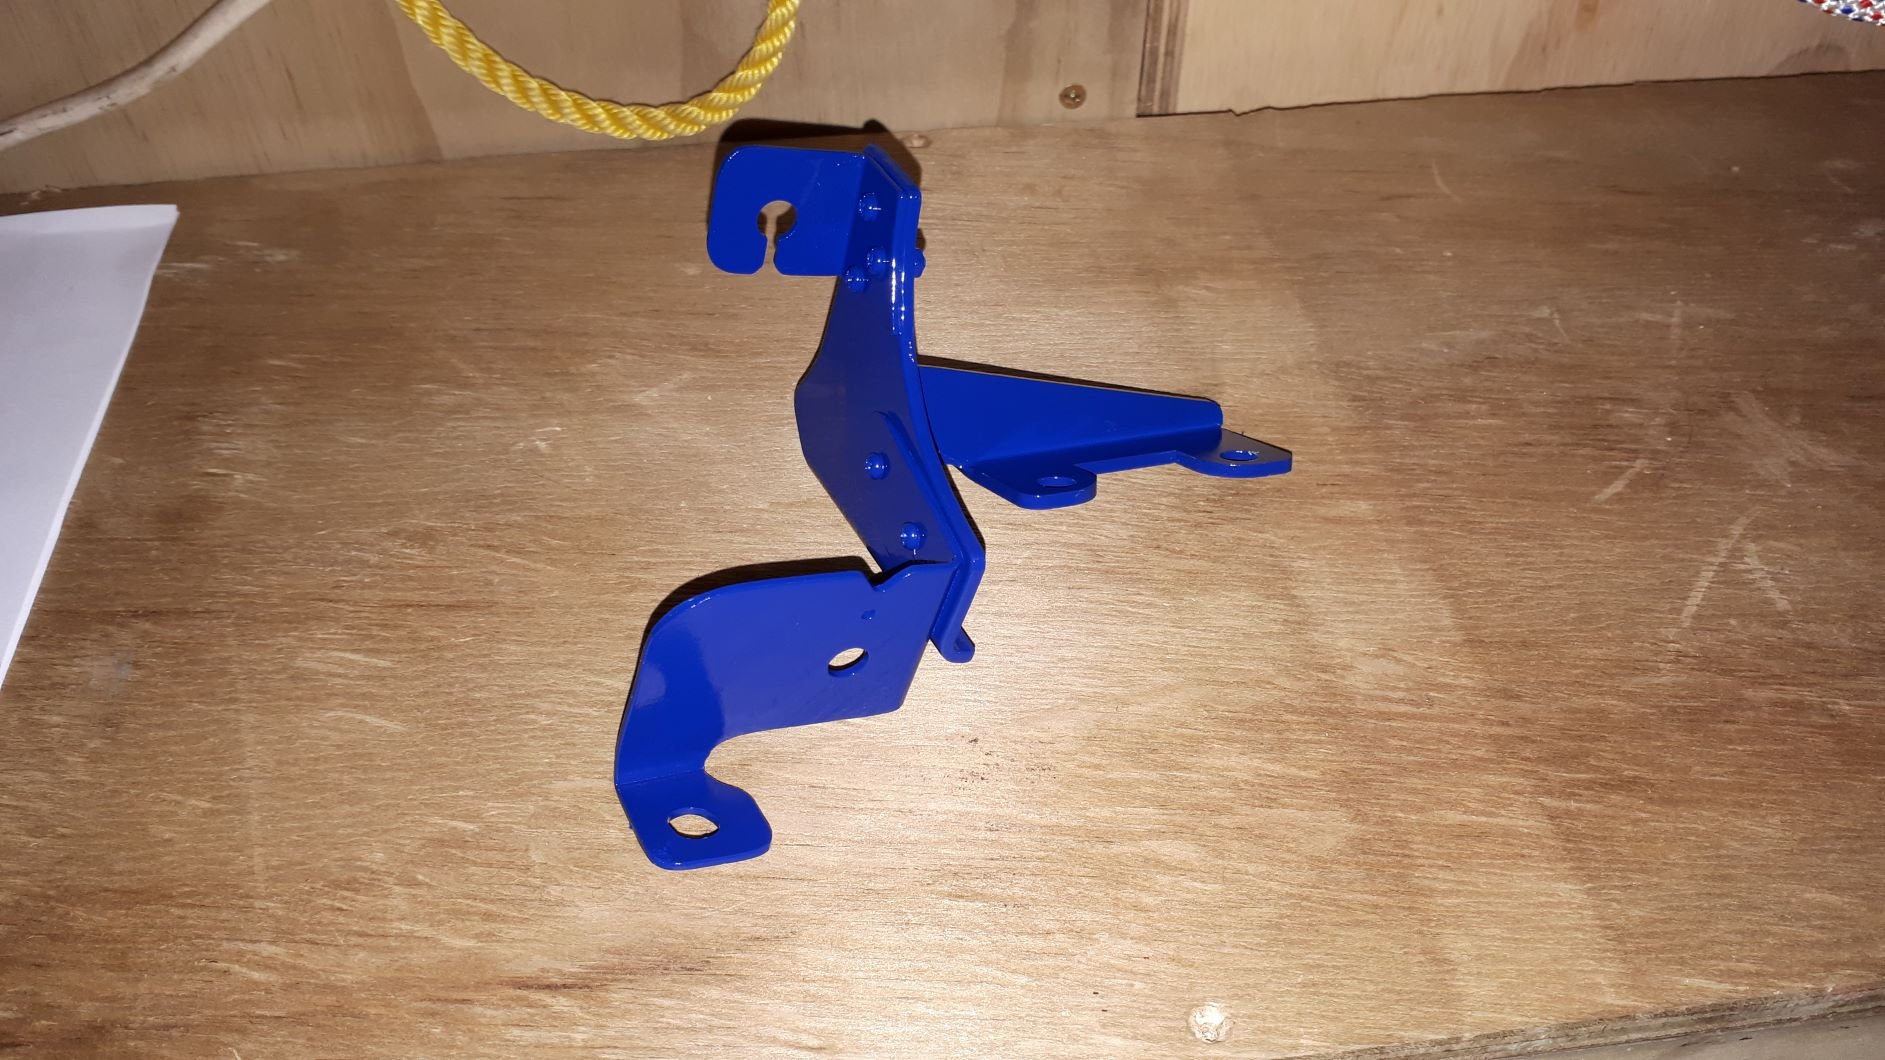
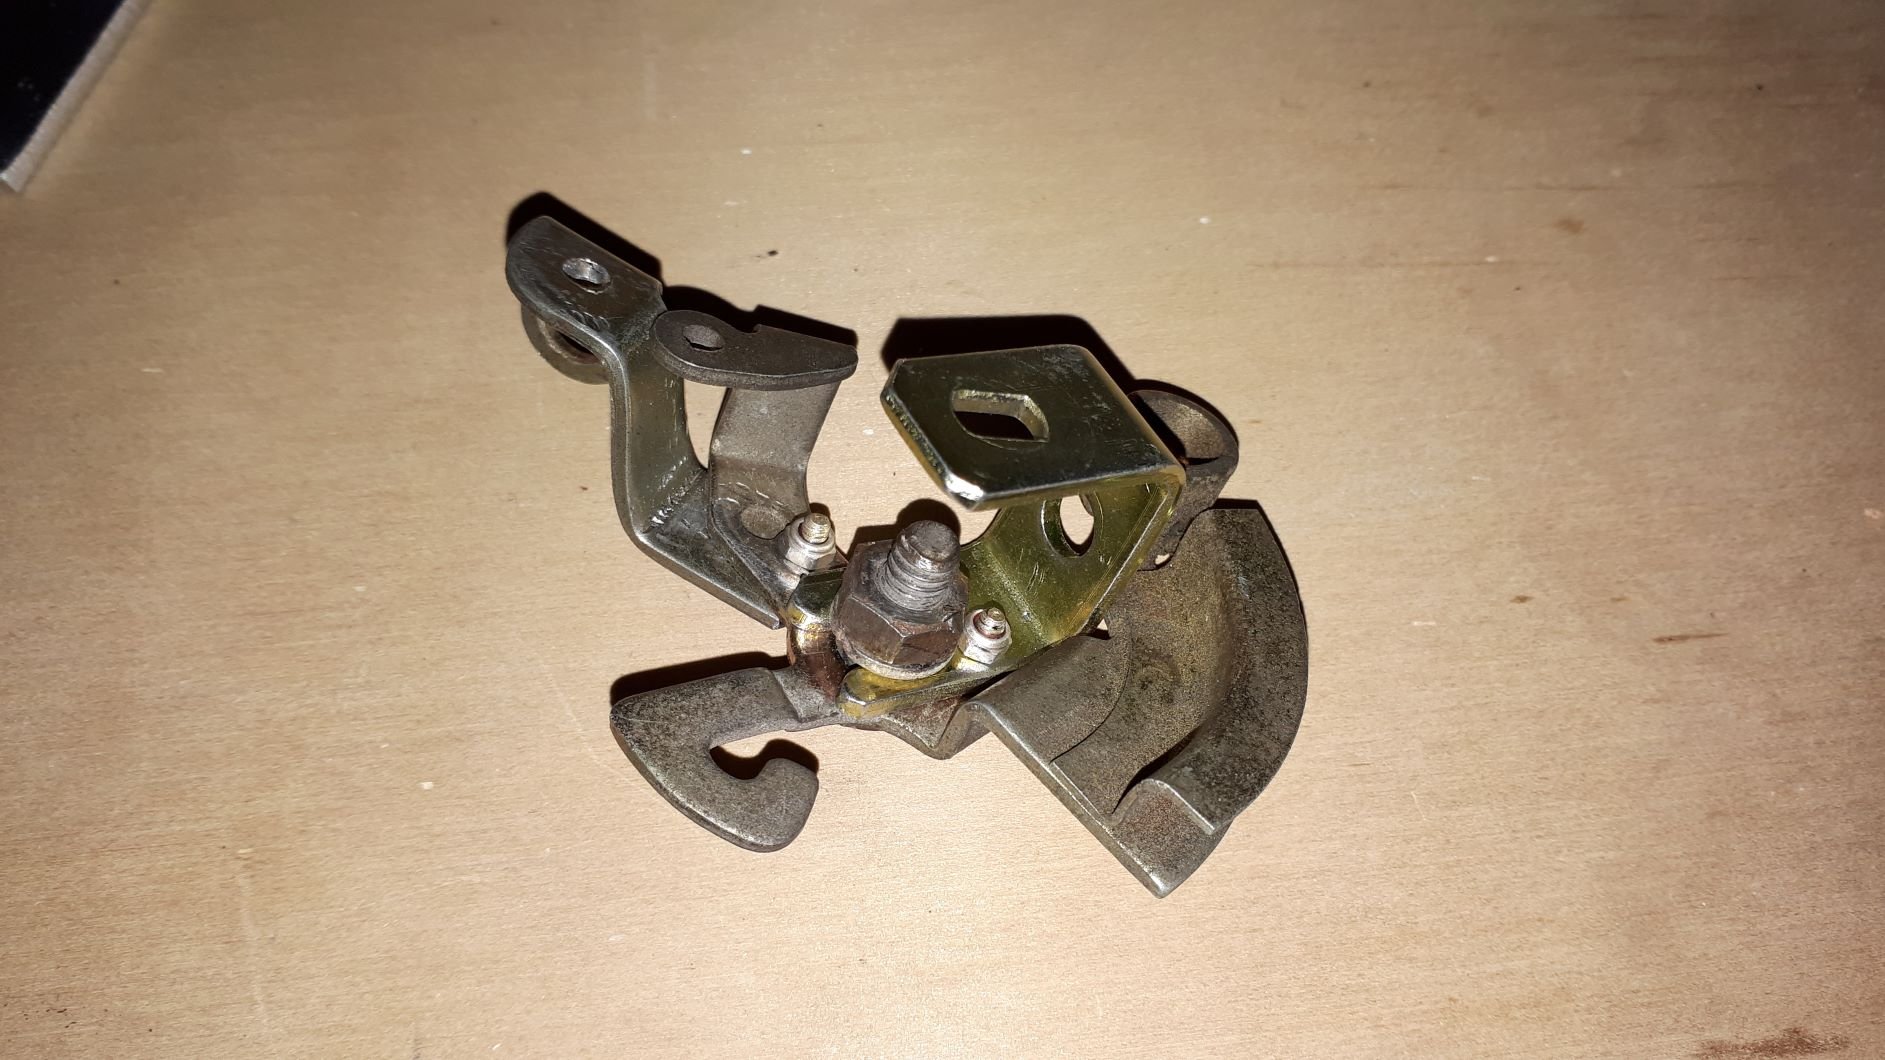
The throttle cable bracket took some figuring out but I got it all working with the factory cable.
-
8
-
-
I managed to rework the throttle cable hardware from the original carb so it would work with the Weber.
It was a little fiddly but ended up working very well.
-
3
-
-
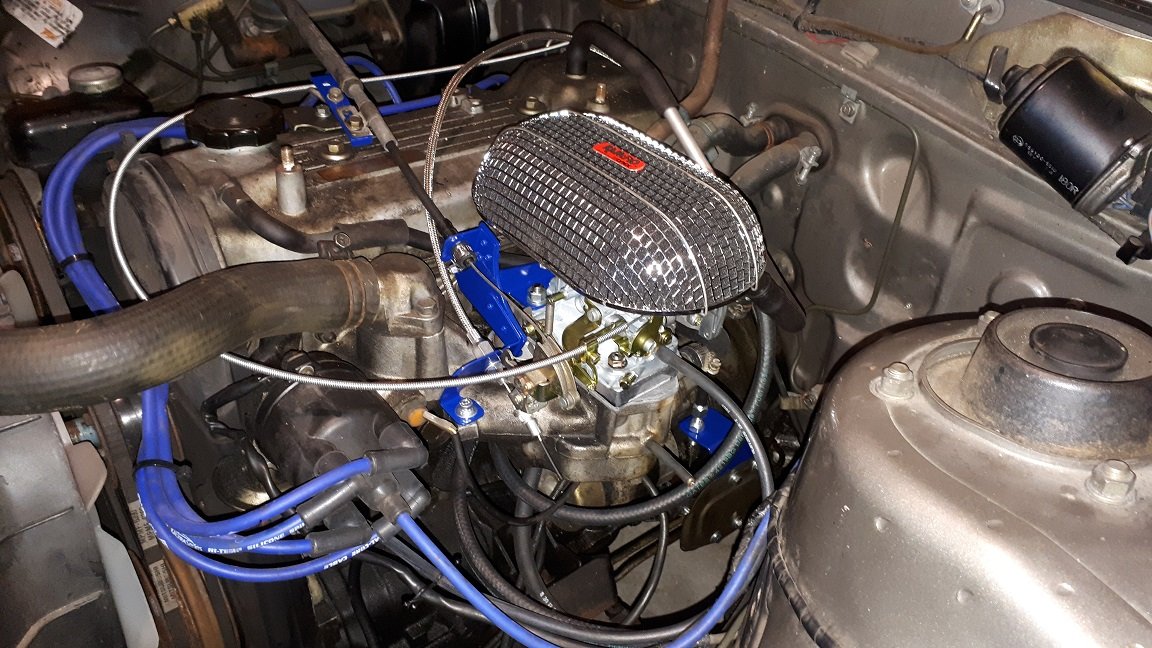
And here it is installed on the car
-
4
-
-
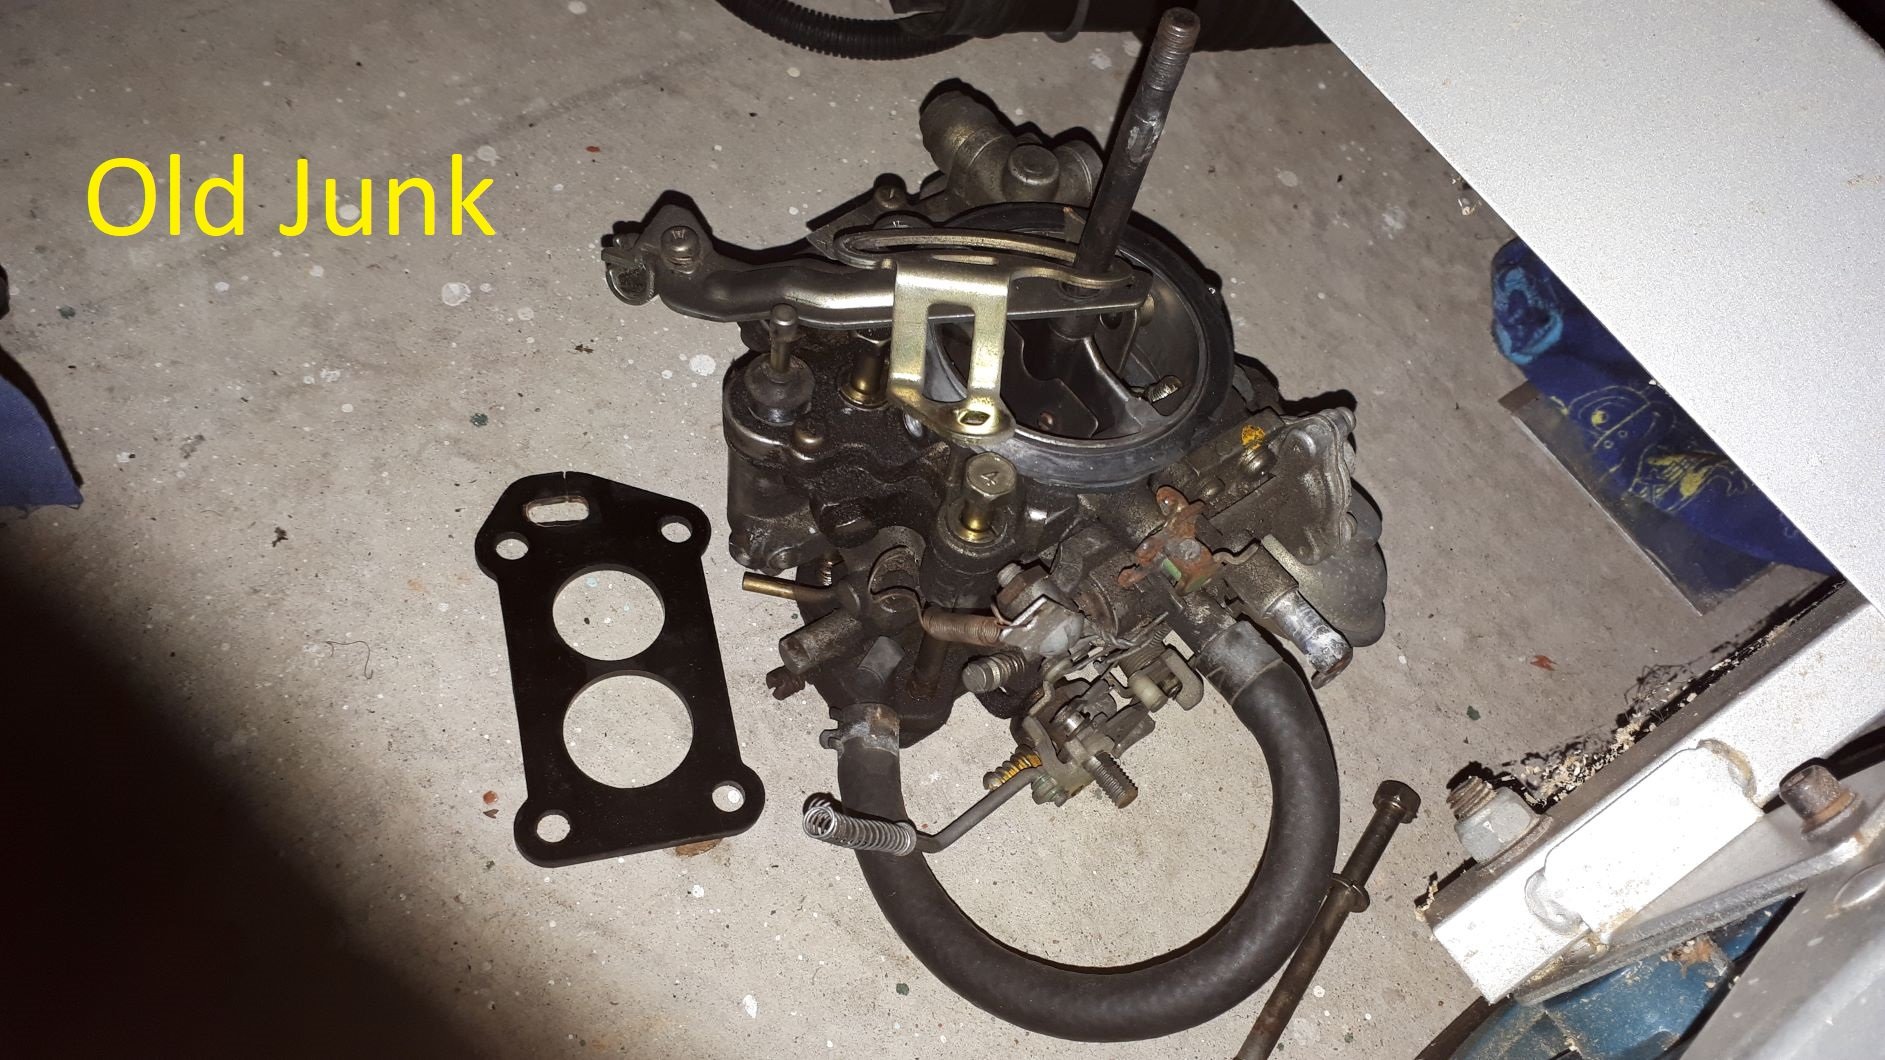
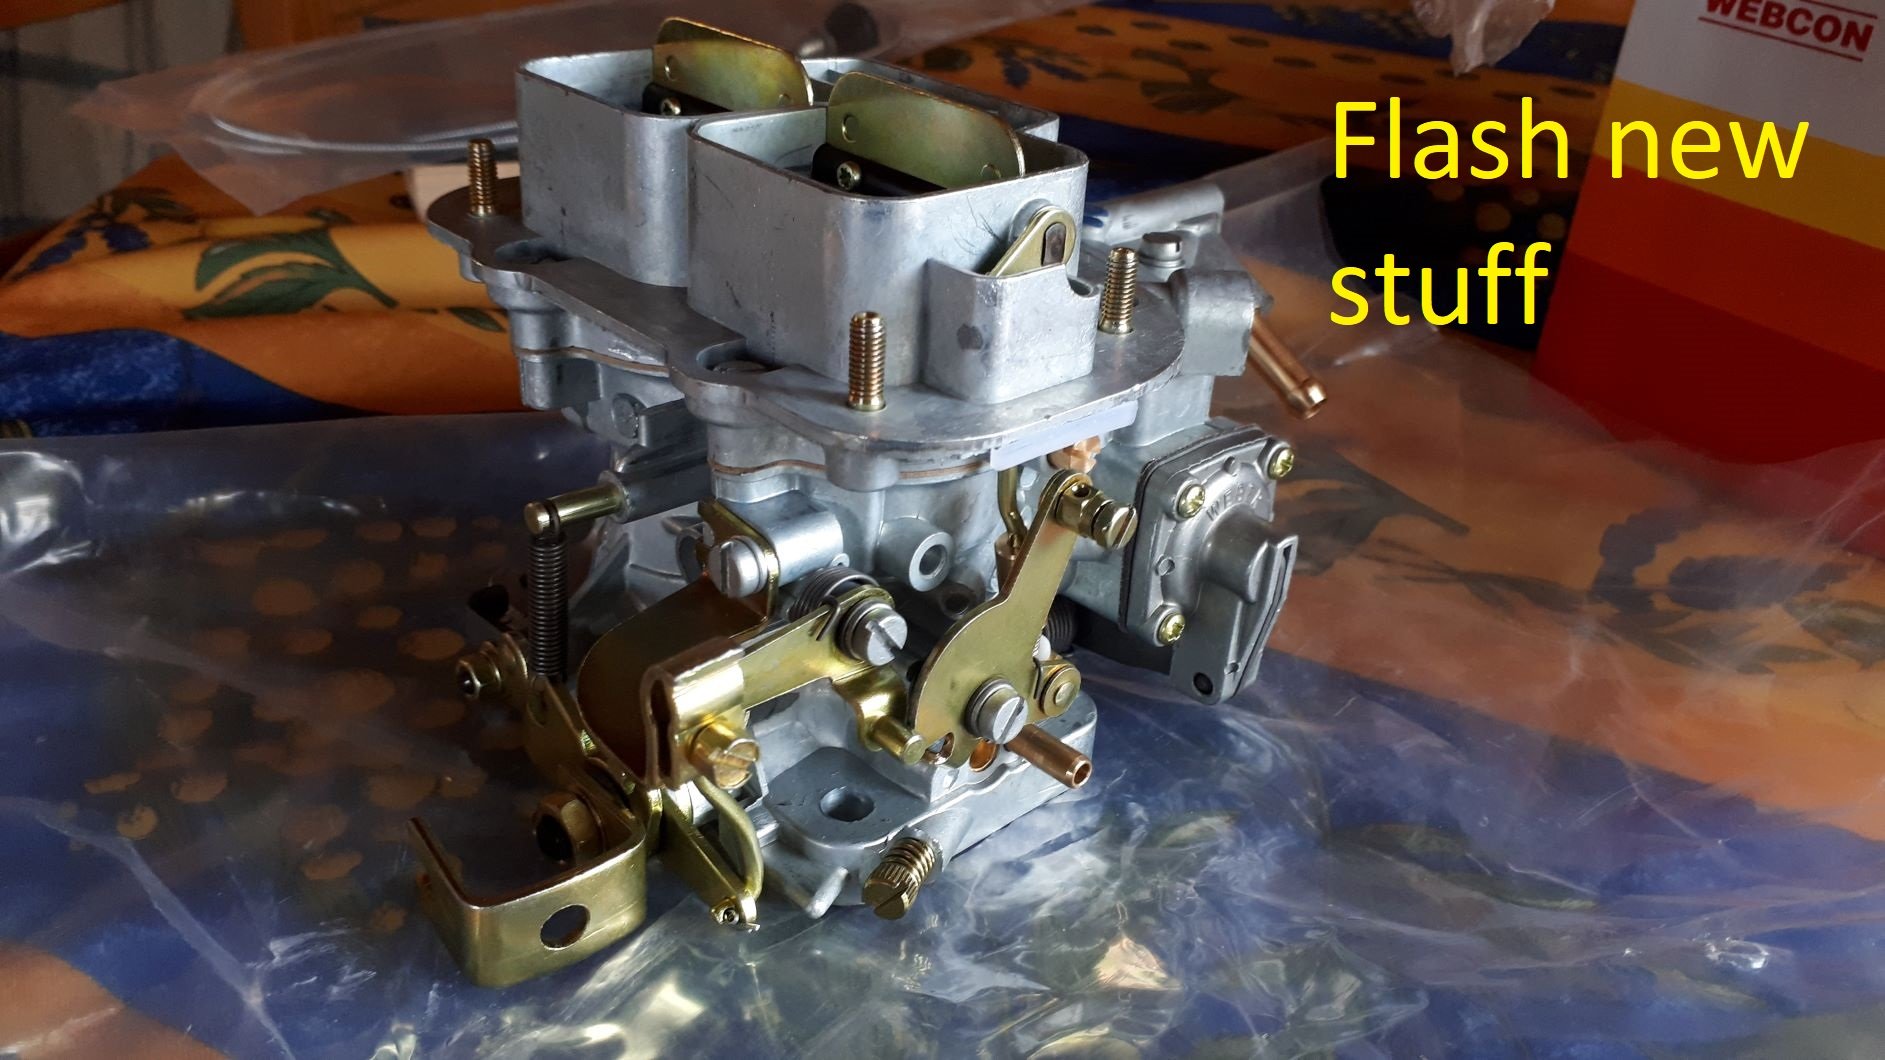
The first task was to replace the factory carb. I pulled the plugs and it was obviously running super lean and on top of this i am sure that the vacuum secondaries weren't working. I couldn't find a rebuild kit for it so replacement seemed like the best option. I went for a 32/36 Weber because I have had good results with Weber's in the past and I find they are easy to configure and tune for different applications.
-
4
-
-
- Popular Post
- Popular Post
Well I haven't been very good at keeping you all up to date with what's going on in my shed lately so I thought I should try a little harder and share this with you.
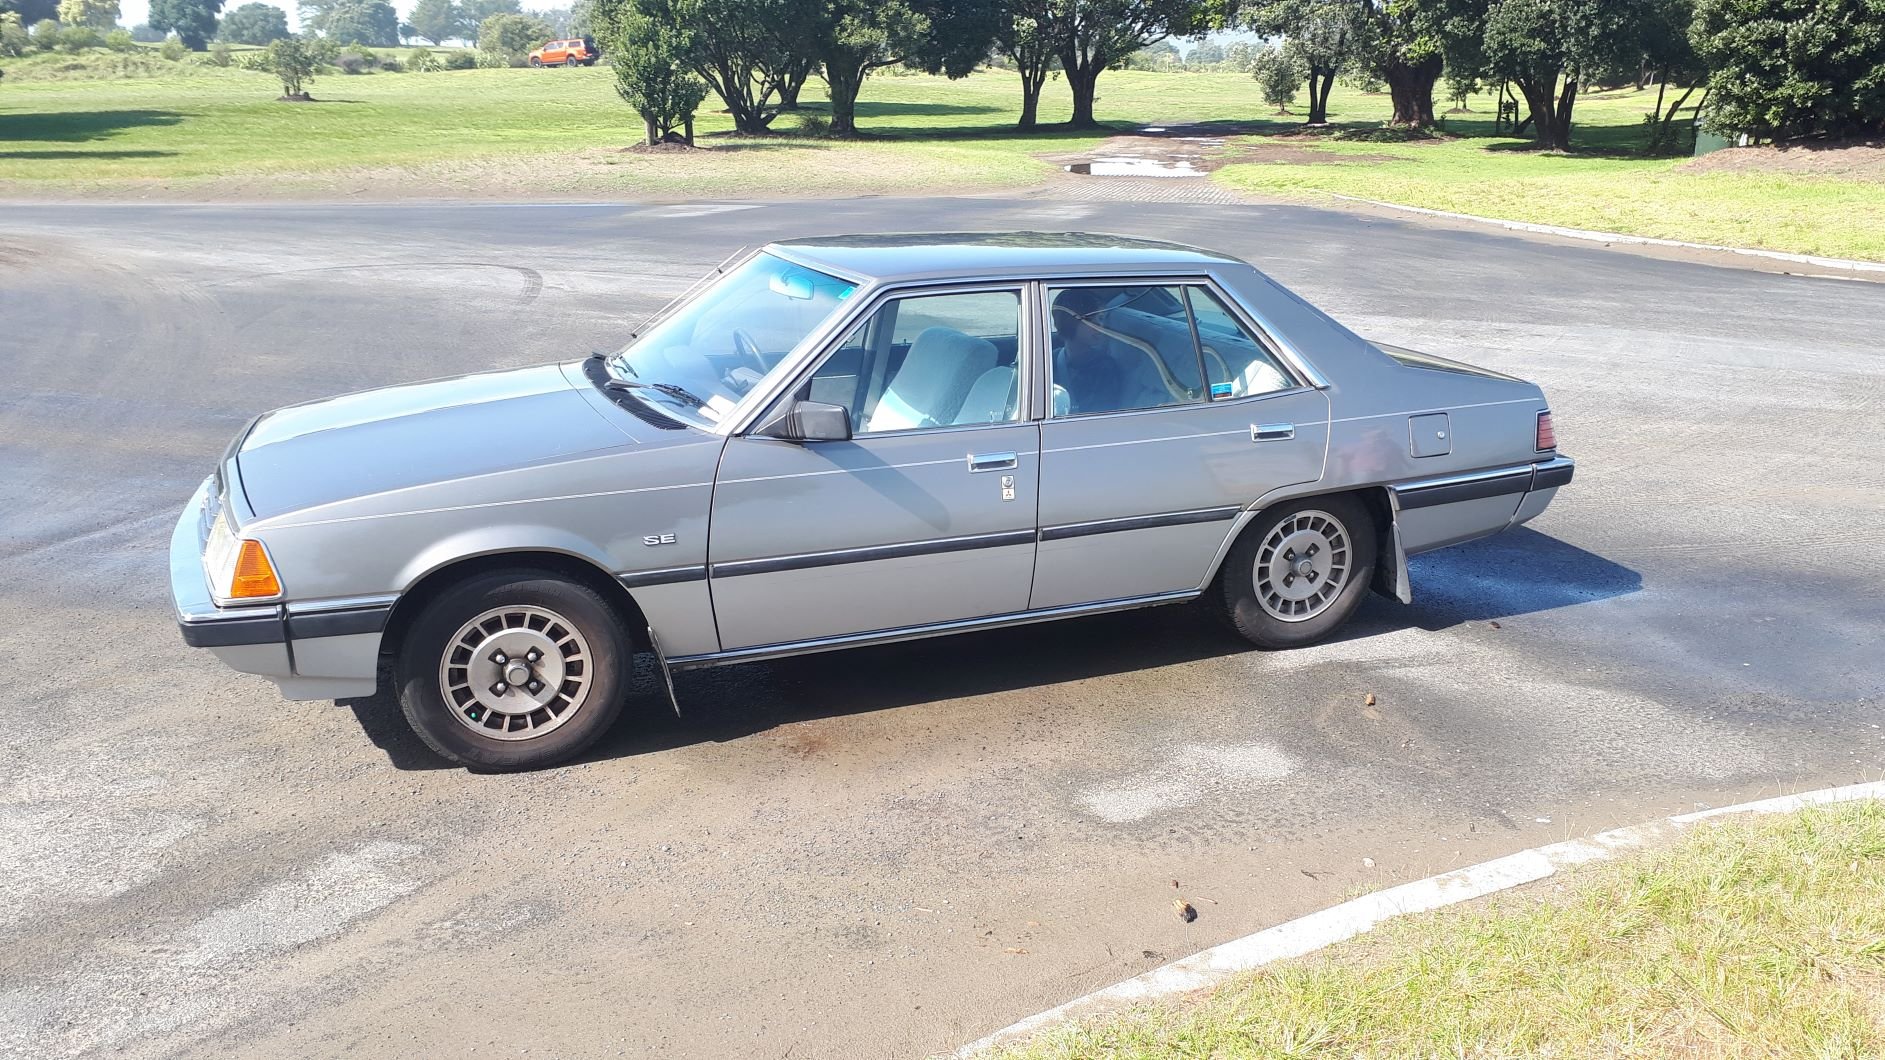
A few weeks ago I spotted this 1982 Sigma SE on the side of the road in Ohope and decided that it had to be mine. It ran like crap, but it is very tidy and most importantly is rust free. I have been busy working on getting it running properly. The car was on LPG for many years and the factory carb was pretty much useless. I have fixed this problem by installing a 32/36 Weber and she runs sweet now. Photos and details to follow.
Discuss the project and/or mock me for my ridiculous life choices here

-
13
-
Please share your comments
-
Oh dear, it's a sad day when the factory single barrel carb is genuinely the best option available. If you really do run out of ideas for the Weber flick me a message, maybe you can send it my way and I can pull it apart and have a look for ya. These carbs really shouldn't be that problematic but maybe there is something wrong with the way yours is put together. It is even possible that somebody messed around with it and got something wrong before you got your hands on it.
-
Good trick using the old solenoid housing as a jet holder.
It's great to see it running a whole lot better!
-
Here you go.
As shown on the pictures this is how my one works.
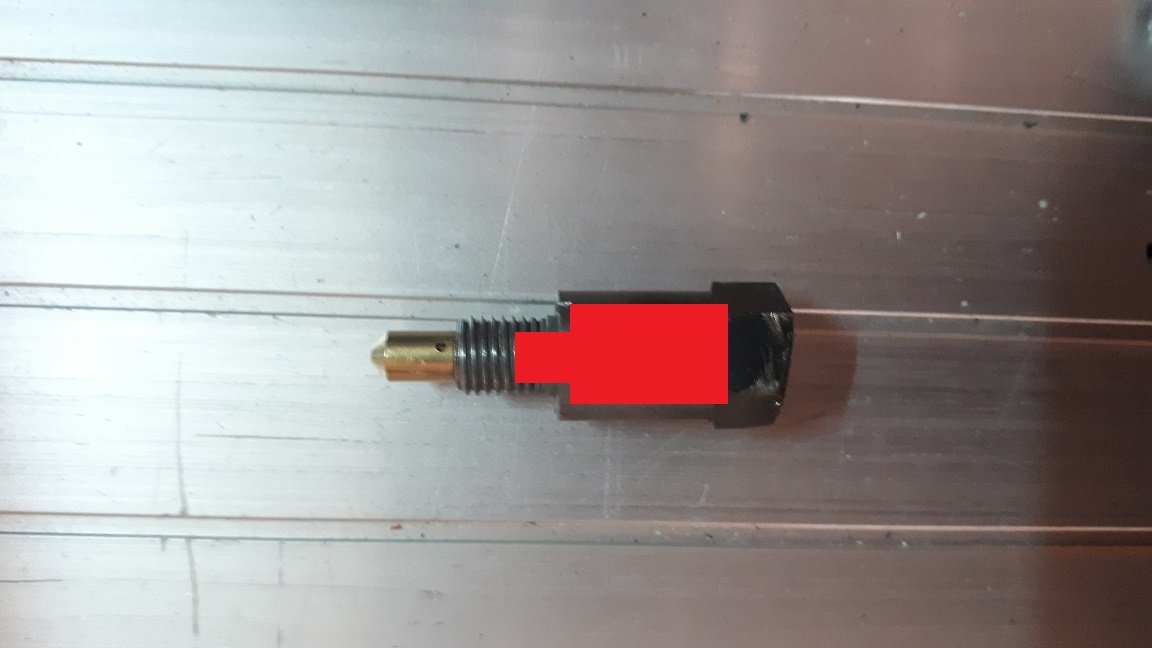
The low speed jet and holder on the primary side is an aftermarket item that is designed to be used in place of either the two stage jet (on late model versions like mine) or the integrated solenoid/idle jet (on early versions like yours). It is physically much larger than the jet fitted to the secondary side and I have included a picture that shows the size for reference.
On my carb the fuel supplied to the progression circuit (low speed circuit) must pass through this jet before it gets to the progression holes in the primary barrel. This is important because without this jet you simply can't tune the amount of fuel delivered to this fuel circuit. I think I made a mistake in the previous post and I got the direction of the fuel flow through the jet wrong, it actually enters through the end and exits through the holes in the side.
I also took a photo of the carb body looking inside the area where the jet is installed. It does look suspiciously like a plunger sized hole but I am pretty sure your one should work just like mine and it will need a jet fitted in this location.
As far as I am aware the only difference between the early model version like yours and the later model version fitted to my car is the separation of the fuel shut off solenoid and the idle jet. On the early version, the jet and solenoid were combined in one assembly. On the late model carbs they relocated the solenoid and changed it to a plunger type and fitted a fancy 2 stage idle jet in the low speed fuel circuit. I don't think the plunger type is supposed to be fitted to the early version of the carb.
I also checked the jet size and it's a 60.
-
1
-
-
No worries, will do.
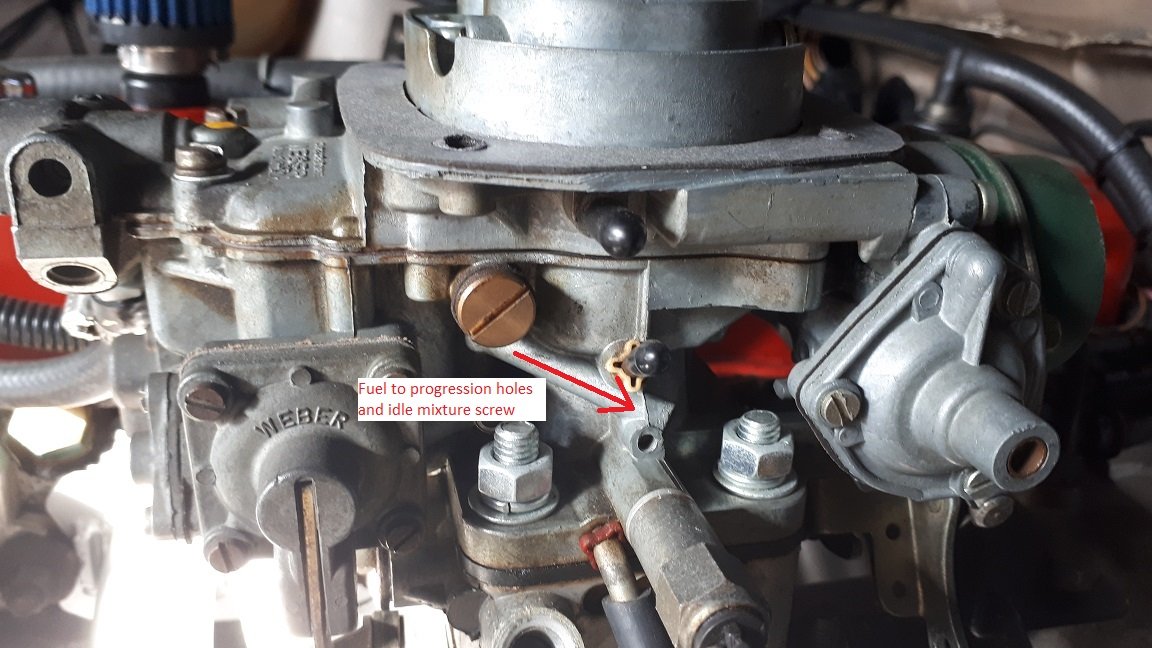
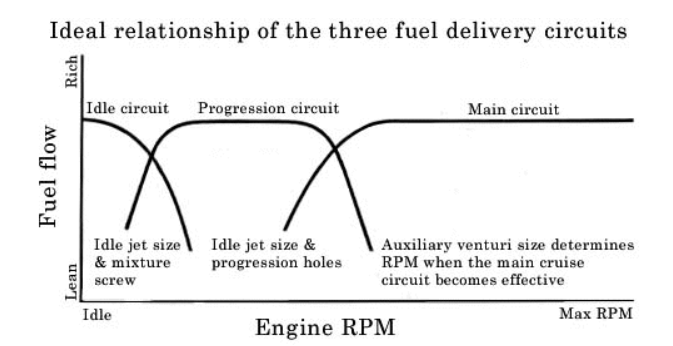
In the mean time this diagram may be useful to you. It describes how the fuel circuits in the primary barrel work. I think you are probably experiencing problems with the progression circuit. You can probably get it to idle OK but it will cough and splutter as you open the butterfly and the engine transitions to the point where it will run nicely on the main circuit. Sorry if I am adding way too much info but I will try to describe how this works.
At idle with the throttle butterfly closed (well nearly closed) the fuel mixture is controlled by the idle mixture screw.
As you open the butterfly the progression holes (I called them transition ports in by previous post) are uncovered and exposed to vacuum pulling fuel into the airstream. The amount of fuel delivered to the progression circuit is controlled by the low speed jet (idle jet). The progression circuit remains active up until about 3000 rpm and after that the engine will be running on the main circuit.
Without the low speed jet metering the fuel in the primary progression circuit I think it will just pour fuel through the progression holes.
Detailed photos of my carb to follow.
-
1
-
-
This picture of the secondary side of the carb may help as well. The red arrow shows the fuel pathway inside the carb and you can see that the low speed jet is in the path of the fuel flow and controls the amount of fuel delivered. Pull out the secondary low speed jet and have a look at it, you will soon see how this works. The primary jet and the jet holder is physically larger than the one fitted on the secondary side but works exactly the same way.
If you want to get really carried away have a look inside the primary barrel above the butterfly and you should see a row of small holes. These holes are called transition ports and this is where the fuel is flowing to. The fuel delivered to these transition ports must be precisely metered to ensure the correct air/fuel ratio is achieved and this is the purpose of the low speed jet.
-
1
-
-
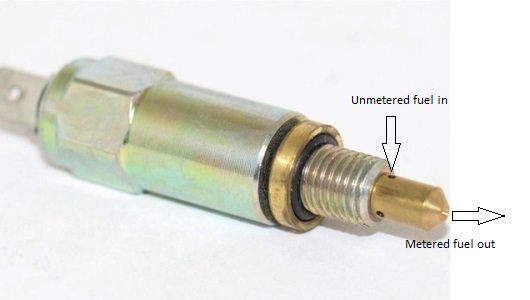
Something seems vey strange, the carb needs 4 fuel jets to work properly (plus the two air correction jets). You definitely need low speed jets for both the primary and secondary barrels. As far as I can tell, only 3 of the 4 fuel jets are fitted to your carb. Obviously the main jets are installed and the air jets as well, and there will be a low speed jet installed on the secondary barrel but you need a low speed jet (sometimes called an idle jet) on the primary side as well. From the factory your carb would have had a special solenoid that incorporated the low speed jet. The picture below shows how they work. Unmetered fuel enters through the holes in the side of the jet, the tapered end of the jet seats and seals against the carb body (this is the area that you described as a plunger sized hole). In your version of the carb this hole is not there to accommodate a plunger it is supposed to accept the tapered end of a fuel jet. Metered fuel exits via the calibrated orifice and ensures the correct amount of fuel is delivered to the primary low speed fuel circuit. Without this jet there will be way too much fuel delivered at low engine speeds (up to about 3000 RPM). Would it help if I took mine apart and snapped a few pictures for you?
-
1
-
-
Hey any chance you can post a picture of exactly what is installed in this position on the carb. This is where the low speed fuel circuit jet is supposed to be installed. This jet is responsible for fuel metering from idle and remains active up until around 3000 RPM when the main jets progressively take over the fuel metering. I believe you should have either the integrated jet/solenoid assembly as shown in the above post (bottom pic) or the alternative solenoid delete option as fitted on my car.
-
Alright I am sure we have nailed the issue, it seems highly likely that you are missing the jet for the primary low speed fuel circuit. This would certainly explain the problems you are having.
This is probably not your fault as I expect the carb came with the incorrect solenoid assembly installed.
All you need to do to fix it is throw the junk solenoid in the bin and replace it with one of these.
https://www.weberperformance.com.au/product_info.php?cPath=6_268&products_id=1345
I would also purchase a selection of these
https://www.weberperformance.com.au/product_info.php?cPath=6_268&products_id=631
I would grab a 55, 60 and 65 as you may need to experiment to see what suits best.
When I tuned mine I used a wide band O2 sensor and a stand alone gauge. From memory the AF ratio on the gauge looked best with a 60 installed but the car seemed to run nicer and pull better under load with a 65 installed. I decided the seat of the pants dyno was telling the truth and went with the 65.


1963 AP5's dirty old '82 Sigma SE
in Projects and Build Ups
Posted
If anybody knows where I might find an inlet manifold for a RWD SOHC Mitsubishi 4G63 engine please let me know.
I will need one to hack about (modify) in order to make this work.