Lord Gruntfuttock
-
Posts
13099 -
Joined
-
Last visited
-
Days Won
27
Everything posted by Lord Gruntfuttock
-

LG's ebike prob-never-happen project
Lord Gruntfuttock replied to Lord Gruntfuttock's topic in Two Wheels
Looked at display instructions today and there's all sorts of settings you can change. Set up wheel diameter for accurate speedo, max speed limit etc. Will get into that later but going pretty good with default settings... -
LG's ebike prob-never-happen project
Lord Gruntfuttock replied to Lord Gruntfuttock's topic in Two Wheels
Yeah that'll be the glued together warehouse shoes and footy shorts. Found these bad boys today, for some extra barry points...
-
LG's ebike prob-never-happen project
Lord Gruntfuttock replied to Lord Gruntfuttock's topic in Two Wheels
Slight shudder from takeoff if you don't pedal assist but otherwise pretty smooth. Can ride hands free no bother with throttle in cruise control mode. Little bit of motor noise but not much more than the ticking of rear hub if you're not pedalling. Best bit is pedalling you feel like a machine and can zoom past proper cyclists. Cos it's not obviously an ebike can sense their frustration as you casually pass chopping a beer...
- 67 replies
-
- 10
-

-

-
- ebike
- vintage bicycle
- (and 1 more)
-
LG's ebike prob-never-happen project
Lord Gruntfuttock replied to Lord Gruntfuttock's topic in Two Wheels
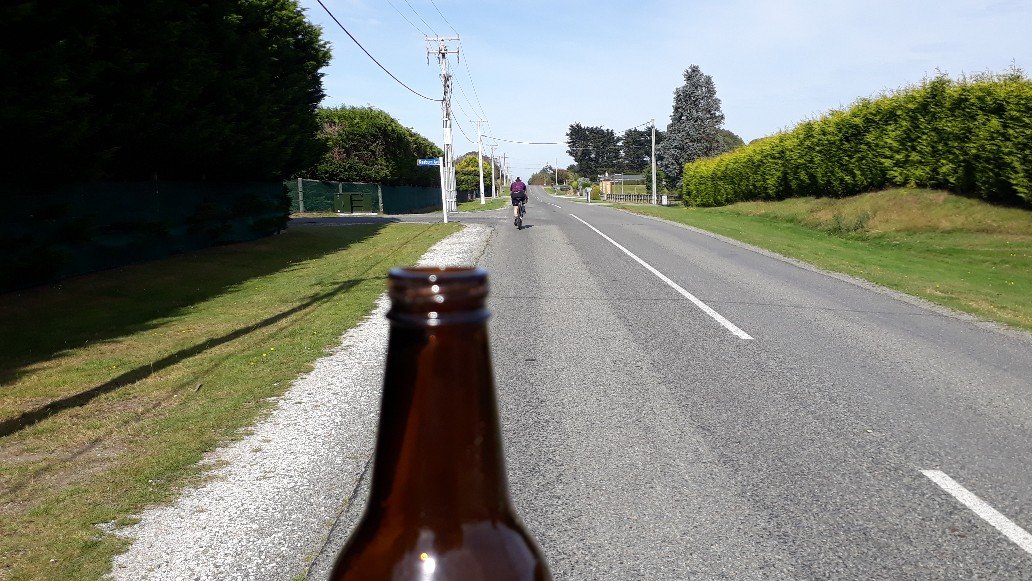
So with controller flipped, I discovered I could get around 30km/h on the flat, and GPS mapping showed this was pretty accurate. I was keen to test endurance so just hooned round the block, a bloody hoot not pedalling. Still have to sort cable routes etc but effectively still in prototype stage... Was hot and I was feeling chuffed, so grabbed a stubbie... Which gave me an idea, a 4km circuit round the block, with some gentle hills, almost the perfect distance to chop a stubbie each lap, game on... So merrily hooned around, passing lycra cyclists, waving to kids and tipping my stubbie to dads working in their yards, grabbing a fresh one each lap. (daughter was taking these pics)... Then suffered a puncture the furthest I could get from home (rear is dead flat). Think I felt it happen on a fast corner I was attempting to take at full noise, knee down style... So endurance test canned, but bloody happy how it went. Exceeded my estimates, going for over an hour at full noise with very little pedalling. Although time is misleading as it doesn't account for stubbie pit-stops (7). But over 30kms is bloody brilliant. Measured voltage after walk home and was 33.3V. Think controller cuts out at 30... So still have a bit to do (brakes, gears, sort cables etc) but it met my calculated speed and distance expectations, and got a lot of smiles from people I passed (although they may have been chuckling at the happy looking Barry day-drinking on his contraption). Wife even had a go... So a bit to fettle, and I still have the bonus 48V motor I was sent in error, plus I bought a spot welder so can make up a more compact battery for the next one.- 67 replies
-
- 21
-
-

-
-
- ebike
- vintage bicycle
- (and 1 more)
-
LG's ebike prob-never-happen project
Lord Gruntfuttock replied to Lord Gruntfuttock's topic in Two Wheels
Got her rollin' yesterday Started by fitting controller into the fake vintage leather bag I got from Ali. Was a tight squeeze, especially as the throttle connectors were wrong (M-M) so I just rigged some strip connectors, and I taped up the wires I didn't need (PAS sensor, headlight, brakes and cruise control)... And thumb throttle couldn't be taken apart so had to remove the 50-yr old grips without buggering them to slide it on. The left one resisted gentle heat/wd40 spray, so decision made, throttle on right... And made up a heavy gauge power cable between battery pack and controller. This was around 8-10mm sq cable with XT60 connectors each end, and still measured around an ohm resistance. Not too many options if I want to keep batt pack at rear though. Couldn't find my cable ties so just insul-taped things together for trial run. Need to punch some brass grommets into bag at rear so can cable tie to stays, it wobbles about a bit... And still have no brakes, the pads are very hard, worn down, and cables at max adjustment. Will replace pads and make new cables when I can. BUT, when I plugged everything in and turned on the controller it ran. Quick test run showed me the controller was on upside down, (not reading 62km/h) I learned the throttle locked on at full noise if you hold it on for ?? seconds, so first corner was a bit hairy, no brakes and full throttle. I could either rig up a brake switch or just learn to blip throttle to reset when approaching corners/intersections. Bloody pleased it went though, back to garage for a few tweaks before proper test run...- 67 replies
-
- 7
-
-

-
- ebike
- vintage bicycle
- (and 1 more)
-
LG's ebike prob-never-happen project
Lord Gruntfuttock replied to Lord Gruntfuttock's topic in Two Wheels
All cells fairly even after a charge so wrapped battery in foam... Put some plastic card over BMS as protection, foam on all sides and some layers of heat shrink... And yes, fits in the canvas bag like a good'un... Very snug but I'll take it...- 67 replies
-
- 10
-
-
- ebike
- vintage bicycle
- (and 1 more)
-
LG's ebike prob-never-happen project
Lord Gruntfuttock replied to Lord Gruntfuttock's topic in Two Wheels
Measured battery voltages this morning, ranged from 4.09 to 4.16V, so a 0.07V difference. Hooked up some lamps and drained high cells individually while working this morning... Then when all even'ish drained the whole battery over a couple of hours, down to around 3.4v and chucked it on charge again, will see how even the cells are when it's charged... Looked in the garden shed of future treasures and had a couple of old carriers. Of course only the rustiest one fitted... Then lubed the brake cables and reassembled, only really have around 1/2 front brake, but it'll do for now. Also shortened chain... And went for a short ride up the road, in rugby shorts, socks and slippers. Kids didn't want to go with me... And hopefully (but seems unlikely) the battery and controller will fit in these 'vintage' bags (courtesy of Ali)... Gonna be tight up front, have to fit Sturmer Archer trigger shifter and throttle yet. Wonder if I can go LH throttle (think I bought a thumb-type lever) without it being upside down... So may be able to rig some power up over the weekend. Quite excite..- 67 replies
-
- 4
-
-
- ebike
- vintage bicycle
- (and 1 more)
-
LG's ebike prob-never-happen project
Lord Gruntfuttock replied to Lord Gruntfuttock's topic in Two Wheels
Yeah did think of painting it silver. Never mind... It's almost same size as dynohub I was going to put on it. Not overly concerned about looks as I still have to fit battery pack, controller, throttle and cables etc. Wonder if I can rig a carrier up in isolation...- 67 replies
-
- 1
-
-
- ebike
- vintage bicycle
- (and 1 more)
-
LG's ebike prob-never-happen project
Lord Gruntfuttock replied to Lord Gruntfuttock's topic in Two Wheels
Yeah wasn't happy with a single washer so pulled the spokes and built it again, loosely assembled here with 2 washers on each spoke... And after truing it up this happened... Took it for a blat up the street with no brakes, actually rides really well. Gotta take another couple of links out of the chain yet, surprised to find a new chain, hoarding pays off again... Then once I sort brake cables and see if I can get the gears working it should be a decent old bike. Could even get motoring this week...- 67 replies
-
- 13
-
-
- ebike
- vintage bicycle
- (and 1 more)
-
LG's ebike prob-never-happen project
Lord Gruntfuttock replied to Lord Gruntfuttock's topic in Two Wheels
Sat in the sun and laced up rear wheel today. Used spoke washers as the old Sturmey Archer hub has thin flanges, and new spokes have too big a bend radius... Threw it in the wheel stand and bearings were adjusted so loose it wobbled all over the show, so cleaned, greased and adjusted them... And all set up on the home office desk to tinker with... Quite theraputic doing this when stressed, wonder if I could get away with it at work... [Edit] might need 2 washers on each spoke to fit right. Dang, lucky I have time...- 67 replies
-
- 8
-
-
- ebike
- vintage bicycle
- (and 1 more)
-
Yeah just looked and that pattern is BSA. Interesting...
-
No BSA logo chainwheel, has it been swapped or too early? Not sure when they came out but my 30s roadster has one.
-
LG's ebike prob-never-happen project
Lord Gruntfuttock replied to Lord Gruntfuttock's topic in Two Wheels
Lockdown progress. Been truing the wheel while waiting for documents to load remotely in my slow remote office, and put tyre on it last night. Was worried I had no rim tape to protect tube but found some in my hoard of old bits... And what I'm starting with... Widened the front fork slots to fit the motor axle... And stretched the forks out a bit, they were around 86mm and need to be 100mm... And it's not going to look too silly... Clearance on one side slim but ok... But the other was touching... And couldn't slide a washer on cos there's a plug preventing the nut coming off. So bent a spring washer open, slid on over the cable, and closed up again... Old pedal was a bugger to get off, had to get grinder out... And MKS pedals look sweet in white... Adjusted crank bearings and put new seat on too, plus slight panel beating of front guard. Starting to get close... Wasn't going to put seat and pedals on, I like putting new bits on last, but not much else to do until I get rear wheel made up. Hope to get on that this week...- 67 replies
-
- 16
-
-
- ebike
- vintage bicycle
- (and 1 more)
-
LG's British Seagull outboard
Lord Gruntfuttock replied to Lord Gruntfuttock's topic in Other Projects
Up at stupid o'clock this morning, so did a bit of glassing, then thought this thing needed a name, so got out the paintbrush... Bloody hard doing script upside down... And she's damn near shipshape... Just need to sand down the rough glass, smooth the yellow gelcoat, give her a wax and install the new rowlocks for a voyage before it gets too cold for such shenanigans...- 48 replies
-
- 13
-
-
- seagull
- two-stroke
- (and 5 more)
-
Yeah brakes is something I happily pay to get right, not stopping can coast a heap more than some new lines...
-
LG's ebike prob-never-happen project
Lord Gruntfuttock replied to Lord Gruntfuttock's topic in Two Wheels
Well that was disappointing. Went home at lunch to lace up the rear wheel, got started and things went awry pretty quickly, seems the other CR18 rim I have is a 32H. Bugger. Went though old emails and I did buy one 36 and one 32H (in 2015). Can't remember why, but I assumed they were both 36 when I found them in parts pile for this project. Ordered another 36H but my cheap build is getting more expensive... [Edit] vague memory now that the front rim was going on an old Dynohub, think it was 32H and I bought spokes to suit. Suppose I can still lace that up and swap for the motorised front rim if I change my mind in future...- 67 replies
-
- 1
-
-
- ebike
- vintage bicycle
- (and 1 more)
-
Meh, just use the 'rock side to side and listen for a slosh' method. I reckon those tubes ruin the clean look and are just something else to leak/go wrong. Far better spending your efforts on getting the fuel tap location right cos it sucks when you 'run out' but there's litres left in the tank. I know this cos i adjusted the angle of my tank after brazing in the tap... Actually I'd rig up a trick bracket for a 1 litre alloy fuel bottle. They can look pretty cool, and when you do run out you've got enough to get to a servo...
-
Any tension on those short leads? I'd leave a little slack so vibration doesn't kooze them. Old industrial electrician thing with crane cables etc.
-
LG's British Seagull outboard
Lord Gruntfuttock replied to Lord Gruntfuttock's topic in Other Projects
Flipped it over at lunchtime and peeled tape off... Sanded back to get a rough surface and laid long strips of cloth with some yellow pigmented resin along the sides. Used some red plasticine to stop resin flowing where it shouldn't. Works much beter than tape... And colour looks great... So the rails are straight (I'd clamped them for first application of glass) and should be strong AF now, will tidy up the top side (sand down and paint) and re-drill the rowlock holes. Still have some sections extending down the sides of hull to patch, will try using epoxy silica filler to make a paste that shouldn't run... On the front, the whole rail needs rebuilt similar to the sides (had bits missing). I'll patch the weak spot on the hull with a layer of cloth and yellow top coat/filler paste... And back at work with dust in my hair, bright yellow boogies and a sense of achievement...- 48 replies
-
- 4
-
-
- seagull
- two-stroke
- (and 5 more)
-
LG's British Seagull outboard
Lord Gruntfuttock replied to Lord Gruntfuttock's topic in Other Projects
Was nudged into action today, bodged up some glass repairs on the dinghy. Typical cracks along the edge... I drilled a hole at the end of each crack, feathered the repair section then taped underneath and laid some glass mat and epoxy on it... Just did a few to see how things go... The other side has some bigger damaged sections. Will keep tinkering away. Messy job though, got epoxy dripping all over the show...- 48 replies
-
- 4
-
-
- seagull
- two-stroke
- (and 5 more)
-
LG's ebike prob-never-happen project
Lord Gruntfuttock replied to Lord Gruntfuttock's topic in Two Wheels
Dug the old BSA frame out of the shed for a cleanup... Been putting it off cos I'm a bit over cleaning up old shit, was thinking about putting new bars on... But some steel wool and WD40 and the old bars came out great... Love how good 50+ yr old chrome is... So minor achievement, but should encourage me to get wheels finished so it's rolling at least...- 67 replies
-
- 5
-
-
- ebike
- vintage bicycle
- (and 1 more)
-
LG's British Seagull outboard
Lord Gruntfuttock replied to Lord Gruntfuttock's topic in Other Projects
Retirement plan. Buy 300 shitty old outboards nobody wants, spend ages and $$$ getting them going and sell at a loss... Tried to register on UK Seagulls forum again to show them the above hoard, have tried 3 times and never heard back, and when I try now it tells me 'that email is already registered'. Maybe they don't like the usernames I've entered, so used my last remaining email address today with user name 'Barry Womble'. That should do it...- 48 replies
-
- 9
-
-
- seagull
- two-stroke
- (and 5 more)
-
LG's British Seagull outboard
Lord Gruntfuttock replied to Lord Gruntfuttock's topic in Other Projects
Taupo, was sent link from FB marketplace...- 48 replies
-
- 1
-
-
- seagull
- two-stroke
- (and 5 more)
-
LG's British Seagull outboard
Lord Gruntfuttock replied to Lord Gruntfuttock's topic in Other Projects
I'll just leave this here... Barry level 1000...- 48 replies
-
- 8
-
-
-

-
- seagull
- two-stroke
- (and 5 more)
-
LG's British Seagull outboard
Lord Gruntfuttock replied to Lord Gruntfuttock's topic in Other Projects
Transom done and I've moved the dinghy into the carport to start glassing up the cracks. Seems I have a boatport now... Graound down around all the cracks and holes, found a surprising amount of bog in the front. Not really sure how to patch this up so I'll do a bit of research before getting covered in epoxy...- 48 replies
-
- 3
-
-
- seagull
- two-stroke
- (and 5 more)