

PedRac3r
-
Posts
87 -
Joined
-
Last visited
Posts posted by PedRac3r
-
-
Bob Homewood at Hitech Motorsport in Drury. I had him setup/rebuild a set DHLA40's for me. Amazing the difference is when they are setup properly!
-
With the brake booster gone and compact Wilwood master cylinder now mounted on the firewall with the adaptor I machined, I had a heap of space behind the strut tower to fill. Enough space I could fill it with a catch can. Made a paper prototype to check the fit and then as usual left it in the good hands of Adam at C's Garage. Hes become my regular ali welding expert lately haha, works out good though as he often needs bits and pieces machined up here and there.

Quality workmanship as always... Made up some -10 AN lines and it was done. Catch can crossed off the list!
Next thing which has been bugging me for a while, was the shabbiness of the front panel. Obviously been in a crash (or two) before I bought the car, and the less than average repairs were starting to show with seam sealer peeling away from rusty bare panels, cracks in the upper rad support and even in the lower crossmember where the castor arms pick up from. So I went to the extreme and rather try to repair crap, I chopped the front off decided to start from scratch with some tube instead.
Start of the top tube bent up. This is a bolt in piece. Hoping to make it so I can unbolt it and remove it with the headlights, grille, intercooler etc all attached to make engine removal and maintenance a breeze.
Lower tube (38 x 2.6) welded in place with some gussets. Made up the castor arm bracket mounts. Notching them was a little tricky to get a nice fit, first one took over an hour, and the second one only took 15mins to get right haha. Evidence of the damaged panels there. That will get some more hammer and dolly work before it all gets painted.
Added some 3/4" tube to the lower tube so I could weld the lower rad mounts on. And playing with the idea of doing some small tubs with the cardboard template. They take up a bit more room, but I dont have a lot to put in that space.
Made up some end caps for the front tub/wings. This will add alot of strength back to those front tubs, also tidy up the front a bit also. They are just taped on atm as I need to dimple die those holes.
Will have some more updates soon!-
 6
6
-
-
Obviously building a new set of headers Kris? Gonna whack a megaphone on the end of the collector or something?
-
Good work with the lines! I opted for the easier braided line option when I did my fuel setup because I really didnt want to deal with bending lines the length of the car haha.
-
You aren't after a polished RWD intake manifold are you? cut/shut manifolds give me all sorts of funny feelings
No thanks, not for me. The thought of lopping the plenum off this one and fabricating a new one has crossed my mind, or building a new one from scratch. But to be honest, I wouldnt know (until it was dyno'd) if it would be any better off. Need some of that Solid Works flow simulation wizardry I think.
-
- Popular Post
- Popular Post
Been pretty slack with updates. Have been busy though. Although it seems I start something, hit a bit of a road block then start something else before finishing the last, so lately I have been trying to get those unfinished bits done before starting anything else.
So Im still yet to finish the rear section of the exhaust. With the new raised height of the exhaust, when the diff is at full droop, it will be sitting on the exhaust. Original plan was just to get some cheap shocks that were short enough to clear, but I may wait and get a set of coilovers for the rear. USD sucks right now though!
With the exhaust manifold off, repaired and improved (hopefully), I turned my attention to the turbo. The exhaust housing had a broken stud in it, so this was the perfect oppurtunity to get that sorted. Removed the housing and set it up in the mill. Dropped a carbide endmill in the hole to remove the stud then went and tapped it for a M8 Helicoil insert... Sorted. I noticed that the internal wastegate, which had been welded shut, had started to crack a little. Probably nothing to really worry about, but I machined out the internal waste gate valve/shaft, and machined up an insert to go in the now gaping hole. I made the insert longer than it needed to be so that it protruded into the port of the housing, to remove the "trough" for the internal wastegate valve. Once I had welded the insert in, i got the die grinder out and removed the protrusion and blended it in with the port.
Reassembled, ready to bolt back up.
With the manifold back on the engine, I could make up some braces to support the weight of the turbo and manifold. If you can remember, I welded some tabs on the manifold for this earlier. Machined these up. 6061 Aluminium, and some bronze lined left/right hand rod ends.
Front brace installed (also got a secondary cam belt tensioner from Barry Manon)
I decided I needed to add an oil cooler, so I purchased a 180x350x73mm core from AdRad. They only had the 350mm wide core in 73mm thick, which is a bit overkill, atleast I know it will be more than enough.
Ended up cutting the core down to 100mm, so it will fit nicely under the intercooler. I was busy at work, so I got my mate Adam from C's Garage to fold up and weld some end tanks onto the core for me, as well as the mounting bosses I had machined up. Finished product:
Purchased a Grex thermostat oil cooler sandwich plate from NST. I was very limited for space, and for options mounting it, either with the ports facing to the front, or to the rear. Had to machine up a new union bolt to mount it as well, the Grex one was too short.
I made a start on making the oil lines, but I need to mount the cooler to get the lines exactly right, theres some work in the front end of the chassis I want to do which is stopping me from mounting it, but more on that later.
I wanted to delete the brake booster, to get a better brake feel, and as a bonus free up some space in the engine bay. Was originally going to use the standard brake master and bias valve etc. But for a couple hundred bucks I could have a Wilwood master and bias valve, so fuck it, bought that, which will get rid of all the messy brake lines on the strut tower. Machined up an adaptor plate to mate the Wilwood master to the firewall.
Mounted the bias valve on there too. I dont think I'll need the in-car adjustment, just set and forget. Had to machine up a longer clevis for the brake pedal too, complete with weight reduction pockets.
Just need brake lines to finish off the new master setup now. Last item on the update. Welded some -10 fittings to the valve covers to make a proper catchcan setup, then painted them with wrinkle black. Pretty happy with how these turned out.
Discussion //oldschool.co.nz/index.php?/topic/48043-pedrac3rs-1985-ae85-levin-discussion/
-
15
-
Whats the deal with the panhard bar (in first pic I linked) attaching to the chassis in two places before attaching to the diff, sort of in a 'V' shape? Why not just from one chassis rail straight to other side of diff? More rigidity?
Looks like its just bracing for the pick up point on the diff. Theres another to the right of the mount, and possibly one above the lower one on the left.
-
So the front locker works good then? Haha. Love those limiter echos through the whole of Northland too.
-
Is it just matter of shifting the pins on the bottom of the rad, to move it away from the rad support?
-
fenix are made locally iirc
Some of them may be, but I think a lot of there stock is imported from Asia or wherever. I bought one of these radiators a few years back for my Levin, ended up returning it after trying to fit it. The locating pins on the bottom were welded in the wrong location so it sat crooked (not parallel with the rad support) and was sitting hard up against the headlight panels. The radiator cap was cheap, and a cunt to get on and off also. These issues may have been fixed since then. When the USD was good, you could get a genuine Koyo radiator for less that 500 to your door.
-
After Taupo, the car was still in one piece and running good. But it got a few battle scars and few other issues arose that I want to sort out. After clipping the tyre in the morning it had bent the exhaust some where, along with scratching up my freshly painted fuel tank and denting some of the panels/floor under the car. Tried to tweak the exhaust back into place at the track but it no longer sat where it used to, which caused the hot muffler to melt a wider cut out in the bumper. So new exhaust was in order.
Other thing that bugged me was the lack of suspension travel in the rear. So I pulled the springs out and start moving the diff through its travel to see whats what. From ride height to bumpstop is only 25mm. Bumpstops have been trimmed to as minimal as possible, the diff head hits the floor the same time bumpstops bottom out. A bit of a major cutting the floor out for clearance, so decided to put it back to how it was for now. Long term plan will be to equal length the rear arms and add some diff clearance into the floor. May add some coilovers to the rear in the mean time and raise it ever so slightly to get a touch more room.
The exhaust manifold had developed a few cracks also. The cause I believe is inadequate and improper bracing. You can see on the picture below, I have 2 small braces between the collector and runner.
They both cracked around either side of the weld. This is just and educated guess, but I think the cause for these cracking was that the runner would be heating up and expanding in one direction, and the collector heating up and expanding in the opposite direction, creating a bending force through each weld, combined with many heat cycles has caused the metal to fatigue and crack. The whole point of the braces was to reduce harmonics and vibrations to stop the collector shaking about between the runners.
So after getting the manifold off, removing those braces and repairing the cracks I needed to come up with a better idea. I decided to do this:
I used 15x3mm flat bar and welded it like so, so when the manifold heats up and wants to expand in the direction of flow, there should be enough flex in the flat bar to allow for that, but the flat bar should have enough lateral strength to stop the collector vibrating about. Thats the plan anyway. You may also notice I welded some tabs on too. These will be to brace it back to the block, to take the load of the header flange.
Also added a wastegate flange brace too.
I had a bent exhaust to fix now… I decided to redo the whole lot, from the down pipe flange back. I went with V-Band Flanges all around now, makes it a lot easier to remove and refit. Only problem with V-Band flanges is that they wont take a beating (or scraping) like a steel flange will, which meant I need to get the new exhaust up nice and high. So at the front it kinks to the right and up into a bit of a cavity in the floor, then maintains that height throughout the length of the exhaust, which is about 10mm below the sill.
With the exhaust up nice and high I had to work out a way to keep it up there. Because I had moved it so far up, it had become quite difficult to hang the usual way with hangars. Decided to still use the hangar bush, but like this instead.
It allows for a sturdy exhaust mount, which wont swing around like a normal hangar, and should give good vibration dampening. I was going to try my luck using a lock nut and sandwiching the hangar, but ultimately I may need to add some crush tubes. I currently have a solid mount at the front, so I may chop that off and do the same up front, and most likely the same on the third and final rear hangar, when I decide what I should do with the rear of the exhaust.
-
5
-
-
There is a thread at the top of this section full of good info about mufflers. I recently just gave one of these a go http://www.adrenalinr.com/productdetail.php?productID=530 and I was really impressed. I think one of these in your system, where ever you can fit it, will give you the results your looking for, and still have have that straight pipe look at the rear.
-
Had to search to find this. Still here! Have been keeping busy as usual... Did a Zero Class drift day at Taupo back in March. First time I had driven there in a few years. Was a good day overall. Forgot how to drive properly in the morning, couldnt get it right. Spun a few times and collected a tyre when I ran too wide once. After all that I decided I would drive it how I should have been. Managed to burn through a few tyres, was getting pretty comfortable in the car by the end of the day.
Got some in car footage from the day too. Just a quick run:
Next time Ill give fourth a go exiting the sweeper along with some high boost engaged haha. Discussion: //oldschool.co.nz/index.php?/topic/48043-pedrac3rs-1985-ae85-levin-discussion/
-
8
-
-
Need to have 4 arc sensors for it to work with tig welding, most cheaper helmets only have 2. I also have a similar Miller helmet as above, might be the older version as Ive had it for about 4-5 years now, still working mint, great helmet. Has 4 arc sensors and can weld as low as 10 amps with tig and never have an issue.
-
1
-
-
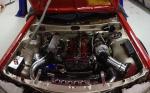
This is cool dude! That engine is begging to have all that junk removed and some ITB's and headers fitted
-
Dont know if you any of you guys have seen products from these guys www.adrenalinr.com? NZ company making some top notch mufflers and resonators etc. I fabbed a 3" zorst for my Hilux, from the turbo back and side exit dumping before the rear wheel, it was fucking loud, sounded like a open headered tractor with mad turbo whistle. Anyway, put a 450mm 3" reso from AdrenalinR in it and holy shit, what a difference. It took away all the raspy tractor sounds and ended up with a nice a deep tone throughout, and I would say its now mildly louder than a factory exhaust now. Would definitely recommend you guys try them.
-
2
-
-
Measure the length of the lower control arms.
-
As above, Tube Bending in East Tamaki. They have an offcut bin you can look through if its only short lengths you need. Otherwise they can cut and bend to your specifications.
-
2
-
-
When is this going to be finished? I want to see it doing some jumps and shit.
-
So Im pretty much up to date with where the car is at right now, managed to summarize four years into a single page haha. Car has been running great with the new motor and Link G4+ Atom, could not be happier with it at this stage. Had another drift day at Meremere again in September (2014), car went well, I was struggling to get the hang of the ever changing weather, and first time back in the seat drifting with a turbo. Managed to get a couple okay runs done at the end of the day.
After looking over the car after the drift day I noticed the brace for the intake manifold had lost a bolt which caused the manifold to crack through the first runner again. Decided this time I would make a good, 3 point, triangulated brace, to really support it properly.
So intake manifold off, cleaned, weld prep’d the crack and welded inside and out, cleaned up the port with die grinder to keep the flow smooth. I also welded another tapped boss onto the first runner to use as my third point for the bracing. Last step was to set the intake manifold up in the mill and face the flange to ensure that its nice and flat for a good gasket seal.
With the intake fitted back up, it was time to make a brace.
Was also tired of the lack of rear brakes and handbrake its always had. Did some research on the rear calipers I was using, turns out they were early Corona stuff, with S13 rotors, quite an odd combination. I had some Nissan S15 rear calipers lying around for a while now so I figured Id put them to use, as they are much easier to source brake pads for.
Dug up the S15 Calipers, stripped them, cleaned them and a fresh coat of high temp paint (Dulux stuff, same paint I have been using on my manifold and exhaust, holds up really well). Decided to cross drill the rear rotors too, mostly because racecar, but it may serve a purpose on the track. Had to draw up and machine some new caliper mounts to suit the S15 calipers, made from 10mm mild steel plate. Project Mu pads turned up, so started to re-assemble everything so I could get some measurements for brake lines.
Was really happy with how it all turned out! Although it wasnt over yet…! Quick test run on the hoist and I noticed that the calipers were moving back and forth on their slides as the wheels spun around. Brought my DTI home from work to see where the run out was coming from. Long story short, both rear axles were slightly bent (would have always been this way since Ive owned it), one had 0.3mm run out on the bearing diameter when held between centers. Managed to straighten them and get down to 0.01-0.02mm run out, then took a light skim off the hub face to ensure a true running brake rotor and wheel. Installed some new bearings while they were apart, put them back together, new brakes back on and everything was mint!
Got to test the new handbrake at Meremere again in December, it was perfect! Project Mu pads work crazy good. The rain held out. and it was a mint day at Meremere, first time I really felt comfortable in the car, and pretty stoked not to have single mechanical fault for a change!
-
3
-
-
-
-
-


Muffler Tech
in Tech Talk
Posted