


johnny.race
-
Posts
731 -
Joined
-
Last visited
Posts posted by johnny.race
-
-
Yeah a coil would have more surface area for less volume of water.
This will put more temperature into the water in the coil creating faster flow, which means more heat transfer per hour into your tub.
Make your coil 20mm or 25mm if possible. 15mm will have too much internal restriction for a thermosyphon
This is what i reckon too - go for bigger pipe. I have been experimenting with my waste oil burner using 20mm copper pipe. What an absolute cunt to try and coil at a smallish diameter though, lol. Made even worse by my propensity to be joining short bits together (expanded end/silphos) to get some length using scrap offcuts. But this is what I discovered ... there must be a point where the weight of the water (due to volume) is great enuff to prevent thermo siphoning to occur to any great degree, thus necessitating less volume (shorter length of pipe in the coil) or a pump. Another thing I have noticed is that most (all) of the wetbacks I have pulled from out of decommissioned fireboxes have been made from short lengths of large diameter copper pipe. They'd be at a guess around the 25mm OD size and say between 1 - 1.5m long. Just saying what i have seen and have tried. Good luck.
-
Would you make unbreakable axle shafts in exchange for money? (trying to decide if i should go hilux diff' or not)
Mate, if this question is for me then I can respline 9 Inch, Hilux and BW78 axles - this is all. And even then I only offer to respline when there is meat there that allows a new spline to be cut. I don't offer to build up a shaft using low hyd rods or similar in order to get a certain length. So pretty limited in one respect but good to know for the users of these 'most popular differentials'
 I can also narrow diff housings (again 9 Inch, Hilux, BW78) and oddly enuff Ford Courier/Mazda1600 housings. I use jigs that run true, my work is decent and I have usually a way quicker turn around on stuff than you will get from an engineering workshop in town.
And why is the print about using a Lux diff in small print, lol ... are you a dyed in the wool Hotrodder that has been brought up on nothing but Ford diffs?
Haha! Let you in on a little secret ... factory 9 Inch axles have the consistency of cheese a lot of times. Jap iron from the 90's leaves yank iron from the 60's in the dust. The diff heads are a different story though.. -
 1
1
-
-
- Popular Post
- Popular Post
hey man thats awesome !- the gear im using is works, how did you make your hob?
Mate, I brought a couple of HSS cutters from off TM. I had familiarized myself with Diametrical Pitch's ummmm lingo and stuff and read that DP24 was the DP used by most (all) of the OEM's who's axles I sought to cut new splines into. I learned my first lesson about HSS vs Induction hardened hard shit. You mentioned this above, lol! Where the fuck were you sentra when I was cutting my teeth into this new venture? So after finding out how much the tool resharpening pricks wanted to redo my cutters - it was onto the net to see what others were doing who did resplining on a more regular basis. I saw a commercially available indexable one that was cost prohibitive to me but sowed the seed to make me my own. I think I cut this one out of some 12mm plate or something. It might be 10 - dunno. Turned up a collar thingy and pressed/welded them together. Trued it up in the lathe and beveled the edges to 90 degree's included. I drew it up in TurboCAD (don't laugh - I love it and I am self taught to do cool 2D shit) and cut it out on the table. Had to do all of this twice because I was not as good as I thought i was. Fucked it up the first time but the second time round I stopped at the point i fucked it up and paid a machine shop to complete it. They indexed the tungsten cutter pockets/seats and cut the internal keyway in the collar. They got 3 of the cutters spot on but one of them stands a thou or 2 proud of the others. I have marked this one and use it to touch off. Judicious use of DTI and adherence to my own established procedures has seen me do quite a few axles for cunts. I have a biggish (for home use) old Horizontal Mill dedicated/setup to do just axles. They are worth nothing more than scrap value in today's market thanks to CNC. I fucking love them, the big old grunters, lol. That's my story bro..
My name is axle ...
Bigblockpoweredstickcarsthatdontshine
-
10
-
Sentra bro, is that your shit in your shed or you bludging off your bosses back
I was cutting splines (but 90's) in the shed the day before yesterday and took a couple of pics. WTF is an encoda?? That machine of yours moves the hell fast compared to mine, lol. My setup has stood the test of time though, is able to take over 2 inches through the bore and my homemade machinists jack will bend an axle. There is no downwards pressure on the dead center whatsoever - even when cutting. I dial in a measured amount of preload upwards on the jack during the setup and the cutting pressure cancels it out i have found. Made the cutter myself. 4 tips at around $90 - fuck! If Noah had a setup in the Ark - he'd have copied off mine, haha! I am not a machinist and have had no formal training whatsoever. But if you have a passion for something though ... it negates most of the formal training shit institutions stuff into ya.Hilux axle for a stockcar. Churr!
-
5
-
-
Fark! This is a labour of love eh? I have a couple of LN106's ... well 1 x LN106 and a LN65. But the LN65 cab was in the same sorta condition your cab looks to be so looking around, I managed to find a good nic single cab 106 cab to replace it. That cab came on a rolling chassis. There are still a heap of these things around the traps in different stages of disrepair. They wreck well too. Sometimes its more economical to buy another one and raid it for parts then selling the rest off to try and recoup some of the cost. This is what I did anyway and I pretty much well ended up getting a free cab when all was said and done. There is a bit of fucking around doing it this way though. You look like you are handy in terms of doing body work - I am not. but yeah ... love those luxers!
-
2
-
-
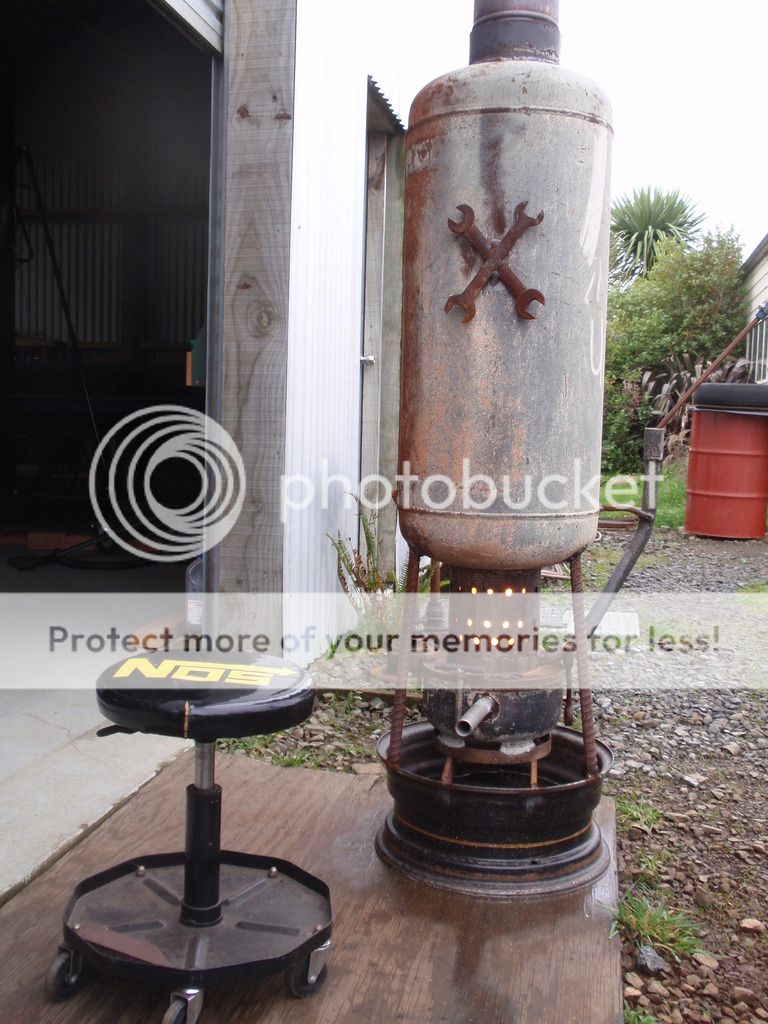
Make one of these.
There is no wood fueled fire or anything else that can match the heat output for the money that one of these can wack out. Apply said heat to a 20mm or 25mm diameter coil of copper ($$) inside the secondary burn part and you are away. You are going to pay for copper. Suck it up. Every ones in the same boat re that stuff. I have been collecting 20mm stuff from out of the yard when it comes in but joining it (silfos) is proving costly and it coils like shit at the joints. Almost not worth it. But yeah ... a coil of 20 or 25mm dia copper pipe in one of these things will heat a house load of water in quick order. People try to get away with the smaller diameter stuff and save money but their results are proportionate to what they spend. Check out the commercially available wetback and wetback boosters ... check out what size copper pipe diameter the pro's are using. There's a lesson in that.
I like your tub man. Good stuff.-
2
-
-
What normally goes first/breaks in a T series diff? Their axles must be piddly small. I googled that they had either 23 or 24 splines. Go for a 30 spline lux and forget about the arse end giving you trouble ever again.
-
I've never experienced flame coming back up the feed pipe. The whole thing revolves around creating an oxygen deprived environment in the primary burning pot. The roar these things make is the flame grabbing a hold of the oxygen rushing in, or of my darling pig racing through the paddock to get her dinner. It actually sucks through that feed pipe (the fire - not my pigger).
My little Darlek whanau has grown legs
My baby!
-
1
-
-
I reckon the same as Pog. I know nothing about these things except to say that they would be considered uncommon here meaning you are always going to struggle to find things with the ease that others do that have more common engines. Also, there is not much that is not understood thoroughly by someone on here re the more common stuff like Ls1's an UZ's etc. If you want an 8 cylinder sound then there would be easier (and most likely cheaper) ways to go about it and still have 6 bolt mains and 4 camshafts etc. IMHO.
-
Bro, my 5c worth ... I wouldn't go chopping up that high density stuff just yet. But first things first ... is that cable 3ph? It is aye? Have you got 3ph running to the house? I'd be getting 3ph out to your shed. A shed as big as yours shows you're into it. Sooner or later, you are going to want to import some decent capability into your shed in the form machinery. It don't matter what sorta gear you're looking at - because there will be an equivalent HD item found second hand from industry that will last longer, go harder and run cheaper than the domestic version you can get from ripco/bunnings. A lot of it can be had reasonably cheaply also. No one ever regretted getting 3ph in their shed. It fucken costs though. In anycase ... you'd be wanting to get a meter in there too.
Shelving ... don't build your own. You'll never build a setup that will be as strong, durable and as versatile as dexion pallet racking. You are going to change your shelving configuration and location. I put money on it. As you become accustomed to your new found surroundings, certain things are going to pop up in your head about your current arrangement. Wooden shit does not change easy and is piss weak compared to industrial spec shit. You can use that high density stuff you have as filler for the pallet racking. You can shorten the depth down to suit yourself. This is what i did and i have never looked back. I've changed mine (major change) twice. Some people want moonbeams for the stuff up in jaffa land while yet some scrap yards are full of the shit. You gotta look around.
Your shed is going to be a cold hole. You are not going to want to be out there in the winter. And if you are out there - you are going to be working slow and everything is going to seem like a chore. Get yourself a waste oil burner. I'm a fucking expert in keeping warm in a big arse shed, haha!
You need to think work flow.
this will show you where and how much shelving you'll need. It will show you where the power needs to be/go. It'll show you where your clean and not so clean areas are going to be. I've been where you are mate.
Best.
-
1
-
-
This pic was taken to show what happened to the gauge. This would have occurred sometime after the last pic was taken of it pegging the dial. When i was putting it away the next morning I noticed the needle could not be seen on the gauge ... plus the gauge looked a little faded and shit. I peered into it trying to see what happened to the needle ... couldn't see nothing so pulled it apart. It must have got hot. The needle got toasted and all of the 'black' left the gauge face and turned into this reddy color.
Don't leave these things in your shed together ... because they breed like little fricken Daleks.
-
2
-
-
Finished. Added some heavy iron to the exterior of the secondary pot in the form of scrap reo bar and offcuts from bulldozer tracks. Plonked a length of chain on top also. All this in an effort to increase the effective use of the heat this thing puts out. This cloak of iron on the outside is dense and emits heat for yonks after the flame has been extinguished.
Tested it last night by running it for a few hours. It got toasty and passed its 'ready to be put into service' test.
Opps - wrong pic.
A mate gave me a temp gauge he pulled off a BBQ. Its a contact type but because it was an after thought on this beastie I just sat it on top of the chain links. Even with no contact - this bad little fucker pegged the dial, lol!
The next trick will be the installation. I have decided to put it inside the shed. I have nutted out a basic refueling system and some safety provisions in my head. I'm in no rush and need to make room first. I've picked up some more LPG pots also in order to make a few to flick off on TM ... if I can get off my chuff.
-
2
-
-
... cut the top off completely, bend sides out to correct place with a crescent or something, weld top back on, profit.
This.
Fuk - sometimes the answer is staring you right in the face.
Cheers.
-
Yup, mate i hear you but the pie cut is 560mm in length. The inward lean of the sidewalls of the RHS commence around 450mm mark and get progressively worse as it heads out to the front/end. There is only 44mm max - room to work in at 450mm depth. I won't be able to swing a ring openender or anything in this space. I was thinking along the lines of something like a round piece of 8mm plate cut to the correct inside width of the RHS or similar ... welded to a slide hammer. tap it in there and slide wack it out as i tack it together as it spreads. Hmmmm. The rodders in here have done this sorta stuff before - I bet.
-
I'm up to this - tapering the front of a new chassis build. I have cut a pie/wedge shape from out of the sides and intend to press the top down then weld.
The problem I have is that as soon as you cut the pie shape into the sides - they (the sides of the RHS) kick inwards. If this only occurred at the big end of the pie cut then i could just pry them out and tac - but it occurs for quite a way in. See pic. The ruler part of the square is touching the top and bottom but not any part of the side wall in the center. It looks to be a real prick to get in there in order to wedgie both walls outwards. Anyone got any advice on how to go about it or what the DIY tool looks like to get it sorted? The RHS is 150 x 50 x 3mm. Ta.
-
And what are ya doing asking shit like this in here ... this is the front door to OS and where you tell everyone you're a GC and other stuff
-
There is a heap of different G series out there and they all had different handbrake cable setups due to the type of chassis/application they were being used in. I could tell you exactly 0.001mm for a LN65 which would be right because they didn't have one coming out past he backing plate ... as opposed to a long arsed one for a 93' 2WD. What was your one in its last life - my crystal ball is broked' at the moment so I can't see what it was. And most dudes who put one of them into their ke' are also slipping on a set of rotors and calipers at the same time. What are ya doing going to a mechanic to sort out your cables for - he wouldn't know, and it sounds like he's given you the farkin run round already. Find a place that does this for a living - they are around.
-
Cool ride mate. Who's doing the cert, Marty, Danny or someone else?
-
This is the first burn. You gotta turn your head sideways to look at the vid, lol! I am useless. The size, placement and amount of holes must just be about right. This ran very well 'straight out of the box' I used the same oil flow as I did for the big one. Also, this one seems to run hotter and with no tractor chuffing sounds. The paint didn't peel off the secondary pot on the big one like it has been doing on this one. I am planning on dressing this thing up with heavy iron in order to use the heat more efficiently ie a heat bank.
http://vid528.photobucket.com/albums/dd329/race_hemi/P8150562.mp4
-
2
-
-
Got it going this arvo - runs hotter than a snakes arse. Check out the intensity of the burn in the secondary pot. Can we start winter again please.
-
Smudge Pot bro
You don't wanna be sticking that thing inside your shed, haha! They put out some massive heat aye? -
Mk2 next door to the original grunter. This bad little heater is going to fire wayyy above its weight judging from initial observations. I have incorporated improvements (well i reckon they could be) I have thought about since cobbling together the big one. Deeper pan compared to the original so the flame will have to work/jump extra high. Less scrap to source by eliminating the brake rotor. A smaller diameter primary (I am sure that is what it is called or maybe not?) connecting the secondary burn chamber to help keep the velocity up and some big arse holes in the bottom of the secondary burn chamber thingy (that you cannot see in the pic) The exhaust on this is the same size as the big burner - look at the fucking size of it, lol! This is the full race version of the original
Its not finished but should be tomorrow if I pull my finger out. I did a 'test firing' of it to see if the flame would jump from the bottom pot high enuff to grab hold of some air through that ring of holes ... maaaate, friggin rocket motor! Haha!! But that was on gasoline mixed with my normal concoction. Confidence is high that this is going to go hard on the black stuff though. Churr.-
2
-
-
Mk2 coming together. This one is going to be smaller but with the same size exhaust as the big one above and going to try an even deeper drop/bigger area in the primary pot. 1950 Youngs Welder made in Onehunga, Auckland. Type F (I think) Got it at an estate sale years ago. The oldmans kids didn't want it and were getting rid of all of his gear. What a waste. This thing probably helped build NZ. Will outlast me I bet. Grunter and unliftable.
Learn from someone that has been there - Don't build one of these waste oil thingies ... they are addictive.
-
3
-
-
Cheers mate, I am in with a scrap metal outfit so am sweet for supply.But thanks for the offer.
-
1
-


 I was cutting splines (but 90's) in the shed the day before yesterday and took a couple of pics. WTF is an encoda?? That machine of yours moves the hell fast compared to mine, lol. My setup has stood the test of time though, is able to take over 2 inches through the bore and my homemade machinists jack will bend an axle. There is no downwards pressure on the dead center whatsoever - even when cutting. I dial in a measured amount of preload upwards on the jack during the setup and the cutting pressure cancels it out i have found. Made the cutter myself. 4 tips at around $90 - fuck! If Noah had a setup in the Ark - he'd have copied off mine, haha! I am not a machinist and have had no formal training whatsoever. But if you have a passion for something though ... it negates most of the formal training shit institutions stuff into ya.


 You don't wanna be sticking that thing inside your shed, haha! They put out some massive heat aye?
  Its not finished but should be tomorrow if I pull my finger out. I did a 'test firing' of it to see if the flame would jump from the bottom pot high enuff to grab hold of some air through that ring of holes ... maaaate, friggin rocket motor! Haha!! But that was on gasoline mixed with my normal concoction. Confidence is high that this is going to go hard on the black stuff though. Churr.

Muffy's Hillbilly Hottub
in Other Projects
Posted
Yeah I have. I got to a length of just over 3.5m of 20mm in a coil. And it did not want to work like it had when I had just under 2m of it coiled. A couple of things though ... my coiling ability was haphazard and shit. Some of it was alright but there were a couple or 3 kinks that i could not be fucked trying to work out. I had started trying to fix the first one when it occurred but it work hardened (by the looks of what happened) the copper and it fractured and cracked. I ended up cutting this piece out and carried on. It happened another couple or three times by the time i got to 3.5m. So there is this factor. Another thing was that (if you know anything about Waste Oil Heaters then you will know what I am on about. Me? I am a fucking expert on them) because i was in the experimental phase, I was not buttoning up the top each time due to the couldn't be fucked factor. i added some more copper to the coil so my draw was less than adequate due to all of the leaks i am guessing.But all this said ... check out the pics below. I am going to try this setup and probably do a decent job sealing it all up. Should work a beauty. 1.7m of 25mm copper pipe. Intend to 'shape' the heat flow so it absolutely murders the pipe but hopefully still keep its blowtorch like velocity up. We will see.