Not-a-number
-
Posts
264 -
Joined
-
Last visited
-
Days Won
7
Content Type
Forums
Downloads
Events
Gallery
Everything posted by Not-a-number
-

Bugatti T57/59 Engine Project
Not-a-number replied to Not-a-number's topic in Projects and Build Ups
Getting the hang of this. Ready to go to the foundry tomorrow. Did a few small mods to the runners and risers. See if it cleans up the defects.- 143 replies
-
- 24
-

-
Bugatti T57/59 Engine Project
Not-a-number replied to Not-a-number's topic in Projects and Build Ups
Round 3. Filled the patterns at the foundry. So much easier. 30 minutes instead of 3+ days! The strip time is about 10mins on this sand. It took me an hour to get them home and by that time it was pretty hard to remove the main pattern. Had to use the slide hammer setup. Little bit of damage to the pattern and sand but nothing too major.- 143 replies
-
- 29
-
-
Bugatti T57/59 Engine Project
Not-a-number replied to Not-a-number's topic in Projects and Build Ups
Cleaned it up a bit. Took some rough measurements and it looks like it has shrunk the right amount. Machine allowance. About 4-5mm.- 143 replies
-
- 44
-
-

-
Bugatti T57/59 Engine Project
Not-a-number replied to Not-a-number's topic in Projects and Build Ups
Ohh yeah it worked!!!! One minor defect where one of the thin standoffs didnt vent. But thats a simple weld job. Other than that it went awesome! She was a pretty big job!- 143 replies
-
- 77
-
-
-
Bugatti T57/59 Engine Project
Not-a-number replied to Not-a-number's topic in Projects and Build Ups
Loaded up. Suitably sketchy process, no injuries though. Air bags doing the job for now.- 143 replies
-
- 27
-
-
-
Bugatti T57/59 Engine Project
Not-a-number replied to Not-a-number's topic in Projects and Build Ups
All glued up. Ready to clamp it down to the pallet, then drop it to the ground. Went a lot smoother than last time but still a big big mission. Need a bigger area and a better way of mixing sand. I think its a little lighter than the last one. In preparation I added some 'helper' air bags to the El Camino a few weeks back. Should be good for 1000lbs.....- 143 replies
-
- 38
-
-
Bugatti T57/59 Engine Project
Not-a-number replied to Not-a-number's topic in Projects and Build Ups
Sprayed everything with the insulative coating. Youre meant to set fire to it just after spraying, but the shed was pretty hazy and Im sure the spray is 90% alcohol. So didnt want to explode the house! Got all the riser holes and vents done. Dry fits together well.- 143 replies
-
- 20
-
-
Bugatti T57/59 Engine Project
Not-a-number replied to Not-a-number's topic in Projects and Build Ups
Pattern came out a lot easier this time. Mould looks pretty good for the most part! A few little areas that didnt pack well and also damaged some of the sharp corners. Close enough to good enough- 143 replies
-
- 35
-
-
Bugatti T57/59 Engine Project
Not-a-number replied to Not-a-number's topic in Projects and Build Ups
Mixed 250kg in two batches. Super hard work and now I can hardly move! I think I need to do a single partition or take it to the foundry to fill.- 143 replies
-
- 20
-
-
Bugatti T57/59 Engine Project
Not-a-number replied to Not-a-number's topic in Projects and Build Ups
Main inner core done. 75kg It removes from the patterns so much easier than last time. Now need to do the largest one at 230kg. No idea how thats going to go! Added a lift point as that helped last time.- 143 replies
-
- 40
-
-
Bugatti T57/59 Engine Project
Not-a-number replied to Not-a-number's topic in Projects and Build Ups
Did the bellhousing part using the mortar mixer. Gave me atleast a 45min work time on a hot day. Probably 3x as long as the last resin system. Picked up a 6cuft concrete mixer. El Camino for scale. Mixed 70kg for the runner system mould without much issue. Wasnt a perfect mix but I have time to leave it mixing for quite a bit longer. So will try that first.- 143 replies
-
- 26
-
-
Bugatti T57/59 Engine Project
Not-a-number replied to Not-a-number's topic in Projects and Build Ups
Runner system pattern complete. Re sprayed everything with the better mould release. All patterns ready to go now. Next will be testing out the new sand resin system to figure out ratios and work times. Dont really want to go all in with a 200kg batch first go!- 143 replies
-
- 36
-
-
Bugatti T57/59 Engine Project
Not-a-number replied to Not-a-number's topic in Projects and Build Ups
Doing 2 sprues/filters on this one which each feed one side of the casting. There will be more volume but also the mould is higher with no basin which will give more pressure. Completed the box. Quicker and cleaner than the last one. Next will be the runner system pattern/box.- 143 replies
-
- 23
-
-
Bugatti T57/59 Engine Project
Not-a-number replied to Not-a-number's topic in Projects and Build Ups
Time to have another go Got almost a ton of sand, new resin system and a new insulating spray for the moulds (meant to help big thin castings). Planning to use a concrete mixer to do larger batches. Doing some repairs to the damaged patterns. Drilled holes in the print and injected concrete epoxy. Also adding a few bond on thread plates to hopefully get a slide hammer on.- 143 replies
-
- 34
-
-
Working with a Lino-Cure supplier. Thanks for the suggestion (even though you suggested it ages ago!) Should have some in the next couple of weeks. Work time of 50min, strip time 80mins which should be good. Ill get a concrete mixer and see if I can do 300lbs in one go! @PatJ What ceramic mould wash do you use? I use to use Zircon but only used it on Iron.
-
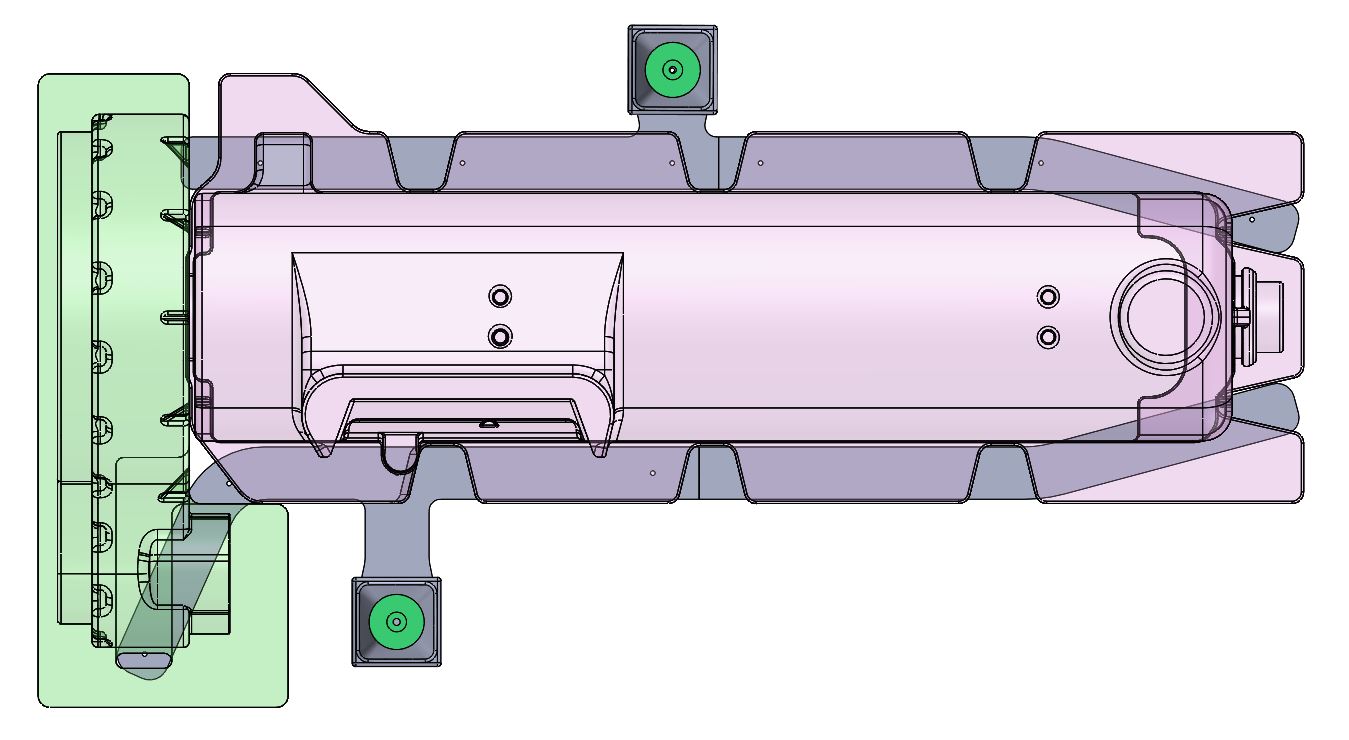
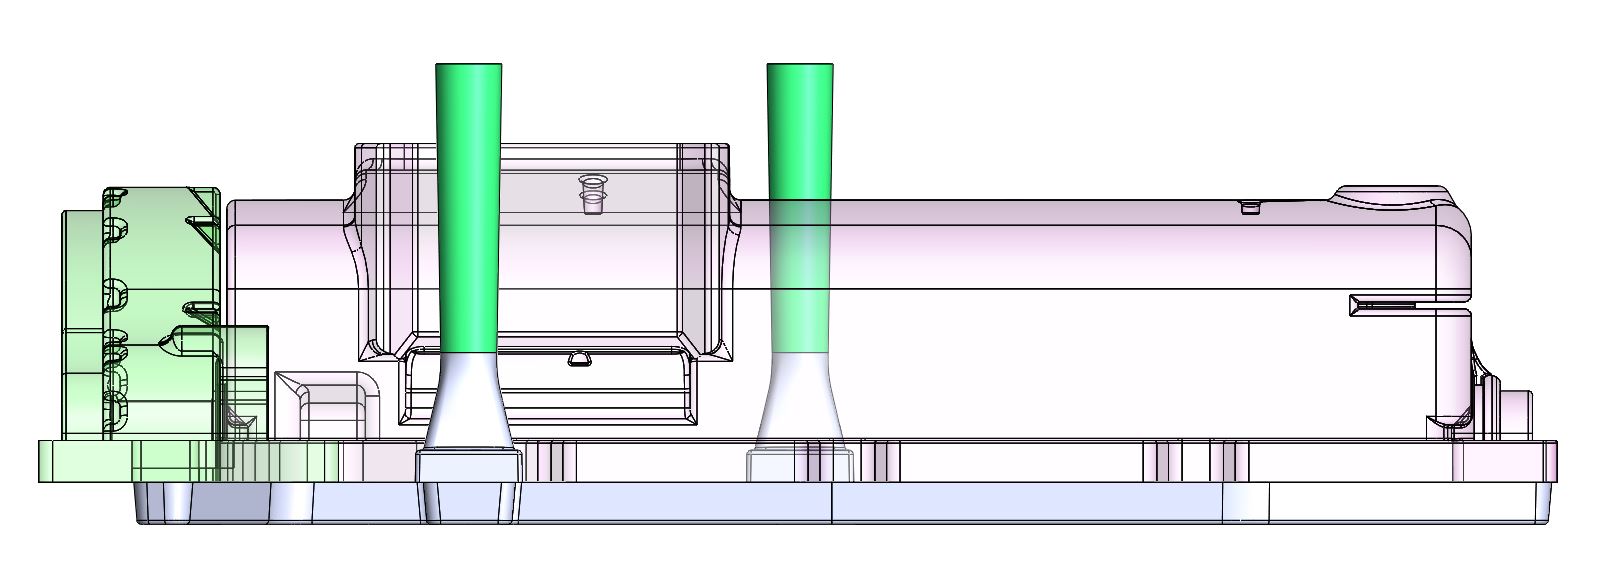
This is all really great info thanks Pat. I can implement a lot of these. I dont have control over the foundry though, so pour temperature changes probably isnt an option. I also cant pre heat the mould to help the problem. This is what Im currently thinking for the runner. 2 sprues and runner on each side. The in gates arnt great and they just rise up through the core becuase it was convenient. No real knife gate. I can try add spin traps/risers but it doesnt work well at the bellhousing end (green end) Im going to try do the filters horizontal at the bottom of the sprue. Ive never tried this. Do you think this is a bad idea? Can you talk more about the 'Lino-Cure' system? Whos a good supplier? Is it a 3 part system? What strip/cure times do you think I could get? Do you have a recommendation of type to try? The mixing of sand is the worst part of the whole thing and thats whats stopping me from getting things done. I need to do about 300lbs in 1 batch. So if it took 1-2hours to cure that would be perfect. Also if it could be done in a concrete mixer! My current plan is to re work the patterns and pack them at the foundry. The issue there is I dont have any control over the sand density/strength or how carefully they will pack it. From what ive seen, their resin quantity is a low as possible so its easy for them to remove after pouring. The parts they make dont have a lot of fine detail so the sand doesnt need to be strong. So ideally I would like to mix the sand myself. If you could help figure out a good binder solution that would be awesome. Im planning to have another go at the end of next month so I would like to do some sand testing beforehand.

-
Cheers. I do want to make a few more. But doing it in the garage is really limiting and makes it a lot harder than it needs to be. I need to figure out a better way. The best way would be to re design the patterns so that the foundry could easily handle them. Then I take them there and do it all. At the moment they are not very user friendly. I think I will weld this one up and make it usable because really all its doing is holding oil. I can re use the patterns to make new cores/moulds (on the patterns that I didnt break!). The cores are the inner bits and the moulds are the outer bits, they are made from sand and are only a one time use.
-
Bugatti T57/59 Engine Project
Not-a-number replied to Not-a-number's topic in Projects and Build Ups
Well it didnt 100% work. But it could definitely be fixed with a welder! It didnt fill fast enough and there wasnt enough pressure. So they had to frantically fill from one of the riser holes to try save it. In doing that there is a big section of cold lap and a big hole! So the changes would be to have 2 filling sprues in the middle of the casting. Then increase the head pressure a little bit. The bowl I had in the sprue was way too big and reduced the head pressure. For the most part it looks pretty good. All the finer details are there. No cores collapsed or shifted, no shrinking of any areas so I dont need to worry about chill blocks. El Camino for scale. Going to have to figure out an easier way to do this in the shed. Was way too much work!- 143 replies
-
- 55
-
-
-

-
Bugatti T57/59 Engine Project
Not-a-number replied to Not-a-number's topic in Projects and Build Ups
Finished and loaded up. Probably the most expensive and elaborate way to lower an El Camino! Looks like we'll see how good these bump stops are!- 143 replies
-
- 55
-
-
-

-
Bugatti T57/59 Engine Project
Not-a-number replied to Not-a-number's topic in Projects and Build Ups
Got it down without dropping it or injuring myself! Been a productive weekend. Just need to add some walls and pack some extra sand around the areas im worried about. Then will be good to go to the foundry!- 143 replies
-
- 28
-
-
-
Bugatti T57/59 Engine Project
Not-a-number replied to Not-a-number's topic in Projects and Build Ups
All assembled. Quite a mission. Not my best work but I'm learning a lot. Total is about 380kg. Now I need to make a pallet and tie it all together well enough so that when it’s tipped over to horizontal it doesn’t shift around.- 143 replies
-
- 24
-
-
Bugatti T57/59 Engine Project
Not-a-number replied to Not-a-number's topic in Projects and Build Ups
All the bits ready to go together.- 143 replies
-
- 19
-
-
Bugatti T57/59 Engine Project
Not-a-number replied to Not-a-number's topic in Projects and Build Ups
Got the small cores made and bonded in. Will try not to break them off when installing the main core.- 143 replies
-
- 22
-
-
Bugatti T57/59 Engine Project
Not-a-number replied to Not-a-number's topic in Projects and Build Ups
Runner mould done. Was being a bit too fast and didnt mix the sand as well as I should have. Really soft section at one end. This wouldnt be good because it would erode like crazing and send sand through the fill. Managed to cut it out and repair it. Hopefully it doesnt leak.- 143 replies
-
- 22
-
-
Bugatti T57/59 Engine Project
Not-a-number replied to Not-a-number's topic in Projects and Build Ups
Partitions assemble like this. They look overly complicated but once the rods are fixed in place with sand its tricky to remove the walls so need them to split up.- 143 replies
-
- 22
-