


kempy
-
Posts
2340 -
Joined
-
Days Won
2
Posts posted by kempy
-
-
I was going to suggest something just like that and a relay for the stater field coil, you might need an additional relay for the stator as well as I dont know what current is going though the red wire.( and possibly a hefty diode)
Is the reg totally stuffed? wouldn't mind looking at it so I can get an understanding of how exactly it works, or a bunch of close up pictures.
Youll need to check the max voltage input for that charge controller, at high revs some of these bikes put waaaay more than the 6v they were designed for.
Only other concern is that on 12v, you may eventually burn the stator, starter field coil out, but you may get away with the momentary use it gets
What i think we will have to address is that the charge field coil normally has 6v to generate the 1.21Gigawatts to charge the flux battery, this field coil is turned on/off by the regulator when required.
In the new scenario it will be on permanently and have 12v on it, I's suggest a regulator to drop the charge field winding to 6v, or at least a current limiting device.
handy with electronics?
-
$250!! tosser.
Looking good so far, what did the yellow connect to?
Blue- Neutral switch
Black- Points parallel with condenser
Red- Charge feed from stator/large field coil
Green- Field Coil for controlling charge current.
Yellow- Field Coil/stator for starting
Edited....
Hope I'm right, making a bunch of assumptions here.
-
ok so we can ignore the black wire, its the ignition coil feed as suspected (I assume there's a seperate ignition coil somewhere?)
Red is the windings on the rotor ( Motor/Generator).
Taking a wild stab in the dark here, without ever seeing one of these in the flesh or knowing what's inside, I'm kindof suspecting that there's some permanent magnets inside, and in addition a field coil to boost the magnetic field for starting?
What does the green wire connect to, i cant quite make it out.?
-
In the photo on the previous page there was a yellow wire, is that still attached?
To me, it looks like from the diagram that there's an ignition coil feed (to the - side of the coil and probably goes to points?), a charge light feed (d) , a motor feed (M) a field winding (f)
A close up pic of the motor would be useful, as well as the internal wiring of the regulator.
Probably similar to this buick reg.
I found this page just now that seems useful http://www.dansmc.com/genstarter.htm

-
Testing.....
-
 1
1
-
-
Here she is, all done and ready to go.
I tried to match an original Wega colour which I think didn't turn out too bad.
Polished up all of the stainless which took a while as there were some fairly heavy marks.
The pressure gauge looks almost new from a good strip down and clean out, new switches on the front as the crummy old red ones didn't suit the new colour
-
5
-
-
Everything back together, Chassis zinc plated, new pressurestat and seals throughout.
-
1
-
-
New shiny bits..blow off valve, water level probe and vacuum valve fitted
The vacuum valve is the little short silver one with a brass cir-clip closest to the bottom of the picture.
It's role is to let air back into the boiler when the machine is turned off, this avoids the boiler collapsing inwards under the vacuum caused by cooling.
-
7
-
-
Here's the completed boiler.
Spent hours using an acid softener and finishing with a glass bead blaster.
New nylon seals were used but I kept the original boiler element as it looked like it had been replaced at some stage.
Luckily the boiler is one of those types that have a removable end so I could get the bead blaster inside, most have just inlets/outlet points with the largest hole being for the heater element.
-
Boiler
Outside is caked with old coffee grinds and mouse droppings, this is after a hose off.
Plenty of nice lime scale build up with years of use with water sitting stagnant under pressure.
Certainly nowhere near the worst that I've seen though.
-
1
-
-
This machine was saved from a trip to the scrap metal merchant yard.
It's a 2 group Wega Orion that was sitting in the shed for while until I got time to completely strip it down and get the parts organised, but once everything was together it was completed in just under 4 weeks.
The rebuild itself was done couple of years ago so a few of the progress pictures are MIA, I thought I'd get pics up of at least one completed project if only to make myself feel better about finishing something.
Sadly, I didn't take a picture of the machine while it was complete in it's original condition so the first pic is off the net.
Rest assured, although it was the same colour it was a total mess with a lot of the original red paint scratched off and deep scratches in the stainless trays
It's a nice old girl, no electronics apart from the autofill controller.
First view is of the internals prior to deconstruction, loads of heavy pitting in the chassis
-
2
-
-
Great trip, love the teardrop.
Thanks for the inspiration, kids were bored yesterday so we followed the coastline from Whitford to Thames, with a small stop at the oyster place, yum!!
-
1
-
-
Thought it was a waste of time but I never realised how much delivery rate was required to get any gains.
Great pleasure in delivering the news though
-
I more or less said that, not quite so eloquently.
-
A novice question here as a mate was talking about sticking one of those electric blowers onto his Mitsubishi Lancer (1.4L standard thingy) for fun and I suggested he should check it out before he goes ahead and does it.
Question being: does the EFI automatically adjust for different air input pressure such as a few pounds boost or does the mapping cater for a generally fixed environment with some slight adjustments for cold/hot/knocking etc. expecting that it would probably lean it out far too much?
Cheers
K.
-
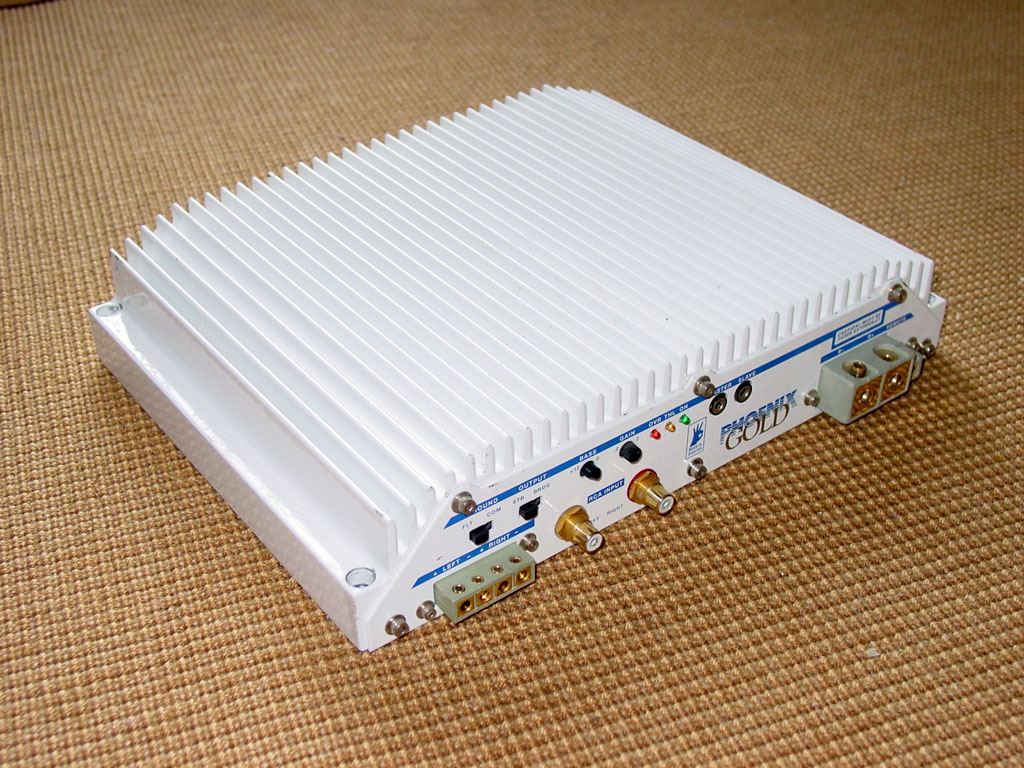
Score, found an unwanted Phoenix Gold MS275 car stereo amp, a good amp in their day
(not mine in the pic but exactly the same)
-
Yeah gotta watch that, thanks for the heads up. It's an 800w Sine wave one but I've change my mind on this.
Went down to Jaycar and bought a cheap 50wpc class AB car stereo amp as I figured it's a pretty inefficient way to do this by inverting 12v up to 230v then back down to ~40v via the transformer in the NAD.
May as well use the inverters in an efficient design and it's a lot less clunkier/easy to use which is important as it gets loaned to the PTA every year for the Santa Parade float sound system.
-
I'd be keen on the red light lens in the box
-
Just spent about an hour reading this thread, man... Some funny shit in here but frustrating bjesus~!, no doubt nothing compared to what you were experiencing Steelies.
Liking the outcome though, thumbs up here!
-
1
-
-
Display dead or just the backlighting?
-
Perfect, thanks! Saves me destroying the daughters UE speaker
-
What will you use for a Bluetooth receiver? Ive gotta make something similar for the wedding and so far I was thinking 12v battery, inverter, NAD amp I had lying about, spkrs, and butchering something like a Bluetooth speaker so someone in the seats can play DJ on their phone.
-
Would it be fair to say the first one is more for heavy duty polishing/cutting for those with a good technique, the 2nd for lighter work and easy of use?.
-
1
-
-
Coincidentally I went to 4 stores today looking for that exact thing and bought the 2nd on the list above from super cheap, it works great especially with the random orbit.
The guys at repco had a nice mothers kit with one of those 2 handle polishers but I backed off once I saw the polisher had a 60w motor.
Driveby, where did you buy the extra pads from?


jacknz123 1962 Suzuki MA50
in Two Wheels
Posted
It's a 6v bike isnt it?( does it have 6v light bulbs?)