


Kimjon
-
Posts
2181 -
Joined
-
Last visited
-
Days Won
1
Posts posted by Kimjon
-
-
Brought two cool new tools this week to use.
1) step drill set

Which did an amazing job cutting a perfect hole to fit this volt meter in. I feel stupid for not previously owning one, as I now appreciate just how good they are.
The second tool is a compact bender. I'm feverishly googling and YouTube-ing up a storm on how to set-up and use one, as I've never used one before. Looks easy, so once I get it bolted down I'll put it to use tomorrow.
-
 1
1
-
-
8 minutes ago, flyingbrick said:
Awesome
I wonder if that area would look better with the rear tank mount/bolts painted black so they kinda dissappear
Yeah, that flat part of the tank that sits on the frame by the front of the seat. That would disappear if painted to match the frame.
-
1
-
-
Hi, what's the rules on indicators and stop lights?
There are those clever led strips that do just about everything (lights, split turn signals left/right and rear brake light). I'd love to bend one around the inner lip of my rear fender, or perhaps under the seat?
Is this a reality...or will a certification engineer just laugh at me and tell me to pis off?
Your thoughts/experiences please? Thanks
-
Like, like, like! Awesome project, and so beautifully engineered.
-
5
-
-
Girder frontend underway
Still a fair bit left to do, but it will have to wait until next weekend.
-
7
-
-
Forget world peace, solving the famines in Africa, and whatever bullshit woman say about how difficult child birth is...this my dear friends has to be the most difficult problem the world has faced!
No...not that
No that was easy, just slap it in the mill
Bingo! Yup, an innocent looking little pull start. But it's not innocent, Satan had a lead role designing this system in the 1940's when he realised humans were getting tired of killing each other in WW2... so he cursed the world with this pull start mechanism, and the suffering continues to this day!
8 hours spent on this over two days trying to figure out how the fuck this pull start works!!!! 8 Fucking hours!!!! But it now works, and I'm exhausted...my brain hurts, my fingers are bleeding and I'm covered in carcinogenic grease from 1943 when this was last assembled. 8 hours!!!!
-
9
-
-
I think I've got my head around it now. I only had an hour to play with it today, so made up a bracket and bent up some rod.
Then I jumped back onto the cvt connection to the motor. It had an internal keyway, so I milled a slot to receive this on the output shaft.
Im not 100% happy with the hollow aluminum output. I have my doubts it will be strong enough...but if needed I can turn up a steel version later to the same dimensions.
-
2
-
-
Today I had McDonalds for lunch, WTF does that have to do with anything? Well it cost me $21 for a coffee, fancy chicken burger and an M&M McFlurry... $21 dollars!!!
Half an hour later I purchased a leaf spring for a trailer, brand new, made of real steel...$22.
Hard to believe that both items cost roughly the same, my only fear is that I turn both purchases into shit? But life's boring without a little gamble every now and then, so here goes nothing:
Cut with angle grinder, left purposefully oversize for now.
Mocked up for size...yip, too big, but that's an easy fix.
Will roll with this idea and see where it takes me.
-
4
-
-
Wow...just read all 8 pages, epic!!!
Such an awesome project, keep at it, its beautiful!
-
1
-
-
Well done, you're doing such a good job of this, very tasteful build. Can't wait to see more as it develops over time.
Keep up the good work!
-
Stupid amount of effort going into this project, but it's kind of fun bodging together cheap parts to make something cool.
Seat arrived today all the way from China. Fucked if i can work out how they can only charge $17 for a leather seat including free postage from another country door to door?
Anyway:
Seat stripped down, set back pivot made up and fitted
Seat posts with a M8 captive nut in each. Plus pivot front mount.
Test fit
Hmmmm leather...sexy!!!
Going to swap the leather on the tank to match. Will try simply sanding it first...nothing to lose trying that. But otherwise, back to the $2 shop to get another belt.
Edit:
Easy fix on the tank leather, simply turn it the other way around. I'll lacquer it another day to match seat.
-
7
-
-
Waiting on a few parts to turn up, so that gives me a little time to play with some of the "styling".
Leather and pinup girls...two of my favourite things
-
1
-
-
The cvt and freewheeling rear hub should offer a certain safety factor should the engine fail/seize. Hopefully it will allow me to safely roll to a stop?
-
Through the magic of the internet, a cvt appeared in the mail today. This was a tad exciting, as up until today I've never actually seen one in person.
Now the wajax motor on the bike is pretty fucked. Pete has raced it along the beach (that would have been fun!), unfortunately the salt has got into every crevice and caused severe corrosion to both metal and aluminium.
However the silver lining to this situation is there was a second incomplete parts motor included...so fingers crossed I should be able to cobble something together out of the two?
I "test fitted" front driven pulley of cvt on second motor, and it's going to fit with a bit of work done in the milling machine to square it up.
The cvt is a big mother!!! I up-sized my combo and got a 40 series not realising the physical size of it. Hopefully it doesn't bend the crankshaft with all that weight hanging off it? Like everything else in this build...try and see i guess???
I mocked it up using a plywood template to check clearances, looks like it should work.
Down tube will be tight, but I think with some creativity I'll find a solution for that. After all we want "no problems, just solutions"!
-
Sweet! Will roll with that, and go to plan B if it fails later on.
Thanks for your advice.
-
5 minutes ago, tortron said:
Common on mountain bikes and touring bikes, bang a 100kg cyclist on a 170mm crank and you have some decent torque.
The drive dogs are pretty strong the only issue is them not reengaging when you throttle off. You may even flush the grease out and just use oil instead
So you go for it eh?
-
Any reason why this won't work? The hub still free wheels, is this good or a bad idea?
I haven't welded it to the other sprockets yet, but that should hold it fine. More concerned about the strength of the two dogs that lock the hub up when torque is applied. Maybe I'm just over thinking everything now?
-
And a battery box.
Cut about 100mm off its overall length, then cut out a hole out for the battery to sit in. I'll wrap fuel line around the sharp edge by cutting a slit on the outside edge.
Welded together. Welding has never been a talent of mine, but I own a grinder!
Mounted to frame. Its removable so I can get battery out.
Kj
-
3
-
-
In the meantime, I figured just carry on and deal with rear wheel later.
Made some cool struts to securely mount fender:
Kj
-
Dude, that would be fantastic! Don't go out of your way, but if you're down this way sometime in the near future (10 minutes out of Cambridge) I'd love to get some expert opinion.
Its a cheap wheel, so I do have concerns. I YouTube'd wiring and soldering spokes. That looks like a great idea too.
-
Oh Christ! Didn't realise the spokes would be under so much stress.
My thinking was a wheel designed to be stoped by disc brakes should be strong enough, as rapid deceleration around the hub is equal and opposite to acceleration from a motor?
Usually braking produces more torque than accelerating does. But the top end speed and weight of the bike has increased in this case...dam it...now I'm concerned.
Has this scenario shown up in previous velobikes? Is it common to rip spokes out of the bicycle rims?
Kj
-
1
-
-
Gave it another nudge today, got a fair bit done.
Welded in new rear end
View from behind, with new fat rear tyre.
Moved jackshaft location and made up a lower mounting bracket to support it all.
Starting to take shape now.
Kj
-
2
-
-
As they say...to make omelettes, you've gotta break a few eggs!
So, fully committed here goes:
Limited time to spend on it, so mocked it up for a rough overview. Looks crappy now, but should all come together at the end.
-
6
-
-
4 minutes ago, Steelies said:
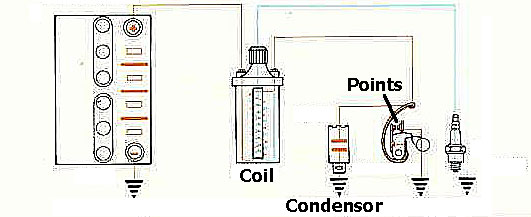
wajax? can't remember how pete did it but likely used the existing pair of points to trigger a coil each, powered directly off a small battery.
Awesomeness! Thank you.
Going to give it a try and see what happens.
-
1
-


")


Kimjon's and Flea's chopper velobike
in Two Wheels
Posted
I made this a couple years ago using a mates workshop, tools and help.
He said to me if I ever decide to get rid of it, be sure to send it his way. Last year that time came...so I gave it to him to keep. It seemed only fair considering without his help I never would've been able to build it i first place.
I told him about the drome racing and sent him a YouTube link...now he's keen as! So too are two more mates, so if possible we have a gang of 4 ready to take on the dome!