
- Popular Post

98cc
-
Posts
295 -
Joined
-
Last visited
Posts posted by 98cc
-
-
- Popular Post
- Popular Post
Well I think i can call this project finished and I will report if its been successful after the ride haha. Both of the bikes are done, I had a big assembly day last Sunday and I have ridden them around the block a couple of times now and they both go really well. I haven't got any pictures of them both together yet but i just took a few of my bike so here's a big pic dump of it all finished.

Tonight's job is to wrap it all up ready for its trip down to chch in the plane with me tomorrow night. The ride that i'm doing starts in Arundel at 11pm Tuesday. The ride ends at Akaora on Friday after about 180km of riding. Im doing the chch swapmeet on saturday as well which should be a pretty good event.
-
 23
23
-
Thanks Ned! Its all done now just about to do a big update
-
1
-
-
- Popular Post
- Popular Post
Well the bikes are nearly finished now which is good because im flying down to chch next Monday to start the ride! The top coat color has also been sprayed on all the parts.
One of the last jobs that had to be done was to make the handlebars. I originally thought i was going to have to find someone with a tube bender and mandrels suitable for the job but i managed to find some 2.5mm wall hydraulic tube and this bent very easily without wanting to collapse at all. The handle bars are bent with a hump in them to clear your legs at the top of the peddle stroke. There is a piece of threaded rod welded into one end for the bars to screw into the head assembly
Starting the bend
With a little bit of heat on the outside of the bend the tube just pulled around
And bending the other side to match (the hard part!)
I got the bars and all the fasteners nickel plated, i did all the polishing myself to save time and cost at the platers. I can highly recommend Electroless Coating Systems Glenfield for any nickle plating you want done, top service and they do a very good job.
I also did the grips, for those i raided my dads file draw, i was lucky i found 2 with exactly the same wooden handles
After trimming a bit of each end a putting a 5/8 hole up the middle and giving them a good sand they looked like this
And stuck onto the bars, they are still wet with the first coat of sealer, there are a couple coats of varnish to go on yet.
All going to plan final assembly of both bikes should be tomorrow night
-
11
-
Awesome bike! Are you going to do a full restore or just fix it up? Do you know why they were plated and then painted?
-
Cool might see you there then. Supposedly back around 1870 they had only invented 3 colors. They were Black, dark blue and burgundy. As i am trying to make this one look like an original Its going to be a dark burgundy as lots of pennys are black and blue.
I got the first coat of epoxy primer on the bikes and i got them all sanded up last night
I will hopefully get another coat of primer on tonight and then give the bits a good wet sand and then topcoat sometime this weekend!
-
5
-
-
Thanks for all the comments everyone! I suppose everything i do i try to do to the best of my abilities so i can have pride in the finished product. Thats what i couldn't understand at school engineering classes, most of the guys didint give a toss what their work turned out like and even if they finished it at all. There are so many awesome and inspiring projects on OS so its good if someone can get something out of what I'm doing.
Steelies, i think lead should be encouraged for sure!
BL, you should defiantly head to Oamaru if you are keen, the full ride that I'm doing is 4 days long, i can send you the details if you are keen. Also chuck a pic of that BSA up!
FB, about the braking, these things generally dont have them. The main form of braking is by putting back pressure on the peddles. Some pennys have a spoon brake on the front tyre but they are pretty ineffective.
Are you doing the full ride Valiant?
Thanks rusti, its good that i dont need to go to my dad every time i need something welded now
-
3
-
-
- Popular Post
- Popular Post
I have basically finished off every thing that needed making on my bike now, all that's left is handlebars and paint which i will hopefully start this week.
As i said before i was hoping to make my forks more like the originals, they are all done now and i am extremely pleased with how they have turned out.
Pics....
I started with this head casting. I got it from the guy in Oamaru, it's a steel casting that was taken off an original bike.
I cut of the handle bar spigot as it was to small for the 5/8" handle bar tube that i wanted to use. I got it in the 4 jaw running as true as i could get it and then machined the 2 degree taper down the length of it. I then drilled and reamed the hole for the adjusting bolt to 1/2" for the next step.
I found a 1/2" center drill with a broken of end so i could modify it with out feeling bad, i welded it to a 1/2" rod and then ended up with a long center drill.
With the long drill running really nicely in the reamed hole i cut the bottom bearing surface, the long center drill worked well and didn't wander at all when i started drilling. After that was done i bored it out some more and tapped it to 5/8" UNF.
That finished off the head and i started on the fork tubes.
For those i used the squashed round tube i got from Oamaru. The problem was that i didn't like the look of the long straight tubes when all the other parts on the bike were tapered so all i did was cut a big long triangle section out of them and welded them back up.
Tacked back together
And all welded up. These long welds were good practice for my tig welding, im slowly getting better at it. I get to do a tig course next year through my apprenticeship so im really looking forward to some proper instruction.
For the fork end detail i just cut out some blocks and welded them on.
Cut to shape and roughly filed up.
And after final shaping and sanding with the bearing carriers fitted.
Once all that was done i welded the 2 fork tubes to the machined head. I did a few plug welds aswell to make sure its as strong as it can be. Once that was done i gave it a good file up to fair it all in.
The other problem with these fork tubes is that when the round was squashed flat i don't think they had a proper former in it so it was hollow in the middle. This didn't look to good either. Ever since seeing Manu's pics of leading his Ariel tank i wanted to give that a go, these fork tubes were the perfect thing to do so. I asked a good panel beater friend of mine if he would give me a hand and show how it was done so i got some pics of the process.
First thing was getting the surface perfectly clean and getting some flux on it.
Then tin the whole surface with the body solder
Next was getting the lead on. It was a fairly big stick and you heat the end up with the torch until a lump falls of onto the bit of steel you just preheated.
You work your way along until there are lumps of lead stuck to the length of the part. The key to the whole thing seemed to get all the lead on in one go so you don't have to put more on later over the top of it. He told me that it is much easier to file of excess lead than put more on.
After that was done you go round and using a wooden shaper heat up each lump of lead at push it around until it is roughly the shape you want.
After all the lead was on i gave it a real good scrub in water to get rid of all the flux and this is what the forks looked like
Now for the fun? part, I dug out my dads body file and got into it. After the basic shaping it looked like this. It happened pretty quick because the lead is very easy to file as you can imagine.
And what they looked like after finial filling and sanding. I have also machined up a new handle bar spigot and welded it on, its also tapped 5/8 UNF for the bars to screw into
I also finished of and painted the rear saddle mount and spring. The leather saddle is riveted on with big copper rivets.
The front seat mounts ready to be cut out
All fitted up with the front mounts bent to shape. I also set up the adjusting screw in the rotary table and milled a 1/2" hex on it for your spanner to go on.
And how the bike looks at the moment. I am wrapped with how the forks have turned out and they now look like they were in 1870.
If i had handlebars i could ride the thing, i am going to strip it down and hopefully get primer on both the bikes this week. The ride that im doing on it is less then a month away now so hopefully the painting process will go smoothly and then i might even be able to get a bit of practice in!
-
23
-
Thanks 7VEN, yup its all coming together now. Did you see many of these things over in England while you were there?
-
1
-
-
Very cool! Is the villiers bike a thing of the past now?
-
Thanks Tortron, no i dont think i will do any lug detail, the ride is only a month away now and i still need to get both of the bikes painted and do all the final details. A good replica penny will generally sell for between $2-3000 even up to $4000 and originals are well into the 7-15k range. I got my bike welded up on the weekend so i will do a big update sometime this week.
-
- Popular Post
- Popular Post
I have made up the first set of forks now, i just need to make the handle bar mount and weld it on. These forks are for my mates bike
This is the steering and neck assembly, very simple but effective. The thread at the top is 5/8 UNF. It will have a lock nut to hold it in the right position when it is all set up. I got my dad to weld the pin on as it's the highest stressed part on the bike and I'm not really keen on it breaking of when I'm up on top of the thing haha
Fork ends i made earlier welded into the tubes with the bearing carriers fitted
Getting it all set up ready to weld in the steering assembly
And all welded up with the fork rake and wheelbase set
I have made up most of the bits to put my forks together now, they are going to be different to this set and much more like they were in 1870 with a cast head arrangement and taped fork tubes and a few other different details. This should make them much nicer looking than the standard forks for these replicas
-
13
-
Thanks BVB, I need to get them finished for the ride I'm doing in October. It's quite good knowing you need to get something done by a certain date or else you won't be able to do the event that you have already paid for haha.
-
3
-
-
Thanks born loser, the bits for my bike have cost about $700. The long spokes are $4 each and the tyre rubber is $40 a meter so these were the main costs. I wont need to buy anything else apart for some paint to do the forks and frame from this point though
-
1
-
-
- Popular Post
- Popular Post
Ok i have made a fair bit of progress since the last update. First of all i have drilled the holes in the rims for the spokes, all 400 of them! I painted the rims gloss black with base and clear.
Then it was the job of cutting and threading the spokes and lacing all the bits up. All 4 wheels are done now which i am very pleased with because they are definitely the trickiest bit of the build.
This was the tool my mate lent me for rolling the threads on the spokes. Its pretty old and i imagine it has done a few thousand spokes in its life. Rolling the thread takes less than 10 seconds.
Here are some pics of lacing up one of the big wheels, i didn't take any of the small wheels as they are pretty standard.
Put all the spokes in the hub
The first side in with the nipples loosely on
The other side going in
I found the perfect jig to true them up in the scrap at work so i just tacked the bearing carriers on top of it. Truing up the wheels was a long job and the big ones took around 4 hours each to do with the 72 spokes to tighten up.
And all done with the tyres on
Mock up.....
Next job is making up the front forks
-
17
-
I just found out that the vintage car club rally im going on in my Austin 7 tomorrow finishes in Rotorua so im looking foward to going to this as i havent been to the Rotorua one yet
-
1
-
-
I have got the rear forks all finished and welded on now. The hubs i got from the guy in Oamaru, they are just steel front hubs off a normal bike. The rims are all drilled and ready for painting so hopefully that will happen this weekend.
-
9
-
-
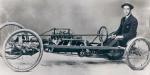
They were even used on rails!
-
3
-
-
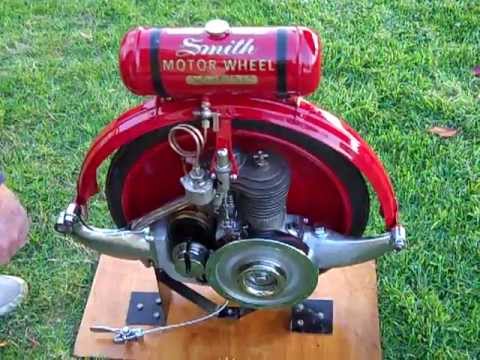
Thats a Smith Motor Wheel, built around 1918. They were designed as a bicycle clip on attachment but they were also put on small cars. They are quite rare and very expensive if you do find one for sale. This one is at the Southward car museum
-
3
-
-
Thanks born looser and rot808. If you ever want to do one bl, get in touch with Grahame Simpson in Oamaru. He is extremely helpful.
Yeah it should be a good thing for leadfoot and roycroft events Amy!
Rustisize, Grahame gets the engineering company in oamaru to do it. They have a big press and the just swage the taper into it.
-
2
-
-
- Popular Post
- Popular Post
I had an awesome few days in Oamaru making penny farthing bits, we managed to get all the stuff i needed finished so hopefully the bikes will go together pretty quickly now.
For the front and rear rims we first had to form the round tube into a crescent shaped section. This is done by pulling the tube through a set of rollers with an electric winch, you have to do 3 passes through the rollers to get the right section.
We then rolled the crescent section into a circle, This only takes a couple of minutes. Both of the front rims have been rolled to 52 inch diameter.
And the rear rims, we could roll 3 at a time.
The backbones were rolled to fit the rims.
Lastly we did the tyres. First you cut the rubber to length and set it up in the machine.
You then tension the wire and this compresses the rubber into itself untill it fits tightly onto the rim.
You lock the wire in place with the 2 cap screws and remove the tyre from the machine, you then silver solder the ends of the wire together.
Once you undo the 2 cap screws and remove the locking jig the rubber completely covers the join and you are left with the finished tyre. These solid tyres will do two lengths of New Zealand before they need replacing.
And this is the pile of bits at the end of the weekend.
The next job is to drill all the holes in the rims and paint them ready for lacing up.
-
15
-
Yup they are a solid piece of rubber with a wire through the center. You first cut the rubber slightly larger than the circumference of the wheel, you then lay the rubber around the rim and using a special tool tension the wire until the rubber is tight on the rim and then braze the ends of the wire together.
-
3
-
-
I am flying down to chch tonight, and then going to Oamaru tomorrow morning and spending the rest of the week making the rims, backbones, spokes and tyres. I will try to take as many pics as possible
-
5
-
-
Very cool, was this the one that was on trade me a while ago? Why dont you just use a mag? Heres one for sale at the moment http://www.trademe.co.nz/Browse/Listing.aspx?id=883887354 A bit newer than it should be but at the moment its cheep and would save a lot of work doing a dissy and battery etc.
-
1
-
-
Yeah i reckon, do some sketches! I will see if i can do it


98cc's Ordinary Bicycle Build
in Two Wheels
Posted
Thanks for all the awesome comments guys! The place that we are staying at tonight in Rakaia has internet access so i can catch up on a few things. The ride is going extremely well so far and i am very pleased with how the bike is going, no problems yet and i think we have done a bit over 100km now. We went out to Erewhon station yesterday and had a good tour around which was cool. Tomorrow is the big day with a bit over 80km to do so i am looking foward to that. I have managed to master a few tricks now like no hands riding, peddle dismounts, coasting down a hill with legs over the bars and I am getting the hang of balancing on the thing stationary. Oh yes the newspaper article, The lies!!! its amazing what these reporters seem to be able to pull out of thin air haha although he did get most of the things i told him right. DIRTY6 yes that pic is of one of the 6 other penny farthing riders on the tour, there are also about 16 vintage safety bicycle aswell. Anyway thats my internet just about up, I will put some pics up of the ride next week when i get home.