simsey Posted October 29, 2009 Share Posted October 29, 2009 I bought this hardtop AE70 in November 2007 for just over a grand. I actually have two of these, One of them ive been using as the donor car, which I have pinched a couple of panels and interior bits and peices from. It sat in the garage for about 8 months after I bought it (not running) So I started to get serious about it in July and I've slowly been working away at it since then, now getting close to finishing.. Hopefully be seeing the light at the end of the tunnel very soon! Heres some piccies... The day I bought her Did alot of work before getting her to this stage in the next photos, bashed out the guards about an inch more than standard for some nice flare to get some wide wheels in there at some point.. Got rid of some rust in the bottom of the doors, and a huge chunk of rust in the right rear guard. I could put up a whole bunch of pics from the panel work progress but I wouldn't want to bore you haha. Undercoat with guide coat Engine bay... Excuse the n00b camera skills. Stace givin it some tender rubbin.. All sweet to go to the booth.. Shits getting exciting.. There are a few wee imperfections in the final paintjob, but i was kinda expecting that considering this is the first panel job ive ever done on a car.. Overall i'm f@%king wrapped with it.. Adjustable Koni kit Fitted rear bumper ( note wrong endcaps..:thumbdown: ) Just bought some brand new TRD shock inserts from trademe. Here's the struts all made up.. Also had the brake rotors skimmed. Just scored a package I couldn't refuse, a full rwd setup S14 vvt SR20DE with 5spd manual gbox, loom, everything for very, very cheap... Sold the 4AGE and K50 box I had sitting in there ready to go.. I made a "mock up" cardboard rim the other day to get measurements for my steelies, going for 15" x 8 -12 offset, fills out my flared guards perfectly.. Quote Link to comment Share on other sites More sharing options...
simsey Posted November 1, 2009 Author Share Posted November 1, 2009 Got stuck in this weekend, got the engine sitting where it will be mounted on the crossmember. Made our measurements for the mounts, just have to tack them to the xmember and take them to get welded up by a pro.. Here's the S14 SR20DE package as it turned up. Scored a TE71 pedal box to make hydraulic clutch conversion heaps easier.. Swapped my power steering rack for a manual rack.. As you can see the silvia gearbox that came with the motor was very long, couldnt get it to fit without mounting the motor too far forward... So we went on the hunt and picked up a gearbox from an L20 Nissan motor from an R30 Skyline.. Huge difference in size.. The awesome thing is that the L20 box bolted straight up to my SR20 bellhousing... only thing we had to change was swapping one of the main shaft bearings from the silvia box on to the L20 to make it fit the bell... Ya can't do an engine swap without getting some serious meat sweats on... And this is how it's sitting at the end of the weekend.. Just another good shot of the car Mounts and hydraulic clutch conversion to be finished this week hopefully.. Quote Link to comment Share on other sites More sharing options...
simsey Posted November 11, 2009 Author Share Posted November 11, 2009 Well.. Not much to update.. Finished mounting the engine.. Got all the materials for my 2.5" exhaust, should be welding it up tonight / this weekend, with wiring the engine to follow that.. Couple of pics.. Holes we made in the firewall for the hydraulic clutch setup.. Engine all mounted up! 2.5" piping for the zorst.. Quote Link to comment Share on other sites More sharing options...
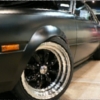
simsey Posted February 3, 2010 Author Share Posted February 3, 2010 Only a 3 weeks till 4 n Rotary CHCH which I'm putting my car in to with 14 other Club K cars... I'm really pushing to get her finished in time!! This means I will be sticking with factory AE70 radiator and factory diff untill after the show, as I dont have the money to get that stuff in by that time, will be running cut springs in the rear to match whatever height I run in the front, that's untill after the show of course and I can chuck in the adjustable setup with the new diff.. Everything else is pretty much done, engine, exhaust, hyraulic clutch etc etc... Still have to modify driveshaft and make a driveshaft hoop. NOW.. I REALLY wanted some 14s... Unfortunately I don't have enough money / time to get the rims I want.. So I've gone for the best I can get for cheap.. I'm buying a set of these Sportmax 513 rims (15x8 -0p) which are going to be cheaper than making steelies! They look good and they will do untill I can afford / find some proper jap wheels. Just got tyres the other day, Nankang ns2's 195/45/15's... the guy fucked up and gave me one 16" tyre so gotta get that swapped up.. Just a random pic of the SR20 mounted up Quote Link to comment Share on other sites More sharing options...
simsey Posted February 17, 2010 Author Share Posted February 17, 2010 Just got tyres fitted today at Patterson Brothers Tyres, got real good service there.. Also had to get some special small wheel nuts and a special socket for them so they hooked me up with all that too. Put my park bench spec bumpers on front and rear, because I don't have a matching pair of chrome bumpers. I put the carpet in and the rear seat in.. Things to do before show day Saturday: Find steering rack clamp brackets, put it in and hook it all up to struts Fit front calipers Attatch steering colomn to steering rack Get rear shock rubbers for the diff mounts Attatch rear boot lock Get clip for left rear chrome window trim Find front left bumper indicator (housing & lens) Fit MR2 seats Put dash in That's it. Had today off work, got heaps of shit done.. Got the rest of the week off to get it all finished. Here's some pics Quote Link to comment Share on other sites More sharing options...

Recommended Posts
Join the conversation
You can post now and register later. If you have an account, sign in now to post with your account.