


estate_
-
Posts
201 -
Joined
-
Last visited
Posts posted by estate_
-
-
Truck has 320k on it, thanks it looks a lot like whats going on, truck is also cutting out/stalling and faulting the ECU apparently. Looking into mechanical pump conversion now, getting the engine running would be easy but not sure how the auto box/ecu would work without the electronic pump connected?
Anyone here know much about this? Ill try get ahold of some of the guys on offroadexpress who have done similar but i haven't got an account so just trying to sort that out
I think continueing with the ETi pump will only give headaches.
-
Anyone here know much about these engines?
I have a friend who has just bought a newish shape Terrano with a TD27 turbo ETi, I haven't had much chance to look at it properly but it seems to be hunting a bit at idle, moreso when cold. The RPM does not drop, rather sort of jumps and shudders up, eg at idle it sits at 1000, then will kind of jump between 1000/1300 and back. If you come to a stop at lights it will often do one big jump up to 1800/2000. No problems at higher RPM, holds load no problems etc so doesn't seem like a fuel supply/air issue. It is automagic so not sure what trickery there is there that could send the fuel pump signals
I cant find any good info on the ETi engines online, but I assume they are ECU controlled mechanical pumps that have no mechanical governor? Therefore chances are it is an electical issue giving it little pulses of more fuel due to a dodgy sensor/wiring/idle up/??. I haven't been able to find a wiring diagram or anything to show how the system works so I can only guess here. Tachometer also does whatever it feels like, sometimes likes to go to 6000rpm when the engine is idling and definitely not revving up. However the hunting of 1000-2000rpm is definitely real. So it definitely has some electrical gremlins going on.
Only other perhaps far fetched explanation I can think of is that the turbo is spitting a bit of oil through the intake which is causing the engine to self fuel/burn the oil and as a result revving up a bit. The turbo definitely seems a bit tired, will put out a bit of white smoke on takeoff and when the auto shifts gear/backs off rpm and boost, but hardly enough smoke to be really worried. Intake pipes are relatively wet with oil though.
Anyway, bit of a wall of text here but hopefully someone here has a better idea of at least how these ETi engines are meant to govern themselves. I will hopefully get a chance to have a better look at it and clean plugs/sensors/check turbo play etc, but any insight on these engines is much appreciated
Cheers!
-
We've got new (2016) hiluxes as our work fleet and they're mint to drive and super capable as you'd expect.. Auto boxes are a bit hit and miss but overall not too bad. If you go for any of the wellside options they come with a mint fish eye rearview camera too which makes backing easy as..
We have had a number of our fleet all had to go back for a remapping as they were apparently on a tune that was causing issues with injectors and making them SUPER smokey to drive. Mine went back at 15km for service/remap and toyota very quietly had to replace the injectors and particulate filters.. Toyota obviously footed the bill no questions asked and were really easy to deal with. Trucks been mint since!
-
 2
2
-
-
Ah yup okay, straight edge and light shows a slight curve in the old engines set, the ones with holes, most of them are fine and slight radius however a few have wear marks of where the cam has begun to dig in. The ones in the new engine however definitely are flat and look like they've been refaced recently, but flat. Might be worth getting the worn ones with holes refaced in that case.
Not much showing up for strong bros, some sites saying they have gone under, other listing addresses in Sunnybrae and Diana drive in Wairau area.
EDIT: Yup seems they are on Diana drive, just missed them today so will try again tomorrow, certainly looks like the place to go
-
Hmm perhaps they were meant to have a radius but both these sets seem flat, I'd better look into that.
On another note I'm thinking I may still get a little stuck with rings. Went into partmaster yesterday to sort out rings, he's found a listing for .060 rings for a 998 which he said he would sort out on Monday and couldn't get any additional info on, however doing a bit of looking into it now I think they might be no good, as the listed ring set from ACL is "PS1145-060" which is showing as 12 compression rings and 4 oil rings. So that doesn't cover the two oil rings per piston, and presumably means that it is a one piece oil ring too. Bugger.
I'll send an inquiry to FES/Johnson rings and see what they can do. Where did you guys end up sorting your 3 piece oil control rings, any ideas?
Something like this maybe
http://www.minimania.com/part/RA17927-60/Piston-Ring-Set-060-998--1100-5-Ring-Piston
-
Here are the current pistons and single piece control rings. Can measure anything if necessary
-
That oil is far too thin, running in or not.
Drain it and fill with Penrite 20w60 asap- compatible specification to the original 30w
That Penrite 20-60 was what I ended up running after the running in oil in an attempt to help the issue, will be the oil I end up running I would imagine. I have actually got a different oil on its way for run in as not keen on the 15-40 again - this stuff which is a genuine SAE30 and non friction modified so should be good for the initial few km to bed in?
gap those rings in the bores they are going into for maximum sealing abilities. Solid lifters were used in some models (forget which), I've always preferred the drilled type for reasons you mention. Check valve guides also.
As frosty said, some pistons aren't up to much, I have drilled bigger oil control ring drain holes into replacement pistons to cure smoking.
Some A series bits I've come across new have been intended for industrial motors, post up pics of the pistons if you can.
Will gap them for each bore when I get ahold of the rings, haven't got too much info on the rings yet, meant to be ACL brand and he wasn't able to tell me much more so no idea what oil control ring setup is on it, will check if they will suit when they arrive in store. Bit tricky being stuck with him running 60 thou pistons, limits my options for getting rings. I'll grab a photo of the pistons now in regards to the oil slots.
Will pull the head down tomorrow to see how the valve guides feel etc, and see what is going on with seals or o-rings or anything.
I wouldn't change the cam followers unless they have been refaced. If they have been broken in to a different cam in a different block you may have lifter rotation and wear issues.
I think the non holed ones are more a competition item as they can break where the drilling is. Remember the cam also gets a good splash from the crank flinging oil around (hence 2000+ rpm cam break in).
The ones with holes haven't been refaced, some of them do show marking/indents where the cam was running and they haven't been rotating much, others are fine. Might come out with an oil stone and some persistance? The nice thing is the followers can be removed without too much drama should I change my mind on what ones to run later.
-
Updating this:
-Gave it some decent days of solid cane, to no success, still smoking and burning oil something chronic
-Pulled head off, pistons out, it looks as if someone had once honed it nicely, then for whatever reason gone and wrecked it with emery giving it some pretty horrid marks in a near horizontal direction, so it was left with a very inconsistant patchy surface with deep scours then glossy patches, it wouldn't have run properly in a million years like this. It's almost as if it had been nicely honed, sat around, forgot about, then the bores rusted a bit and one day he went shit I'd better throw that engine together and flick it off, giving it a sand to get rid of the rust. I can only spectulate hah. The pistons are(well were) brand new, so he seems to have put so much work in, then rushed the last bit to sell it or something.
-I have now honed the bores and they are now measuring almost perfectly 66.07mm with a nice cross hatch. The pistons are a 5 ring piston, non OE but not sure what manufacturer etc, however they are on stock conrods. They are marked +1.5mm 060, and comparing my bore size with factory this is something like 3mm over a stock 948 bore, however the 998 shows a 64.58mm bore, with 64.58 + 1.5mm equating to exactly what my bores are it seems he has bored it out to suit 998cc 60 thou over pistons. Have ordered a set of rings so hopefully they will fit. Again the bores are very very good, not tapered, out of round or anything, so he has definitely bored them recently so who knows why he skimped on honing properly.
-Another thing I've found while I had it apart is that the cam followers are a bit funny, these engines have a basic bucket type cam follower, and the oil returns from the head down the pushrod hole area lubricating the cam lobes etc from the looks of it. On this rebuilt engine there are no holes in the cam followers, so the oil seems to pool in the followers and the surrounding area until it is high enough to flow down the slot between the followers. However this can't be getting much oil to the cam lobes as the drain point is between them, and leaves oil sitting right beside the tappet door vent pipe, which has been spitting out heaps of oil.
-The old engines cam followers have holes in them so it drains through, lubricates the cam lobes, and doesn't pool beside the breather tube. So i'll put those in it. Just seems odd hah. I won't worry too much about it, just put the cam followers with the holes in them in the new engine unless you lot can think of anything I can't
Anyway, bit of a wall of text, so have just put the main points in bold, but the summary of it all is that it should be all sorted and under way, thanks to all of you for your insight and suggestions. Hopefully will get my hands on the parts I need early this next week and be putting it back together very soon.
-
1
-
-
Didn't take photos before cleaning up so shall have to run it again and get photos, main concern is down the bores appears to be wet with oil as do the plugs, and the pistons are pretty black after such a short period, I've got a photo of the plugs:
http://iforce.co.nz/I/5rhwlb5y.0u5.jpg
Interesting re: the 1300, again I am not sure of what pistons/rings are in it currently. The following are photos from when I had the sump off of both the bottom of the pistons and the bores
-
Seems like it is a bigger problem then perhaps? As the excess oil in the bores is going to prevent the rings bedding in properly if they haven't already, but this excess oil burning surely has a bigger cause than just the rings not bedding in properly? Also hard to know what is done already, as the pistons are looking pretty black and presumably the whole chamber is carbon covered. Should I still be looking at thrashing it to see if it clears up or investigating further before running it again?
-
That's the issue, no idea. The person who I bought the engine off bought it off someone else before him who did the work, I have no record of the actual work done, nor does the person who sold it to me. For all I know they could have put higher compression pistons in etc, as the pistons are brand new, but I've only seen them from the sump end.
-
Thanks for all the responses. I figured I would have a quick look over the engine and do a compression test pre-thrash so I have a benchmark and can ensure nothing ridiculous is happening. Now the plot thickens. Pulling the rocker cover and plugs shows there is oil everywhere, and far too much of it, the plugs are looking pretty oily and shitty, the area around the plugs too, the rocker cover was fill of oil along the non pushrod side(also worth noting it is parked on a sideways slant keeping oil by the valves - not good!)
The bores all seem wet with oil and compressions came back too high - 200psi, must be because they are wet? Maybe worth drying bores and retesting?
However what has got me a little confused is the heads between the two engines, google is a little confusing with the valve stem seals or lack thereof that these engines are meant to have? Looking at the head on the rebuilt engine it is running double valve springs, and there is a large portion of valve stem exposed when the valve is closed(maybe 12mm) however looking at the old engine it is single spring, and very little exposed(sub 6mm). Interesting, the twin valve springs are presumably a performance upgrade as my Haynes manual shows single springs only. But the shorter distance I am not sure on, almost seems as if it is missing valve stem seals or something silly. Bit hard to tell what is going on under the twin springs.
-
Shall take it for a good thrash and see where that leaves me. Leave the running in oil for now?
-
Hi all
I have recently picked up a 62 Morris Minor, with a knackered engine. In the process of looking at rebuilding the engine I came accross a rebuilt engine that had been sitting around for a couple of years for cheap so went with that option. When I got the engine I lubed the bores through the plugs with oil, pulled the sump to have a look and all seemed great, the seller mentioned the engine had been rebuilt, no expense spared, and balanced(!) by the person he bought the engine off. The crank showed fresh grind marks on the counter weights and the cam still had grey assembly lube on it, the pistons were brand new and the bores showing fresh hone marks. All pointing towards a proper rebuild.
I have put this engine in, tidied it up, prelubed it etc, and it runs well, good oil pressure and runs nicely. However it is a a bit smokey and breathing. I wasnt immediately concerned, there is a mixture of white smoke and water, along with slightly blue smoke, so one would assume the rings are still seating, and there is plenty of condensation and maybe old oil in the exhaust etc. The engine has had a good few runs now though, and approx 75km of varied around town driving, changing rpm load etc constantly, and it still seems smokey and throws a bit of oil out of the crankcase breather on the side.
What I am interested to hear is what you lot have done for similar engines in terms of running in, how long is too long to be smokey? I am running a 15-40 penrite non friction modified running in oil, which may be a part of it as it is probably a bit thin for this engine but was the only running in oil I found at the time. I am also running fresh 95 octane with a hint of valve master lead substitute. Thoughts?
I would imagine I just need to change the oil and give it a bit more of a thrashing and it should hopefully clear up, but am eager to hear your opinions as I don't wish to glaze the bores or anything silly and have to pull it all apart and out new rings in.
The engine is a 948cc A series.
Thanks
-
Awesome thanks for all the feedback, much appreciated. Sounds like best plan will be to roll as is and try get WOF, I had just expected them to be all over something like this. May look at putting in a reproduction cut in long term
-
Hi all
Have just acquired an old 62 Morris Minor, however crawling under it now have found a pretty ugly looking patch on the chassis. Now the vehicle hasn't had WOF since 2007, and no idea when this patch was done, but I'm picking they won't like this for a WOF? Is it meant to have a repair cert?
Moving forward, what options do I have? Should I be looking at leaving as is on the basis it has been like this for years(perhaps), or should I look at grinding and/or painting it all? The patch is located at the front of the vehicle, passengers side.
http://iforce.co.nz/i/gc4e2ate.zic.jpg
http://iforce.co.nz/i/lmujquwz.pxx.jpg
http://iforce.co.nz/i/o1awkslr.5mv.jpg
http://iforce.co.nz/i/ndeelcnp.r5w.jpg
Any thoughts appreciated!
Thanks
-
+1 Best tool set ive ever had is Bahco. never a problem, the ratchets are superb.
Even used as a hammer when angry/frustrated/drunk.
Loves it.
Seconding this. Bought a bahco set(metric spanners, met/imp 1/2", metric 1/4" set) years ago before I went into trade, only cost me $200 odd, and it's seen more use and abuse than any of my other tool sets which I've thrown far more money at. The ratchet is fucked visually from exactly this, hammering, using as a hammer, putting meter long poles on etc but works like a bought one.
-
Slow going but I haven't updated this in some time! So here are some odd pictures I've scrounged up. There were heaps of better ones... somewhere... I will put some others up if I find them
Fantastic original mounts:

Be gone:
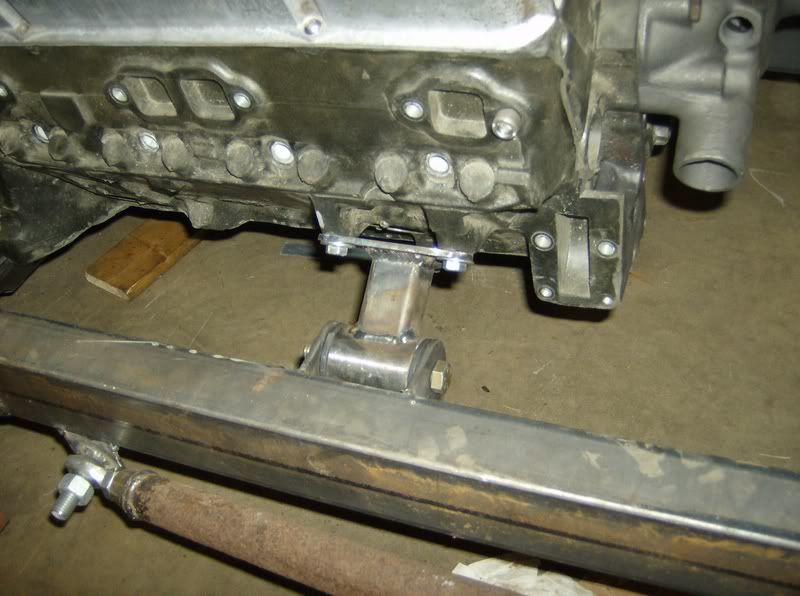
Now this is gonna kinda set the tone for these engine mounts, I'm no precision engineer, so I seem to have been more on the overkill side... okay completely overkilled it in material choice but hey. Decided to go with the mount type I was pondering above with a tubular spec mount running leaf spring type collared rubber bushes. So finding it a little tricky to find nice thick tube I decided to bore it out of 2" mild steel round bar, bore it out to suit 1 1/2" OD, 7/8" ID collared bushes from the mount shop. This left me with a good 6mm wall thickness tube. These were purchased, the bar bored and we got an idea of where it was going
I used 50x50x5 RHS as the main supports of the mount, notched with a 50mm holesaw to give me two bits like this, which I could then weld up at work
12mm plate was used and I made up some pads to bolt to the engine itself, got some tabs lasercut and after final engine position was decided it could slowly all get tacked up.
Crossmember out, everything welded, painted. Big thanks to Sheepers for helping out with TIG welding those big fucking 12mm plates to the tiny crossmember which I wasn't game enough to tackle with my skills and a MIG. The subframe and everything around the running gear of this thing it covered in a mud/sand/oil/??? treacle sludge which is sweet so spent lots of enjoyable hours cleaning that shit up.
Anyway subframe all back in and everything looking much nicer!
Will continue update later, running out of time, but there are the engine mounts at least
-
7
-
-
Figured this is probably due an update and by updating it I figure I'll feel more pressured to get it back on the road!
This account is semi shared/complicated as the viva is owned by my brother(Duncan) who has been using this account for posting up the log etc. Back in late last year(as above) the viva obviously spat the dummy with throwing the 1800 into the rad, and causing a bit of a mess. We towed it home and it became increasingly evident that it was gonna need some serious attention in a number of areas, which time and money(read: student saving to travel) didn't allow at the time, so the viva was parked up with a cover over it until we can give it the attention it deserves. The rust was one of the main issues which was getting to a point where we can't really put it off any longer. The engine mounts were also obviously a bit of an issue, and considering those were the third set of mounts its had issues with, its broken a few sets we figured its probably time to do it properly. Timing wise this coincided with Denham/73crownwagon dropping a 202 into his CF and flicking off the low mileage 2.3 out of his van. So that happened and we now have a 2.3 for the old viva.
My brother has taken off overseas for a year or few and I've now taken this over in the time being, the viva has been pushed back into the garage and is slowly getting a bit of work. The first goal was obviously to get the thing moving and driving again, then focus on getting it legal/dealing to the rust later. The 2.3 had its sump and rocker cover swapped to suit the viva setup, then hurrriedly dropped in, which was to get it moving again then plans to work back and tidy up the job, but of course that logic doesn't work, so the clutch friction plate turned out to be toast(which I should have checked), the pressure plate the wrong size, the engine filthy, the firewall still rough and in primer, thermostat housing leaky, and the mounts still being gay. Teach me for being lazy. But I had the engine running and sorted out swapping over the electronic ignition dizzy etc from the 1800 and saw it run which is always motivating. The 2.3 seemed to run much smoother it must be said, and seemed promising engine wise. Took a bit of pissing around with the ignition timing as that dizzy was a bit tricky, nothing says try again like flames out the carb
So the engine out again, I went through and gave it a good clean up, as well as the bellhousing etc, then decided I should tackle the clutch. Sourced a standard 8.5(or 9?) inch pressure plate for an old land rover or something which looked pretty heavy duty, then had the friction plate relined, bearing recored, flywheel resurfaced etc. The ring gear on the 2.3 flywheel was rough and had some pretty ugly grind marks on it, but the 1.8 wouldn't suit the bigger 2.3 friction plate and the dowels wouldnt' suit the bigger pressure plate in their current position. So I heated and swapped the good ring gear onto the 2.3 flywheel. Next issue was to make an adjustable clutch fork pivot to suit the different height pressure plate, so tapped a thread into the bellhousing and turned up a threaded adjustable pivot to take the place of the originally pressed in fixed length one, and locking nut to suit the job. Clutch setup done and engine painted! Also chucked a new cambelt on while the engine was sitting there, and gave the firewall a quick fill and paint where it had been massaged with the 1.8.
Got a brand new diesel bluebird radiator to suit as well which will do the job. Next issue: Engine mounts. The engine mount design in these coming off the crossmember is pretty much an unsupported trapezoid which was a terrible idea at best, paired with unsymmetrical offset stud supportless rubber mounts, add 38 years of abuse and these pedestals off the crossmember seem to have gone out of shape, causing me all sorts of grief with engine positioning, mount alignment and extra stress on the rubber mounts. So i'm now at the stage where the stock mounts can meet a grinder and I'm just gonna have to build mounts from scratch off the crossmember. So the grinder took out the mounts for the moment, as I couldnt' really get a drill in there to drill out the spot welds with the crossmember in the car, so they are cut down below flush for now, then later will be drilled off completely. My current thinking is to run plates off the crossmember with mounting tabs on them, with a leaf spring spec bushing, then some seamless tubing with a support leading to the plate on the engine. Should be a solid, unstressed design which will manage the forces in any direction, with some cushioning. Think vaguely something like this:Engine mounts are the current focus but there is some serious cancer in the viva which i have slapped POR15 on to prevent worsening, but will need to put some new metal into at some stage. The brake master cylinder also started leaking so I have pulled it to rebuild it. Any suggestions/experience on building new engime mounts is welcome! Drop by the discussion thread with any thoughts/ideas/criticism. Unfortunately I have very little time to spend on the viva due to work and all sorts, but I make time where I can. Long term plans still include hopes of rebuilding and working the engine, which should be a little easier now working in the trade.Discuss/help/abuse etc:-
2
-
-
Oh and a proper exhaust needs to happen soon too!
-
Ah sweet thanks Geoff, great to have all the valuable insight on here. Saves alot of time wasting and headscratching over the small things. I'll certainly be hoping to pick your brain for more viva guru-like knowledge as this goes along. haha
Short term horizon will be getting the 2.3, doing gaskets seals belts etc and a general tidy up so that I can get the car mobile again. I've started dealing with all the little bits of rust to stop bodywork deteriorating.
And then in the long run I'd certainly love to do pistons, cam, diff, respray origional colour and potentially carbs before getting it all certed.
I was looking at 307 pistons from ebay, and getting 4 new ones landed here were pretty cheap! Which was rather exciting.
-
Yeah they were poorly designed, even for a vauxhall. This is going to sound silly but I'm suspicious that my front cross member is slightly wider than it should be/ warped as with both the 1256 and slant I've had to space out the engine mounts to make them fit..even then, this'll be the 3rd set of engine mounts the old girls pulled to pieces since I've had her. I've got a spare cross member under the hous so I'll measure it up and see one the engines out this week/weekend.I ended up making almost solid mounts for the 1256 out of some box section and old van engine mounts. They worked pretty well so might have a look at something like that or else like you say some captured ones would be good. From memory 4age mounts look nice and solid with the base plates of the mount kinda surrounding the rubber.
Thanks for all the info about the 2.3. definitely an exciting thought. Just going to have to be slow process of collecting parts on a shoestring student budget. Guess it'll mean I wont rush anythng and make sure its all perfect.
I assume the alternator and setup on the 2.3 is the same as the 1759? - just trying to work out how much is going to need sourcing.
-
Shocks are holding up fine, never been the smoothest ride but that's to be expected. Rear always has a little sway in it which could probably be helped by wider rubber and bushes but it's not too bad.
I dropped off the 1256's at 73crownwagon's place and got talking about buying the 2.3 from his van when he's done with it. It's be good to have a history on the engine and if I'm eventually going to go the route of cert etc i might as well go the full way with 2.3 instead of the 1759.. -
loaded up with a pair of 1256's and a slant
-
2
-


Bike spam thread
in General Bike Chat
Posted
Hmm random question: is it common/necessary to have little circles of fibre material(almost like gasket paper) between the brake rotors and a bike rim? Changed the front rotors the other day and couldn't really see why they were there, perhaps vibration or heat? Didnt put them back on and its been fine, just curious now.