-
Posts
1,136 -
Joined
-
Last visited
Posts posted by Esprit
-
-
Going for the emerald purely because they do the job, do the job well and they're plug and play compatible with my loom. They're a known quantity and THE standard for tuned Lotuses in the UK so I won't be breaking any new ground with it. To my mind the Emerald will do way more than I'll ever want to do with it so why bother with anything else that'll be a bodge to fit?
I used to work on at Ray Hartley Motors and we had a lot of MGF (with the same motor) - approx 1 BHG a week.... and we also had a handfull of S1 and a couple S2 Exige that came in also.. One S2 we fitted a full aftermarket kit to (including head, manifolds etc etc) They went well... Tis a shame the toyota engine in the newer model MGF doesn't bolt straight into an Exige...
The MGF engine dos suffer a head gasket weakness, but this is now a known issue, the cause of which is thermal shock as dictated by the cooling system design. My Exige runs a different format cooling system to sidestep this issue. My engine has never (and will never) suffer an HGF for similar reasons because it's had these issues ironed out.
There have been about 4 Elises in NZ that have suffered HGF, not bad really given that of all the Elises in NZ, about 80% of them see regular track time.
the S2 Exige DOES have a Toyota engine in it and to be honest it's rubbish. They don't stand up to track abuse that well and are really no more reliable than the K-series engine in Elise/Exige application. The Toyota engine's extremely reliable as a road-car engine, but certainly isn't anything special as a track engine.
Above all else, I'm sticking with the Rover K engine as it's unrivalled for size and weight. The Toyota 2ZZ (and the Honda K20A) are both boat-anchors in comparison (although the Honda makes up for that by being very strong and very tuneable).
-
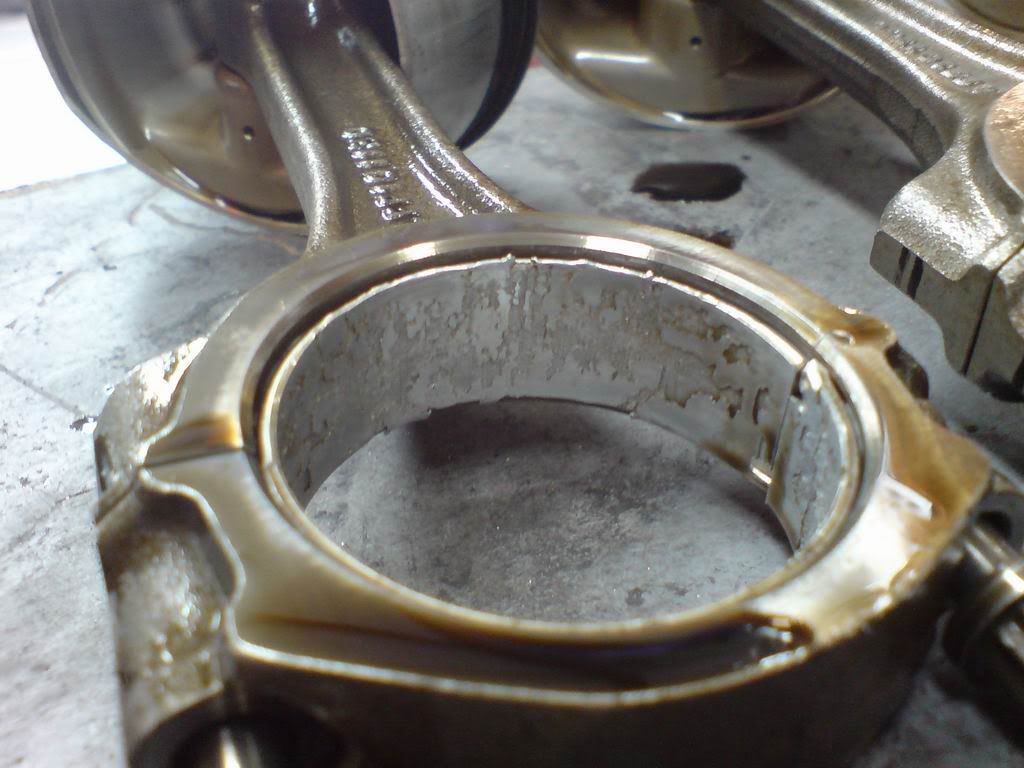
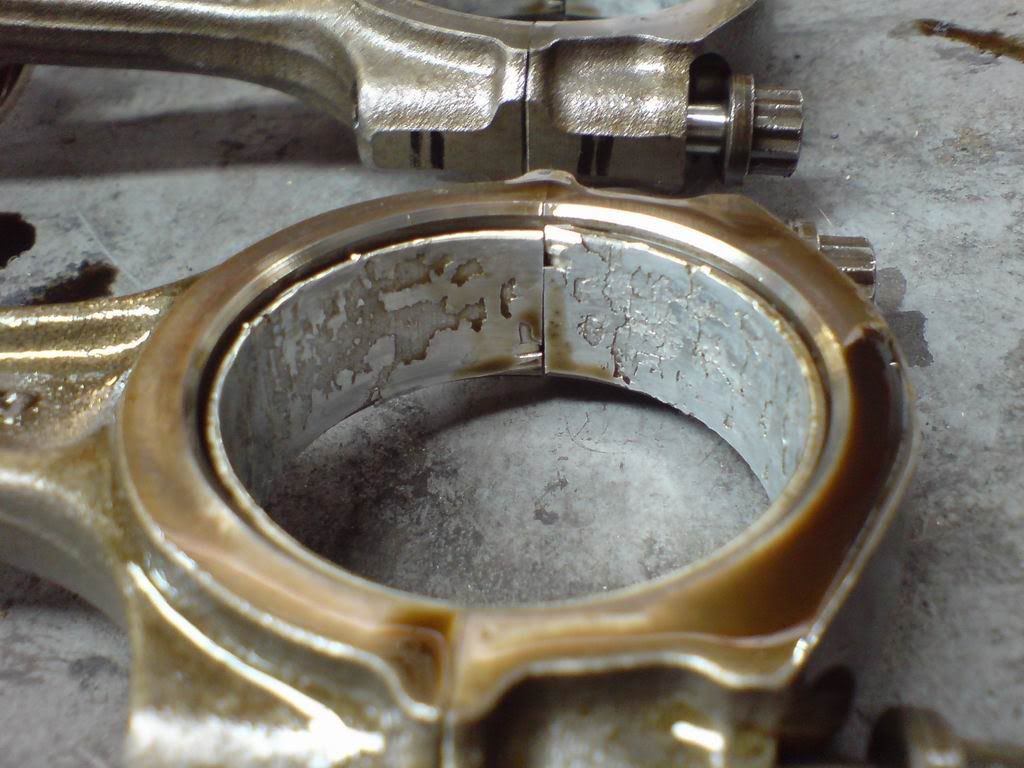
it looks like the bearing has been chattering on the crank somehow.
detanation causes the rod to virbrate on the journal and in turn defeats the oil suspension
basically its like tapping on the babet with a hammer...hence why it delaminates

cavatation in hydraulic pumps and on boat props looks identical
cavatation is basically the reverse effect of detaination
Detonation doesn't seem to have been the issue here thankfully... the stock mapping is shocking but it errs on the side of being too rich rather than leaning out. The piston tops showed no evidence of anything untoward on the fuelling or timing leading to detonation. In the end, it matters not as the engine when rebuilt is getting run off an Emerald K3 ECU, which will be mapped appropriately once the engine's built and run in.
-
Bloody hell!

It does not look like it got hot (which is good).
Was #1 the only B/E that looked like this?
Is the #1 B/E journal the first to see the oil under pressure? On the Fords I have messed with it would be #3 Main Bearing that gets the oil first which would not support the excess oil pressure theory but may lend weight to vvega's injector issue theory (P.S. I have no idea what caused this delamination but am extremely interested to hear the diagnosis).
Is this an east-west motor? I would expect to see more heat witness marks if there was mid corner oil starvation but could oil surge be a contributing factor?
Yeah she was nasty alright! That was the only big end that looked like that, although ALL of them were JUST starting to show witnessing up around the very top of the upper shell and were obviously going the same way. I'm pretty sure #1 is the first in line for the oil feed (feed comes from the front in through the corresponding main bearing). There was definitely little heat involved, as there was no evidence of heat in bearing or crank and the bearing hadn't spun.
Oil starvation typically isn't an issue with the K-series (although it IS when mounted longitudinally as in Caterhams etc, but it's Transverse in my car), although I will be fitting a baffled sump as an insurance measure upon reassembly.
I've seen the same thing on other K-VHPD engines and it seems it's down to a few factors:
-
[*:2y7mov79] Shit bearing material.... this has since been rectified and all new bearings are from a much higher grade of material than the OE spec when this engine was new
[*:2y7mov79] Non-thermostat oil cooler.... The Exige S1 has one and it can take a very long time for the oil to reach running temperature. Many owners warm them up before thrashing them but without an oil temp gauge, the oil can still be quite cold (and high pressure) when you start piling the revs on. This could cause bearing break-up like this through cavitation. I'm going to be installing an oil temperature gauge and possibly a thermostatic bypass on the oil cooler... I may even solenoid-actuate this to allow for manual override we'll see.
[*:2y7mov79] Problematic crankshaft balancing.... probably key to this problem is that there's large secondary out of balance load on the crankshaft caused by insufficient counterweighting. There's physically not enough space in the block to make large enough counterweights on the crank to counter the pistons and rods in the 1.8L engine size (bear in mind this engine was designed as a 1.1 and 1.4L engine, hence why it's so small and light). This out of balance causes a 2-tonne bending moment in the crankshaft between the main bearings, causing distortion in the crank and the block as well as causing other problems (like the ovalling evident on my pistons and liners) This is being rectified in my rebuild by strategcally inserting tungsten slugs into the counterweights to add mass where it's needed and to cancel out these forces. This has proven VERY successful in a handful of race engines that have been built recently in Lotuses and although expensive, it gets to the root of a problem that's been the main reliablilty killer in this engine when used at high RPM.
KK... this engine has thankfully not suffered any overheating... My engine runs a remote thermostat which rectifies many of the overheating root causes.
As for the crank, I'm throwing it away and getting a new one. I'm just going for a standard one at this point, although am considering a DKE steel one as a possible alternative.
-
-
dont be mistaken by the rain, southerlies, and gale force winds, its summer now, time to get it back on the road...
Haha just goes to show you how the budget (in both time and money) can get blown on these projects! I'm aiming for completion in March... that'll make it a 12-month long project in all.
-
The last week or two has been painfully slow going... I've been slowly cleaning up the chassis corners so that the suspension can be bolted back on. Getting rid of 8 years worth of grime and accumulated crap that had sunk into the anodising has proven tricky.... the only way to clean it is by rubbing down with a solvent first to remove most of the stuck-on stuff then going over and cleaning the resultant with Autosol.
This has to be done by hand as you don't want to machine buff it and go through the anodising....just rubbing down by hand with the Autosol is quite safe on the anodising (so long as you don't go nuts) and it cleans it up well, albeit slowly. I've done the front corners and also the front underchassis (see pic showing in-progress cleaning). I've also done one of the rear corners and also much of the engine bay. Another 5-6 hours elbow grease and this will be done. I'll also do the full underfloor as well but this will wait until after the car is back on its wheels again as I've more pressing matters. I'll also give the undertrays and fuel tank shear panel the same treatment to get it looking presentable before this whole shabang is finished.

I've also started making up my fastener list. Done the front and some of the rear suspension for starters, will complete this this week as I want to order fasteners shortly. Still to go are all the clam fixing fasteners and other miscellaneous ones from around the car. The list probably won't be 100% complete on its first iteration as I'm bound to miss a few, but it'll get there in the end.
Other big news is that I've also now finalised the engine spec and now plans are actually underway to get it rebuilt. Rough spec as follows:
New Stock Rover crankshaft custom tungsten inserted by Vibration Free
New Steel H-Beam rods from Arrow Precision
New Omega Pistons / rings (machined by DVAPower for larger valves)
Bottom end will be balanced as an assembly with my existing flywheel/clutch cover and pulleys
VHPD head will be sent to DVAPower to receive his porting magic. Head will then be rebuilt with:
Larger valves
Dual valve springs
Colisbro guides
Piper 1444 Cams
Piper Vernier cam pulleys
Engine will then be rebuilt here in NZ with all new consumables (seals, gaskets, fasteners, liners etc). Whole setup will be run from a new Emerald ECU which will be mapped locally.
Ideally the goal is to build a reliable road/trackday engine that spits out enough power to keep a Honda-powered car at least semi-honest on track. Theoretically, anything up to about 240bhp should be possible in this spec but in the interest of longevity I will be trying to tune it to produce some solid torque without raising the VHPD redline... down the track I can investigate if I want to up the RPM envelope to chase more power. I'm hoping for about 220bhp in a semi-reliable package... something that should be possible.
So yeah, that's it in a nutshell... things should start moving in the next couple of weeks, engine bits being ordered this week and I'll be freighting off my stuff to the UK shortly thereafter. Meanwhile, I've a chassis to finish cleaning up and fasteners to order and still a VERY long list of things to do before the engine comes back together sometime late February..... can't say I don't keep myself busy!
-
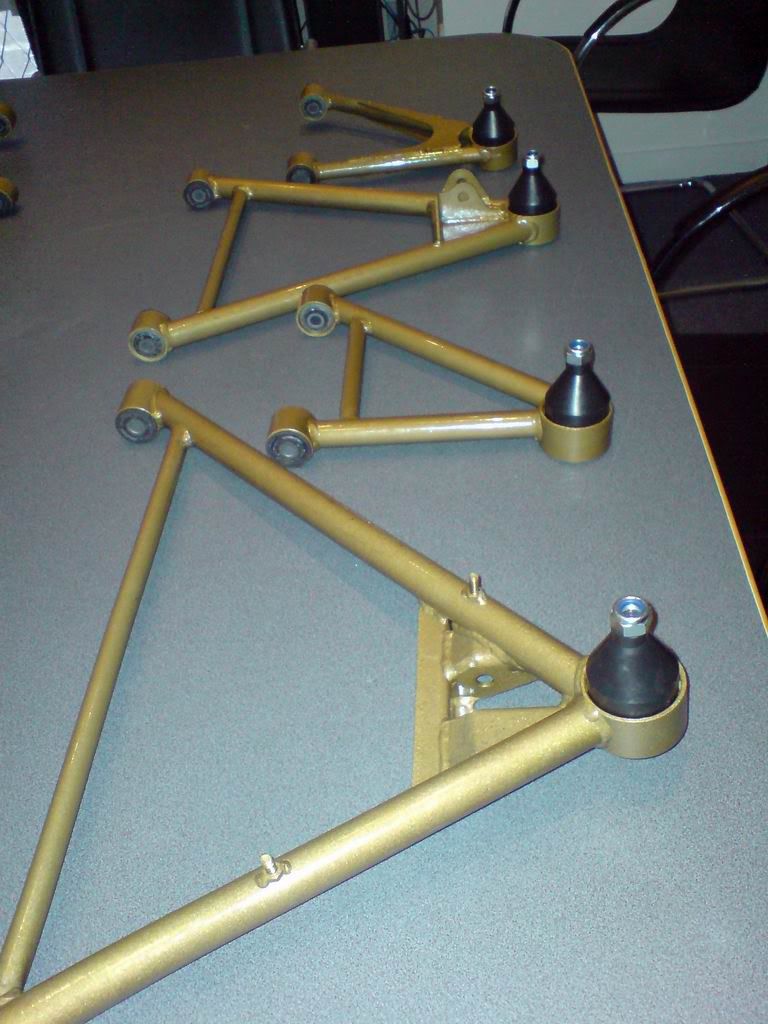
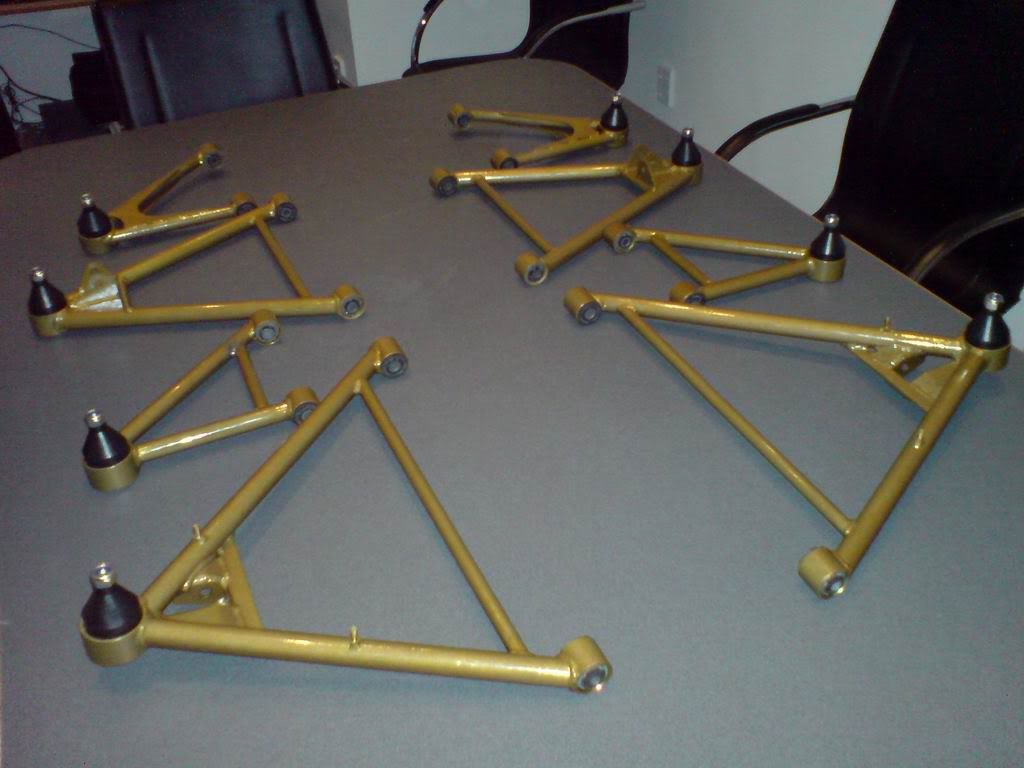
Well a little bit more progress today.... aside from the engine dramas that is, but I got my wishbones preassembled today including the suspension bushes and ball joints.
Fingers crossed, I'll be hanging these off the car sometime in the next week or two as I work towards getting the car back on its wheels and rolling so that it's a little more easy to work on.
Tomorrow's job is the rear subframe detailing.
But for now, wishbones...


-
PROGRESS!!!! ... ok well no, not really... but I felt I should update y'all to let you know where I'm at with things

As I've mentioned before, the VHPD is going to be rebuilt. After weighing up several options, I've decided to go "the whole hog" and build the engine with a decent budget doing everything right, rather than just slapping it back together as a standard VHPD. Everything's been pulled apart and inspected and I'm hopefully going to soon pack up the complete cylinder head, crankshaft, flywheel, clutch cover, pulleys and oil pump to send back to the UK.
The plan is to order new rods and pistons in the UK and have them meet my bottom-end components at Vibration Free so that I can follow what Steve Butts/Skeggsy have done with their Ks and do the full on high-tolerance balance and tungsten crankshaft insertion. While this is going on, my head will go on to DVAPower and get the magic DVA tough with porting and will be rebuilt with all new fresh bits and pieces and all the good bits to make the head able to make more use of a freer bottom end. I'm currently just trying to find out when Dave's got some free time to do the job but other than that it's all go!

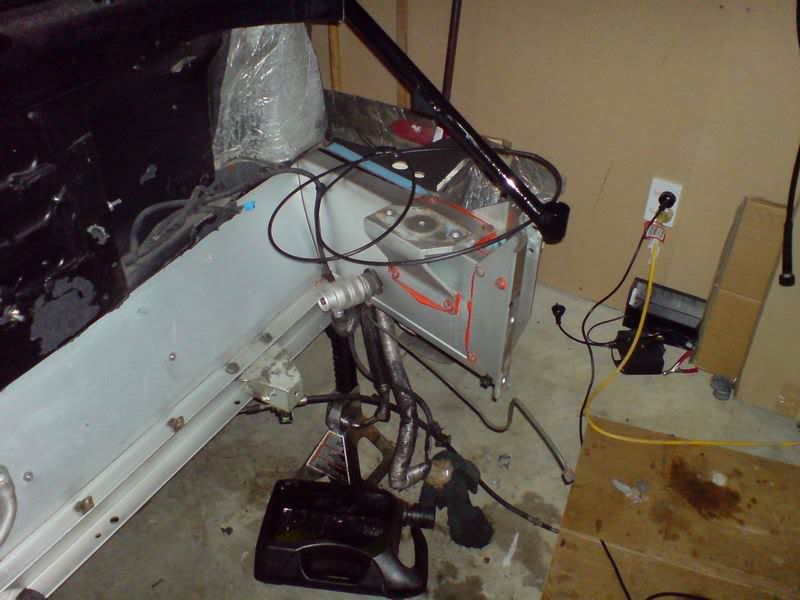
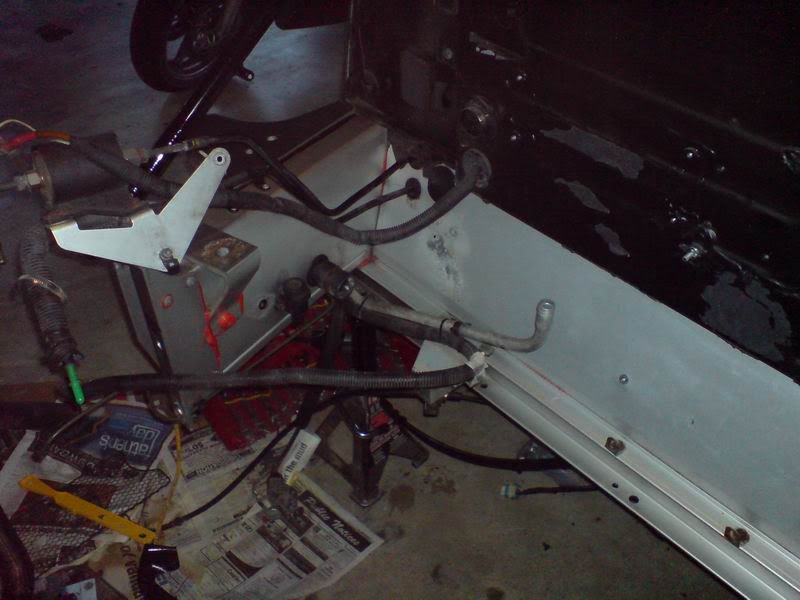
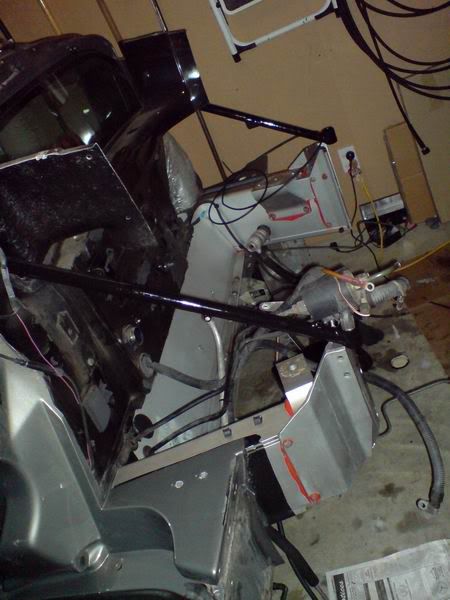
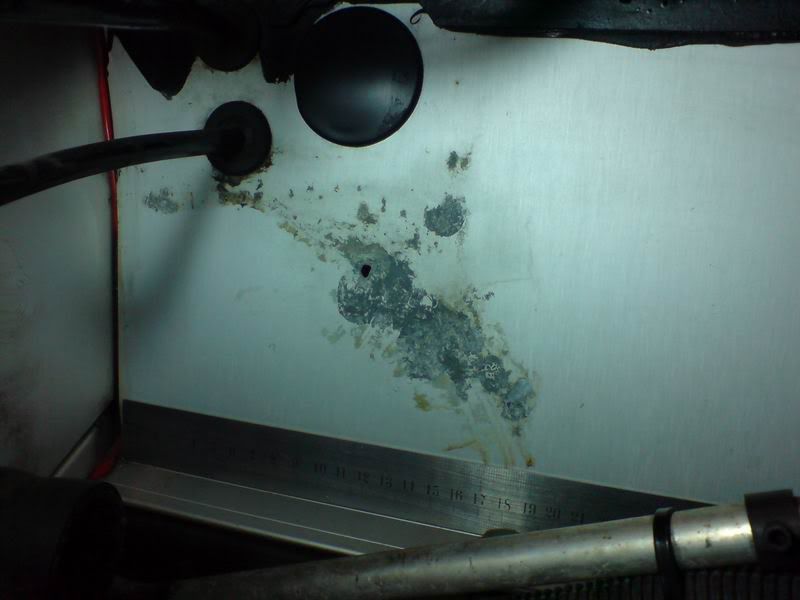
The other hold up has been (as some of you might have seen from my other thread on SELOC) that I discovered some corrosion in the lower rear firewall. This was discovered as a small 4mm diameter hole in the bulkhead when I was reinstalling the fuel tank. Subsequent stripping of the firewall heatshield has shown that moisture has gotten in behind this and has caused an identical crevice corrosion problem as to what occurs with the OEM rubber floor mats.
The images I below show the state of the engine bay with the corrosion being clear in the fourth picture. There's a few other small pits on other locations along the firewall.


I have been in contact with Lotus over this issue and they have been very helpful to date. They are interested in learning more about this as they've not been aware of this area being a problem on the chassis before. My chassis is under the 8 year corrosion guarantee and they are currently formulating a fix and are going to send me a repair kit (and new engine bay heat shield) free of charge once they determine the best cause of action to affect a repair and prevent any further corrosion spread.
If any of you are contemplating a strip down and rebuild at any stage in the future, or doing an engine-out job, it would certainly be a worthwhile exercise to strip back the firewall to see if there's any corrosion damage lurking underneath.
Alternatively you can simply drop out the fuel tank and look at the bulkhead from this side to see if there are any holes that have gone through, although this may not show any corrosion that's still in its infancy. I'm certainly very lucky that I bothered to check as I've caught this at a reasonably early stage and can now hopefully arrive at a permanent fix so it'll never need doing again.
All this has put a large pause on proceedings and what was initially meant to be an over-winter refresh (as the thread title suggests) is now turning into something altogether rather more comprehensive. I'm hoping to have the car back together in the NZ Autumn in time for the last of the nice weather before I have to put my toys away again for winter '09.
Rest assured, when she's all done, it's going to be SIGNIFICANTLY better than it was before.
Jobs coming up in the next couple of weeks will be to finish cleaning up the engine bay and to re-hang the rear subframe. Once this is done, I'll then install bushes and balljoints in all the wishbones and set about hanging them back on the car. I'm hoping to get the car rolling again by early/mid December as this'll give me a chance to clean up the garage a bit and also to wheel the car in/out so I can work on it in the sun when the weather's nice as the garage is a little dingy, even in daylight.
f**k me, I don't do things by halves do I?

-
I heard the S30 Z looks nothing like an E-Type but a Toyota 2000GT does.
The 2000GT shares some E-type proportions as well for sure, perhaps even moreso than the Z-car, but the 2000GT also has a bunch of quirky (less conventional) little features that help to make it a little more distinct I think... but yeah, they're a similar shape.
-
I would suggest that stating that jap cars were years ahead of the Brits, Germans and yanks from a value and engineering standpoint is going a bit far. 1960s/70s jap cars were just as crap as british, german + yank cars.
Yeah I guess, in some ways they were.... but I think for the price they were dirt, dirt cheap in comparison and the quality wasn't exactly dire in comparison, hence they offered a lot of car for the money.... that's what I was getting at, apologies if I worded it like a load of codshit

-

My qualm is not the cars in question but the disregard for Japanese design and the constant implication that they couldn't possibly have come up with any designs on their own and they're always taken from someone else.
I don't think that anyone is saying that Jap cars don't have a unique style... I mean the 240Z is one of the nicest looking (IMHO) jap cars ever made. The Jap car industry in the '60s and '70s pretty much learned from the (at the time) automotive giants the world over... they were aspirational and they used their strengths of productionisation and revolutionary quality control and stock-management techniques to beat them at their own game (hence why Toyota is such a giant today).
Japanese cars really never sold all that well in western markets from a styling perspective until at least the early '70s, surprising when you consider that they were years ahead of the Brits, Germans and yanks from a value and engineering standpoint even at that time (at least in the smaller car market). It was when they started to blend western design with their own unique style that Japanese cars caught on in the west. Most of Japan's '70s sports coupes borrow heavily from the American pony cars of the era but retain a unique style all of their own.
I don't think any Japanese car fan should feel insulted that they clearly cribbed a few styling ideas from the West any more than any Yank/Euro fan should be insulted that pretty much every Western manufacturer copied Japanese production/QC techniques. In the end, that's the way you make yourself better, you look to the leaders in any given field and try to copy their successful elements.
-
You don't hear people say.
"The Ferrari 275GTB, Italy's answer to the Jaguar E-type"
The Z car looks more like a Ferrari than it does a Jaguar. (also, the alleged photo sent was not of the 275GTB btw, I just think if the Z "looks" to have taken design from anywhere, it would be the Ferrari over the E-type, by a mile.)
At least Ferrari and Nissan got the proportions right.
As all good debates go you're certainly entitled to your opinion.... and the vast majority of the motoring press is entitled to theirs.
As for proportional beauty, there's only one car in the world's largest art museum and it's not a Ferrari or a Datsun

-
Also I imagine they are talking about the "G" nose


And it's usually compared to the Series 1 E-type, which has a lot nicer proportions to the uglier Series II pictured above.

As I've said above, it's obviously not a direct copy, but the design is undeniably heavily influenced by the E-Type... in much the same vein as is the Triumph GT6

-
The MX5 is pretty much a blatant rip-off of the S2 Lotus Elan... it's pretty well documented that Mazda wanted to make a modern version of that car in spirit and appearance. Is that wrong? Not at all... some would say that imitation is the sincerest form of flattery.
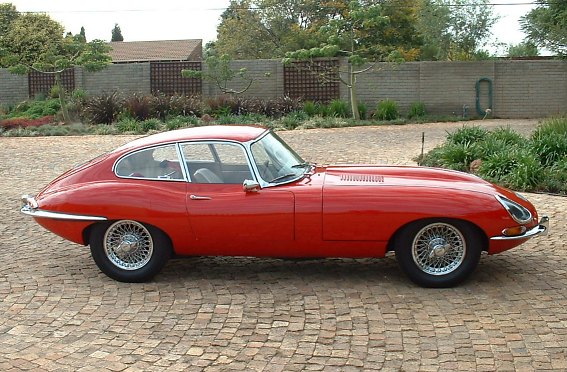
Same deal with the 240Z and the Jaguar E-Type, the Z's design is HEAVILY influenced by the "E". Yes, it's copying in places, but that's no bad thing. The "Z" still has enough unique design cues to be recognisable as its own car as well as showing clear links to the car it imitates. Saying that they just happened to be a bit similar is a little naive though, the Z designers clearly set out to capitalise on the E-Type style. Heck, try to find a period article on the "Z" that doesn't coin the phrase "Japan's answer to the Jaguar E-Type" (or similar).... pretty hard because most of them seem to.
...and yet that would contradict the story that the head of Nissan sent to the design team a photograph of a Ferrari.
Just because it was written in a magazine, doesn't make it correct.
I'm willing to bet they photographed DOZENS of cars for inspirations but the fact remains that the proportions of the car and several of its distinguishing features are CLEARLY directly influenced by the Jaguar.
And no, you're right, because it's in a magazine it doesn't make it right but when the opinion of pretty much every contemporary magazine at the time made the visual link between the E-Type and the Z you cannot help but admit that the E-Type was its main styling influence.
But in the end there's nothing wrong with this, it's not like they've ripped off Jaguar's design verbatim, they've just used it as the main styling influence... this has happened all through out automotive history... some cars do borrow heavily on the styling of others. Given the styling revolution the E-type was when it came out in '61 on a production car, it's certainly a style that influenced many designers thereafter.
-
The MX5 is pretty much a blatant rip-off of the S2 Lotus Elan... it's pretty well documented that Mazda wanted to make a modern version of that car in spirit and appearance. Is that wrong? Not at all... some would say that imitation is the sincerest form of flattery.
Same deal with the 240Z and the Jaguar E-Type, the Z's design is HEAVILY influenced by the "E". Yes, it's copying in places, but that's no bad thing. The "Z" still has enough unique design cues to be recognisable as its own car as well as showing clear links to the car it imitates. Saying that they just happened to be a bit similar is a little naive though, the Z designers clearly set out to capitalise on the E-Type style. Heck, try to find a period article on the "Z" that doesn't coin the phrase "Japan's answer to the Jaguar E-Type" (or similar).... pretty hard because most of them seem to.
-
I will be there for sure... there's one event each year I refuse to miss and it's either this (if I'm living in the North Island) or the Skope classic (if I'm living in the south)... fingers crossed the E-type will be ready to make the trip to Feilding, we took it last year instead of the Exige when the Lotus shat its alternator, despite the Jaguar being in less than straight condition. Got caught in a hailstorm on the way home and had some epic lulz trying to compensate for a VERY poorly adjusted hood header rail by trying to stem the flood of water coming in with my beanie.
-
id still get the injectors checked....i could well be work a few more hp and a whole lot more throttle responce
That'll all be done as a matter of course anyway.... got a long list of things to tick off before then. Injectors will be serviced before going back in.
-
bearing delamination can be caused by a few things
overly high oil pressure....driving hard when cold
poorly constructed bearing...could just be a freek
inaudible detonation.....perhaps get your injectors flowed/cleaned/checked ... you may have a partially blocked injector running one cylinder lean
hope that helps
v
Cheers mate, I suspect the first. The VHPDs run an unthermostatically-controlled oil cooler and I know the oil can take a good while to heat up. I'm always VERY careful but it's obvious that this damage has not happened recently and has not been the result of a one-off occasion.
When the rebuild's done I shall be installing an oil temp/pressure gauge to keep an eye on things.
-
I've not had a chance to run it past my UK K guru yet, but cylinder 2 and 3 were both showing signs of going the same way, although neither were ad bad as cylinder 1. I'm guessing the first journal is the last in the oil path.
I know that the K runs a rather thick oil in comparison to many modern engines and it could be a symptom of being pushed too hard from cold. The previous owner, while observing the (very strict) servicing schedule, certainly wasn't much of a tinkerer/mechanical sorta person and I think that a lot of the issues with these cars stem from the fact that they only seem to go well with a LOT of TLC.
The heartening thing is that this all points to the engine being rather tired and was most likely 10-20bhp down on the theoretical 190bhp. Given that it's being rebuilt fresh with a few tweaks and mods and I'm hoping to see about 205bhp, it should feel like a rocketship when it's back. Given that I was able to keep the K20-powered (N/A) Elises honest on the track before, I should be able to monster them afterwards.
I'll be double-checking all the oilways before the rebuild (especially in the head area as the stock casting tends to obstrict them and the water galleries with flash). I'll also be fitting the later landrover oil-rail, which passes oil to the crank area. This is mainly to assist in block stiffness and stability at high RPM but I believe the oilways are larger in it too. I'll also be baffling the sump in the interest of safety as well as installing an oil pressure and temperature gauge... this was a mod I'd always planned but having seen this I reckon there's no time like the present!

-
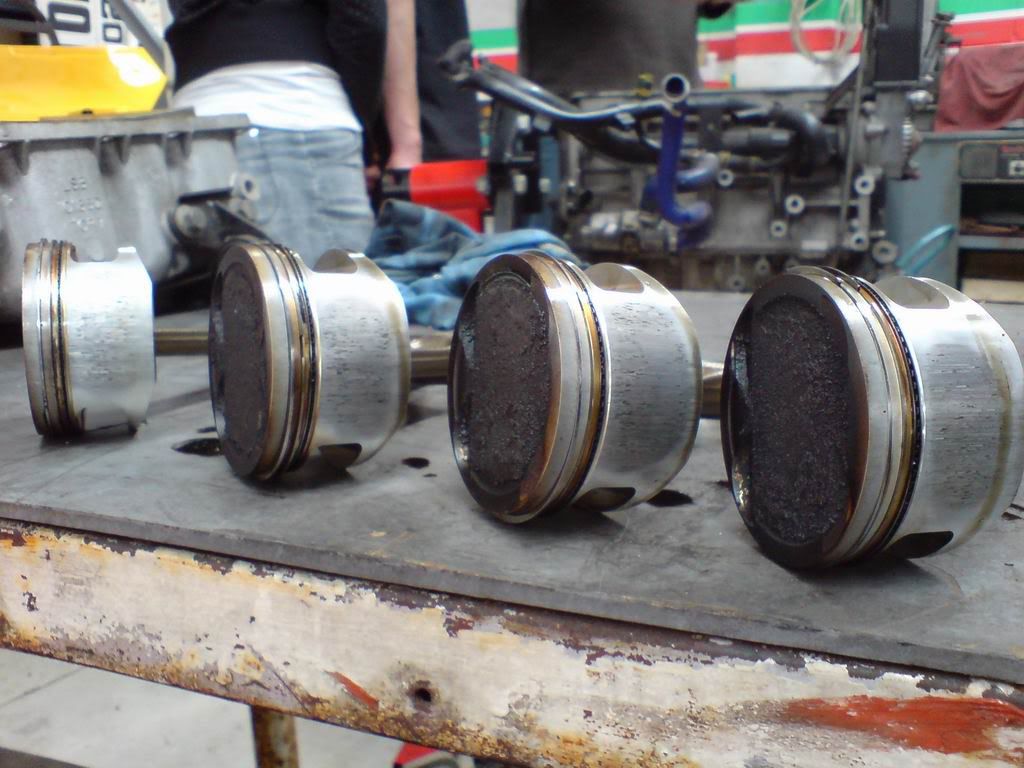
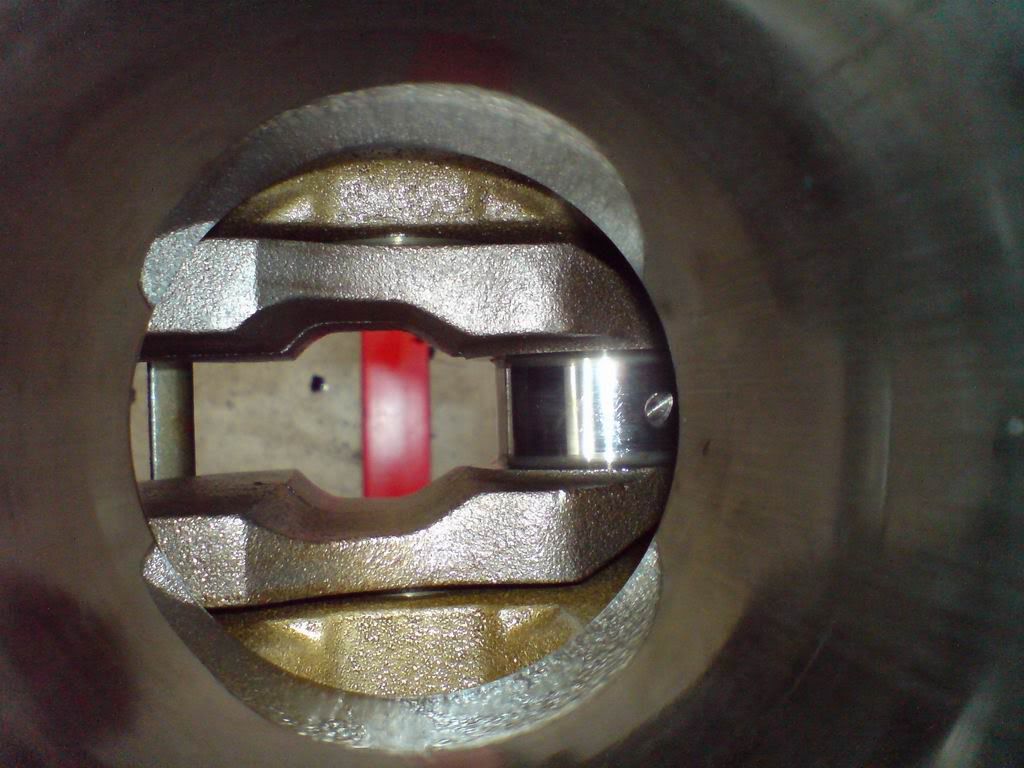
Right well today's update centres around the engine. Finally got it all pulled down today to see whether I needed to add new pistons to the shopping list. I already really knew the answer to be honest, but I figured that I would double check since the engine needed to come to bits anyway.
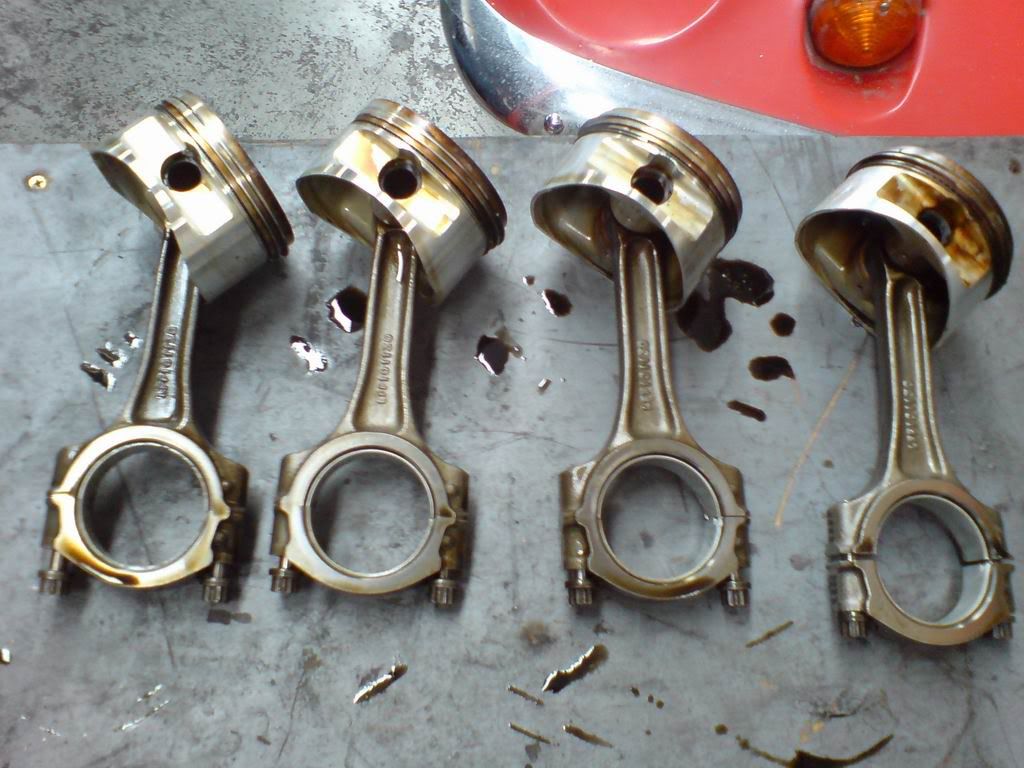
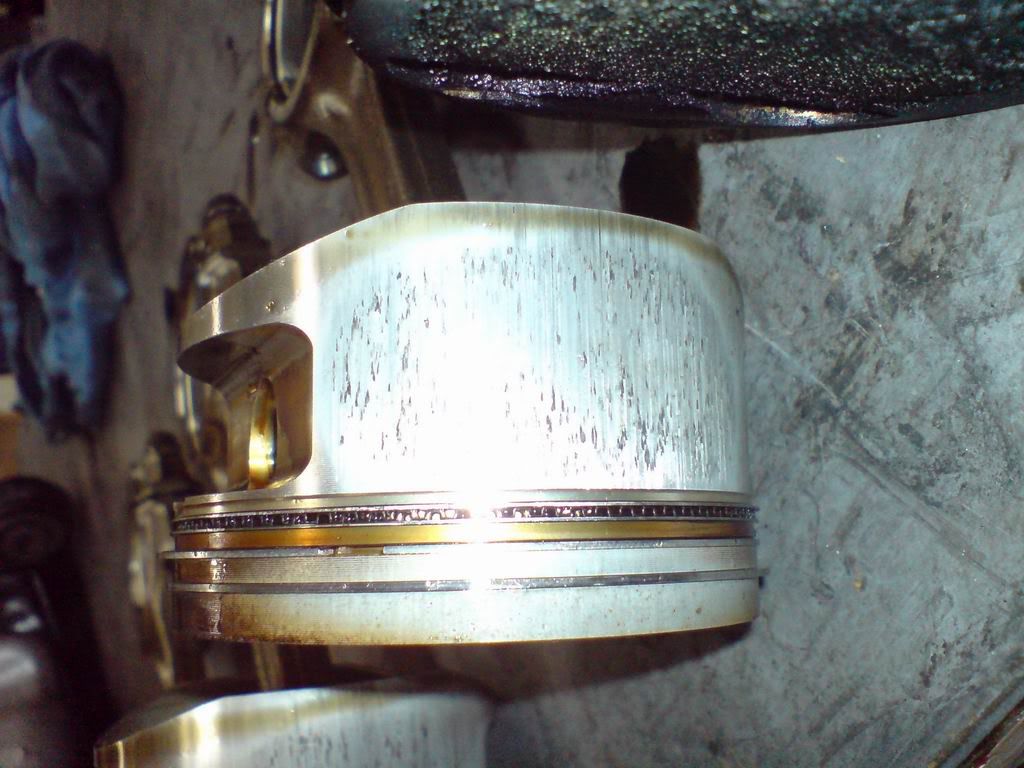
The pictures show that new Omega forgies will DEFINITELY be going on the shopping list as these ones have certainly seen better days.
Pistons on bench


Number one Piston (thrust side)

The background of the engine was that it had done 25,000 miles, many of these on track and was using a fair bit of oil. A bit of a rattle had also developed that we'd traced to a resonating heatshield bracket. Although I could have just dropped the engine back into the car and pressed on with it, I made the call a couple of months back to go ahead and rebuild it top-to-bottom since I had a hunch I'd regret it if I didn't.
When I saw the state of the bottom end today though, I'm now 100% glad that I decided to rebuild it when I did.... I reckon this is about as close to death as an engine can come without actually throwing itself to bits!
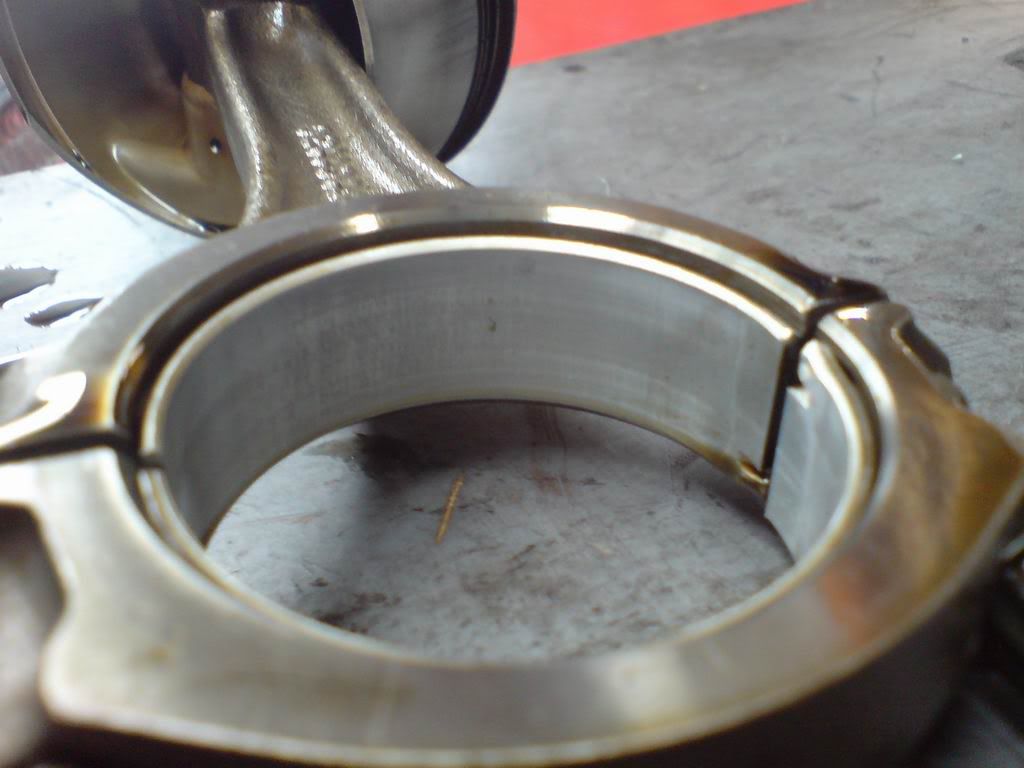
#4 Big end bearing starting to show signs of wear:

#1 Big end!!!
 :o
:o  ... I don't think I've ever seen ANYTHING look this sick apart from on engines that have already flown to bits!

Thankfully though (and amazingly) the big end crank journal looks fine and in perfect condition so despite the awful state of the big end, the crank looks like it's in perfect nick to fight another day.

So now I'm able to complete my engine rebuild shopping list and get an order underway. On one hand I'm disheartened to be spending all this money on the car when I'd not budgeted to do it... on the other hand I'm thankful that I decided to strip it down when I did as things would have got REALLY messy if I'd chanced my luck doing another trackday on the engine.
Sadly now this means that over the next few months that progress will be slowing and the bills will be getting LARGE. This has gone from an over winter refurbishment to what amounts to a full nut-and-bolt rebuild of the entire car. Much more than I'd ever planned, but I'm hoping that's when it's all done, the car and its performance should reflect the time, effort and money put in by myself and others.
Stay tuned...

-
ha yeap .. i meet you at winnies last lan at home

good to see its comming along so nicely

Aah cool cool... I think I remember talking to you
 Small world!
Must hit him up to host another lan at his place .... that is when my garage-bitch gives me some time off!
-
i only just realised ... your george
work for can-do ?? with winston...
am i right
That's the one

-
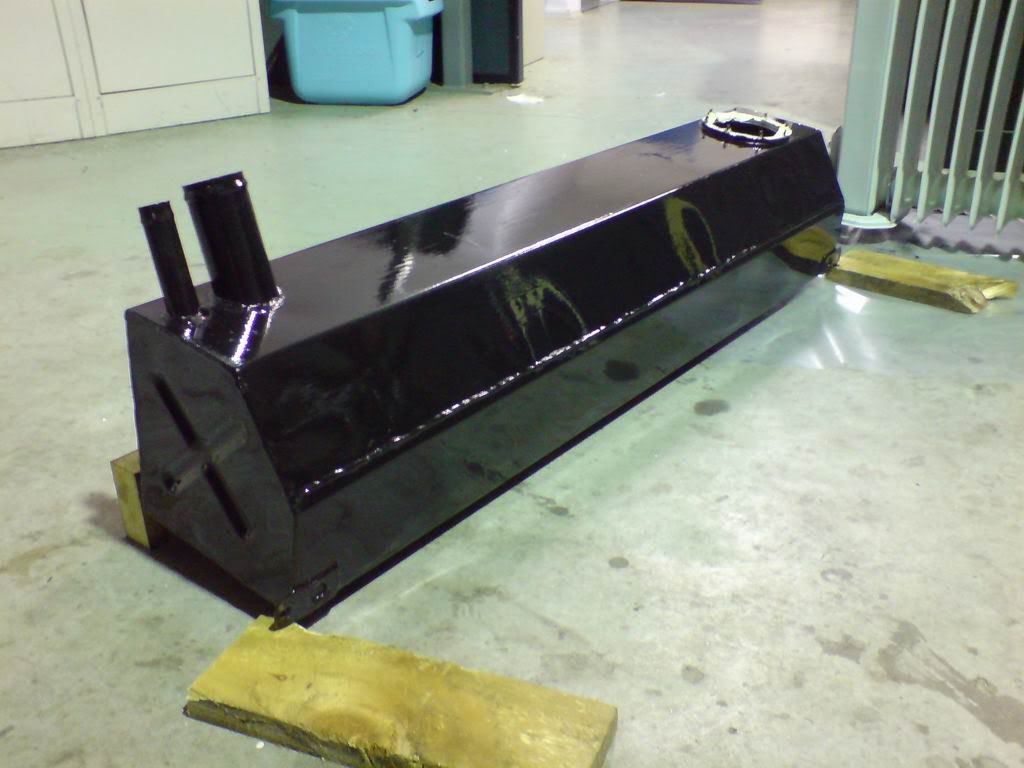
Right, well it took long enough through having to do 4 coats on the damned tank (2 coats, but done in two parts so I could get the whole tank coated as I had nothing to hang it from). Took AGES waiting the requisite 2.5 hours between coats so it's taken pretty much all day, but it's bloody done now and will never need to be done again


The top still looks manky in this pic as it's still wet and showing brush marks but it should level out pretty good. The finish isn't perfect, but again it's more than good enough for the fuel tank that'll never be seen and it won't suffer the same fate as the original paint and it'll never rust

-
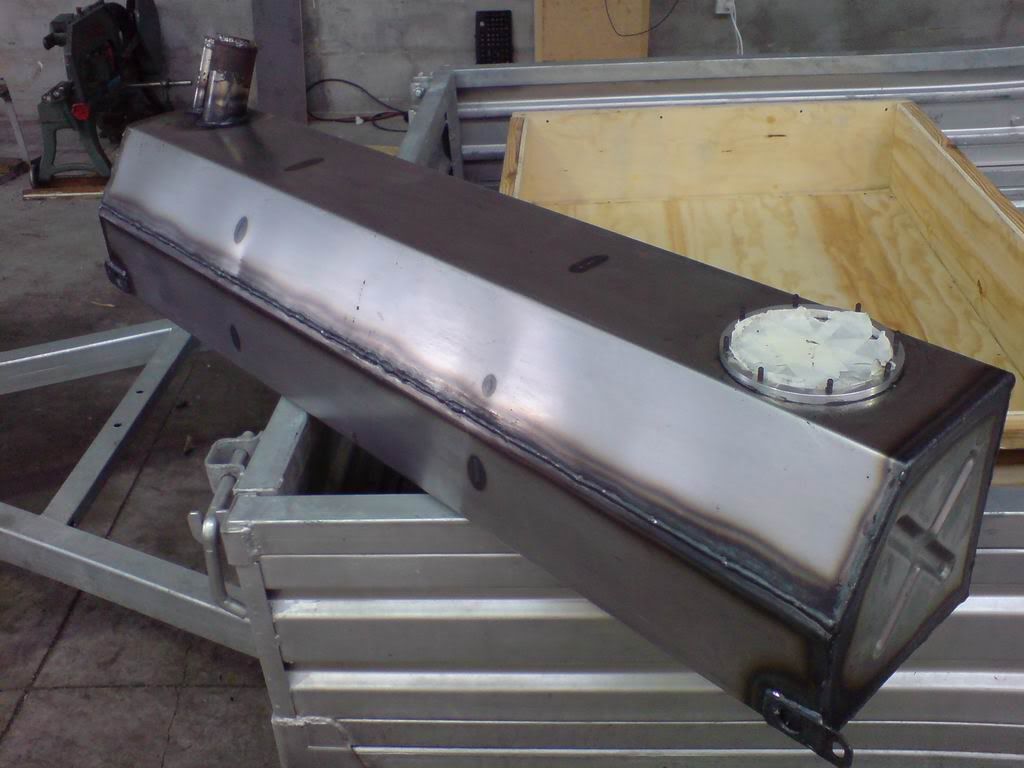
Today's progress thus far! Couple hours of elbow grease and working with the X-Strip has left me with a nice bare, shiny fuel tank


Next step as I'll begin shortly will be to wash-down then acid-etch/Zinc Phosphate (MetalPrep) the tank then cover with a couple of coats of black POR15. POR15 should be much more robust than the OEM paint, which seemed about as resistant to petrol/chemicals as... well... something that's not very resistant to petrol or chemicals.
-
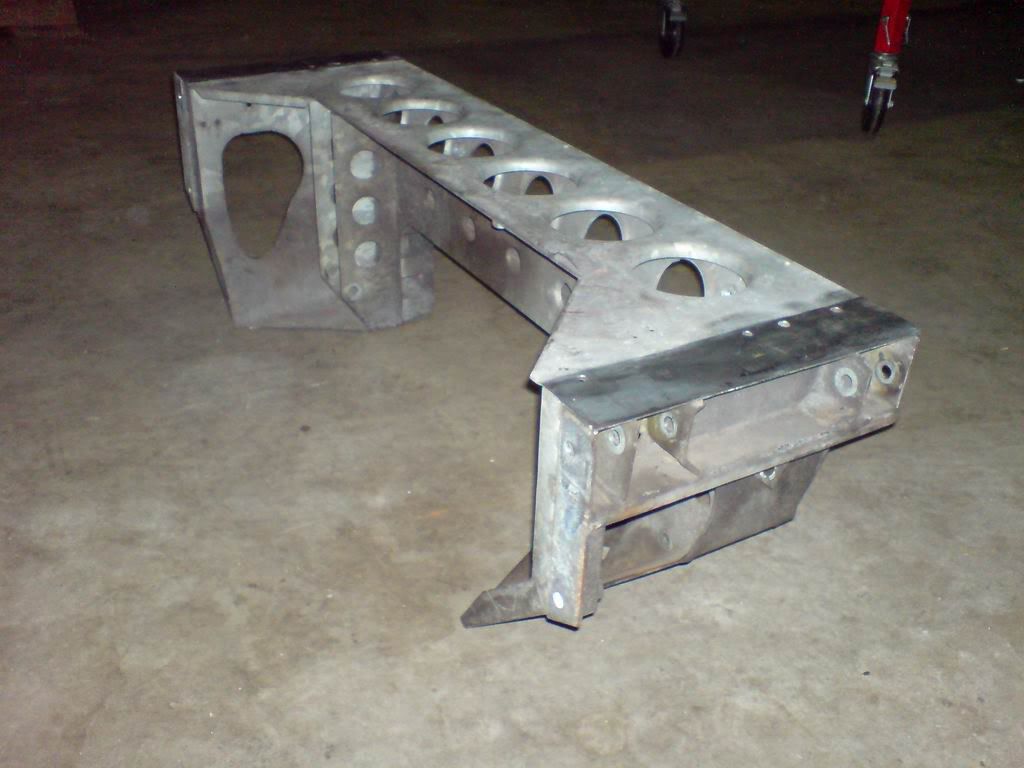
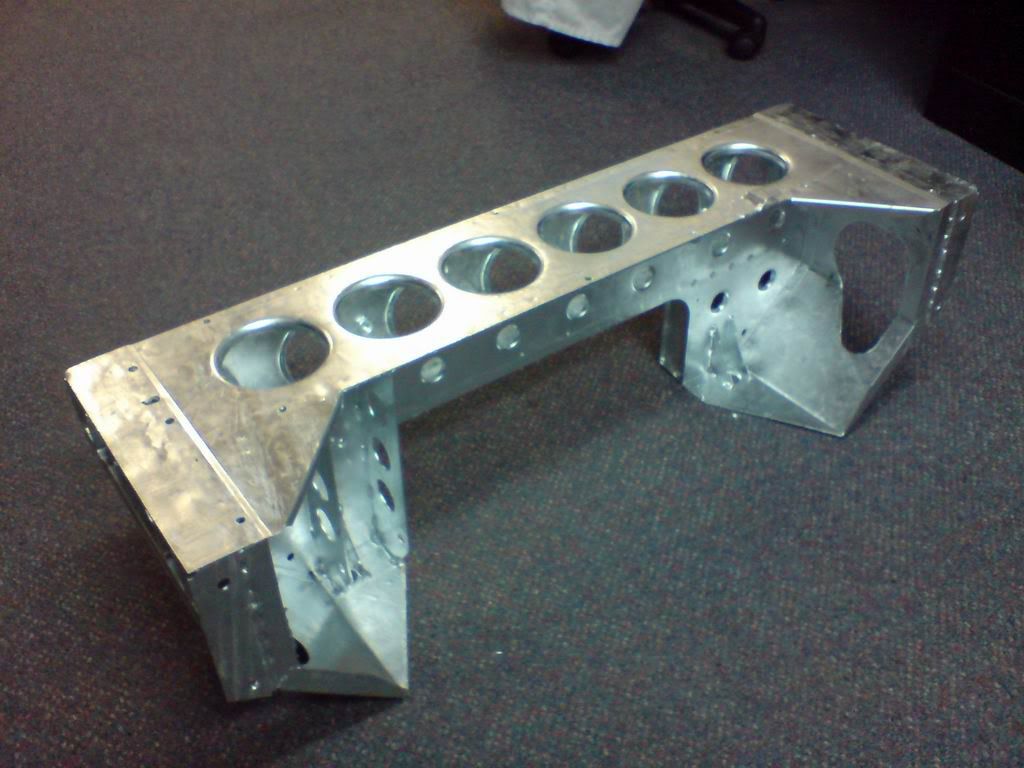
More progress this week. Got the stripper sorted for the tank so will tackle that this coming weekend. In the meantime I've got my toelinks back from the electroplaters and I've also got my subframe back from the galvanisers.... so shiiiiny

Before:

After:

Going to have to get the sikaflex sorted for the rear longerons next week and also some rivets for the rear heat shield/subframe assembly.... should keep me busy.
Not long now before I can begin the long assembly process!





Esprit's sexseige (newschoolspaceship)
in Project Discussion
Posted
Would have been an S2 Elise, not S2 Exige all S2 Exiges are Toyota powered... I'm guessing it was a White one with Green Stripes?