


cute wee gem
-
Posts
2640 -
Joined
-
Last visited
-
Days Won
1
Posts posted by cute wee gem
-
-
Yep there are a few different options. Knurling being the most popular on rolling roads, machined traction grooves aren't as common but is meant to be better than diamond knurling, and I have also seen a spray welded texture finish on brake testing machine rollers at the local truck COF station
-
 1
1
-
-
- Popular Post
- Popular Post
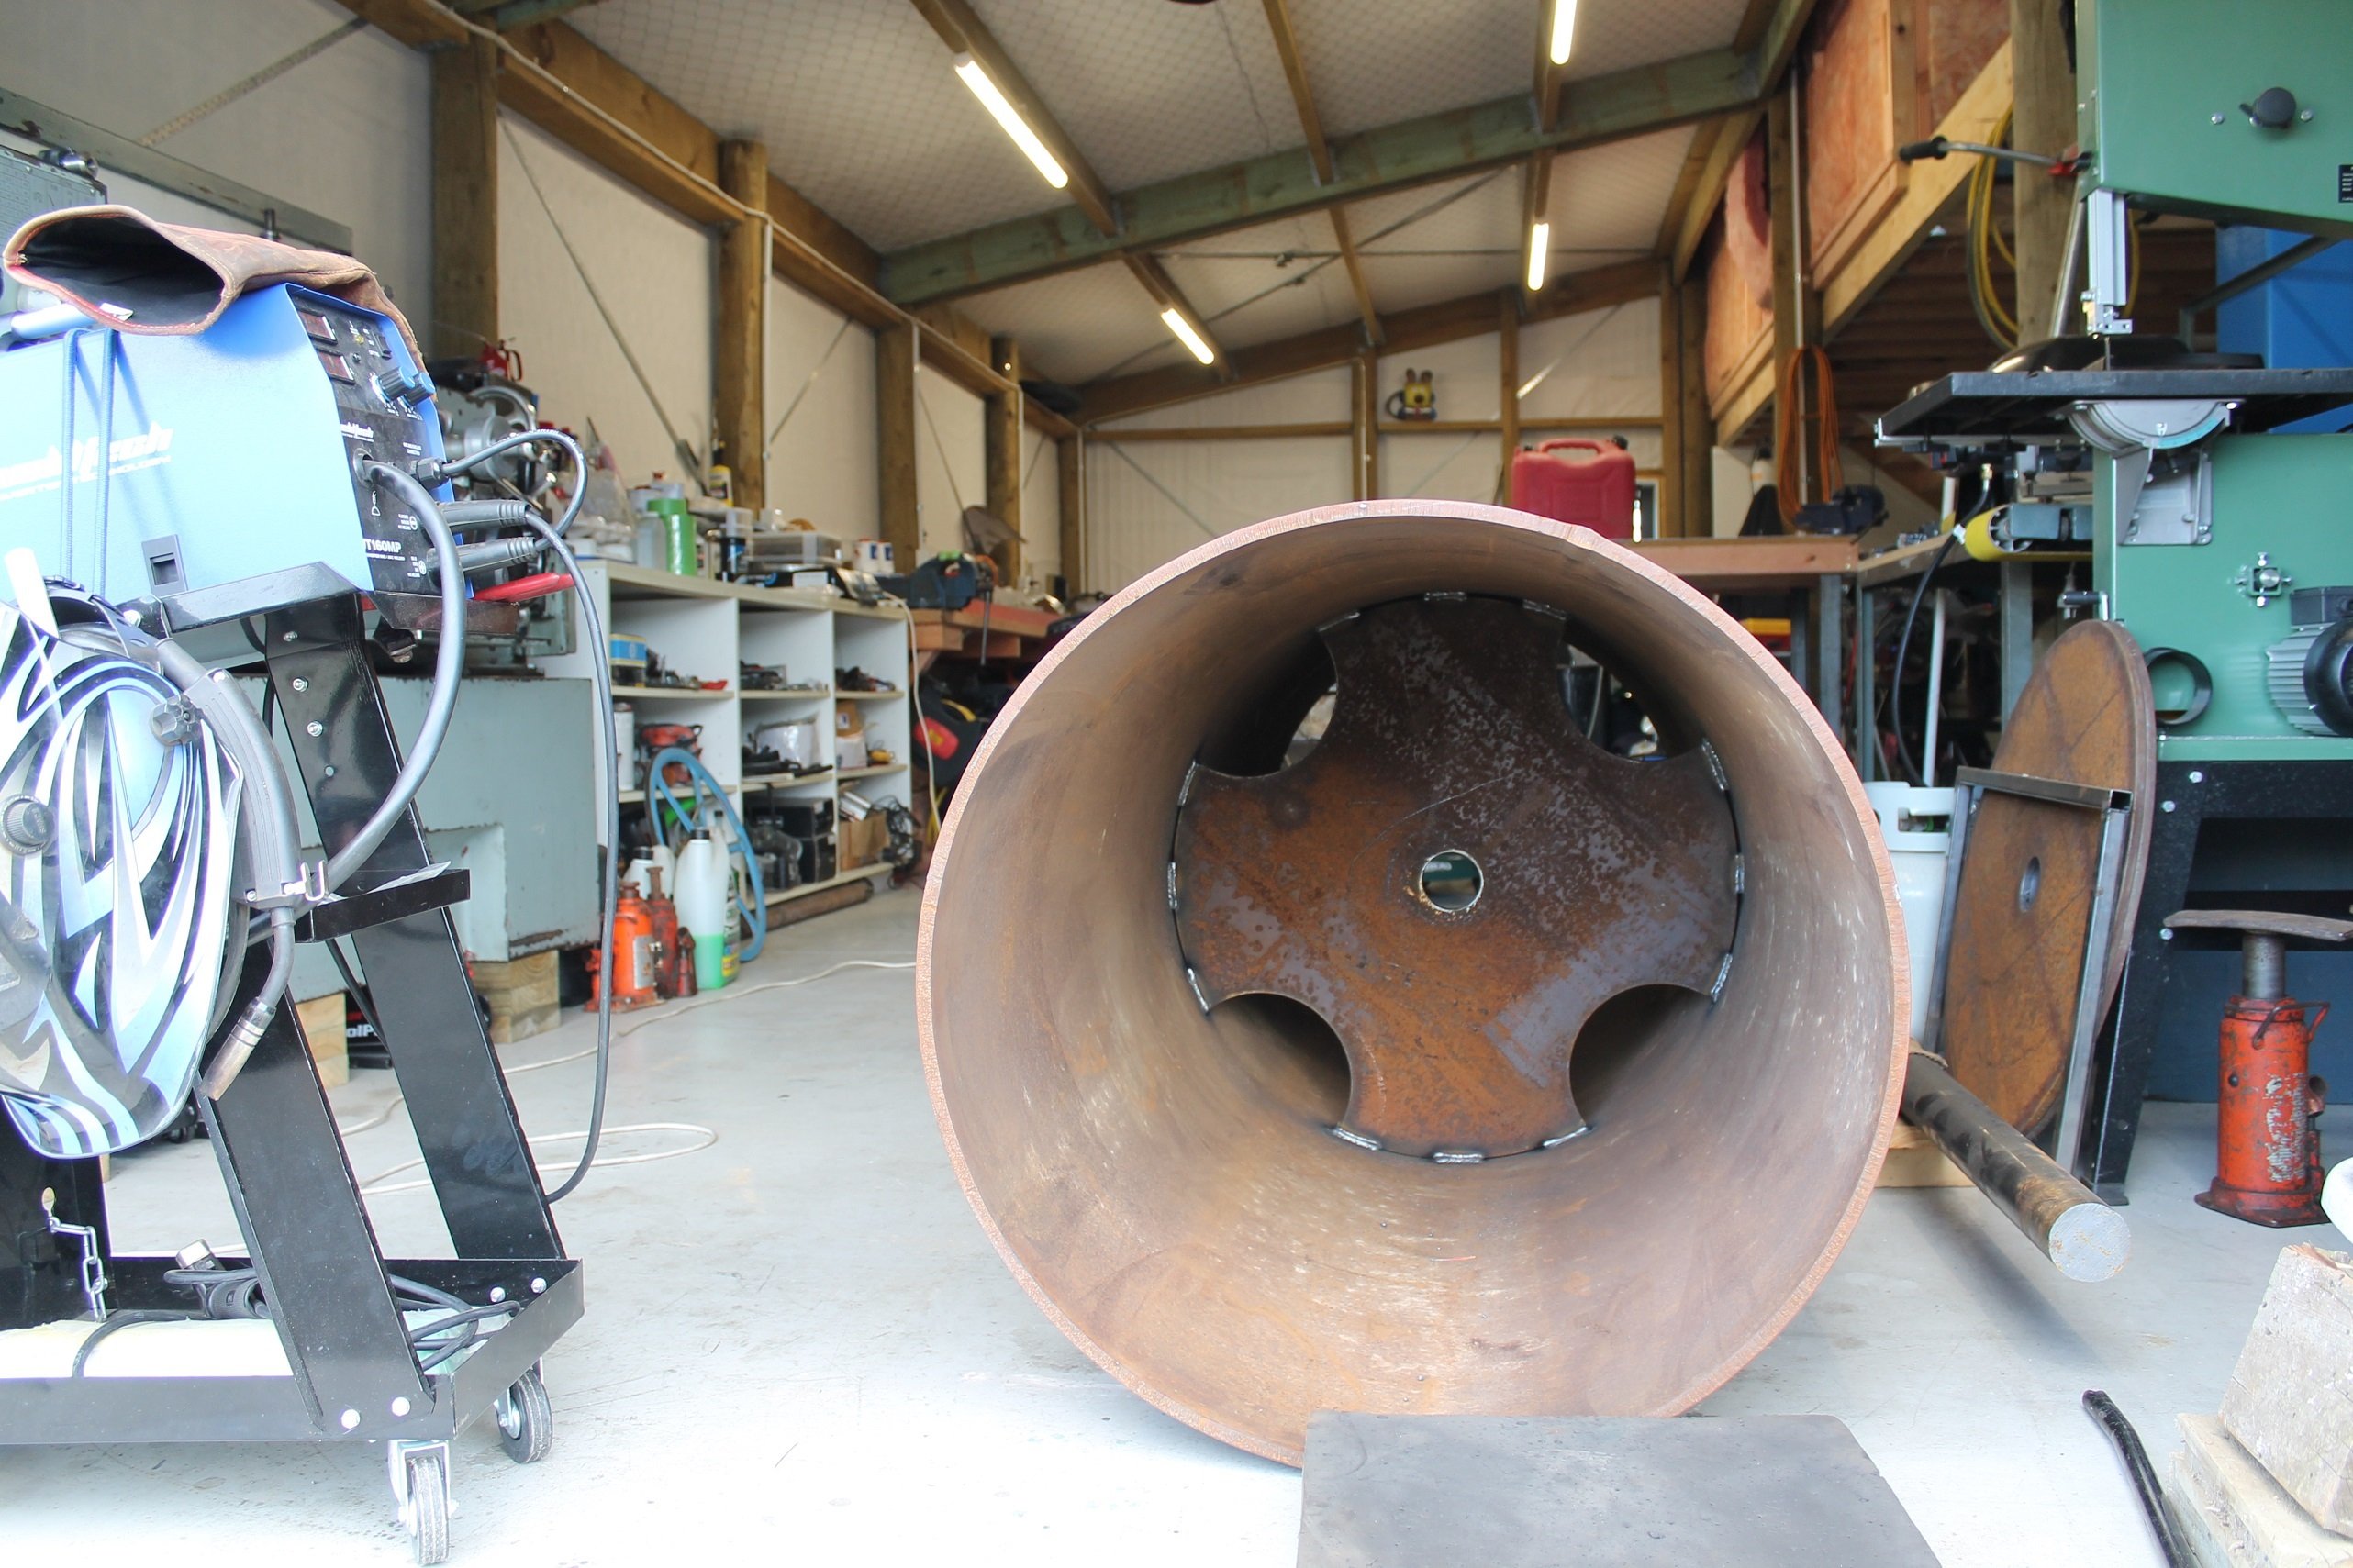
I then zapped the center cap in, followed by the end caps and shaft. - This took quite some fiddling to get it all as close to round as possible as well as getting the shaft as central as possible.

With the roller sitting on it's bearings, I checked it all with a dial gauge near both ends and center, with the worst being almost 3mm out of round - which would give me 8.7mm or so minimum thickness after machining in a couple of small areas. Most of it was within 1.5mm, so I was happy enough with that.
-
15
-
 1
1
-
- Popular Post
- Popular Post
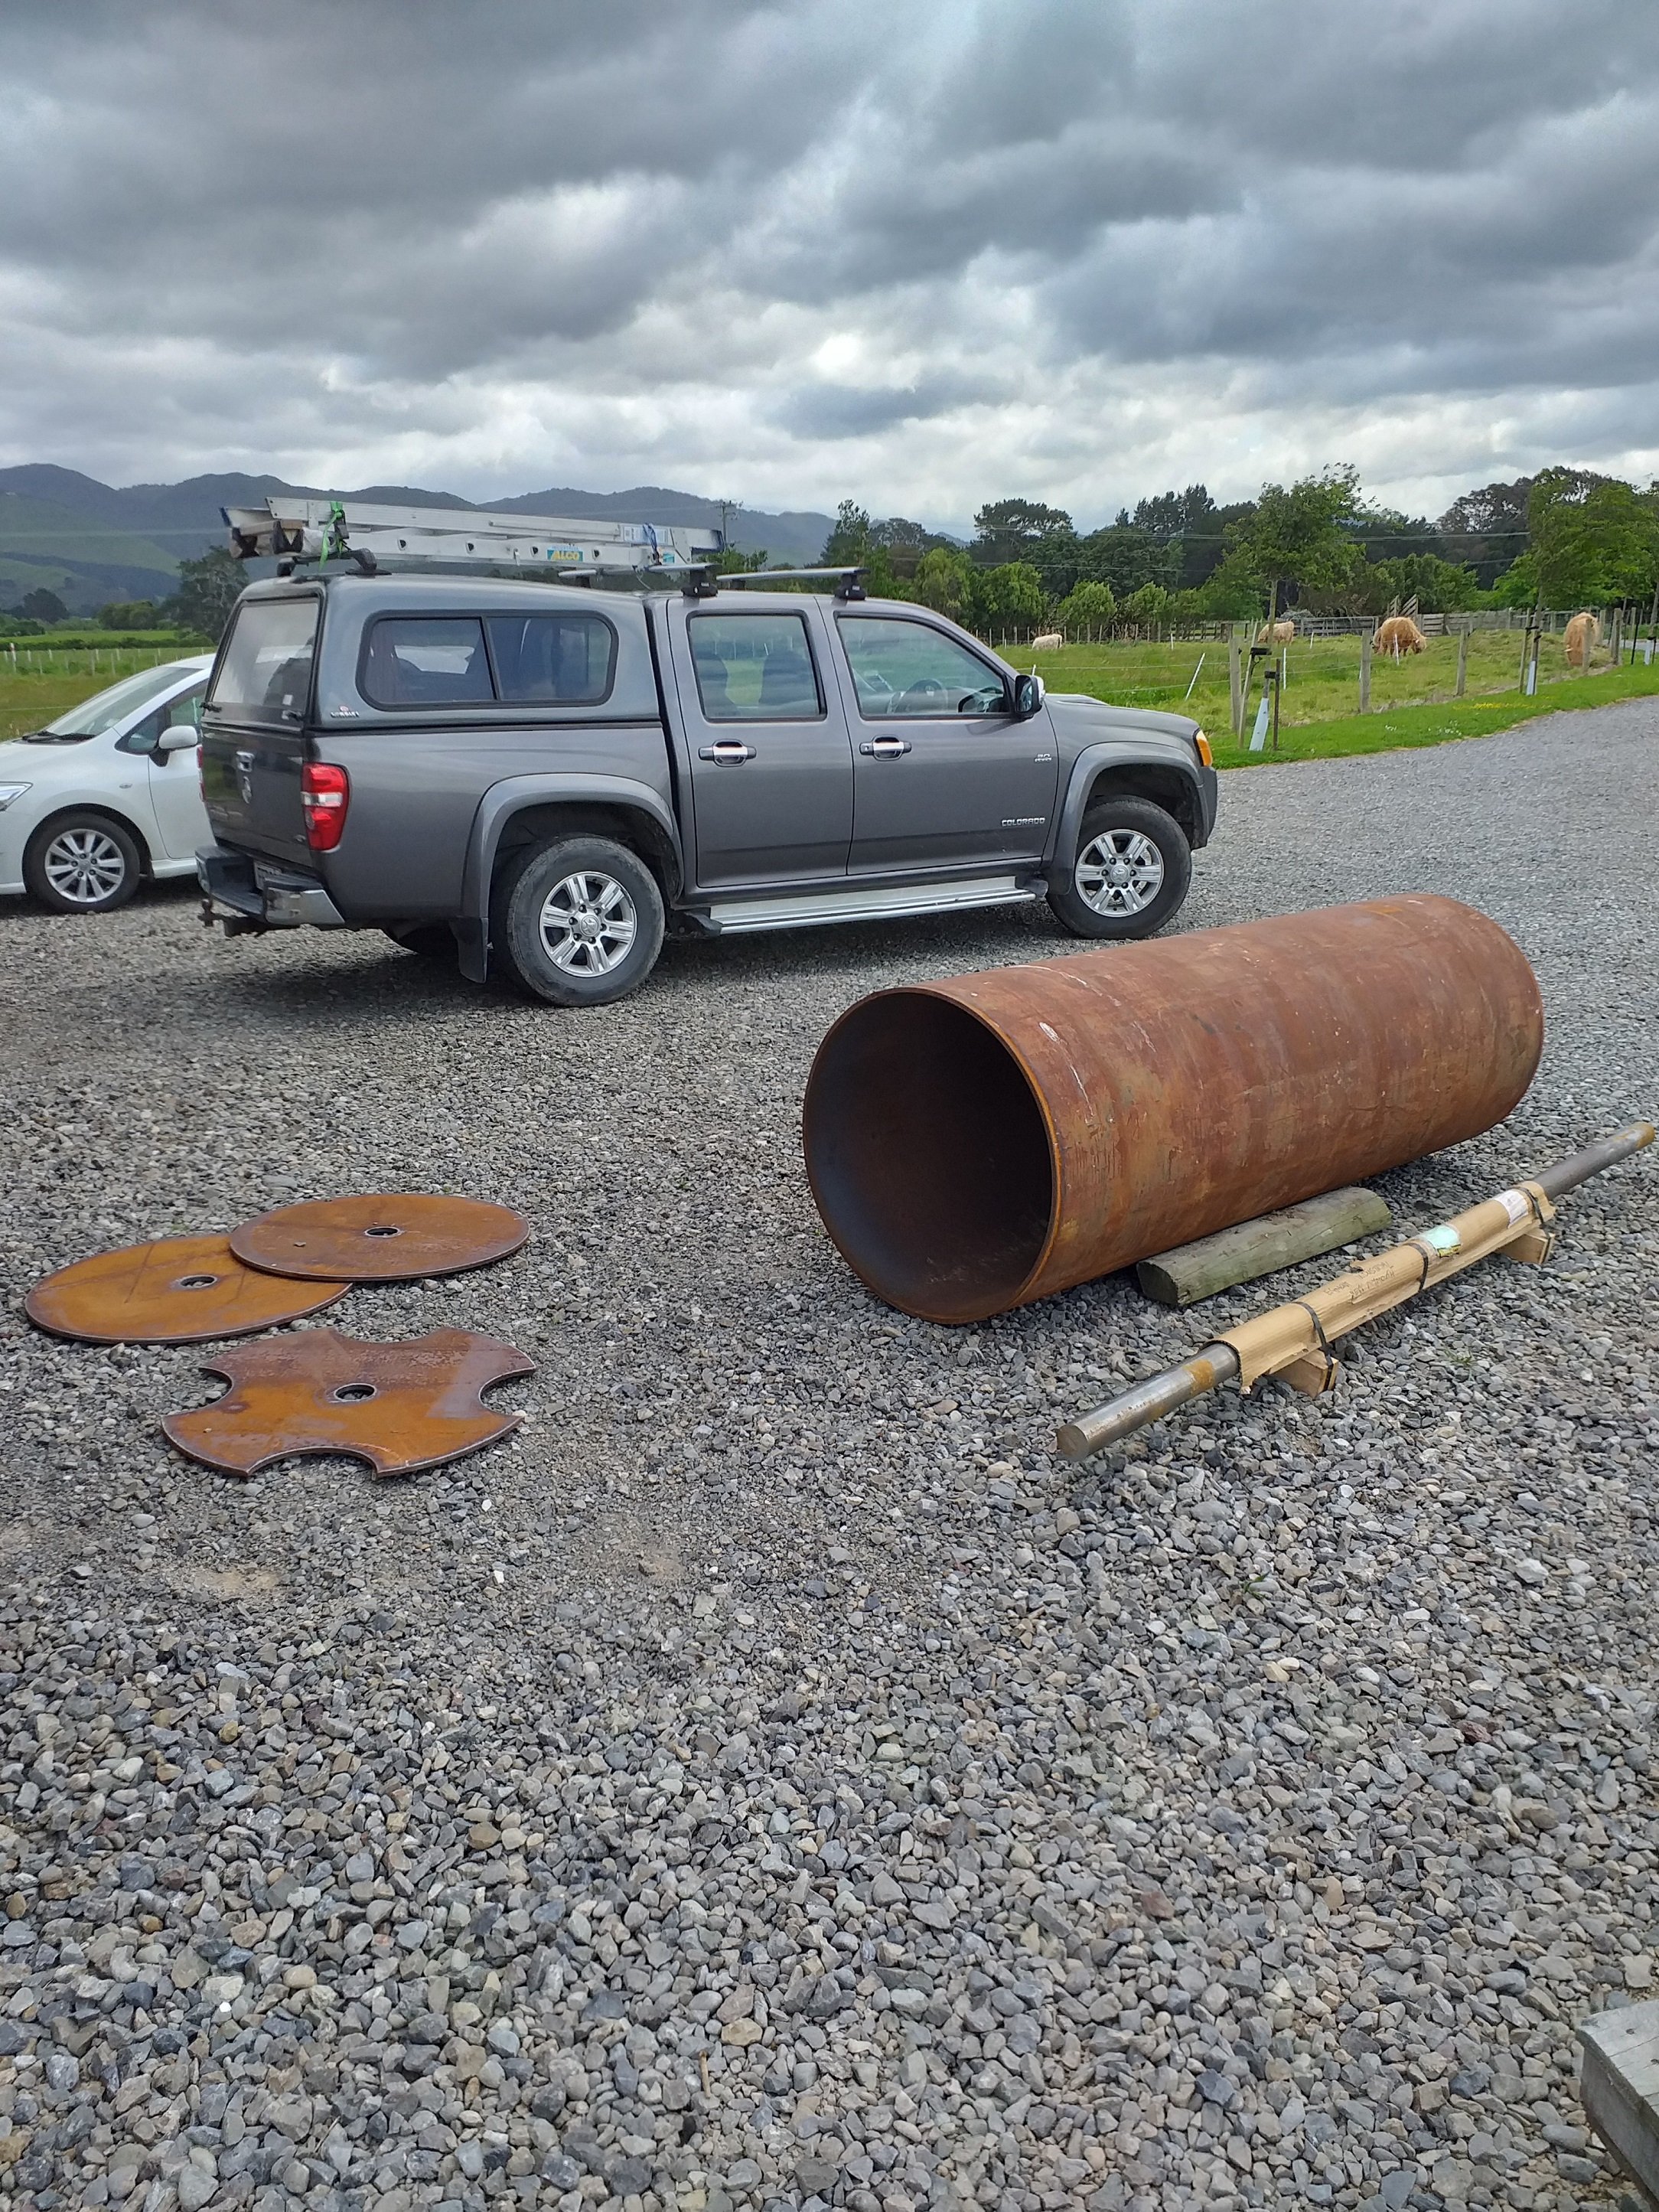
I talked to Egmont industrial supply who I had bought my lathe off previously, because I remembered they had stock of large diameter pipe in various sizes. After telling them I was making a roller, they said they could also supply end plates and shaft to suit. Mint!
Fast forward a few weeks and this lot showed up. 2.1m of 762mm x 12.7mm culvert pipe, end caps, center plate and 70mm shaft.
The reason for the large roller is due to the RPM limit of the retarder as explained in my previous post. One benefit to this though, is better traction than small rollers due to the increased contact patch, which also reduces stress on the tyre.
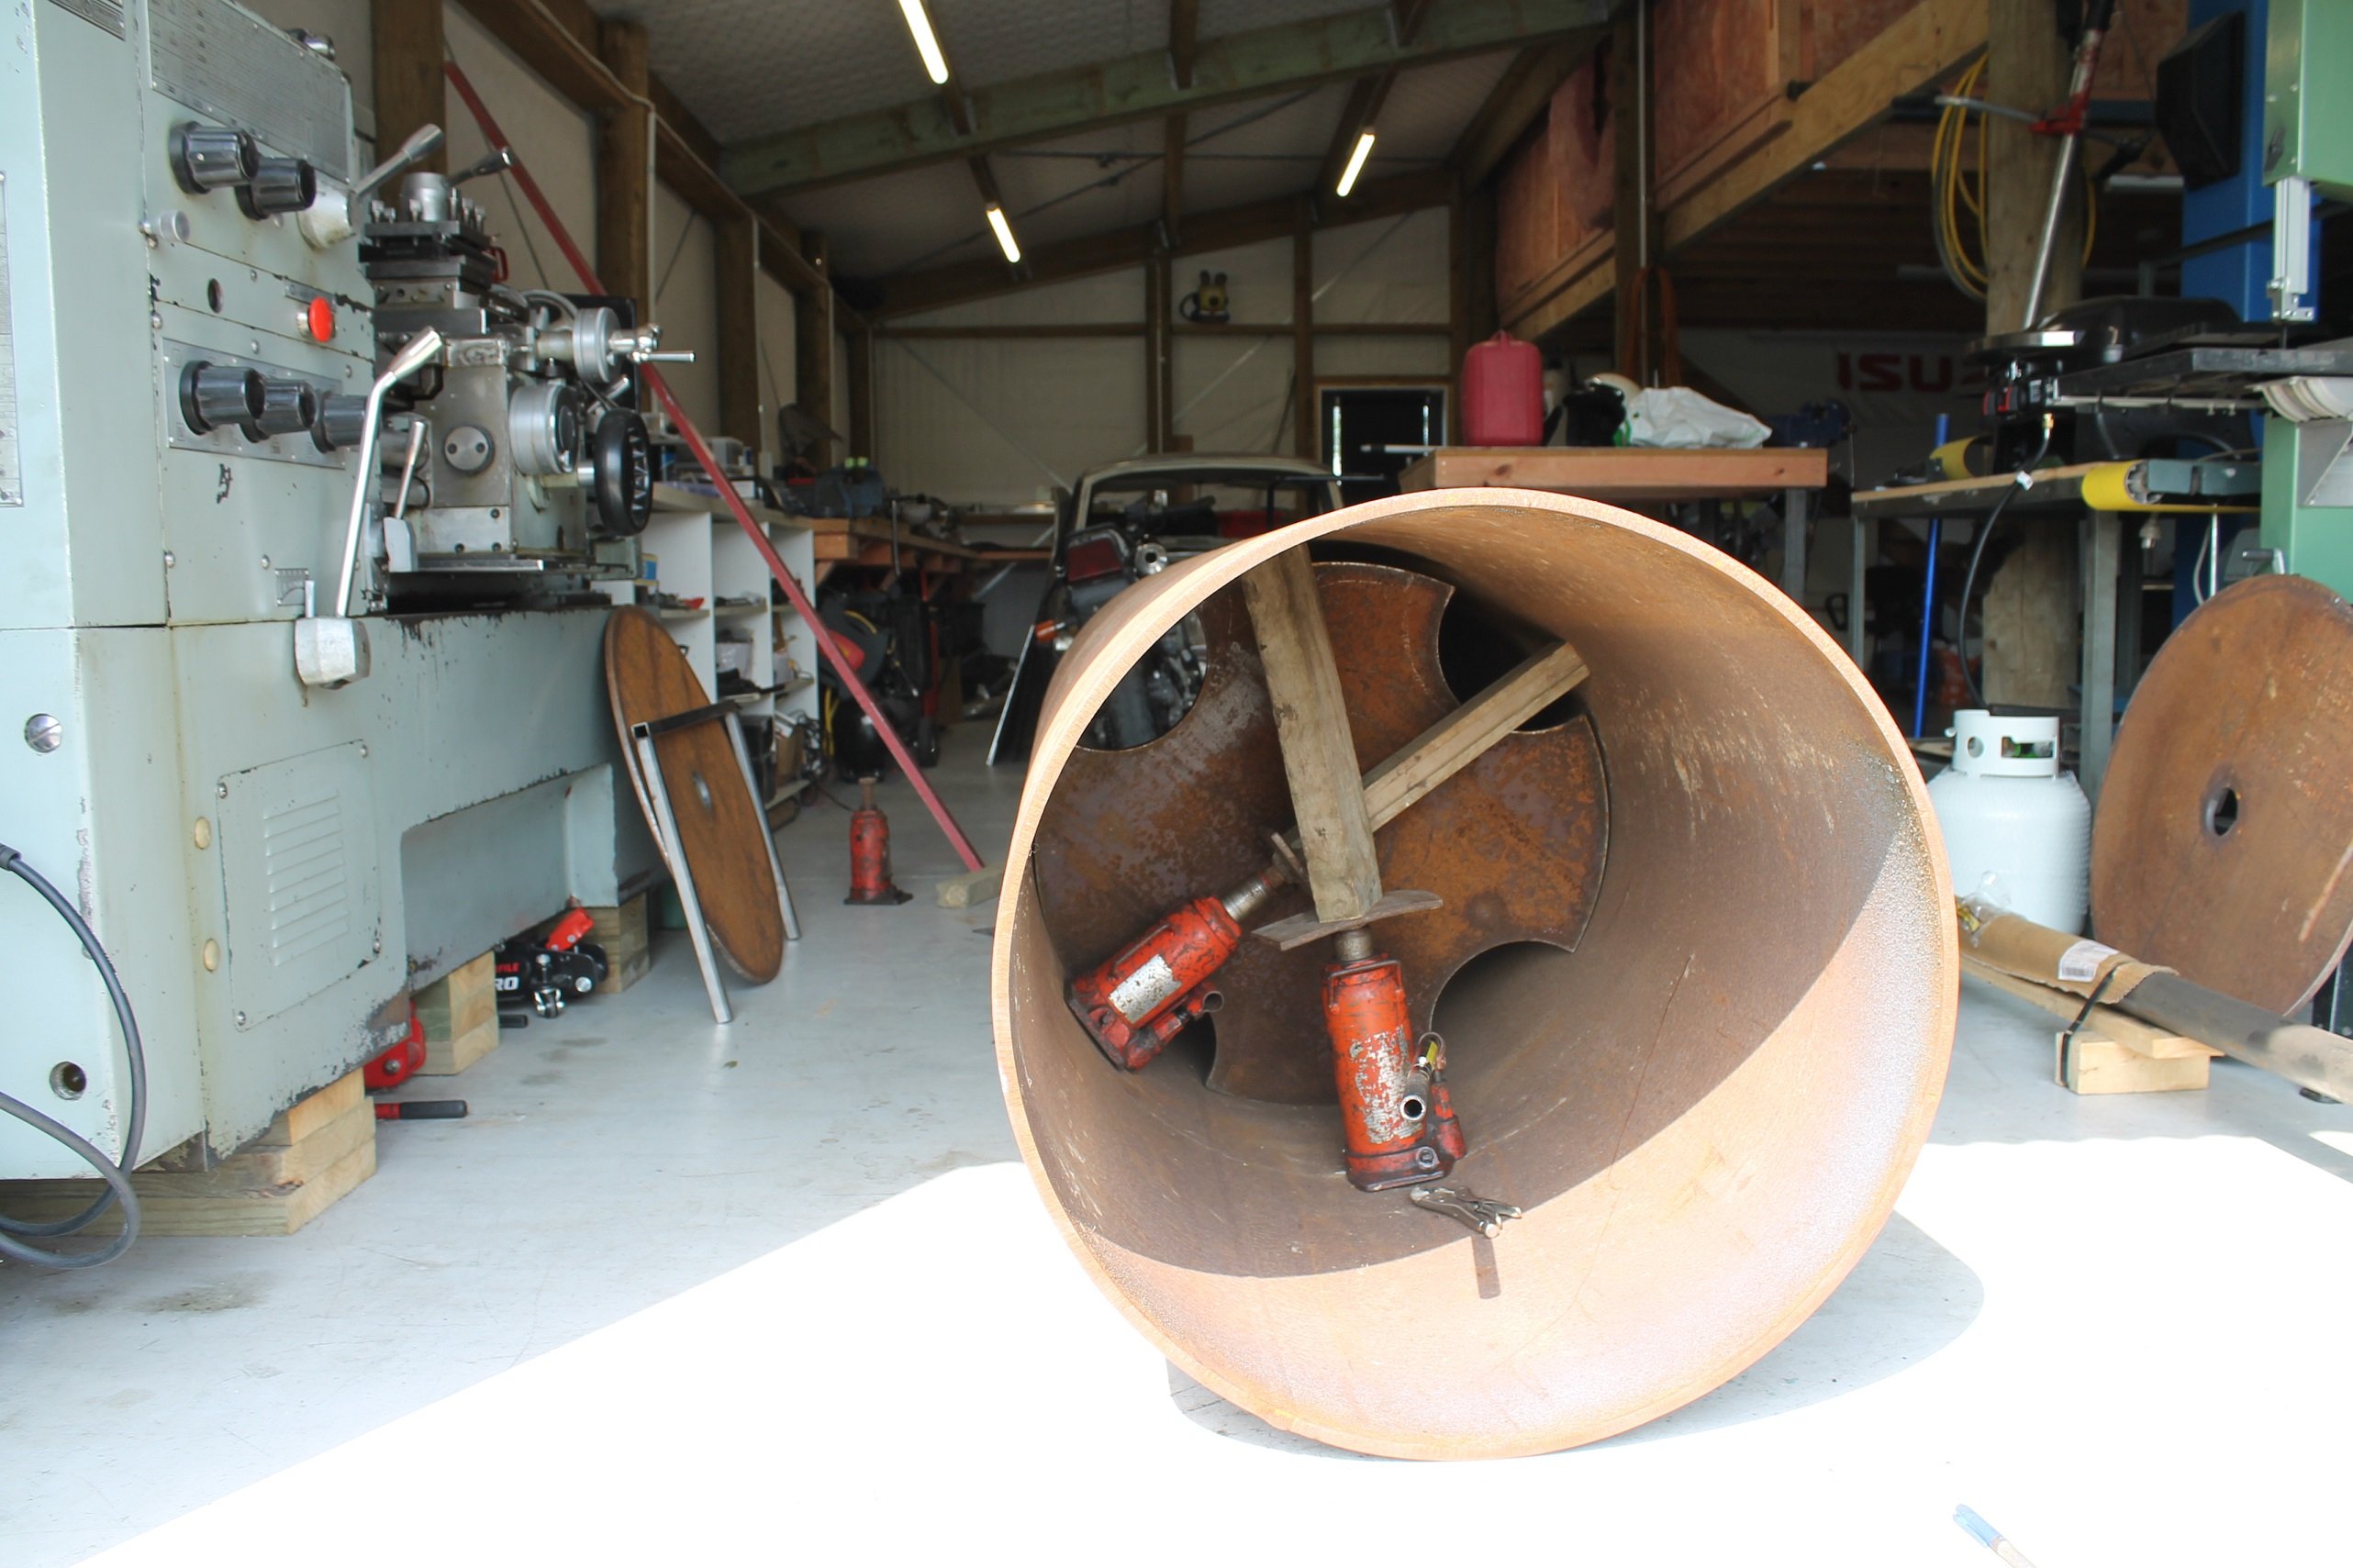
It turns out that culvert pipe is hugely out of round. But that's nothing that a couple of dodgy 20t bottle jacks and some wood can't fix though!
-
20
-
Yep I'm going to use a 762mm roller as some of the bigger/older Telma's like mine are speed limited to 2100rpm (newer ones are 3000rpm for this frame size) - I have talked to Telma and they can do a new hub assembly which is capable of 5000rpm however, but are around $2700 before shipping and taxes.
I had a look at the DIY dyno FB page today and there is some good reviews on the Yourdyno stuff, so that gives me some confidence.
-
1
-
-
I'm fabricating my own roller. I'm a bit further ahead than my first post so I will update in the coming weeks with more deets.
I'm going to use the YourDyno controller and they have just bought out their own eddy power supply as well - it's constantly under development but appears to be quite decent. I would have gone with Sport Devices but they were way over my budget.
PS I do watch your youtube stuff (love all the content btw!) - I assume your Vane is a modified one by torque performance? Knurled rollers do make a huge difference apparently.
-
2
-
-
- Popular Post
- Popular Post
Almost 2 years ago a chassis dyno popped up for sale on TradeMe with a starting price of 15k - I was immediately interested (after looking for quite some time) - so I called the owner to get some information on it. It turned out to be an old Vane 4000 bed with a Telma cc130 retarder, which had been upgraded to modern DTec data acquisition and brake control. Sweet!
After talking to the seller for a while I got the impression it was rather traction limited with its smooth, small diameter rollers. It also sounded like the DTec wasn't that great at steady state retarder control.
I threw in an autobid of 17k (my entire savings) and lost.. But over the couple of weeks that the auction was held, I got to thinking that maybe I could make a dyno for similar money? Google led me on a path to some pretty cool DIY dyno builds..
I thought, if they can do it, why can't I? - The only difference is that I'm not an engineer at all, bar 3 years of light fabrication work and the skills I'd acquired working on cars as a hobby.
So after losing the auction I rang around truck and bus wreckers with no luck finding an eddy current retarder. Damn! - After a few weeks of hunting I found a Telma AC83-00 on Ebay in the UK which was a couple of decades old, but still new in the box. The quotes were quite horrendous at first to get it to NZ but with a very helpful seller who also sold the retarder to me for much cheaper than his listed price, the deal was done.
I was pretty stressed for a few months as I had just sent a big chunk of money to a random bloke in the UK with no tracking and no contact with the shipping company - but 3 months later it finally arrived. You know that feeling you get when you buy a cool new car? This was almost better than that.
390kg potential paper weight...
-
42
-
1
-
Here's a couple of videos from the last 2 events.
All of this seat time is starting to pay off now and I am super stoked with how my driving is improving. Had the best day ever on Sunday with a few attempts to link track 2 reverse

Matsuri video from last month.
Drift Antics from Sunday. (Probably made this a bit long)
-
6
-
-
Had another track day go badly - 2 laps in, an o-ring on the oil cooler pushed out and pumped a sump load of oil on the track, without realizing we did a lap with zero oil pressure.
I put it on the trailer and took it home, pulled the sump off and thankfully the crank looked ok, so I put a fresh set of bearings in and fixed the oil cooler issue.
This weekend we made another trek up to Taupo for Drift Antics. The car went well all day with no hick ups, which meant I could focus on learning to drive instead. Here's a video showing a few laps.
-
8
-
-
@Bperfect Sorry mate I don't even have the factory cast one any more. I was planning to make my own.
Cheers =)
-
- Popular Post
- Popular Post
We spent a few days panel beating, block sanding and roughing in the body work. It's now ready for filler primer but have to wait til after lockdown to get materials.
Overall it wasn't too out of shape. The worst bits being the beaten up front guards and rear passenger door took a fair bit of time to get the body line straight.
-
24
-
Reshaped the ends of the front sway bar to allow for more steering lock. With 6mm total toe out it now has 39-40 degrees of lock. Big improvement from 33-34 degrees that it had before.
-
6
-
-
- Popular Post
- Popular Post
This car has been sold and resides somewhere in the hawkes bay I think.
I went to powercruise and had some fun before deciding to sell it on to fund a cheaper track car and car trailer builds
Here's a couple of photo's that I never got around to posting.
Made an inlet manifold
I also painted the engine bay, made a new loom and powdercoated the inlet manifold (I was planning to paint the whole car)
Mounted an R32 GTR front lip
Built a new stainless turbo manifold with an ebay gtx3582r - this setup went really well and the new owner had it dyno tuned at around 500whp
g
A few random photos from powercruise a couple of years ago.
The end.
-
11
-
Awesome. All threads now fixed up
")
-
Are these not working for anyone else now?
-
Think I can make it work. Going to take me a few hours though
-
1
-
-
Ah really? And I've spent all day doing updates

Where's good to host them these days?
-
- Popular Post
- Popular Post
I got a random facebook message from a local guy saying he was off to Australia and he wanted to know what I thought his Gem was worth so he could sell it. I went and had a look but it was hard to tell how good it was as it was completely full of parts and tucked in the corner of his shed.
Long story short I offered him my entire savings at the time. 700 bucks, which he accepted and in his words "knowing it'll go to a good home"
We came back another day with the money and a tow rope. Kym not totally impressed with the purchase.
I started with pulling the motor and all the parts out of it so i could see what I was dealing with.
I made a start with sanding the engine bay, fixing any damage and getting it in primer.
The lower radiator support was made from 25x25 rhs and pretty ugly so I cut it out and made a new one to replicate the original, then painted the engine bay
I then started on the body work. I didn't spend too much time doing this as I expected the car to get beaten up being a track car, so it's rougher than it looks in photos
Got moisture in the last 2 coats so I left it at that for a while.
I cut the front floors out and replaced them with rare spares pans, then started on making the roll cage.
I was nervous about this but it was all signed off by MSNZ and I also got a scrutineer to come out and look over it. He was really good and we also went through harness mounts etc while he was there.
Sprayed the interior
I had previously been building a turbo g161z with sr20 pistons, forged rods, mls head gasket etc. I even started on custom manifolds for it, but decided to go for something a little more modern.
More body work
It was about this time that I decided to change engines. I picked up a manual beams 3sge and promptly started making it fit.
Built an ms3x to run the engine
I swapped the salisbury diff out for an early Isuzu diff as they have larger axles, then welded the center.
I also strengthened the torque tube and added generic coilover size springs to the front and rear for ease of spring rate changes and slight adjustability of ride height
New bushes, rack ends, ball joints and any other wear items replaced.
Small wilwoods to fit under the 13" hotwires with R31 (I think) skyline rotors - coilover adjuster and spring setup in front
I cut and modified the lower arms. Placing the lower balljoint 13mm further out to get some camber and 10mm further forward for wheel clearance against the wheel tub at full lock - at this point planning to take it drifting.
Rack spacer I machined out of 4340 iirc - for more steering lock.
Slapped some paint on the rest of the car. I continued to have water trap issues and also the body work was very much rushed so it's not perfect.
I also built a car trailer.
15" wheels for extra clearance at full lock with normal tyres for drifting. Hotwires have semi slicks on them for going fast
You can see the 2-3 degrees of camber it now has up front - this is adjustable via the top ball joint - stock was 0 degrees at ride height
Stripped the beams 3sge and rebuilt it. Then got it up and running on the ms3x with a custom loom
The engine is very basic. It has Chinese forged rods, factory pistons, Kelford valve springs, ARP head studs and just a general rebuild - It's a manual engine so it has the titanium valves and more aggressive cams.
Turbo manifold I made to mount the Mamba gtx2863r - I thought it would be cool to do a tubular low mount in stainless, but it was a bit stupid as it burnt the paint on the bonnet.
It made 197kw on 12psi as it's very knock limited on pump 98 due to the original 11.5:1 CR - Pulled 3 degrees from the knock limit and made 180kw to be safe with 4 degrees of timing up top.
I have set it up with flex fuel and will do an e85 tune eventually to make use of the compression. In saying that, it is heaps of fun as is.
Here's a video giving it a quick squirt
First event was Powercruise 2019 and we had a blast. The car went really well until we lost VVTi and had to re-tune it in the cruise session - it was really rich without it and lost a lot of torque - It ended up being a pin not fully engaged in it's connector which I found once we got home.
The clutch was slipping in the drift sessions as well, limiting me to 2nd gear only (chinese puck clutch)
On the Sunday it was raining but we went out anyway and it blew the driveshaft universal on the back straight. The only piece on the car I left up to an engineer to modify - I got a new one made by someone else (W.A.G.S) and replaced the clutch with a decent one from Drews.
Too much castor made the steering quite difficult to drift but I have since fixed that issue.
2nd event was Drift Antics in January 2020. Epic event with rolling pits all day and the car took the abuse of 60 odd laps.
Here's a video from that day - my driving isn't very good but definitely made improvements during the day
The next event was summer Drift Matsuri just before the covid-19 lockdown, I made an effort to learn how to transition and also to be able to grab 3rd gear out of the hairpin while still sliding, both of which I managed to do before the car had mechanical issues after only a handful of laps. Kym reckons I was going a bit faster than last time too, so I wasn't completely dissapointed.
-
23
-
Edit - Post on next page
-
4
-
-
- Popular Post
- Popular Post
Covid-19 lockdown has given us some spare time to get stuck into the remaining panels, all of which received the same treatment as the body. Bare metaled, rust fixed and now in primer
They are now all bolted back onto the car. I have spent a bit of time trying to improve the 60s panel gaps, but it's not perfect. The whole car is now ready for some body filler.
-
21
-
Summer 18/19 we only spent a couple of days stripping the roof as I was busy building my TG Gemini track car.
Fast forward to summer 19/20
We got onto paint stripping the rest of the body, cut out the top of the sills and tigged in some new patches. Metal prepped, etched and primed.
Bonnet and boot stripped.
-
9
-
-
I had also "built" an engine when I was much younger and made an inlet manifold to mount some ITBs from a silvertop 4AGE. I thought it was cool at the time but the whole lot needed to be re-done.
Fast forward to Autumn 18
We stripped 2x G200W engines and used the best bits from each to make one good engine. We had the block, crank, valves and head machined, installed new bearings, rings and set the valve lash with shims.
-
3
-
-
Many years ago my partner Kym claimed this car as hers, but I had lost motivation to work on it (honestly just didn't have the skills required)
Fast forward 9 years and many other projects later. I decided one day to take Kym to my old's house where the car was stored. Making sure the car was safe to tow, we then embarked on a journey to our new place.
We promptly started to strip it down and inspect it properly
There was rust in the tops of the sills, bottom of front guards and the bottom of the shock towers/chassis rail that I had attempted to fix when I was 19. This area is common in all Belletts.
The front crossmember and brackets had to be removed by drilling out the spot welds
Finished result after a couple of days fixing the rails and shock tower skin. I added a design change for moisture to drain from the front and we will spray the inside with cavity wax and seal the water from entering from the wheel well at a later date.
Crossmember mounts welded back on
We then paint stripped the whole front, panel beated and welded where necessary, metal prepped, etched and primed
This was the end of Summer 17/18 (we generally only work on it during summer)
-
8
-
-
ms3x with an additional jbperf 4 channel board can run full sequential fuel/spark on a 12
Probably cheaper and also superior to ms2 x2
-
1
-
-
I use mine occasionally

-
5
-


 g
g


Cute Wee Gem's Dyno build
in Other Projects
Posted
According to my rough math it should suck about 80-100kw + another 5kw (for the retarder rotors) to accelerate the roller over a 6 second ramp run. But not only am I not an engineer, I'm also not a mathematician lol
Retarder when cold can fully brake about 150kw at 500 rpm (roller speed) and about 470kw at 1500 rpm and about 620kw at full song (2000rpm)
To put it into real terms, using my Gemini for example - makes roughly 40kw at 2500rpm (500rpm roller speed) and 180kw at 7700 (1500rpm roller speed)
So the retarder should be able to steady state a car with 2.5 - 3.5 times the power and who knows how much more with ramp runs? Surely 700-800kw? Time will tell.