


dwlee
-
Posts
156 -
Joined
-
Last visited
Posts posted by dwlee
-
-
Have a look at how these guys do it
-
 3
3
-
-
Those images are just thumbnail links to the originals, which are quite large, so click on them and save the images. I suggest you print them out and tape them together to get one big wiring diagram.
Key for the wire colours
B = black
L = blue
W = white
R = Red
Y = yellow
G = green
BW would mean black with white stripe. etc
The number before the colour code gives the size of the wire.
From the ignition switch there should be 5 wires:
L = is for the accessory circuit
B = is the power feed to the ignition switch
BW = the main ignition circuit
BY = 2 wires, one goes the coil bi-passing the coil resistor when cranking. The other BY wire goes first to an inhibitor switch if the car is an automatic (bi-passed when car is manual), then to the starter solenoid.
-
Here you go. I've include both the loom diagram and the wiring diagram for the 73/74. Note the some 75 and newer GTOs are a little different in places than the earlier cars.

-
Yes, that's mine
. If you don't know Matt's car is an ex NZ car. He did a lot of work to it once he got it. There have been a few going overseas in the last few years. I think 500 would be pretty close to the number left.Thanks for the info on where you got the parts. The front bearings are also the same as the late 70s early 80 Sigmas as well.
-
So where did you get the brake parts from in the end?
That car looks strangely familiar... almost like the one in the garage. The front has since been lowered to match the rear. I'm not sure if I like the tinting on the high beams, but I like how the white wall help disguise the high aspect ratio of the tyres.
-
I found the box from the last set of pads I got from Racebrakes and they were Mintye mp-2021.
-
The rotors you are after are dba210. I have got brake pads from Racebrakes and Sterling Brake and Clutch in the past and have been very helpful. Rockauto in the USA has some pads for cheap if you look under 1975 Dodge Colt 2.0L.
-
If you are think of doing the dohc check out http://www.projectzerog.com/ as it has lots of good info. A sohc 4g63 would be much easier and cheaper and it will be a huge setup from the current engine.
-
1
-
-
Are the cups installed in the correct bracket as they are different for left and right sides of the car and are different for high beam and high/low beam as well. Note that the brackets are different left to right, but the retain rings are all the same. The photo below is for the right side and the high-beam is missing.
-
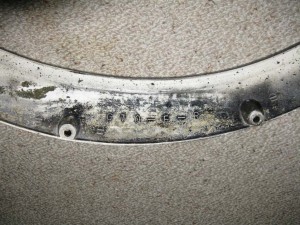
The raised lettering should look the image below with this one being from the front right.
Yes you understood what I was trying to say. The little cut backs at the base of each flare should be pointing towards the door for both front and rear. Hopefully the image below should help explain
. -
Looks like you've got a lot of work ahead of you.
I'm sure DriveBy meant dizzy driven by the crank in the early 4g52. The later engine have the dizzy out of the head and have balance shafts.
Under the rear flares have the original metal flare been cut away and the inner and outer skins been spot welded together like in this photo http://homepages.paradise.net.nz/mitsubishicarclub/photoGTO1976RebeccaShaneReckin.jpg? Your front guards will be different being a 73 unlike the late 75 in the photo, but the cut away rear will confirm if its a GSR.
The original flares will be plastic with the correct position in raised lettering on the inside surface and have five bolt holes. Looking at the photos the front flares aren't original and if the rear left is original it should be on the right not the left.
The tacho is from an earlier GTO with a 4g32 engine as the red line is wrong for the 4g52 where the red starts at 6000rpm even through max power was at 6200rpm.
-
The main differences between the crank and cam driven engines a part from the obvious is that the earlier crank driven engines don't have balance shafts and they have different sized main bearings. The earlier engine cam with 3 different casting with the earliest have square inlet ports and the two later ones have round ports, but one having the inlet bolt pattern bolt pattern the same as the square port head and the later have same bolt pattern as the balance shaft Astron 1. Another difference is that the rocker cover of a balance shaft head wont fit on a pre-balance shaft head as the balance shaft head is longer. However, a balance shaft head will fit on the non-balance shaft block.
In my opinion having had both non-balance shaft and balance shaft engines in GTO's over the years the non-balance shaft engine is more powerful and responsive, but it isn't as smooth as the balance shaft engine.
-
Are you sure it's not the half moon at the back of the head that's leaking?
If your engine has a crank driven distributor the people on sigma-galant wont know much about it they didn't get that engine in Oz, but if its the later cam driven distributor engine then they should be able to help. Also, you could try contacting user "old colt" on http://classiccolt.forumcircle.com/ as he has experience modifying these engines back in the day. There is also a Dodge manual on what needs to be done to prepare these engines for racing and I'm pretty sure there's a link to it http://classiccolt.forumcircle.com/viewtopic.php?t=872
-
Cracking between the valves is very common with the original square port 4g52 heads and the later round port ones are not much better. The 4g51 head will bolt up to your block and inlet manifold will bolt up without a problem. The issue you may run into is the exhaust manifold as there are at least 3 different options; square port, round port with the same bolt pattern as square port and round port where the upper studs are further toward the front of the head.
If the 4g51 head is off a balance shaft engine with the dizzy driven off the camshaft, when your original rocker cover wont fit.
-
I used real wood veneer on a centre console about 7 years ago. Not exactly an easy job to do on the console, but I imagine the instrument panel and the hand brake cover would be much easier being single curvature surfaces. I got the veneer from Gibson Veneer, but they have gone out of business.
-
3
-
-
Hi Dave
Thanks for the info, can you get all heater/radiator hoses or is it just the heater hoses? How much did the pipe cost? Mine is ok but i may get one and have it as a spare,
I will pop into my Mitsubishi dealer and find out about the hoses on Monday.
Cheers
Steve
Hi Steve,
I only tried to get the heater hoses as I couldn't find anything else that fitted correctly. The part numbers for the two heater hoses are MB030230 and MB030231 and the cost around what you would normally pay for heater hose from Repco. The heater pipe cost me $117+gst, which was a bit more than I wanted to pay, but it would take me 1/2 a day to make one if I had to and it would not be as good as the factory part so it probably money well spent. The part number is for the pipe is MD021465. For the upper and lower radiator hoses the one for the Sigma work well. There Mackay rubber part numbers are CH1145 and CH1276 and you should be able to get those through either Supercheap or Repco. Note that Supercheap has the GTO in its parts guide if you hadn't found that yet.
Dave
-
Project thread //oldschool.co.nz/index.php?/topic/47909-steves-73-mitsubishi-galant-gto-gsr/
Hi Steve,
You're making good progress with the engine. I assume the head is the original square port head given the exhaust manifold. Did you use the chain kit from the later balance shaft 4g52 and if so did you have any issues? By the way if you're concerned about rust in the metal pipe running from water pump to the heater they are still available from Mitsubishi ex Japan (ordered one last week). The molded heater hoses were still available two years ago so are probably still available if you need them.
Dave
-
There are actually at least 3 different versions of the 4g32 that I know of and all where known as saturn engines. The early version was sohc 8v using a cam chain and first came in the Galant 16l. There was also a dohc 8v also using a cam chain, which are very rare and came in MR GTOs. The later sohc 8v transitioned from chain driven to belt driven in the late 70s and acquired balance shafts. Looking at your timing cover it looks like you have the belt version of the 4g32.
-
For tech info on the Starion see http://www.austarion.com/tech/index.php
-
That stitching is just like a dot line screaming rip here to open and that's why the button seats last better. That colour is actually called off-black in the manuals and I've seen it many shades from almost green to a very dark greenish black. If the split is just starting then doing what DriveBy suggests is probably the best option and while the cover is off also get them to refoam the pad as they have usually collapse a little after 40 years. Worst comes to worst I probably have a spare rear that can be sacrificed.
-
I assume its split along the stitched seams in the textured centre panels of the seat and back. These should not be difficult to have replaced with a close match and leave the original outer panels. Take the car to a few auto trimmers and see what they can do for you. I've had GTO seats repaired in the past and they have come out much better than I expected.
The other option is to look on yahoo japan as GTO seats come up quite often. At the moment there are a couple of GSR seats http://page18.auctions.yahoo.co.jp/jp/auction/w97356854 and http://page8.auctions.yahoo.co.jp/jp/auction/h186070137 but these aren't the best examples.
I'm not aware of an easy to find seats that will bolt straight in. Don't rely on answers/info you may get from sigma-galant as many of Oz assembled galants used locally manufactured seat and rails that are different to the Japanese seats.
-
The calipers on a GTO should be aft of the struts as are the steering knuckles. The strut in the photo should be on the right hand side and the knuckles will need to be swapped between struts. Be careful with the ball joints as the GTO's are different to the 16L. The original caliper are probably better than the GTO's as the originals are fixed pistons while the GTO's are a floating design.
-
Hi Cletus,
I think I'm going to run into the same issue as Sambo with 10.8.2 © with my mits gto with the oem location of the fuel/brake lines (see below)
Since the photo was taken I've replaced both brake and fuel hard lines and there's no obvious alternative route that offers natural protection like a frame rail, so what type and level of protection is required?
Thanks, Dave
-
I think it has 2 can ports, but only one exposed on the dip pins.


 . If you don't know Matt's car is an ex NZ car. He did a lot of work to it once he got it. There have been a few going overseas in the last few years. I think 500 would be pretty close to the number left.


For anyone who wants to learn fiberglass stuff
in Tech Talk
Posted
Their pattern making / split mound / air box tutorials are also very good.