
- Popular Post


ProZac
-
Posts
1,255 -
Joined
-
Last visited
Posts posted by ProZac
-
-
- Popular Post
- Popular Post
At work
 .
.That's not even the track, that's the testing ring. Down the hill, there is 2.3km of paved private glory.
I'm not going to lie, I've managed to score about the best job, in the world, ever. Yesterday I fixed a Ferrari 458 Challenge racecar (minor electrical fault). Today I spent the day fitting aftermarket race suspension to a Lotus 340R. It's the bizzaro world, and I'm going to ride it out for all I can.
-
 18
18
-
Gave this thing a bit of a thrashing at work this afternoon. I never realised how annoying the exhaust sounds from outside the car! Will do something about that ASAP.
-
4
-
-
Have just been reading your build thread, really really enjoying seeing someone put some development time into one of these engines.
Did you ever manage to find a rocker arm? I've got many if not, and I'm local(ish)
. -
Unfortunately, not really. It's not super secret or anything, but as it's a competition, we never really released any details about it till it was unveiled at the end of October... so no build-thread type stuff
.Lots of pics here though:
https://www.dropbox.com/sh/vax4j5nm8q74eow/AAALvwcgwovN6j5PZzl88YH_a?dl=0
Credit to Toby White for the photos. He's a talented man
.There was some video coverage of the event, available on YT now:
Saturday Morning:
Saturday Afternoon:
Sunday Morning:
Sunday Afternoon:
-
2
-
-
- Popular Post
- Popular Post
Whoa, a whole new year! 2016 is shaping up to be a pretty exciting one, automotive wise. Just want to put down the thoughts here on 2015, and what I'll be doing with the RX7 in 2016.
The end of 2015 was pretty awesome. We took our FSAE car to Melbourne for the Australasian competition, kicked some ass, and had a bloody good time. We came third overall, which for a team that has only been competing for three years, is unprecedented. I'm a bit biased, but I reckon we had the fastest car on the day, just not quite enough luck! But that's racing.
That's me, getting my hands dirty fixing up a slight issue with the brake over-travel switch. My role in the project was the electrical system, I ran a Link Fury ECU, a Nautech PDM, and a MoTeC C185 Dash/Logger. I designed, spec'd and constructed a fully sealed and shrunk loom using all the good gear, as it was on the universities dime
. The electrical system was rock solid reliable, which was my own personal goal for my part of the project. I also undertook a lot of the engine tuning... Tuning a turbocharged single cylinder raciing dirtbike motor with an aggressive cam is not something I'm looking forward to ever having to do again. Very very pulsey and lots of challenges to overcome. We got a great result in the end though, with lots of mid-range to top end grunt which is what we really needed to meet our goals. Shame it still sounds like a lawnmower, hah. Car is a full carbon monocoque, with a very effective aero package. Weighed just shy of 200kg's, made just over 40kw's (all the air has to pass through a 19mm restrictor).
If anyone out there reading this is at uni, and has an opportunity to become involved with FSAE. Do it. It's a massive commitment, a huge time-sink and extremely addictive, but I met some awesome guys, and got two fantastic job offers out of it. The one I've taken is a real unicorn job, I wont say much about it, as I don't start till the 11th, but it's automotive related, and will provide opportunities that I wouldn't have dreamed of a year ago.
On to the RX7! I've been using it as a daily fore the last three months, and it's been great. Not as thirsty as I was expecting, better than my old 81 L200 sport (but that really needs another tickle up). I've replaced a few interior pieces to tidy it up further; new door skins, speakers, stereo, steering wheel, etc. Reverting as much as I can back to stock mazda stuff as I find tidy pieces.
It's got a pretty decent oil leak from the rear of the sump. It's on my immediate list to fix this week. The turbo's are also on the way out, particularly the secondary, as it's a bit smokey. Something has gone wrong in the sequential setup, and the boost pattern is a bit intermittent, I'll hunt down that issue too.
I've got a couple of good condition spare turbos pulled apart, and will get some rebuild kits for them on the way. They have a different type of front seal to the other hitachi turbos, so the kits are a bit more expensive than I'd like, but still not massively expensive. I've got a replacement downpipe to go on, and I'll build a decent exhaust for it while I've got the turbo's off. I bought a cheap shitty stainless muffler off the tard a few months ago, because it has awesome twin tips on it. I'll cut them off and use them on a decent muffler. Will make the exhaust look pretty factory from the back, but with slightly larger tips. Should look cool
. According to teh interwebzzz I can expect boost control issues once I modify the exhaust. I'll port out the factory wastegate system, and hopefully that will help out. Cross that bridge when I come to it .
Happy new year, 2016 is going to be a kickass one
.
-
19
-
I _was_ wearing a hoodie, which is a new development in my life... The hood was down, but my ears did get the itch, that maybe they should be covered up... Should I be worried?
-
- Popular Post
- Popular Post
I think possibly you guys are overestimating me a little, hah. I think it's more just that I'm familiar with the electrical side of cars, so sorting out electrical problems is kind of second nature to me. I promise you all though, once you get into it a little, it really is just pipes and water, not complicated at all!
I managed to daily the Seven all day today, and didn't get a single ticket. Winning
.-
13
-
Hah! Is it also a series 7?
-
Put it on my tab! #ThugLife!
(I'm actually a pussy and have already paid it online so I can forget it ever happened)
-
2
-
-
Ha! Got a boost guage on the thing?
Not yet mate. I have an old one knocking around somewhere though that I'll throw in to check on things. You can definitely feel the second turbo though, really takes of once that things gets going!
-
3
-
-
- Popular Post
- Popular Post
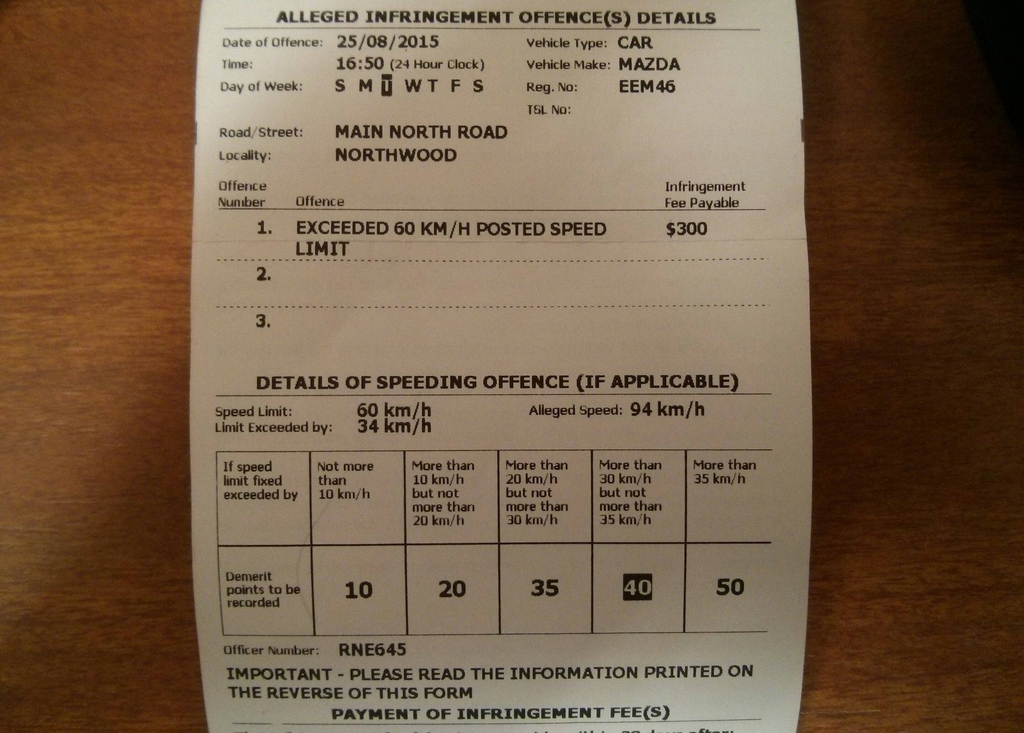
Well, that didn't take long.
Not my finest moment. Had a stretch of two lane blacktop infront of me, completely clear. Gave it a squirt to the top end of second. Apparently it goes pretty fast at the top end of second. The officer was a really nice bloke, had a good chat after we'd done the business.
-
33
-
Tell you what, I'll go hard at uni over the next few days, and If I can get the race spec loom built and done, and my embedded software report done for it's friday due date, then I'm in
.-
3
-
-
It could have been the plugs, and if it was I'd say that's the way it was when Brad got it. It could also have been a bunch of other things, definitely not worth dwelling upon. I did about 50k's in it this afternoon, and apart from the high idle (around 1500rpm) with a slight burble, it's been faultless
. Oil pressure was great and temp was rock solid (although the factory temp gauge is shit-house, I'll have to de-linearise it). The thing is so damn responsive it's hard to keep out of boost. I just want to keep driving it, but I've had to come to uni to get some work done... Still, I live about 35 minutes from uni, so I've got the drive home to look forward to .I think I'll tidy it up further, fix a bunch of interior squeaks and rattles and enjoy it for a couple of weeks.... But the (hopefully tasteful) mods are coming
-
6
-
-
- Popular Post
- Popular Post
Well I've had a pretty damn good morning.
Changed the oil, topped up all the fluids and set off for a test. Hit up Repco and got myself an accessory USB socket to charge my dead phone, just in case I needed it, and a fire extinguisher, for a similar reason. Car was pretty smokey, and had a bit of oil to burn off the turbos/manifold too. It wasn't running overly well. Would stutter, miss and backfire if you gave it even the slightest amount of jandal, so I was anticipating having to get home and rip into it again... But I stuck with it, and took it for a drive along some back roads where I could open it up a bit... After a few backfires and misses, it cleared its lungs, inhaled a bunch of air and FUCKING WENT NUTS!
I had to remind myself that the motor is pretty fresh, so I didn't give it all the beans, but holy hell does the thing shift. Feels like the fastest car in the world to me at the moment, but that's because I'm sitting on cloud
nineseven. After that clear out session, it seems to drive really really well. No farting or missing when tootling around town, just drives really well. The idle is a little high, and not completely smooth, but I suspect that's just going to involve setting up the throttlebody correctly, which I can now do, as I can get it up to operating temp.Going to give it a much needed wash now, get some rego for it, pay the insurance and head off for a longer test-drive
.Grins ear to ear.
-
43
-
So can't wait for the "Fuck yeah. Skids on" update to this thread.
Have been watching with interest and awe of your skills right from the start.
Well , right from when I was pinning over a white fd for sale for fuck all, actually.
So glad I didn't get all excited and buy it, would have thrown a right tanty over the complexity of it's many problems.
Cheers dude, but my skills are nothing to be in awe of, it doesn't run yet, hah! I'm sure someone more familiar with these cars could have had it going in a couple of days, but it's been a hell of a lot of fun learning about the systems surrounding the motor, not to mention rotary engines themselves. I've pretty keen to keep an eye out for a motor with low compression to tear apart and have a play with on the bench.
Really want to get it going and on the dyno so I can do some logging on the twin turbo system, and really crack that side of it open. Would love to get it working properly on an aftermarket ECU. I'm sure switching to a single would have many benefits over this approach, but I just reckon it'd be fun to do. Plus, If I can get it working on a megasquirt, I'm sure there are plenty of other people out there that would like to do the same.
My connector research is almost complete for the base ecu->engine loom. Just the idle air control connector, the coil connectors, and the body loom connectors under the dash. I suspect the coil and IAC connectors are from the same manufacturer as the pins look the same. The body loom connectors look pretty familiar too, I'm just waiting for my mind to click to where I've seen them before, I can feel it working away. Then I'll get some nice Tefzel wire from MSEL and build a nice easy to work with loom for it
. I found the ECU connectors too, so if I do ever change the ECU I can build the new one with the right connectors so it's plug'n'play.It's back together enough to start, need to change the oil and plug the ECU back in, then I can see if it runs. Cross your available appendages for me!
-
6
-
-
- Popular Post
- Popular Post
"Hey Zac, see that open entrance to the motor where the oil filler bolts on, it'd be pretty funny if one of those m6 bolts that holds the fuel lines in place flicked off the top of its thread and sailed in there wouldn't it?".
"Hahahaha, yeah Zac, that'd be pretty funny, buts there is like NO chance of that happeni... AHHH FUCK!!".
"Told you so, idiot".
"You are soooo fucking lucky dude"
-
24
-
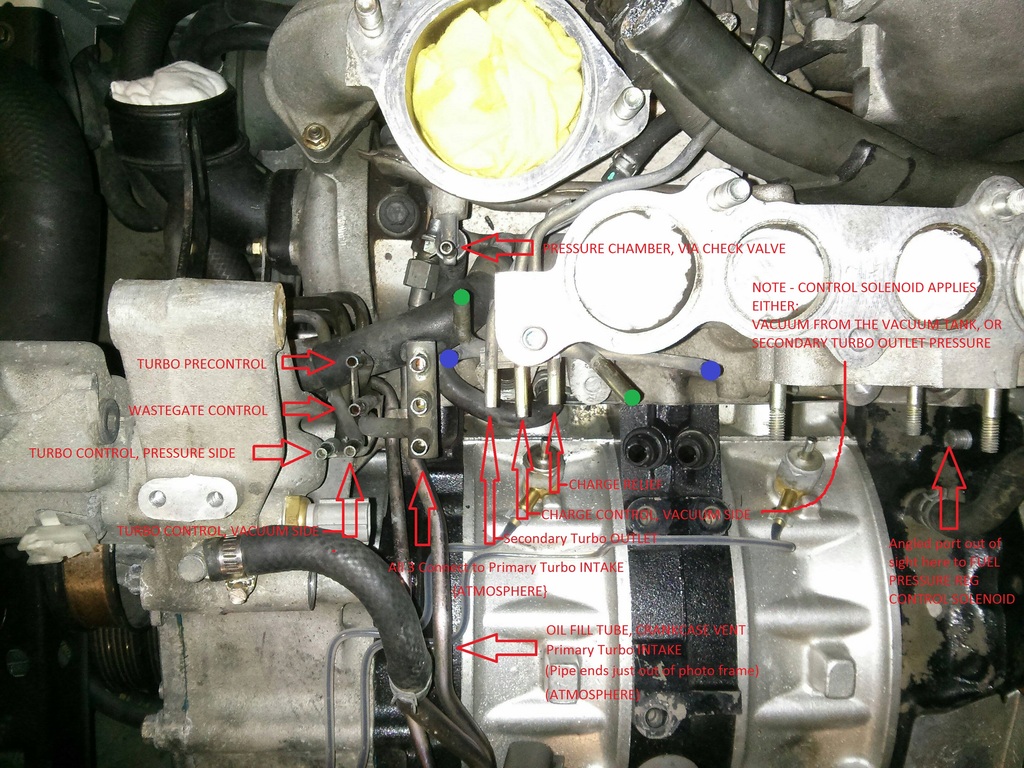
Some info for my reference later on.
Coolant Temp Connector:
http://www.te.com/usa-en/product-178449-6.html
Fuel Temp Connector:
http://www.te.com/usa-en/product-178449-4.html
Fuel Vapour Purge, Wastegate Control, Turbo PreControl and Turbo Control Solenoids, Intake Air Temp Connector:
http://www.te.com/usa-en/product-174352-2.html (Housing)
http://www.te.com/usa-en/product-174353-7.html (Insert)
Coil Loom to Body Loom Connector:
http://www.te.com/usa-en/product-174259-2.html (Housing) (Coil Loom Side)
http://www.te.com/usa-en/product-1-174260-1.html (Insert) (Coil Loom Side)
http://www.te.com/usa-en/product-174257-2.html (Housing) (Body Loom Side)
http://www.te.com/usa-en/product-174258-7.html (Insert) (Body Loom Side)
Oil Metering Pump Loom to ECU Loom Connector:
http://www.te.com/usa-en/product-174657-2.html (Housing) (Oil Metering Pump Side)
http://www.te.com/usa-en/product-174658-7.html (Insert) (Oil Metering Pump Side)
http://www.te.com/usa-en/product-174655-2.html (Housing) (ECU Side)
http://www.te.com/usa-en/product-174656-7.html (Insert) (ECU Side) (Original is White, but they only seem to be available in Yellow)
Knock Sensor Connector:
http://www.te.com/usa-en/product-174877-2.html (Housing) (ECU Loom Side)
http://www.te.com/usa-en/product-174878-7.html (Insert) (ECU Loom Side) (Original is White, but they only seem to be available in Yellow)
http://www.te.com/usa-en/product-174879-2.html (Housing) (Knock Sensor Side)
http://www.te.com/usa-en/product-174880-7.html (Insert) (Knock Sensor Side)
Seals for above connectors:
http://www.te.com/usa-en/product-172746-1.html
Contacts for above connectors:
http://www.te.com/usa-en/product-171662-1.html (Female) (16-20 AWG)
http://www.te.com/usa-en/product-171630-1.html (Female) (20-24 AWG)
NE and G Eccentric Shaft Position Sensors, Air Pump Connector:
http://prd.sws.co.jp/components/en/detail.php?number_s=61950003
Throttle Position Sensor Connector:
http://prd.sws.co.jp/components/en/detail.php?number_s=61950030 (Appears to be obsolete, but still available non-genuine)
Injector Connector:
http://prd.sws.co.jp/components/en/detail.php?number_s=61950043 (Appears to be obsolete, but still available non-genuine)
Contacts for above connectors:
http://prd.sws.co.jp/components/en/detail.php?number_s=81001428 (14-16 AWG)
http://prd.sws.co.jp/components/en/detail.php?number_s=81001429 (18-20 AWG)
http://prd.sws.co.jp/components/en/detail.php?number_s=81001427 (22-24 AWG)
Seals for above connectors:
http://prd.sws.co.jp/components/en/detail.php?number_s=71650210 (1.1-1.5mm Diameter Cable)
http://prd.sws.co.jp/components/en/detail.php?number_s=71650118 (1.5-2.0mm Diameter Cable)
http://prd.sws.co.jp/components/en/detail.php?number_s=71650119 (2.0-2.9mm Diameter Cable)
Solenoid Rack Connector:
Contacts for above connectors:
Coil Connector:
Contacts for above connectors:
Seals for above connectors:
ECU Connector:
http://www.te.com/usa-en/product-316019-6.html (28 Position)
http://www.te.com/usa-en/product-316016-6.html (22 Position)
Contacts for above connectors:
http://www.te.com/usa-en/product-175265-1.html (18-22 AWG) (Tin)
http://www.te.com/usa-en/product-175266-2.html (18-22 AWG) (Gold)
[Editing this as I go to keep it all in one place]
-
2
-
-
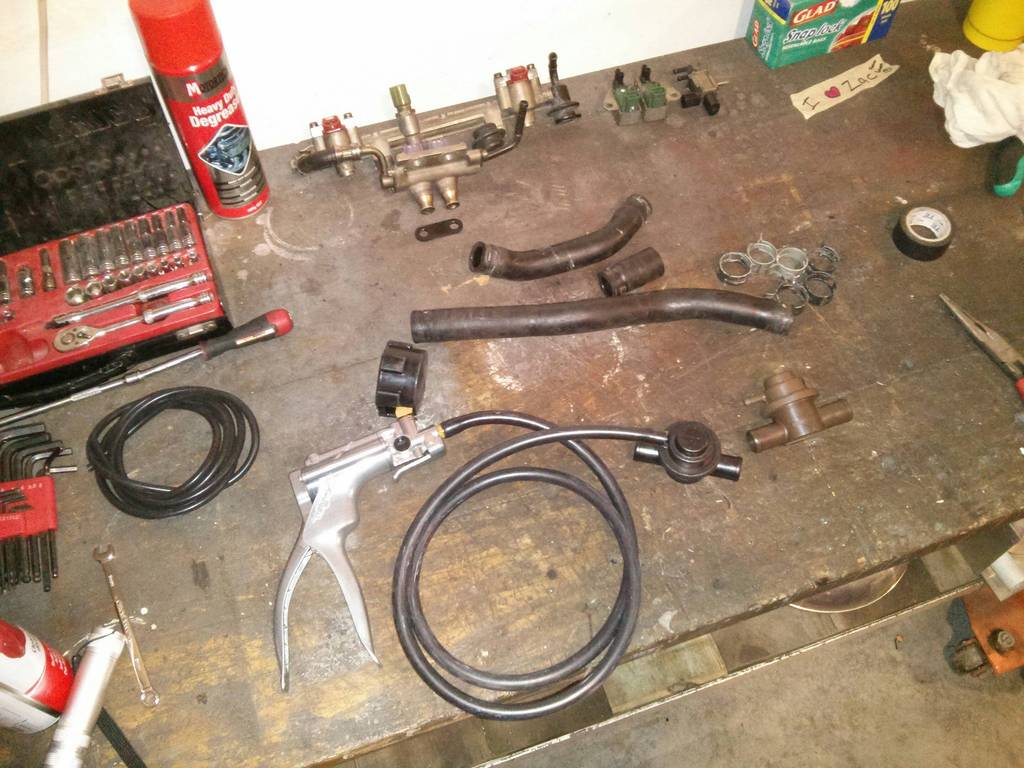
http://www.eastwood.com/mityvac-silverline-elite-test-hand-pump-kit-mv8500.html
They're not actually as expensive as I thought. Might have to pick one up myself.
-
Where did you get your vac / pressure tester from?
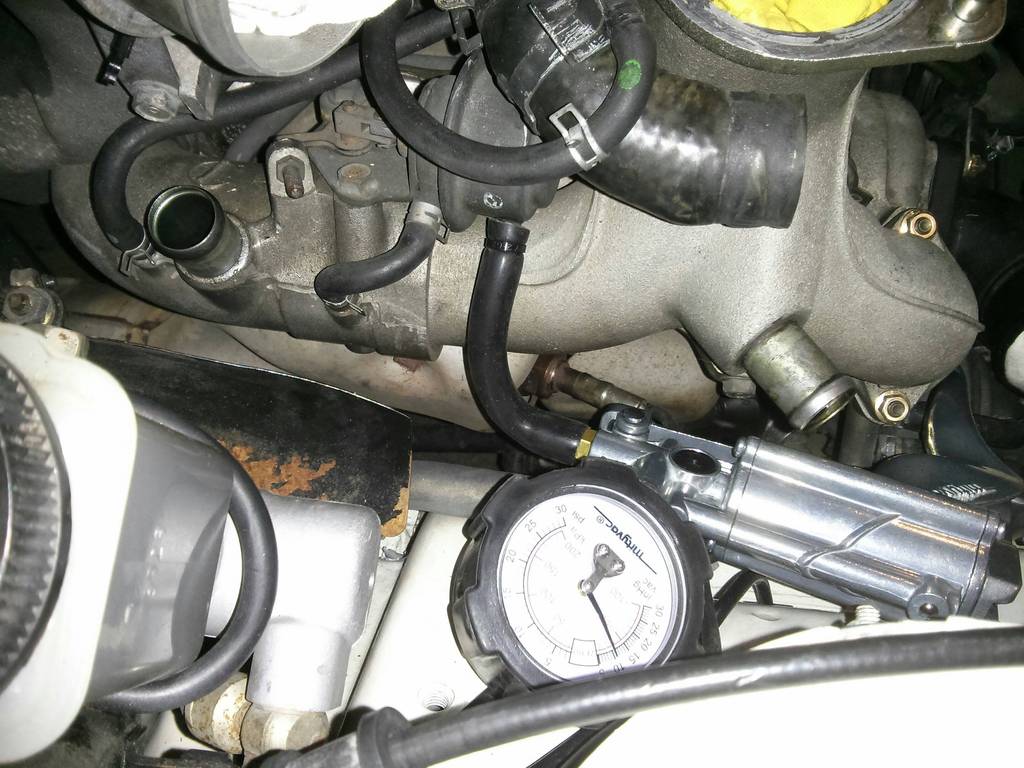
I've borrowed it from Uni, will have to get it back to them next week. It's one of these though:
Seems like a damn good unit, being able to do both pressure and vacuum is so damn handy!
-
A link would certainly be a good option, and I considered it pretty hard, but they can't run the sequential turbo system out of the box, so a single turbo conversion comes along with that decision. I'm pretty sure I'd be able to get either a Link or a Megasquirt to run the sequential system, but I'd have to do a bit of datalogging to confirm when all the valves and what-not switch... And this required a running car
. Most of the information on how to do it is in the USDM Series 6 FSM though. It's pretty tempting to give it a go at some stage, as I havent been able to find any info on people getting the sequentials going on a non-power-FC ECU... But it can;t be that hard, because the power FC can do it!I'm on the hunt for another series 7 loom, as I really really dont like how hard the factory one is to work with... Where they have branched and routed things seems to make no sense, except form a budget point of view. I'll try and collect all the plugs I need, see if I can source new pins and re-build one I think, with decent covering, keep it small and route it more logically.
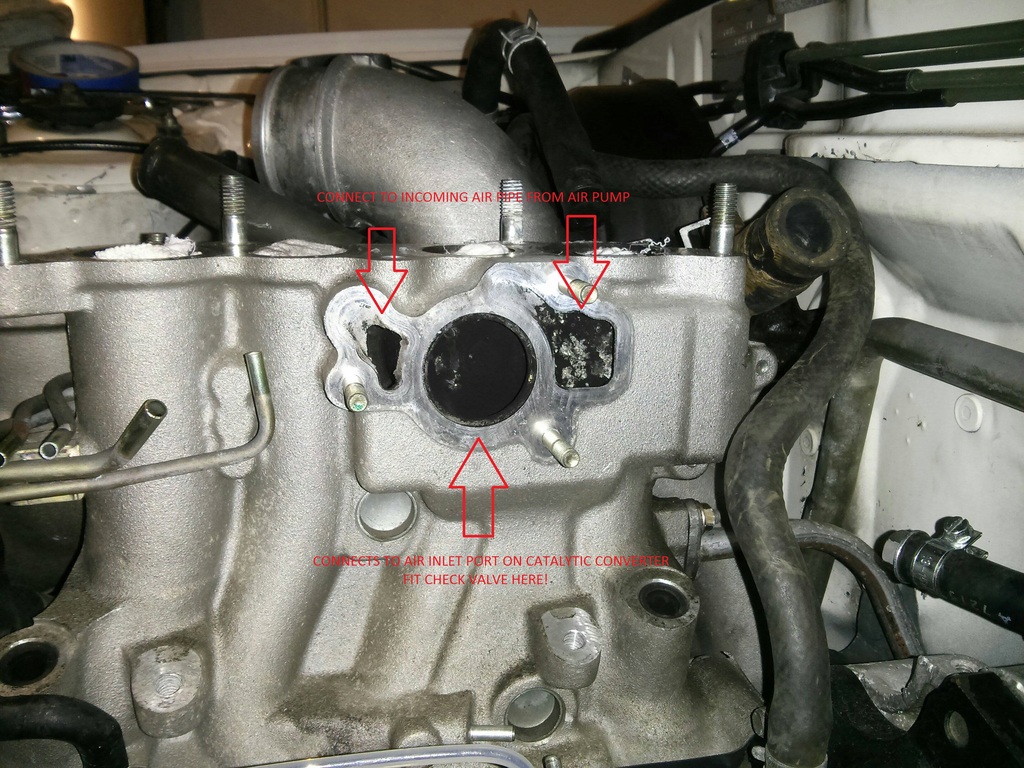
BUT, the loom that I have will get it running I hope. It's all in there and plugged in, just a bit more plumbing and finishing to do, then I can see if it goes. Fingers crossed? I've also just realised that I forgot to install the check valve in the secondary air system, so I have to remove that valve body and put that in, which requires moving a bunch of other stuff first, whoops!
-
1
-
-
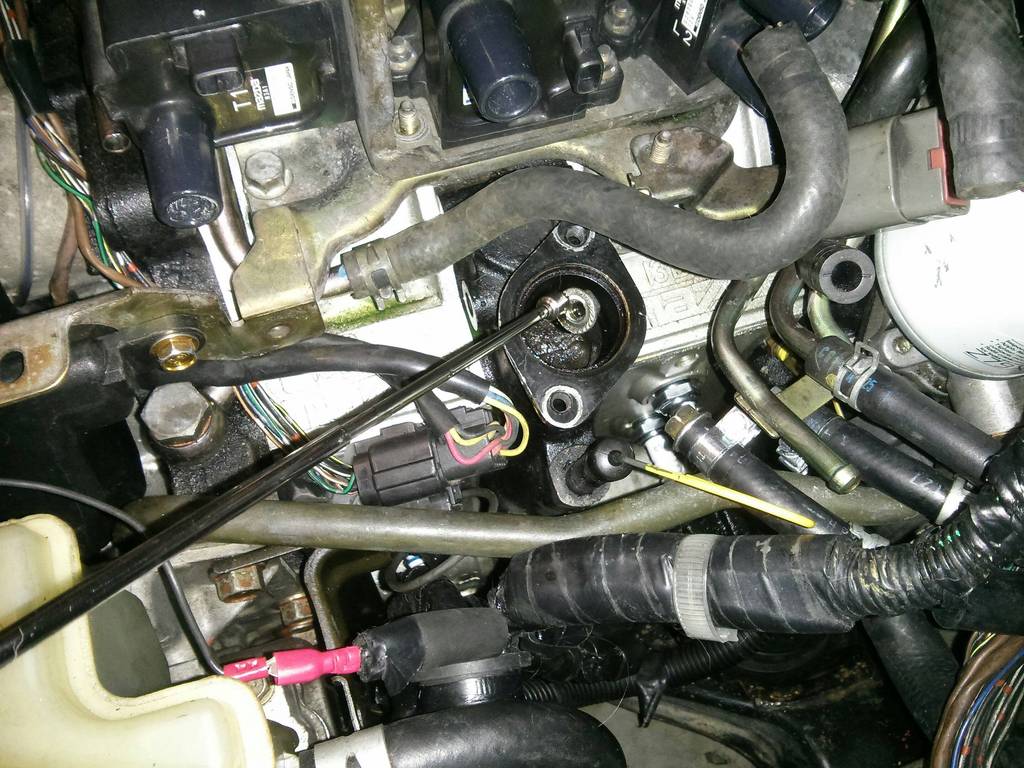
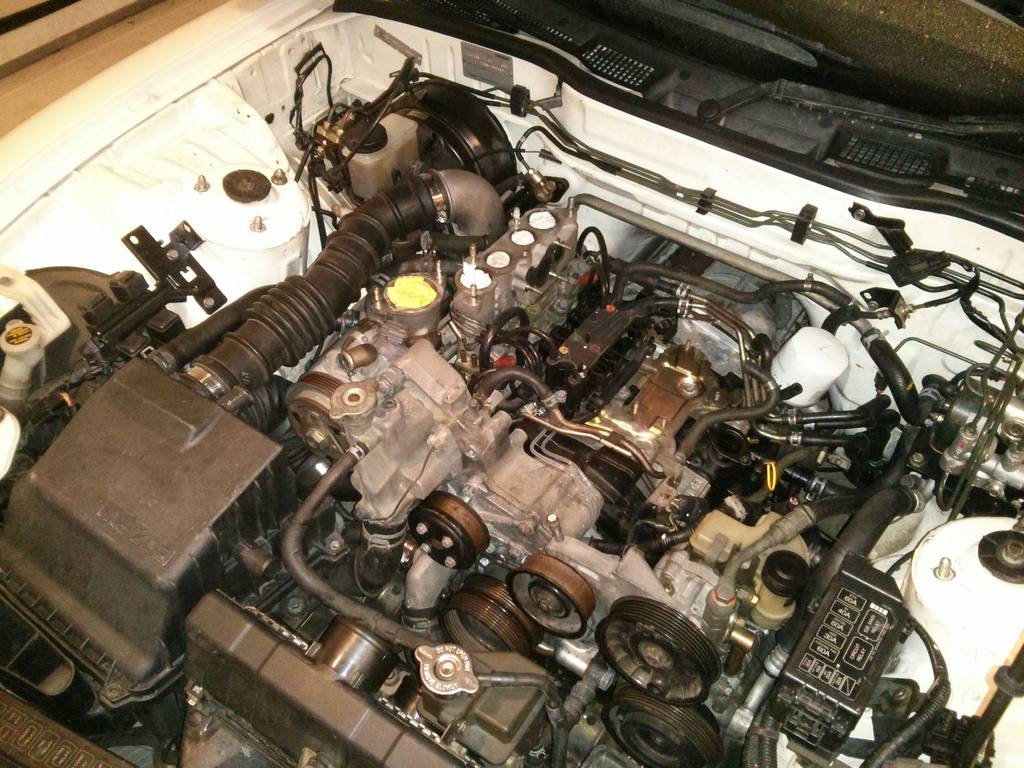
Squeezed in a couple more hours today.
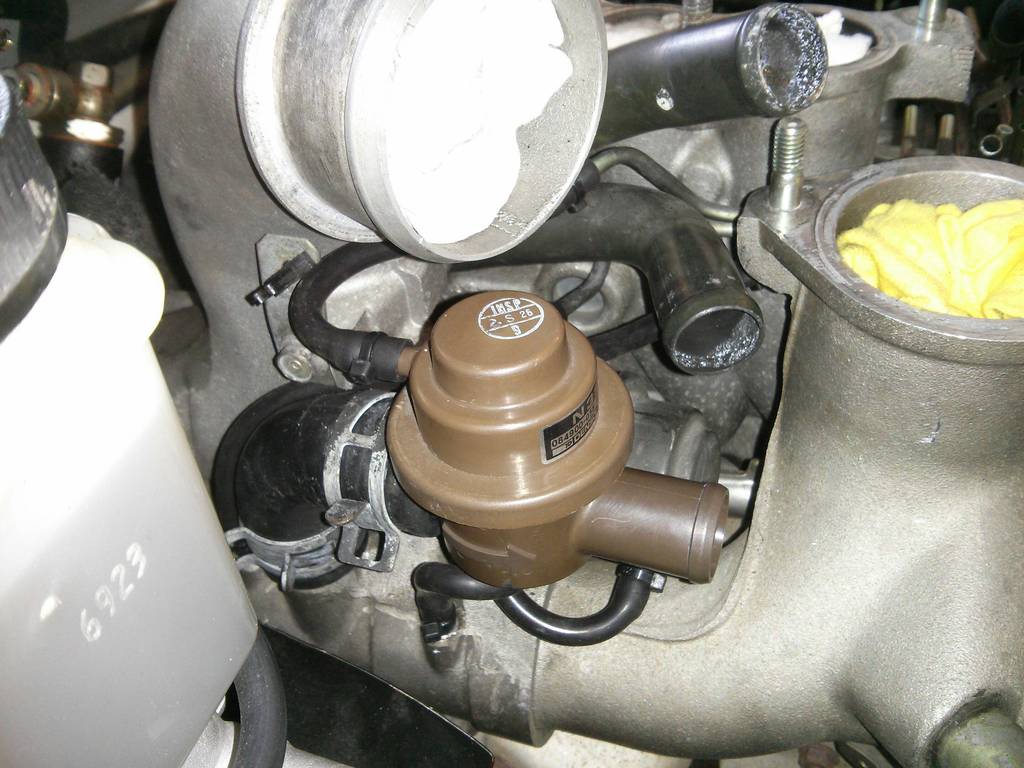
Got the oil injection valves plumbed, They've got check valves built into them (which I've just realised I've forgotten to check!), the plumbing on them is just for evaporation emission purposes I believe. Added in the line which goes to the fuel pressure reg control solenoid too, as I won't be able to get to it later.
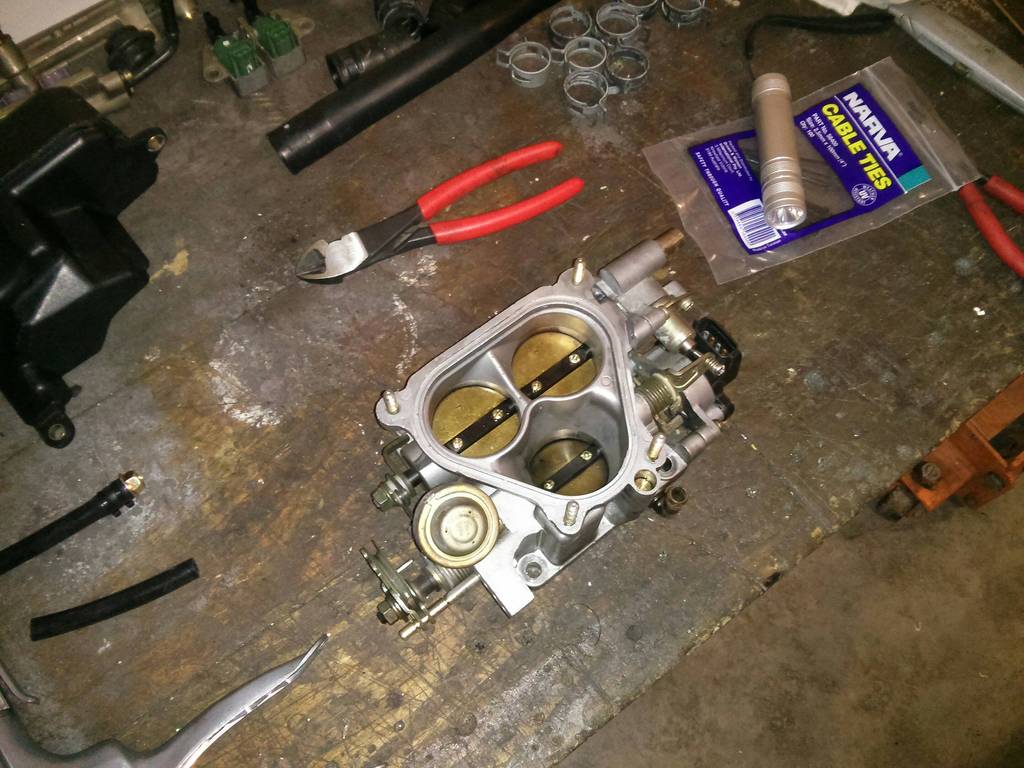
I got the injectors in place, the solenoid block mounted, and started plumbing that in. I'll have to un-bolt it to get the loom in place, but the lines have enough flex to let me leave it plumbed up.
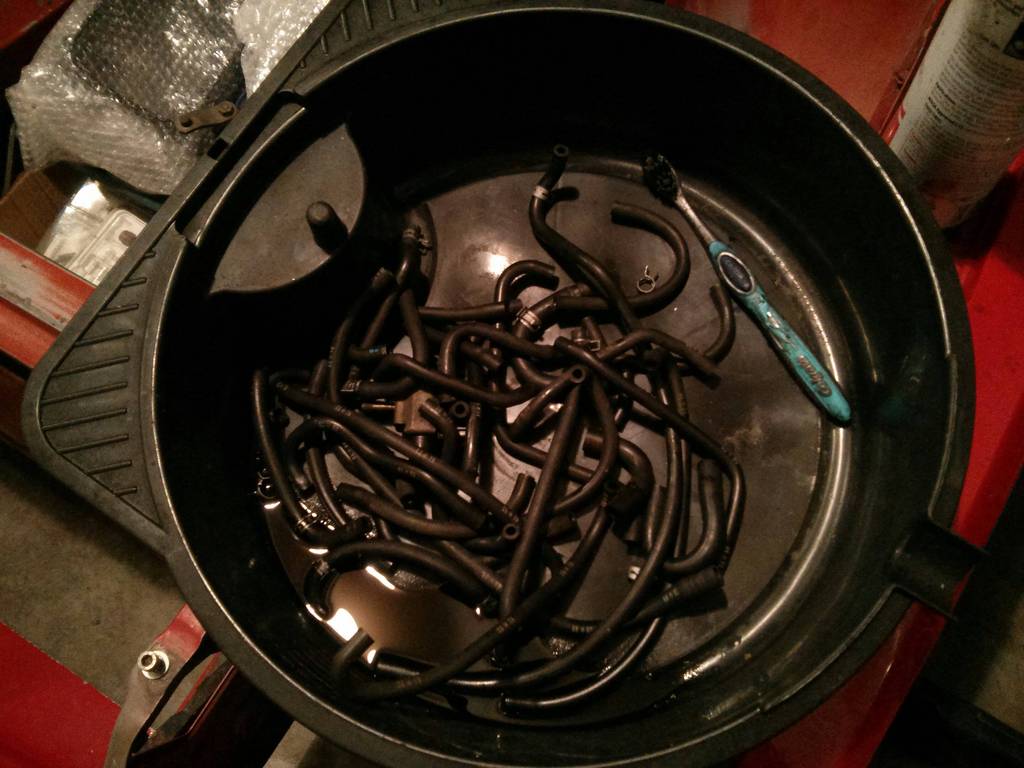
All the old vacuum lines. A few of them are cracked, all of them are super hard and brittle.
Air box and turbo inlet plumbing back in. I made sure to remove the rags from the turbo inlets! I got a replacement secondary turbo inlet pipe locally, guy had the check valve for the pressure chamber too, score
.
It's *possible* I might be able to start it up again tomorrow. I need one new belt as I stuffed one getting it off, and one of the HT leads was in not too great shape, so I might try to track down another set of those. I don't think I'll re-wrap the loom quite yet, as I could yet still have issues. It's not a major to get it out again and wrap it anyways
.
-
6
-
-
Dammnit man, sold plan.
-
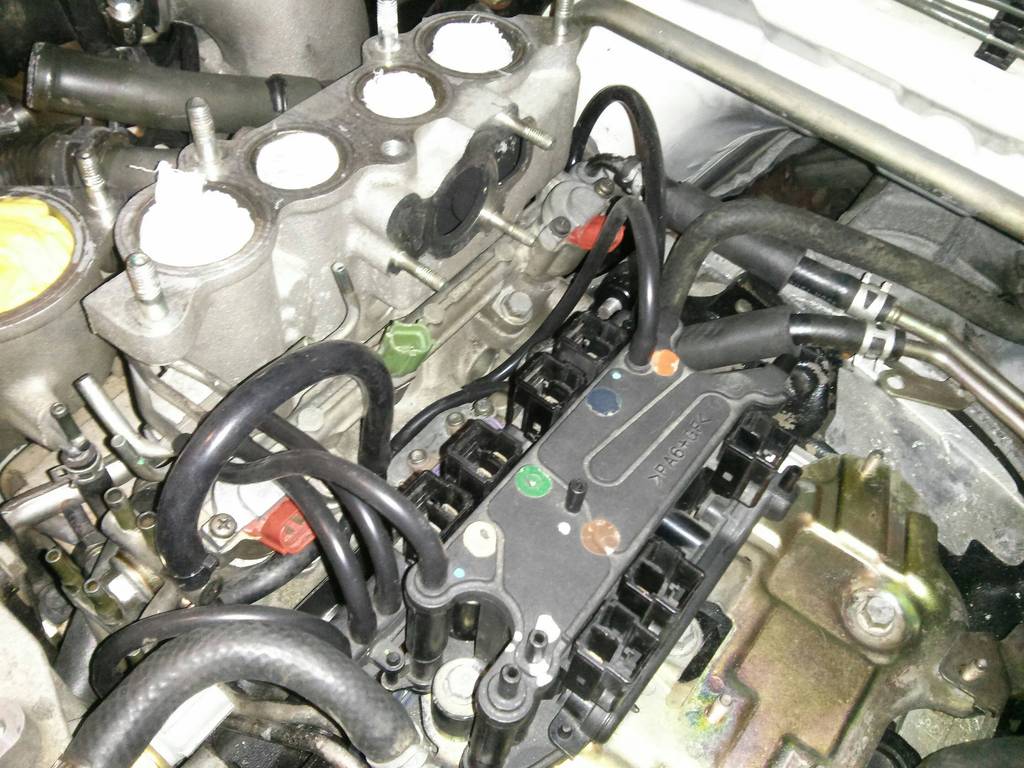
Did a bunch of Uni work at home today, so split some time to work on this for an hour or so aswell.
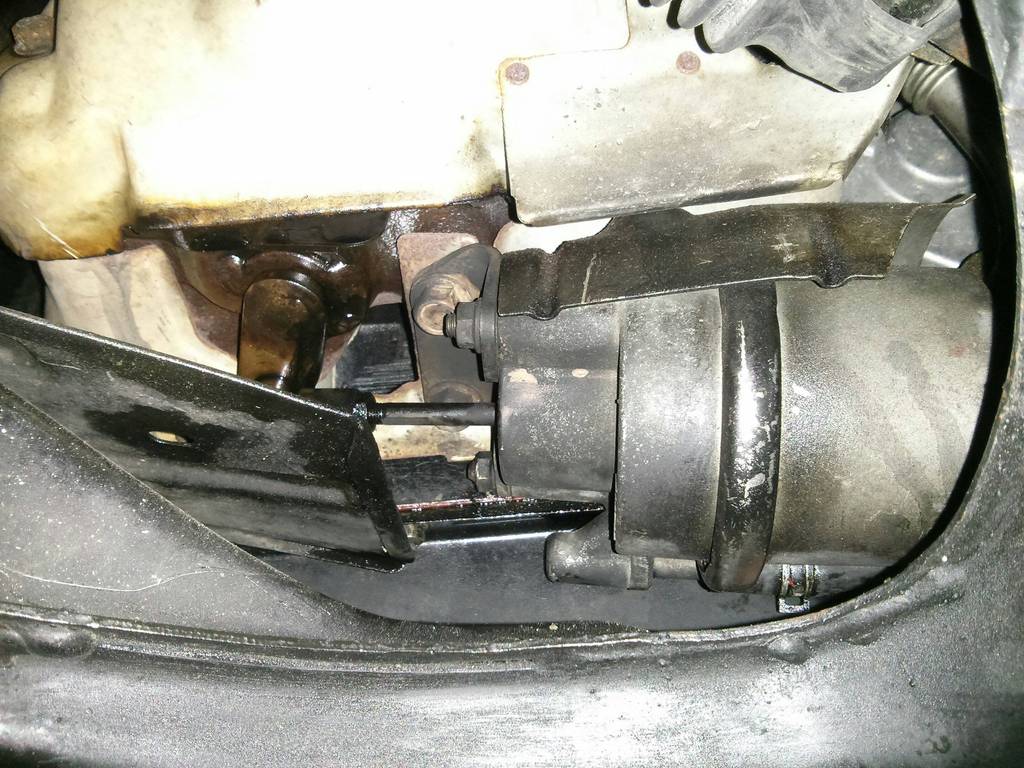
Tested the Turbo Control Actuator, on the pressure side, functioned correctly. I tested the vacuum side too, didn't climb under the car and actually observe the valve, but the line did hold vacuum.
Plumbed up the actuator side of the metal pipe manifold that feeds the Charge Relief system.
Installed and plumbed in the Charge Relief Valve.
Updated my vacuum port reference map.
Will hopefully get a bit more time after dinner to have a further play, can hopefully get the injectors installed, secondary air system back together, Air Bypass Valve (blow off valve) installed and start in on the solenoid block.
-
5
-
-
Wasn't really tired when I got back from uni in the wee hours this morning, so spent some time in the garage. Once again, this post is more for my reference than any actual progress.
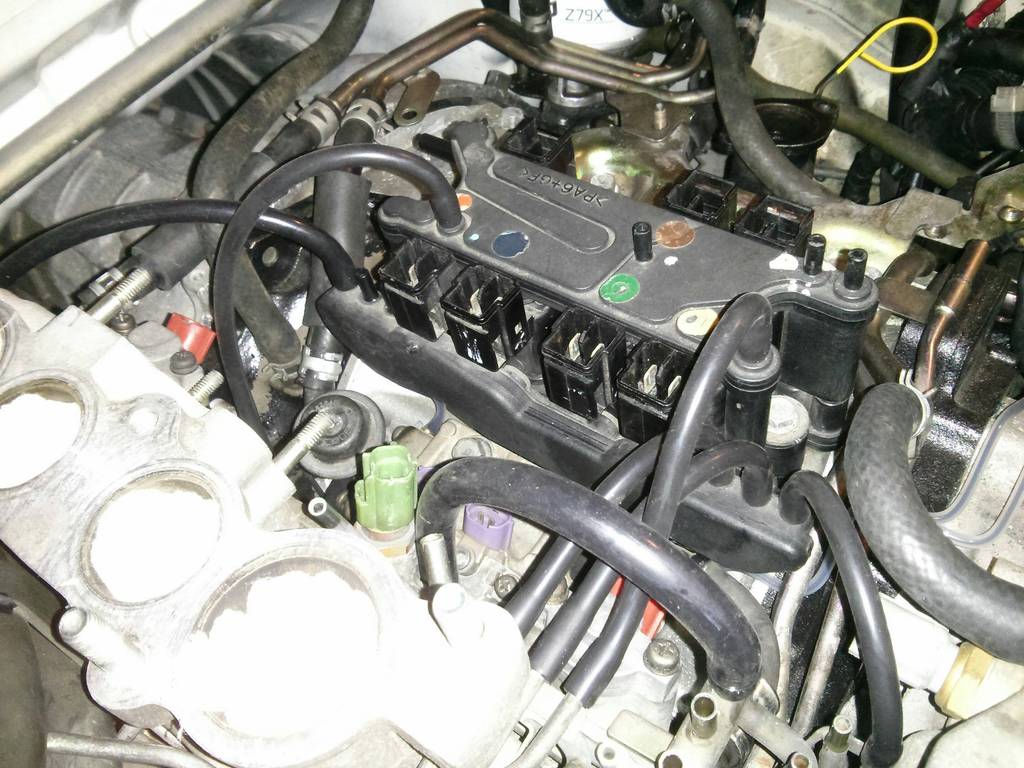
Air Bypass (Blow Off) and Charge Relief Valves both tested and functioning correctly.
Vacuum Tank tested and held vacuum fine.
Pressure Tank tested and held pressure fine.
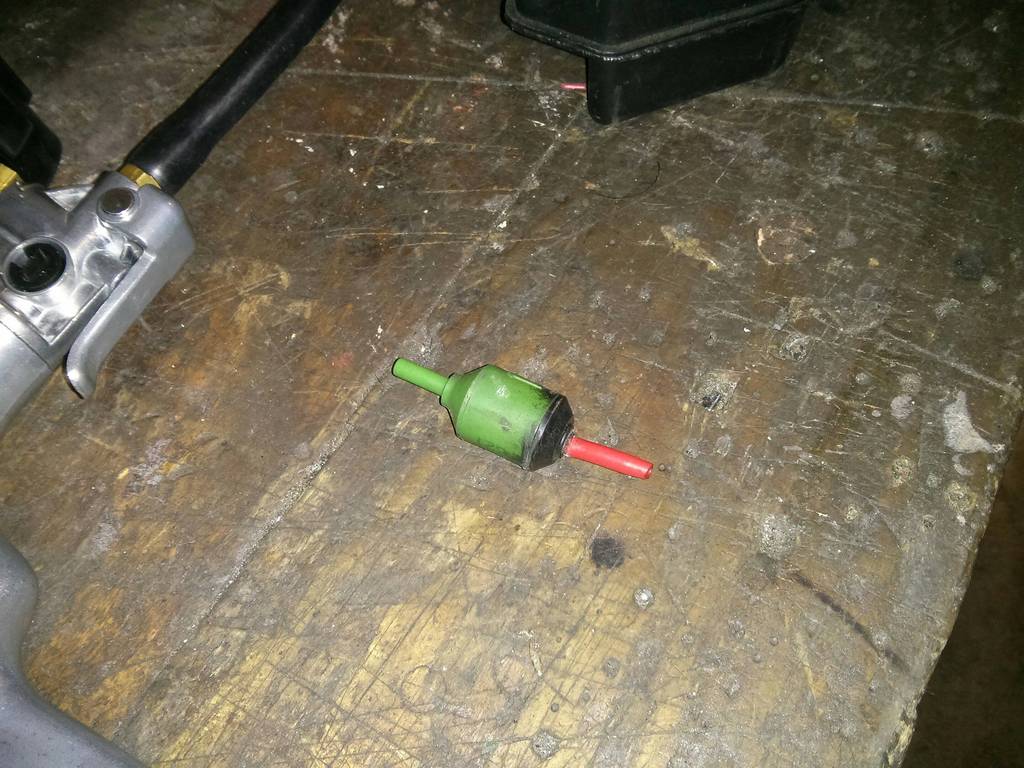
Check Valves that goes inline with the Pressure Tank is fucked, will need to source another.
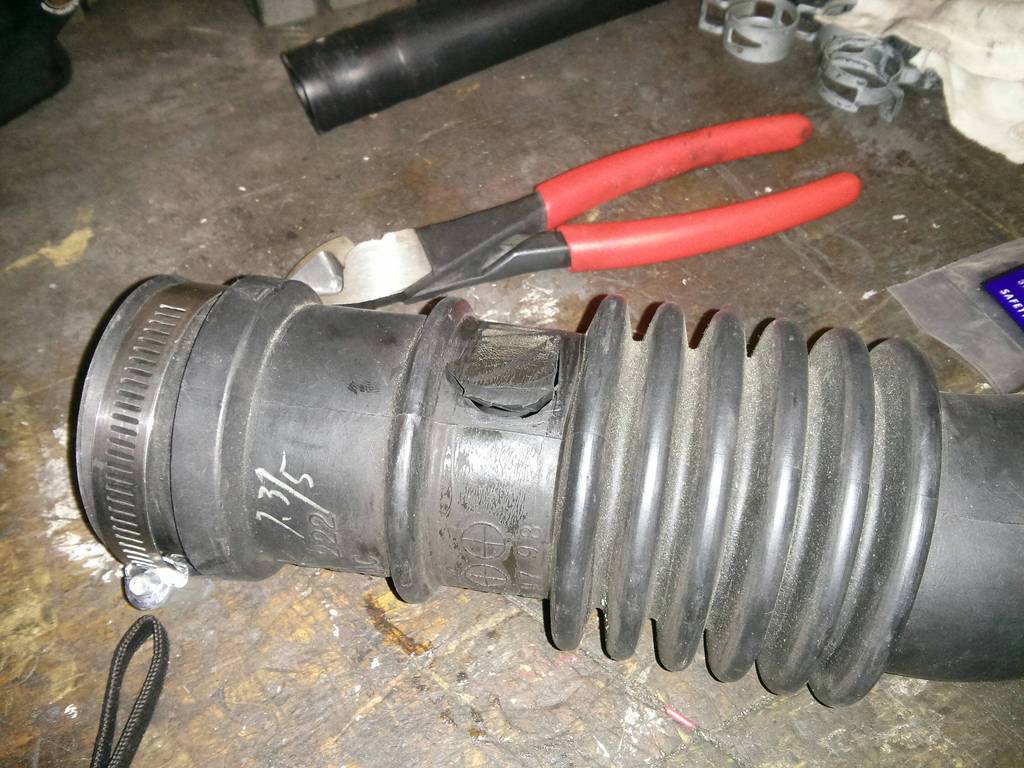
Airbox to Turbo Intake accordian pipe is fucked, will need to source another.
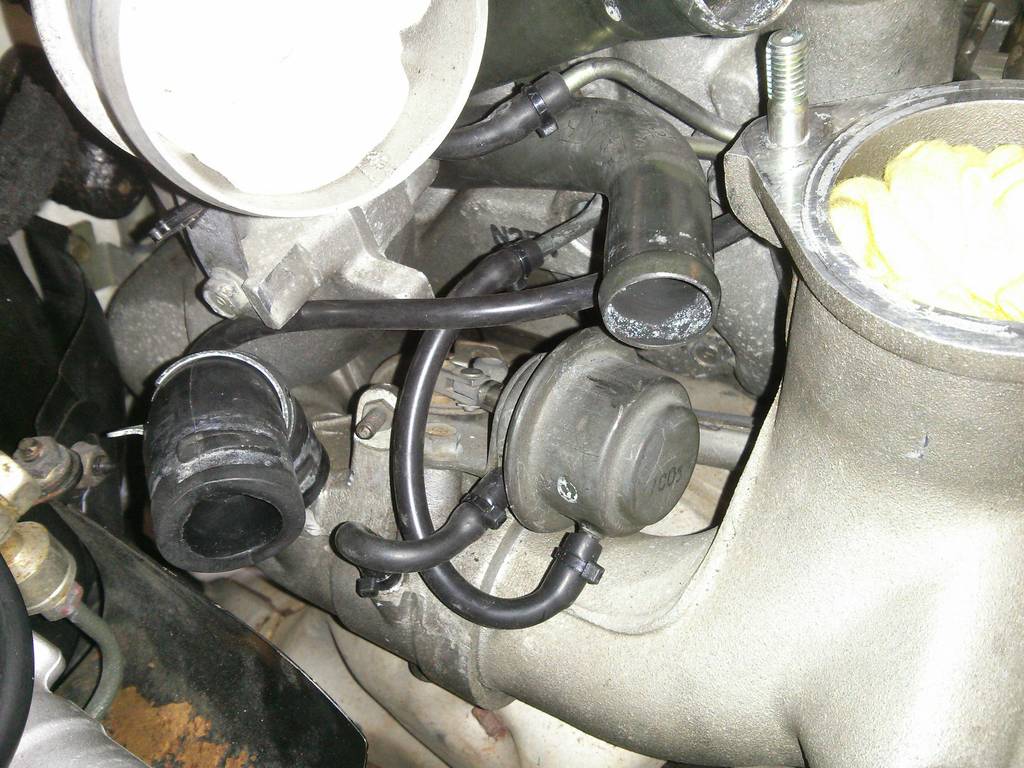
Figured out how the Secondary Air Injection system is routed through the manifold.
Tested the Secondary Air Injection unit and is functioning correctly.
Tested Deceleration Control Dashpot and is working correctly, however will need to be set once the car can be run to normal operating temp. Cold start system looks like it's bee played with, set to somewhat logical settings, but will need to reset once car can be run and warmed up.
Tested both Wastegate Control and Turbo Precontrol Actuators, both hold pressure and function correctly.
Tested Charge Control Actuator and it's functioning correctly.
Just need to test the Turbo Control Actuator now, but its a pig to get at, will jack car up and get at it tomorrow. Started re-running vacuum lines, but really need to remove the secondary turbo intake pipe to get to a couple of the barbs, will also do that while car car is jacked up.
-
7
-
 .
. .
.


 . The electrical system was rock solid reliable, which was my own personal goal for my part of the project. I also undertook a lot of the engine tuning... Tuning a turbocharged single cylinder raciing dirtbike motor with an aggressive cam is not something I'm looking forward to ever having to do again. Very very pulsey and lots of challenges to overcome. We got a great result in the end though, with lots of mid-range to top end grunt which is what we really needed to meet our goals. Shame it still sounds like a lawnmower, hah. Car is a full carbon monocoque, with a very effective aero package. Weighed just shy of 200kg's, made just over 40kw's (all the air has to pass through a 19mm restrictor).


Zac's 1998 RX7
in Other Projects
Posted
Cats out of the bag then eh? Thus my strong words that FSAE is the best thing I've done, ever, period (except meeting Laura and getting married, yaadaa yaadaa yaadaa). If you get the chance, get involved. The people are Awesome. The competition is Awesome. The cars are Awesome. This job is a unicorn, and so far it's every bit the dream I was hoping it would be.
I did get another job offer out of being involved with FSAE. Not automotive related, and more 'conventional', but still an amazing graduate position. The opportunities are out there. Get involved. Do it.
Also, that article makes David seems marginally arrogant. He's really not, he's a bloody smart dude, and knows what he wants, which we're there to help him achieve. He's got a good sense of humour, and is a car nut like the rest of us. One of the other guys that has come on board was working on his supercharged MX5 in the workshop this evening, and David was right there alongside, talking car shit with us. Good times.