


Bananaman
-
Posts
100 -
Joined
-
Last visited
Posts posted by Bananaman
-
-
8 hours ago, Stu said:
Would it be possible to have a return on the bottom edge of the dash panel and have them underneath on that instead so they are hidden?
Dont think that would work since there is limited pivot in the connection to be able to clip the bottom lifting upwards and then tilting backwards. (if that makes sense) Looking at it again last night I think it it the right move to trim the bottom and make it a little shorter which aesthetically is going to help, that and trimming the dash pad down on the bottom of the ends to thin it more so it doesnt sit so far down at the edges.
The goal here is not have to relocate the reservoirs for the pedal box for cert. "Easily accessibly" is the goal.
-
Thanks. I think trimming some of the lower edge making them seem closer to the bottom might help too.
-
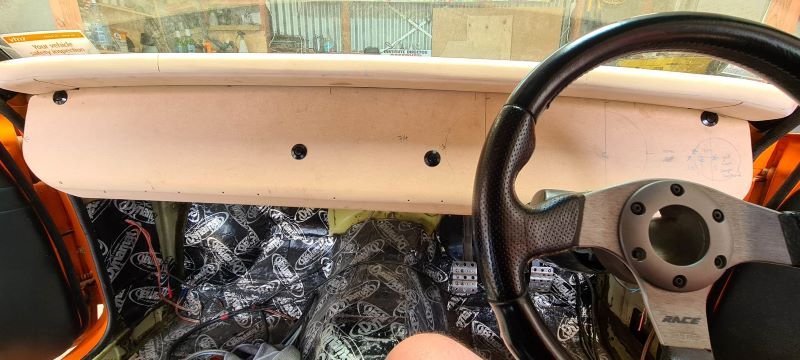
Quick release steering wheels were very 2000's but quick release dash's are going to be 2023.....
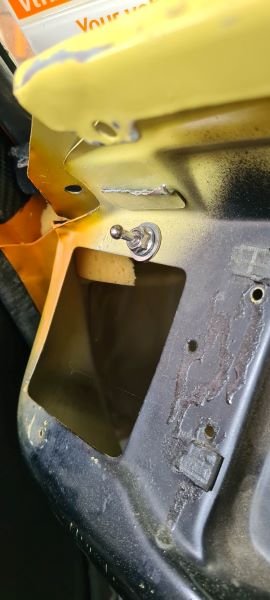
Looking for opinions on the centre. I needed to find another at least one mounting point to make it stable. In order to get the clips to work they need to be fitted perpendicular to the mounting surface within reason and recessed. So the KE20 has two factory screw points in the middle of the dash that the clips as luck would have it screw straight into. (this could almost be a complete replacement package fully reversable for standard KE20)
Wondering what everyone thinks of having the middle two quick releases in the centre of the dash. Will be black vinyl finish with the black anodizing as per my concept above. Other option is bracket the mounts and move them to a more discrete location.

-
 7
7
-
 1
1
-
-
- Popular Post
- Popular Post
So working towards a dash. Here is my "artist impression" lol.
I did rough cut the bezel to size everything and looked good. Going a little hot rod style I guess but that is mostly the theme for this car. Will get it water jet cut in stainless and polish it all up with the bars and logo the installed into a black vinyl
-
12
-
- Popular Post
- Popular Post
Managed to get into this again over the weekend. Hoping to keep momentum high on the car now that I have a wee bit more time.
So before I could get back into the custom dash I had to take care of the steering components so I could check the location of the steering column. I had alot of parts replaced at the beginning of version 1 which meant this wasnt a massive task but the steering box is really the piece I wanted to deal with as it was covered in oil and paint and we quiet frankly not going to work for me. Phase one is clean up, mock up then I will have it sent to Christchurch for a rebuild.
Before and After
Steering parts all cleaned up.
Some painting and they look like new.
So once I had all that cleaned up and could install the steering box back in the car I decided I should clean all the bolts, re tap the holes so everything fits as new.
Then turned my attention back to the dash. Some smaller details coming together first.
Now I have the basic shapes I will start working on the return down the sides above but got the steering column relief cut in.
Next will be the bezel for the gauges. I want to make two so I can install a digital dash and remove to put the Autometer gauges back in for compliance.
-
10
-
- Popular Post
- Popular Post
Since I have finally been able to install the sway bar with all the correct parts and clearance I need maybe I should update this thread.
So as above I have used a KE70 sway bar which mounted to the KE20 mounting locations but the ends were 15mm too wide so had a local engineer bend it up to fit.
I had a friend machine up some aluminium sway bar mounts which I am going to have to refine as I miss calculated (fuc#!d up) the direction the castor rod is installed vs the sway bar.
So for now I have had a bunch of parts re plated to get this moving forward which I quietly contemplate what the end game here is.
Freshly powder coated the sway bar
This is the final looking castor / sway bar mounting solution for now until I sort machining the aluminium mount the way I want it.
Had to lift the back of the sway bar to clear the castor arm so just sourced this end link vs the ones you see in previous pictures.
But it all works and gives me the clearance I need to install the motor and have a sway bar at the same time. WIN!
-
14
-
On 02/05/2022 at 12:32, AALAWS said:
There's two types of KE2X sway bar.....the later one has more of a bend I'm it....will that work for you?
I checked a KE30 one which has a dip in the front but it still didnt clear the sump

I have some sway bar mounts being CNC'd at the moment. Once I have them I will post up a complete build process on getting it to work. Im a little torn as having a 26mm front sway bar is going to change this car into something else. What that is I won't know until the first drive which is going to have to be a tame one as I think it will just promote the back to break loose more!
Will also draw your attention to the donor car you got.
Looks like the wheel position is consistent with what you have now.
-
1
-
-
- Popular Post
- Popular Post
Some progress is still being made on this for those wondering. It does take a lot of my free time to work on this which is limited at best so chipping away at it.
Trying to work on the new dash layout. I was just not a fan of the dash that was made for this car and think I can do better. So I started getting stuck in to see what I could come up with. Being it is an old car trying to piece together an original dash was going to be complicated and frankly I don't like it either.
So this is what it looked like to begin with.
So set about creating a top dash pad as I wanted something that overhung the gauges as sunlight and the location of the gauges was just not ideal. Face fixture first. The rough cut and simple flat face.
Refined the shape a little more and attached an additional piece so I can shape the curve on the lower edge.
Laminated some pieces up for the dash pad.
We glassed the back of the dash pad so it could be shaped and still hold its form. For the most part I am pretty happy with the final shape it is taking.
From this I will turn my attention to the flat face, adding contour to the lower edge, wrapping it around the sides of the dash frame and adding a bezel of sorts to the gauges aren't just planted on a flat surface. This is intended to be a plug for me to take a mold off so I can have a full fiberglass one piece made. No point in going carbon which was a consideration as this is still a road car and the dash is required to be padded for certification.
New bits should arrive in the next 2-3 weeks for the custom sway bar install in the front which I have been quietly working away on.
-
18
-
Bugger, build looks good though mate.
-
Not sure if you have sourced it already but I had a great tip for the idle control valve.
You can source the bosch idle control valve from euro cars. I picked up one with mounting bracket, pig tail and the valve off a BMW at pick a part for $20.
-
1
-
-
So turns out with the motor in the Ke30 bar is just not an option as it does make contact with the sump when the engine is installed.
So where I am at. Ke70 Sway bar. KP61 sway bar mounts. Ke70 Bushes which is enough to mock everything up and get measurements for some custom sway bar mounts to locate it centre of the hole it passes thru in the caster arm mount.
The bits, the Ke20 stock sway bar vs the ke70 one. Will use the Ke20 bar as a guide for bending the ke70 to fit properly. (Yes the ke70 is not direct bolt on)
Bushes in the KP61 sway bar mounting brackets
Mockup to adjust height
Note the KP61 sway bar mounting bracket is a 60mm centre to centre mounting holes, the Ke20 uses a 55mm centre to centre mount so I had to squeeze the bracket in slightly to get it to bolt up straight. All this was only to mock up so I can have a bracket made.
Installed in the car and clearance for the sump.
And while I was at it I decided it would be a good time to mockup the new turbo setup to ensure nothing had issues going in and I have room for downpipe etc.
Turns out there is plenty of room to play with changing from bottom mount to top mount. (totally excited about this bit as the last dump pipe setup was just crap and wouldn't have flowed well)
So I have ordered fresh whiteline sway bar bushes so I can get the correct dimensions to have the sway bar bracket cnc'd. Take the Ke70 sway bar and the stock one to my local engineer and get him to bend it to suit (note it is 20mm out each side so this is not a major mod to make it fit.)
-
9
-
-
- Popular Post
- Popular Post
Been absent for a while so here is a small update for those following this.
Been mostly body work for now, some suspension considerations and trying to piece together a sway bar that might fit my conversion as the factory one was removed in favor of getting the engine in which is not ideal.
Before.
During.
After.
About 10 hours per side which is crazy but getting there. Had problems sourcing transport to take it to the sand blasters so did underneath and the sides so I can start mocking up the suspension and sway bar.
And rejuvenating all the old parts. Some I havent shown in this thread will do a proper update at final assembly.
So now the mockup begins.
KE70 vs KE30. Most likely go with the smaller KE30 bar as it fits the car will less problems. Will update after the weekend as I drop the engine back in to check sump clearance.
-
10
-
Looking good mate, I am getting closer and closer to putting some of mine back together also.
You must be pretty stoked to be at this stage.
I have the added headache of trying to mount another sway bar up as the KE20 one doesn't clear the SR sump.
-
1
-
-
- Popular Post
- Popular Post
Must be time for an update how ever small it might be.
Been working on a few details and sourcing parts mainly.
Firstly, I have to relocated the brake and clutch reservoirs from the top of the pedal box to a location that is easily accessible for filling and monitoring. So my first thought was I need to move my gauges so I can put them in behind the dash up high enough they will still gravity feed the pedal box. Enter my first mission, new custom centre console.
Some CAD (cardboard aided design) first.
The cut it open and did a proper cad template and transferred that to a piece of styrene.
The styrene is easy to shape so a little heat and we had something that looked to work.
So next step was to lay out the gauges and switches I wanted to have in there and send it to the local waterjet man to have it cut. Luckily I work at a company that does roofing so folding the final cut piece was easy.
Now to template up the sides and mark out for the shifter to come thru. Once I have this piece constructed it is then time to pull the dash and begin modding it to what I want it to finally be.
Also started to put the front end back together with all new hardware with a very close eye on tolerances to remove excessive play in the old boy.
Final buttons and dash lights are on there way, have also acquired more crimp tools for the metri pack terminals so once I have all this in place I can mount the fuse box in behind the console which is also where I am going to mount the ECU. More of that to come later.
-
14
-
So after the last round of ups and downs I have some fresh bits to add to the pile I call a car.
Caster rods & mounts, bonnet hinges, engine mounts, tow hooks, gearbox x-member all looking great now
Can remove the rimu x-member once the sandblasting and painting happens. But I do have a nice shiny front x-member now.
And the most satisfying part fixing the LCA problems. New whiteline LCA bushes, ball joints and a freshen up.
-
9
-
-
Been hanging out for updates mate. Looks fucken amazing!
I kinda wish I did this to mine now
-
1
-
-
- Popular Post
- Popular Post
Posting more problems than solutions. But god damn who ever worked on this car prior to me needs a kick in the nuts!
Tearing down the front end for sand blasting / powder coating which will also let me replace bushes and ball joints as I go. However it would be useful if the removable parts could actually be removed!!
And how about reusing the dump pipe with my new turbo setup..... Nope, gas and a hammer seemed to make this one fit another chassis (there was no clearance issues in this car)
But one thing has worked out.
-
15
-
Some progress this weekend. (and some things I havent shared)
Cardboard aided design to water cut and painted engine lift hooks.
Had to install my bulkhead connections before I get the bay stripped and fix the fuckup that the previous owner has created with what looks like a sledge hammer #facepalm
Before:
After:
-
3
-
-
Sometimes taking a car back to a blank canvas is a good idea. In my case this is a great idea.
From engine mounts that were finger tight to burnt out electrics I am happy to be at the turning point. Only dealing with paint in the engine bay and radiator support panel so it is off to the media blasters to strip it back very shortly.
-
6
-
-
Nice work, watching also just for curiosities sake. Been in the construction industry for most of my life.
-
1
-
-
From concept to reality. Stoked to have picked this up today.
Still have to drill some mounting holes and then polish it up but so happy with the final result.
-
7
-
-
Been intentionally putting off the radiator update until I had a clear solution to my space restriction problem. Now I have an idea it is full steam ahead before I pull the engine out.
So plan is to make a fill pot like Nigels from ETS on his PS13. (pictured below)
So I am gathering materials and will post some pictures up once I have it all welded up. Should look cool and be totally functional.
Not much else happening with it just at the moment since I have other priorities but hoping to jump back into it soon enough.
-
7
-
-
3 hours ago, ajg193 said:
Put a bit of load on it, maybe it just isn't slowing down enough to actually park.
Success!
As you have pointed out it only needed a fraction more resistance to stop each time at the park position. Thanks for the guidance guys.
-
1
-
 1
1
-
-
28 minutes ago, ajg193 said:
Put a bit of load on it, maybe it just isn't slowing down enough to actually park.
Will try tonight. Thanks


Bananaman'S KE20 Rebuild
in Project Discussion
Posted
Just found them on Trademe.
https://www.trademe.co.nz/a/motors/car-parts-accessories/performance/other/listing/3894694448?bof=gIh3KavG