
- Popular Post


Not-a-number
-
Posts
236 -
Joined
-
Last visited
-
Days Won
7
Posts posted by Not-a-number
-
-
First job was to set up the TV arm correctly. Learning new things but it looks like the 700r4 really needs the cable set correctly or you can burn the trans out within miles
 Its not just a kick down cable.
The arm was completely wrong but luckily not in a bad way. Needs a 1in leverage and was set to about 2in so it was driving the line pressure up really quickly.

-
 3
3
-
-
- Popular Post
- Popular Post
Need a ute to carry moulds for the engine project. So I got a 67 El Camino.

Picked it up in Tucson and drove it back to CA without too much stress.
Has the original 327 with camel hump heads and a modern (/80s) 700r4 trans.
Ton of things to sort to make it a daily. Like it doesnt run very well! Timing feels off or vac advance isnt working. Carb seems way too big.
It looks good from a distance but dont let the fool you!
-
47
-
- Popular Post
- Popular Post
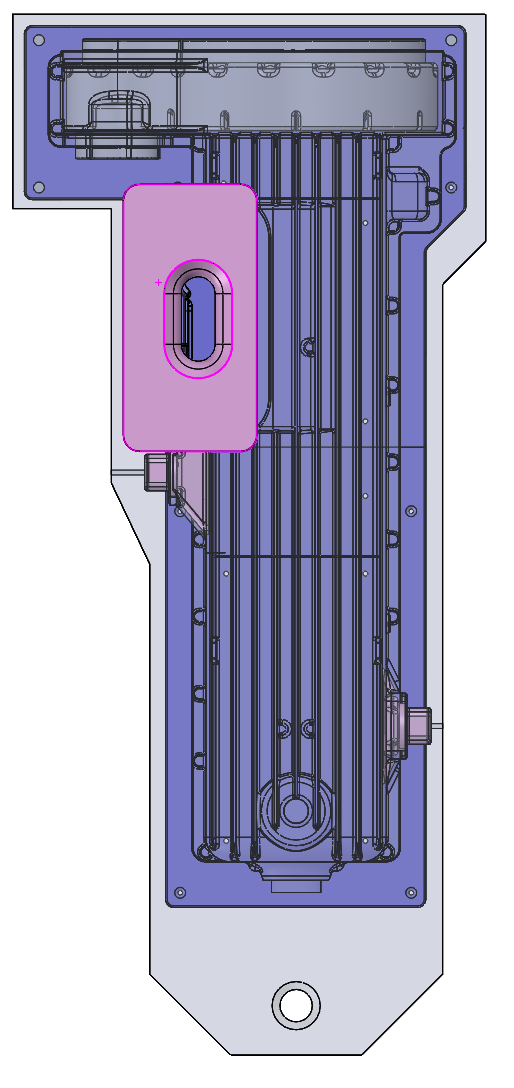
Main inner core pattern is complete. Will most likely do a partition in the middle of this one too.
-
26
-
4 hours ago, flyingbrick said:
Amazing. Is it going to banana when removed off the plug?
Hopefully not.
Its going to take quite a bit of squashing on the sides to get it finished before we can see if thats a problem.
-
1
-
-
10 hours ago, flyingbrick said:
This is getting more and more incredible!how would they have made rails in the factory? Surely they wouldn't have had access to a press large enough to do it in a few stamps like they do these days?
Im pretty sure, from what I've seen of other chassis (and what Pur Sang do), that they would have used a lot of heat and a lot of guys with big hammers. Thats just way too hard work for one person though!
9 hours ago, CUL8R said:My hat is off to your dad
How thick is that plate for the chassis? 2.5-3mm? Looks laborious, his neighbours must love him lol
Its 4mm!
-
2
-
 2
2
-
-
- Popular Post
- Popular Post
Chassis Update:
My Dads been working away on this when he has a spare minute.
Been making various press tools and working out a process.
Starting to look like a chassis rail! Not the easiest way of doing it but definitely the most authentic!
")
Also if anyone needs a clock or a barometer restored hes your go to. As long as it doesnt take away chassis building time!
-
58
-
7
-
- Popular Post
- Popular Post
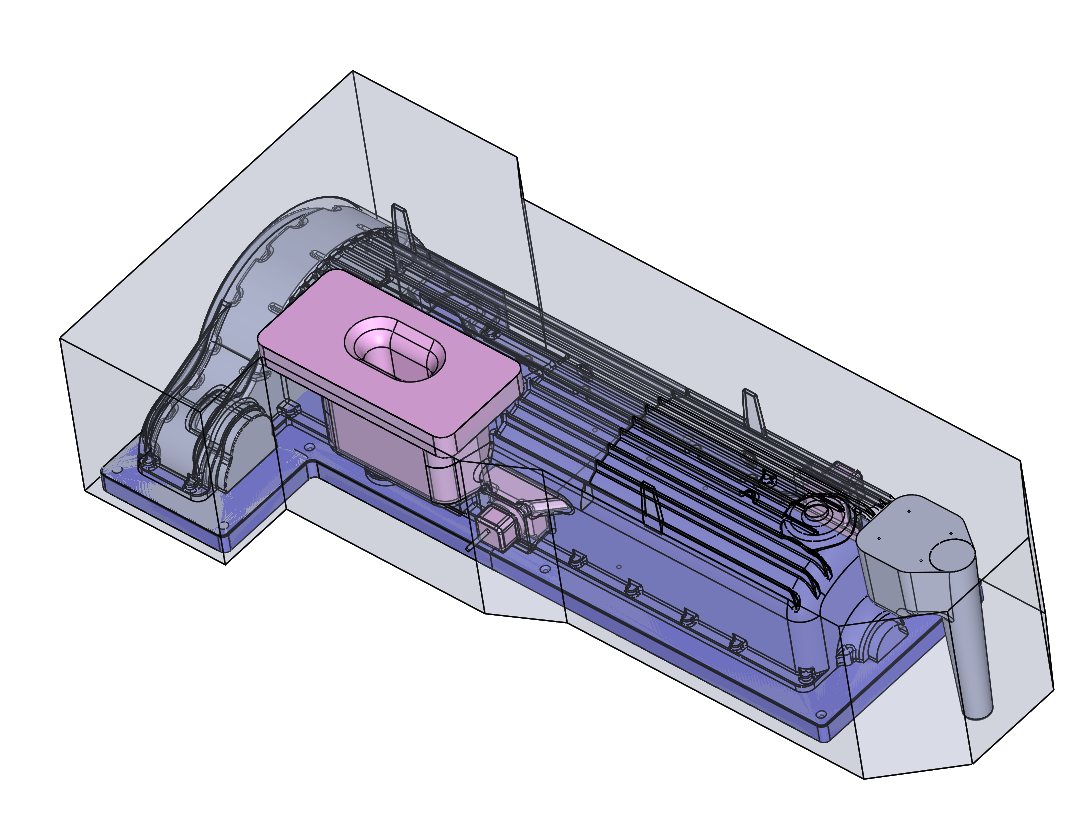
Got the sump inner core pattern assembled and painted. Should be a lot easier to sand than the outer pattern!
This gives a visual on what its making. The main inner core. A couple of smaller cores attach to it.
-
22
-
1 hour ago, PatJ said:
A few divots in each section would at least give you some shear strength at the joint, and if the mold parts did separate, the divots would allow them to be easily realigned.
Just a few thoughts. Not sure if I understand your process exactly, but this is what popped into my mind.
.
Yeah that’s exactly the plan. Was just going to use a 2in router bit or something to make a couple of half rounds on each section join.
Ideally I won’t need to split the sections from each other at all.
I will then build a frame around them to hold them together once I remove the mould box (could maybe keep it in the mould box but the foundry is pretty rough and it would probably get wrecked)
-
- Popular Post
- Popular Post
Got the mould box done. Just need to sort the partition mounting.
-
14
-
4 hours ago, PatJ said:
The danger for me is getting bogged down in a continuous mixer build, and then working on that only for several years, trying to debug it.
Exactly. This is what I keep a check on all the time. Im not doing sand casting because I want it to be a hobby. Im doing it because I need the parts.
. So I dont like getting bogged down in stuff that isnt moving things forward.
I do want to get good at it because I have a lot parts to do, so I do spend more time testing different approaches to pattern prep and runner systems by doing several castings.
I can do 30-40kg of sand at a time so if I partition off the pattern I can work my way through it at home. Once Ive figured out how well the assembly goes together then Ill go to the foundry and fill the sand in one piece.
This was todays job.
-
5
-
-
Ive been looking at continuous mixers quite seriously. How I could make a small one etc.
They are a horizontal auger with a center mixing section that have apposing and varying angled paddles. The resin is injected at a point a long the mix. If its a 3 part resin you do a pre mix (like you normally do).
Ive used them at the foundries before and youre right about keep things clean. An initial un mixed amount comes out that you set aside (which you can throw into the pattern in the right place). Then when youre finished you have to do the same, keep running sand with not resin for quite a while.
So even with a small mixer you would end up wasting a bit of sand.
-
1
-
-
Awesome work! Moulds look great.
I am definitely trying to reduce the sand in these big moulds because its going to be hard to pack and hard to handle.
Should be able to save 100kg on the big mould.
Good idea on removing the catalyst. I havnt considered that but it kind of makes sense. It would be awesome if it took a few hours to go off! Even if it took days!
I use a mortar mixer and 10L buckets. It is a workout when youre doing a bunch of transferring to make sure everything is mixed and you only have 30mins to do the whole thing!
Ive been considering a big cake mixer.
-
1
-
-
On 24/12/2020 at 09:06, PatJ said:
I am really late to the party, but I have just recently run across this thread.
I have been making resin-bound sand molds for small steam engines for the last 8 years, and the product I use is LINO-CUR by Ask Chemical.
It is a 3-part system with resin, hardener, and catalyst, and it is very easy to come up with about any set time you desire.
Varying the set time is very handy since the temperature around here varies quite a bit, which affects set time.
I have been using my first batch of LINO-CUR for four years, and some of the hardener has crystalized, but it is easy enough to remove that.
I pour the hardener into separate mason jars, to minimize the crystalization.
The resin has never gone bad, nor has the catalyst, and I don't control the storage temperature for these material, so this is really a long shelf life for binder.
I use OK85 commercial sand, which is a very dry fine round-grain sand.
The art-iron folks use a lot of LINO-CUR, but it works very well with gray iron also, which is what I pour.
And I spray on a layer of alcohol-based ceramic mold wash, and burn it off, and that gives a surface on the iron that is clean and shiny right out of the mod, and eliminates any post-casting cleanup.
You have a fantastic thread going here, and it is spectacular on so many levels (3D modeling, pattern making, mold making, casting, etc).
I started making my own iron castings in 2012, and have that process pretty much perfected at this point, and can make iron castings without defects.
I was told that quality gray iron castings could not be made on a hobby level, but that is not true.
Anyway, I noticed you having issues with set time, so I thought I would share this info with you.
Great thread !!!!
Keep up the great work.
Pat J
Edit: I am working on learning how to cast ductile iron, and hope to have that figured out early next year. This will be used to cast crankshafts.
Thanks for the info. Ill look into it.
Whats the longest cure time you think is possible? I need to be able to mix 350lb worth and pack into reasonably detailed areas. So I think I would need atleast an hour from when the catalyst is added. Maybe even more with that big quantity because its pretty hard work.
At the moment I can cleanly mix 15kg batches which take about 25-30mins to go off (if I chill them down before adding catalyst). I can easily do 30kg moulds and have done 45kg before. Anything more than that and the first batch starts to go off.
-
On 21/12/2020 at 17:48, Arifidyan said:
Super cool! Can you reuse the sand after is has been used with the resin in it? can you give an example of the sand recycling process? #thumbsup
The sand cant be re used for moulds that I know of but it can be 'recycled' into fill for roads etc. If the foundry wants to send it to the place to do that. Kind of like when you 'recycle' a glass bottle it just ends up ground up in a road.
 It would be hard to re use it in casting even if you ground it up and re sieved it. The old epoxy would absorb moisture which would mess with the new epoxy and then outgas when the metal hits it.You could probably grind it up, burn the epoxy off, wash it, dry it then sieve it. But that would be hard to justify since the sand costs 50cents a kg.
-
2
-
1
-
-
- Popular Post
- Popular Post
Since I can only safely mix 30kg of sand at once Ive made some partitions over the pattern for 30kg sections.
Will do some sequence of removing walls and work along the pattern.
Probably key the sand together as I go so hopefully it doesnt shift around.
The base is an overly complicated 30mm spacer that the inner cores align to. Could have done it out of wood but when you have a big printer why not!
Once Ive figured out if the pattern works I will be able to fill it at the foundry in one go without partitions.
-
33
-
- Popular Post
- Popular Post
High build primer is like sanding chalk! Coming out ok but taking a lot of sanding!
-
23
-
-
- Popular Post
- Popular Post
Runner system printed.
-
23
-
- Popular Post
- Popular Post
These are 'feet' for the sump. So the engine can stand upright. Good chance ill break them off at some point so I printed a hole up them and bonded in some steel dowels.
Started bogging.
-
21
-
Ill do a timelapsy video for the Sump.
What sort of stuff do you guys like to see in a video like the last one?
-
1
-
-
- Popular Post
- Popular Post
Fitting up well. Inserts and removable pieces are looking good. Its going to take a bit of bog before paint and a lot of sanding afterwards.
-
27
-
- Popular Post
- Popular Post
Starting on the sump. Its going to be a pretty big job!

-
36
-
On 14/10/2020 at 22:36, IvyMike said:
What resin do you use for your castings and at what ratios? The quality looks great.
Techniset 6435 with catalyst 712. Its a 3 Part system.
Part 1 + 2 = 1.8% of sand mass
P3 = 3% of Part 1.
Sand is #90 so quite fine.
3 part system works way better than the 2 part I used in NZ. Mixes really evenly with hardly any effort.
-
2
-
1
-
-
25 minutes ago, 00quattro00 said:
Is that tomato sauce in the bottle?
Ketchup* since im in America.
*actually ceramic core paste
-
1
-


Pete's 67 ElCo
in Projects and Build Ups
Posted
Started goin over the engine.
Compression testing @ about 155-165 but cylinder 4 is at 145psi. So I gotta keep checking that and see if it is actually bad.
Ignition was way off too. I had 35deg mechanical advance (excluding vac). So even with low static timing I was in the mid 40s which cant be good.
So I got a new electronic dizzy and high power coil. Now running 16deg static and 38deg mechanical with 14deg vac.
Works way better. It wasnt without its issues though. I didnt know the harness ran an internal ballast. So the coil was only getting 4volts and breaking up at higher revs. Then after I fixed that out the ignition key couldnt handle the higher current coil and started playing up after a while.
Put a relay in and fixed that.