HumberSS
-
Posts
308 -
Joined
-
Last visited
-
Days Won
1
Everything posted by HumberSS
-
I looked at the cheap trojan ones but thought cert guy may not like these.. perhaps i need to explore further. Can you send me link to caliper you used? Also might explore drum option further..
-
Thought about this too, either pack the cylinder with grease instead of brake fluid or return the circuit back throigh the bleed nipple
-
Prob is, it seems easy but the drum actually essentially has a drivshaft spiggot built into it in the factory setups. In order to then put this at the back id need a much bigger drum to accomodate the nose of the diff pinion. While typing this, maybe it is doable though... i did think about the potential for dosk damage. Will ponder more and look at some drums for inspo..
-
Think i just want a simple mechanical setup,thanks though.
-
Hey all, so on my camper build (see 4v Dyna camper build thread) i need to figure out the handbrake situation. The original one was mounted to the rear of the gearbox, as is often done in trucks. It was quite small (10" tops diameter)but obvs benefits from the diff ratio for mechanical advantage so doesnt need to be much. I cant mount anything on the back of my auto box so am going to go with a disk mounted on the diff pinion. Spoke to my cert guy today, hes ok with it. Just said make it as big a disk as possible. I can prob safely have a disk about 12" diameter, however the caliper situation is the thing. Ive looked at mechanical types like trojan ones but dont think they will like that for cert, really want sometjing off a car or light truck etc - any thoughts on suitable mechanically actuated disk calipers appreciated. Any other thoughts also welcome.
-

4V Century V8 powered Dyna Camper Discussion
HumberSS replied to HumberSS's topic in Project Discussion
@Otodat Yeah i did get the Delta. I swapped it for a diff as the one in it wasnt the go...i kept a few bits, mint doors and a few other tidbits. Can still raid some bits if hes quick..Let me know if hes after anything. Ill update on the full story soon. -
Humber SS's 4V Century V8 powered Dyna Camper
HumberSS replied to HumberSS's topic in Projects and Build Ups
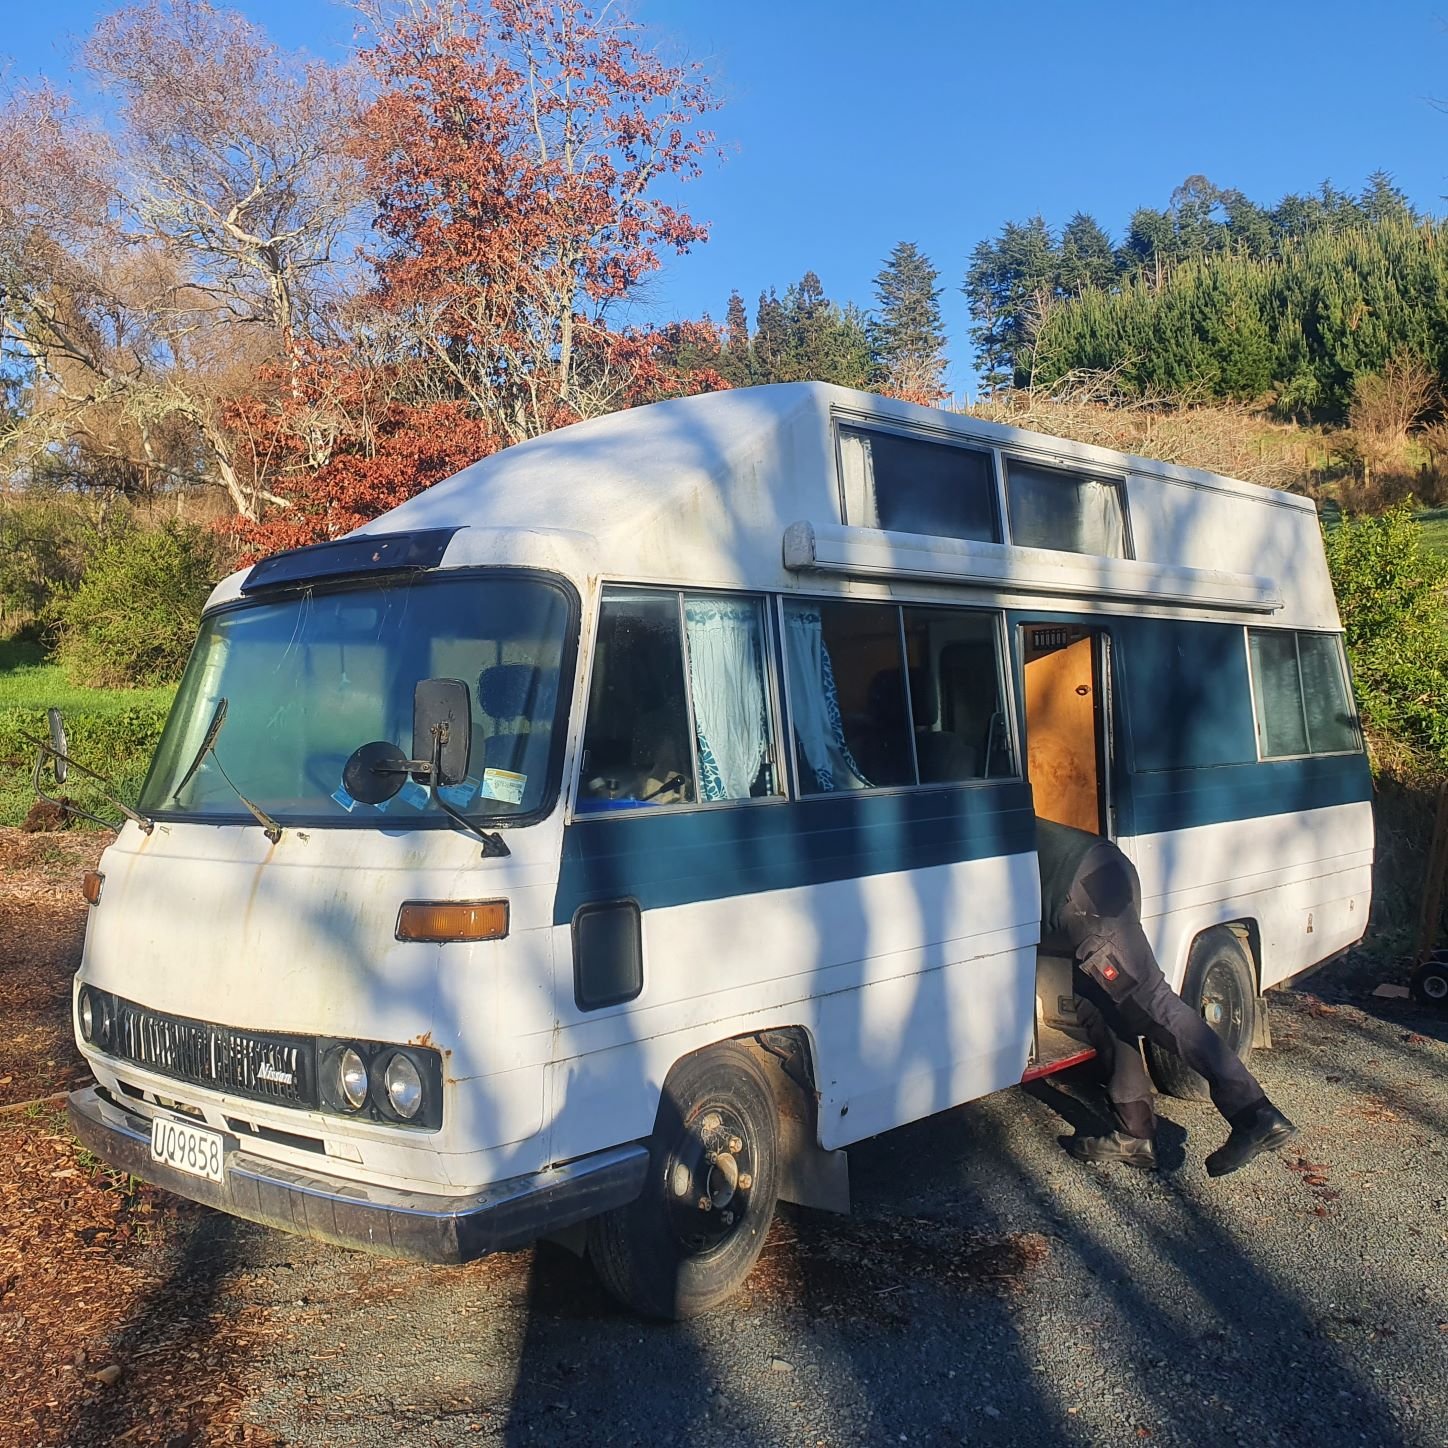
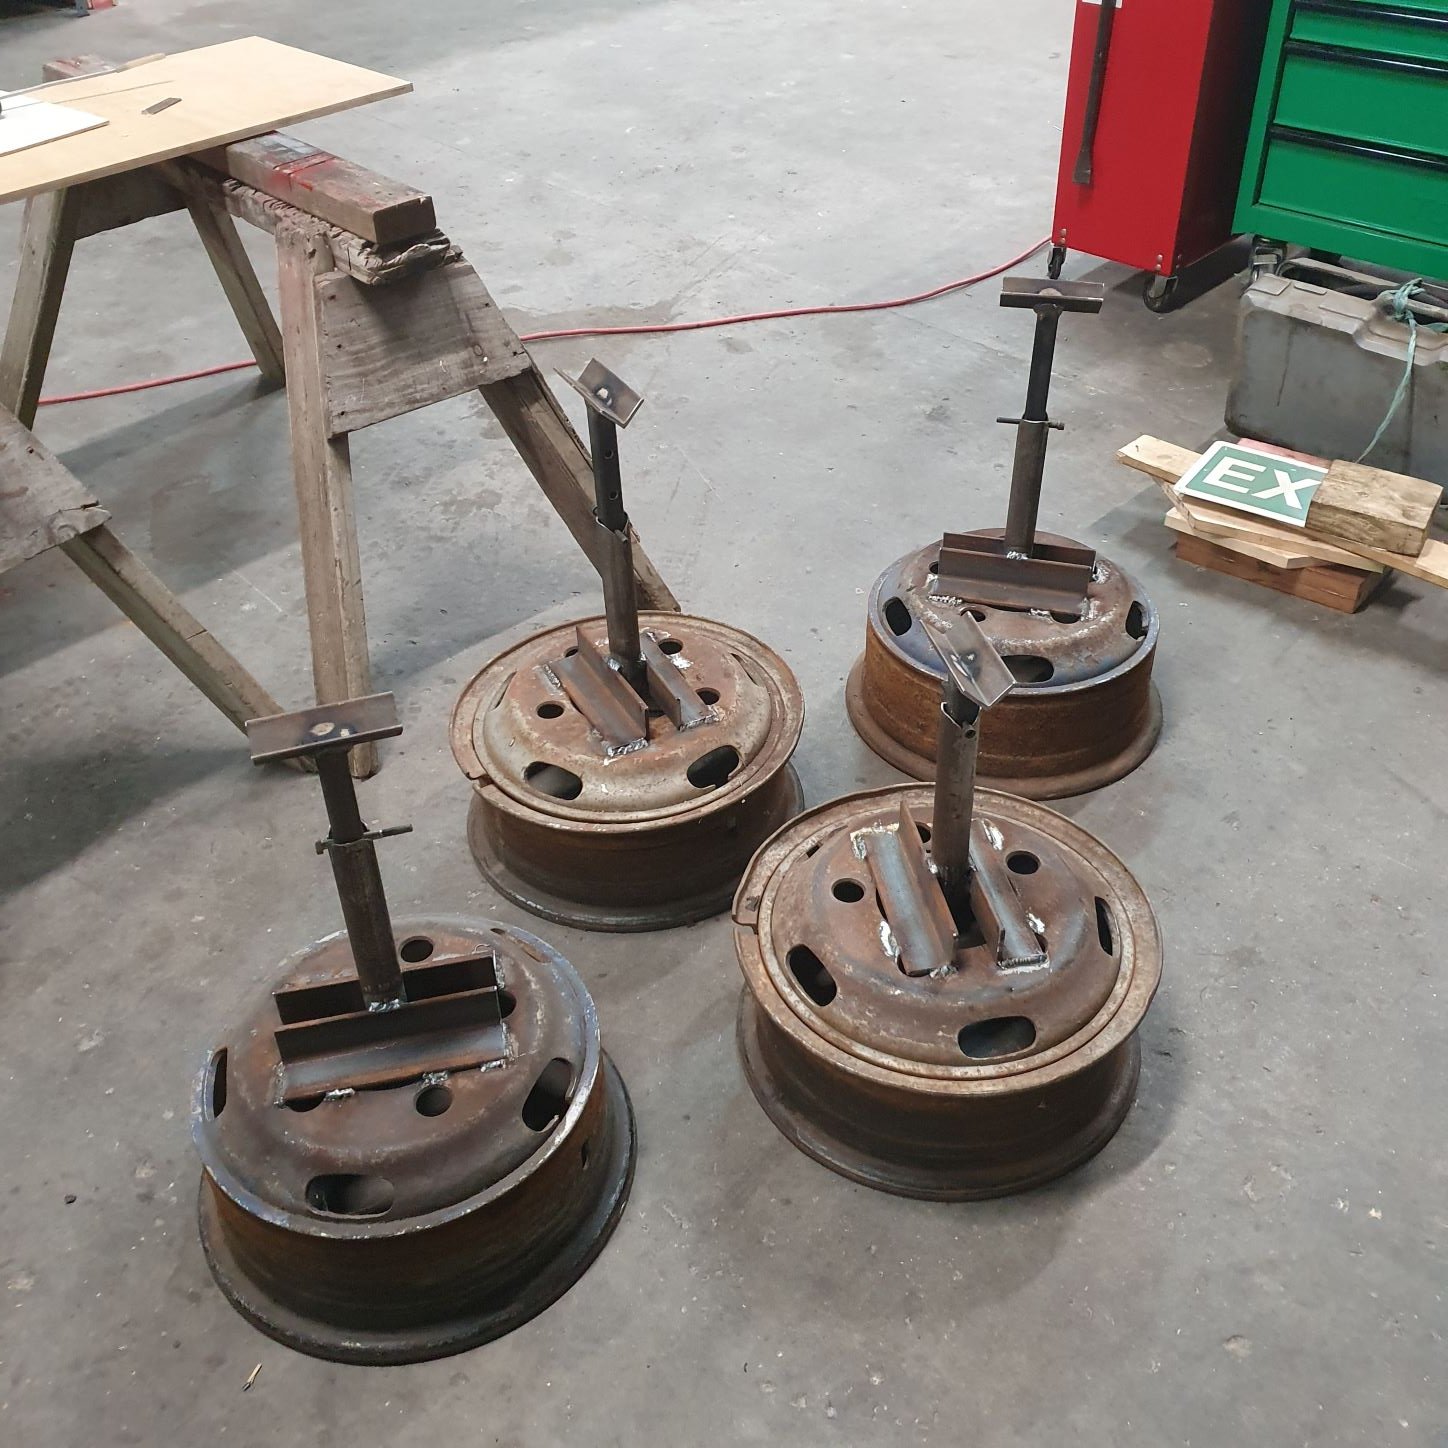
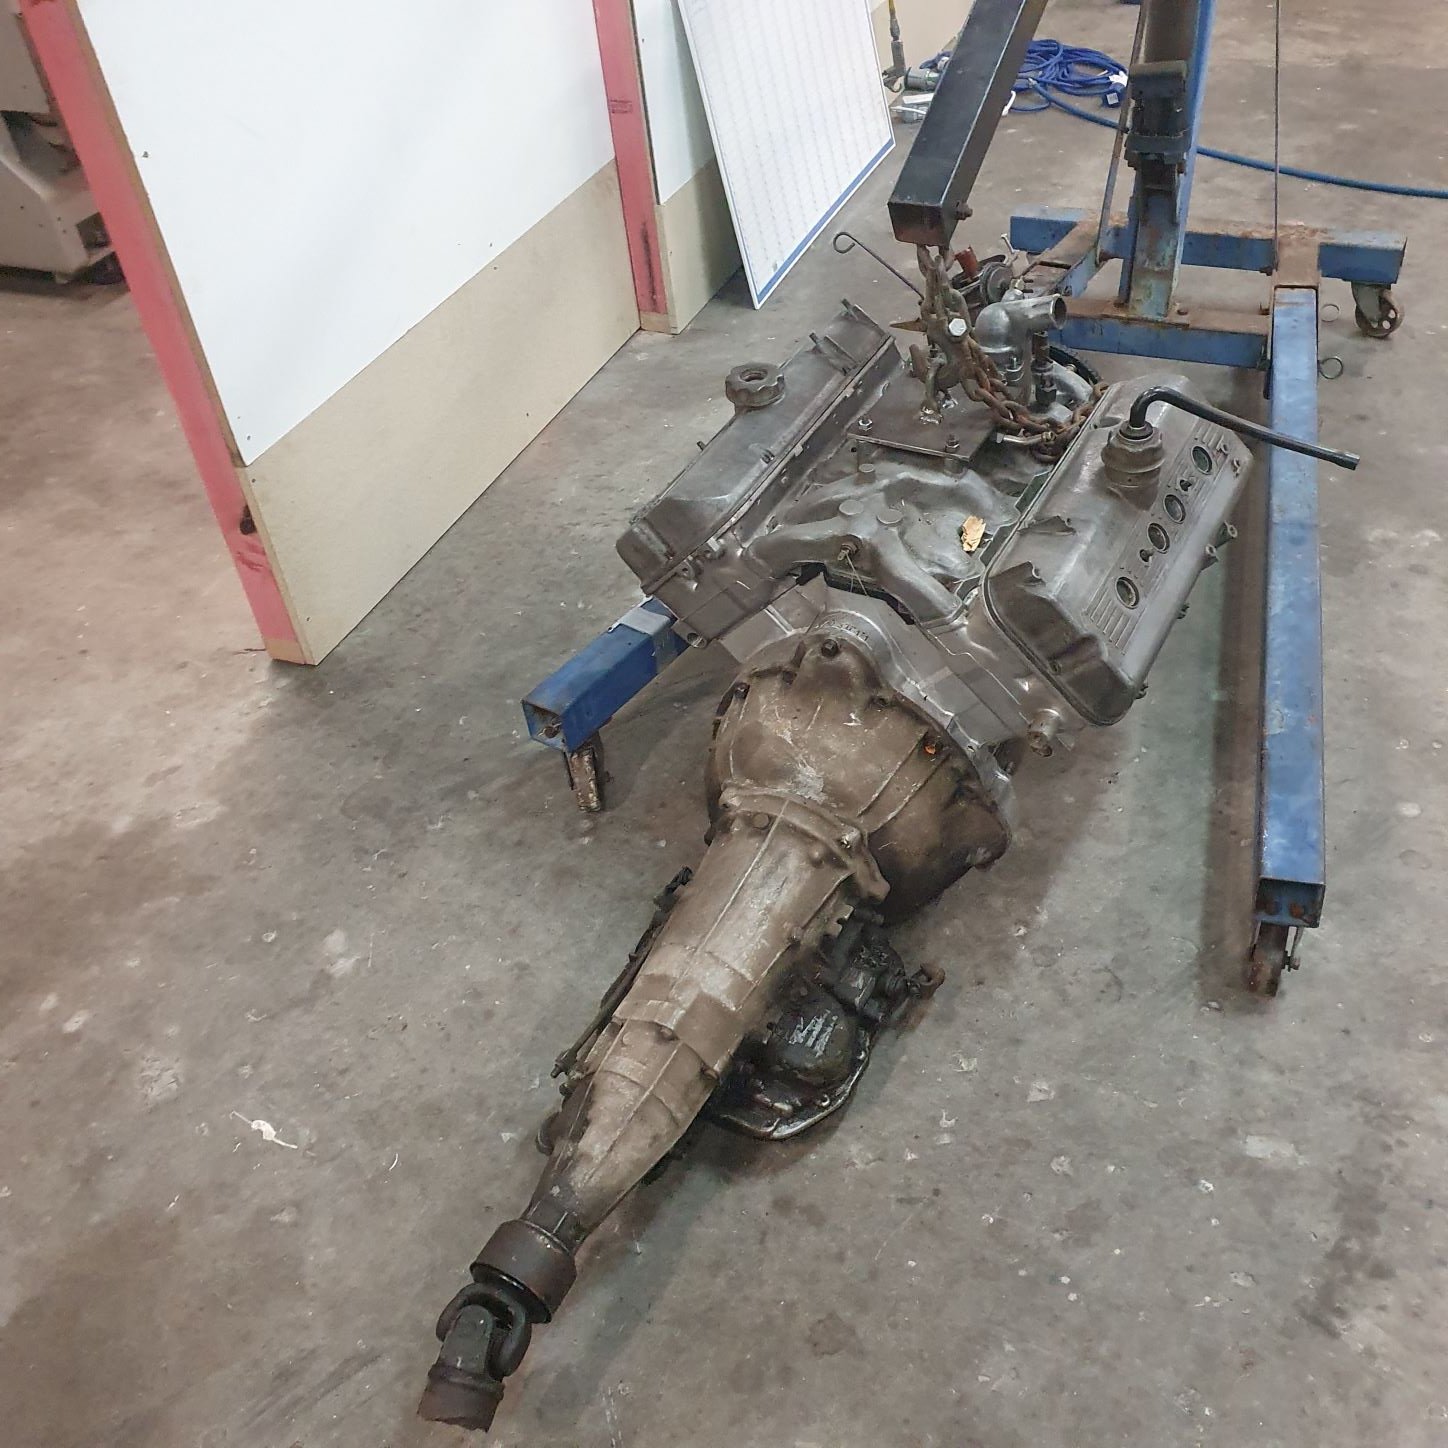
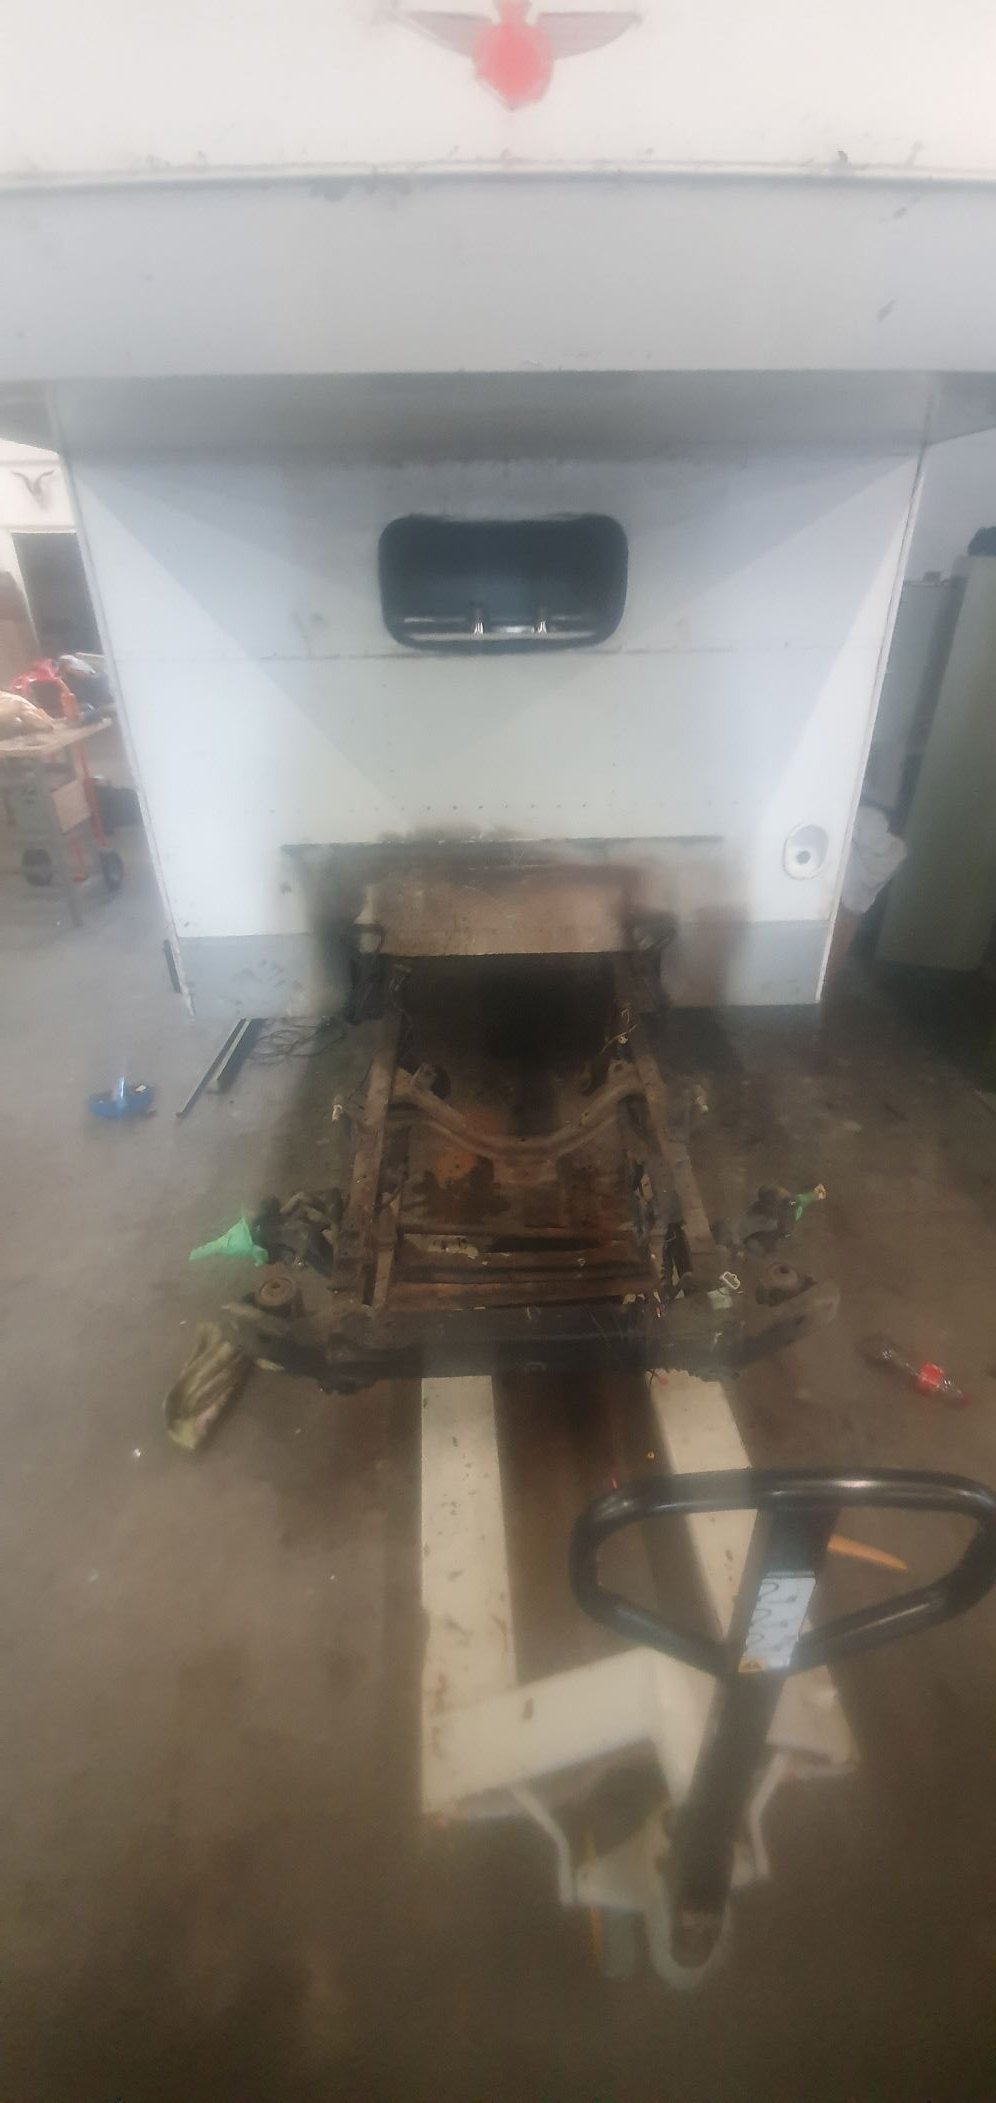
Time for another update. Slow and steady here, nothing major to report but just little jobs ticking along. I had a bit of a panic moment as I started thinking a bit more about the califont, and the legalities around that. I asked my gasfitter broher-in-law but he said dont touch it. So I stopped talking to him and went to my local gasfitter next door to my workshop, conveniently. He came had a look, basically I cant co-locate the gas bottle where the califont is so have to build a separate gas locker, and just fully line and vent the box where the califont will be going, as well as some separation from electrical. I was happy. He essentially said, its all down to the dude signing it off being happy - to which I asked "will you be that dude?" A bloody good cunt, even happy to guide me on what I can do without him, hes pretty disinterested in doing the actual job, and I am a cheap cunt, so I think we are going to get along just fine. I finished the ply lining in the califont locker, and decided to mount to the rear face of the locker. Made a couple brackets and got it dummied up. Now I can starat planning out some plumbing, and obviously the gas situation. I need money for the next steps in here, so I have elected to keep moving on with tasks which are not of cost at this point. I also went to the south island with my kids for a week and visited @ThePog - here is a picture of his ass sticking out from Uncivil Ian. I was also fortunate enough to convince him to let me drive The Dynafari. I nearly accidentally offroaded it - the look on that cunts face was priceless. It goes bloody good, I feel like my cock grew 3 inches that day from the manliness one is imbued with when driving. It has since retreated back into its tiny pocket under my beer gut. Also, Ian needs some love, so I think Dylan is tending to that. So returning home from a bout of inspiration from my southern friends rather impressive workshop, I set too on the camper again almost immediately. I have decided that I am going the full hog, as its already pretty deep and Id be fucked off it it failed wof on some scabby bit of rust I missed or whatever. So next inexpensive job on the list was to whip the chassis out from underneath the body. Not exactly easy, just a cunty job really. I made these sweet stands one arvo out of bits of shit lying around the workshop. There was a bit of maths involved in figuring how much I needed to lift it, and a bit of pondering over how complex to make them. It would have been great if I could have essentially made them jacks, but my brain hurt thinking about it, and I wanted it done in an arvo so I just made something simple. Unbolting was a bit of a cunt, and I had to kindof lift, then slide forward, then lift some more, teetering on one jack I got up a few notches then decided it was getting dodge, so borrowed some jacks to get it up higher. Ended up lifting it about 600 off the ground, not quite high enough to clear the wheels, but high enough to remain safe, which was starting to be my greater concern. Anyway, finally slid the entire chassis out a few nights ago, then finished pulling the loom out. Next job it to xy12 and steam clean, then start the glorious task of wire-wheeling, rust converting and painting in black enamel (eventually once fab is complete). While it was half-way jacked I slipped the cab back in. It looks rather Over-landy and quite beastly. There was some conversation around the potential to pursue this vein, but I just cant be assed, and the thing will handle like a pig. It handles pretty sweet so Id rather keep the weight low. But it does look cool lifted! So we whipped the wheels off and rolled the chassis out on a pallet jack and trolley jack. Its good, cause I can stow it back away each night and it doesnt take up space. Also I have included another gratuitous engine (and trans) shot, just for good measure. So after all of this, we have now started really thinking out the chassis tasks. There isnt a hell of a lot to do really. Mount engine and box, make a disk handbrake setup mounted to the Diff Pinion, driveshaft and hoop, radiator. Fuel tank. Ok, there are a few things. We finally also measured the diff ratio - a very spritely 6.2:1...By my calculations at 100km/h with the original 5R was spinning at about 4150rpm - obviously 85-90 is a more realistic cruising speed for that, but anyway, thats not really going to work on the V8. I want to cruise at 100k. My original thinking was to find a 4speed overdriven Auto, but I couldnt conclusively find anything Toyota that would bolt to the existing bellhousing, dont want anything electronically controlled, and basically got lazy and/or didnt like the price/hassle on the GM and ford 4speed boxes. So that necessitate trying to find another diff head. Which luck would have it, I think I may have done from an early 80s diesel Diahatsu Delta - just down the road even. Im going to look at this on Sat, and if its the go Ill load the truck on the trailer and bring it home. https://www.trademe.co.nz/a/motors/cars/daihatsu/delta/listing/3615732978 The dude has already given me some critical measurements/pics and spun the wheels to count the driveshaft turns - its looking anecdotally around 5:1 or perhaps a fraction under ratio which is way more acceptable - cruising rpm should be around 3300 at 100kph. Anyway, fingers crossed this is the same diff head. If anyone wants some Delta parts hit me up! Thats all for now
- 43 replies
-
- 20
-

-
Humber SS's 4V Century V8 powered Dyna Camper
HumberSS replied to HumberSS's topic in Projects and Build Ups
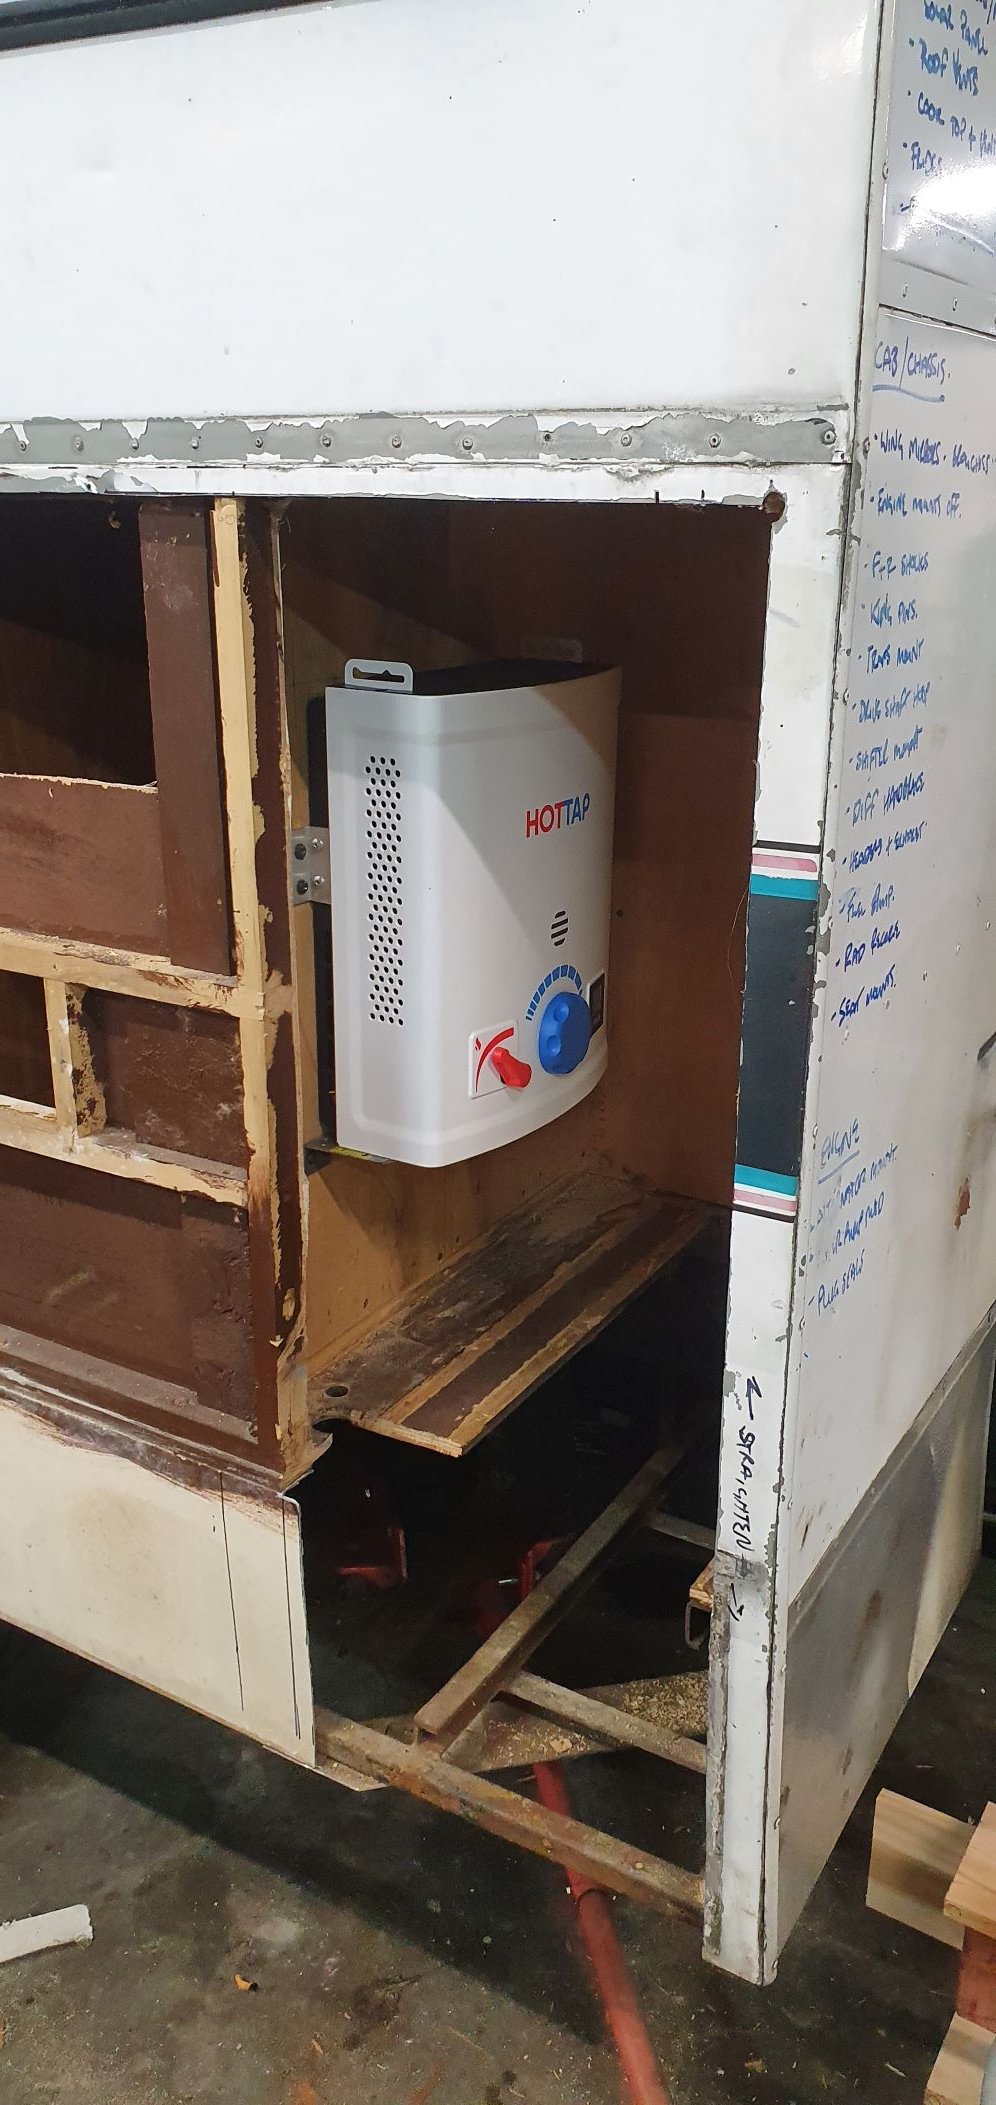
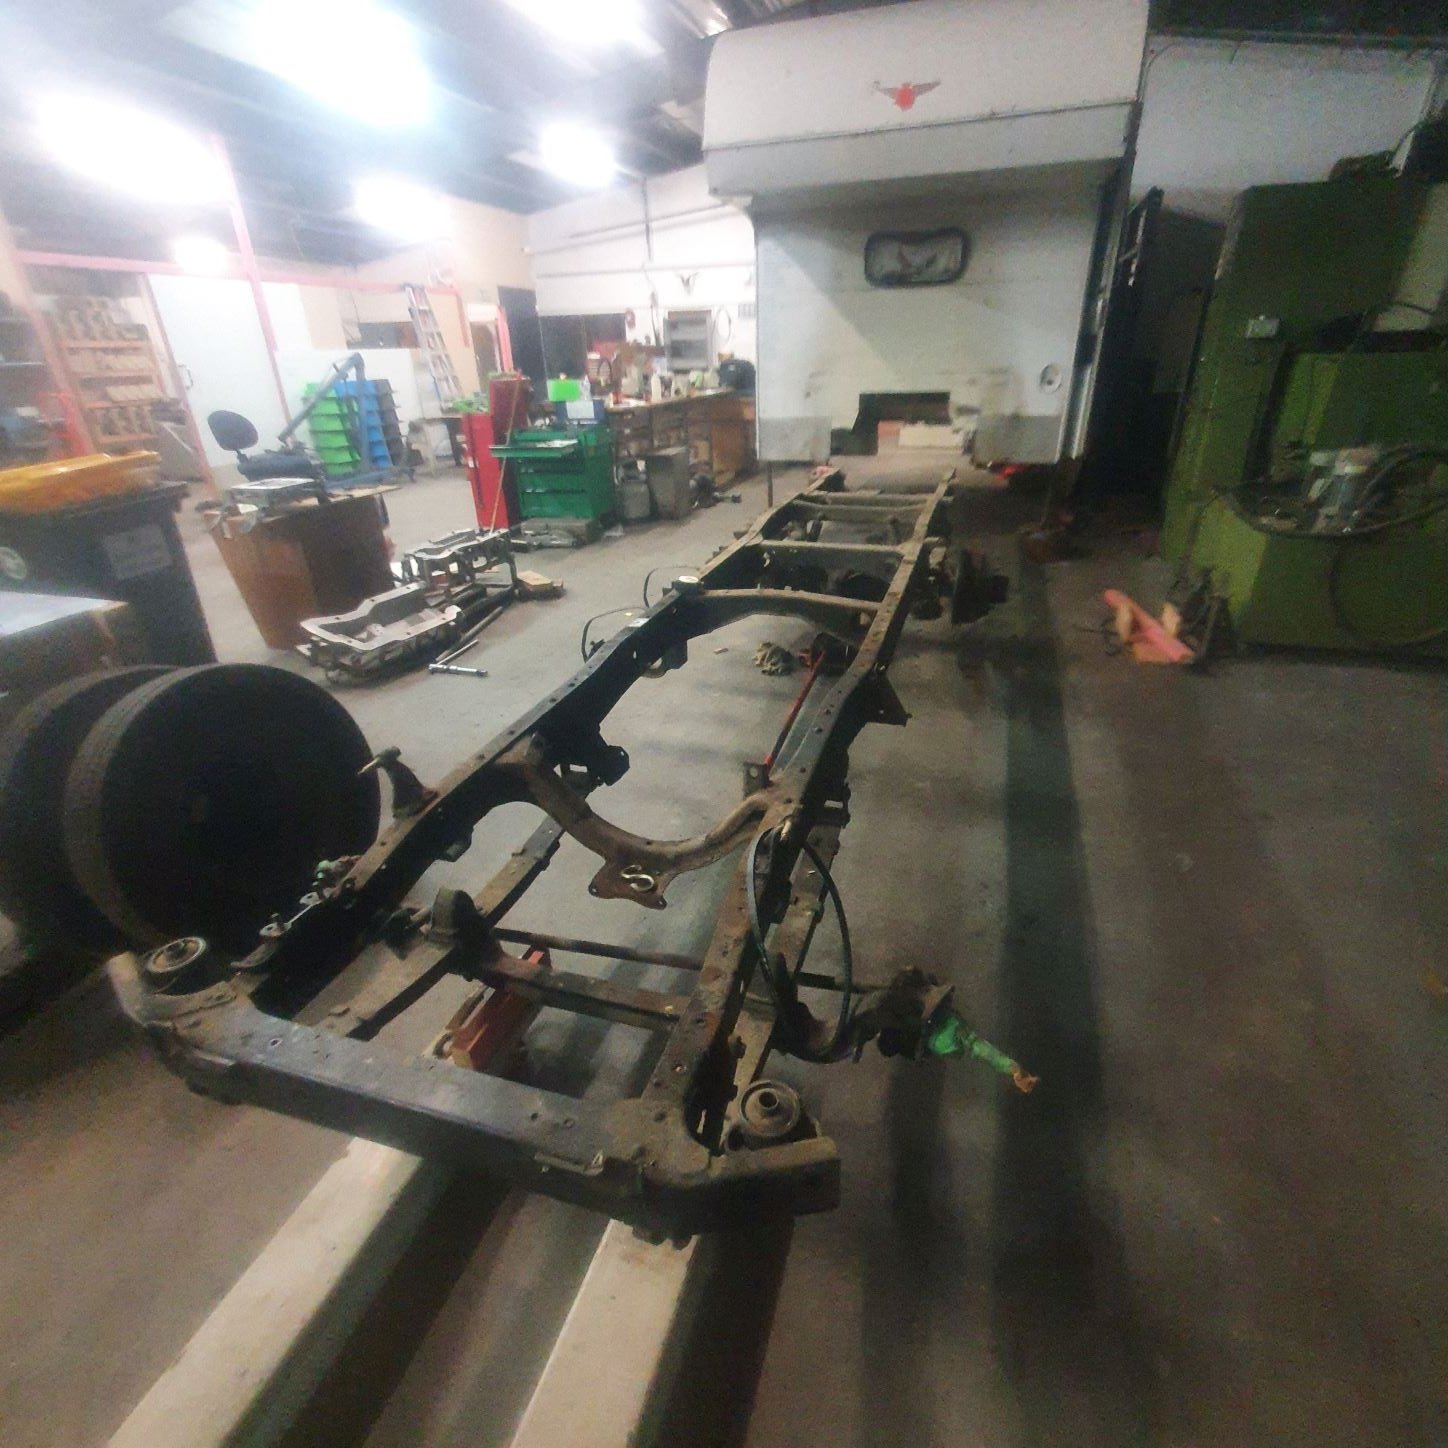
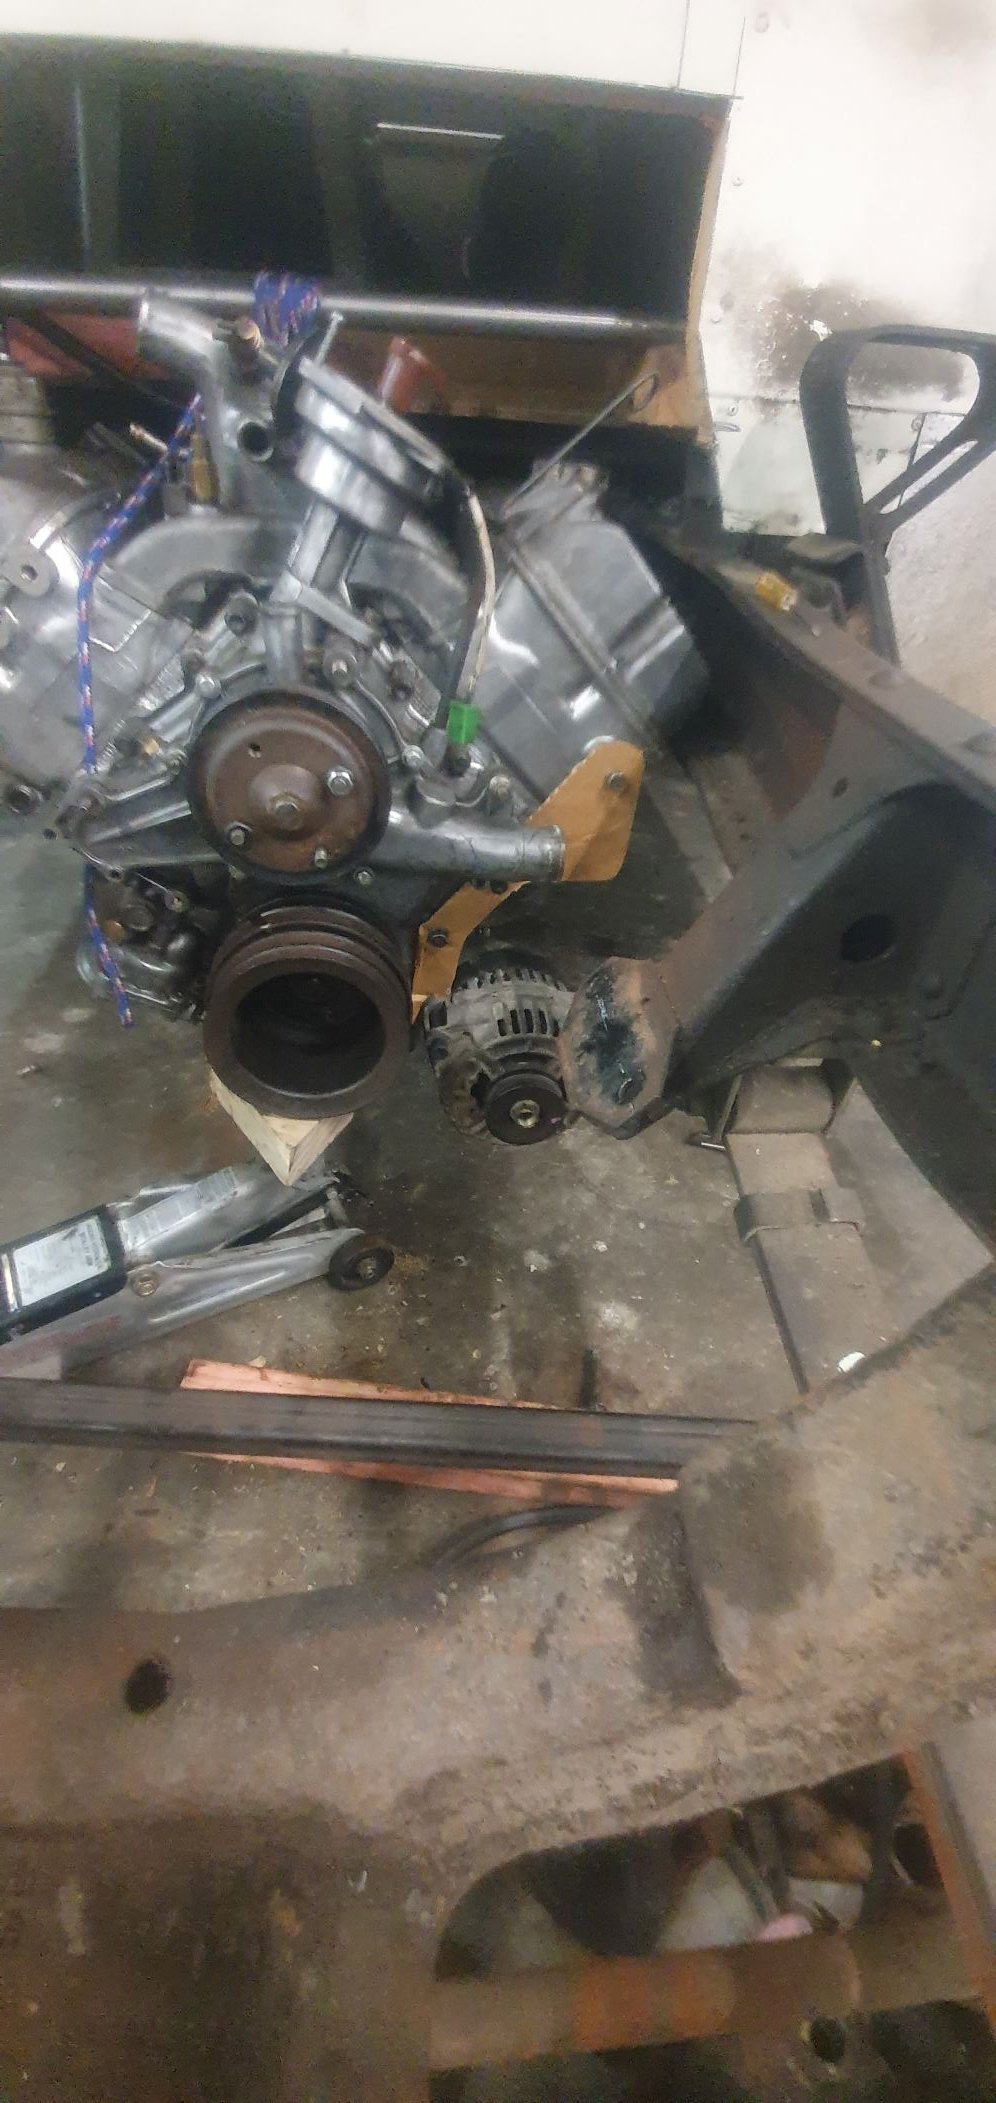
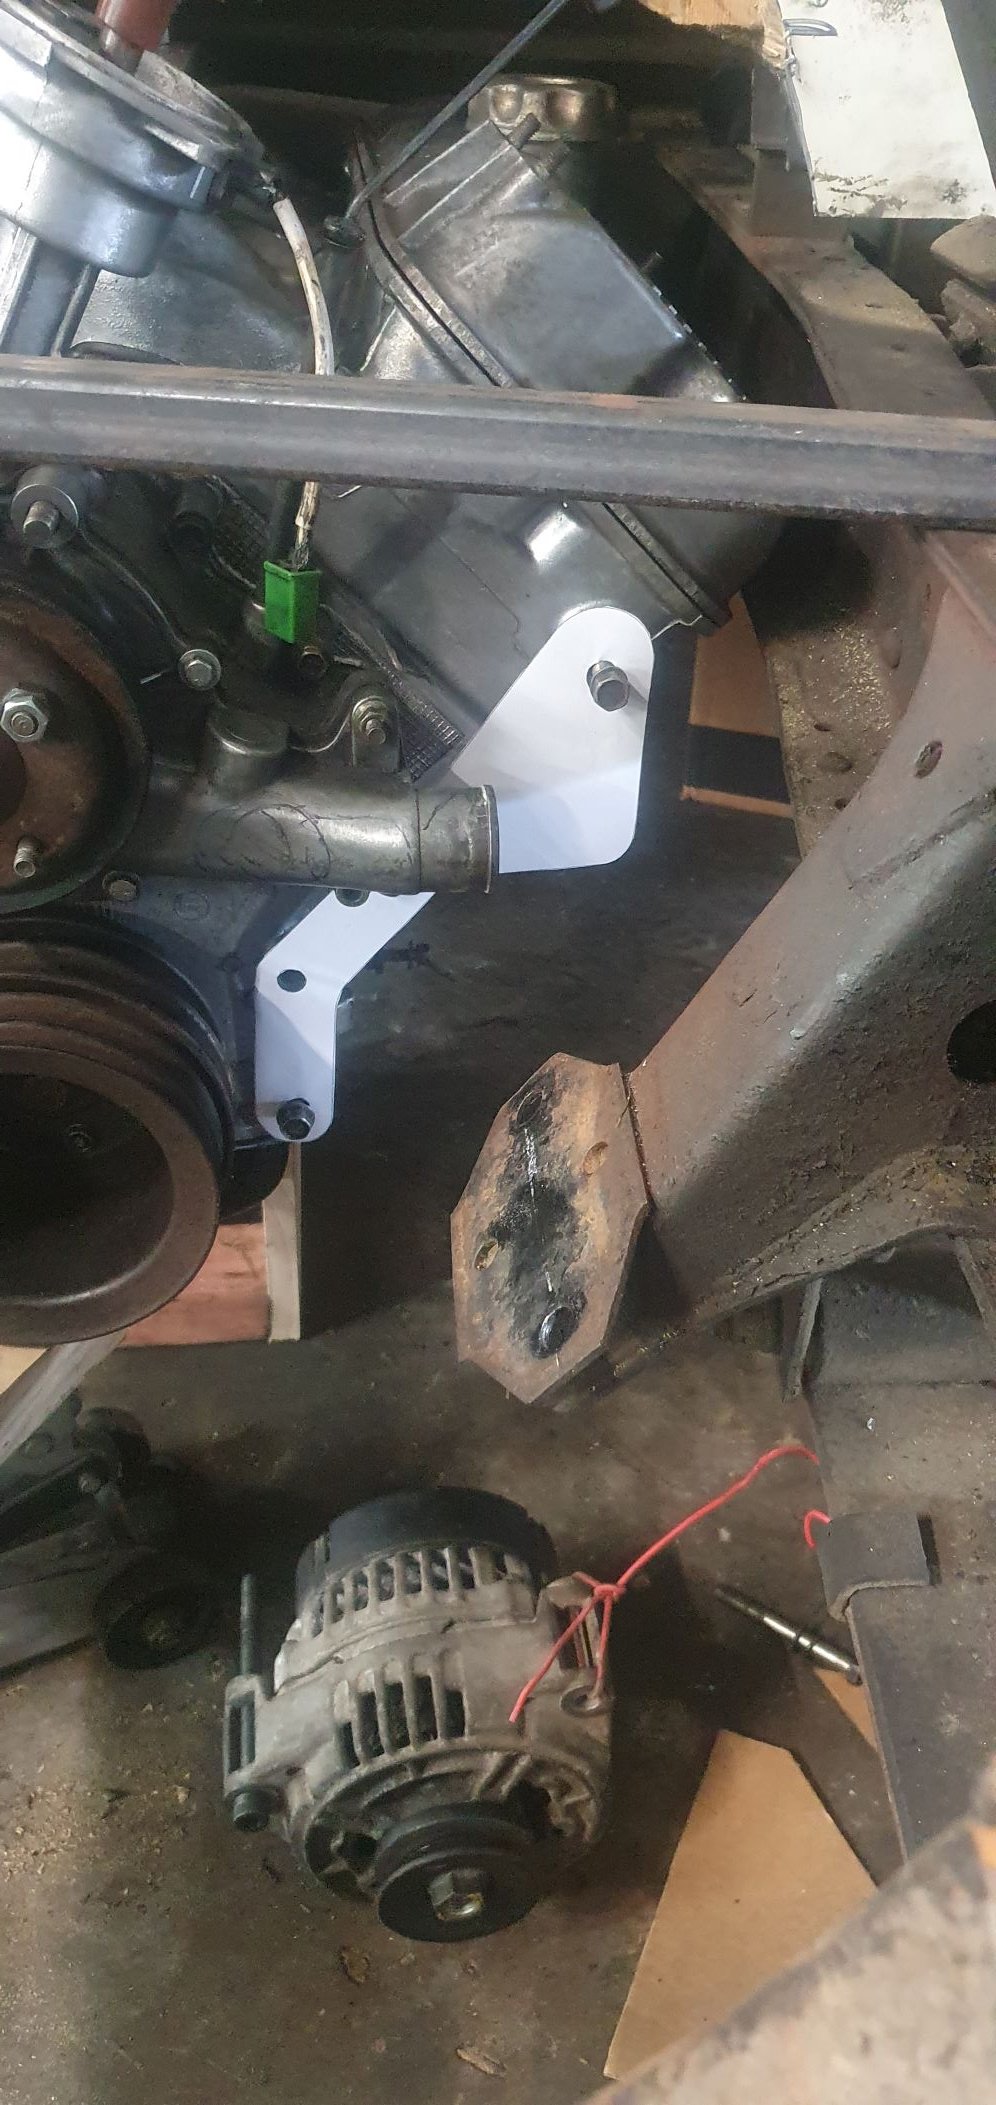
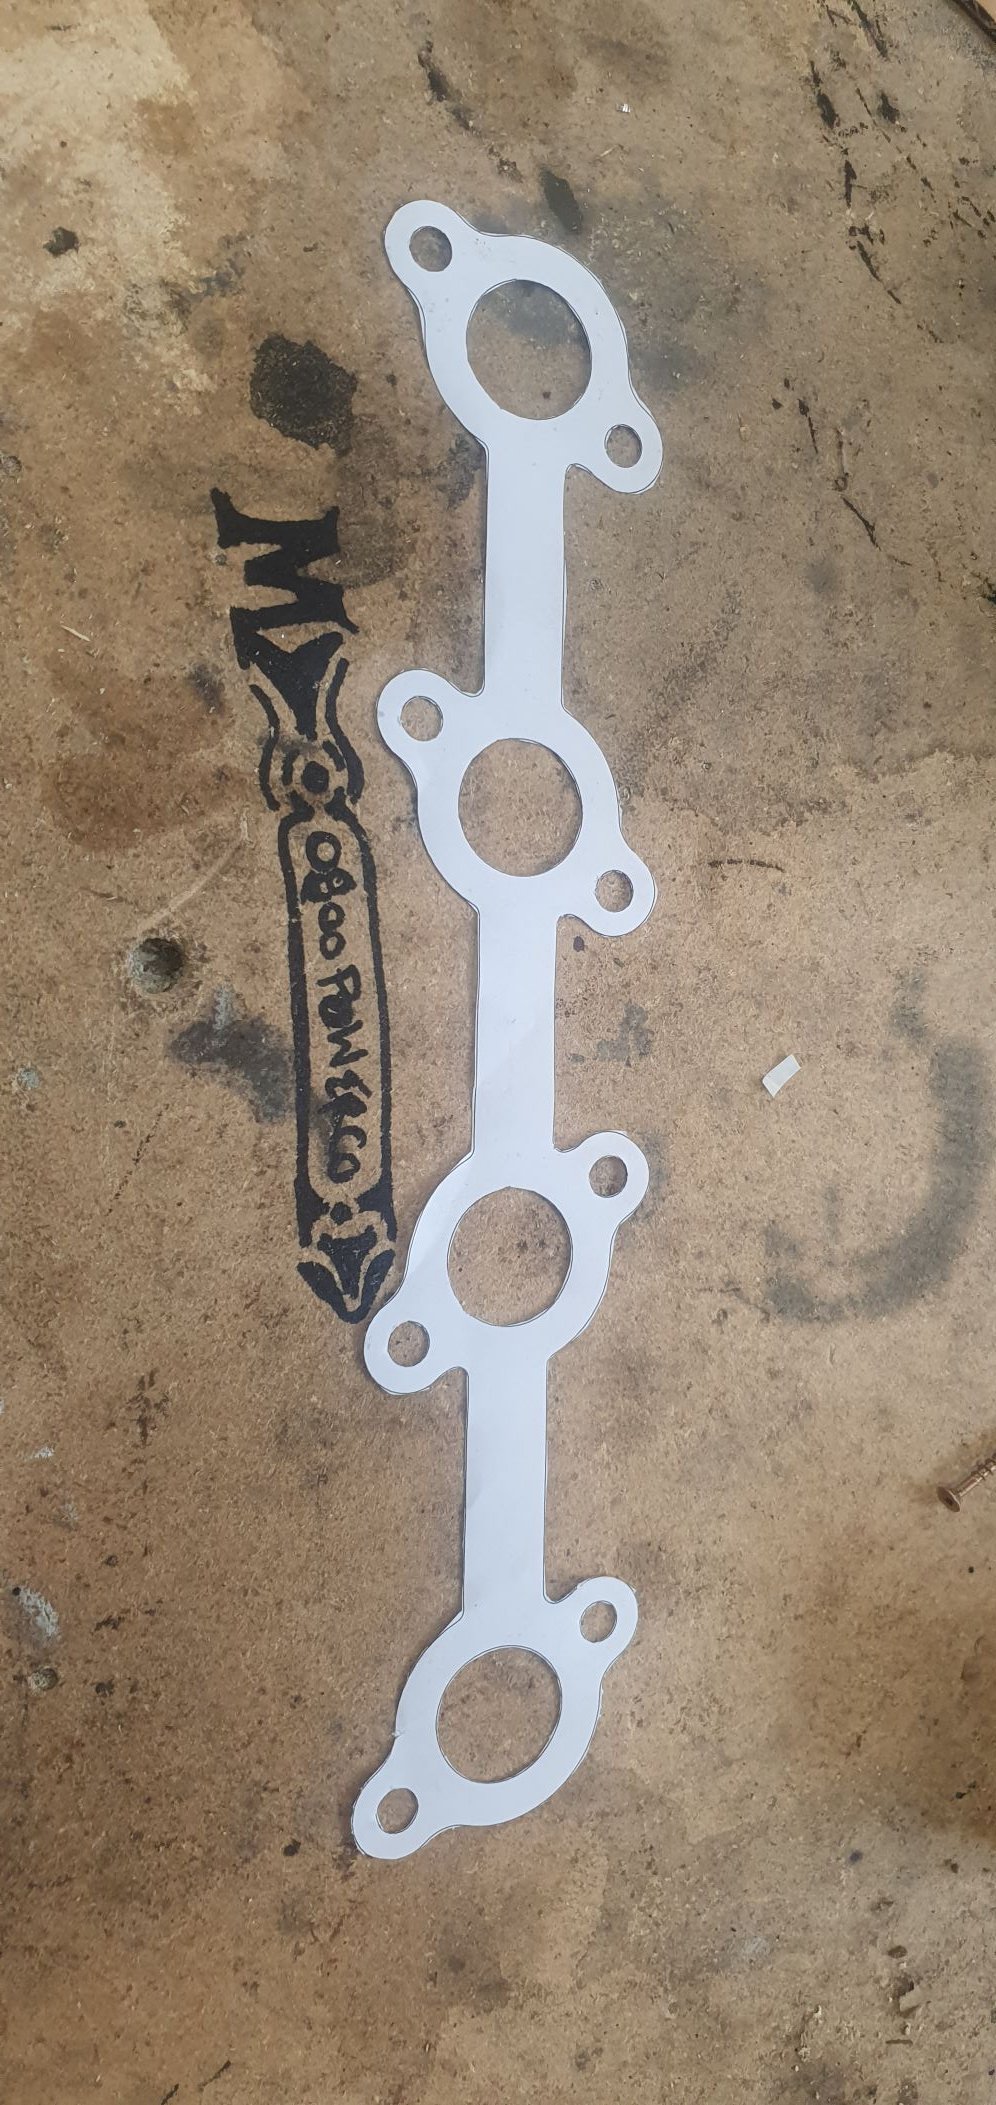
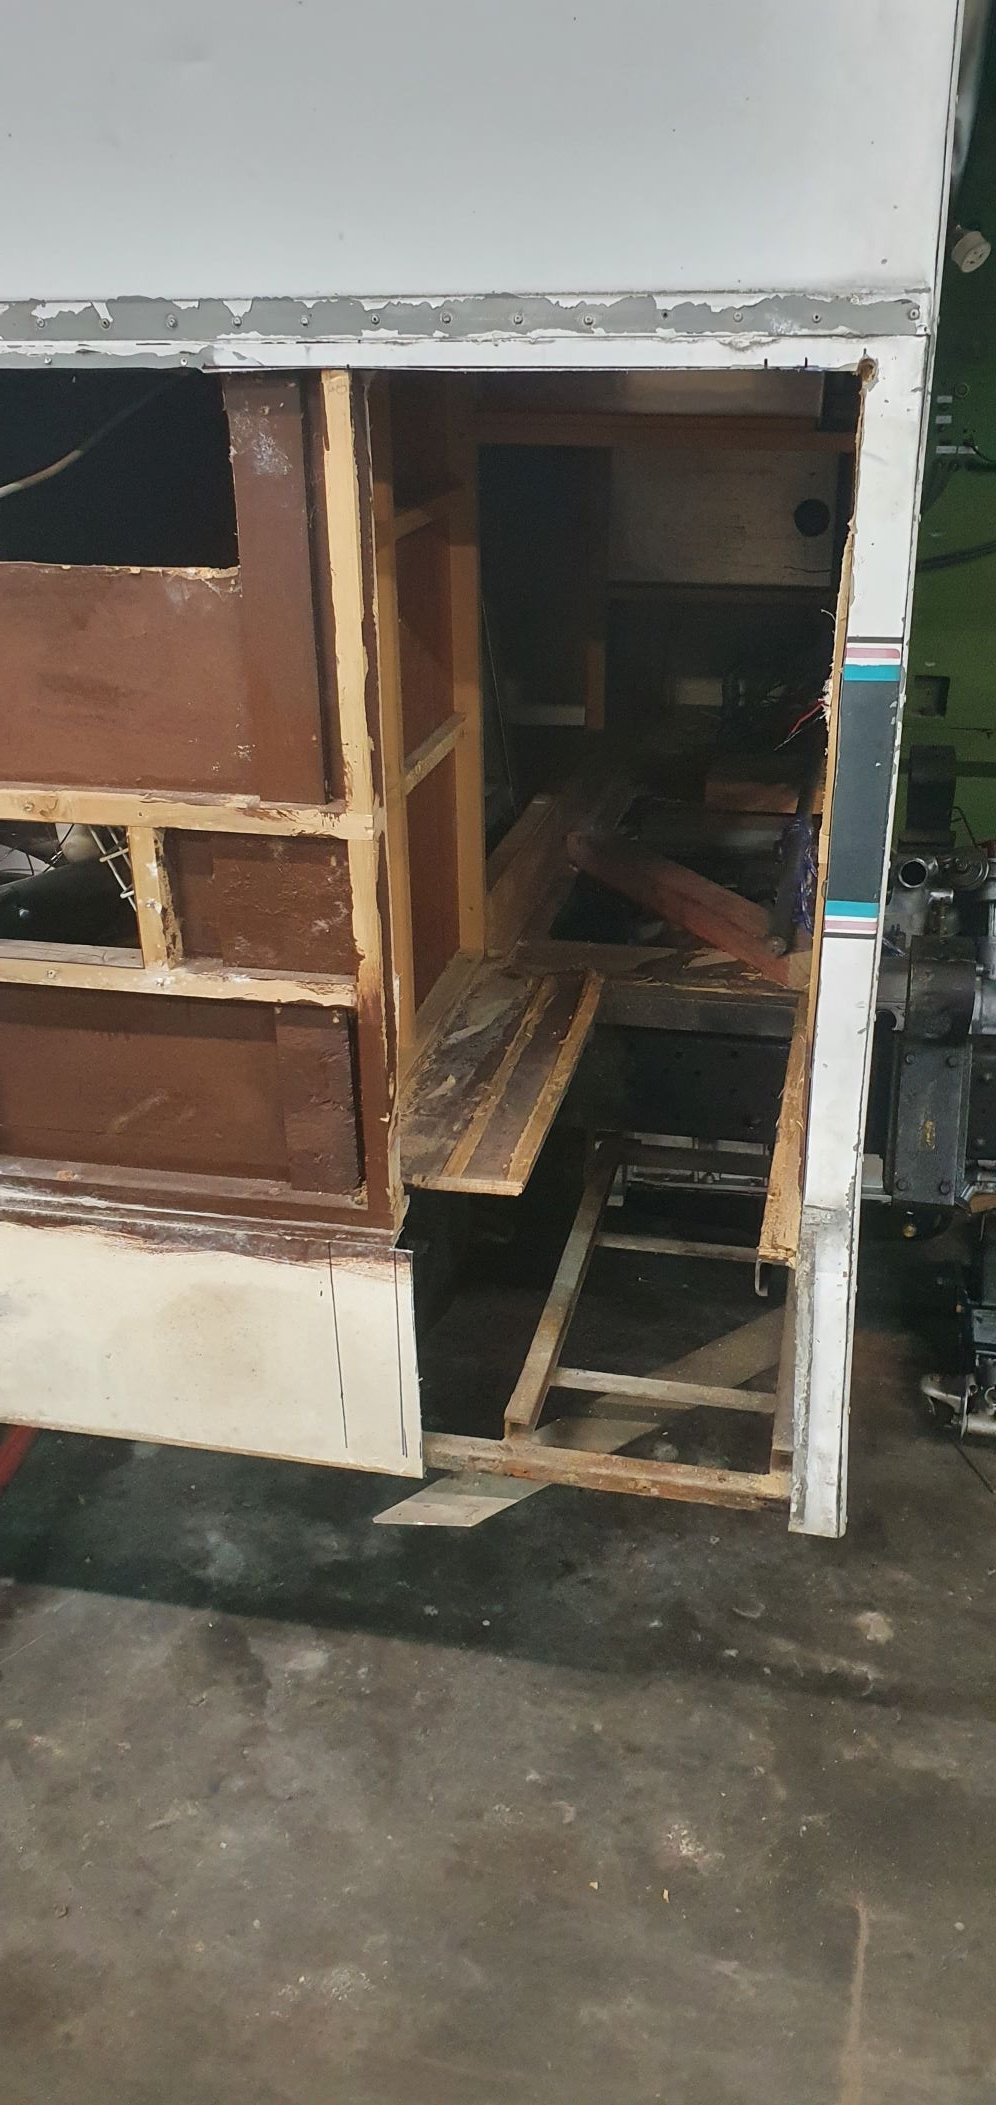
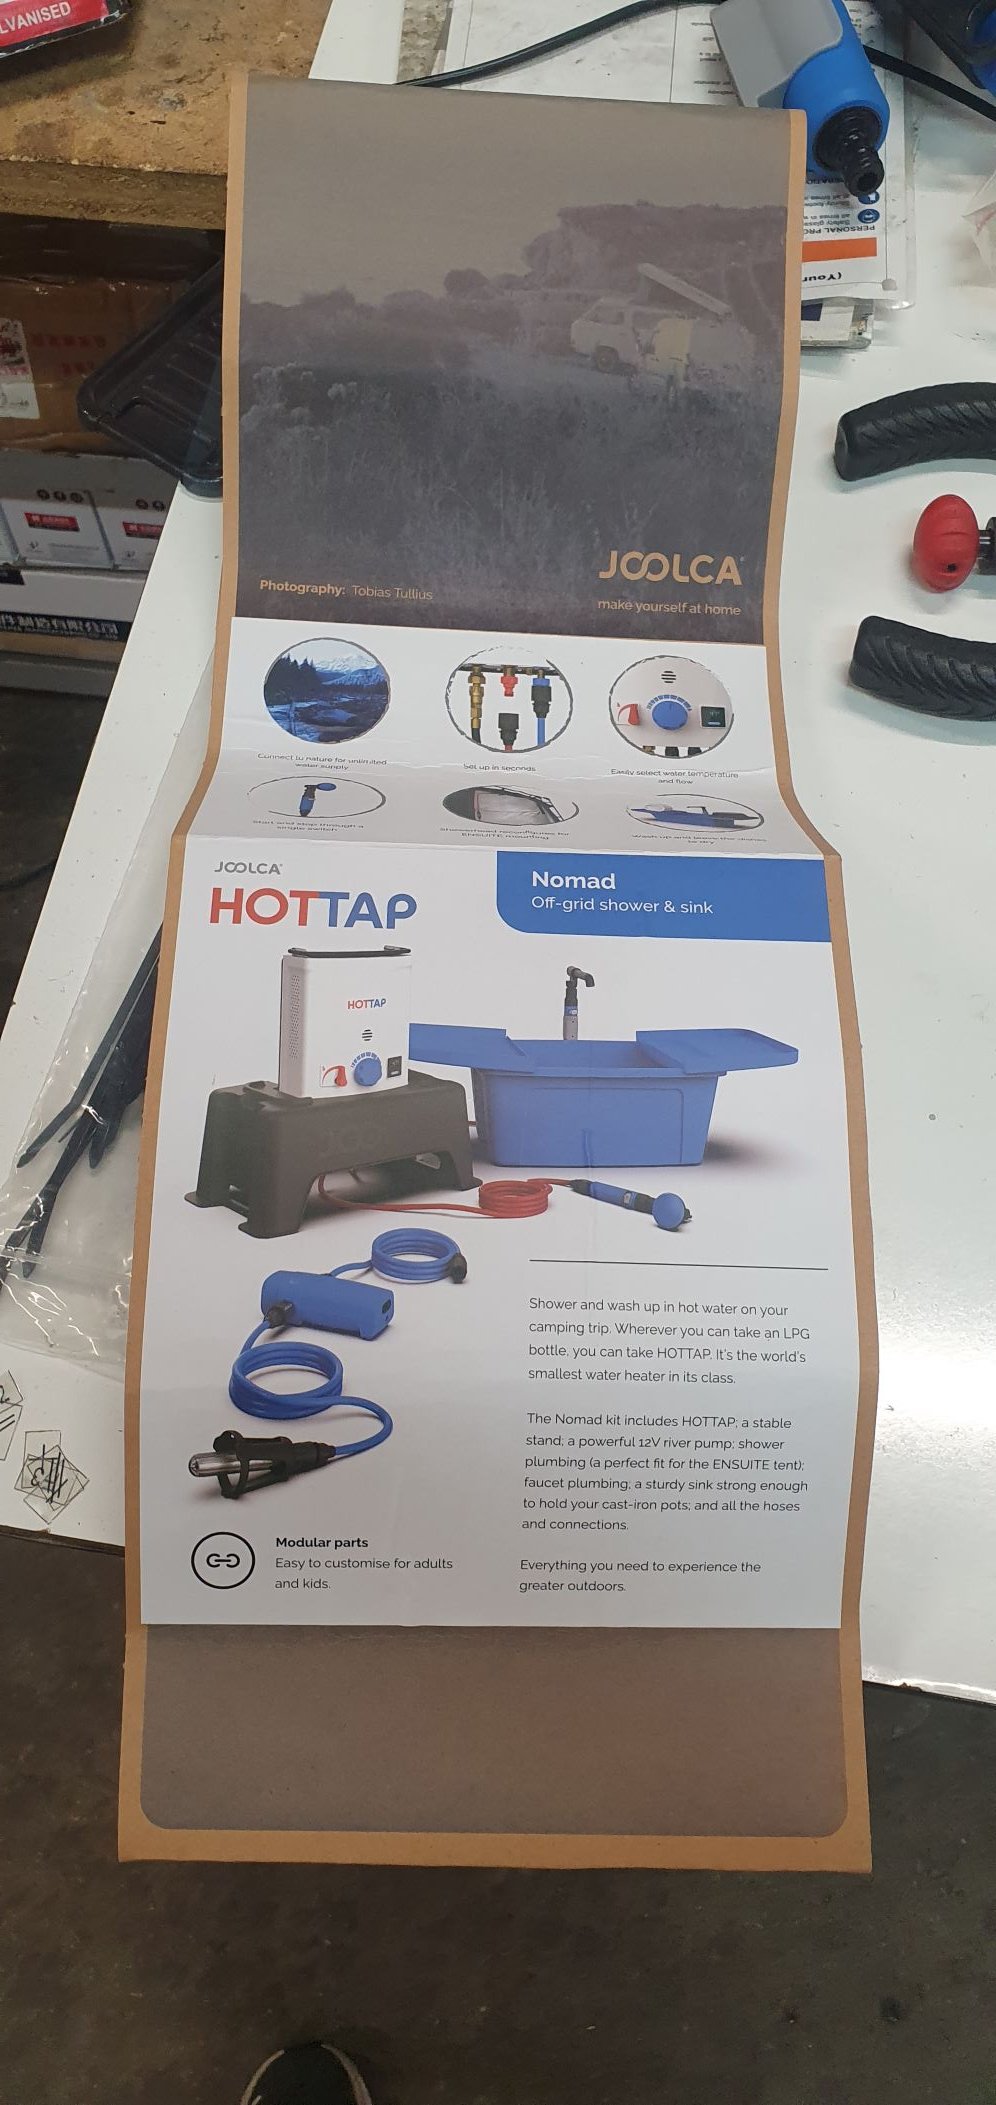
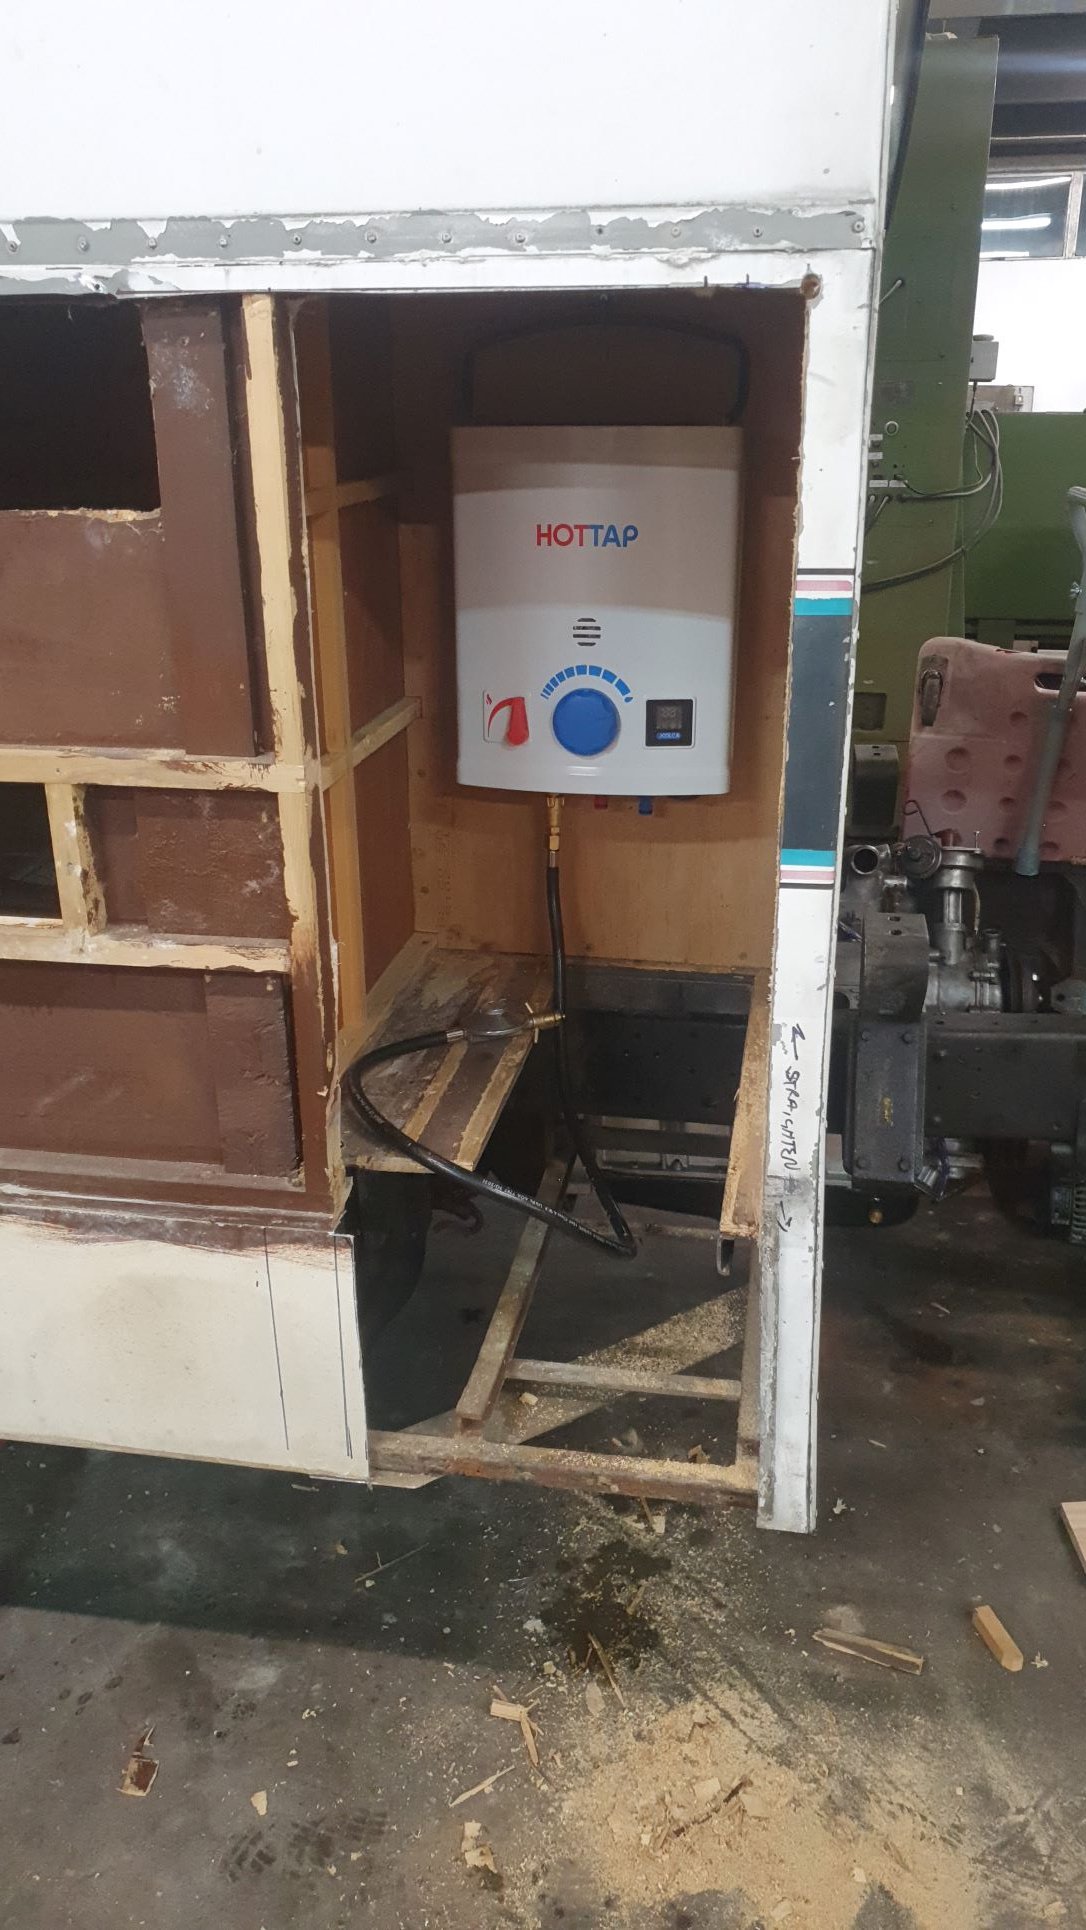
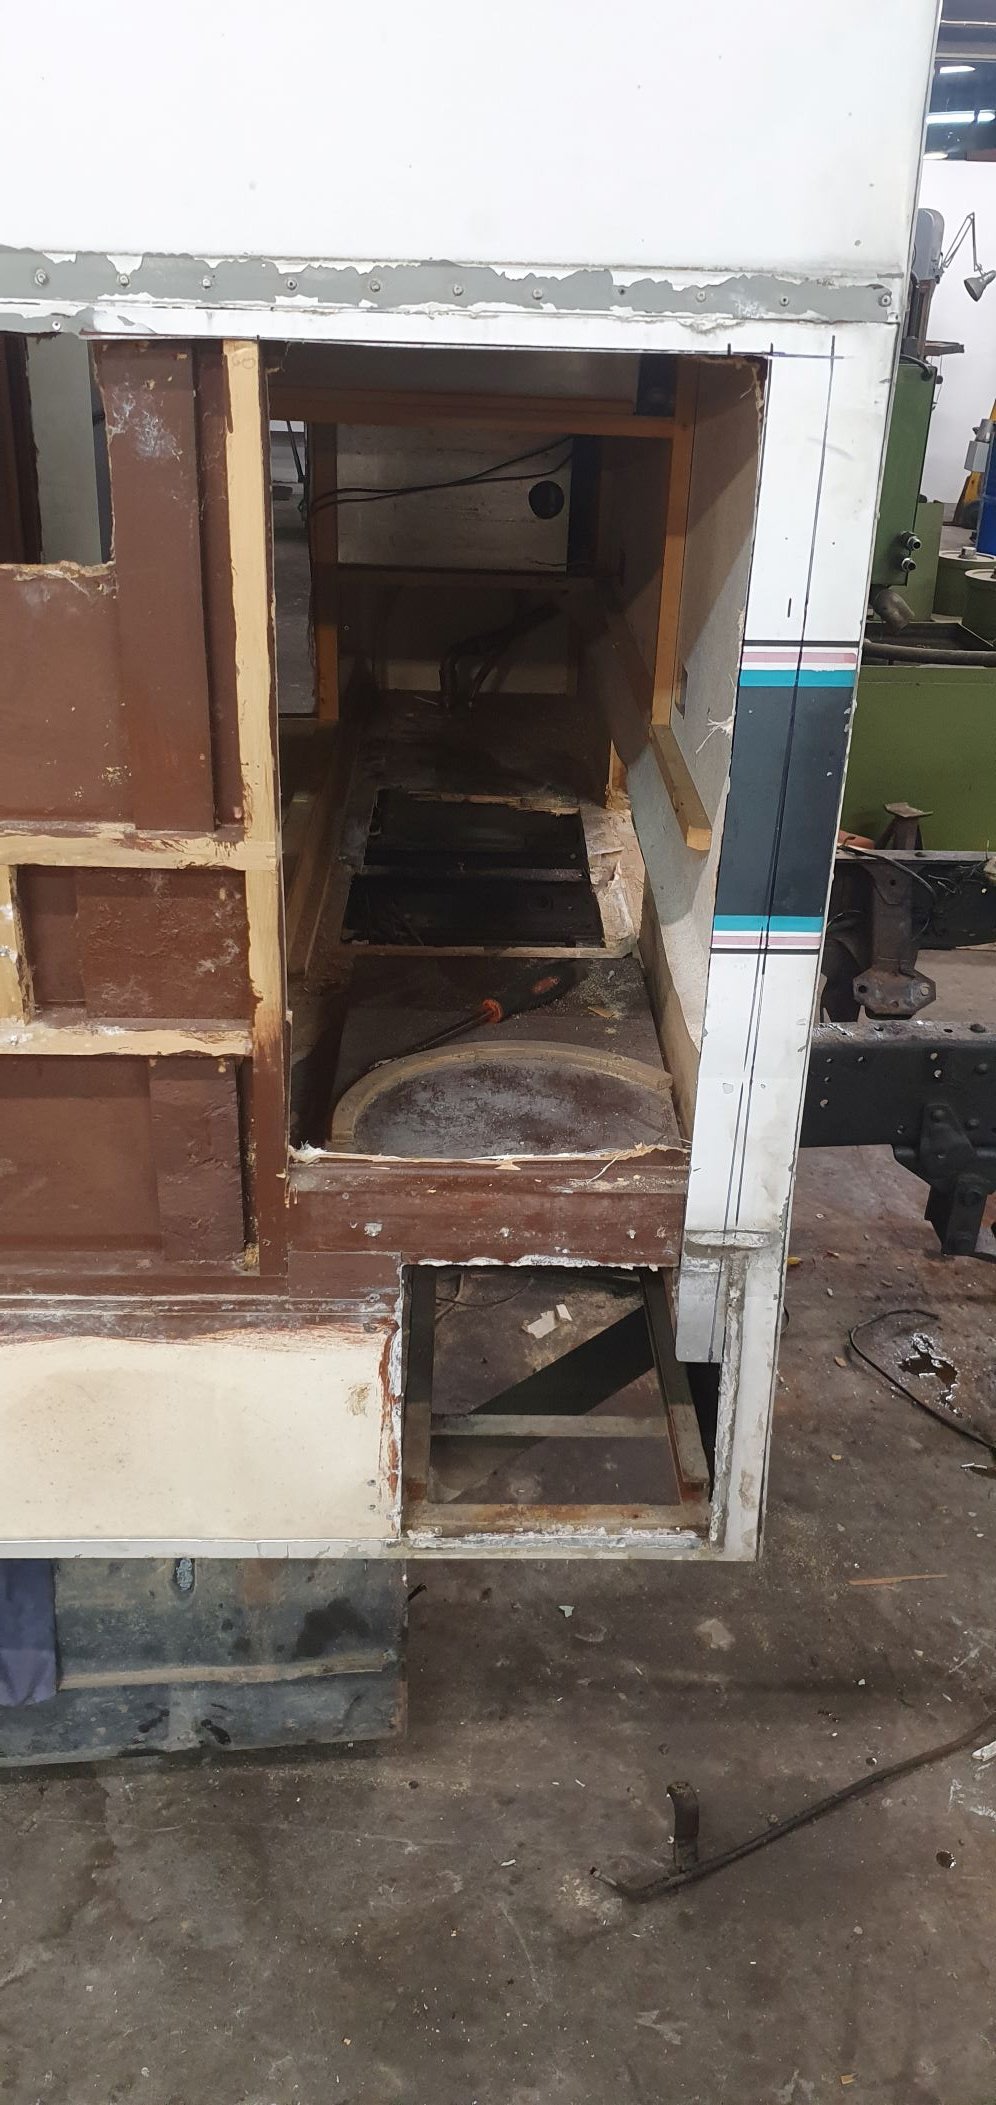
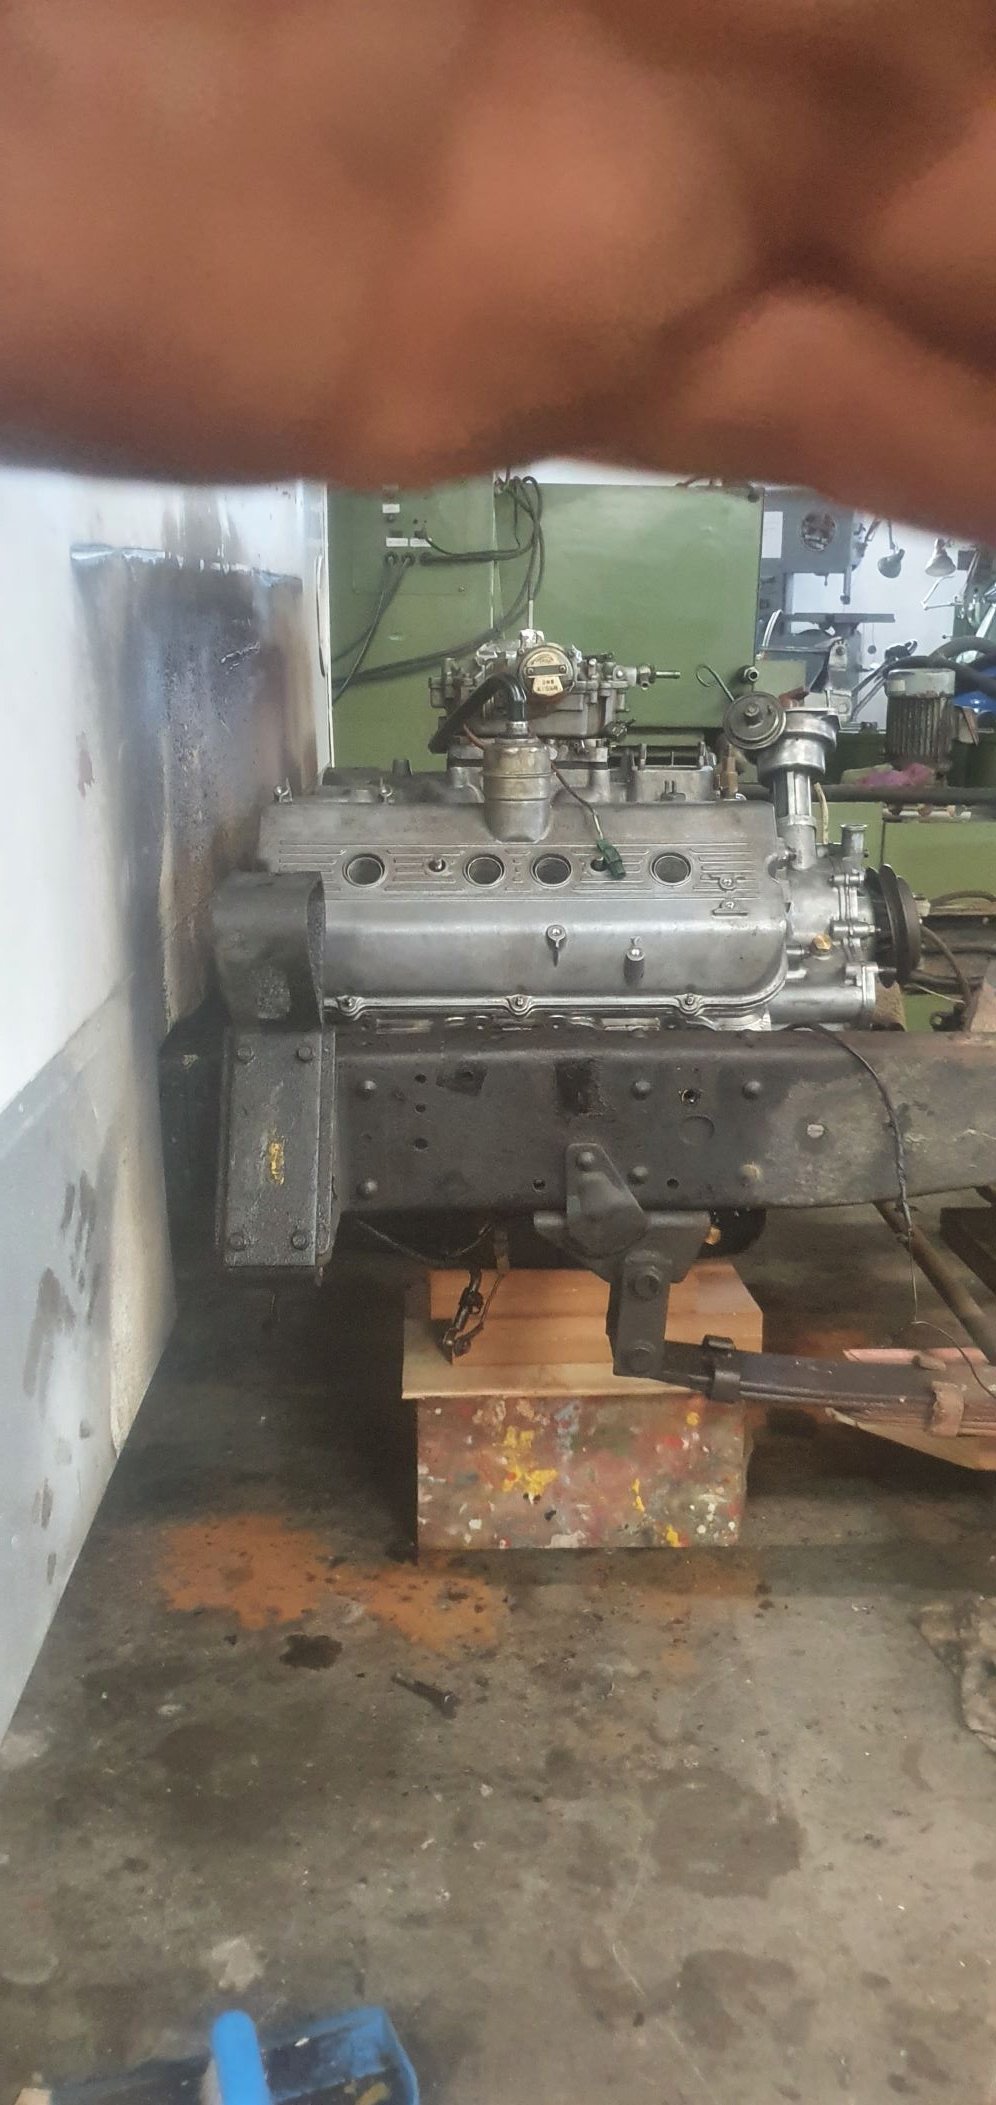
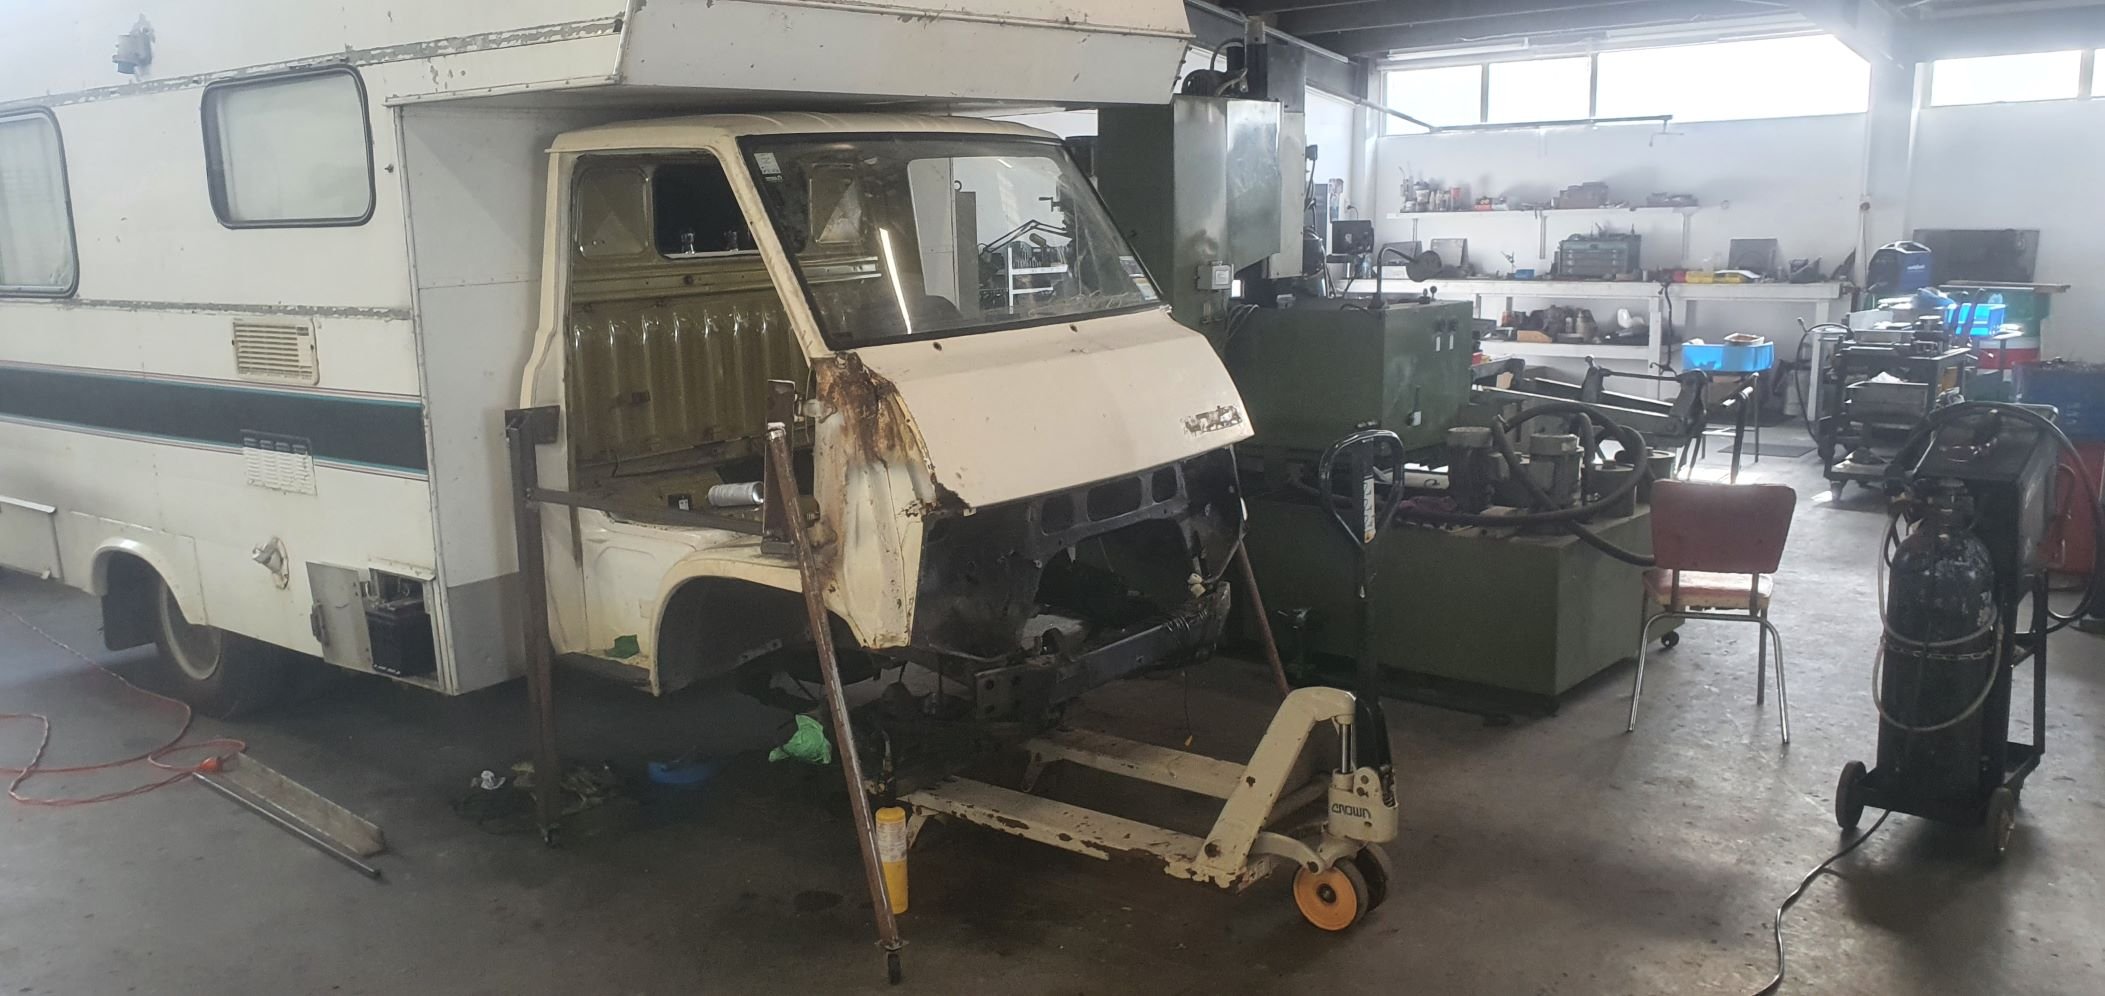
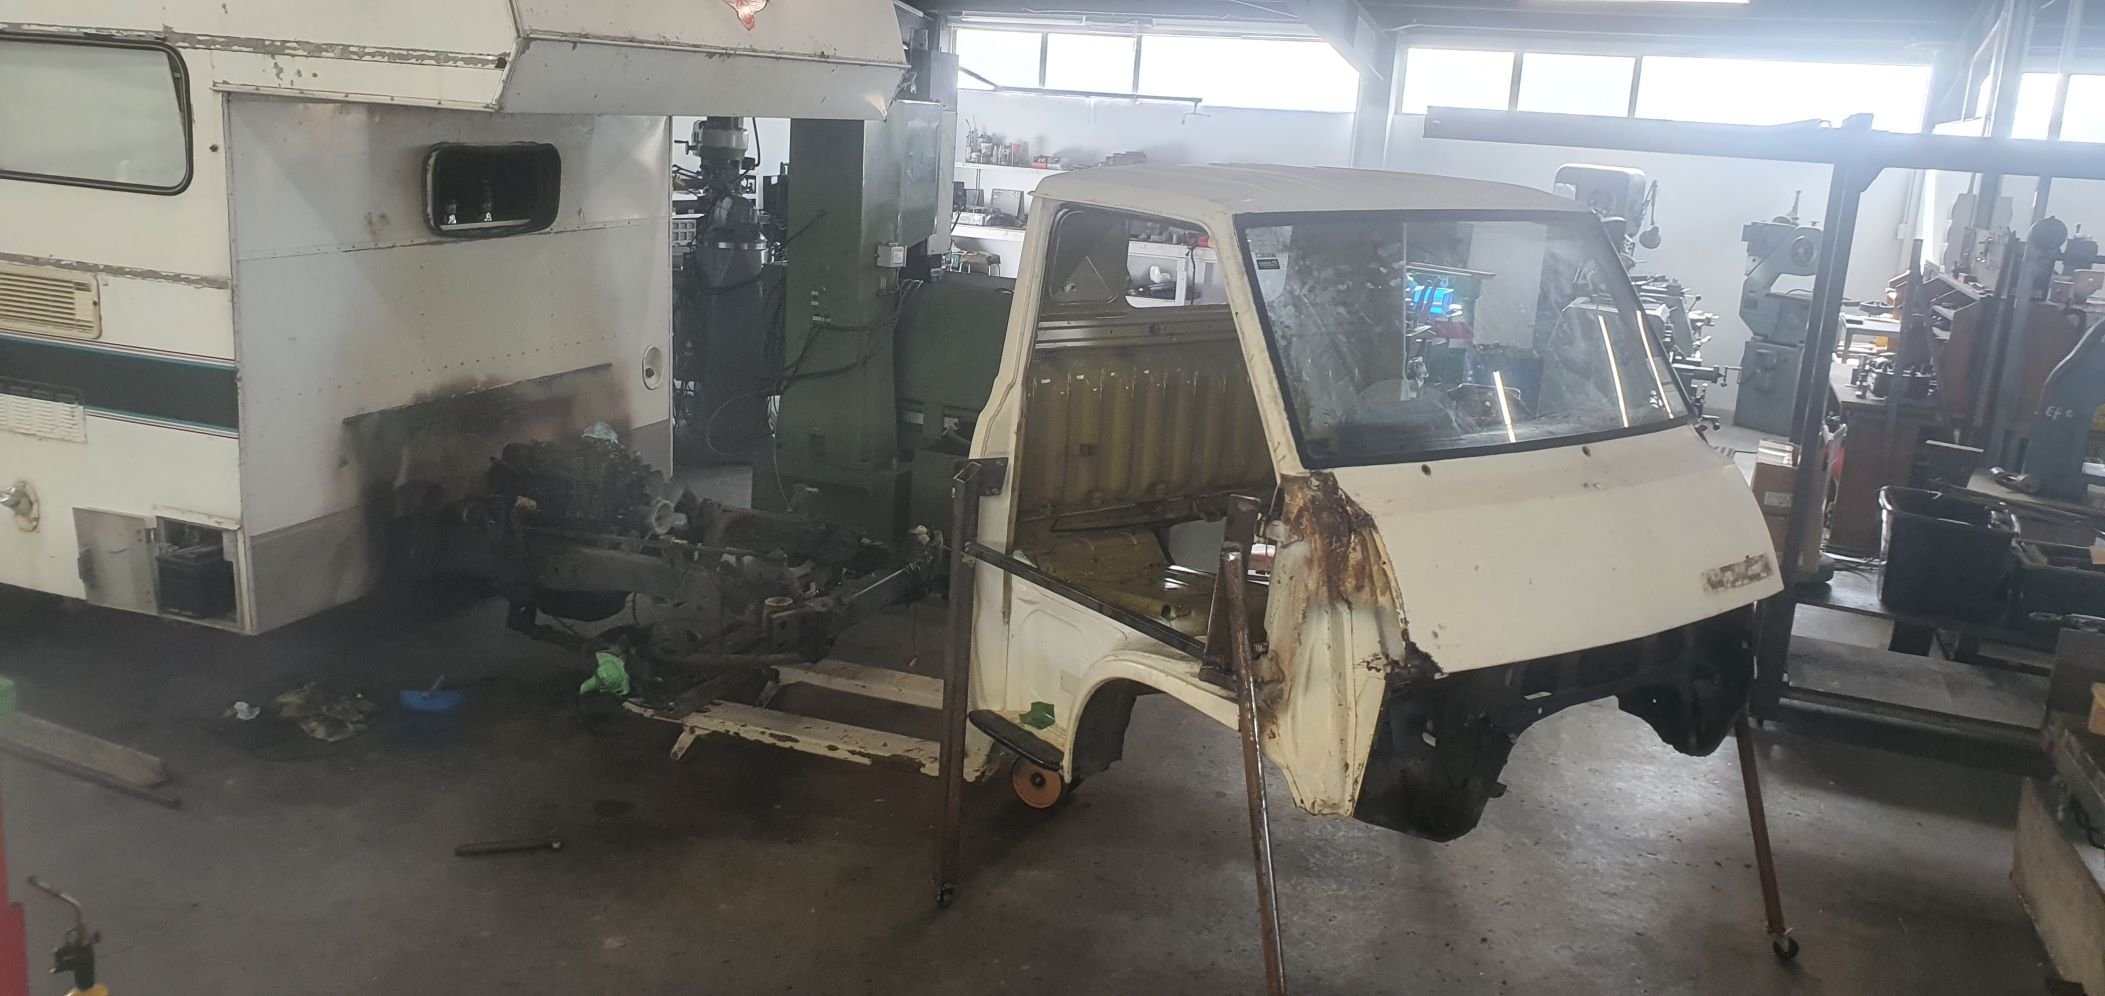
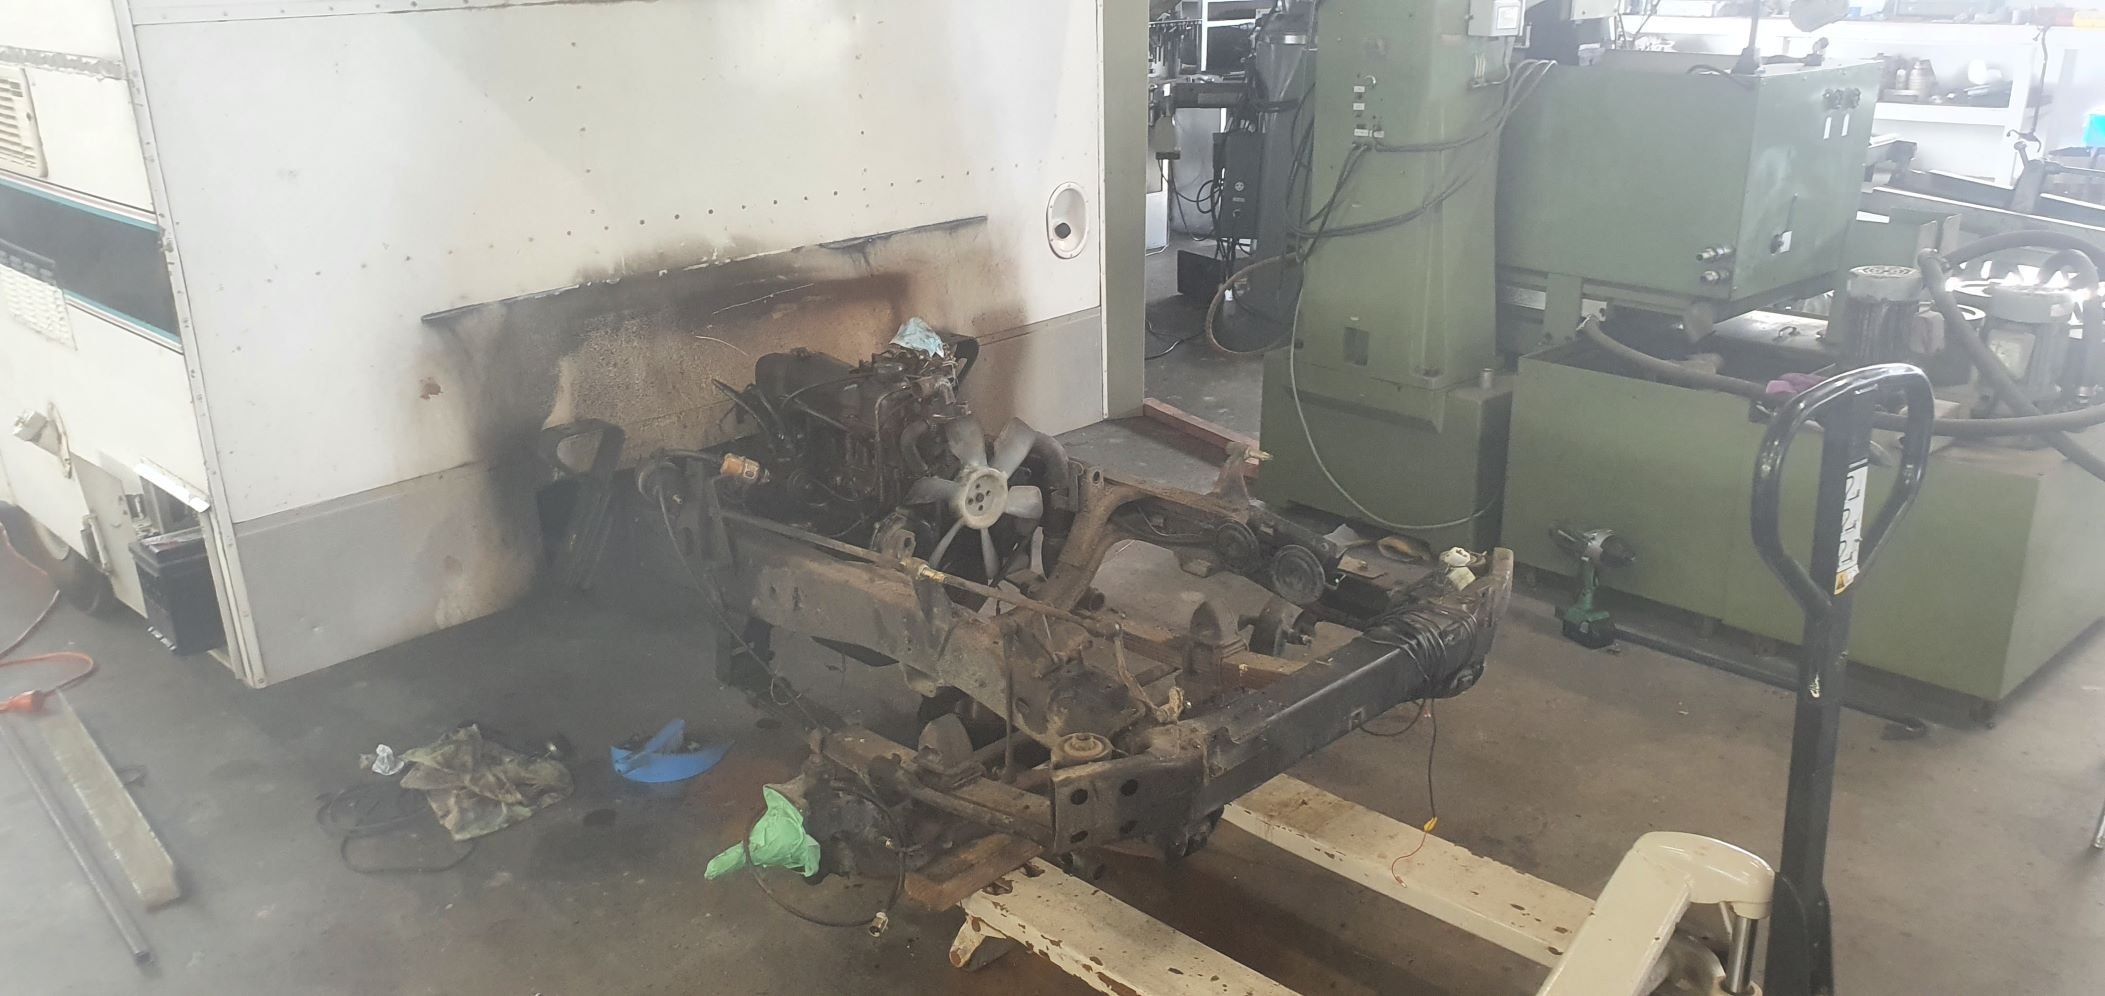
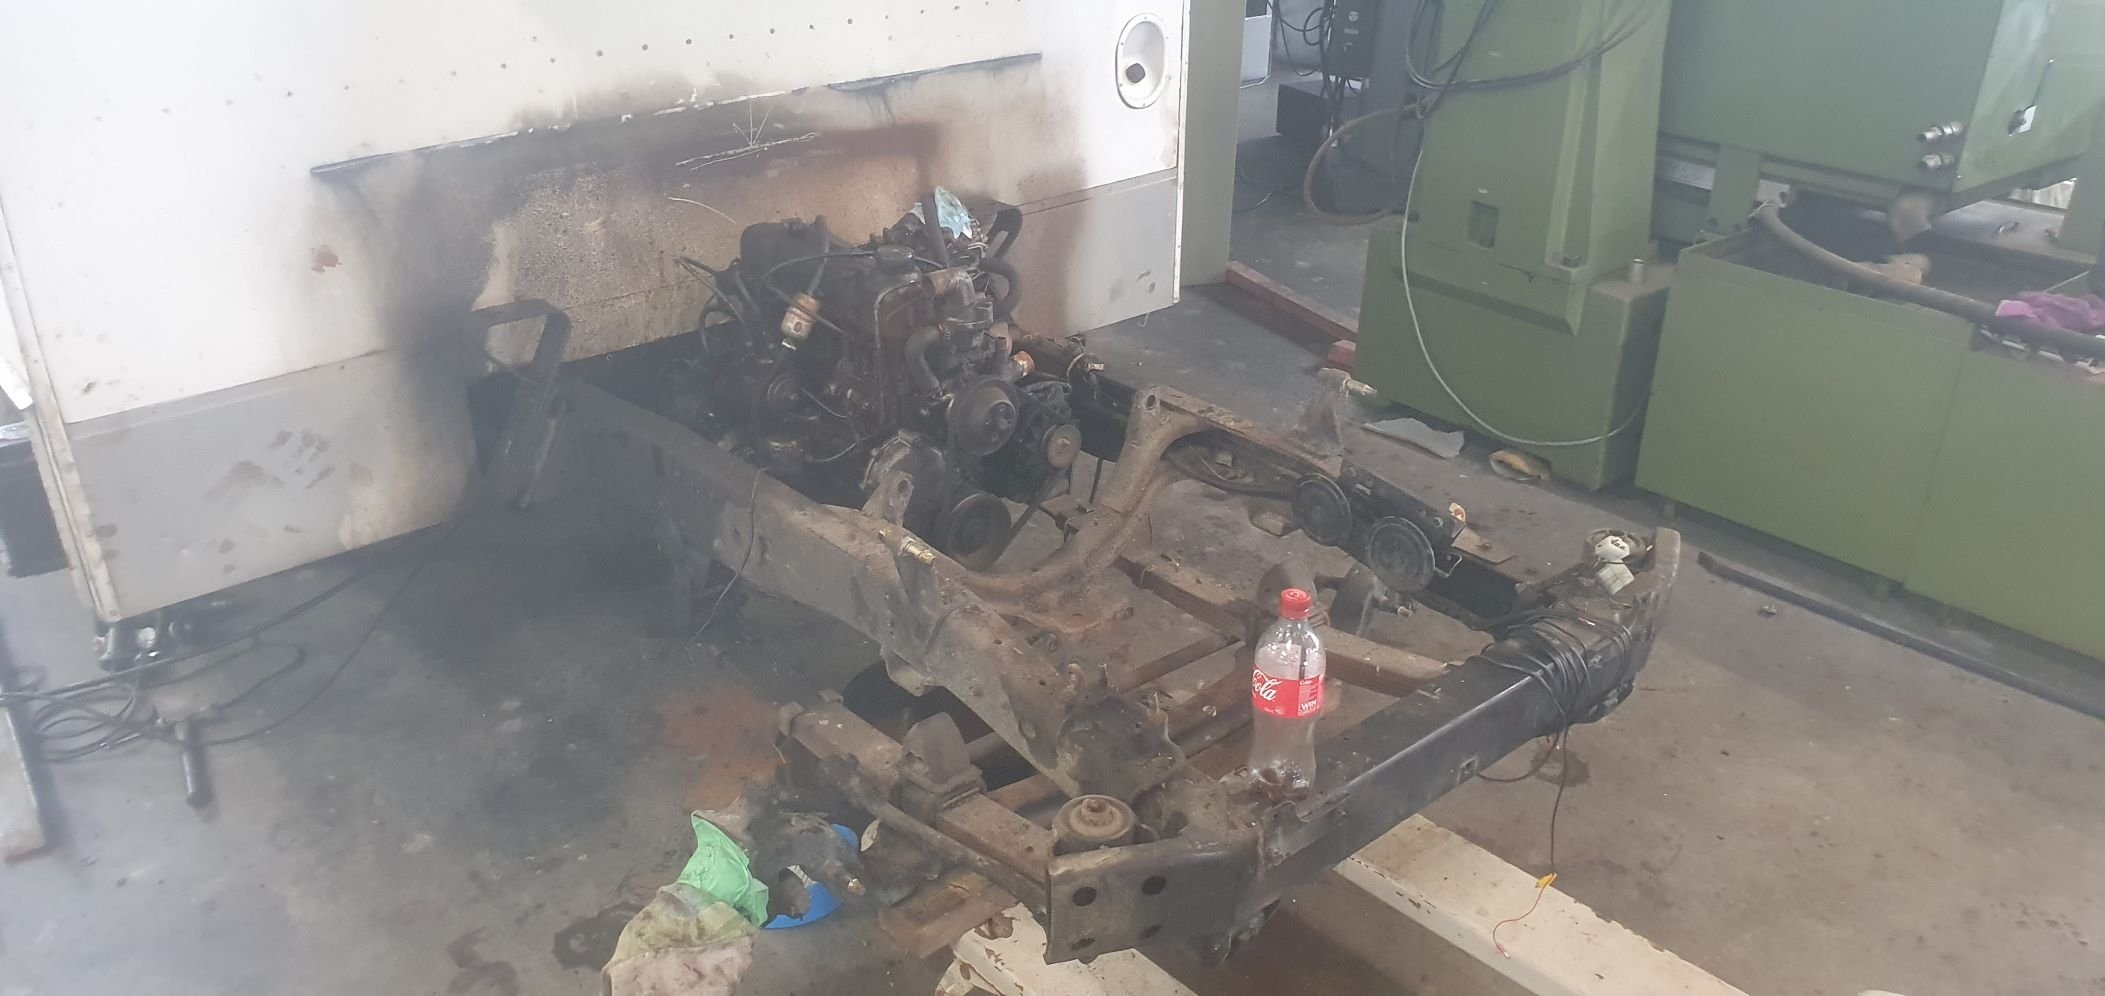
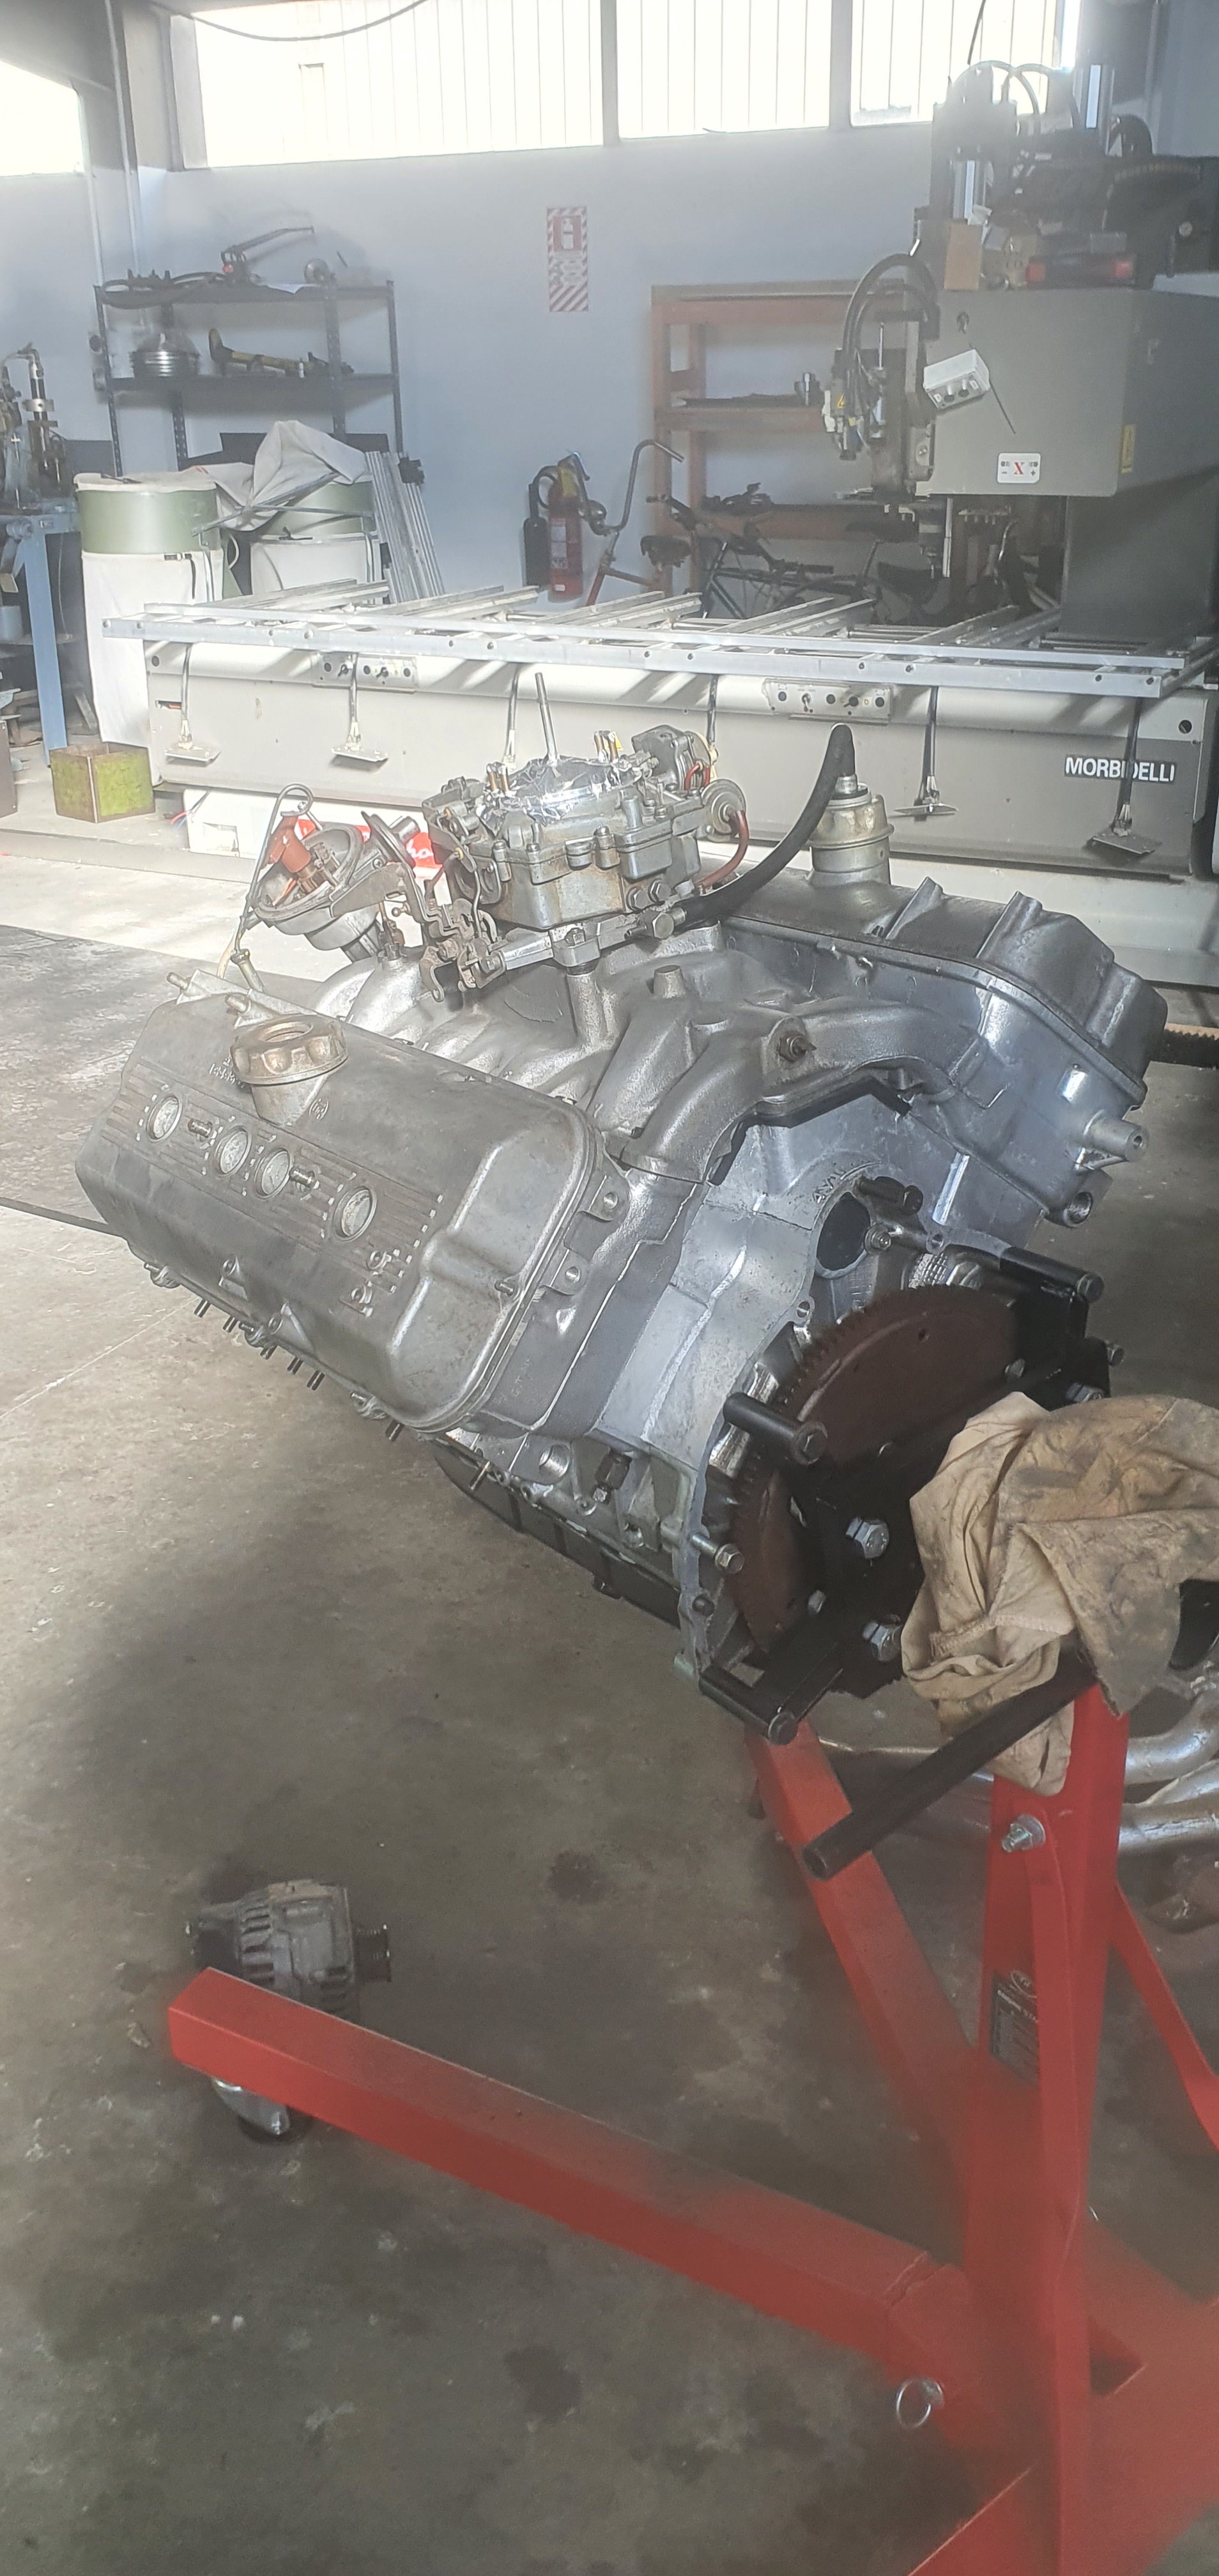
Been a while since I posted anything, progress has been not too bad. The engine has been hanging out in there for a bit now, Im pretty comfortable with it. I decided to start working on the mounting and some of the other ancillary bits, as well as sorting out the gas locker and battery area. Got a sweet new toy too! So I threw the engine mounts and trans on and really got the engine into the final resting posi, or thereabouts. Started sussing out what to do re engine mounts, which necessitated starting to sus out what to do with alternator.. I have a 140A alternator form an old benz I scrapped so kindof dummied that into place, took original pully off old motor and bored centre out on my lathe for dummying purposes (still unsure if crank to alt pulley ratio is bang on - minor detail at this point). Anyway a bit of faffing about and we settled on a way of mounting and tensioning that ensured the belt doesnt foul the water pump housing (its pretty close). Made a cardboard template for the bracket, then drew it up in CAD, then printed 1:1 and cut out and checked fit. Was good. Did the same for header flanges. Also good. Next mish was then to CAD up the engine mounts, or rather engine cradle... So I spun up dome hollow bosses on the lathe for mounting to the original mounts, then roughly figured the width across these. Did a butload of measuring and crawling around underneath, fucked off a whole bunch of shitty wiring under there while I was at it. Then drew up the engine cradle, which mounts between the original engine mounts and gearbox mounts. Ill make a gbox xmember later. Looks like tail shaft will be about 600 long. I CAD this up with the intention of mounting the engine without the alternator to get engin placement right, and for ease of fab, then Ill clearance the mount later to accomodate the alternator. I need to release all these files for cutting now, but just been sidetracked with other bits.. So I started sorting out the gas locker, random I know but I kindof want to get the fuel tank situation sussed (possibly going to find another slightly bigger one, different shape), anyway that kindof relates to the gas/battery locker as there is some encroachment there.. So I removed a shitload of shit out of there, cut and trimmed everything that needed to go so I have a nice simple rectangular opening I can start to work with that also maximises use of the space. There will be a fair bit going on in here. Starter and house battery, battery splitter rig and solar controller, inverter and gas califont for sink and shower (see below, I got me a Joolca!) For the battery splitter/solar controller I have done a bit of digging around, there appears many different ways you can do this, but I was really hoping there was a product that just did it all and sorted it for you...turns out I think Ive found it - https://www.kickassproducts.com.au/buy/kickass-25a-dc-charger-with-anderson/KADCDC25A-AND be interested to hear peoples thoughts on this, and also opinions on simple ways of doing this. For me this ticks a lot of boxes. Controls Solar, does battery isolation between house and starter battery, accepts alternator input. Only problem I see is I have got me a pretty big panel to throw up top, around 375w from memory. I recall it outputing around 40V peak in summer and this thing is only rated to 23V... anyway, good to hear peoples thoughts on this. Plan is to mount Joolca in the back, gas bottle in front and a floor between gas and battery cavity. So I trimmed out the gas locker nicely, framed it up and instated a new rear wall for the locker from ply, reused some old bits of framing I chopped out. I gave the Joolca a good thrashing tonight. It pissed me off a bit, but I think it was because I was reciring water and it doesnt like the inlet temp of the water too high otherwise it cuts off the flame. I brought the Nomad kit for $650 thinking the shower head and tap looked the goods. They are, but I have since thought maybe I just hard plumb everything and only use the flash Joolca pump...will see. So the plan is to fully line the gas/califont locker with ally sheet and then duct from the door and have an exhaust fan sucking the hot air away through a hole behind the cab., go a nice louvred panel for this today and can reuse a few other bits of steel flashing I pulled from elsewhere. I also got some extrusion angle today for framing up around the gas locker opening. Next mish is to get some 0.9mm ally sheet for the outside cladding and gas locker. I will prob just draw all this up and then order a bunch of laser cutting, as I dont have a guillotine. I am fortunate enough to have a brake press though, so will draw to spec and then fold everything. Id kinda like to get the gas locker somewhat completed before refocusing on the engine. I probably wont do that though and jump all over the show or start a new mission...I cant really fully sort the gas locker until I commit to batteries, inverter and the like. That shit is proper money which I dont have right now. so will need to wait a bit and plan as best I can for what will go in there. Ive also started contemplating a bit of body work. I have decided to mount the shitter in the cab under the middle seat as there is enough room for the cassette in front of the engine, and also, its pretty funny. Anyway, thats my lot for now..
- 43 replies
-
- 20
-
-

-

-
4V Century V8 powered Dyna Camper Discussion
HumberSS replied to HumberSS's topic in Project Discussion
Awesome, that looks like a sound rig for someone -
Humber SS's 4V Century V8 powered Dyna Camper
HumberSS replied to HumberSS's topic in Projects and Build Ups
- 43 replies
-
- 21
-
-
-
Humber SS's 4V Century V8 powered Dyna Camper
HumberSS replied to HumberSS's topic in Projects and Build Ups
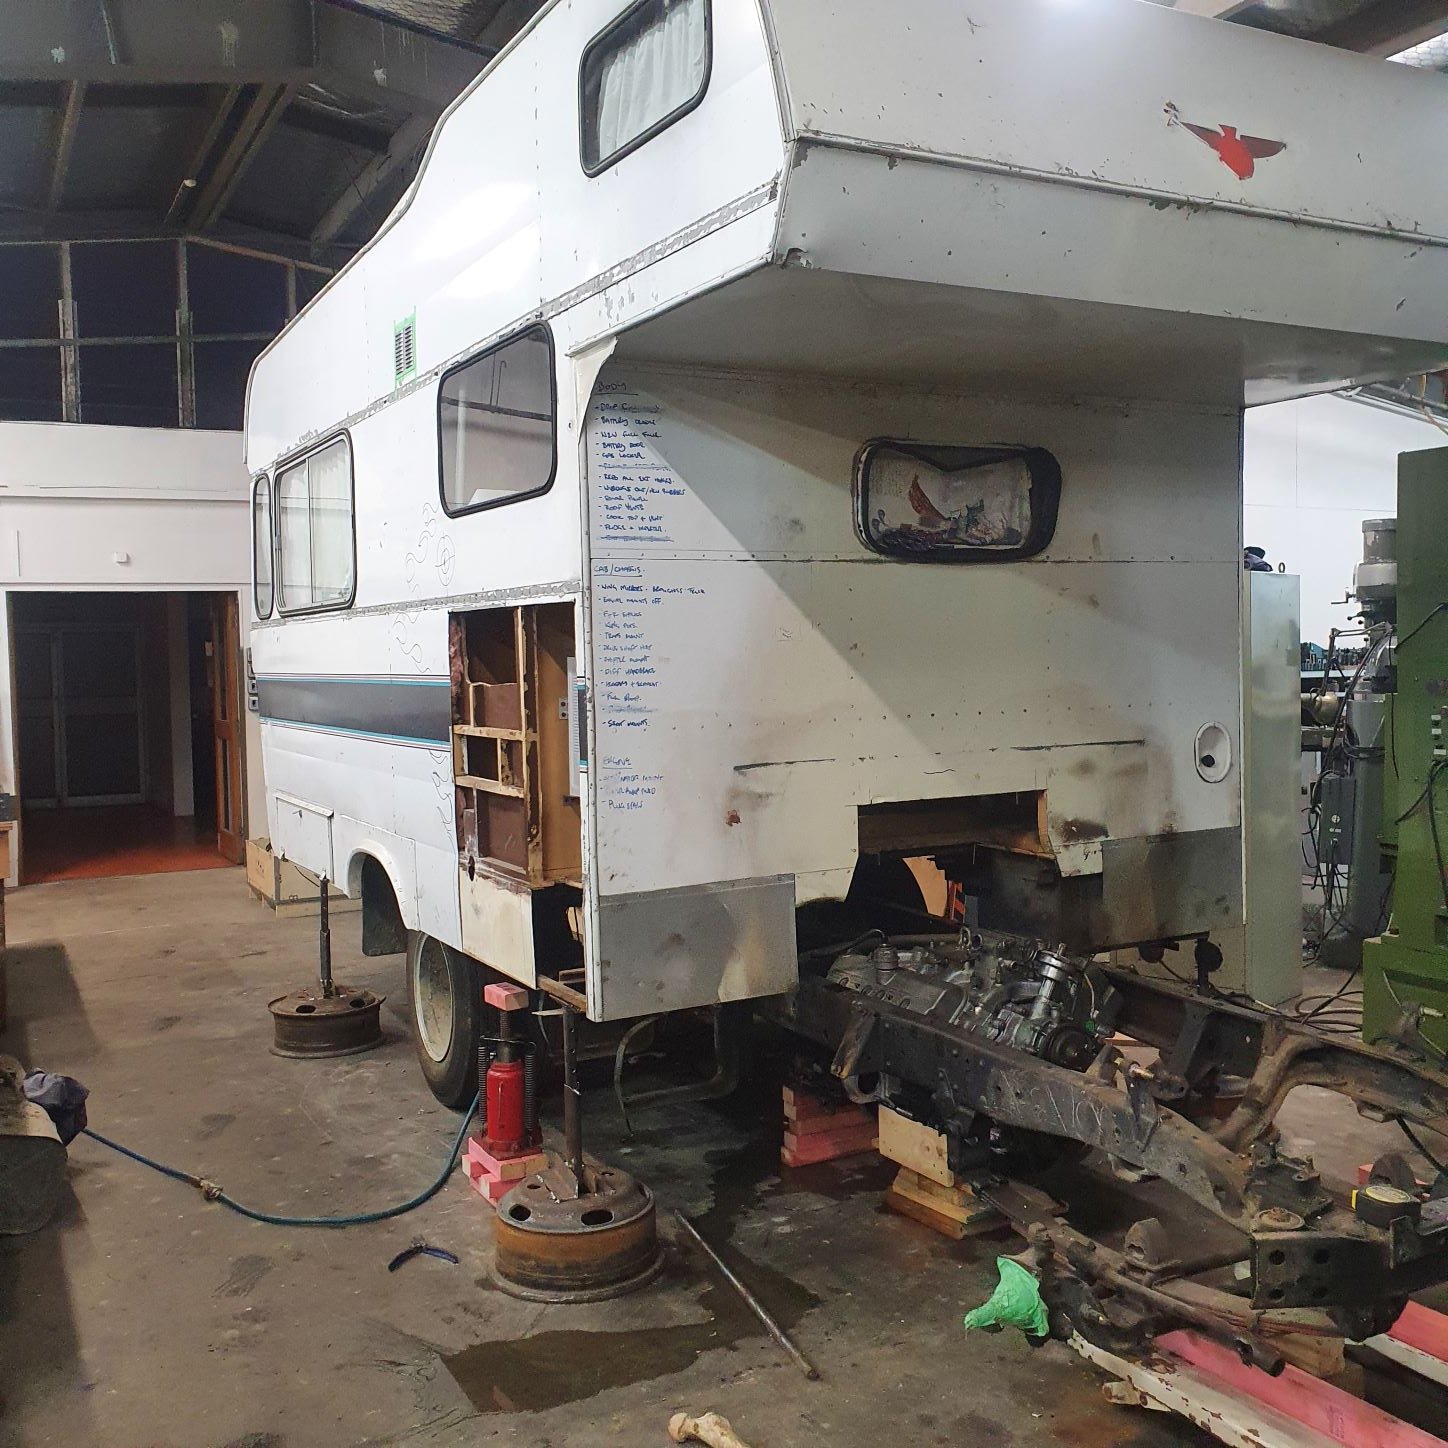
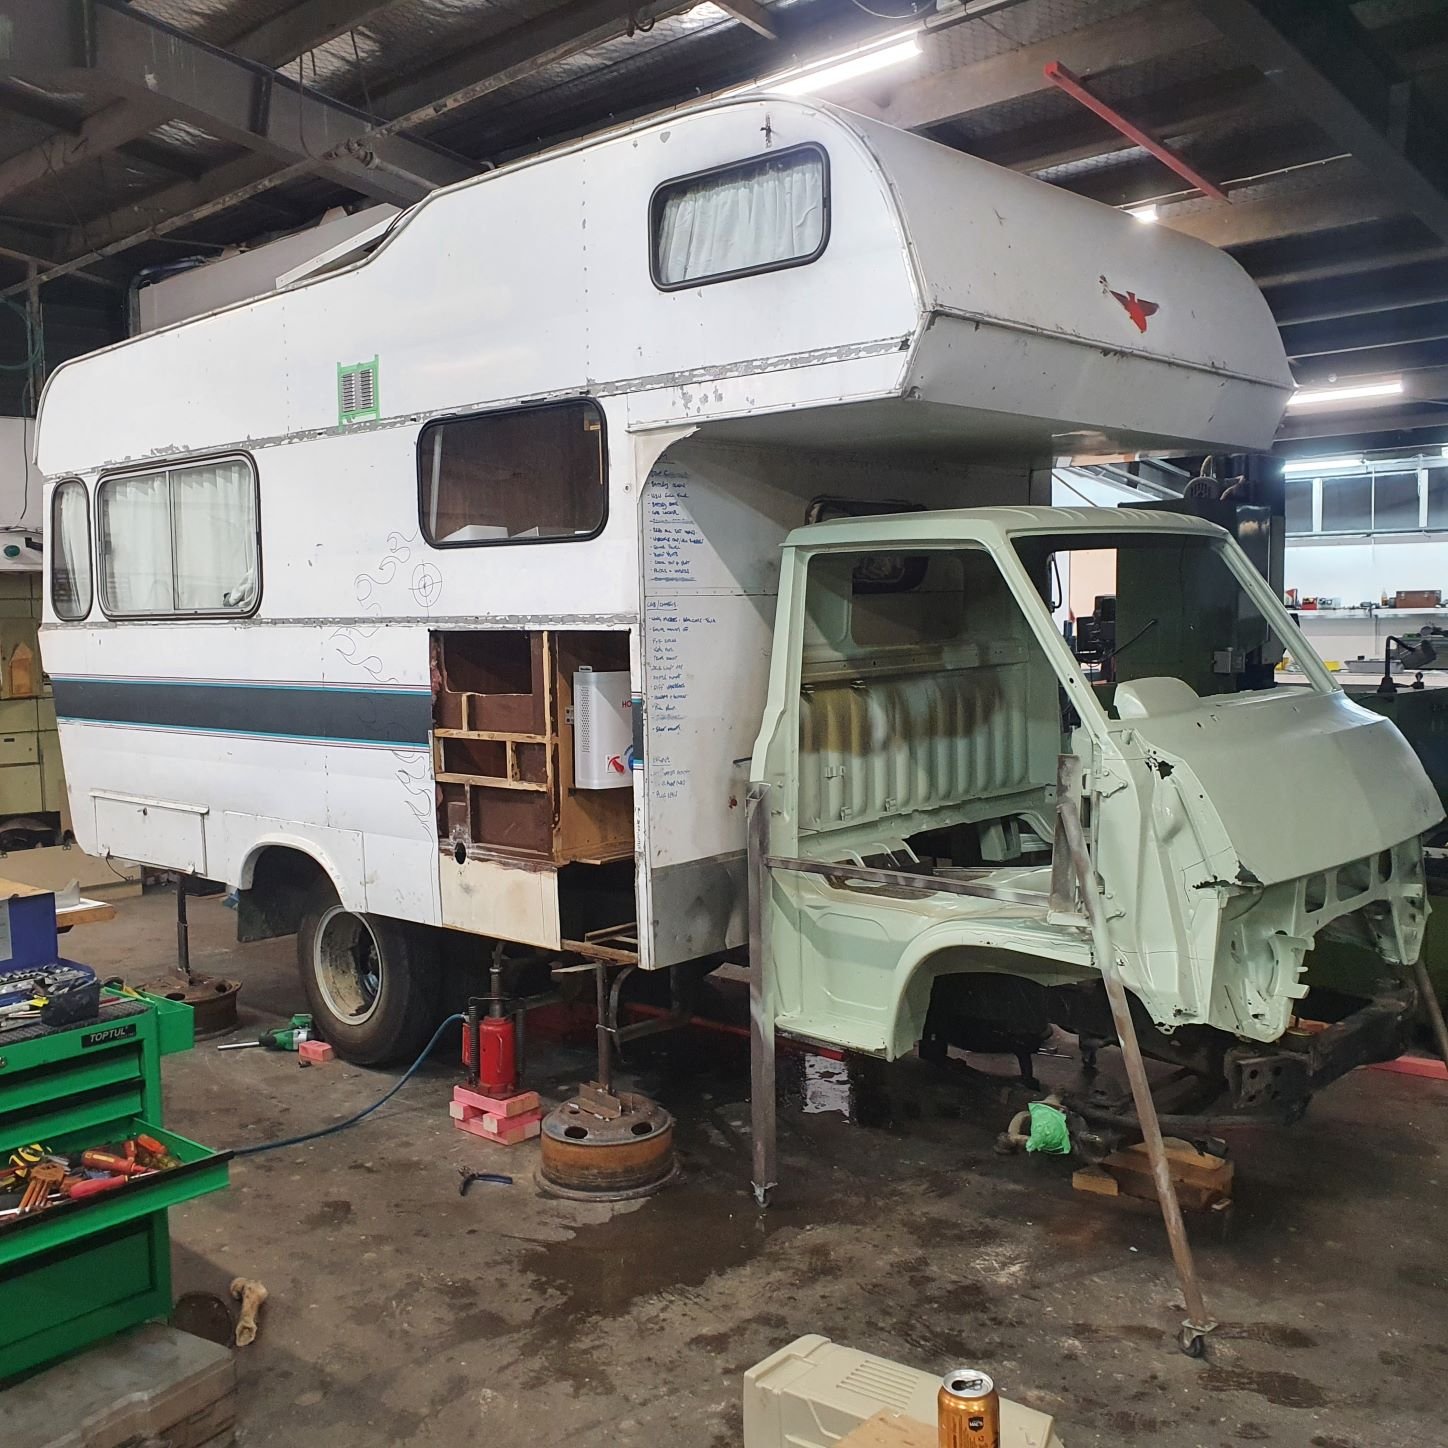
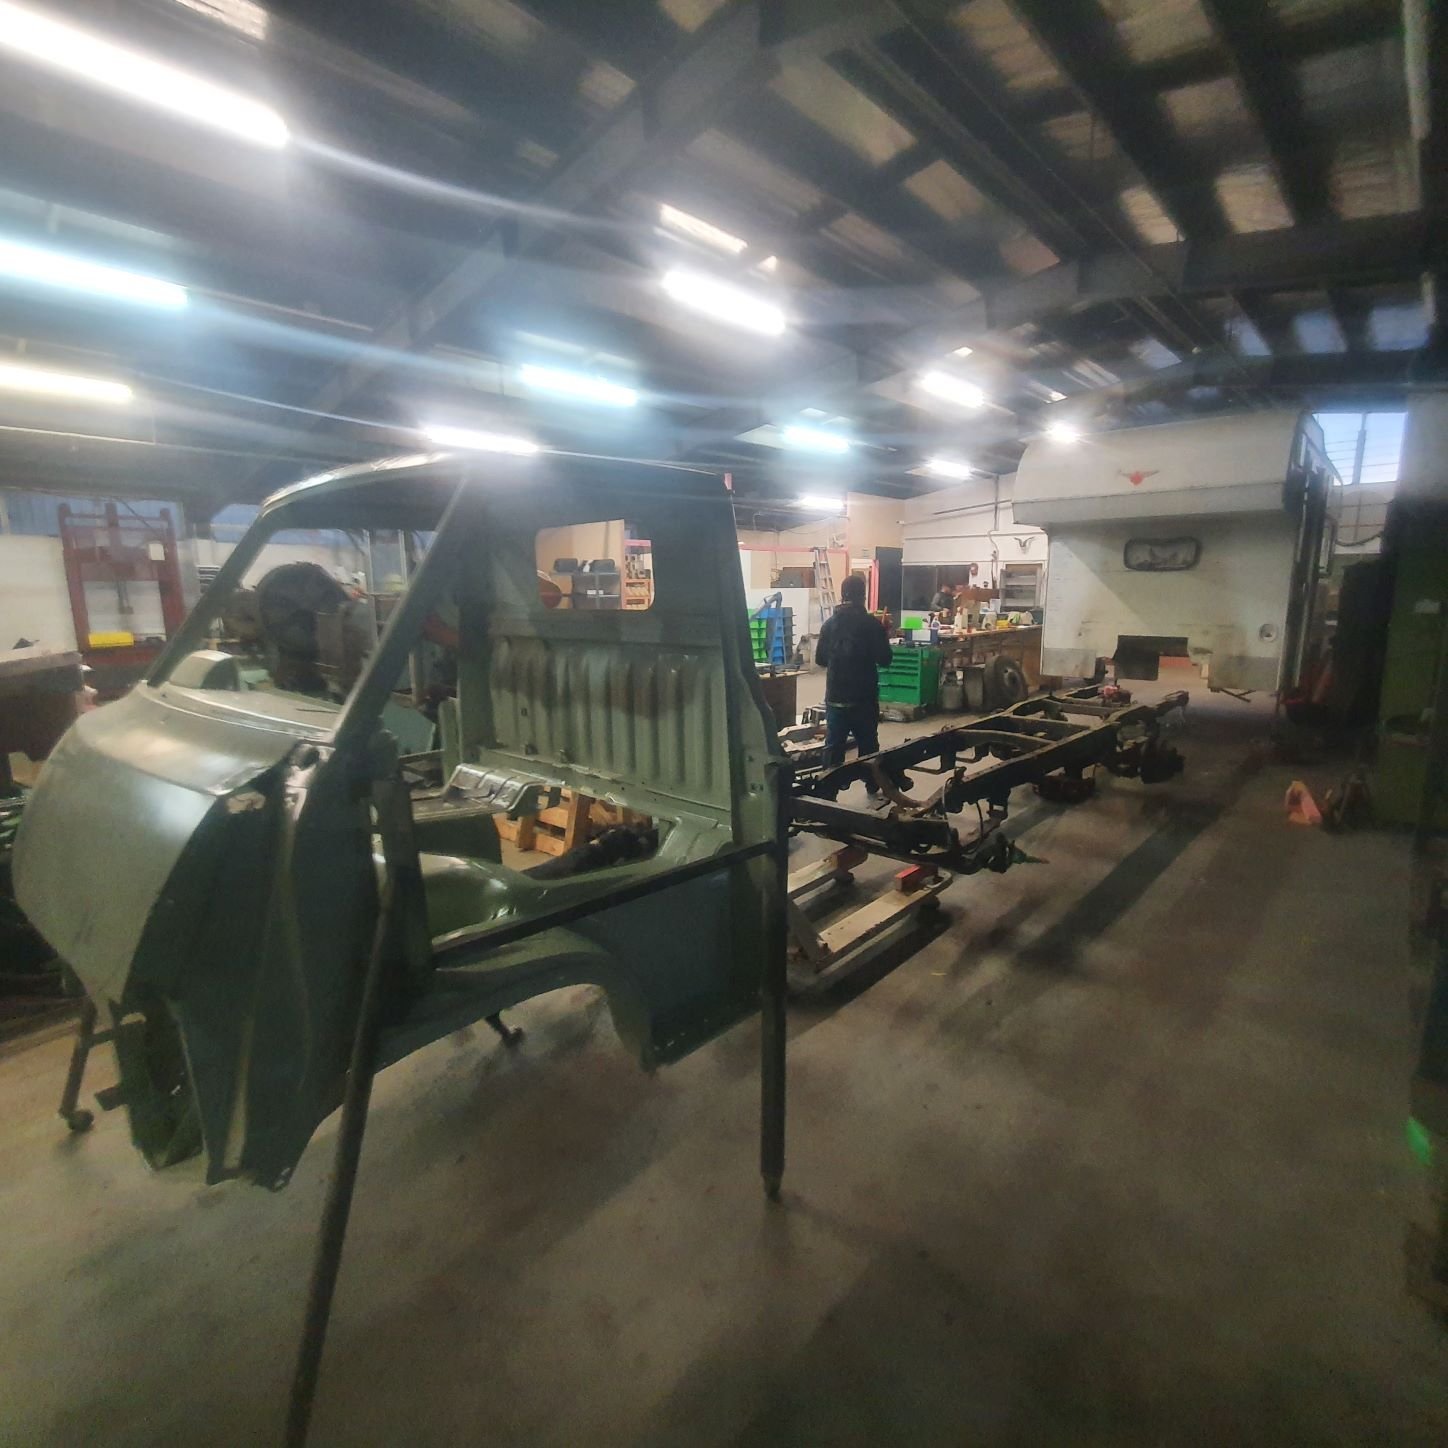
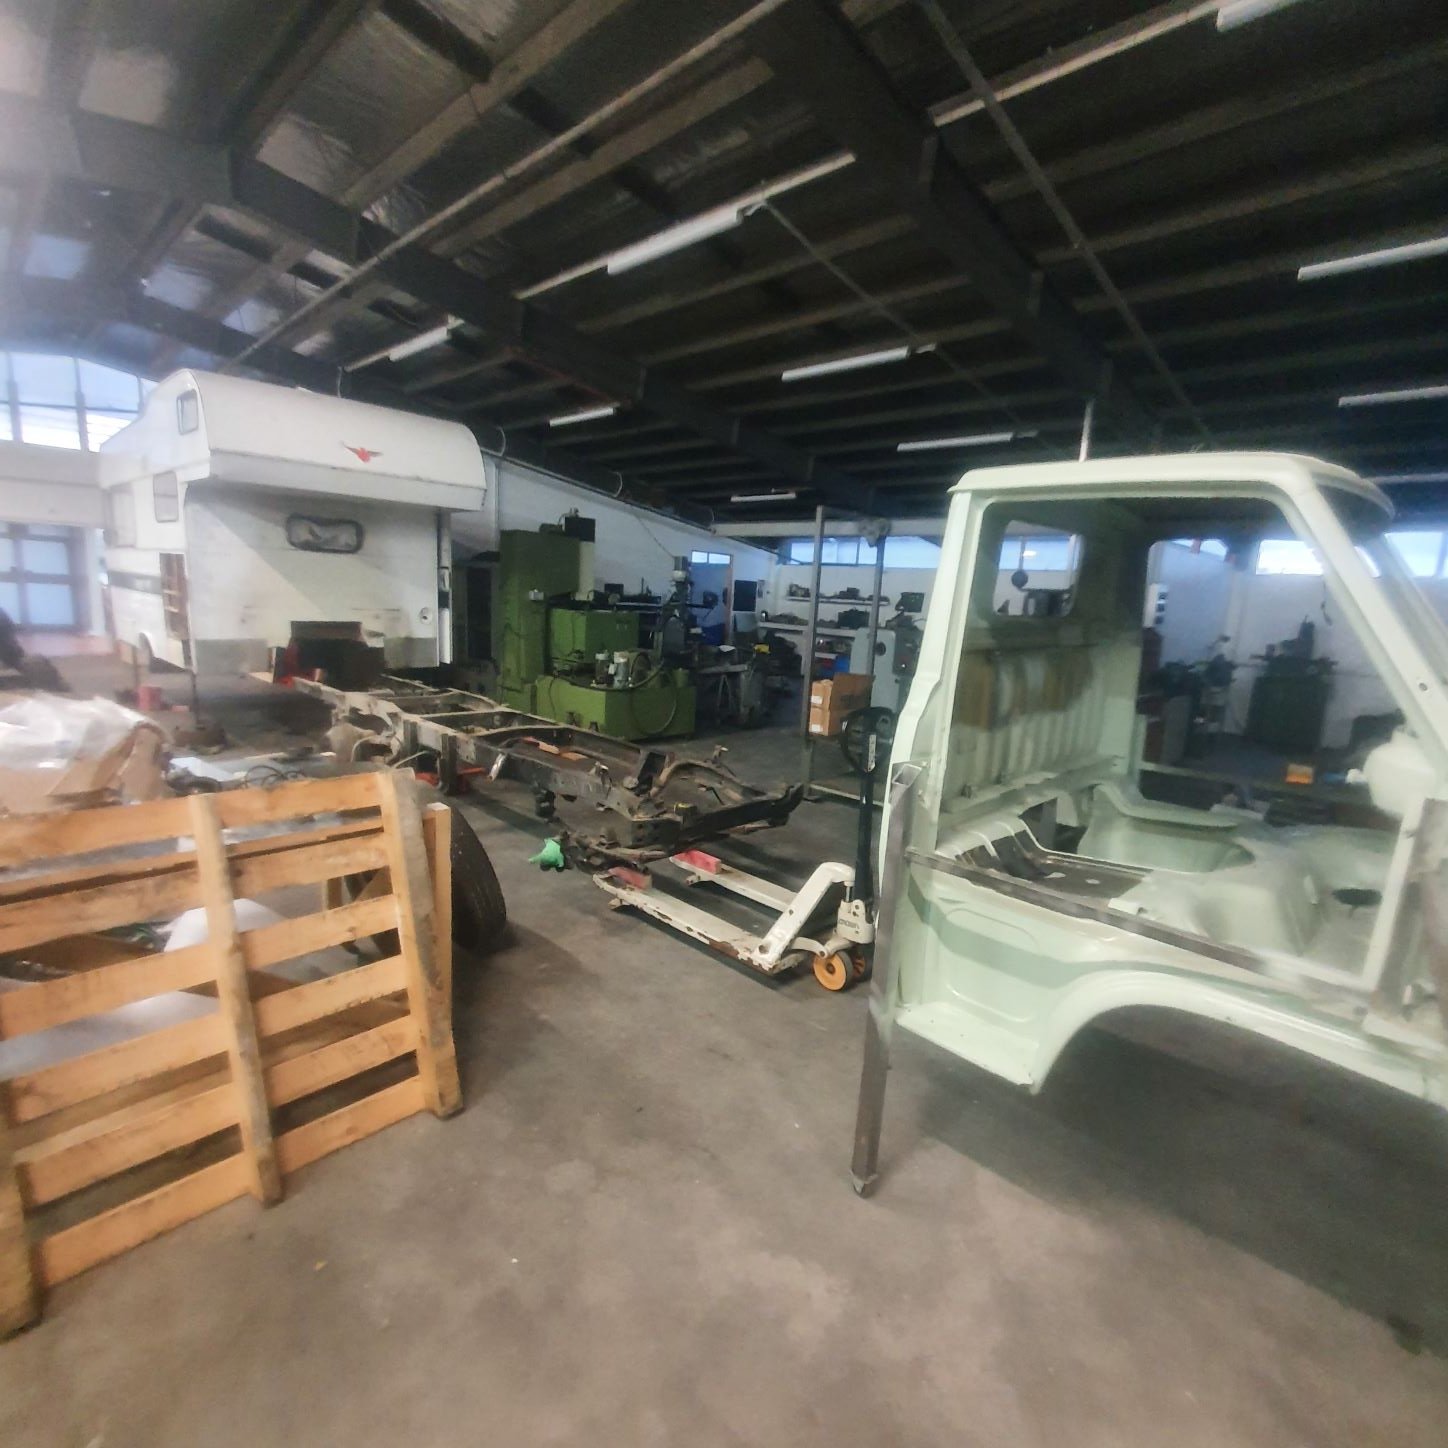
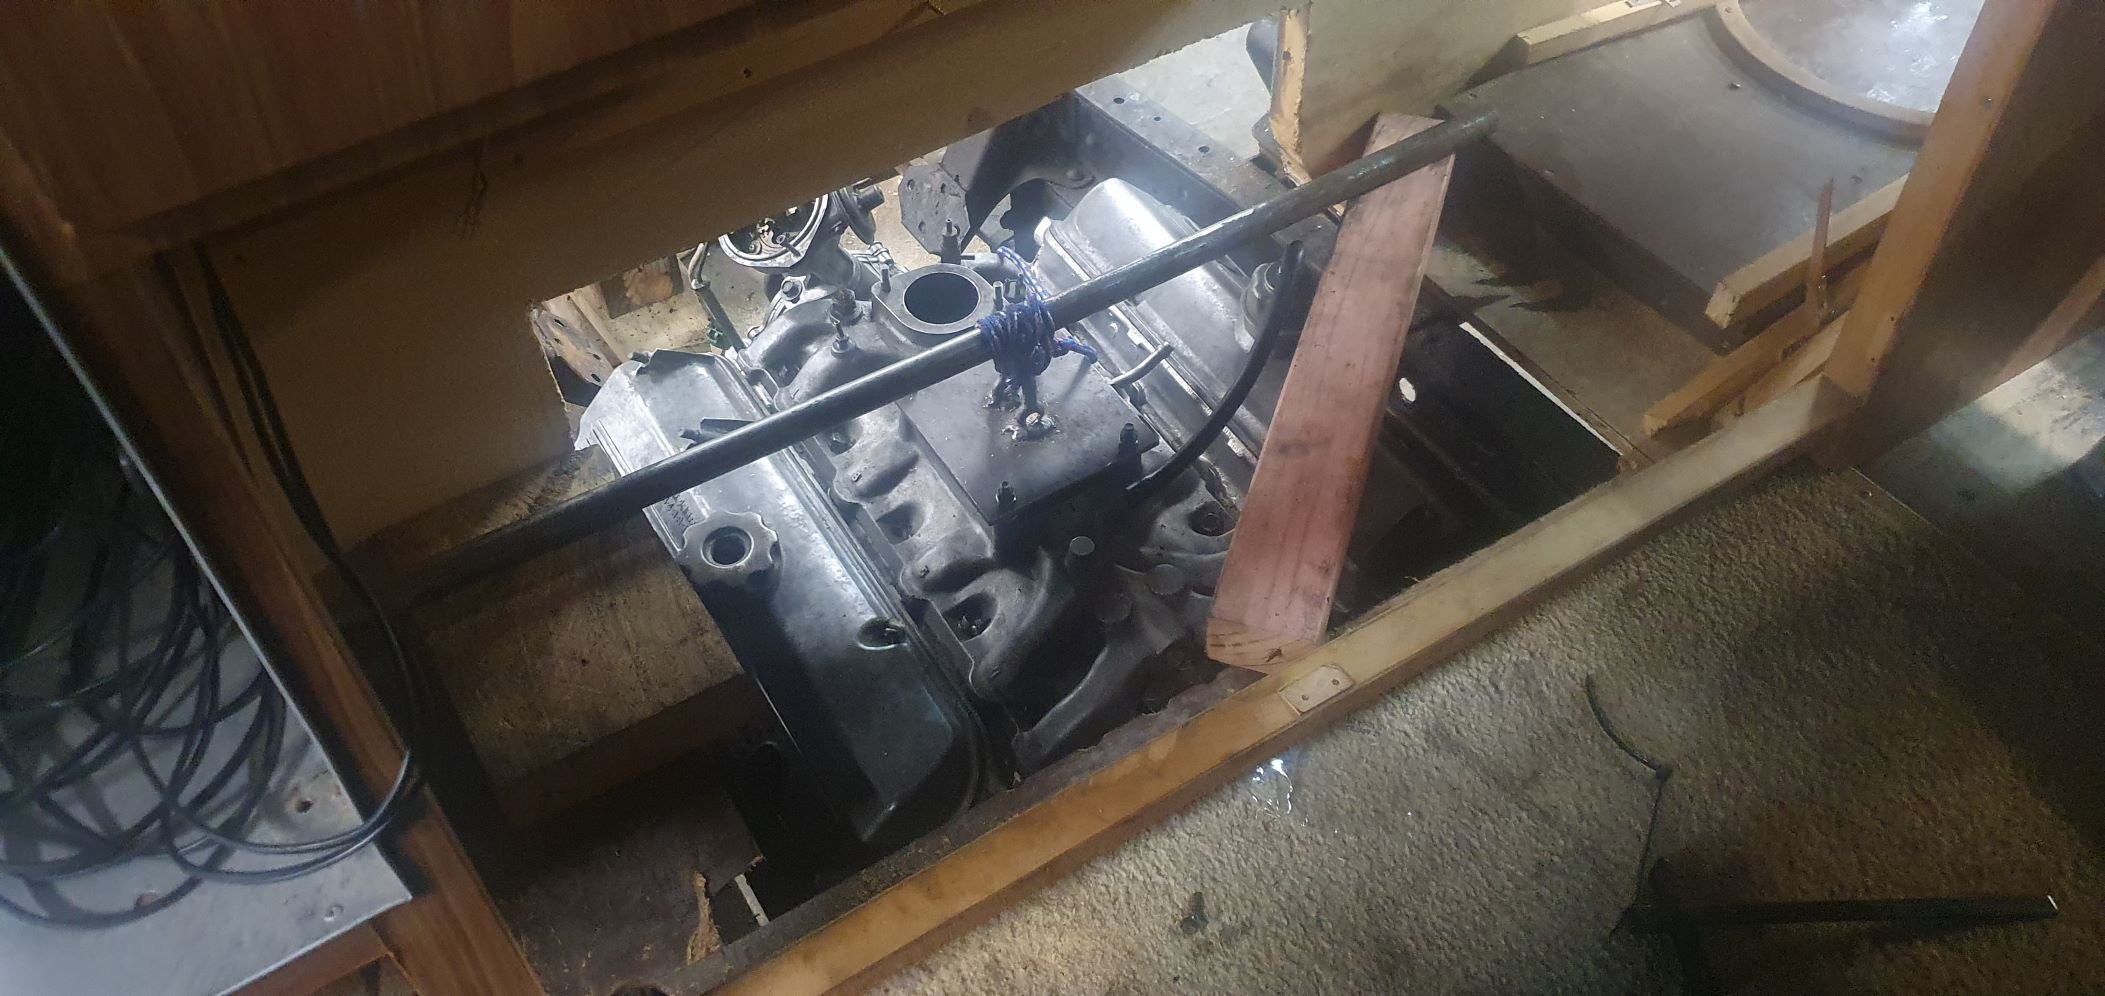
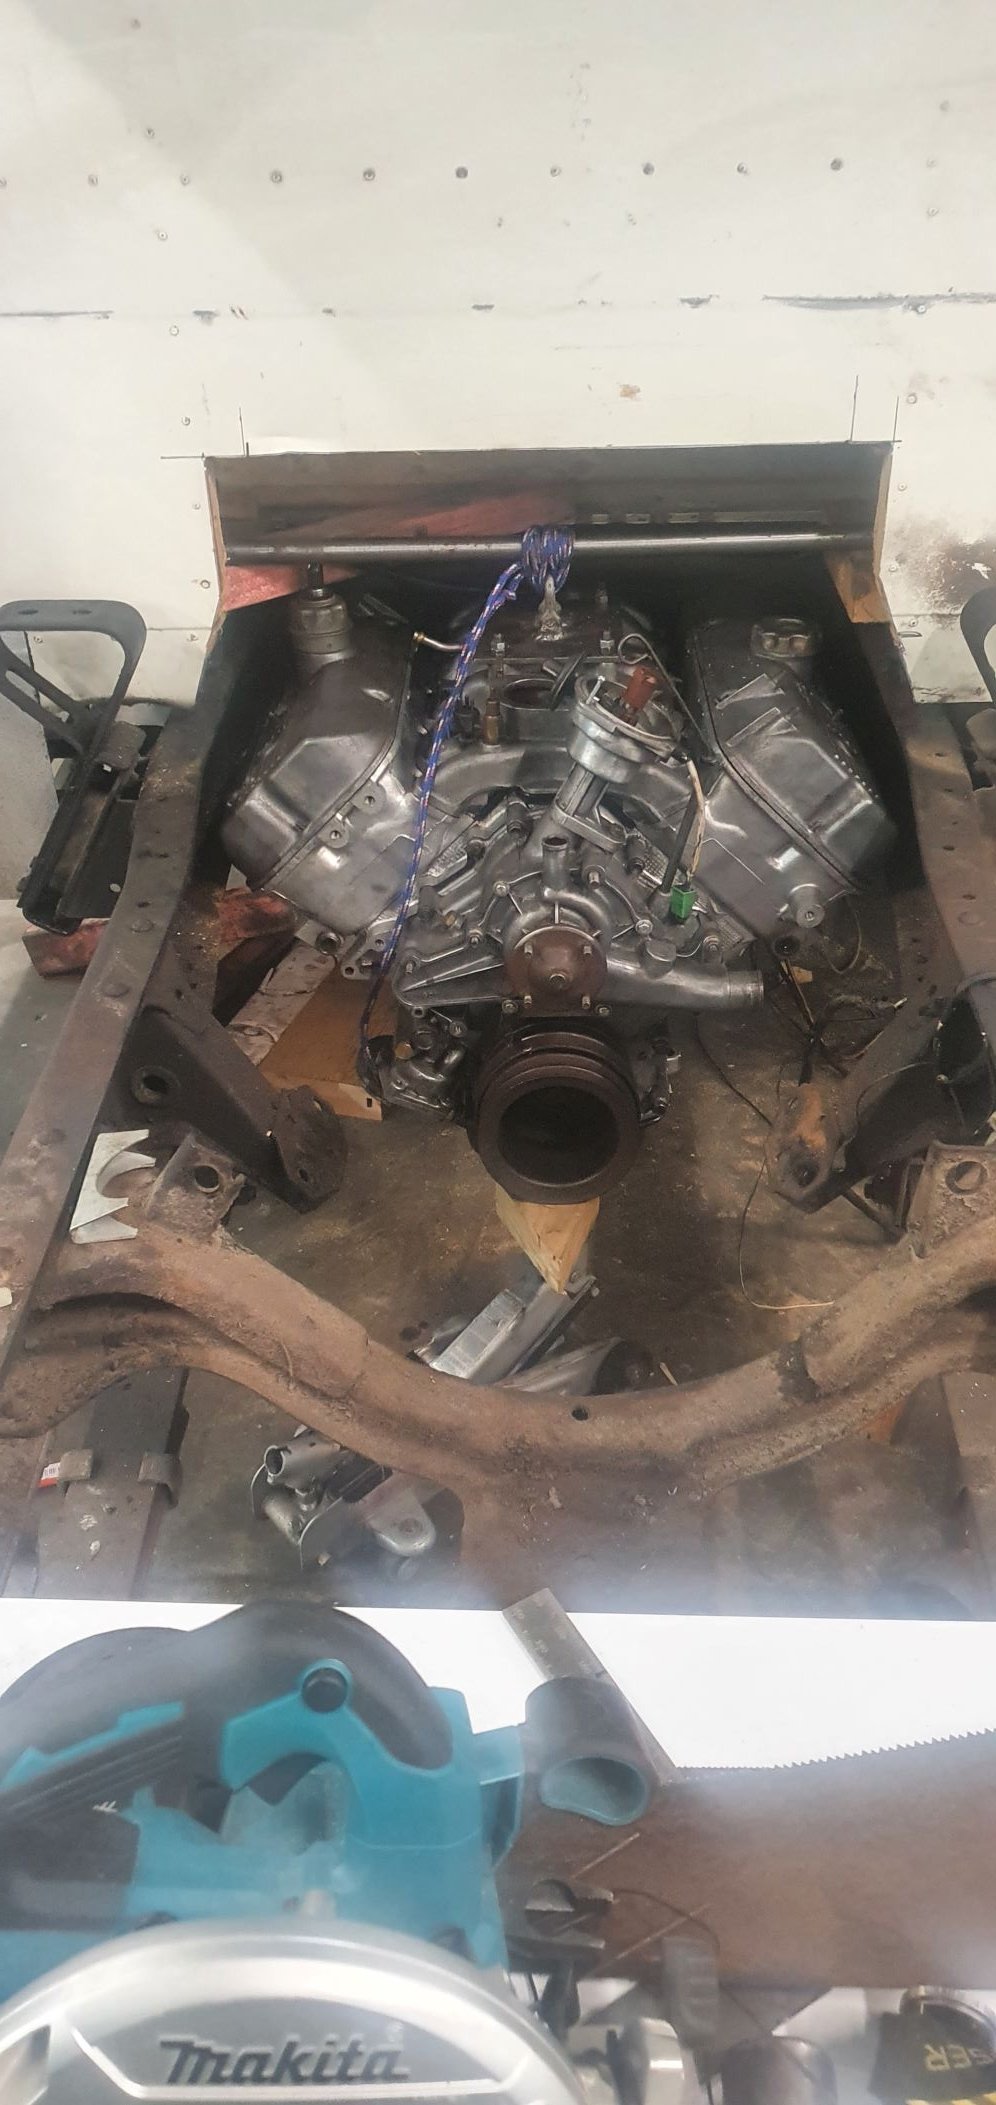
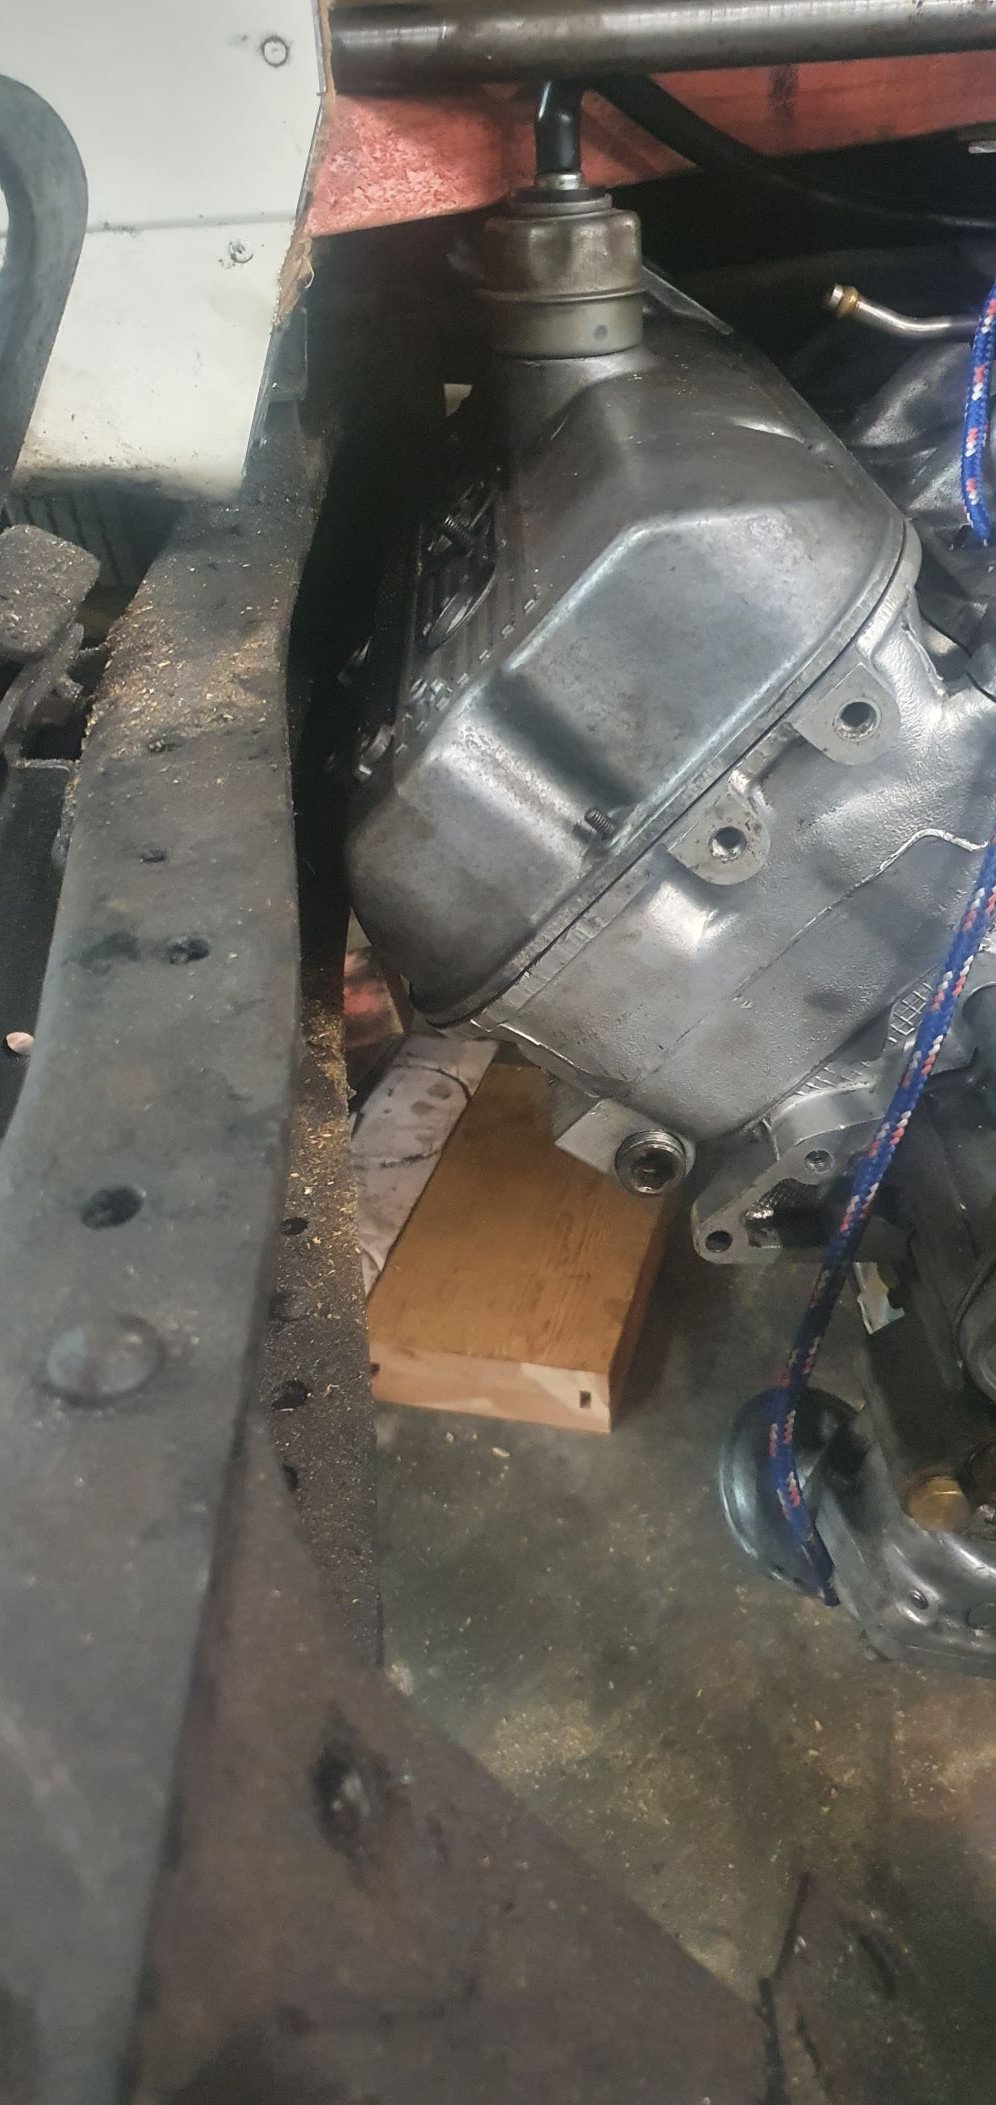
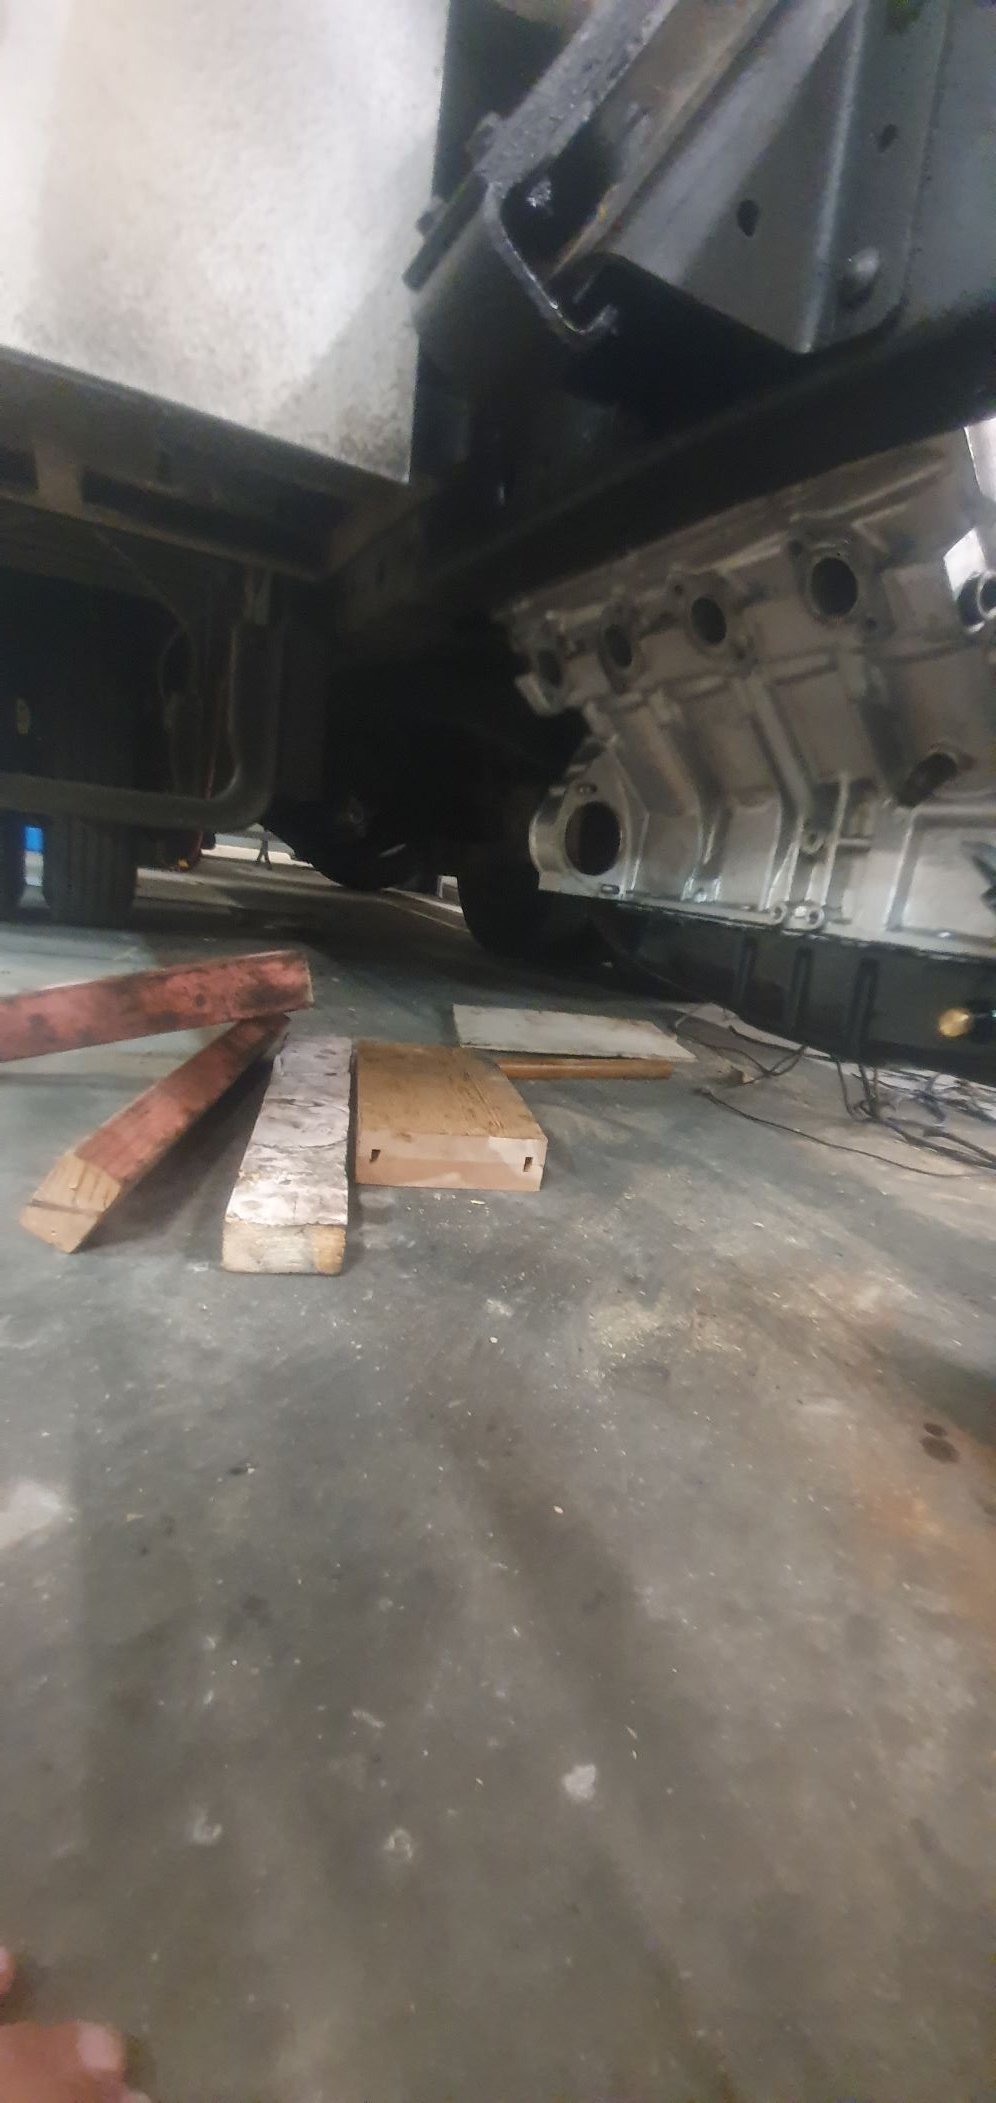
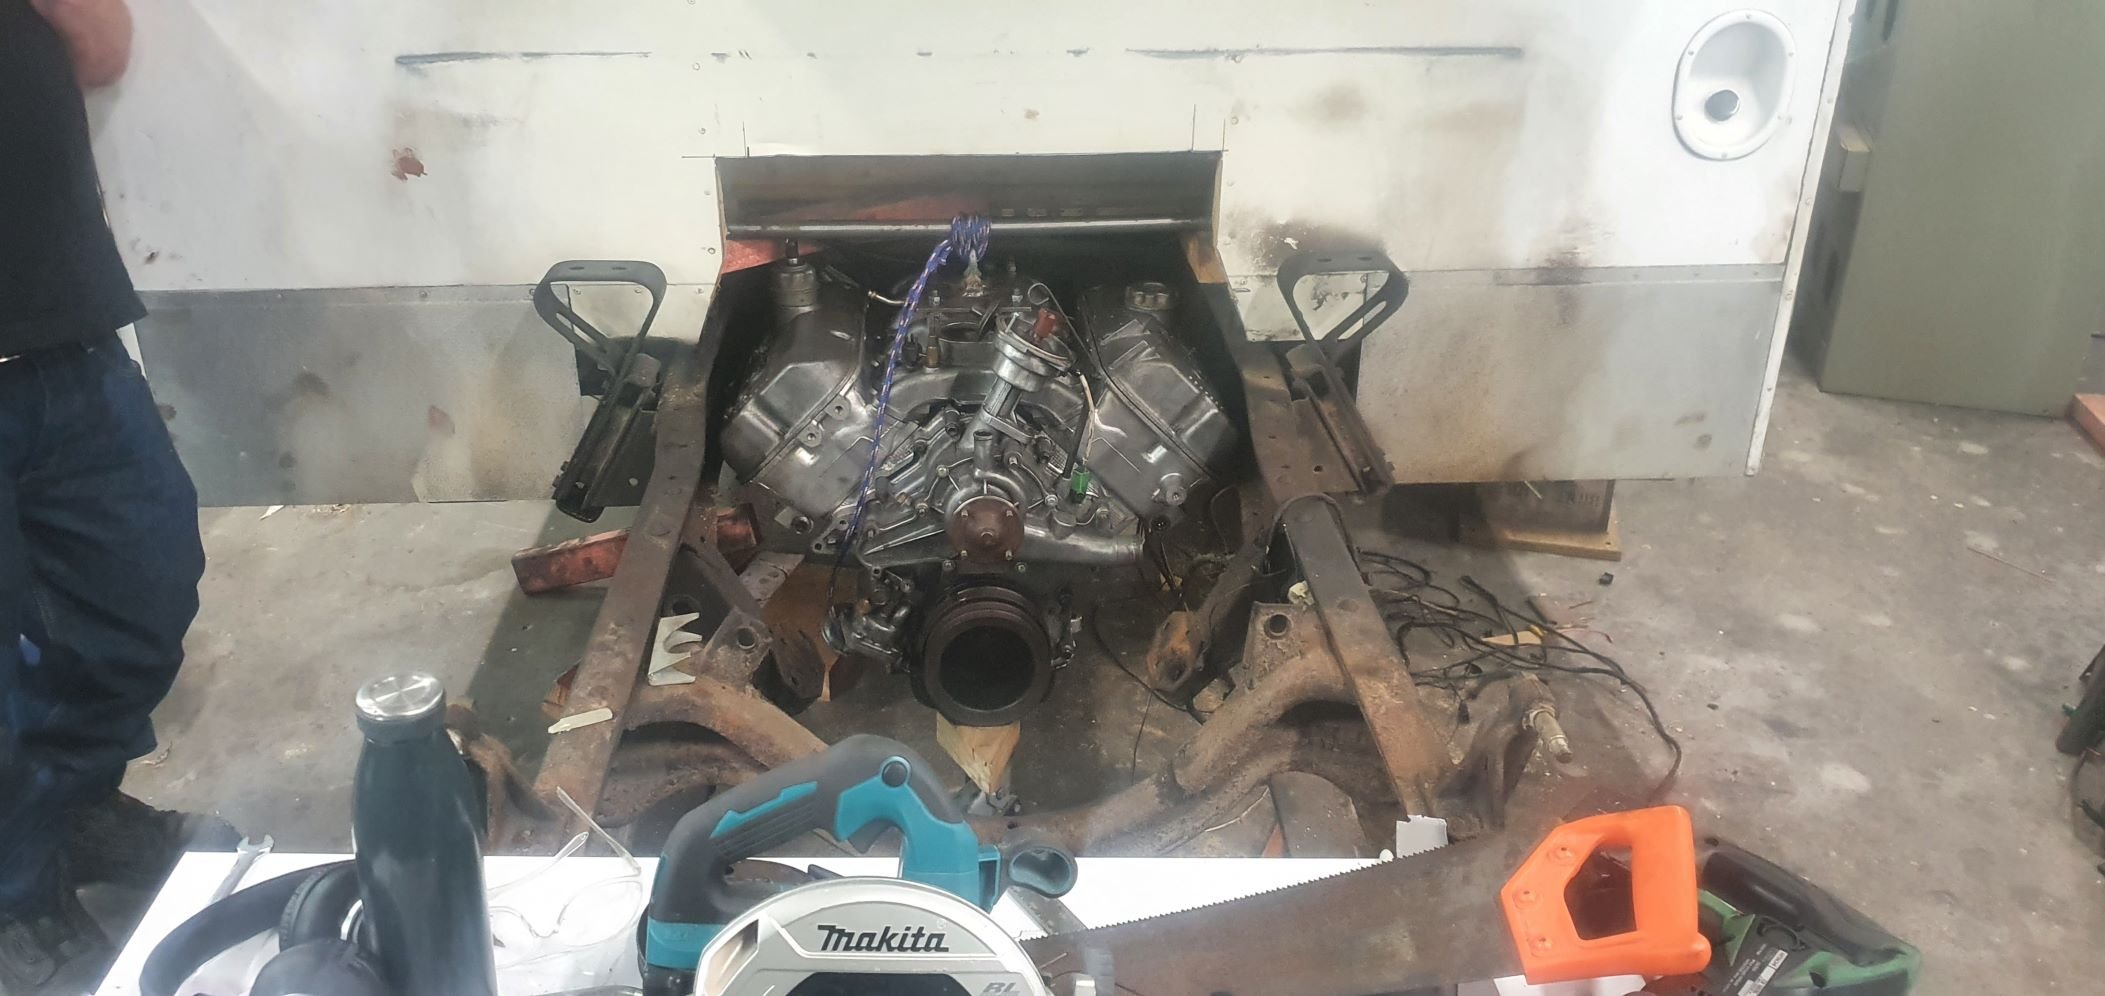
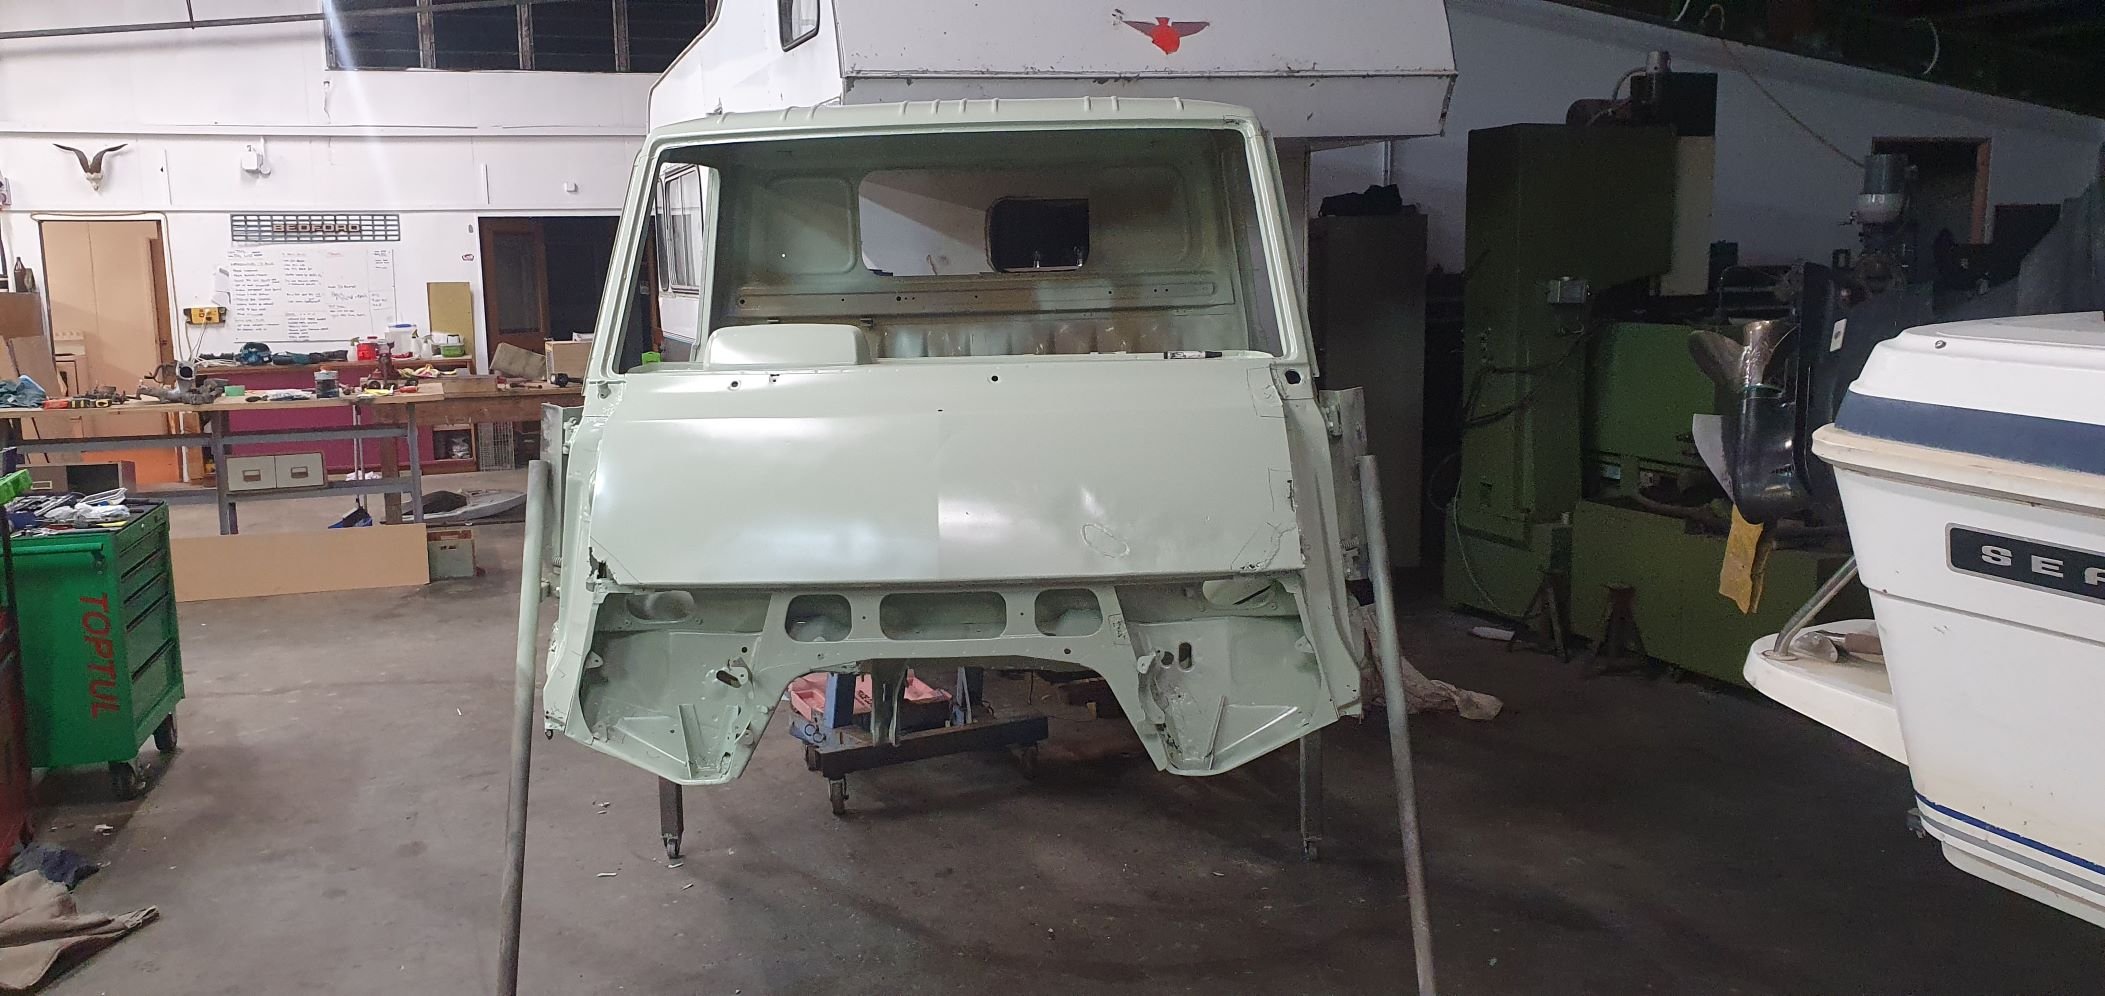
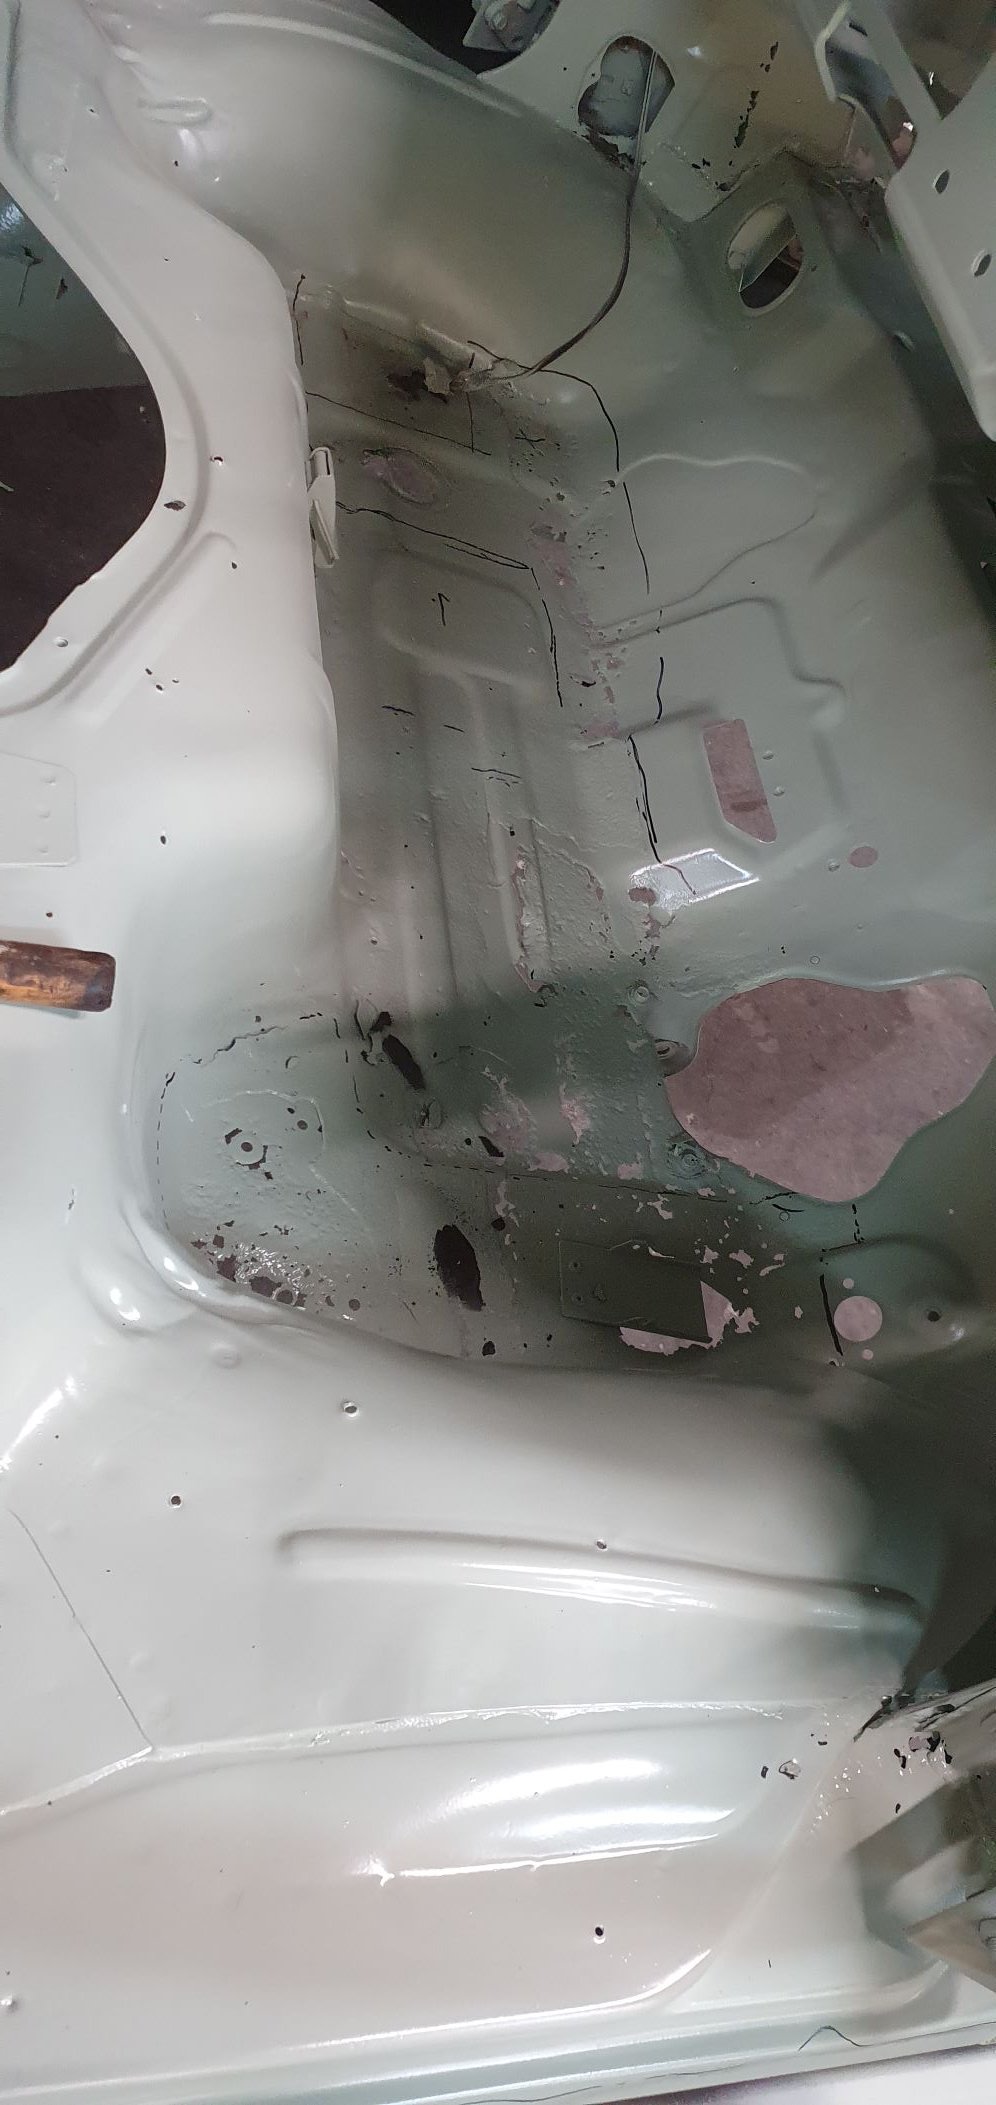
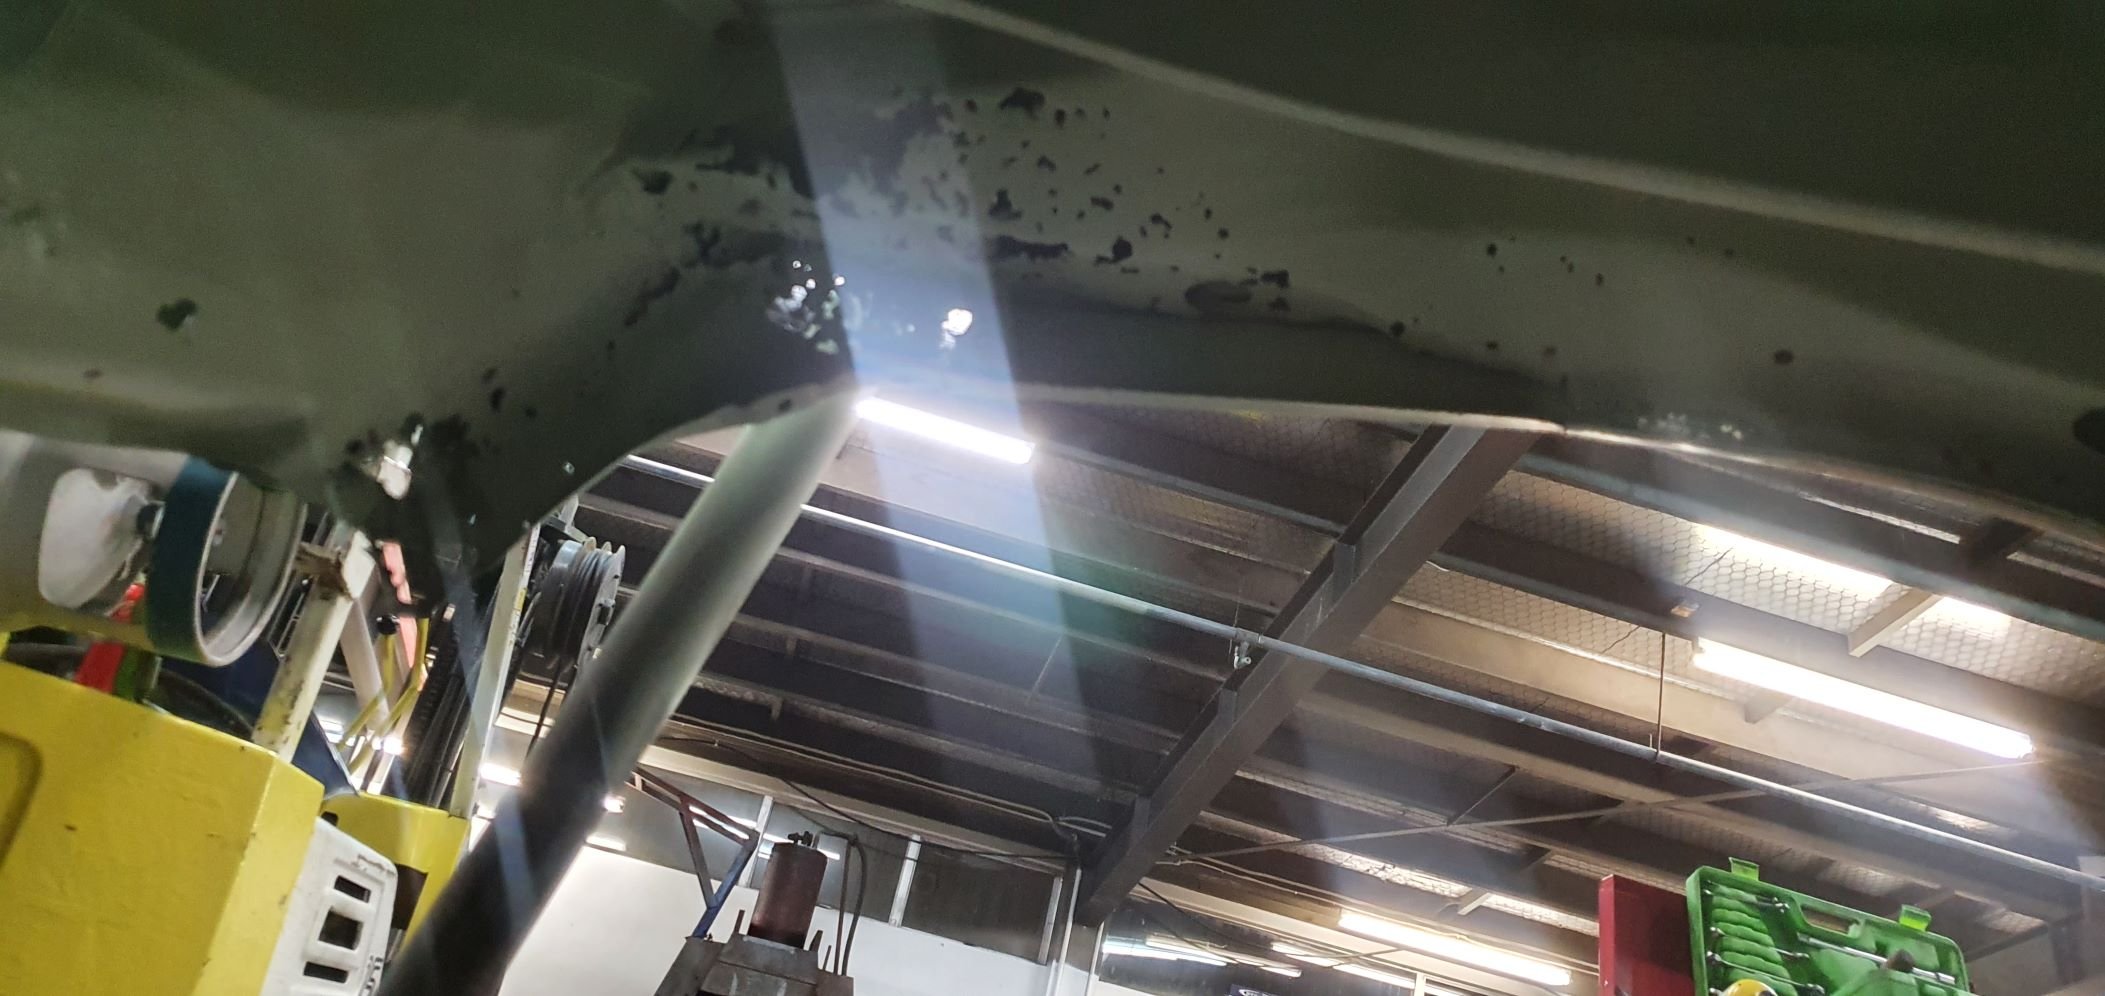
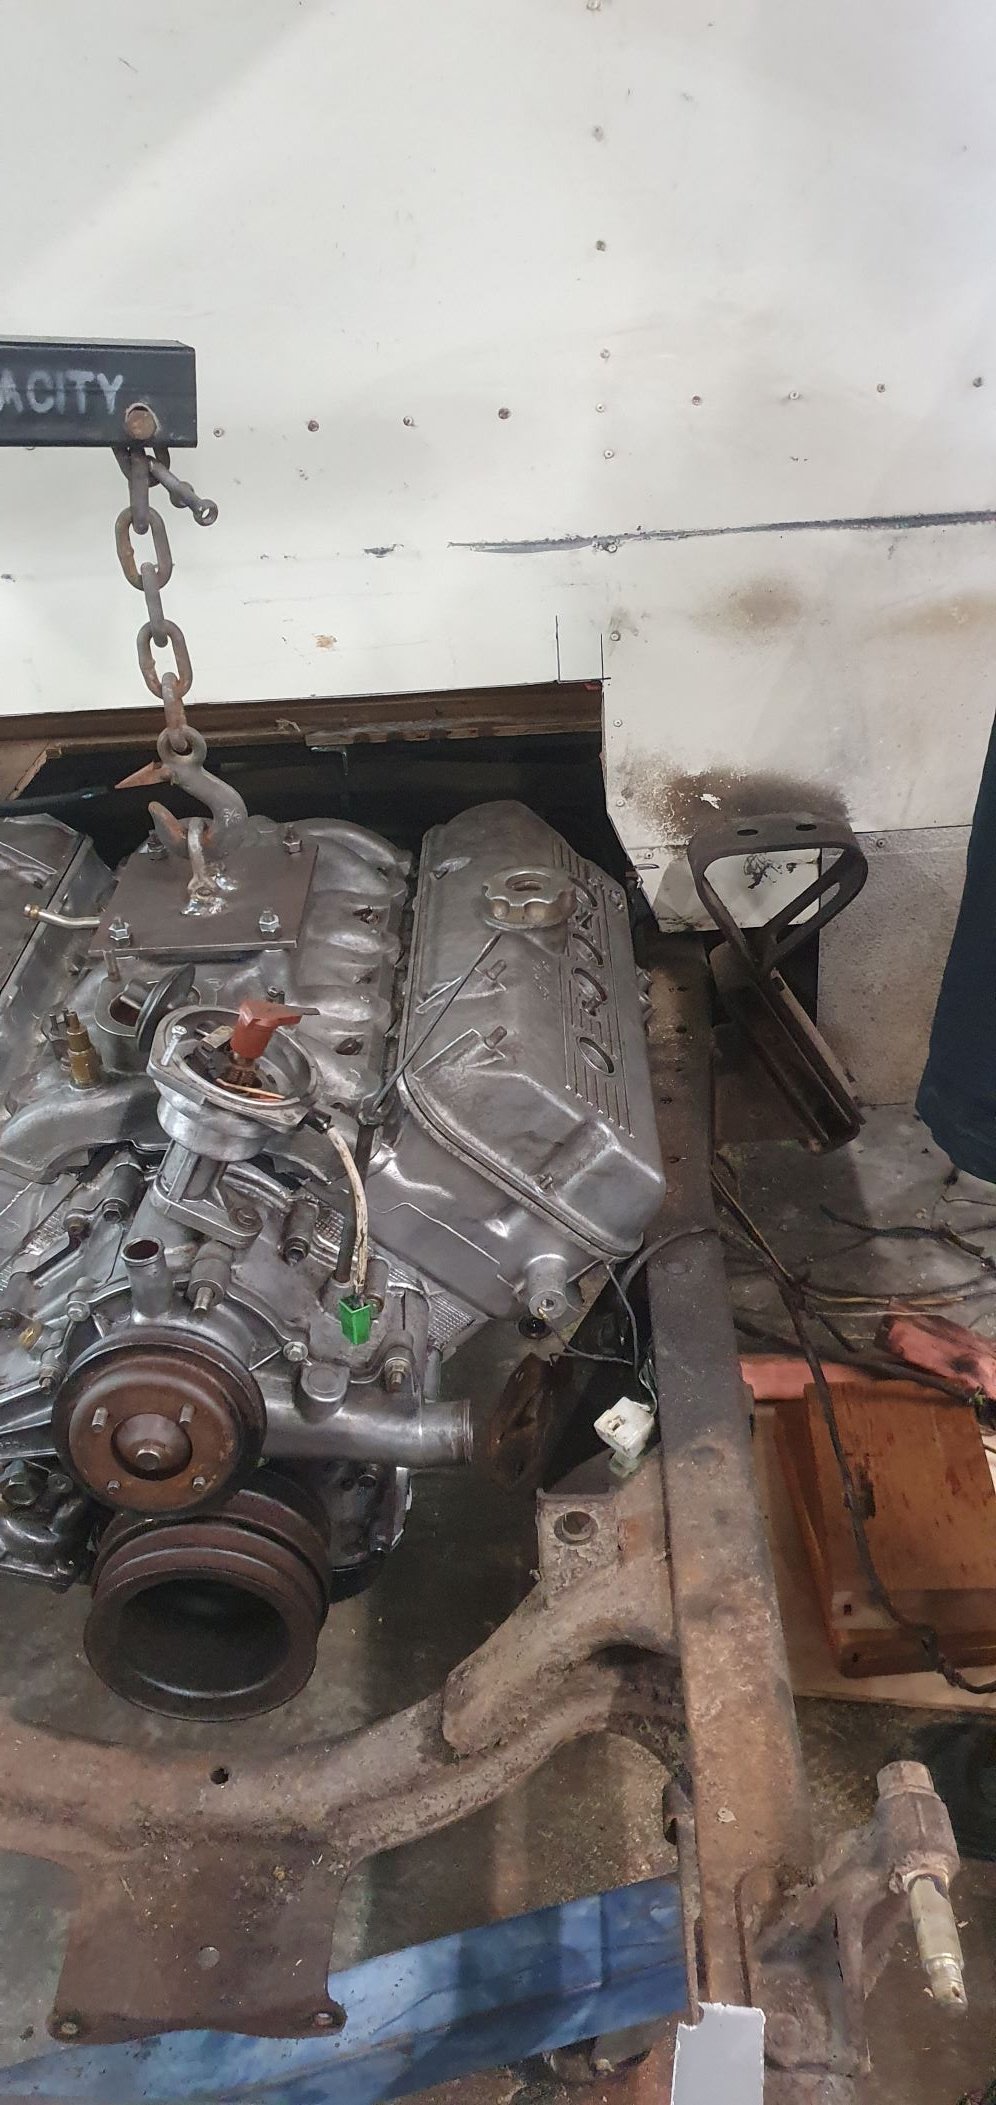
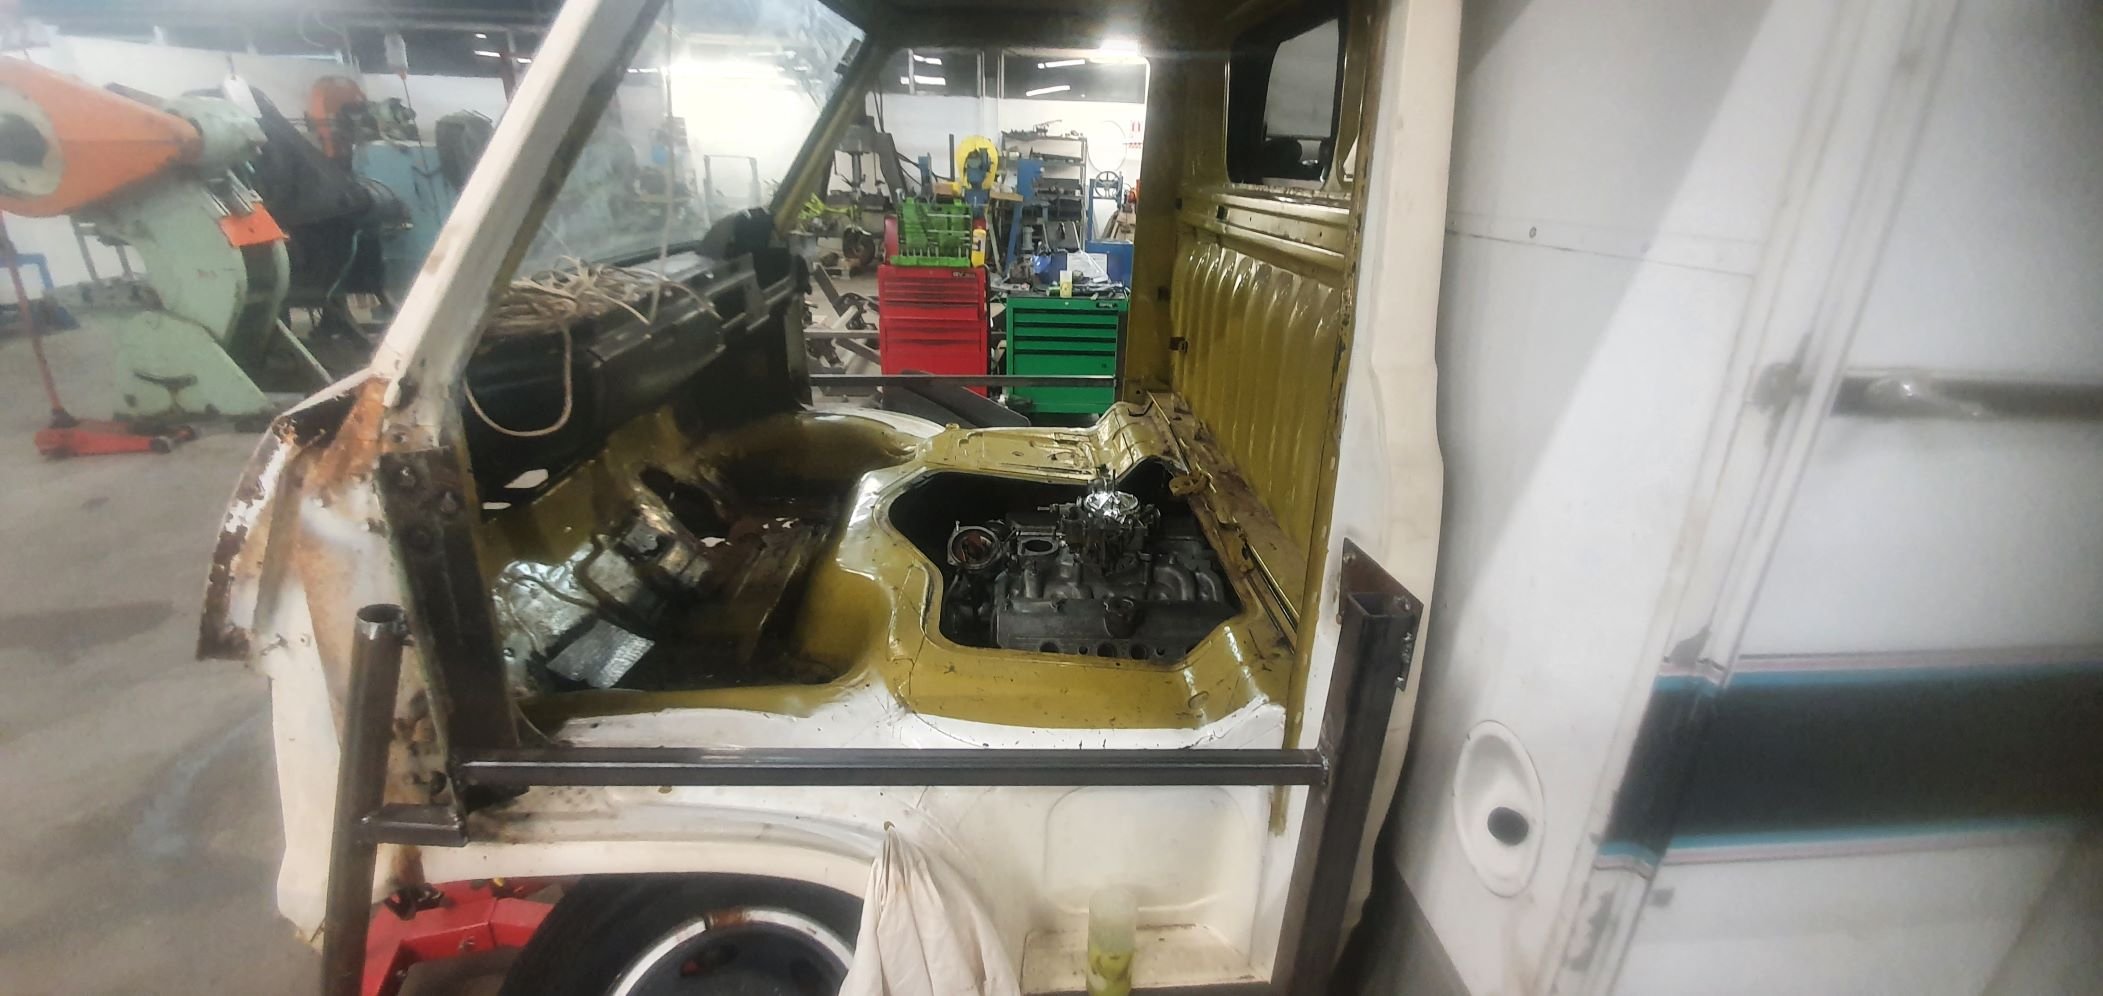
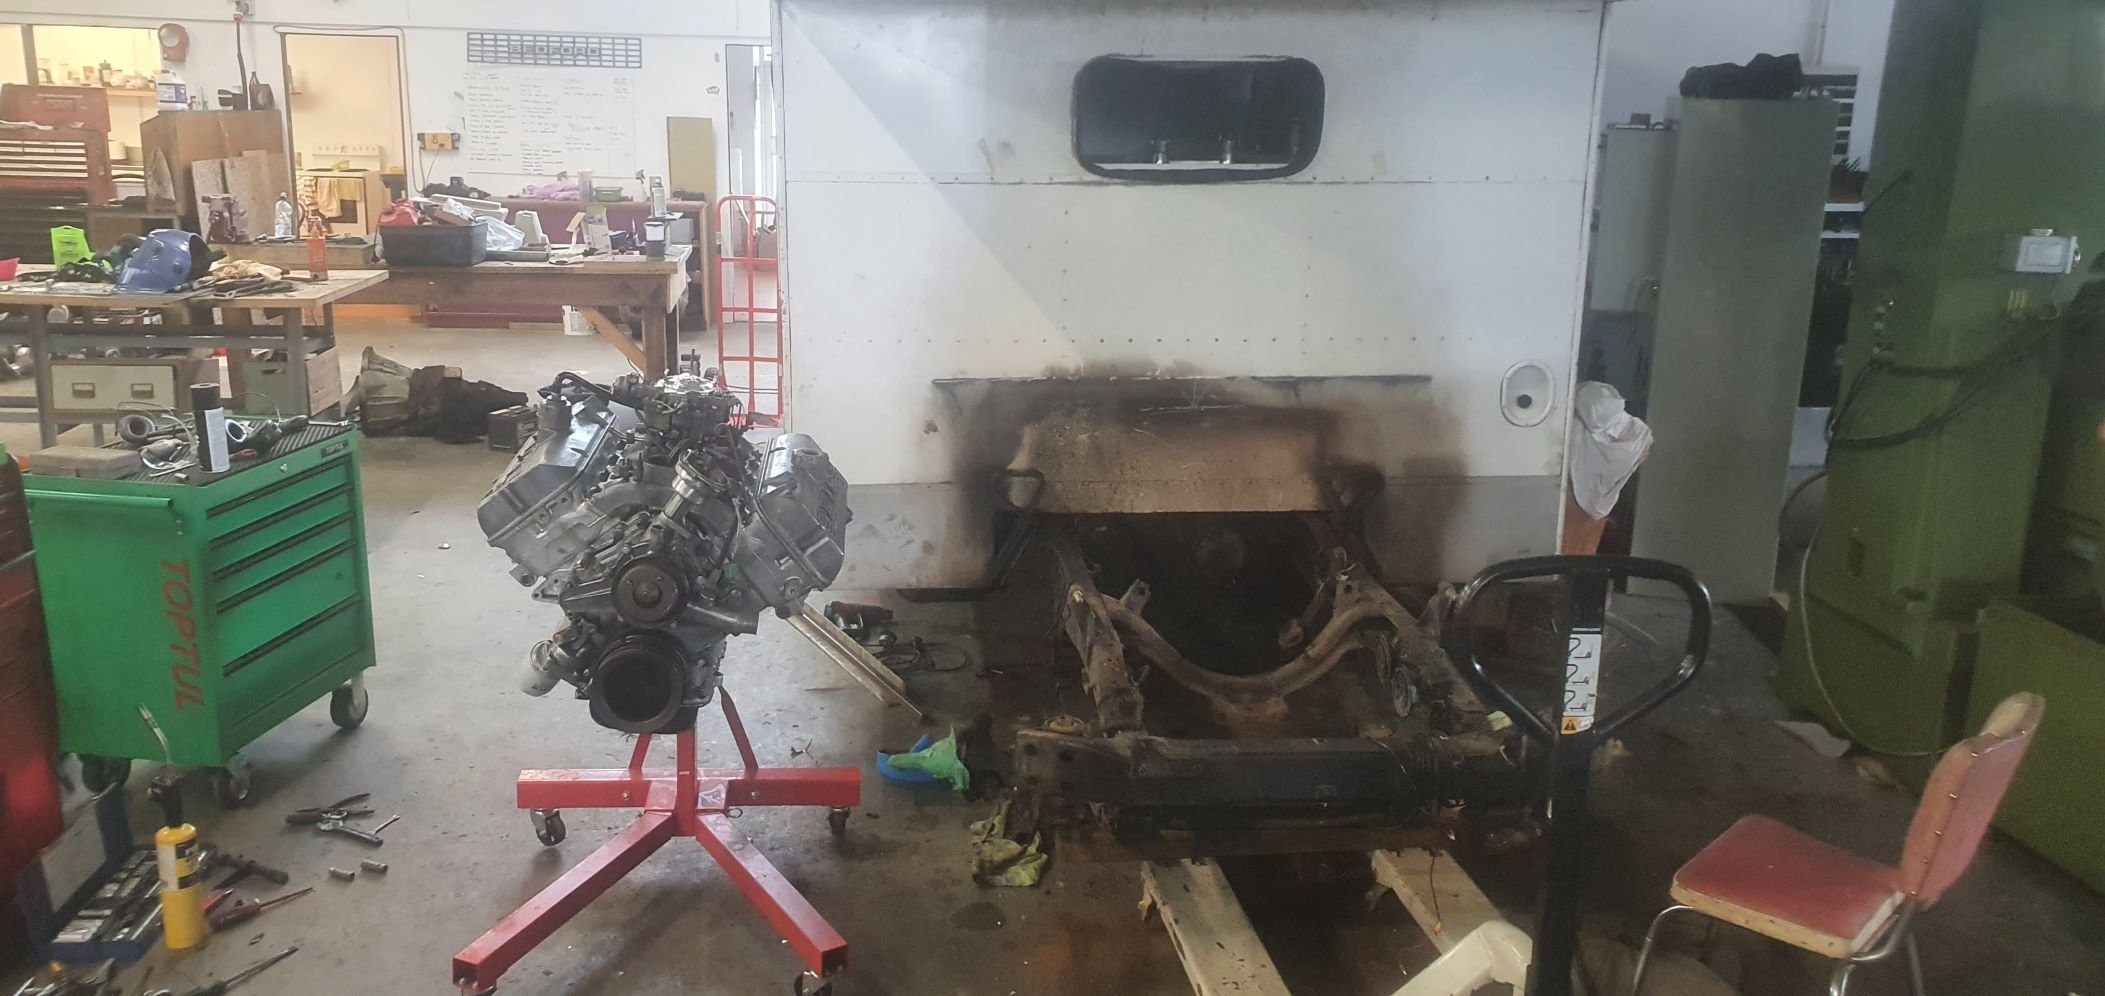
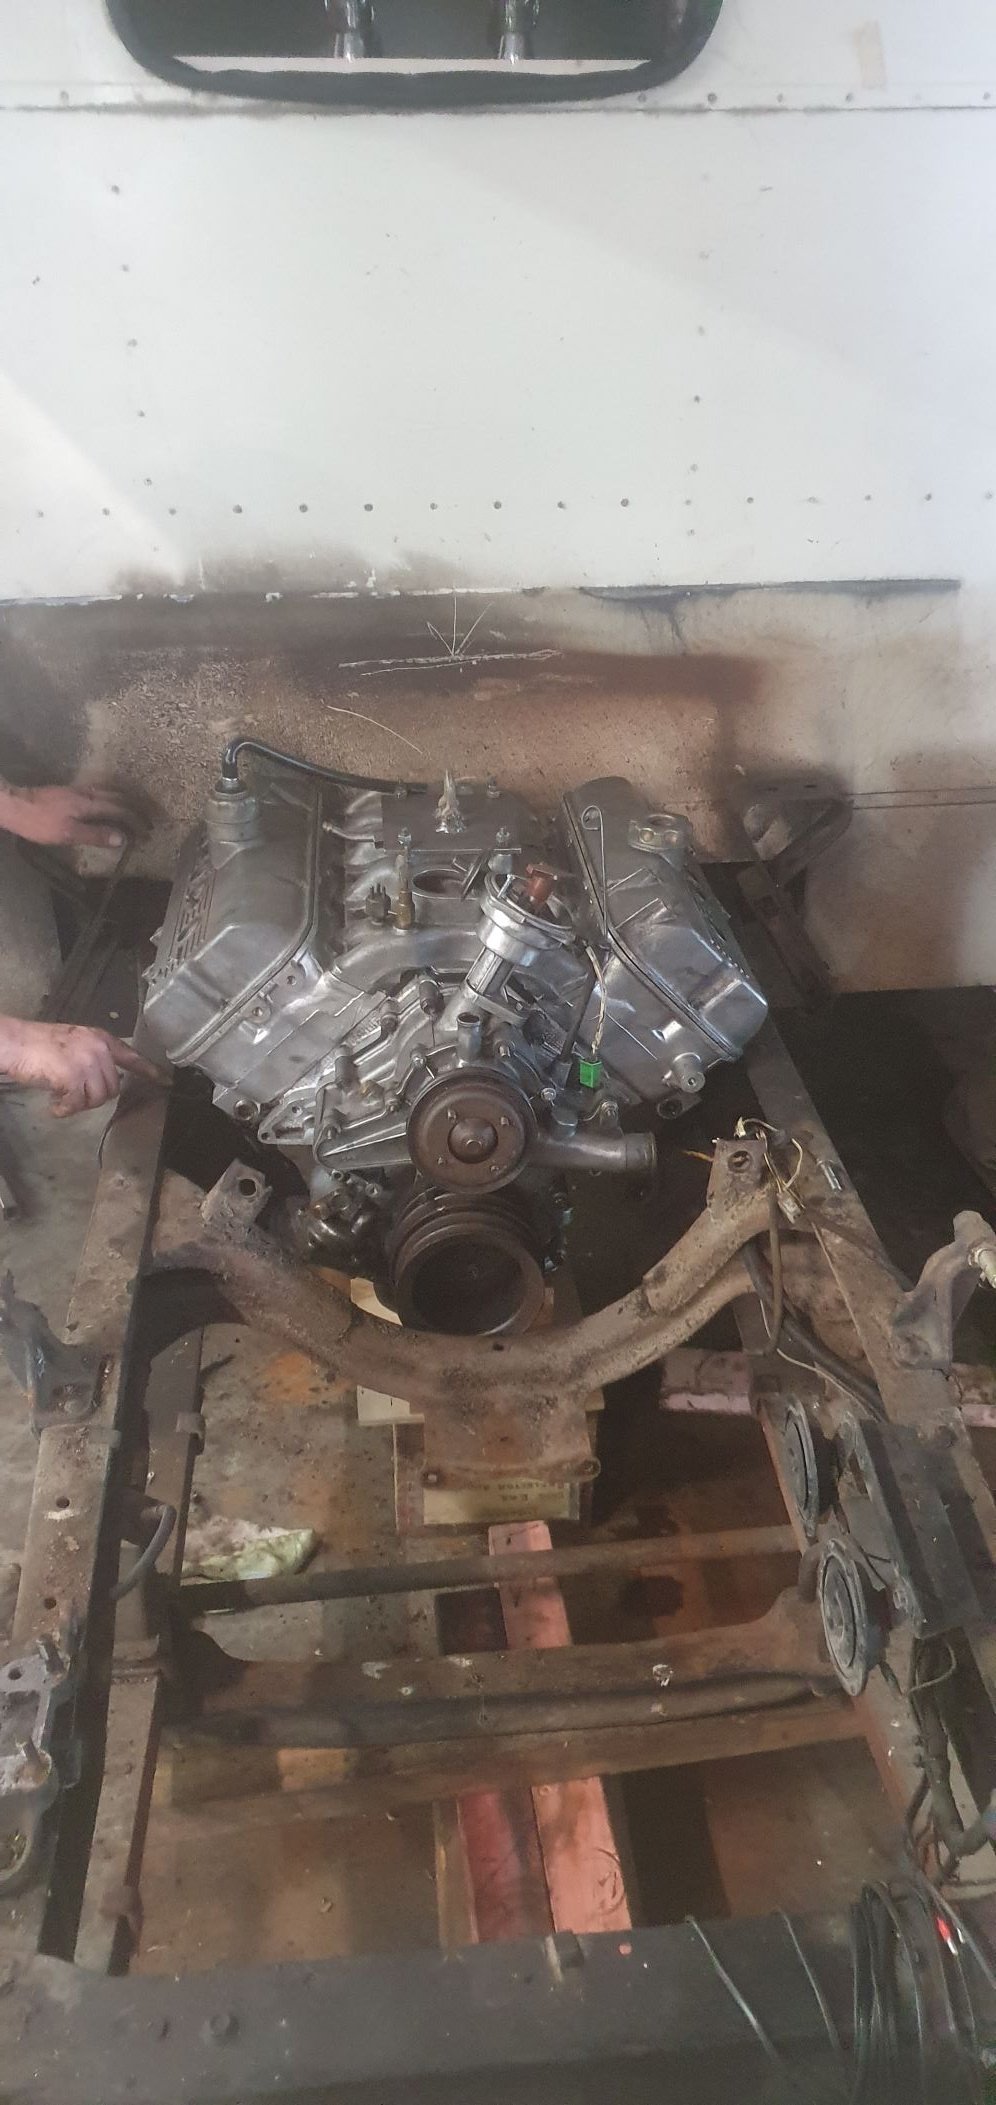
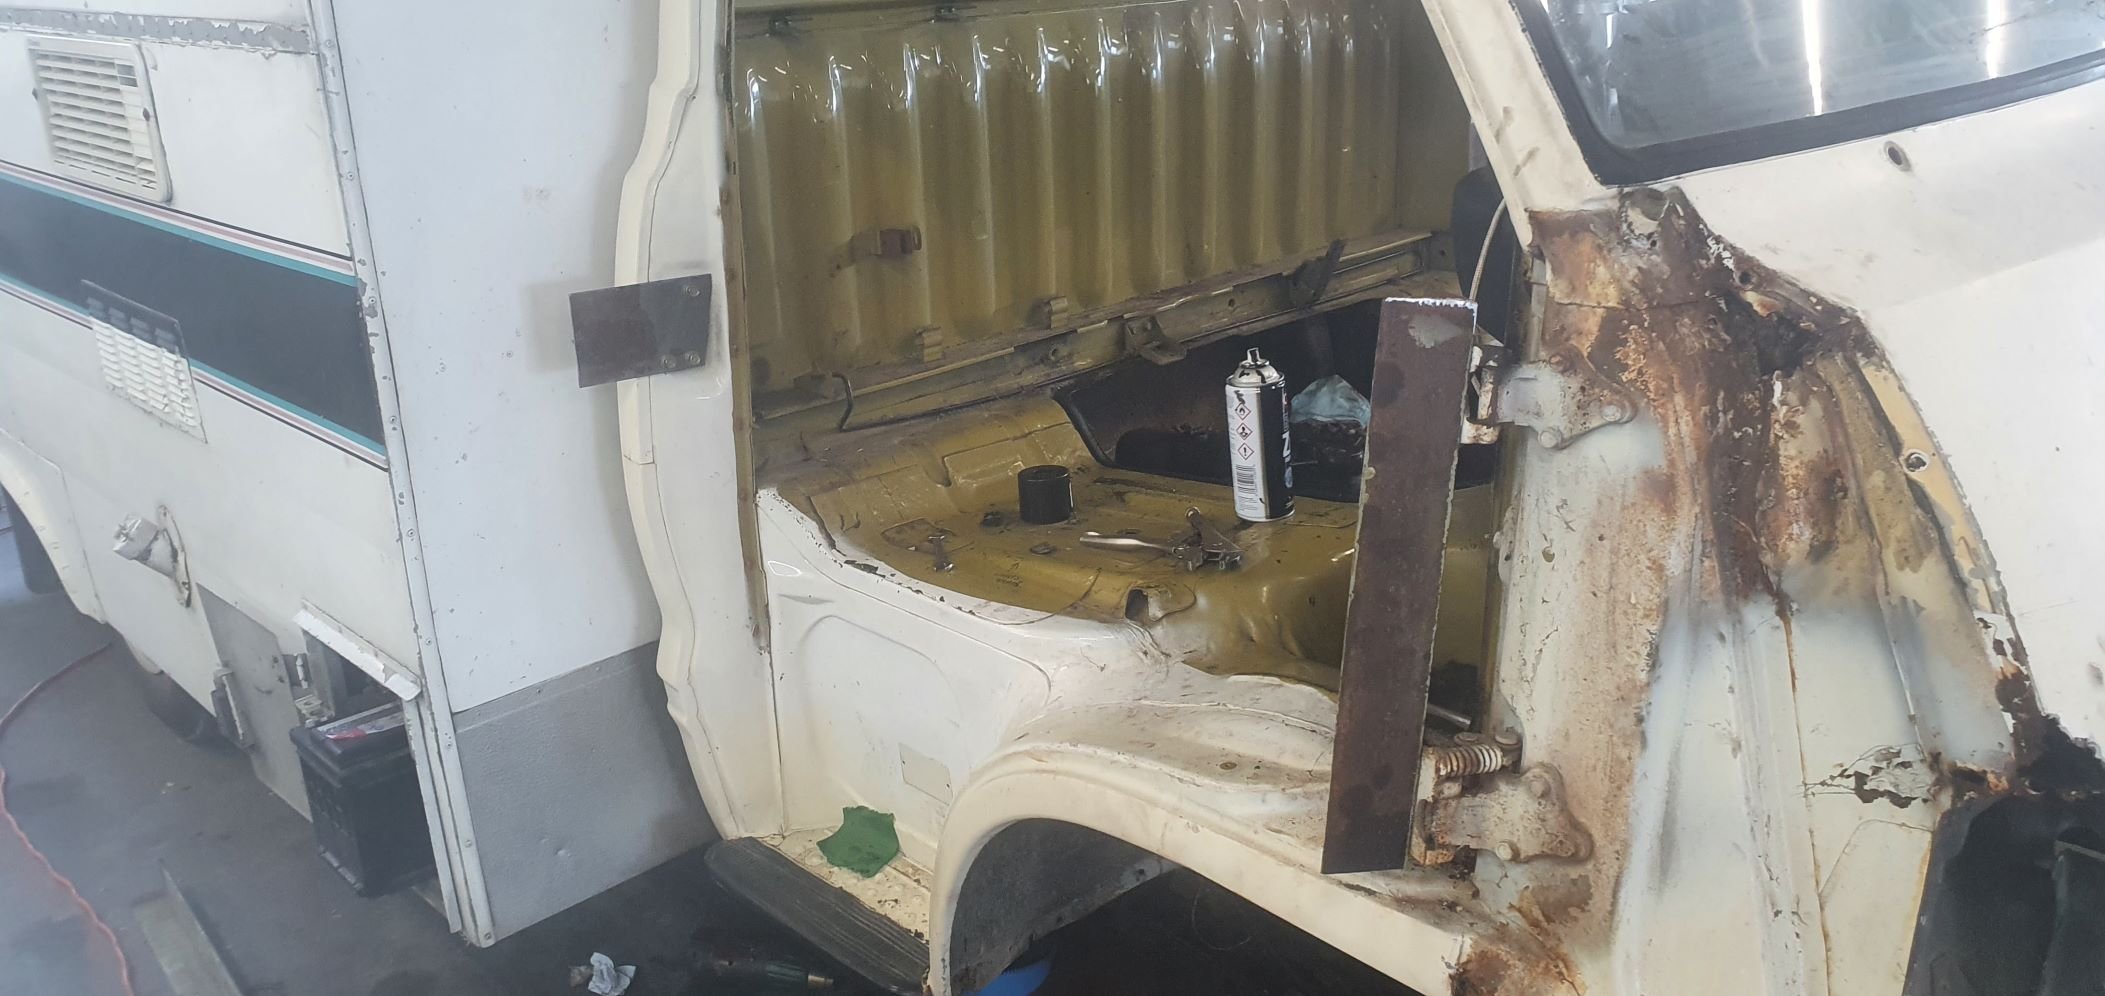
Rather large update today, its been about 2 weeks and progress has been steady. Finished stripping the cab and parts and sent all the metalwork off to the local panel shop for blasting and epoxy priming. So that came back, well about 60% of it came back, the rest got turned into some kinda ferrous red sand...suffice to say there is some cutting and welding to do. Im ignoring that bit right now, there are more important things. So while the Cab was away I started looking at what was going to have to happen to get the motor seated in the right place. I decided it didnt really matter what I did, I had to cut a hole, and can always reinstate if plans change. The thing is, the entire kitchen and underbench area was on the list for the loving also. So I kind of started looking at all of that. I removed the cupboard doors and shelving, wooden framing etc. The underbench area is going to have a permanent step built into it for climbing up to the top bunk, presently I use a foot stool which gets in the way. Im also going to run a small gas califont inside a locker under bench in the dead corner. So I cut the exterior panel off on the RH side, which was all ugly anyway, had old fridge plastic grill hole thing, the fuel filler is fucked and an absolute dog, so that has been on the list also. Cut a nice big hole, hoisted the old 240V Hot water cylinder out of it, and am nearly at the point now where I can start reinstating material, lining etc and building the gas locker/califont locker. I also dropped the fuel tank and ripped out the battery setup - which was messy and needed the goodness also. I measured the tank at 62L, which is borderline too small I feel. It has only every been able to take about 40L fuel due to the shitty filler setup spitting back at you. But anyway, it measures at 60, and ideally it would be good to have about 80. Will see, might shoot down the road to the truck wreckers and see what they have. So once I had kinda mostly figured out what was happening in the gas locker corner, I got back to tending to the engine issue. I marked out a hole I though would work, and cut. It pretty much worked. First attempt getting it in the hole wasnt great, but then we took off the rocker covers and got fancy with a jack underneath, as well as massaged a little more material off the bodywork, and vioula! Its in the hole. Its kinda tight (again, fuck this thing is huge) but it sortof works the more I look at it. My worker Kyle is adamant its going in there, you can see him pondering the girth in the photo below. He was determined not to be beat, hence him grinding more shit away for a second attempt at stuffing it in there. Feel free BTW to fully tell me Im being a total fucktard, as I have momentary thoughts like that. Its quite bonkers, its obviously not in there yet, but where it sits is looking about where it wants to sit. It would be servicable, it just would be a bit cunty, but then it was always like that anyway with the old motor, and this will probably be better than that for access once finished. Ive entertained different motors in my head, the next best thing would be a 1UZ, the internet tells me its about 80mm narrower across the rocker covers. It wouldnt be as cool, and would prob have to end up in the same place as this, so Im unconvinced there. I dunno, I think its just going in there.
- 43 replies
-
- 13
-
-
-
4V Century V8 powered Dyna Camper Discussion
HumberSS replied to HumberSS's topic in Project Discussion
Bro fully appreciate the input, no offence taken.. Will consider further.. May still pursue irrational option. -
Humber SS's 4V Century V8 powered Dyna Camper
HumberSS replied to HumberSS's topic in Projects and Build Ups
It was somewhat depressing to learn today, when peering under the bonnet of my mates HQ Statesman, that an engine of near double capacity (ie a SB chev) is about 200mm narrower than this donk. Todays Fun fact. -
4V Century V8 powered Dyna Camper Discussion
HumberSS replied to HumberSS's topic in Project Discussion
@ThePog you know you're a total cunt. But probably right. I have decided best 'first move' is to get rid of encumberances in the body, which need to happen anyway for trans clearance so there was no avoiding relieving the camper body anyway. May as well chop a hole, then see how much real clearance I have and if it truly is viable to slot it in there. Kyle reckons as soon as we clear the top, it wont take as much as I think to move it back/down and may in fact not have to move rearwards as far as it looks like it needs to. The only way to answer this question is with the chorus of the angle grinder. -
4V Century V8 powered Dyna Camper Discussion
HumberSS replied to HumberSS's topic in Project Discussion
Re EFI, just not that keen tbh. I was born in 1981, TV was barely a thing. @anglia4 thanks I know Richard well. @Otodat def not keen on a chassis swap. This is already more than enough of a job. @MaxPower yeah its a lot of work, agreed 15B is the easier route. Im just attached to the V8 in this era Dyna as a combo. Im fairly irrational.. @CUL8R I still need primary tubes into some sort of collector, unless I run Zoomies through the rails, which sounds epic, but probably will weaken chassis a little too (although not was much as proposed. -
4V Century V8 powered Dyna Camper Discussion
HumberSS replied to HumberSS's topic in Project Discussion
Sorry folks, been a few days away. To answer this question, main issue is both fowling of cab and width between rails. Fowling of cab by a good 100-150mm. Im wanting to run a bench seat (had buckets, dont like the look). Main real issue though is the width for headers. not a lot we can remove off engine, but will shave a few bosses etc definitely. -
Humber SS's 4V Century V8 powered Dyna Camper
HumberSS replied to HumberSS's topic in Projects and Build Ups
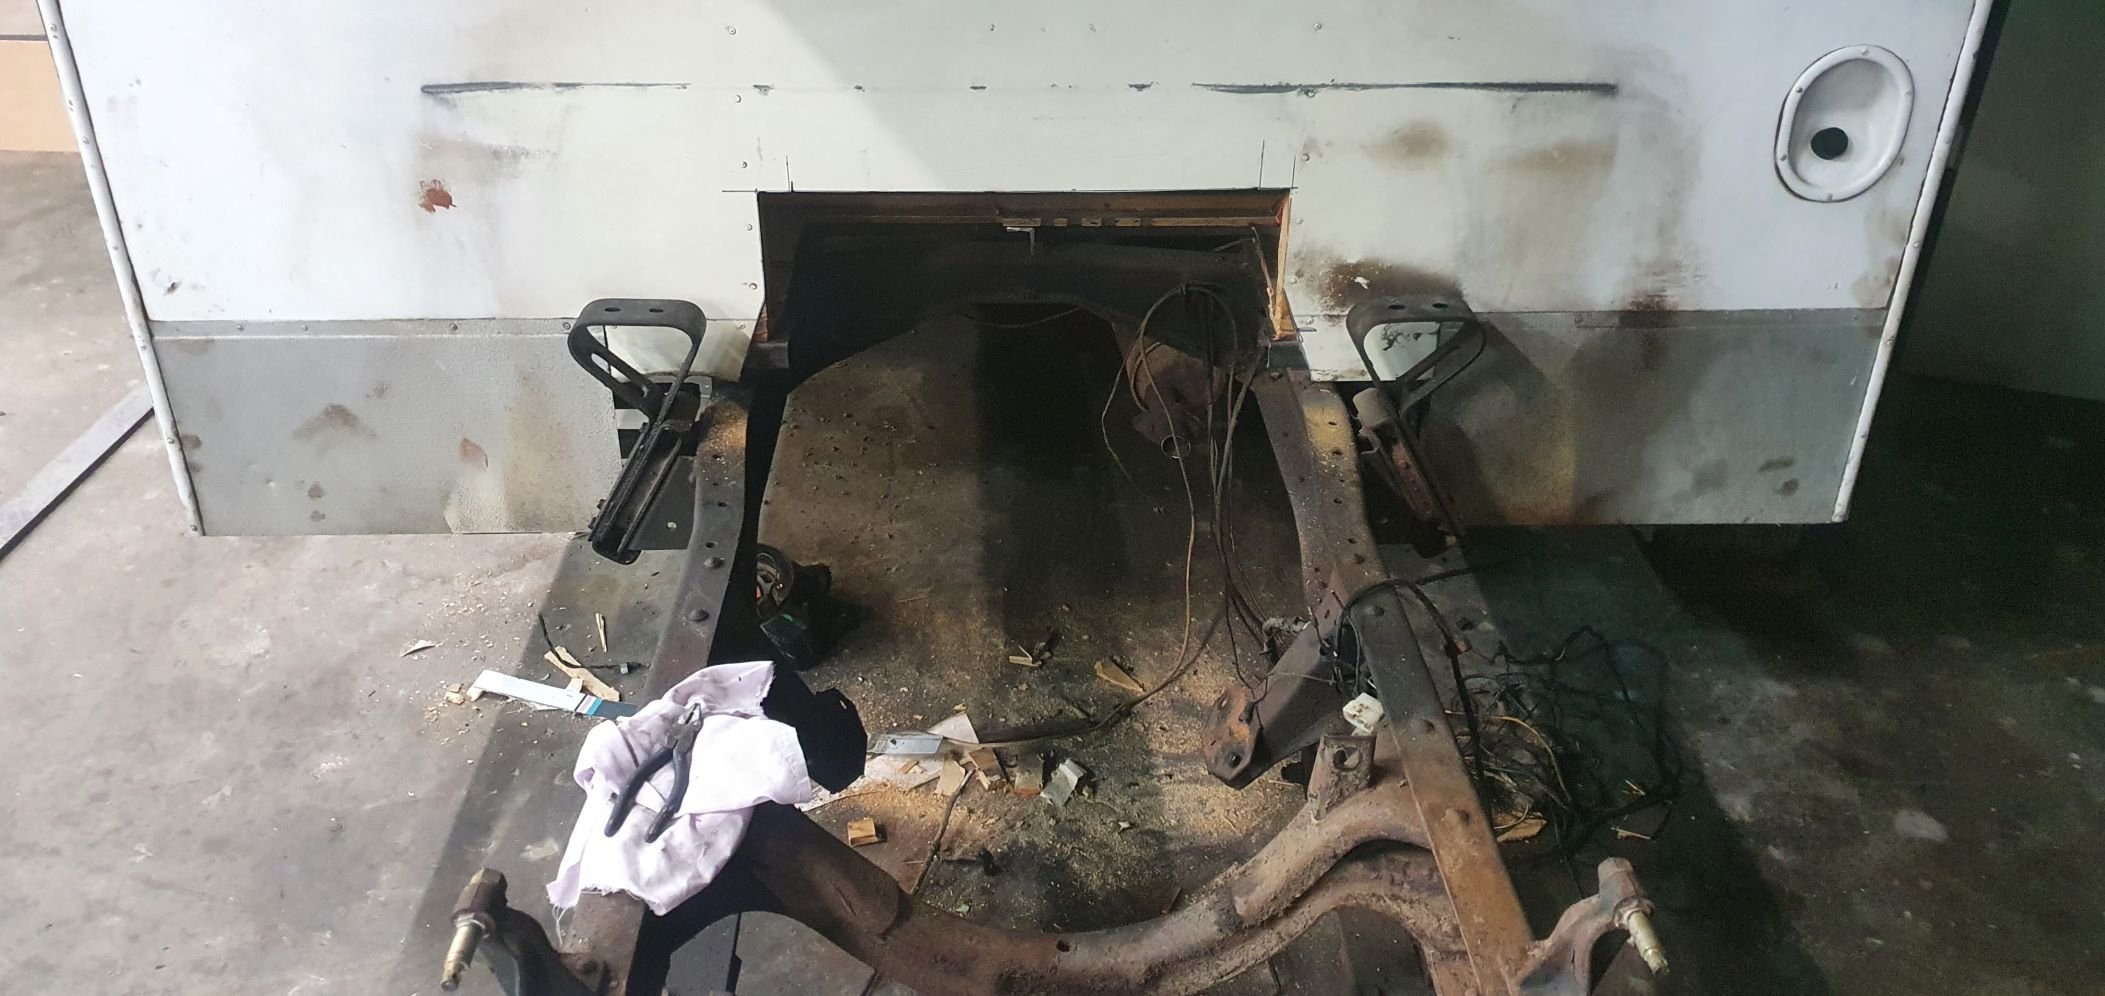
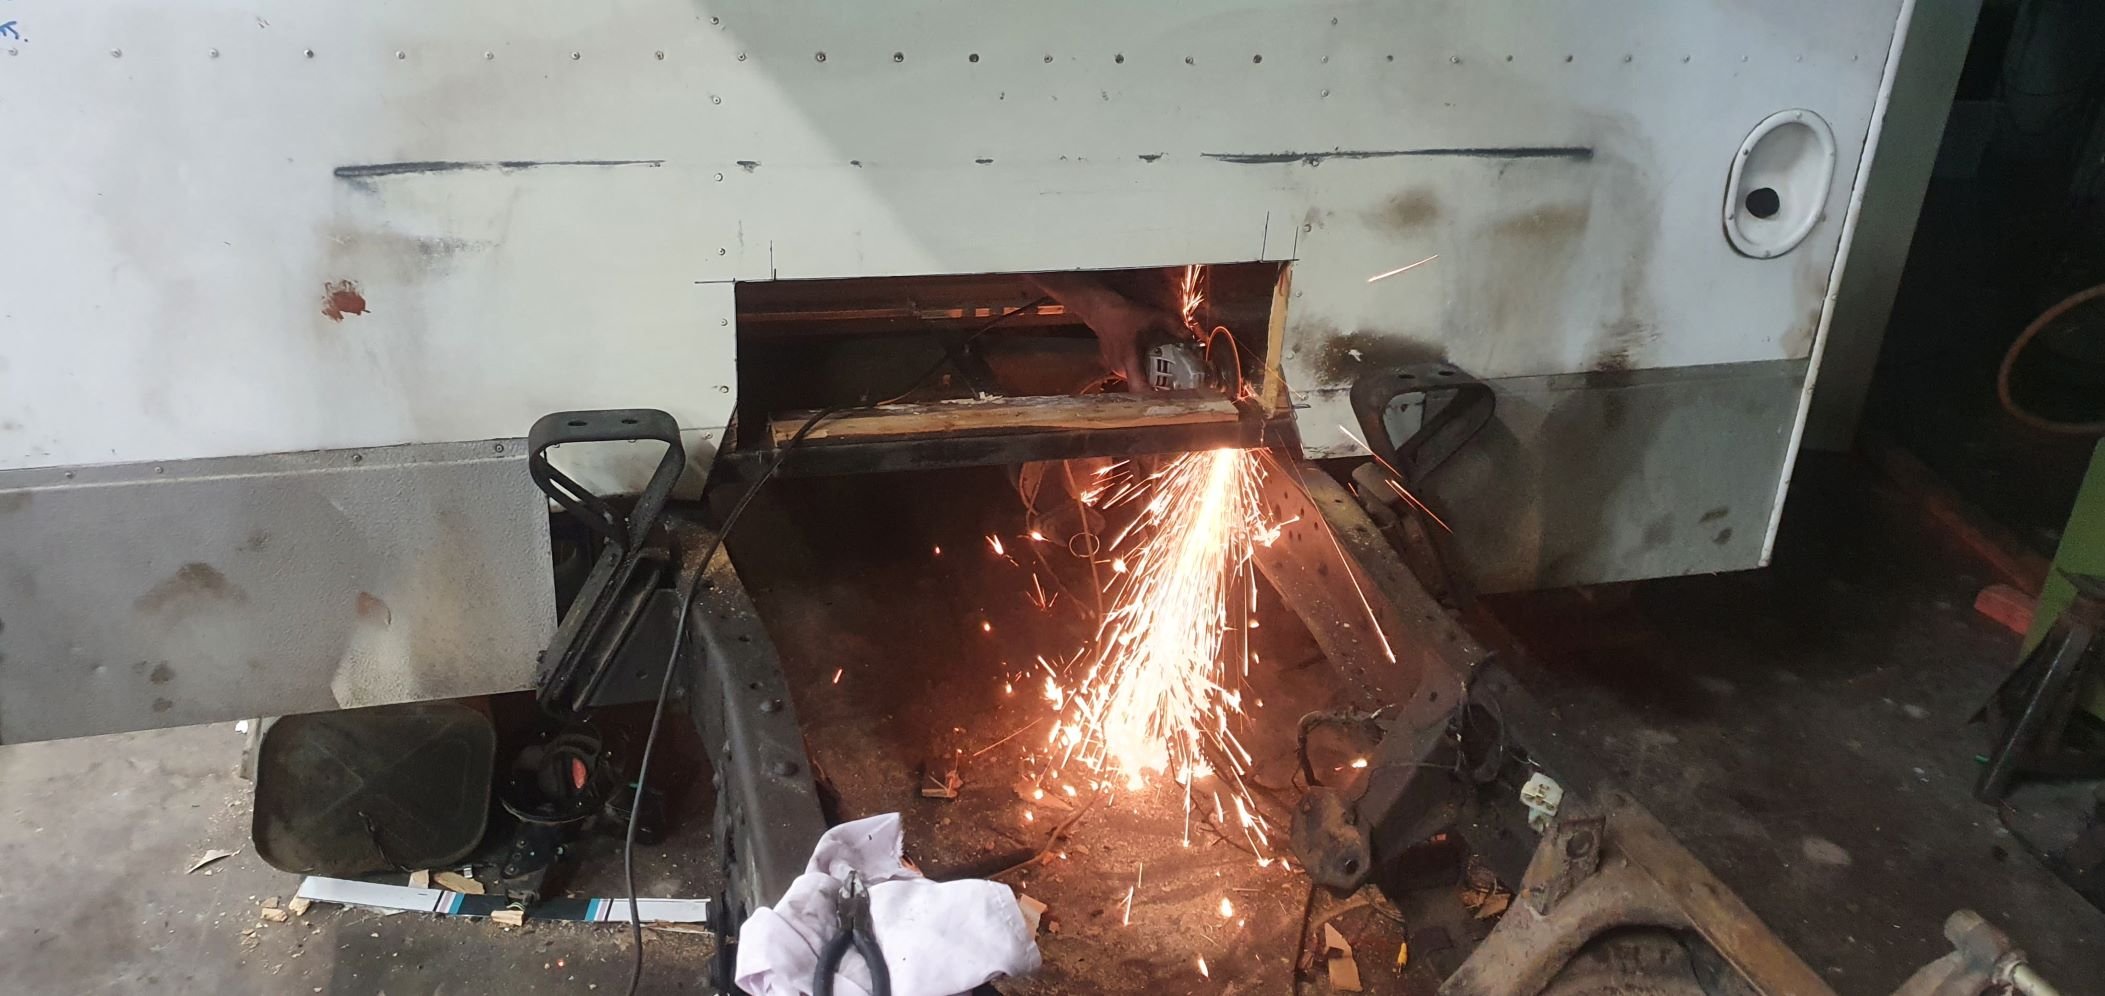
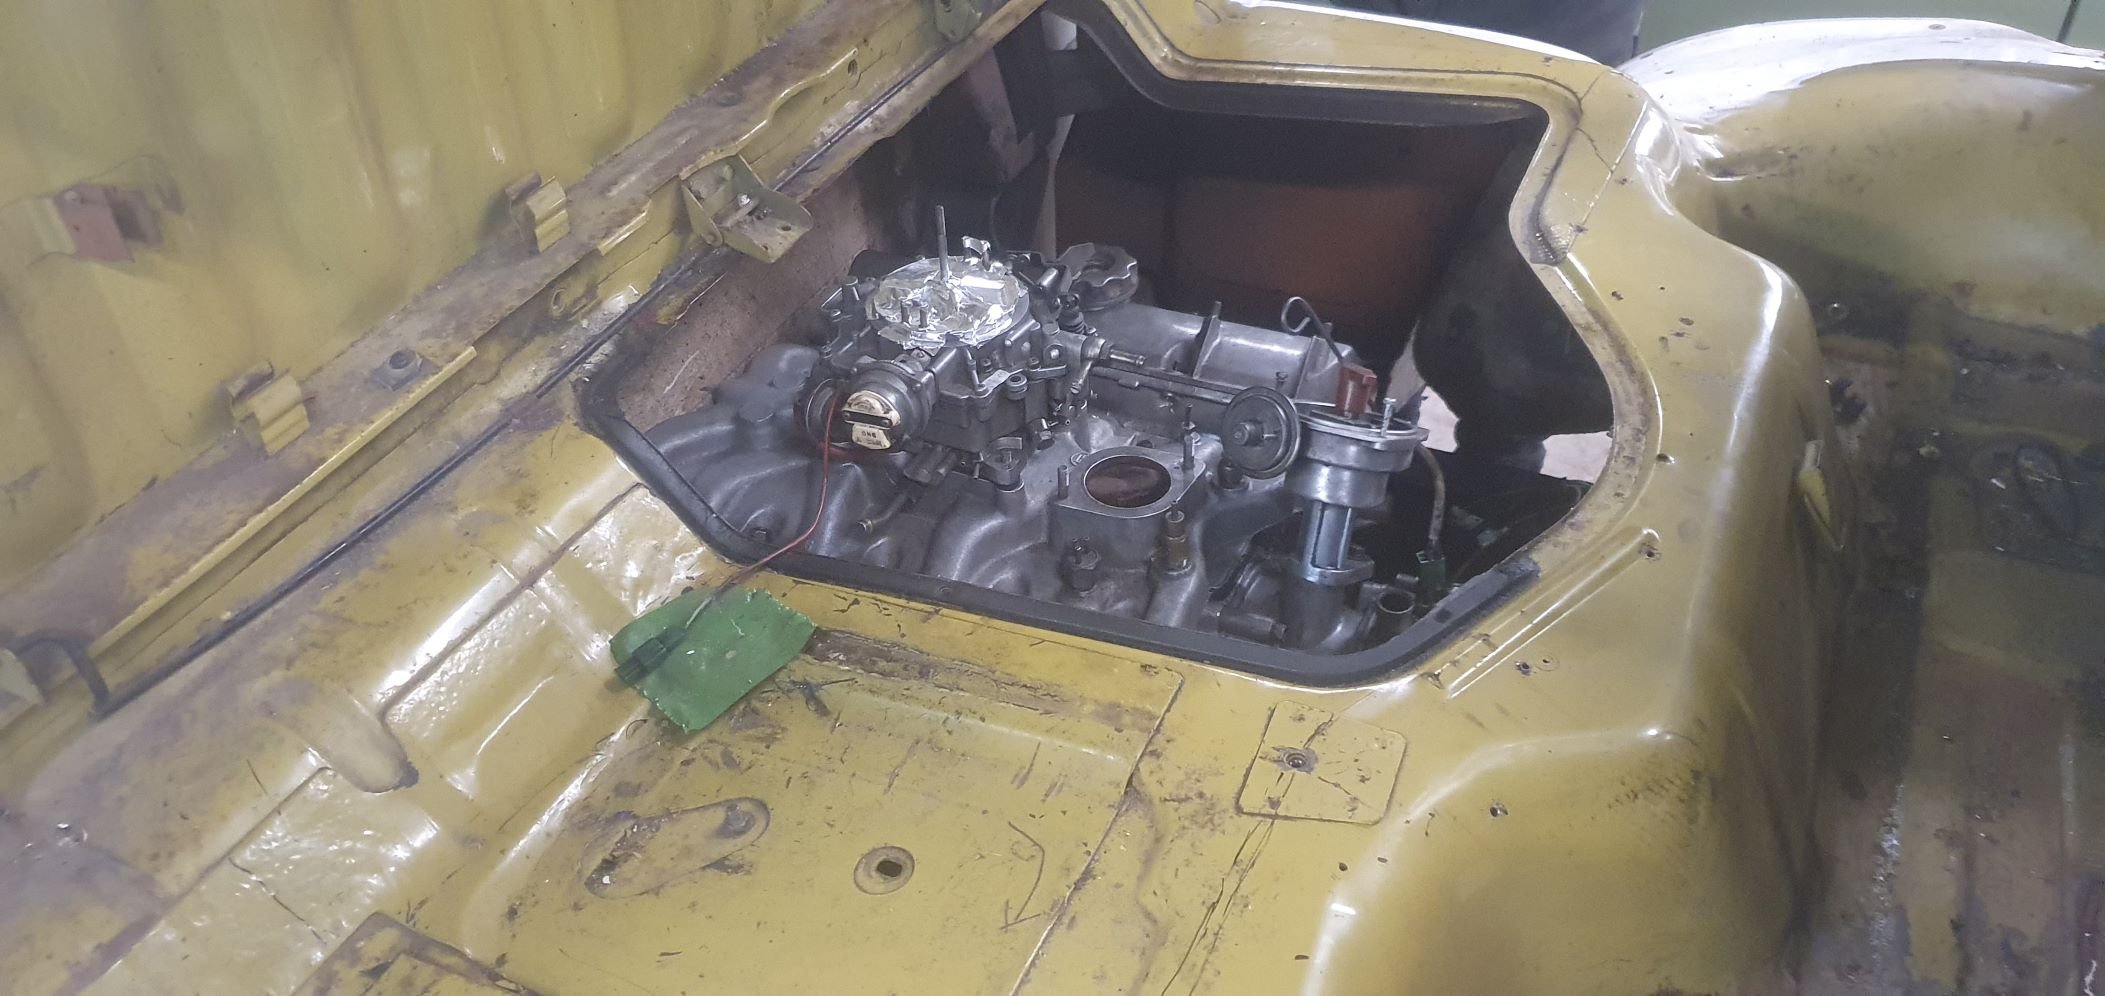
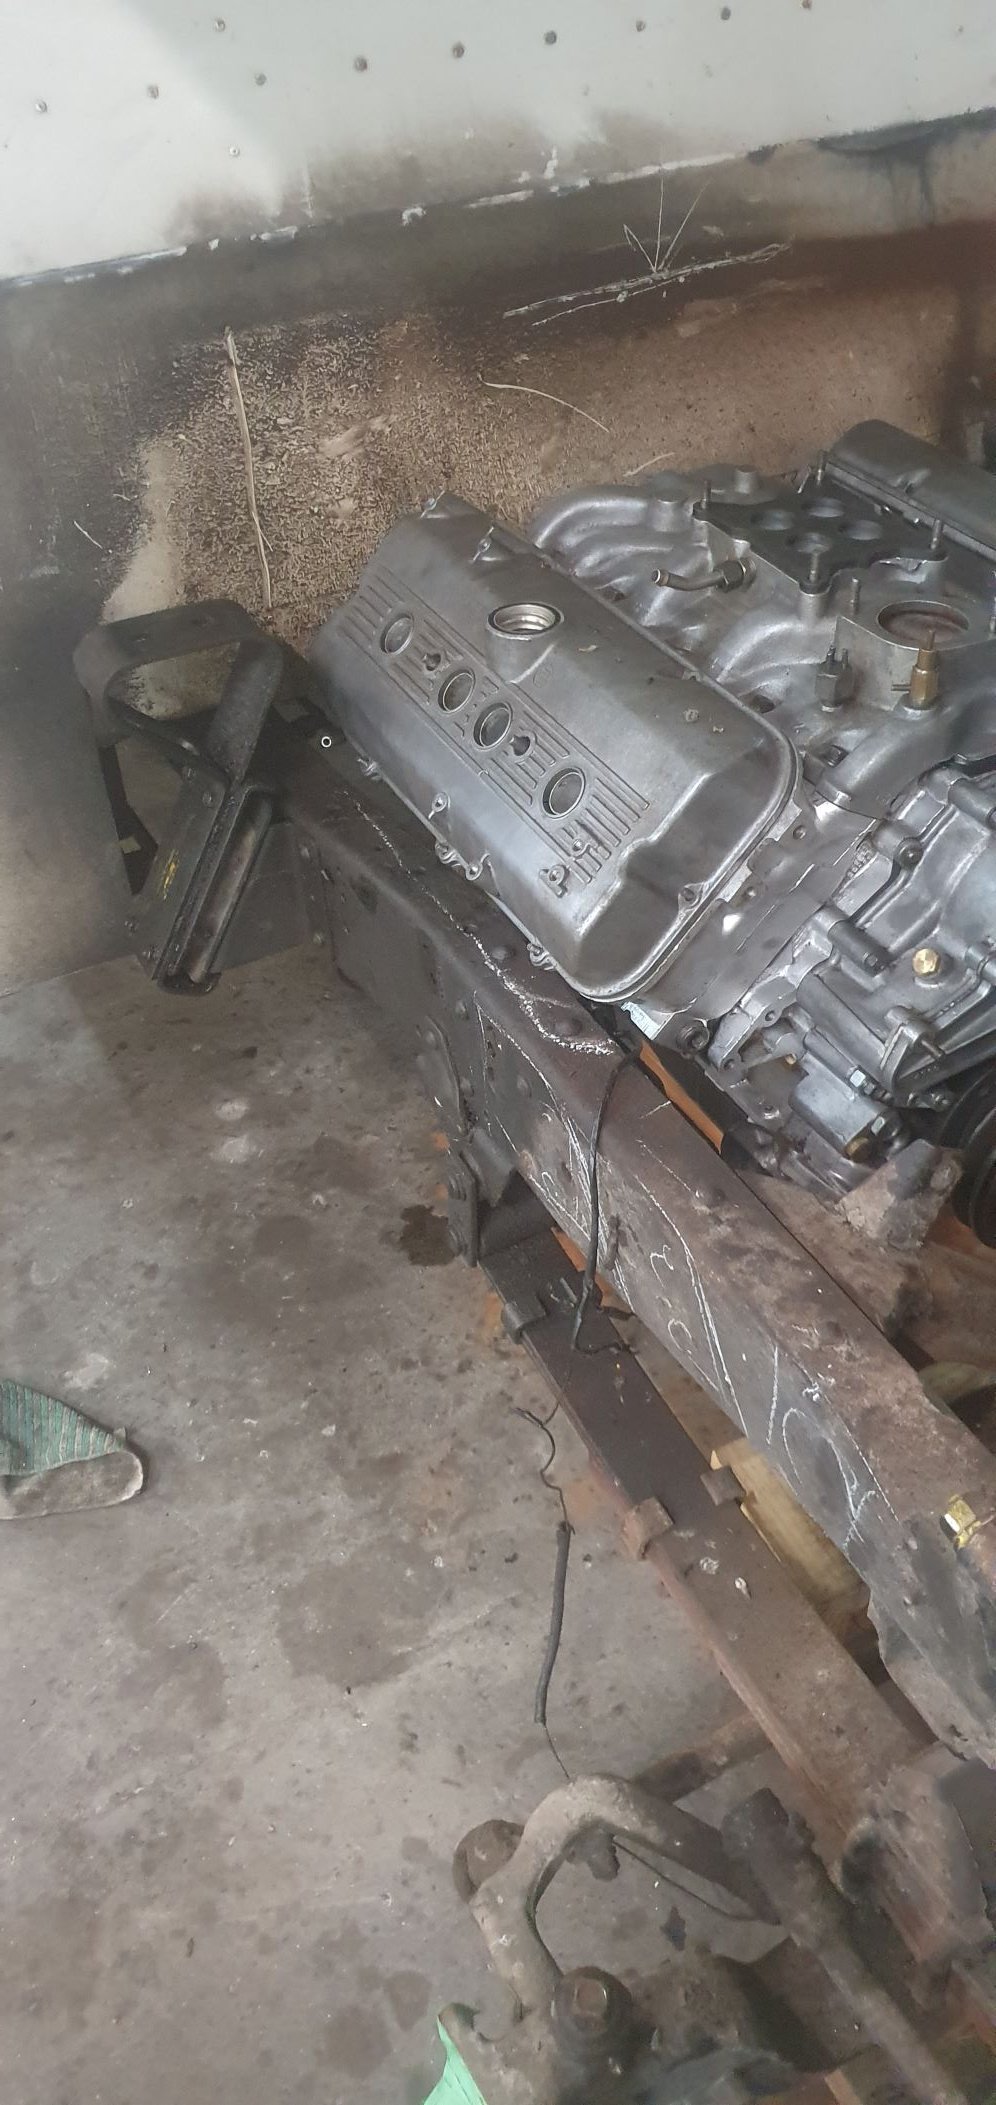
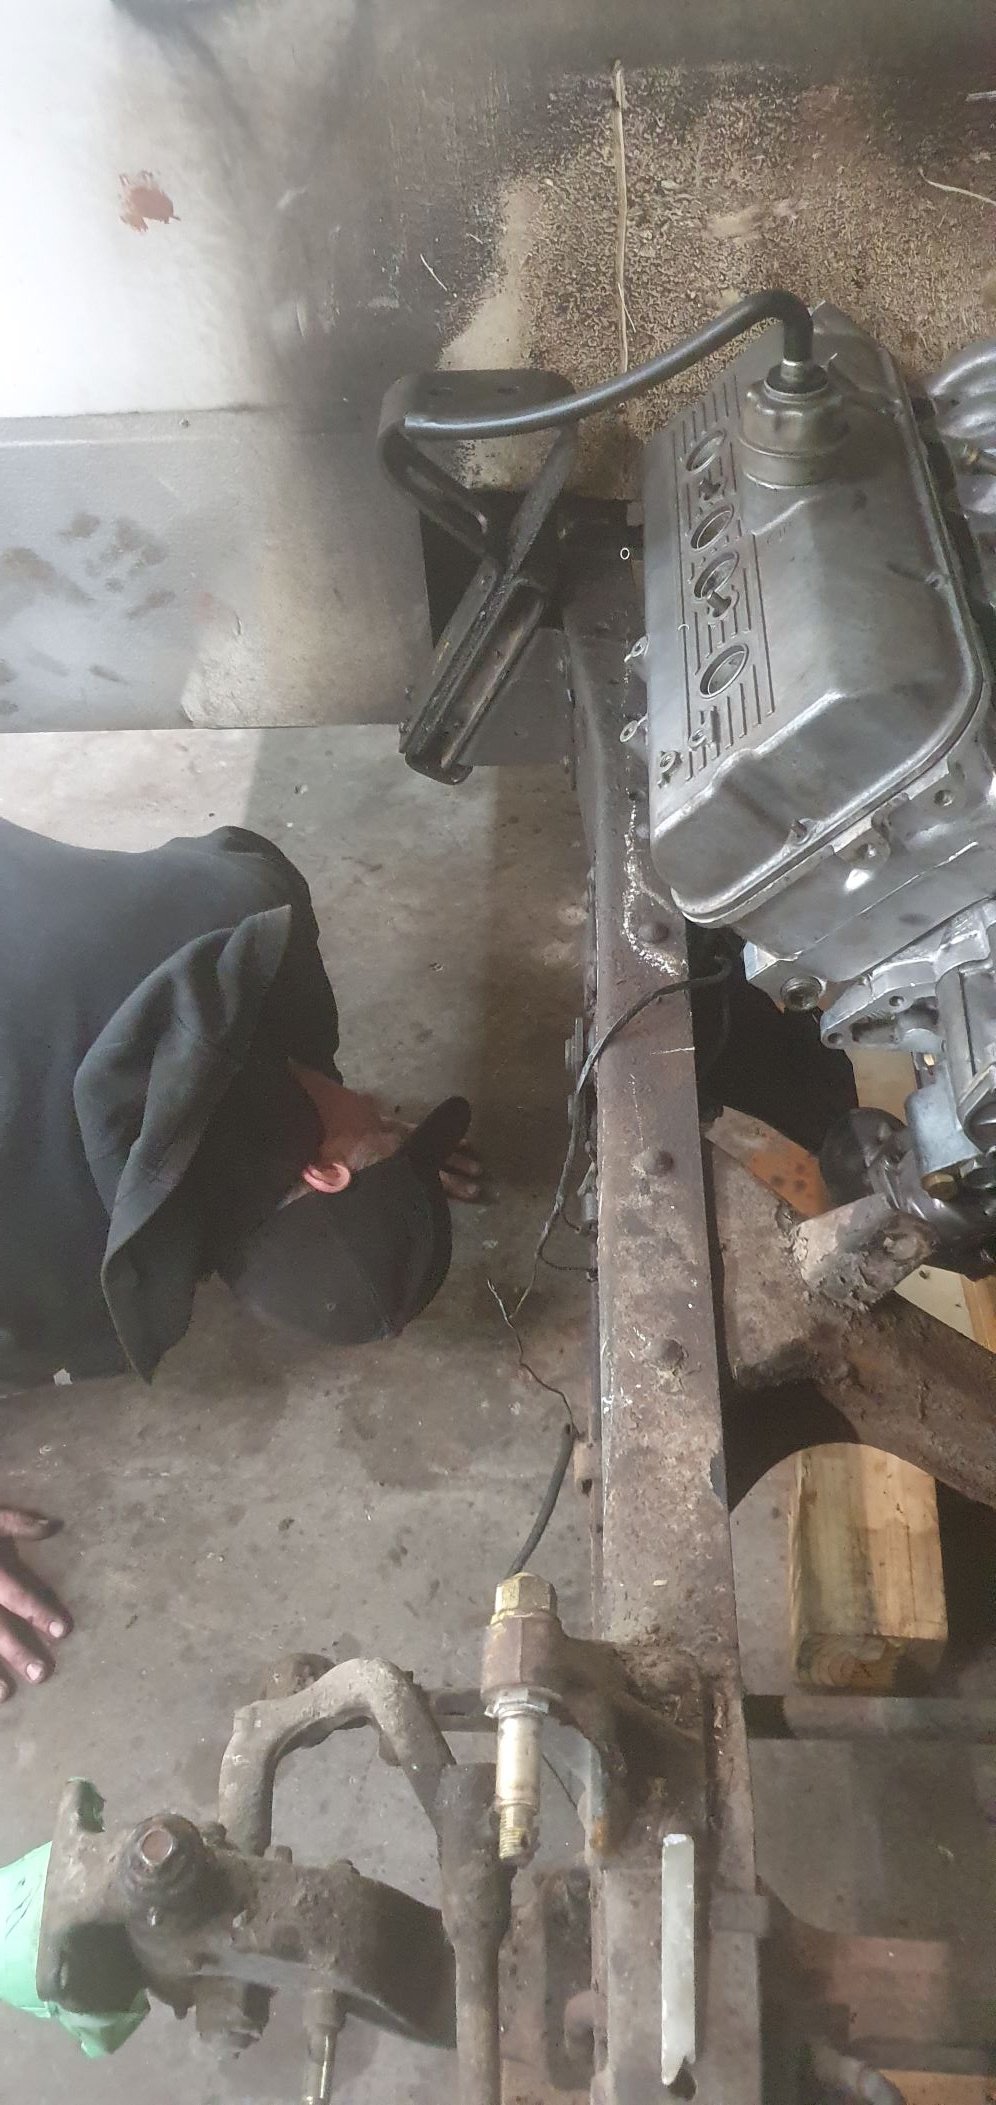
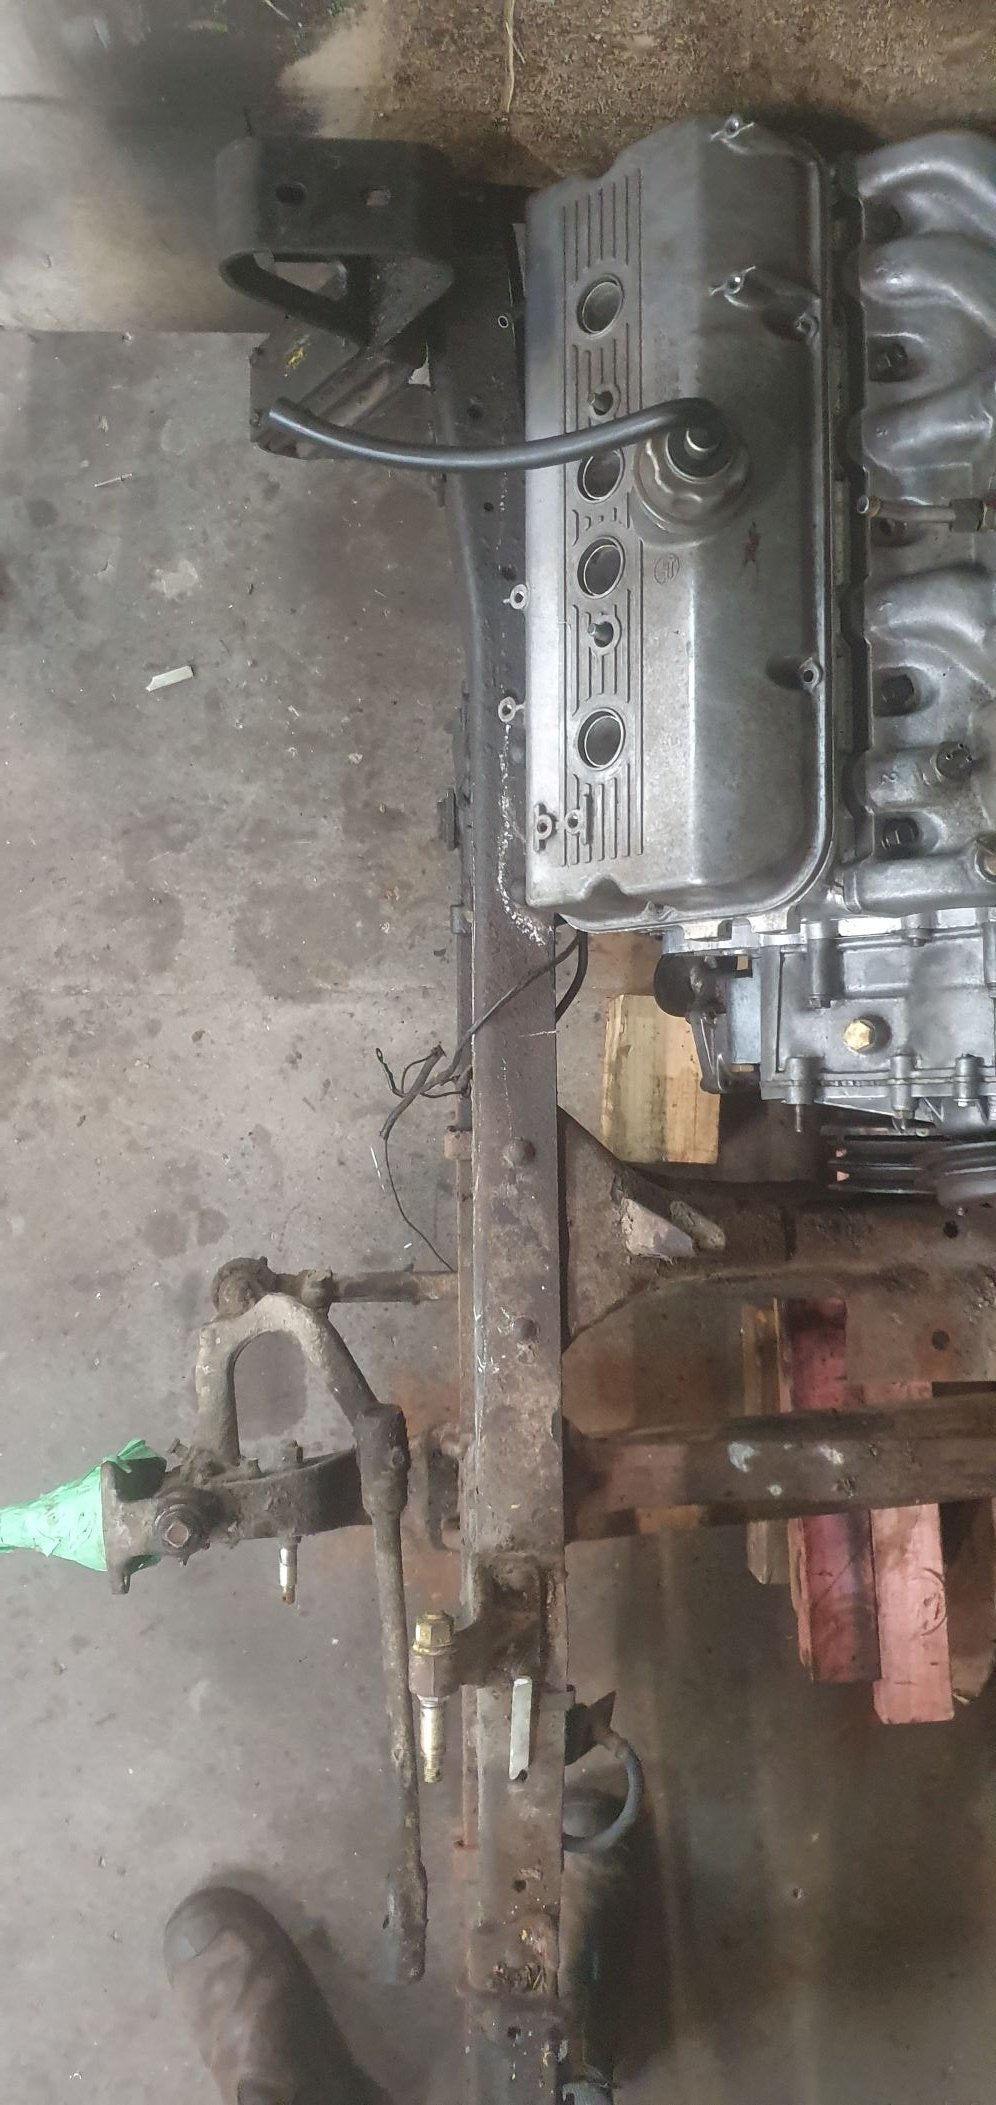
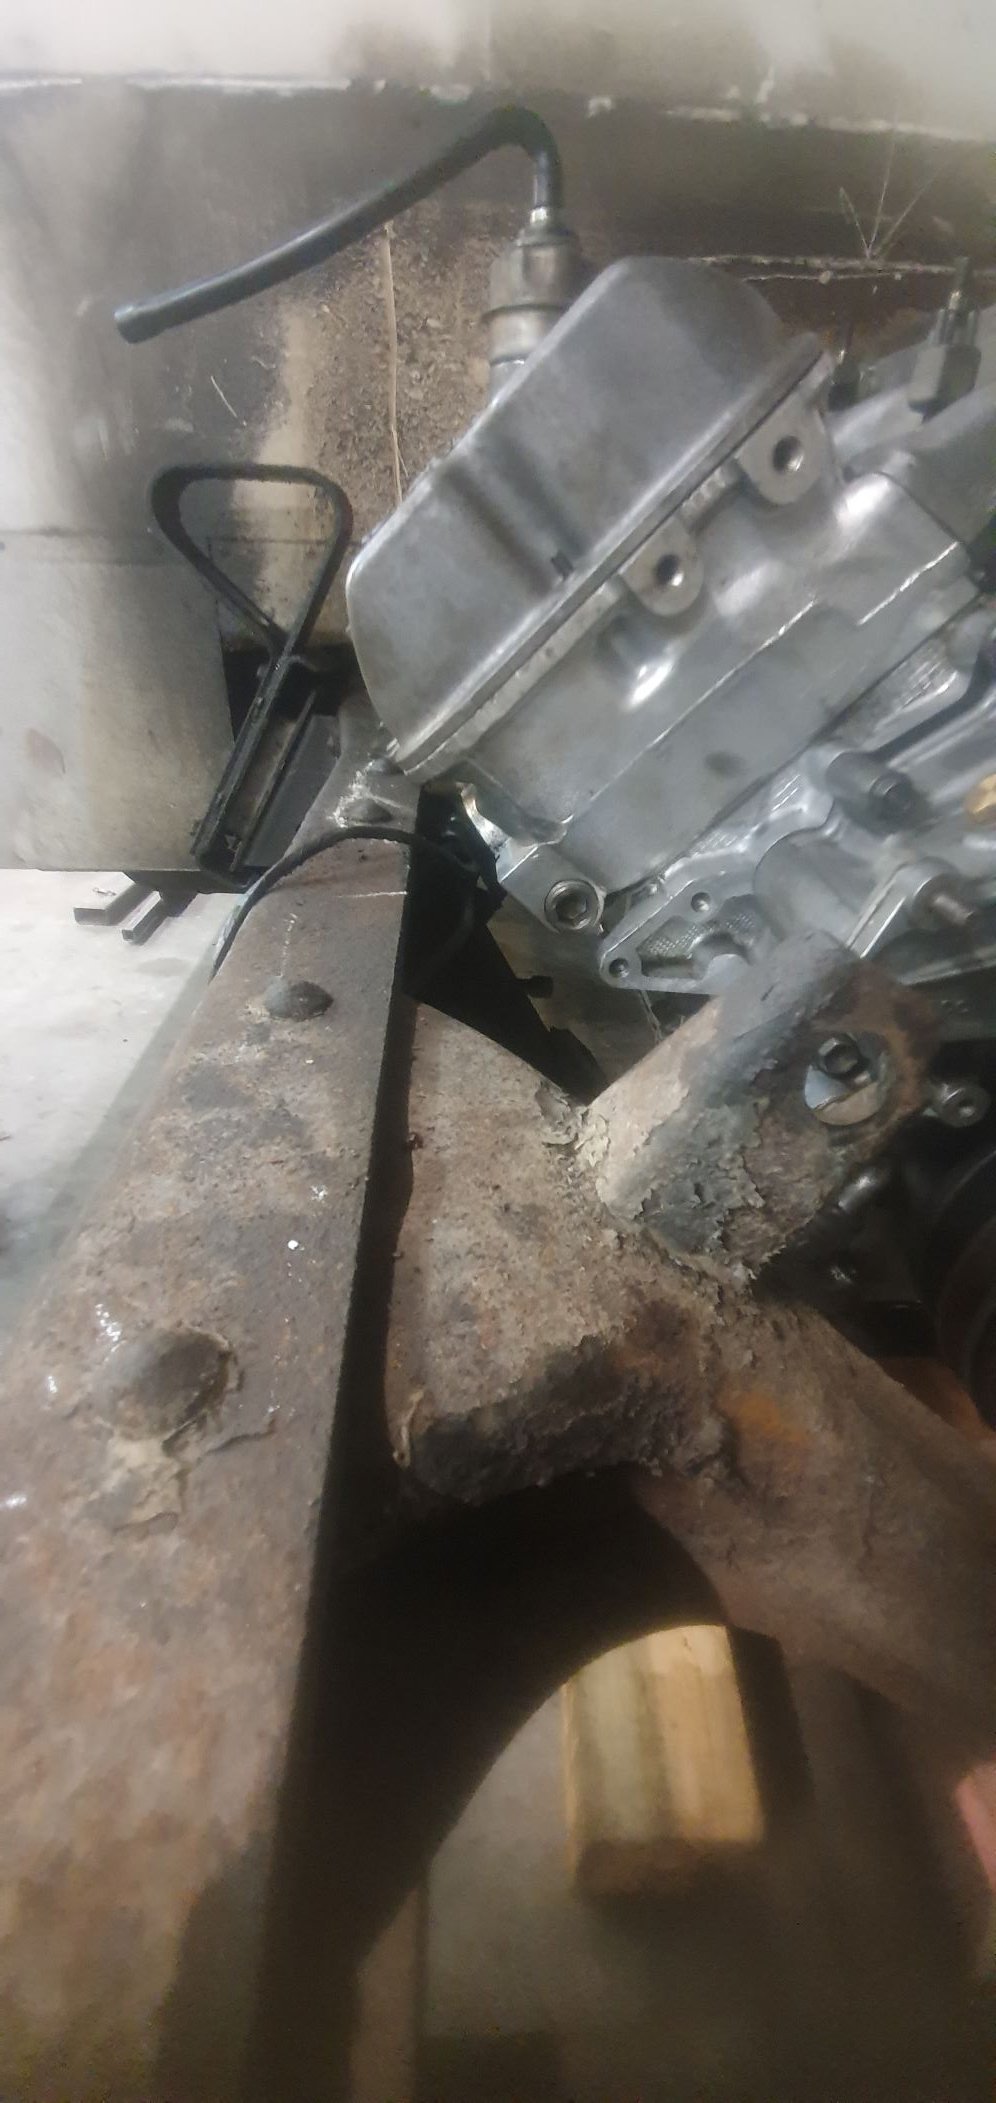
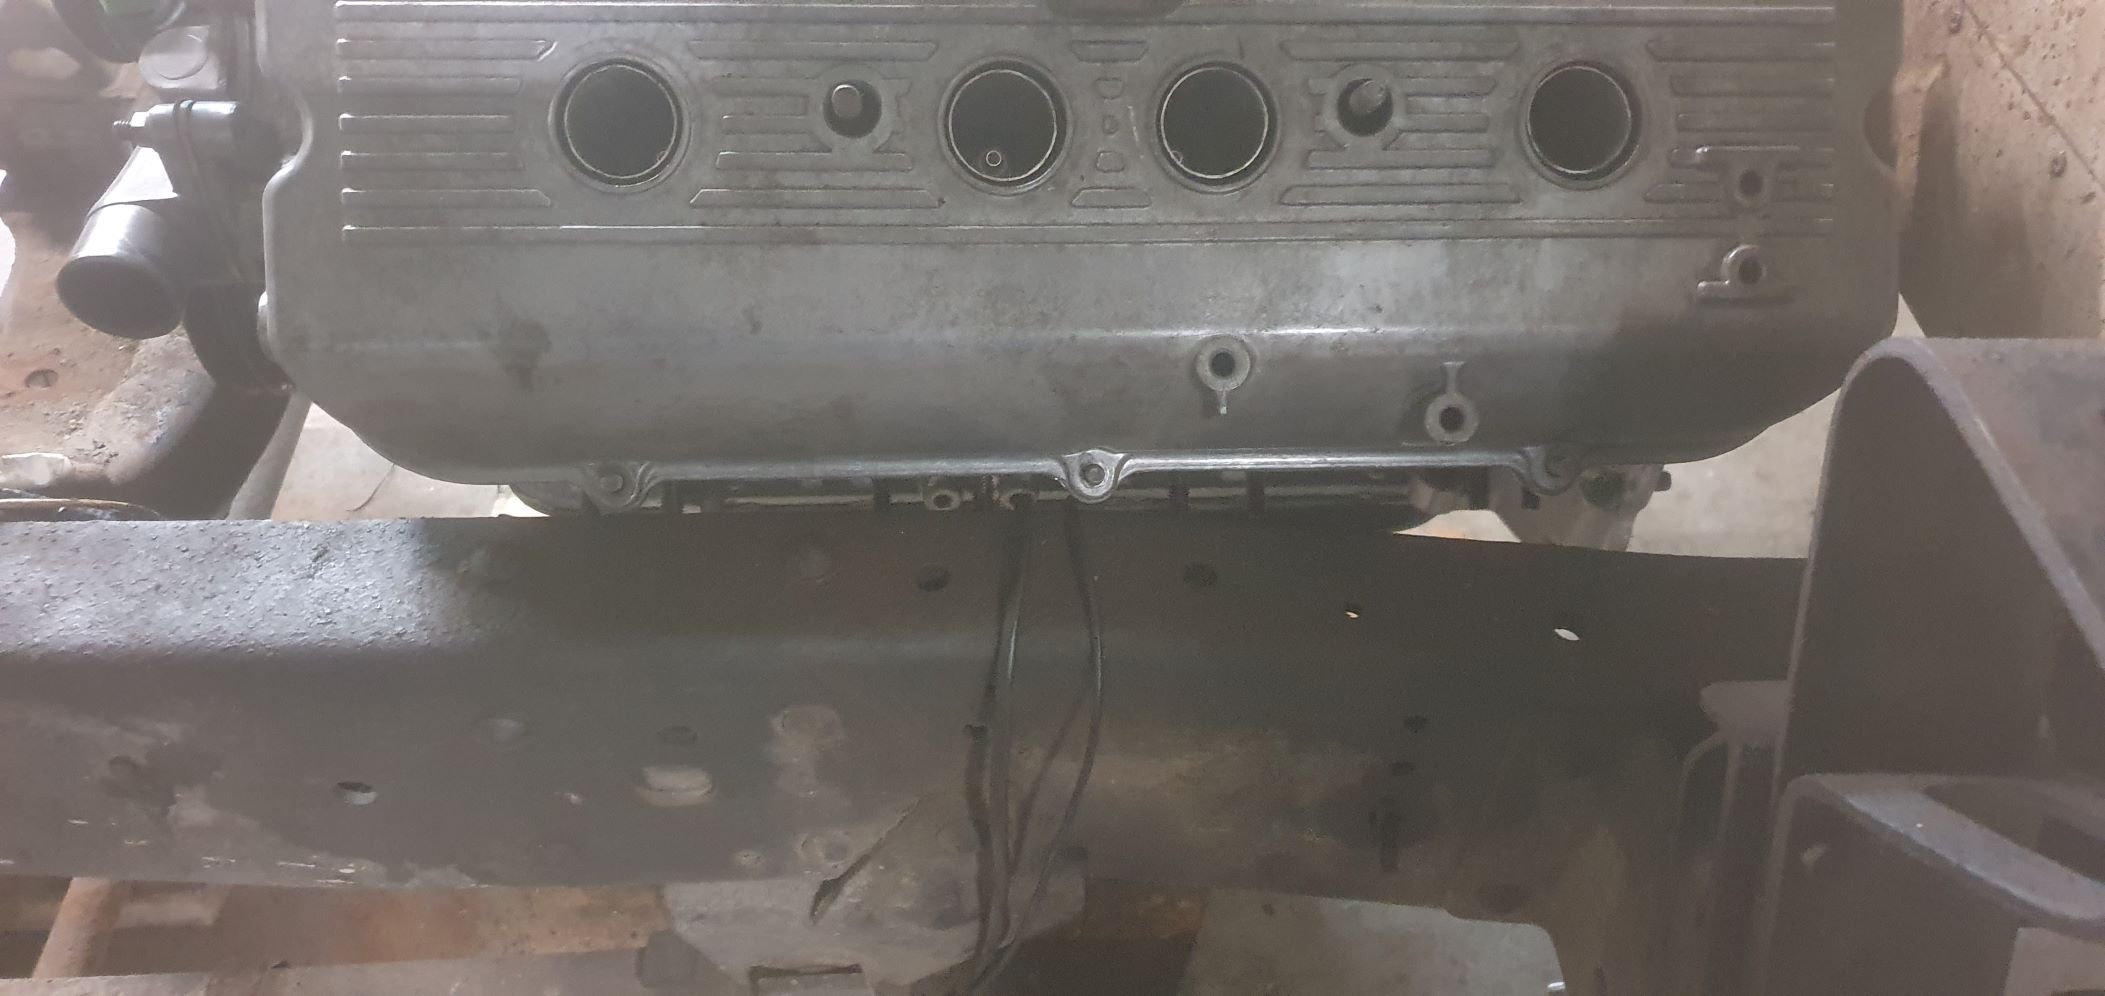
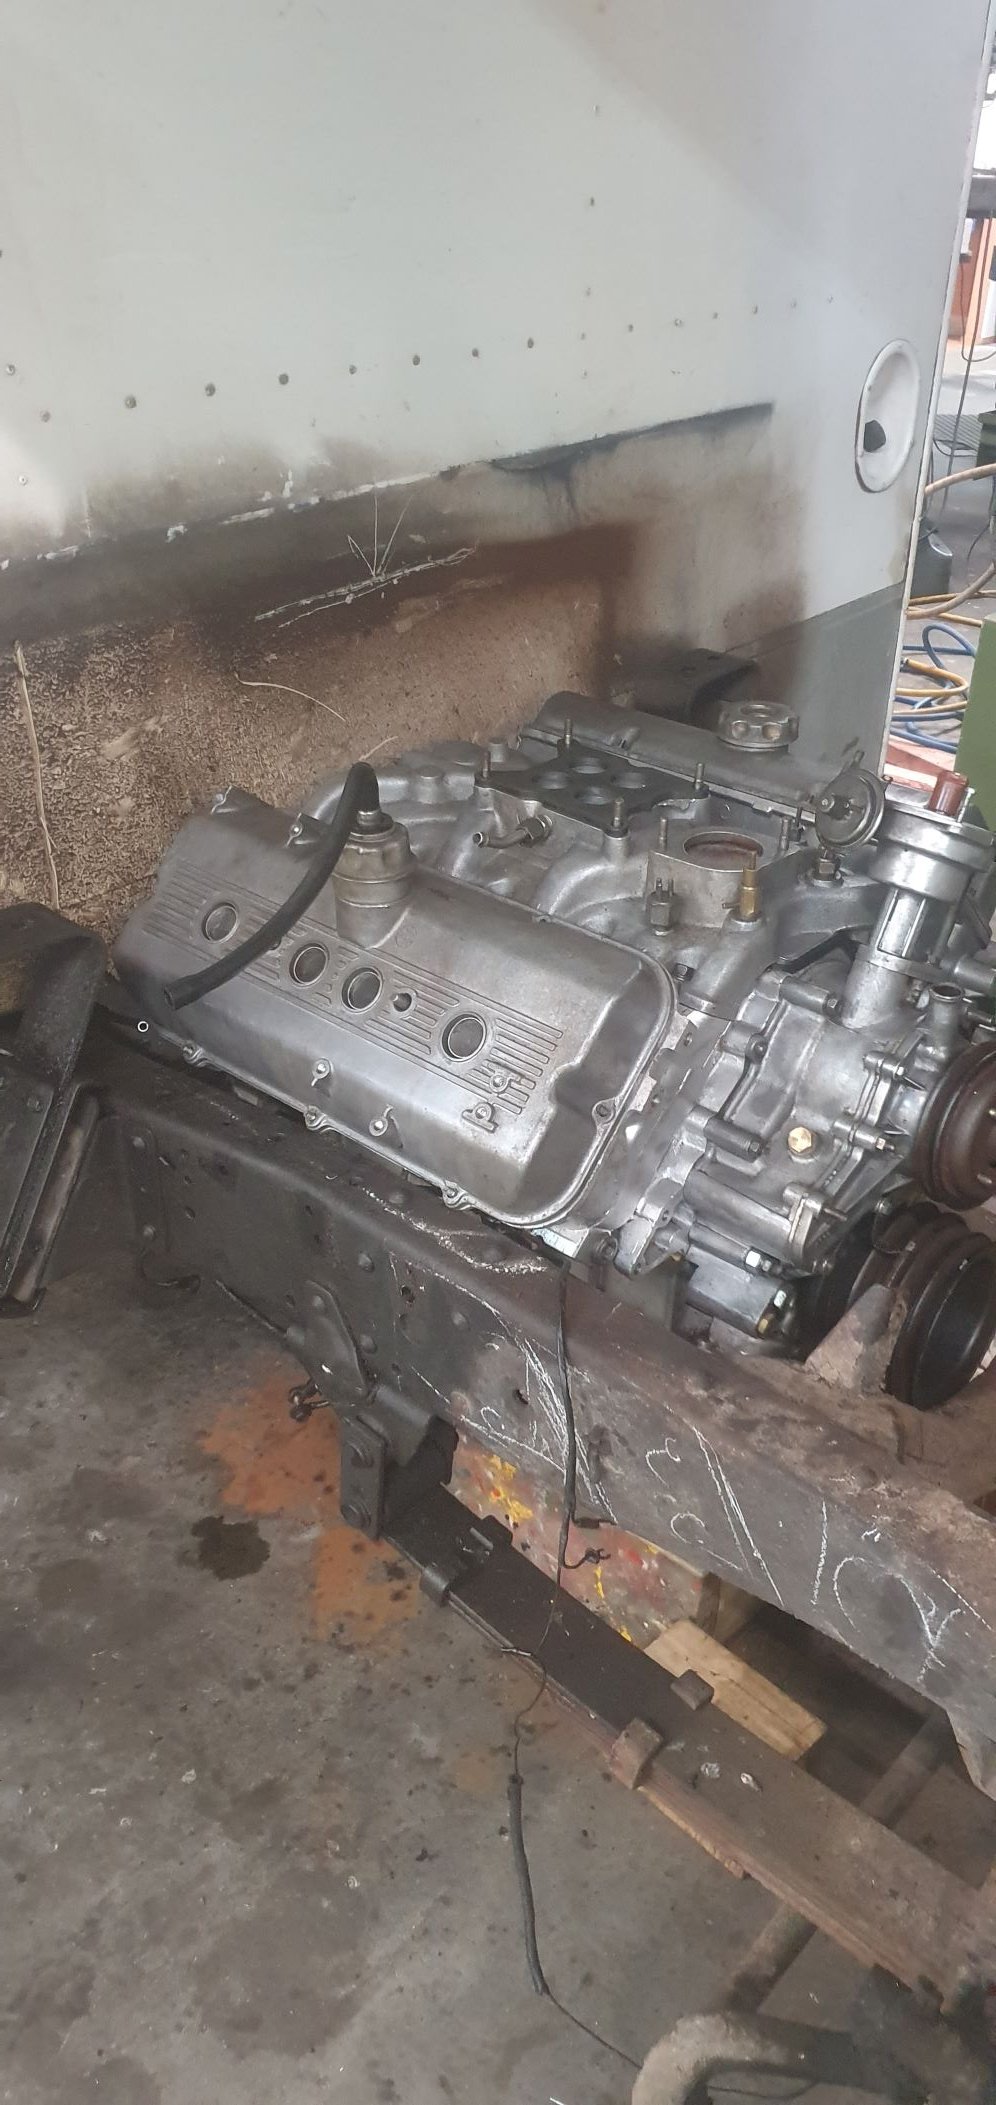
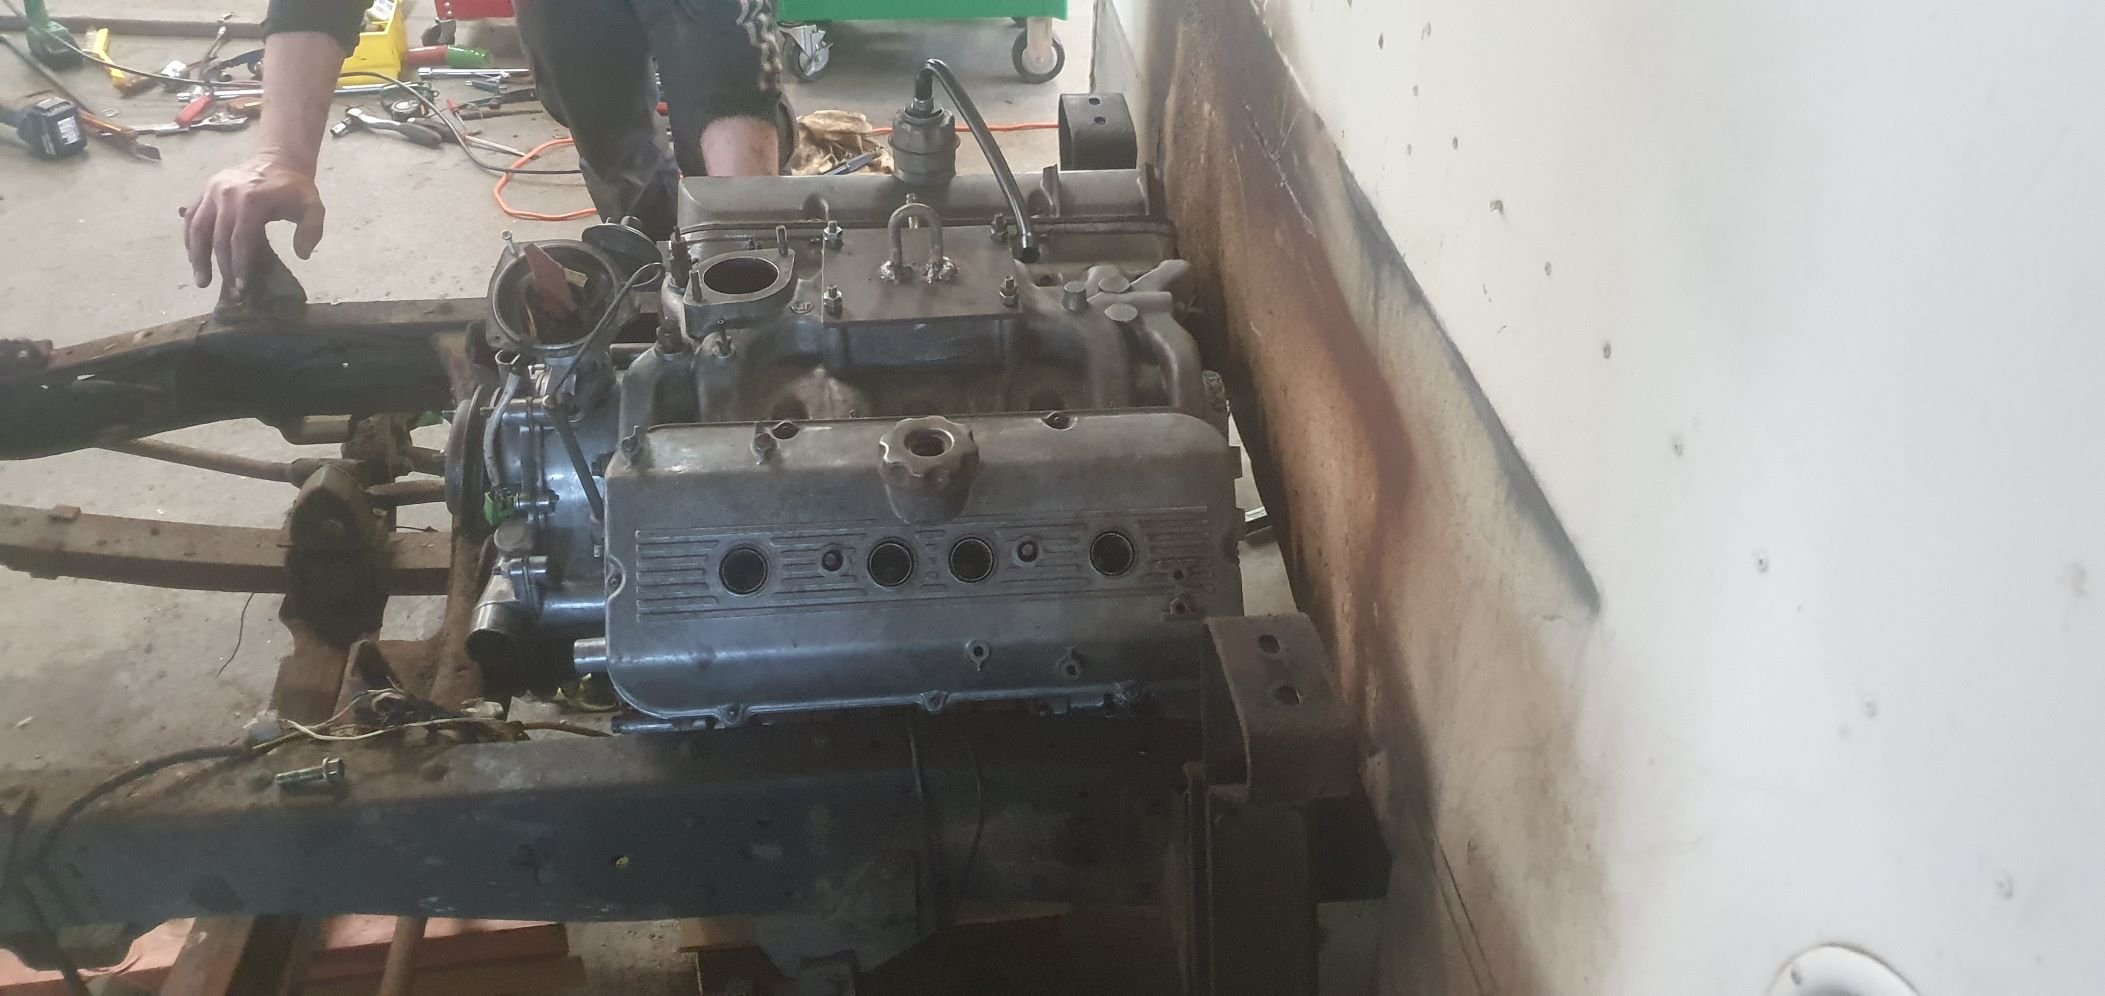
In terms of actual activity there is little to report, however the pondering, and opining from cunts like @ThePog and my worker - of near-equal cunt status - has been somewhat rampant. The main topic of conversation has over the last few days largely revolved around whether it is actually going to fit. It is largely a problem I have never encountered - just saying. So the motor has been sitting in the same position since we dumped it in there. I had to have a bit of a workshop tidy up. As many of you would well be familiar with, doing shit like this means sorting your shit out along the way and doing things in stages, so come assembly time you largely have all the shit in order, just requiring cleaning or a fufu can touch-up job. So I did that last night, and then suggested to Kyle that we wheel the cab back on, just to see (and to stop us thinking about the actual problems below). The carb had to be lifted off the engine to wheel the cab back over. But my oh my, doesnt it look pretty in the hole. Confirmed, It is Gynormous.. Also confirmed, the fucking thing is going to live in that hole regardless. Chassis chop, mid mound, fucking whadeva G. Every other possible engine option is shit in comparison, so that bit is solved. Now I need to solve the actual shit of ensuring whatever we do doesn't result in either a basket case chassis-hack job that will never be legal, or someones lunch being sucked out through their asshole by virtue of the carburetors somewhat prominent position inside the cabin. See pics - it is not optimal, the engine must go down in order for the carb to actually clear the engine cover and/or seat. The chassis rails actually widen where they pass under the camper body, and if they were that width in the engine bay we would already have that cunt mounted and half wired up - but alas that is not the case... So the present possible solutions are as follows; Option 1 - slice a 30mm ish slither out of the inside top of the chassis rails (removing some of top leg of C-channel), effectively continuing the inside line of the chassis rail (under camper body) further forward through to where the front of the engine is, then stepping in (see chalk marks). Then strengthening the Chassis with another plate on outside with folded edge to reinstate the 'beam strength' back into the chassis, or adding other folded piece over top extending further rearward and forward (kindof boxing the outside) This would allow the engine to drop down and maintain the current position. Tight set of log-style headers, removable from below should be achievable. FYI, Im an Industrial Designer by trade so drawing up, profile cutting, folding some shit, fabbing and modding the rails doesnt seem a terrible idea to me - but there are obviously rules and my cert man has already advised his 'preference' is for not modding the rails. I feel a CAD model is needed just to communicate my thinking further here.. Option 2 - start hacking out the camper body - this is effectively the area at floor level under the sink - possibly the most useless space in the entire camper. Making a removable section and shifting the motor back far enough (prob 250mm max further rearward of current position or roughly half of the engine under the camper body. Driveshaft gets rather short, as believe it or not the wheelbase of this thing is a tad under 3 metres. This area will need a massage anyway for the trans, so there is some logic in cutting here now and then reinstating removable infrastructure later for trans access etc - regardless of where the engine ends up - ie it would allow us to fully entertain that possibility. Doing this means the engine slots between the rails somewhat easier, but obviously engine access becomes more limited and opening the engine access hatch means the engine wont really be that accessible (prob dipstick, dizzy etc access but little else). And it will look weird - I like the idea of opening that hatch and there she is in all her glory.. Added bonus is there will effectively be a 'Frunk' under the seats where the engine once sat... Option 3 - the oldschool hivemind give me your opinions on my discussion thread - maybe there is something I am missing here. Its hard to communicate how tight it is, hopefully the pics below tell the full story. Be great to hear others thoughts on what is possible here - I am actually also thinking of talking to one of the local Truck Chassis mod dudes too - given this thing is actually just a truck.. Chur.
- 43 replies
-
- 24
-
-
Humber SS's 4V Century V8 powered Dyna Camper
HumberSS replied to HumberSS's topic in Projects and Build Ups
Got Impatient/bored with work today around 3pm and wandered out into the workshop, decided to poke it in the hole. No amount of tape-measury can prepare you for the shear girth of this thing. You think you have room until you are trying to jam a 4V into something. Fuck me there is some thickness there. Chassis needs to be chopped....... actually at this stage fuck knows, time to talk to the cert man about what options we have. I havent fit the cab back over it to see what wriggle room we have, but suffice to say it needs to either come up (unsure if possible without losing the middle seat...), or the top edge of the chassis rail needs some massaging. Either way its tighter than tight thing. It looks fucking cool in there, I really hope I can make it work. If I cant Im turning it into a caravan and towing it with a T-bucket fashioned from the remains of the cab with the motor in it - its the only logical maneuver The way I saw it in my head was I would remove Cab, engine would drop in, sit perfectly where I wanted it and the factory mounts lined up.. I may not only be a cunt, but an unreasonable one. Watch this space I guess, the next bits become infinitely more difficult and time consuming...
- 43 replies
-
- 28
-
-
Humber SS's 4V Century V8 powered Dyna Camper
HumberSS replied to HumberSS's topic in Projects and Build Ups
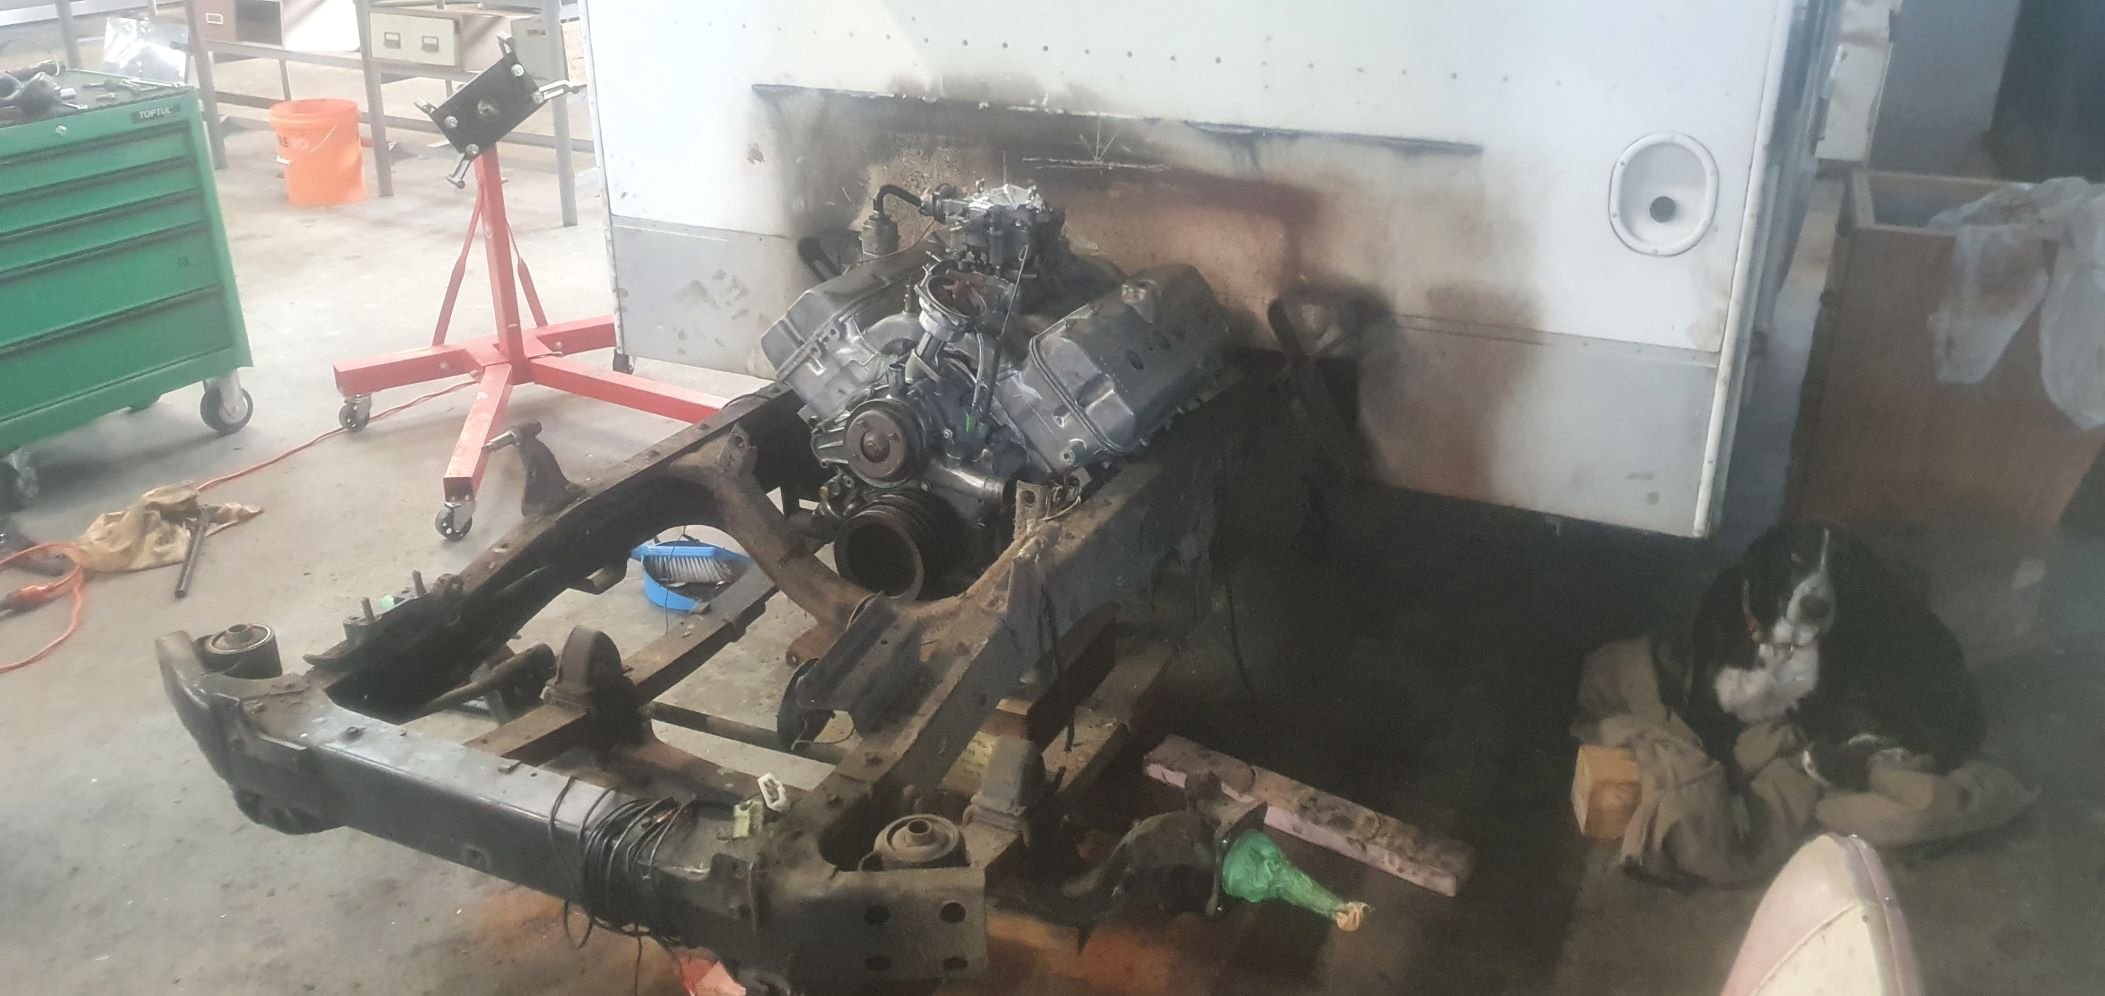
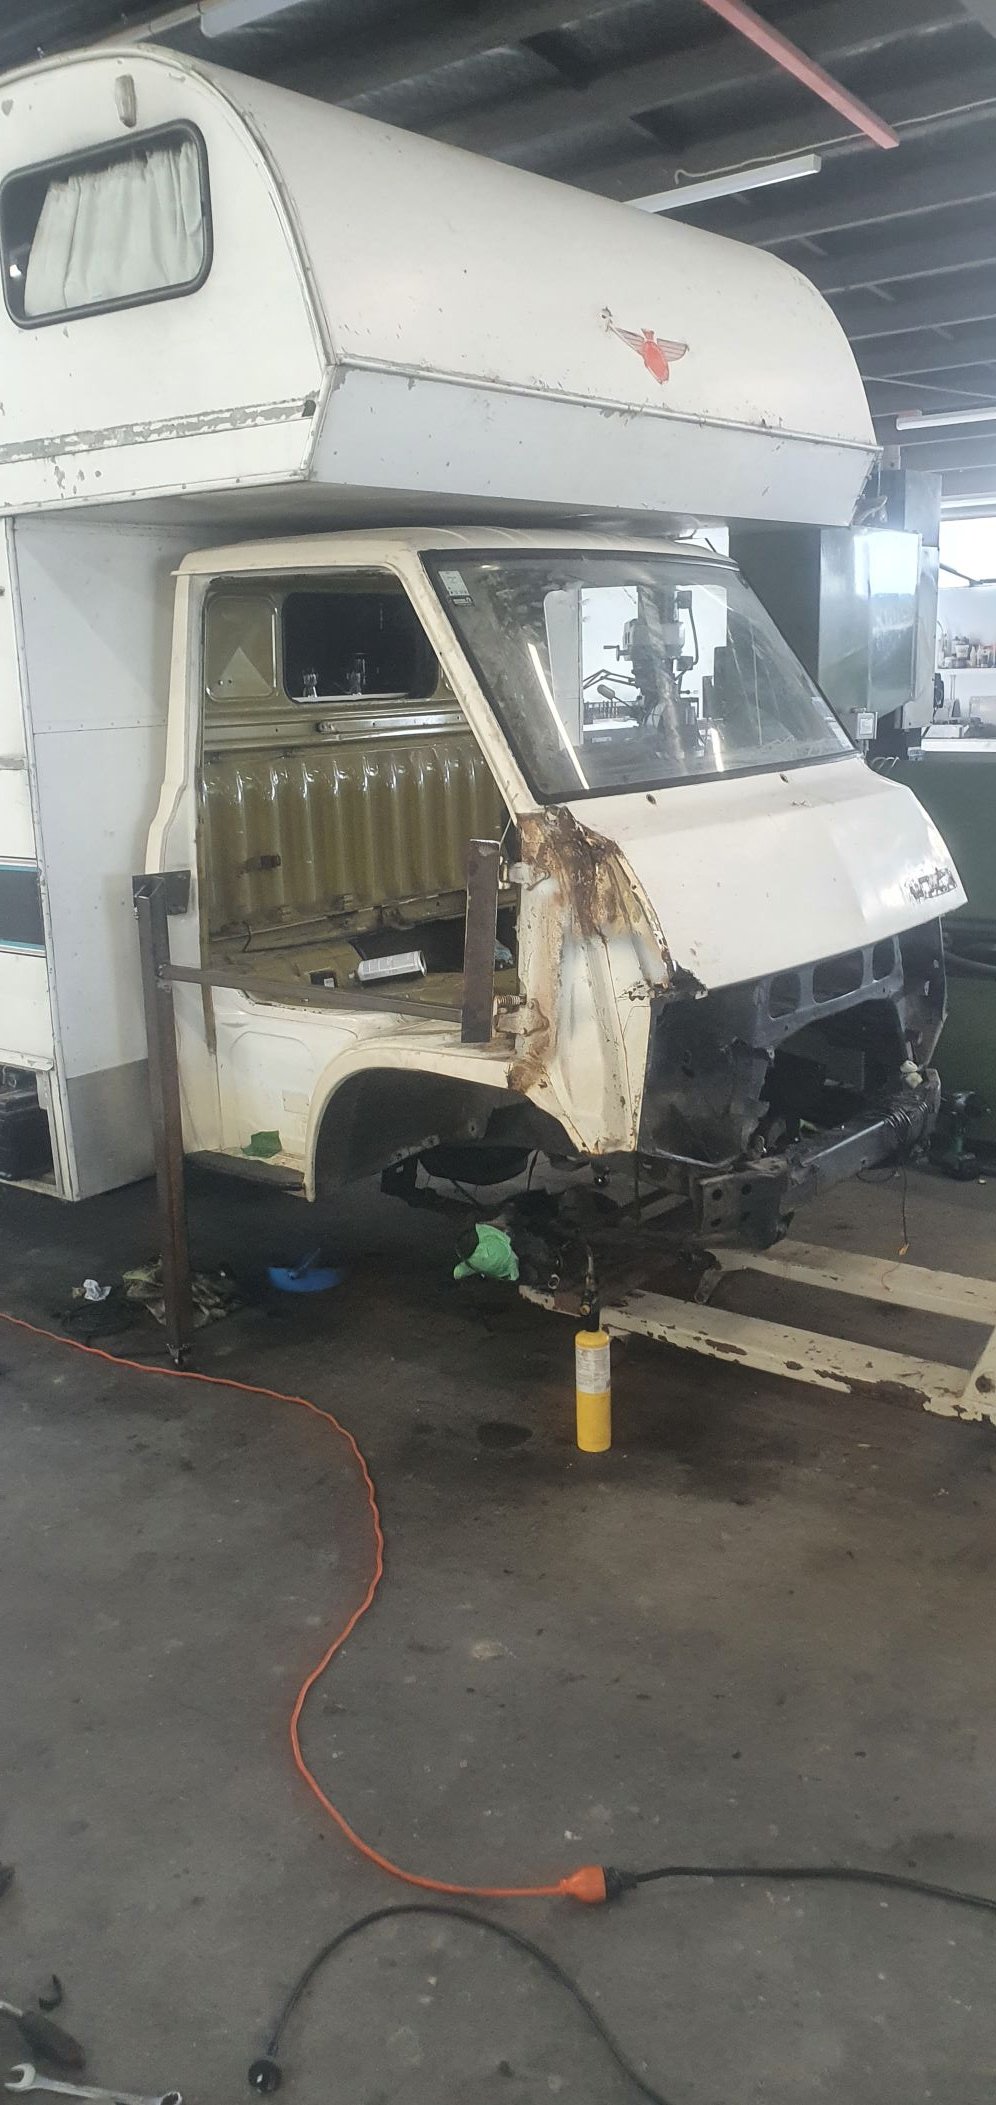
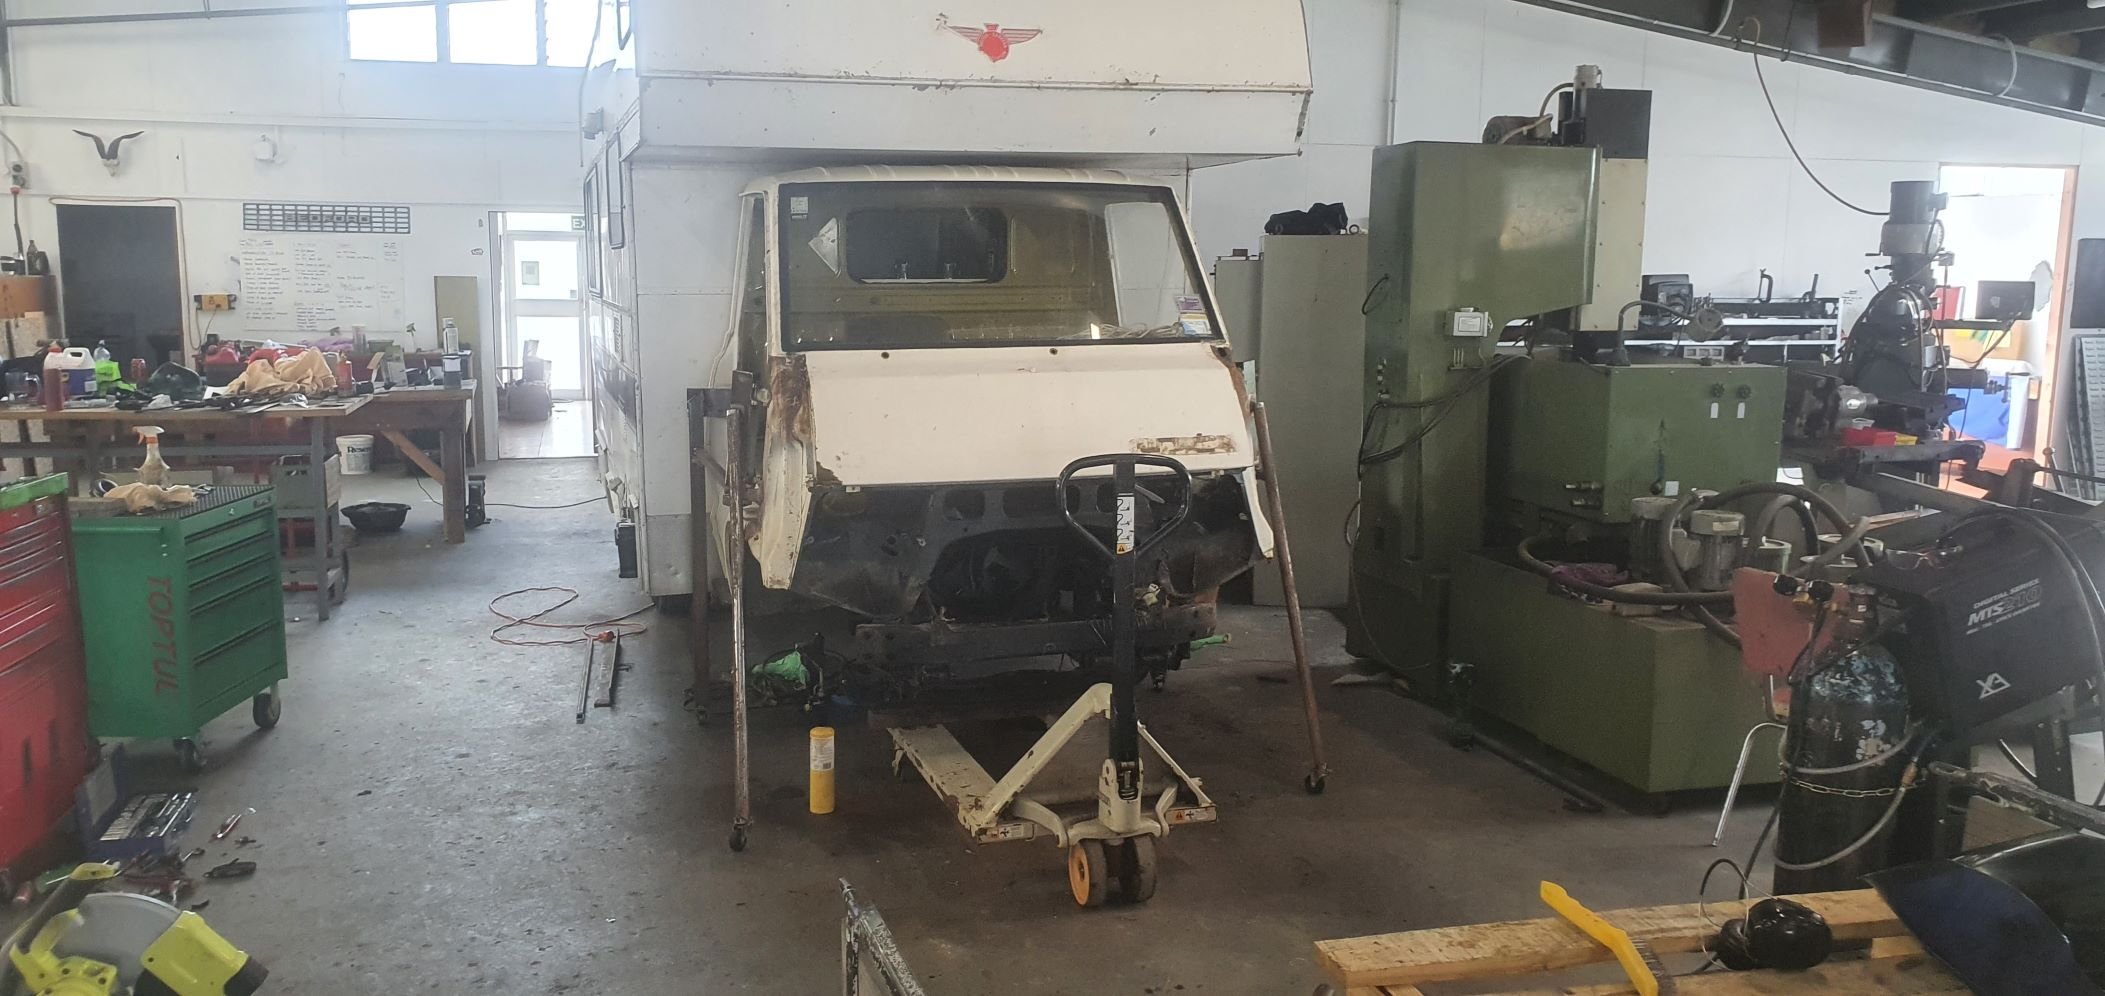
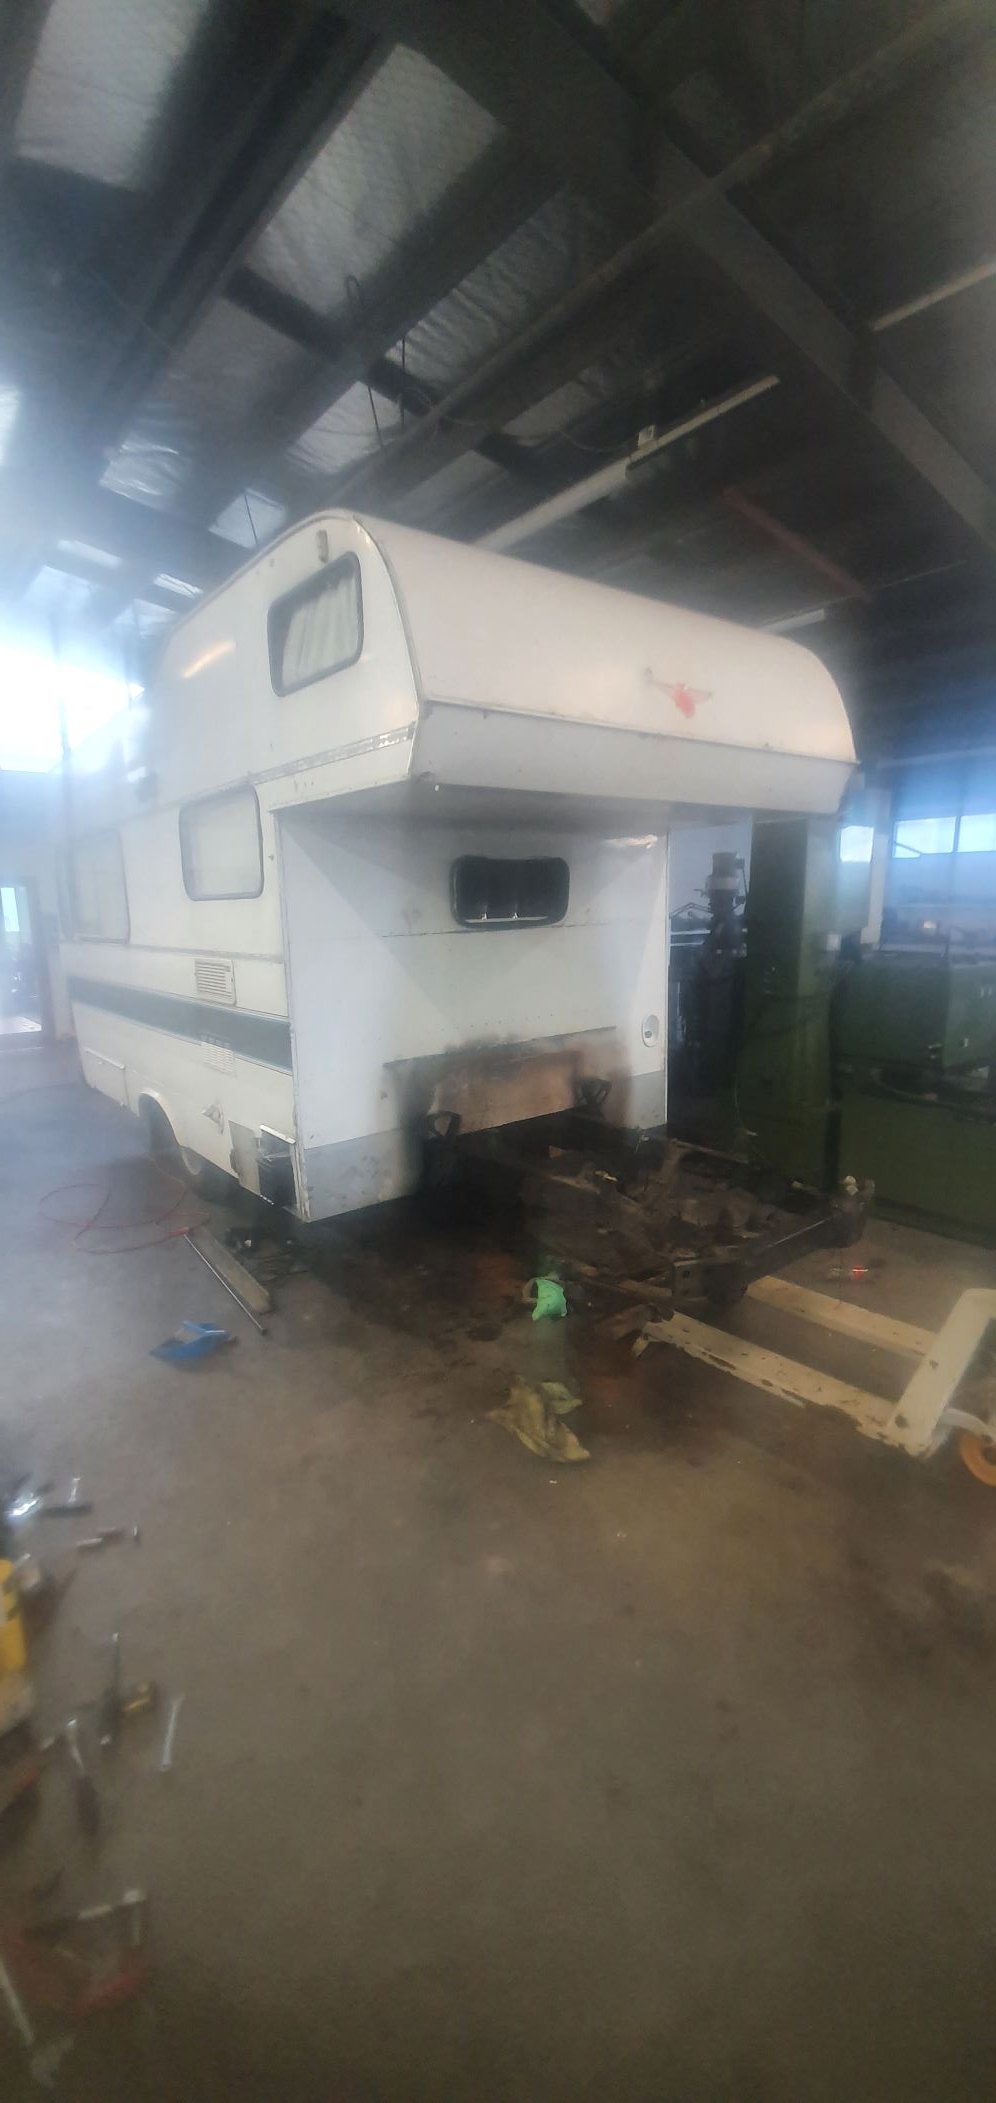
Big day of mahi today. Started by making two frames which mounted on each of the door hinges/door catches, castors on the bottome so I could slide the cab off without lifting the camper body. Worked out pretty well, cab came off relatively easily except for the dreaded last two bolts.. oh and some minor inner guard grinder removal work Engine was revealed, lots of this shit has to go as going from manual to auto box really simplifies things. So, dat what I did... At the very worst at least I still have a caravan.. am actually now thinking Ill put coupling mounted on the front chassis xmember for towing it around.. Am now gagging to slot that V8 between the rails. It measures up pretty good now that you can see what you have to work with. There may need to be a little relief on the camper body itself for the weird bulge on the top of the bellhousing, but no biggy. Apologies for grainy pic my camera is smashed.
- 43 replies
-
- 24
-
-
-
4V Century V8 powered Dyna Camper Discussion
HumberSS replied to HumberSS's topic in Project Discussion
yeah...sorry about that. It was truly too good to pass up. It also forced me to make a decision on the repower of the camper - fate has its ways. -
Humber SS's 4V Century V8 powered Dyna Camper
HumberSS replied to HumberSS's topic in Projects and Build Ups
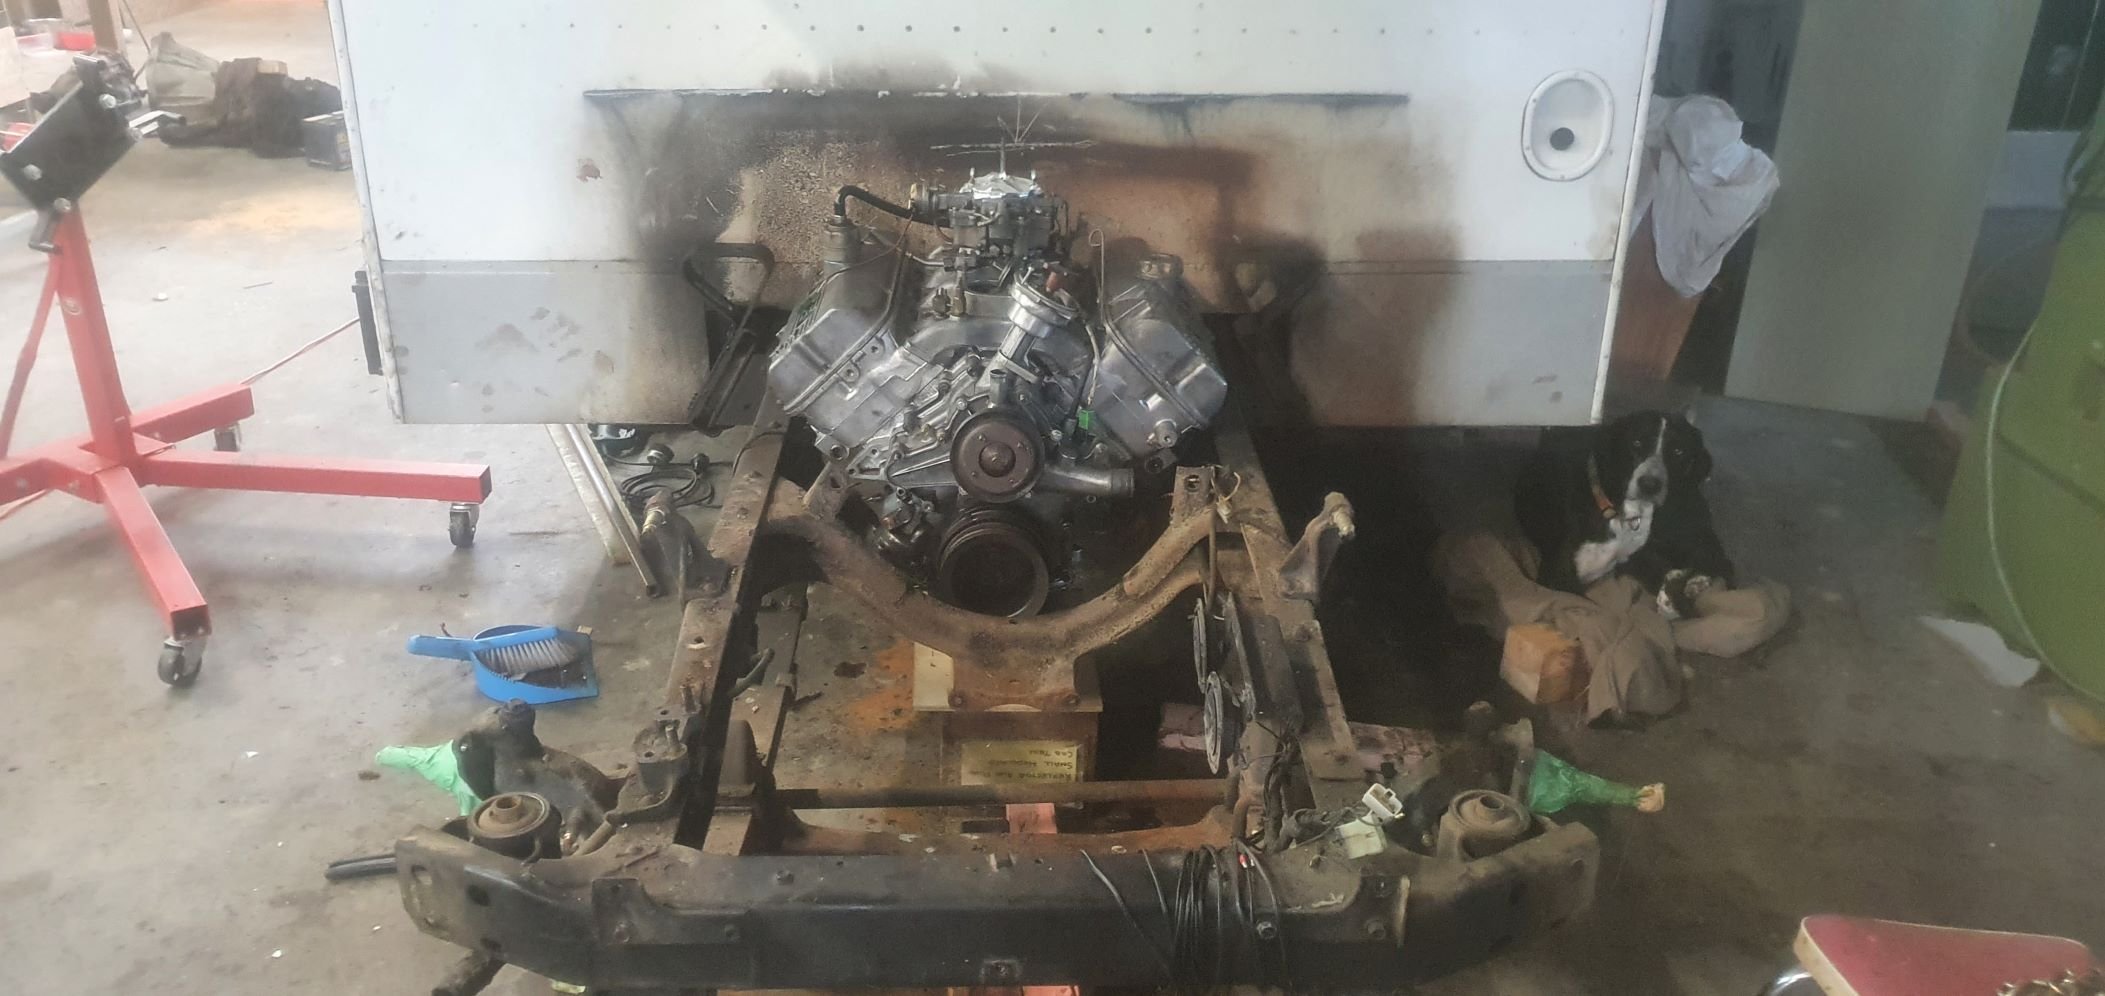
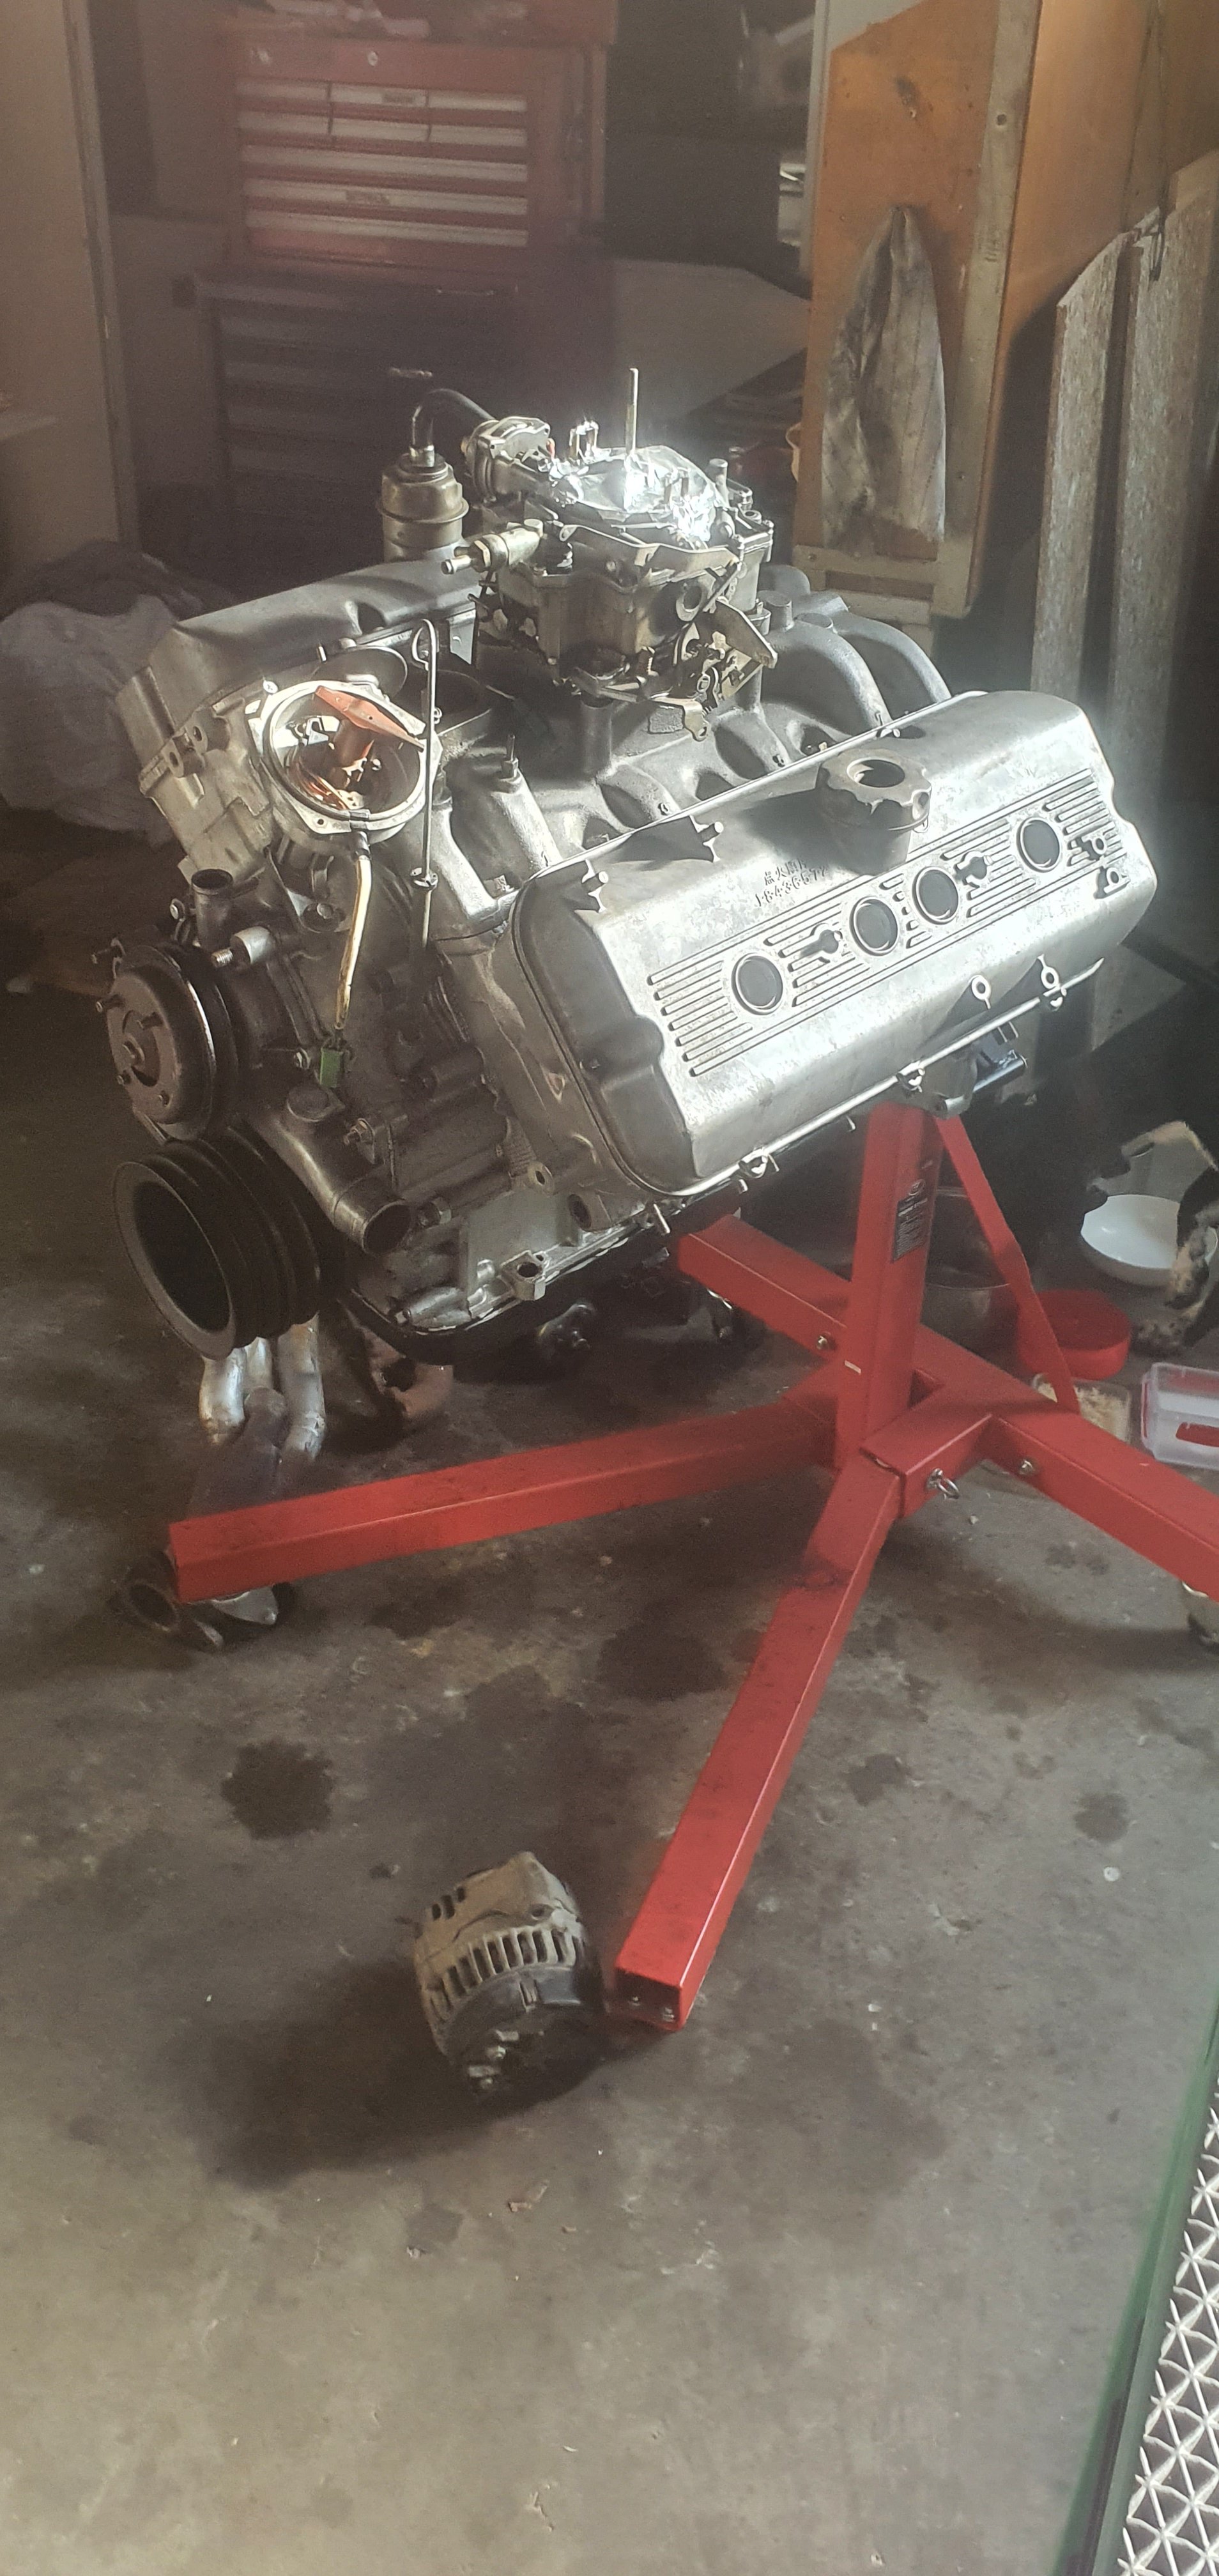
Engines been cleaned up pretty good awaiting slotting between the rails. Still have to make alternator bracket, and the seals under the rocker covers which seal around the spark plug tubes are toast so machining new ones there too.. Will probably make a set of log-style headers. Next weeks job is to get some flanges cut. Tomorrows Job is cab off and old engine out..
- 43 replies
-
- 20
-
-
4V Century V8 powered Dyna Camper Discussion
HumberSS replied to HumberSS's topic in Project Discussion
Thanks mate -
Missed muncies post. I considered the gm trans too but thought the integrated bellhousing might make it more difficult.
-
ok thanks man. I have one here a mate has I can look at for sizing up, will pm you if I decide to go for it. What do you want for it?
-
4V Century V8 powered Dyna Camper Discussion
HumberSS replied to HumberSS's topic in Project Discussion
I initially did before the 4V came along. I agree they are no powerhouse, but the 4L 5V is actually worse than the 3.4L 4V as its choked up with emissions gear. I want the simplicity of no electronics and with the tickle up its had I expect it should make 150kw at least and enough torque - will be over double whats in there. Economy isnt the biggest deal its not a daily, and tbh the original 4 cylinder averaged 23L/100km on trips as you had to beat the dick out of it everywhere, mostly with the secondarys open , so I expect the V8 might be slightly better than that. Its still a cheaper holiday than flying and motels