
_Matt
-
Posts
453 -
Joined
-
Last visited
-
Days Won
5
Posts posted by _Matt
-
-
- Popular Post
- Popular Post
Learnt a lot in the past month and a bit.
Main thing being that you should probably lube your fuel injector o-rings when you go to put them back in.
Got the engine running, was only running on half the cylinders. Discovered there was no fuel going to the rear half cylinders, so decided to pull out the injectors. Took them into town and put them on an injector tester and nothing happened. Was told they can gunk up after sitting for awhile.
So went off back home and gave them a spray with some cleaner and smashed them on the ground until they started clicking freely again with power to them. Got them all sounding really good, so in they went (without any lube, thinking back it should of been something that should of come to mind, but I guess I was just in a rush to get it running!), as they went in they must of torn the o-rings. I got the intake and everything back on and together and we started it up again. Ran mint!! So turned it off to see how it would start again, flat battery.
Chucked the charger on, and then decided we'd put the wheels on, piece it a bit more together and go for a drive up the driveway. By time we got it together and off the hoist, a few hours had past and so had a decent amount of fuel past the o-rings and into cylinder no.5. Cranked it over and it didn't want to start very easily, so gave it a few more attempts and finally started up with a lovely knocking noise! We thought maybe it was just something loose in the bellhousing, as when we first started it we quickly realised there were no bolts in the flex plate to the torque converter.
Anyway drove it up and down the driveway and then back on to the hoist. Decided over Christmas we'd pull out the transmission to have a look in there, other than the weights on the flex plate being ripped off by the torque converter there was nothing that obvious. Started the engine without the trans in and it still had the knock, which was a disappointment. Our neighbours Tony and Jason, who are a bit more mechanically minded came over on Boxing day after hearing that it wasn't transmission related, and went over everything they could think of. Eventually after a good few hours we narrowed it down and decided to check how high each piston is coming up by sticking a threaded rod with a nut on it and turning the engine over by hand. Got around to cylinder no.5 and it was about 5-6mm lower than the rest. Was obvious at this stage that we had a bent rod that was caused by hydraulicing the engine with fuel.
Out came the engine, onto a stand, flipped over and then pulled the sump off. It was pretty bent! The crank smashed up the bottom of the piston, but other than the rod and piston everything else looked good.
The engine is now at the rebuilders and injectors have been professionally cleaned with new o-rings.
The buggered o-rings on the injectors.
Since I had awhile off work over Christmas and the engine debacle halted progress a bit, we decided it was a good time to sand out all the runs in the clearcoat and give it another couple of coats with some flatter clear since I wasn't quite happy with the last stuff I used.
Used some PPG autothane clear with flattening base in it this time. Was way easier to spray, looks waaaaay better, a lot smoother and a more consistent flatness. Also the extra coats covered the rust up a bit more, as before it didn't seem to be covered well in the rusty areas.With the engine out it was a good time to go through and tidy up a few things. Made up some stainless heatshields that cover the wiring on one side and the fuel and brake lines on the other. Also wrapped some of the exhaust in heat wrap to try and help keep some heat away. Ignore the plastic cable ties, the ones that came with the wrap were too short, and I'll change them soon.
After trying to drain the coolant I decided it'd much easier if there was a drain plug, rather than having to disconnect a hose and having it run straight onto a crossmember.
Next thing to do was sort out the fuel filler. Turned out the u-bends I bought for the headers were the correct size I needed, so took one of them, cut it to fit and welded a breather pipe on the side.
Made a stainless pipe that goes from the 1 5/8" u-bend to 2" on the tank.
Also added some gas struts to the rear bed lift up part.
Whilst under the rear end noticed the rear airbags were only mounted on the bottom with bolts and no washers. This was mostly because the mount was so close to the diff tube and the airbag mounting holes had quite a small PCD, you couldn't fit much else in there. Came up with these plates that mount to the airbags with a countersunk screw and then have the studs stick through the outer of the slotted hole in the diff mount. Heaps of room to get a nyloc nut and washer now.
Was running out of stuff that I could think of to do, so my Dad made a start planing and fitting the Matai wood planks that I bought quite a while ago.
Fitted in they looked a bit weird being natural, too bright or something.Had some Japanese stain lying around that we tried and I quite liked it. So went and wiped that all over it once it was fitting well. Then wiped over some Scandinavian oil and came it out really nice.
Got the windows installed, he still needs to come back and finish them off.
The front window stainless trim doesn't fit as well as I'd hope it would, sorta sticks out a bit, but we're sure it's in there properly. Probably a combination of the crappy re-pro rubber and trim not being 100% right to start with, as I've heard of a heap of people having troubles with windscreen rubbers not fitting nicely on these.
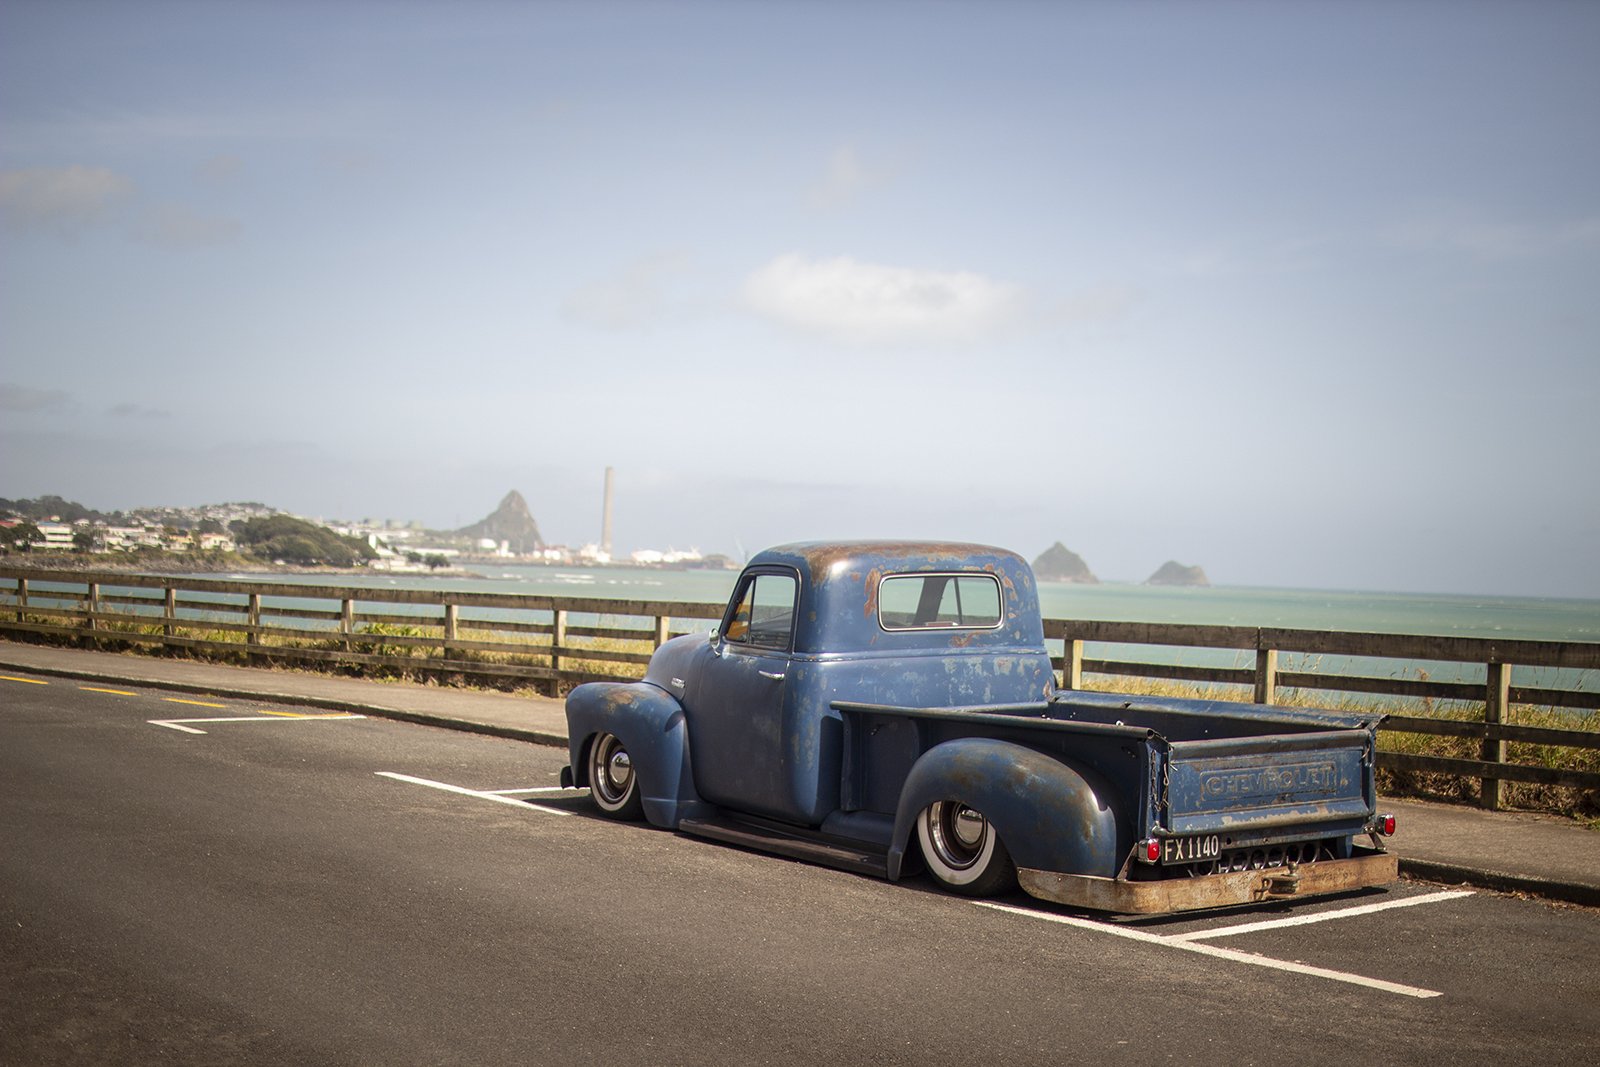
Supposed to be taking this to Nats in less than 6 weeks hahaha-
 59
59
-
 1
1
-
- Popular Post
- Popular Post
I said I should post more often so they're smaller, but here we are, another big post. I didn't think I had much to post because the majority of it has been wiring and that's boring, so not many photos.
Air horns are now fully plumbed up. Used one of my dads cast aluminium fuel logs and used it as the manifold which has the main inlet and then each individual line to each horn.
Bought the biggest battery that would fit inside the box I made earlier. Then drew up a clamp for it, laser cut it from some ali and folded it up.
Getting better at ali welding!
Fitted back into the under floor hole. Bought some battery cables and hooked them up to the main engine power junction.
Wanted a killswitch mounted somewhere, made up a bracket for it out of stainless steel.
Decided under the seat was the best place that is still reasonably easy to access and hidden from sight.
Made an aluminium glovebox since the original cardboard one had seen better days. As the dash is quite short, it would of been hard to tuck up the fuse box behind it and not have it being a eye sore. So designed the glove box to fit the fuse box inside out of sight, which also tucks the wiring up.
Started with the air bag wiring as it was the easiest to do and I don't have very much experience with it, other than a couple of weeks work experience nearly 5 years ago.
Once the airbags were all done and working, I made a start wiring the rest of it. Started at the rear and worked forward.
Need to make a reflector of some sort for the licence plate light.Since the engine had already been rewired at some stage, it had it's own fuse box and relays ready to go. Decided to mount the fuses up under the dash, after extending the wires to reach.
The relays stayed in the engine bay since they shouldn't need to be accessed as often. Had to rewire the starter relay as it had full power going through the inhibitor switch and apparently that wouldn't be good for the switch, so cut and swapped around some wires.
Stole the power steering pump off of my parent's Mercury that also has a Nissan V8, since they won't be needing one for a while yet. Only just fits, the pulley is pretty close to the chassis rail and the tensioner bolt is very close to the crossmember. Got a new high pressure line made up by using the original fitting from the Nissan line and the rack end of the Jaguar line.
Assembled the inner and outer fenders and then lifted them in place, to check everything still fits. The engine bay looks pretty nice (other than the ugly engine)!
The accelerator cable needed a new bracket to hold it in place since the original didn't work that great anymore.
Made up a V2 under dash panel for the ignition switch and other numerous switches. Looks better than the first one, it might end up black eventually I think, brushed stainless doesn't really match anything else.
From left to right has the ignition, heater, fog lights, wipers and horn switch. Also charge and oil pressure lights.Made a stainless steel bracket to mount the tacho gauge under the dash. Also above it is the headlight switch. Had to make a bezel for it as the hole in the dash was 25mm and the switch was supposed to only fit in a 8mm hole.
Park/indicators and headlights all wired up with some waterproof plugs.
Managed to blow the 6v sealed beams in the fog lights, so got some new GE 12v ones from America. Made some stainless steel spacers for them to sit on. Need to get enough courage to drill some mounting holes in the front splash apron now.
Noticed the transmission mount was broken, asked around and found Nengun.com had genuine new ones far cheaper than any where else I found.
Bought some oil filter relocation sandwich plates, as the oil filter was nearly impossible to access with the inner fenders in place. Had to get a new adapter nut turned up since the supplied one was too short like they seem to be. Made a new mount for the oil filter plate since the one that came with it was pretty pathetic and weak. Then got some fittings and hose, cost way more than what I thought they would.
-
41
-
1
-
11 hours ago, KKtrips said:
Hey man. Don't get the headlights out of the USA. They will dip to the right because driving on the other side of the road.
Yeah I thought about that, but my parents have a set on one of their cars that were the same brand and they were dipped to the left. Could only find that one place in America that sold them, so maybe thought they do rhd ones.
11 hours ago, KKtrips said:Also is Danny or Marty doing your cert?
Danny, he called in last week and was very happy with everything so far
-
- Popular Post
- Popular Post
Need to do updates more often so they're smaller!
Put the tray on as I needed to see where I could run the fuel and brake lines.
Also borrowed a pair of wheels off one of my parent's cars, to test the tire sizing.Bought a fuel filter and made a stainless steel bracket to hold it.
Made some mounts for the rear bumper to bed brackets, as they were welded on before.
Got out the LED tail lights that I've had for ages and made up some stainless brackets and polished them.
Started running the brake line out of copper-nickel tube.
Also got some 5/16" lines for the fuel lines.
Made some stainless clamps to hold them all together and to the firewall and chassis.
Made some bits for the column change linkage. Top middle piece mounts on the firewall around the column and has some little stoppers that make it so the gear stick needs to be pulled out to change from certain gears. Left bit is what goes over the stoppers and pivots with the gear stick to push the rod bit down, which then pushes the right piece down and change gear. Thought at first it would have to be some super complex system with cables and stuff but this way was actually pretty simple to make work.
Then I needed to make up a indicator on the column to show which gear it was in. Drew on up in Solidworks and laser cut it out.
The accelerator cable needed some modifying to work, it's wasn't quite long enough to reach the pedal, so made a new bracket that moved the housing closer to the throttle, which allowed for more cable out the pedal end. Then all it needed was a plate with a lot in it that bolted to the pedal to hold the little ball on the end.
Have had some big train air horns for ages. Couldn't find anyway with enough space to fit them, as they were originally mounted together in a triangle shape. So pulled them apart, made some new brackets and bolted them up under the cab to the chassis. Need to just run some lines to them.
Some boxes of stuff finally arrived from America.
They included some front windscreen stainless trim, door panels and the surrounding trim. Might replace the door panels one day as they weren't as good as I thought they'd be for the "deluxe" spec ones.
Also arrived were some wheels. 15x8 Artillery steel wheels with baby moons and beauty rings.
Spent ages trying to figure out what colour to paint them, didn't really want to go red (what everyone does) or black (spent too much money on them for them to be hidden). Decided a bronze colour would look good and hopefully not too out of place. Then spent more time trying to find a nice bronze.
-
69
-
- Popular Post
- Popular Post
All the bits are clearcoated. Came up alright, got way too many runs on the cab, but that's okay as I'll be re-coating it all again once it's assembled with some flatter clear. At least it's all sealed up now.
Installed some black fender welt between the bed and the guards.
Started installing some of the parts.
Put the door latches in, had to replace one of the springs behind the interior handle on the left side as it had snapped.
Squeezed some Dynamat on to the outer skin of the doors and wooow what a difference that made to the whole door including the inner skin.Couldn't wait to see what the gauges looked like, so in they went.
Got the door windows and quarter windows in, what a frustrating time that was, since they had to be installed in the right order and it all has to be fitted through the small slot in the top.
Put an LED in the original interior light housing, wired it up and fitted. Puts out some decent light.
Pulled apart the old headlight surrounds and put in new spring and seals.
Gave them a bit of a polish up as well.
Bought some new sealed beams, no-one could seem to find any semi-sealed ones with the domed glass when I was looking. Found some in America after I bought these though, but will try these out for now and if they're rubbish change them later.
Fitted one of the inner guards when the engine was in and realised that trying to make headers was waaaay too much effort, time consuming and there really just is no space in there, plus the factory ones already fitted perfectly.
So cut off the ugly heat shields on the factory headers, tidied up some of the welding, ground out the lumpy weld on the inside of the flange, painted them with high-temp paint and then wrapped them in heat-wrap, look much better. Would of really liked to build my own headers, maybe on the next project, as I have 20x 1-5/8" U-bends arriving from America next week haha.Put the cab on so I can see where the brake and fuel lines can run.
Looks like it could actually be finished sometime soon haha.-
67
-
1
-
- Popular Post
- Popular Post
A bit overdue on an update.
Undersealed the cab, came up pretty good!
Flipped the cab back over and sanded all of the inside and door jambs. Then put some epoxy primer on.
High build primed the dash and a few of the panels that will be visible once done, so they sanded up smooth and just sprayed the primer as a surfacer on the rest.
Once I got it all sanded down and filled the little bits that needed doing sprayed some colour on. Pretty happy with how it turned out, other than a couple of small sags on the dash, but I'll sand them out later.
Picked up a couple of boxes of Dynamat and covered it everywhere I could get it. Made a decent improvement, just need to get some inside the doors somehow and also do something with the gap in behind where the top seat belt mount is.
I needed to sort a radiator as the original one wasn't in the greatest of condition. Tried searching for a couple of weeks to find somewhere to buy an aluminium core the sizes I want, but seemed to be pretty hard to get anything. So went and bought one of those universal Chevy cross-flow things that had a core close to what I needed.
Cut off the tanks, drew up the radiator and support in solidworks and designed the mounts and new tanks from there. Top tank is angled at the front and with the gap at the top allows me to bring the air intake through there, as there's not really anywhere else for cold air.
Drew up some aluminium brackets to mount the electric fan as well.
Should clear the engine if I trim some of the pulley bolts that stick out a bit much.
Started on prepping the rest of the body panels for clear coating. Left side is sanded with 800 grit which seems to work pretty well, cleans it up nice.
The seam at the back was pretty rusty so gave it a sand, rust kill and then seam sealed it. The blue colour I was using for the rest of painting was quite the same as the patina'd paint some had some different stuff mixed up and used it to blend in the repairs. Came out really well!
Fixed up the patches where I welded up the old mirror, spotlight holes and the area around the cowl vent..
The sanding brought back some of the original pinstripping around the cab which is cool.Had to clean up this seam on the tray as well since it was rusty and needed touching up.
-
39
-
new page pls
-
1
-
-
- Popular Post
- Popular Post
My parents came back from America and brought back a bunch of parts for me. Nothing really too exciting, just some headlight parts, steering column rebuild bits and various rubbers that I needed. The slightly exciting parts here were door arm rests and exterior door handles. There is some cool bits coming in a container soon though!
They also picked up some NOS optional fog lights for a Chevy truck which are cool.
The ignition switch that I got didn't work in the original bracket that fits into the dash, so tried to come up with ideas on where to put it. Came up with this, has the ignition switch and light, rpm gauge, wiper switch and oil pressure light or something. Would probably cover it in black leather to match the door cards, don't know how I feel about it though, sorta looks a bit bulky. Might revisit it later again once the inside is painted.
Also needed somewhere to mount the airbag controller. Made it hinge down under the panel and pivot up when it's needed, which worked alright. Other option is to modify the original ash tray and put it in there, which I would prefer but requires more work and cutting up the dash panel.
Dropped the engine back in and regretfully put the old rusty jag wheels back on to roll it off the hoist.
Bought some Durapox clearcoat with flattener in it awhile ago and have tried it on quite a few different parts with varying outcomes. Unsure what's going wrong but it doesn't seem to flatten off if it's put on more than just a light dusting coat, just stays glossy if too much is put on, but it's sorta patchy/rough if it's too light. Have gotten these bits good enough, but seems like it's going to be a real pain to try and get the whole truck consistent.
Had an attempt at patina-ing the grill guard. Doesn't look too bad I think, will have to see once the grill and guards are back on though.
As I was having problems with the clearcoat, I did some research and turns out the suction feed gun I was using had a 1.8mm tip which is a bit big for painting/clearing, more used for primer. So we went out and purchased a new decent gravity feed spray gun.
Took the rattle can primer off the firewall to put some epoxy primer on.
Epoxied.
High build primered, and then filled all the spot welds, little dents and welded holes that needed doing. Then spent ages sanding!
Once it was smooth enough I remasked it and applied some paint with the new gun, which is quite a bit better.
Isn't perfect, but good enough for a firewall.
Made up some plates that bolted to the upper door hinge mount on the cab and then welded a long piece of RHS between them. Then used some tie-downs wrapped around the hoist and flipped the cab on it's back, which sits on some inner tyre tubes.
-
41
-
- Popular Post
- Popular Post
Gave the exhaust a paint with some high temp paint and then tried to assemble it all with out getting too many scratches, wasn't too bad.
Bought some new braided rear brake hoses from Australia.
The steering rack rebuild kit I got from England was the wrong one so just left the current seals as is and hope they are alright. Sanded it all back and gave it a coat of paint and assembled it back together.
Made a new filler tube for the fuel tank and added a drain plug. Since it then needed painting again I sent it off to get powder coated instead.
Cut some rubber up for the mounting straps.
Just had enough rubber left over for the fuel pump seal.
Pulled the engine out and gave it a good clean up. Still isn't the best as some of the aluminium parts are a bit oxidized.
Whilst I cleaning the engine I got sick of looking at the hideous standard headers, and ages ago I drew up some exhaust flanges and cut them from 10mm mild steel. So I'm going to try and make some headers with the very little space available. There's heaps of room upwards so maybe try and do some high-rise ones.
Started by making some ob-round to round transitions by bumping them on a pressbrake from two pieces. Worked really well, they were quite accurate to size. Need to put the engine back in, cab back on and fit the inner guards so I can build some jigs.-
38
-
- Popular Post
- Popular Post
Painted the diff, came up pretty good considering how rusty it was around the hubs.
First time changing brake shoes, thought it would be harder than it was. Hardest part was just trying to pull the springs into the slots, but got there in the end.
Bolted almost everything back into the rear end. Finally cut down the 4-link bolts that have been annoying me for ages as they had about an inch of extra thread.
My Dad (www.acecustoms.co.nz) makes these diff head covers to suit Holden/Falcon diffs as well as others. So I grabbed one, trimmed some material off the fins (so it didn't hit the fuel tank crossmember), rumbled it all day at work and then polished the fins. Also made another brake hose bracket, as the previous one didn't work with this cover.
-
55
-
3
-
- Popular Post
- Popular Post
Received the order of parts from England, had to pay GST which was a bit annoying.
My dad had some spare Jaguar hubs and calipers laying around and they had better condition calipers on them than what my ones were, so swapped them and gave them a sand blast ready to paint.
Painted and installed new seals, pistons and dust boots.
Fully assembled caliper with all new parts, apart from the pad pins and anti-rattle springs because the ones I bought ended up being too short to fit for some reason.
Painted the front end and all the other bits that needed doing. Sent off some small bits and bolts to get electroplated.
Hub assembly all together with new wheel bearings, bolts, ball joints and rotors.
All bolted together ready to bolt onto the chassis.
Brought the chassis back into the main shed to put it back on the hoist to start some assembly.
Got the front end mounted on the chassis and all the bolts torqued up. Looks really good I think. Need to rebuild the steering rack and paint the diff now.
-
51
-
- Popular Post
- Popular Post
Spent a few more hours sanding the chassis down. Once that was done I borrowed a rotisserie off our neighbour and made some brackets that bolted through the bumper mounts.
Worked really well, was very balanced and didn't want to spin around by it's self. So then sprayed some epoxy primer down.After much deliberation I decided to paint it with some Hammerite. Since it comes only in certain colours I bought some silver and black and mixed them until it reached a colour I was happy with.
Was quite difficult to paint as it was getting lots of overspray on parts I'd already painted and drying too quickly. But eventually got it reasonable enough.
Isn't quite as dark as it looks in the photos.
Now the chassis is done it was time to start on the front and rear end. Did a bit more welding and tidying up of the front clip, once it was all stripped down.
Made some solid mounts for the front since the rubber ones weren't really doing anything as it's already solid mounted.
There's quite a few bits to it once it's all in pieces. Going to take awhile to paint it all.
Sent the front end to get sandblasted as it's easier to get someone else to do the bigger stuff since it doesn't fit in the cabinet. I did all the little bits which took most of a day.
Bought some new brake rotors, pads, shoes and a rebuild kit for the rear calipers locally. Have purchased everything else to rebuild the Jag front from England, which should be here next week hopefully.
Gave the rear calipers a tidy up by sandblasting, replacing the seals, better condition slide pins, new pads and a coat of paint. Now they just need new hoses.
-
33
-
- Popular Post
- Popular Post
Went and painted the seat frame and the interior window frames. Terrible photo but came out really well.
Awhile ago I made some stainless steel bracket things to hold the airlines down. Did some others to fit further along the chassis but they didn't work well enough so I think I'll just use some P clips.
Mounted the airbag height sensors on the 4-link bars. Got them pretty good to the movement needed throughout travel, but then I jacked it up with the airbags inflated and the diff drops further than what the bags pump it up, so it was pulling on the sensors a little. To fix that I made some travel limit straps and got them sewed at a local auto interior shop. These also helped with the rear brake hose that goes from the diff to chassis as there was just too much travel for it.
Now that every thing chassis fab related was done (that I know of for now) it was time to strip everything off to the bare chassis.
A few hours later and...
Now the cab was off it was a good time to sort out the battery tray that I bought in from america to replace the rusty on that was originally there. Once I got the old one off I decided that it would be better to just make a box that bolts in there instead. So drew one up and made it from some 2.5mm ali. Hoping that I can either fit one really big battery or a couple of smaller ones in there, so one can run the air compressors.
Flipped the chassis and started to finish welding all the little bits I never fully welded previously, until I ran out of argon, so I made a start sanding it all back and then I ran out of sanding disks for now.
I can't decide on what colour to paint the chassis, will be a gloss or metallic of some sort and the front and rear end will most likely be gloss black. So far the decision is gloss black (everyone does that though) a darkish grey either metallic or just 2k. Also have thought about going all out and doing something like purple flake, but I feel like it would just be wasted as hardly any of the chassis will be visible and will cost a bit more.-
37
-
- Popular Post
- Popular Post
Made some mounts for the gauges.
Also made a mount to add some strength between the pedal box and dash. The wiper motor was just dangling around with the single mount so made another that connects it down to the bottom of the dash.
Once they were made there wasn't much else that needs access from behind the dash so I welded the dash in.
This is the second heater mount I made, the other one didn't look right as it didn't go up as high and wasn't the correct angle. Attached it with some rivnuts on the original firewall stiffeners or whatever they are.
Found a high stop light in my pile of parts so decided to make up a bracket to sit on the seat frame.
Gave all the dash parts, cowl vent and handbrake a sandblast and rustkill ready to paint.
Painted with 2k gloss black.
Made up a new brake line mount on the diff because the other one was fairly close to the exhaust. Have ordered a new line and fitting for it.
Finished all the lines for the airbags.
Here's a video of them working, the back still goes up very quick but that should hopefully slow down once there's more parts/fuel.
-
32
-
1
-
On 3/26/2018 at 21:25, Seedy Al said:
Haha no doubt.
But yeah one thing I always seem to struggle with is getting the tube nice and straight if its in a roll. Always looks out of straight and a little wobbly and kinky.
Nice work man. As always haha
5 minutes ago, tortron said:Stick one end under your work bench leg and roll it out against the ground. Straight pipes erry time
I'm sure you guys are referring to plastic tube? I did all of mine from aluminium tube, which comes in straight 5m lengths
-
6 minutes ago, Seedy Al said:
Dude how do you get your pipes so straight and bent beautifully?
I just use one of these and spend ages working out were the bends need to be. Don't worry I do have a pile of messed up ones as well haha
-
1
-
-
- Popular Post
- Popular Post
Went and bought a bunch of things to finish of the air bag system. Got a couple of water traps between the compressor and tank now. There's already a decent amount of moisture in them from a few fills as you can see.
Bought a pressure gauge as well, just to check on what it's doing occasionally. Trying to get all the correct fittings for everything to work was a mission haha.
The 3/8" line coming off the tee is for the huge air horns that I have, it's sooooo loud!Waiting on the laser cutter at work to be fixed so I can cut out some brackets to hold all the lines in place.
Undersealed the running boards and the radiator panel.
Split apart the grill bars that were all the riveted together so I could sandblast and paint the backside of them. No progress pics but here's some of them done. Painted the back ones cream underneath because they were originally that colour on top but they have some blue overspray on them. It should mostly clean off with a scotchbrite, as that needs doing all over the body panels before it gets clearcoated anyway.
Started to assemble the front grill/radiator panels. All went together well apart from the fastener sets I got from America not having the correct amount or just missing things all together.
As you can see in the above pics I also assembled the park lights, I had new lenses, bulb sockets, gaskets and chrome surrounds but no new housings. The original ones looked pretty bad before I pulled them all apart and gave them a sandblast, but cleaned up like new with some silver zinc paint.
The new bulb sockets I bought were double contact ones to run park lights and indicators on a dual filament bulb, but I had some orange/amber LED's laying around that fitted, so may use them and just have parklights in the headlight housing and have these just as indicators.
-
26
-
On 3/14/2018 at 13:58, 64vauxhall said:
man i cant wait to see this truck complete.
cant wait to see what you do with the upholstery side of things. let alone finishing the truck.
shit is insainly great!
keen on a visit on my way to chch nats.Thankyou! Neither can I!!!
You're more than welcome to call in, if there's others convoying as well I'm sure they can come as well
-
1
-
-
- Popular Post
- Popular Post
Fixed all the rust holes in the lower radiator panel. Forgot to take photos of the progress but nothing really exciting anyway.
Bogged up all the pitting in it and gave it a couple coats of paint, along with the brackets that go behind the grill bars.
Made up the air lines that go to the rear air bags. Made the left hand one with not too much trouble and then made the other side incorrect, as it had to go a different route because of the fuel tank fittings, and would of fouled on the deck frame. Got it right the next go though.
Of course had to give it a test!
-
38
-
22 hours ago, f100_dreamin said:
I see you have your compressors plumbed straight from the compressor into the tank, just curious as to where are you going to mount water traps? Most of what I’ve seen has them between the compressor and tank (which is where mine are in my Belair)
Never really thought about water traps and my dad never mentioned it to me, but just did some research and from what I could find a large majority just drain the tank every so often. Corrosion won't be an issue for me because everything is ali or brass.
Otherwise it seems like it's better to have the trap between the tank and valves from what I found.QuoteWhen you are setting up a water trap in an air suspension system the reason for doing so is to trap water/particles before it goes into the valves, which can cause them to become faulty/fail.
Almost 85% of the setups I see, people put the water trap in between the compressor and tank. THIS IS 100% WRONG!
An air compressor over time generates heat when running for an extended amount. That hot air passes through the water trap and into the tank. Due to magic and witchcraft, when hot air becomes cold in certain climates, its causes condensation which builds up in the chamber of air aka tank.
Water traps should be located after the tank, before the valves, that way any condensation in the tank is stopped before the valves. It also doesnt hurt to put a check valve aka one way valve after the water trap, before the valves, incase of loss of tank pressure. that way it will assure you the car will stay in the air so you can drive to rectify the issue.
-
2
-
-
- Popular Post
- Popular Post
Have now finished both inner fenders. The first one seemed to come out better for some reason, had a bit nicer shape to it, but they aren't too noticeably different.
At this point I pulled apart the whole front clip and took the fenders, radiator support, lower grill panel and a couple of fender supports to the sandblasters.
Got them all back and epoxy and filler primed the inners, then bogged up all the bits that needed doing. Didn't really need much at all, pretty happy with how they turned out.
Painted the radiator support at the same time, should really try and have more things ready to paint at once as I've already gone through 4 litres of epoxy primer and paint and a decent amount is just waste.
Primed and painted the inside of the fenders as well. Every time I mask up the patina I realise how much easier it would of been to just paint the whole thing haha.
Need to give them and the inners a coat of underseal now.
This is the lower grill/radiator panel, it needs quite a lot of rust repair. Have already done a patch in the middle awhile ago but haven't gotten around to it since.
The grill is going to be great fun cleaning up the backside and painting
Again should of painted the whole truck haha.
Painted the deck frame with hammerite and then installed it and c--notch cover into the bed. The latch works how I'd hoped it would.
Added a gusset on to the bed frame hinge as it didn't quite seem strong enough when all the weight of the wood will be on there.
Received the cut windows back. Got green tinted ones because I wanted some sort of tint and grey looks too modern/yuck on old cars.
'
Ordered a couple lengths of 1/2" aluminium tube and bent up some of the air lines for the valves to air tank.
-
46
-
- Popular Post
- Popular Post
Finished off the left side of the inner fender and have nearly finished the other side.
Decided on where to put the fuel filler, so went and bought a flush pop-up filler cap so it can be hidden on the c-notch cover. Came with a steel weld-in bung, was really good quality over-all (unlike the chinese one I tried first), but didn't like how the cap had a slight roundness on top, so chucked it in the lathe which fixed that.
Bung welded in and cleaned up.
Wanted the c-notch cover to be painted some sort of satin black but also to be pretty durable. Decided to try and give some Hammerite a go. Looks pretty good I think.
So went a head and painted the airbag tray with it as well.
Since I mounted the two compressors too close together to fit standard 90° fittings in the intake ports, I had to make some of my own up. Turned the thread down so they wound all the way in and then cut off the female threaded end and added some turned down hose-tails.
Finished fittings welded and painted.
The original trim that held the rubber on the bottom inside of the doors were pretty rusty so folded up some new ones and gave them a coat of black paint.
While I had the paint ready I gave the fuel tank a coat.
Moved on to the latch for the bed that lifts up. Bought a coupe of bear-claw latches from Ebay and made a box for it to fit in, which then gets welded in to the box section frame. Made it that way just so water and crap wouldn't fill up in there.
A package arrived last week as well. An Accuair E-level Air Management system.
-
39
-
- Popular Post
- Popular Post
Sandblasted and zinc sprayed all the parts that go inside the doors.
Also stripped the rubbers and glass out of the vent window frames, sandblasted, epoxied, primed and painted them in 2K black.
Did the same to the door and bonnet hinges except did them in the blue. I have already used just over 3 litres of blue so far! Will need to get some more at some stage.
Now that all the glass has been removed I made some wooden templates and sent them off to get some new ones cut. Should be done next week sometime and then the doors can be assembled.
I have also made a start on the inner guard where the engine was too wide. Have changed my mind many times about how to go about this. Decided it was easier to try and make in two pieces rather than attempting to get one the right shape and fitting nice enough to weld. Although it ended up being made in 3 pieces, because the front compound curved part ended up too small. Worked out really well this way, as I just started with a rectangular sheet of steel with the edge folded, then just trimmed it down until it fitted in the gap. Once it was fitted and tacked in I could make up the compound curved piece to fit.
Test fitted it back on and there is heaps of clearance, wasn't sure if there was going to be enough at first.
Took it back off to fully weld and sand. Has come out pretty good and it's all quite smooth/blends in very well.
Made a start on the lower flange. Needs to raise up in the middle where those two lines are to clear the engine mounts on the chassis.
-
30
-
1
-
- Popular Post
- Popular Post
Bolted on the fenders and sprayed some underseal on to them.
Moved onto sanding down the doors ready to paint. Needed a little bit of filler in a few small dents and some spot welds right in the middle, otherwise they're really straight.
Happy with how they came out, will give them a wet sand and polish since a few bits of dust landed in there when I was painting.
Next up was the bonnet. Used a strip disk and DA sander to remove as much rust and paint as I could and then used the sandblaster to remove the rest I couldn't get to.
Finally got a couple of runs, not too bad though as one gets covered by the latch panel.
-
27


 '
'


Matt's 1951 Chevy Pickup - Discussion
in Project Discussion
Posted
Yeah quite surprise how bent it was. The starter motor must be pretty good!
I thought they did, shouldn’t matter too much as 99% of the time they’re going to be laying horizontal and the back won’t be opened very often. I’ll spin them around anyway
Yeah just replacing the rod and piston. Have already sorted some 4.1 ones. Probably easier to just keep it all standard for now, thanks though!
I put it on wet, it just really didn’t want to wrap around the flexi’s very well. Yup wore gloves this time after doing the headers without them haha