Banga
-
Posts
203 -
Joined
-
Last visited
Everything posted by Banga
-
Looking at dialing out some bump steer from my set up, looks like the best was to do so is to go to rose jointed arms. Rather than drilling our the steering arm and using a straight bolt I’m looking to have a new pin made to match the OEM steering arm and taper. I’m looking through the information sheet https://www.lvvta.org.nz/documents/infosheets/LVVTA_Info_04-2020_Spherical_Bearing_Rod_End_Conversion.pdf The minimum sizes quoted are larger than the OEM specs I was hoping to replicate I.e. taper is 1/2” vs 16mm- is there any wriggle room with the diameters quoted in the information sheet?
-
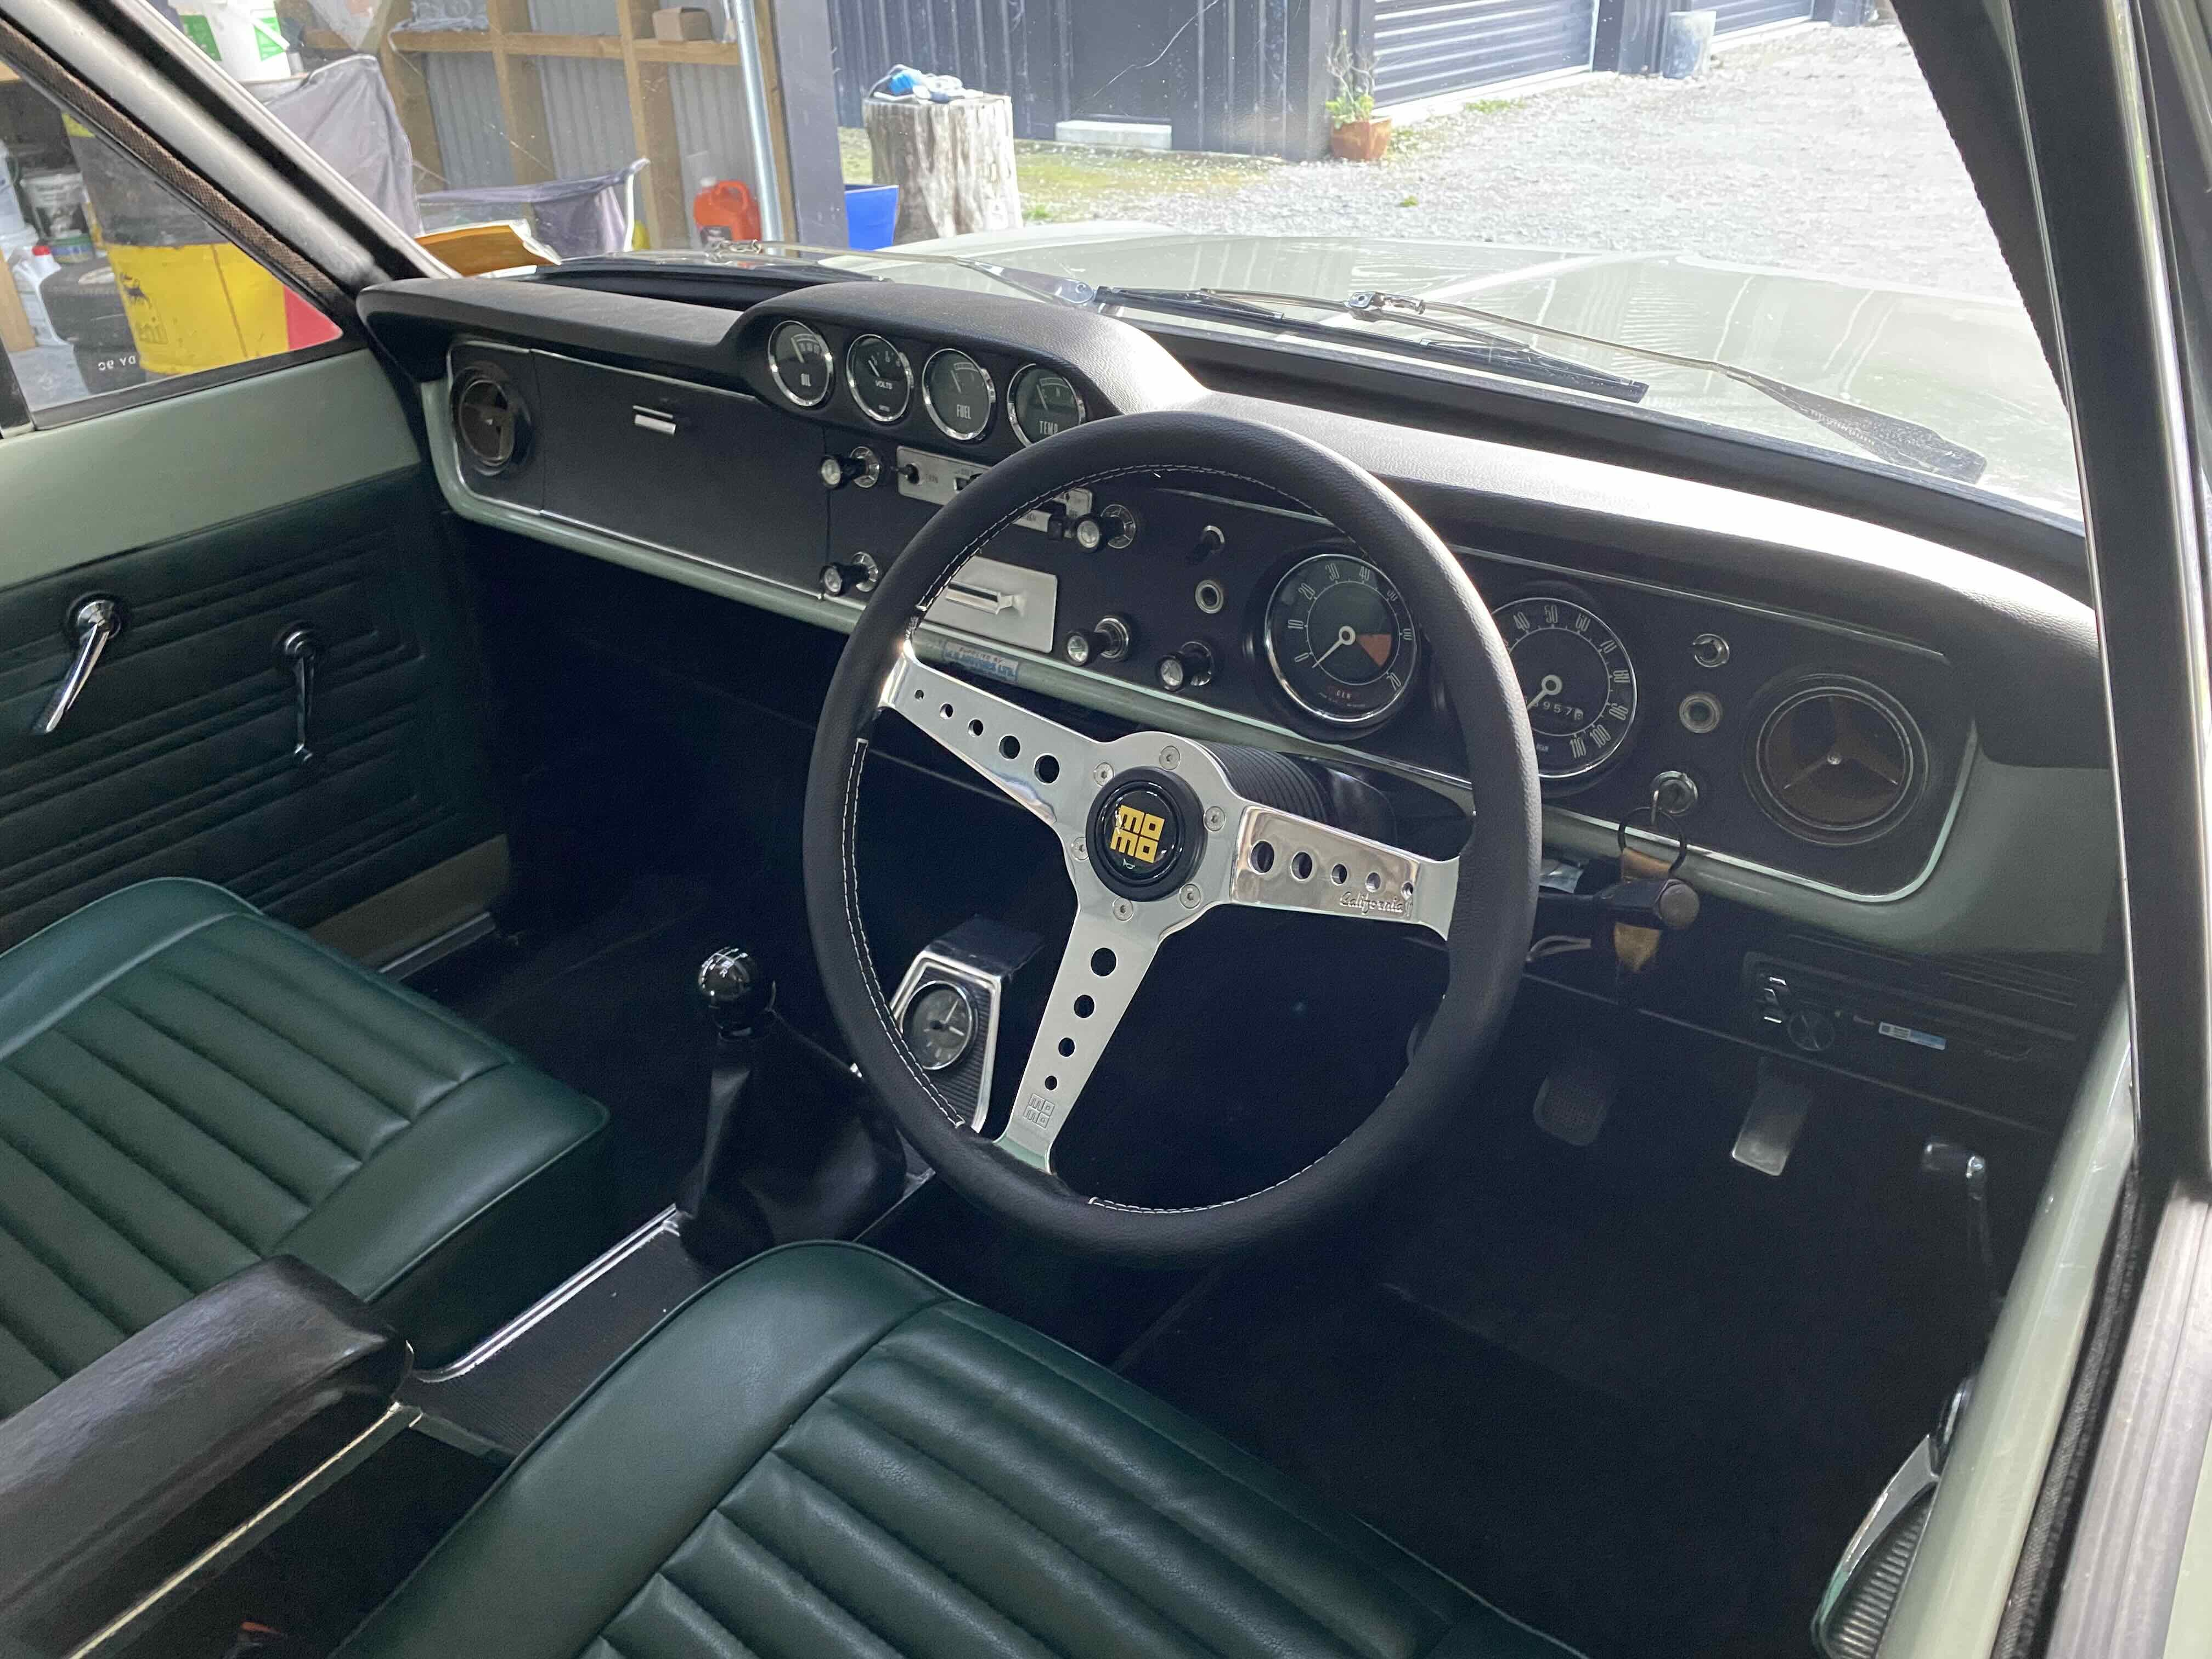
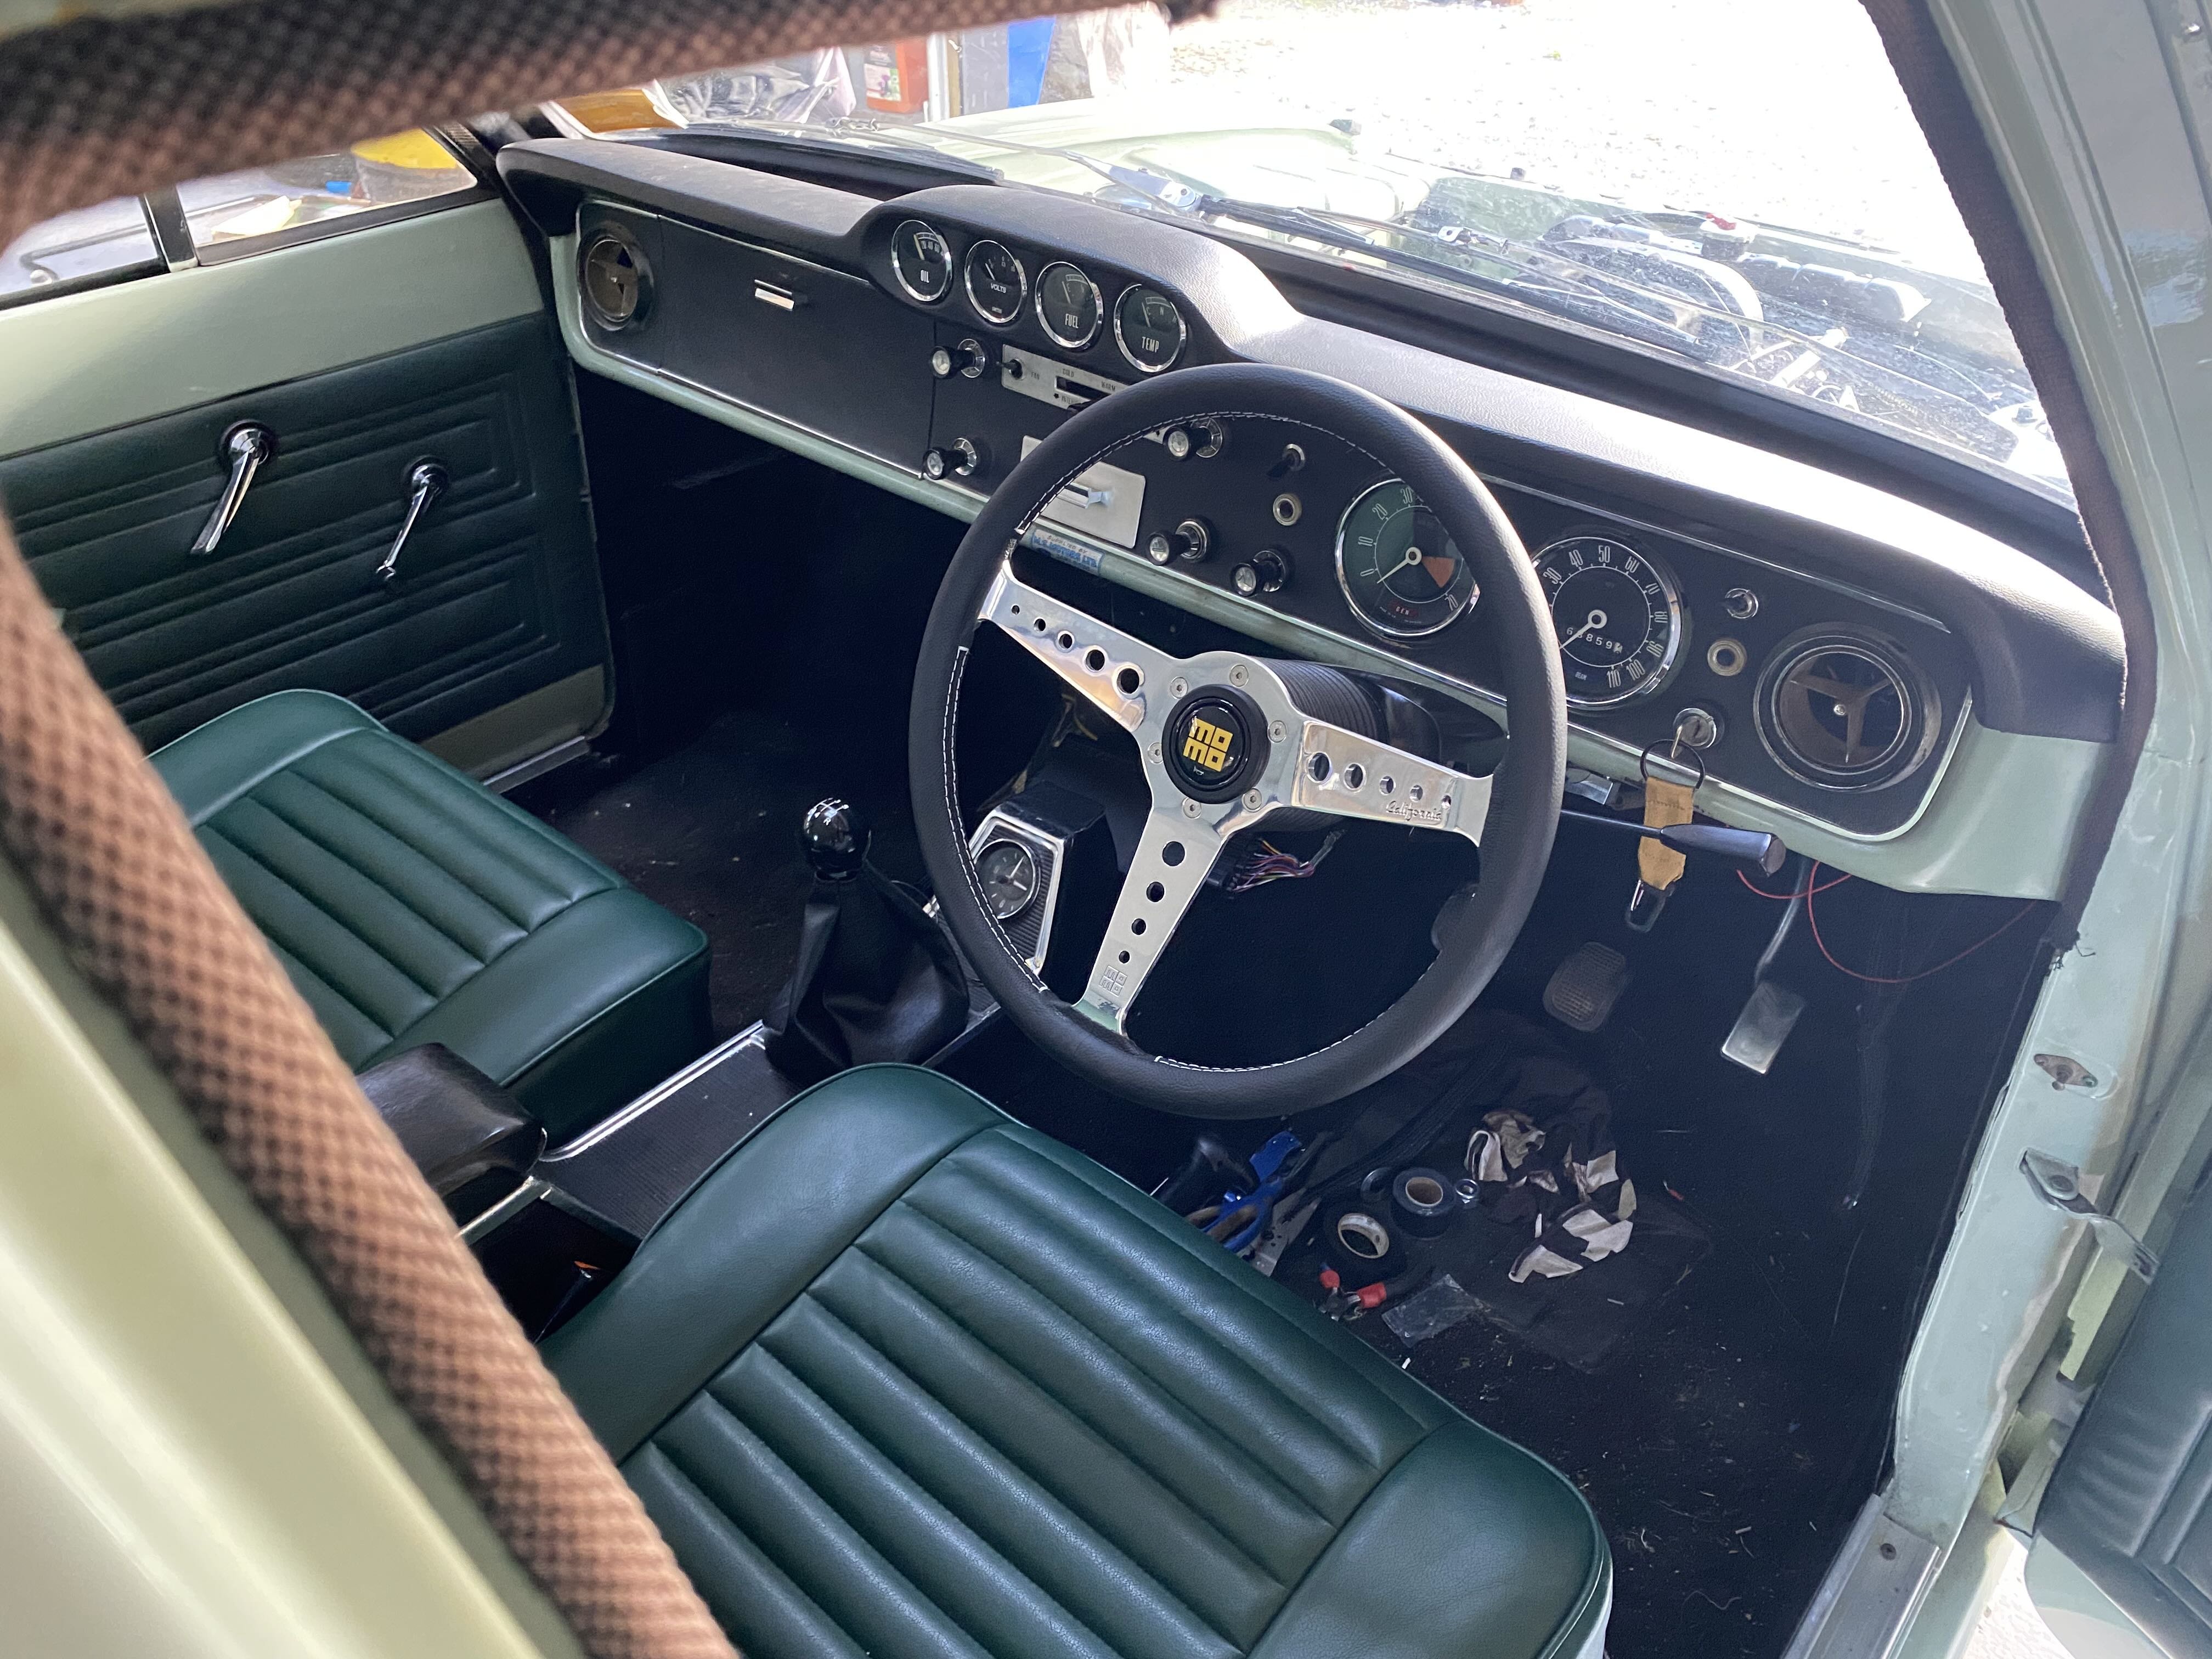
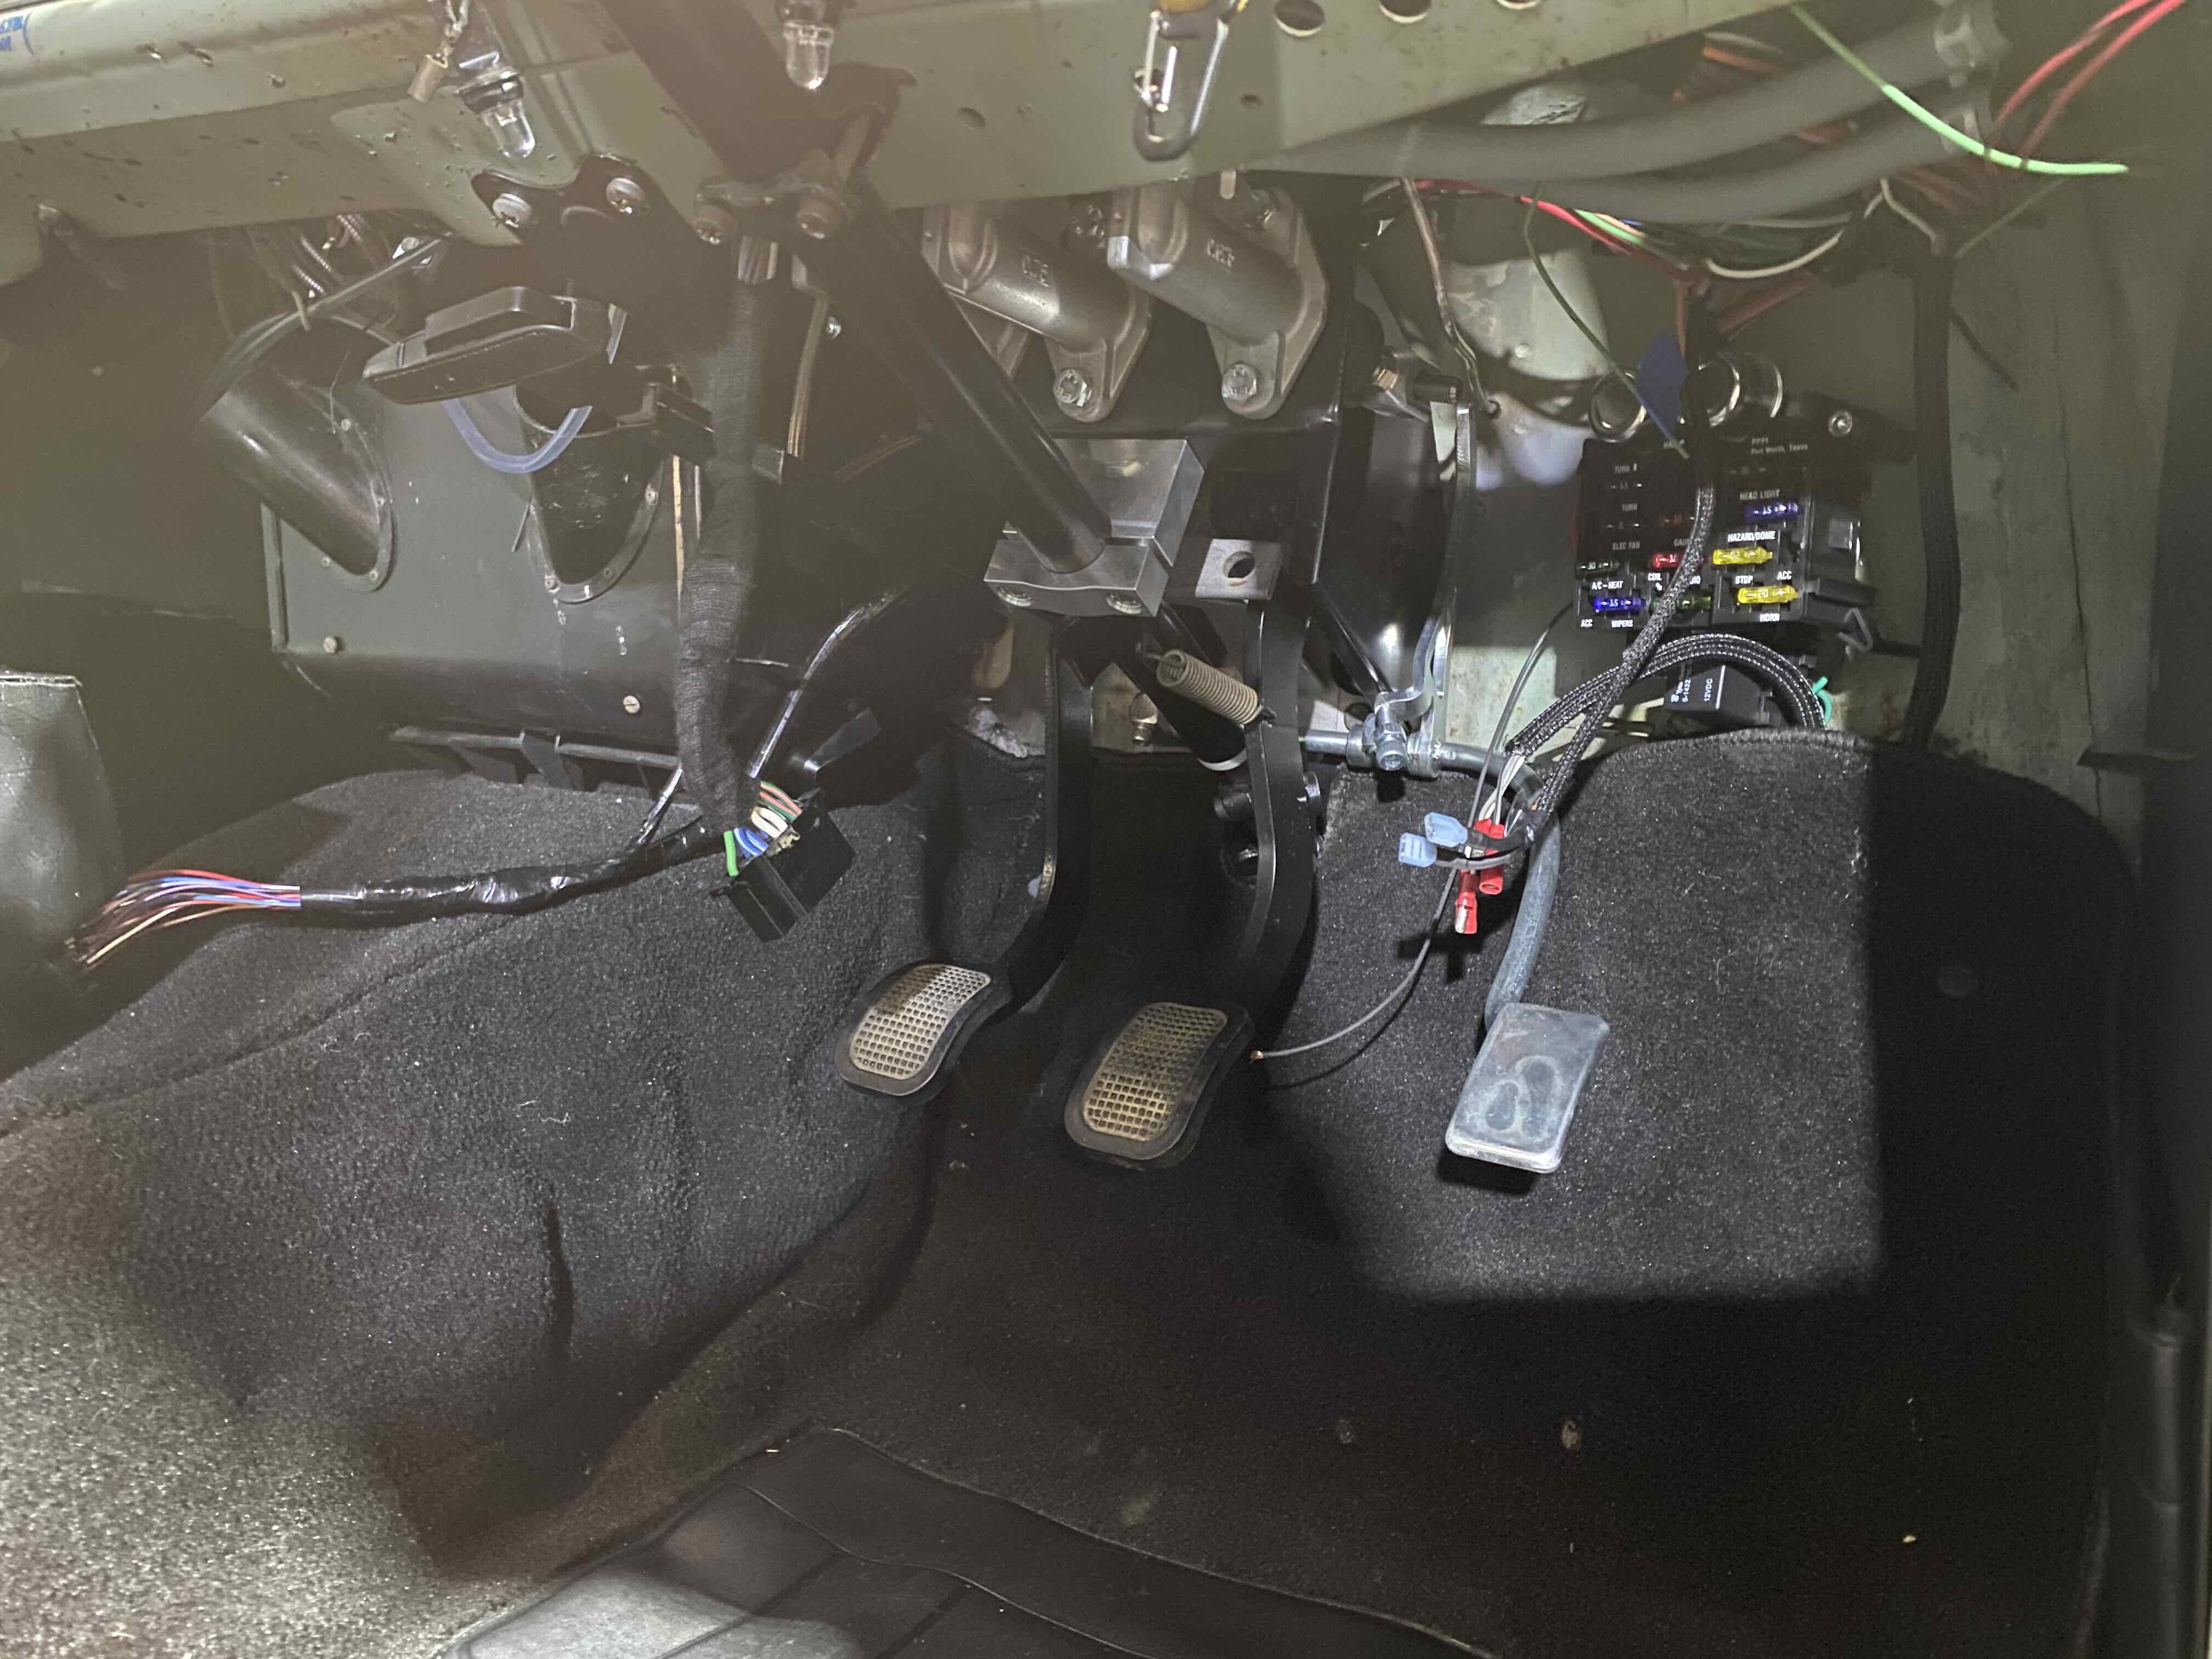
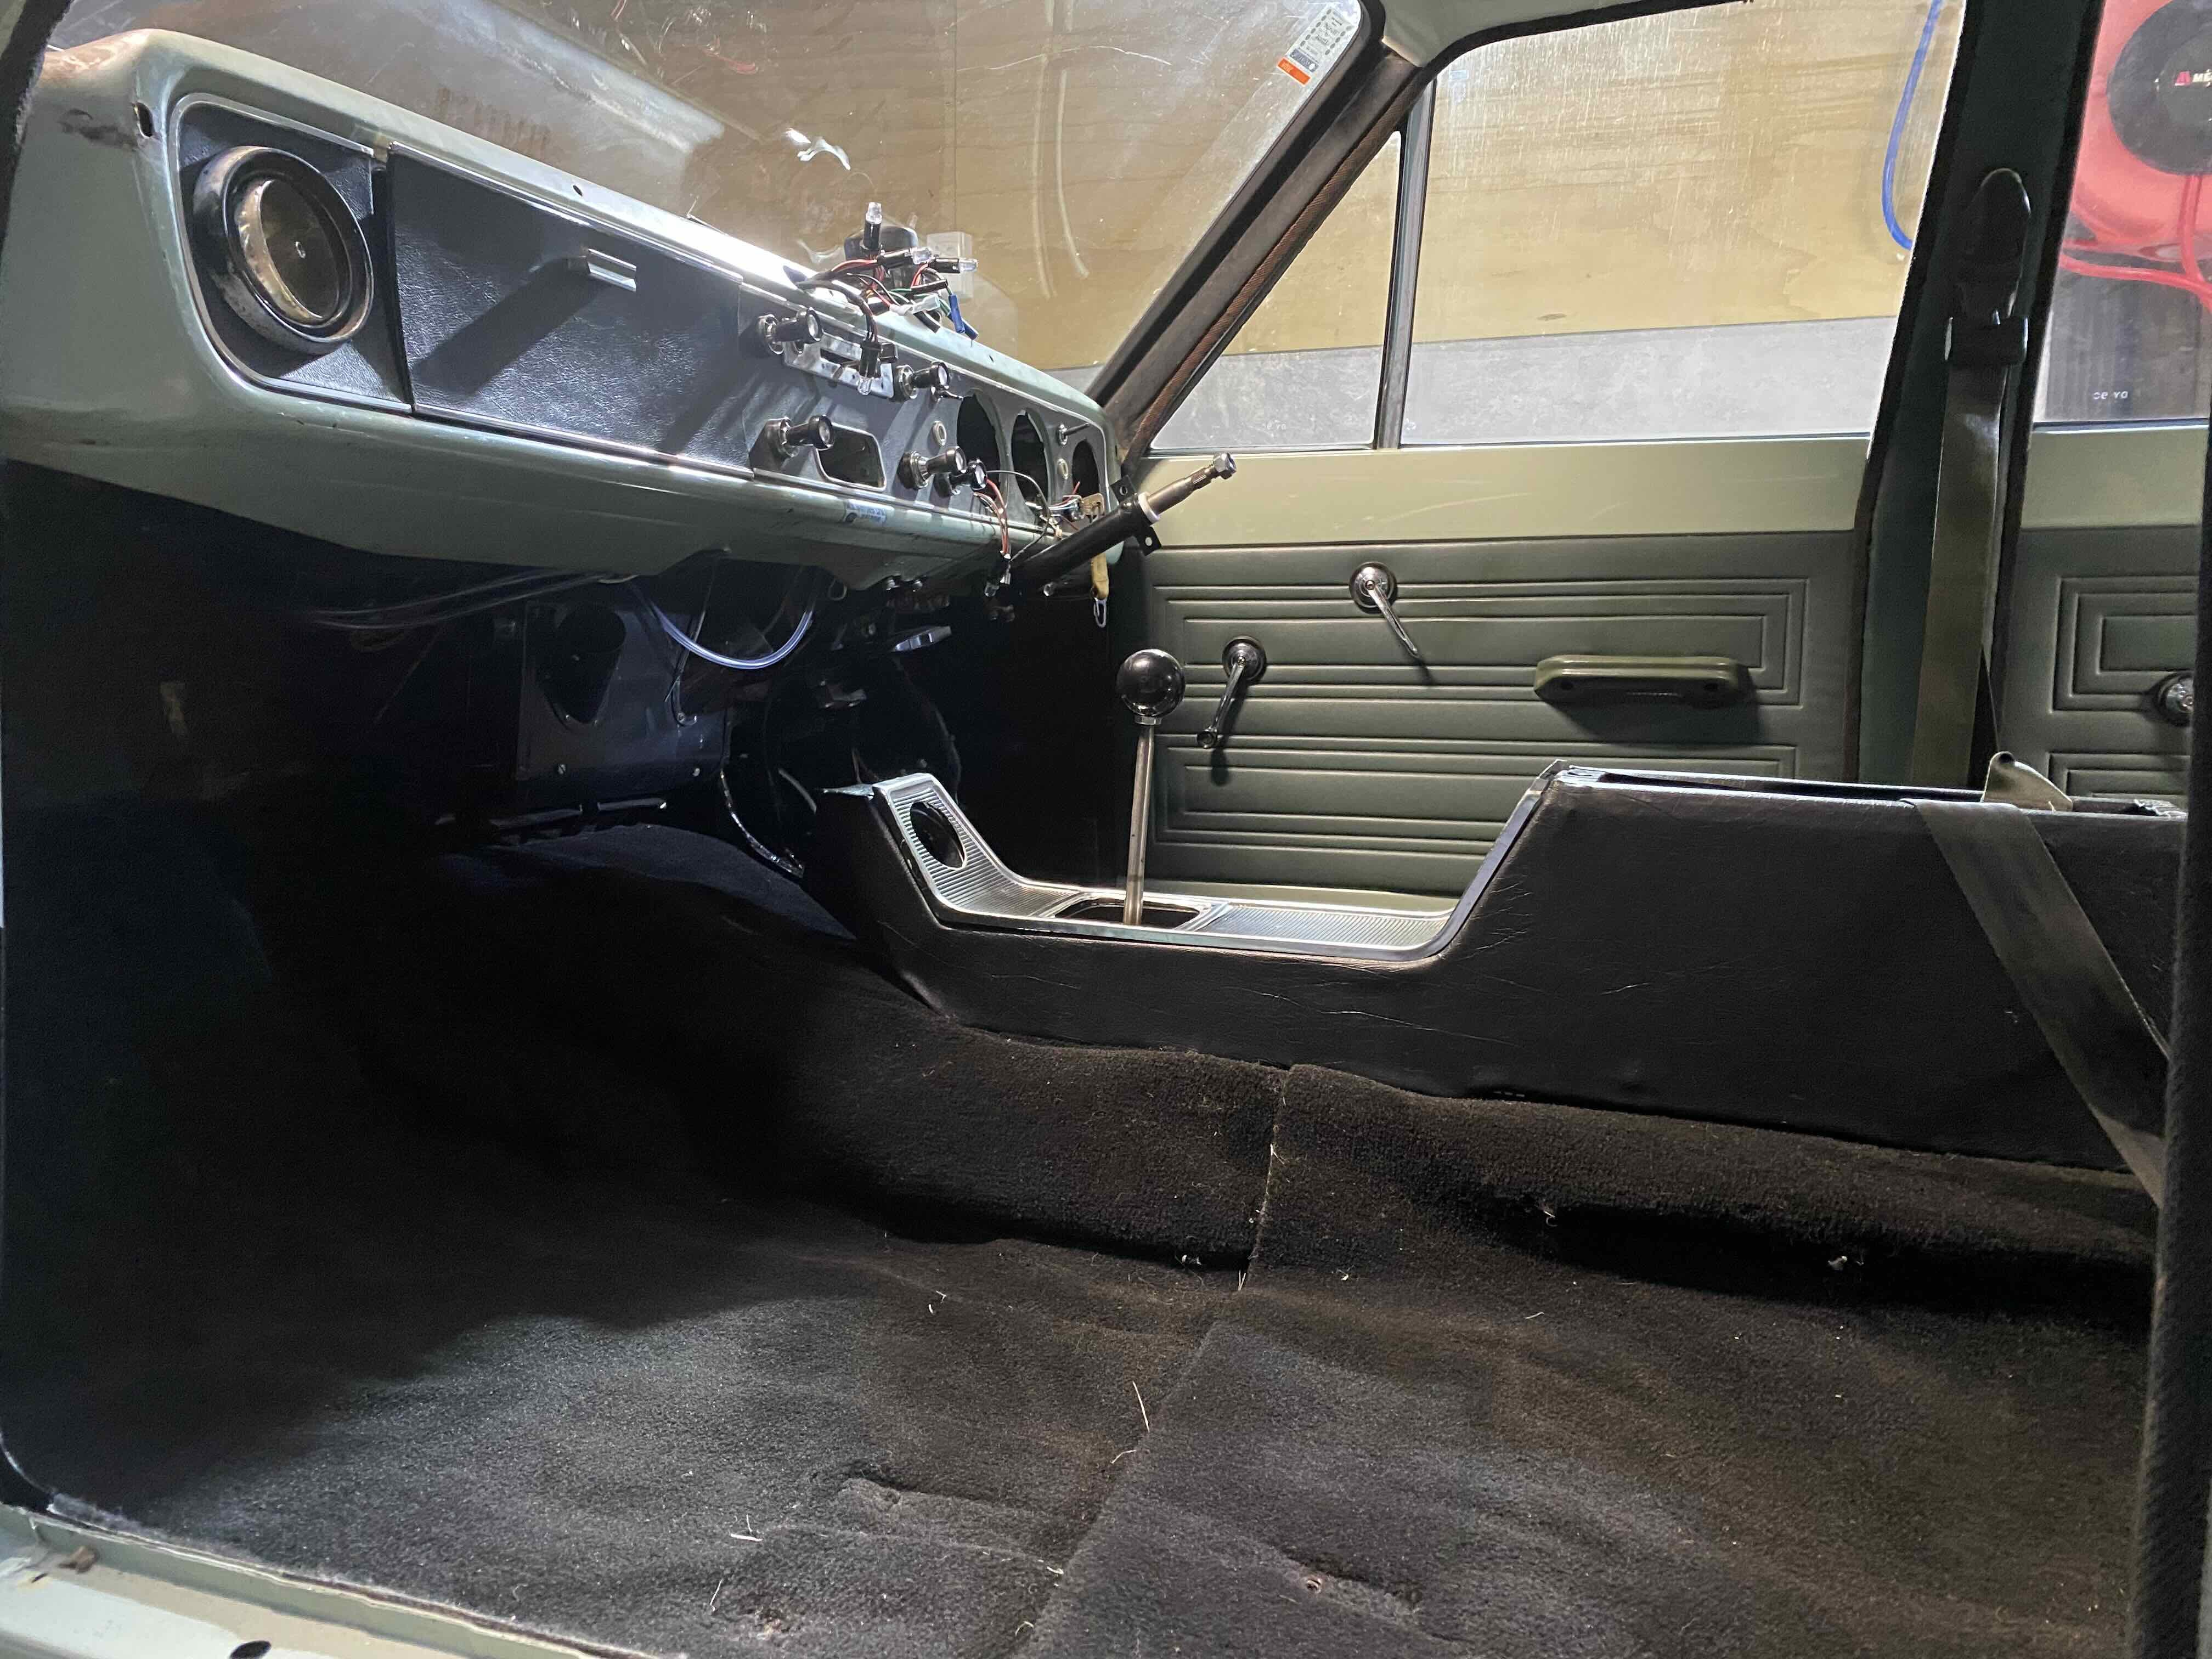
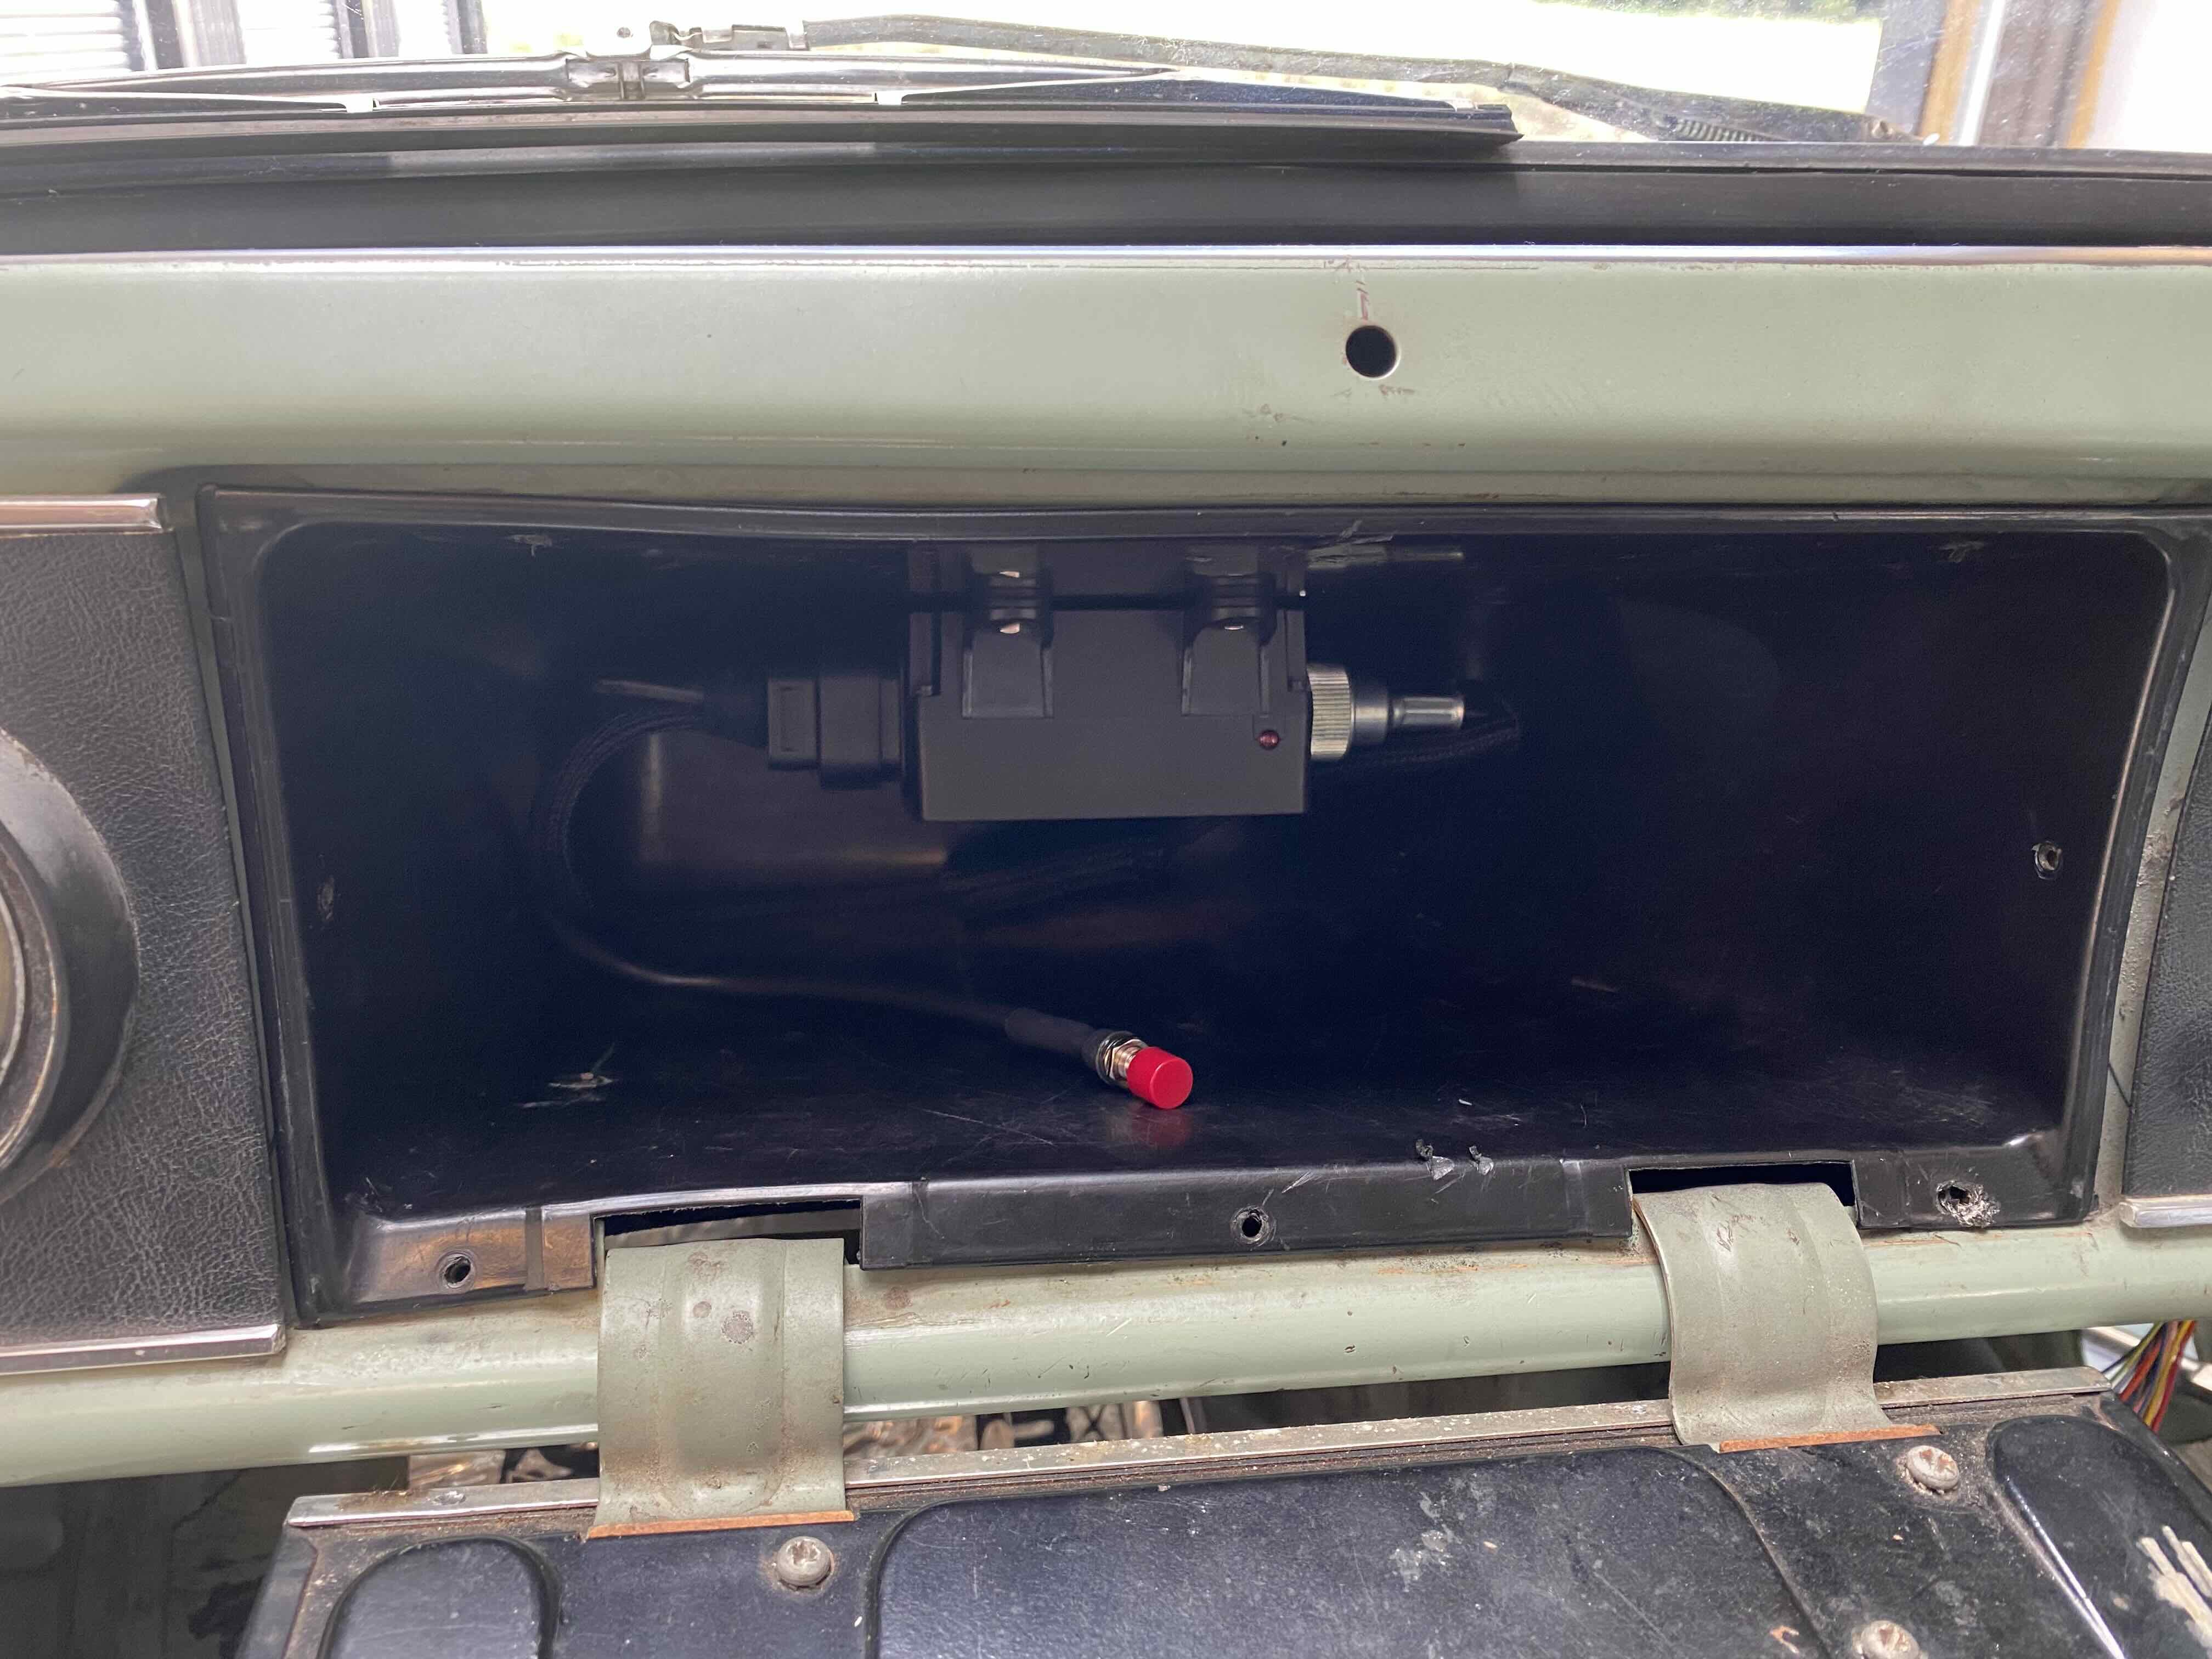
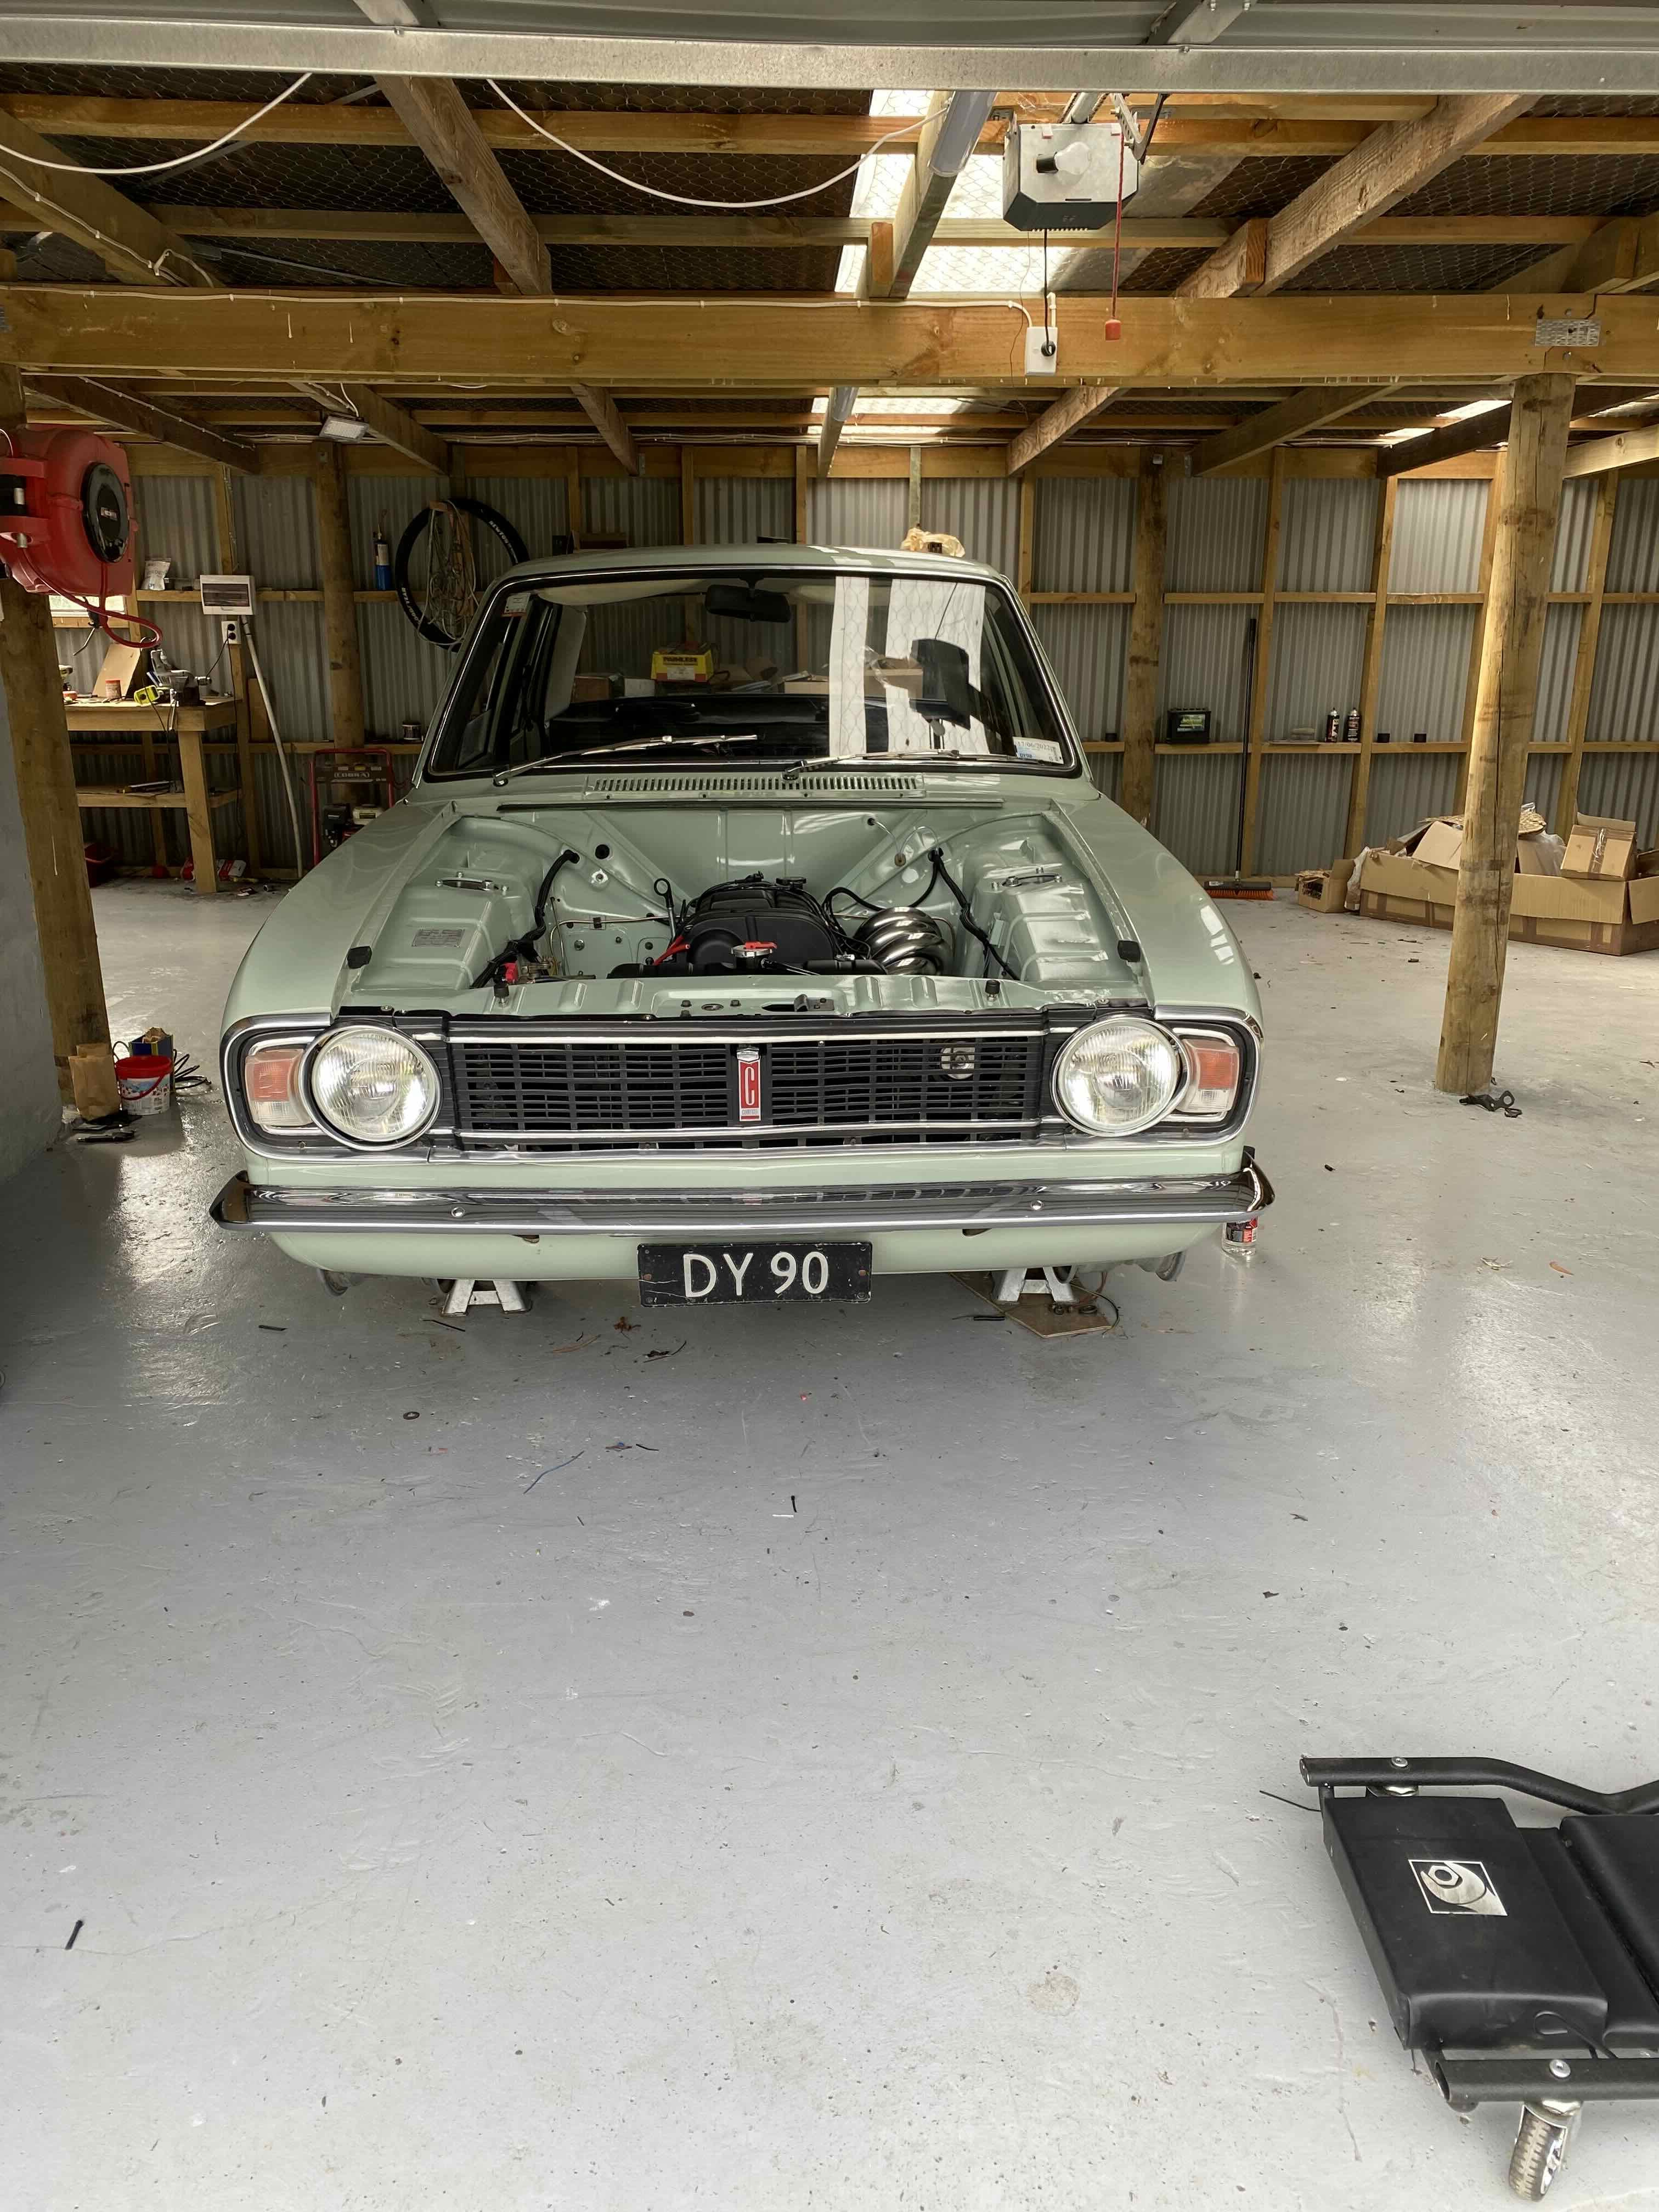
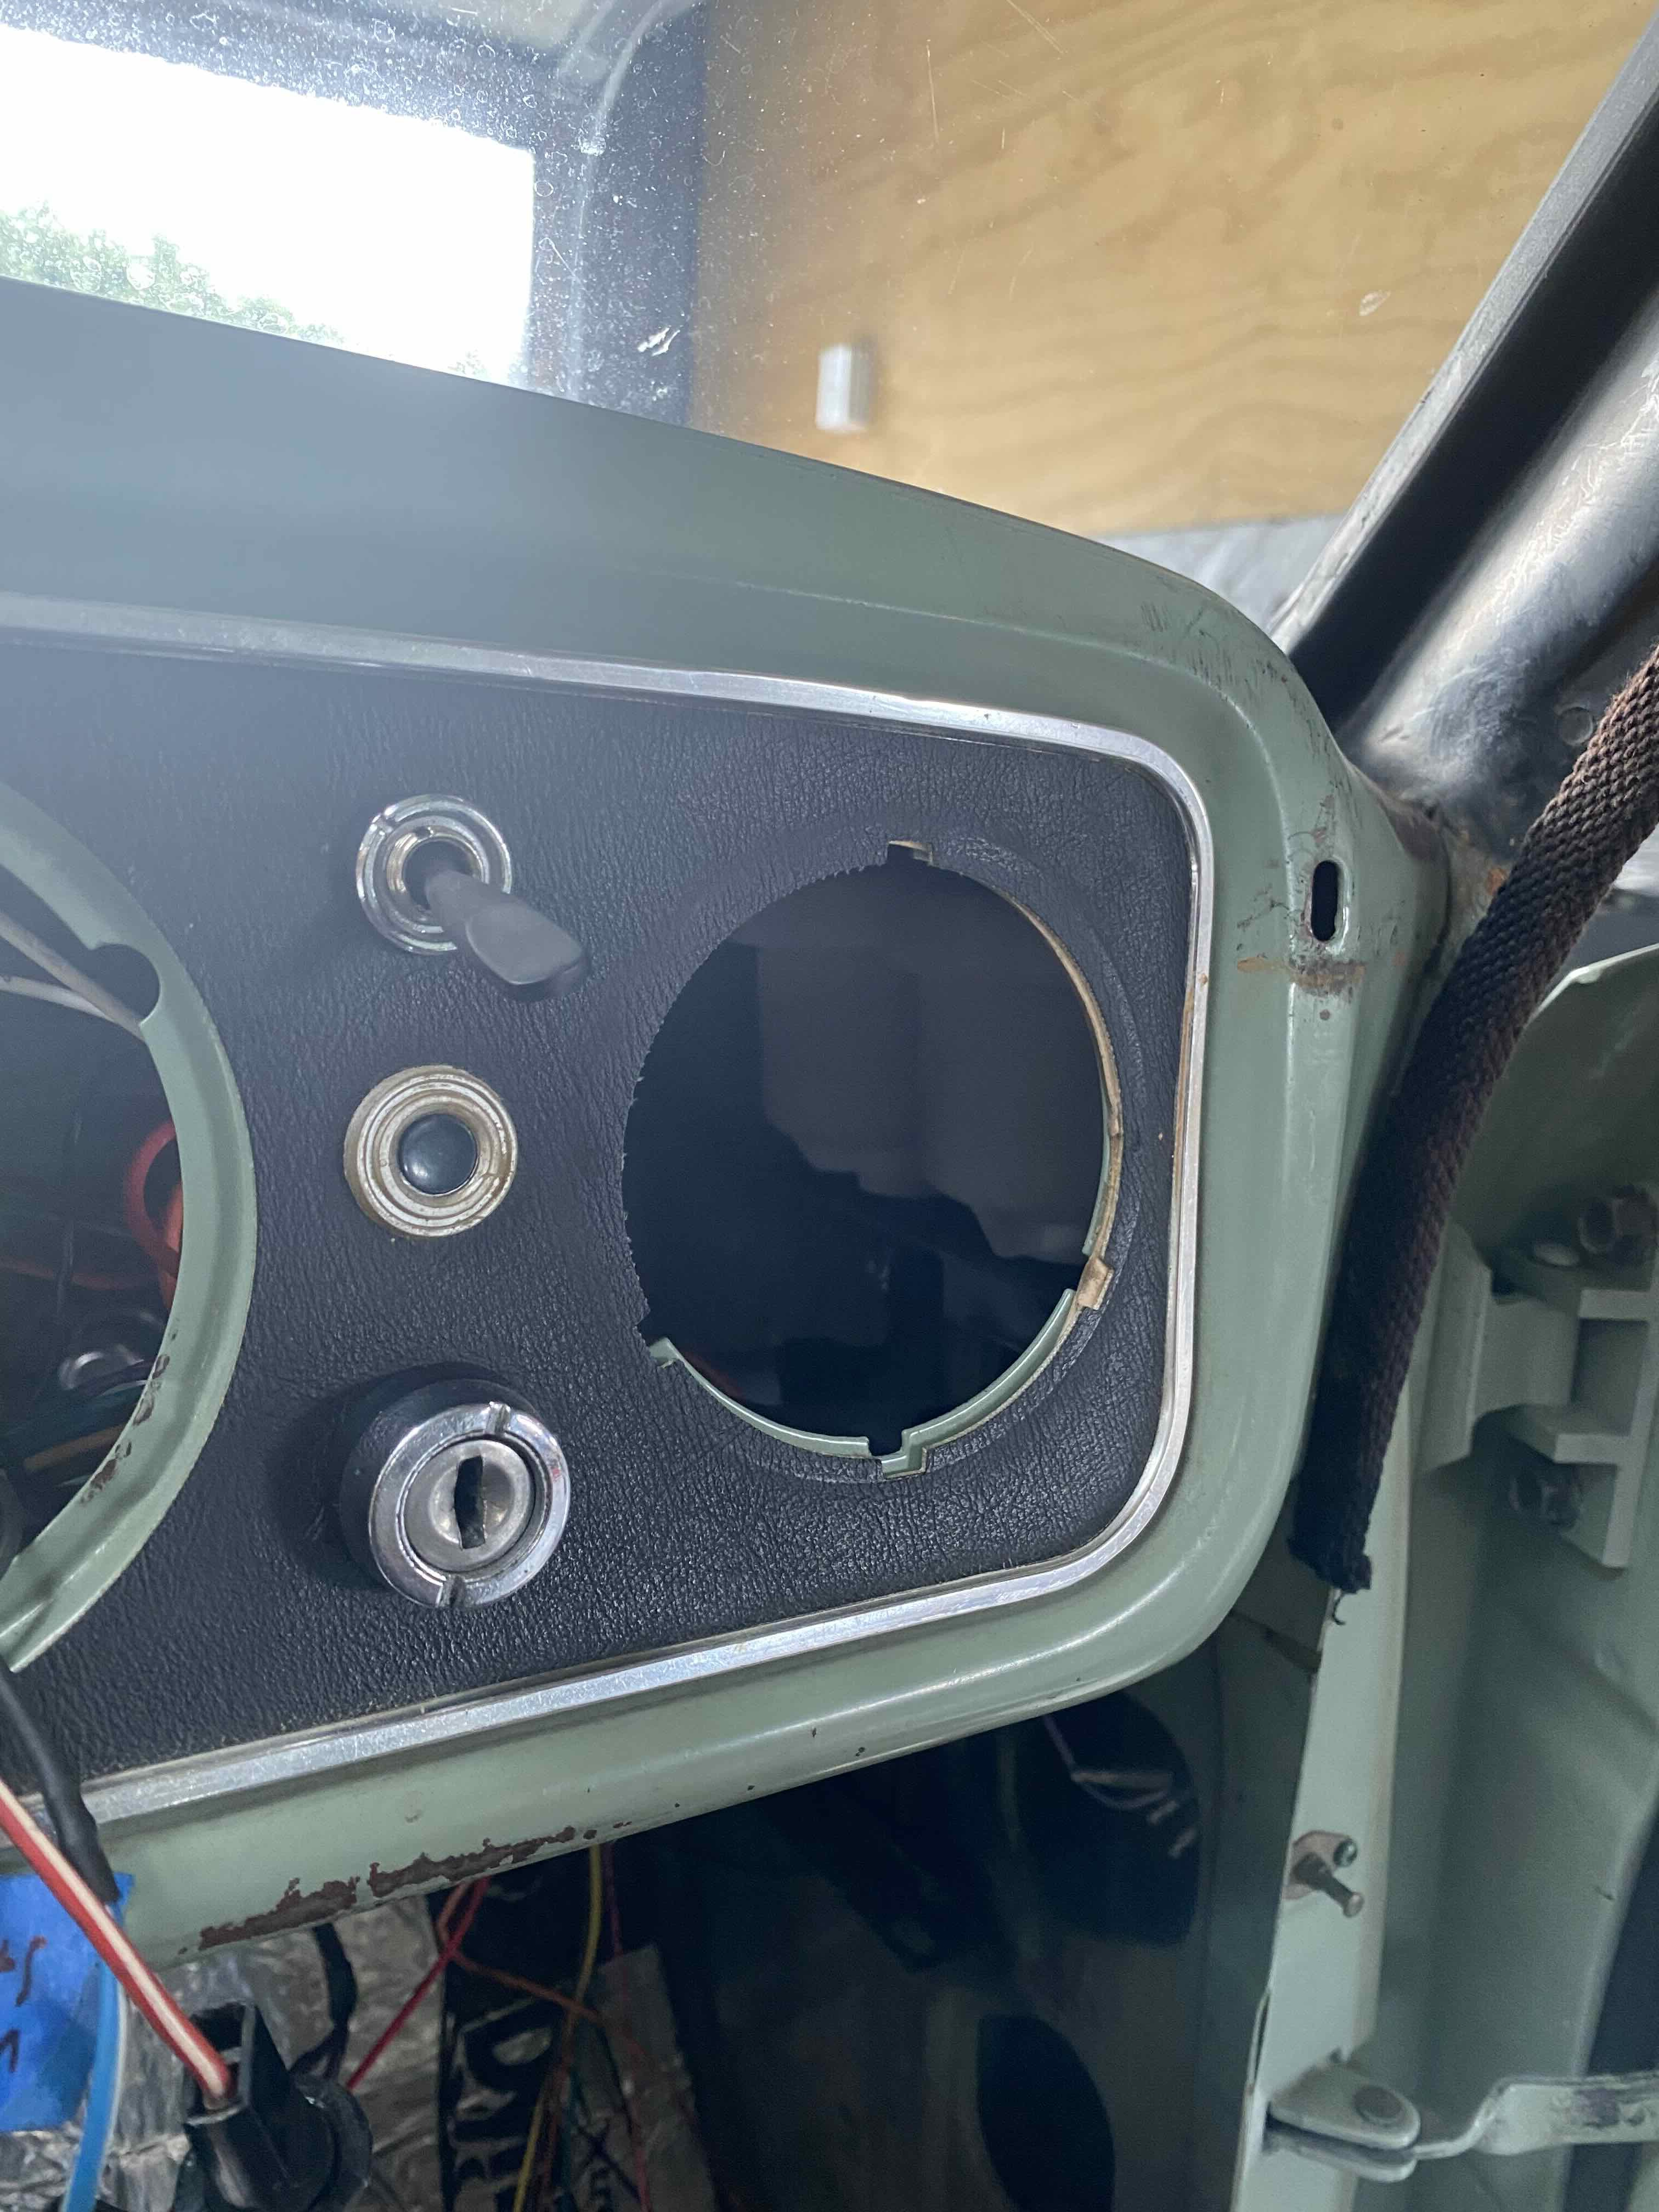
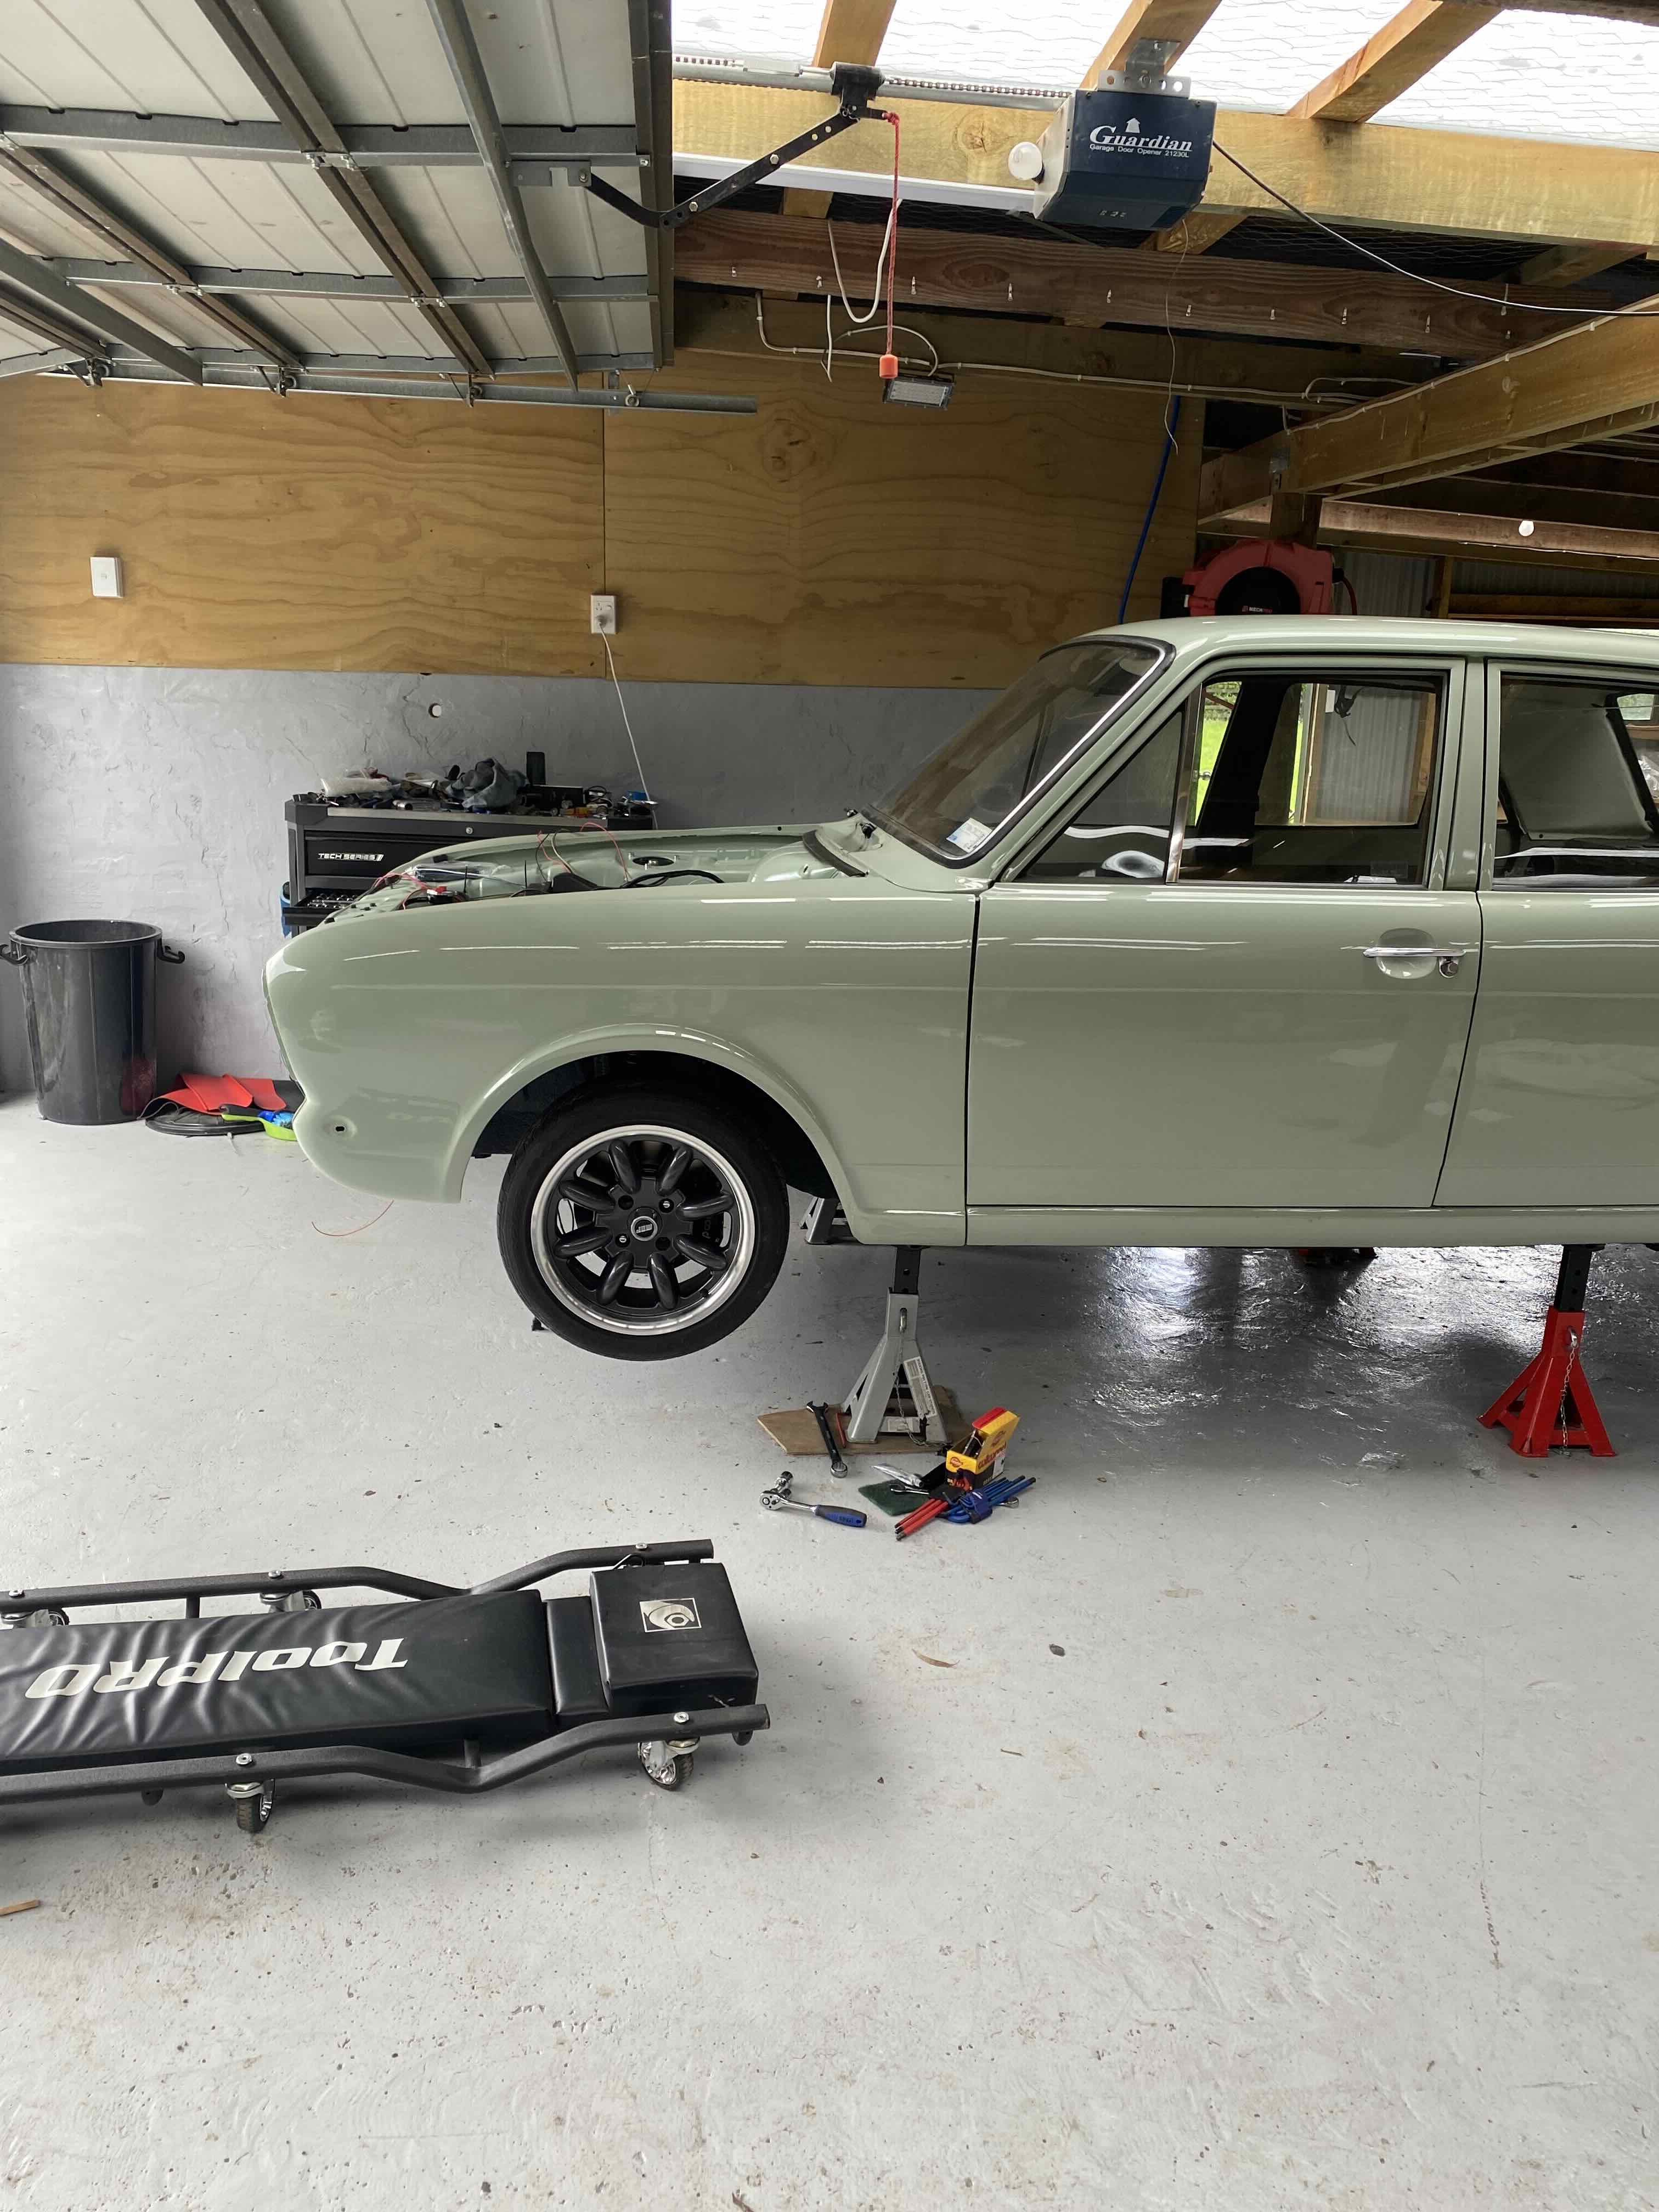
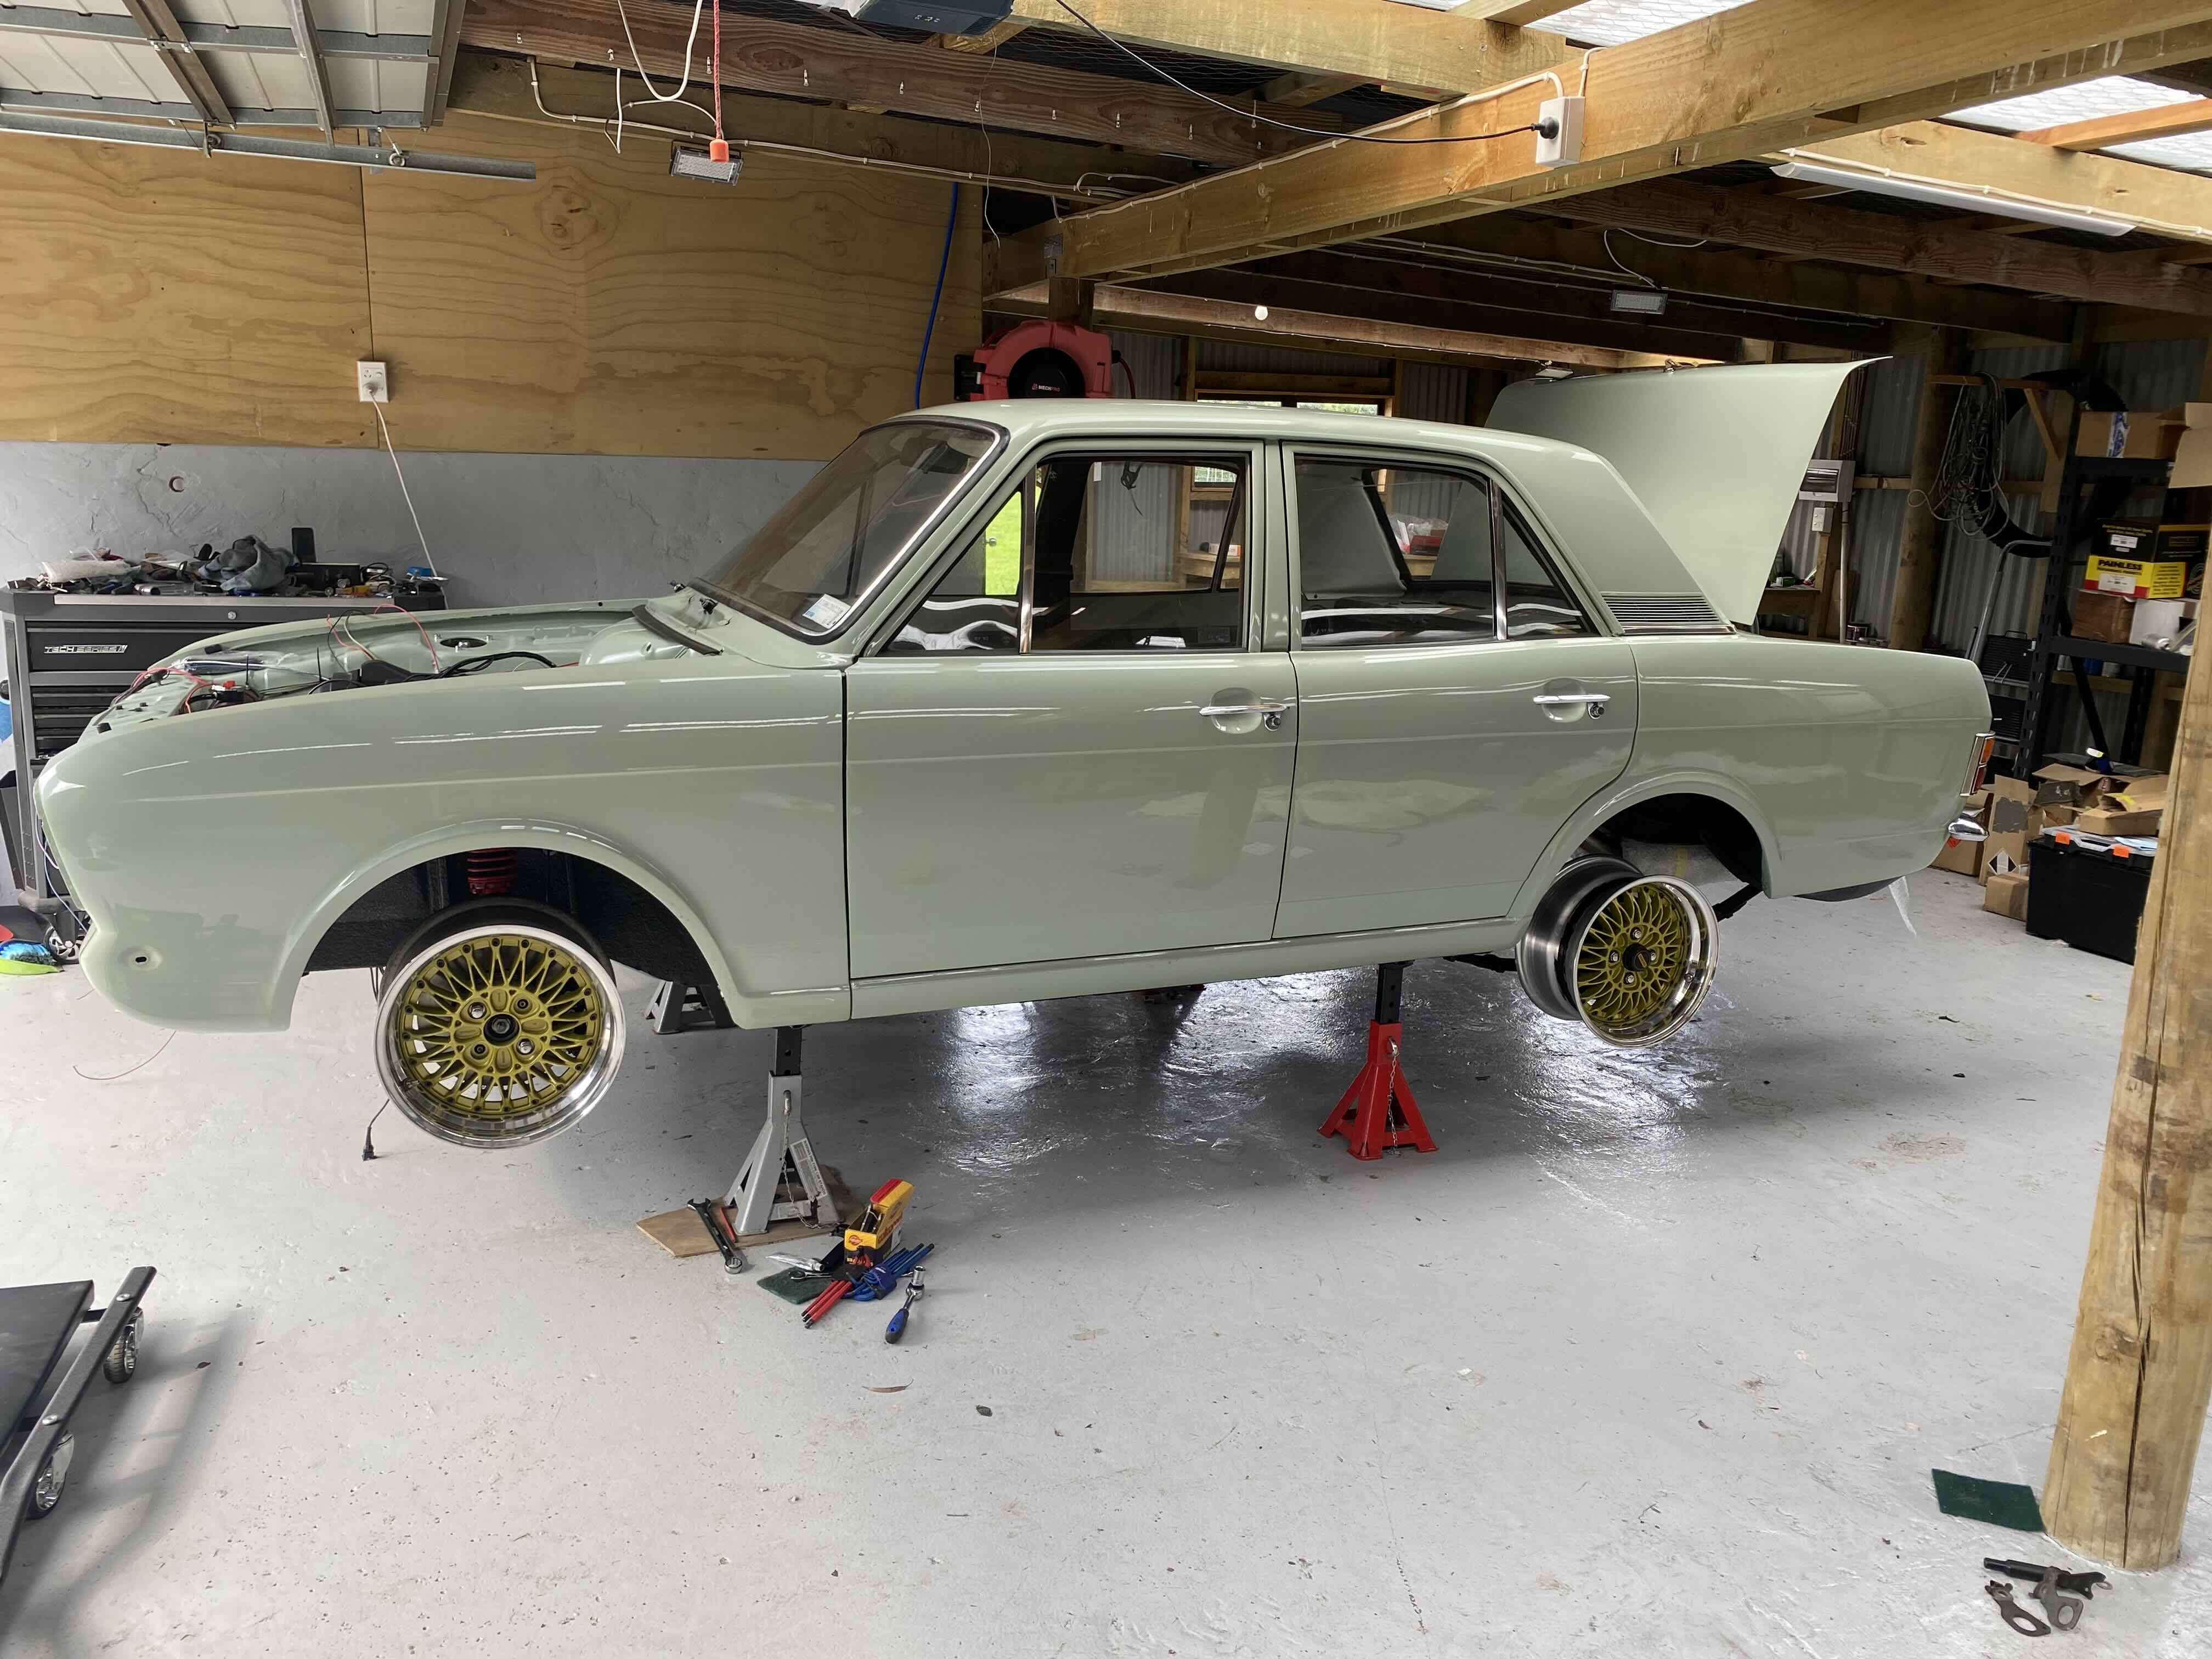
Busy week, buttoned up enough to go off for a tune yesterday. Slight issue with the cam sensor being wired the wrong way round but that was quickly sorted. She made 158hp at the wheels which is about what I was expecting- much more dialed in now and nicer to drive. Have been working away on eliminating all the bumps and rattles- as much as I can anyway. Spent today tidying up the interior, gauge surrounds on, parcel shelf installed and the ECU mounted in behind the centre section of the parcel shelf. Coming together nicely. Will look to book her in for a cert shortly.

- 55 replies
-
- 24
-

-
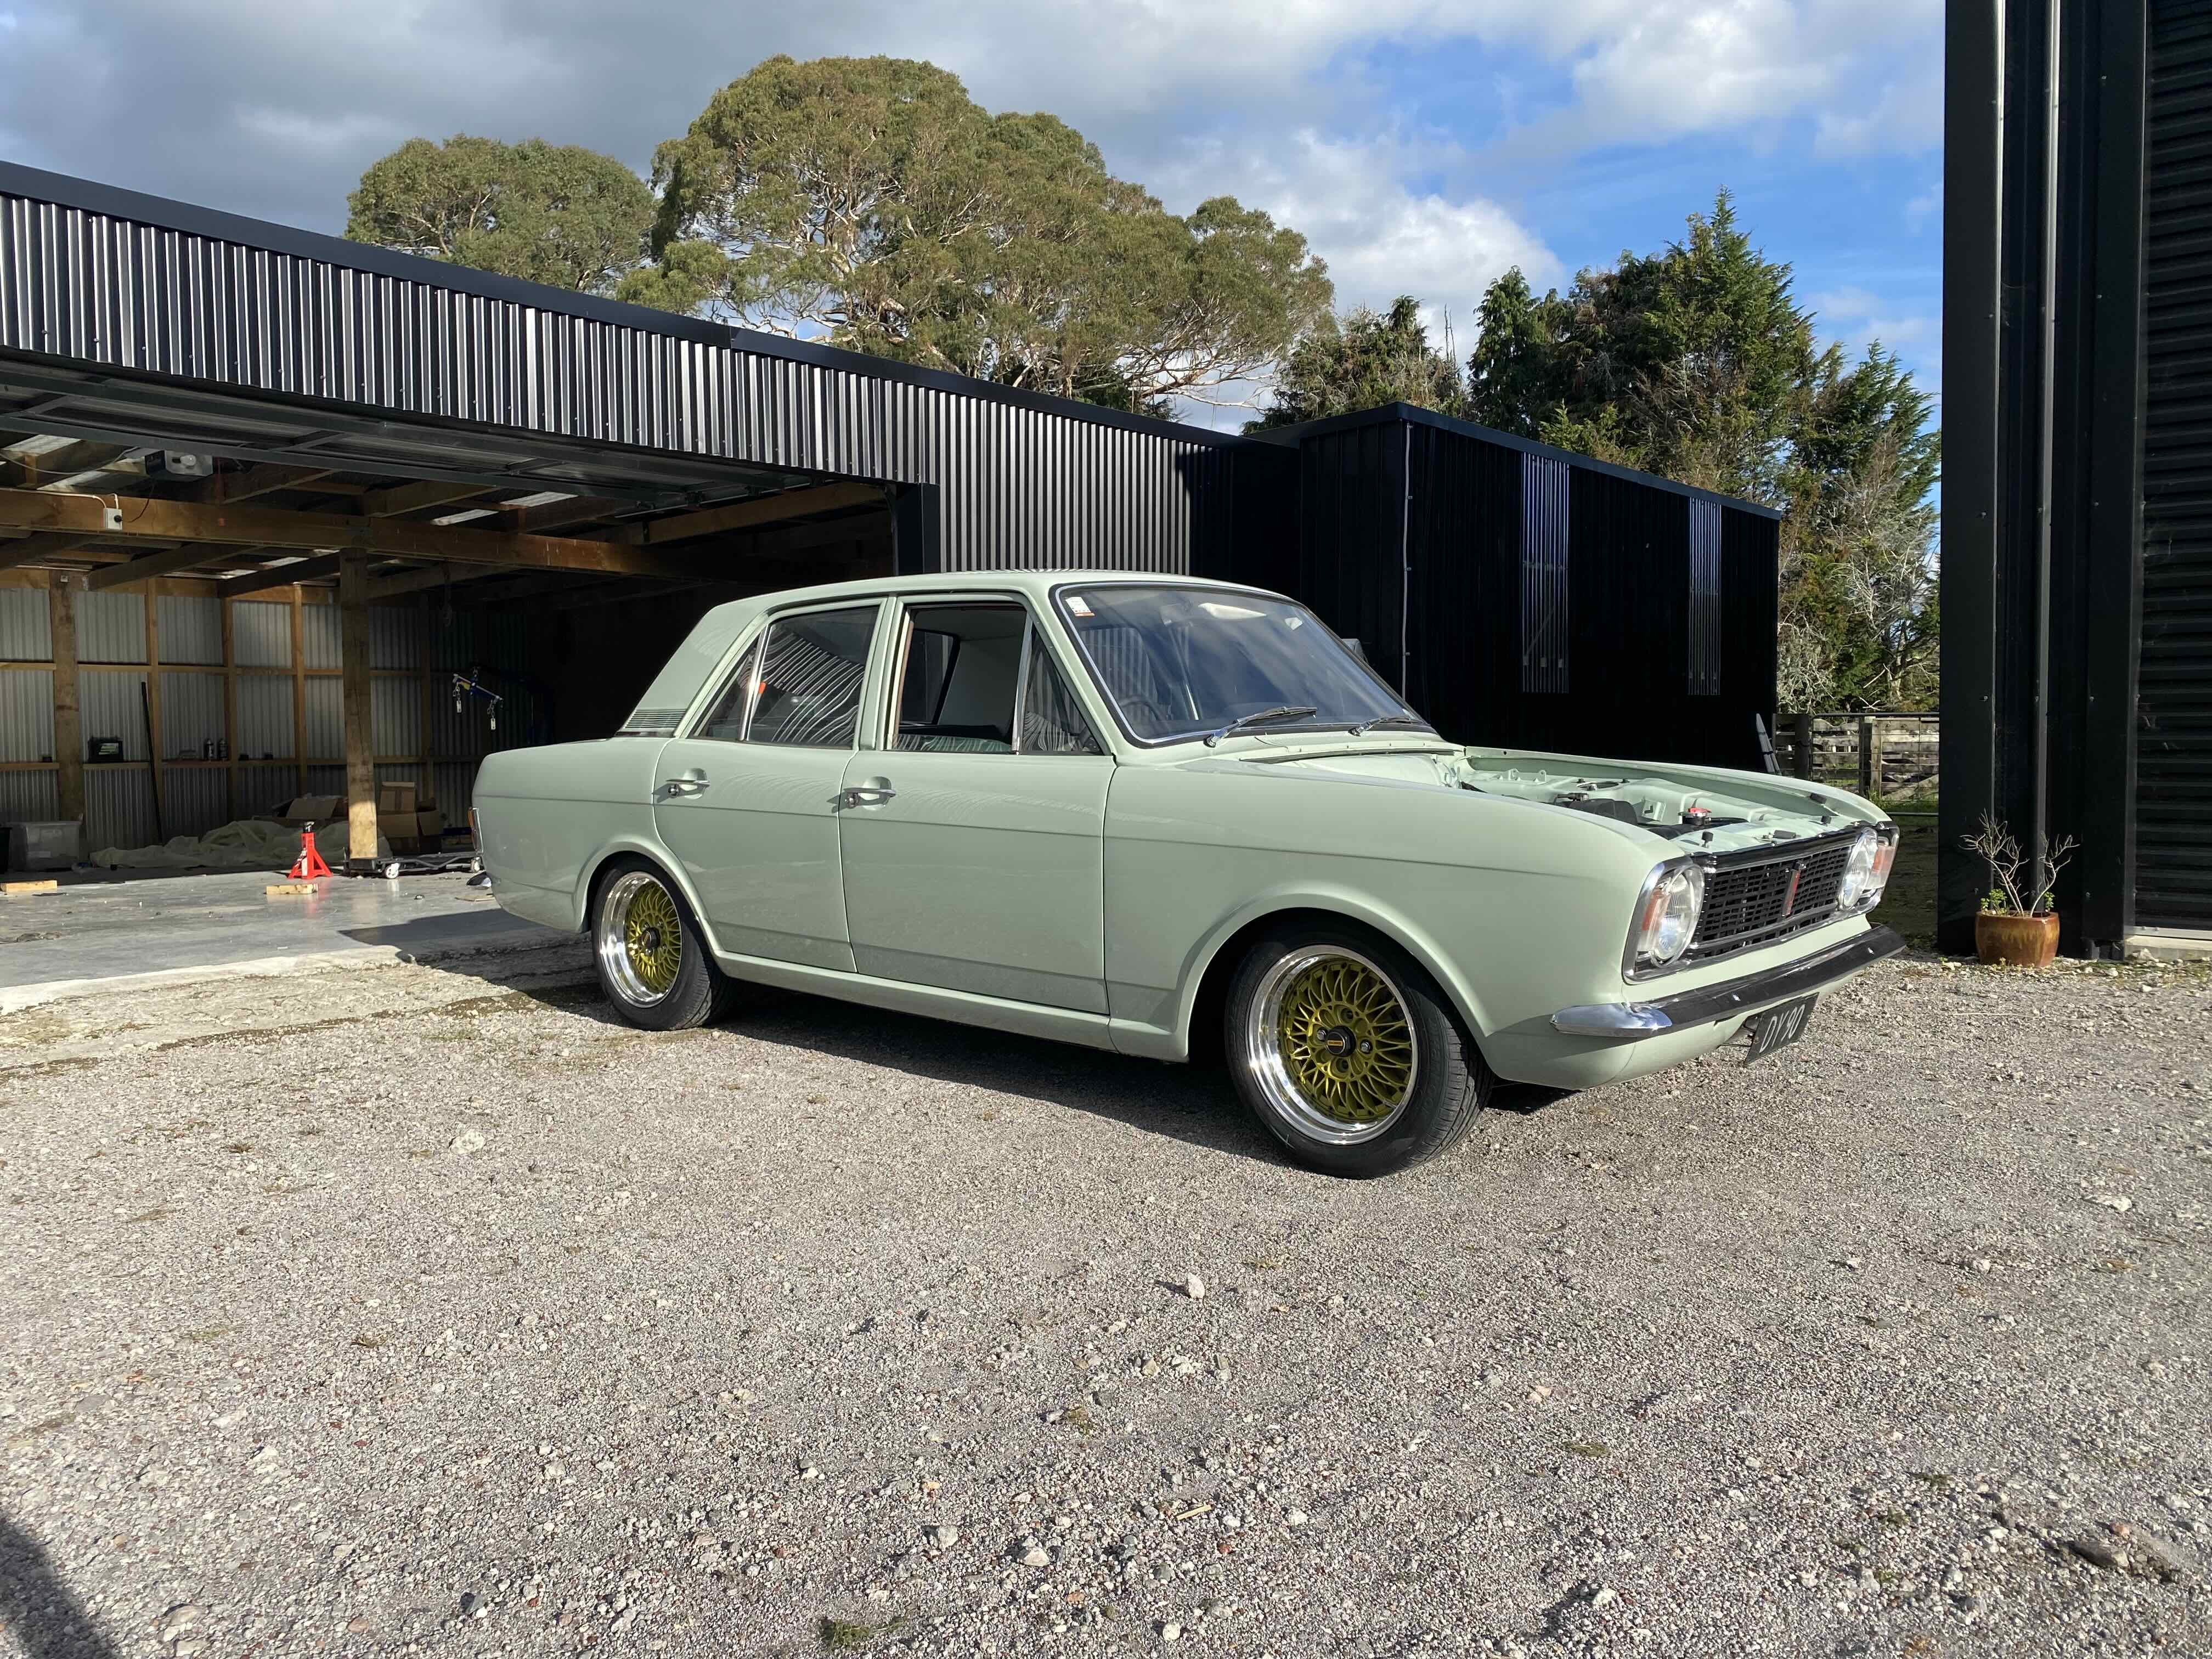
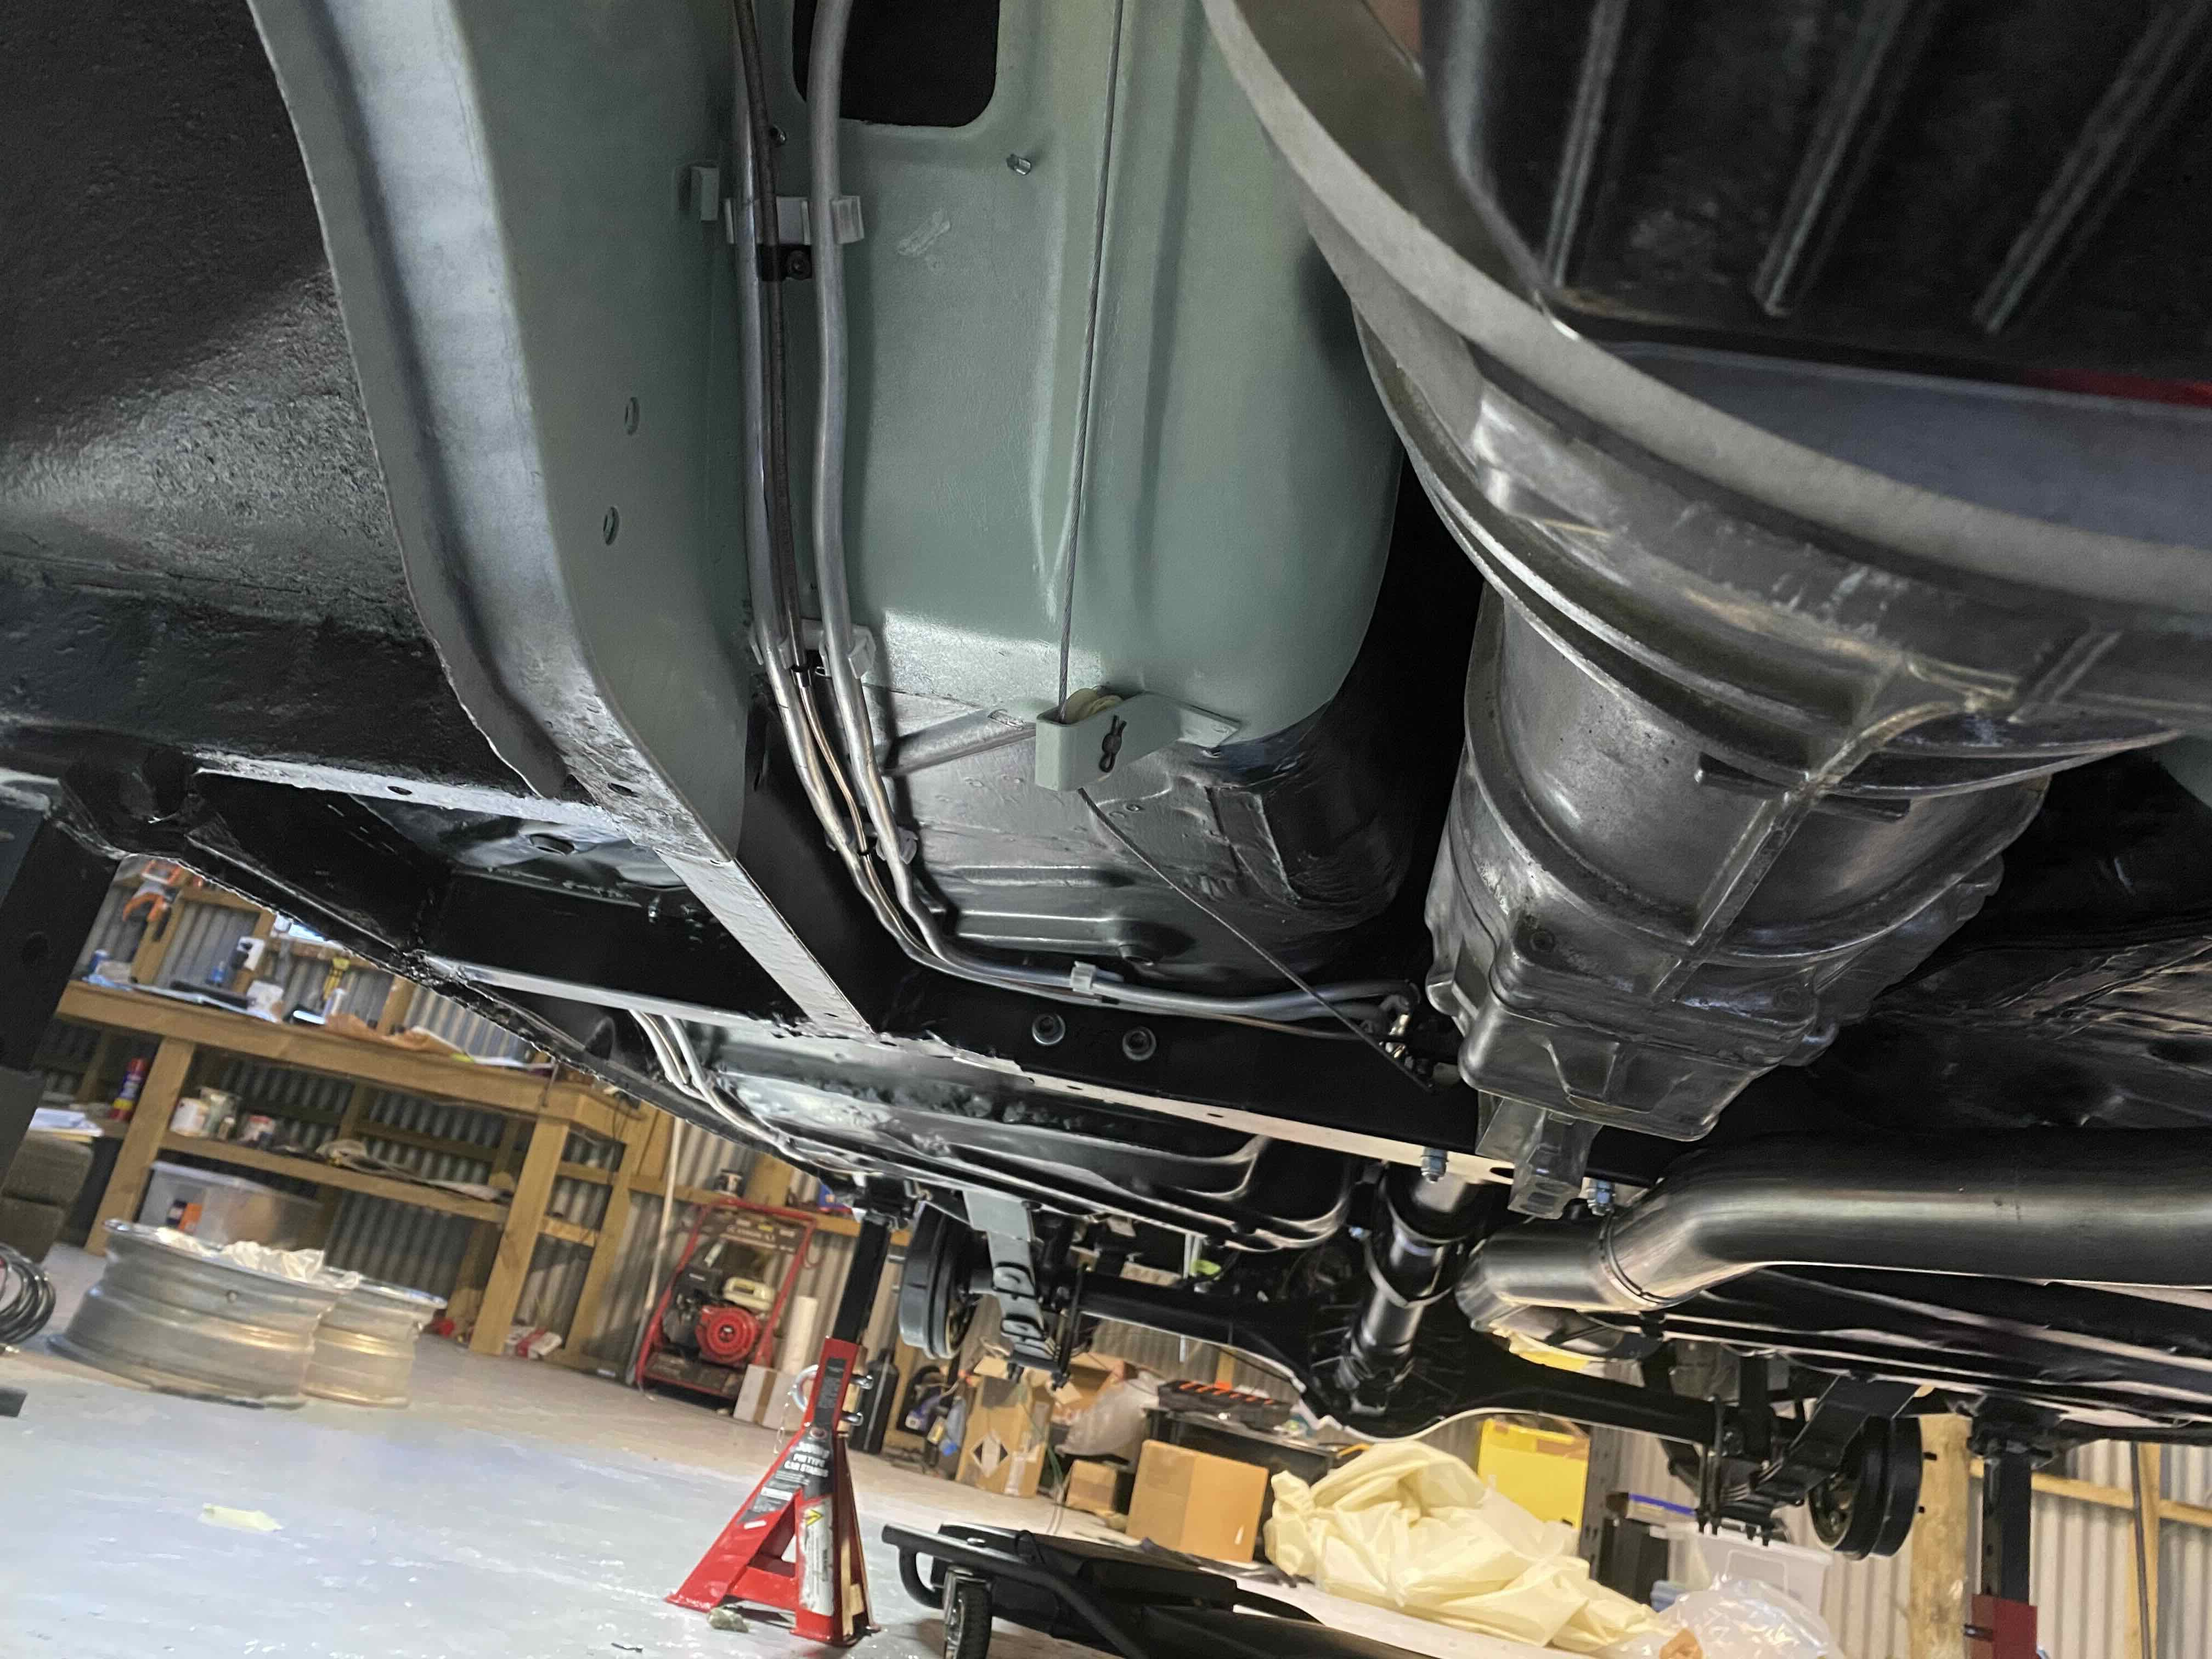
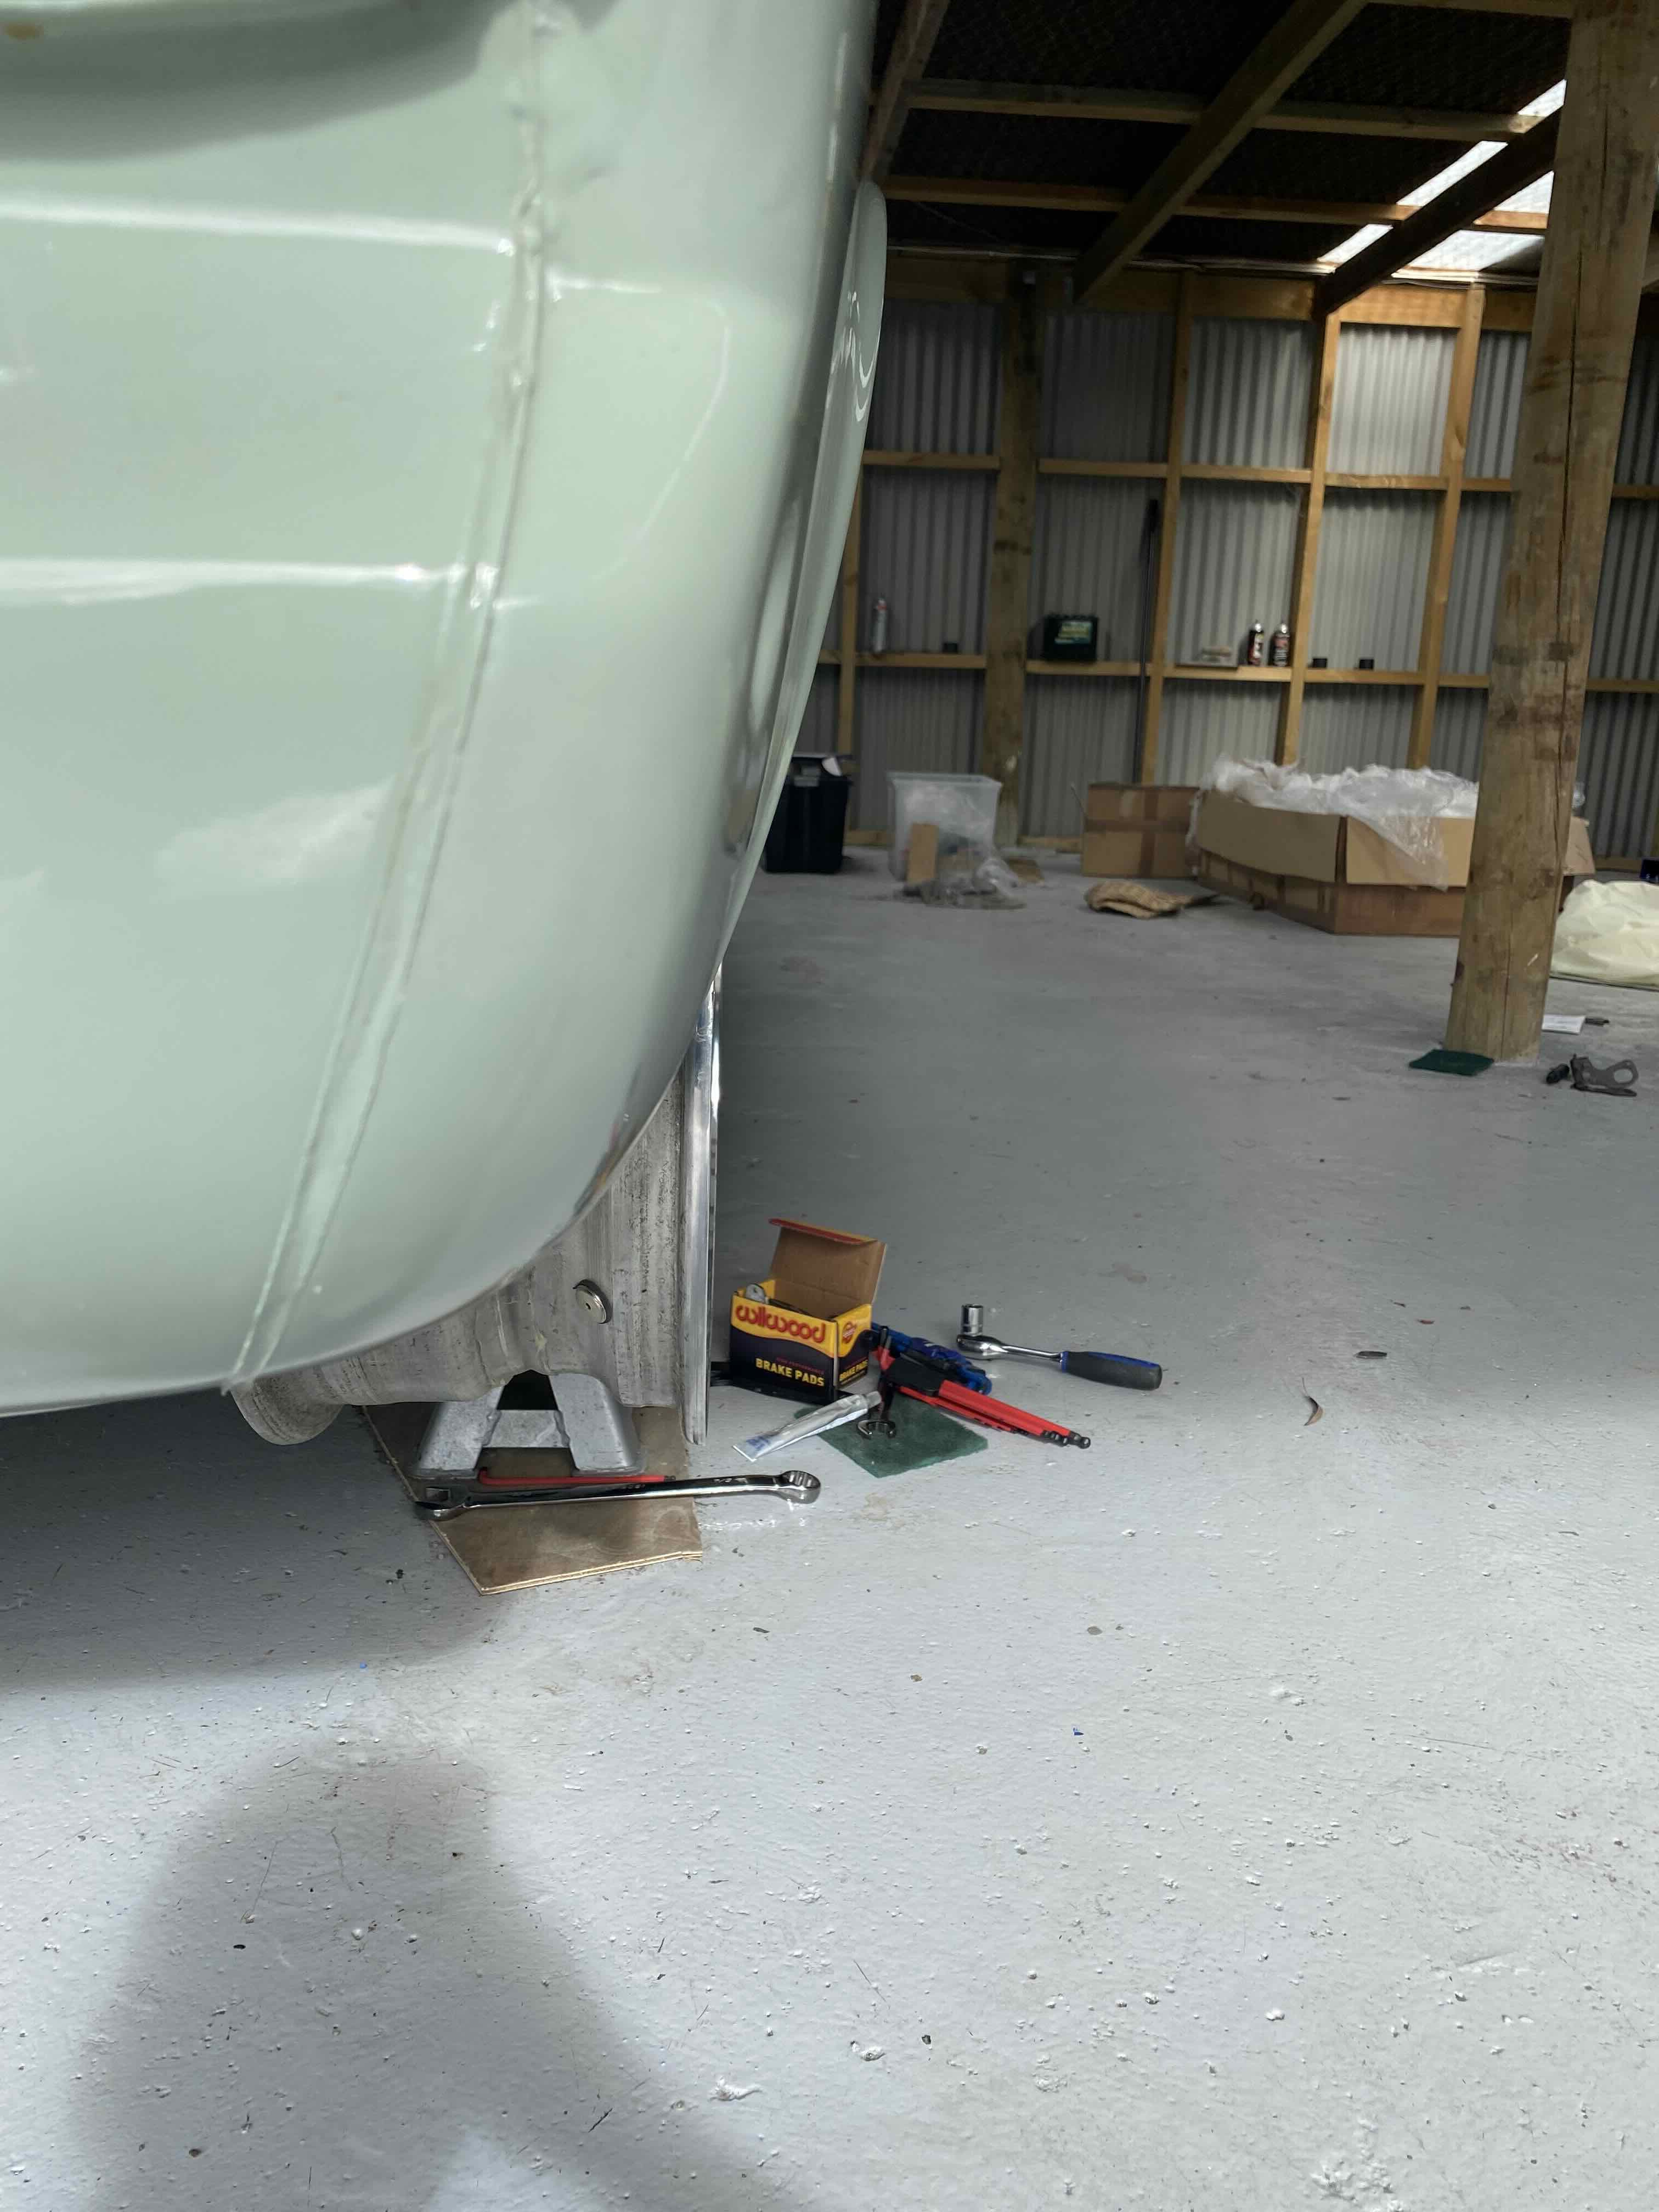
All sort of back together last night so took it out for a cheeky driver. Rear master was too big with a .75 so wasn’t getting too much braking on the front. Swapped out to a .7 in the rear this morning and it’s much better now- wants to launch you through the front windscreen. Speedo works well with my fancy little box. Just need to set it up for VSS input only. No major leaks found so far, looks like a little weep from the front of the sump to will re torque those bolts. Bit of a weapon compared to the old 1500!
- 55 replies
-
- 39
-

-
-
Picture-less update. I didn’t pick an ideal time to run into an ECU problem as the company who produced the ECUwas in the midst of an ownership and premises change. So support was a wee bit delayed. But last night I finally received a new calibration for the ECU using a different output for the ground wire for injectors 2&3. I switched the wiring for the injectors accordingly and after uploading the new map she fired right up and on all 4 cylinders. So stoked/relieved. Shes booked in for a tune next Friday so plan between now and then is to try and get some kms in to weed out any major issues before dyno day. Amazingly after ordering in August last year my surge tank should arrive tomorrow or Thursday so will get that installed before dropping it back on the ground and trying for a drive.
- 55 replies
-
- 11
-
-
Still wrapping my head round the EFI/ECU life but my layman’s understanding after playing around for a bit is that my ECU isn’t sending ground pulses to injectors 2&3 which seems to be my issue. Injectors 1&4 are on a different pin from the ECU. Hopefully not too much of a drama to sort out. I’ve been plodding along with the interior, have managed to get all the gauges working, including rev counter which is a bonus. Slight issue is that the old 1968 rev counter only goes to 6k rpm’s, where redline in the ST170 is 7200, I’m going to try and rig up the shift light output from the ECU to be where the old generator light was in the rev counter at 6500- really need the engine to be running properly before I can see if that will work. Speedo and rev counter still need to have the outer bezels attached but that will come after final install. Have an underdash parcel tray to go in also but will hold off on that until everything else is finished. Could wait to try out my Xmas present from the better half- a nice Momo California which tops it off I reckon. She also made the shifter boot .
- 55 replies
-
- 24
-
-
Mostly pictureless update- she runs! Albeit pretty poorly. Currently having issues with the injectors firing, cylinders 2&3 definitely aren’t playing the game- can remove the injector plugs when running and it makes no difference. Have swapped around injectors and the issue stays with those cylinders so seems like a loom or ecu issue. Have sent an email off to omex in the UK to see what they think. First time down on the ground since June last year.
- 55 replies
-
- 24
-
-
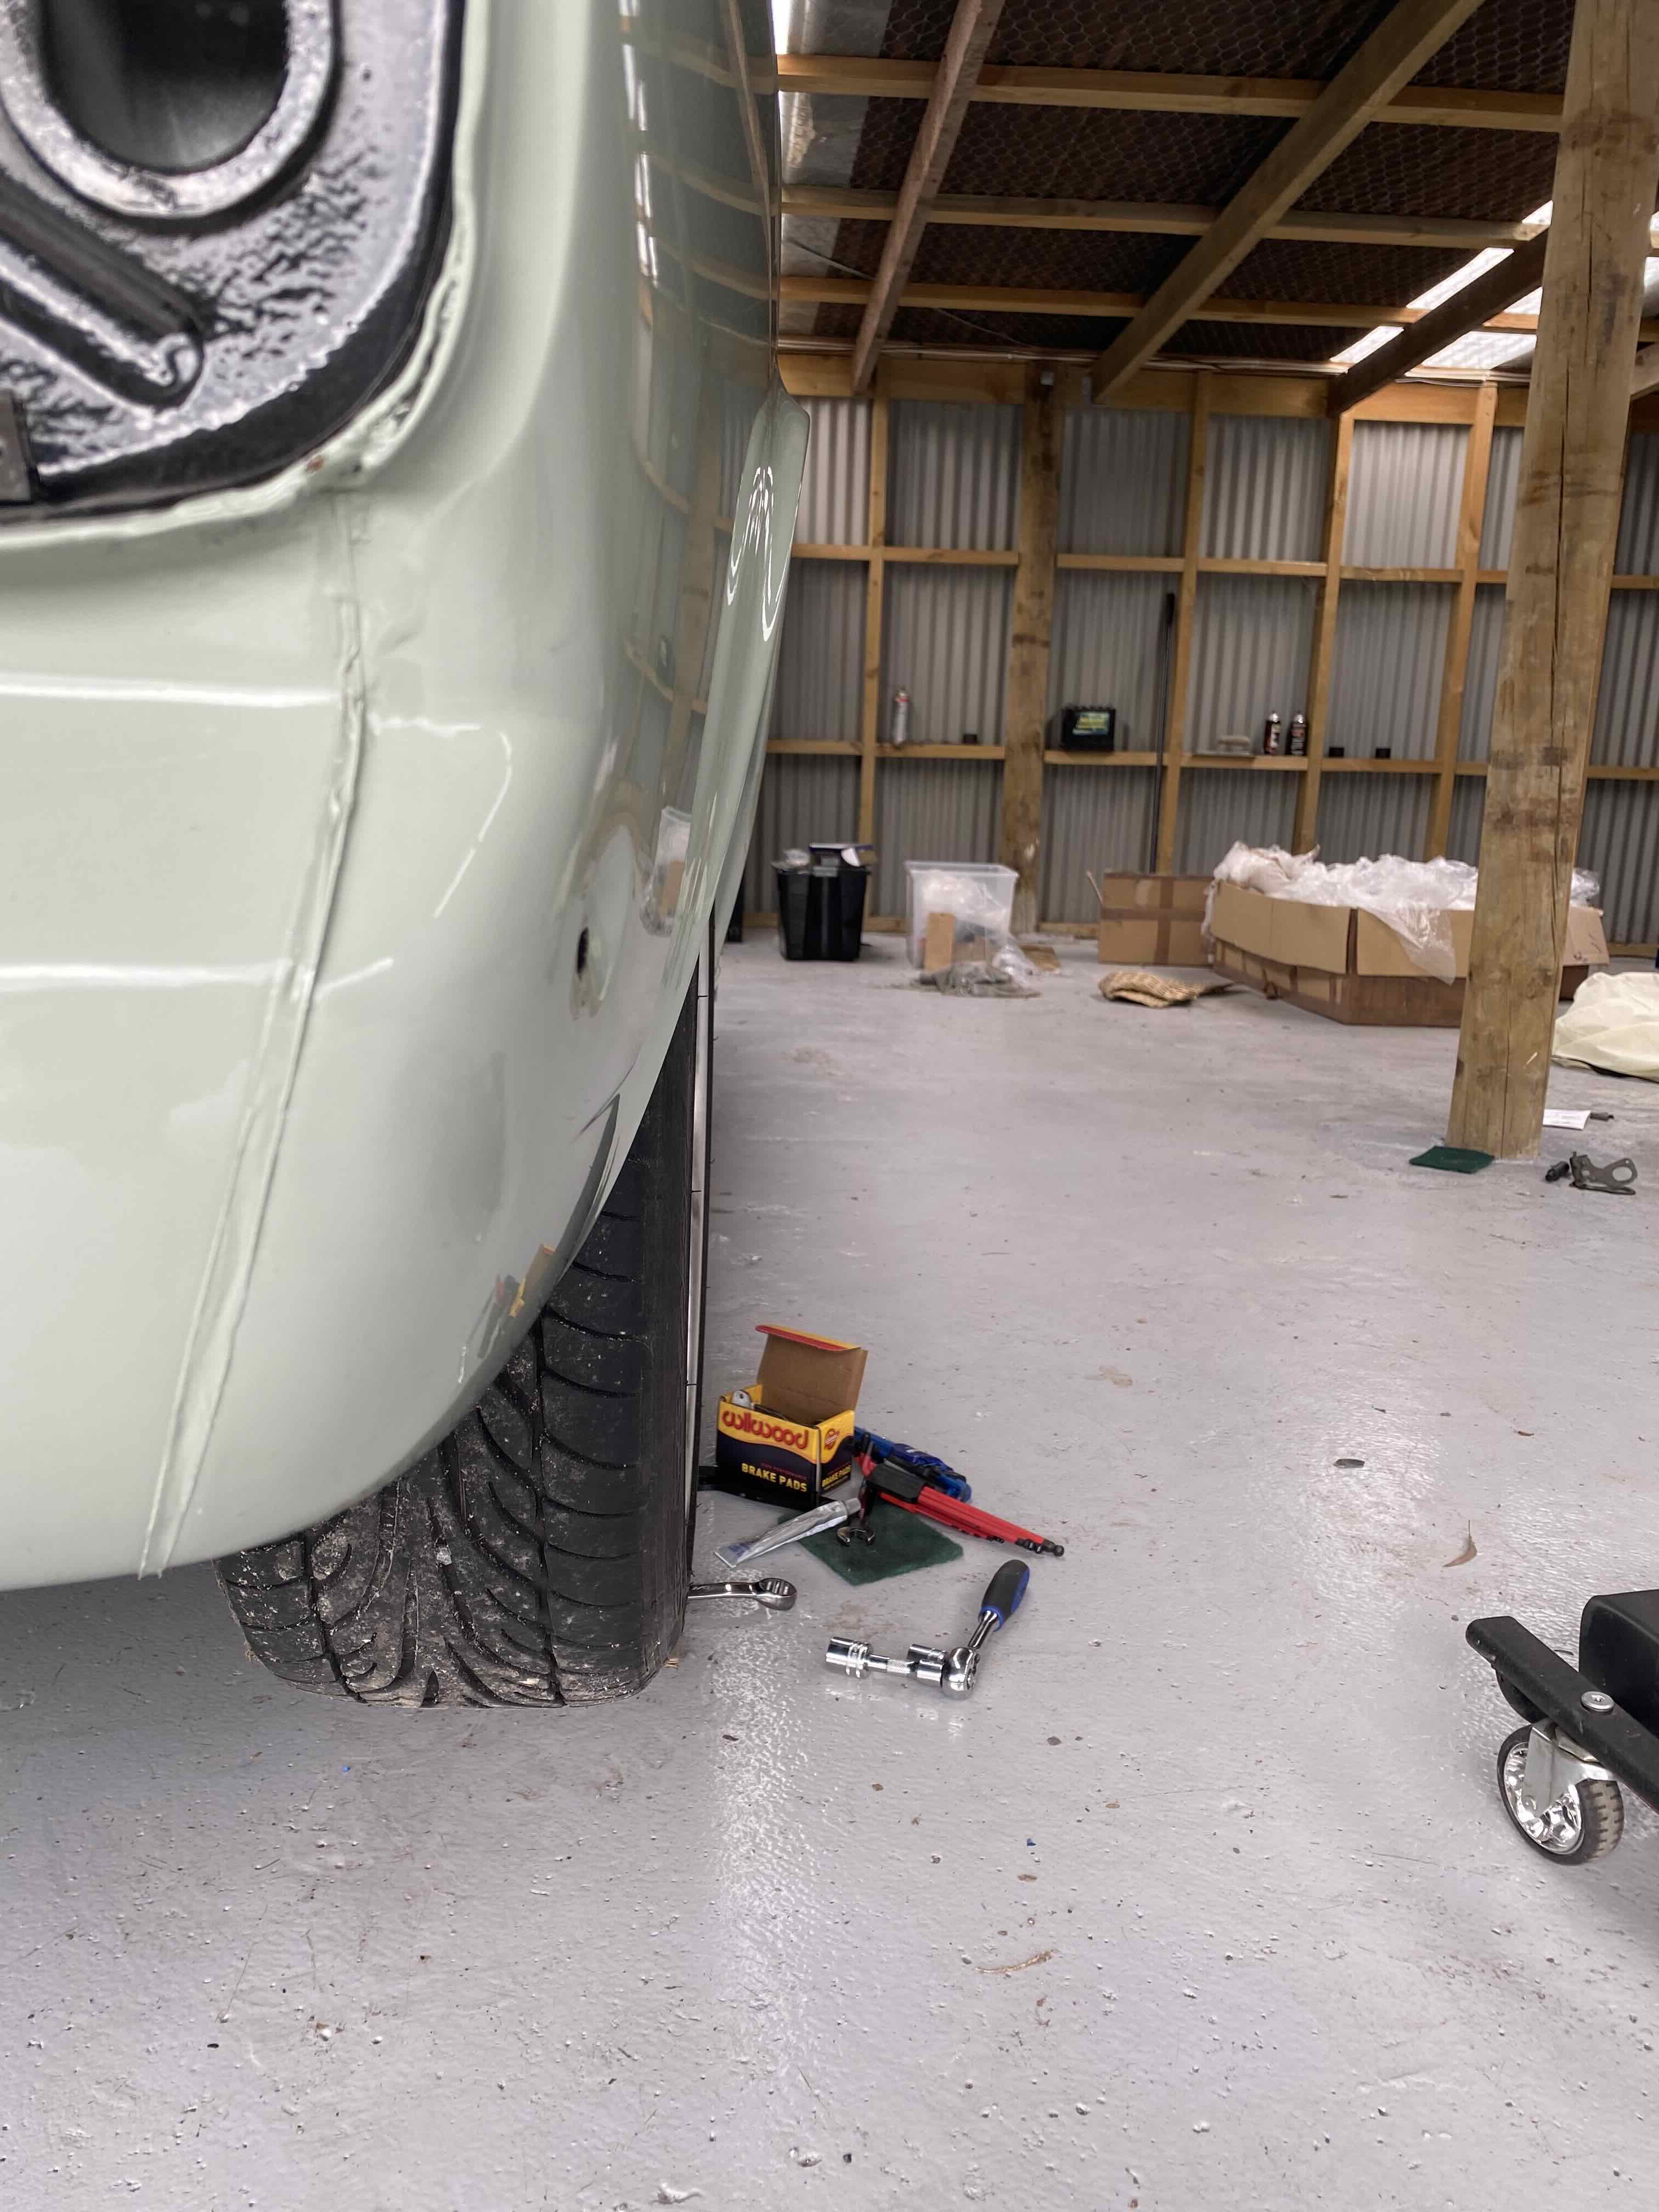
Finished brake pedal came back this weekend so have been able to push on with finishing brake fuels and rear brake line- brakes all held up. Recovered the centre console and slapped the underlay and carpet back in starting to come together. Still waiting on the surge tank, been a bit of a drama really. Might be able to get it running with the pump. Tune is booked in for 3rd June so have a deadline to work to now.
- 55 replies
-
- 17
-
-
I know there are specific limits in terms of camber when going through a cert but is there anything similar for castor? I’ve gone from a steering box to rack and pinion and it’s increased the castor quite a bit - do I have to stay within factory specs?
-
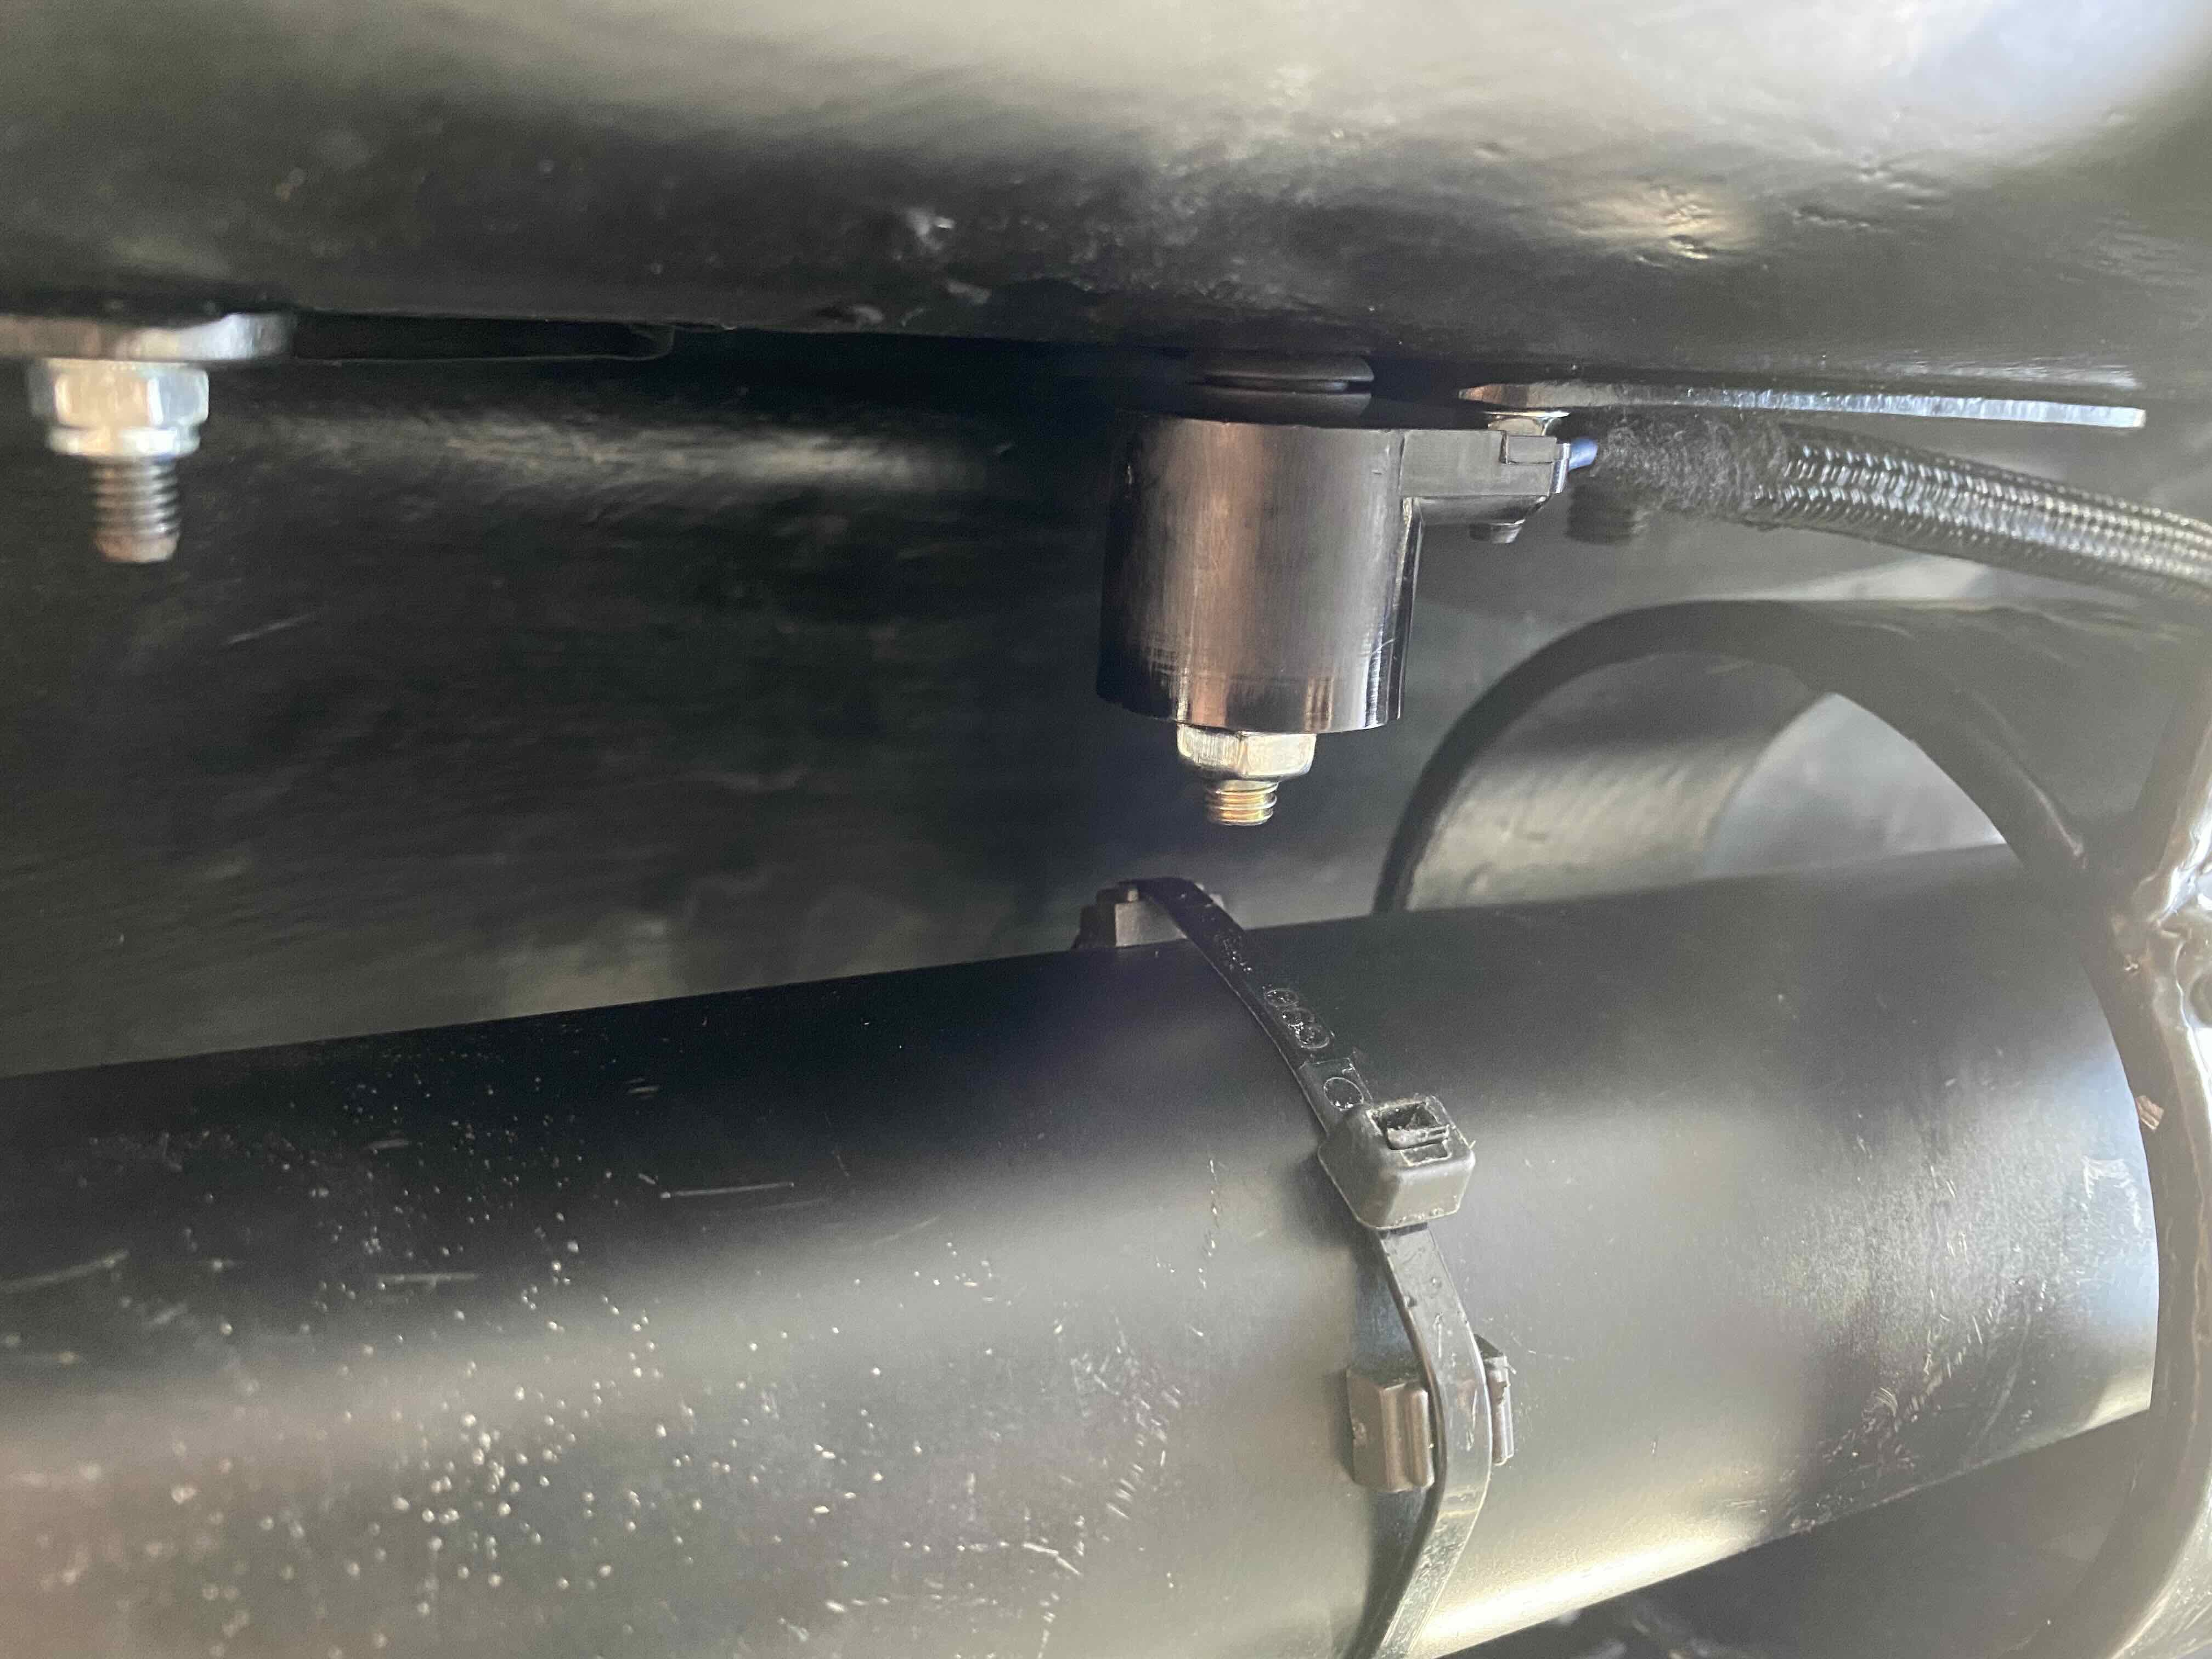
Another small job today. in keeping with my wanting to look stock/gt standard inside I wanted to keep the original gauges and mileage. I got one of these little speed boxes from speed hut that drives the speedo cable. You can run it via GPS or VSS with the cool bit being that it will calibrate/sync the VSS output to the GPS speed and then once calibrated you unplug the GPS and just use the now calibrated VSS output. Should mean easy speedo syncs between wheels. Anyway, nicely tucked away in the glovebox and the cable goes across to the speedo. They are meant to be fairly quiet so hope that’s the case . I originally thought the MX5 gearbox had a VSS output but seems not to be the case so I’ve gone with a sensor that picks up on magnets on the drive shaft. Bonus that I could mount the sensor to the driveshaft tunnel and avoid having to use a ugly L bracket mount. Time will tell if it works. Onto fuel hard lines now.
- 55 replies
-
- 14
-
-
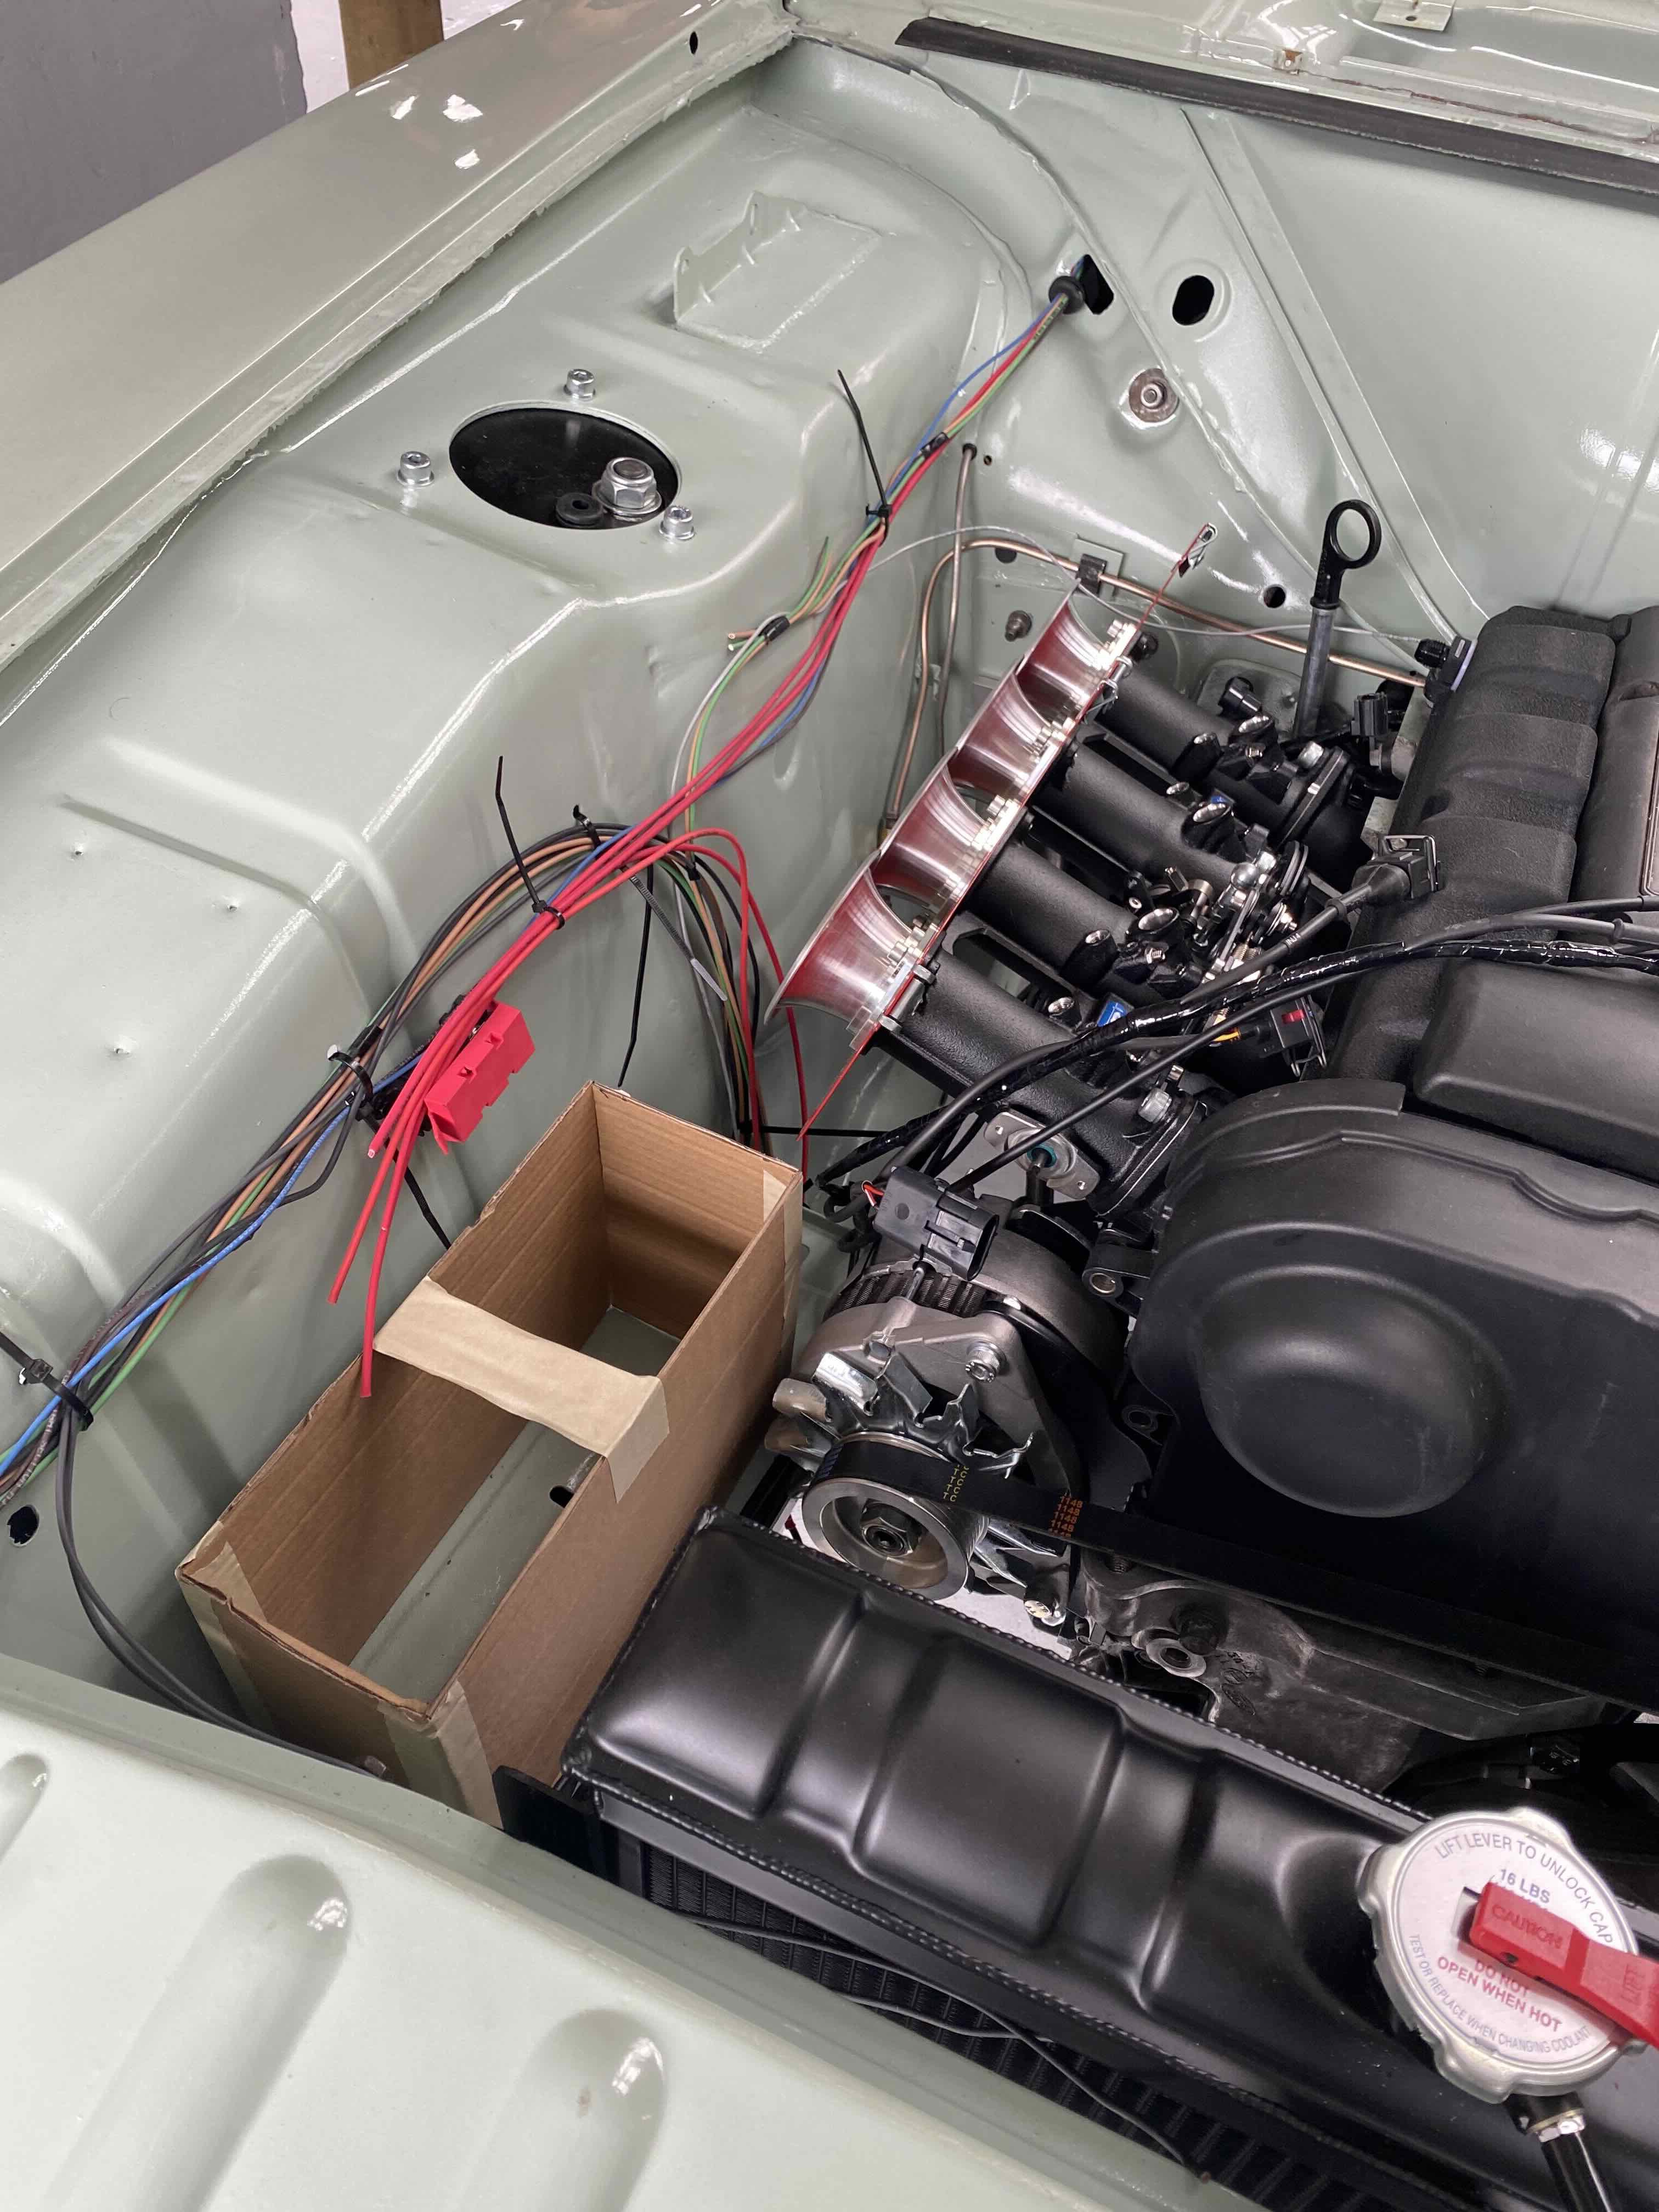
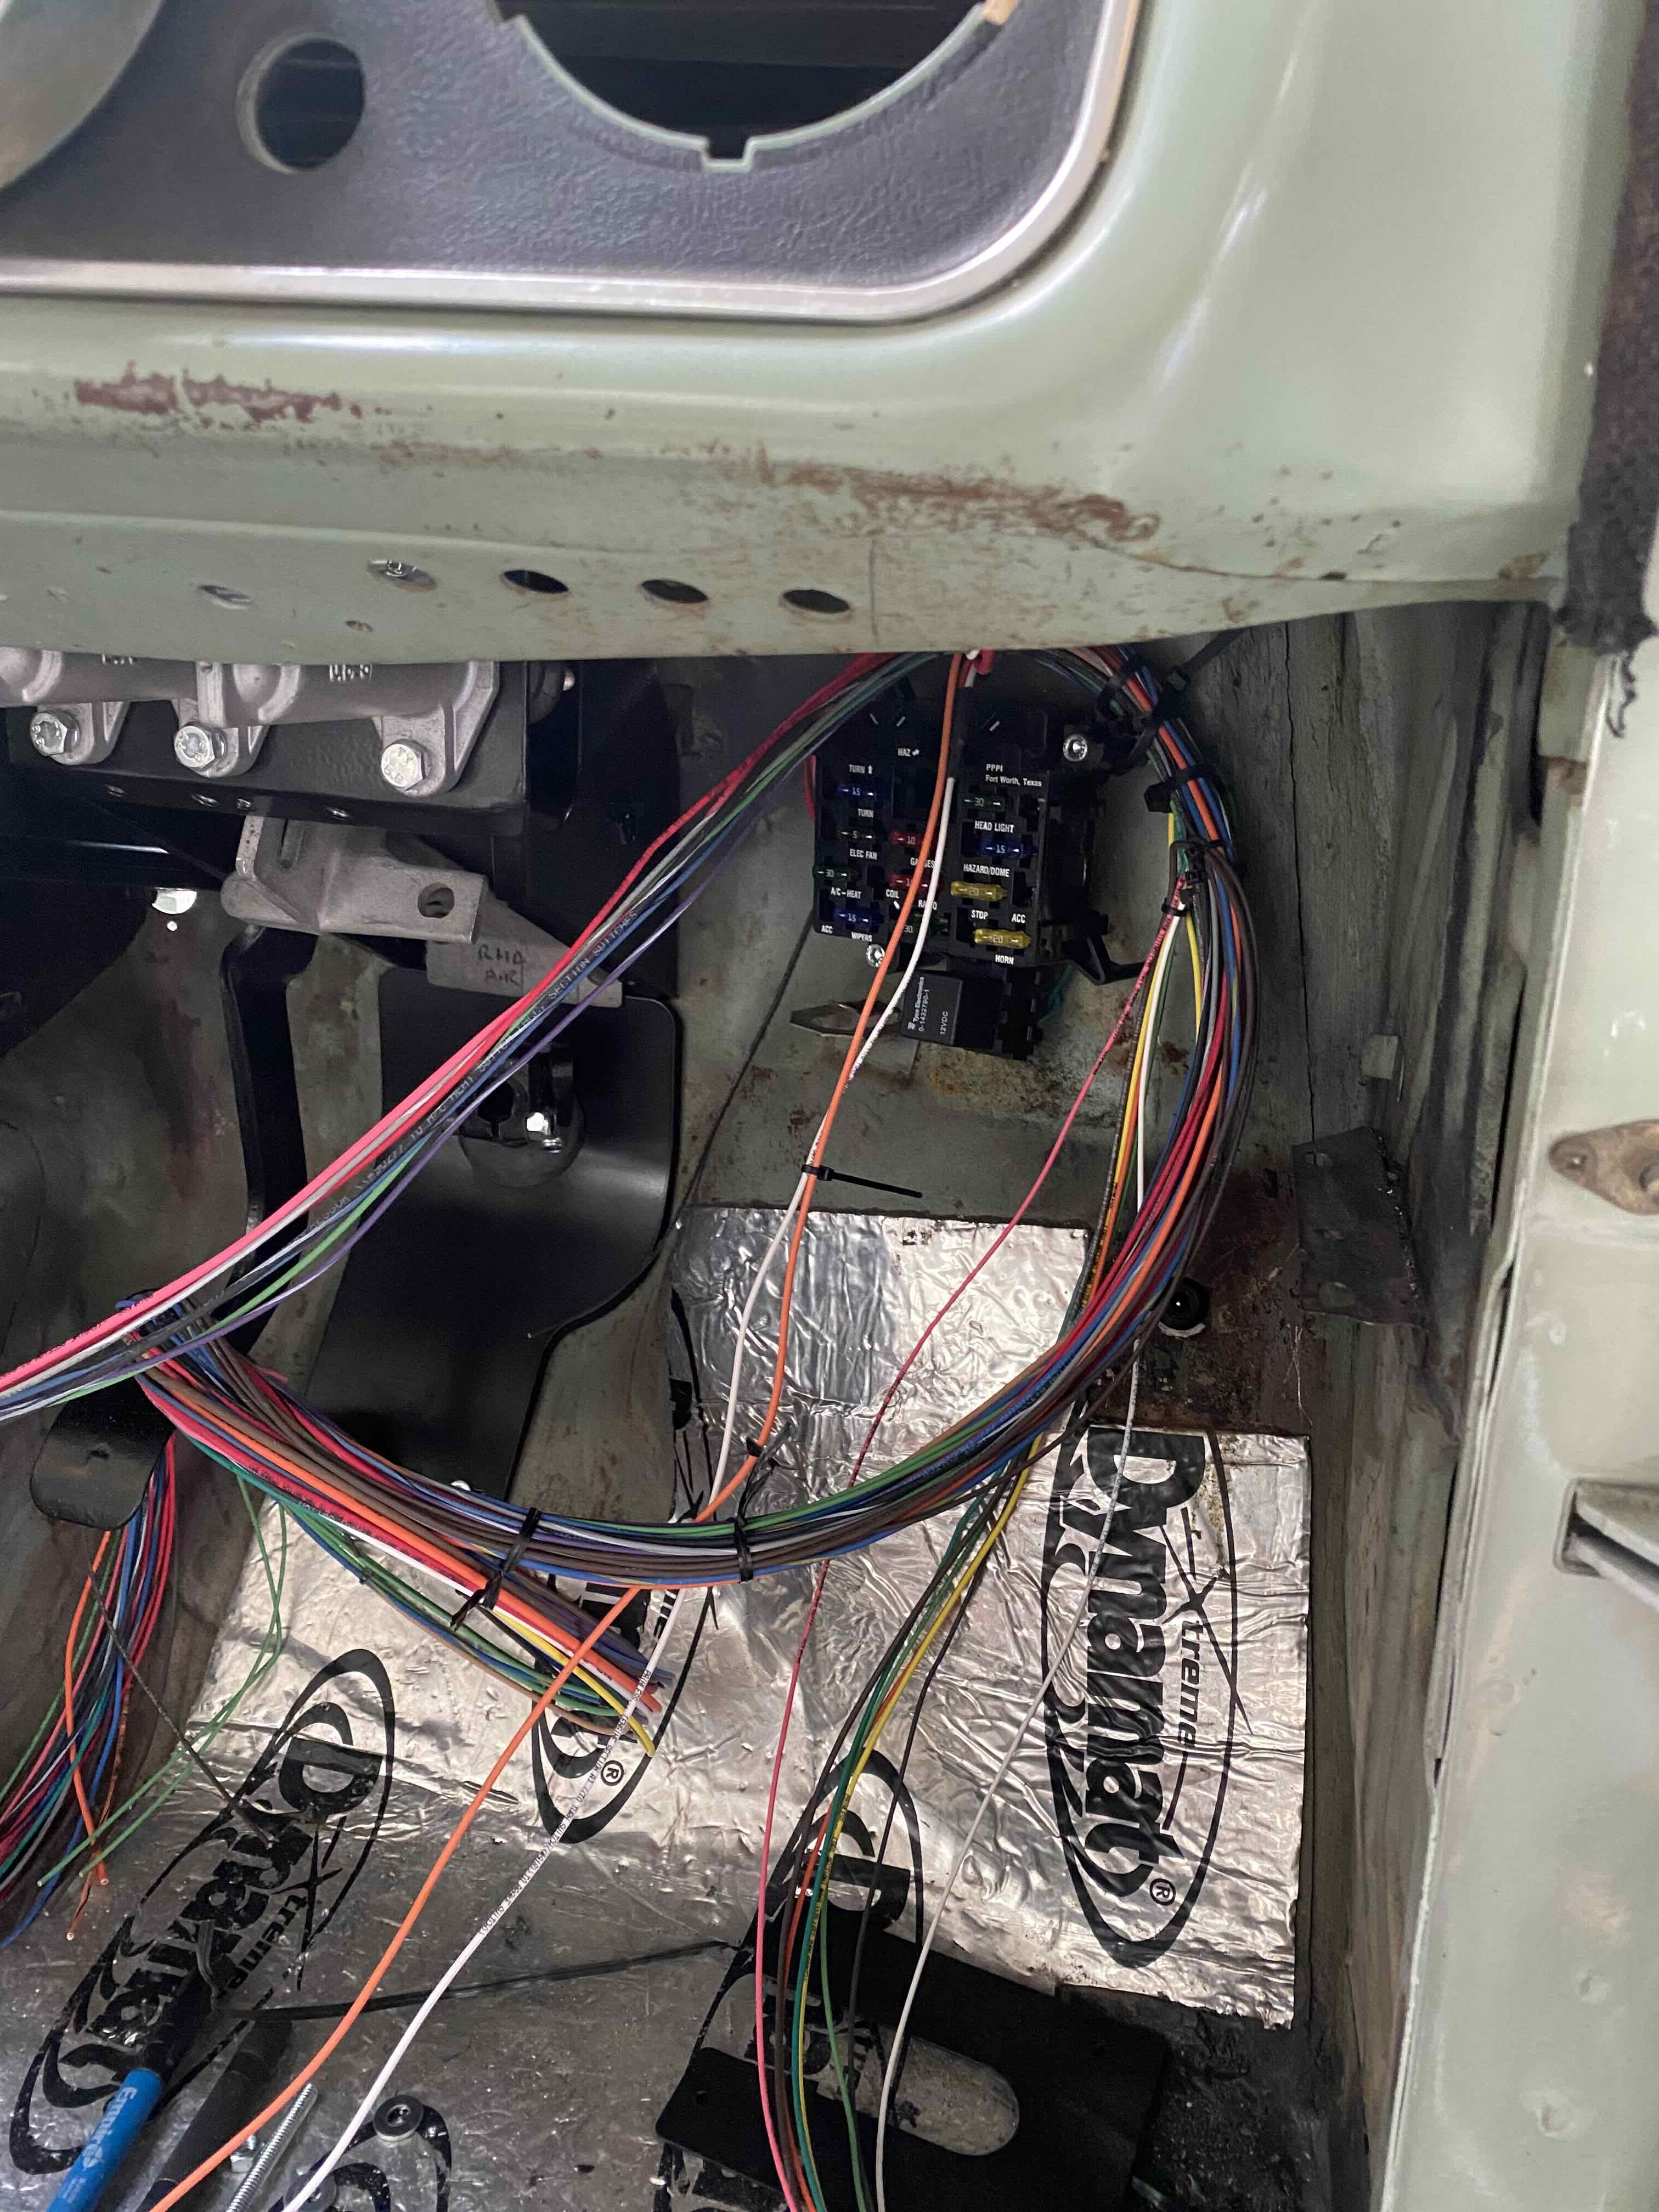
Making good progress on the wiring - probably 90% on the way there. Volt meter turned out to be a dud so that will stop me from getting the dash in until a new one arrives. Looking pretty tidy in the engine bay wiring wise- pretty happy with it. Will order a new battery this week and then I can finish finish up the starter and alternator wiring. New H4 lights and relays are a heap better than the old candle sticks.
- 55 replies
-
- 16
-
-
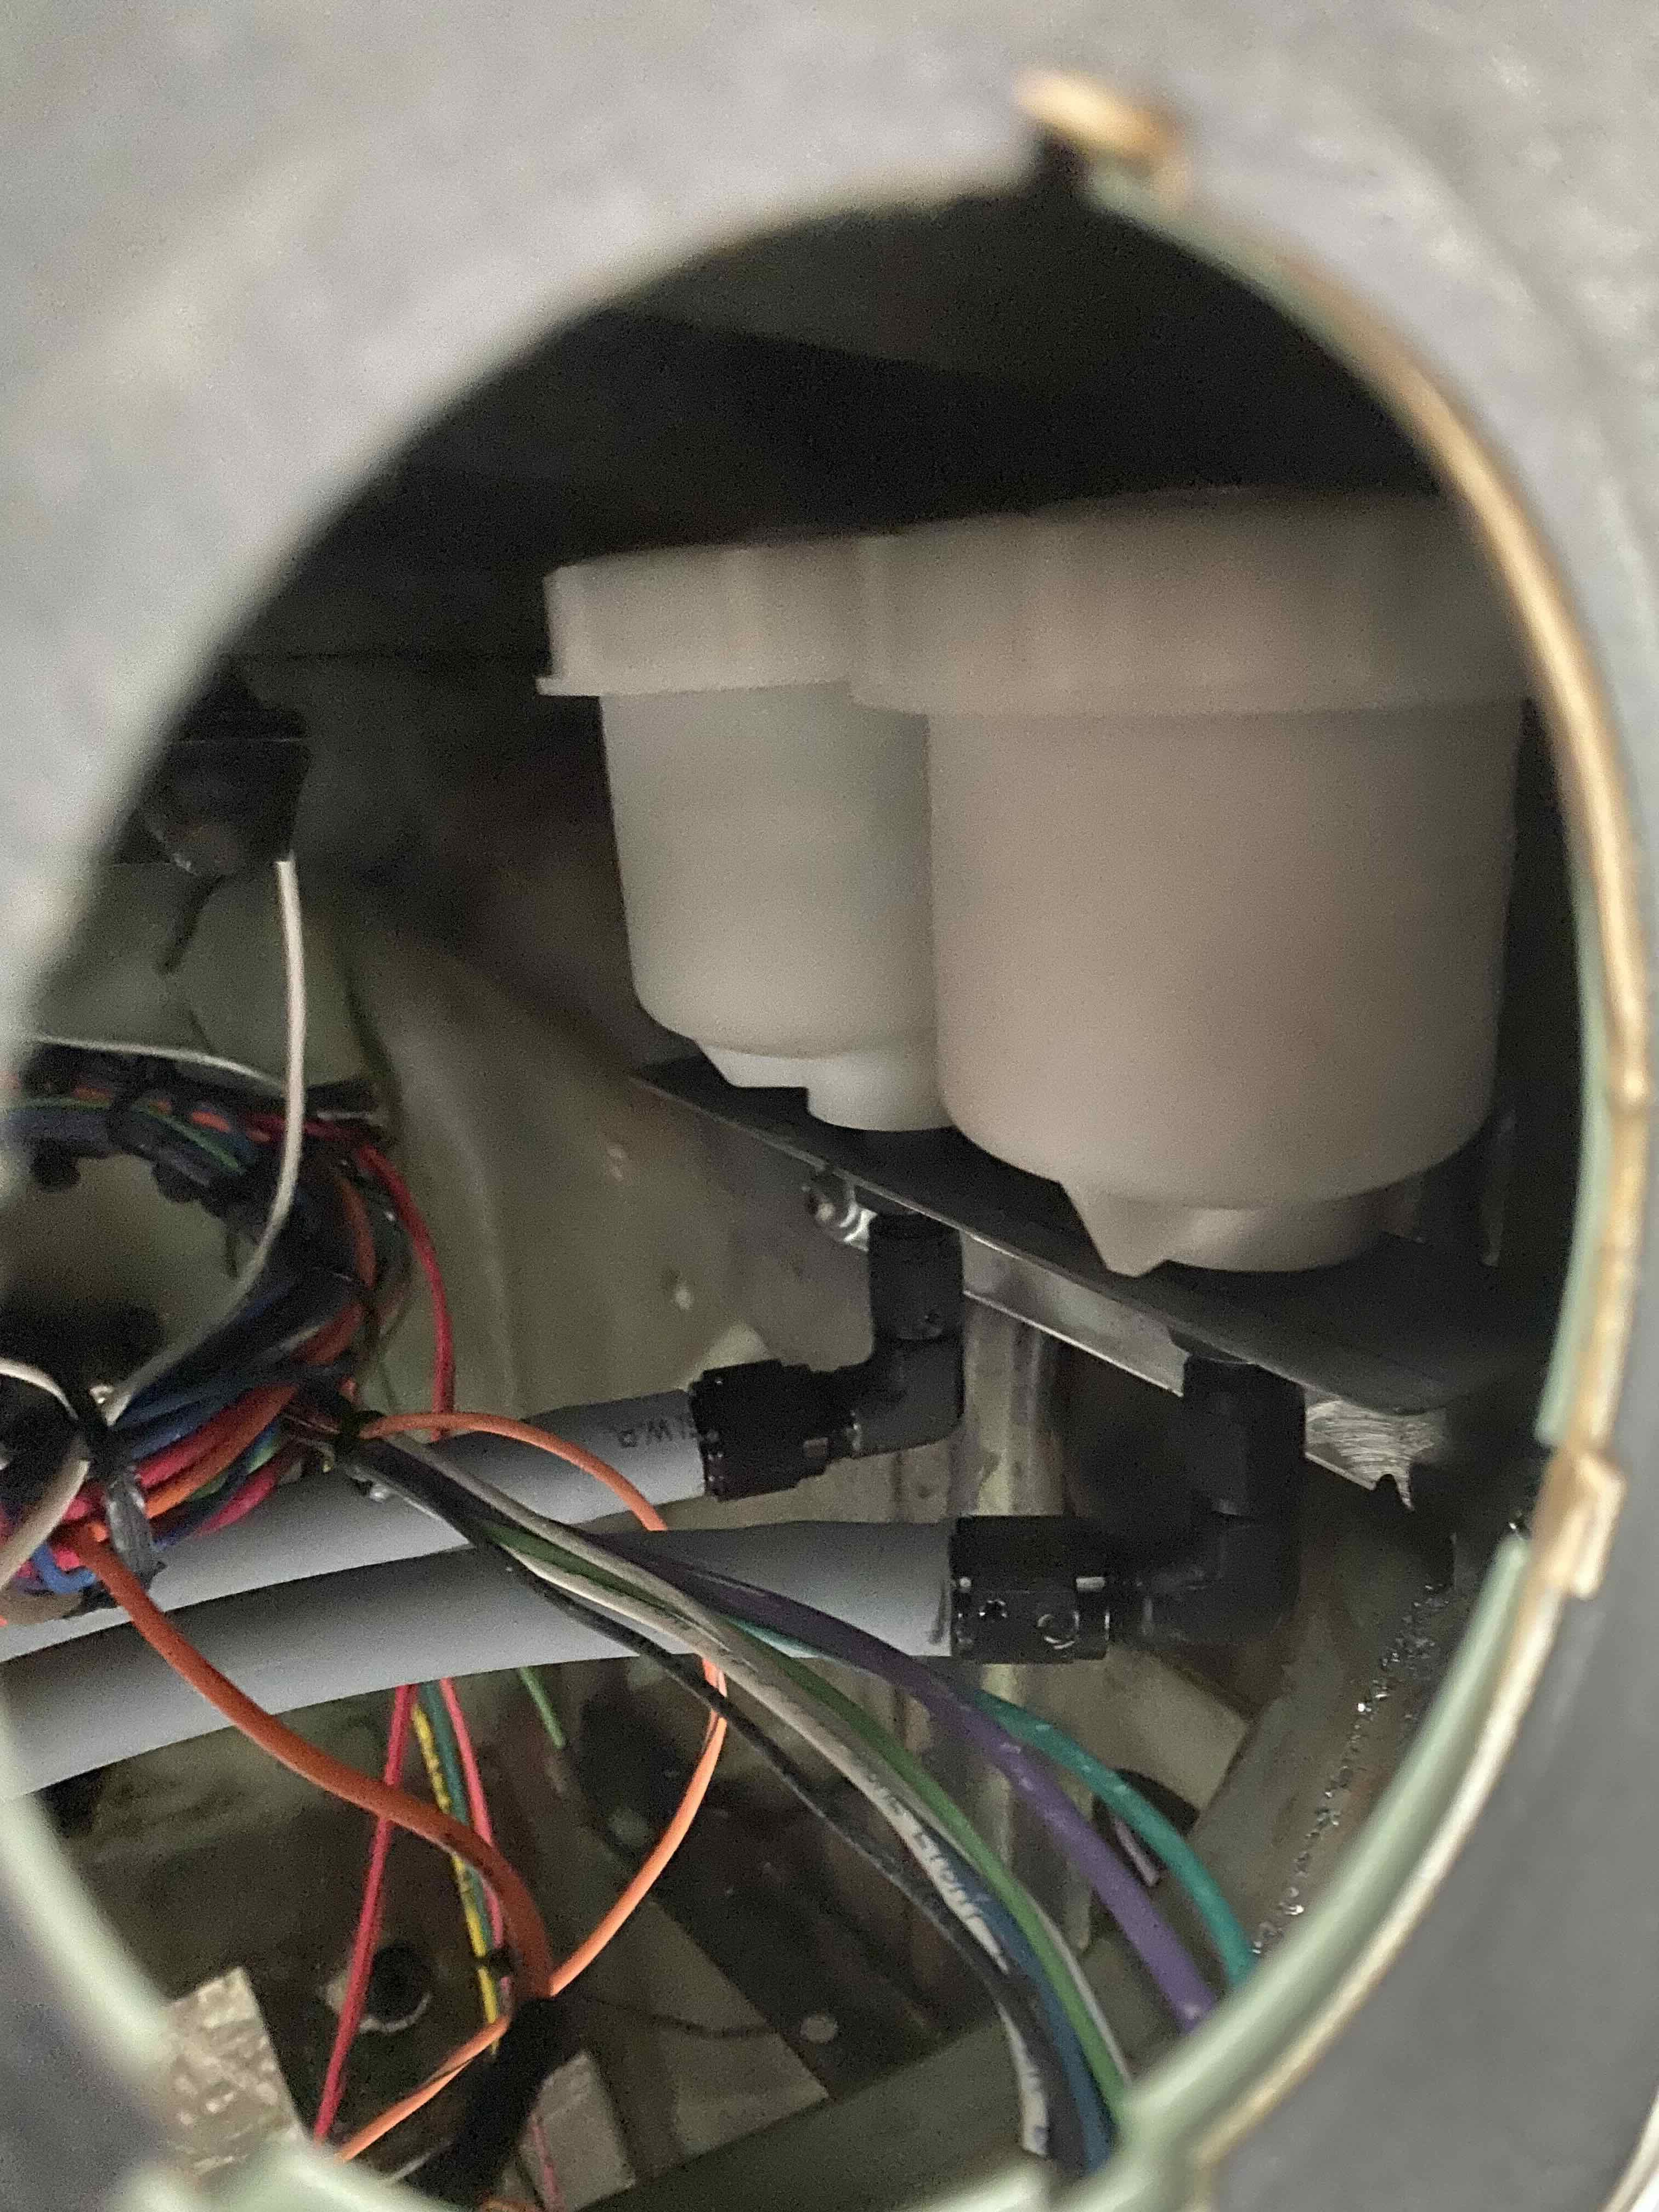
Thought I would carry on with brake stuff today and figure out what to do with master cylinders. I wasn’t too keen on them being in the engine bay so started poking round under the dash - still a bit of a birds nest under that needs wrapping. Turns out the clutch reservoir can go straight into the master which is a win. With the pedal box I can’t run the original vent hose so that frees up enough space to run the reservoirs behind the dash. Ill run the vent in the original hole which means I’ll be able to see in there to check levels. Will probably have to fill them with syringes but at least I’ve got midget hands so won’t be too much of a drama. The height works out nicely too- the hose has a slight fall from reservoir to master. Not 100% sure how the alloy fittings will hold up to brake fluid though. Good afternoons work.
- 55 replies
-
- 16
-
-
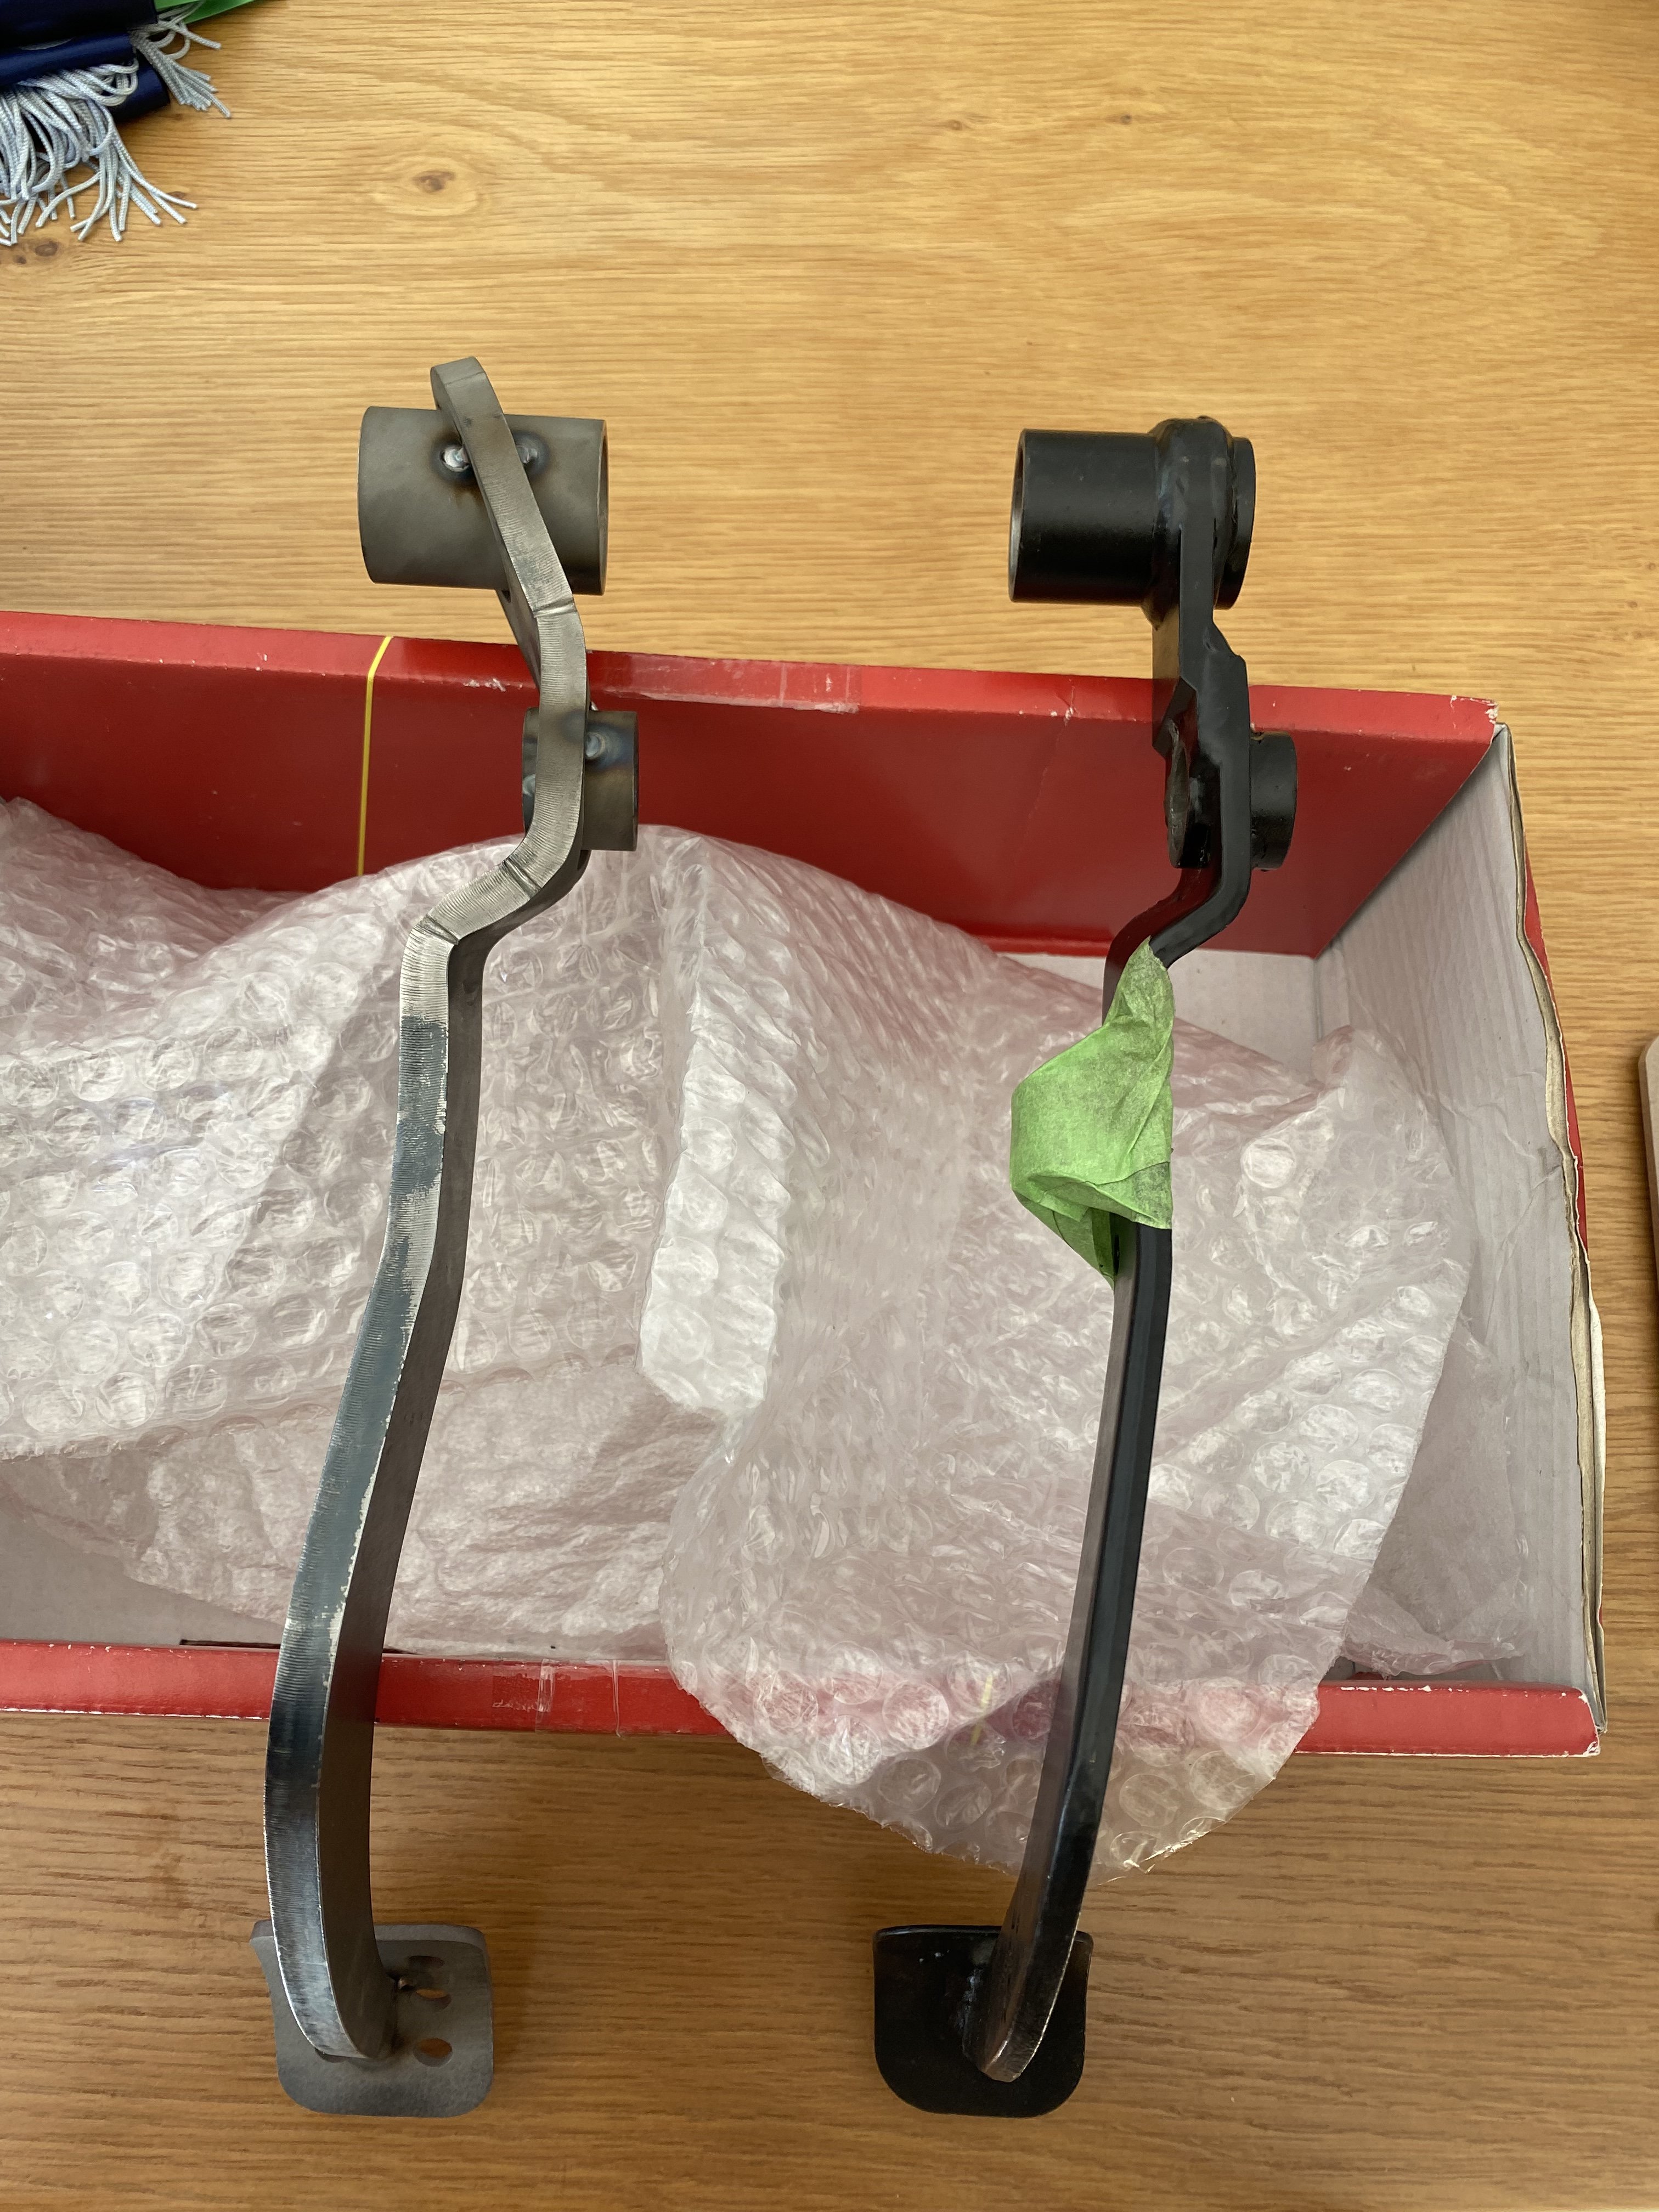
Cert spec brake pedal tacked up and sent back to me for a test fit.
- 55 replies
-
- 13
-
-
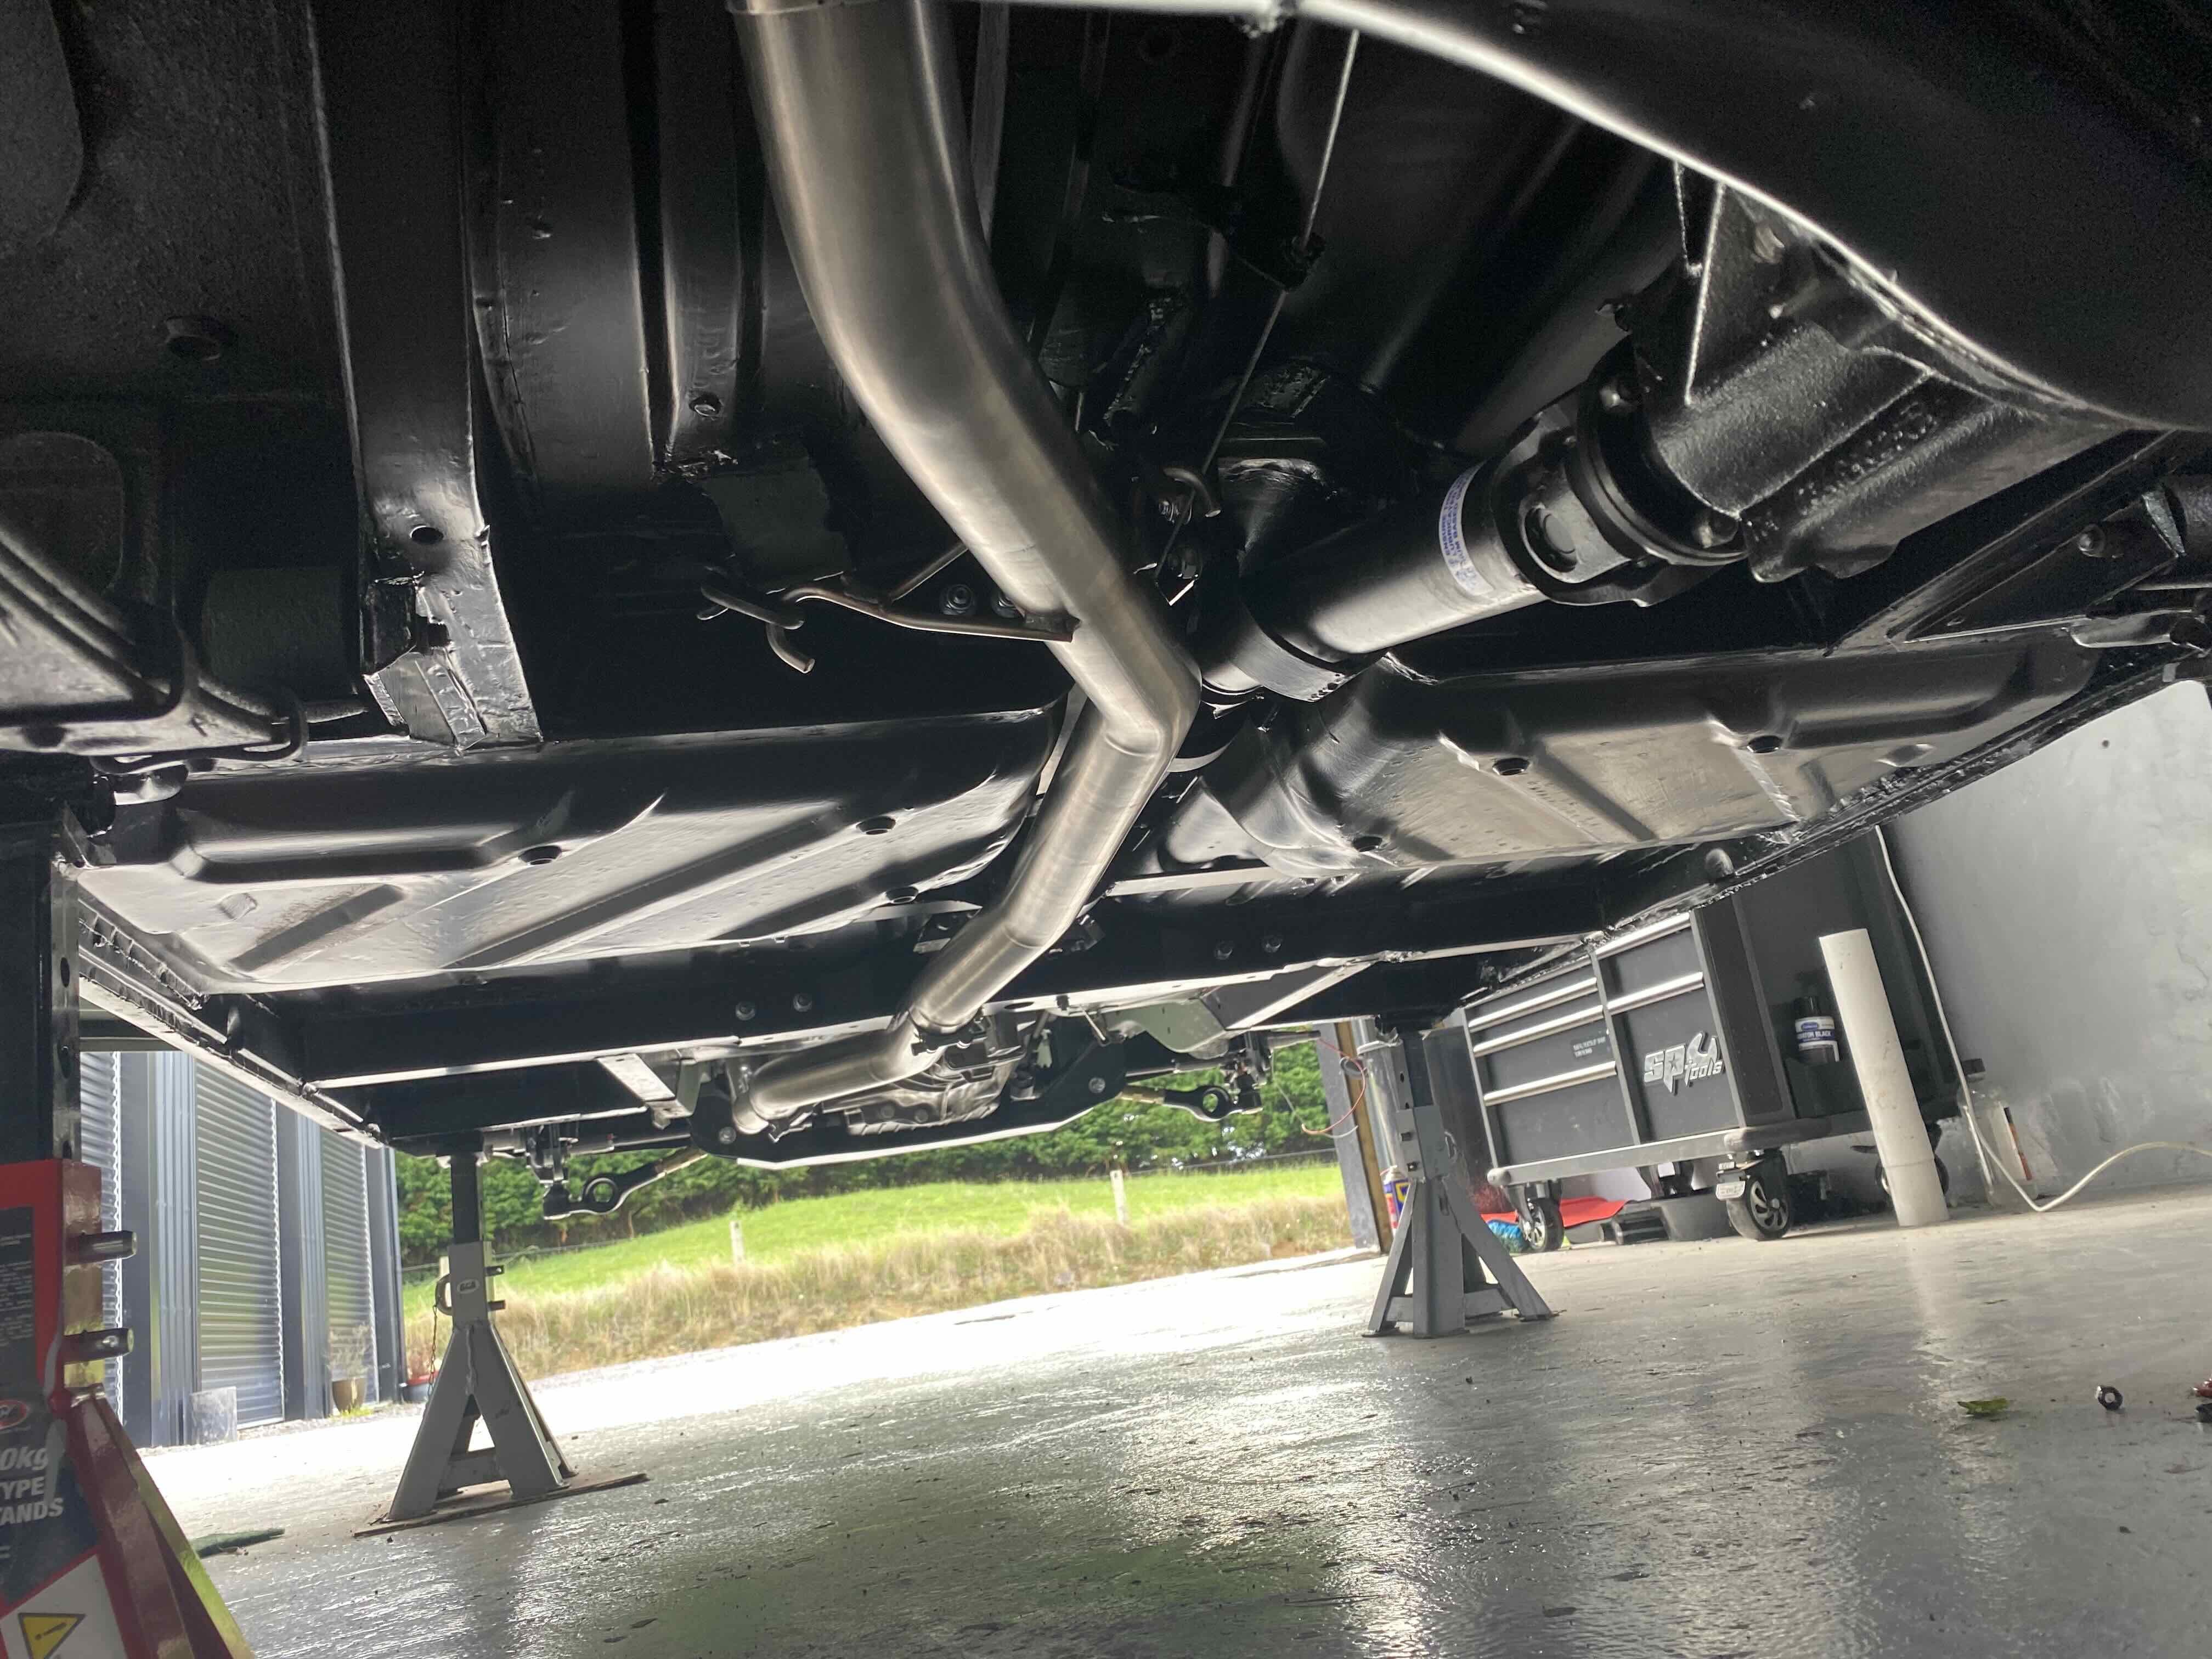
Work has been mental as result of the invasion of Ukraine so not too much time on old Doris over the last couple of weeks. Have still made some progress though. It’s getting pretty busy on the drivers side of the engine bay so whipped up a CAD battery to make sure I do have space- don’t really want to go down the path of mounting in the boot. That does limit my battery choice though- I’ll be going with an oddesey of some sort. Alloy hubs arrived and gave me the clearance I needed- might still run some 8mm front spacers maybe. Front end nearly done now. Made some new front brake hard lines too.
- 55 replies
-
- 19
-
-
Hopefully I’ll get to see that one in person one day!
-
Even if it only makes 170 it will still be about double what had previously!
-
Just the one sadly, it has been in and out a couple of times but hopefully in for good now.
-
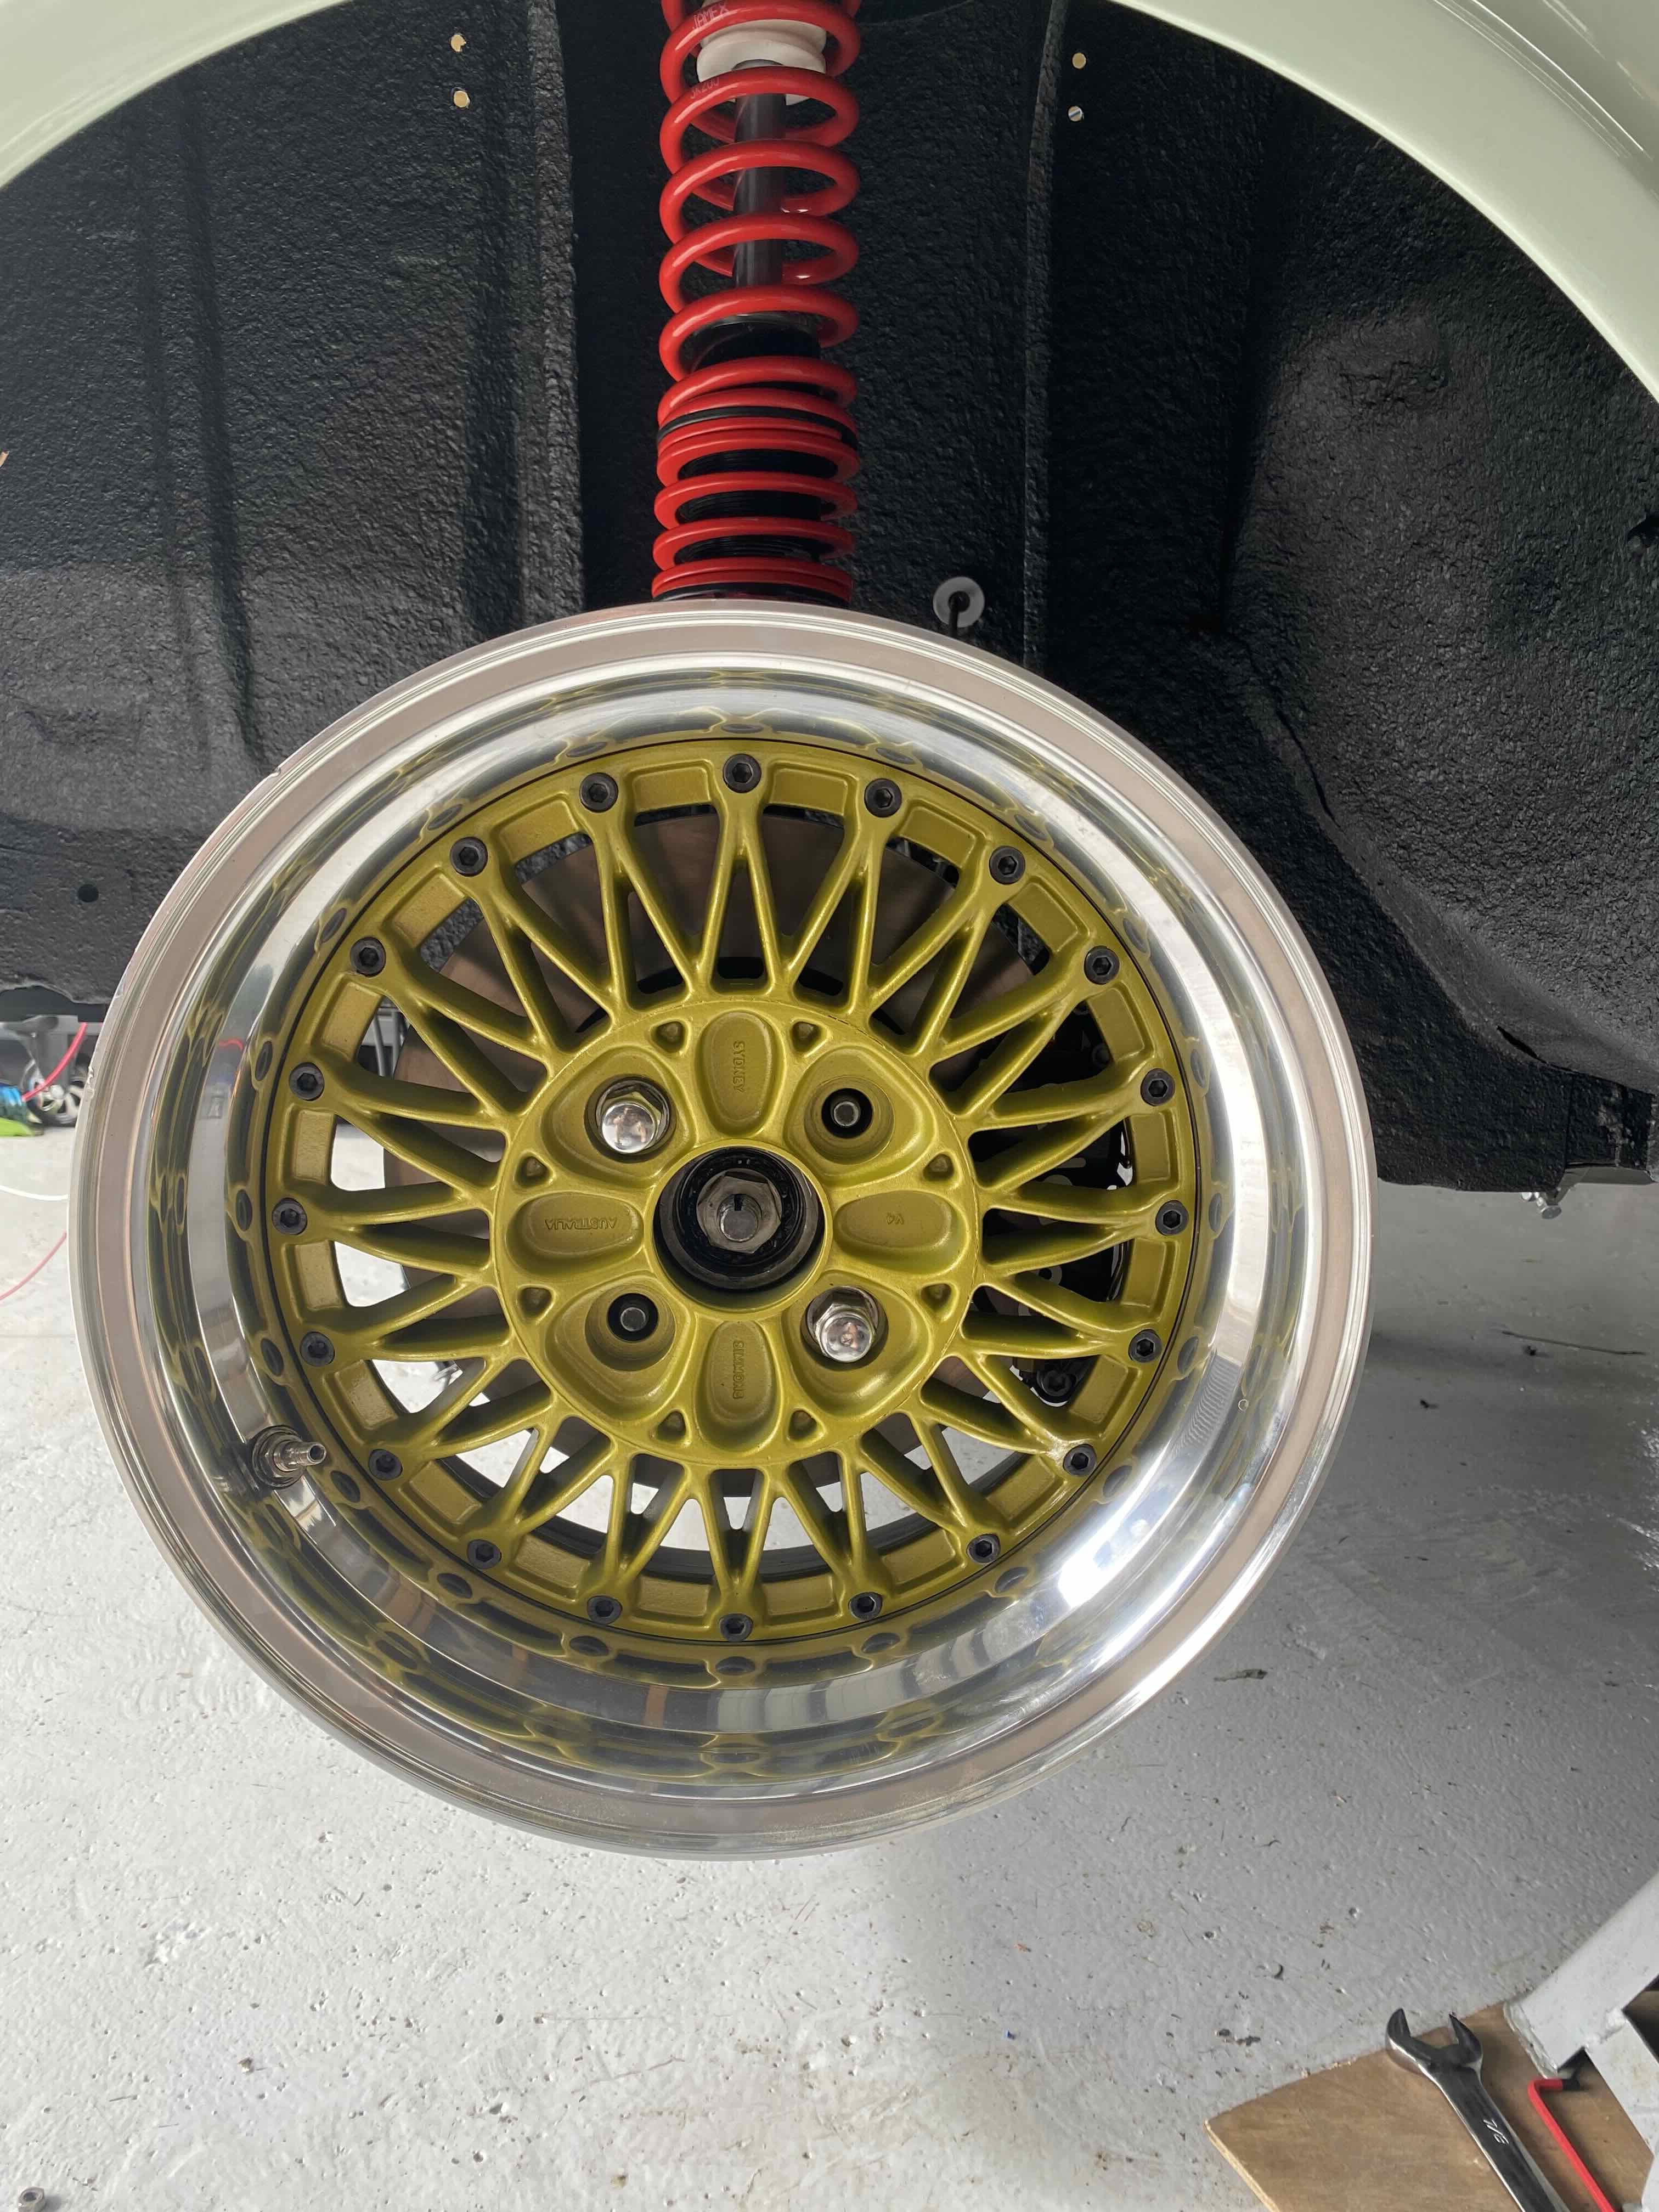
Old wheels fit better but no harm in them coming out 10mm
-
Also started some wiring …
-
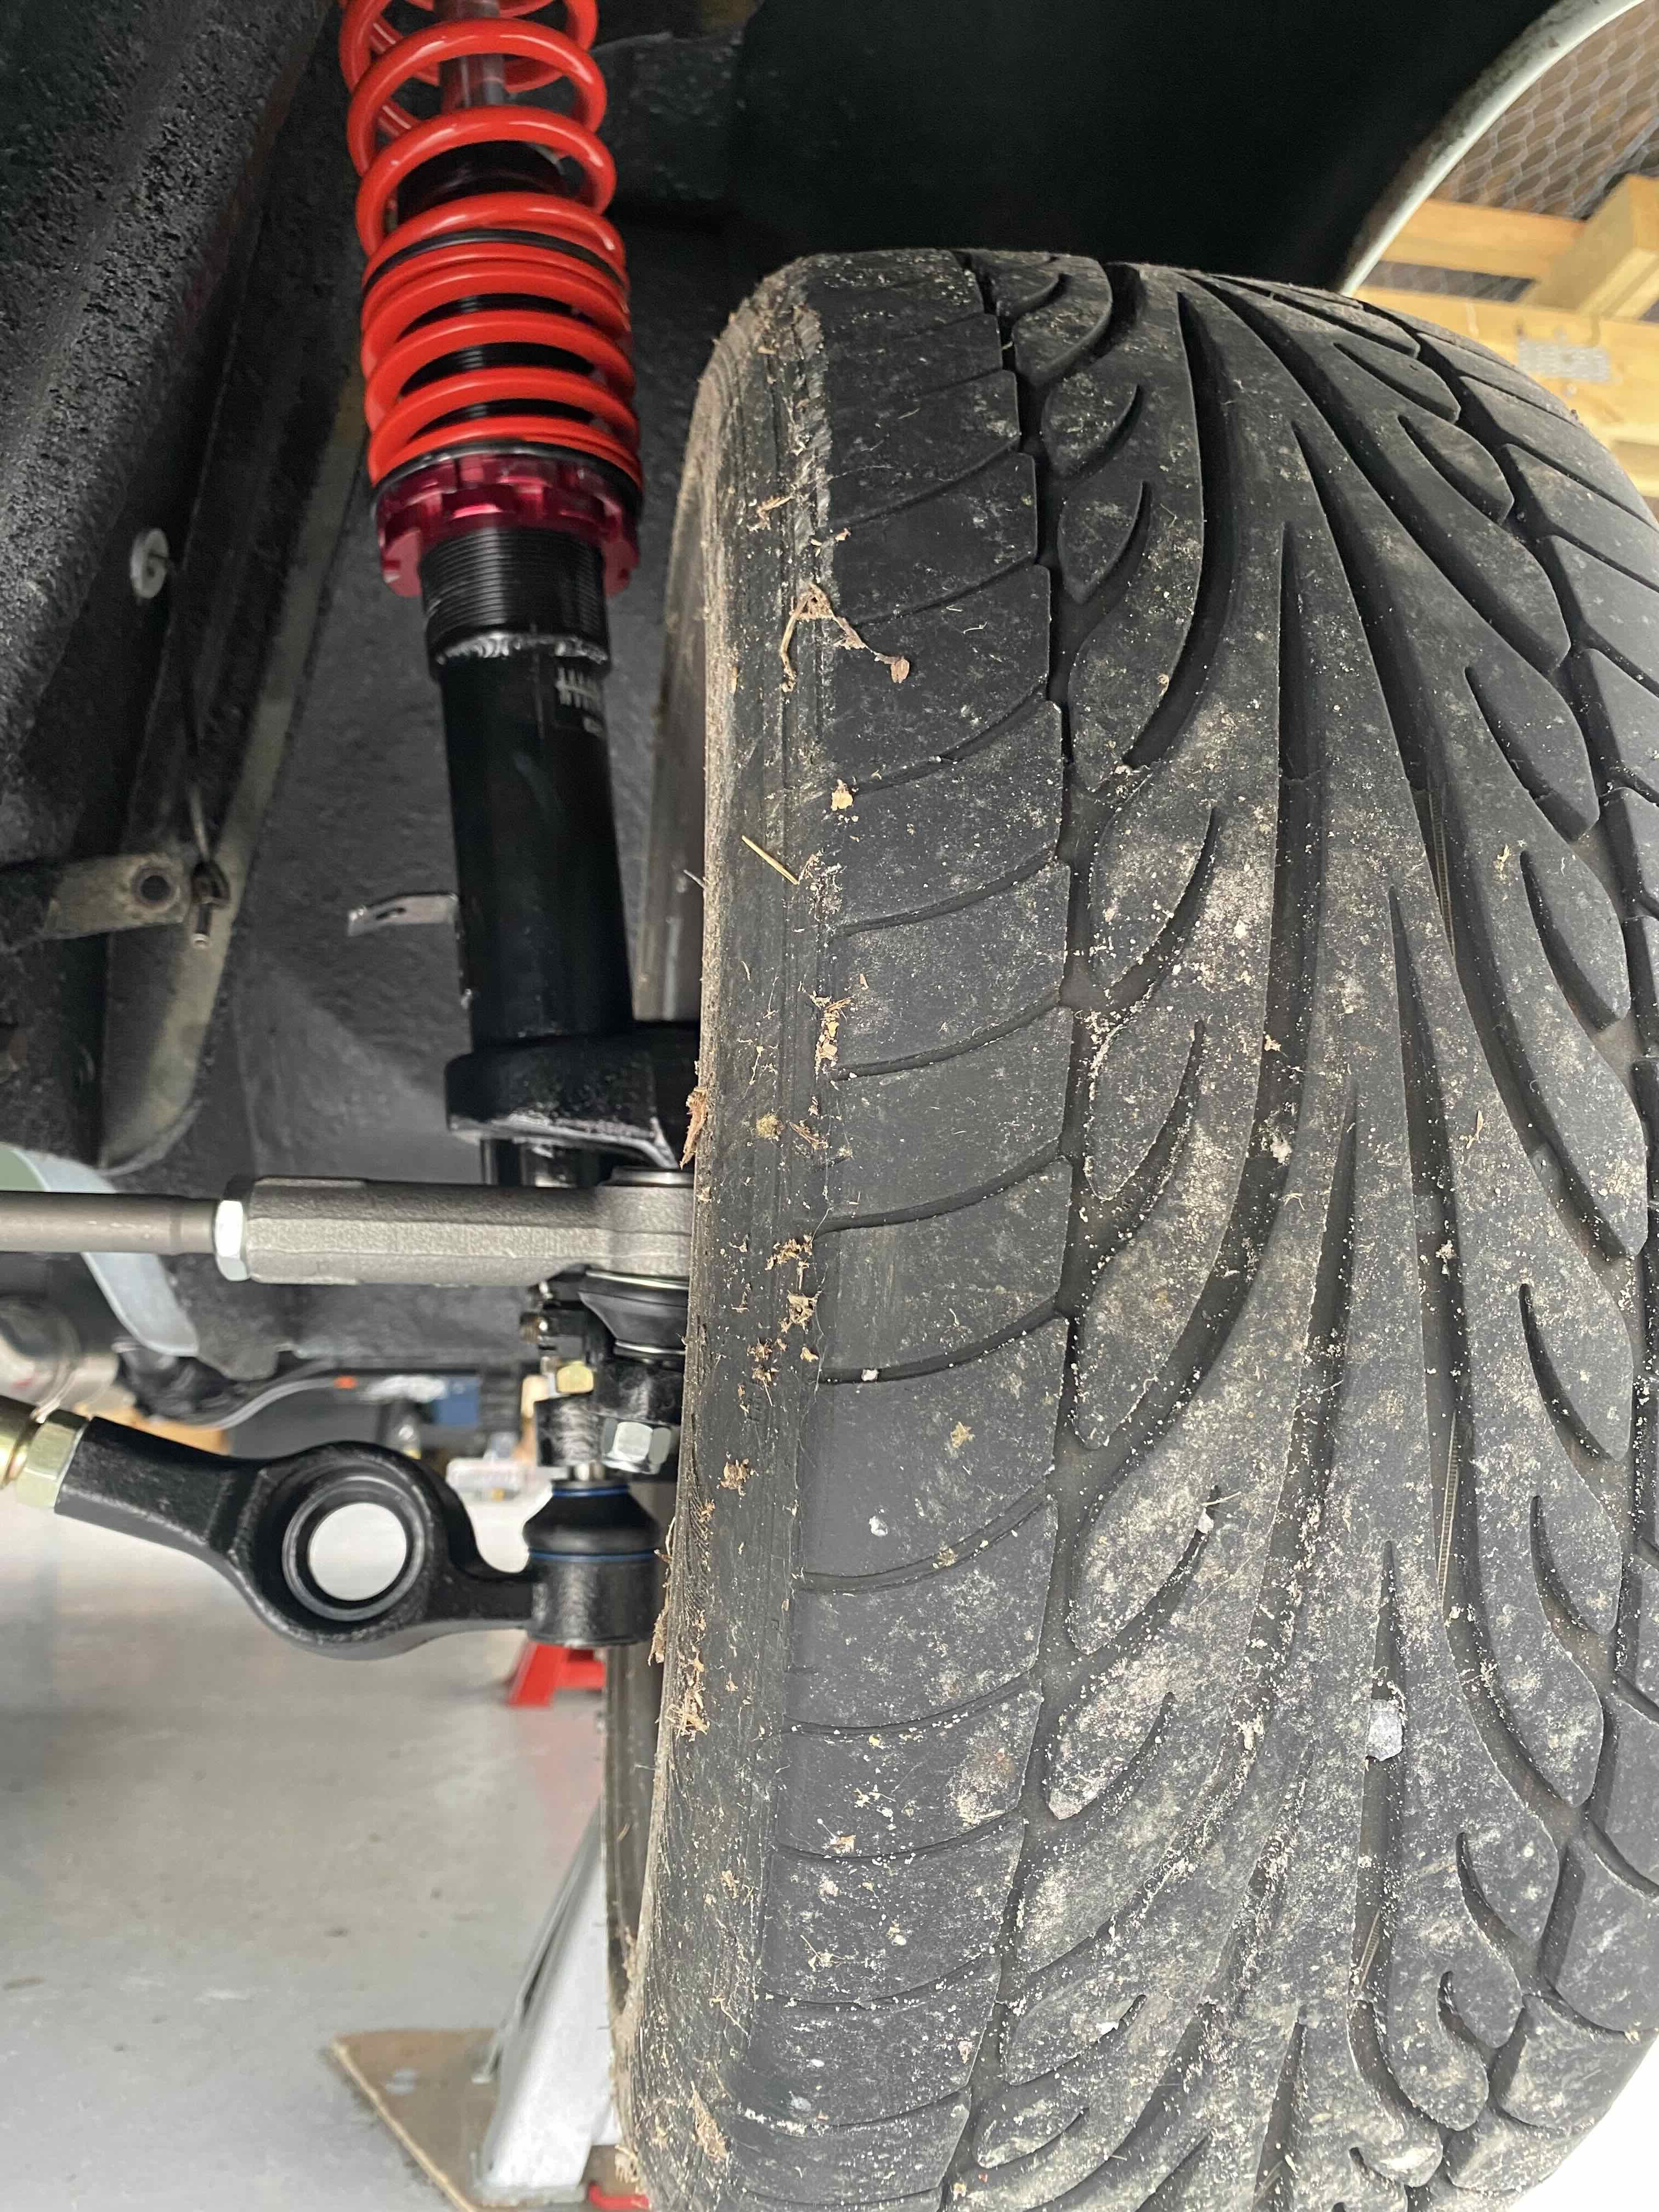
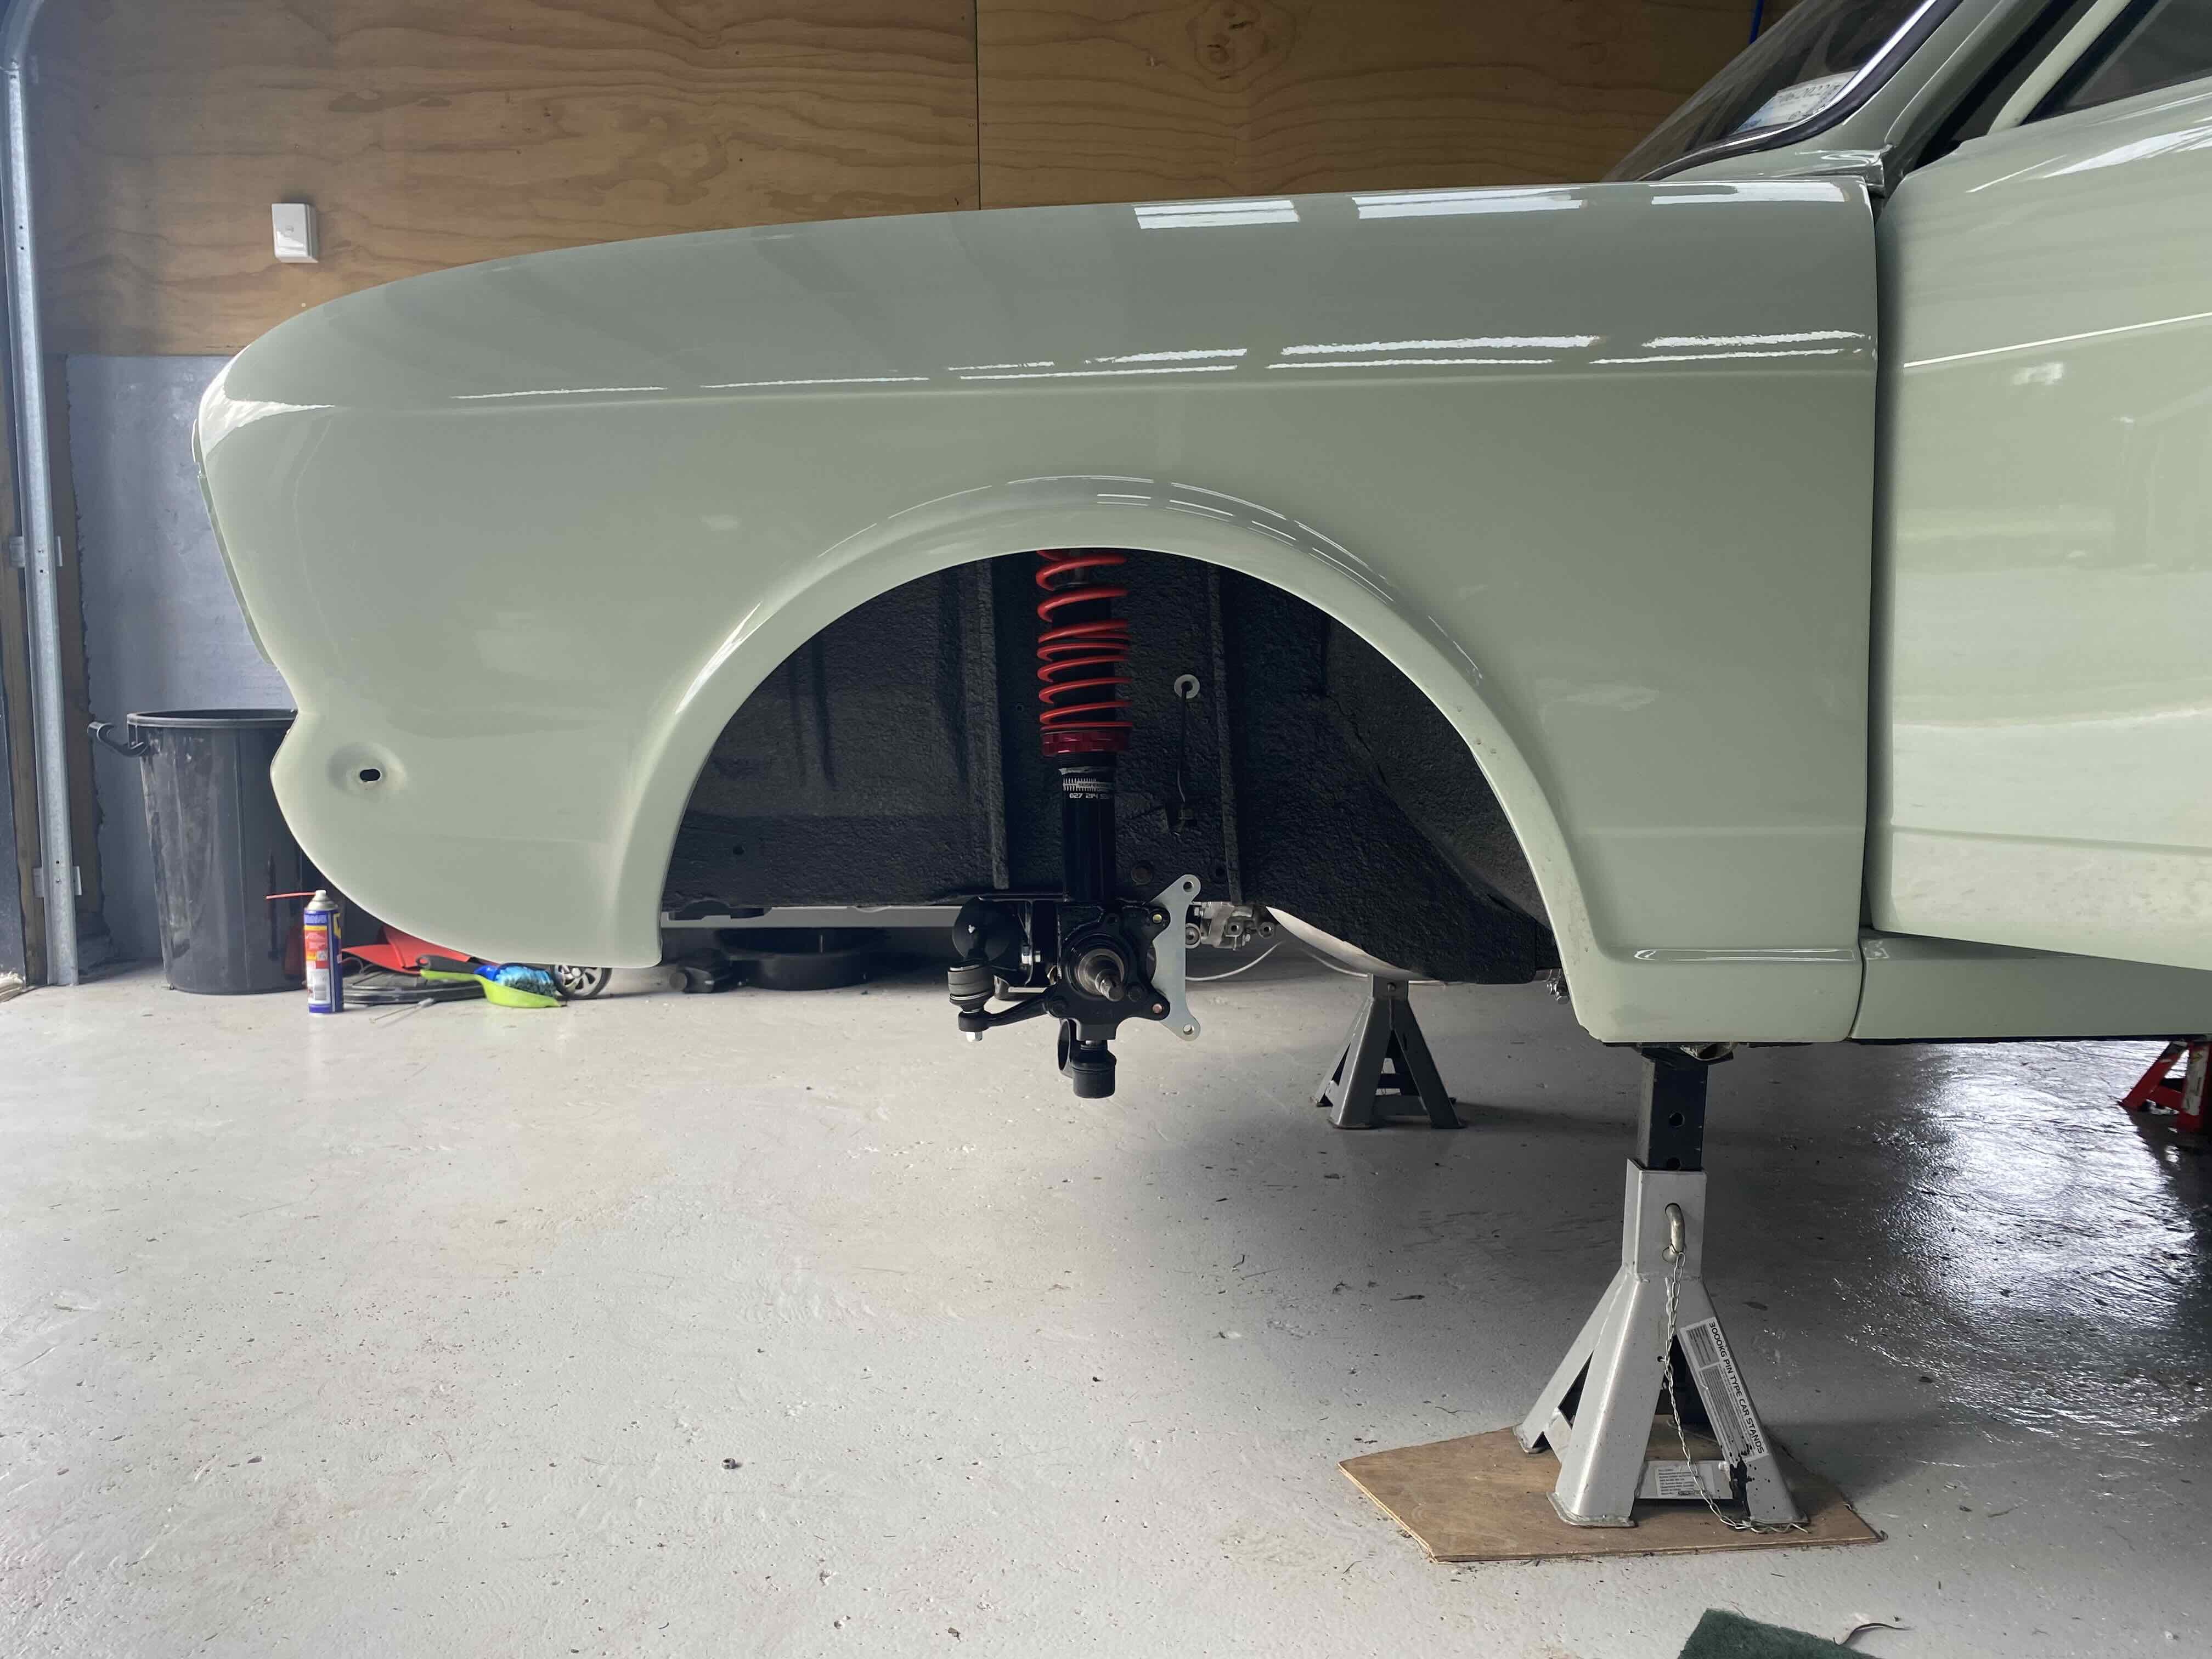
Bit of a one step forward one step back kind of day today. Wilwoods fitted and they fit with my wheels with no issues. But not quite the same with the strut… it was a 50/50 as to whether this would work with standard Capri hubs. Got plenty of space plenty of space to go outwards so not a huge issue I guess. Will probably get some +10mm alloy hubs rather than going spacers. Can still get some 5mm spacers if I need it with the hubs.
-
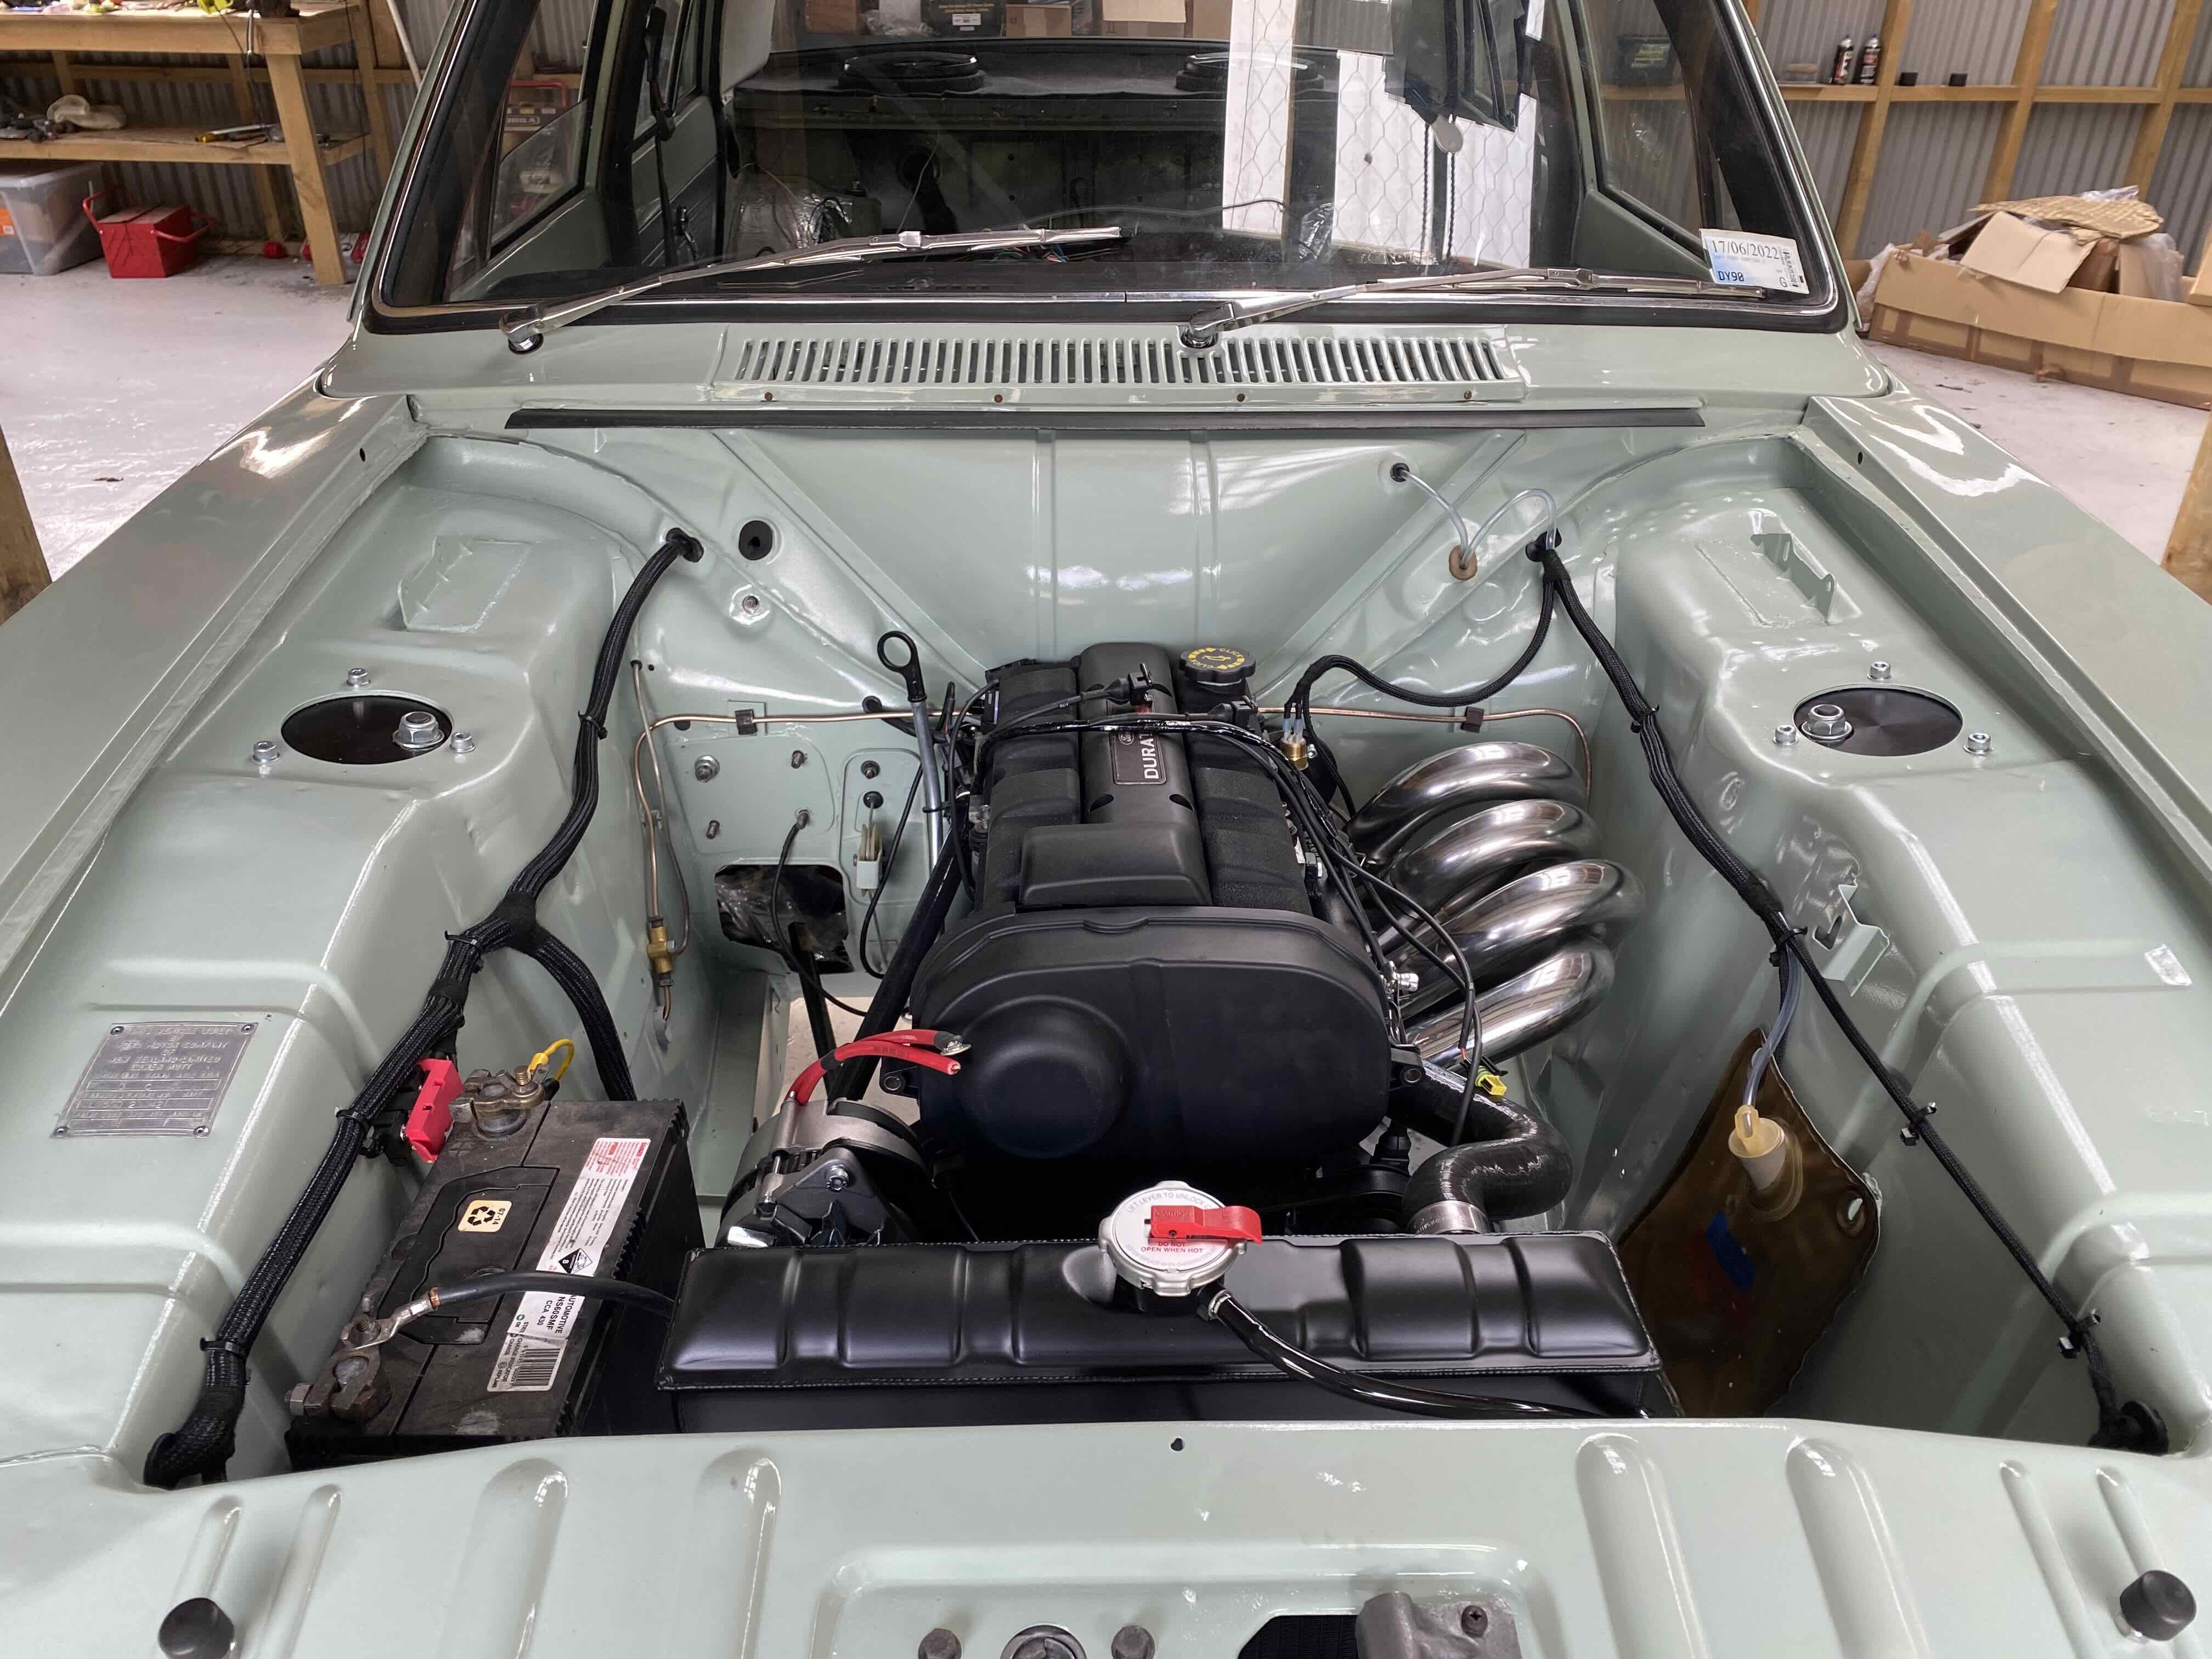
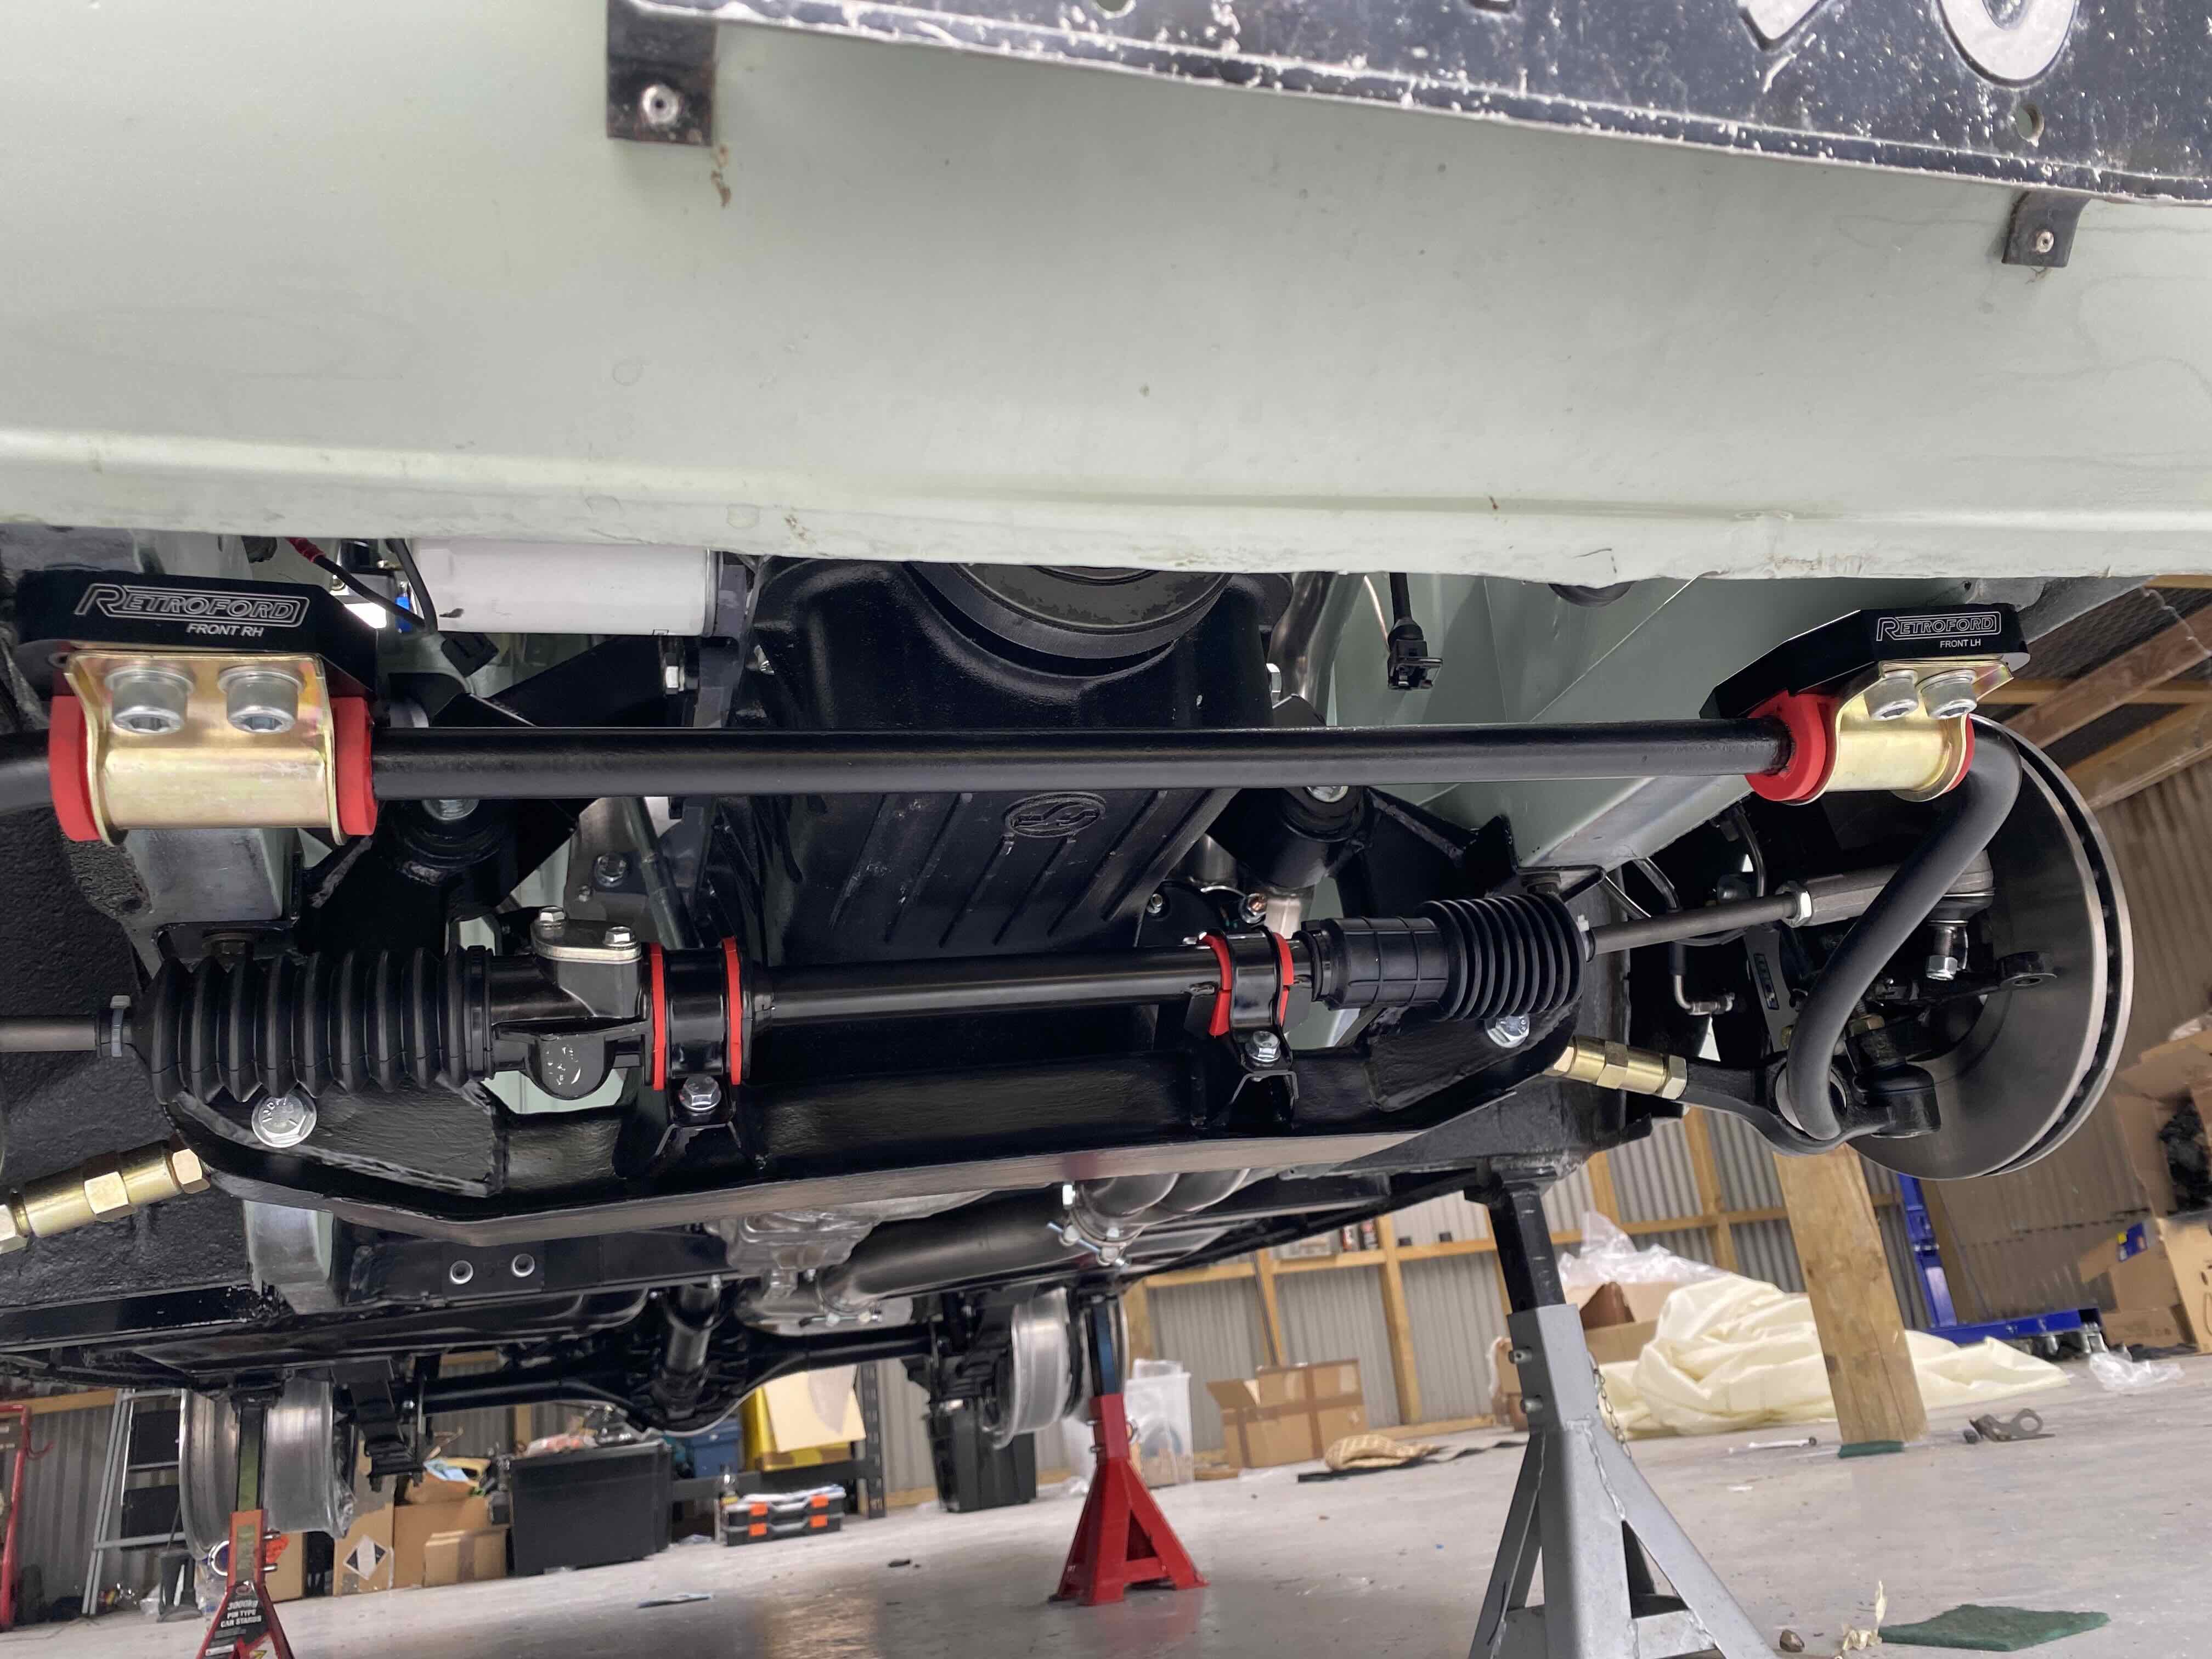
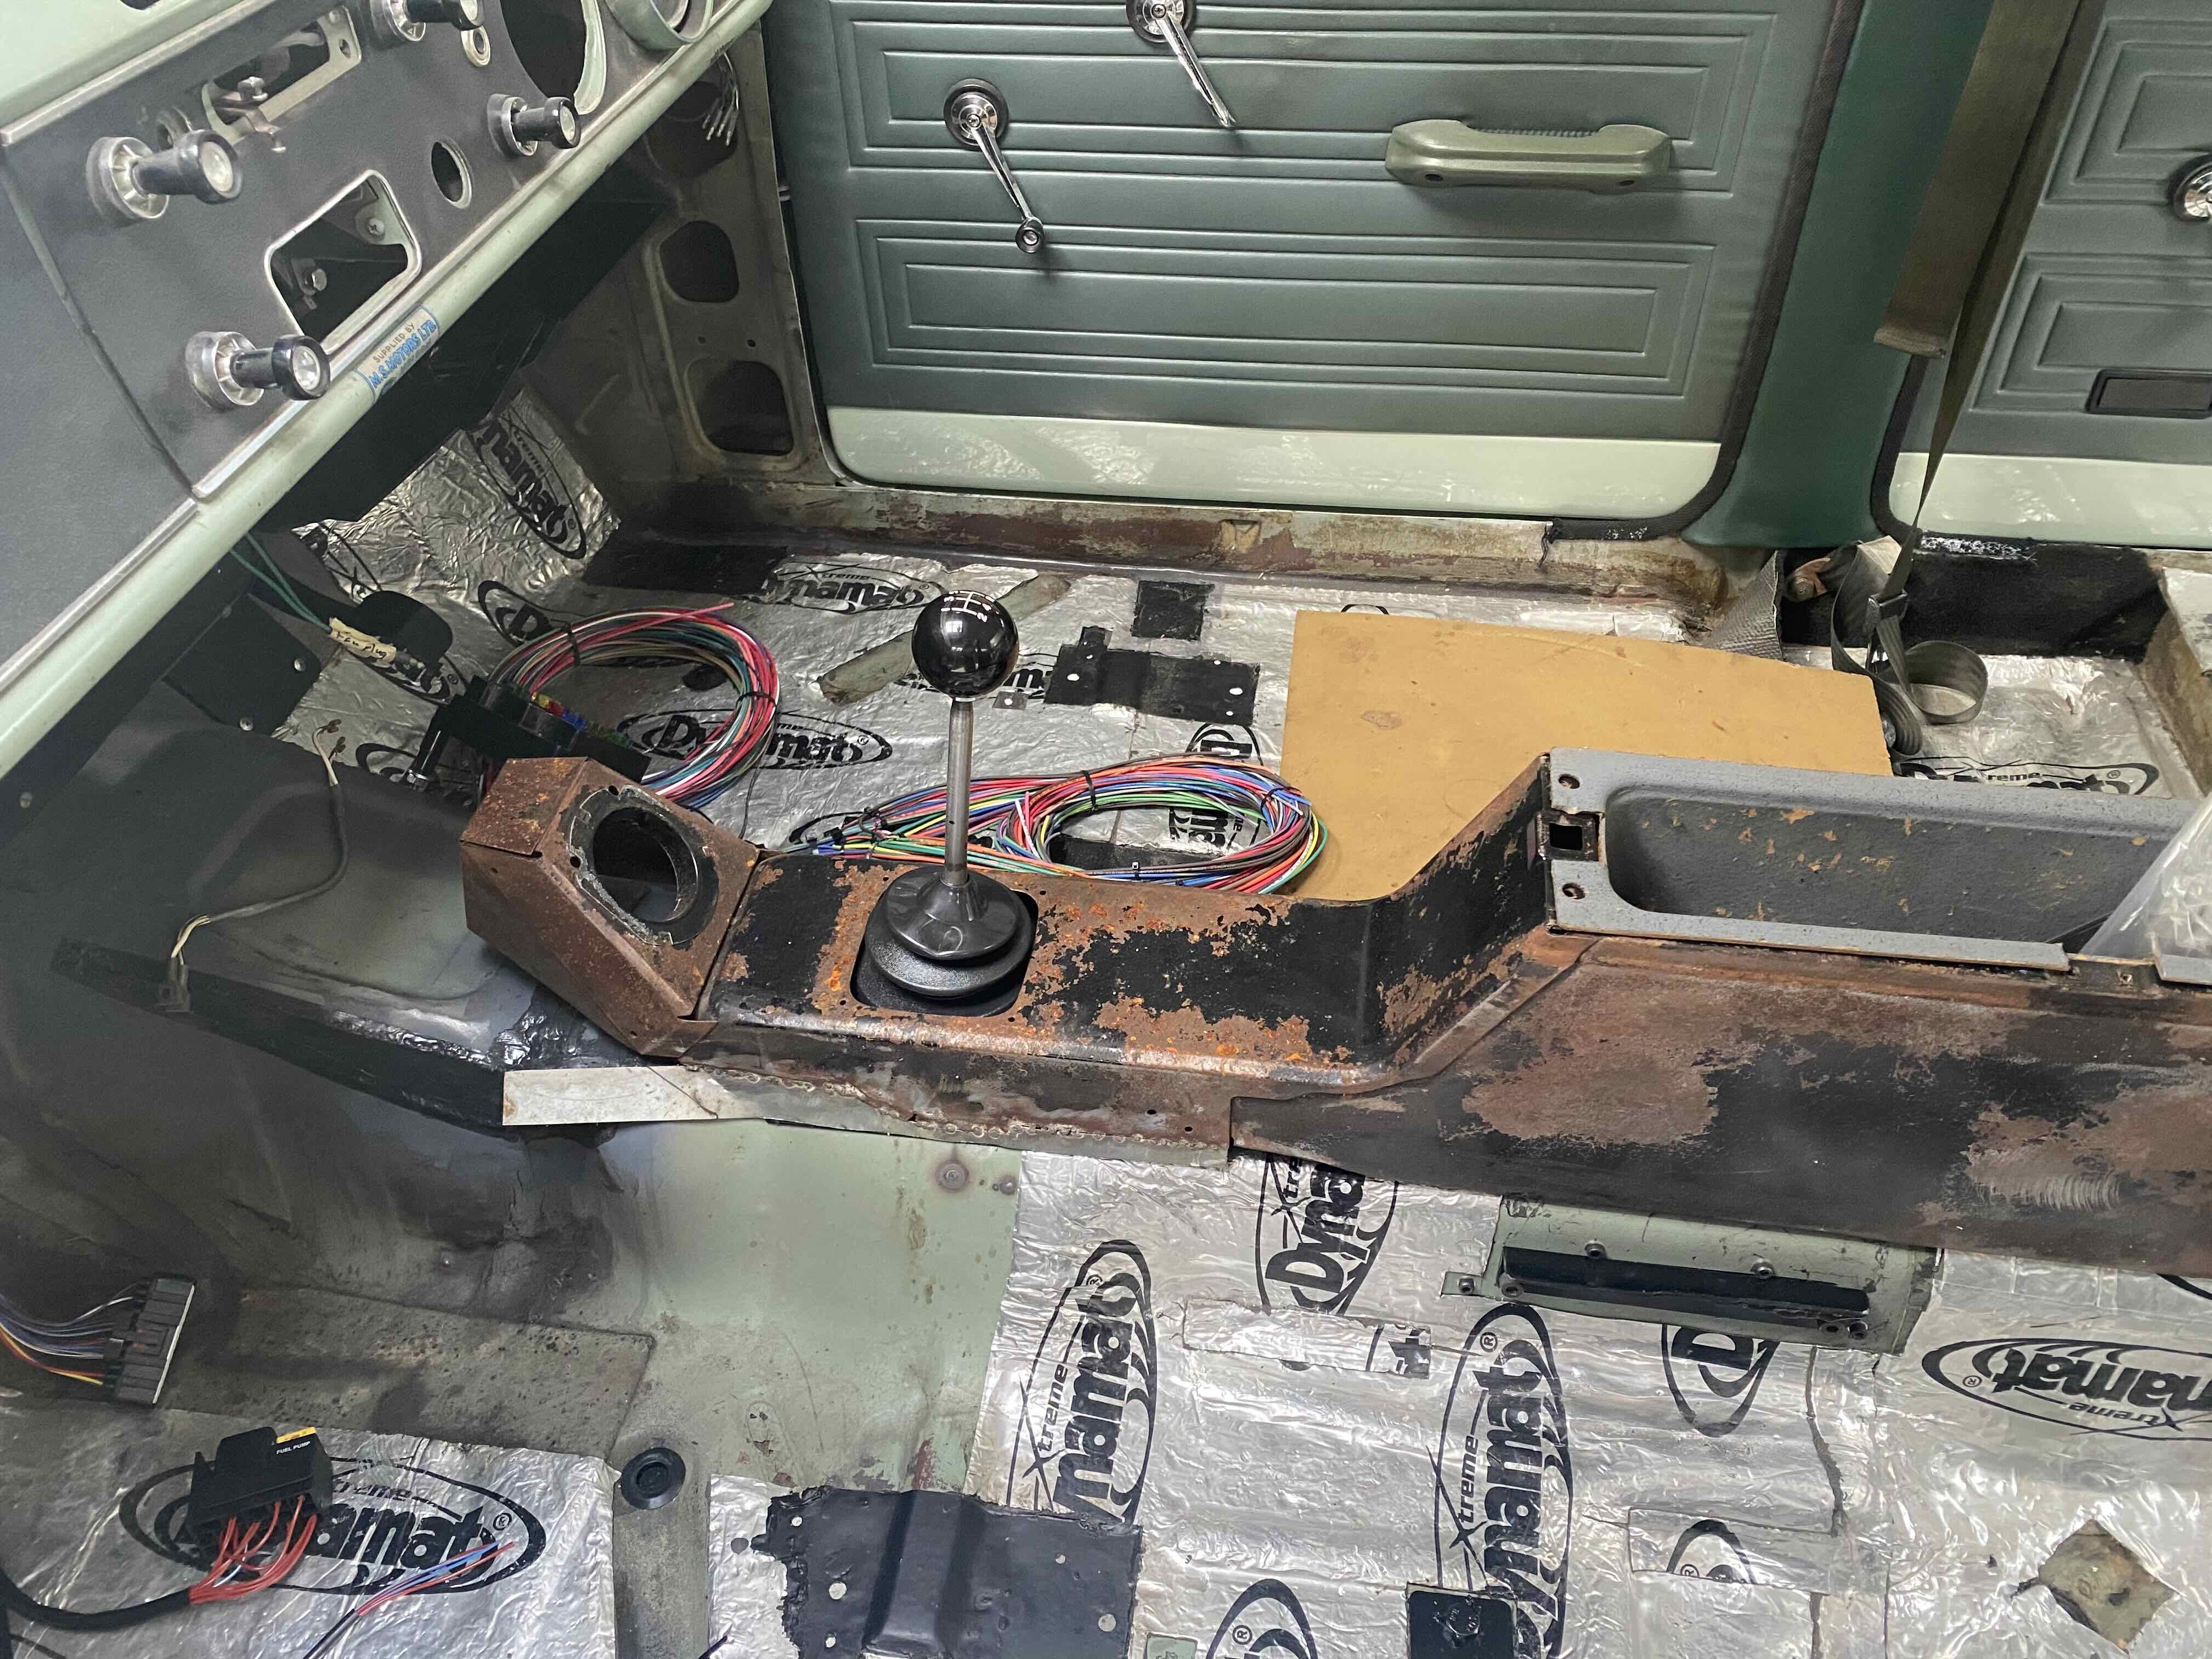
More work done during the week, new alloy radiator painted black and fitted- came with a nice spal fan. Have fitted the driveshaft and two hoops, exhaust fitted. New handbrake cable after modifications the routing to work with everything going on under neath now. New struts have gone in, after trying a couple of second hand escort sways bars that have turned out to be fairly rusty I’ve ordered a brand new one that should be here next week. Have to change the female fittings on the brake hardline to fit my braided lines. Rack in now too. Started playing around with the centre console to fit again after changing the trans tunnel. Will be wrapped in black vinyl, I think going green will be too much. Can also see the under dash parcel tray there too. Next big job is wiring, trying to figure out where to put the fuse box and ecu is going to be a bit of a challenge. Mine is a series 1 so hasn’t ever had a fuse box so will be good to update. Brake pedal is at Fraser Cars in AK getting copied and made to cert standards.
- 55 replies
-
- 20
-
-
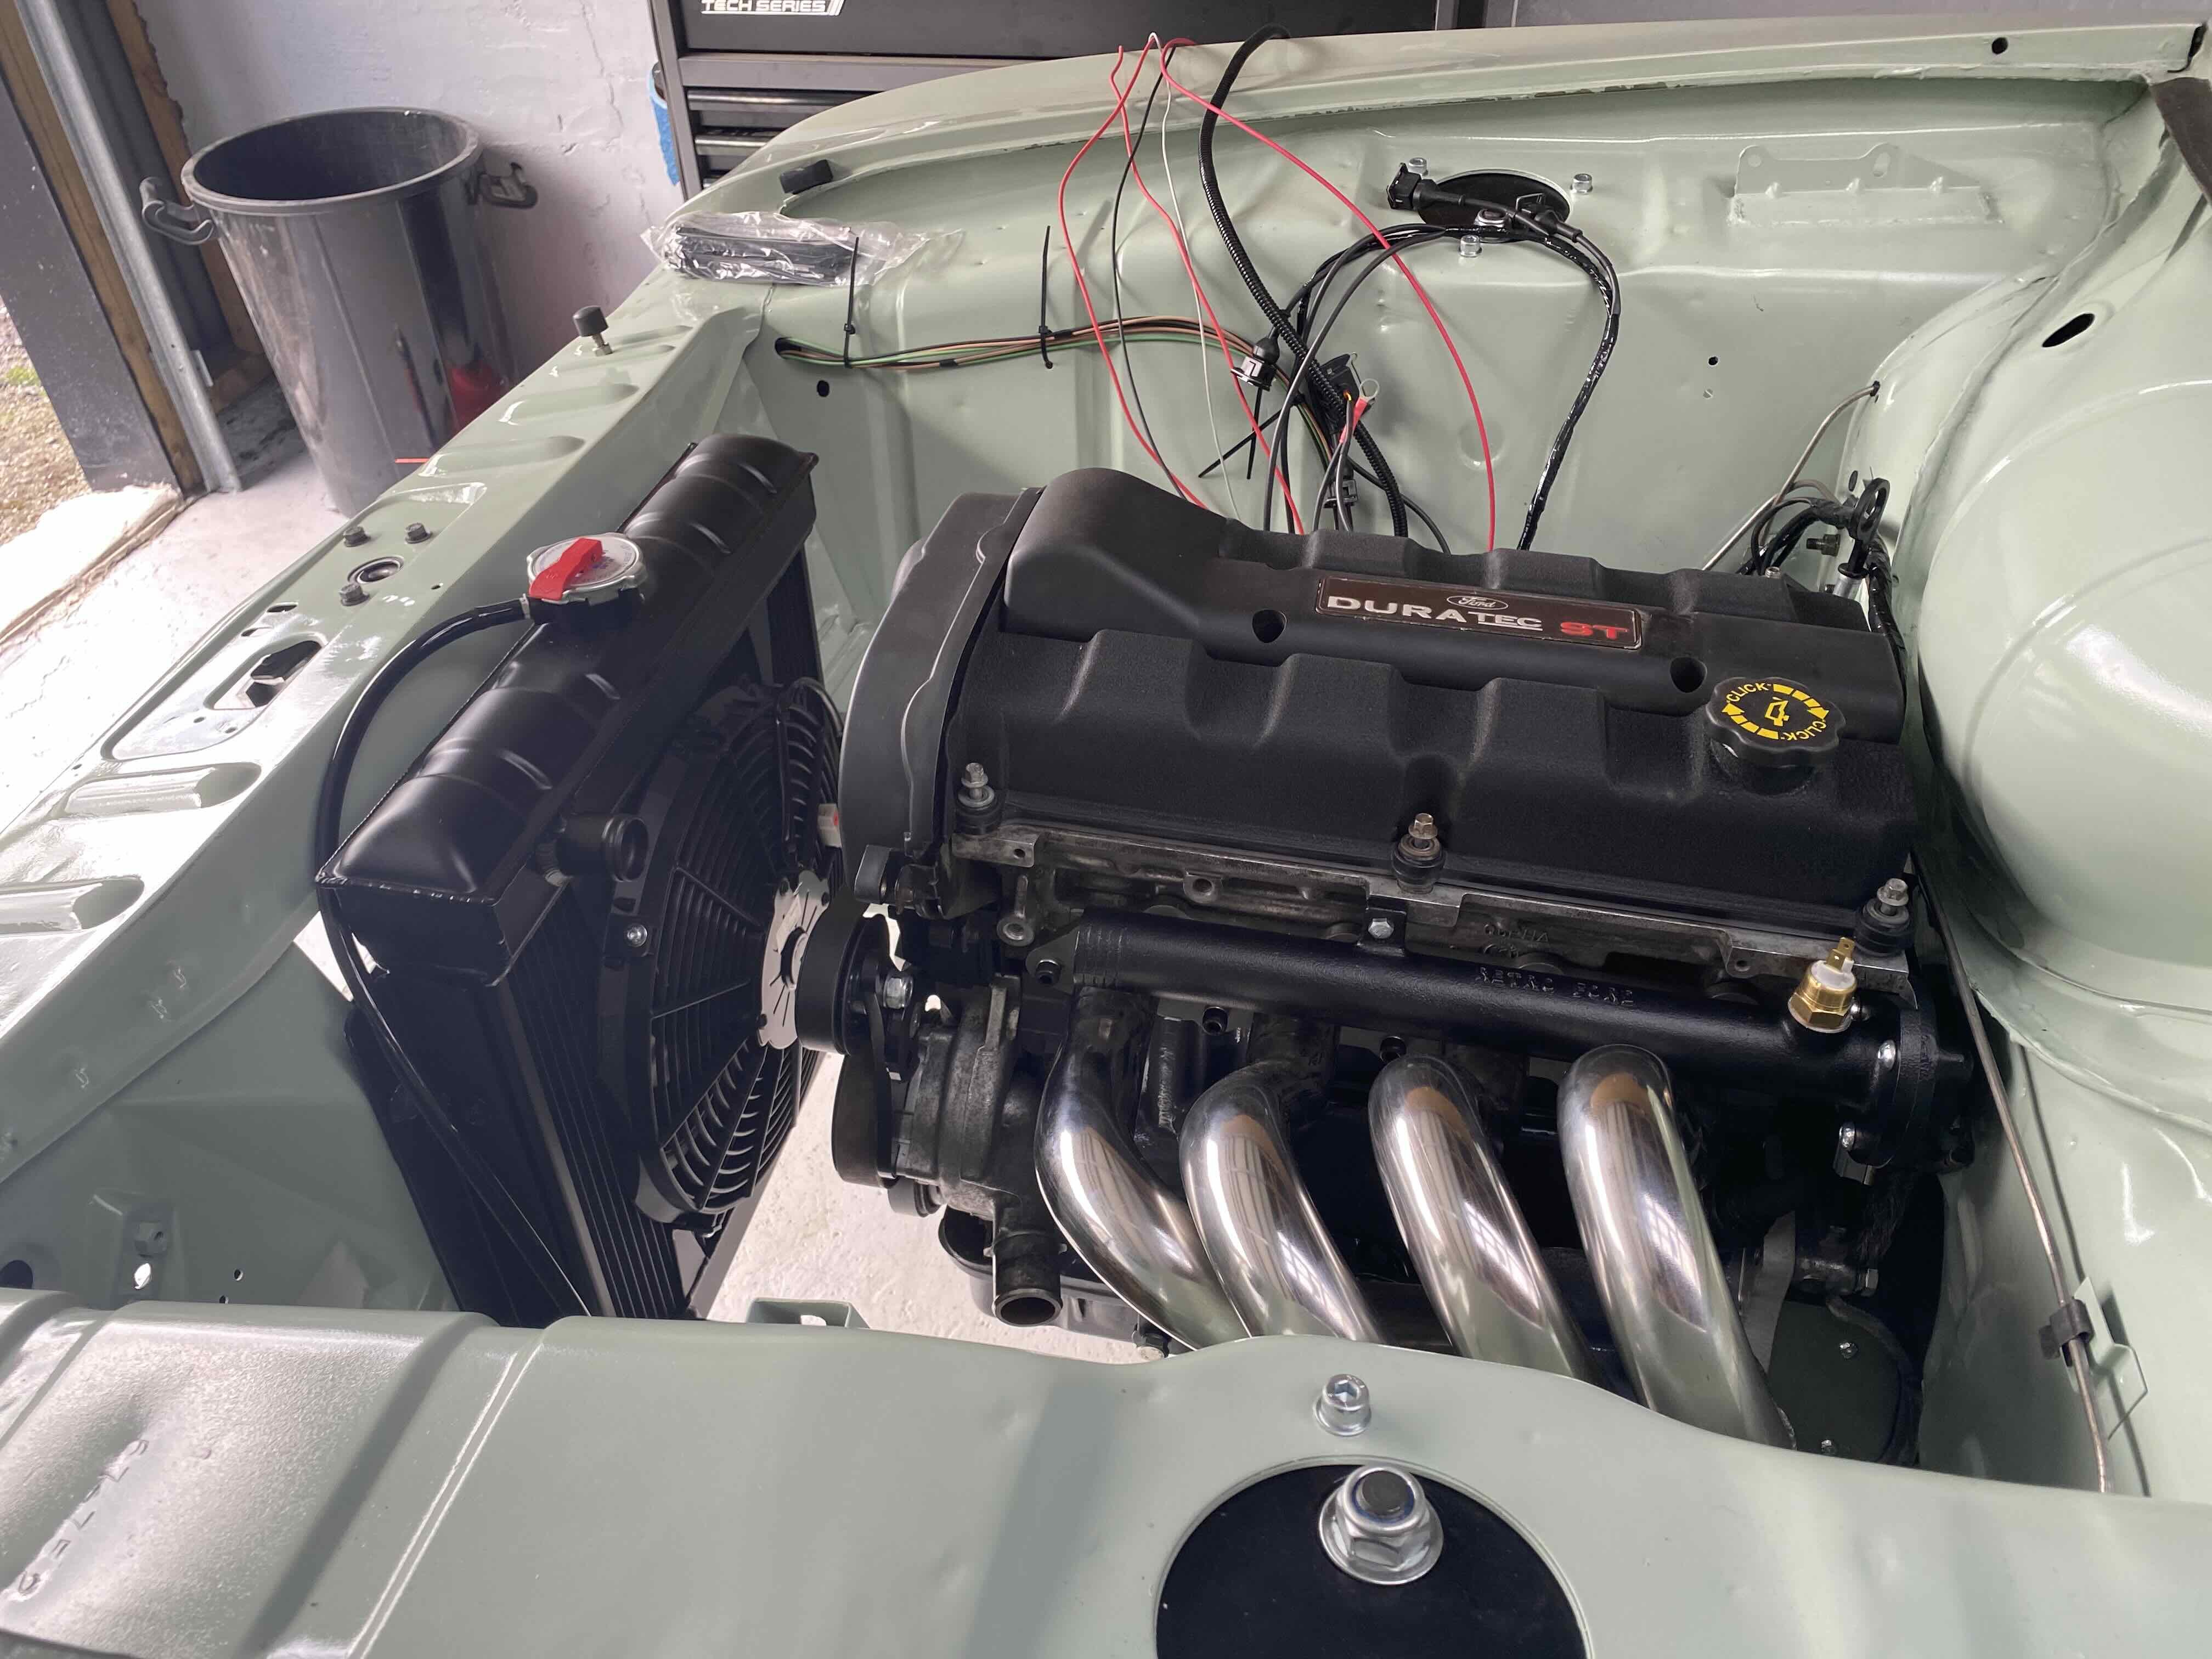
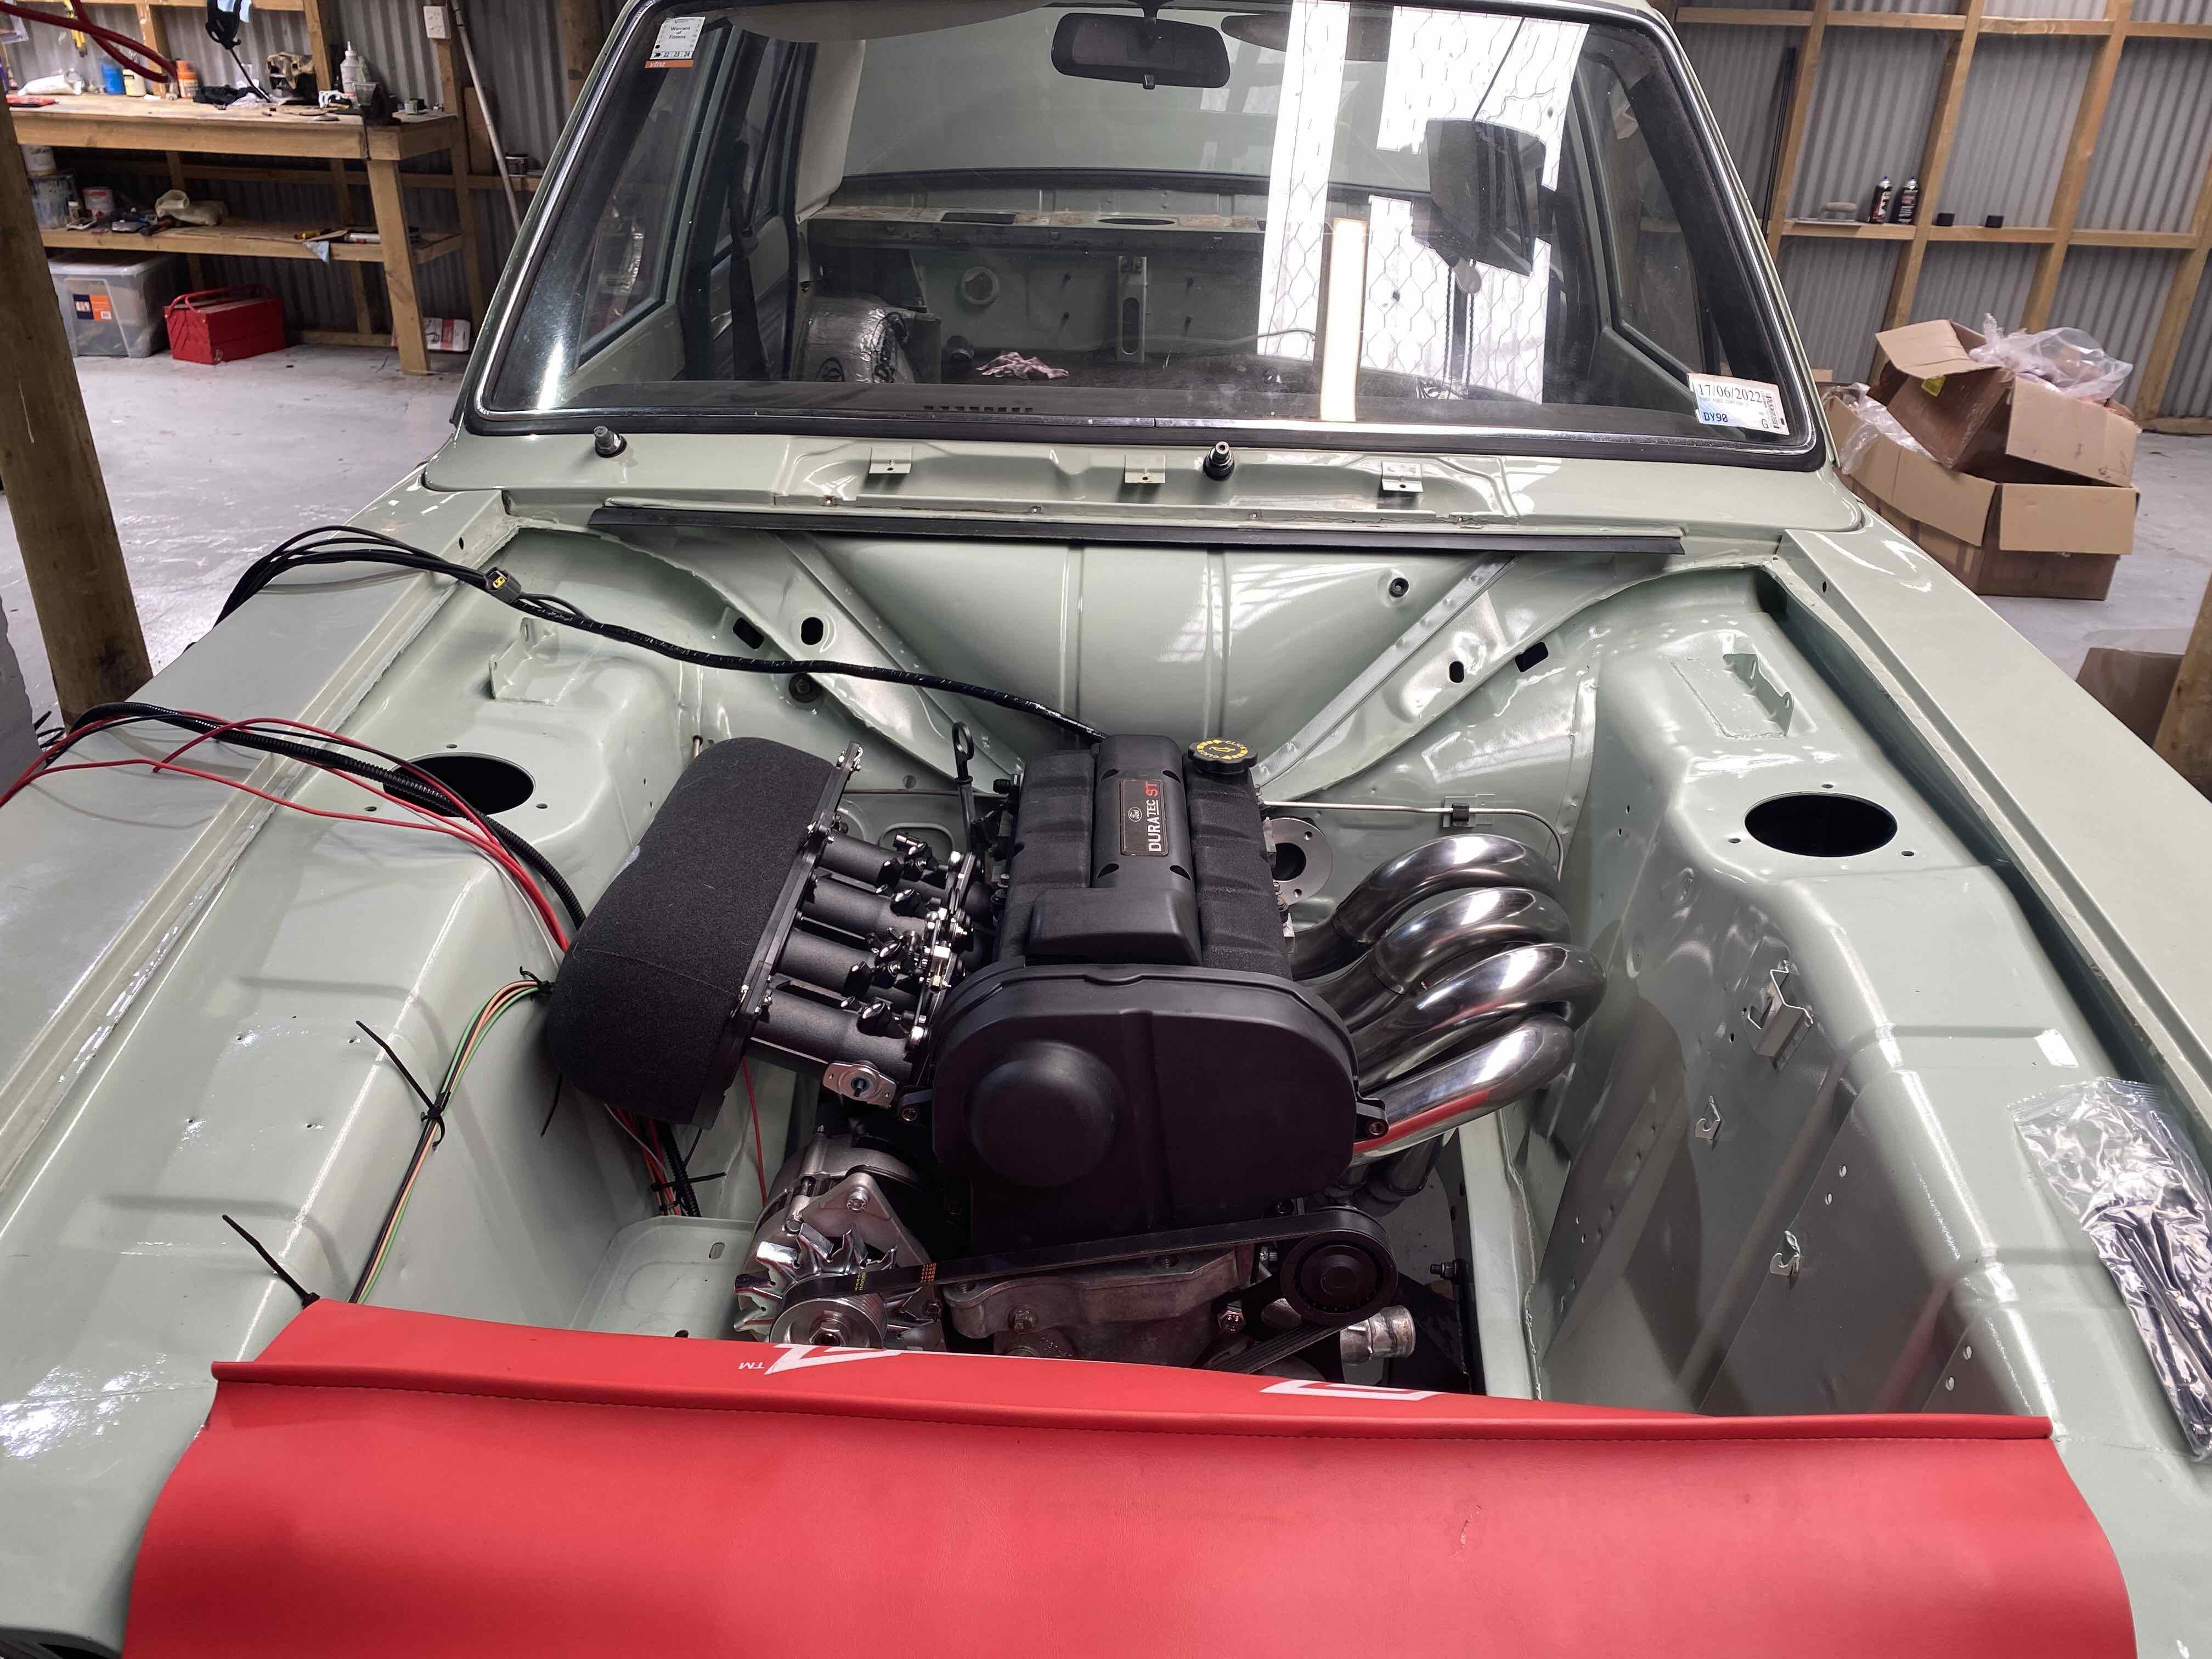
Great success - not too many scratches on the new paint- probably should have asked the better half for a hand really. Pretty tight in there with the ITBs and decent filter but it fits. I am going to have to hunt down a narrow battery- ~110mm so that it doesn’t play with the alternator. 3BDF345D-765F-475F-9DDD-67BA8701E82A.jpeg
- 55 replies
-
- 11
-
-

-
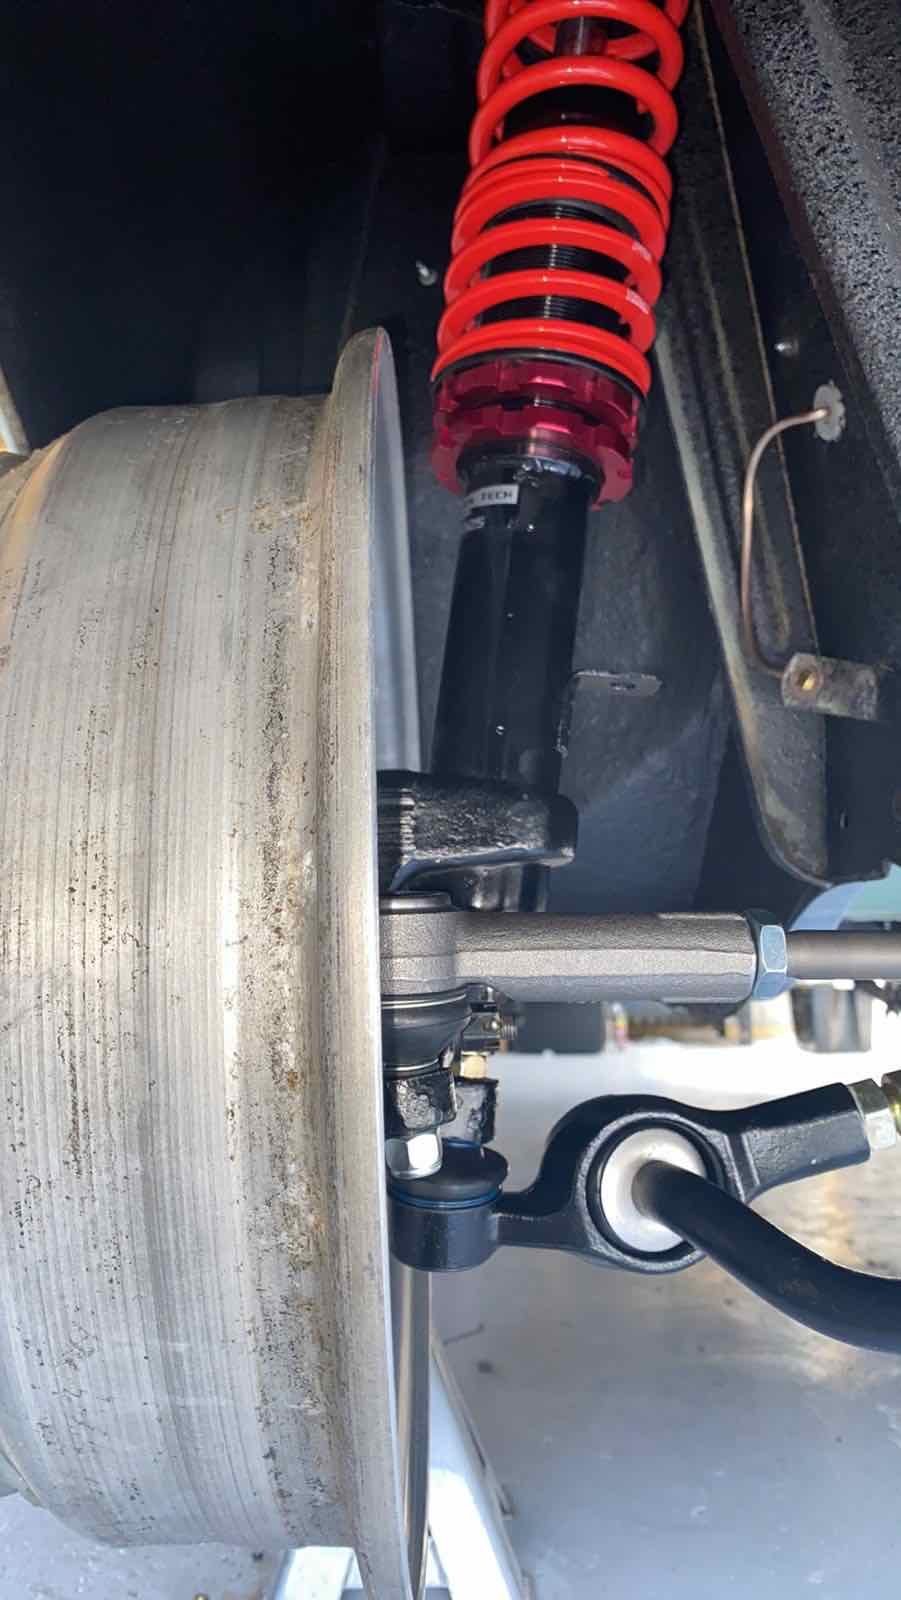
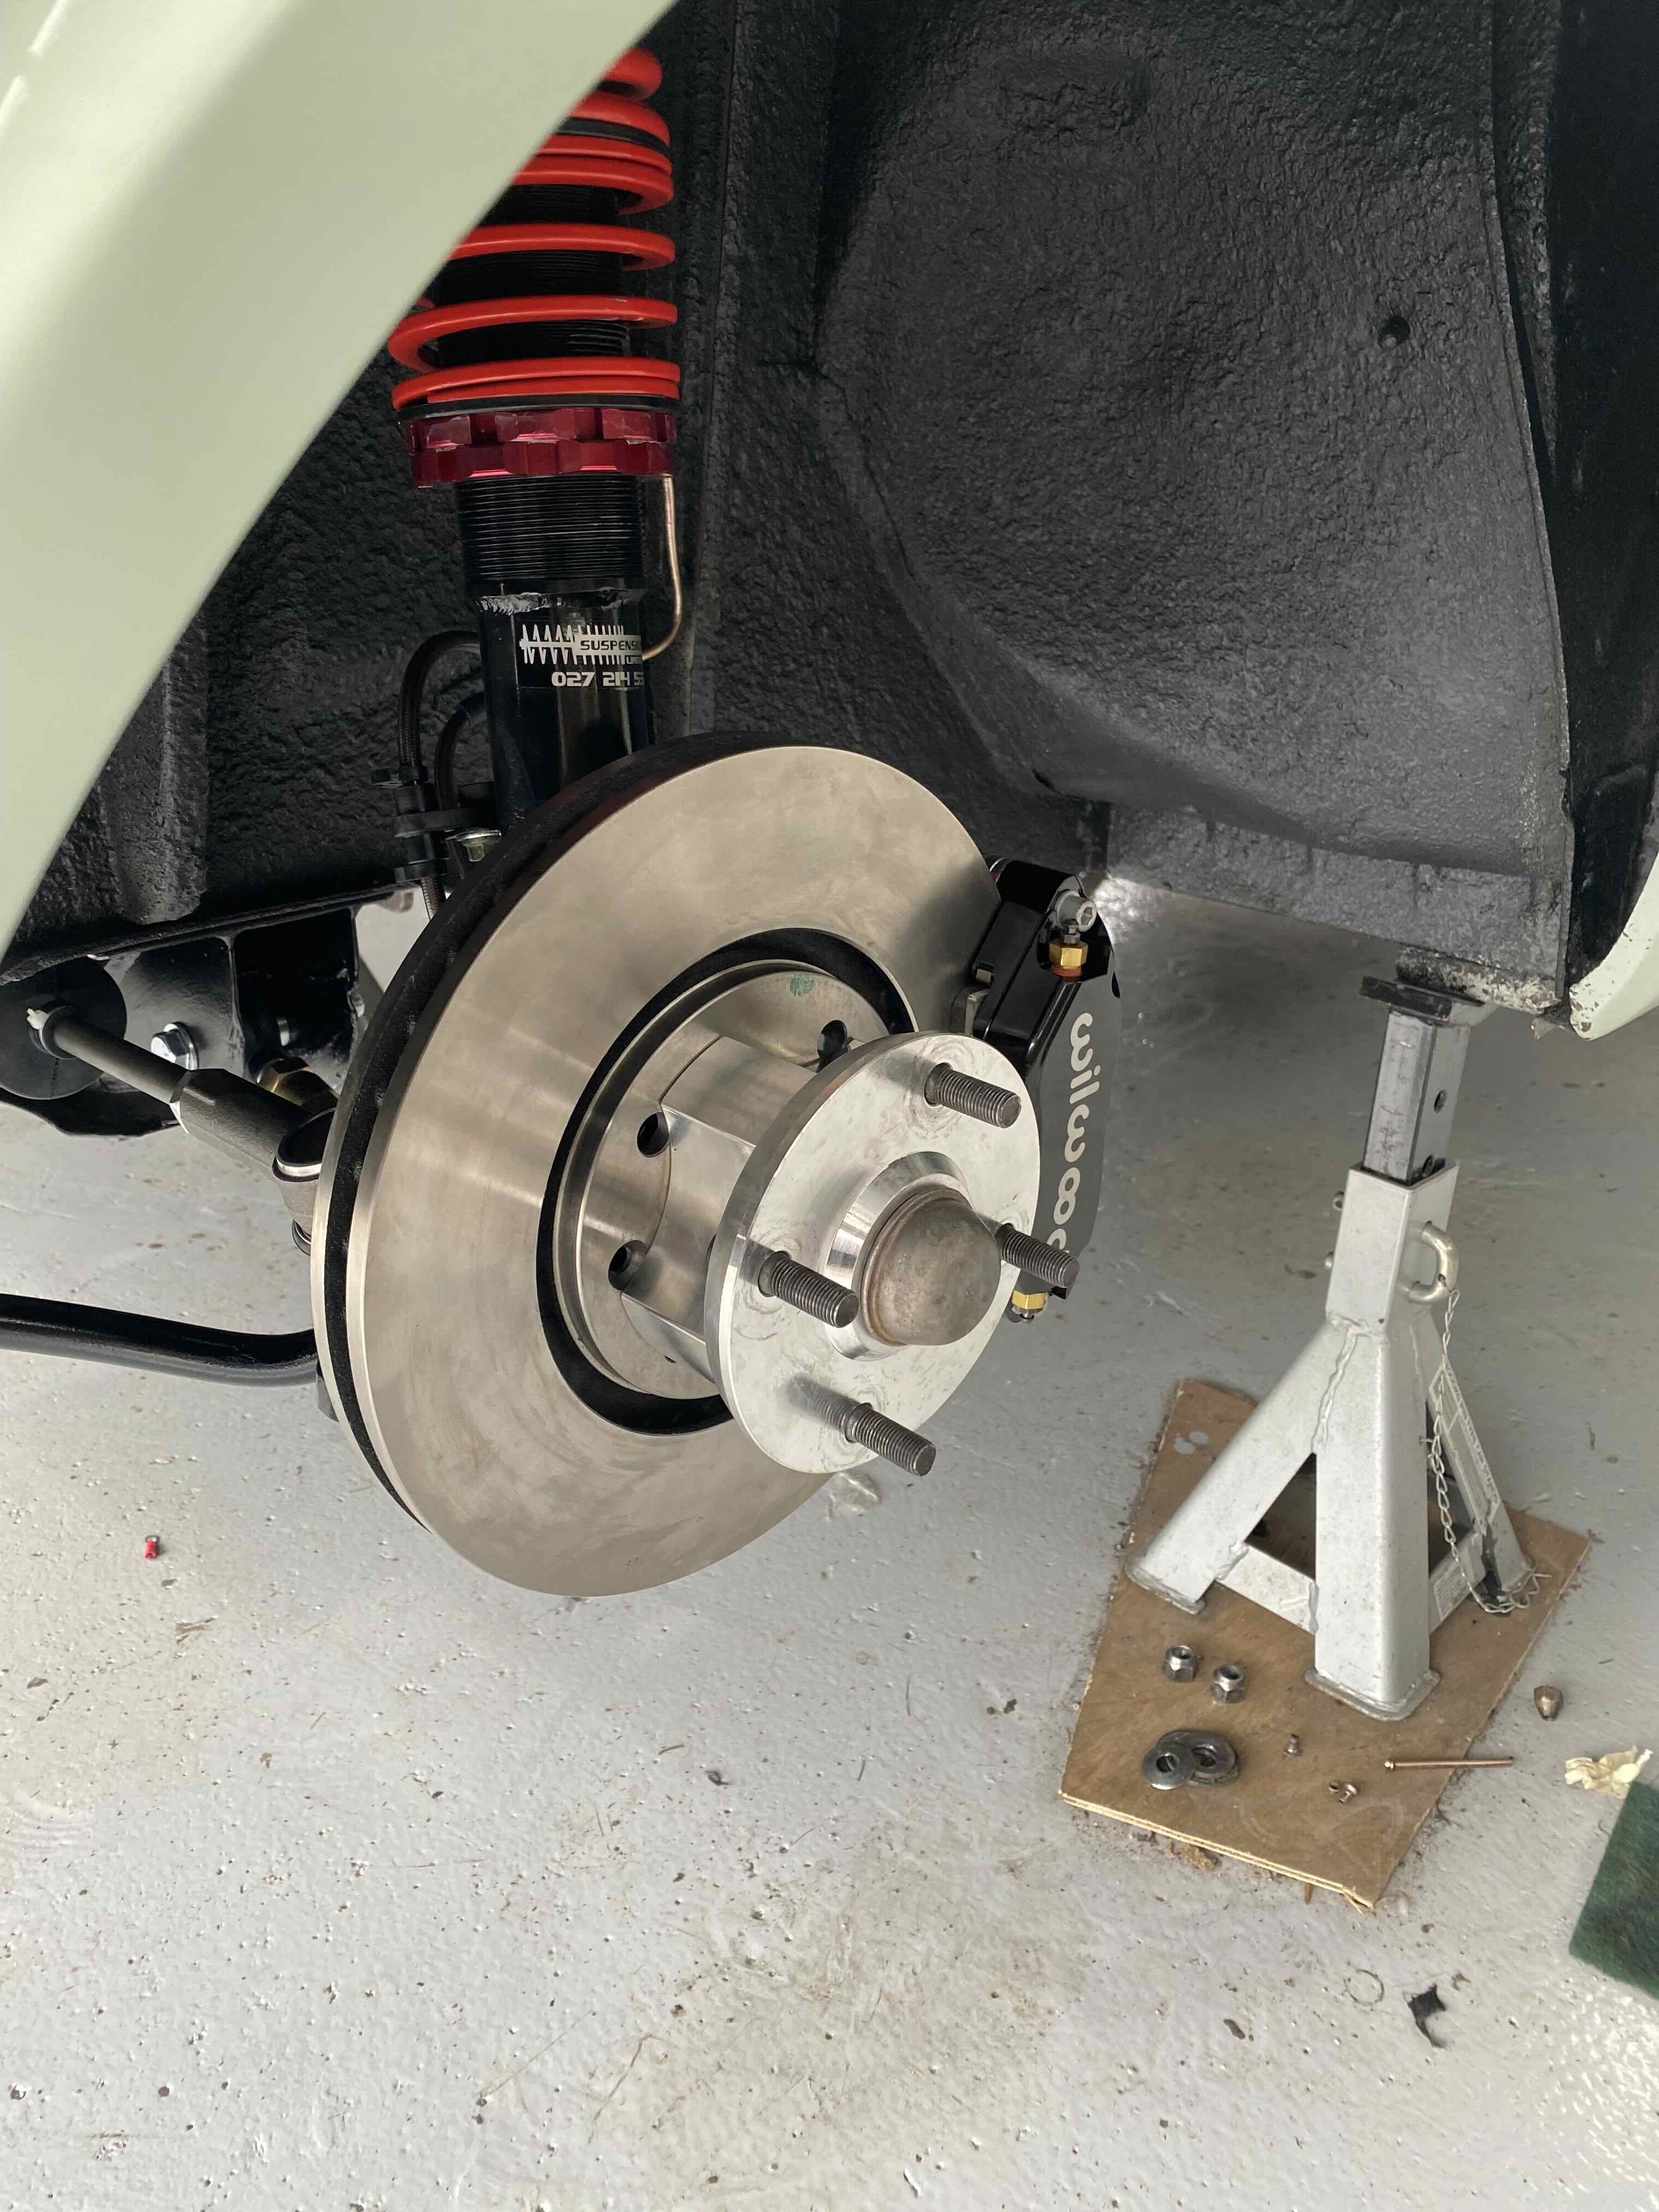
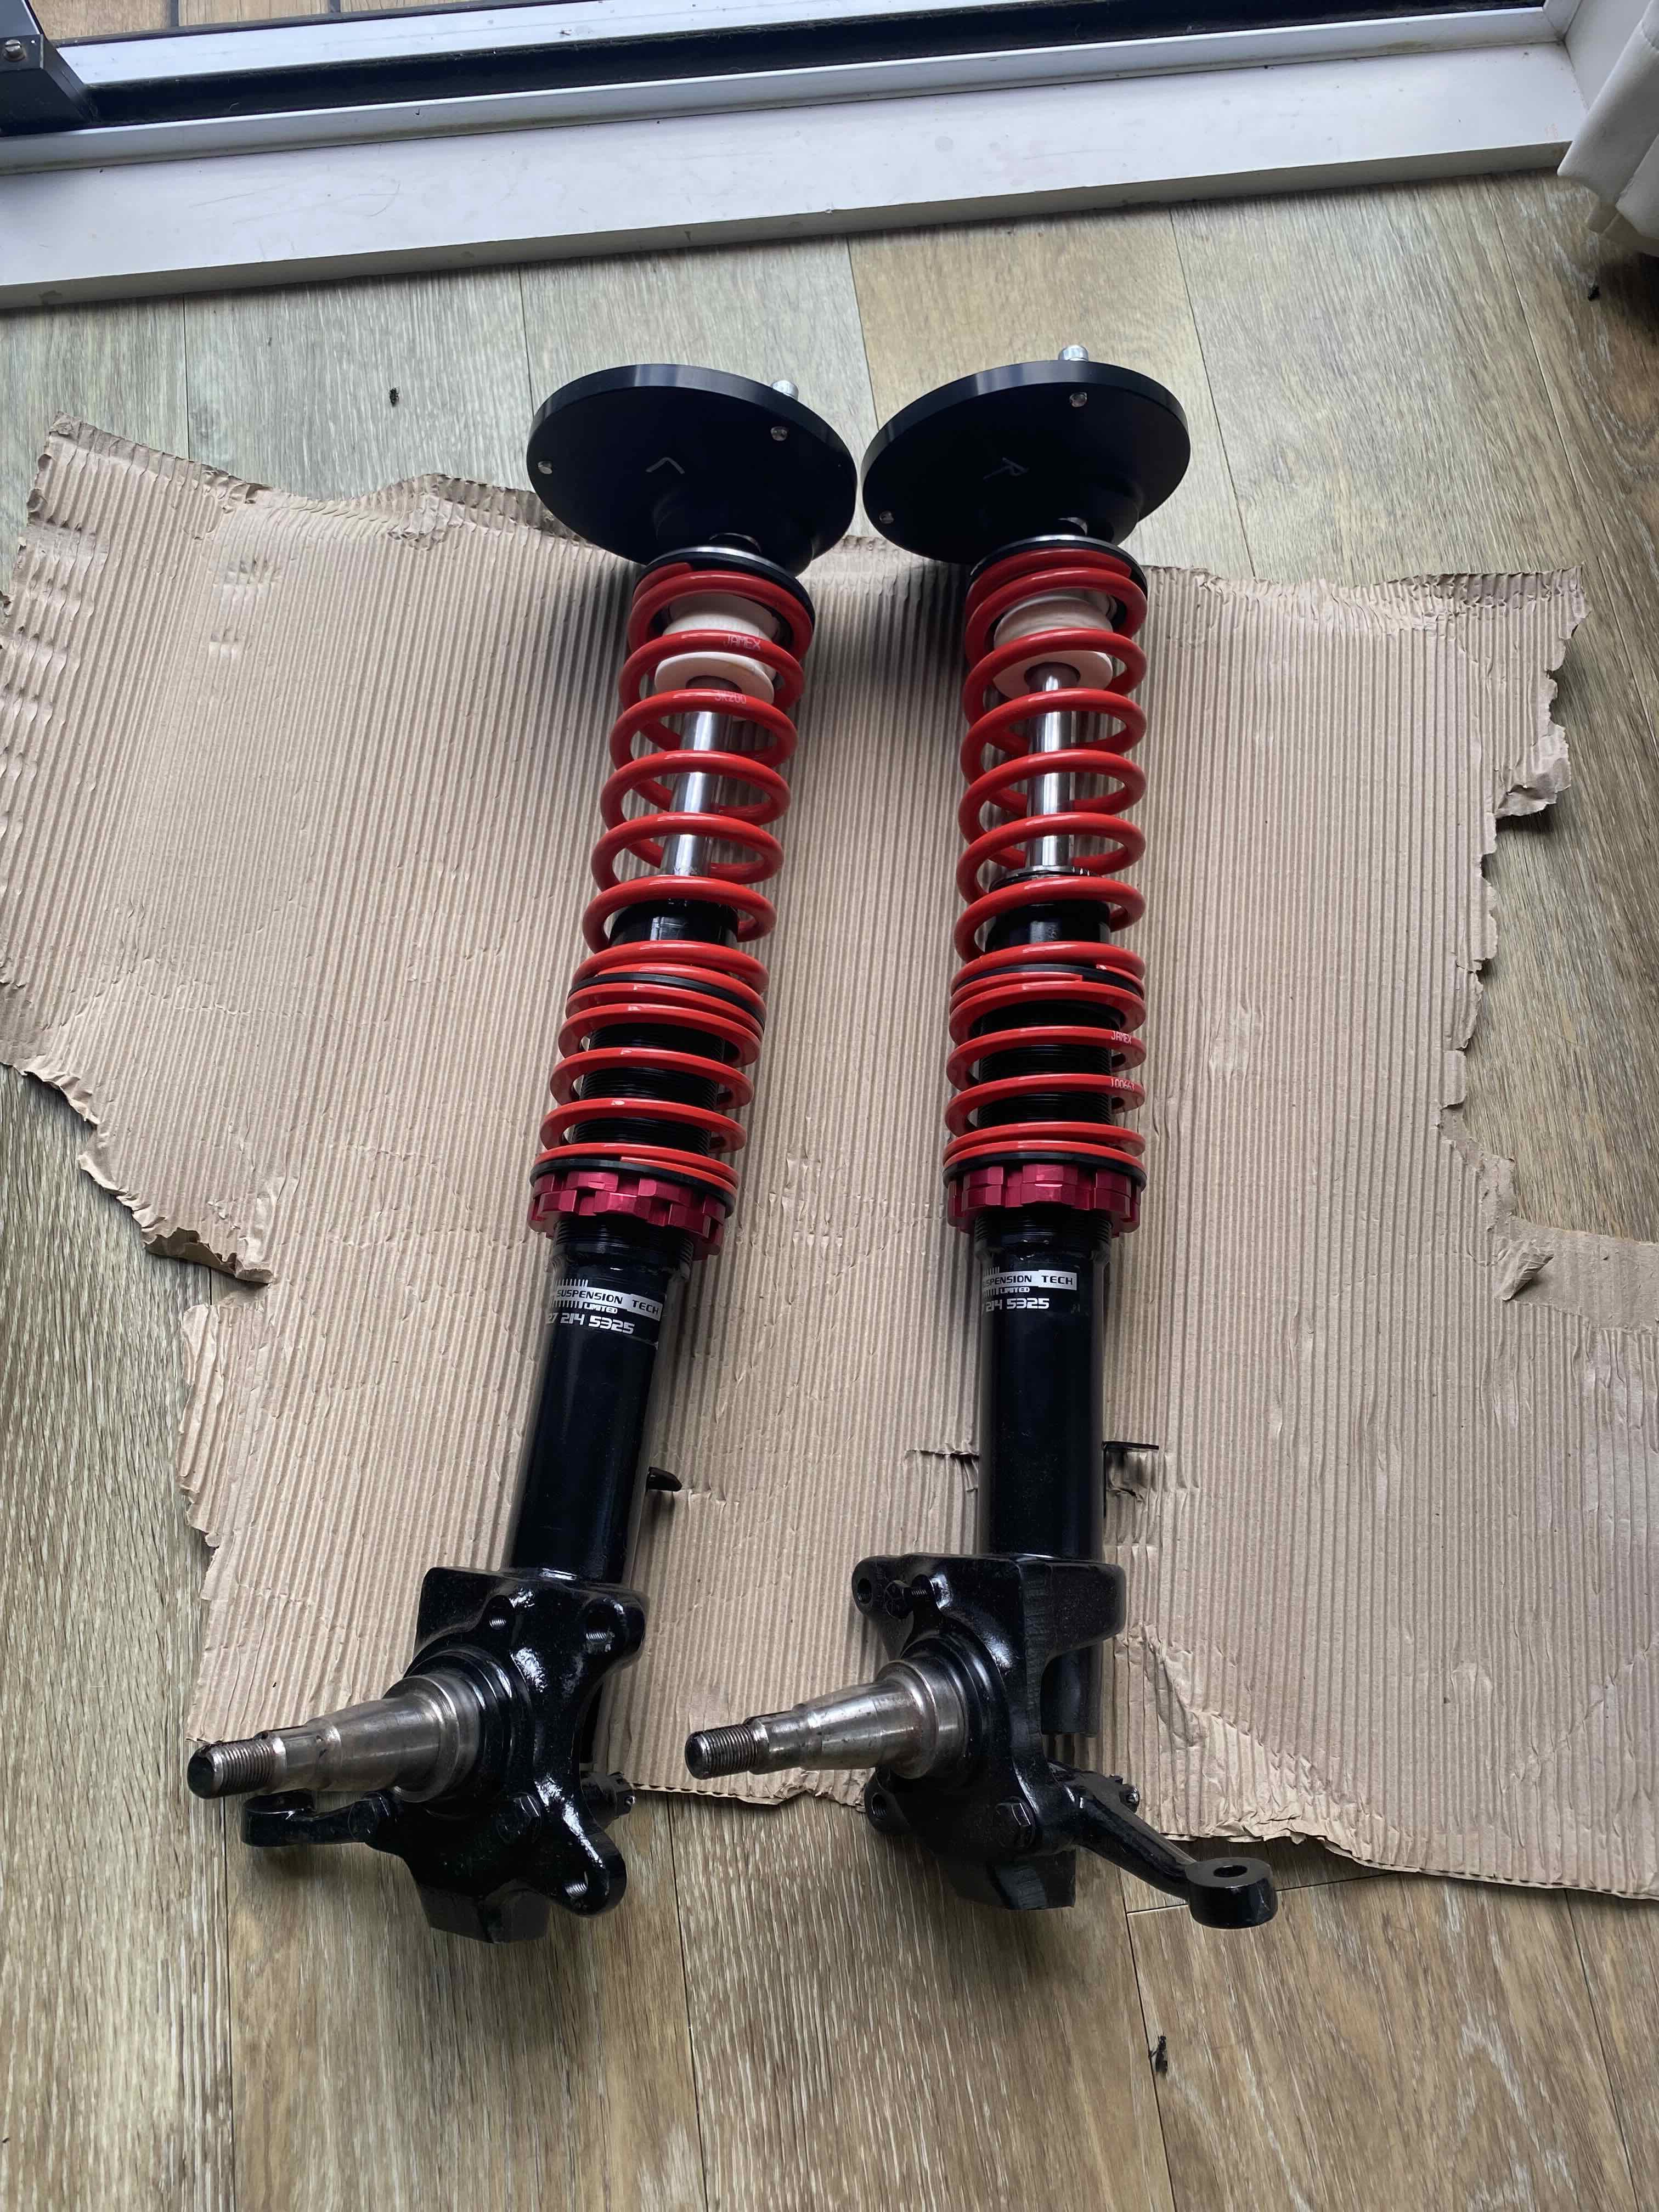
Another piece of the puzzle. Mk1 Capri struts modified by Suspension Tech. With the Capri struts, Retroford top mounts and rack and pinion conversion I’ve pretty much got Escort front end geometry and steering so should be quite nice compared to the old steering box.
- 55 replies
-
- 12
-
-
Hot ticket- thanks! Will be sending up their way.
-
Not yet- thought I would try getting some recommendations to save some time!