


civic_zr
-
Posts
198 -
Joined
-
Last visited
Posts posted by civic_zr
-
-
^Cheers nick will pm you.
Few updates in order! Caution enormous post follows
#1
These goodies arrived today
All new gaskets and bearings for the gearbox, bar a couple of unavailable roller bearings. Cheers Caleb8-)
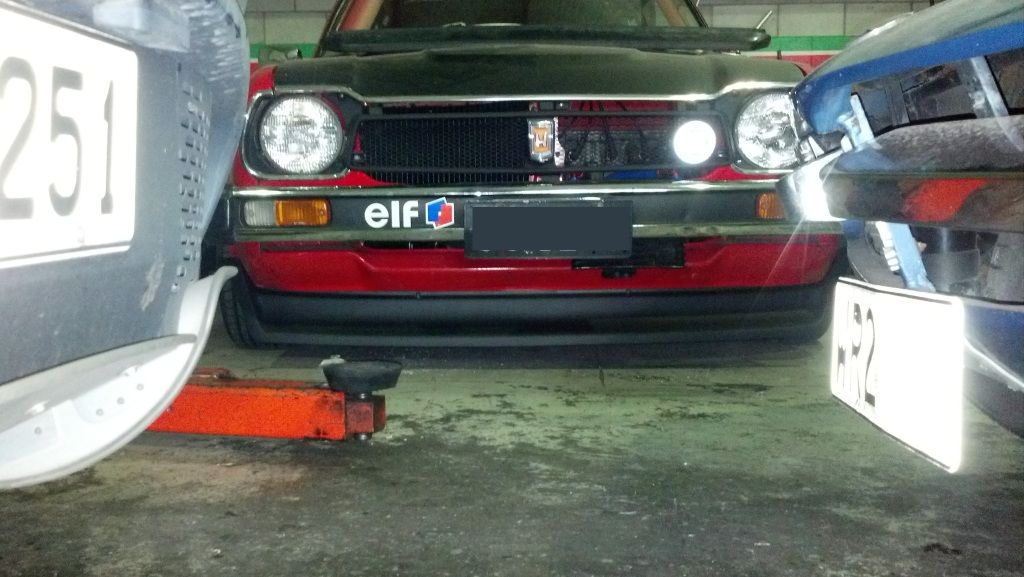
Had a return line for the turbo welded to the sump, and also a bash plate as a precaution. Because on my old motor I managed to split the sump. Planning to play around with the mounts to get a 10mm lift on the motor
Gave it a quick 220-320-600,
New genuine sump gasket thanks to Stephen, took the oil pickup off and cleaned it. Then put everything back together.
Now waiting on a new exhaust gasket, honda aren't sure if they are available in japan, so might be stuck with the tough task of finding a browntop specific one locally
Started giving the shocker of an engine bay a clean up
mild wire tuck and a paint job are on the cards
Leaky battery at some point and the old master cylinder had damaged the paint, luckily there was only a small amount of surface rust. So ground it off and treated it
#2
Been a while since an update... getting there slowlyBefore
Engine bay masked up, spot welds on the towers shaved
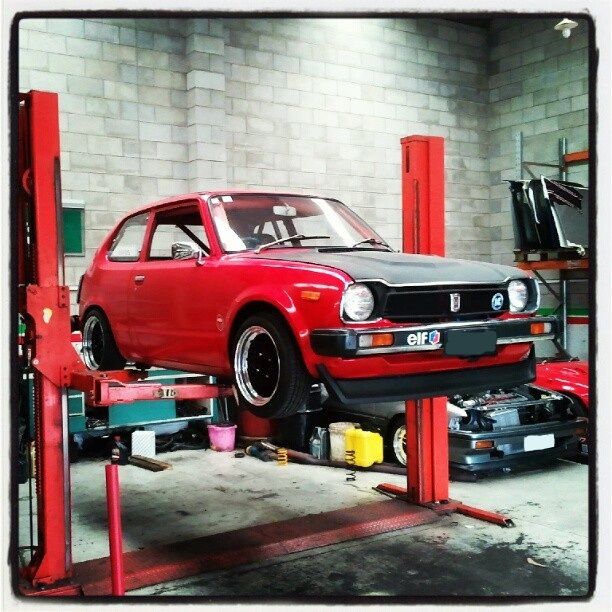
Engine in ~ finally haha
Test fit of the piping - everything fits, just need a new throttle body silicon joiner as the hks one is for the fail spec browntop throttle body, not the h22a one
Gearbox apart, bolts all in place prior to going for plating
Bolts back from electroplating - better than new!
LSD - Check, New bearing - check, new seals/gaskets - check. All ready to go on the motor
Motor all done, not just looking done haha. Oil feed line was damn tricky, not much room under the manifold hoping it won't leak
Old flywheel vs New
The mail seal was something I had forgotten to order, luckily everything from ZC -> B -> H even some K series are all the same - so Honda had one in stock on the shelf!
In other news
Wagon knuckles for the front of the EB - nice chap in canada swapped them for some EB bumpers. They allow bigger brakes to be fitted as the caliper spacing is tiny on the regular eb hubs. (Y) to procoat in east tamaki - another stella job by them.
Wheels
Powercoated red by last owner -> acid dipped -> polished -> painstaking scrubbed to remove polishing compound build up -> then masked - outer 4 sections of the spokes painted -> re masked to do the inner spokes (Did this because I'm a fussy fuck and don't like cutting masking tape as it doesn't give a straight edge with a blade) - Moral of the story - good things take time hahah!
#3
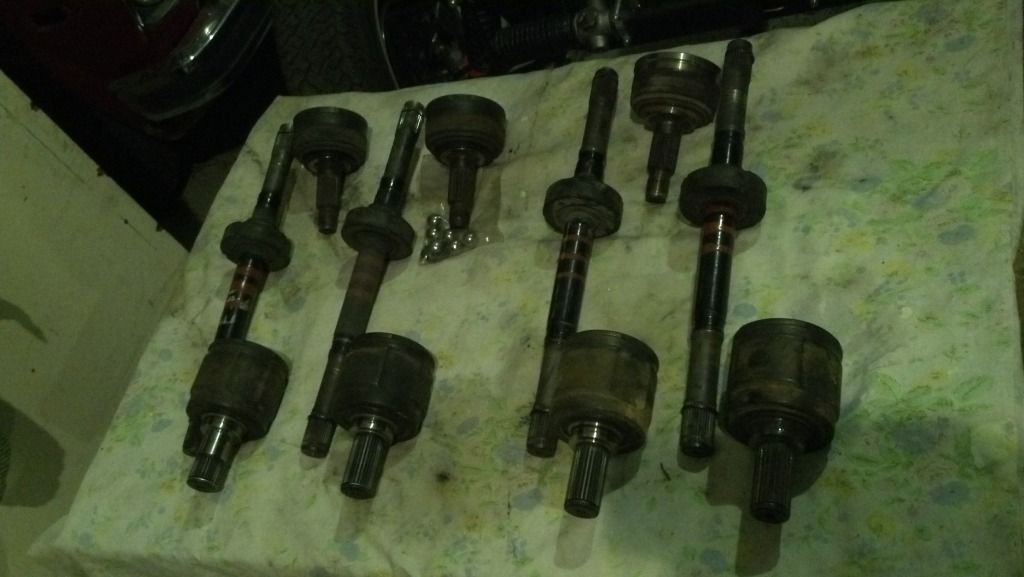
Stripped them down
http://i1147.photobucket.com/albums/o549/lotusboy_nz/2012-08-11_17-58-43_323.jpg' alt='2012-08-11_17-58-43_323.jpg'>This was one of the ones that came out...
Because of the angle they're on once lowered, this ones worn the end of the shaft
What it should look like (left)
Have the parts to make two decent ones, just need to arrange some new boots.
Also fitted these to the front, getting camber into these old torsion bar hondas is an issue. So I got the crush tubes in the top hats offset, while also replacing the rubber with nolathane
Also had a bit of a mission finding which shifter linkage to use.. 1500cc and 1600cc are different... and some gypsy sold me a 1600cc with the end cut off
Shifter sorted, Exhaust sorted.. new wheels on
Teaser with new exhaust on, and new wheels
[/img]#4
Look what finally arrived!BC Suspension specially built for the EB 1-2-3 Chassis. Big thanks to the UK 1stgencivic.com club for working together with the UK supplier of BC to get the factory to build some suspension for these old cars! There is virtually nothing else available, so to get a taylor made, height, damper and camber adjustable setup for under 2k is great.
Front comparison
Rear comparison
Got it all in last night, huge improvement, need to set the camber/ride height up though
Next update will hopefully be driveshafts back in the CR-X
#5
Slow progress lately due to working weekends fml...But had this one off so got stuck in at the workshop!
EB as it was sitting. Unfortunately the BC's came from the UK with a odd ball spring setup - 7kg front, 3kg rear.... so changed out the rears for some 350lb, and looking to swap the fronts for some 450lb. At the moment looking to buy some longer fronts, as I don't want to run keeper springs if I can avoid it.
Got stuck in and rolled the rear guards after fitting the bcs.
Heat gun + old roll cage section + hammers + patience = win (so long as there's no bog in your guards)
Its mugen..... just not for a civic... think it works
Excuse the shit cellphone and instafag photos
Made some cardboard templates up to get ally plates cut to reinforce the edges of the splitter, so it won't fall off and get run over.
Also finally got around to addressing the fuel issues in the EB (It's always had the original carby fuel tank, which previously, once pressurized sprayed fuel out the breather pipe! And also the tiny carb fuel lines)
New surge tank, high pressure supply pump and alloy mounting plate. Used rubber washers and cap screws to try and limit vibrations from the pump. Plan is to sort new lines tomorrow, and find a low pressure supply pump during the week.
#6
Hit a hurdle with the fuel system install - motorsport nz requires that any fuel tank/ surge tank / swirl pot be contained in a sealed box if in the passenger compartment. So because hatchback, I've got to get an ally box folded up to surround the setup. Also all internal hoses must be steal or metal reinforced.In better news, lifter pump has been ordered, looking at bending up some steel lines to run inside the car, with braided lines to run to pump/tank.
Also been playing around with brakes to upgrade the crx and 1g civic.... there is little info online about the older stuff so, for the greater good, here's what I've found / measured
Left to right as follows
Disc Specs
City Turbo II
Dia - 210
Height - 40
Centre Bore - 61
Thickness - 10
EB3 Civic
Dia - 225
Height - 44
Centre Bore - 92
Thickness - 7 (Wagon - 11)
1G CR-X / Teg - Si (Ex-race car, unsure if standard)
Dia - 241
Height - 45
Centre Bore - 60.5
Thickness - 19
EG5 Civic
Dia - 240
Height - 45
Centre Bore - 60.5
Thickness - 21
1G Teg GSi Disc (CA3 Twin pot caliper)
Dia - 243
Height - 45
Centre Bore - 61
Thickness - 20
CA3 twin pot caliper bolted upto 1G Civic wagon rotor/hub (significantly different to 1G civic hatchback/sedan)
-
quick question, not sure if its been covered before,
can multiple wheel sizes be certified on one plate? I run 13x6.5, 14x6 and 15x7 wheels a different times, and would hate to get a pinkie from an anal cop for running the wrong size wheel. The over all rolling radius is within 5% of each other, thus shouldn't effect the certified height outside of the allowances
-
-
Sad site eh... couple more
-
images broken?
hotlinking doesn't seem to work for the blog sorry, worth a look though
-
http://kusahiroexploration.blog107.fc2.com/
warning, easy to lose track of time looking through this blog
-
Nice find with the flares, want to get rid of a couple? Let me know when you're ready to lower it, might be able to hook you up with some lowering springs
-
pcd on the corona is 5x100, so would need adaptors
-
^masking/general fuckery of painting and the top black strip, would be shit for such a small gainplease don't matty b it, will look like shit
it would look similar to the pov spec bumpers? anyway i like it grey, black wheels/grey bumper looks nice.
Ah right, yea poverty spec bumpers look all good, thought you meant the whole car
-
please don't matty b it, will look like shit
-
Sweet project, nice to see such a mint one.
These have massive inner guards, can get wide wheels in, had 30ish offset 17x8, and 17x9 on mine. 8mm spacers at the front, 25 at the rear.
-
I reckon he needs to paint that whole line down from the bump strips grey to match the bumper. Fuck that would look boss
x2.. two tone ftmfw
-
Engine is an EN1, I've got a box of spare cam shafts, also some re-faced rocker arms.
I've done heaps of EB/EN engine work, would be more than happy to fix this one up as a cashy. Let me know if you are interested. Cheers, Matt.
-
flush the radiator and check thermostat, check headgasket not blown, replace radiator.
City turbo is an easy mechanical swap, but vaccum lines and wiring are a nightmare - best way to do it is have entire city turbo loom, and just add in civic style plugs for basics like lights etc.
-
they're a hard car to slam.. run out of shock travel quickly. However can use regular generic coil over springs, with keepers and shortened shock shafts, but still won't be slammed sadly. wheels above are 14s originally for a rx5 mazda, so rwd offset
-
Just be careful how wide you go, there isn't much room
-
Thanks for the quick reply... So normal mounting brackets like seen here on the rear are fine? They are welded, but not to the strut tube, rather a separate sleeve that threads to the shock.
Just a final clarification before I fork out mega bucks for shipping ex-uk?
Are these ok?
-
I know this has been talked about before, but can't find the post.
BC Suspension, heard it can't be certified... why?
Reason I'm asking. British First gen Civic club are getting a custom run of BC Gold shocks done for 74-79 Civics. There is nothing else on the market, and no other option for aftermarket suspension. So obviously I'm really keen to get something to lower/adjust camber/damper but don't want to fork out the cash only do find I can't use it here in NZ.
Cletus... is there any recommendations I can make to the factory to make the suspension legal in NZ, the club is corresponding with them no regarding final details.
Cheers
-
Got the racecar eb out couple of weeks back. With a group buy run of BC suspension, and alloy radiators on the horizon decided it was time to start working through some of the previous issues it had.
First the temperature issue. Decided an oil cooler was the best place to start. There is a group buy for triple core alloy radiators on 1stgencivic.com so water cooling will be sorted soon too. Also wrapped the turbo downpipe
Before installation, first step was to modify the horrible sandwich plate that came with my cooler kit. The internal galleries in the typical chinese spec plates are rough, and restrictive. Have heard of pressure drops upto 10-12psi on F20c motors, so got in there with the dremel to smooth everything out.
Before, see the blunt edge. After photo didn't come out well.
Next headed out to STA for some 10-AN fittings, 4 for $80 odd bucks on trade. Beats the ridiculous $46+gst each of the Fragola ones.
Please to report, no issues with quality, no leaks so far.
Hidden nicely away, but still plenty of airflow under the bumper
Next got the wheels for it finished off...
Think some flares are going to be in order
Also some more progress on the Orange EB. Lack of picture though, sorry for the crap ones.
Well I said never again, but it happened... another bare metal job.
Thankfully this time we decided to have the car media blasted rather than manually stripping it.
Waiting at the strippers.. haha
Unfortunately, due to poor timing I didn't get any photos of it all stripped afterwards, as it went straight from the blasters to the panel shop, where the rust killing solution was applied before I got there
In the booth waiting for the epoxy 2k primer.
Primer on, all sealed, waiting for panel beater to carry out dent removal, and weld a couple of small areas.
Should hopefully have this done next week, and the sanding can begin again
-
Awesome car man, would you be keen to take some photos of it some time with my silver '84 cr-x, and '83 city turbo II?
Cheers, Matt
-
my concern is that reviewing the WOF frequency will open the flood gates for changes in the law regarding modifications. Say they make it once a year for WOF, hopefully they don't want to clamp down on modifications, I can see them demanding cert's for everything
-
Just be careful with airbox designs, if they aren't big enough can quickly lose power, found this out the hard way with twin dellortos.
-
I personally wouldnt touch their paint and the bog is pretty shit Gaz. Good brand stuff will be just as cheap especially if you can get a trade discount or something.
x2
I've only had bad experiences with both the paint and the bog. My 2c, the horrid australian export thats $3 a can on trade is better than the 3M spray cans. Also the bog seems to always give a million pin holes.
-
^^ Thats a massive carb for a tiny motor


 [/img]


Matts 1G Honda talk
in Project Discussion
Posted
unfortunately there is no way to shift it higher, there is a factory baffle that runs inside the sump thats spot welded to the walls -- stopping me from drilling a hole any higher