


Camel
-
Posts
469 -
Joined
-
Last visited
Posts posted by Camel
-
-
C4s are all good bro. When its out drop the pan and take the servo housings off, that is always a really good indication of the condition of the box. If there is no sludge or filings in there then adjust the bands up and you should be sweet for cruising etc.
If you want to do b-owts etc then id definitely look at getting it rebuilt by a reputable shop, they can be built to handle up to 400+ hp without too much trouble
-
What you doing with that 4M you scored with the parts car?
DIBS???!!!
-
So long time no update.
Things have been progressing at a medium/really slow rate.
I stripped the trans down and was no good so scored a late 60s C4 (much more common and has the same bellhousing to trans bolt pattern) forked out the cash and got it rebuilt. Also picked up a reduction starter for it which is extremely loud.
Got the engine in the hole and running and took it for a creep round the block but the factory 2 barrell carb was leaking so have not driven it since. I have a rebuild kit from the states that I will throw at it when I get to it.
Have also been getting parts in from the states on a pretty consistent basis.
Trim rings
Spider bullets
drag link balljoint
alternator
carpets
carb kit
dizzy
leads
fuel pump
trans pan with drain plug
trans cooler
seat belts
etc
I also forked out for a set of brand new bf goodrich wide whites (225/70/15 with 2 3/4 whitewall) and picked up a set of 15 x 6 kelsey late 60s rims which Spencer kindly painted bright red for me. The mounting plates for the spider bullets required quite a bit of work (grinding) to fit the rims and am slightly concerned that these may stress fracture as the spider is not very light... the alternative however is new rims which would be a bit gay, will see how I go.

Also found that the exhaust bracket had been bolted through the floor pan and had mangled a bit hole in it so made up a super sturdy new bracket and patched the hole in the floor. I also replaced the rear brake hose as was perished and replaced the steel line to the rear brakes as it had decent surface rust.
After looking at getting some foam to do a temporary job on the front bench seat I decided I would just get both seats completely re upholstered so pulled them out and they are away getting done at the moment.
Once they were out had a bit of a dig around and found some rust around one of the body mounts so cut the floor out to assess the damage. Doesn't look too bad except for the fact that it has eaten through into the sill as you can see in the below pic. To properly repair that would mean body off the chassis as it would need the floor pan brace removed so for the moment it will get a heavy dose of POR15 and wurth cavity wax until I have a shed sorted with enough room to tackle that task.
Oh and the aussie-tastic ranga roof is gone too, I stripped that back to bare metal and spence bombed it with white. It needs another coat but will do for the moment until his car is back together and we have a bit more space. We will also give it a fresh coat of satin black as the bling wheels and roof make the black look even worse than it is, which is no easy feat.
Still so much that needs doing though!!
Im hoping to replace the left rear floor pan this week and have dropped the fuel tank out as it has some dodgy patches and is starting to leak so will get an alloy replacement made and painted black for stealth. Hopefully faster progress and a few more updates shortly.
-
That colour will look real good with stuff all over it to break it up. I think it will look heaps as good once black vinyl roof is installed
-
Can I ride shotgun with you for a bit - like that time at Hawkes Boes to ocean beach...
definitely honeybunch. October is so far away yet scarily close for Spencer and his ride haha. Working bees on the buick will no doubt be in order
-
it is going to be TITS
I can't wait either, also to have wagon on road and put some km under its belt
NOT TO MENTION SEEING BO3S AGAIN
-
Thinking of popping back for a quick trip soonish so will have to come visit and get the low down from Rhona on your misbehaving haha. PM me your email anyway so I stop spamming your project thread
-
next time i'm back we can go for a roll to my old stomping ground (Ponsonby Bowling Club)
-
What worked best for me was lean/pose on sweet old toyota whip outside the bowls club as they are leaving and complement them on their walking frames and fresh perm. Probably helped they were a few sherrys down by then/sherry goggles...
-
Im a huge fanboy of that green. It went well on my old MS53 with both black and white roof stz. Cream or light BROWN interior would look schmick and have all the purple perm hair gals down at the local home swooning when cruise past...
Also,
Sheepers wrote
you forgot "buy cardigan"i already have the cardigan.
lots of cardigans.
anywho, how you doin stranger?????
I did forget "buy cardigan" but only as i ASSumed it would be factory get-up when going for a creep in this thing/leaving the house.
And Im good mate how bout yourself?? Hows the arthritis these days? must be playing up with the cold and the amount of weight your carrying around?
-
Paint brown.
Convert to valiant straight 6
Convert to unboosted 4 wheel drum brakes
win
-
What engine is that again? 302W?
-
Yea such a sweet colour ay just needs some dubs now. Yea plan is get on road asap, paint roof, possibly steels and whitewalls and slowly fix shit while keeping it usable as much as possible. will get bits together for big block conversion as I can and start sorting bags
-
Discussion here http://www.oldschool.co.nz/phpbb/viewtopic.php?f=18&t=30825&hilit=desert+spec
So picked this up for a reasonable price, definitely no trailer queen but pretty much rust free and hasnt been hacked up by anyone so thought it would be a good basis for my next project.
1964 Ford Country Sedan
factory 289/cruisomatic/9 inch
NO DICKEY SEAT
super shit matt black paint job
totally fabyouluss orange roof paint job
no carpets
no seat belts
fucked front bench seat
cruisomatic transmission slipping
engine and box not in car
However has been previously registered in Aus so no dramas just need a Queensland RWC/WOF.
This thing needs some love to get it legal, I had to get the car transported up from NSW then went and picked engine and box up a couple of weeks later.
Bought myself a tear down table and stripped the box to figure out why it was slipping. Turns out no one had done a service on it in ages and it had the grey sludge throughout the box including servo housings etc. The front band was toast, pump thrust washer had snapped its retainers so was spinning and intermittently blocking off oil feeds to clutch packs. Also found that the modulator piston had seized in the casing which would have lead to the initial loss in pressure resulting in the front band slipping etc. Another thrust bearing in between the clutch packs was also completely fucked and had made a bit of mess of one of the surfaces. I was considering buying some bits and repairing this transmission but after stripping it down had second thoughts. The reason why I didnt just grab another trans is that the 1964 (and I think 1965) 289 had a 5 bolt bellhousing pattern on the block that ford quickly changed to 6 bolt. After some research I found that a pre 70 C4 had the same bolt pattern on the transmission side so managed to score another box for $300 which wasn't fantastic on the inside (I only checked the oil, filter and pan) but should do for the moment. Gutted I didnt get photos of the damaged parts etc.
Sweet massive downstairs rumpus room/trans area and parts storage
As for the 289, the previous owner had knocked the frost plugs out as he was planning on storing it for a while. I tried cleaning the plug holes up with a wire brush and 3M scotch pad but it wasn't doing the trick so had to hunt around to find a die grinder wire wheel small enough to fit. Got them all cleaned up, smeared a bit of jointing paste on for good measure and knocked the new frost plugs in.
Was about to drop it off the engine stand ready to throw in the hole but heard a metallic noise from the sump when we were rotating the engine so whipped the sump off to find a block plug, parts of the pickup bypass spring, and a tooth off the crank timing chain sprocket. Not ideal. It does look like the engine has had some work though as its way too clean in there. As this is just a temporary engine I have decided not to replace the cranking timing chain sprocket and hope for the best, I will not be thrashing this motor so am hoping it will hold up for a little bit.
The plan is to get it running and legal using this engine/trans as they are quite anal about engine numbers etc over here then swap in a 460 big block when I get my mitts on one. I'll most probably swap to a C6 trans also.
As you can see the factory bench is pretty rooted so purchased some mexican blankets to recover it with for the moment. Will also score some seat foam to patch the sweet holes etc.
Gotta love the oldschool dash too, am keen to add some mild pinstriping to the lower metal section.
Anyway thats it for xmas, when I get back from holidays in NZ will get a sump gasket, slap sump back on then bolt trans on and drop in the hole. Also need to track down a starter motor then should have all I need to get it running and go for a RWC/creep around the block.
Also cant decide for the life of me what colour to go, want to spray that roof ASAP as it is atrocious, also trying to figure out what direction to go with wheel/tyre combos. Input please....
-
pretty keen to attend tbh
-
Also need ideas on lush/weird roof lining material...
I dont think ive ever seen so many different browns in one place in my life!
-
this makes me very happy, in the pants
part of me died inside when you sold the last one, dont ever do that to me again sparkular -
PICLESS UPDATE
Well brakes are all done for now, really need to test drive it to see exactly how bad it is with the factory master. Rear springs and bumps are cut and rear is sitting back down on the ground. Engine stz is pretty much done just waiting on radiator. Found out that XF falcon springs are the same size as fronts, stoked, so will try sus a set to cut. Fukn itchn to take it for a drive, is getting so close!!
-
chur bro park up with president etc?
-
Lookin so sweet. I like that you started with 2 coils. Are the springs similar to later model Crowns? Shouldn't be too hard to find a set if so.
How is the rear brake rebuild coming along?
Yea pretty similar, shouldnt be hard to find some more to chop up. Um dropped rear cylinders off at apex, they said should be done by monday arvo. Dont know if ill get all done by kumeu tho, still have to get radiator back and finish engine etc
-
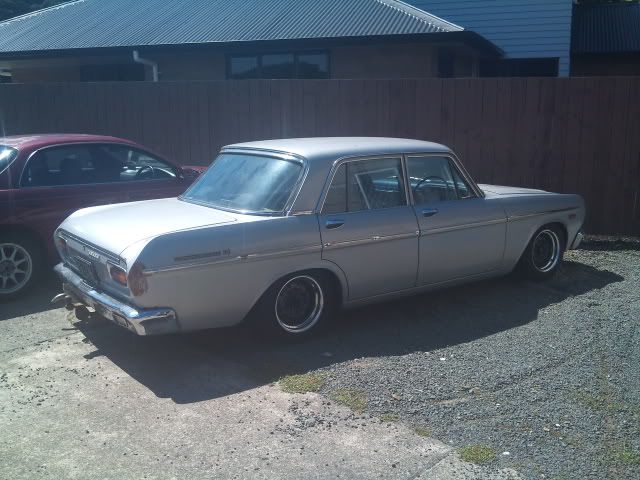
What are the rims on it in the last pic?
Factory crown rims that spencer refurbished and I stole haha. Need bullet centres and white walls tho
-
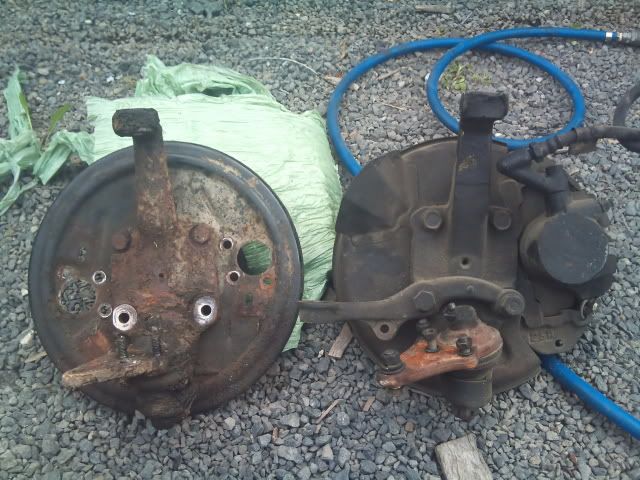
So ended up taking a gamble and purchasing some hilux front hubs/brakes that i hoped would fit the front. Had to use the hilux lower balljoint which meant enlarging the hole in the lower arm which took a while as i couldnt find my dremel so had to hand file it
Anyway heres a pic of them next to eachother
Also hiluxs have their steering on the front and crown is on the rear but the steering arm unbolts from the hub so just had to drill the holes from 10mm to 12mm and it bolted straight on!! STOKED.
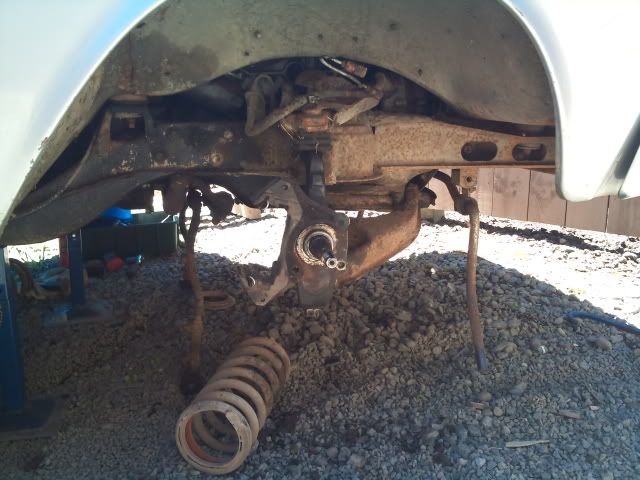
Also changed waterpump which was a bit of a bitch as fan and pulley are pressed onto it, big ups to E for the borrow of the workshop and a hand in getting it done. Thought it would be rude not to lop a coil or two off the front springs while i was at it, thought 2 would be a good starting point and cut the bumps right down. Then last night went to the fort and stole diddys wheels off the wagon as the factory 13s dont fit over the disc brakes. Then proceeded to remove rear springs so i could get front sitting right and then put the bitch back on the ground. Looks pretty sweet in my opinion however the front is pretty much on the bumps so guna have to find some more springs and raise it a tiny bit, then cut rear springs to suit.
-
sadly i am lacking in wagon this year
-
Im there, who else is heading from/though Hamilton on the Friday?
Should be heading up then, Keen to shoot up pretty early tho what time were u thinking??


steelies' 64 ford wagoon
in Project Discussion
Posted
when is 2014 nats??