


VintageSpecial
-
Posts
100 -
Joined
-
Last visited
Posts posted by VintageSpecial
-
-
I've always wondered what the story is for vintage cars like mine with a long, pointy tail. Traditionally the number was painted on the tail side. Can't do that now. I can mount the rear plate to one side or the other but the tail means it is only visible from one side. You can't really put it under the tail. Might have to do like they did on Austin 7 Speedy cars where it's on a board sitting on top of the tail (with stop lamps either side)? The front is easy at least, it fits between the front dumb irons.
-
1 hour ago, zep said:
What's the deal with certing your build before paint? Ideally I'll build the entire thing, get road legal, then paint - ensure I don't need to make any changes that would affect new paint. Are there any issues with having cert photos of the car without it's fancy new paint job?
I am wondering similar for my scratch built Riley build. As far as I can tell I need to finish the whole car before I can take it to VTNZ to get a VIN then to the certifier for LVVTA cert then back to VTNZ for Entry certification.
I had the same question as Zep. When I last saw the certifier he said finish the whole car then bring it back.
-
To be fair, stickers work the other way around too!
-
15 hours ago, KKtrips said:
In my opinion, vehicles once they reach a certain age should be able to have all the driver assist, ABS, airbags etc removed, just because getting parts for them if they go bung will be impossible.
But it probably needs to be longer than 14 years, cos my Prius is nearly 14 years old and its just broken in.A chap I know thinks there is a conspiracy involving Dekra and the car manufacturers (big car?) to try to get all old cars off the roads faster saying it's in the name of safety but really so the manufacturers can sell more new cars.
As a software guy my concern isn't parts but what happens when the software in cars stops being updated and you could end up with vehicles no longer compliant due to not having some vital update or patch. Someone can always make mechanical parts, but software is all protected by copyright and licensing restrictions so it's not so easy to get around (legally). See all the fights with John Deere about the right to repair around this.
It's a bit like how Apple use planned software obsolesce to force people into new iPhones. Owners of older Teslas will find it starts happening to them soon too I imagine. It's made worse with the way cars seem to becoming more like appliances these days.
14 years is a long time in software terms. That's how long it was between Windows XP being released and the end of life support date for it for example.
We do Agile now, people seem to expect the software to change every two weeks
")
-
 2
2
-
 1
1
-
-
23 minutes ago, Nominal said:
You could try asking NZTA / OIA?
It could be a way to use the rules they have (safety systems) to back-in improving pedestrian safety without having to make a lot of new rules.
I was considering that but that page does sort of explain the thinking of this particular change. You'd just get that back to an OIA.
They are basically saying vehicles are built and tested to a standard and you're adding something that now changes that so it needs to be inspected to see what the impact of that is then that makes sense. NZTA check vehicles are to the standard, LVVTA are there to check vehicles that fall outside that (and in turn have their own standards). That makes sense. I am not picking on NZTA here, this is just an interesting example of change.
I am more interested in how they decided that this was a thing to change now rather than some other thing or problem.
Where I work, I wonder the same thing - what drives the work we do and the pace we have to do it. It's quite hard to find out! The larger an organisation the harder it is to find out. The people at the top have a vision but no idea of the practicalities, the people at the bottom know the practicalities of their small area but don't know how it all needs to piece together and so you have to have layers and layers in the middle trying to co-ordinate/deliver it all. And in really big orgs you have whole departments whose job it is to communicate what's happening in the middle bits so people understand why they are there and what they are doing. Especially across orgs, say between NZTA and LVVTA.
Politicians of all flavours often campaign on removing those middle bits (and the communicators) as wastage.
-
1
-
-
14 hours ago, cletus said:
I'd like to know what drives (no pun intended!) these sorts of changes at NZTA? They seem a bit vague:
"There's some evidence..."
"Bullbars can cause airbags..."
Would be interesting to see some of that evidence.
It seems odd they focus on the drivers safety when you'd think the risk from bull bars is far greater to a pedestrian or cyclist and that adding bars to the front of a vehicle will affect any of the Vulnerable Road User safety features a vehicle has. Australia has done some research on this but it's tricky to get solid conclusions since the data from real crashes lacks certain information and the sample sizes are quite small.
But generally it seems accepted that bull bars increase the risk to pedestrians. But it's hard to find much about how they affect they affect the internal safety systems, like air bags, of vehicles fitted with them. I think partly since some of those systems are quite new so again there isn't enough real world data and that studies on that specifically haven't been done.
With all the things they could be doing/looking at, how does something like this get chosen as the change NZTA spend time working on?
-
2
-
-
On 13/07/2023 at 18:09, morkster said:
Hi, could someone please tell me if a hood/head lining is required for a wof?
Reason i ask is i need to fix the leaking sunroofs in a s1 Disco and at the very least i need to lower the lining, but i'm thinking of removing it as it's a bit rough anyway.. thanks
I 'fixed' the leaking sunroofs in my Disco a by covering them completely with clear PPF. I need to redo it as it has split on one part though. Definitely stopped the leaks though. The headlining on mine was ruined so I replaced it with grey polar fleece bought from Spotlight. You can get it in extra wide widths so can do the whole headliner in one shot. It's stretchy and glues well (but use high temp contact glue) and looks pretty good. On mine the interior is grey so it blends right in. You don't need foam underneath it which is what goes on the original headliners. If anyone asks I tell them it's headlined in Muppet hide!
Simon
-
1
-
3
-
 4
4
-
-
- Popular Post
- Popular Post
I seem to have been locked out of my account for some time but finally got back in. I updated the project mainly on YouTube so look there to see all the progress but to finish this off I should at least post a picture of the finished bike.

Goes very well. At least puttering around the garden that is.
I have a new bike project to do now. A 1953 Velocette LE Mk2.
Simon
-
11
-
1 hour ago, RXFORD said:
I'l tell ya what had me livid, went for a subway footlong and theres a sign saying bloody pickle shortage. Shoulda seen me Karen at them.
I didn't realise things had gotten THAT bad!
I don't mind paying for shipping for specialised things for my projects, I factor that in, but when it starts getting to hard to get the basics I think I need a easier hobby!
One thing that has actually got easier/cheaper to get is electronics, as in parts for projects. The amount of little bits and pieces and modules you can get easily (from China) is amazing.
Am working on a side project to drive a tachometer directly from a spark plug lead using a neon indicator and a small light detector module and a small micro controller.
Simon
-
2
-
-
By things I mean things like hardware, materials, paints, etc we use on our old cars.
A couple of examples I have found recently. BSW/BSF hardware. OK, this has been an issue for a while now so not recent. But hard to find locally and expensive when you do. I have to get mine from overseas. Nickle Silver metal sheet. Can't get it here. No one uses it or imports it. Maybe small amounts like a jeweler uses but not enough to make a radiator surround. OK, those two things are specialised so not really surprised.
Another more common one, 1100 series aluminium sheet. Tried to get that recently and no on has it. So I'll have to use 5005 since you can still get that.
Recently looked for certain paints for something. Was looking for appliance enamel in stainless steel finish (for some rims). Rustoleum make such paint, easily available overseas and you can get the white paint here easily enough. But not the stainless steel colour. It's just not imported. Doesn't even show on the local Rustoleum site but you can get it overseas.
Another one is Septone white underbody seal. You definitely used to be able to get it here. SupercheapAuto had it. I used it on my MGB 10 years ago or so but now it's not available at all, just black.
It's far more annoying for things like paints or chemicals since you can't just get them shipped from overseas.
Has anyone else noticed this? Or am I just turning into one of those old guys who complains that things were better in the good, old days!
And I don't think it's related to supply chains, it's like the retailers/importers just aren't bothering since the market is too small/unprofitable.
Simon
-
2
-
-
Next in the saga:
I cleaned all the rust off the forks then put layers and layers of anti rust paint on them and sanded it off again. Should save the seals I think.
Also the frame is back from the blasters and is all painted. And I stripped the wheels and will get new bearings for them. Does anyone know what the top steering bearing is?
Simon
-
That beer cooler was YEARS ago! I actually have a tiny turbo and parts sitting on the shelf as another project I should do sometime. I always wanted to make a much smaller, more portable jet engine, to be able to more easily take places to show.
Simon
-
5
-
-
More progress and another little film. I stripped the front forks. Not totally, I didn't strip the internals, just got them out so I could clean and check everything. The insides don't quite match the manual/parts books I have. One was worse than the other. Looked like the oil had never been changed. Springs were within serviceable limits. I cleaned the internals in the ultrasonic cleaner and they cleaned up nicely. I will fit new oil seals and have new dust covers coming (I hope). The tubes I wire brushed and have sitting in Evaporust to get all rust out of the rust pits. I will fill the slight depressions with epoxy then sand them smooth to make a nice surface for the seal to ride over. Luckily most rust was not where the forks pass the seals. I made a tool to hold the inside bolt to allow you to undo the Allen bolt in the base to get it all apart.
A small film is here: https://youtu.be/bHCRbjLJTvk
Simon
-
2
-
-
Never mind, I got them off in the end using an old school hit it with a hammer impact driver with the biggest flat bit it had. one tap and out they came.
-
4
-
-
18 minutes ago, xsinclairx said:
Could you just use a large flat head on that bolt?
I did try of course. But they don't seem to fit well. Large ones are thicker so won't fit the slot. Hence wondering if there is a special tool. Actually, I think the manuals I have show all the tools in the back including any special ones. Need to pop out to the shed...
-
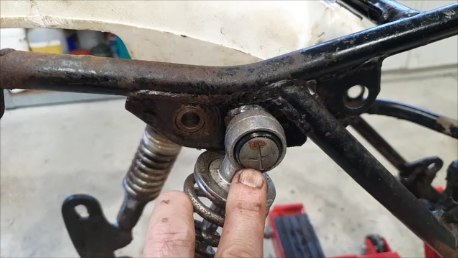
I decided it was time to finally totally strip the bike. That didn't take too long. I posted about it on my YouTube (https://www.youtube.com/c/asciimation) but I am stuck on two things. The rear mudguard bolts will need cutting off which is easy enough. But I can't get the rear shocks undone. I don't know what tool you use on the odd, large cross shaped holding bolts. How do you get them undone? Is there a special tool? I don't want to mess them up. These things:
Frame is in great shape except for the boogered kick stand mount on the swing arm. I have a new stand I just need a picture of how the originals looked without the stand bolted on. I can easily make the required part then weld it on.
Simon
-
2
-
-
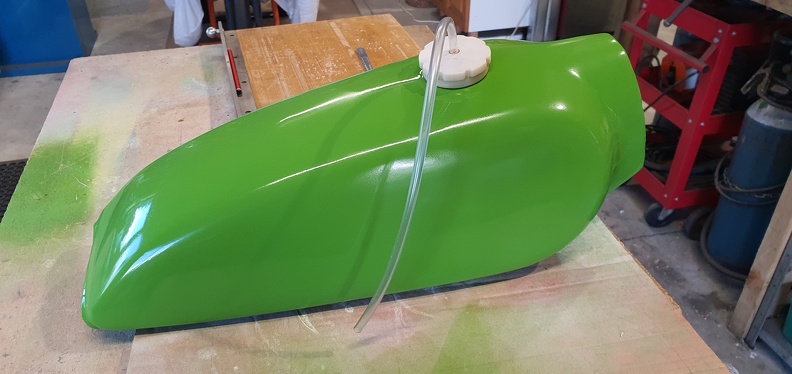
Finding a suitable paint was tricky by the way. The proper way would be some kind of 2 pack I guess. But I didn't go that route and instead went with rattle can. I am not sure any spray can paint will be totally fuel proof though. The paint I used was ColourLab from Mitre 10. It seems to be new and is a NZ made paint (Damar). It sprayed on really nicely. Very quick coverage, easy to not get runs and very fast drying. Nice rich colour too (that's Kiwifruit I used). Not exactly right for a KT-250 but for a hack close enough.
That finish was from the can. I haven't tried flatting and polishing it at all.
Simon
-
4
-
-
- Popular Post
- Popular Post
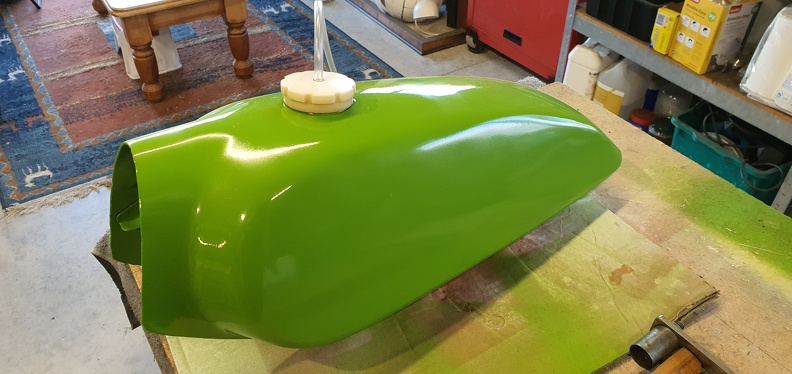
I finished the tank. Well, as much as I want to do. Much hammering, a healthy layer of filler and some cheap green paint and I have this now. It's usable. Am waiting for a bunch more parts to arrive then I should probably strip and rebuild the whole bike. I have a new chain, new sprockets should be arriving, brakes are on order as are new fork wipers. The lights have been repaired and repainted. I don't think I will touch the engine, it runs well and has good compression. The throttle and levers are pretty worn so I need to see about restoring them. I know people do fit other throttles to them so maybe that's an option too.
I did strip and clean the carb and that went well. Came us nicely and everything still runs.
Simon
-
12
-
Ah, I did know that LVVTA was now looking after the repair stuff too now so that makes sense, thanks. They don't make it clear in the mention in the magazine.
-
I know there aren't too many vintage people here but does anyone know anything about a comment in the presidents message section of Beaded Wheels (page 4) saying there is a new category of certifiers expressly for pre 1990 vehicles?
It doesn't sound like it was anything they were involved in, they were just told about it at a meeting they say, and that it should help getting deregistered pre 1990 vehicles back on the road. It mentions new certifiers in place by mid 2023 and not much else really.
I know there are already rules around exemptions for pre 1990 vehicles (https://www.nzta.govt.nz/vehicles/vehicle-types/vehicle-classes-and-standards/exceptions-to-the-standards/) but that's all I have found so far on NZTAs site.
I can't find anything on the LVVTA site about it at all. I was going to ring them to ask but being the end of the year I imagine they are mad busy so thought I would ask here first.
Thanks,
Simon
-
Just an update on this. I totally stripped the tank to bare metal, soaked it in phosphoric acid and did my best to bash out the damage where someone had hammered it all to fit a different seat. I was semi - successful there. they unfortunately creased the metal so without totally taking it apart to get to both sides I can't make it perfect. I resorted to drilling a hole in the base and making a bend rod to use as a hammer type tool to try to get the worst bashed out. I then TIG brazed all the pin holes which of course revealed MORE holes but eventually, with huge ugly blobs of braze (all on the base of the tank) it's mostly solid. There were a few tiny pinhole leaks around the welds still. The tank has been sealed now with two coats of Red Kote sealer which I find works very well. I'll slap some filler on the outside to smooth the worst of the dents and repaint it.
No pics yet, it's too embarrassingly ugly
I am hoping the filler hides most sins!
Theoretically I could make a new tank, maybe from aluminium, but that's a lot of work which I don't have the time to do now.
Simon
-
8
-
-
Latest on this little bike. I did get hold of a dent puller kit, the kind that used hot glued pads, and that did manage to remove the worse of the dents. Where the metal is creased though I can't do much unless you can get to both sides of the damage. But it's certainly improved.
Unfortunately manipulating the tank made the inevitable rust pitting come to light as the picture shows! It is only that bottom corner so far from where fuel was sitting while the bike wasn't used I imagine.
So my plan is to completely strip the paint off the tank. Fix as best as possible the dents and TIG braze the holes. I have the tank soaking in a phosphoric acid bath currently to remove all the rust and will fill it with water before brazing it so I don't explode myself. I will then line the inside with Red Kote sealer which is what I used on the fuel tank I made for my Austin 7 special and that seems to be working very well.
Since I had the tank removed I stripped and cleaned the fuel tap which is what normally attached to that threaded bung there.
Simon
-
9
-
-
Thanks! There have been several large piles of KT parts on TM lately. I keep an eye on them of course.
-
On 26/10/2022 at 12:00, tortron said:
You can make do with a hand polish and some epoxy in the pits
Epoxy to fill the pits then sanding it smooth does seem to be the way people do it when new forks aren't available. It makes sense, you just need a smooth surface to stop from ripping the seals up.
I started removing the easy to remove bits like the lights. The rear light was broken, one of the mounting bolts ripped out, but I was able to beat it all back into shape and TIG weld it back up. I sandblasted it all and it should all clean up well and be easy to repaint.
I decided to make a nice, tidy, original bike but not go for a concourse restoration given how hard it is to get some parts now. So tidy and usable will be good enough for now!
-
1
-


For Questions Regarding WOFs/CERTs/NUMBER PLATEs
in Tech Talk
Posted
Won't that come down to if it's a modified production vehicle or a scratch built? If modified but you haven't changed the fuel tank or battery from production then it's fine. As soon as you start modifying anything then all the rules in that section of the manual seem to apply. That's how it seems to work to me but I read it through a vintage car lens.
A lot of vintage cars have their fuel tanks scuttle mounted right next to a battery in the engine bay. Mine has both in the tail. The manual talks a lot about compartments which doesn't really apply to some vintage cars. Mine is basically a metal tube on a chassis.
For a scratch built historic replica the rules get a bit odd since if you had to follow them all you end up something with is neither historic, nor a replica! This is recognised, and called out in some of the Info sheets (#01-2008 mainly). So I try to keep everything as factory original as possible.
Simon