

2052NV
-
Posts
19 -
Joined
-
Last visited
Posts posted by 2052NV
-
-
the road to checking the brake liners continues....
with side project number 3. The wheel spacers were totally functional buuuuut ugly af. I decided to give it a little effort and its really amazing what a couple nice radius's can do to imrove the form of a component. I also added in a sort of dust shield for the wheel bearing, was a bit over cautious with clearance tolerances which meant it ended up a bit bigger in diameter than would be optimal for my ocd.
Sort of unfortunately, this was the only stock we had lying around that was a big enough for the job. It happened to be 4140 cromo which is total overkill, but i actually really like turning hard steels and smashing out fat blue C chips. really satisfying.

mine left vs old totally functional one
I then did the same hot Bluing process to the spacers and checked them on. they came out really lush, another thing that no one will notice ticked off the list.
Ok so now i actually am so far as having the wheels off. I wasn't happy with the front brake drum situation of simply painting over rust with horrible high gloss 2k paint is just not ok. So this also got some lathe treatment inside and out. The Actual drum braking surface was also semi rusted. Side project 4??
Here you can see how the wheels are attached. Front and rear wheels are the same. They both have a 6 pin "flange" And when you take the wheel off the brake drum and in the case of the rear wheel the brake drum and the chain actually stay on the fork/frame, which makes changing wheels super easy no messing about with setting chain tension etc. And you can see one of the "stub axles" I made installed. The toothed wheel you see here is actually the drive cog for the speedo. I have a speedo to put on i just need to find or make a small speedo cable drive which uses another smaller cog (driven by the big one you can see here) to turn the speedo cable.
I'm just smashing all parts that I've worked on with rattle can matte black for now so they don't rust and one day ill do the paint properly.
Holy shiiiit i think i can actually look at the brake shoes now!!
and yuuup there buggered, next project begin!
I've never replaced riveted shoe linings before (stop laughing all you old mechanics), so i was super excited to give it a hoon.
The brake lining material is actually super cheap and easy to get as many industry machines still use this material. So i brought a meter of the stuff and the proper half hollow copper rivets and went to town with only theory and questionable logical thought processes.
The rear shoes have seen better days. This would be really good side project material to make new ones. But machining new ones of these would just take too much time, totally doable but a project for future rob. Now to the new pads!
First remove old braking material, i forgot to make them wet so hoping there wasn't tooo much asbestos and that i don't get cancer too soon.
Cut new band to length mark out holes drill and counter sink holes to roughly about the same depth using a hand drill and the good old eyecrometer
Whack in the new rivets and bobs your uncle. I actually installed these far "too tight" the first time which made the braking material surface wavy. Classic un-experienced hand worker move. Learning by doing, Thankfully i had 100 rivets to learn with.
Next step is to machine them down to the correct diameter and get them round so as to obtain a nice contact patch. This will hopefully aid me in arriving at my crash destination slightly later than if i had not machined the shoe material.
Almost there
now we are talking, note my slight slip up with the grinder while cutting to length. I also blew out the wall a little while i was still smashing the rivets way to tight. shell be rite tho
Hell yea! well that's the brakes done and wheels mounted time to have a little fun.
I got this lush fuel tap at a market in France. It has a really cool action, much more tactical and satisfying to use than the one that was on the bike. Of course the thread was heaps bigger so i had to make a new threaded bush and solder it onto the tank.
I found out why the action of the tap was so satisfying, it actually uses a cork cylinder as the seal which is super french and lush as all i need to do is carry around a bottle of red wine and if the fuel tap starts leaking use the cork to make a new seal! French solutions for the win.
soldered on
Then while i had the gas torch out i decided that the rubber knee pads on the fuel tank are really ugly so i took these off. They are conveniently soldered on so if i decide i want it original again then i can just stick them back on.
-
 5
5
-
 1
1
-
-
- Popular Post
- Popular Post
So now to get into some real fun stuff (for me). Getting this bike was mostly an investment in creating excuses and generating possibilities to flex newly learned skills that i have gained in the last few years through my job and cough cough "youtube".
The first real job i thought id tackle was the brakes. This idea instantly lead me into a few nice side projects, where new knowledge could be implemented. So far everything is going to plan!
The road to checking the brake pads
As soon as i removed the wheels i quickly found the stub axle's were very not straight and had strange thread sizing, for today's standards. So... awesome excuse for a side project no.1. First I found some steel in the scrap pile and then jumped on the lathe and mill to smash out a couple new shafts, went with a more normalish m18x1.5 thread instead of the m18x1.25 on the rear and an undefinable thread on the front. This should make finding replacement nuts in the future more easy.
Side project 1.1 was making some appropriate width nuts out of wheel nuts found lying around
side project 1.1/2 making thin washers to maximize threads engaged and get the nut sitting nice and flush on the axle, I made them 0.5mm thick. I Hardened them as well just to be safe. They will hold up no problem as the stub axle nuts are not done up very tight and the stub axle is only getting shear force.
side project 1.2 was remaking the short stub axle (i don't know what you would call this part?) on the other side as it was super floppy in the frame slot. This is where the rear wheel alignment/tension is set so yea.. while im at it. I also machined "normal" Sized flats for where the spanner holds the part when installing. Im making all the "flats" 24mm so i can use just one spanner size for all axle parts.
mini stub axle test fit
Now for the bit I was most excited about! I've been looking for an excuse to give hot bluing a proper go and here was my first chance. These parts were perfect candidates for it as i wanted a rust proofing coating that wouldn't just rub off on assembly. This is one of the oldest black-smiting tricks known and works amazing.
I didnt get any photos of the process as you need both hands and there is no time to wip out the phone. But basically you just heat up the part until you have it over a good few hundred degrees (not quite glowing) you then whack it in a bucket of old oil and swirl around until cool while enjoying the sweet smell of the resulting, what must be, carcinogenic white smoke. This Leaves a layer of carbon on the surface which helps protect the part from rust and also as a bi product (good in this case) hardens the surface a little. Im super chuffed with how the parts came out. Definitely am going to be using that process where ever i can. Its often not possible to do because of the heating process and because of the hardening which is sometimes not wanted in a part. It's much better than the chemical cold bluing imo but cold bluing definitely has its time and place.
parts before
Parts after
Old and new parts (Here you can see my rookie mistake on the left axle, she'll be rite though)
The road to checking the brake pads does continue but first a quick brake (sorry) from that for a fun job. Got this bronze tank cap off ebay and thought it was a solid cast item. Was keen to machine it out and press in my really ugly corroded alloy cap (im not so skilled at cutting big threads on the lathe yet). But turns out the cap was not solid but made from thin sheet bronze. Sadly welding was also out of the picture so I just made a press fit adapter bush and pushed it in there with some Epoxy (just for a bit of safety, seen at though the part will go through hundreds of twisting torque cycles over time)
Cut out the old thread on the lathe, sadly hollow and no real structure to work with, the cap was suspiciously light when i unpacked it

Pressed adapter on the cap
Pressed that lot into the brass bit
And bobs your uncle. Made the rubber seal and vent hole off camera.
-
8
-
2
-
18 hours ago, GregT said:
I remember a kids book "Mick and the P105" The said Mick took up motocross on one.....Either a lover of cruel and unusual punishment or way fitter than I was at the same age. Great find though and I hope you can get it back to NZ.
I found this photo on the internet a while back when "researching". Im guessing he just used the motor? Maybe because the motor, clutch and gearbox are in one sealed housing? which for that time was still pretty uncommon. Nice memory man.
-
Ill throw in a couple of before pics for me.
-
3
-
-
Been slowly doing a couple things to this. This year i really want to ramp up the work being done as ill hopefully be leaving Germany at the end of the year.
theory is to go through everything step for step and check if I, grease it, clean it, fix it, improve it, totally customize it, buy a new one...... jokes. This thing was obviously thrown together so it would look like a working bike, to sell at the best price..... but really isnt, gotta love the french.
I was having that classic starting at the bottom of a mountain feeling where every corner is another un-avoidable Pandora's box of un-avoidable side projects. woohoo!! Isn't this exactly why we do these kinds of things??
But i figured why not just start with some fun things first.
First strip the carb and try to understand French design logic (got some experience with this through my 205). Im really making the most of my time being close to the source here in Germany. Been hitting up heaps of swap meets for old motorbike shit here and in france (its only a couple hours to the french boarder). So been picking up a few bits which will pop up throughout the posts
Like new sealing rings for the carb thanks to an epic German company that's painstakingly re-creating an insane amount of Carb "service" parts that are loooong out of production.
It a solid brass casting, so lush
Are these photos too big?? Maybe i smallerize them before i upload the next batch. Sorry if so.
Next was a cool little tail light i scored at a swap meet, got it actually cheap and saw the potential with brass hinting through the old paint.
tidy'd up the bulb holder too made some new insulating gaskets for the positive from gasket paper. Will give it a soak in oil and that should keep the paper pretty resistant to the wet i hope.
came out good with elbow grease (thats a lie i used a lathe with little physical effort). Also super stoked to pick up the "F" badge which is also made from brass. I am really falling in love with the materials they used back then.... quality!!
next job on the fun list was the headlight mount. I really love the design of pre war bikes hence why i have one but one thing i just cannot get behind is the super high rise headlight mounts that are very common for the time. Lights were accessories that were an "option" at the time. So most didnt come with lights at all, and these imo were the coolest looking bikes.
For now i decided just to slam it and see how it looked, most things look better slammed or?? I also found a copper headlight ring at a market which after some lathe work fitted my headlamp pretty ok. I was hoping to keep up the theme of the period Brass/Bronze highlighted components on the bike, not sure if this really fits? But worst case ill just nickle plate it in the future if it doesn't vibe with the finished look later on.
The bloody thing is just over 200mm in diameter an the 6V yellow bulbs are the size of golf balls, i love it.
Keeping this customizing as original as possible??

Next stop will be checking the brakes and going on an epic adventure filled with side projects! Yayyyy
-
4
-
-
29 minutes ago, tortron said:
oh wow are those interchangable front and rear wheels so you can change the sprockets from mountain to highway quick? i have seen these being introduced on single speed mountainbikes recently
It is not actually, But my 84 Simson Schwalbe has this feature though, Good old communist efficient engineering.
The wheels are mounted on a clever system where you only need one spanner and you can remove either wheel in minutes, the rear wheel comes with out disturbing chain tension too.
-
1
-
-
- Popular Post
- Popular Post
Long time listener first time caller.
I am "one of those kiwis" who is living overseas at the moment and yes i am missing NZ very very muchly for many reasons that are probably clear (cough cough, corona lock downs)
BUT there is always a silver lining rite?!
Because we are not allowed to travel and every social event, Motorsport meeting, music festival and swap meet have been cancelled for the last year I've had a bit of time to save some cash that would have otherwise been spent on said activities. The plan was to continue my "invest in future fun times" thinking which actually kicked off a couple years ago. This accumulated, at the time, to a point where now there is a Trabant 601 S station wagon patiently waiting in my mums (thanks mum) garage for when i eventually come home and finally take it too the next possible old school event!
Seen as though I already been there done that with the 4 wheels I figured this time i ought to go for two. Now not having a motorbike licence here or in NZ did cross my mind but yea that's a small detail which can be sorted out later.
Somehow i had always melted over super old pre WWII motorbikes at shows and swap meets, mainly for the fact that they are just pure simple mechanical machines and i knew i would have a great time flexing my knowledge to simply maintain such a machine. But somehow it had never occurred to me that it might be possible to own one for my self.... until it did occur to me. Thus, following this thought the next 6+ months was spent, at a level of addiction i don't think i have yet experienced in my life, following every single possible classic motorbike out let in Europe learning everything possible about which bike is which and what i liked or could possibly afford . I had a bunch of small details that i wanted the bike to have and finding a bike that i could afford with all the details was the tricky part, if i had 20-30k Euros then i would have had a bike in a week.
I got really lucky to have the first say on this bike which i was offered from a semi professional collector from Holland who did regular trips to France to buy old bikes. I got in contact with him about another one of his bikes and after a very long talk on the phone (he turned out to be a GC who liked my story) he said he was picking up a special one in a couple months time and maybe i would like it, but he only had two photos of it and not much more information. He said it was the son of the owner (now dead sadly) who had owned the bike for many years, who was selling it. It came with french ownership papers which i found is quite rare and saves me heaps of paperwork in Germany as i now have the papers i need already to get it into NZ.
So yea the bike basically ticked all the boxes and yes of course it was outside of my budget but i made the stretch because yolo.
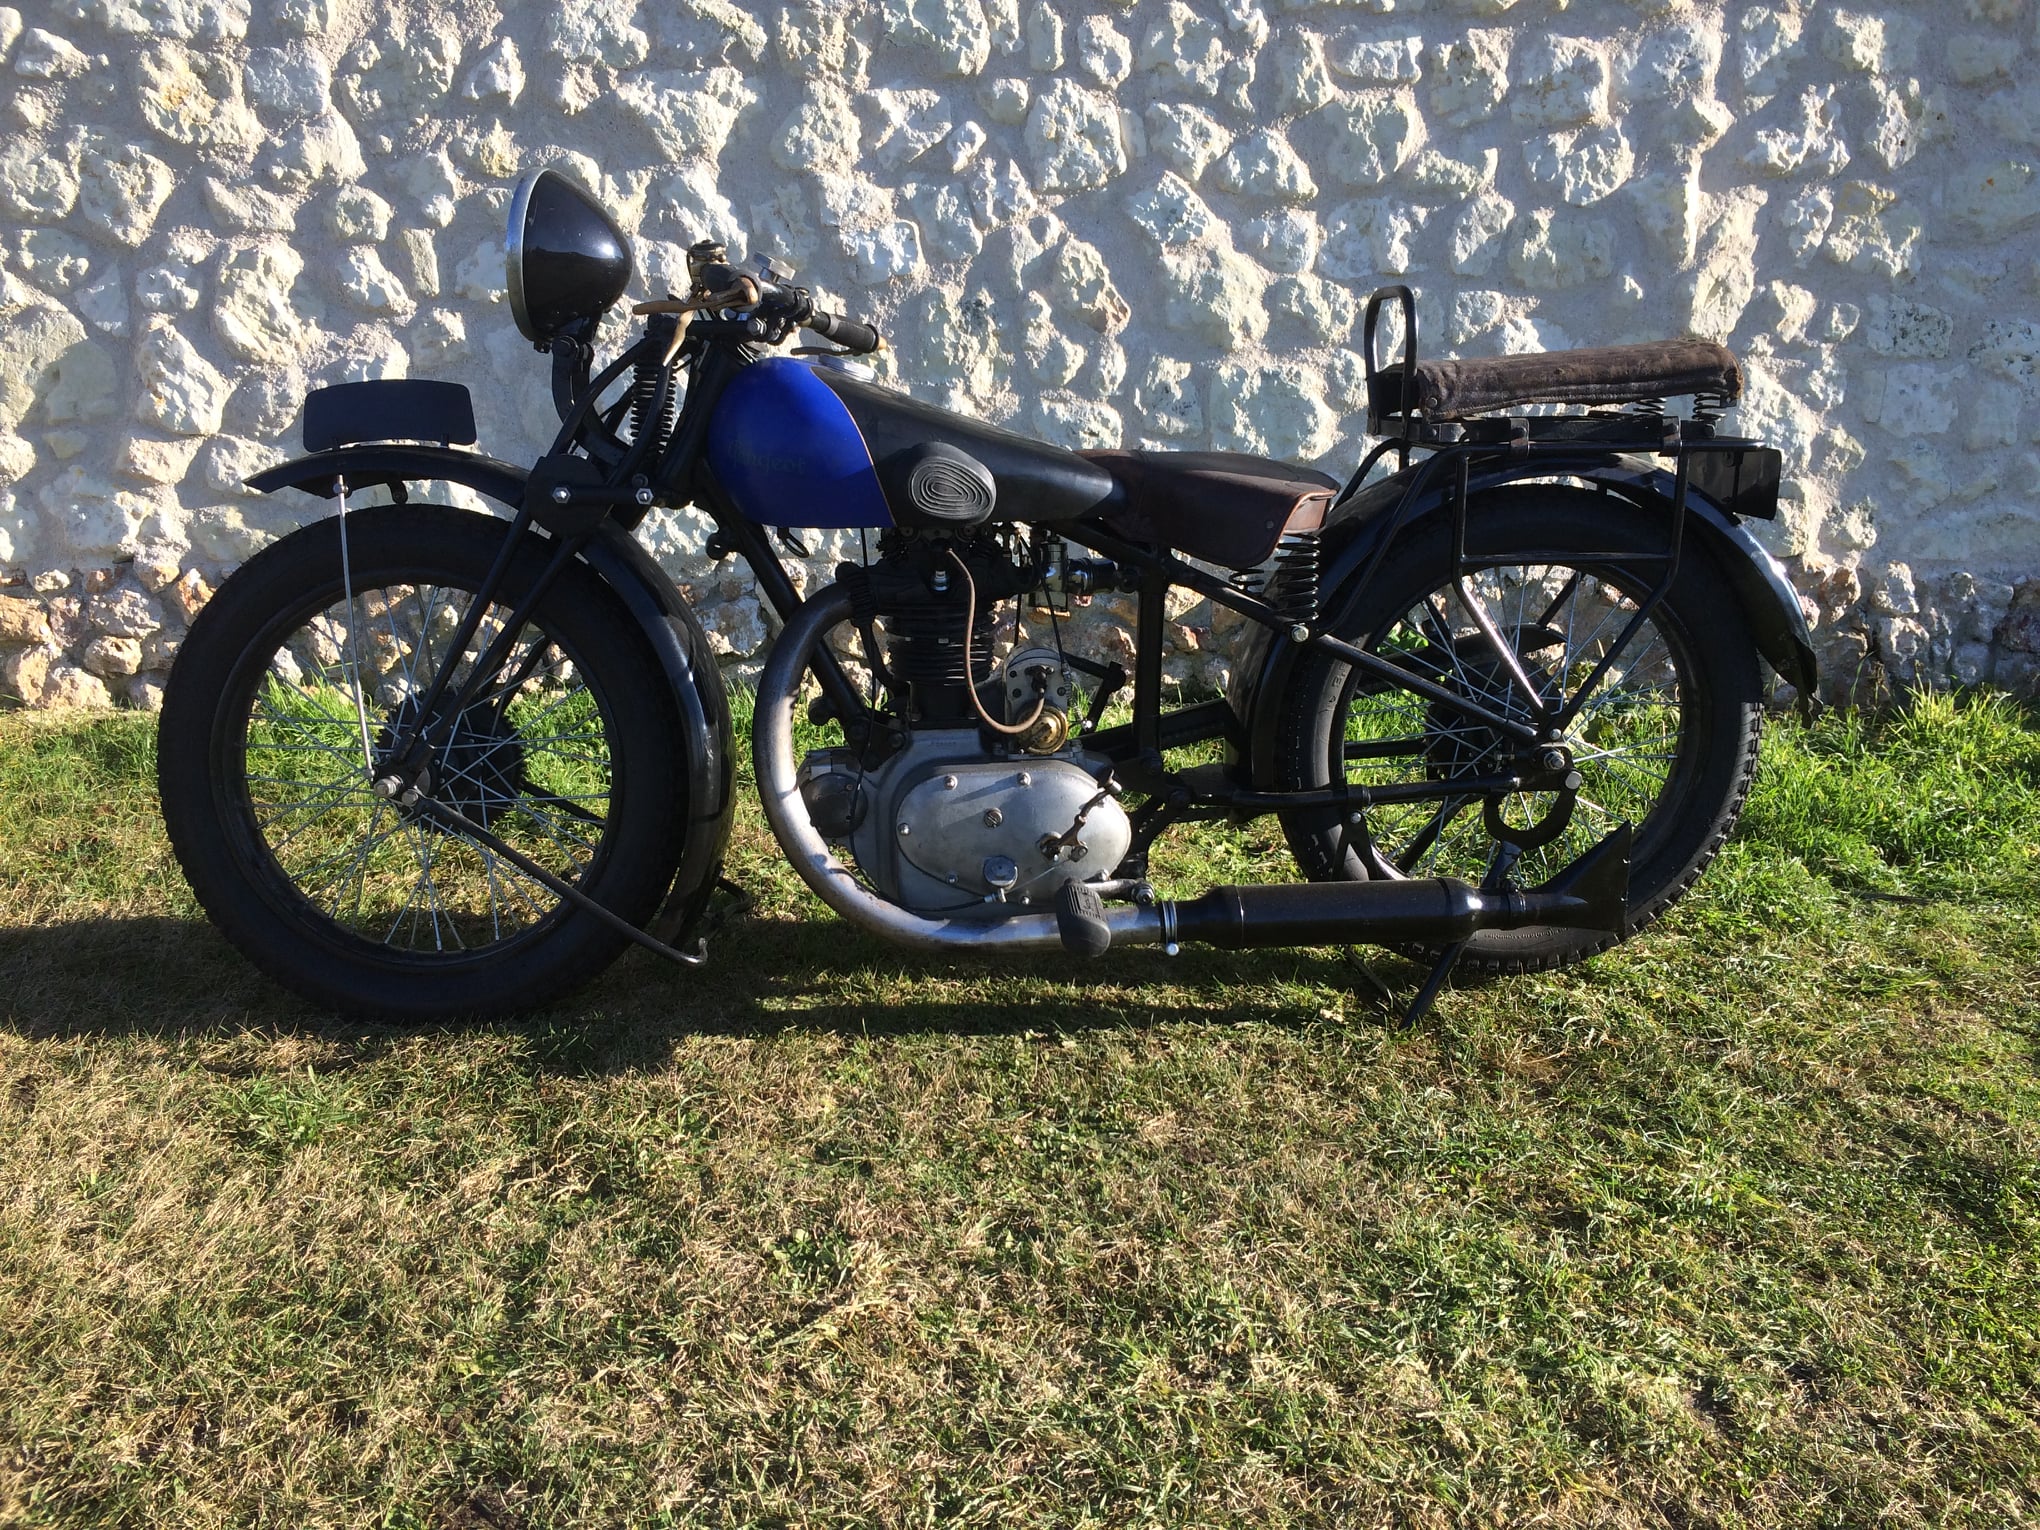
I brought it totally blind only had these two photos of it but i really fell in love, Its no where near the condition i would have liked for the price but i now realize that my standards were totally noob spec and now i'm really happy with what i managed to get my hands on. She is 92 years old after all.
Its a Peugeot P105 Which at the time was the top of the line model. With 350cc and very modern overhead valves it was by far the most expensive Peugeot from when it was released in 27/28 until 34 when Peugeot brought out a 500cc Version with the same engine concept.
For a 20's bike its really quite advanced when you consider the Hemispherical combustion chamber, over head valves, gearbox and engine sharing the same housing with a totally sealed automatic oiling system (most motorbikes still had hand pump 100% loss systems) and the oil breather port it directed at the drive chain so that it is always automatically lubricated.
But it still has cool stone age shit like the hand operated gear shifter, Thumb lever throttle, Manual timing advance and retard, girder forks, hard tale, the valve drive terrain on the outside of the engine and the speedo (which is missing) Is driven of a massive toothed wheel on the front hub.
So yea of course got a big list of stuff i need to do already, it does run but not properly it needs a full go through and adjustment of everything.
I also have already got a shopping list lined up but i will purchase these things slowly as as i find them and or can afford them (while keeping the missus happy too!). I have a lot of time this will be a slow progress thread up until i find a way to get this thing back to New Zealand without buying my own container again, that was bank account killer last time.
-
13
-
2
-
On 6/25/2018 at 22:38, mk2marty said:
Wow, I remember back in high school when I used to visit Porsche for Gateway and you were doing the Mi16 swap on this.
Random!
Highschool........shit you are making me feel old!! hahaha
On 6/25/2018 at 23:31, igor said:@2052NV, welcome to the forum. I dig the Trabant. You have to bring this home to NZ and turn up to meets in it.
Thats the plan, will start a thread when im back form my holiday
")
-
3
-
-
- Popular Post
- Popular Post
Hi......... Im new here but have been pesting around Fastfrogs and CJC for many years but never had a car that I thought would qualify here but now I think I do?
In the future im going to be super keen to attend events and such that you guys put on I've heard and seen so much cool shit coming from Oldschool in the past.
Name (first is sweet): Robert
Location: Germany (currently)
Motorized things I own: 205 GTI, Trabant 601 S Kombi, Solo 712, Citroen Berlingo (campervan)
Mods to them (can be brief or detailed): Aint nobody got time for that shit
Pictures (Either attach the files here or use an image hosting website):
How you found out about oldschool: Through friends
Anything else you want to add: My current home is Germany, been living here for two years working and travelling with my self built micro campervan, this happened after a year of hooning abrund Asia with a couple backpacks. At the end of this Summer (opposite seasons etc) ill be moving on from Germany and doing something new hopefully
-
12
-
20 minutes ago, AllTorque said:
We have already covered the legality @2052NV and you are wrong.
fair game! ill take that hit. looks much more complicated than my experiences have to offer. no more skim reading
-
your not ment to have yellow front facing lights its simple as that....... but you can then plead ignorance if pulled over, not so sure about now but a couple years back when i was in NZ i had yellow bulb covers for two years with no issue. you can also get yellow bulbs which looks far better than tinting the lenses and less obvious in day time.
yellow covers
yellow bulbs
-
the two cars in one park is amazing!!!!!
-
WOW!!!!!!!!
so it turns out im not the only person mentally
retardedambitious enough to attempt getting one of these automotive icons as far away from its ritefull home as possibleMy friend told me about this thread after he learned what im doing.
Hopefully your little Blue Limousine will have a Papyrusweiß Kombi brother joining the family
Ive sent you a PM mate. Would be wicked to talk to you and pick your brain.


64Valiants 1985 Gsx1100
in Two Wheels
Posted
cool story bro! like actually