


fagoff
-
Posts
119 -
Joined
-
Last visited
Posts posted by fagoff
-
-
//oldschool.co.nz/index.php?/topic/54164-73-hq-sedan/
Don't be shy with comments , I am open to positive feedback. Interested in your thoughts.
-
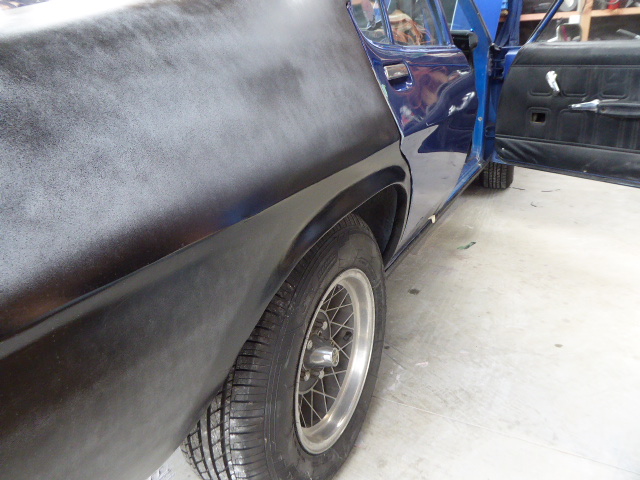
Bogged up and undercoated bottom section today. It only needed a light skim coat compared to the 1/2 inch of bog I originally sanded off.
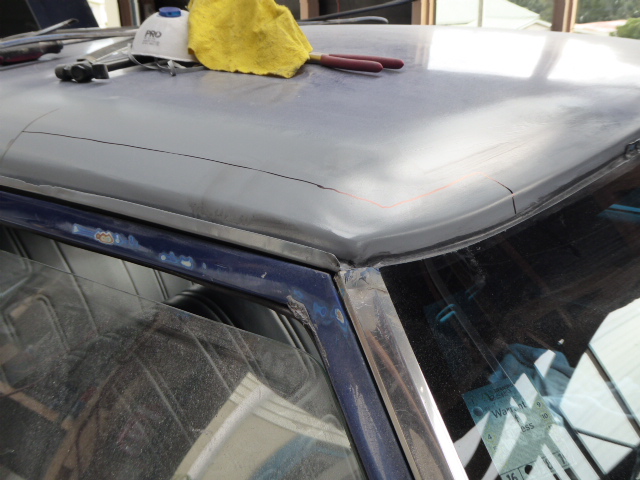
I put a shiny black coat over the strait line and curve above wheel arch so I could see how it looks .There are a few spots that need a bit more massaging before its ready for painting. I am happy with it overall though. Even as it is, it looks much better than how it was before I touched it.

-
 4
4
-
-
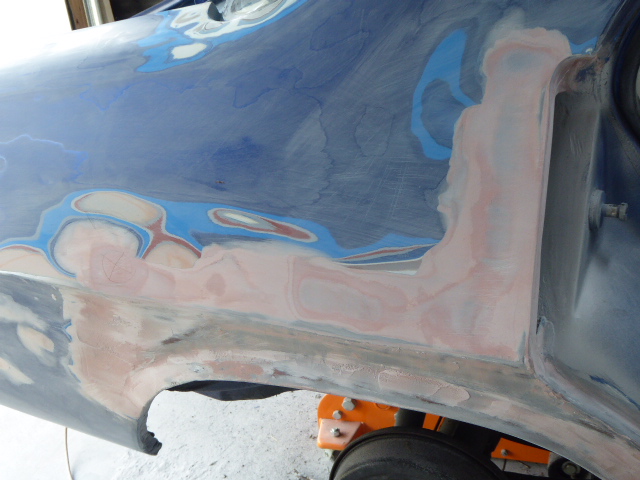
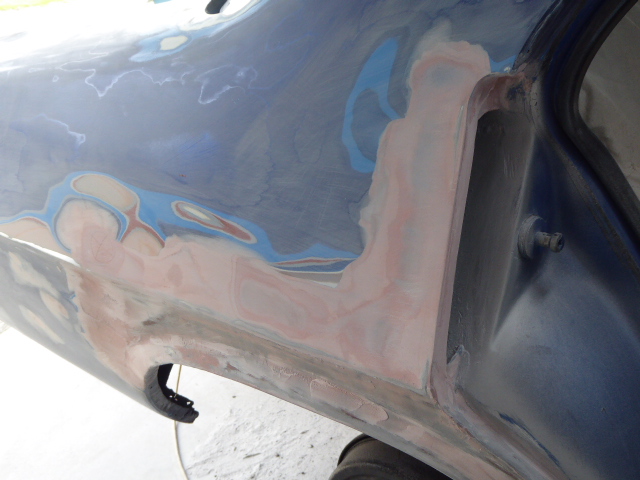
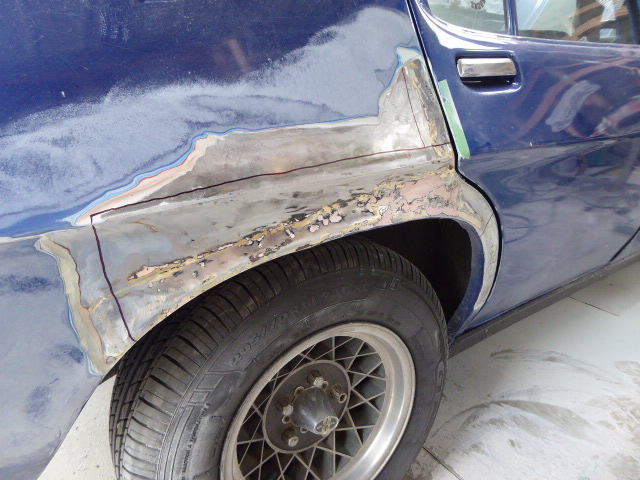
I started bogging today. I had to use bog as this whole panel is pretty knocked about .I managed to sand it down quite a bit first so I don't need anywhere near as much bog as was on there before but needed to build it up to match the existing body lines. Ive done the top section first to try and get it as strait as possible down to the strait edge.
The bottom section should only need a light skim coat. I will sand it back more to the left of new piece first, then hopefully I can feather the bog into the wheel arch .
I guess the experts would do it differently and better, but I don't think its too bad for a self taught novice.
-
I am really enjoying doing this its very satisfying really. 12 months ago I never would have imagined being able to fabricate metal patches and the weld them into a car.
-
4
-
-
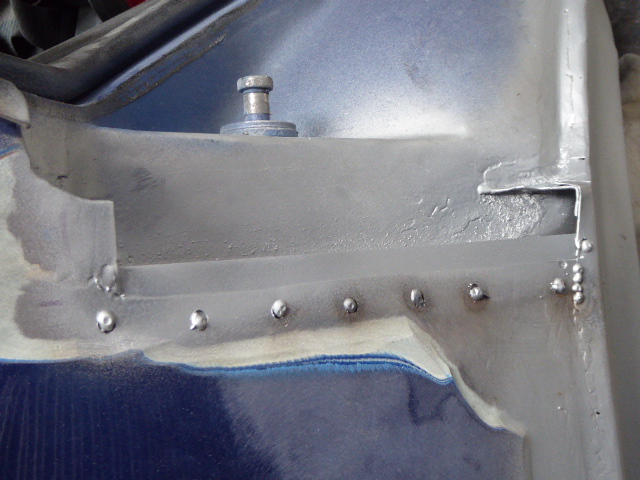
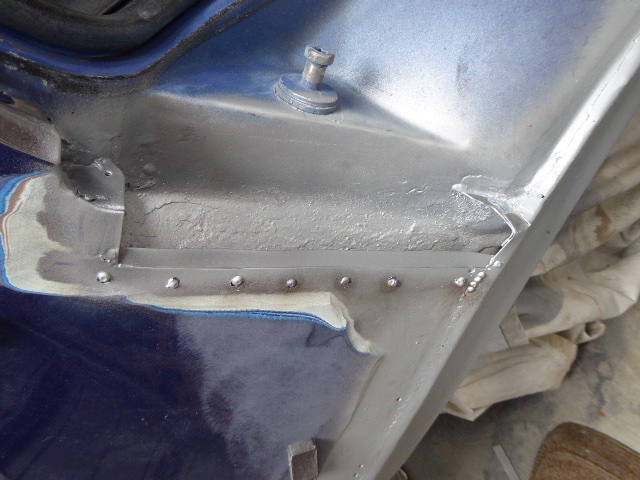
Hole cut out and backing strip spot welded in. Corner patch made up and tacked into place. I reinforced it at the corner with a double thickness ,same as it was before, minus the rot.
-
3
-
-
Who does chroming in Waikato. Im in Thames . Any idea what it would cost to have a rear bumper off an Hq tidied up and rechromed.
It has minor dings and the chrome is stuffed.
-
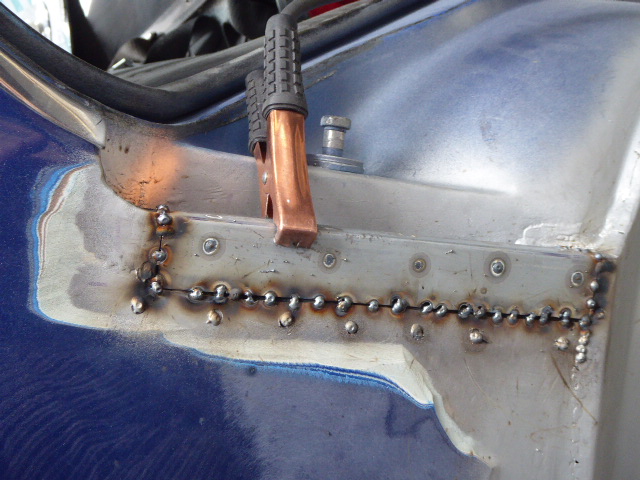
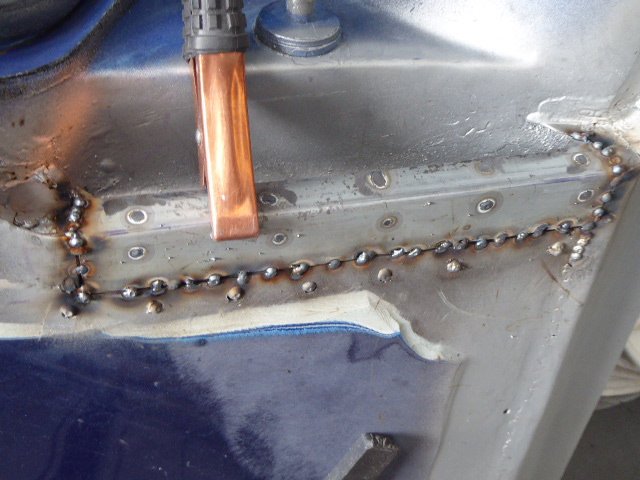
I got my patch welded in today ,it was a mission to keep it lined up rite to be able to tack it in place. I ended up putting strips between the old metal and new patch held on with tec screws then welded in place then I teck screwed to the patch as well. I probably over did the welding but I don't want anything coming loose later.
Tomoro il cut out the top piece and make a patch to go in there. That piece is quite a solid bit of metal as I guess it is a part of the body reinforcing. I will make the bit that goes against the door double thickness for extra strength.
-
1
-
-
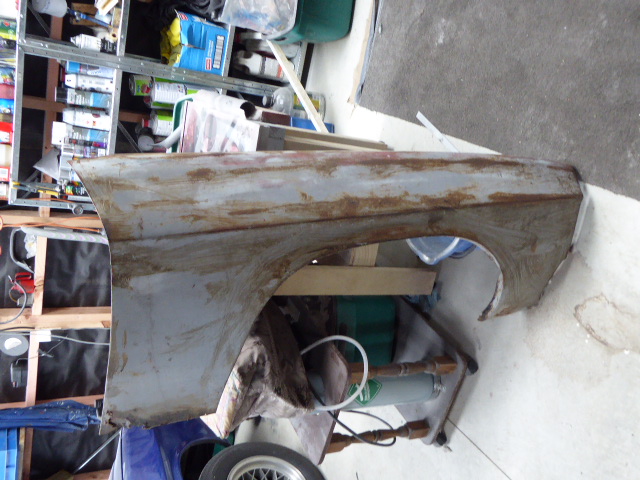
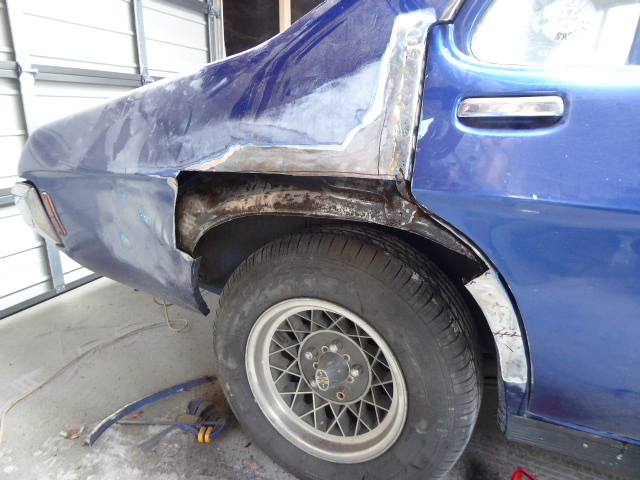
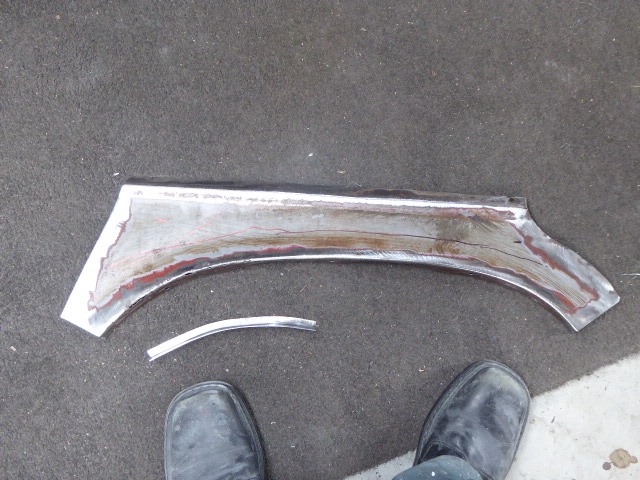
Made a bit more progress today. I picked up a reasonable front quarter panel as it has a similar wheel arch to mine. Cut out the piece I need to replace the rotten bit in mine . There is a section of it that is rusty ,but wont take much to replace that, ive already made up a curved piece to go in there. had to massage the panel cut to fit as the strait egde over the rear wheel arch is about 20 mm higher than the front wheel arch panel I'm using.
I cut away the rot in my car hoping it wasn't to bad in behind. I was pleasantly surprised to see the secondary panel was only rusted at the bottom, I will make up a piece to go in there tomoro hopefully. Once ive welded in my new panel I will cut out the bit above there and make a piece to go in there, shouldn't be to difficult.
-
4
-
-
Yep hes da man. (-:
-
This time when I paint it I aim to use basecoat or acrylic lacquer . So I need to seal coat everything first to ensure no reaction to previous coatings.
Will I need to then put an undercoat over the sealcoat before topcoat or can I topcoat onto sealcoat ?.
I prefer lacquer as I find its easier to work out any imperfections in the paint job and get a nicer finish. I am only an amateur. I am looking around for a reasonably priced HVLP spray gun to do car with too. I bought a cheap and nasty one a few years ago to try out,for under $ 100 which I like better than standard guns, but I need a better quality one for this job . Looking around it seems like I could get a reasonable one for under $ 200.Any suggestions my compressor setup goes up to about 9/10 cfm.
-
-
comments here.
-
.
Here is where I put my new found welding skills to the test. Ive known there are a few rust issues around the car to deal with for ages.
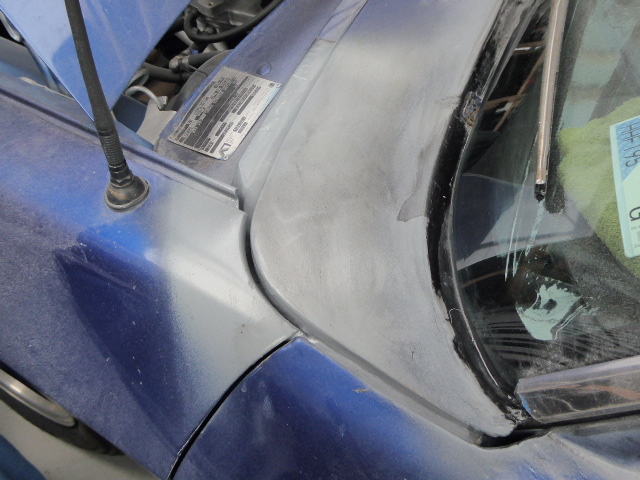
My first patch was on the front left in front of windscreen and second was above drivers door, that one went right to the front under windscreen, so I took old screen off and made two metal patches to go over there.I put a new windscreen on over the weekend .My plan is to go over the whole car first patching where necessary, then to sand it all down and bog up any small imperfections ,then seal the whole car and repaint ,probably the same color.
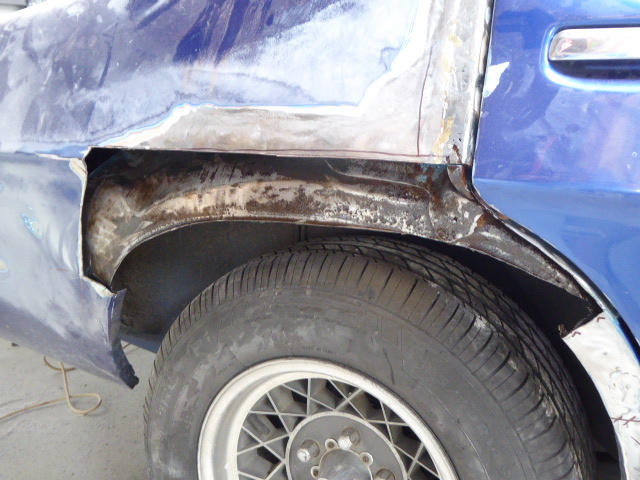
The ground off area over rear wheel arch will be a challenge for me.It has been repaired before with bronzing, but will need to be cut out and new metal put in. There was nearly 1/2 inch of bog over that. My garage is now covered in dust. I have been told you can use a front wheel arch to make a good patch for this area. There is a guy here in Thames with loads of spares for these, ill go see him tomoro. The black lines I drew are where I hope to cut the metal, will depend on what the patch piece will cover. I will probably have to make a smaller piece for it as well. I will try to put a link in for discussion.
-
no corrosion or overheating seems like a good reason,?
-
thanx.
-
what is the total 186 engine coolant quantity in liters. Need to know as I am converting my engine to Evans waterless coolant.
-
kelford in chch, did the poor job.
-
1
-
-
Progress at last . I had my old cam machined, pretty mild I think. Its back in and its a different car altogether. Starts great, idles lovely and plenty of power. Ive got around 18 inches of vacuum now up from 8 inches. Just have to replace all the leaking gaskets the mechanic didn't replace. Plugs are nice and clean on the open road but a bit black round town. May need to look at some smaller idle jets ?, its got .45s in at the mo. latest cam was done by Franklin Cams.
-
lookin good man. who polished your wheels they look great.
-
Through process of deduction I figured out what the problem was. valve timing was way off ,causing poor vacuum only had about 7/8 inches vacuum. Went through everything ,timing and lifters etc no problems ,talked to cam machinists in Chch he swore the new worked cam was fine. So we pulled it out and sent off to another cam guy in Auckland to check it. The cam was crap basicly ,really bad .So I'm getting another one done ,in Auckland. My mechanic didn't cause the problem but I am disappointed that he didn't spot what was wrong earlier on. As I understand it a 186 with the work Ive had done should be pulling 16/20 inches vacuum at good idle mine was 7/8 inches then 11/12 after I opened the rocker adjusters half a turn and it idled way better. Everyone ive talked to told me something different so its been difficult and bloody frustrating getting to the bottom of it ,but progress at last.
-
1
-
-
Ill let the garage replace head gasket tomorrow and replace pcv and grommet then see how it goes ,before I do anything else .
-
No he retorked it but still leaking. hes gona put new head gasket in Monday . engine has electronic converted distributor, not points. I think my pcv valve mite be faulty it seems to be open rite up at normal idle. sucking in too much air ?
-
ive got another problem .I cant get the engine to idle in a stable manner and its hard to start again after running. I think ive got it rite ,go for a drive then after pulling over the engine sometimes idles ok for a bit then drops off and runs rough again and sometimes dies. I checked for vacuum leaks every where I could get at by spraying carb cleaner around joints etc and no fast idling or anything. manifolds on tight with new gasket all fittings seem good. I had .45 idle jets in and same thing ,replaced with .50 jets and not much difference.had to unscrew mixture screws out 5 1/2 turns to get it running reasonably. any less turns it doesn't seem to like. The main difference from current setup to before I changed carb from the old factory was I had the pcv valve piped into the old aircleaner which meant it wasn't doing stuff all and used to fume a lot. I pulled the hose off and blanked off the manifold fitting the engine ran really rough.. something keeps changing ,at a loss to know what else to do.Its got a brand new weber 38 dgms carb and manifold with water jacket fitted.
-
missed one


Fagoffs 73 HQ Sedan
in Project Discussion
Posted
Anna from resenes in Tauranga is looking out for a good gun for me hopefully. She did show me one English gun but it wasn't HVLP.